

SUNE TECHNOLOGY CO.,LTD
CarNavi-Tech
No.9,Lane 606,Anping Rd,Tainan City
70849,TAIWAN
TEL:+88662292246 FAX:+88662288104
Http://www.sune-tech.com
Shop http://www.carnavi-tech.com
SKYPE:sune_tech or hsin_han99
Index
CarNavi-Tech
1. General spec
2. System Diagram
3. Components
4. Setting up Dip S/W
5. Setting up FACT ORY M ENU
6. Cautions before Installation
7. Installation Diagram
8. Pin Specification of Connector
9. Installation
10.Quality Warranty
Warning / Precautions!
CarNavi-Tech
Warning
Do not modify, dismantle or unintended
operation this system outside Q-roi After Sales.
Damage occurred by unintended operation
may cause Q-roi After Sales service void.
Always wear seatbelt. When the vehicle is
suddenly stop can ca us e injury.
Warning
Remove dust, oil, and waste on the displ ay.
Incidental damages (including, without
limitation, consequential damages due to the
use of this unit and the dead loss of business
profit, changes, loss of memory contents, etc)
will not be taken responsibility.
•Any function that requires your prolonged
attention should only be performed after
coming to a complete stop. Always
stop the vehicle in a safe location before
performing these functions. Failure to do so
may result in an accident.
The engine is off while the system operates for
long time, battery may be discharged.
This product is not a substitute for your
personal judgment. Any route sugges ted b y
this navigation system may never supersede
any local traffic regulation. Do not follow route
suggestions if the navigation system instructs
you to perform an unsafe or illegal maneuver.
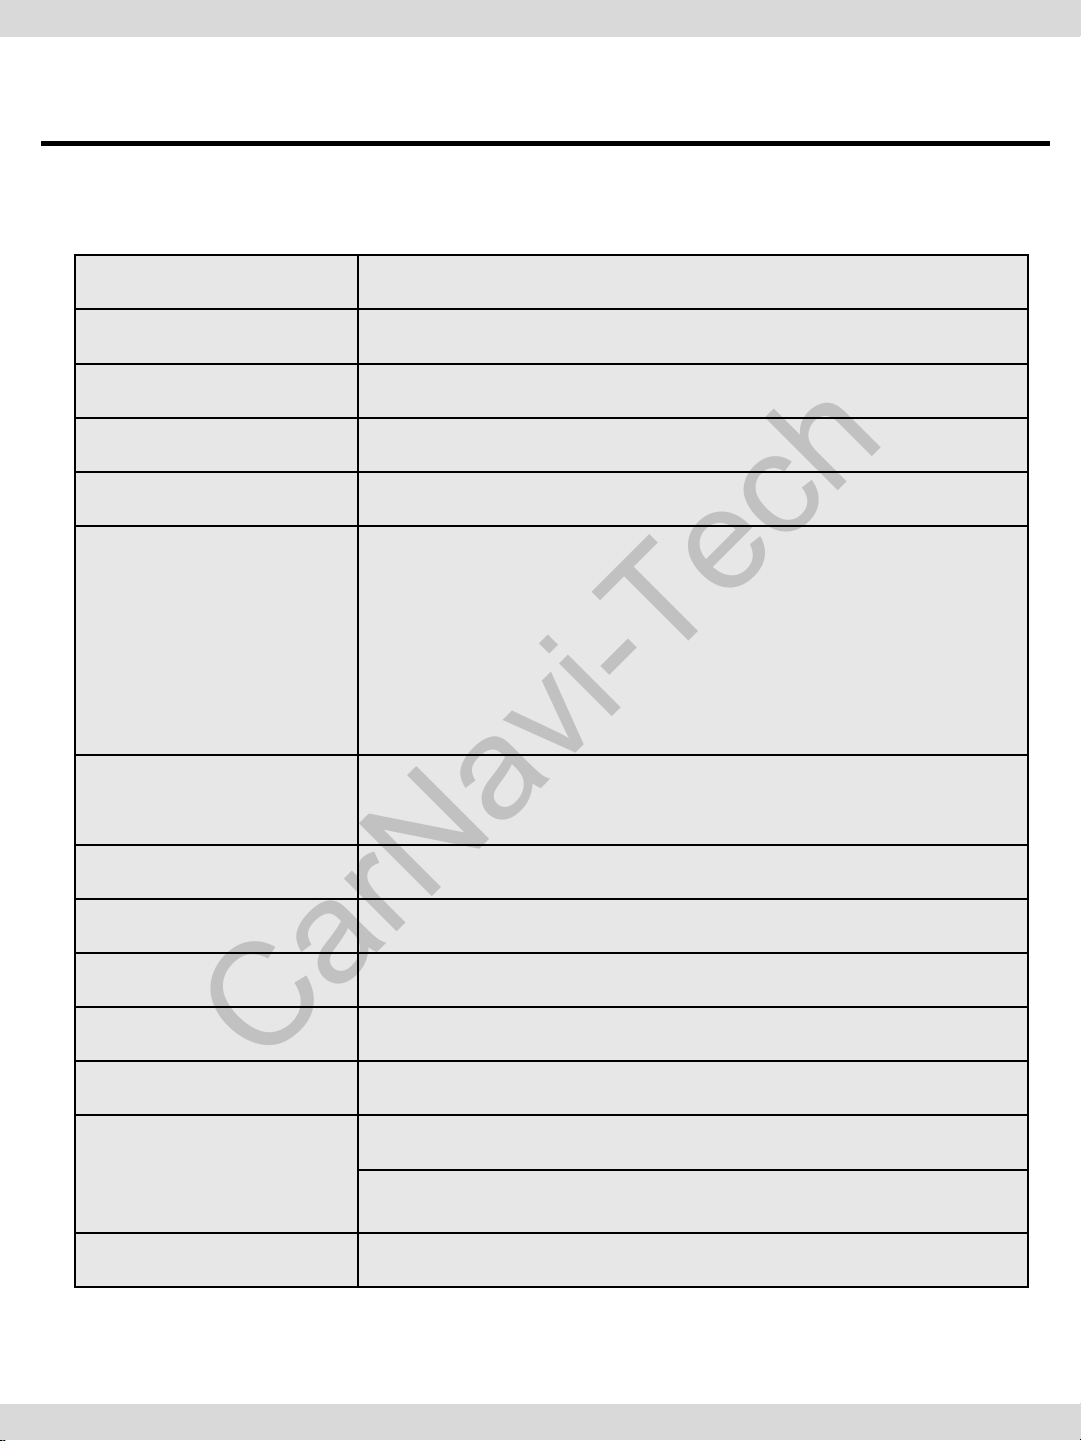
1. General Spec
CarNavi-Tech
OS Android 4.2.2 (Jelly Bean)
CPU Telechips TCC8930 (1GHz Cortex A9 DualCore)
Display OEM LCD
Internal Memory DDR3 1GB RAM + 8GB eMMC
External Memory SDHC Slot Support (up to 64GB)
A/V Input x 3,
Rear Cam Input x 1,
Function
CAN(Controller Area Network) x 2,
Mic x 1,
External Speaker x 1 (mono),
External Audio Out x 1(Car Aux),
Output
Touch Type Resistive Touch
GPS SiRF
Resolution 800*480 or 1024*480
USB USB 2.0 x 5 (USB x 4, OTG USB x 1)
Input Voltage 12V
Temperature
Languages multi-languages
LVDS ( thru Video Interface),
RGB (thru Sub-Board)
operating 0 C to 60 C
Storage -20 C to 60 C

2. System Diagram
CarNavi-Tech
LCD Display
Touch
Screen
Button CAN
data
Steering wheel
CAN data
Touch
Screen
Controller
CAN
Transceivr
CAN
Transceive
LVDS
Transmitter
Image Scaler
Microprocessor
With
2 CAN ports
eMMC
Flash
Memory
8GB
Application
Processor
Video
Decoder
Rear Camera
DVD Player
Other Composite
Video Signal
Audio
Decoder
/Encoder
Microphone
USB HUB
DDR3
1GB
Audio Amp.
USB Devices
- USB memory
- Hard Disc
- Wifi dongle
- BlueTooth dongle
- 3G / LTE dongle
- Other USB
Accessories
Speakers

3. Components
CarNavi-Tech
LCD cable * 1ea
3G dongle * 1ea(Option)
(ETCETC0116)
(HLCDCA0007)
WIFI dongle * 1ea(Option)
(ETCETC0110)
TOUCH cable * 1ea
(HTOUCH0007)
Power cable 16P * 1ea
(HPOWER0041)
LVDS cable* 1ea
(HALVDSC0024)
AV/BT Cable * 1ea
(HAVCAB0020)
Sub-board * 1ea
(QCPASS0289)
USB cable * 2ea
(HARETC0027)
Multi cable * 1ea
GPS Antenna * 1ea
(GPSANT0006)
MODE switch cable* 1ea
(HARETC0001)
(HARETC0068)
Speaker * 1ea
(SPEAKE0001)
Microphone cable * 1ea
(MICPHO0001)
REAR CAM ERA cable * 1ea
(HARETC0002)

4. Setting up Dip Switch(Main board)
CarNavi-Tech
: C Class(W204) 2012~
Low Resolution Monitor(5.8inch)
※ Please make sure to disconnect the power cable of the interface and reconnect
the power cable again to apply the dip switch setting whenever changing DIP switch.
Otherwise, DIP switch settin g will not be applied.

5. Setting Factory Menu
CarNavi-Tech
※ APPS→FAC TORY SETTI NG
① Put Password a nd c hange program upgrade and set-up of
external device. (Only Installers are authorized)
※ Please contact the manufacturer to get Password.

5. Setting up Factory Menu
CarNavi-Tech
⑤
①
②
③
① CAR MODEL : No use
② DVD TYPE : Only for DVD connected to A/V
(Connect IR-AV1 to DVD to use DVD as touch Screen)
④
③ CMMB SELECT : Select DTV model ( Only Chinese)
④ SETTING
- GEAR CHECK TYPE : Detecting rear camera via either CAN or Rear Lamp.
- REAR CAM : Put “On” – External rear camera
Put “Off “ – OEM Camera
- SAFE MODE : Either Enable or Un able to watch V ideo while driving
- MODE SWITCH : NO use
⑤ SAVE & EXIT : Save and Reboot

6. Cautions before Installation
CarNavi-Tech
Ignition key s hould be t aken off before s tar ting installat ion, interface
power connection must be the last step in installation.
Power cable should be separated when connecting interface.
Should be no any electronic devices or magnetic pole around
installation place.
All steps of installation should be done by well-trained specialist.
Dismantling without manufacturer’s permission can not be
guaranteed, (No permission to break attached label on the board.)
Kindly check all parts are in the box, when receiving the product, if
anything missing, inform t o the supplier or manufacturer.
Install GPS away from electromagnetic devices such as black boxes,
Hi-Pass and etc.
Advisable to Install GPS at the edge of dash board or a front window
or a rear window.
Install GPS antenna mounted on window or roof facing to Sky .
According to our sales policy, any problems caused by user’s
mistake, careless can not be guaranteed.

7. Installation Diagram
CarNavi-Tech
※ Pull out the original LCD cable from comand control unit and connect it to LCD-IN of IF.
Connect a provided LCD cable to the port of comand control unit where the original LCD cable was pulled ou
Behind of comand Control unit
Monitor
Speaker
GPS
TOGGLE
SPK
Provided LCD cable
GND
REAR (12V OUT)
REAR CAM
POWER
cable
Provided LVDS c ab l e
Original LCD cable
Touch
Screen
Provided Touch In cable
ACC
SAFE
CAN1-
H
CAN2-
H
MMI
N.C
AUX-GND
A OUT(R)
POWER cable
GND
FRONT
REAR
CAN1-L
CAN2-L
AUX-ON
N.C
A OUT(L)
MIC
SD Card

8. Pin Specification of Connector
CarNavi-Tech
Power LVDS-OUT AV MULTI USB USB MIC
2
<Multi Cable>
2
<AV Cable>
16
2
<Power Cable>
3132
1
1920
1
15
1
10
16
15
14
11
32
31
30
29
28
27
26
25
24
23
22
21
20
19
18
17
16
15
14
13
12
11
10
9
8
7
6
5
4
3
2
1
9
8
7
6
5
4
3
2
1
AUDIO OUT (L)
AUDIO OUT (L)
AUDIO OUT (R)
AUDIO OUT (R)
VIDEO IN1
VIDEO IN1
REAR-C
REAR-C
FRONT-C
FRONT-C
VIDEO OUT2
VIDEO OUT2
VIDEO OUT1
VIDEO OUT1
SPEAKER
SPEAKER
QSOL
QSOL
QSOL
QSOL
QSOL
QSOL
REAR
REAR
IR-AV2
IR-AV1
TOGGLE
TOGGLE
GPS
GPS
GPS
GPS
BT
BT
BT
BT
BT
BT
BT
BT
BT
BT
AUDIO IN3(R)
AUDIO IN3(R)
AUDIO IN3(L)
VIDEO IN3
VIDEO IN3
AUDIO IN3(L)
AUDIO IN2(R)
AUDIO IN2(L)
VIDEO IN2
VIDEO IN2
AUDIO OUT(R)
AUDIO OUT(L)
AUDIO OUT GROUND
AUX-ON
MMI
CAN2-L
CAN2-H
CAN1-L
CAN1-H
REAR
SAFE
FRONT
ACC
GROUND
AUDIO OUT(L) AUDIO L Input
AUDIO OUT(R) AUDIO R Inut
VIDEO IN1 VIDEO Input1
REAR-C
Connect Rear Camera
FRONT-C Not available
VIDEO OUT2 VIDEO Output2
VIDEO OUT1 VIDEO Output1
SPEAKER Connect with Speaker
QSOL Not available
REAR Connect Rear Camera
IR-AV2
IR-AV1
Connect external
device IR Cable
Connect external
device IR Cable
Connect QDIS Button
TOGGLE
Cable (For switching
GPS Connect GPS Cable
BT Not available
AUDIO IN3(R) AUDIO R Input3
AUDIO IN3(L) AUDIO L Input3
VIDEO IN3 VIDEO Input3
AUDIO IN2(R) AUDIO R Input2
AUDIO IN2(L) AUDIO L Input2
VIDEO IN2 VIDEO Input2
AUDIO OUT(R) AUDIO R Output
AUDIO OUT(L) AUDIO L Output
AUDIO OUT
GROUND
AUX-ON Not available
MMI Not available
CAN2-L
CAN2-H
CAN1-L
CAN1-H
REAR
SAFE Not available
FRONT Not available
ACC Connect Car ACC
GROUND Connect Car GROUND
AUDIO Output GROUND
Connect with Car Lame
VIDEO
mode)
Connect with
Car CAN2-Low
Connect with
CAN2-High
Connect with
Car CAN1-Low
Connect with
CAN1-High
cable

9. Installation
CarNavi-Tech
9.1 Connection of CAN Wire
* Connect CAN1-H(Yellow + White) of Provided Power cable to
CAN-High(Brown + Red) of Car.
* Connect CAN1-L(Yellow) of Provided Power cable to
CAN-Low(Brown) of Car
※ You will be able to find the bunch of cable beh ind Coman d contr ol
unit

Warranty
10. Quality Warranty
CarNavi-Tech
This product has been tested and have passed under our strict
quality control. If the failure occurred due to the carelessness of
workmanship within one year after the purchase, we are
responsible to repair free of charge.
Please bring this warranty to dealer whom you purchased this
product from at the repair time. Should this warranty not
presented, repair charged wil l be on customer. Please keep this
warranty card.
Product
name
Warranty
period
Customer
Dealer
QROI
1 year Purchase
date
(yy/mm/dd)
Address
TEL
Name
Address
Name
 Loading...