


NO: 101-60 0-015 5-01
Iss ue:1. 0
Table 2 -1 Fron t panel d escri ption
Por t Name
Des cript ion
HDD
Ind icato r
The ha rd disk o f the NVR m ust be pr ovide d by the us er. Take the
fol lowin g steps t o insta ll hard d isks:
Ste p 1 Remov e the scr ews for f ixing t he cove r and tak e down th e
cov er.
Ste p 2 Take o ut the sc rews an d silic one cus hion, r oute th e screw s
thr ough th e silic one cus hion, a nd inst all it to t he scre w
hol es, as sh own in fi gure 3- 1.
Fig ure 3-1 I nstal ling th e hard di sk scre ws
Har d disk st atus in dicat or
Thi s indic ator fl ashes w hen dat a is tran smitt ed.
KB/ MOUSE
Sup ports c onnec tion to a U SB mous e and
key board .
BAC KUP
Sup ports c onnec tion to a U SB flas h drive o r
USB r emova ble har d disk.
PWR
Ind icato r
Whe n the NVR i s opera ting, t he PWR in dicat or
is st eady on .When t he NVR is s hut dow n, the
PWR i ndica tor is tu rned off .
Network Video Recorder(NVR)
Quick Setup Guide
Ful ly unde rstan d this do cumen t befor e using t his dev ice, an d
str ictly o bserv e rules i n this do cumen t when us ing thi s devic e. If
you i nstal l this de vice in p ublic p laces , provi de the ti p "You have
ent ered th e area of e lectr onic su rveil lance " in an eye -catc hing
pla ce. Fai lure to c orrec tly use e lectr ical pr oduct s may cau se fire
and s evere i njuri es.
It al erts yo u to mode rate da ngers w hich, i f not
avo ided, m ay caus e minor o r moder ate inj uries .
It al erts yo u to risk s. Negl ect of th ese ris ks may
cau se devi ce dama ge, dat a loss, d evice
per forma nce det erior ation , or unpr edict able re sults .
It pr ovide s addit ional i nform ation .
Str ictly o bserv e insta llati on requ ireme nts whe n insta lling t he
dev ice. The m anufa cture r shall n ot be hel d respo nsibl e for
dev ice dam age cau sed by us ers' no n-con forma nce to th ese
req uirem ents.
Str ictly c onfor m to loca l elect rical s afety s tanda rds and u se
pow er adap ters th at are ma rked wi th the LP S stand ard whe n
ins talli ng and us ing thi s devic e. Othe rwise , this de vice ma y be
dam aged.
Use a ccess ories d elive red wit h this de vice. Th e volta ge must
mee t input v oltag e requi remen ts for th is devi ce.
If th is devi ce is ins talle d in plac es with u nstea dy volt age, gr ound
thi s devic e to disc harge h igh ene rgy suc h as elec trica l surge s in
ord er to pre vent th e power s upply f rom bur ning ou t.
Whe n this de vice is i n use, en sure th at no wat er or any l iquid
flo ws into t he devi ce. If wa ter or li quid un expec tedly f lows in to
the d evice , immed iatel y power o ff the dev ice and d iscon nect al l
cab les (su ch as pow er cabl es and ne twork c ables ) from th is
dev ice.
Do no t focus s trong l ight (s uch as li ghted b ulbs or s unlig ht) on
Precaut io ns
NOTE
CAUT ION
WARNI NG
WARNI NG
Special An no un cement
For mo re info rmati on, ple ase ref er to CD an d websi te.
Avoi d heavy l oads, i ntens ive sha kes, an d soaki ng to pre vent
dam ages du ring tr anspo rtati on and st orage . The warr anty do es
not c over an y devic e damag e that is c aused d uring s econd ary
pac kagin g and tra nspor tatio n after t he orig inal pa ckagi ng is
tak en apar t.
Pro tect th is devi ce from f all-d own and i ntens ive str ikes, k eep the
dev ice awa y from ma gneti c field i nterf erenc e, and do n ot inst all
the d evice i n place s with sh aking s urfac es or und er shoc ks.
Cle an the de vice wi th a soft d ry clot h. For st ubbor n dirt, d ip the
clo th into s light n eutra l clean ser, gen tly wip e the dir t with th e
clo th, and t hen dry t he devi ce.
Do no t jam the v entil ation o penin g. Foll ow the in stall ation
ins truct ions pr ovide d in this d ocume nt when i nstal ling th e devic e.
Kee p the dev ice awa y from he at sour ces suc h as radi ators ,
ele ctric h eater s, or oth er heat e quipm ent.
Kee p the dev ice awa y from mo ist, du sty, extr emely h ot or col d
pla ces, or p laces w ith str ong ele ctric r adiat ion.
If th e devic e is inst alled o utdoo rs, tak e insec t- and mo istur epro of meas ures to a void ci rcuit b oard co rrosi on that c an affec t
mon itori ng.
Rem ove the p ower pl ug if the d evice i s idle fo r a long ti me.
All c omple te prod ucts so ld by the m anufa cture r are del ivere d
alo ng with n amepl ates, and a ccess ories a fter
str ict ins pecti on. The ma nufac turer s hall no t be held r espon sible
for c ounte rfeit p roduc ts.
The m anufa cture r will up date th is manu al acco rding t o produ ct
fun ction e nhanc ement o r chang es and re gular ly upda te the
sof tware a nd hard ware de scrib ed in thi s manua l. Upda te
inf ormat ion wil l be adde d to new ve rsion s of this m anual w ithou t
pri or noti ce.
Thi s manua l may con tain mi sprin ts, tec hnolo gy info rmati on that
is no t accur ate eno ugh, or p roduc t funct ion and o perat ion
des cript ion tha t is slig htly in consi stent w ith the a ctual p roduc t,
the f inal in terpr etati on of com pany is a s a stand ard.
Thi s manua l is only f or refe rence a nd does n ot ensu re that t he
inf ormat ion is to tally c onsis tent wi th the ac tual pr oduct . For
con siste ncy, see th e actua l produ ct.
qui ck setu p guide
NOTE
thi s devic e. Othe rwise , the ser vice li fe of the i mage se nsor ma y
be sh orten ed.
If th is devi ce is ins talle d in plac es wher e thund er and li ghtni ng
fre quent ly occu r, groun d the dev ice nea rby to di schar ge high
ene rgy suc h as thun der str ikes in o rder to p reven t devic e
dam age.
CAUT ION
Ope n the pac kage, c heck th e appea rance o f produ ct for no
obv ious da mage, a nd conf irm the i tem for 1-1 i s
con siste nt.
lis t tab le
Table 1 -1 Pack ing lis t
Open Pack ag e Ex aminati on
1
2.1 D evice P orts
Diff erent d evice m ay have d iffer ent por ts and
, ple ase ref er to the .
mul ti-he ad
cab le act ual pro duct
NOTE
Device St ru ct ure
2
2.2 D evice D imens ions
Diff erent d evice m ay have d iffer ent dim ensio ns, ple ase ref er
to th e .act ual pro duct
NOTE
3
Device In st al lation
Fig ure 2-1 D imens ions (U nit:m m)
PoE
Ind icato r
PoE n etwor k statu s indic ator
Thi s indic ator fl ashes w hen dat a is tran smitt ed.
RES ET
Fac tory re set but ton
LAN
RJ4 5 10 /100 /1000 M bps ada ptive E thern et
int erfac e.
Ste p 3 Route t he scre ws thro ugh the h oles on t he base , push th e
har d disk to t he appr opria te posi tion on t he left , as show n in
fig ure 3-2 .
Turn t he devi ce over, a nd fast en the re st two ha rd disk
fix ing scr ews, as s hown in f igure 3 -3.
Ste p 4
Net work Vid eo Reco rder
Phi llips h ead scr ew
Sil icone c ushio n
Pow er cord
Pow er adap ter
Mou se
CD- ROM
Qui ck Setu p Guide
1
Termi nal blo ck
1
12
8
1
1
1
1
2
311.8
372
44.5
KB/MOUSE
BACKUP
LIN E OUT/
LIN E IN
Aud io outp ut and au dio inp ut
Com ponen t
HDM I
VGA
Vide o outpu t inter face
Ala rm inpu t and ala rm outp ut
110 V/2 20 V AC powe r input i nterf ace of th e
dev ice
Con necte d to an ext ernal p ower ad apter
Por t Name
Des cript ion
PoE
PoE n etwor k inter faces
Saf e groun d screw o f the dev ice
Table 2 -2 Rear p anel de scrip tion
Dur ing the i nstal latio n, ensu re that th e larg e disc of th e sili con
cush ion cl ose to the h ard di sk screw h oles .
Ple ase ins tall th e hard di sk fixi ng scre ws on the s crew ho les far
awa y from the p ower su pply i nterfa ce.
NOTE
Fig ure3- 2 Instal ling ha rd disk
Step 5 I nstal l other h ard dis ks foll owing s tep 2,s tep 3 and s tep 4,
and i nsert t he hard d isk dat a cable a nd powe r cable , then
put o n the upp er cove r and fas ten the f ixing s crews .
Fig ure3- 3 Fixing h ard dis k
Rema rk
Qua ntity
Opt ional
Opt ional
Fro nt pane l descr iptio n of r efer to t able 2- 1.dev ice, pl ease
Rea r panel d escri ption o f r efer to t able 2- 2.dev ice, pl ease
DC 12V
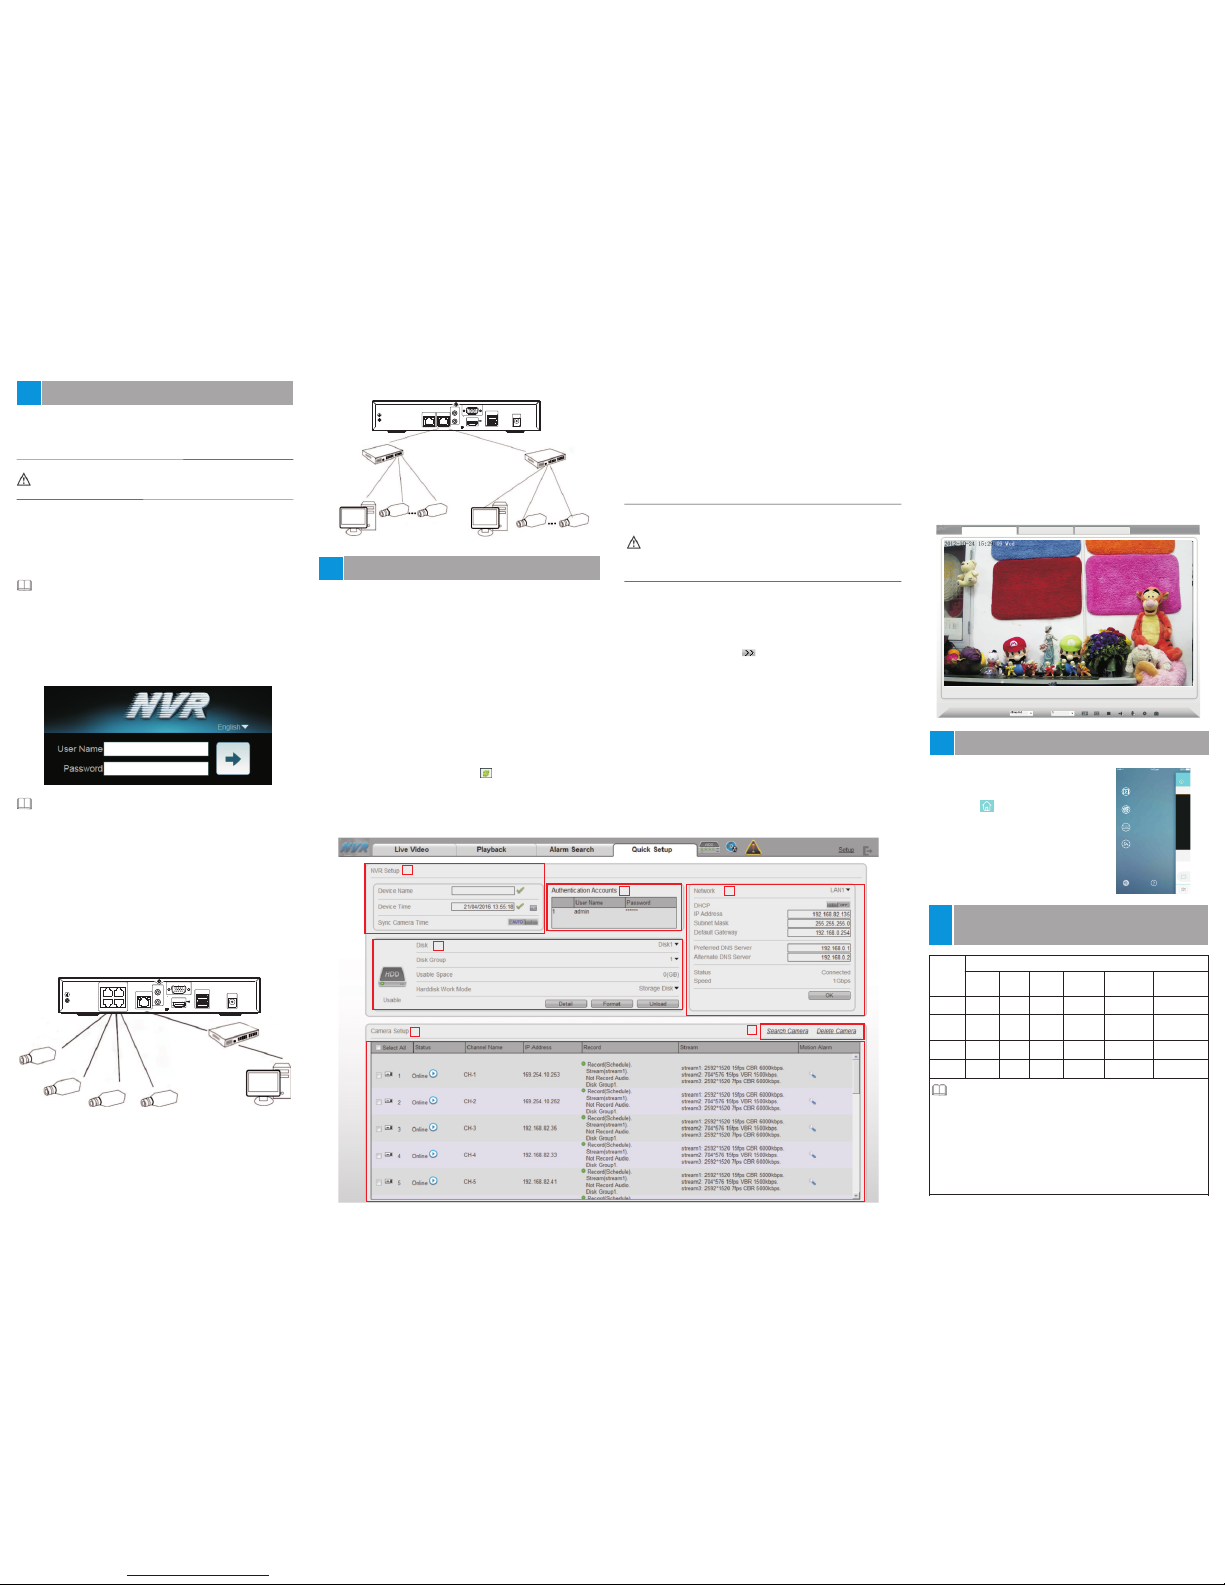
Fig ure 4-2 N etwor k topol ogy of th e NVR
Whe n the NVR i s start ed, the p ower in dicat or beco mes ste ady
on an d the NVR s tarts a s elf-t est and d ispla ys the te st resu lt on
the s creen . The star tup pro cess ta kes abo ut 2 minu tes.
Whe n a hardw are abn ormal ity is de tecte d, the se lf-te st scre en
sta ys on. You ca n click c ontin ue or shu tdown i n the low er righ t
cor ner of th e scree n. If you c lick co ntinu e, the NV R enter s the
log in scre en.
Hard disk d etect ion is perfo rmed d uring start up. If the de tecti on
fai ls, pos sible cause s incl ude:
The h ard dis k is new an d unfor matte d. In this c ase, fo rmat th e
har d disk ba sed on“ Quick S etup” .
The h ard dis k is forma tted, b ut the fi le syst em is inc onsis tent wi th
the o ne supp orted b y the NVR .
The h ard dis k is dama ged.
In som e envir onmen ts, if th e power s upply i s abnor mal,
the N VR may not w ork pro perly. I n sever e cases , the NVR
may b e damag ed. In the se envi ronm ents, yo u are adv ised
to use r egul ated po wer sup ply.
Fig ure 4-1 L ogin
Ent er the co rrect u ser nam e and pas sword . The main s creen o f
the N VR is dis playe d.
4.2 A dding We bcams
4.2 .1 PoE
Afte r the PoE n etwor k inter faces a re conn ected t o IP camer as,
the N VR auto matic ally ad ds the IP ca meras . Figur e 4-2 sho ws the
net work to polog y of the NV (e. g 2 Disks ,4 PoEs ).R
PoE
PoE
PoE
PoE
LAN
Swi tch
Rem ote cli ent
POE
1
2
4
3
HDMI
DC 12V
USB
VGA
RESET
LAN
LINE OUT
LINE IN
Fig ure 4-3 Top ology o f a free ne twork
NVR
LAN 2
swi tch
LAN 1
Rem ote Cli ent
IP cam era
HDMI
DC 12V
USB
VGA
RESET
LAN
LINE OUT
LINE IN
LAN
The N VR is emb edded w ith a web s erver a nd supp orts
mai nstre am brow sers su ch as Int ernet E xplor er, Chro me, Fir efox,
and S afari . Opera tions s uch as qu ick set up, rea l-tim e previ ew,
vid eo play back, a larm se arch, N VR setu p, and ca mera se tup can
be pe rform ed thro ugh the w eb.
Ope n the Int ernet E xplor er, ente r the IP add ress of I P camer a
(de fault v alue: 1 92.16 8.0.1 21) in the a ddres s box, an d press
Ent er. The log in page i s displ ayed. a s shown i n figur e 4-1 .
5.1 Q uick Se tup
Qui ck setu p provi de NVR ne twork c onfig urati on, dis k
man ageme nt, tim e setti ng, IP cam era sea rch, vi deo con figur ation ,
cam era net work co nfigu ratio n, stre am conf igura tion, a nd mobi le
det ectio n confi gurat ion, as s hown in f igure 5 -1.
5.1 .1 NVR Se tup
NVR b asic in forma tion: You c an set th e devic e name an d devic e
tim e of the NV R.
Syn c Camera T ime: It c an be don e manua lly or au tomat icall y.
If th e manua l mode is s elect ed, cli ck to syn chron ize the t ime
of IP ca meras . If the au to mode i s selec ted, th e NVR
syn chron izes th e time of I P camera s autom atica lly.
Aut henti catio n Acc ounts : To log i n to an IP ca mera, y ou need t o
ent er the co rrect a uthen ticat ion acc ount. O nly suc cessf ully
aut henti cated I P camera s can be ma naged . Doubl e-cli ck the
use r name an d passw ord tex t field t o modif y the use r name an d
pas sword .
NVR n etwor k confi gurat ion: You ca n enabl e autom atic IP
add ress ac quisi tion an d set the I P addres s, subn et mask ,
def ault ga teway, DN S addre ss of the N VR, and d ispla y the
net work co nnect ion sta tus and s peed.
Har d disk ma nagem ent: You ca n manag e the har d disk of t he
NVR a s follo ws:Fo rmat th e hard di sk; Che ck the st atus of t he
har d disk (u sable , abnor mal, un forma tted, a nd unav ailab le);
Che ck the us ed spac e and tot al spac e of the ha rd disk .
Form attin g will cl ear al l video d ata on th e hard di sk.
Use th is func tion on ly whe n neces sary.
Be su re to uni nstal l the har d disk be fore re movin g it
from t he NVR du ring ru ntime ; other wise, t he hard d isk
may b e damag ed or dat a may be lo st.
The N VR must be c onne cted to a st able po wer sup ply
dur ing run time; o therw ise, the h ard di sk may be
dam aged or d ata may b e lost.
5.1 .2 Came ra setu p
Cam era sea rch and d eleti on
Whe n you nee d to sear ch came ra for ma nagem ent, cl ick
Sea rch Cam era, th e Camer a Searc h page is d ispla yed, th en clic k
Sca n, it wil l scan fo r the cam era aut omati cally, as s hown in f igure
4-1 . Click , t he came ra sele cting p age is di splay ed, Sel ect the
cam eras yo u want an d click , t hen cli ck Ok to co mplet e
sel ectio n of IP came ras.
To remo ve mana ged cam eras, c heck th e camer as in the c amera
lis t and cli ck to del ect cam eras.
IP cam era set up
You can v iew the s tatus o f an IP came ra and se t the nam e, IP
add ress, r ecord p olicy, st ream pa ramet er, and mo tion al arm
par amete r of the IP ca mera.
View t he stat us of an IP c amera : The cam era sta tus may b e
Onl ine, Off line, a nd Inco rrect a ccoun t. For an o nline I P
cam era, cli ck to vie w live vi deo.
Cha ng the ch annel n ame: Cl ick a sel ected c hanne l name, e nter
a cha nnel na me in the N ame tex t field .
Set a r ecord p olicy : Click a s elect ed reco rd, the R ecord P olicy
Con figur ation p age is di splay ed. For h ow to set a r ecord p olicy,
see t he Reco rd of Net work Vid eo Reco rder (N VR) Use r Guide .
Fig ure 5-1 Q uick Se tup
Set a s tream : Click a s elect ed stre am, the S tream p age is
dis playe d,Set str eam par amete rs, sel ect On fo r App ly to all t he
sam e devic es, and c lick OK . The para meter s ettin gs are ap plied
to al l IP camer as that h ave the s ame res oluti on as the
con figur ed reso lutio n.
Set a m otion a larm: C lick th e motio n alarm i nform ation , the
Mot ion Alar m page is d ispla yed. Se t the sch edule a nd moti on
are a when th e motio n detec tion al arm fun ction i s enabl ed.
Quick Con fi gu ration( e. g IE )
5
Quick Con fi gu ration( e. g IE )
4
Compo nent
Haza rdous S ubsta nce or El ement
Plum bum
(Pb)
Merc ury
(Hg)
Cadm ium
(Cd)
Hexa valen t
Chro mium
(Cr6 +)
Poly bromi nated Bi pheny ls
(PBB )
Stru ctura l
part
Boar d/
circ uit
modu le
Cabl e
conn ector
Acce ssories
○: ind icates t hat the c oncen trati on of the h azard ous sub stanc e in
all h omoge neous s ubsta nces of t he comp onent i s withi n the
lim it speci fied i n SJ/T 1136 3-200 6 Requi remen ts for
Con centr ation L imits fo r Certa in Haz ardou s Subst ances i n
Ele ctron ic Infor matio n Produ cts.
×: indi cates t hat the c oncen trati on of the h azard ous sub stanc e in
at le ast one ho moge neous s ubsta nce of th e compo nent
exce eds the l imit sp ecifi ed in SJ/ T 11363- 2006
Req uirem ents fo r Conce ntrati on Lim its for Ce rtain
Haz ardou s Substa nces i n Electr onic In forma tion Pr oduct s.
×
×
×
×
○
○
○
○
○
○
○
○
○
○
○
○
○
○
○
○
○
○
○
○
Poly bromi nated
Diph enyl Et hers
(PBD E)
NOTE
Appendi x:
Hazardo us S ub stance De cl ar ation
5
4.1 S tartu p
Bef ore sta rting N VR, ens ure tha t the NVR i s conne cted to a
pow er supp ly prop erly an d a monit or is con necte d to the HD MI or
VGA in terfa ce of the N VR corr ectly. NV R will au tomat icall y power on, W hen it is c onnec ted to a po wer sup ply,
CAUT ION
NOTE
NOTE
The default user name is admin. The default password is admin.
Change the password when you log in the system for first time to ensure
system security.
You can change the system display language on the login page.
A free n etwor k inclu des oth er netw ork dev ices in a dditi on to IP
cam eras an d NVR. The t opolo gy of a fre e netwo rk can be
org anize d freel y so long a s NVR and I P camera s can
com munic ate wit h each ot her smo othly.
Whe n a free ne twork i s used, t he user n eeds to m anual ly
sea rch for a nd add IP ca meras . For det ails, s ee chap ter 5.1 "Quic k
Set up”.
4.2 .2 Non -PoE
CAUT ION
To brow se a real -time v ideo, c lick Li ve Video . The Liv e Video
pag e is disp layed in fi gure 5- 2., as sh own
Fig ure 5-2 L ive Vide o
Stream
Camera
Live Vi deo
Play back
Conf igura tion
5. 2 Live v ideo
2
1
3
4
5
6
Mobile ph on e cl ient
6
Mob ile pho ne clie nt supp orts
IOS、A ndroi d syete m,searc h
”In view Pr o” or “In view Li te” in th e
App s tore an d insta ll it.
Cli ck icon , the main m enu is
dis playe d,as sh own in fi gure 6- 1.
You can p erfor m the fol lowin g
ope ratio n:
Liv e previ ew
Pla yback
Dev ice Man age
Ima ge
Fig ure 6-1 M ain men u
Live Pr eview
Playb ack
Devic es
Image s
Settin g H elp
 Loading...