

Page 1
Sunding Bicycle Computer
SD-548B (14Functions)
FUNCTIONS
- SPD CURRENT SPEED
- ODO ODOMETER (0.001~99999km/m)
- DST TRIP DISTANCE
- MXS MAXIMUM SPEED
- AVS AVERAGE SPEED
- TM ELAPSED TIME .
- CLK CLOCK (12H/24H)
- SCAN
- “+” “-” COMPARATOR
- SETTING SPEED SCALE(km/h,m/h)
- SETTING TYRE CIRCUMFERENCE : (0mm ~
9999mm)
- SETTING THE LAST VALUE OF
ODOMETER/ODO
- FREEZE FRAME MEMORY
- AUTO ON/OFF
Computer Battery Installation
Remove the battery cover from the bottom of the computer
by using a flat blade screwdriver, install an AG13 battery
with the positive (+) pole facing the battery cover and
replace the cover. Should the LCD show irregular figures,
take out the battery and re-install it.
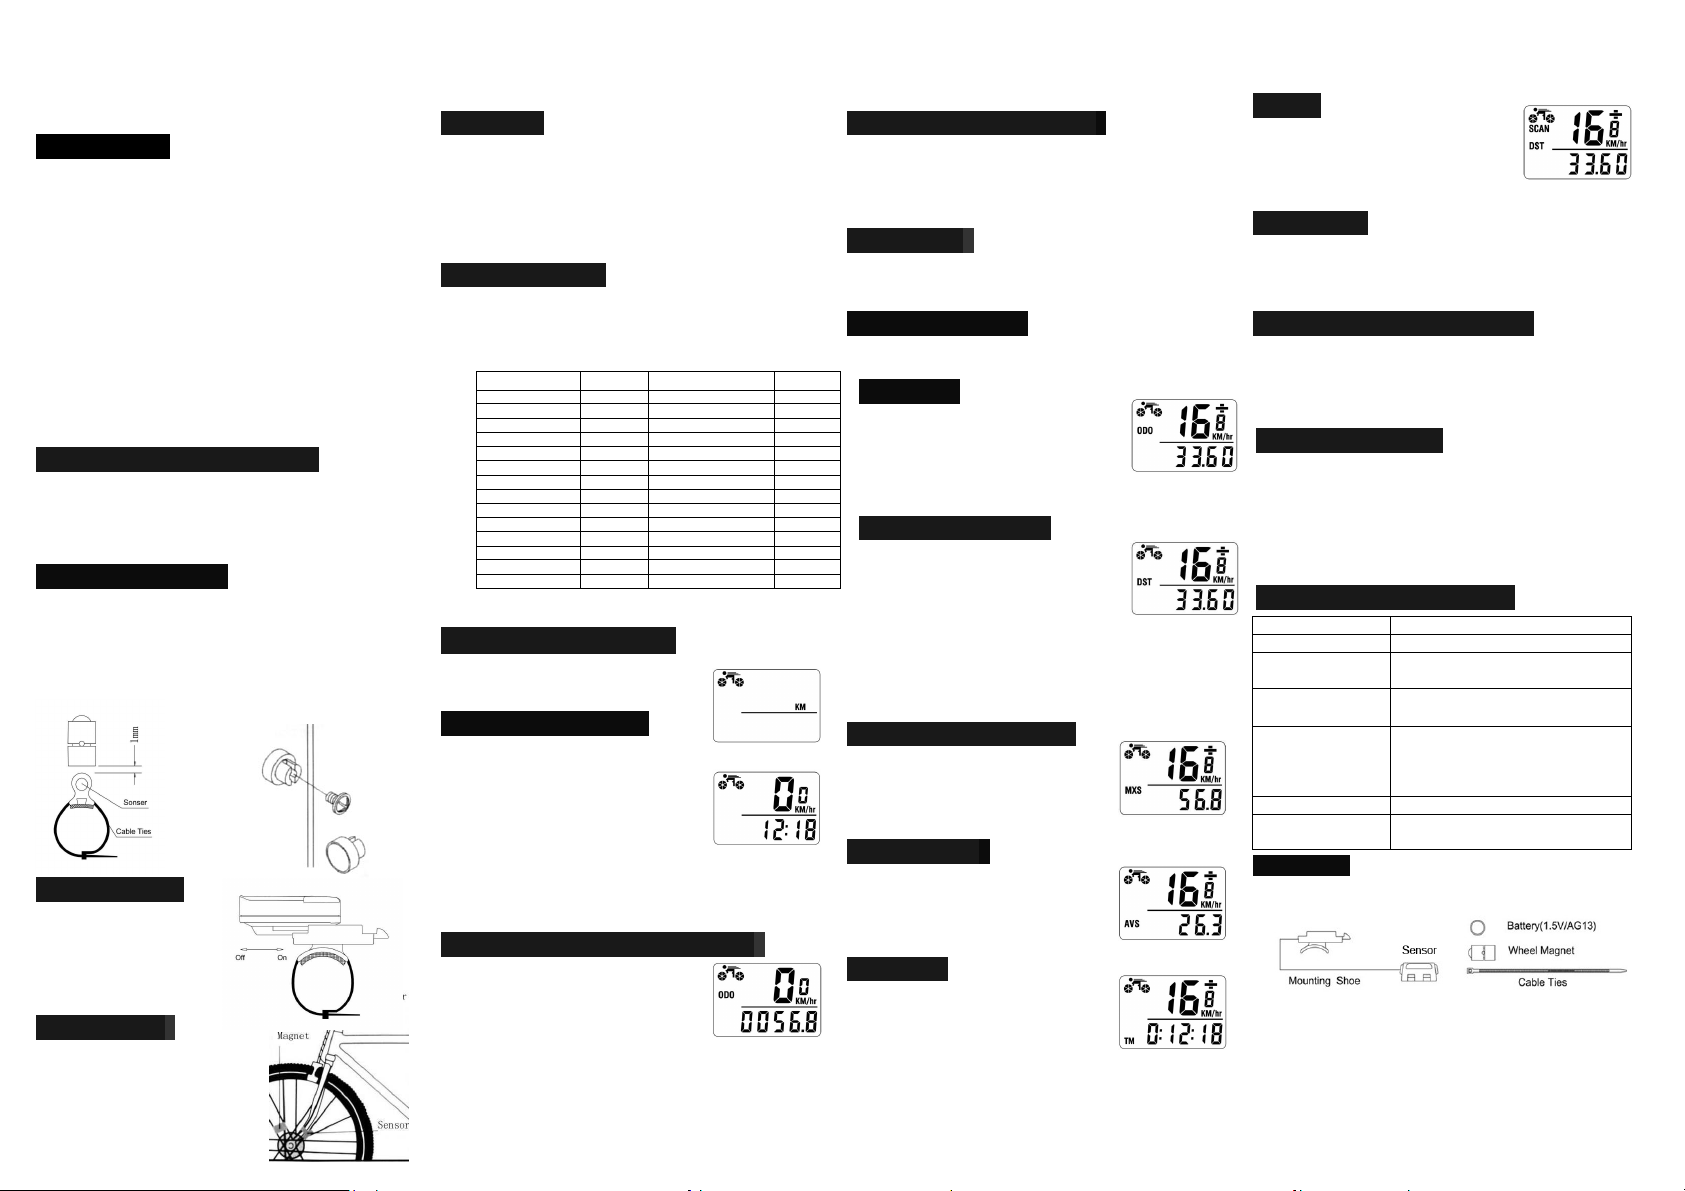
Speedometer Sensor
Attach the speedometer sensor bracket to the left fork blade,
using the shims to adjust the diameter, and using the cable
ties (show below) to tie it with the fork. Position the sensor
and magnet as show; make sure that the arc of the magnet
intersects the alignment mark on the sensor with 1mm
clearance
.
Mounting Shoe
Attach the mounting shoe
with the cable ties to the
handlebar, adjust the
mounting shoe on the
handlebar with the shims to
hold its position
.
Sensor Wiring
Route the sensor wire up the fork
blade, using cable ties to secure it
at the bottom and crown to avoid it
hinder the movement of the front
wheel.
Computer
Attach the computer to the mounting shoe by sliding the
unit until it snaps firmly into its postion. To remove it, press
the button on it in the opposite direction.
To check for proper speed function and sensor alignment,
spin the front wheel with computer in speed mode. Adjust
the position of sensor and magnet when there is no or weak
reaction.
Wheel Size Input
‘2060’ appears on the screen when the battery has been
installed, with one figure flashing, choose the correct wheel
circumference from the table below. Press RIGHT button to
advance digits as needed and LEFT button to confirm and
TIRE SIZE
700c x 38mm 2180 26’’ x 2.25’’ 2115
700c x 35mm 2168 26’’ x 2.1’’ 2095
700c x 32mm 2155 26’’ x 2.0’’ 2074
700c x 30mm 2145 26’’ x 1.9’’/1.95’’ 2055
700c x 28mm 2136 26’’ x 1.75’’ 2035
700c x 25mm 2124 26’’ x 1.5’’ 1985
700c x 23mm 2105 26’’ x 1.25’’ 1953
700c x 20mm 2074 26’’ x 1.0’’ 1913
700cTubulari 2130 24’’ x 1.9’’/1.95’’ 1916
650c x 23mm 1990 20’’ x 1-1/4’’ 1618
650c x 20mm 1945 16’’ x 2.0’’ 1253
27’’ x 1-1/4’’ 2161 16’’ x 1.95’’ 1257
27’’ x 1-1/8’’ 2155 16’’ x 1.5’’ 1206
26’’ x 2.3’’ 2135
advance. (The circumference ranges 0mm~9999mm),press
LEFT button to enter KM/M mode.
CIRC
TIRE SIZE
CIRC
Setting((((km/h))))/((((m/h))))
Press the RIGHT button to choose km/h
or m/h. Press the LEFT button to enter
CLOCK mode.
CLK Mode(12H/24H)
In CLOCK Mode, press the LEFT button
for 3 seconds to enter 12/24H selection.
Re-press the LEFT button for 12/24
exchanging. Press the RIGHT button to
enter Hour setting mode, when the figure
indicating HOUR start to flash, press the
LEFT button to adjust it.
Continue to press the RIGHT button to enter Minute setting
mode, when the figure indicating MINUTE start to flash,
press the LEFT button to adjust it and RIGHT button to
confirm, re-press RIGHT button to enter ODO mode.
Setting the Last value of Odometer
In ODO mode, press the LEFT
button for 2 seconds to set the ODO
value, its initial value is 0000.0.
when one figure flashing, press
RIGHT button to adjust it and LEFT
button to confirm it, and start to set the next
figure.(after re-install the battery, latest value can
be inputted according to the value exists before the
battery is re-installed).
Reset of Mileage Parameter
In ODO mode, Press and hold both RIGHT and LEFT
button simultaneously for 3 seconds to clear the
circumference value and cancel (km/m) setting. The user
need to reset the tyre circumference, and (km/m), the
original ODO value and CLOCK will remain unaffected.
Speedometer
Speed is shown all the time on the screen, its maximum
reading is 99.9km/h(m/h), and it is accurate to +/- 0.1km/h
(m/h).
Speed Comparator
During riding , ‘+’and ‘-’ indicates the current speed is
higher or lower than average speed(AVS) .
Odometer
In ODO mode , the total distance is
indicated on the screen, its mileage range
is 0.001~99999km(m). The display will
be back to 0 when value exceeds its
maximum limit, press the RIGHT button to enter DST
mode.
Trip Distance (DST)
In DST mode, the distance for one trip is
indicated on the bottom line. DST
ranges from 0~99999km(m), when the
value exceed the range limit, it restarts from
0 automatically. Both the time and the
distance records will be cleared when the time of one trip
exceed the range limited.
press the LEFT button for 5 seconds, the computer will
clear the records of DST,MXS,AVS,TM to 0.
Press the RIGHT button to enter MXS mode.
Maximum Speed (MXS)
In MXS mode, maximum speed is
indicated on the bottom line. Press the
LEFT button for 5 seconds to clear the
records of, MXS,DST,AVS,TM to 0.
Press the RIGHT button to enter AVS mode.
Average Speed
In AVS mode, average speed is indicated
on the bottom line. Press the LEFT button
for 5 seconds to clear the records of
AVS,DST,MXS,TM to 0.
Press RIGHT button to enter TM mode.
Trip Time
In TM mode, trip time is indicated on the
bottom line. TM ranges 0 :00 :00 ~
99 :59 :59. It will be back to 0 when
value exceed the limits.
Press the LEFT button for 5 seconds to clear the records of
TM, DST, MXS and AVS to 0.
Press the RIGHT button to enter SCAN mode.
SCAN
In Scan mode , DST, MXS, AVS and TM
mode are indicated in turn every 4
seconds.
Press the RIGHT button to enter CLOCK
Mode.
Sleep Mode
If no signal has been inputted for 300 seconds, computer
will enter into Sleep Mode,and CLK value remains. It will
turn back to the former mode with all the data collected then
when any signal is inputted or any button is pressed.
FREEZE FRAME MEMORY
Press the LEFT button in any time will enter into freeze
frame memory mode. Flashing TM data will appear on the
screen. Press the RIGHT button to view the records of DST,
MXS,AVS,TM.
Press the LEFT button to end it.
Buttons Instruction
Press the RIGHT button to choose any mode below :
ODO, DST, MXS, AVS, TM, SCAN(DST、MXS、AVS、
TM) and CLOCK. It’s unnecessary to press the LEFT
button except choosing the Freeze frame Memory mode.
In Freeze Frame Momery mode, press the RIGHT button,
several data will display, re-press LEFT button to turn back
to other modes.
Malfunctions and Problems
Malfunctions Problems
No speedometer Improper magnet/sensor alignment
Inaccurate value is
indicated
Slow display
res po ns e
Black display
Weak display Poor battery contact or dead battery.
Display shows
Irregular figures
Improper input, such as wheel
circumference.
Temperature exceeds operating
limits(0℃~55℃).
Temperature too high, or put in
direct sunlight for too long time.
Need back to shadow place for a
period.
Take out battery and reinstall it after
10 seconds.
Accessories
 Loading...