


Ulitium Lightkit
User Manual
Ulitium Lightkit
Betriebsanleitung
Ulitium Lightkit
Manuel d’Utilisation
Ulitium Lightkit
Instrucciones de Uso
1


Contents
Overview
2
How does it work?
4
Planning the installation
6
Installing the LEC
8
Connecting the Hub4
9
Installing the Ulitium
10
Operating the Ulitium
12
Troubleshooting
15
Energy Accounting
16
Energy Harvest
17
Energy Consumption
19
What next?
20
English
1

Bayonet Plug
Overview
The Sundaya Lightkit system
consists of very simple
modular parts that you can
connect together to form an
expandable, energy-efcient
lighting installation.
LEC
(Light to Electricity Converter)
2
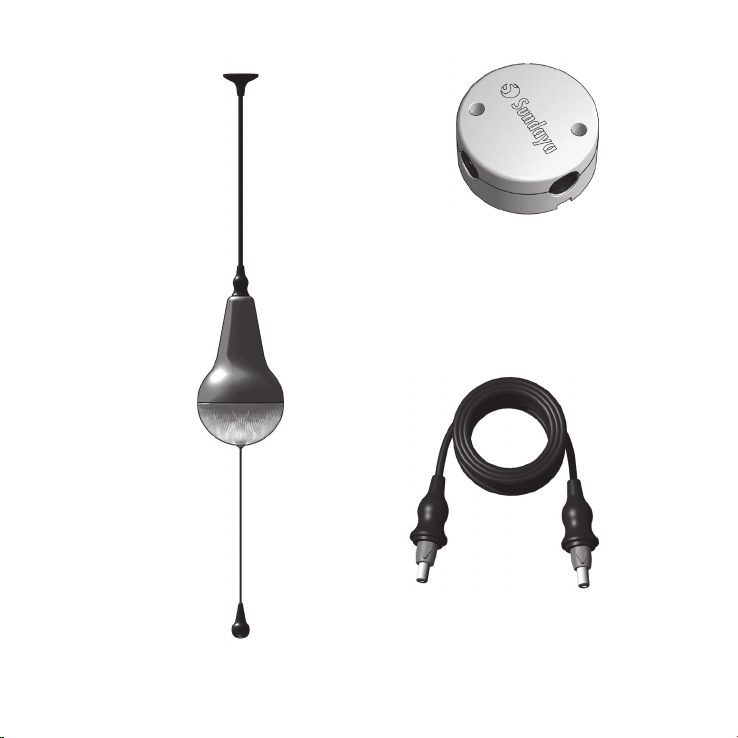
Ulitium
Ceiling
Cap
Hub4
Cable with Bayonet Plugs
3
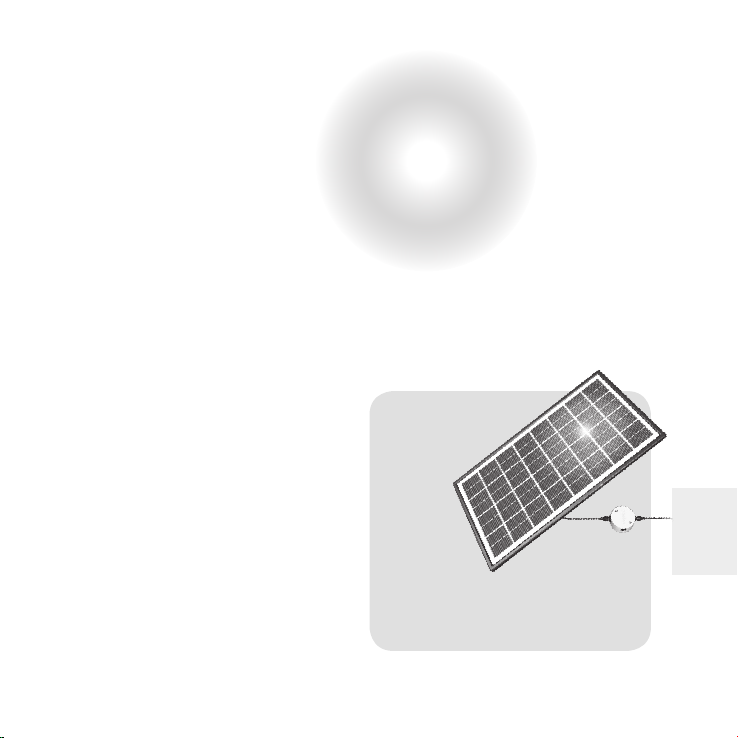
How does it work?
The concept of the basic
Sundaya Lightkit is simple.
During the daytime, energy is
harvested from the sunlight
using the LEC (Light to Energy
Converter), and converted
into electricity. This electrical
energy is then passed through
the cables and Hub4 in your
installation, to the Ulitium
lamps.
LEC
Energy Harvest
4

When not in use, the Ulitium
lamp will store this electric
energy, and then convert it
back to light whenever it is
switched on. It is considered
an ELC (Electricity to Light
Converter).
You can have as many LECs
and ELCs in your installation,
as long as there is a good
balance between energy
harvested and energy
consumed every day.
Energy Storage Energy Consumption
The harvesting capacity of
the LEC in every Sundaya
Lightkit has been chosen to
be in good balance for the
number of energy consumers
included in the kit. If you want
to add more energy consumers
(lamps, TV, laptop computer,
etc.) please also consider
installing additional LECs to
maintain this energy balance.
ELC
5
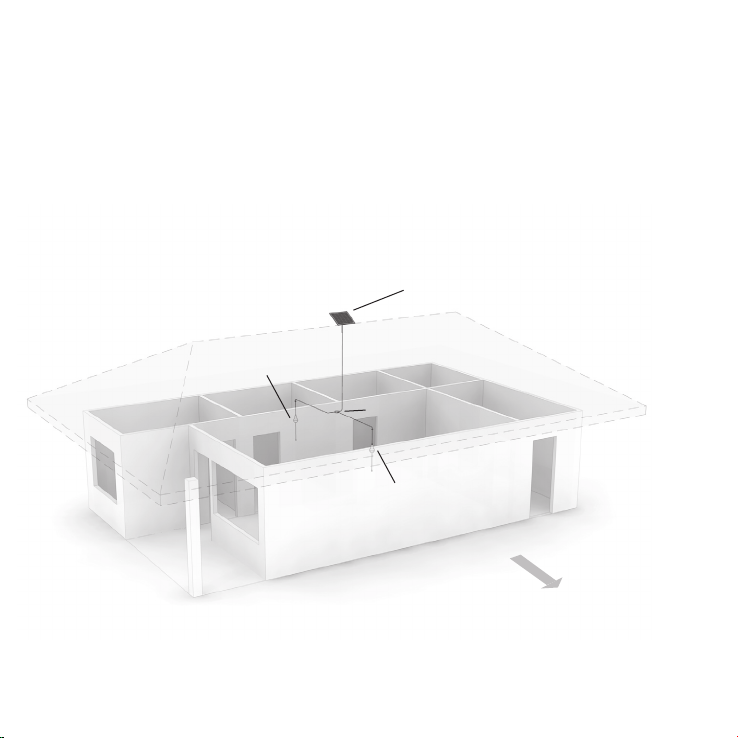
Planning the
installation
Before you begin installing the
system, please consider where
you would like to suspend the
lighting, and the LEC’s location
on or near the roof.
Ulitium
6
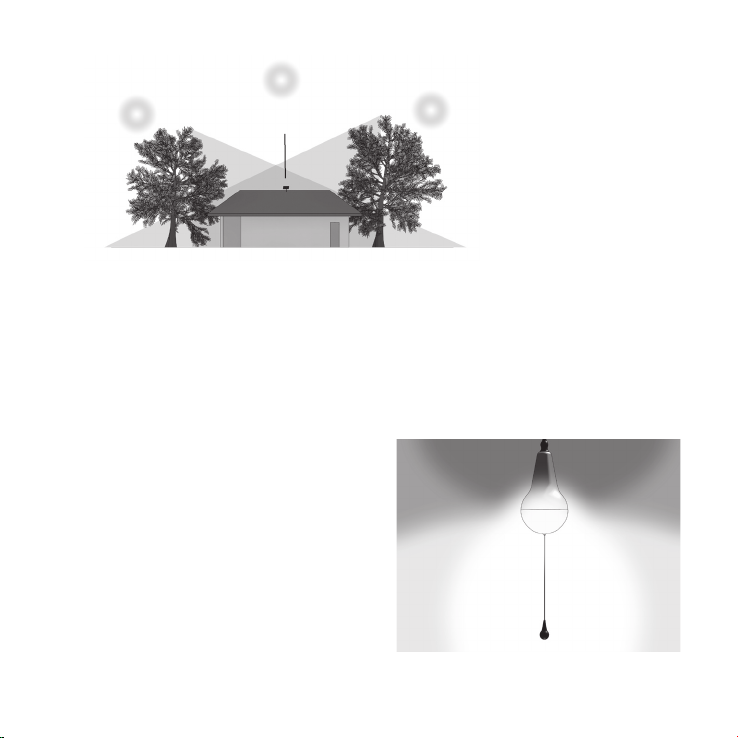
The LEC needs to be able to
face the equator, so choose
the correct side of the roof.
LEC
Hub4
Ulitium
Equator

LEC
overshadowed
The LEC must not be
overshadowed by trees or
buildings throughout the day.
Judge the best placement
and height for your Ulitium
to get the light distribution
you want for the room. See
the chapter on how to switch
on the Ulitium if you want
to study beforehand its light
distribution in the room.
Make sure the total distance
from the LEC to the Hub4 and
the energy consumers will
not exceed the length of the
cables. The Hub4 should be
placed above the ceiling, at
roughly equal distances to all
the devices.
7
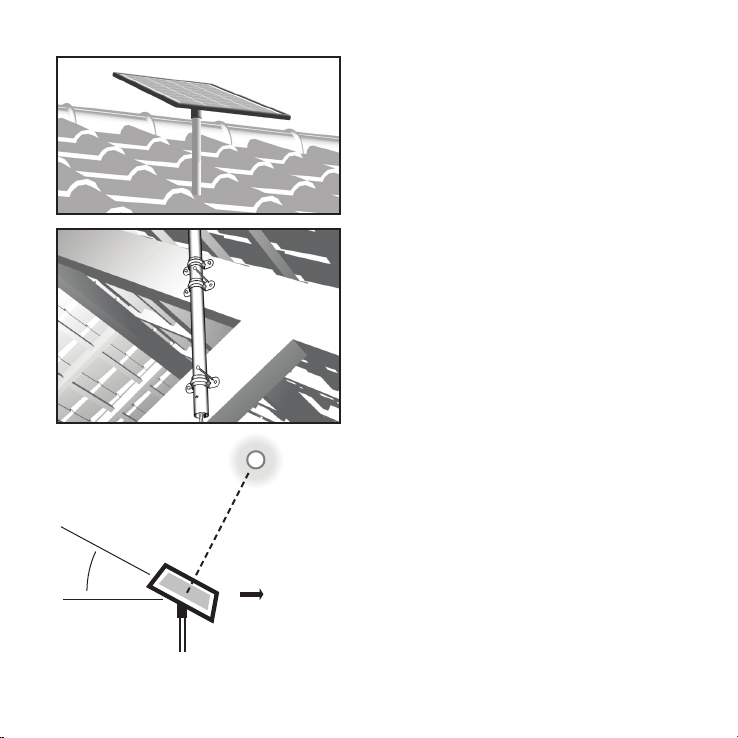
Installing the LEC
The LEC is designed to be
mounted on a rigid pole. An
alumunium or galvanized
pipe of diameter 26 mm is
ideal, but a thick PVC pipe is
acceptable. The pole should
be mounted on the rooftop,
clamped or tied to the truss of
the roof. If you cannot mount
it there, you can also nail
the pole on the outer wall of
your house that is facing the
equator, as long as the LEC is
The Sun
Tilt
angle
8
Equator
not overshadowed.
It is very important that the
LEC be positioned facing the
equator. If necessary, also
adjust the LEC’s tilt angle, so
that at 12 o’clock the sun’s
rays should fall straight on
the LEC’s top surface for
an optimal sunlight energy
harvest.
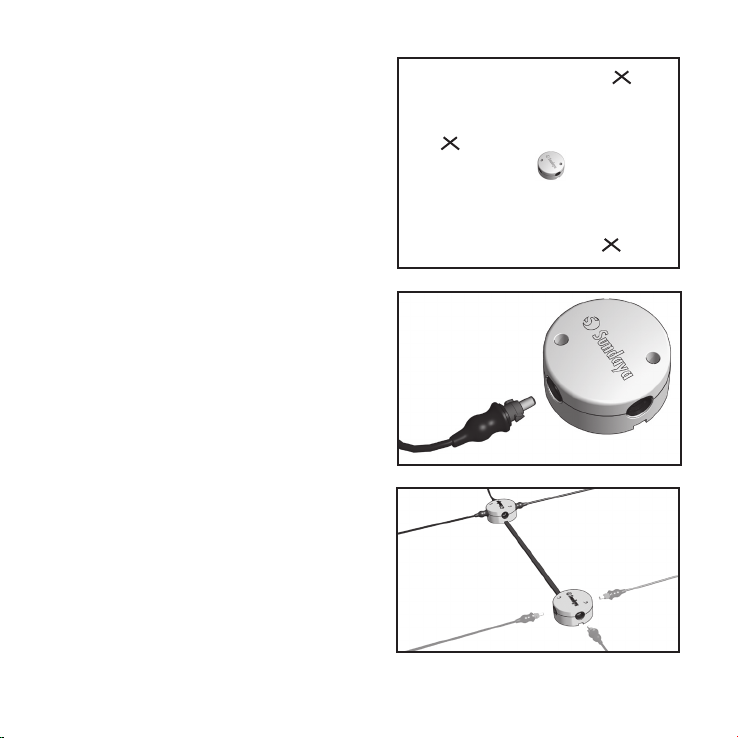
Connecting the
Hub4
Under the roof, place the Hub4
somewhere between the future
locations of the Ulitium lamps.
Insert the Bayonet Plug of the
cable from the LEC, to one of
the four ports on the Hub4.
Twist clockwise the Bayonet
Plug to lock it in place.
(For 4 Light kits, connect
one Hub4 to another using
the extra cable with Bayonet
Plugs).
OPTIONAL: for longer
distances, you can also
connect two Hub4’s with
an optional Sundaya DC
cable, wired to the terminals
underneath each Hub4.
9
Hole through
ceiling
diam. 2 cm
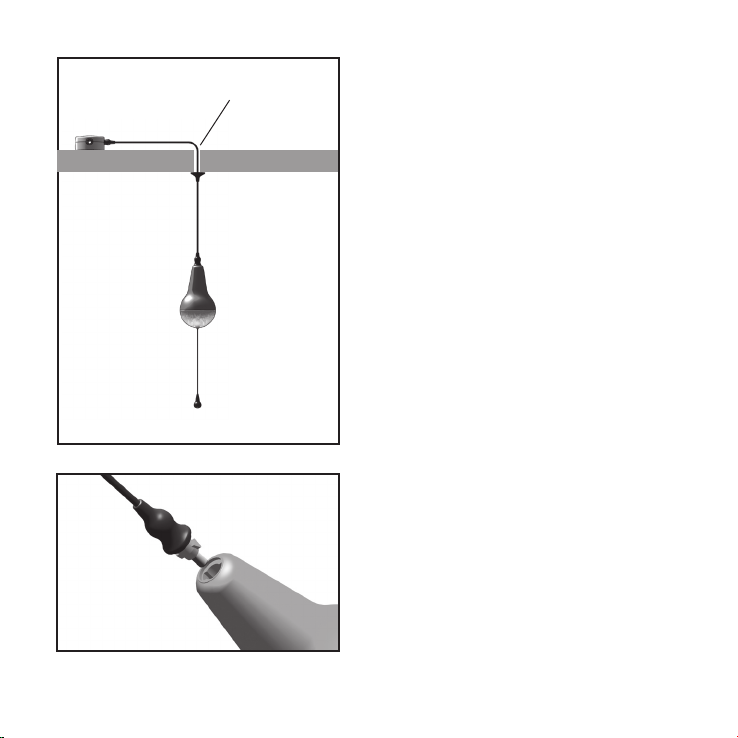
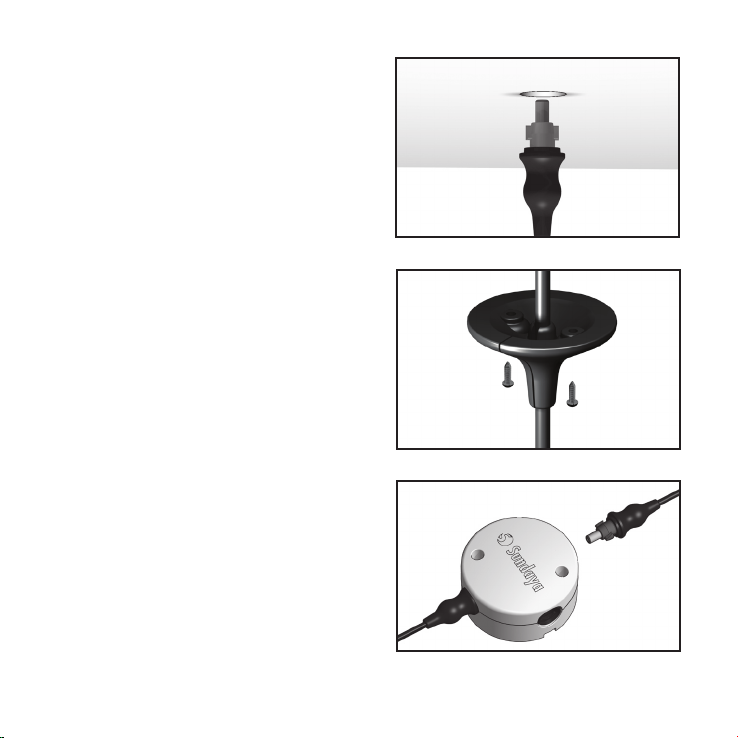
Installing the
Ulitium
Ceiling
The Ulitium is designed to be
suspended from the ceiling.
At precise location on the
ceiling where you have
planned to suspend the
Ulitium, drill a hole 2 cm in
diameter, barely large enough
to allow a Bayonet Plug to
pass through.
Insert Bayonet Plug of the
cable provided, into the port
on top of the Ulitium.
10

Pass other bayonet plug and
rest of the cable through the
hole in the ceiling you just
made.
Slip cable into Celing Cap
provided, through a slit on its
side.
Maintain the Ulitium at desired
height. Then fasten Ceiling
Cap to the ceiling with screws,
covering up the hole on the
ceiling.
Connect the bayonet plug that
has been passed through the
ceiling, to any available ports
on the Hub4.
Repeat the above steps for all
lamps in the kit*.
*) for Lightkits 2,3 and 4.
11

Operating the
Ulitium
When the Ulitium is shipped
out of the factory, the
electronic circuitry is not yet
activated.
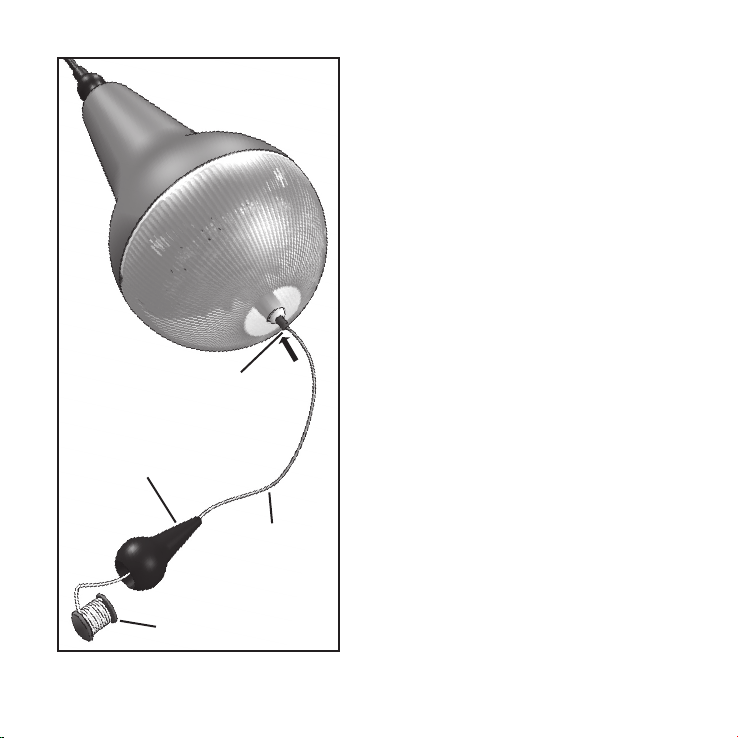
Press once the Master Switch
at the bottom of the Ulitium to
activate the unit.
(When storing the lamp away
Master
Switch
Pull
Switch
Cord
Spool
12
for a long time or during
transportation, do not forget
to deactivate the circuitry by
pressing again the Master
Switch).
The cord length can be
adjusted by pulling out the
Spool inside the Pull Switch,
and then winding or unwinding
the cord.

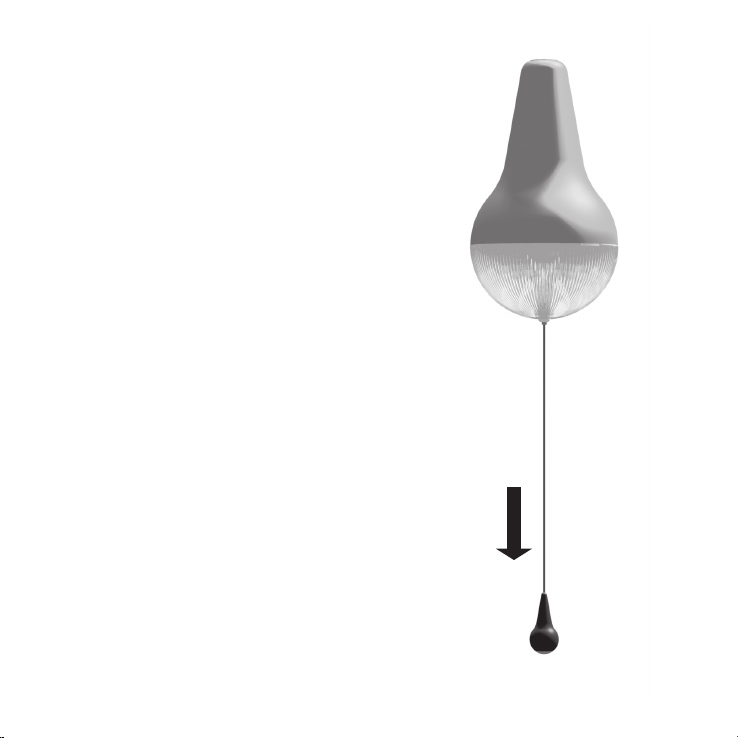
To switch on the light, pull
down once on the Pull Switch.
The lamp brightness is set in
progressive steps, the rst
being at 100%.
Pull once again to dim the light
to 50% brightness.
Another pull on the Pull Switch
will dim the light down to 10%
brightness.
Pull again one more time to
switch off the light.
So, to get to the desired
brightness after turning on the
lamp, cycle through by pulling
down the Pull Switch several
times.
13

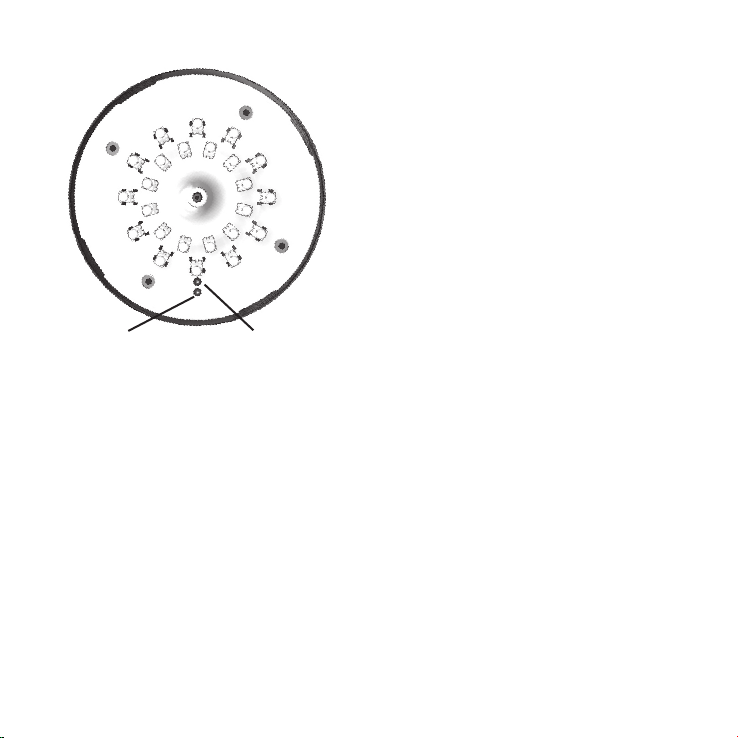
When the Ulitium is storing
any unused electrical energy,
the green indicator light inside
the grated plastic lens will
start to blink.
Once it is full and can store
no more electricity, the red
indicator light will light up.
14
green
indicator
red
indicator
If the Ulitium has no more
electricity in its storage, it will
not be able to provide lighting.
Try using it at lower brightness
settings, or allow it to store
electricity back to full the next
day, before using it again.
Avoid wasting energy. Dim or
turn off the lights when not
needed. During the day when
it is already bright, avoid using
the Ulitium, and just let it
store the energy harvested.

Troubleshooting
If for some reason, you
tried switching on a Ulitium
and it does not want to
light up, please follow these
troubleshooting steps:
1. Push the Master Switch, and
then try switching on again.
2. If during daylight the green
indicator is blinking, give
the lamp some time to store
enough energy before using
the lamp again in the evening.
3. Try unplugging the Bayonet
Plug on the Ulitium and
plugging it back in, before
attempting to switch on the
lamp again. This will reset the
Ulitium’s protection circuits.
4. Check the cabling from
the LEC all the way to this
Ulitium, and verify all plugs
are connected, to make sure
the Ulitium has been getting
energy from the LEC during
the day. If a cable is broken
or damaged at some point,
replace.
15

Joule
Energy Accounting
All Sundaya products are rated
in Joules for energy harvest,
storage and consumption, and
Lumens for light output of
lamps.
Joule is the unit to quantify
energy (all forms of energy
can be quantied in Joule).
The higher the Joule number,
the higher the energy amount.
Lumen
16
Lumen is the unit to quantify
total amount of light emitted
by a lamp. The higher the
Lumen number, the more light
it emits.
For more information about
energy education, please visit
www.kajul.org.

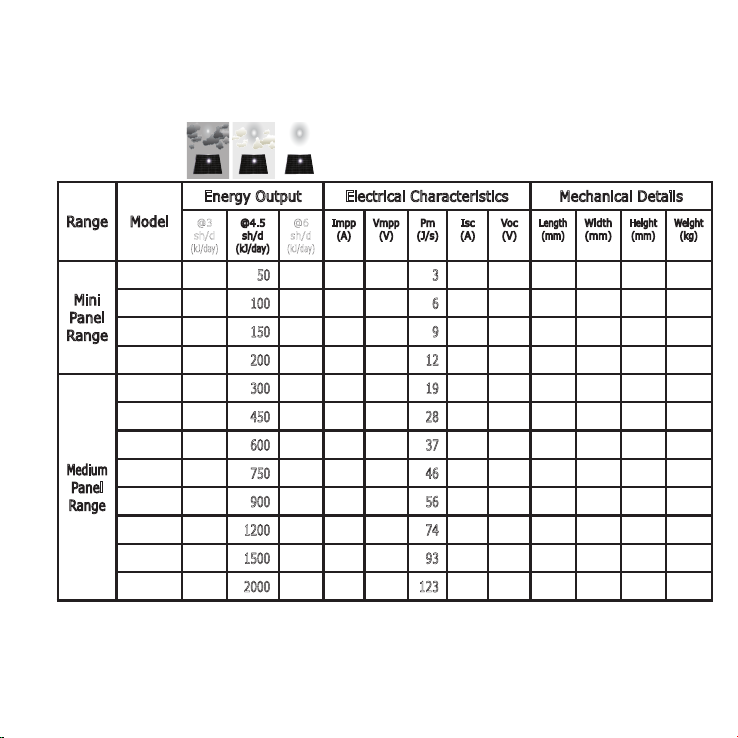
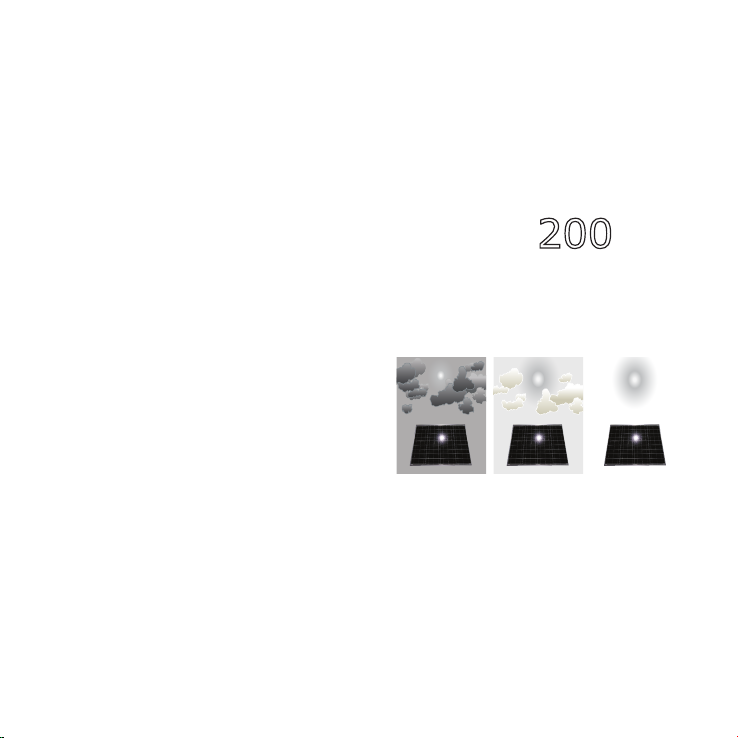
Energy Harvest
The Sundaya solar panel
range is named LEC (light to
Electricity converter) followed
by a number that indicates the
amount of electrical energy (in
kiloJoules) that it can harvest
at 4.5 sun-hours per day (4.5
sunhours is the average in
tropical regions).
During bad weather or cloudy
days the sunhours can go as
low as 3 sunhours per day, and
in very bright days as high as
6 sunhours per day.
LEC200
The next table gives the range
of daily energy harvested from
the available LEC range.
3 sh/d 4.5 sh/d 6 sh/d
17
Range Model
LEC50 33 50 67 0.19 16.5 3 0.20 19.5 168 278 9
Mini
LEC100 67 100 133 0.37 16.5 6 0.40 19.5 278 278 9
Panel
LEC150 100 150 200 0.56 16.5 9 0.61 19.5 388 278 9
Range
LEC200 133 200 267 0.75 16.5 12 0.81 19.5 498 278 9
LEC300 200 300 400 1.12 16.5 19 1.21 19.5 330 735 37.5 3.4
LEC450 300
LEC600 400
Medium
LEC750 500
Panel
LEC900 600
Range
LEC1200 800
LEC1500 1000
LEC2000 1333
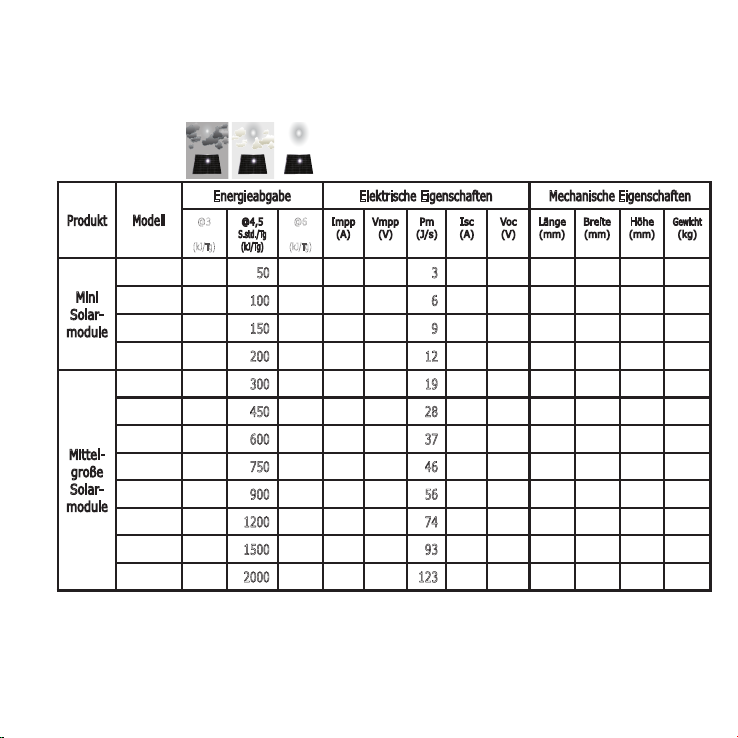
18
Energy Output Electrical Characteristics Mechanical Details
@3
@4.5
@6
Impp
Vmpp
Pm
Isc
Voc
Length
Width
sh/d
(kJ/day)
sh/d
(kJ/day)
sh/d
(kJ/day)
(A)
(V)
(J/s)
(A)
(V)
(mm)
(mm)
Height
(mm)
450 600 1.68 16.5 28 1.82 19.5 450 735 37.5 4.4
600 800 2.24 16.5 37 2.42 19.5 570 735 37.5 5.4
750 1000 2.81 16.5 46 3.03 19.5 690 735 37.5 6.4
900 1200 3.37 16.5 56 3.64 19.5 810 735 37.5 7.4
1200 1600 4.49 16.5 74 4.85 19.5 1010 735 37.5 9.1
1500 2000 5.61 16.5 93 6.06 19.5 1210 735 37.5 10.7
2000 2667 7.48 16.5 123 8.08 19.5 1430 735 37.5 12.6
Weight
(kg)
0.9
1.2
1.5
1.9
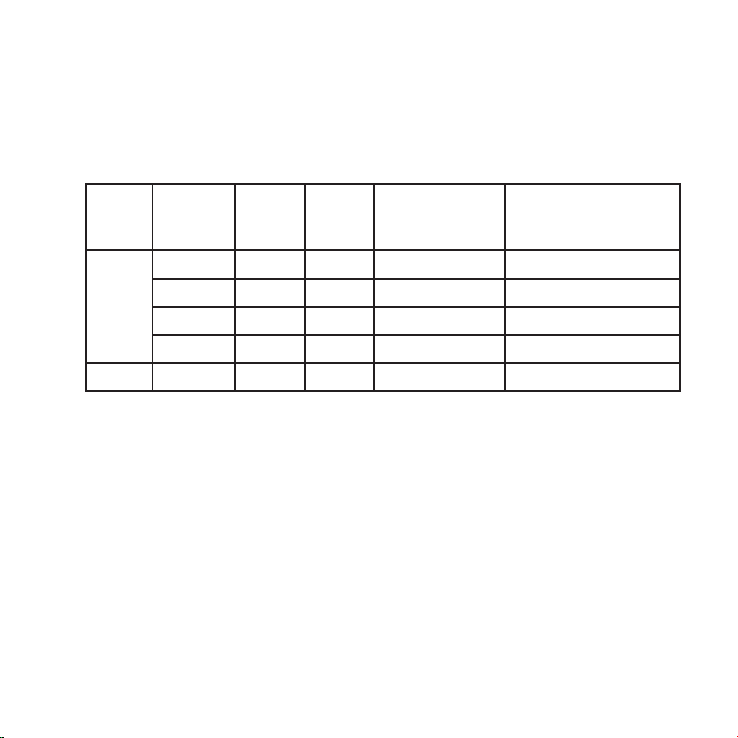
Energy
Consumption
Ulitium200 Light Output, Energy Consumption and Operating Hours.
Master
Switch
Position
ON 1 100 200 10 kJ per hour 6 hours
OFF - - - 5 kJ per month 12 months **
Switch
Position
2 50 100 5 kJ per hour 12 hours
3 10 20 1 kJ per hour 60 hours
4 (OFF) - - 2 kJ per day 30 days *
Light
Output
(%)
Light
Amount
(Lumen)
Energy
Consumption
(kJ = kilo-Joule)
Maximum Operating Hours
without rell (based on
60kJ internal storage)
* The electronic charge protection circuit inside the lamp also consumes
energy (although a very small amount) when the lamp is off. Therefore it is
recommended to switch off the Master Switch when your Ulitium is not going to
be used for a long time.
** The Energy Storage have a self discharge of +/- 6-7% per month. Therefore
it is recommended to let the lamp rell back to full at least every 6 months, even
when the Master Switch is in the OFF position.
19
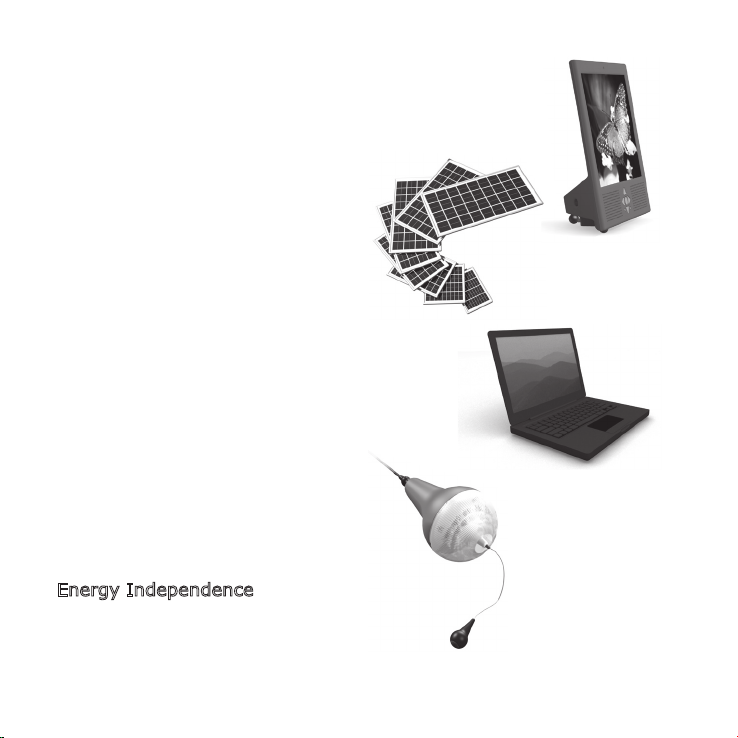
What next?
This product range is just the
beginning of an exciting series
of innovative products.
You can expand this basic
installation with:
- other Lightkits,
- an STV with more lights,
- a laptop computer,
- more LECs,
- an AC to DC Converter to use
along with grid electricity,
- more Ulitium,
- other accessories,
- or anything that will become
available in this product range.
The possibilities are unlimited.
Thank you and enjoy your
Energy Independence!
20

Inhalt
Übersicht
22
Wie funktioniert das Ganze?
24
Installationsplanung
26
LEC Installation
28
Anschluss des Verteilers Hub4
29
Installation von Ulitium
30
Betrieb von Ulitium
32
Störungsbehebung
35
Energiekalkulation
36
Energieertrag
37
Energieverbrauch
39
Was kommt als nächstes?
40
Deutsch
21

Übersicht
Das Sundaya Lightkit System
besteht aus sehr einfach
konzipierten Einzelteilen,
die miteinander verbunden
werden können und so eine
ausbaufähige, energieefziente
Beleuchtungsanlage ergeben.
LEC (Licht-Strom Konverter/
Wandler)
Bajonettstecker
22

Ulitium
Deckenkappe
Hub4
Kabel mit Bajonettsteckern
23

Wie funktioniert das
Ganze?
Die Grundform des Sundaya
Lightkit ist einfach konzipiert
Während des Tages wird
mit Hilfe des LEC (Licht/
Stromwandlers) Energie aus
Sonnenlicht gewonnen und in
Strom umgewandelt. Dieser
elektrische Strom wiederum
wird anschließend durch die
Kabel und Hub4 in Ihre Anlage
zu den Ulitium Leuchten
geleitet.
LEC
Energieertrag
24

Ist die Leuchte Ulitium nicht
in Gebrauch, speichert sie die
elektrische Energie und wandelt
sie anschließend, sobald sie
eingeschaltet wird, wieder in
Licht um. Deshalb wird sie
als ELC (Strom/Lichtwandler)
bezeichnet.
Sie können eine beliebige
Anzahl von LECs und ELCs in
Ihre Anlage integrieren solange
ein ausgewogenes Verhältnis
zwischen gewonnener und
täglich verbrauchter Energie
gewährleistet ist.
Energiespeicher Energieverbrauch
Bei allen Sundaya Lightkits
besteht ein ausgewogenes
Verhältnis zwischen der
Ertragskapazität des
LEC und der Anzahl der
im Lightkit enthaltenen
Energieverbraucher. Sollten Sie
weitere Energieverbraucher
(Leuchten, TV, Laptop
Computer, etc.) anschließen
wollen, installieren Sie bitte
zusätzliche LECs um dieses
Energiegleichgewicht weiter zu
gewährleisten.
ELC
25

Installationsplanung
Bevor Sie mit der Installation
des Systems beginnen, wählen
Sie die für das Aufhängen der
Beleuchtungsanlage bestimmte
Stelle im Raum und die
Installationspunkte der LECs
auf, oder neben dem Dach.
Ulitium
26
Der LEC muss nach Äquator
ausgerichtet sein, achten
Sie deshalb auf die Wahl der
geeigneten Dachseite.
LEC
Hub4
Ulitium
Äquator

LEC
überschattet
Der LEC darf während des
Tages nicht von Bäumen,
oder Gebäuden überschattet
werden.
Wählen Sie die am besten
geeignete Stelle und die
Höhe für die Installation
Ihrer Ulitium, um die im
entsprechenden Raum
gewünschte Lichtverteilung zu
erreichen. Die Lichtverteilung
bei Ulitium können Sie im
Bedarfsfalle vorab dem Kapitel
über die Inbetriebnahme
entnehmen.
Stellen Sie sicher, dass die
Gesamtstrecke von LEC zu Hub4
und den Energieverbrauchern
die Länge der Kabel nicht
überschreitet. Hub4 sollte auf
dem Dach in etwa gleicher
Entfernung zu allen anderen
Geräten installiert werden.
27

LEC Installation
Der LEC ist für die Installation
auf einem feststehenden Mast
konzipiert. Ideal sind Aluminium-,
oder galvanisierte Rohre mit 26mm
Durchmesser, evtl. auch dicke PVC
Rohre. Der Mast sollte auf dem
Hausdach an den Dachstuhl geklemmt
oder gebunden werden. Sollten Sie ihn
dort nicht anbringen können, besteht
die Möglichkeit, den Masten an der
nach Äquator gerichteten Außenwand
zu befestigen, vorausgesetzt, der LEC
liegt dort nicht im Schatten.
Neigungswinkel
28
Sonne
Äquator
Es ist sehr wichtig, den LEC nach
Äquator ausgerichtet zu installieren.
Falls notwendig, justieren Sie den
Neigungswinkel des LEC so, dass um
12 Uhr mittags die Sonnenstrahlen
möglichst direkt auf die LEC
Oberäche fallen und somit ein
optimaler Sonnenlichtenergieertrag
gewährleistet ist.

Anschluss des Hub4
Befestigen Sie den Hub4 an
einer geeigneten Stelle zwischen
den für die Installation der
Ulitium Leuchten vorgesehenen
Punkten.
Schließen Sie den
Bajonettstecker des LEC
Kabels an eine der vier
Buchsen des Hub4 an. Drehen
Sie den Bajonettstecker im
Uhrzeigersinn bis er einrastet.
(Bei 4 Lightkits verbinden
Sie die Hub4 mit Hilfe des
Bajonettsteckerzusatzkabels).
OPTIONAL: Bei größeren
Strecken können Sie auch
jeweils zwei Hub4 mit
einem beliebigen Sundaya
Gleichstromkabel verbinden
und an die unter jedem Hub4
bendlichen Pole anschließen.
29

Loch in
der Decke
mit 2 cm
Durchmesser
Decke
Installation von
Ulitium
Ulitium ist für das Aufhängen
an der Zimmerdecke konzipiert.
Bohren Sie exakt an der für
die Installation von Ulitium
vorgesehenen Stelle ein Loch
mit 2 cm Durchmesser, gerade
groß genug für die Aufnahme
eines Bajonettsteckers.
Schließen Sie das mitgelieferte
Bajonettsteckerkabel an die
Anschlussbuchse am oberen
Ende von Ulitium an.
30
Führen Sie den zweiten
Bajonettstecker und das übrige
Kabel durch das bereits gebohrte
Loch in der Decke.
Schieben Sie das Kabel durch den
seitlich angebrachten Schlitz in die
Deckenkappe.
Bringen Sie die Ulitium auf die
gewünschte Höhe. Befestigen Sie
nun die Deckenkappe über dem
Loch mit Schrauben an der Decke.
Schließen Sie den Bajonettstecker,
den Sie vorher durch die Decke
geführt haben, an eine beliebige
freie Anschlussbuchse des Hub4 an.
Wiederholen Sie die oben
genannten Arbeitsschritte bei
allen im Kit vorhandenen Leuchten
entsprechend*.
*) für Lightkits 2,3 und 4.
31

Hauptschalter
Zugschalter
Betrieb der Ulitium
Bei Auslieferung der Ulitium ist
der elektronische Schaltkreis
noch nicht aktiviert.
Betätigen Sie den
Hauptschalter am unteren
Ende der Ulitium und
aktivieren Sie das Gerät.
(Sollten Sie die Lampe längere
Zeit lagern, aufbewahren, oder
transportieren, vergessen Sie
bitte nicht, den Schaltkreis
durch erneutes Betätigen
des Hauptschalters zu
deaktivieren).
Kabel
Spule
32
Zur Anpassung der Kabellänge
kann die Spule aus dem
Zugschalter entnommen und
das Kabel durch auf- bzw.
abwickeln verkürzt, oder
verlängert werden.

Zum Einsschalten des Lichtes
betätigen Sie den Zugschalter
einmal.
Die Helligkeit der Lampe wird
in fortlaufenden Schritten
eingestellt, im ersten Schritt
werden 100% Helligkeit
erreicht.
Durch nochmaliges Betätigen
des Zugschalters dimmen Sie
das Licht auf 50 % Helligkeit.
Der dritte Zug am Schalter
dimmt das Licht auf 10%
Helligkeit.
Zum Ausschalten der Leucht
betätigen Sie den Zugschalter
ein viertes Mal.
Nachdem Sie die Leuchte
eingeschaltet haben, können
Sie die Helligkeit also
stufenweise durch wiederholtes
Betätigen des Zugschalters wie
gewünscht einstellen.
33

grüne
Anzeigenleuchte
rote
Anzeigenleuchte
Speichert Ulitium ungenutzte
elektrische Energie, so beginnt die
grüne Anzeigeleuchte zu blinken.
Ist der Speicher voll und kann
keine weitere Energie aufnehmen,
leuchtet die rote Anzeige auf.
Verfügt der Ulitium Speicher
über keine Energie mehr, ist die
Leuchtleistung ebenfalls erschöpft.
Versuchen Sie dann, die Leuchte
mit verminderter Helligkeit zu
betreiben, oder warten Sie vor
erneuter Inbetriebnahme bis sich
der Speicher bis zum nächsten
Tag wieder vollständig aufgeladen
hat.
Vermeiden Sie
Energieverschwendung. Dimmen
Sie die Helligkeit, oder schalten
Sie die Leuchte aus, wenn Sie
nicht benötigt wird. Vermeiden Sie
bei Tageslicht den Gebrauch der
Ulitium und warten Sie, bis der
Energieertrag gespeichert ist.
34

Störungsbehebung
Sollte Ihre Ulitium aus
irgendwelchen Gründen
beim Einschalten nicht
funktionieren, bitte beachten
Sie folgende Schritte zur
Fehlerbehebung:
1. Betätigen Sie den
Hauptschalter und versuchen
Sie dann, die Leuchte
nochmals einzuschalten.
2. Blinkt die grüne
Leuchtanzeige während des
Tageslichts, lassen Sie vor
erneuter Inbetriebnahme
der Leuchte am Abend
etwas Zeit verstreichen
um zu gewährleisten,
dass ausreichend Energie
gespeichert werden kann.
3. Stecken Sie den
Bajonettstecker an Ulitium aus
und wieder ein, bevor Sie die
Leuchte wieder einschalten.
Auf diese Weise werden die
Schutzschaltkreise von Ulitium
zurückgesetzt.
4. Überprüfen Sie die
gesamte Kabelführung vom
LEC zur Leuchte und stellen
Sie sicher, dass alle Stecker
angeschlossen sind, damit eine
Energieversorgung der Leuchte
durch den LEC während
des Tages gewährleistet ist.
Wechseln Sie im Bedarfsfalle
beschädigte Kabel aus.
35

Energiekalkulation
Sämtliche Sundaya Produkte
werden im Bezug auf
Energieertrag, Speicher und
Verbrauch in Joule kalkuliert, die
Leuchtleistung der Lampen wird
in Lumen gemessen.
Joule
Joule bezeichnet die Einheit zur
Bestimmung der Energie (alle
Energieformen können in Joule
gemessen werden). Je höher der
Joulewert, desto höher auch die
Energiemenge.
Lumen
Lumen bezeichnet die Einheit zur
Bestimmung der Gesamtmenge
des von einer Lampe
abgegebenen Lichts. Je höher der
Lumenwert, desto größer auch die
abgestrahlte Lichtmenge.
Weitere Informationen entnehmen
Sie bitte www.kajul.org.
36
Energieertrag
Das Sundaya Solarmodulprogramm
wird als LEC (Licht/Stromwandler)
bezeichnet, der Bezeichnung folgt
eine Zahl. Diese Zahl gibt die Menge
der elektrischen Energie (in kiloJoule)
an, die während eines Tages mit
4,5 Sonnenstunden erwirtschaftet
werden kann (4,5 Sonnenstunden
sind der Durchschnittswert in
tropischen Regionen).
Bei schlechtem Wetter, oder
Bewölkung, kann dieser Wert
auf bis zu einem Minimum von 3
Sonnenstunden am Tag sinken, bei
sehr günstigen Wetterbedingungen
steigt die Anzahl auf bis zu 6
Sonnenstunden täglich.
Die folgende Tabelle zeigt
das Spektrum des täglichen
Energieertrages der LEC
Produktpalette.
LEC200
3
Sonnenstd./
Tg.
Sonnenstd./
4,5
Tg.
6
Sonnenstd./
Tg
37
Produkt Modell
LEC50 33 50 67 0,19 16,5 3 0,20 19,5
Mini
LEC100 67 100 133 0,37 16,5 6 0,40 19,5
Solar-
LEC150 100 150 200 0,56 16,5 9 0,61 19,5
module
LEC200 133 200 267 0,75 16,5 12 0,81 19,5
LEC300 200 300 400 1,12 16,5 19 1,21 19,5 330 735 37,5 3,4
LEC450 300
LEC600 400
Mittel-
LEC750 500
große
Solar-
LEC900 600
module
LEC1200 800
LEC1500 1000
LEC2000 1333
38
Energieabgabe Elektrische Eigenschaften Mechanische Eigenschaften
@3
@4,5
@6
Impp
Vmpp
Pm
Isc
Voc
Länge
Breite
Höhe
S.std./Tg
(kJ/Tg)
S.std./Tg
(kJ/Tg)
S.std./Tg
(kJ/Tg)
(A)
(V)
(J/s)
(A)
(V)
(mm)
(mm)
(mm)
Gewicht
(kg)
168 278 9
278 278 9
388 278 9
498 278 9
450 600 1,68 16,5 28 1,82 19,5 450 735 37,5 4,4
600 800 2,24 16,5 37 2,42 19,5 570 735 37,5 5,4
750 1000 2,81 16,5 46 3,03 19,5 690 735 37,5 6,4
900 1200 3,37 16,5 56 3,64 19,5 810 735 37,5 7,4
1200 1600 4,49 16,5 74 4,85 19,5 1010 735 37,5 9,1
1500 2000 5,61 16,5 93 6,06 19,5 1210 735 37,5 10,7
2000 2667 7,48 16,5 123 8,08 19,5 1430 735 37,5 12,6
0,9
1,2
1,5
1,9

Energieverbrauch
Lichtabgabe, Energieverbrauch und Betriebsstunden bei Ulitium.
Stellung
Haupt-
schalter
AUS - - - 5 kJ pro Monat 12 Monaten **
Schalter-
position
AN 1 100 200 10 kJ pro Stunde 6 Stunden
2 50 100 5 kJ pro Stunde 12 Stunden
3 10 20 1 kJ pro Stunde 60 Stunden
4 (AUS) - - 2 kJ pro Tag 30 Tagen *
Licht-
abgabe
(%)
Licht-
menge
(Lumen)
Energie-
verbrauch
(kJ = kilo-Joule)
Maximale Betriebsstunden
ohne Wiederauadung
(basierend auf 60kJ interner Speicher)
* Der elektronische Ladungsschutzschaltkreis in der Leuchte verbraucht auch
Energie wenn die Leuchte ausgeschaltet ist. (Die verbrauchte Energiemenge ist
allerdings gering). Es ist daher empfehlenswert, den Hauptschalter auszuschalten,
wenn Sie Ihre Ulitium für längere Zeit nicht benutzen.
** Der Energiespeicher beinhaltet +/- 6-7% Selbstentladung pro Monat. Es wird
daher empfohlen, die Leuchte mindestens alle 6 Monate vollständig aufzuladen,
auch wenn sich der Hauptschalter in Position AUS bendet.
39

Was kommt als
nächstes?
Das auiegende Programm ist lediglich
der Anfang einer spannenden Serie
innovativer Produkte.
Sie können die Grundform Ihrer
Installation durch folgende Komponenten
erweitern:
- Zusätzliche Lightkits
- STV mit mehreren Leuchten
- Laptop Computer
- weitere LECs
- Wechsel-/Gleichstromkonverter zur
gleichzeitigen Nutzung der Netzenergie
- weitere Ulitium
- weiteres Zubehör
- sämtliche Produkte, die innerhalb dieses
Produktprogramms erhältlich sein werden.
Die Möglichkeiten sind unbegrenzt.
Vielen Dank und genießen Sie Ihre
Unabhängigkeit in Sachen Energie!
40

Table des matières
42
Vue d’ensemble
44
Comment ça marche ?
46
Planication de l’installation
48
Installation du LEC
49
Connexion de l’Hub4
50
Installation de l’Ulitium
52
Opération de l’Ulitium
55
Dépannage
56
Bilan énergétique
57
Production énergétique
59
Consommation énergétique
60
Et après ?
Français
41

Vue d’ensemble
Le système Sundaya Lightkit
consiste en pièces modulaires
très simples lesquelles vous
pouvez joindre pour obtenir un
système d’éclairage extensible
et éfcace en consommation
d’énergie.
LEC
(Light to Electricity Converter
ou convertisseur lumièreélectricité)
Fiche baϊonnette
42

Ulitium
Couvercle
du Plafond
Hub4
Câble avec ches baϊonnettes
43

Comment ça
marche ?
Le concept du système de base
Sundaya Lightkit est simple.
Pendant la journée, l’énergie de
la lumière solaire est récoltée par
le LEC (convertisseur lumièreélectricité) pour être convertie en
électricité. Après, cette énergie
électrique passe par les câbles et
le Hub4 dans votre installation
jusqu’aux luminaires Ulitium.
LEC
Récolte Energétique
44

Quand l’Ulitium n’est pas
allumée, elle va stocker
cette énergie électrique et la
reconvertirera en lumière dès
qu´elle est allumée. Elle est
considérée comme un ELC
(convertisseur électricitélumière).
La capacité de récolte du LEC
dans chaque Sundaya Lightkit
a été choisie pour garder une
bonne balance avec le nombre de
consommateurs d’énergie inclus
dans le kit. Si vous voulez ajouter
plus de consommateurs d’énergie
(lampes, TV, ordinateur portable,
etc.) veuillez aussi considérer
Vous pouvez avoir autant de LECs
et ELCs dans votre installation
que vous voulez, pourvu qu’il
d’installer des LECs additionnels
pour maintenir cette balance
énergétique.
y ait une bonne balance entre
l’énergie récoltée et l’énergie
consommée chaque jour.
Stockage d’Energie Consommation d’Energie
ELC
45

Planication de
l’installation
Avant d’installer le système,
veuillez considérer l’endroit
où vous voulez suspendre
l’éclairage, aussi la position du
LEC sur le toit ou auprés du
toit.
Ulitium
46
Le LEC doit être orienté en
direction de l’équateur, vous
devez alors sélectionner le
côté correct sur le toit.
LEC
Hub4
Ulitium
Equateur
LEC ombragé
Pendant toute la journée, le
LEC doit ne pas être sous
l’ombre des bâtiments ou des
arbres.
Choissisez le meilleur endroit
et la meilleure hauteur pour
votre Ulitium an d’obtenir la
distribution lumineuse désirée
dans la salle. Consultez le
chapitre sur la description
comment allumer l’Ulitium,
si vous voulez découvrir
prealablement sa distribution
de la lumière.
Veuillez assurer que la
distance totale entre le LEC et
le Hub4 jusqu’aux récepteurs
d’énergie ne dépasse pas
la longueur des câbles. Le
Hub4 doit être positionné au-
dessus du plafond, à la même
distance des autres appareils.
47

Angle
d’inclinaison
48
Le soleil
Equateur
Installation du LEC
Le LEC est conçu pour être
monté sur un pôle rigide. Un
tube galvanisé ou d’aluminium
26 mm de diamètre est idéal,
mais un fort tube de PVC
(chlorure de polyvinyle) est
acceptable. Il devrait être
installé sur le toit, serré ou
xé à la charpente du toit.
Autrement, on peut aussi le
clouer au mur extérieur de
la maison qui est orienté en
direction de l’équateur, mais le
LEC ne doit pas être ombragé.
Il est très important que le LEC
soit orienté vers l’équateur.
Si besoin est, ajustez aussi
son angle d’inclinaison pour
que les rayons du soleil à midi
tombent perpendiculairement
sur la surface du LEC, an
d’obtenir une récolte optimale
de l’énergie solaire.

Connexion de
l’Hub4
Au-dessus du plafond,
positionnez le Hub4 quelque
part entre les futures positions
des lampes Ulitium.
Inserez la che baϊonnette du
câble venant du LEC dans une
des quatre portes de l’Hub4,
puis tournez dans le sens des
aiguilles d’une montre pour
verrouiller en place.
(Pour 4 Light kits, reliez
un Hub4 avec un autre en
utilisant un câble avec des
ches baϊonnette).
OPTIONNEL : Pour des
distances plus longues, vous
pouvez aussi relier deux Hub4
avec un câble optionnel de
Sundaya à courant continu,
à visser aux terminaux audessous de chaque Hub4.
49

Trou au
plafond de
2 cm de
diamètre
Plafond
Installation de
l’Ulitium
L’Ulitium est conçue pour être
suspendue du plafond.
À l’endroit precis où vous
voulez pendre l’Ulitium, percez
un trou de 2cm de diamètre,
assez grand pour passer une
che baϊonnette.
Inserez et verrouillez la che
baϊonnette du câble prévu,
dans la porte au-dessus de
l’Ulitium.
50

Passez l’autre che baϊonnette
et le reste du câble à travers
le trou qui a été percé au
plafond.
Glissez le câble dans le
Couvercle du Plafond par la
fente sur son côté.
Maintenez l’Ulitium à la
hauteur désirée. Ensuite,
xez le Couvercle du Plafond
au plafond avec des vis, ainsi
couvrant le trou au plafond.
Branchez la che baϊonnette
qui a été passé à travers
le plafond, dans une porte
disponible sur l’Hub4.
Répétez ces démarches pour
le restant des lampes dans le
kit*.
*) pour Lightkits 2,3 et 4.
51
Interrupteur
Général
Interrupteur à
Tirette
Opération de
l’Ulitium
À la sortie de l’usine, le circuit
électronique de l’Ulitium n’est
pas encore activé.
Appuyez une fois sur
l’Interrupteur Général audessous de l’Ulitium pour
activer l’unité.
(Quand vous rangez la lampe
pendant une certaine période
ou pendant le transport,
n’oubliez pas de mettre le
circuit inactif en appuyant sur
l’Interrupteur Général encore
une fois).
Cordon
Bobine
52
La longueur du cordon peut
être ajustée en retirant la
bobine qui se trouve dans
l’Interrupteur à Tirette.
Embobinez ou désembobinez
le cordon de la bobine pour
ajuster sa longueur.
Pour allumer la lumière, tirez
l’Interrupteur à Tirette une
fois.
La brillance de la lampe est
dénie progressivement en
étapes, la première étant à
100%.
Atténuez la lumière à 50 %
en tirant l’interrupteur une
deuxième fois.
Tirez l’Interrupteur à Tirette
encore une fois pour atténuer
la lumière à 10 %.
Tirez-le une derniere fois pour
éteindre la lumière.
Ainsi pour obtenir la brillance
souhaitée, tirez l’interrupteur
à tirette autant de fois
nécessaires.
53
54
indicateur
vert
indicateur
rouge
Quand l’Ulitium stocke
l’énergie électrique non
utilisée, l’indicateur vert sur
le réecteur commencera à
clignoter.
Dès que l’Ulitium est rempli
et ne peut plus stocker
d’électricité, l’indicateur rouge
s’allumera.
Si l’Ulitium n’a plus d’électricité
en stock, il n’est plus capable
d’éclairer. Essayez de l’utiliser
à brillance réduite, ou attendez
jusqu’à ce qu’il ait chargé
l’électricité complètement le
lendemain avant de l’utiliser de
nouveau.
Ne gaspillez pas d’énergie.
Atténuez ou éteignez les
lumières quand elles ne sont
pas utilisées. Pendant la
journée, quand il fait déjà
jour, évitez d’utiliser l’Ulitium
et laissez l’appareil stocker
l’énergie récoltée.

Dépannage
Si l’Ulitium ne s’allume pas
bien que vous avez essayé
de la mettre en marche,
veuillez observer les mesures
suivantes :
1. Appuyez sur l’Interrupteur
Général et essayez après de
l’allumer de nouveau.
2. Si l’indicateur vert clignote
pendant la journée, donnez à
la lampe le temps de charger
assez d’énergie avant de
l’utiliser de nouveau le soir.
3. Essayez de débrancher la
che baϊonnette de l’Ulitium et
enchez-la de nouveau avant
de rallumer la lampe. Cette
mesure remettra le circuit de
protection de l’Ulitium à la
position initiale.
4. Contrôlez le câblage
complet du LEC jusqu’à
l´Ulitium, et vériez que
toutes les ches sont bien
branchées pour assurer que
l’Ulitium ait obtenu l’énergie
venant du LEC pendant la
journée. Si un câble est
détérioré ou endommagé
quelque part, remplacez-le.
55

Bilan énergétique
Tous les produits Sundaya
sont indiqués en «Joules»
pour la récolte, stockage et
consommation d’énergie, et
«Lumens» pour la lumière
sortant des lampes.
Joule
Joule est l’unité pour quantier
l’énergie (toutes formes
d’énergie peuvent être
quantiées en Joule). Plus la
valeur de Joule est grande, plus
le niveau d’énergie est élevé.
Lumen
Lumen est l’unité pour mésurer
la quantité de lumière générée
par une lampe. Plus la valeur
de Lumen est élevée, plus de
lumière est générée.
Pour plus de renseignements
sur la production énergétique,
visitez www.kajul.org
56

Récolte énergétique
Le nom du panneau solaire
Sundaya est LEC (Light to
Electricity Converter) et il est
suivi par une valeur indiquant
le volume d’énergie électrique
(en kiloJoules) que le panneau
peut récolter pendant 4-5
heures d’ensoleilment par jour
(en moyenne, il y a 4-5 heures
d’ensoleilment dans des
régions tropicales).
Quand il fait mauvais ou
nuageux, l’ensoleilment peut
descendre jusqu’à trois heures
par jour et pendant des jours
très clairs s’élève voire jusqu’à
six heures par jour.
Le tableau suivant montre
l’énergie récoltée par jour
selon le LEC disponible.
LEC200
3
heures de
soleil/jour
4,5
heures de
soleil/jour
6
heures de
soleil/jour
57

Gamme
Petite
Gamme
Moyenne
Gamme
58
Production énergétique
@3
@4,5
Modèle
hs/jr
(kJ/jour)
hs/jr
(kJ/jour)
@6
hs/jr
(kJ/jour)
LEC50 33 50 67 0,19 16,5 3 0,20 19,5
LEC100 67
LEC150 100
LEC200 133
100 133 0,37 16,5 6 0,40 19,5
150 200 0,56 16,5 9 0,61 19,5
200 267 0,75 16,5 12 0,81 19,5
Propriétés électriques Détails mécaniques
Impp
Vmpp
Pm
Isc
Voc
Longueur
(A)
(V)
(J/s)
(A)
(V)
(mm)
Largeur
(mm)
168 278 9
278 278 9
388 278 9
498 278 9
Hauteur
(mm)
Poids
(kg)
0,9
1,2
1,5
1,9
LEC300 200 300 400 1,12 16,5 19 1,21 19,5 330 735 37,5 3,4
LEC450 300
LEC600 400
LEC750 500
LEC900 600
LEC1200 800
LEC1500 1000
LEC2000 1333
450 600 1,68 16,5 28 1,82 19,5 450 735 37,5 4,4
600 800 2,24 16,5 37 2,42 19,5 570 735 37,5 5,4
750 1000 2,81 16,5 46 3,03 19,5 690 735 37,5 6,4
900 1200 3,37 16,5 56 3,64 19,5 810 735 37,5 7,4
1200 1600 4,49 16,5 74 4,85 19,5 1010 735 37,5 9,1
1500 2000 5,61 16,5 93 6,06 19,5 1210 735 37,5 10,7
2000 2667 7,48 16,5 123 8,08 19,5 1430 735 37,5 12,6

Consommation
énergétique
Production de lumière, consommation énergétique et heures de travail de
l’Ulitium200.
Position de
l’Interrupteur
Général
MARCHE 1 100 200 10 kJ par heure 6 heures
ARRÊT - - - 5 kJ par mois 12 mois **
Position
l’interrupteur
4 (ARRÊT) - - 2 kJ par jour 30 jours *
Production
de
de lumière
2 50 100 5 kJ par heure 12 heures
3 10 20 1 kJ par heure 60 heures
(%)
Quantité
Lumière
(Lumen)
Consommation
Énergétique
(kJ = kilo-Joule)
Maximum d’heures de
travail sans recharge (selon
60kJ stockage interne)
* Le circuit de protection de charge électronique dans la lampe est aussi un
consommateur d’énergie, même quand la lampe n’est pas allumée (bien que la
part soit très petite). Il est alors recommandé de mettre l’Interrupteur Général en
Arrêt quand vous n’utilisez pas Ulitium pendant longtemps.
** Le stockage d’énergie se décharge tout seul d’environ 6 à 7 % par mois. Nous
recommandons donc de recharger la lampe complètement au moins tous les six
mois, bien que l’Interrupteur Général soit en position Arrêt.
59

Et après?
Cette gamme de produits n’est que
le début d’une excitante suite de
produits innovatifs.
Vous pouvez élargir cette installation
de base avec :
- d’autres Lightkits,
- un Téléviseur LCD solaire avec
plus de lumières,
- un ordinateur portable,
- plusieurs LECs,
- un convertisseur de courant
alternatif à courant continu pour
l’utiliser avec l’électricité du réseau,
- encore plus d’Ulitium,
- d’autres accessoires,
- ou tous les produits qui seront
disponibles dans cette gamme
de produits. Les possibilités sont
illimitées.
Nous vous remercions et vous
souhaitons beaucoup de plaisir avec
votre
Indépendance Energétique !
60

Contenido
62
Resumen
64
¿Cómo funciona?
66
Planicación de la instalación
68
Instalación del LEC
69
Conexión de Hub4
70
Instalación de Ulitium
72
Operación de Ulitium
75
Localización y resolución de
problemas
76
Contabilidad de energía
77
Recolección de energía
79
Consumo de energía
80
¿Adónde vamos?
Español
61
Resumen
El sistema Sundaya Lightkit
System consiste en unidades
modulares simples que se
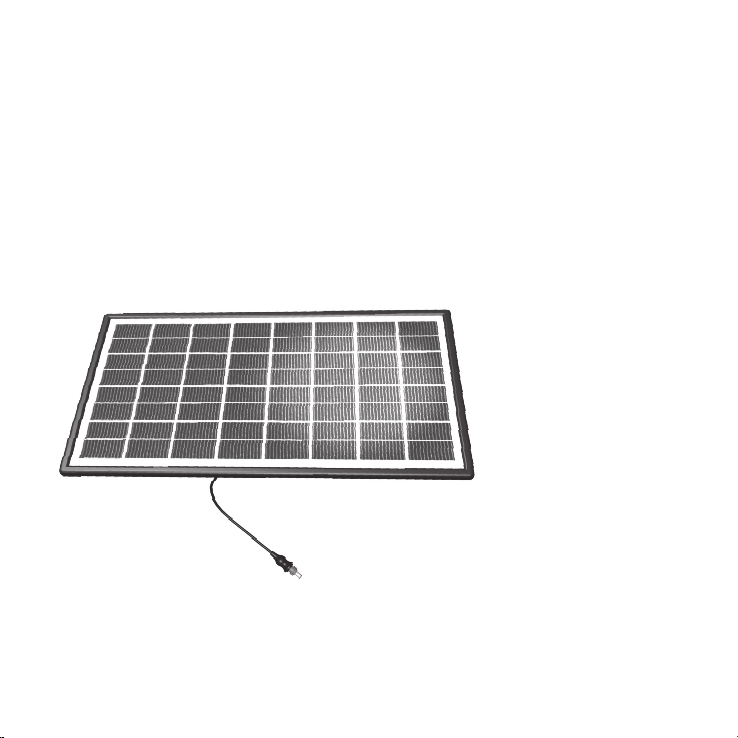
conectan para formar una
instalación de alumbrado
expandible y muy eciente.
LEC (convertidor de luz a
electricidad)
Enchufe de bayoneta
62

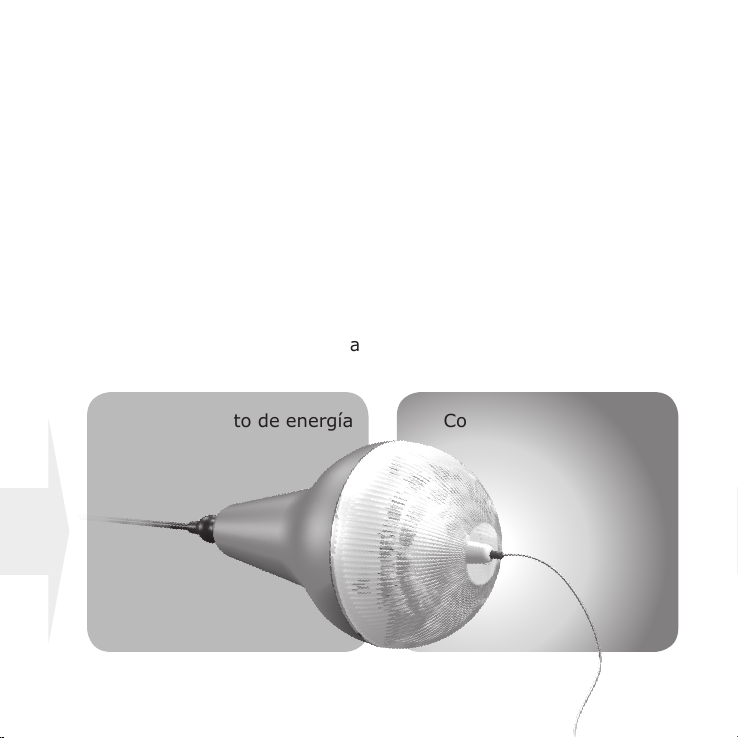
Ulitium
Tapa
(techo)
Hub4
Cable con enchufe de bayoneta
63

¿Cómo funciona?
La concepción del conjunto
de módulos básicos Sundaya
Lightkit es sencillo.
Durante el día, el LEC
(convertidor de luz a
electricidad) recolecciona la
energía de la luz solar y la
convierte en electricidad. Luego,
esta corriente eléctrica es
conducida por los cables y Hub4
a la instalación de alumbrado
con las lámparas de Ulitium.
LEC
Recolección de energía
64
Cuando la lámpara Ulitium no
está en uso, la energía eléctrica
esta almacenada y nuevamente
se convierte en luz al poner en
uso la lámpara. Por eso, está
denida como ELC (convertidor
de electricidad a luz).
La cantidad de energía
recolectada en el LEC es
suciente en todos los Sundaya
Lightkit para abastecer todos
los consumidores de energía
incluidos en el conjunto. En
caso que proyecte de conectar
otros consumidores de energía
Se puede incluir tantos LECs
y ELCs en su instalación como
quiera dado el caso que la
proporción entre la energía
diariamente recolectada y la
(lámparas, televisión, ordenador
port til, etc.), recomendamos la
instalación de LECs adicionales
para que se mantenga el
balance de energía.
energía consumida permanezca
equilibrada.
Almacenamiento de energía Consumo de energía
ELC
65

Planicación de la
instalación
Antes de empezar con la
instalación del sistema, elija
los puntos de montaje para la
lámpara en el cuarto, así como
los puntos dónde se monten
los LECs por encima o al lado
del techo.
Ulitium
66
El LEC debe estar orientado
hacia el ecuador, por ese
motivo, tiene que elegir la
parte adecuada del techo.
LEC
Hub4
Ulitium
Ecuador

LEC en la
sombra
El LEC no tiene que estar en la
sombra de árboles o edicios
durante el día.
Elija el lugar más adecuado
y la altura para la instalación
de su Ulitium para que se
realice la distribución de la
luz deseada en el cuarto.
Sobre la distribución de luz
de Ulitium véase el capítulo
correspondiente a las
instrucciones del uso.
Asegure que la distancia total del
LEC a Hub4 y los consumidores
de energía no excedan la
extensión de los cables. Tiene
que observar que la distancia
entre Hub4 sobre el techo y todos
los consumidores de energía sea
aproximadamente la misma.
67

Ángulo de
inclinación
68
El Sol
Ecuador
Instalación del LEC
El LEC se monta a un poste
jo. Son ideales los tubos de
aluminio o tubos galvanizados
con un diámetro de 26 mm,
también tubos fuertes de PVC
son aceptables. El poste se
ja sobre el techo junto a la
armadura. En caso de que no
se pueda jar allí, Usted tiene
la posibilidad de montarlo a
la pared exterior que está
alineado al ecuador, en tanto
que el LEC allí no quede en la
sombra.
Es muy importante que el LEC
se encuentre frente al ecuador.
Si es necesario, ajuste el
ángulo de inclinación del LEC
de tal manera que al mediodía
los rayos del sol incidan
directamente a la supercie del
LEC para producir el óptimo
rendimiento de la luz solar.

Conexión de Hub4
Fije Usted el Hub4 en un lugar
adecuado entre los puntos de
instalación para las lámparas
de Ulitium.
Conecte el enchufe de
bayoneta del cable LEC con
una de las cuatro hembras de
Hub4. Vuelva el enchufe de
bayonetas en el sentido de las
agujas del reloj hasta que se
encaje.
Con 4 Light kits, los Hub4 se
conectan con ayuda del cable
de bayoneta suplementario).
OPCIONAL: Con distancias
más largas, Usted puede
conectar dos Hub4 cada vez
con un cable de Sundaya DC y
conectarlos con los polos que
se encuentran de bajo de cada
uno de los Hub4.
69

Agujero en
el techo de
diám. de
20mm
Techo
Instalación de
Ulitium
El sistema Ulitium está
concebido para colgarlo del
techo.
Taladre un agujero con un
diámetro de 13/16 pulgadas
o 20 mm para la acogida
del enchufe de bayoneta
exactamente en la posición
dónde quiere instalar Ulitium,
apenas sucientemente
grande para que el enchufe de
bayoneta pueda pasar.
Conecte el cable del enchufe
de bayoneta a la hembra
situada en la parte superior de
Ulitium.
70

Meta el segundo enchufe de
bayoneta y el resto del cable
por el agujero ya taladrado en
el techo.
Introduzca el cable por la
ranura lateral adentro de la
tapa.
Ajuste Ulitium a la altura
deseada. Fije la tapa con
tornillos al techo sobre el
agujero.
Conecte el enchufe de
bayonetas antes introducido
por el techo con una hembra
disponible de Hub4.
Repita los pasos descritos con
todas las lámparas incluidas en
el Lightkit*.
*) para los Lightkits 2,3 y 4.
71

72
Interruptor
de cordon
Bobina
Interruptor
principal
Cordon
Operacion de
Ulitium
El circuito electrónico de
Ulitium todavía no está puesto
en acción a la entrega.
Active la instalación por el
interruptor principal en la
parte inferior de Ulitium.
(En caso que quiera conservar
o transportar la lámpara
durante algún tiempo, no
olvide desactivar el circuito
pulsando el interruptor
principal otra vez).
Para ajustar la longitud del
cable, se saca la bobina del
interruptor de cordón. La
longitud del cable se ajusta
por enrollado o desenrollarlo
respectivamente.

Para encender la luz, tire
Usted el interruptor de cordón
por una vez.
La luminosidad de la lámpara
está ajustada en pasos
sucesivos, con el primer paso
se logran 100 por cientos de
luminosidad.
Se atenua la luz a 50 por
cientos de luminosidad por
tirar el interruptor de cordón
otra vez.
Se atenua la luz a 10 por
cientos por tirar el interruptor
la tercera vez.
Para apagar la luz, tire el
interruptor otra vez.
Después de haber encendido
la luz, Usted puede ajustar la
luminosidad sucesivamente
como desee por tirar el
interruptor repetidamente.
73

74
Lámpara
avisadora
verde
Lámpara
avisadora
roja
Si Ulitium almacena energía
eléctrica no utilizada, la
lámpara avisadora verde sobre
el disco de plástico punzonado
empieza a parpadear.
Una vez el acumulador está
lleno y no puede almacenar
más energía, parpadea la
lámpara avisadora roja.
Si el acumulador no dispone
más de energía, Ulitium
no sera capaz de producir
más luminosidad. Entonces,
trate de utilizar la lámpara a
luminosidad más baja o espere
hasta que el acumulador este
completamente recargado al
día siguiente antes de utilizarla
otra vez.
Evite malgastar energía. Atenua
la luminosidad o apaga la luz si
no la necesita. Evite el uso de
Ulitium durante el día y espere
hasta que el rendimiento de
energía este almacenado.

Localizacion y resolucion
de problemas
Si por motivos algunos, su
Ulitium no funciona cuando
quiere encenderla, observe los
pasos siguientes para resolver el
problema:
1. Pulse el interruptor principal
y luego, pruebe encender la
lámpara otra vez.
2. Si la lámpara avisadora verde
parpadea durante la luz del día,
deje pasar algún tiempo antes
de encender Ulitium otra vez por
la tarde para que el acumulador
almacene suciente energía.
3. Desconecte el enchufe de
bayoneta de Ulitium y conéctelo
otra vez antes de encender
la lámpara otra vez. Así los
circuitos protectores de Ulitium
estarán repuestos.
4. Controle todos los cables
que llevan del LEC a la lámpara
y asegure que todos los
enchufes están conectados para
garantizar que Ulitium haya
recibido energía del LEC durante
el día. Si el cable esta dañado o
interrumpidocambie los cables.
75

Contabilidad de
energía
Todos los productos Sundaya
están calculados en joule para
determinar la recoleccion de
energía, almacenamiento y
consumo, la capacidad de
luminosidad se calcula en lumen.
Joule
Joule es la unidad para determinar
la energía (todas las formas de
energía se pueden determinar en
Joule). Cuanto más alto es el valor
de Joule, tanto más alta es la
cantidad de energía.
Lumen
Lumen es la unidad para
determinar la cantidad total de luz
emitida por una lámpara. Cuanto
más alto es el valor de Lumen,
tanto más alta es la cantidad de la
luz emitida.
Para más informaciones véase
www.kajul.org, por favor.
76

Recolección de
energía
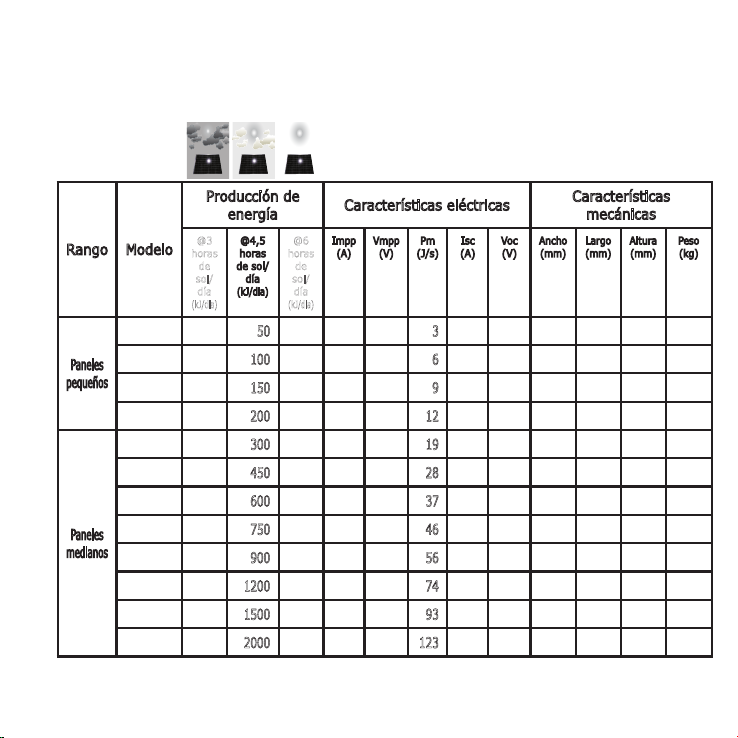
El surtido de paneles solares
Sundaya se llama LEC (convertidor
de luz a electricidad) seguido por
un número que indica la cantidad
de energía eléctrica (en kilojoule)
que la instalación puede producir
en 4,5 horas de sol por día (4,5
horas es el término medio en
regiones tropicales).
Cuando hace mal tiempo o el
cielo está cubierto, este valor
posiblemente se reduce hasta un
mínimo de 3 horas al día, cuando
hace mucho sol, puede llegar
hasta 6 horas de sol por día.
Cuando hace mal tiempo o el
cielo está cubierto, este valor
posiblemente se reduce hasta un
mínimo de 3 horas al día, cuando
hace mucho sol, puede llegar
hasta 6 horas de sol por día.
LEC200
3 horas
de sol/día
4,5 horas
de sol/día
6 horas
de sol/día
77
Rango Modelo
LEC50 33 50 67 0,19 16,5 3 0,20 19,5 168 278 9
LEC100 67 100 133 0,37 16,5 6 0,40 19,5 278 278 9
Paneles
pequeños
LEC150 100 150 200 0,56 16,5 9 0,61 19,5 388 278 9
LEC200 133 200 267 0,75 16,5 12 0,81 19,5 498 278 9
LEC300 200 300 400 1,12 16,5 19 1,21 19,5 330 735 37,5 3,4
LEC450 300
LEC600 400
LEC750 500
Paneles
medianos
LEC900 600
LEC1200 800
LEC1500 1000
LEC2000 1333
78
Producción de
energía
@3
@4,5
horas
horas
de
de sol/
sol/
día
día
(kJ/dia)
(kJ/dia)
Características eléctricas
@6
Impp
(A)
Vmpp
(V)
horas
de
sol/
día
(kJ/dia)
Pm
(J/s)
Isc
(A)
Voc
(V)
Características
mecánicas
Ancho
Largo
(mm)
(mm)
450 600 1,68 16,5 28 1,82 19,5 450 735 37,5 4,4
600 800 2,24 16,5 37 2,42 19,5 570 735 37,5 5,4
750 1000 2,81 16,5 46 3,03 19,5 690 735 37,5 6,4
900 1200 3,37 16,5 56 3,64 19,5 810 735 37,5 7,4
1200 1600 4,49 16,5 74 4,85 19,5 1010 735 37,5 9,1
1500 2000 5,61 16,5 93 6,06 19,5 1210 735 37,5 10,7
2000 2667 7,48 16,5 123 8,08 19,5 1430 735 37,5 12,6
Altura
(mm)
Peso
(kg)
0,9
1,2
1,5
1,9
Consumo de
energía
Emisión de luz, consumo de energía y horas de uso de Ulitium200.
Posición
interruptor
principal
CONECTADO
DESCONECTADO
Posición
interruptor
(DESCONECTADO)
Emisión
de la luz
1 100 200 10 kJ por hora 6 horas
2 50 100 5 kJ por hora 12 horas
3 10 20 1 kJ por hora 60 horas
4
- - - 5 kJ por mes 12 meses **
Cantidad
(%)
(Lumen)
- - 2 kJ por día 30 días *
de luz
Consumo de energía
(kJ = kilo-Joule)
Máximo de horas sin
recarga (basado en 60kJ de
almacenamiento interno)
* El circuito protector electrónico de carga en la lámpara también consume
energía cuando la lámpara está desconectada. (realmente una cantidad mínima).
Por eso se recomienda desconectar el interruptor principal si no utiliza la lámpara
por algún tiempo.
** El almacenamiento incluye una autodescarga de +/- 6-7% por mes. Por
eso se recomienda recargar la lámpara por lo menos cada 6 meses, aunque el
interruptor principal esté desconectado.
79

¿Adónde vamos?
Con este surtido sólo estamos a
principios de una línea interesante
de productos innovadores.
Ésta instalación básica se puede
extender por los componentes
siguientes:
- Lightkits adicionales
- STV con varias lámparas
- Ordenador portátil
- LECs adicionales
- Convertidor C.A. / C.C para el uso
simultáneo de la energía de la red
- Ulitium adicionales
- Accesorios adicionales
- Todos los productos que formarán
parte del surtido en el futuro
Las posibilidades son innitas.
¡Muchas gracias y que disfrute de
su
independencia energética!
80

International:
Sundaya International Pte Ltd
11 Tampines street 92
#03-05
Singapore 528872
Singapore
Tel : (+65) 6788-8345
Fax : (+65) 6788-8749
email: info@sundaya.com
Western Europe and Africa:
Phaesun GmbH
Luitpoldstrasse 3
87700 Memmingen
Germany
Tel : (+49) (8331) 990 42 - 0
Fax : (+49) (8331) 990 42 - 12
email: info@phaesun.com
web: www.phaesun.com
Nordic:
Sundaya Nordic AB
Flöjelbergsgatan 12
SE-43137 Mölndal
Sweden
Tel : (+46) (0)31 313 4240
Fax : (+46) (0)31 706 0680
email: info@sundaya.se
web: www.sundaya.se
East Africa:
Davis & Shirtliff Solar
P. O. Box 41762
Dundori Road, Nairobi
Kenya
Tel : (+254) (02) 558 335/6, 540 670
Fax : (+254) (02) 557 617, 540 899, 540 710
email: info@dayliff.com
Middle East:
Phaesun Middle East
Kuwait Freezone
15459 Kuwait
Kuwait
Contact Person: Mr. Amar Chikha
Email: amar.chikha@phaesun.com
Web Page: www.phaesun.com
Latin America:
Phaesun SA
Apartado 0843-02602
Panama City
Republic of Panama
Tel : (+507) 392 7143
Fax : (+507) 392 7142
emails: heine.aven@phaesun.com
contact person: Ing. Heine Aven
Australia/Pacic:
Rainbow Power Company Ltd
P O Box 240, 1 Alternative Way
Nimbin NSW 2480
Australia
Tel : [Australia] (02) 6689 1430
[International] (+61 2) 6689 1088
Fax : [Australia] (02) 6689 1109
[International] (+61 2) 6689 1109
emails: sales@rpc.com.au
web: www.rpc.com.au

www.sundaya.com
4
 Loading...