

Page 1

SmtFlash V2.0.0
1 August 2003
(SMT6001)
User Guide
This user guide describes the SmtFlash utility that is used to manage the Flash ROMs
on Sundance TIMs. SmtFlash uses Texas Instruments' Code Composer™ to allow
you to analyse the contents of a ROM and program new data. For added security,
SmtFlash will also allow you to erase the ROM completely.
1. Overview
The flash ROMs in Sundance TIMs are programmed in four independent logical
sections:
1. Directory
2. Bootloader
3. FPGA data
4. User data
1.1 Directory
The Directory logical section is used to hold information about the contents of the
ROM. It is managed automatically for you by SmtFlash.
1.2 Bootloader
The Bootloader logical section holds a standard Sundance program that is loaded and
starts to execute when the TIM is taken out of reset. It is responsible for the following
things:
• Initialising the appropriate memory interface settings (EMIF);
• Configuring the TIM's FPGA;
• Initialising any external peripherals or co-processors;
• Loading a user program. This can be:
o from a part of the ROM's User Area; or
o from the first comport that presents data.
• Jumping to the entry point of the loaded program.
Page 2

1.3 FPGA data
The FPGA data logical section holds information that the bootloader needs to
configure the TIM's FPGA.
1.4 User data
The User data logical section holds zero or more areas of user-specific data. There are
four types of data that can be programmed here:
1. Pure Data
The area contains binary data extracted from a file with no
interpretation..
2. S Record File
The area contains data extracted from a file in Motorola-S format. This
is described in section 9.9.3 if the Texas Instruments' publication
TMS320C6x Assembly Language Tools. User's Guide.
3. Executable Program
The area contains an executable program
4. Diamond Application
The area contains a Diamond application. This application may be for
one or more processors.
The number of areas that may be programmed is only limited by the arailable space in
the ROM.
2. Prerequisites
Before you can use SmtFlash you must configure Code Composer to match your
hardware. If Code Composer will not start successfully, SmtFlash will be unable to
function.
Note: Currently there appears to be a 30 second delay between Code Composer
terminating following an error condition and that fact being notified to SmtFlash. If
you stop SmtFlash during this period, a processor will be left running in the
background and you will need to use the Task Manager to stop it.
Page 3
3. Using SmtFlash
SmtFlash is started by clicking on SmtFlash.exe in the installation directory, usually
"C:\Program Files\Sundance\6001\SmtFlash". The installation procedure also puts a
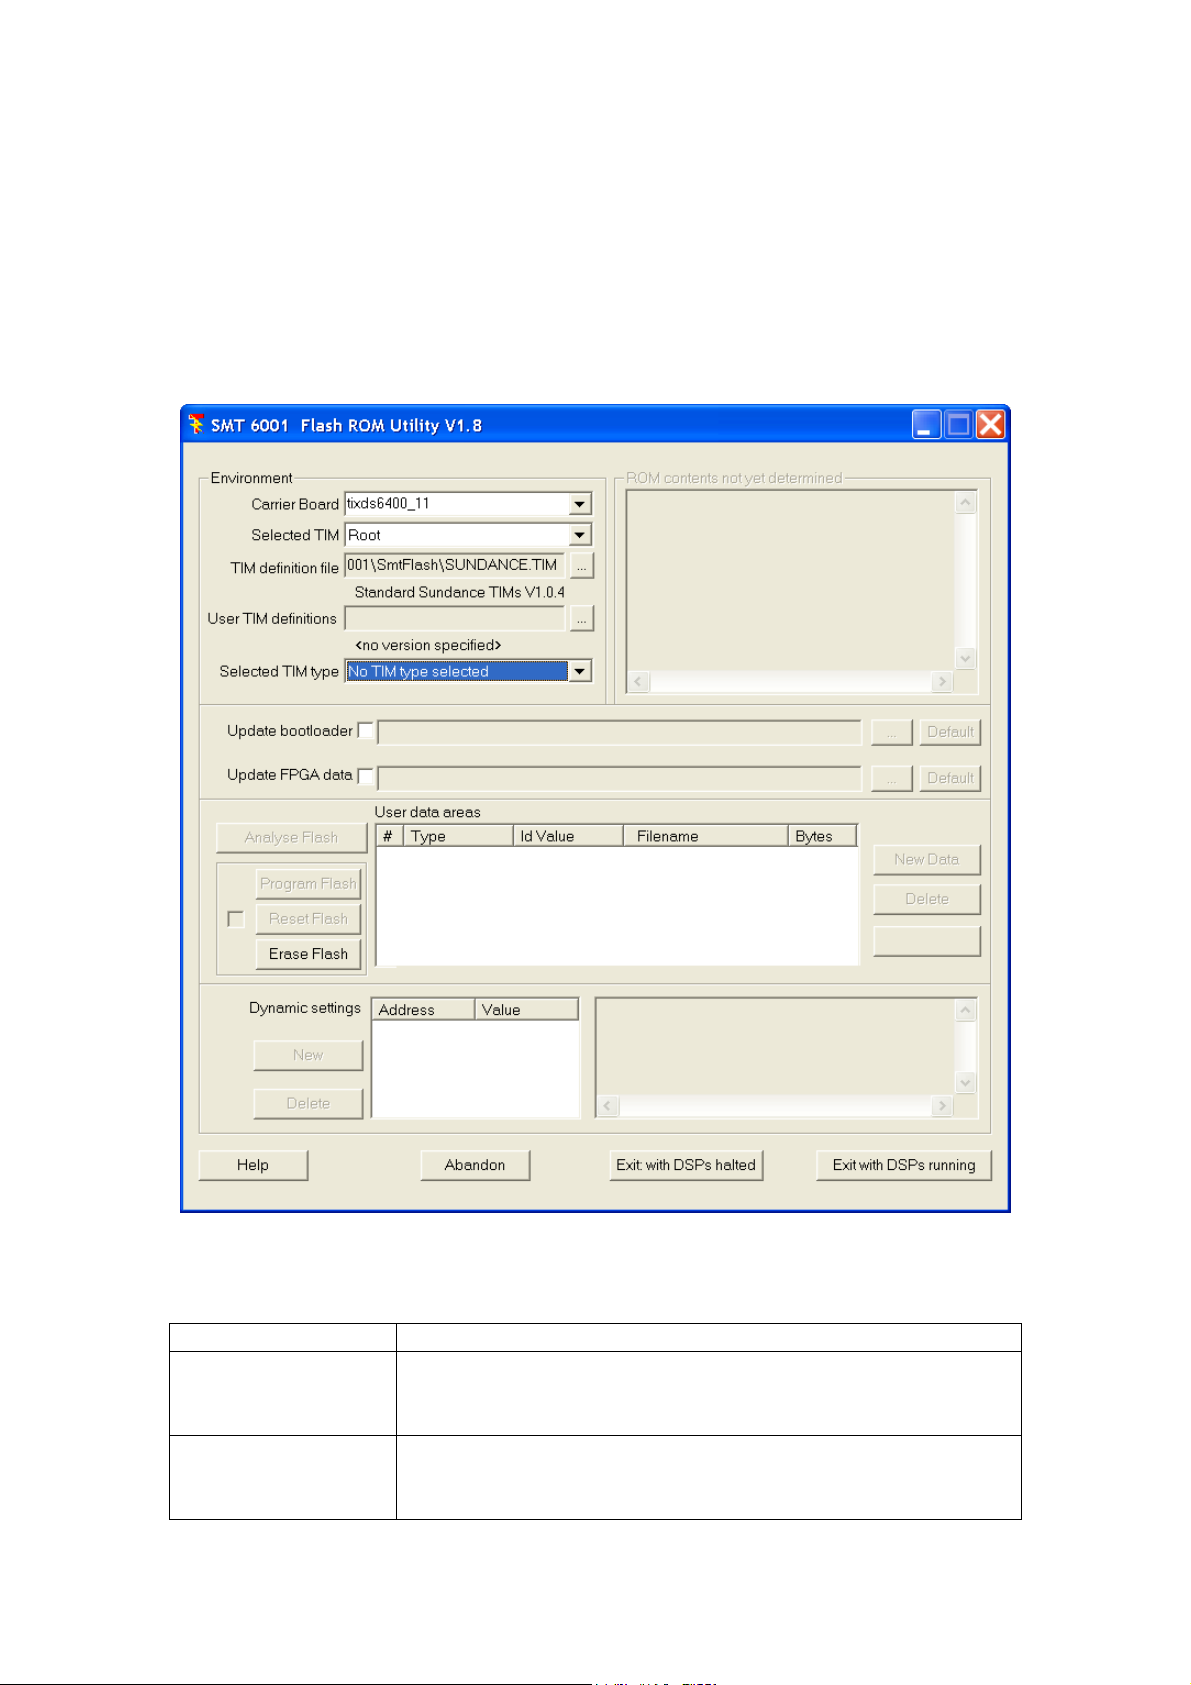
shortcut to the utility in the Start menu. Once started, the utility attempts to start Code
Composer in the background. When this has been successfully achieved, the
following window should appear:
The "Environment" section defines the module you wish to access and specifies its
type.
Carrier Board This selects the board containing the TIM to be accessed.
Selected TIM This selects the particular TIM on the selected board. The
names here correspond to the names used for the processors
when setting-up Code Composer.
Tim definition file This defines a standard file that contains detailed information
about the available TIM types. This should normally find the
file SUNDANCE.TIM in the installation directory.
Page 4

User TIM definitions This is available for users with customised Sundance
hardware to specify additional TIM definitions.
Selected TIM type This is used to specify the type of TIM being accessed.
3.1 Selecting the TIM
Using the "Carrier board" field, select the board carrying the TIM you wish to
access. Often there will only be one such board and it will have been selected for you.
Next, use the "Selected TIM" field to select a particular processor on that board.
Important Note: Some TIMs, such as the SMT374, have multiple processors and
these will appear in the Selected TIM lists. It is important only to select the main
processor for such TIMs (often designated "Processor A"); selecting any of the
secondary processors on a TIM will lead to unpredictable behaviour. SmtFlash will
attempt to detect this situation and prevent access.
3.2 Specifying the type of TIM
There is no practical way that any program can determine the type of the TIM that has
been selected. The ROM usually holds this information, but to access that ROM you
also need to know the TIM's type. Worse, the ROM may not have been programmed
yet or may have been erased for security reasons.
Before you can access the TIM you must use the "Selected TIM type" field to
specify the type of the TIM you have selected. Clicking on the ▼ button to the right
of the Selected TIM type display window will bring up a list of the available TIM
types. Scroll up or down as necessary and click on the correct type.
If the type of the TIM use are using does not appear on the list, please contact
Sundance for assistance.
3.3 Accessing the ROM
You can access the selected ROM once you have analysed its contents. This is done
by pressing the "Analyse Flash" button, and is usually only needed once after
selecting a particular TIM.
The analysis procedure will generate activity from Code Composer and some pop-up
windows may appear and disappear. This is part of the normal operation of SmtFlash.
Following the analysis you will be in one of three states:
Page 5

3.3.1 The ROM contains valid information.
Once all of the analysis checks (including cyclic redundancy checks, CRCs, of the
data) have been passed, SmtFlash will display a summary of the ROM's contents, as
in the following example.
Here, the window to the top right shows the summary information, while the window
at the bottom right shows a report of the activity of the utility. Both these widows
may be scrolled.
The "User data areas" display summarises the information currently held in the user
data logical section. In this example, the ROM has been programmed with one area
which contains a Diamond application. Below this display is an indication of what
will happen when the TIM comes out of reset: "DSP will boot from flash area #1",
meaning that the Diamond application will be loaded and executed after reset.
Page 6

3.3.2 The information in the ROM appears to be corrupt.
This will occur if the ROM has been inadvertently modified or does not contain
information consistent with the selected TIM type. You need to reset the information
by pressing "Reset TIM". This will write a minimal directory and leave the TIM in a
consistent, but unusable state. If a TIM in this state comes out of reset, it will execute
a "jump to here" and do nothing else. Although information previously held in the
ROM is still there, it is no longer usable. If you wish to remove it completely, you
can erase everything by pressing "Erase Flash" (this can take several minutes, so be
patient) . In most cases, you will now go on to program a bootloader and FPGA data,
as described in section 3.4 .
3.3.3 The ROM appears to have been erased completely.
This indicates that either the ROM has never been programmed or it has been erased
using the "Erase Flash" button. Before the TIM can be used you must write a
minimal directory ("Reset TIM") and then program a bootloader and FPGA data, as
described in section 3.4 .
3.4 Programming a Bootloader and FPGA data.
Once the TIM directory is consistent (section 3.3.1 ) you can move on to
programming or updating the Bootloader and FPGA sections. These two sections are
completely independent and you can update either or both.
To select a bootloader, tick the "Update bootloader" box and select the file
containing the appropriate bootloader. Usually the "Default" button to the right will
find the standard bootloader, however, Sundance may release modified bootloaders
from time to time or you may need to use a special-purpose bootloader. In these cases
you can press "..." to browse for the file.
You can select the FPGA data in a similar way using "Update FPGA data
Once the sections to be updated have been selected, you can program them by
pressing "Program Flash". To avoid accidentally overwriting the ROM, this button
and the "Reset Flash" button are only activated when the box to the left of them has
been ticked.
The programming procedure will generate progress messages in the lower right
window and eventually stop. The top right display will be updated to show the new
contents of the ROM. You can check that the versions of the bootloader and FPGA
data are as you expect. ". Note that some TIMs (such as the SMT365E) have several
megabytes of data to program and so this process sould take several minutes.
The TIM should be available for use once this has been completed successfully and
will boot through its comports.
Page 7

3.5 Erasing the ROM
It may be necessary to remove all data from the ROM under certain circumstances.
To do this, press "Erase Flash". This will send a "chip erase" command to the ROM
which will set every bit in the memory to 1. Be aware that this process is not quick
and can take several minutes on a large ROM.
3.6 User Areas
3.6.1 Programming User Areas
When the ROM is in a consistent state (see 3.3.1 ), you can add a new user area by
processing "New Data". This will bring up the following dialogue:
First, select the type of data you wish to add.
• Pure Data
The area will be a binary copy of the input file.
• S Record File
The area will contain data extracted from a file in Motorola-S format.
SmtFlash will interpret the records and construct an image of the data. The
input file is assumed to define a single contiguous section of data. By default,
the input will be assumed to correspond to a little-endian processor, where
significance increases with address. You should select the "Big endian"
button if the file contains big-endian data. where each 32-bit word is
expressed as a sequence of four bytes in order from the most to least
significant.
Page 8

• Executable Program
The area will contain data extracted from an executable COFF program (one
suitable for loading and executing with Code Composer). The data are not
held in the ROM in COFF as this would be far too wasteful of limited ROM
space. Instead, they are held in an internal compressed format understood by
the standard Sundance bootloaders. Once the program has been loaded from
the ROM (after reset), you can debug it using Code Composer by loading the
symbol table from the original COFF file (File/Load Symbols/Load Symbols
Only).
• Diamond Application
The area will contain a Diamond application. This application may be for one
or more processors.
Next, provide the full name of the file containing the data to be added. The "..." button
will allow you to browse for the file.
Now give an "Identification value", a number that can be used to identify the area.
This is usually optional and can be left blank, in which case the value 0 will be used.
Note that some TIMs (such as the SMT363) need certain user areas set up with
coprocessor data and these may require specific Identification values.
Finally, click "OK". The information you have requested will be added to the list of
users areas. At this stage nothing has been written to the ROM. To finish the
procedure, click "Program Flash" and the new data will be written.
3.6.2 Deleting User Areas
You delete user areas by selecting the first area to be removed and clicking "Delete".
This will remove the selected area and all areas below it in the list.
3.6.3 Executable Programs and Diamond Applications
A program (or Diamond application) that is loaded from ROM must be built to
assume that there is no host processor available. This means that programs generated
using Code Composer Studio must not use any of the stdio.h features. Diamond
applications must only include tasks that have been linked as stand-alone tasks (using
C6xSlink, for example) and constructed using the configurer's "/A" switch.
The first user area found to contain an executable program or a Diamond application
will be selected as the "boot area". When such an area is written to the ROM,
SmtFlash automatically assumes that it should be enabled so that it will be executed
following reset (see section 3.6.5 ).
Page 9

3.6.4 Booting from ROM
Programming an executable program or a Diamond application into a user area will
result in the first such area being noted as the "boot area", the place to boot from
following reset. The summary of the ROM's contents in the top right window will
show that area as being "(Boot area: Enabled)".
If the first appropriate user area is disabled (see 3.6.5 ) and marked as "(Boot area:
Disabled)", you can enable it by clicking on the entry in the list of areas and then
clicking the "Enable" button to the right of the list.
3.6.5 Preventing booting from ROM
If a user area has been enabled (see 3.6.4 ) and marked as "(Boot area: Enabled)",
you can prevent it from being executed on reset by clicking on the entry in the list of
areas, clicking the "Disable" button to the right of the list, and then programming the
changes by clicking "Program Flash". This does not remove the area, but simply
stops the bootloader from loading it. Loading will be done from comport as usual.
Page 10

4. Dynamic Settings
The bootloader can perform up to eight assignments of 32-bit values to memory
locations at absolute addresses. This facility is usually only needed in unusual
circumstances, such as to modify the internal comport connections on some multiprocessor TIMs.
These assignments are made immediately after the FPGA has been configured but
before any user code is loaded.
4.1 Adding a Dynamic Setting
Press "New" under "Dynamic settings". This will bring up the following window:
Type in the required address and value, then press "OK".
4.2 Removing a Dynamic Setting
Select the setting to be removed and press "Delete" to the left of the list of current
settings.
Page 11

5. Appendix 1 – Directory Format
The directory for the ROM is a number of 32-bit words at the start of the memory. It
has the following format:
typedef unsigned int UINT32;
struct FlashHeader { // byte offset from flash base
UINT32 Branch1; // 00
UINT32 Nop1; // 04
UINT32 HeaderCrc; // 08
UINT32 HeaderSize; // 0C
UINT32 HeaderVersion; // 10
UINT32 XMemory; // 14
UINT32 BootId; // 18
UINT32 FpgaId; // 1C
UINT32 Branch2; // 20
UINT32 Nop2; // 24
UINT32 TimType; // 28
char TimName[16]; // 2C, 30, 34, 38
UINT32 BootCrc; // 3C
UINT32 FpgaBase; // 40
UINT32 FpgaSize; // 44
UINT32 FpgaCrc; // 48
UINT32 UserId; // 4C
UINT32 AreaBase; // 50
UINT32 AreaCount; // 54
UINT16 Enable; // 58
UINT16 BootIndex; // 5A
UINT32 Dynamics; // 5C
Dset Set[8]; // 60..9C
};
The following fields in the header may be of interest to advanced users:
XMemory
TimType
TimName
AreaBase
AreaCount
Enable
BootIndex
The start address of the largest area of external memory on the TIM
A numeric code for the type of TIM
a null-terminated string giving the type of the TIM
The byte offset into the ROM of the start of user areas
The number of programmed areas
1 if the program selected by BootIndex is to be executed after reset
The number of the area containing a program to be executed. 0 means
there is no executable area
Page 12

6. Appendix 2 – User Area Format
Each user area is made up from a number of complete 32-bit words and has the
following format:
enum AreaType {
AreaData,
AreaSRecord,
AreaProgram,
AreaApplication,
};
struct AreaFormat {
UINT32 Crc; // Cyclic redundancy check
UINT32 Bytes; // total size of area
AreaType Type; // type code word (32-bits)
UINT32 Value; // user-supplied id value
UINT32 Data[...]; // the data
};
Notes:
1. The Crc is computed from the whole of the area excluding the Crc word.
2. To get from the start of one area to the start of the next, add Bytes.
Page 13

7. Appendix 3 – Problems
To avoid problems, you should always stop SmtFlash after programming your TIMs.
You should do this by clicking on "Exit with DSPs running". If you still have Code
Composer running, make sure all the TIMs are left in the "Run Free" state.
The interface between SmtFlash and Code Composer has proved to be extremely
fragile. If the flash programming process fails or is terminated before completion, it is
possible for either or both of SmtFlash and Code Composer to be left in a modibund
state. This can also happen by executing certain Code Composer operations while
SmtFlash is still active, or by using the 3L Server when a TIM is not in the "Run
Free" state. The following procedure will recover from this situation, but be very
careful that you follow the steps exactly. In particular, ensure that you only select the
specified entries, "cc_app.exe" and "SmtFlash.exe":
1. Stop SmtFlash and Code Composer. Note that if you did not have Code
Composer running when you started SmtFlash it will be running as an
"invisible" process.
2. Start the system Task Manager by right-clicking an empty space on the
taskbar, and then clicking "Task Manager".
3. Select the "Processes" tab.
4. Look at the "Image Name" column.
5. If you see "cc_app.exe", select it by clicking on the name and then click "End
Process". A warning will appear. Click "Yes".
6. Do this for all occurrences of "cc_app.exe".
7. Repeat steps 5 & 6 for "SmtFlash.exe".
8. Close the Task Manager (X)
9. Use either BoardInfo or the 3L Server to reset the entire board:
• BoardInfo: Special/Reset Entire Board
• 3L Server: Board/Properties/Reset Entire Board
10. Restart SmtFlash
Code Composer will sometimes bring up a window like the following:
If this happens, click "Cancel" and everything should continue to run correctly.
 Loading...