

Page 1

User Manual
S01
IP Phone
Version 1.0
Page 2

HTTP://www.suncti.co.th User Manual
CONTENT
1 INTRODUCTION...................................................ERROR! BOOKMARK NOT DEFINED.
2 INSTALLATION.....................................................ERROR! BOOKMARK NOT DEFINED.
2.1 Installation.................................................................................. Error! Bookmark not defined.
2.2 Connection diagrams............................................................... Error! Bookmark not defined.
2.3 Package....................................................................................... Error! Bookmark not defined.
2.4 Key introduction........................................................................ Error! Bookmark not defined.
3 PRODUCT OVERVIEW..................................................................................................... 7
3.1 Software Features.......................................................................................................................7
3.2 Hardware Specifications...........................................................................................................8
4 BASIC OPERATIONS........................................................................................................ 9
4.1 Dialing and Making Calls..........................................................................................................9
4.1.1 Dialing General PSTN Phone or Extension. .............................................................9
4.1.2 IP to IP Calling..................................................................................................................9
4.2 Answering Calls........................................................................................................................10
4.4 Call Hold......................................................................................................................................10
4.5 Call Transfer...............................................................................................................................10
4.6 Three-Way Calling.....................................................................................................................11
5 KEYPAD CONFIGURATION............................ERROR! BOOKMARK NOT DEFINED.2
5.1 Keypad CONFIGURATION....................................................... Error! Bookmark not defined.
5.1 Speed dial memory key setting................................... Error! Bookmark not defined.2
5.2 Screen display setting ................................................. Error! Bookmark not defined.2
5.3 Volume setting ............................................................... Error! Bookmark not defined.2
5.4 Greeting message setting ........................................... Error! Bookmark not defined.3
5.5 Language setting .......................................................... Error! Bookmark not defined.3
5.6 SIP setting ....................................................................... Error! Bookmark not defined.3
5.7 Network setting ............................................................. Error! Bookmark not defined.4
5.8 Ring type setting ........................................................... Error! Bookmark not defined.5
5.9 Check caller record .................................................... Error! Bookmark not defined.6
5.9.1 Voice Record.............................................................................................................16
5.9.2 User record................................................................................................................16
6.0 WEB CONFIGURATION.............................................................................................. 17
6.1 Physical Connection................................................................................................................17
6.2 Preparation for Web Configuration......................................................................................17
6.3 User verification........................................................................................................................19
6.4 Current State ..............................................................................................................................19
6.5 Network Configuration ............................................................................................................20
6.5.1 WAN Configuration ...................................................................................................20
6.5.2 LAN Configuration.....................................................................................................22
6.6 VOIP Configuration...................................................................................................................23
6.6.1 SIP 1 Configuration.................................................... Error! Bookmark not defined.
6.7 Advance.......................................................................................................................................25
6.7.2 NAT Configuration .........................................................................................................25
6.7.3 NAT Service Configuration..........................................................................................26
6.7.4 Firewall.............................................................................................................................27
6.7.5 QOS 802.1p Configuration..........................................................................................28
6.7.6 Advance SIP Configuration.........................................................................................29
6.7.6.1 SIP STUN Configuration.................................................................................29
1
Page 3

HTTP://www.suncti.co.th User Manual
6.7.6.2Public Backup Server Configuration..............................................................30
6.7.6.3Private Server(SIP2) Configuration.................................................................30
6.7.7 Digital Map Configuration............................................................................................30
6.7.8 Call Service Configuration ..........................................................................................31
6.7.9 MMI Filter.........................................................................................................................35
6.7.10 DSP Configuration......................................................................................................35
6.8 Dial Peer......................................................................................................................................36
6.9 Config Manage (Save and Clear configuration)................................................................38
6.10 Firmware Upgrade..................................................................................................................39
6.10.1 Web Update...................................................................................................................39
6.10.2 FTP or TFTP Update....................................................................................................40
6.11 Sy stem Manag e.......................................................................................................................42
6.11.1 Account Manage (maximum 5 accounts ).............................................................42
6.11.2 Phone Book Configuration........................................................................................44
6.11.3 Syslog Configuration..................................................................................................45
6.11.4 Time Set.........................................................................................................................45
6.11.5 System Reboot.............................................................................................................46
7 DEFAULT FACTORY SETTING.................................................................................. 47
8 TELNET SETTING ........................................................................................................48
8.1 Config Procedure......................................................................................................................48
8.2 Telnet Basic Introduction........................................................................................................48
8.2.1 Basic Structure...............................................................................................................48
8.2.2 Basic Command.............................................................................................................48
8.3 Global Command......................................................................................................................49
8.4 Net Configuration......................................................................................................................50
8.4.1 LAN interface Settings.................................................................................................50
8.4.2 WAN Interface Settings................................................................................................50
8.5 Net Service..................................................................................................................................50
8.6 Port Settings..............................................................................................................................51
8.7 SIP Settings................................................................................................................................51
8.8 User Management..................................................................................................................51
8.9 Debug (Level 0~7) ..................................................................................................................52
8.10 Show System Running Info. ................................................................................................52
8.11 Logout........................................................................................................................................53
8.12 Tracert Trace Network Path Info. .....................................................................................53
8.13 Update........................................................................................................................................53
8.14 Upload Configure File............................................................................................................53
8.15 Download Configure to Flash......................................................................................53
8.16 Password..................................................................................................................................53
8.17 Reload........................................................................................................................................53
8.18 Network Diagnosis.................................................................................................................53
8.19 Restore to Factory Default...................................................................................................54
8.20 POST Mode(safe mode)........................................................................................................54
8.20.1 Access Post Mode Process......................................................................................54
8.20.2 Post Mode Clear........................................................................................................54
8.20.3 Post Mode FTP Update Firmware............................................................................55
2
Page 4

HTTP://www.suncti.co.th User Manual
1 Introduction
Welcome to select our IP Phone and thanks for your trust and support to our company. We sincerely hope
you can enjoy the convenience and capabilities brought forward by our products.
IP Phone provides all the features and functionalities of conventional phone and more. Our IP phone
guarantees rich function and superb voice quality at mass-affordable price, which is fully compatible with
SIP industry standard and able to interoperate with most SIP compliant devices and software on the
market.
This manual provides the information on basic operations and functions for IP Phone, which would assist
users the fast access to learn basic functions and be familiar with operating these functions.
! CAUTION
△
Although the adapter of IP Phone is compliant with UL standard, please do not attempt to use other
difference power adapter or cut off power supply during configuration or updating phone. Using
other power adapter may damage IP phone and will void the manufacturer warranty.
3
Page 5
HTTP://www.suncti.co.th User Manual
2 Installation
2.1 Installation
a) Insert handset cord into the handset jack and the other end to the left jack of IP Phone
b) Insert the power adapter’s plug into the phone Power jack and the 2-prong plug end of which into
grounded power outlet
c) Connect one end of the network cable to the WAN port, which is indicated as
the internet.
d) If need to set up small LAN network, find the network cable in the box and connect it between LAN
port, which is indicated as
and your PC (PC is not required to set up for making a call)
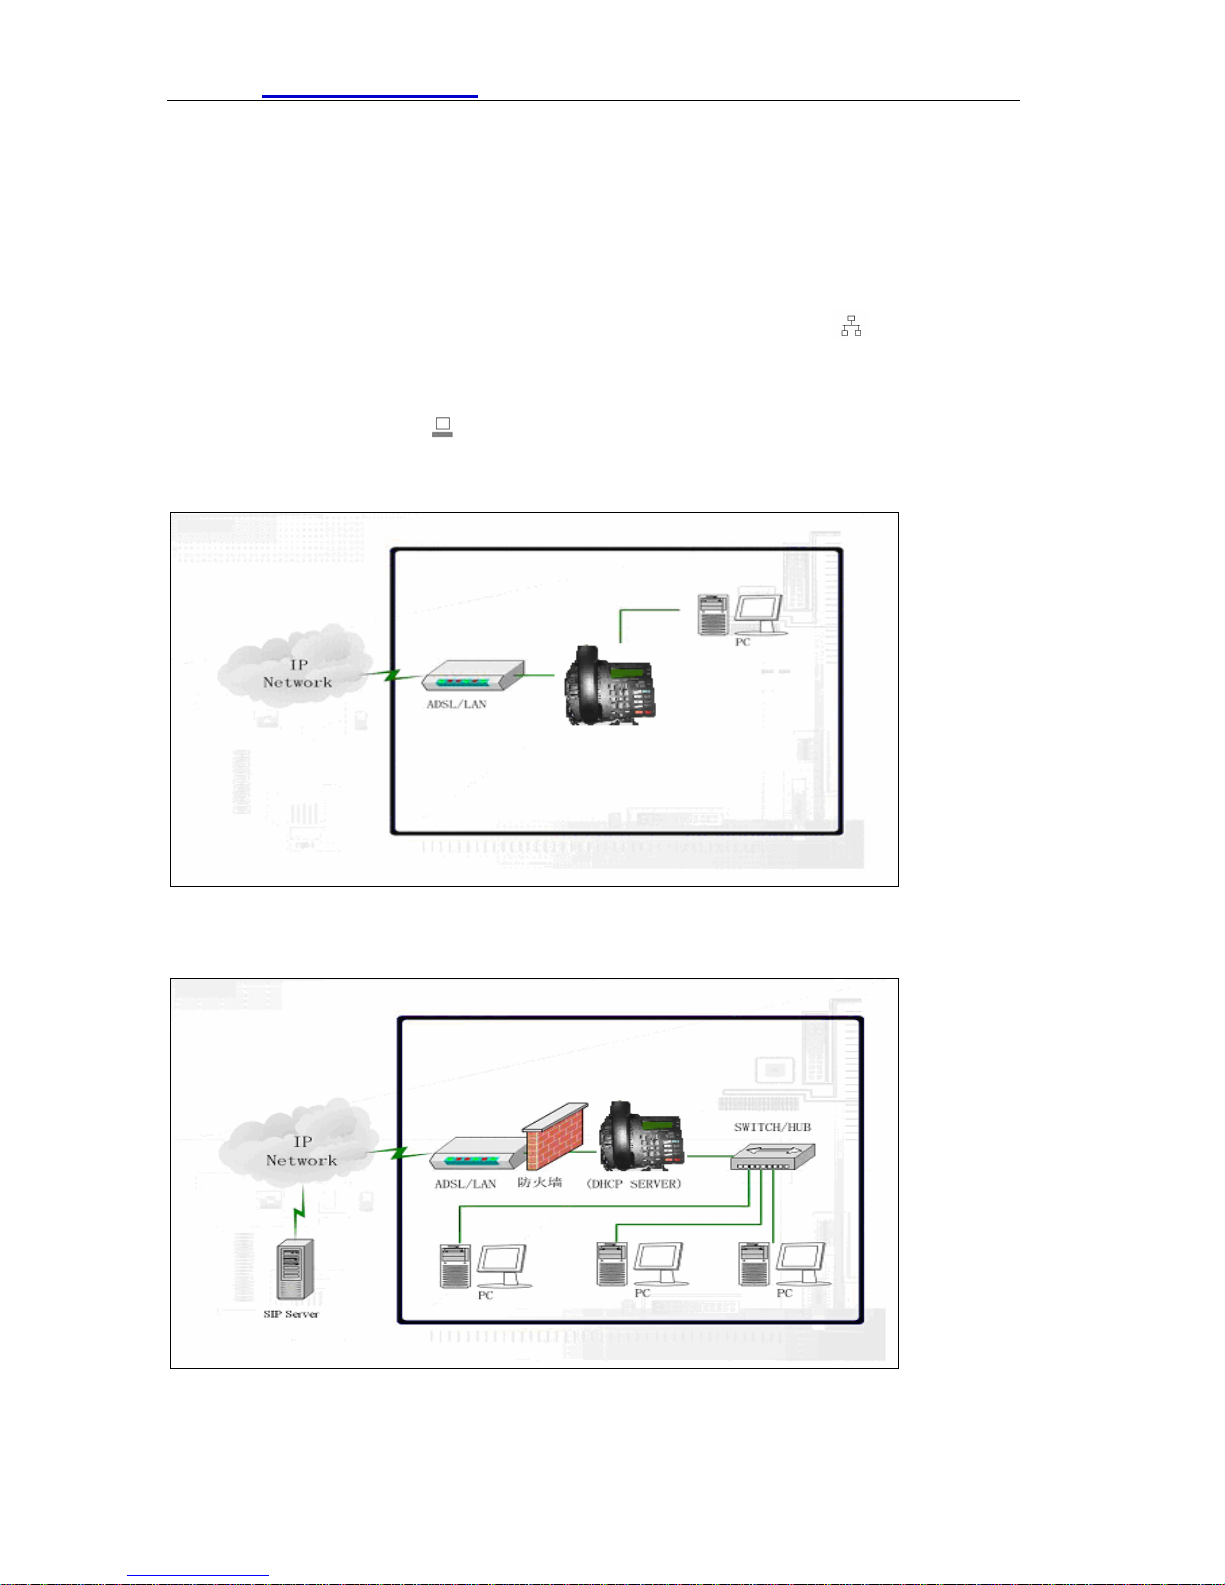
2.2 Typical Product network connecting Diagrams
, the other end to
IP PHONE
IP PHONE
4
Page 6
HTTP://www.suncti.co.th User Manual
2.3 package
Unpacking the package of IP Phone and please clearly check the box contents according to below packing
list .If you find any contents missing or damaged, contact the place of purchase.
Components Packing List
Components Quantity
Main Unit 1 Unit
Handset 1 PCS
Cord 1 PCS
Adapter
RJ45 network cable 1 PCS
User Manual 1 Volume
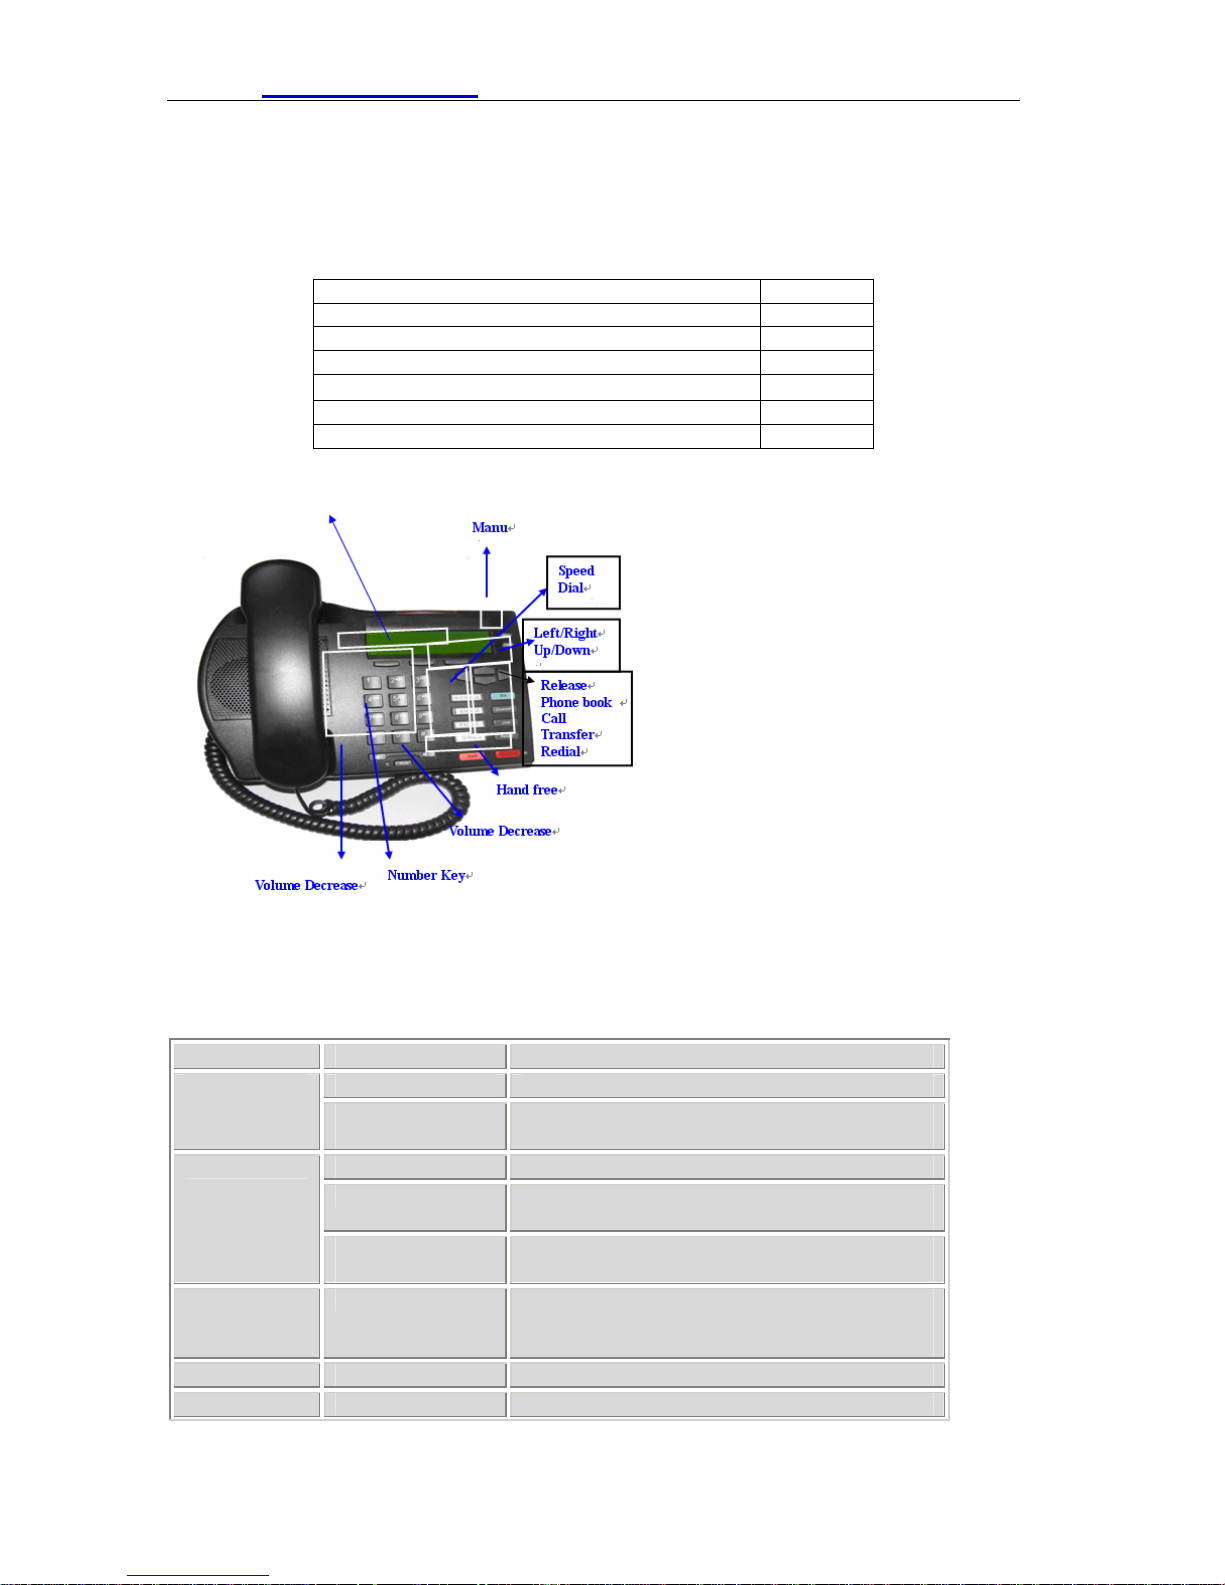
IP Phone are designed to look alike conventional phones, the following photo shows a broad overview of
the IP Phone.
Flexible Function Key
1 PCS
2.4 Key introduction
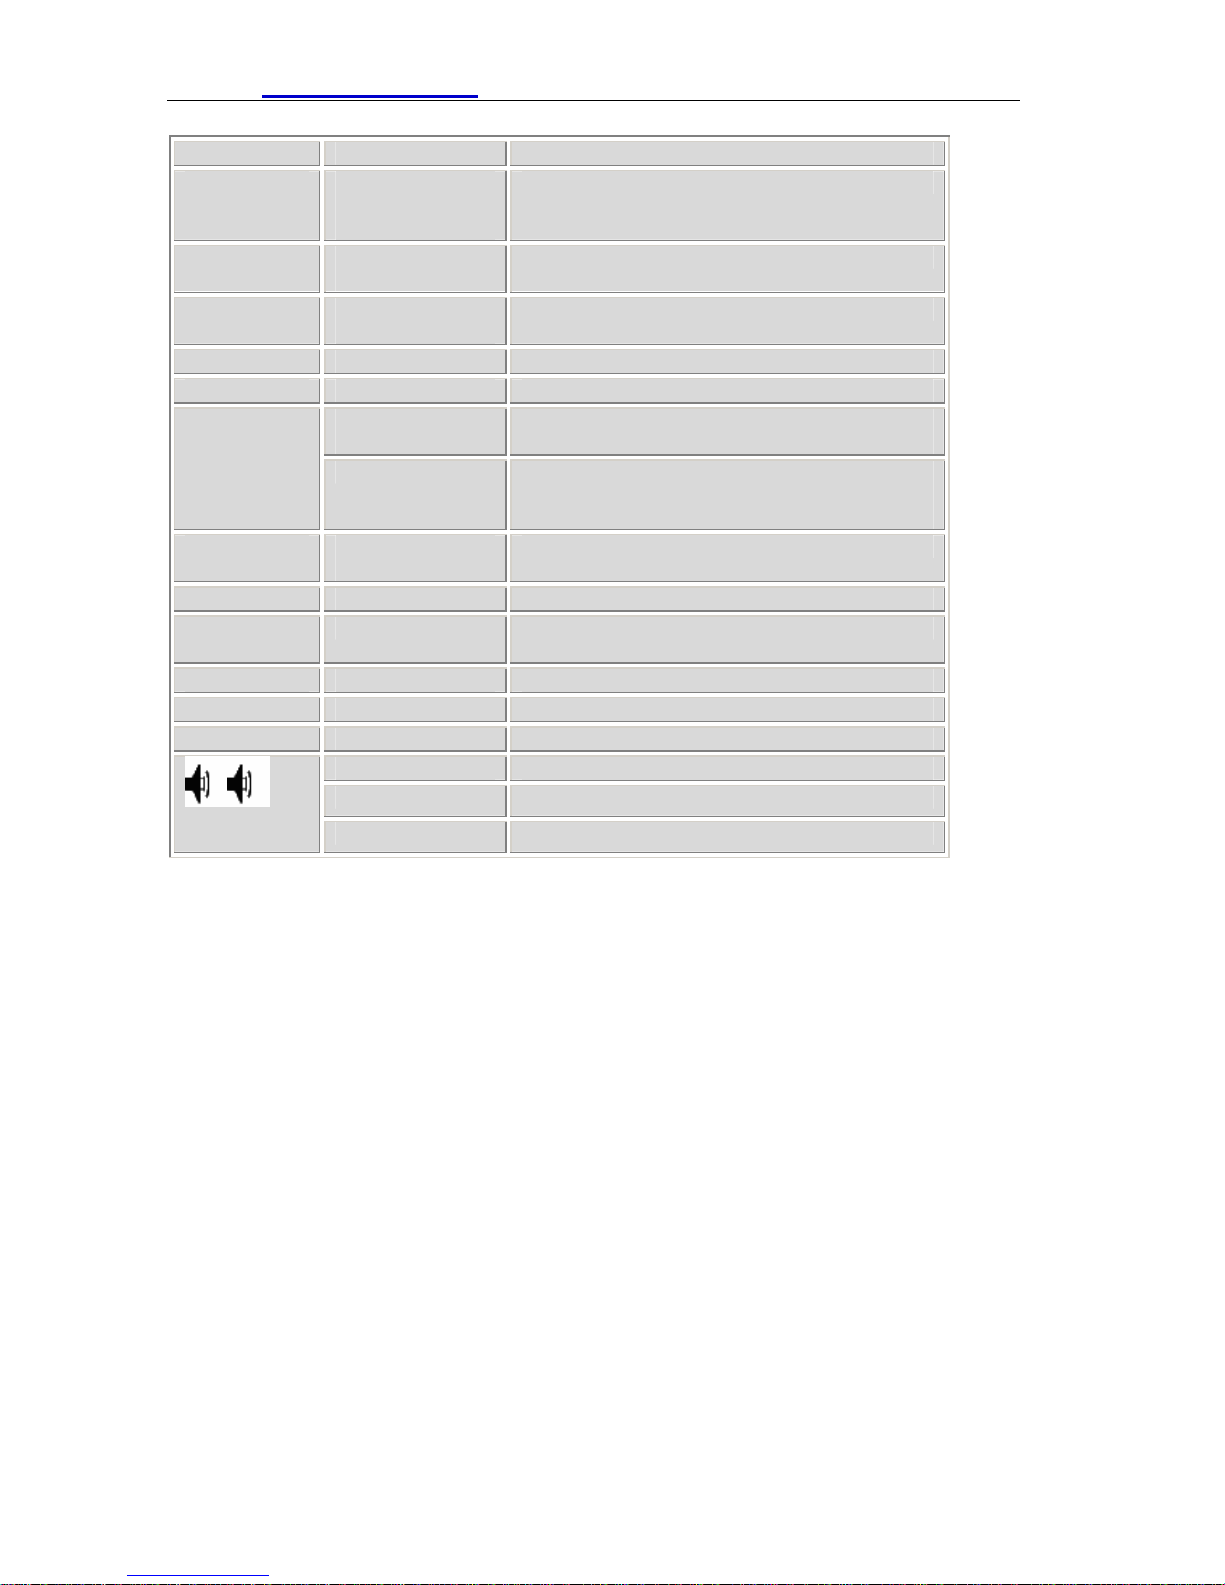
There are 34 keys on the phone. Definitions of each is stated as below
Key Button Mode Definitions
In the dial-up mode Decimal digit number 0-9 0 -9
In the keypad
configure mode
*
# In the dial-up mode As one part of phone number if “#” is the first
MENU In the IDLE mode Enter menu mode and display the tree menu system
Callers In the IDLE mode Check the Income/Outgoing/Missed calls record
In the dial-up mode As one part of phone number when call out
In the call hold mode Ready to call a third party’s number to make
In the keypad
configure mode
Rapid first press display the digit number 0-9,rapid
second press display the English character or others
three-way (or conference) calling
Equal to the dots notation when input IP address
Ex. 192.168.10.202
dialed number, otherwise as the ending symbol to
end up dialing
5
Page 7
HTTP://www.suncti.co.th User Manual
Key Button Mode Definitions
Three flexible
Function Keys
HOLD In the keypad
Transfer In the keypad
REDIAL In the dial-up mode Redial the number last dialed
In the IDLE mode Enter hands-free mode
UP/Down
Left/Right In the keypad
MUTE In the dial-up mode Mute an active call;
Memory Key
1~4
Rls In any mode Exit to the default idle mode
Directory In the IDLE mode Access to phone book.
Hand free In the IDLE mode Enable Hand free function
In the IDLE mode or
In the keypad
configure mode
configure mode
configure mode
In the keypad
configure mode
In the idle mode Continuous thrice press display assigned WAN Port
configure mode
In the IDLE mode Show the corresponding recorded phone NO.
In the IDLE mode Adjust the dialing ring volume
In the hand free mode Adjust the hand free volume
In the dial up mode Adjust the handset volume
Select the relevant function on the LCD
Temporarily hold the active call
Transfer the active call to another party
Go back to previous menu item/ Go down to lower
menu items
IP, gateway’s IP and the phone number registered
on public server
Choose the item on the menu
6
Page 8

HTTP://www.suncti.co.th User Manual
3 Product Overview
S01 IP Phone is a next generation IP network telephone based on industry open
standard SIP (Session Initiation Protocol).S01 series IP Phone offer customer superb
sound quality and rich functionalities at mass-affordable price.
3.1 Software Features
z Support two modes: Bridge and Router (NAT&NAPT)
z Network Protocols: TCP/UDP/IP,ICMP,HTTP,DHCP Client ( WAN
Interface),DHCP Server(LAN Interface),DNS Client, DNS Relay, SNTP, PPPoE,
FTP,TFTP
z VOIP Protocols: Support H323 (V4)&SIP (RFC3261, RFC3262, RFC3264,
RFC3265) synchronously
z Voice Codecs: G.711(A-law/U-law),G.723.1(High/low),G.729
z NAT transversal: Support STUN client, etc. Can modify SIP register port, HTTP
server port, Telnet server port and RTP port
z Support two SIP server synchronously:Can register two different SIP server, and
can make a call by either proxy
z Support standard voice features such as numeric Caller ID Display, Call Waiting,
Hold, Transfer, Do-Not-disturb, Forward, in-band and out-of-band DTMF, Hotline
(off-hook autodial), auto answer, ban outgoing
z Full duplex hand free speakerphone, redial, call log, volume control, voice record
with indicator
z Support standard encryption and authentication (DIGEST using MD5, MD5-sess)
z Support Silence Suppression, VAD (Voice Activity Detection), CNG (Comfort
Noise Generation), Line Echo Cancellation (G.168), and AGC (Automatic Gain
Control)
z Provide easy configuration thru manual operation (phone keypad, Web interface
and Telenet) or automated centralized configuration file via TFTP or HTTP
z Support firmware upgrade via TFTP/FTP and HTTP
z Support syslog, can send event of phone to syslog server
7
Page 9

HTTP://www.suncti.co.th User Manual
3.2 Hardware Specifications
The below table describes the hardware specifications of S01 Phone
Item S01
Power Adapter Input: 100-240VAC 50~60Hz
Output: +5VDC, 1200mA
CPU Infineon PSB21553 150MHz
WAN 10/100Base T RJ-45 for LAN Port
LAN 10/100Base T RJ-45 for PC
Power Consumption Idle:1.4W / Active:1.8W
LCD size 3 inch (74×28mm)
Operating Temperature 0~40℃(32°~104℉)
Storage Temperature -10°~60(14°~140℉)
Relative Humidity 10~65% (Non-condensing)
Dimension (W×H×D) 11.6× 8× 3 inch (29.5×20.5×7.5cm)
Weight (packaging
2.07 lb. (0.94kg)
included)
Certification CE / FCC Part 15 Class B
8
Page 10

HTTP://www.suncti.co.th User Manual
4 Basic Operations
4. 1 Dialing and Making Calls
4.1.1Dialing General PSTN Phone or Extension.
There are three dialing modes:
1. Pick up handset or press SPEAKER button, and then enter the phone
numbers, IP phone will send out the numbers with the DTMF tones.
2. In the off hook mode or Hands-free mode, Press the REDIAL/SEND button
directly to redial the number last called. Once pressed, the last dialed number
will be displayed on the LCD with DTMF tones and an outgoing call is sent.
3. Make use of Speed dialing mode: enter PBOOK→SPEED DIAL→INPUT
INDEX submenu to input the index which correspond to the phone number you
want to dial, then the phone could automatically dial the number.
Process: PBOOKENTER—INPUT INDEX (1,2,3…) + #
4.1.2 IP to IP Calling
Making IP to IP calling is nearly same as dialing general PSTN Phone, there are
three ways to set IP phone number and domain (more details please refer to 5.2.4)
1. “Peer to Peer” calling mode: direct make calls and no need to set phone
number thru proxy server (user could refer to Dial peer setting on web
configuration charter).The phone should be operated under following
condition (satisfy one option)
z Requirement 1 both two phones are assigned the public IP address
individually
z Requirement 2 both two phones using private IP address should be on
the same LAN.
2. Dialing the IP number configured by public agency, both two phones should
be already registered on the public server.
3. Dialing the IP number configured by private agency, both two phones
should be already registered on the private server.
Examples:
To dial a number on the proxy, such as 1001, simply pick up handset or press
speakerphone, dial 1001 and then press the REDIAL/SEND button.
To dial a PSTN number such as 62281486, you might need to enter in some prefix
number followed by the phone number. Please check with your VoIP service provider
to get the information. If your phone is assigned with a PSTN-like number such as
62281493, most likely you just follow the rule to dial 62281486 as if you were calling
from a regular analog phone, followed by pressing the REDIAL/SEND button.
9
Page 11
HTTP://www.suncti.co.th User Manual
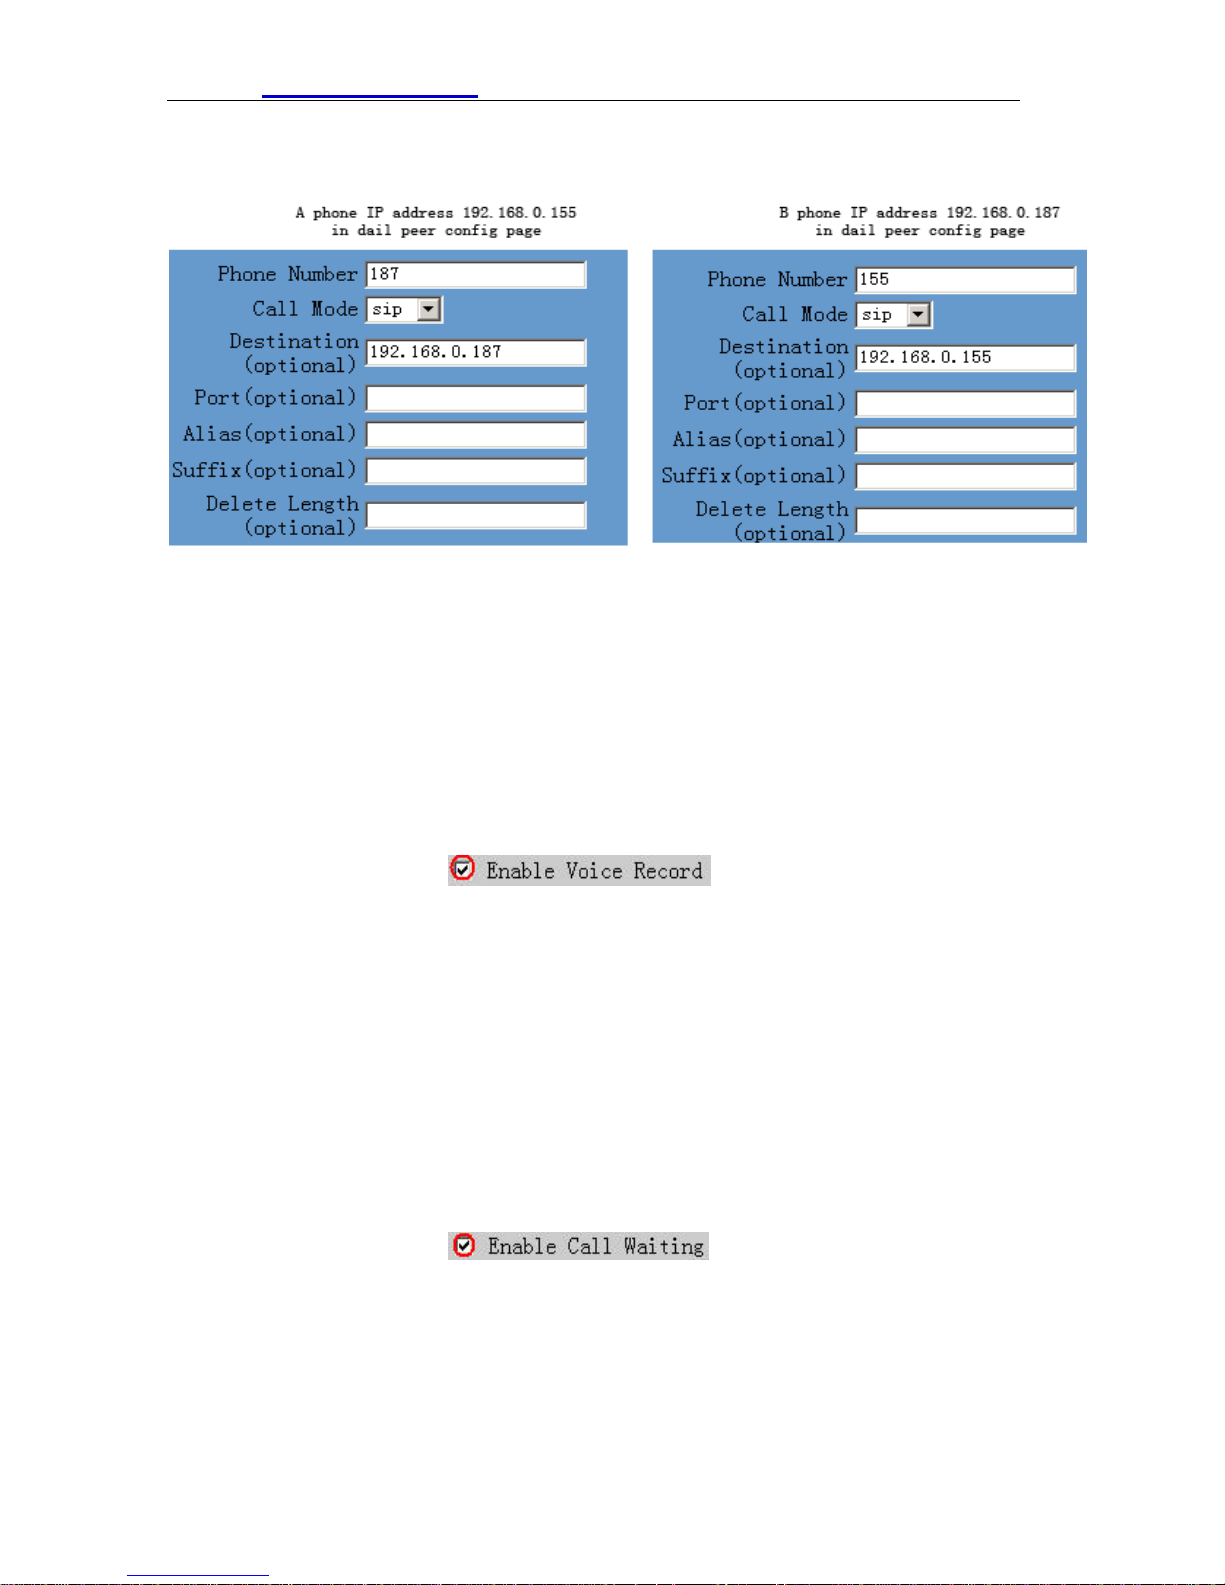
Example 1
If A dial number 187 , A can talk with B . If B dial number 155 , B can talk with A
4.2 Answering Calls
There are three ways to receive incoming calls:
z Pick up handset to receive incoming calls
z Press the SPEAKER button to receive incoming calls
z Start-up the voice message function to record the incoming calls, afterwards
listen to voice messages thru phone audio play .
Operations: Enter REC→RECEIVED→NEW→UP OR DOWN to the LIST NO
submenu (maximum is 3 message) 。
Precondition : must enable
in Advance /Call service
Note: User can switch from a hands-free call to handset by picking up the handset. To
switch from a handset call to a hands-free call, press hands-free button, and then
hang up the handset.
4.3 Call Hol d
Pressing the HOLD button during current conversation enables you put an active
calling on hold temporarily while a second call is answered or made, press this button
again will go back to the previous call.
Precondition : must enable
4.4 Call Transfer
Press the TRANSFER button enables users could transfer an incoming call to the
third party’s number. When user A and user B both sides are on conversation,
in Advance /Call service
10
Page 12
HTTP://www.suncti.co.th User Manual
Users A press <TRANSFER > button ,and then dial the thid party user C . User
A will hand up . User C ring , User B is on Hold state. User C pick
up ,and talk with user B .
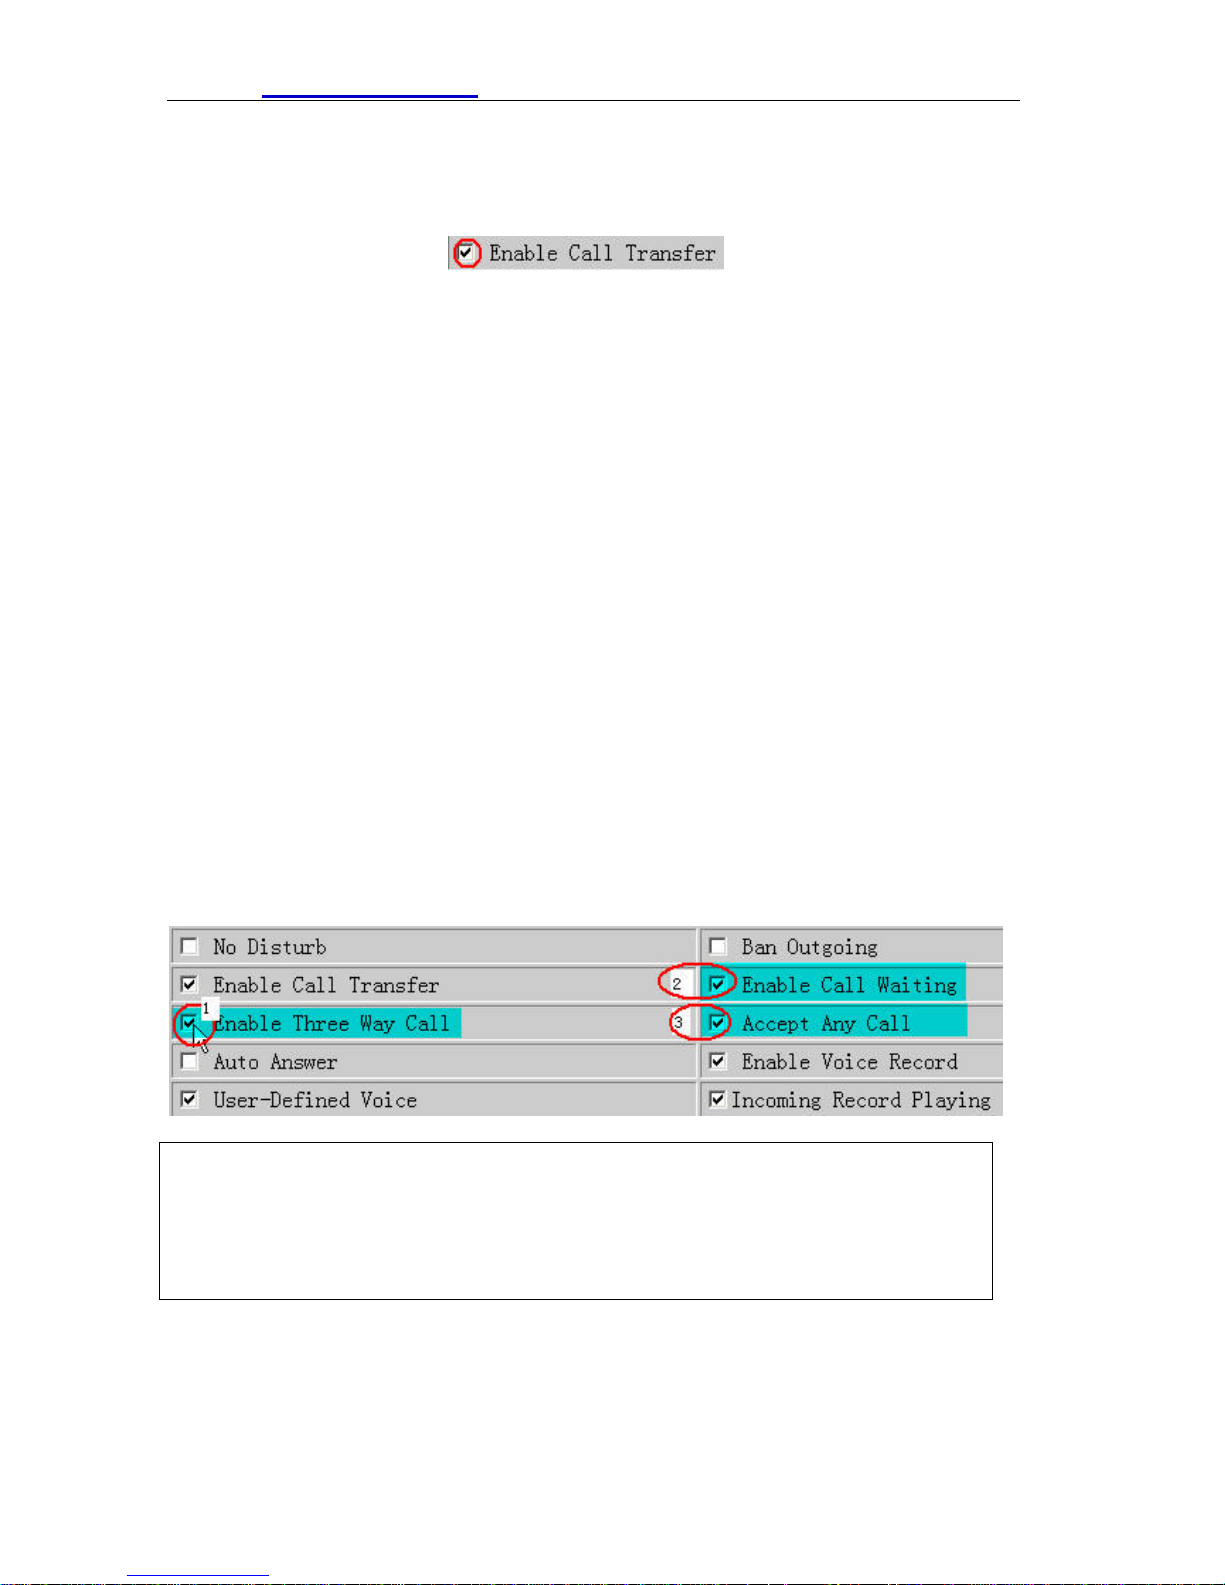
Precondition : must enable
Process: Transfer button + the third party number
Example:A is talking with B , A press <Transfer> button and dial C number. A line
break, then B will talk with C.
4.5 Three-Way Calling
S01 IP phone support three-way (or conference) Calling. That is users could talk to
more than one person (up to two) at the same time.
Process: press HOLD button →Dial third party’s number->put through→ press HOLD
button again →Press * button
Once the three-way initiator concludes the three-way calling, the other two sides can
not continue the conversation call and hand up automatically.
Example: A are talking with B. A press HOLD button for holding B line , and dial the
third party`s number , so A will talk with C . A press HOLD button again for holding C
line , A dial * , make three-way (or conference) calling successfully.
in Advance /Call service
Pro-condition: enable the three functions as below picture.
Note:
The function 4.4 & 4.5 & 4.6 could be started or closed thru system setting, so
when you need to use above three functions please make sure of opening these
functions.
11
Page 13

HTTP://www.suncti.co.th User Manual
5 keypad configuration
Hereinabove the manual has defined the keypad function. It is easy to config IP phone thru the keypads.
Get the assigned WAN Port IP, gateway’s IP and the phone number registered on public server:
Press the Down Key for three times. It will display the WAN Port IP, gateway’s IP and the phone
number registered on public server
5.1 Speed Dial Memory Key setting
5.1.1 Set Speed Dial Memory Key
¾ press Menu Key in Idle mode:
¾ LCD displays 01 Memory Key
¾ Select Choose a Memory Key
¾ Choose one from Memory 1 ~ Memory 4
¾ Enter the phone number you want to speed dial
¾ Select Save
¾ Finished.
5.1.2 Dial Speed Dial Memory Key
¾ Press Memory 1~4 key in idle mode
¾ Press Hand free or pick up the handset
Notice: The key cover can be moved. You can write what you want on the prepared paper in the
inner box.
5.2 Screen display setting
¾ Pressing Menu Key in Idle mode
¾ Press the Down Key .
¾ The LCD displays 02 Screen Setting
5.2.1 Letter contrast setting
¾ Select Enter. The LCD displays 01 Contrast
¾ Adjust the letter contrast by pressing Left Key or Right Key
¾ Select Save
¾ Finished.
5.2.2 Brightness setting
¾ Select Enter
¾ Press the Down Key . The LCD displays 02Brightness
¾ Select ■ Off, ■ Low, ■ High of the brightness by pressing Left Key or Right Key
¾ Select Save
¾ Finished.
5.3 Volume Setting
¾ Pressing Menu Key in Idle mode
¾ Press the Down Key twice. The LCD displays 03 Volume Setting
12
Page 14

HTTP://www.suncti.co.th User Manual
5.3.1 Ringer Volume Setting
¾ Select Enter. The LCD displays 01 Ringer Volume
¾ Adjust the ringer volume by pressing Left Key or Right Key
¾ Select Save
¾ Finished.
5.3.2 Call Part Volume
¾ Select Enter. The LCD displays 01 Call Party Volume
¾ Adjust the call party volume by pressing Left Key or Right Key
¾ Select Save
¾ Finished.
5.4 Greeting Message Setting
¾ Pressing Menu Key in Idle mode
¾ Press the Down Key three times. The LCD displays 04 Greeting Message
¾ Select Edit
¾ Enter the greeting message with the Number Key and Letter Key ( The LCD displays number
while pressing Number Key 0 ~ 9 once and displays the Lowcase letter /
Capital letter while pressing twice. The * stands for full stop or comma. #
stands for space.
¾ Select Save
¾ Finished
5.5 Language Setting
¾ Pressing Menu Key in Idle mode
¾ Press the Down Key four times. The LCD displays 05 Language
Notice: The phone only support English at present. It will support more than one language in the
future.
5.6 SIP Setting
¾ Pressing Menu Key in Idle mode
¾ Press the Down Key five times. The LCD displays 06 SIP Setting
5.6.1 SIP server setting
¾ Select Enter. The LCD display 01 SIP 1
z SIP 1 setting
¾ Select Enter. The LCD display 01 SIP 1 Server
¾ Select Edit. Enter the IP domain/ IP address.
¾ Select Save
¾ Finished.
z SIP Number Setting
¾ Return to 01 SIP 1
13
Page 15

HTTP://www.suncti.co.th User Manual
¾
Press the Down Key once. The LCD displays 02 SIP 1 Number
¾ Select Edit. Enter the SIP 1 Number
¾ Select Save
¾ Finished.
z SIP Account Setting
¾ Return to 01 SIP 1
¾ Press the Down Key twice. The LCD displays 03 SIP 1 Account
¾ Select Edit. Enter the SIP 1 Account
¾ Select Save
¾ Finished.
z SIP Password Setting
¾ Return to 01 SIP 1
¾ Press the Down Key for three times. The LCD displays 04 SIP 1 Password
¾ Select Edit with Flexible Function Key. Enter the SIP 1
Password
¾ Select Save
¾ Finished.
z Register Setting
¾ Return to 01 SIP
¾ Press the Down Key for four times. The LCD displays 04 SIP 1 Register
¾ Press Left Key or Right Key to select □ ON / □ OFF
¾ Select Save
¾ Finished.
SIP 1 Account Setting finished.
SIP 2 Account Setting is the same as SIP 1 Account Setting
(Notice: You can select the SIP account by pressing SIP with Flexible
Function Key when the phone is registered two SIP account.)
5.7 Network Setting
¾ Pressing Menu Key in Idle mode
¾ Press the Down Key for six times. The LCD displays 07 Network Setting
z Net Mode Setting
¾ Select Enter. The LCD displays 01 Net Mode
¾ Press Left Key or Right Key to select □ Static / □ DHCP /□PPPoE
¾ Select Save
¾ Finished.
z Static Setting
¾ Return to 07 Network Setting.
14
Page 16

HTTP://www.suncti.co.th User Manual
¾ Select Enter and go into WAN port network setting.
¾ Press the Down Key and go into the Static Setting.
The LCD displays 02 Static Setting
¾ Select Enter the LCD displays 01 Static IP
¾ Select Edit . Enter the Static IP.
¾ Select Save
¾ Finished.
Return to the Static IP Setting mode. The LCD displays 02 Static Setting
¾ Select Enter and press
¾ Select Enter . Press the Down Key twice.The LCD displays
04 Static DNS
¾ Select Edit . Enter the gateway IP
¾ Select Save
¾ Finished.
5.7.1 PPPoE Setting
¾ Return to 07 Network Setting.
¾ Select Enter and go into WAN port network setting.
¾ Press the Down Key twice. The LCD displays 03 PPPoE
Setting
¾ Select Enter. The LCD displays 01 Account
¾ Select Edit . Enter the PPPoE account. Please refer to 3.4
¾ Select Save
¾ Finished.
Return to 03 PPPoE Setting
¾ Select Enter. Press the Down Key .The LCD displays 02
Password
¾ Select Edit . Enter the PPPoE password.
¾ Select Save
¾ Finished.
5.8 Ring Type Setting
¾ Press Menu Key in Idle mode
¾ Press the Up Key . The LCD displays 08 Ring Type.
¾ Press Left Key or Right Key to select the ring type.(There are 8 default ring
types).
¾ Select Save
¾ Finished.
15
Page 17

HTTP://www.suncti.co.th User Manual
5.9 Check the Callers Record
You can check the incoming calls, outgoing calls and missed calls by
pressing Callers
5.9.1 Voice Record
Voice record while calling
¾ Press Rec.
¾ Press Stop to stop the record.
Notice: You can make voice record for 20 minutes.
Check the voice record
¾ Press Rec. The LCD displays Receive Record
¾ Select Enter
5.9.2 User Record
¾ Press Rec
¾ Press the Down Key
¾ enter User Record → Press Rec
Notice: The record can work as User message.
16
Page 18
HTTP://www.suncti.co.th User Manual
6.0 Web Configuration
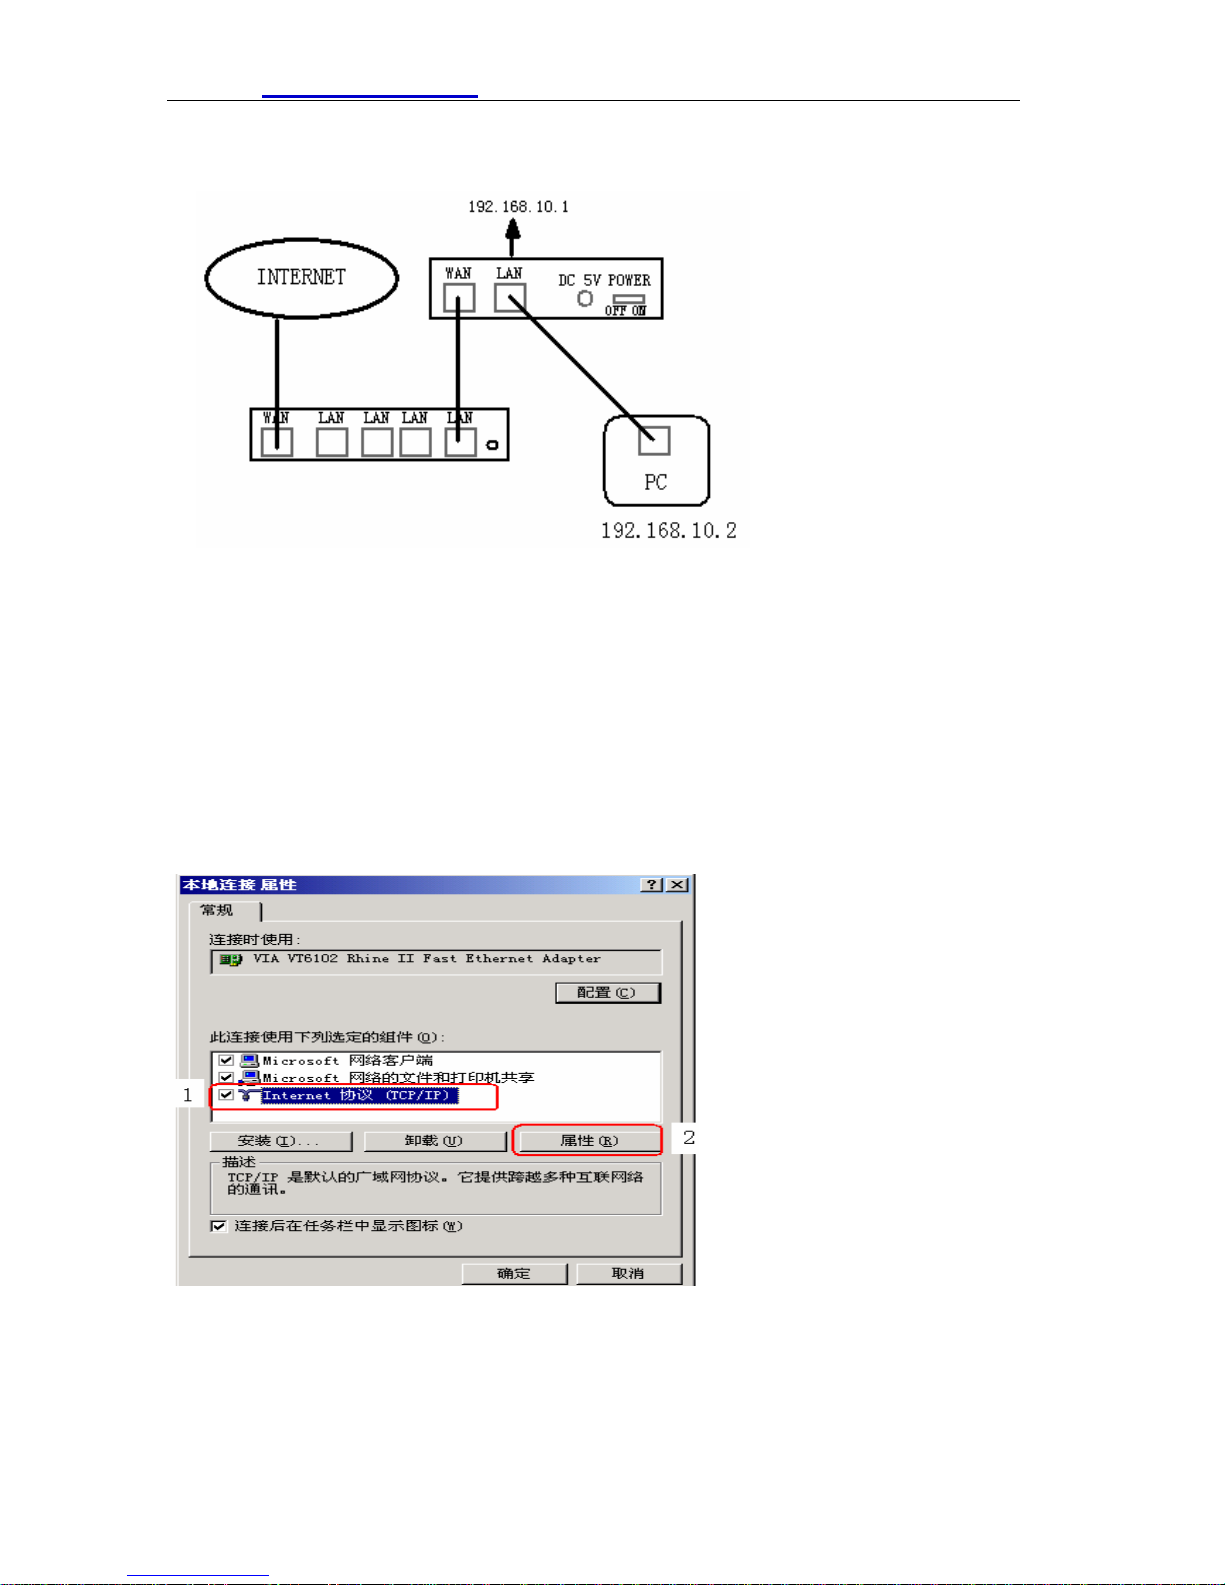
6.1 Physical Connection
6.2 Preparation for Web Config uration
The IP Phone Web Configuration Menu can be accessed by the following URI:
http://Phone-IP-Address. The IP address can be set to either WAN IP address or LAN
IP address, default factory setting of WAN configuration is DHCP Client model,
default LAN IP address is “192.168.10.1”.
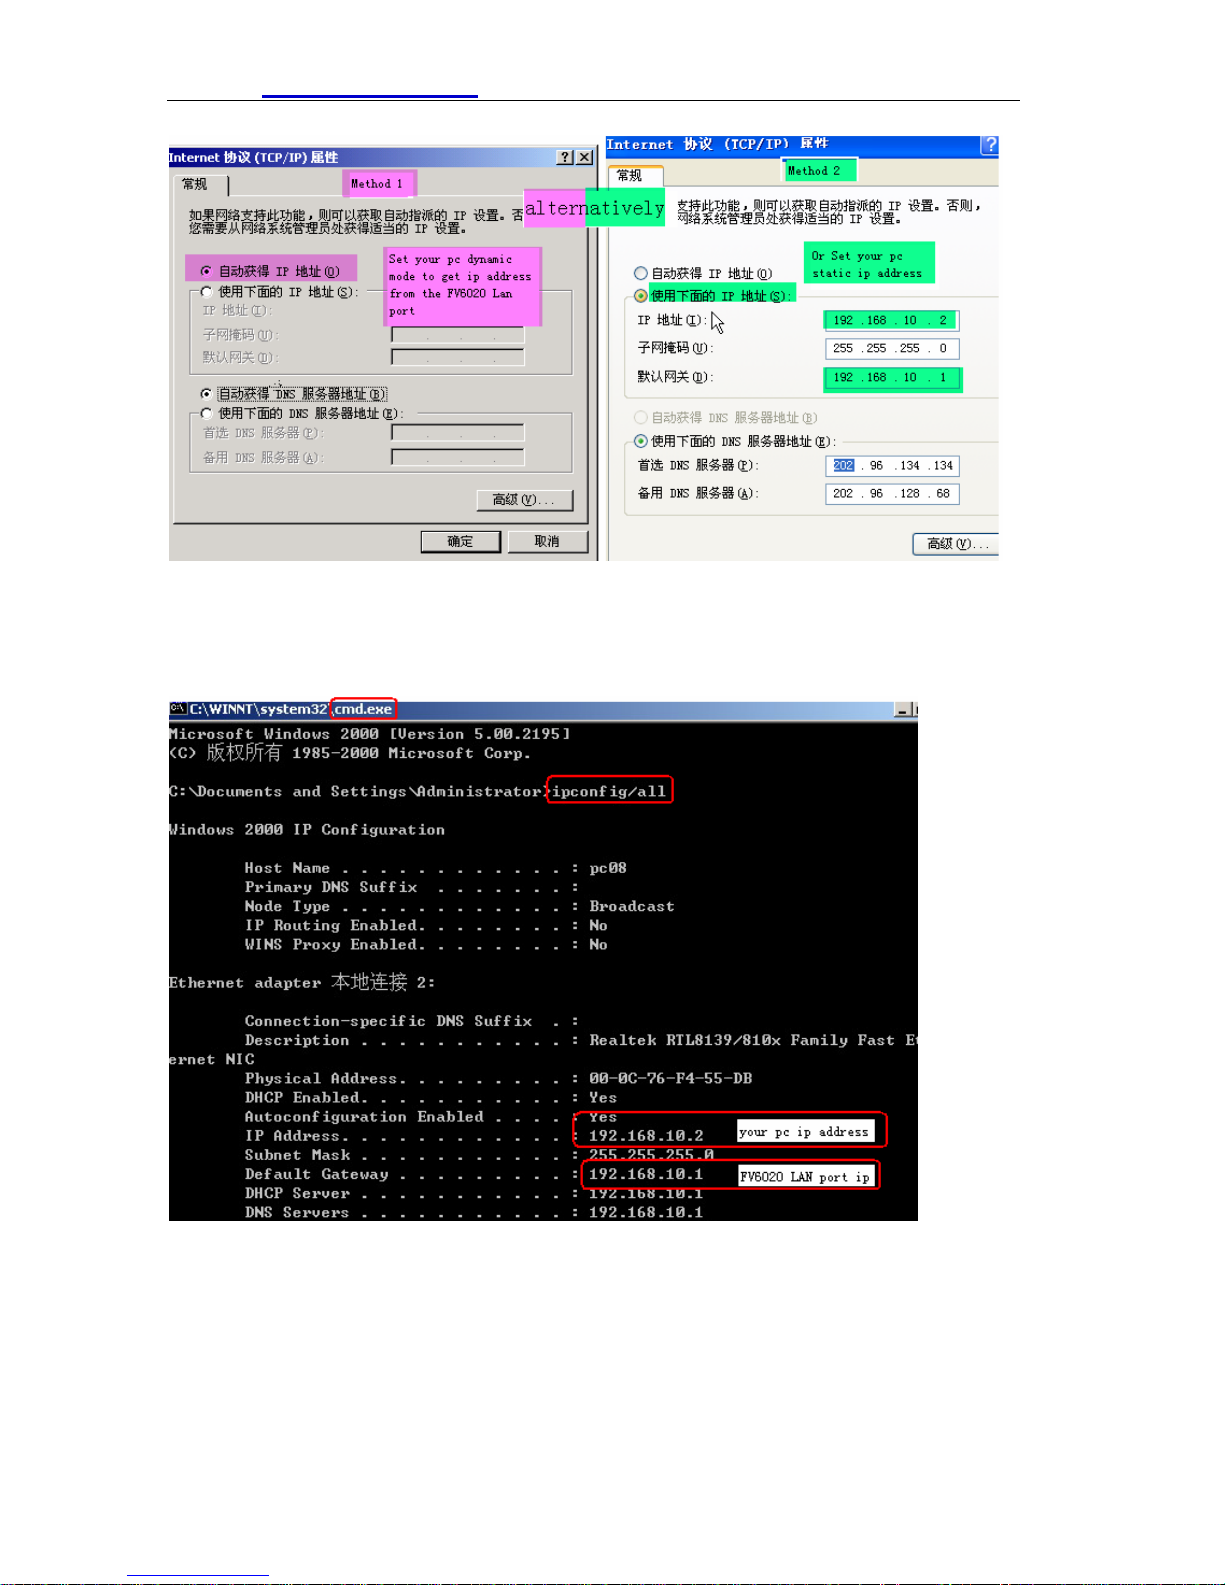
If connect PC with IP Phone LAN port and config to obtain IP address automatically,
you could check the default gateway IP namely LAN IP address of IP Phone. The
procedure as below
a) Access to “Property of local area connection” dialog box
b) Select “Internet Protocol (TCP/IP)”,click “Property” button
c) Setting refers to below dialog box, and then click “OK” button, PC will obtain IP
address automatically.(or set your pc static ip 192.168.10.2)
17
Page 19
HTTP://www.suncti.co.th User Manual
Method 1 Method2
d) Input “cmd” command on the RUN submenu under PC START, key in “ipconfig/all
on the command lines dialog box to find the default gateway IP address, which is
LAN IP address of IP Phone.
18
Page 20
HTTP://www.suncti.co.th User Manual
6.3 User verification
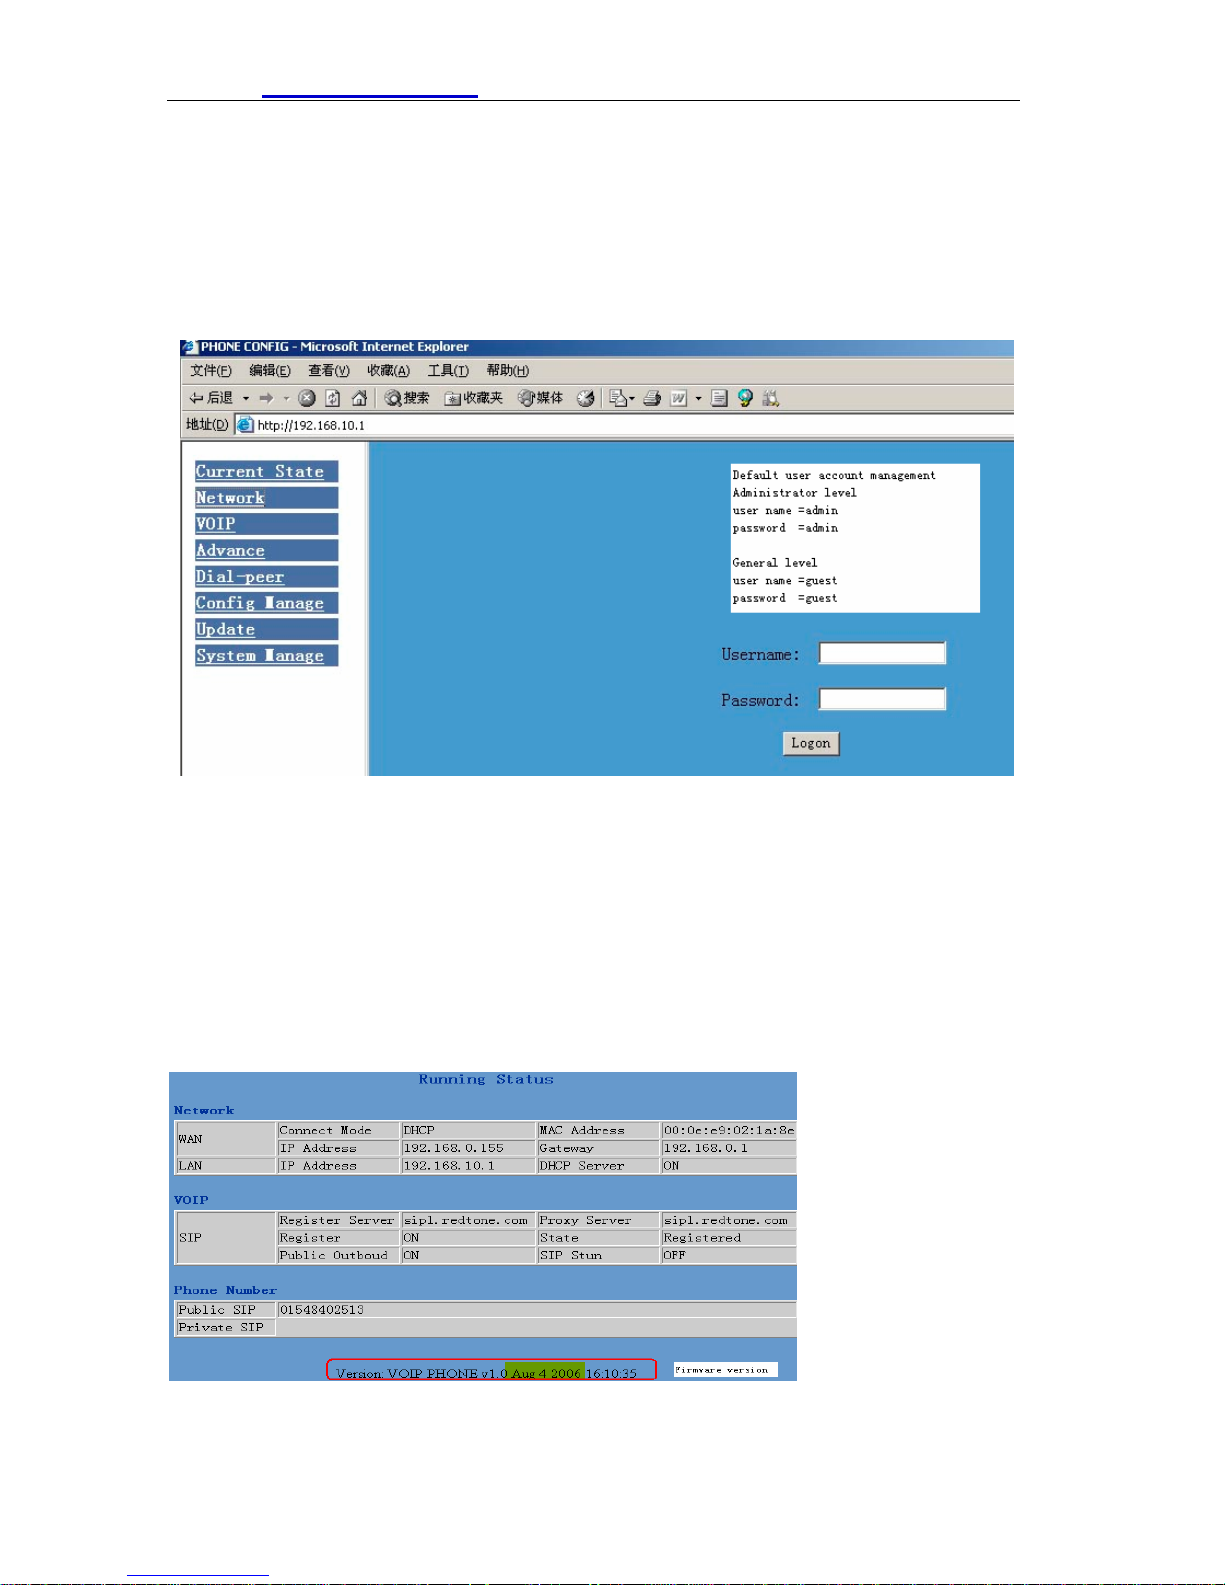
Users are requested to make verification when config or browse the IP phone thru
web pages, users can direct login the config menu by inputting username and
password as below:
Default username and password is:
Administrator: Username: admin password: admin high level user interface
User: Username: guest Username: guest low level user interface
6.4 Current State
On this page user can gather information of each commonly-used parameter of the
phone, it is shown as the following figure:
z Network section: Display the current WAN, LAN configurations of the phone
z VoIP section: Display the current default signaling protocol in use,and server
parameter in use of each protocol
z Phone Number section: Display the phone number against each protocol
z The version number and date of issue have been shown at the end of this page
19
Page 21
HTTP://www.suncti.co.th User Manual
6.5 Network Configuration
Network configuration includes WAN Config and LAN Config.
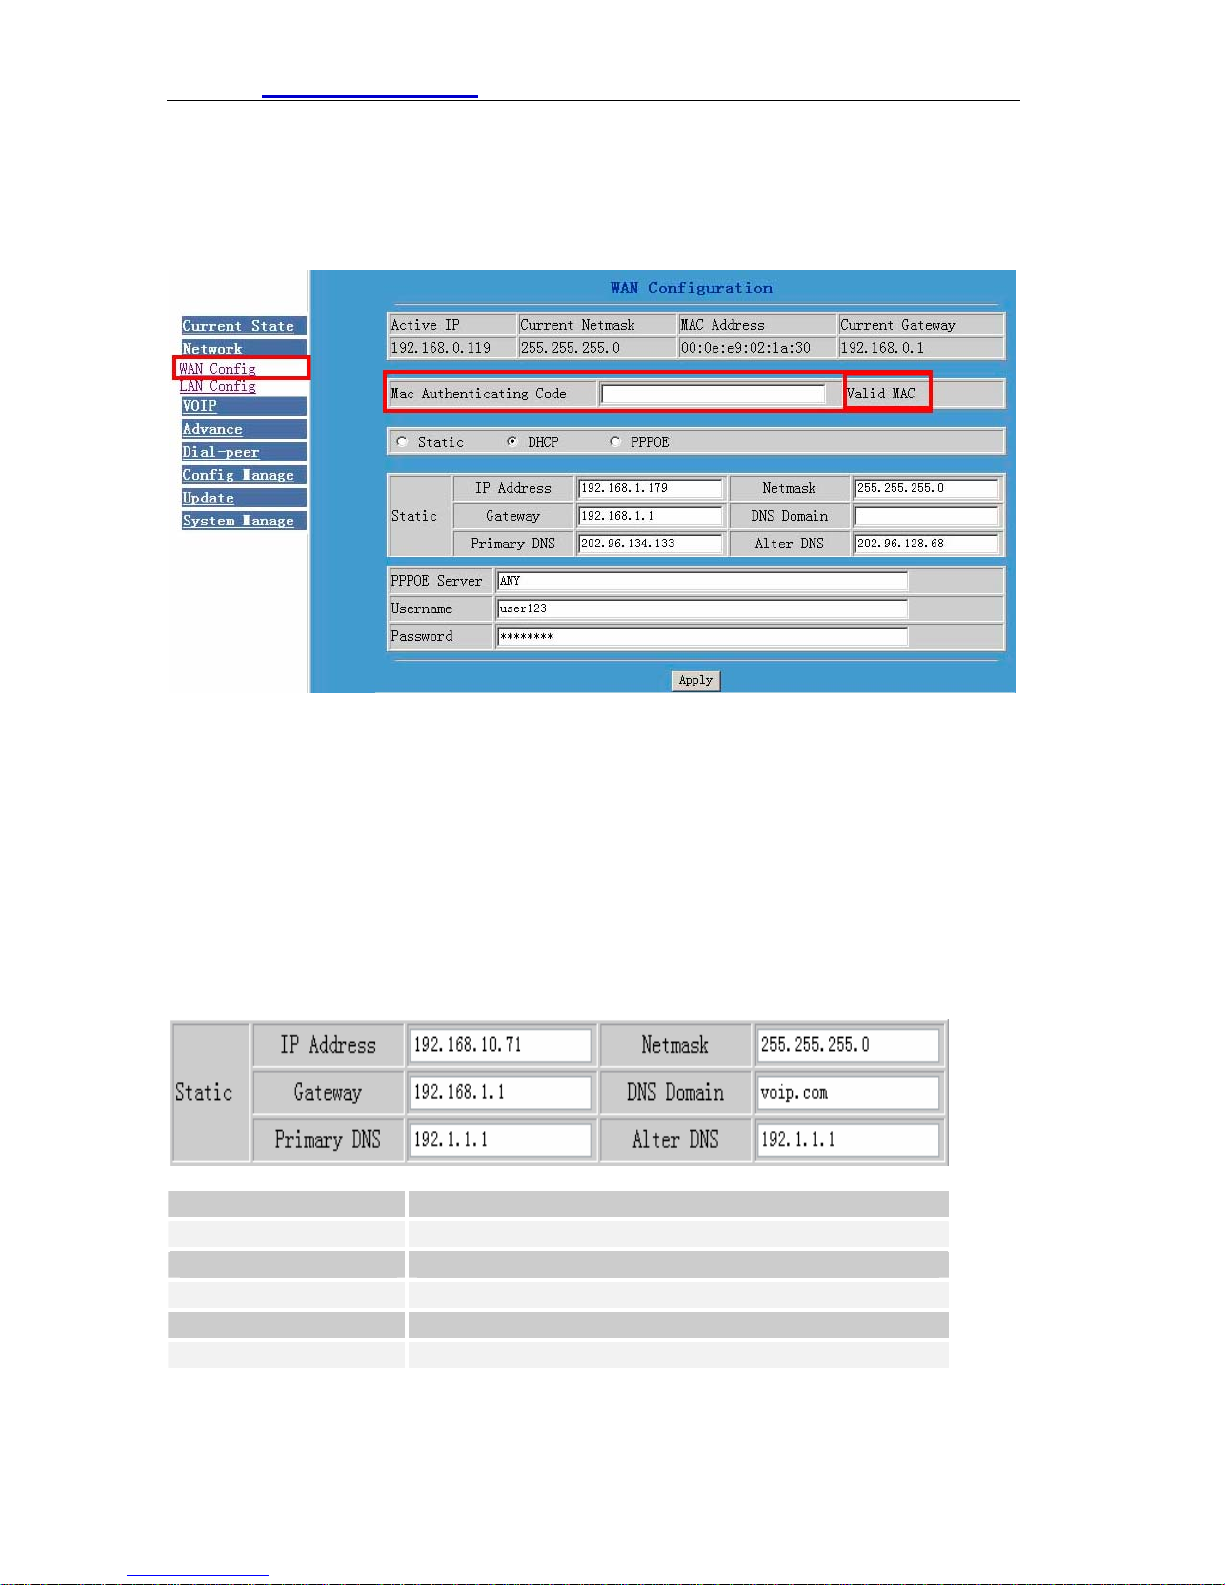
6.5.1 WAN Configuration
This web page displays the WAN parameter configuration.
Display <valid MAC >, that means the phone had been certificated.
Display <invalid MAC>, that means the phone need a Mac Authenticating Code .(get
it from Fanvil or your provider )
Display <invalid MAC, that means the phone can not work normally.
Three models (Static /DHCP/PPPoE) are paratactic. Users can set the right model
base on actual requirements.
z Connect network to internet thru Static mode
Default network config is DHCP model; Users need to set below parameters
IP Address WAN IP address
Netmask Network mask
Gateway Default gateway IP address
DNS Domain Option configuration
Primary DNS IP address for primary Domain Name Server
Alter DNS Option configuration
Click “Apply” button after finished above setting, IP Phone will save the setting
20
Page 22
HTTP://www.suncti.co.th User Manual
automatically with immediate effect.
If users visit IP Phone thru WAN, it need to input “ipconfig” command to get the new
IP address and copy it to web browser bar to visit IP Phone.
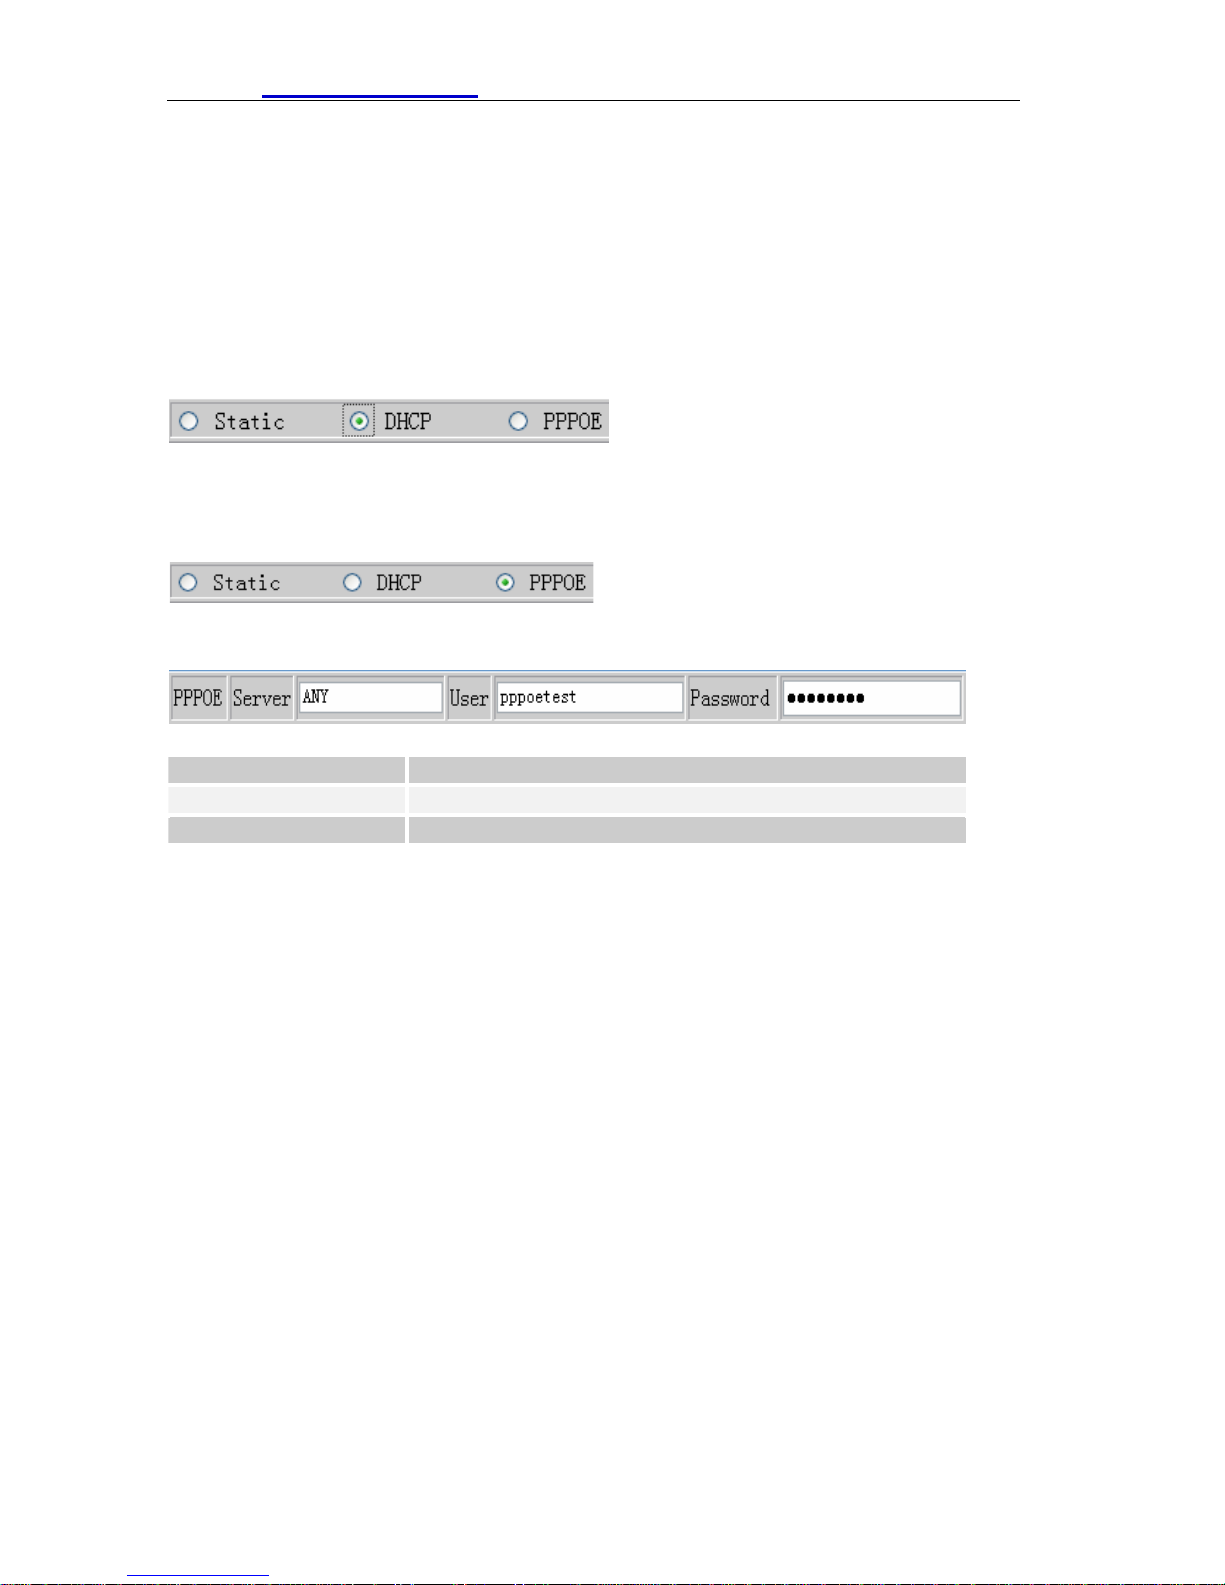
z Connect network to internet thru DHCP mode
Select “DHCP” on below single option, IP Phone will auto-config the WAN parameter
with immediate effect.
z Connect network to internet thru PPPoE mode
Select “PPPOE” on below single option,
Set below parameter of PPPOE mode
Server If ISP no special requirements, remains default setting
User Provided by ADSL ISP
Password Provided by ADSL ISP
Click “Apply” button after finished above setting, IP Phone will auto-config the WAN
parameter with immediate effect. The setting of WAN is still effective and enables IP
Phone to connect to internet.
21
Page 23
HTTP://www.suncti.co.th User Manual
6.5.2 LAN Configuration
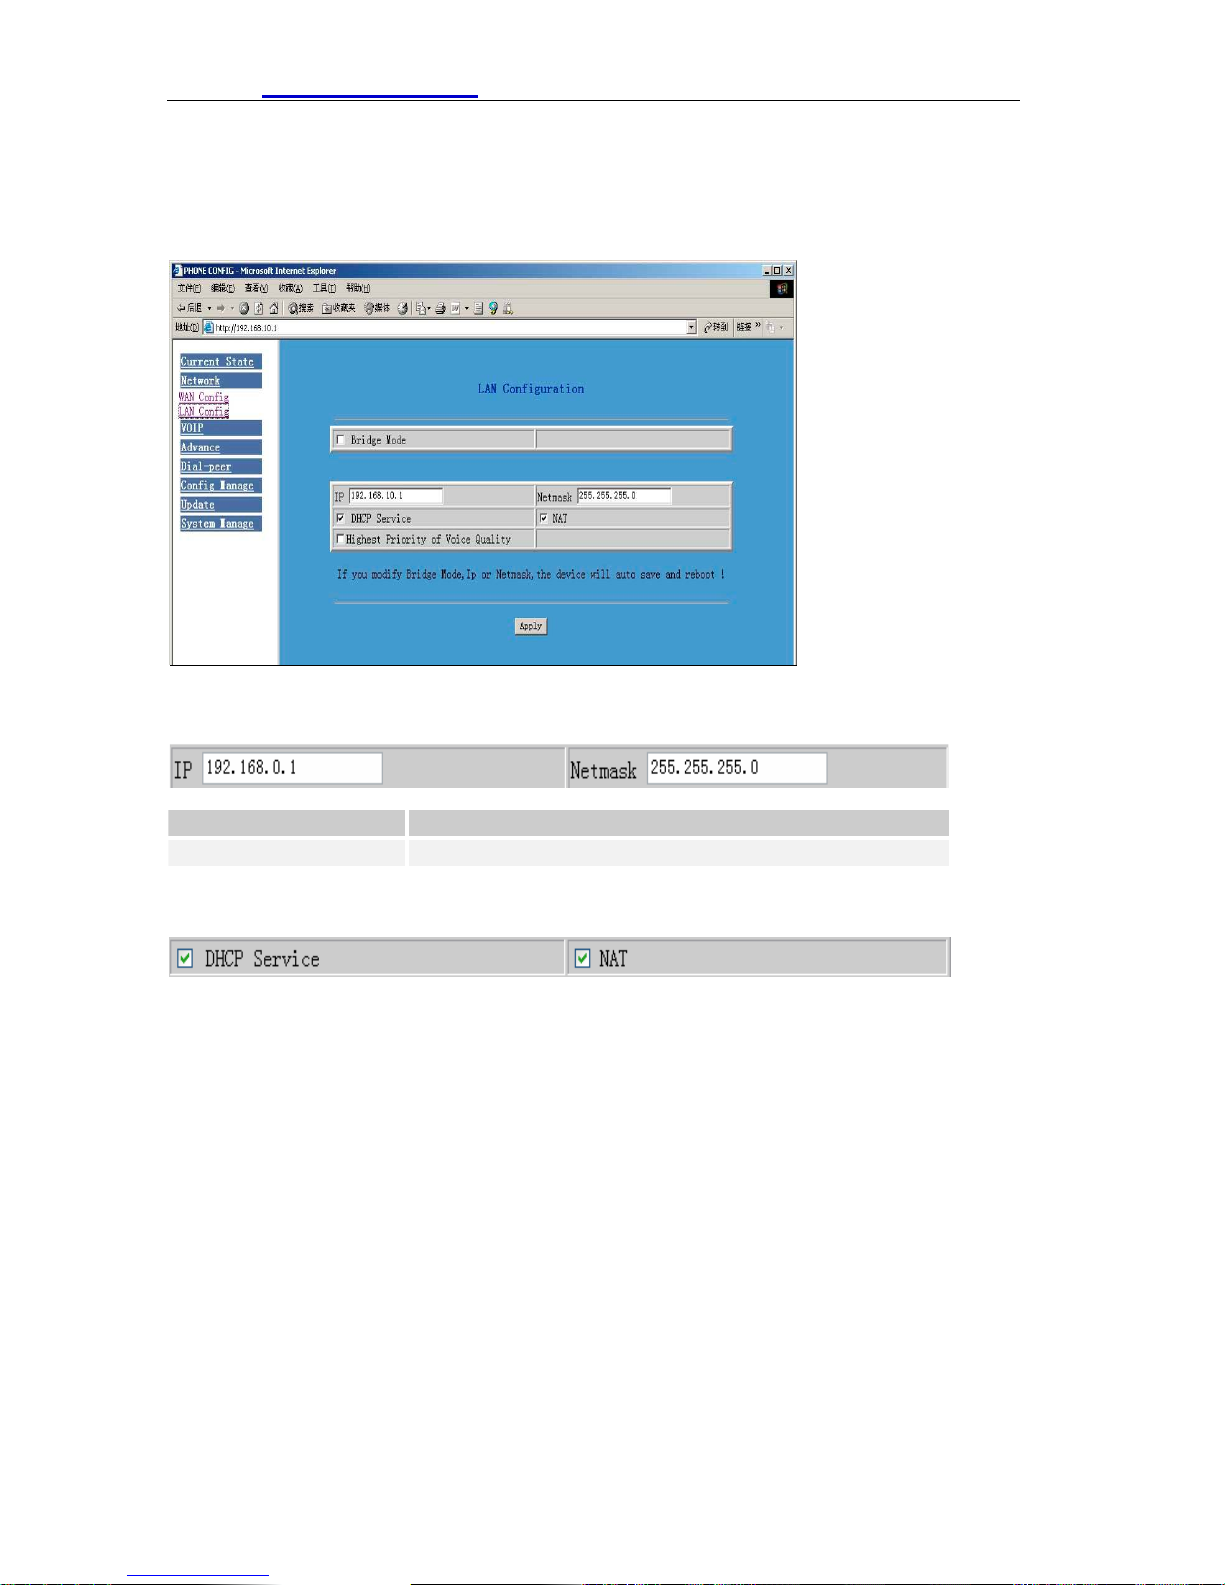
This web page displays the LAN parameter configuration. Please note once the
bridging mode is selected, the LAN configuration will be no longer effective.
Configuration Example
z Config LAN: generally config one private IP address
IP LAN IP address
Netmask Network Mask
z Start LAN DHCP Service and NAT or not: default setting is start
Start Bridge Mode or not(transparent mode): Once start Bridge Mode, some parts of
LAN config will be disabled, and the phone will no longer set IP address for LAN
physical port,LAN and WAN will join in the same network;
22
Page 24
HTTP://www.suncti.co.th User Manual
6.6 VOIP Configuration
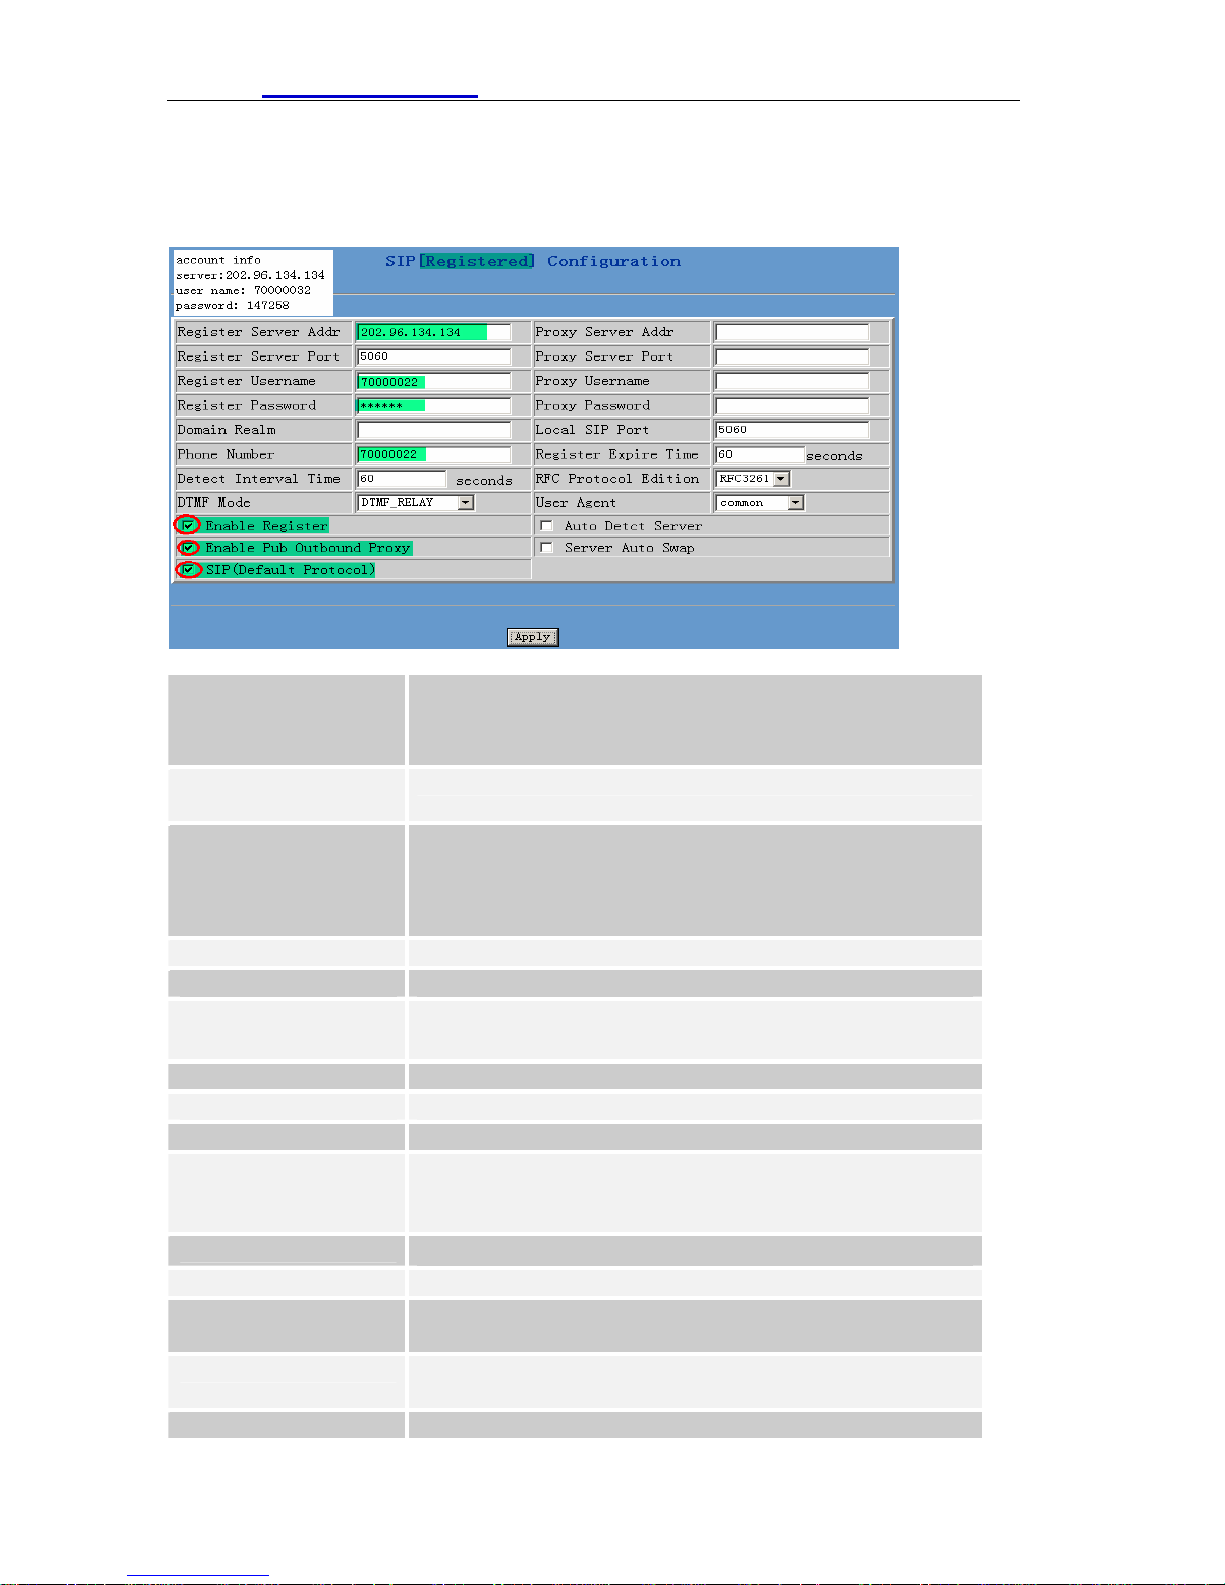
This section is to config signaling protocol for the SIP Server and Client.
User can configure specific parameter of SIP1 on this page:
Definition of each parameter described as below:
SIP[Unregistered]
Configuration
Register Server
address
Proxy Server addr
Register Server Port Set SIP register server signal port
Proxy Server Port Set SIP proxy server signal port
Register Username
Proxy Username Set the SIP proxy server account username
Register Password Set password of SIP register server account
Proxy Password Set password of SIP register account
Domain Realm Enter the sip domain if any, otherwise S01 will use the
Local SIP Port
Phone Number Set assigned phone number
Register Expire Time Set expire time of SIP server register, default is 120
Detect Interval Time Set detection interval time of server, default is 120
RFC Protocol Edition Enable the phone to use protocol edition. When the
SIP register state ; if register successfully, show
“Registered” in the square bracket, otherwise show
Unregistered
Set SIP register server IP address
Set proxy server IP address(usually SIP will provide the
same configuration of proxy server and register server,
if different(such as different IP addresses), then each
server's configuration should be modified separately)
Set SIP register server account username(Usually it is
the same with the config port number)
proxy server address as sip domain. (Usually it is same
with registered server and proxy server IP address).
Set local signal port,the default is 5060
seconds
seconds
23
Page 25
HTTP://www.suncti.co.th User Manual
phone need to communicate with phones using SIP1.0
such as CISCO5300 and so on, need to modify into
RFC2543. the default is to RFC3261;
DTMF Mode Set DTMF sending mode, support RFC2833,
DTMF_RELAY (in-band audio) and SIP info
User Agent Set the user agent if have, default is common
Enable Register Configure enable/disable register
Auto Detct Server Co-work with Server Auto Swap and Detect Interval
Time. Enable this option, S01 will periodically detect
whether the public SIP server is available, if the server
is unavailable, the S01 will switch to the back-up SIP
sever, and continue detecting the public sip server. S01
will switch back to the primary SIP server if the server is
available again.
Enable Pub
Outbound Proxy
Server Auto Swap
SIP (Default Protocol) Set SIP as the default signaling protocol
After finished the aforesaid network and VoIP configurations on the phone and
network communication has been implemented,the user can make VoIP calls by the
calling register and proxy server.
Configure to enable to use public outbound proxy,if you
have no stun server , advise to enable the option
Configure main and backup auto-swap server;if the
phone enables main and backup server function,the
automatic detection and auto-swap functions should
both be chosen
Note:
Some ISP internet may inhibit the phone to register and cancel the register in
process, so user had better cancel apply or register soon and then submit
registration repeatedly. Server may stop response of dialogue machine, then
the phone receives no register/cancel login request and registration state will
show incorrectness!
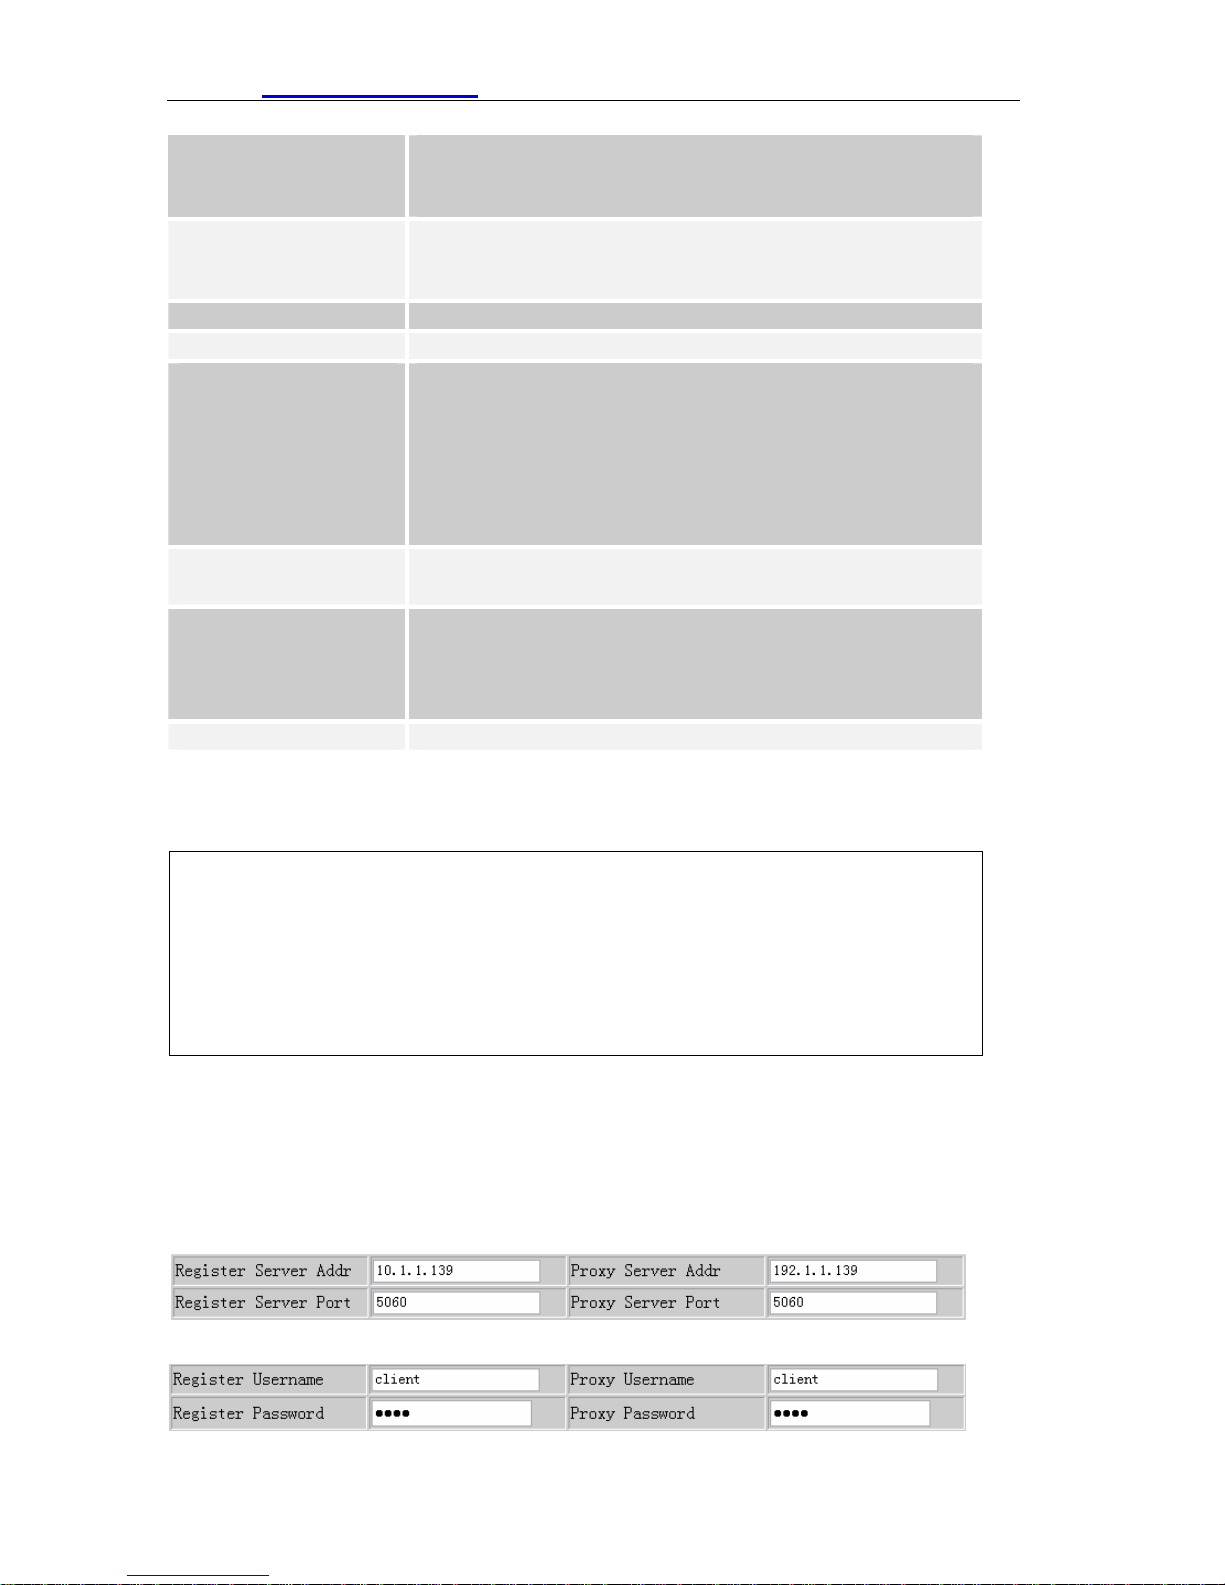
Configuration Example
Firstly users should get the account info from VOIP Operator (Including Server IP
address, port, username, password etc.) and follow below procedure.
z Config registered server and proxy server IP address and signaling port.
(Support DNS for registered server and proxy server)
z Config the username and password for registered server and proxy server.
24
Page 26
HTTP://www.suncti.co.th User Manual
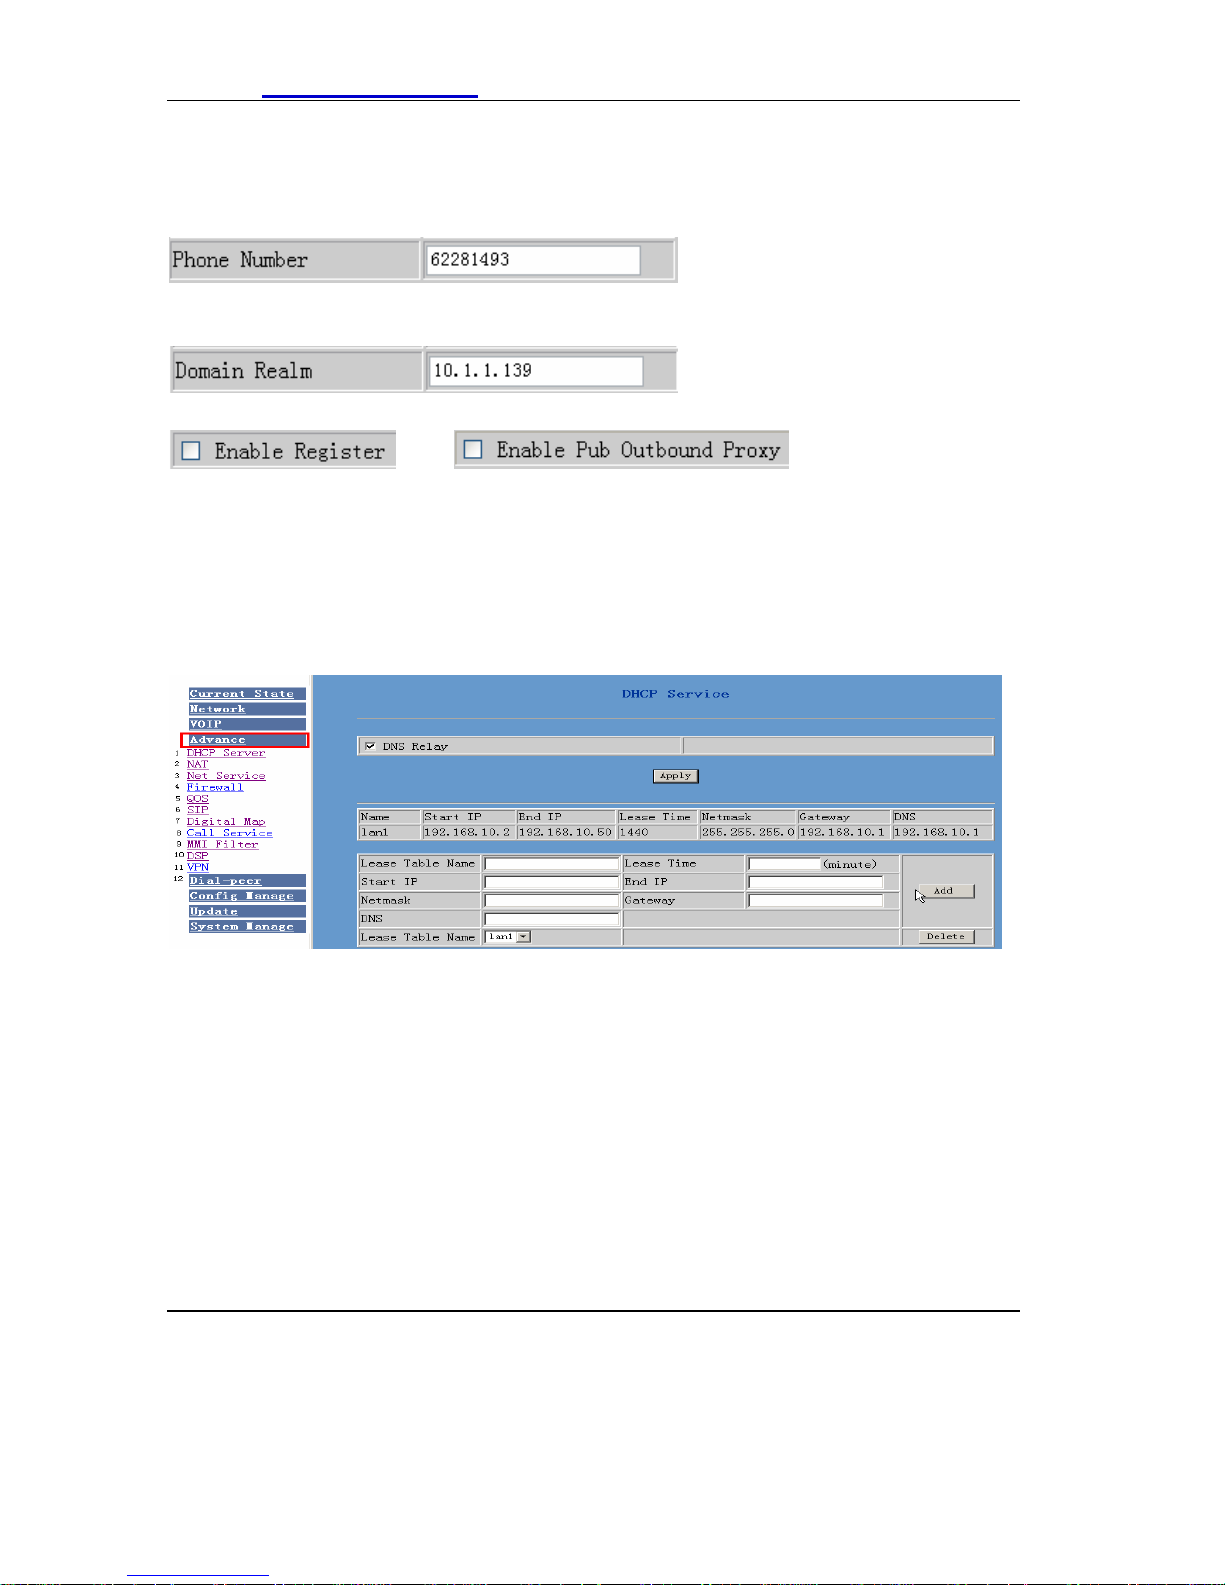
z Config the phone number (Usually phone number is same with SIP account)
Remark: due to the above register username is “client”, so the phone number is
different from SIP account)
z Config the domain realm (Usually it is same with registered server and proxy
server IP address, Let it be blank)
z Select below two option and registered in local outbound public proxy
&
Usually these two option need to be selected, when you want to use SIP1.
6.7 Advanc e
6.7.1 DHCP Server Configuration
When S01 work as a router, this config is for S01 LAN port network device
DNS Relay: DNS relay acts as a forwarder between the DNS Clients and the DNS
Servers, DNS relay is designed for home/office networks where the users might want
to dial into more than one Internet Service Provide (ISP)
DHCP server manage page.
User may trace and modify DHCP server information in this page.
DNS Relay: enable DNS relay function.
User may use below setting to add a new lease table.
Lease Table Name:
Lease table name.
Lease Time: DHCP server lease time.
Start IP: Start IP of lease table.
End IP: End IP of lease table. Network device connecting to the S01
LAN port can dynamic obtain the IP in the range between start IP and end IP.
Netmask: Netmask of lease table.
Gateway: Default gateway of lease table
DNS: Default DNS server of lease table.
Notice: This setting won’t take ef fect unless you save the confi g and reboot the device
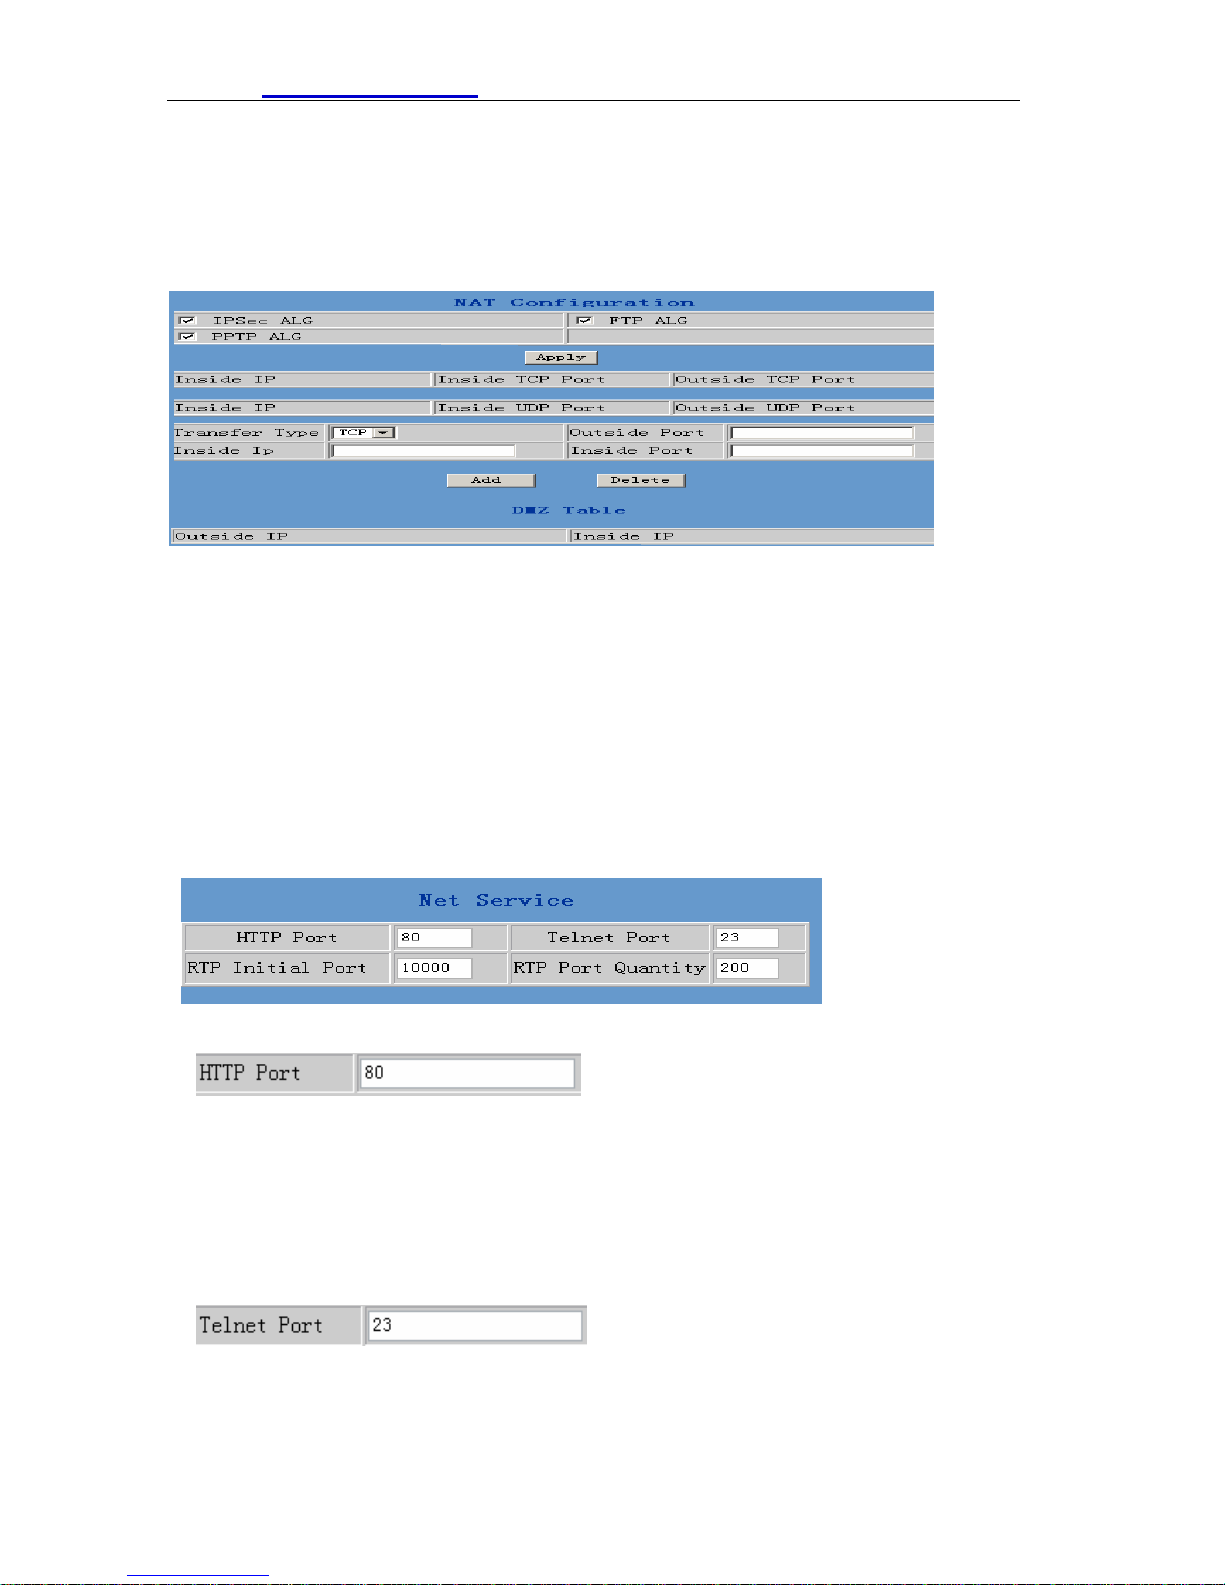
6.7.2 NAT Configuration
This page is for NAT configuration, such port forward, DMZ .
Network Address Translation (NAT) provides a mechanism for a privately addressed
25
Page 27
HTTP://www.suncti.co.th User Manual
network to access registered networks, such as the Internet, without requiring a
registered subnet address. This eliminates the need for host renumbering and allows
the same IP address range to be used in multiple intranets. With NAT, the inside
network continues to use its existing private or obsolete addresses. These addresses
are converted into legal addresses before packets are forwarded onto the outside
network.
Advance NAT setting: Maximum 10 items for TCP and UDP port mapping.
IP Sec ALG: Enable/Disable IP Sec ALG;
FTP ALG: Enable/Disable FTP ALG;
PPTP ALG: Enable/Disable PPTP ALG;
Transfer Type: Transfer type using port mapping.
Inside IP: LAN device IP for port mapping.
Inside Port: LAN device port for port mapping.
Outside Port: WAN port for port mapping.
Click Add to add new port mapping item and Delete to delete current port mapping
item.
6.7.3 NAT Service Configuration
6.7.3.1
Configure web browse port, the default is 80 port,if you want to enhance system
safety,you'd better change it into non-80 standard port;
Example:
The ip address is 192.168.1.70. you change the port value to 8090, the accessing
address is http://192.168.1.70:8090
But if the value is 0, that imply it can not be configured by web browser.
6.7.3.2
Configure telnet port,the default is 23 port. You can change the value to others.
Example: The IP address is 192.168.1.70. you change the port value to 8023, the
accessing address is telnet 192.168.1.70:8023
26
Page 28
HTTP://www.suncti.co.th User Manual
6.7.3.3
Enable RTP initial port configuration. It is dynamic allocation;
6.7.3.4
Configure the maximum quantity of RTP port. The default is 200;
Leased IPMAC correspondence table of DHC. The table will display all device
getting IP address from S01 LAN port by DHCP.
The configuration on this page needs to be saved after modified and will go
into effect after restarting. If the Telnet, HTTP port will be modified, the port is
better to be set as greater than 1024,because the 1024 port system will save
ports. Set the HTTP port as 0,then the http service will be disabled.
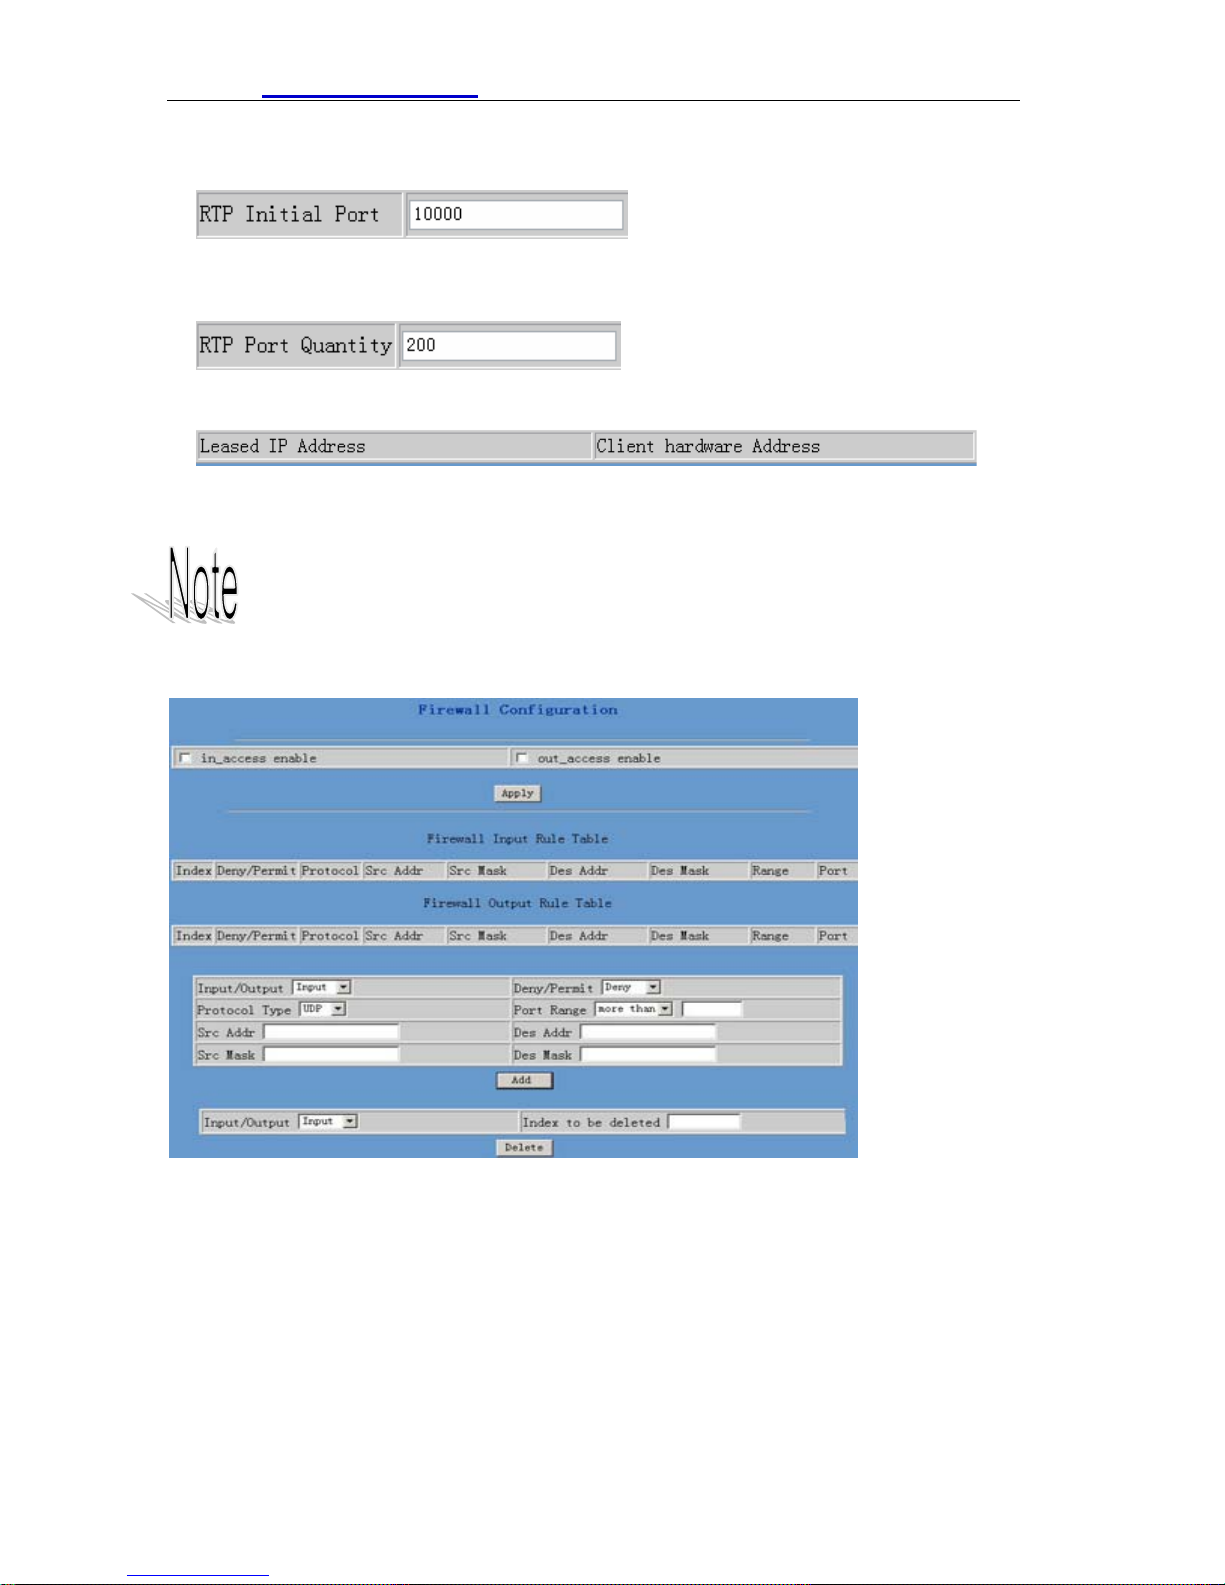
6.7.4 Firewall
Firewall Setting Page. User may set up firewall to prevent unauthorized Internet users
from accessing private networks connected to the Internet (input rule), or prevent
unauthorized private network devices to access the internet.
Access list support two type limits: input_access limit or output_access limit. Each
type support 10 items maximum.
S01 firewall filter is base WAN port. So the source address or input destination
address should be WAN port IP address.
Configuration:
27
Page 29
HTTP://www.suncti.co.th User Manual
in_access enable: enable in _access rule
out_access enableA: enable out _access rule
Input/Output: specify current adding rule is input rule or output rule.
Deny/Permit: specify current adding rule is deny rule or permit rule.
Protocol Type: protocol using in this rule: TCP/IP/ICMP/UDP.
Port Range: port range if this rule
Src Addr: source address. can be single IP address or network address.
Dest Addr: Destination address can be IP address or network address.
Src Mask: source address mask. Indicate the source is dedicate IP if set to
255.255.255.255. Otherwise is network ID
Des Mask: Destination address mask. Indicate the source is dedicate IP if
set to 255.255.255.255. Otherwise is network ID
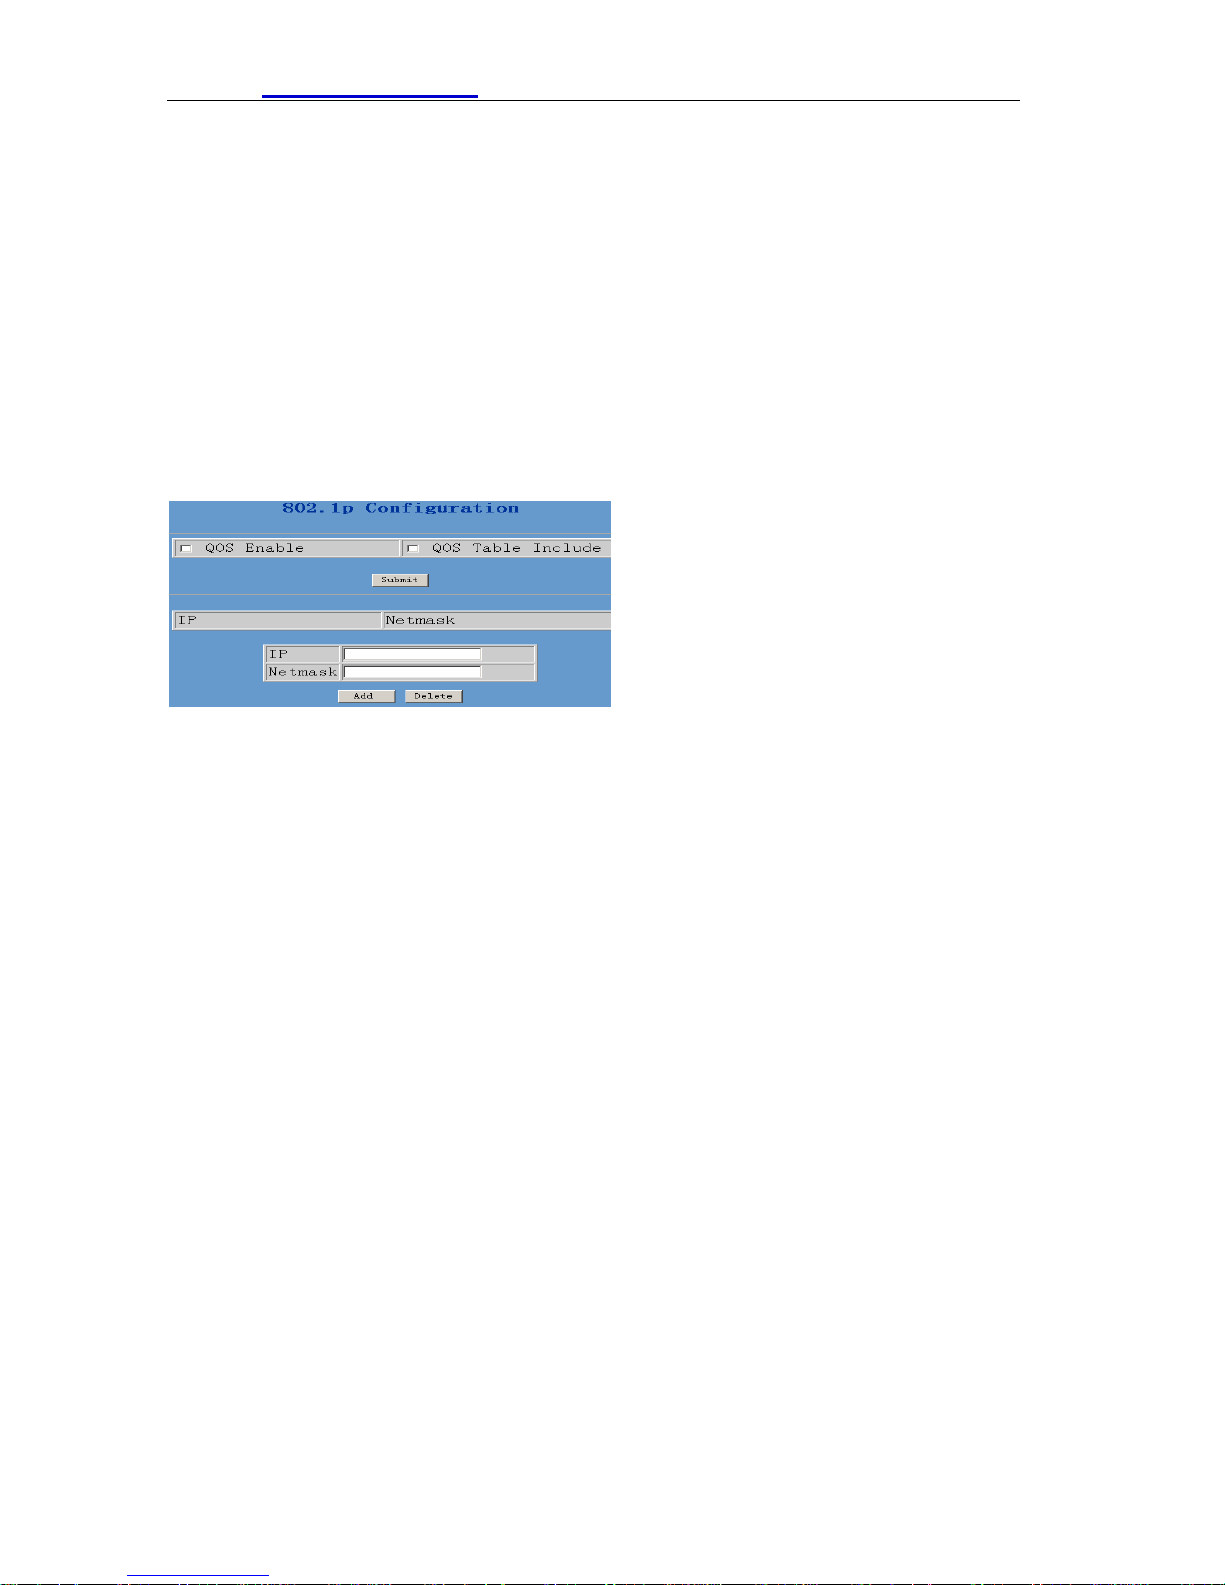
6.7.5 QOS 802.1p Configuration
QoS Control based on 802.1p for different IP users. The QoS is used to mark the
network communication priority in the data link/MAC sub-layer. S01 will sorted the
packets using the QoS and sends it to the destination. QoS provides service classes
for accessing traffics in Internet.
QoS Enable: Enable QoS service.
QoS Table: enable include QoS table, S01 will only provide QoS service to the
network address included in the QoS table. Disable the option. S01
provides QoS service to the network address outside the QoS table.
Delete Enter the IP/MASK configure and select delete to delete corresponding
item
Add: user can set the QoS Table using IP and Netmask. the IP can be
network address (set netmask to 255.255.255.255)
6.7.6 Advance SIP Configuration
28
Page 30
HTTP://www.suncti.co.th User Manual
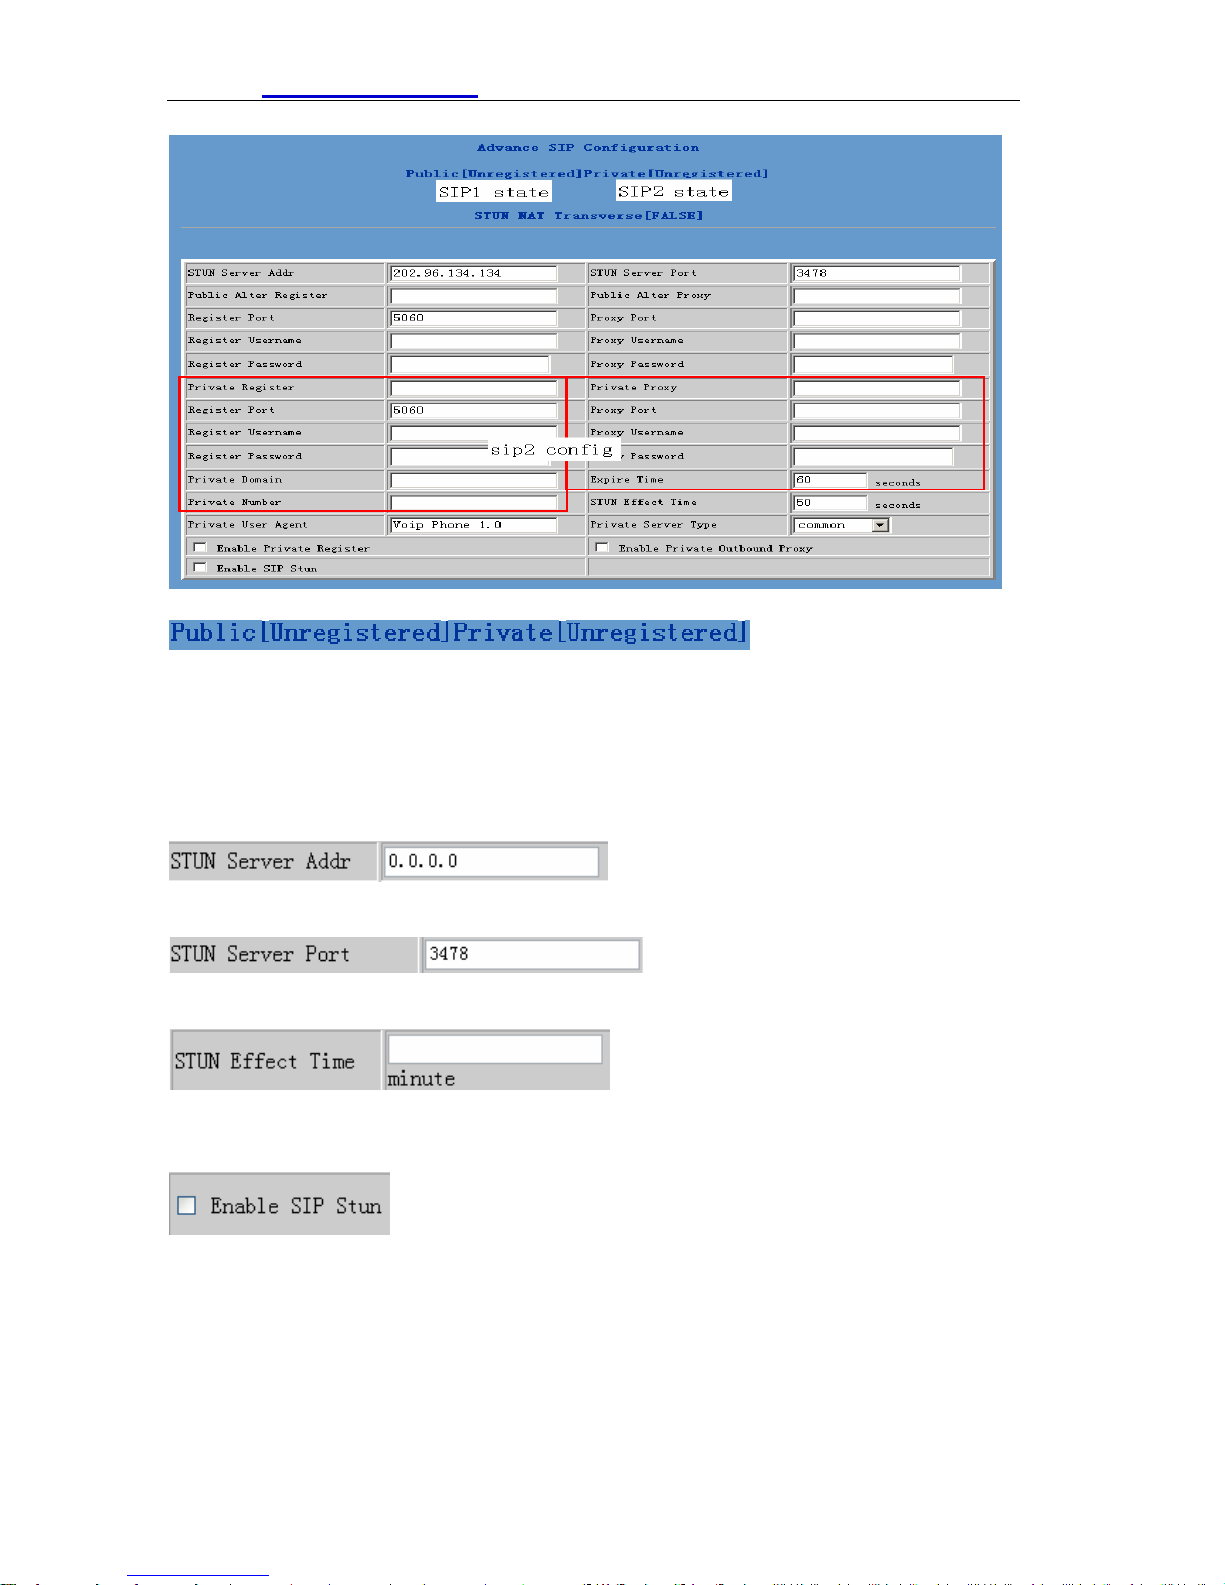
To show the phone whether has been registered on public server or private server
SIP STUN Configuration:
STUN can support SIP terminal's penetration to NAT in the inner-net. In this way, as
long as there is conventional SIP proxy and a STUN server placed in the public net, it
will do; but STUN only supports three NAT modes:FULL CONE, restricted, port
restricted.
IF you have stun server .please input stun server address here.
The STUN server default port is 3478
The unit is minute. if you have STUN server .please input interval time for STUN`S
detection on NAT type.
Configure enable/disable SIP STUN;if you have stun server .please enabe the
option.
Public Backup Server Configuration
29
Page 31
HTTP://www.suncti.co.th User Manual
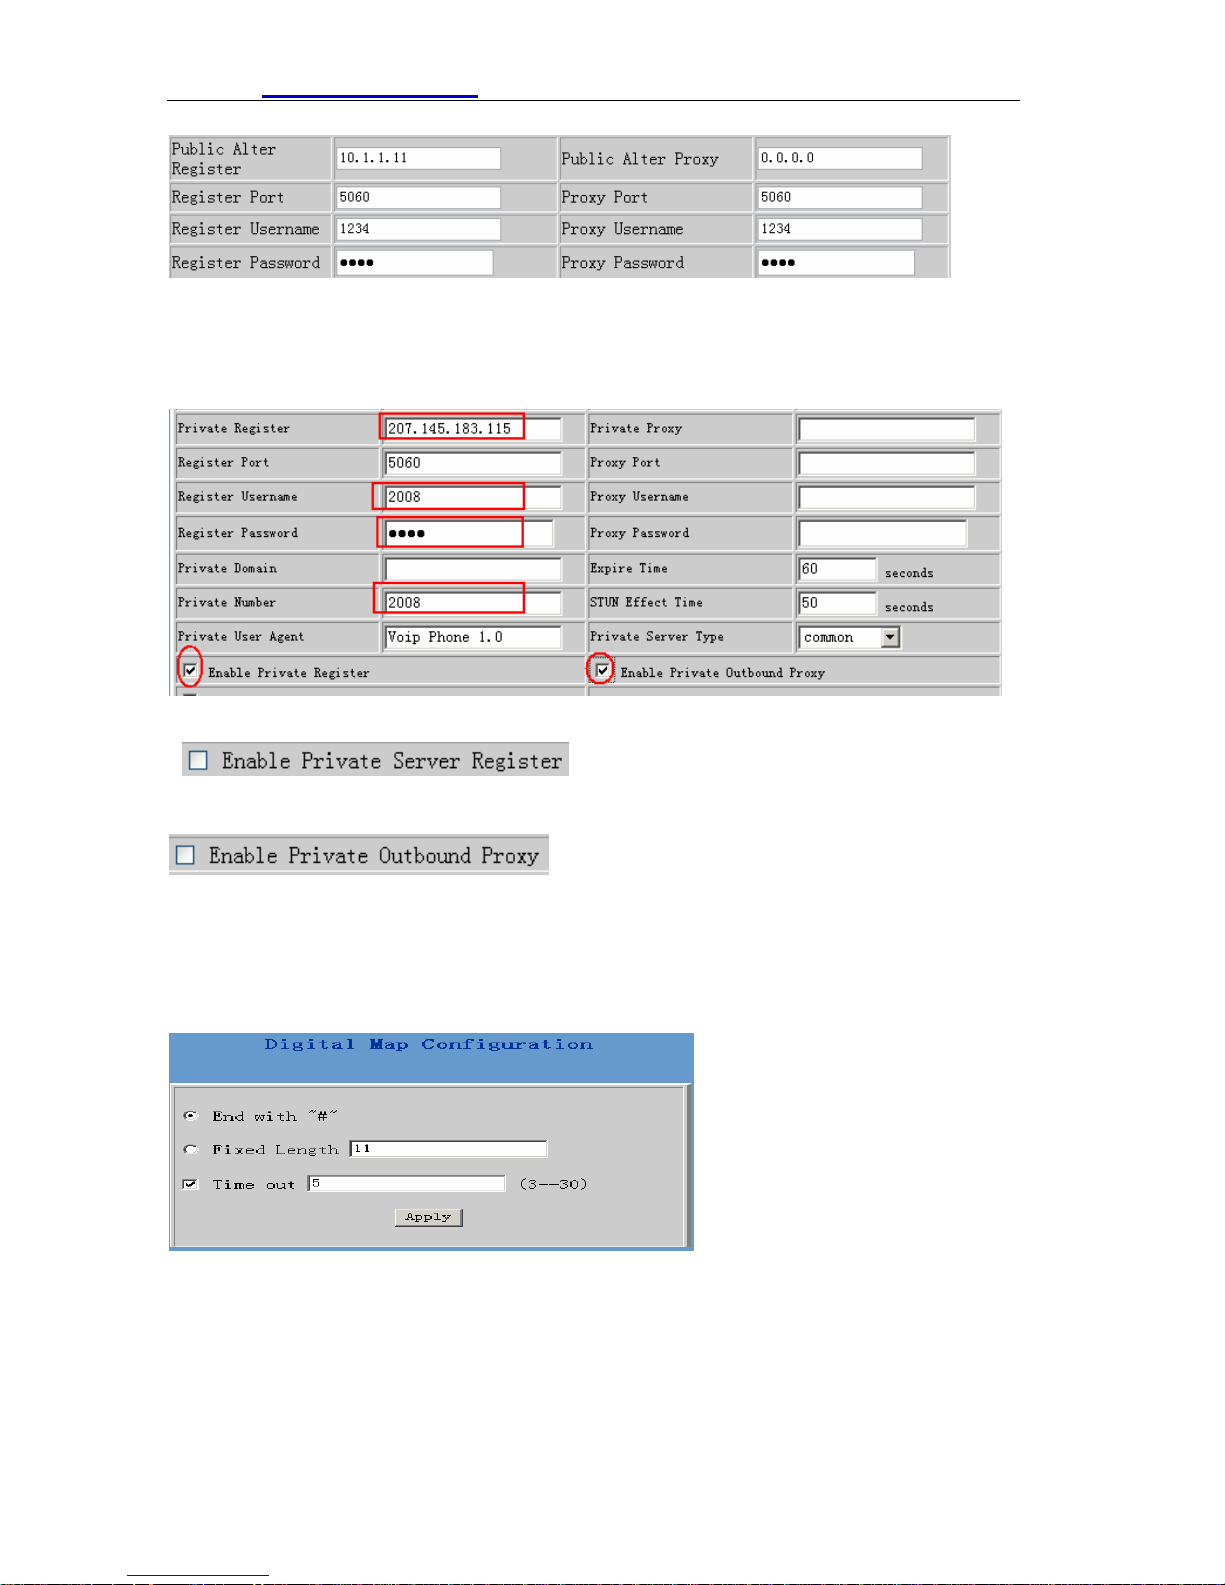
The specific configuration parameter has the same meaning with public server. It
should be noted that the username and password should be the same with the public
main server.
Private Server(SIP2) Configuration.
Specific configuration parameter has the same meaning with public server.
Configure permit/deny private server register;
Configure enable/disable private outbound proxy ; if you have no stun
server .advise to enable the option.
Note: about how to use SIP ,Please refer to the Dial peer chapter.
6.7.7 Digital Map Configuration
6.7.7.1 Fixed Digital Map
End With “#”: Use # as the end of dialing.
Fixed Length: When the length of the dialing match, the call will be sent.
Timeout: Specify the timeout of the last dial digit. The call will be sent after
timeout
6.7.7.2 User D ef i n e F lexible Digital Map Table
30
Page 32
HTTP://www.suncti.co.th User Manual
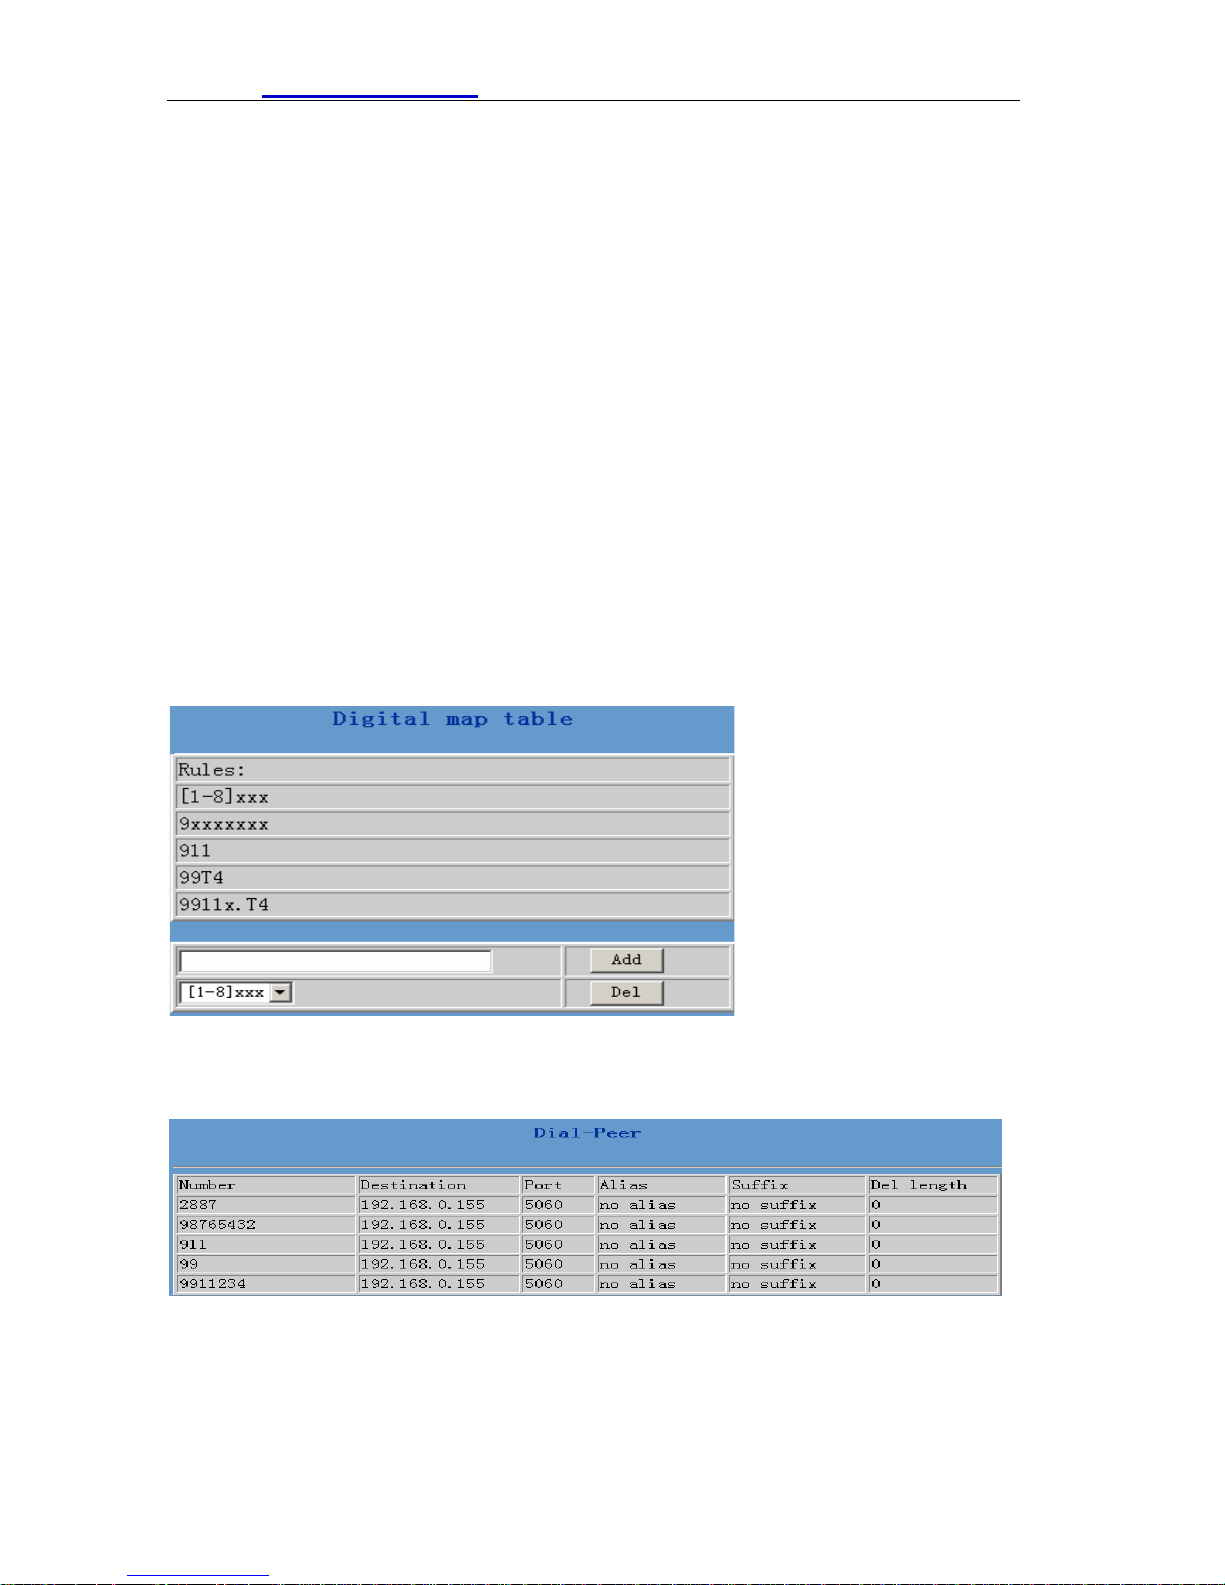
Digit map is a set of rules to determine when the user has finished dialing. Digital Map
is based on some rules to judge when user end their dialing and send the number to
the server. With digital map, users don’t have to press ‘#’ key or "call"key after dialing.
If the number dialed matches some item in the digital map table, or it doesn’t match
with any item, this number will be sent out immediately. It is not like using dial peer .
Using digital map won’t change the number dialed, the number sent is the same as
the number dialed.
X represents any one number between 0 and 9.
Tn represents the last digit timeout. here [ n ] represents the time from 0~9 second, it
is necessary. Tn must be the last two digit in the entry. If Tn is not included in the
entry, we use T0 as default, it means system will sent the number immediately if
the number matches the entry.
(Dot) represents any number and no length limit.
[ ] number location value range . It can be a number range(such as [1-4]), or
number is separated by comma such as [1,3,5],, or use a list such as [234]
Example:
[1-8]xxx any 4 digits number between 1000 and 8999 sending out immediately
9xxxxxxx any 8 digits number starting with 9 sending out immediately
911 after finishing dialing 911 ,it will send out immediately
99T4 after finishing dial 911, it will send out in 4 second
9911x.T4 any more than 5 digits length starting with 9911, sending out within 4
seconds.
Using digital map can be combined with dial peer. First digital map will determine
when the user finished dialing, then convert this number to the number actually sent
according to "dial peer".
When user dial 2887 or 98765432、911、99 、9911234,they will send out immediately.
6.7.8 Call Service Configuration
31
Page 33
HTTP://www.suncti.co.th User Manual
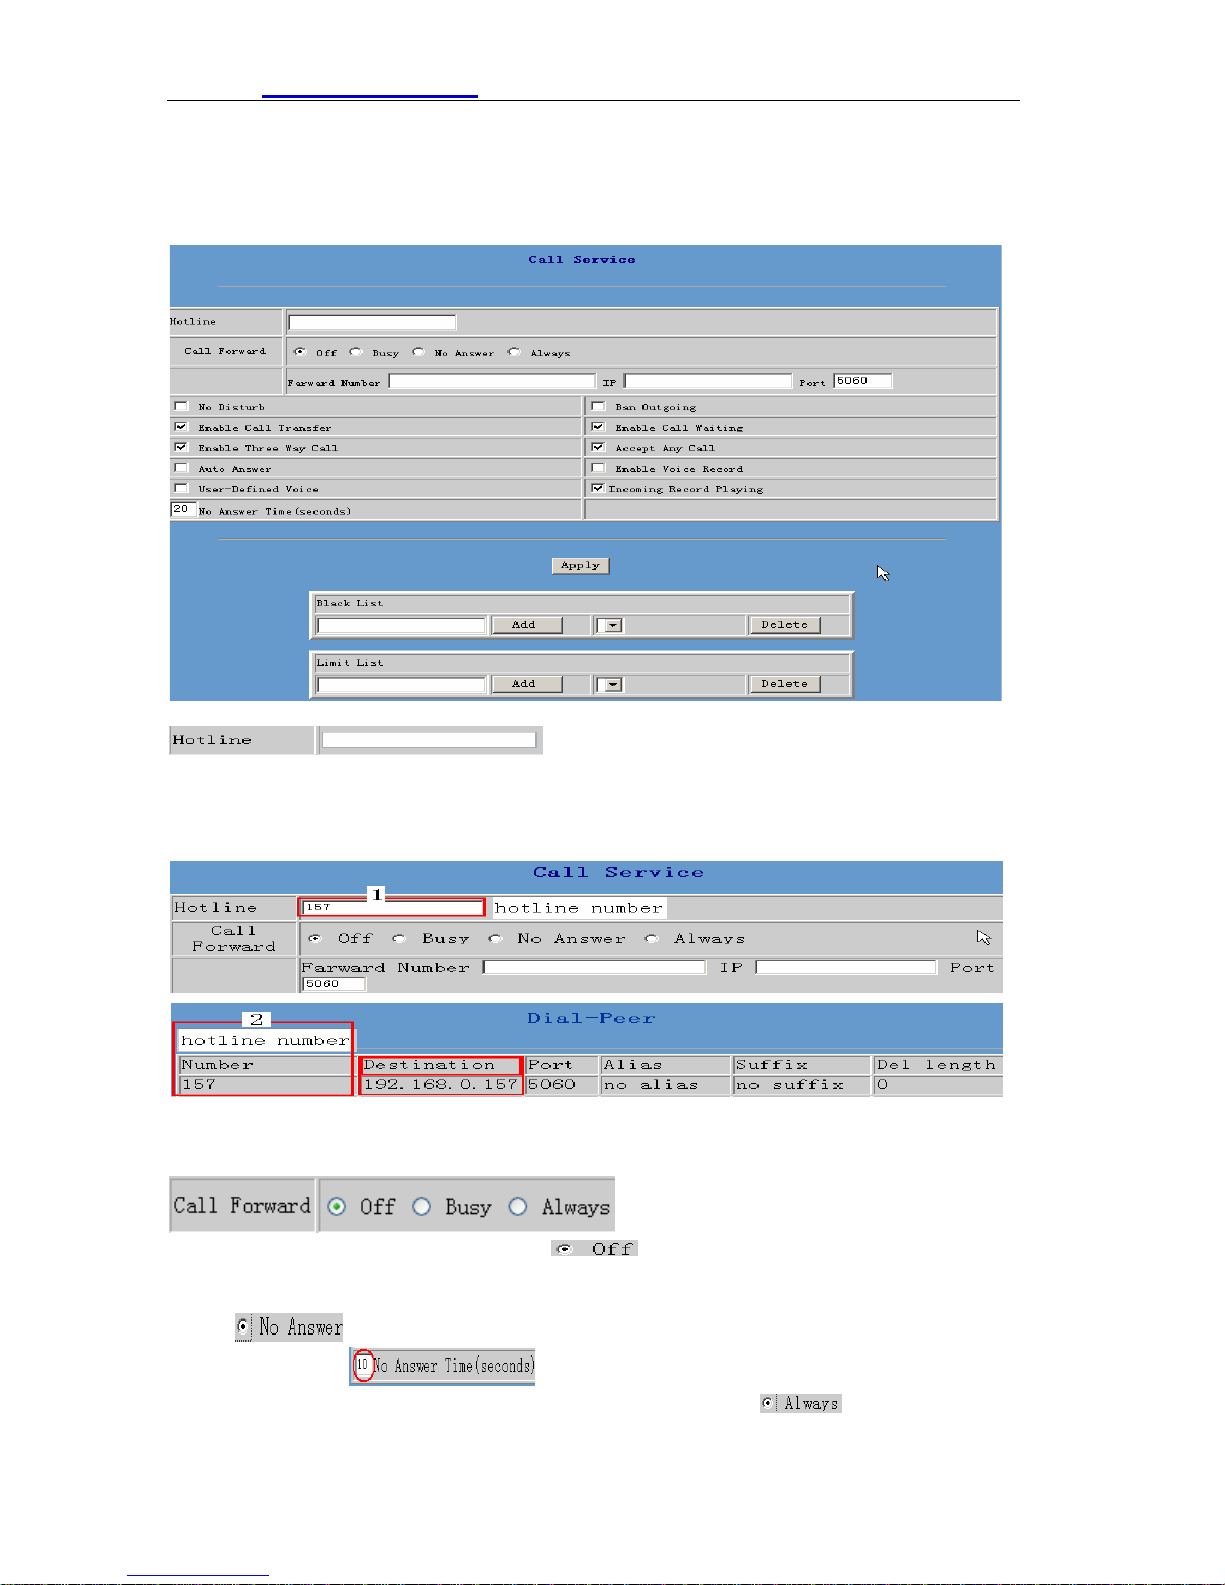
Value added service configuration
On this page, user can set value added services such as hot-line,call forwarding,
call transfer (CT),call-waiting service,three way call,blacklist,out-limit list and so
on.
6.7.8.1 Hotline
Configure hot-line number of the port. With this number of the port,this hot-line
number will be dialed automatically as soon as off-hook and user can's dial any other
number. If you do not use hotline, please let it be blank.
Configuration example:
6.7. 8.2 Call feature
6.7.8.2.1 Call forwarding
.
Call forward default is Disable. When is selected,if the number dialed is
engaged after the phone has received a call, then it will automatically transfer to the
configured number according to the following picture (CF001 forward ) configuration.
when
is selected,if the phone do not receive the incoming call .it will
automatically in
the following picture (CF001 forward ) configuration. When
the phone will directly transfer all incoming call to the number that had configured in
forward to the configured number according to
is selected,then
32
Page 34
HTTP://www.suncti.co.th User Manual
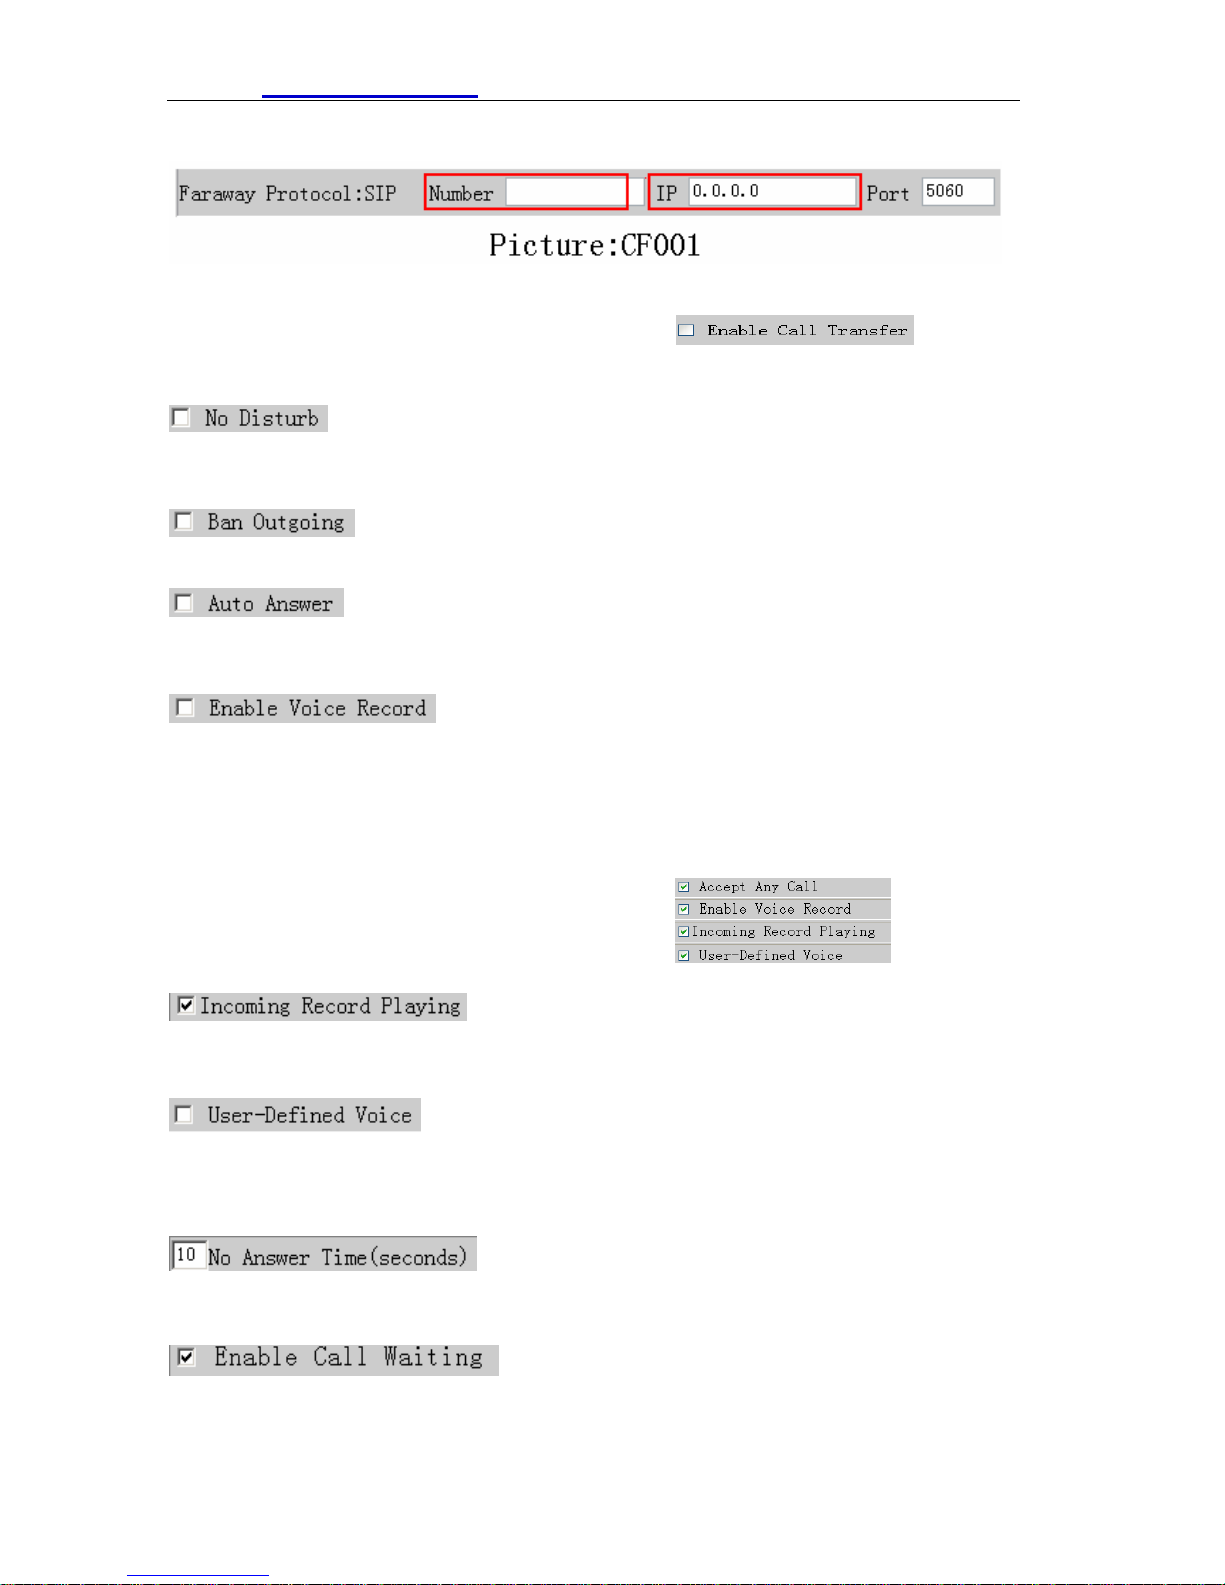
advance like the picture showing.
Note:
1 Number can be sip server extension number or DID number (any PSTN number)
2 the function have no relationship with the option
that
enable or disable
If it is enabled, the phone will not ring when there is a incoming call . DND, do not
disturb, enable this option to refuse any calls.
Enable this to forbid outgoing calls.
If it is enabled, when there is a incoming call .the phone will automatically press
SPEAKER button.
If it is enabled, the phone can record the incoming call leaving voice message.
It support only 3 leaving message. It can not record leaving message when it had
reach the maximum. After restarting the phone, the message will lose . or you can
delete the record message by manual(on phone operation).
If it is enabled, after playing the prompt message, the phone will automatically press
SPEAKER button and start to record leaving message.
Generally, these four option are selected together
If it is enabled, the caller will hear S01 automatically play prompt message (welcome
message.)
User can define only one prompt message (welcome message) that can be played
when someone call the phone. The second defined voice will cover the first one.
Process: on phone operation
The unit is second. no answer call forward time setting.
6.7.8.2.2 Call Waiting Configuration
Configure enable/disable call waiting service;After it is enabled, user hold calls of the
other party by <HOLD >button, by pressing <HOLD >button again, the call can go
33
Page 35
HTTP://www.suncti.co.th User Manual
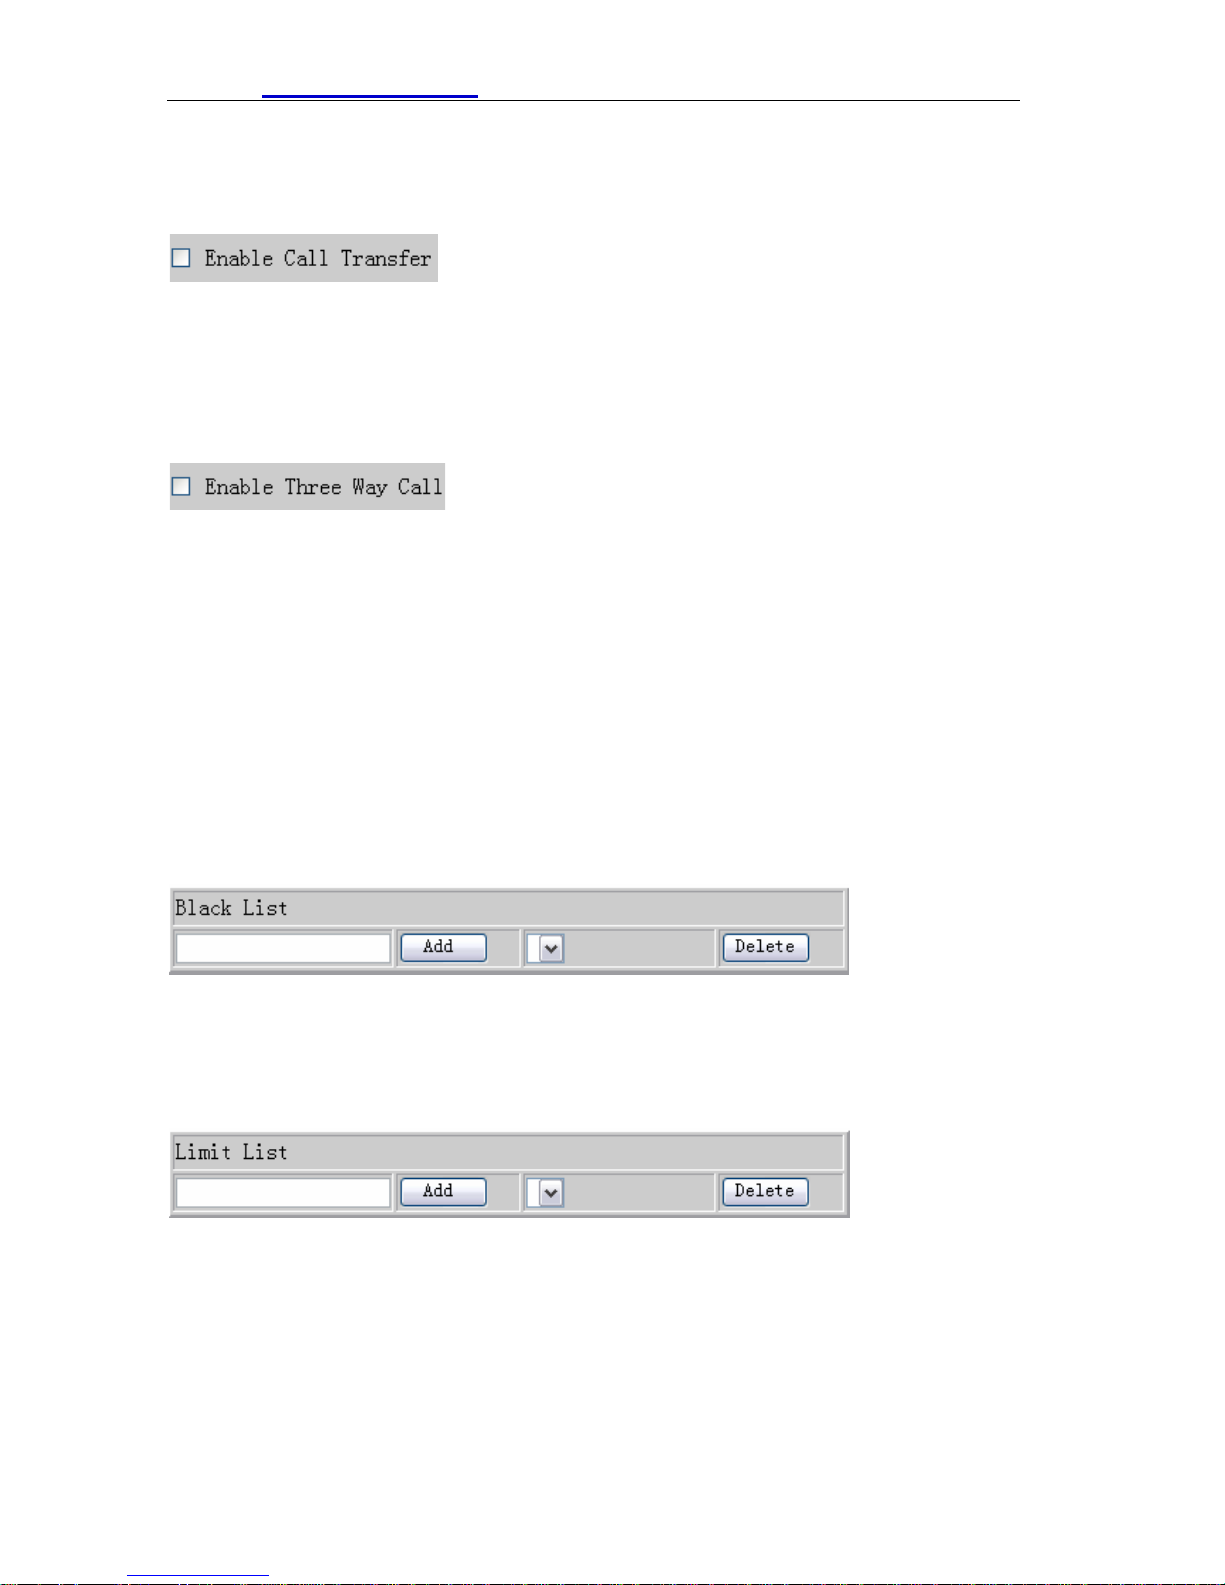
back to the previous call. If you want to use three way conference , this option must
be enabled.
6.7.8.2.3 Call Transfer Configuration
It is for enabling or disabling phone <TRANSFER> button transferring function. If it is
enabled, when user A are talking with user B , A press <TRANSFER> button on
the phone then dial the third party number (C user) directly. the phone will transfer
the calls to C. The result is C phone will ring (user B LCD display HOLD, A will hang
up) . User C pick up phone then user B will talk with C .
If it is disabled, on phone operating transfer call will fail.
6.7.8.2.4 Three W ay Conference Call
Configure enable/disable three way call;When user A are talking with user B as the
call origination,user A click HOLD button to hold user B line and then dial the third
party user C. User A click HOLD button again to recover the talk with user B. At this
time user A press * key to make C into the three-way conference.
Operating process:HOLD button + third party number+ HOLD button+ *
Example:
A are talking with B .
A click HOLD button (holding B line ) .then dial C number .
A will talk with C .
A click HOLD button again (holding C line ), A dial *
A 、B、 C make the three party conference successfully now
6.7.8.2.5 Black List
Incoming call in these phone numbers will be refused. It is for precluding incoming
communication like Call ID. If user doesn't want to answer a certain phone number,
please add this phone number to the list, and then this number will be unable to get
through the phone.
6.7.8.2.6 Limit List
Outgoing calls with these phone numbers will be refused for example, if user don't
want the phone to dial a certain number, please add the number to this table, and the
user will be unable to get through this number.
6.7.9 MMI Filter
34
Page 36
HTTP://www.suncti.co.th User Manual
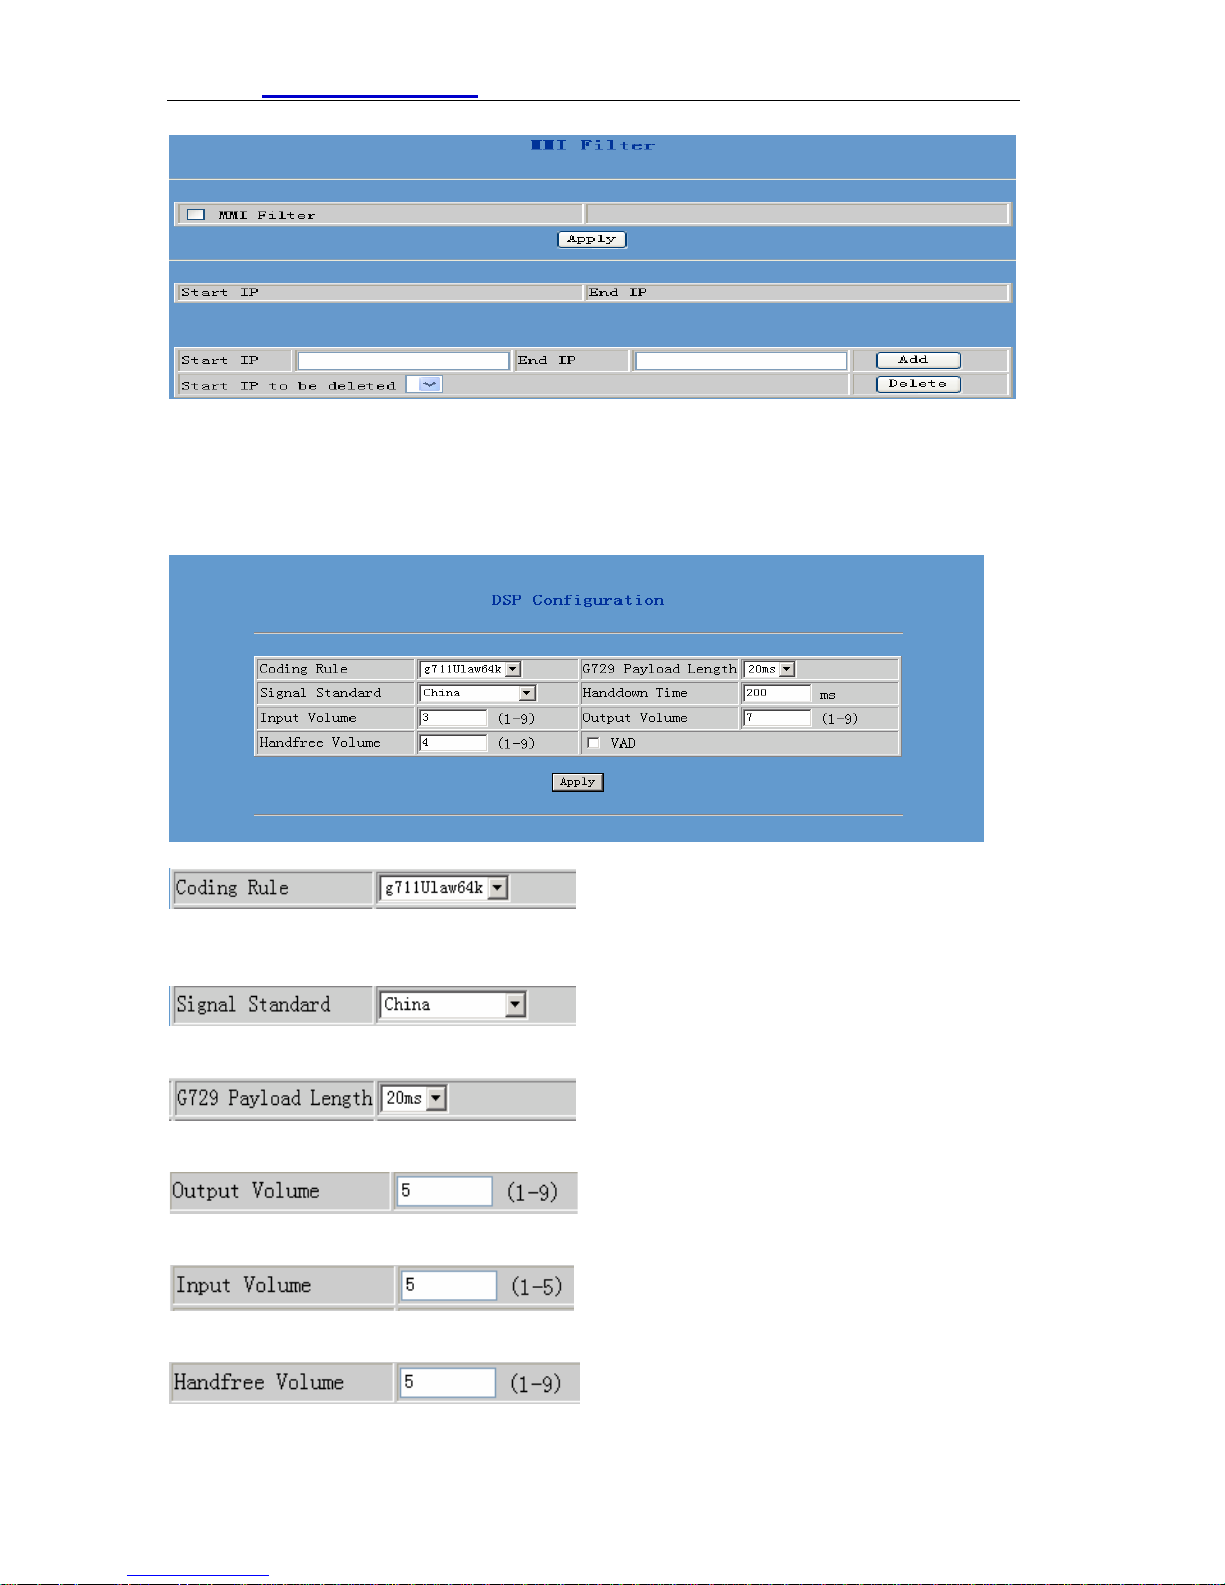
MMI filter is used to make access limit toS01.
When MMI filter is enable. Only IP address within the start IP and end IP can access
S01.
6.7.10 DSP Configuration
On this page, user can set speech coding,IO volume control, cue tone standard,
caller ID standard and so on.
Configuration Explanation:
Configure Coding Rule: according to network bandwidth; support G.711a/u
G.729 ,G7.23
Configure Signal Standard: according to country’s phone voice;
Normally, G729 Payload Length doesn’t need be changed into 10 ms;
Handset Out Volume.
Handset In Volume.
Configure Hand-free Volume
35
Page 37
HTTP://www.suncti.co.th User Manual
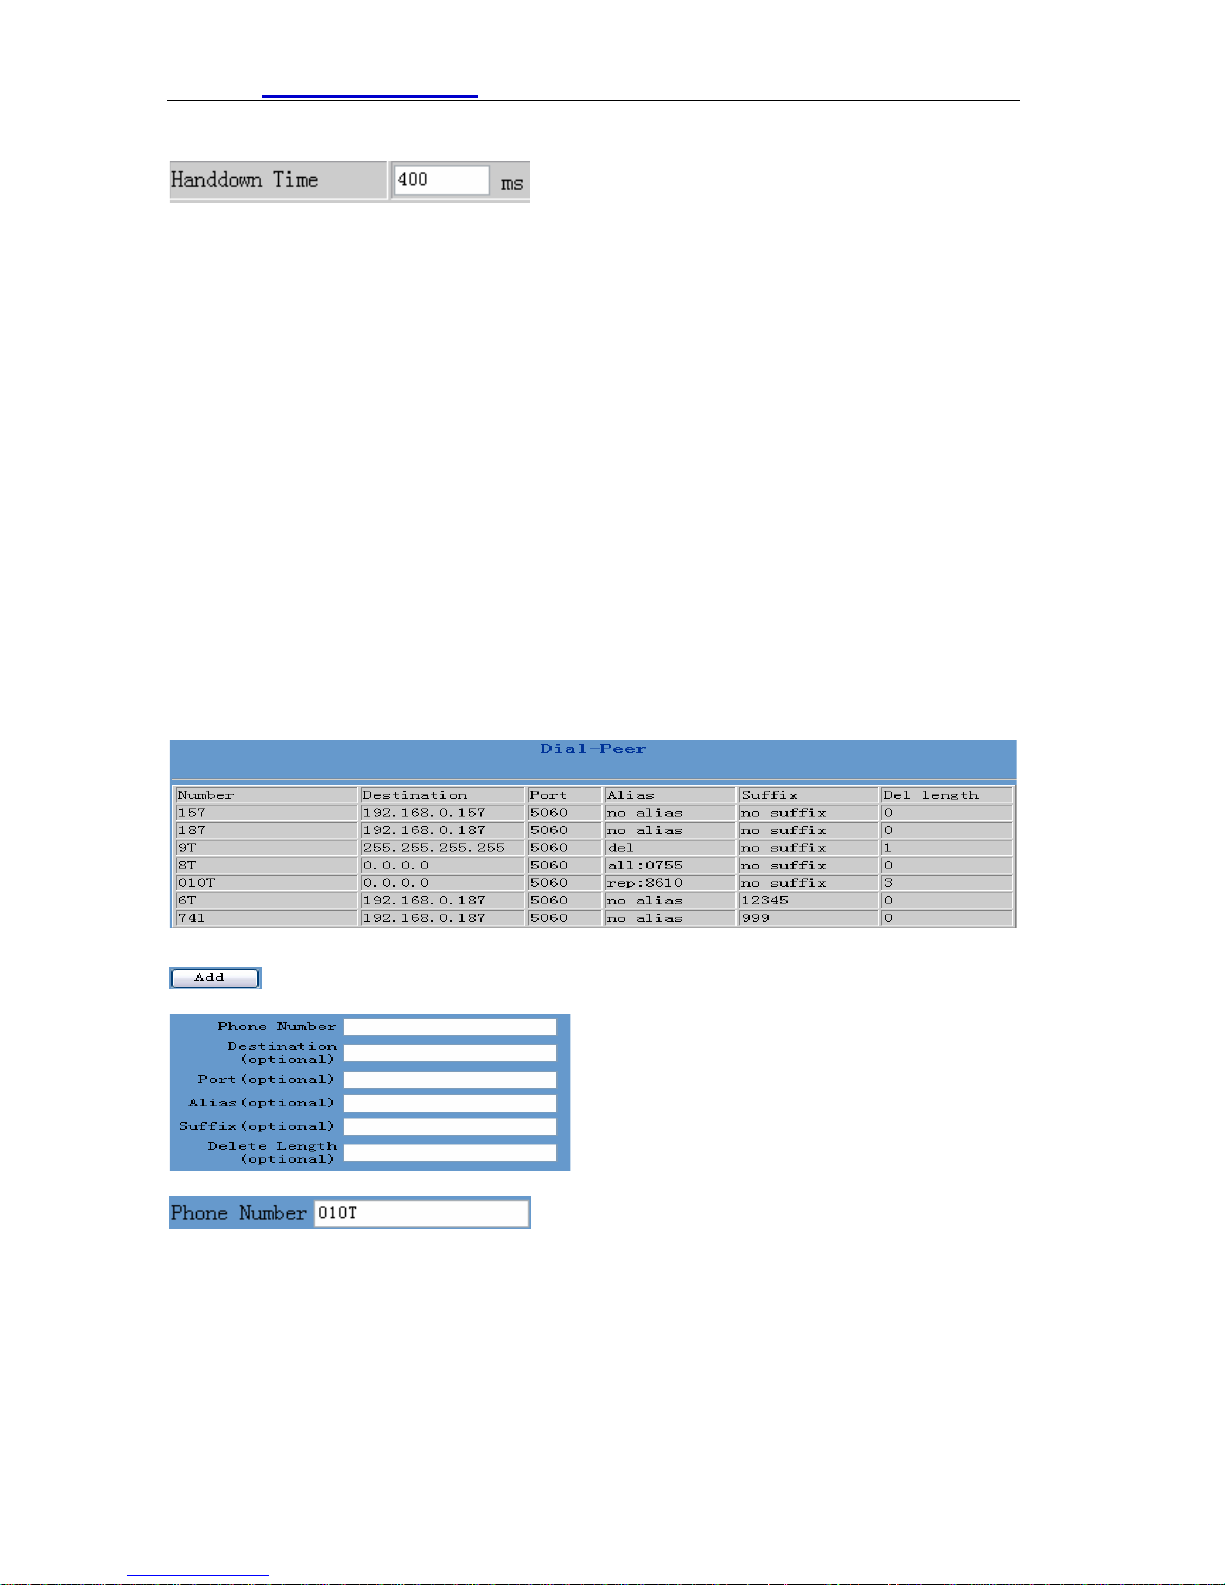
Configure hand-down time,that is, if the hooking time is shorter than this time, then
the gateway will not consider the user has hand-down.
VAD: Enable/disable Voice Activity Detection
6.8 Dial Peer
Number IP Table Configuration
Function of number IP table is one way to implement the phone's calling online, and
the calling of the phone will be more flexible by configuration the number IP table.
For example, user know the other party's number and IP and want to make direct call
to the party by point-to-point mode: the other party's number is 1234,make a
configuration of 1234 directly ,then the phone will send the called number1234 to the
corresponding IP address; Or set numbers with prefix matching pattern,for example,
user want to make a call to a number in a certain region(010),user can configure the
corresponding number IP as 010T― protocol― IP,after that, whenever user dial
numbers with 010 prefix( such as 010-62201234),the call will be made by this rule.
Bases on this configuration,we can also make the phone use different accounts and
run speed calling without manual swap. When making deletion or modification,
select the number first and click load, then click Modify and complete the operation.
Display of calling number IP image list
Click Add, the following figure will be shown at the lower part of the page.
It is to add outgoing call number, there are two kinds of outgoing call number setup:
One is exactitude matching,after this configuration has been done, when the number
is totally the same with the user's calling number, the phone will make the call with
this number's IP address image or configuration; Another is prefix matching( be
equivalent to PSTN's district number prefix function),if the previous N bits of this
number are the same with that of the user's calling number(the prefix number
length),then the phone will use this number's IP address image or configuration to
36
Page 38
HTTP://www.suncti.co.th User Manual
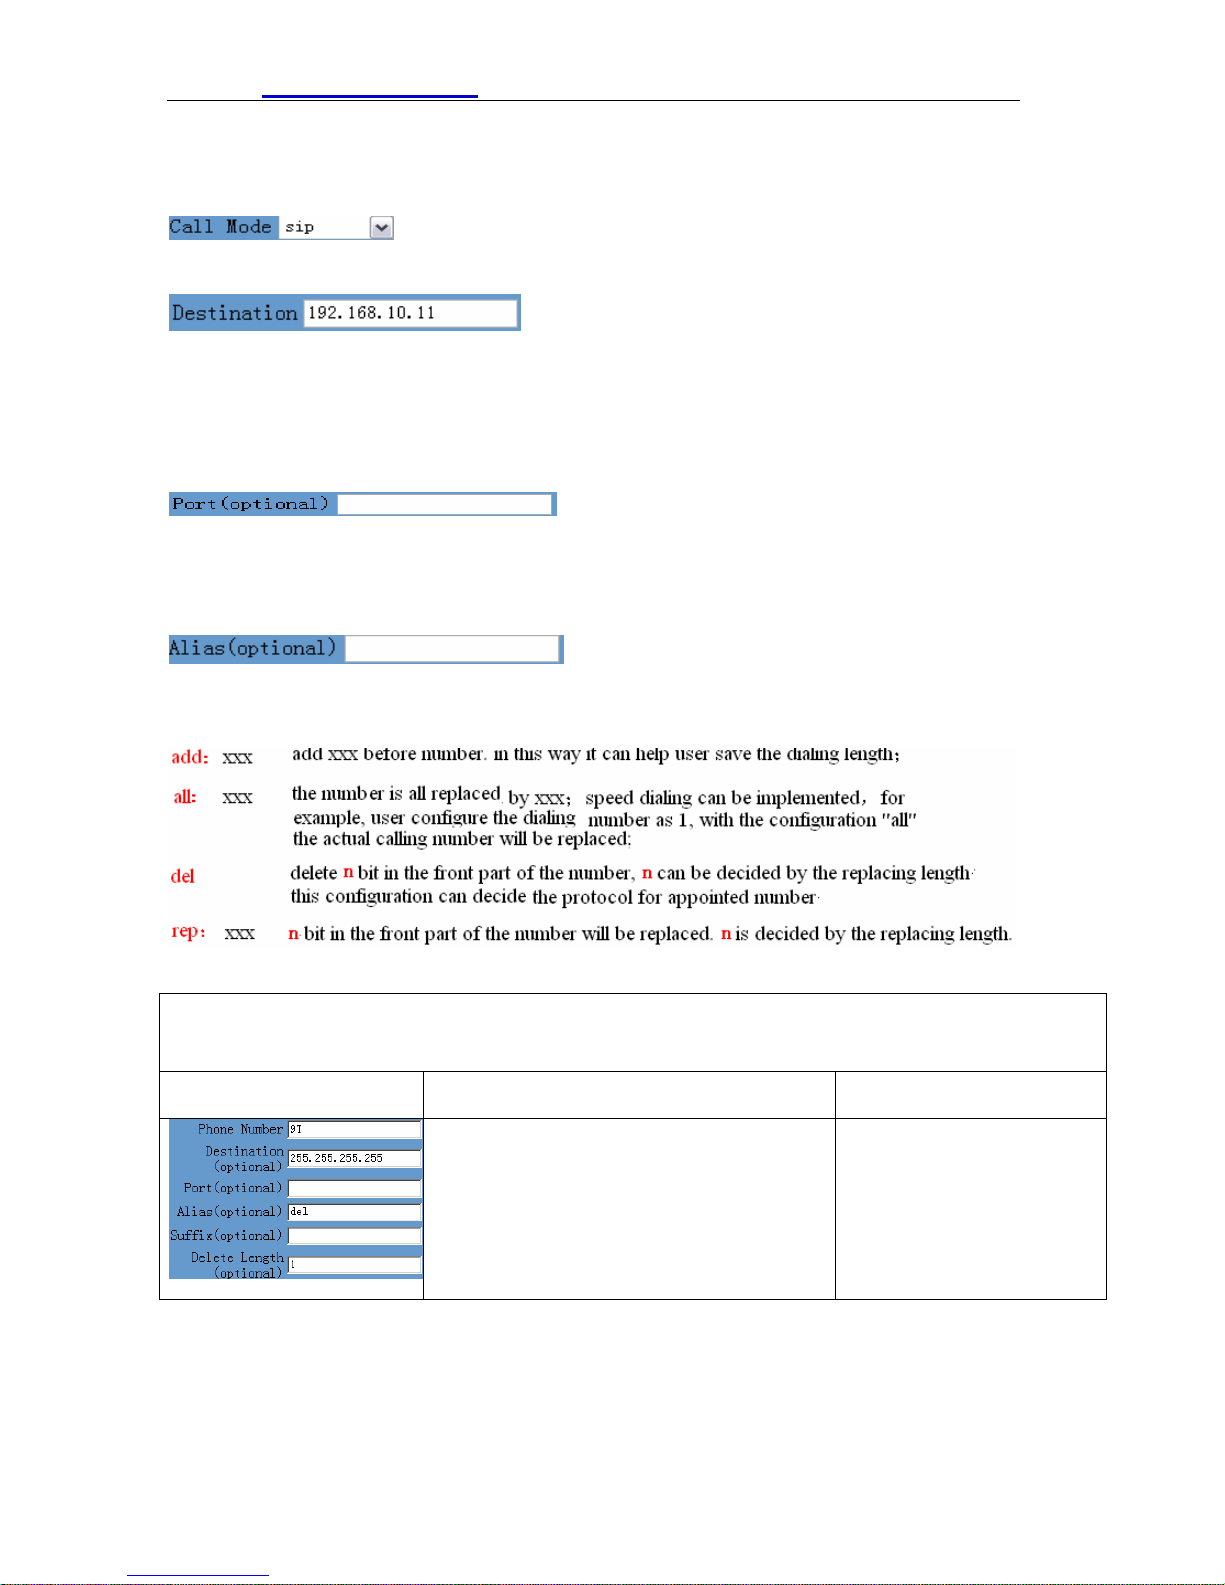
make the call. When configuring the prefix matching, letter "T" should be added
behind the prefix number to be distinguished from the exactitude matching.
Configure the calling mode:H323 and SIP.
Configure destination address,if it is point-to-point call,then input the opposite
terminal's IP address, it can also be set as domain name and resolved the specific IP
address by DNS server of the phone. If no configuration has been made, then the IP
will be considered as 0.0.0.0. This is an optional configuration item.
Configure the other party's protocol signal port, this is optional configuration item:
when nothing is input, then the default of h323 protocol is 1720,the default of sip
protocol is 5060;lifeline required no configuration of this item, shown as 0.
Configure alias,this is optional configuration item:it is the number to be used when
the other party's number has prefix;when no configuration has been made, shown as
no alias.
Configure suffix,this is optional configuration item:it is the additive dial-out
number behind the number; when no configuration has been made, shown as
no suffix;
Example 1
T mean any length digit number.
Destination is 255.255.255.255 that mean calling out through SIP2 server.
Destination is 0.0.0.0 that mean calling out through SIP1server
Config page
Explanation Example
That means Any digits number starting with 9
pass through SIP2 server.
Here alais is
Delete Length is 1 that means the phone will
delete the first number before send number to
server
del
User dial 93333
SIP2 server receive 3333
37
Page 39
HTTP://www.suncti.co.th User Manual
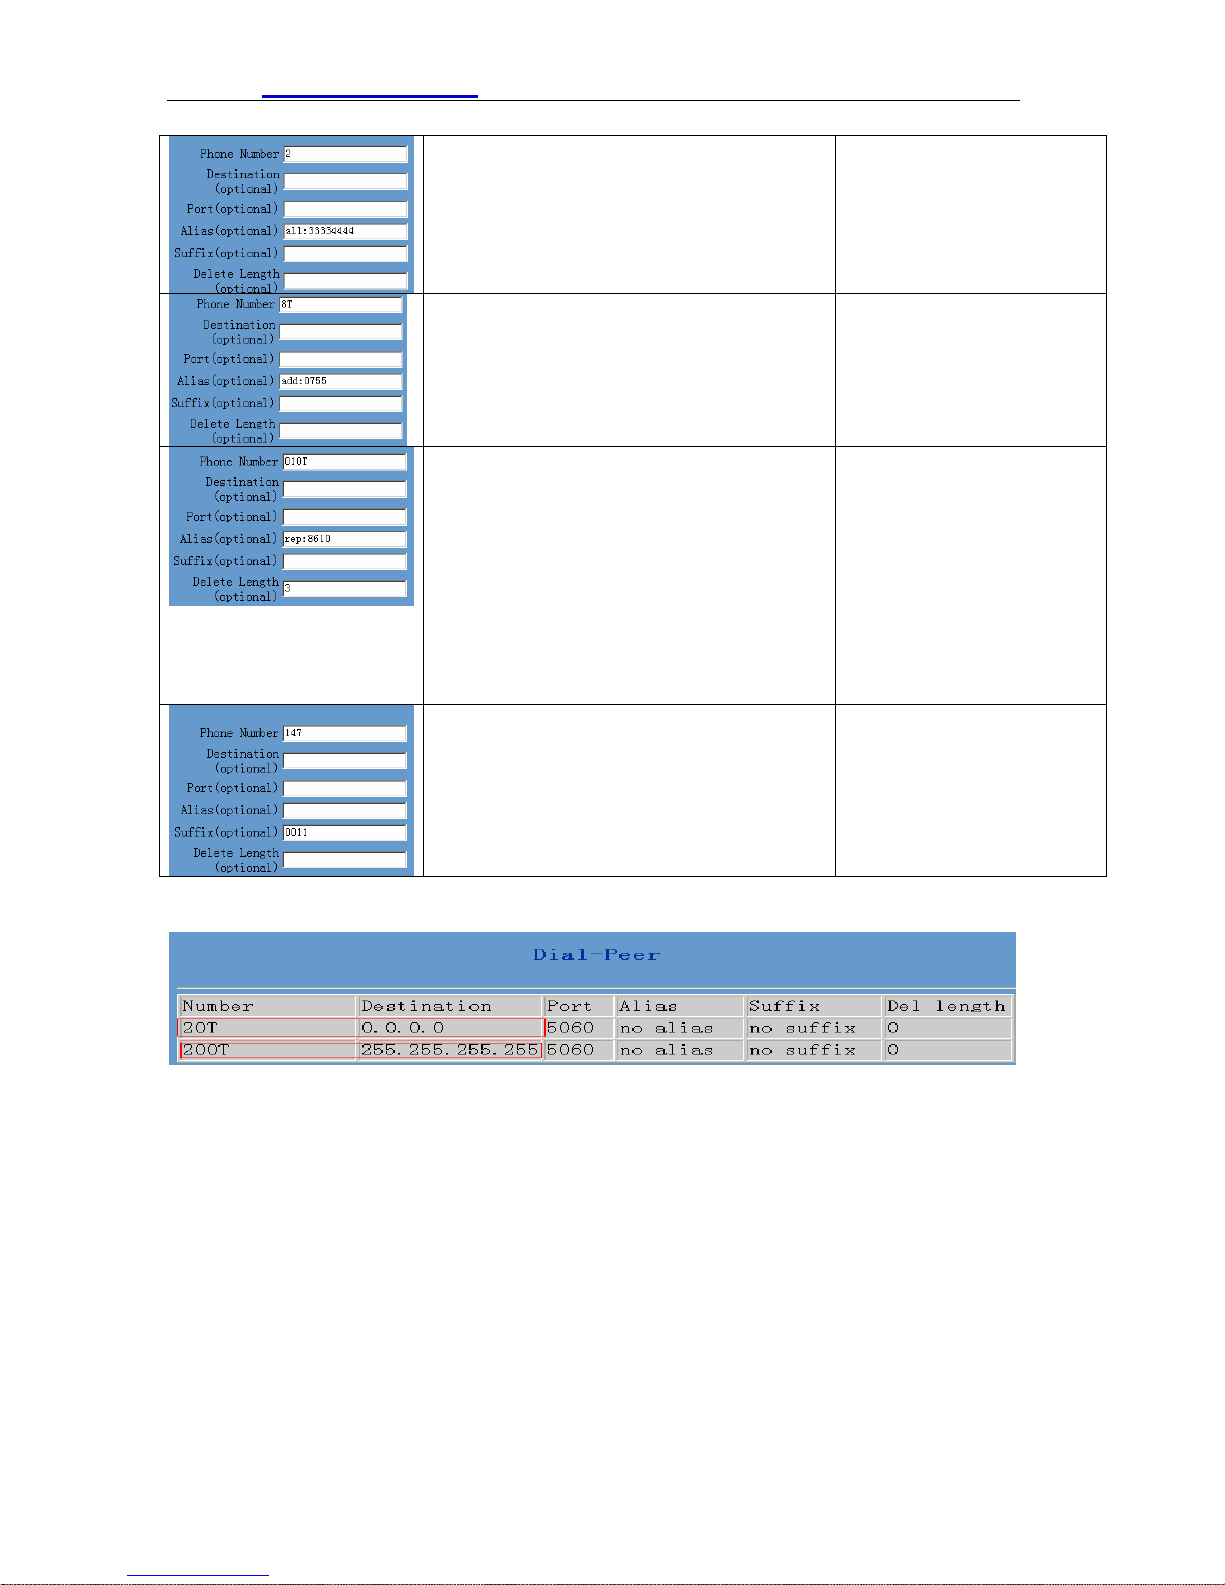
It can be used for speed calling
The number user dialed will be replaced fully by
the number that is behind
Here alias is
It can be used to add local area or prefix. before
sending out.
It saves user dialing number.
Here alias is
all: (not all)
add: (not add)
all)
user want to dial PSTN(010 6228)by SIP1,
while actually the called number should be
86106228,then we can configure called number
as 010T, then rep: 8610 , and then set the
replacing length as 3. So that when user make a
call with 010 prefix, the number will be replaced
as 8610 plus the number and then sent out.
Replace the number that user dialed before
sending to SIP1 server.
Here alias is
this is optional configuration item. It is to add
number behind the number user had dialed. when
no configuration has been made, shown as no
suffix
rep:(not rep)
User dial 2
Sip1 server receive 33334444
User dial 8309
SIP1 server receive07558309
User dial 010 6228
SIP1 server receive8610 6228
User dial 147
Sip1 server receive 147 0011
Example 2
When user dial 200 , It will pass through SIP2
When user dial 2009 , It will pass through SIP2
When user dial 20096, It will pass through SIP2
When user dial 201, It will pass through SIP1
When user dial 20, It will pass through SIP1
6.9 Config Manage (Save and Clear configuration)
Notice: clear config in admin mode, all settings restores to factory default; clear config
in guest modem, all settings except sip, advance sip restore to factory default.
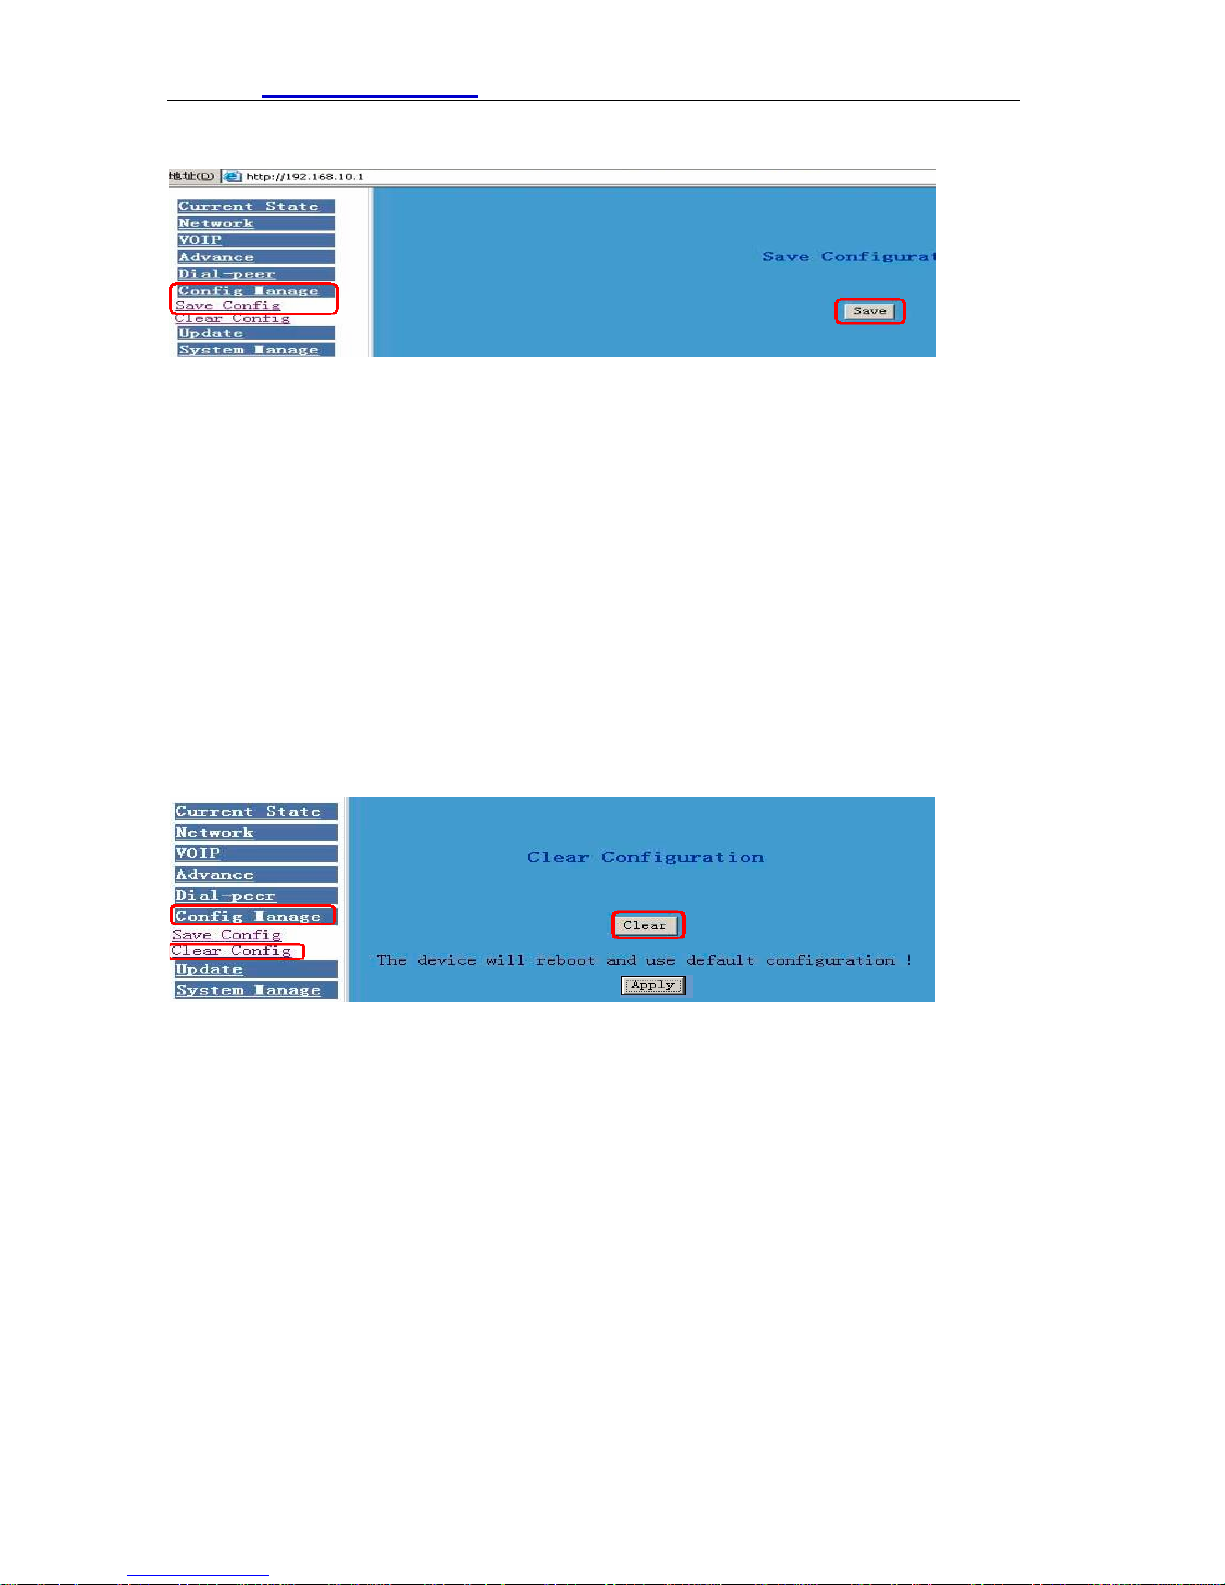
6.9.1 Save Config
Once change is made, Users should save the modified configuration to take effect,
otherwise the IP Phone will go back to the last saved setting after phone reboot.
38
Page 40
HTTP://www.suncti.co.th User Manual
The interface of “Save Config” as below, please follow the four steps below to config.
Enter “Config Manage” Menu →“Save Config” Submenu→ Click “Save” Button→
Return to “Current State” Web page
6.9.2 Clear Config
There are four method to clear config (set factory default), web 、telnet 、post mode、
keypad. If the IP Phone doesn’t work properly after modifying config, users can clear
all modified config on “Clear Config” web page. The phone will clear all modified
config and restore the default factory configuration. (Default network type for WAN is
DHCP mode; default LAN IP address is 192.168.10.1)
Process Please follow the below steps to clear config:
Enter “Config Manage” Menu →“Clear Config” →Click “Clear” Button →show “Submit
Success” info on screen →Click “Return” button
6.10 Firmware Upgrade
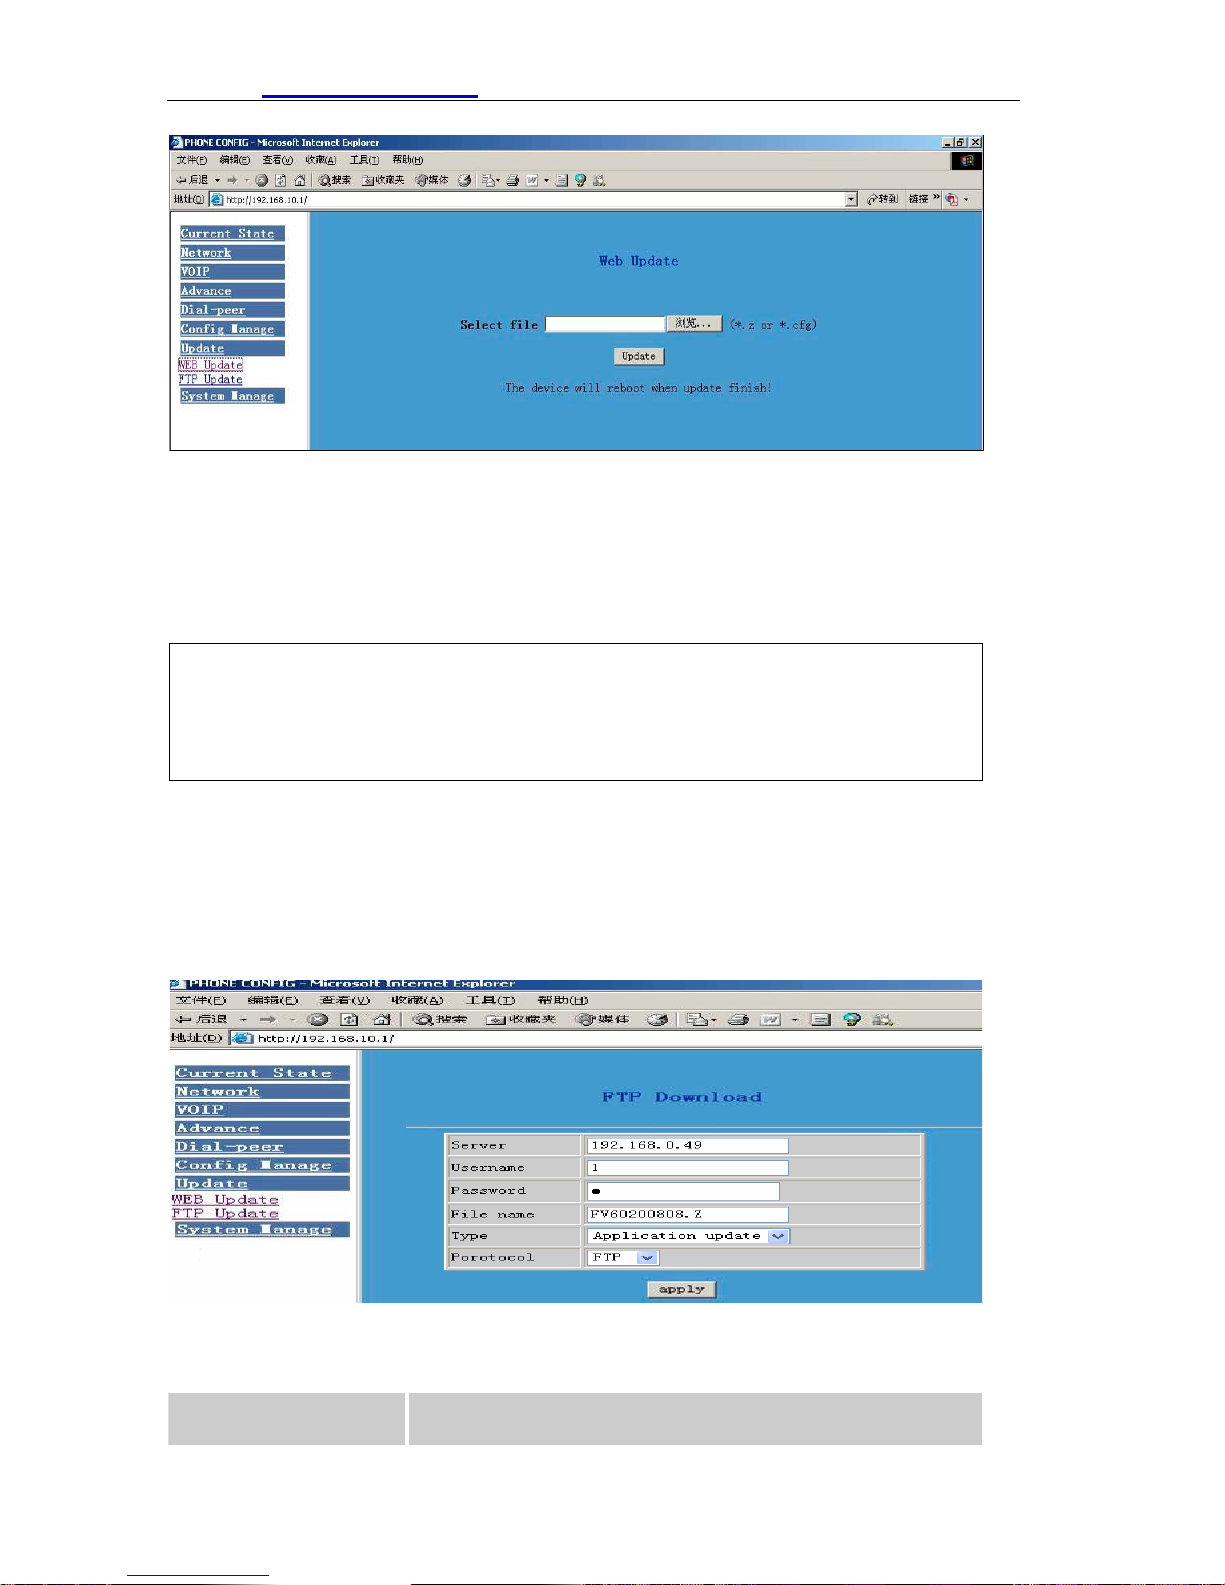
6.10.1 Web Update
On this page, user can select the upgrade document (firmware
or config file) from hard disk of the computer directly to run the
system upgrade. After upgrade completed,reset the phone and
it will be usable immediately. Firmware format is *.z as suffix
39
Page 41
HTTP://www.suncti.co.th User Manual
STEP:
Enter Update menu →WEB Update submenu→ click “browse” button→ download
upgrade document from hard disk (firmware or config file provided by manufacturer)
→ click “Update” button →reboot IP phone to go into effect
Note:
Under system upgrade progress, IP Phone may not be restarted normally due
to some system reason (e.g. electricity shut off), users can re-download under
post mode.
6.10.2 FTP or TFTP Update
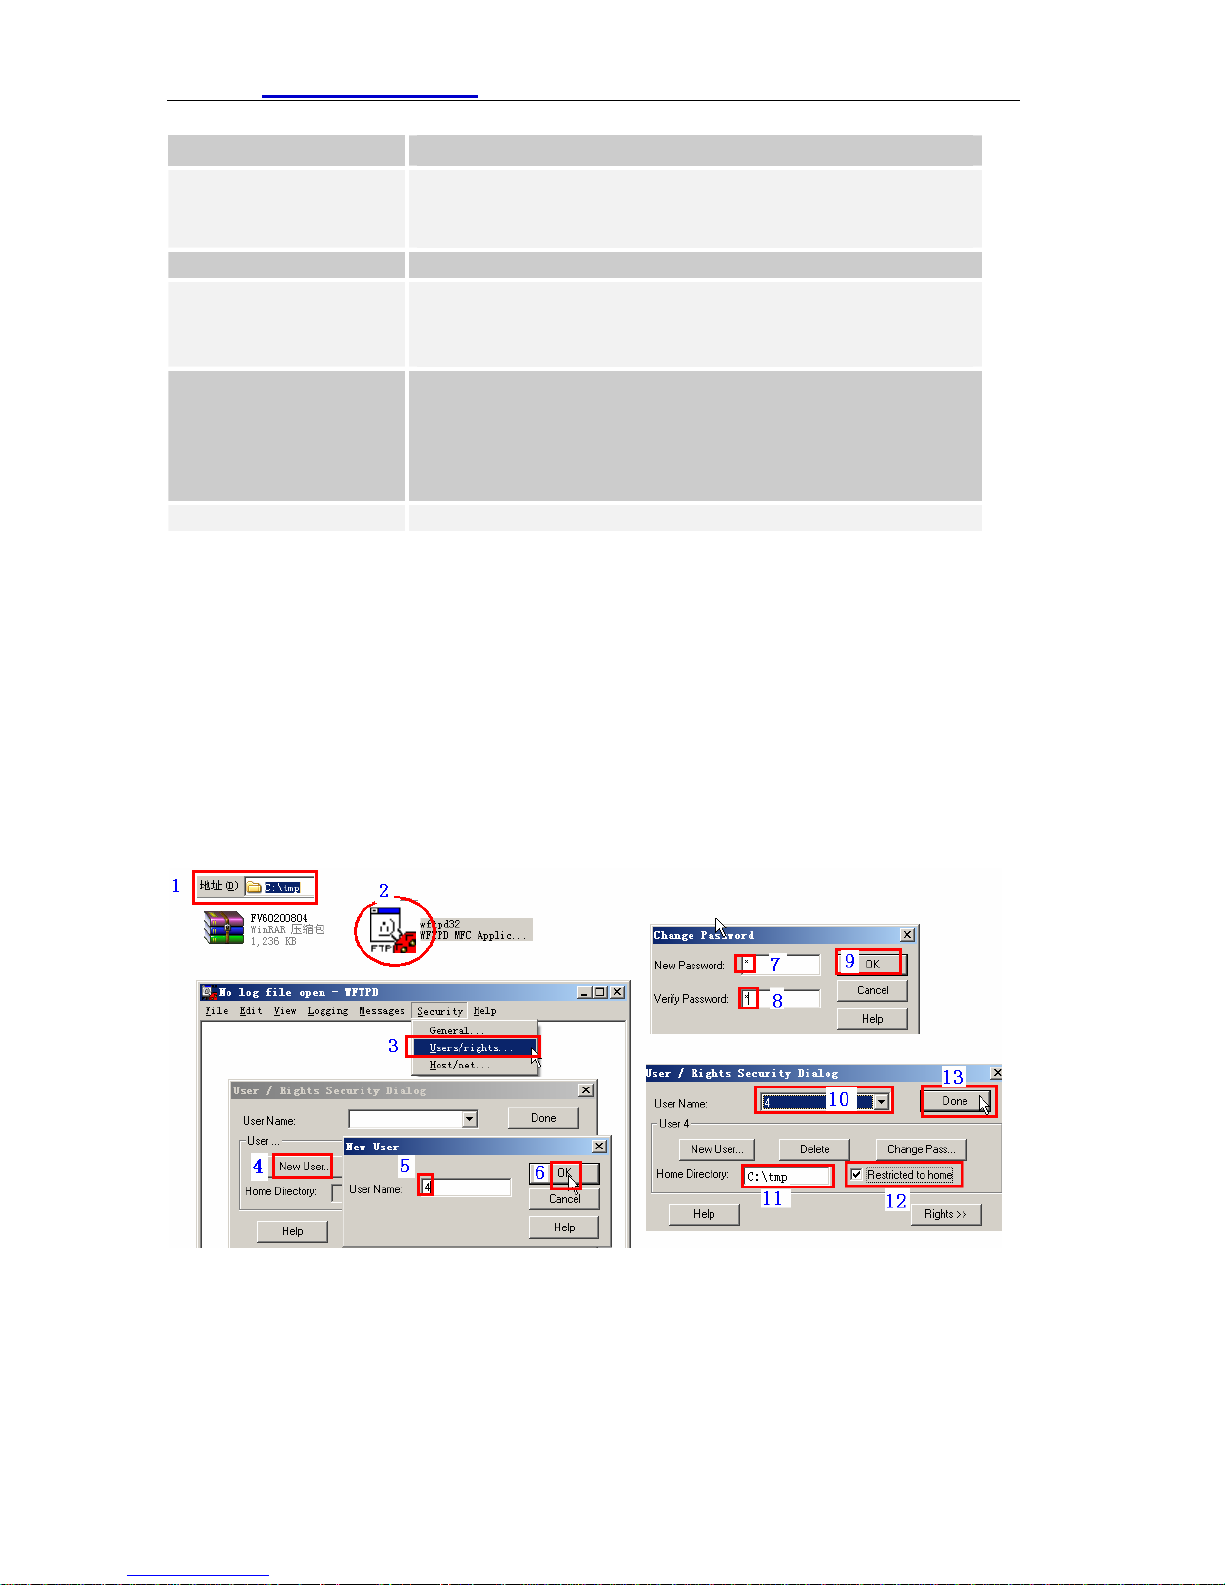
Users can download upgrade documents or lead in configuration files thru FTP or
TFTP mode.
TFTP server before using FTP update way.
Please make sure export and import rights are authorized by FTP or
Definition of each parameter described as below
Server Set IP address for upload or download FTP/ TFTP
server
40
Page 42
HTTP://www.suncti.co.th User Manual
Username Set username of the upload or download FTP server. If
user select TFTP mode, no need to input username and
password
Password Set upload or download of FTP server password
File name Set file name for system upgrade documents or system
configuration files. system file take .Z as suffix ,
configuration files take .cfg as suffix;
Typ e Config export/import/upgrade file type [three options]:
“Application update” is system documents upgrade
“Config file export” is export configuration files to server
“Config file import” is import configuration files to
gateway
Protocol Set transport protocol type [two options]:FTP and TFTP
STEP:
Enter Update menu →FTP Update submenu→ Config FTP/TFTP server → Config
username and password of FTP server (if select TFTP mode, please skip this step)
→key in file name → choosing file type from the dropdown menu→ choosing protocol
type
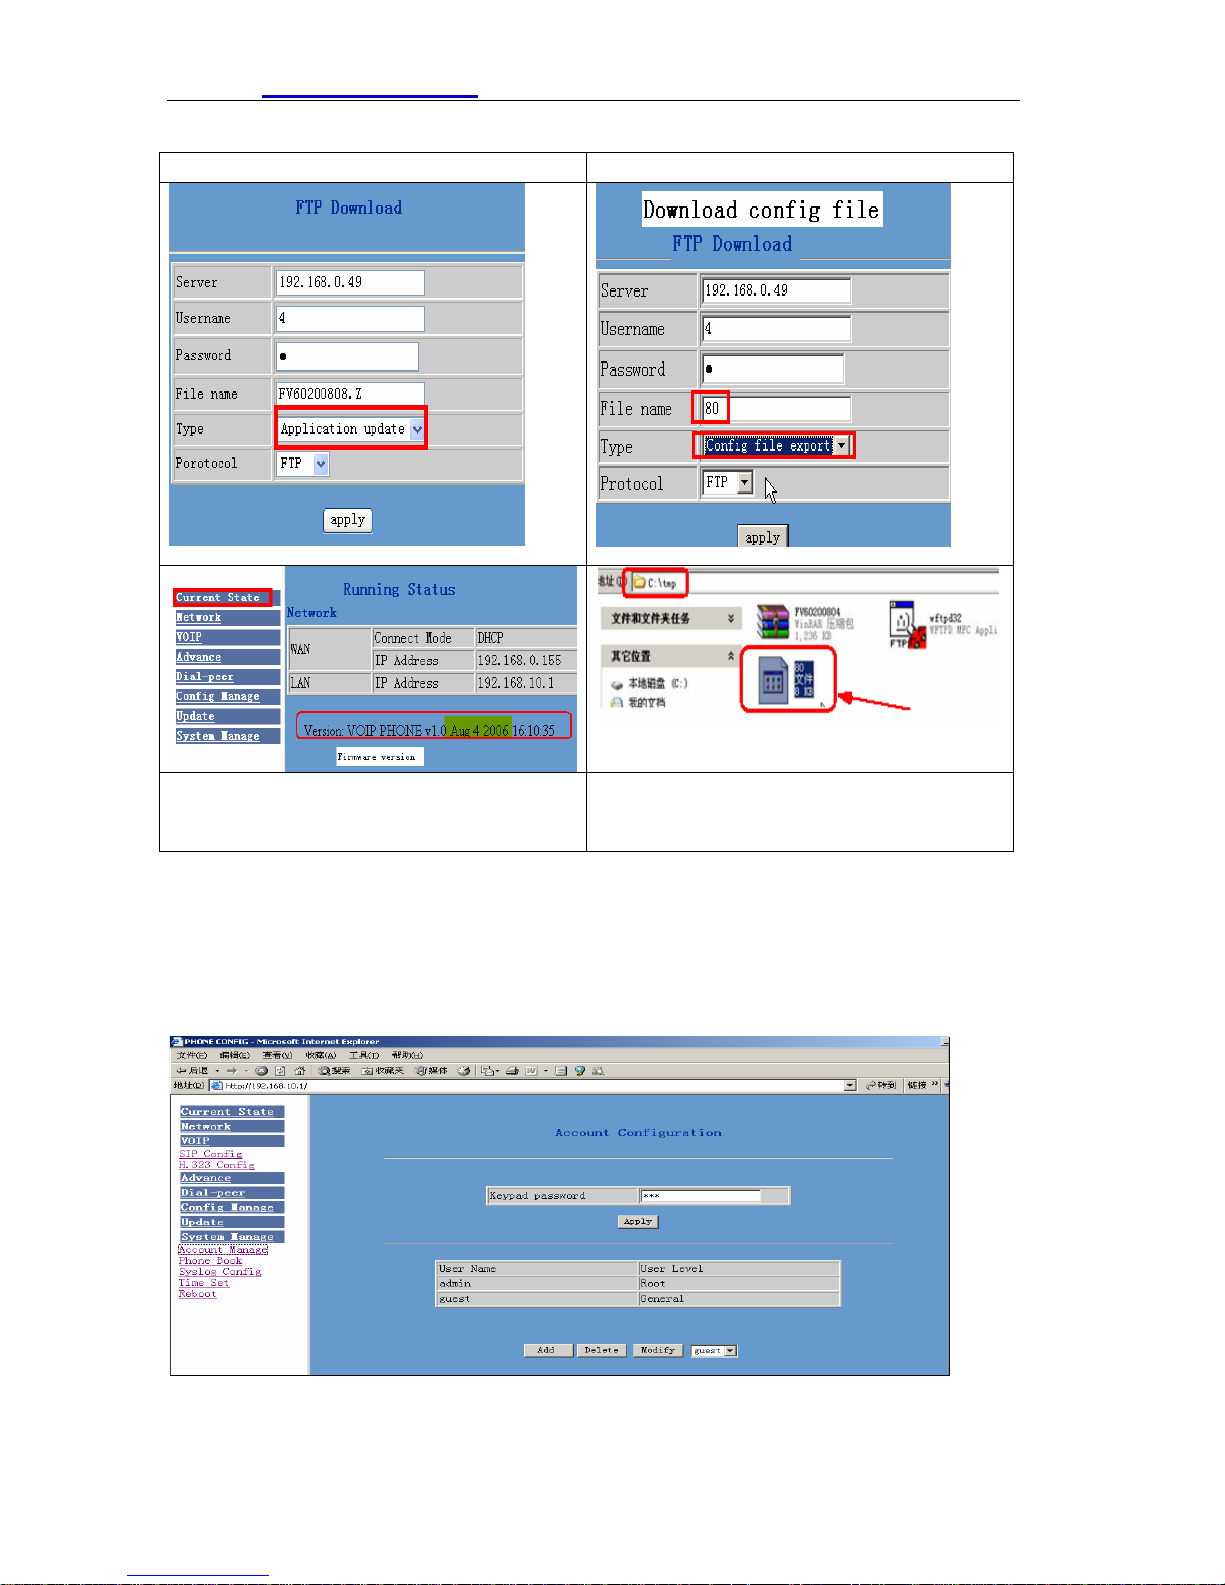
Example: (export config file)
1 FTP
<1> Copy Wftpd32 software and S01 Firmware into a new Folder ( example c:/tmp)
<2> Run wftd32.exe. Set a user name and password for S01 ftp updating
The process is like the below picture showing from step 1 to step 13.
41
Page 43
HTTP://www.suncti.co.th User Manual
Update the firmware Download config file to you pc.
After it update successfully. You will find
the new version in Current State
After you click apply , you can find the
file that it had download to your pc
<c:\temp>
6.11 System Manage
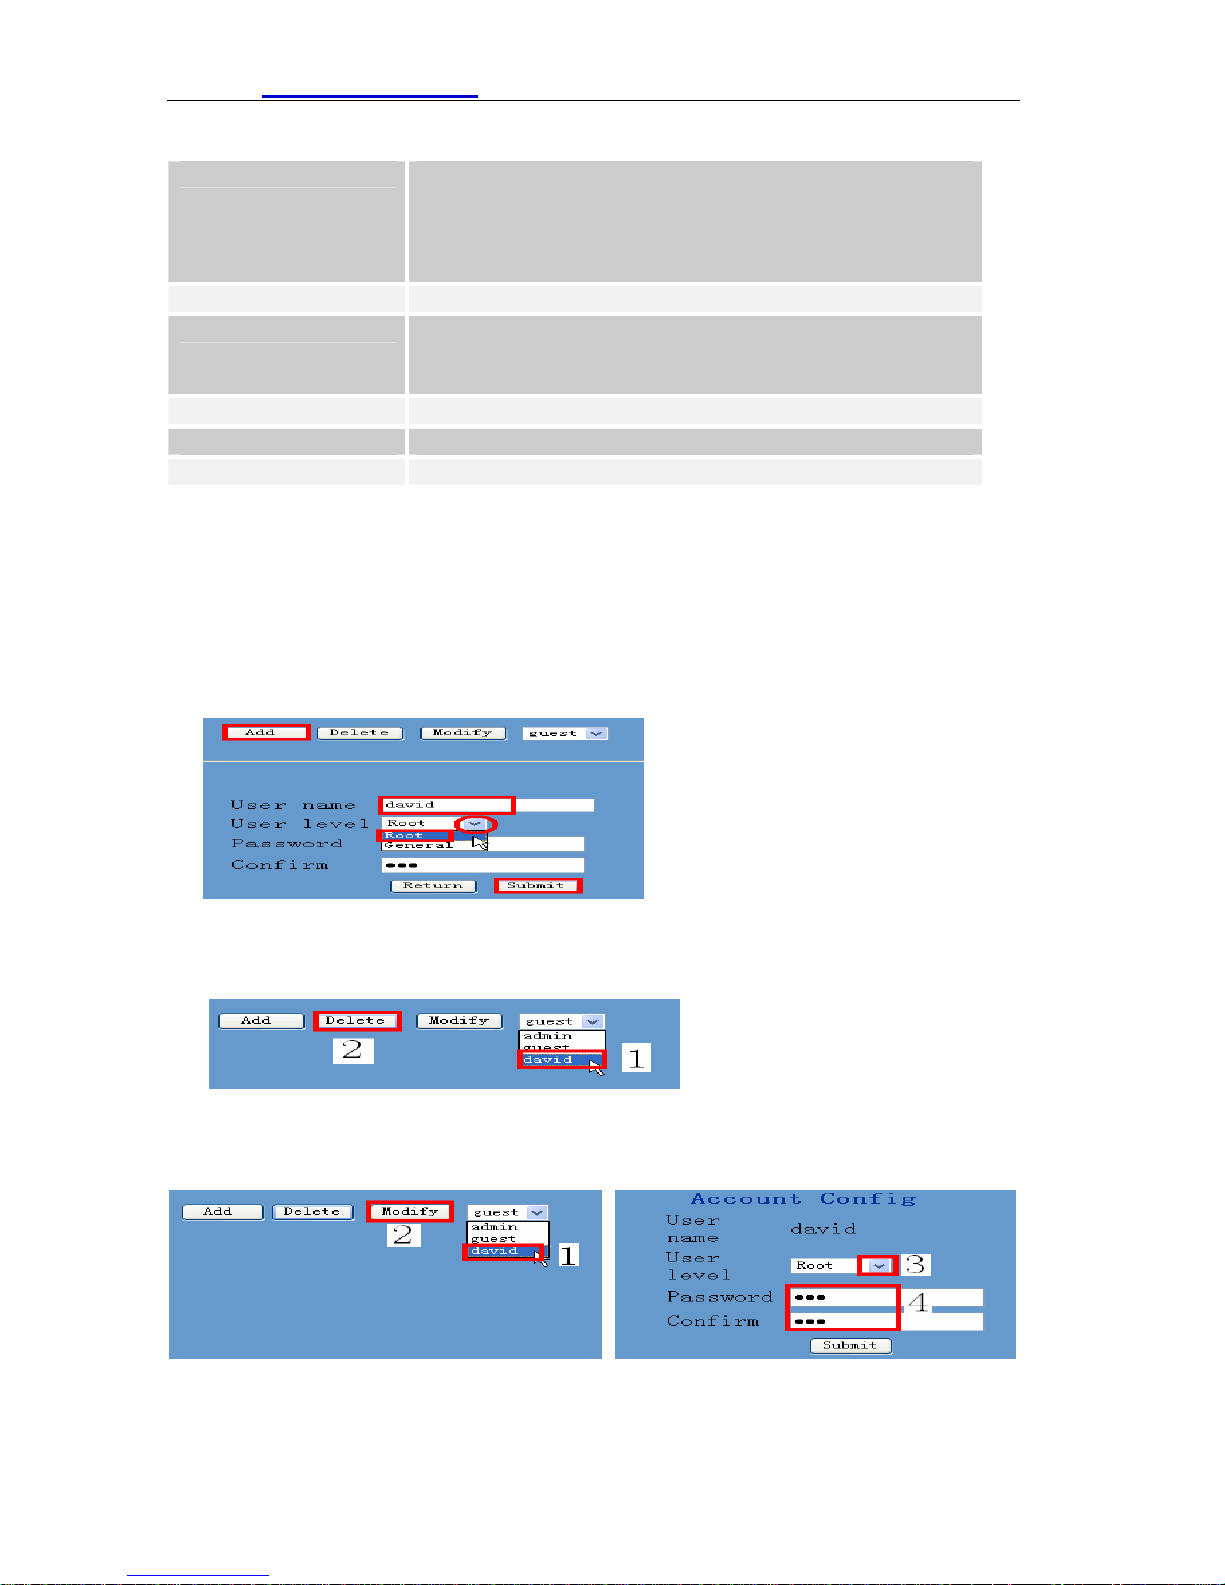
6.11.1 Account Manage (maximum 5 accounts )
Users can edit users (add or delete) account and modify existing users’ authority on this web page.
Definition of each parameter described as below
42
Page 44
HTTP://www.suncti.co.th User Manual
Keypad password
Set keypad operation config password, default is
123,users can input new password then click “apply”
button ,”submit success” info will show on screen, reset
password successfully
User Name List existing phone user account name
User Level Show existing user account level [two option]:Root and
General: Root level users have the right to modify
config; General level users have the right to read-only
Add Add user account to IP phone
Delete Delete increased user account
Modify Modify increased user level and password
Operation Example
z Add one new account
Click “Add” button →input User name (No-Modify) →Choosing User level from
dropdown menu →set new user password →confirm password →submit the new
account info by clicking “submit” button →show “submit success” on screen →return
to account configuration interface by clicking “Return” button
z Delete increased account
Choosing the account need to del. from dropdown menu→ Delete account by
pressing “Delete button” →show “Submit Success” on screen
z Modify increased account (For Root-level user account only)
Choosing the modified account →enter below interface →modify user level or
password →click “Submit” button to submit the modification
Owing to the phone's default account:accounts of the administrator level-admin
account and the ordinary level-guest account are all weak account and weak
43
Page 45
HTTP://www.suncti.co.th User Manual
password, the username and password will be easily to guess on public network, so
the user had better modify the administrator and ordinary user.
Enter with manager level when making modification,create a administrator account
and a browse account (you'd better not set the name as admin, administrator, guest,
etc.),set password and then save configuration,entering with new manager account,
delete default manager and browse account and save configuration,security will be
enhanced!
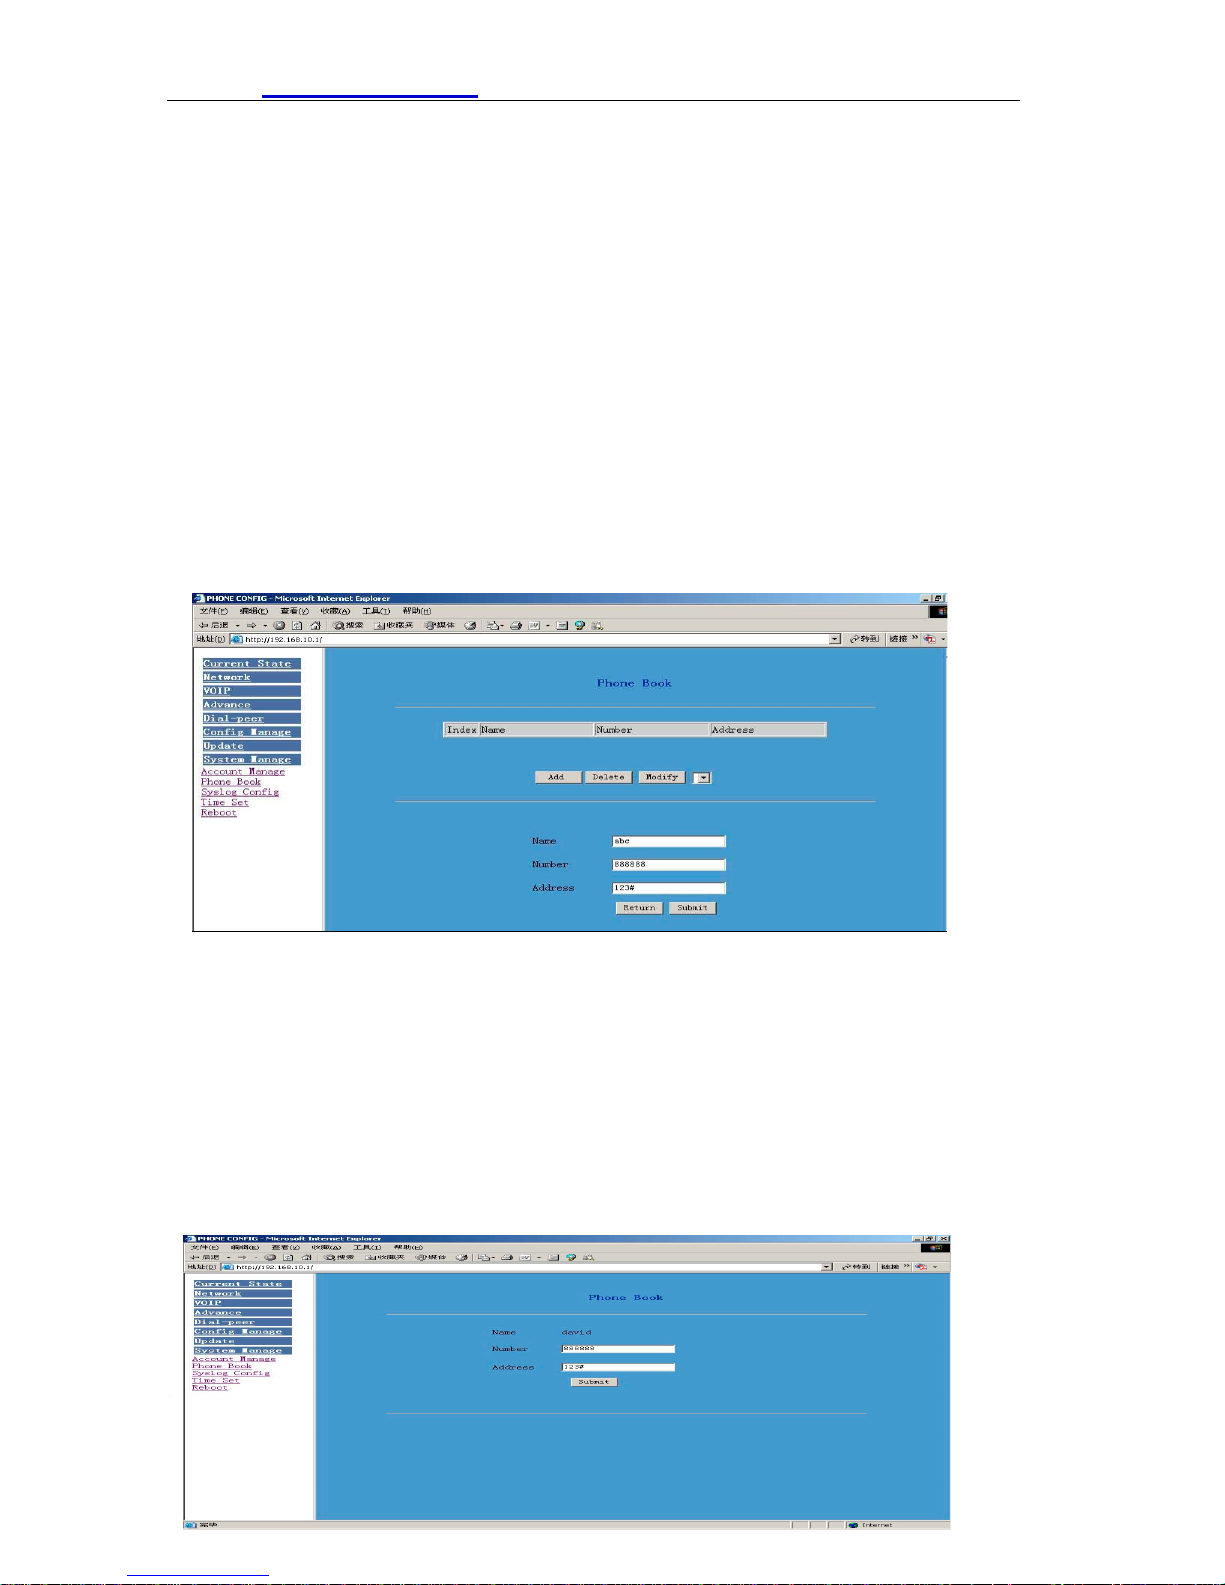
6.11.2 Phone Book Configuration
On this page, user can save and configure telephone book.( maximum 100 record)
z Add phone book record
Click “Add” button →Input Name name, number and address→ click “Submit”
button→ show “Submit Success” on screen
z Delete Phone Book Record
Choosing the record need to del from dropdown menu →Del account by pressing
“Delete button” → →show “Submit Success” on screen
z Modify Phone Book Record
Choosing the record need to modify from dropdown menu→ pressing the
“Modify” button→ key in the new phone number and Address → click “Submit”
button → Return to “Phone Book” interface
Application: please refer to 4.2.1 chapter
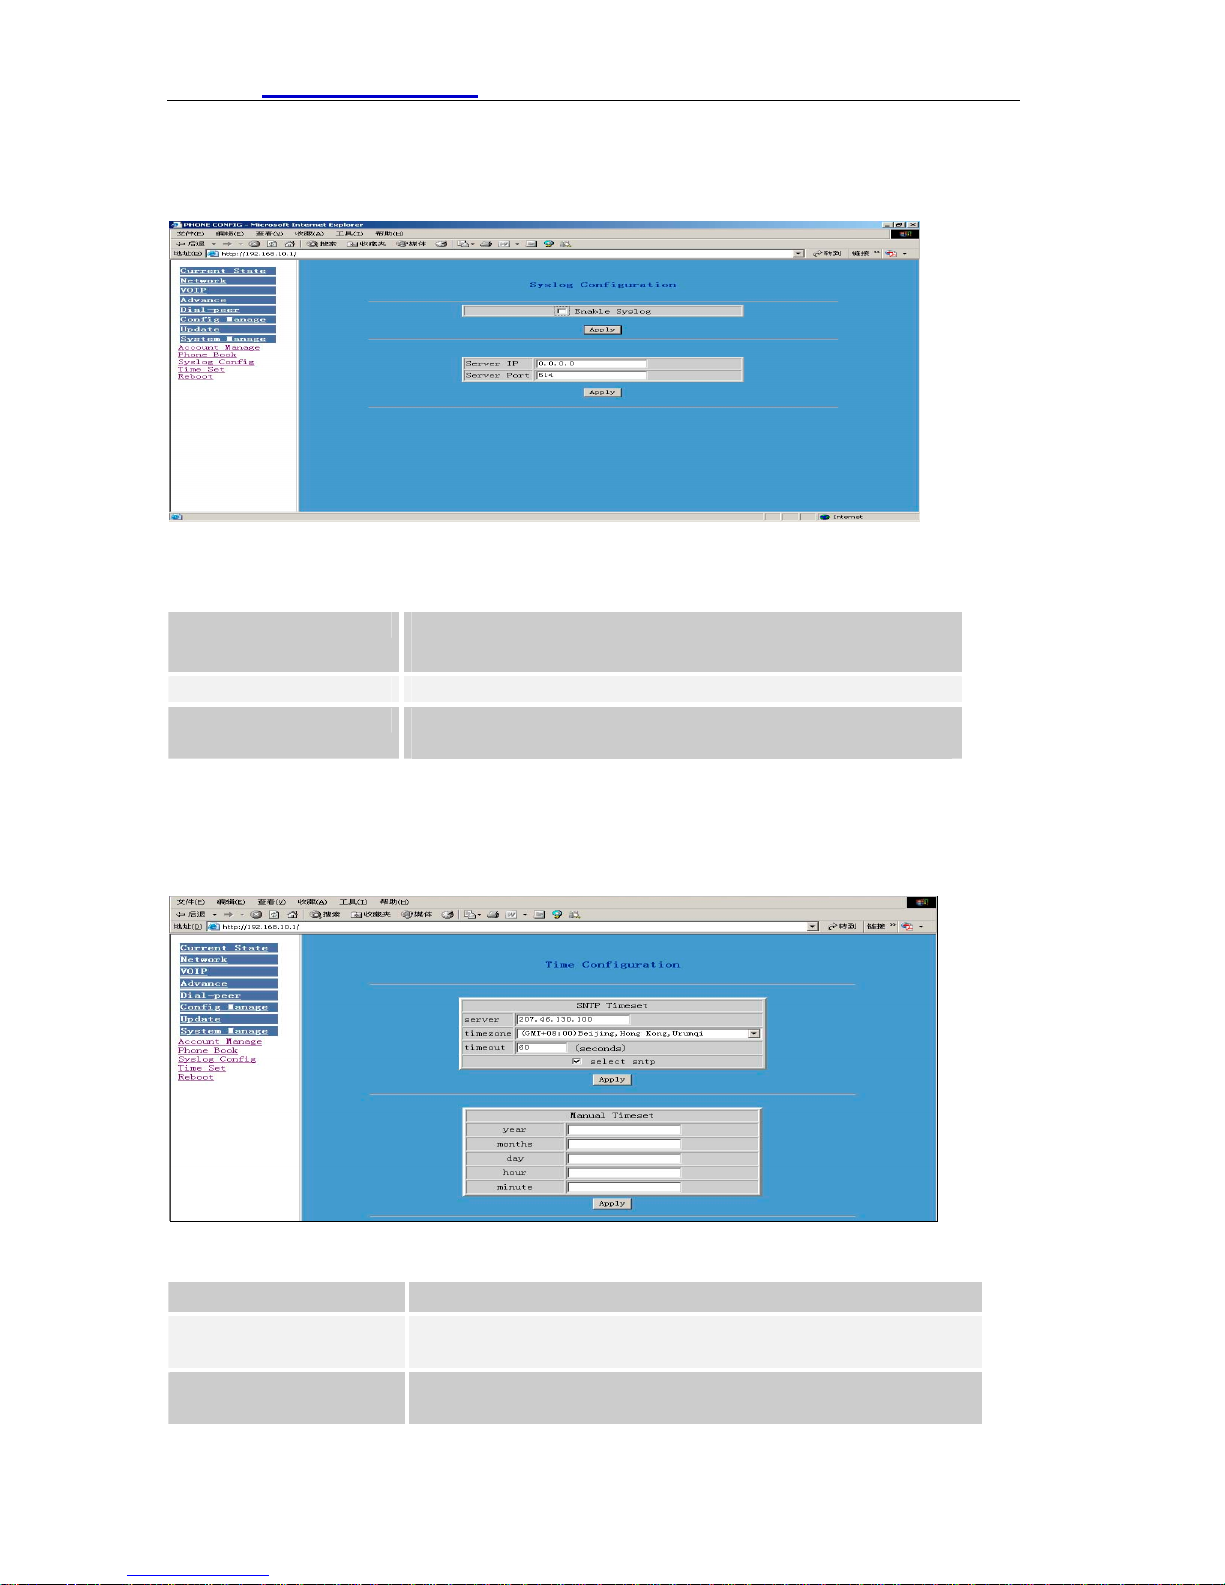
6.11.3 Syslog configuration
44
Page 46
HTTP://www.suncti.co.th User Manual
Users can star or close syslog function and config syslog server IP address & port.
Syslog Configuration
Definition of each parameter described as below
Enable Syslog
Server IP Config syslog server IP address
Server Port Config syslog server port, click “ Apply” button after
6.11.4 Time Set
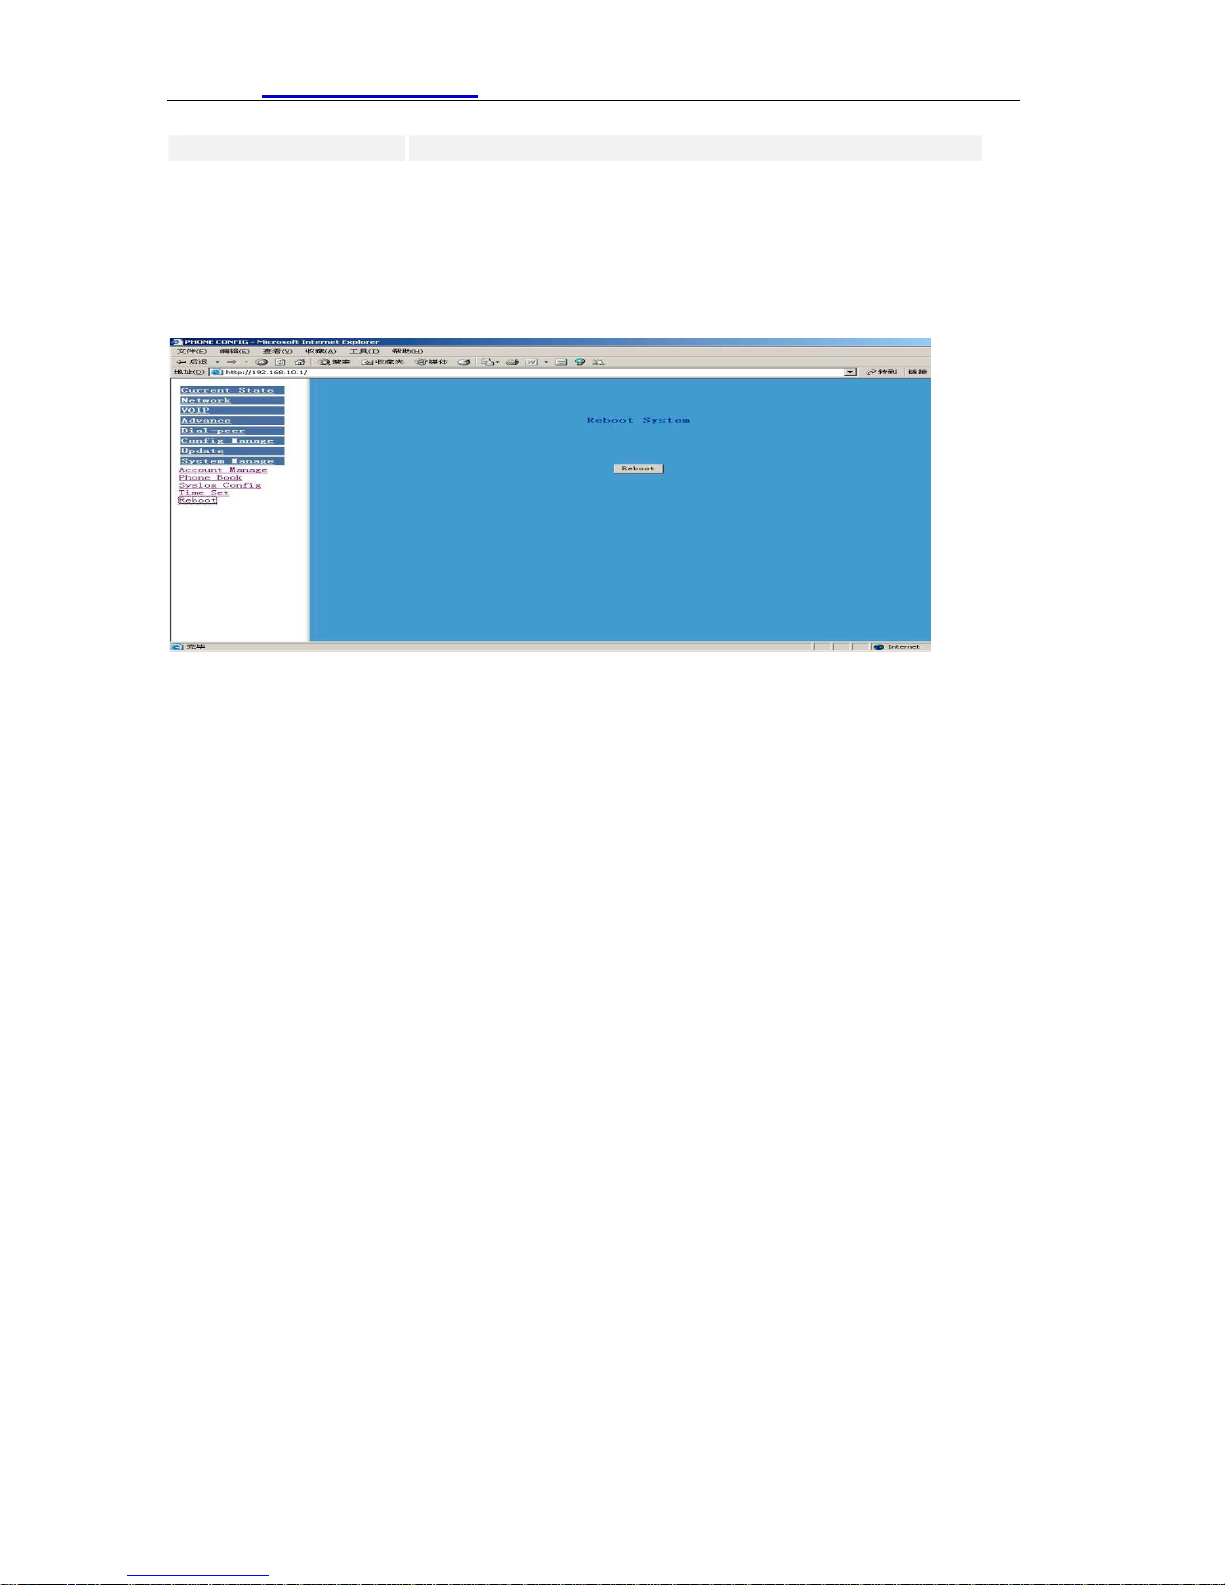
Setting time zone and SNTP (Simple Network Time Protocol) server according to
users location, users could manual adjust date and time on this web page.
Config enable/disable syslog function, choose it and
then click “Apply” button to go into effect
inputting server IP & server port to take effect
Definition of each parameter described as below
Server
Time zone Set time zone according to users location, Beijing time
Timeout use for socket calls which will block while doing the
SNTP server IP address
zone is GMT:+8:00
SNTP query, default value is 60 seconds
45
Page 47
HTTP://www.suncti.co.th User Manual
Manual Time set Manual set date and time
6.11.5 System Reboot
Once any change of phone configuration is made, users need to reset IP phone to go
into effect. Users should save the modified configuration before system reboot,
otherwise the phone system configuration will go back to last saved setting. The
system reboot interface as below
7 Default Factory Setting
46
Page 48

HTTP://www.suncti.co.th User Manual
z Gain IP address thru DHCP mode, WAN Port static IP is 192.168.1.179, LAN port
IP is 192.168.10.1.Default is to start the DHCP service and NAT function.
z Default communication protocol is to use SIP, SIP port is 5060
z Default HTTP port is 80, Telnet port is 23
z Default number end is “#” button
z Default user account is admin and guest
z Default phone time is to use SNTP protocol to get GMT
8.0 Telnet configuration
47
Page 49

HTTP://www.suncti.co.th User Manual
8.1 Config Pr o c ed ure
z Input command “cmd” on Run submenu under
PC START menu, and then key in “telnet phone-IP-address
enables users to config IP phone thru telnet.
z Input username and password, both default
username and password of Administrator account are “admin”
z Config IP Phone through command lines
Note:
1. We suggest users to config IP Phone thru web browser instead of
keypad or telnet.
2. After any change of configuration, please remember to make “write”
command to save changes and then input “reload” command to reboot
IP phone to take effect.
8.2 Telnet Basic Introduction
8.2.1 Basic Structure
User may use telnet command to access and manage gateway.
S01 adopts tree structure for telnet. Every node contains its sub-nodes or local
command. User can type “help” or “?” whenever to see sub-nodes and all local
command under current node.
Besides local command, there are some global commands can be used in each
node.
8.2.2 Basic Command
Logout: exit telnet mode.
Write: save current settings.
Type sub-nodes name in current node to switch to sub-node.
Type “!” or “exit” in current node to return to parent-node.
Type “help” or “?” can see all sub-nodes and all local command under current node,
every help item has comments such as <command> or <node> to distinguish
sub-nodes and local command. Type “help” or “?” in command can see all
parameters using in this command.
When typing node name or command, user no need to key the full name, use TAB
button will make it more efficient.
There are two types in command parameters: optional and required. “required”
parameter use “-” as prefix and “optional” use “_” as prefix. User may type “-” or “_”
then press TAB button for complementarily.
48
Page 50

HTTP://www.suncti.co.th User Manual
8.3 Global Command
Global command is available under all nodes, S01 support following commands.
Command
Name
chinese Set the language of help prompt info
clear Clear screen #clear
english Set the language of help prompt info
exit Go back to upper level of node #exit
help 1.Display help prompt info
history Display the history info for inputting
logout Exit telnet config interface #logout
ping One test program using to check
tree Print out the tree structure of current
who Display current users login to PC #who
Write Save configuration to flash #write
Reload Reboot IP phone #reload
Common Network command
Command
Name
ping The same with above stated #ping www.fanvil.com
tracert Print out the network path #tracert
show basic Print current configuration status table #show basic
show ip route Print phone Router table #show ip route
show ip arp Print phone arp table #show ip arp
show ip
netstat
telnet telnet another user host #telnet 192.168.1.2
Set default Clean phone configuration
Set all default Clean all configuration and restore
Command function Example
#chinese
to Chinese
#english
to English
1.#help ping
2.Display all subnode under current
node and local command
command
network or program availability
node
Command function Example
Run Netstat program #show ip netstat
modification and restore default
except network configuration
default manufacturing setting
2.#help
#history
#ping www.fanvil.com.
#tree
www.fanvil.com
#setdefault
#setdefault all
49
Page 51

HTTP://www.suncti.co.th User Manual
8.4 Net Configuration
8.4.1 LAN interface Settings
Path: <config-interface-fastethernet-lan>#
Function Command
[disable]enable bridge mode [no]bridgemode
[disable]enable DHCP service [no]dhcp-server
[disable]enable NAT [no]nat
Show current DHCP rules dhcpshow
Show LAN port IP address ipshow
Show NAT info natshow
Change LAN port IP address ip –addr x.x.x.x –mask x.x.x.x
Example:
#config interfact fastethernet lan
<config-interface-fastethernet-lan>#ip –addr 192.168.1.10 –mask 255.255.255.0
8.4.2 WAN Interface Settings
path: <config-interface-fastethernet-wan>#
Function Command
[disable]enable dhcp client [no]dhcp
[disable]enable pppoe [no]pppoe
[disable]enable QOS [no]qos
Set default gateway IP gateway x.x.x.x
Clear default gateway IP no gateway
Set WAN port IP address ip –addr x.x.x.x -mask x.x.x.x
Show WAN port settings show
Example:
# config interface fastethernet wan
<config-interface-fastethernet-wan>#ip –addr 202.112.241.100 –mask 255.255.255.0
You need to reconnect if the WAN port has been changed.
8.5 Net Servi c e
path: <config-netservice>#
Function Command
Set DNS address dns -ip x.x.x.x _domain xxx
Set alternate DNS address alterdns -ip x.x.x.x _domain xxx
Set hostname hostname xxx
Set http access port http-port xxx
Show http access setting http-port
Set telnet access port telnet-port xxx
Show telnet access port telnet-port
Set RTP initial port and
quantity
Add route rule route –gateway x.x.x.x –addr x.x.x.x –mask x.x.x.x
Delete route rule no route –gateway x.x.x.x –addr x.x.x.x –mask x.x.x.x
Show route info Route
Show netservice info show
Example:
#config netservice
<config-netservice>#dns –ip 202.112.10.36 _domain voip.com
<config-netservice>#media-port –startport 10000 –number 200
media-port –startport xxx –number xxxx
50
Page 52

HTTP://www.suncti.co.th User Manual
<config-netservice>#route –gateway 202.112.10.1 –addr 202.112.210.1 –mask
255.255.255.0
8.6 Port Settings
path: <config-port>#
Function Command
set caller ID mode Caller ID xxx
disable caller ID no caller ID
Disable call forward no callforward
[disable]enable call transfer [no]call transfer
[disable]enable call waiting [no]call waiting
Set DTMF gain Dtmf volume xxx
[disable]enable3-way conference [no]three talk
Show port settings show
8.7 SIP Setti ngs
path: <config-sip>#
Function Command
[disable]enable registration [no] register
[disable]enable auto detect
server
Set sip domain default-domain xxx
Set DTMF mode dtmf-mode xxx
Set auto detect interval time interval-time xxx
[disable]enable auto swap server [no]swap-server
Set local SIP signal port Signal port xxx
Set proxy server server proxy -ip x.x.x.x _port xxx _user xxx _password xxx
Set register server info server register -ip x.x.x.x _port xxx –user xxx _password
Set alter proxy info alter-server proxy –ip x.x.x.x _port xxx _user xxx _password
Set alter server info alter-server register –ip x.x.x.x _port xxx _user xxx
Show current sip info show
Example:
#config sip server
<config-sip-server># server proxy ip 210.25.23.22 _port 5060 _user aaa _password
123456
8.8 User Management
path: <config-user>#
Function Command
Change user right. access –user xxx –access xxx
Change user password password –user xxx
Add new user entry –user xxx –access 5 (or 12)
Delete user entry no entry –user xxx
Show current sip info show
Example:
#config user
<config-user>#entry –user abc –access 7
Example:<config-user>#access –user aaa –access 7
[no] detect-server
xxx
xxx
_password xxx
51
Page 53

HTTP://www.suncti.co.th User Manual
Note:
The command : –user xxx –access digit
Here if the digit is less 10 , then the user level is guest
If the digit is more that 10 ,then the user level is administrator
8.9 Debug (Level 0~7)
path: <debug>#
Function Command
show debug setting show
[disable]enable debug all modules [no] all xxx
[disable]enable debug app module [no] app xxx
[disable]enable debug cdr module [no] cdr xxx
[disable]enable debug sip module [no] sip xxx
[disable]enable debug h323 module [no] h323 xxx
[disable]enable debug tel module [no] tel xxx
[disable]enable debug dsp module [no] dsp xxx
8.10 Show System Running Info.
path: <show>#
Function Command
show: accesslist (firewall) settings accesslist
show network status basic
show current call info call active
show CODEC capability capability
show debug info debugging
show LAN status and DHCP server info dhcp-server
show digital-map info dial-rule
show LAN info interface fast ethernet lan
show WAN info interface fast ethernet wan
show arp table info ip arp
Show DNS gateway info ip dns
Show netstate info ip netstat
Show route info ip route
Show icmp packets Stat. ip icmp
Show igmp packets Stat. ip igmp
Show ip packets Stat ip ip
Show RTP packets Stat. ip rtp
Show TCP packets Stat. ip tcp
Show UDP packets Stat. ip udp
show gateway memory memory
show NAT information nat
show caller-ID info port caller ID
show dsp info port dsp
show hotline info port hotline
show black list info port in-limit
show outgoing limit info port out-limit
show current phone number port number
show current port status port status
show PPPoE info pppoe
52
Page 54

HTTP://www.suncti.co.th User Manual
show QoS table info qos
show sip info sip
show UDP tunnel info udp tunnel
show running time uptime
show gateway version version
8.11 Logout
Usage: #telnet –target -port
Login:xxx
Password:xxx
#logout
8.12 Tracert Trace Network Path Info.
usage: #tracert –host
Example: #tracert www.google.com
8.13 Update
usage:
# update ftp –user xxx –password xxx –ip x.x.x.x –file xxx
# update tftp –ip x.x.x.x –file xxx
Example:
# update ftp –user abc –password 123 –ip 202.112.20.15 –file S01.z
8.14 Upload Configure File
usage:
# upload ftp –user xxx –password xxx –ip x.x.x.x –file xxx
# upload tftp –ip x.x.x.x –file xxx
8.15 Download Configure to Flash
usage:
#download tftp –ip x.x.x.x –file xxx
#download ftp –user xxx –password xxx –ip x.x.x.x –file xxx
Example:
#download ftp –user abc –password 123 –ip 202.112.20.15 –file S01.cfg
8.16 Password
usage:
#
password
Enter new pass word: xxx
Confirm new password :xxx
8.17 Reload
usage: #reload
Reboot system
8.18 Network Diagnosis
There are some telnet commands for checking your network. Now Listing below for
your information
Command Function Example
ping Check if the destination is accessible #ping www.google.com
53
Page 55
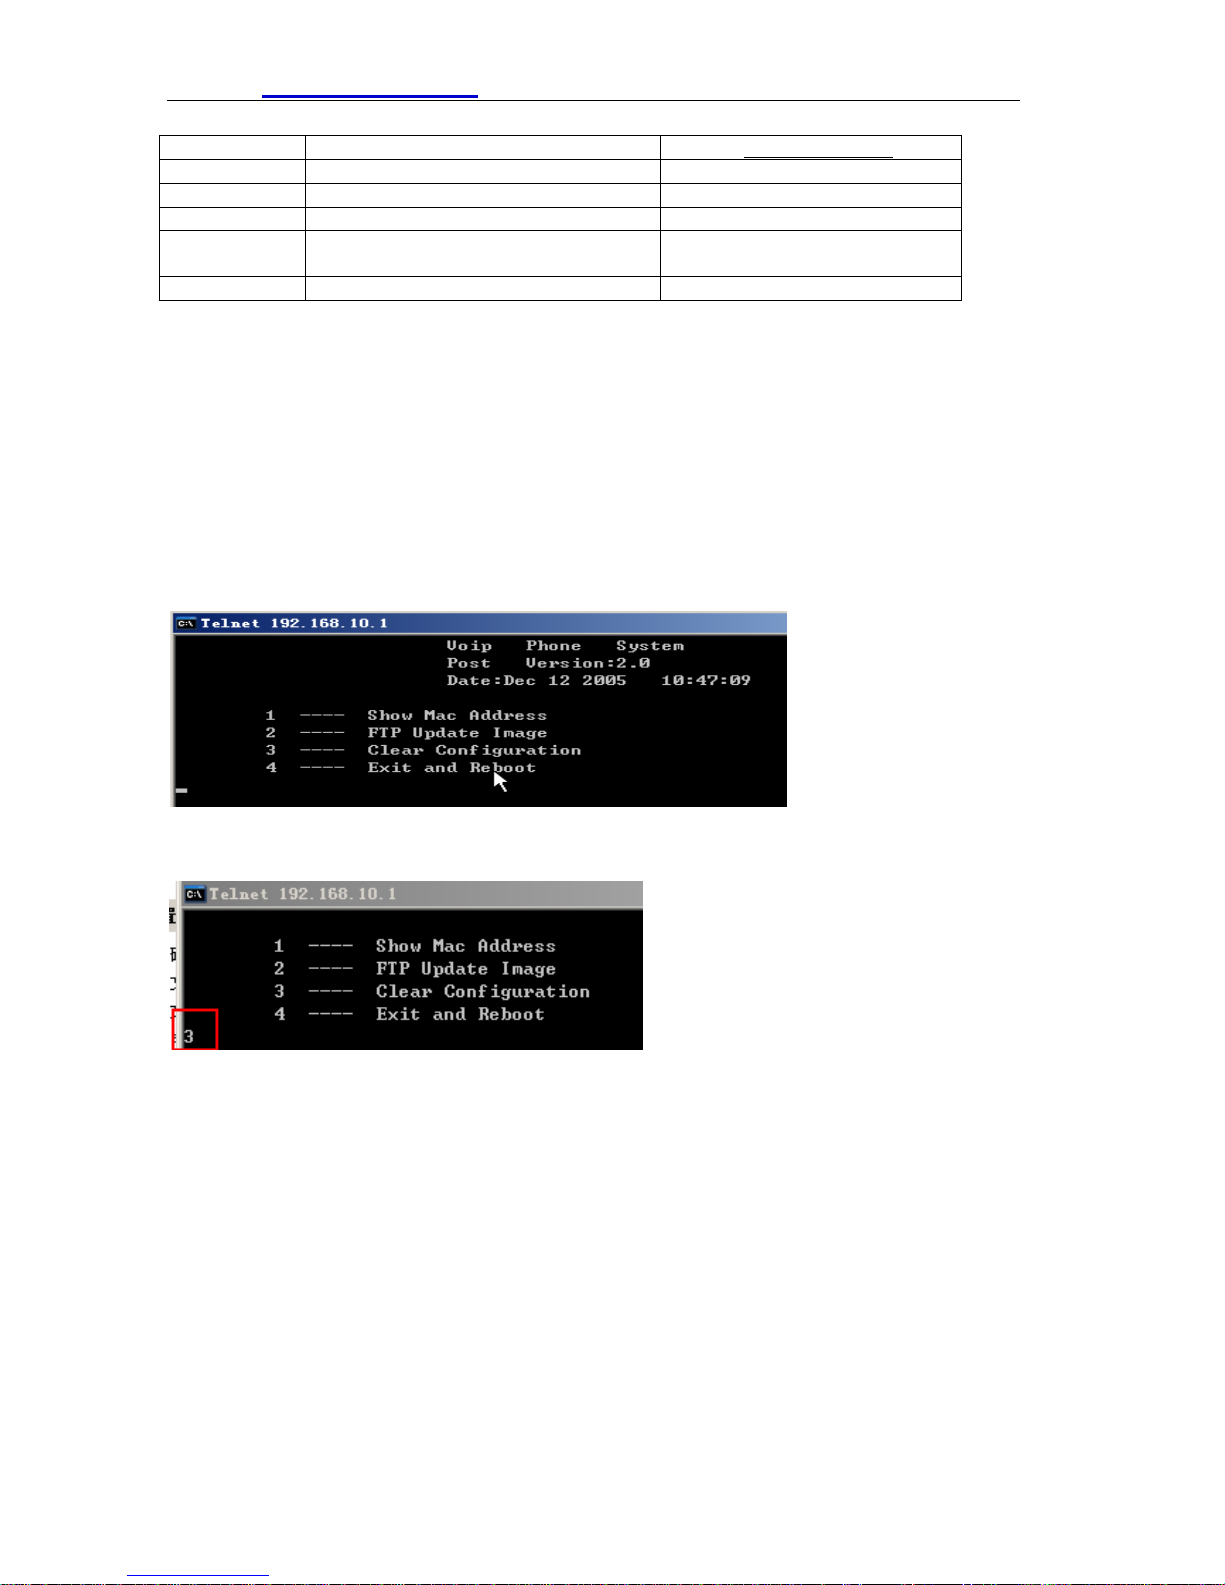
HTTP://www.suncti.co.th User Manual
tracert Show network path info #tracert www.google.com
show basic Show network settings #show basic
show ip route Show route table #show ip route
show ip arp Show arp table #show ip arp
show ip
netstat
telnet Telnet to another device #telnet 192.168.1.2
8.19 Restore to Factory Default
#setdefault (clear gateway settings expect network part)
#setdefault all (clear all settings.)
8.20 POST Mode(safe mode)
8.20.1 Access Post Mode Process
1 PC connect to S01 LAN port
2 power off
3 press # and power on till the LCD display POST MODE
4 telnet 192.168.10.1
5 config page as below
Netstat programme #show ip netstat
8.20.2 Post Mode Clear
Input 3 and enter for clear configuration
54
Page 56
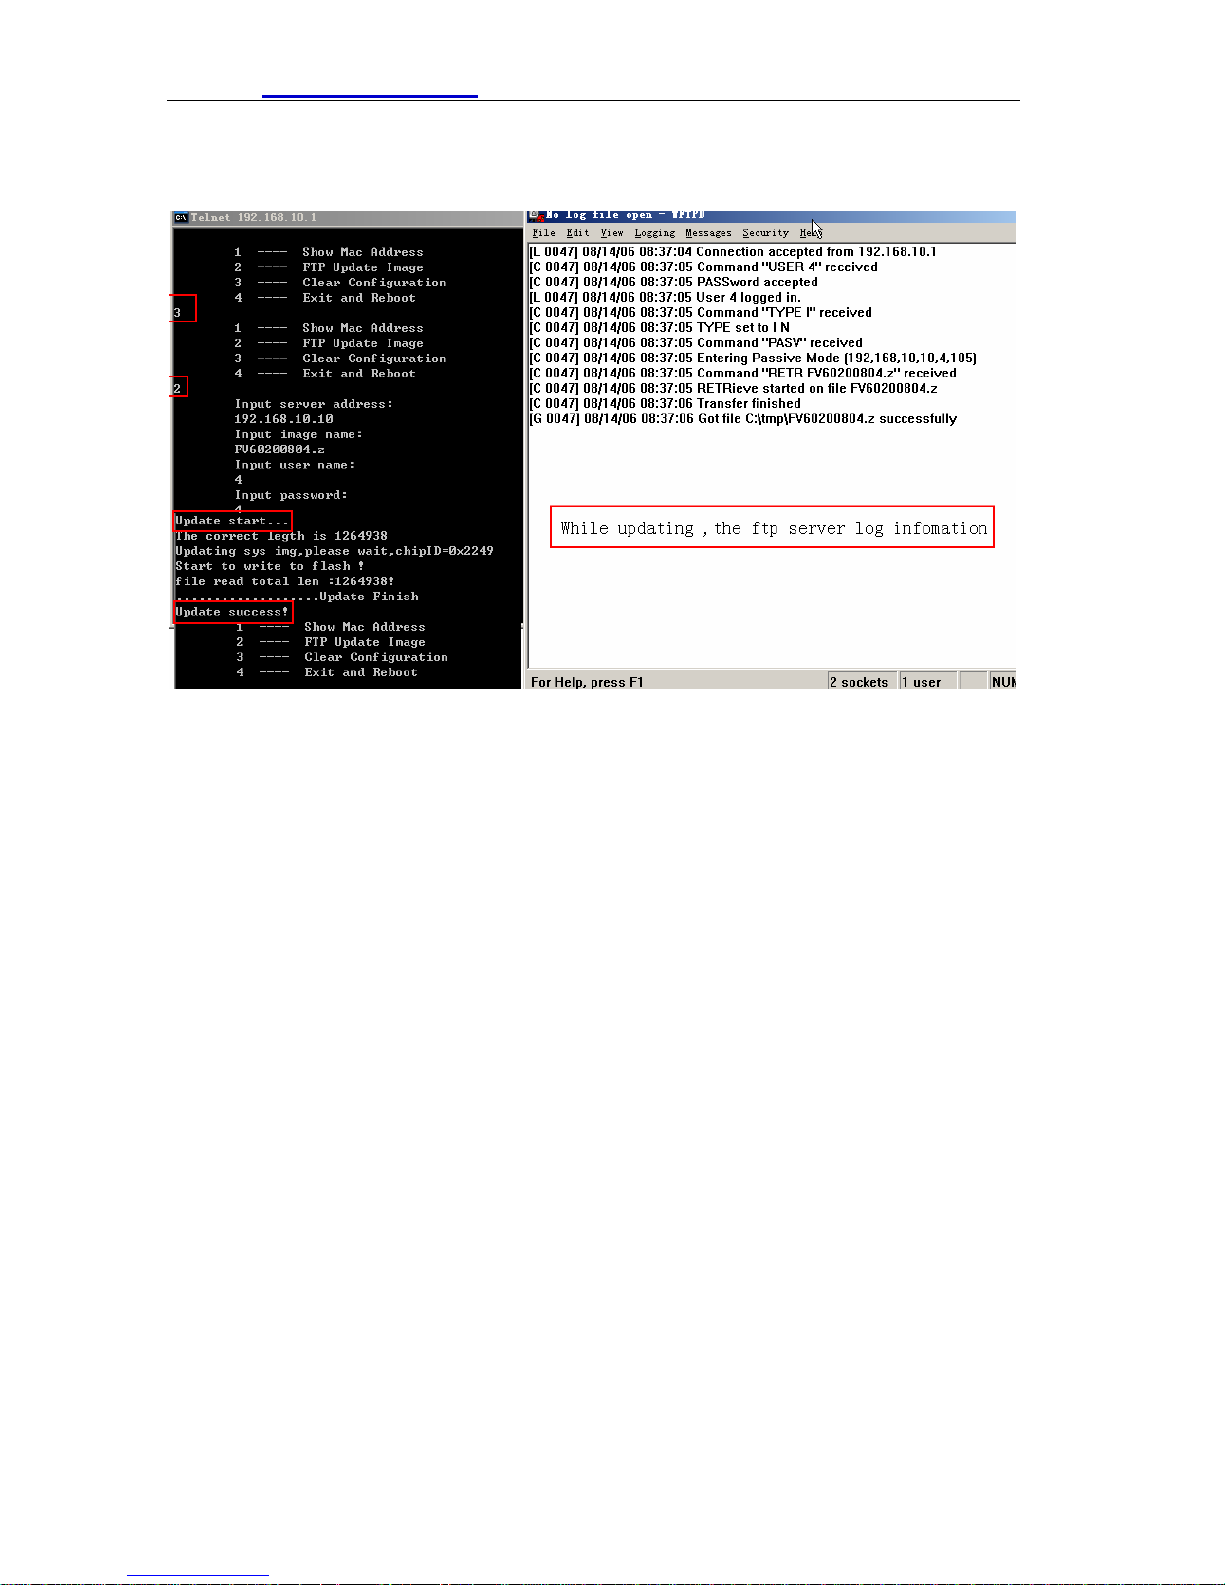
HTTP://www.suncti.co.th User Manual
8.20.3 Post Mode FTP Update Firmware
Input 2 for update firmware
S01 provide safe mode. When there is booting problem because of setting problem or
firmware problem. User can restore the factory setting or upgrade to a new firmware
to solve this problem.
55
 Loading...