

Page 1
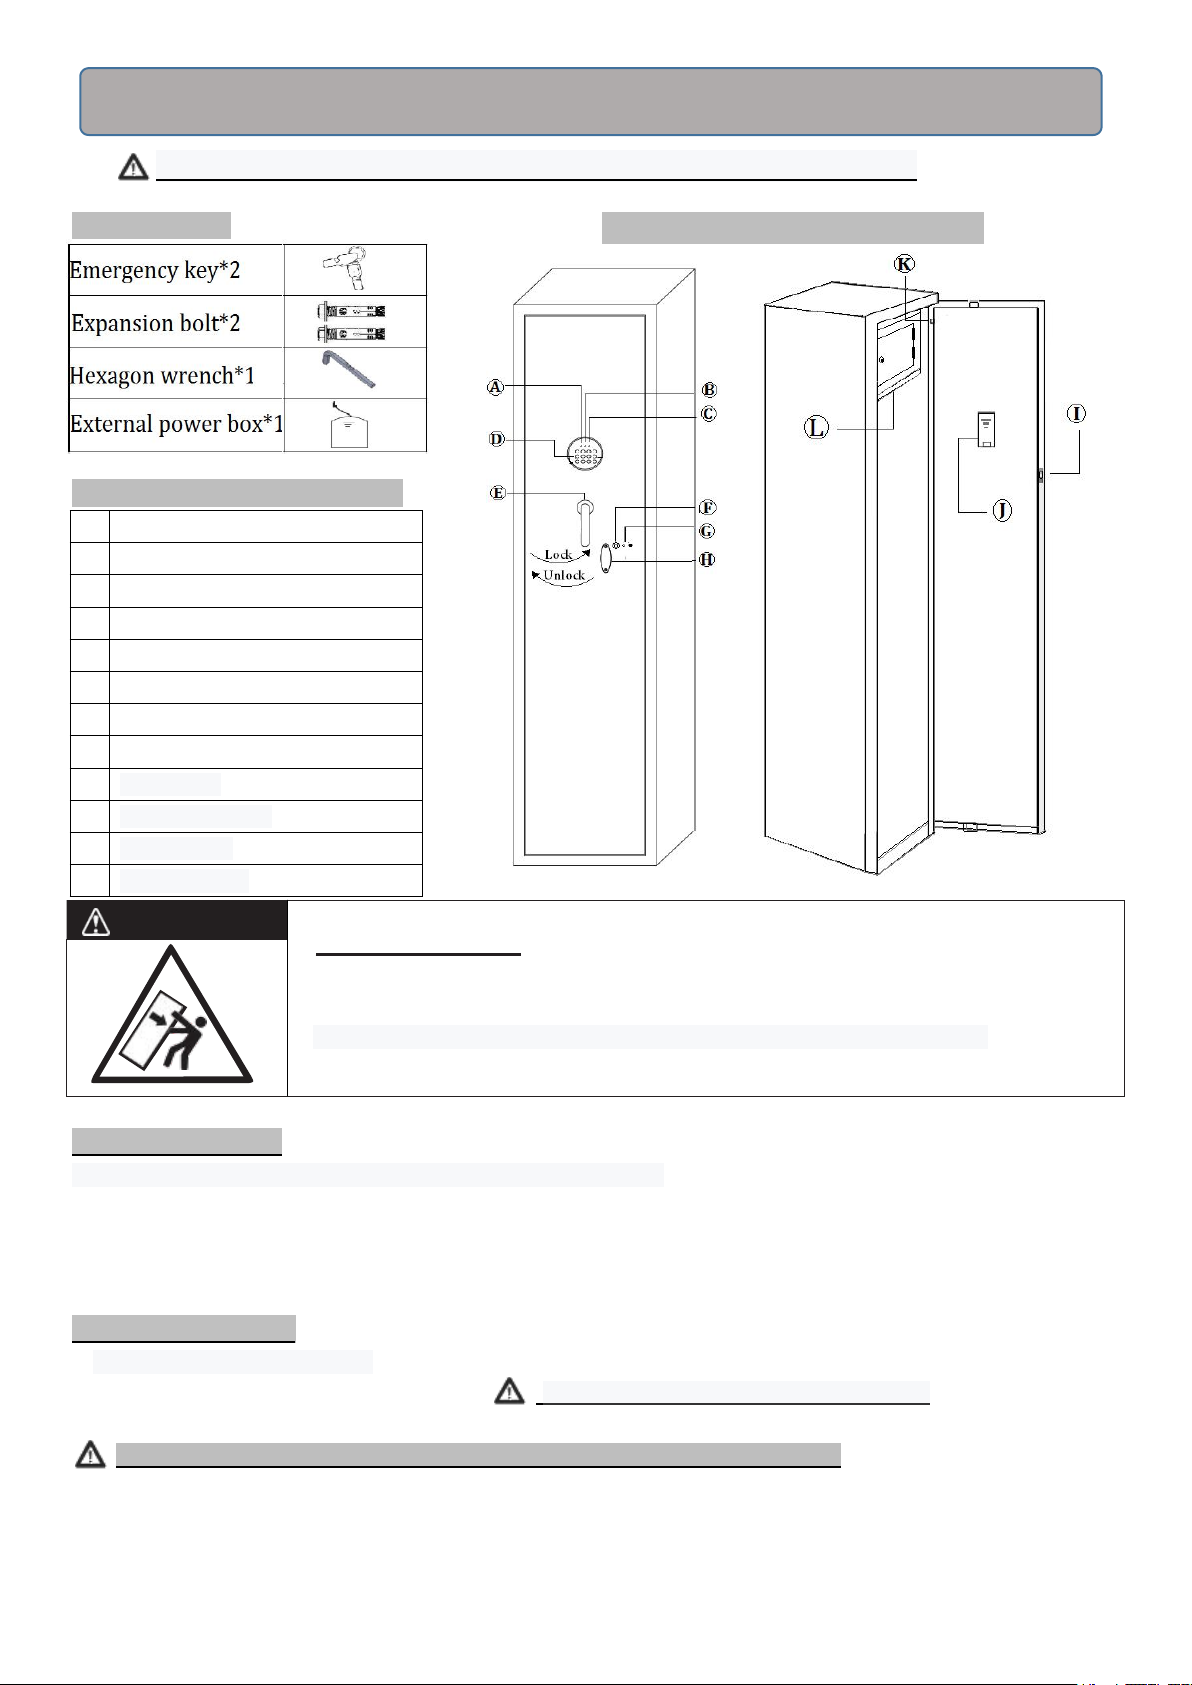
INSTRUCTION MANUAL FOR ELECTRONIC GUN CABINET
A
Yellow indicating light
B
Red indicating light
C
Green light
D
Digital keys
E
The handle
F
Emergency keyhole
G
External power hole
H
The sign plate
I
The lock pin
J
Internal power box
K
Setting button
L
bullets lockbox
WARNING
Tip Over Hazard
•
A child or adult can tip the safe and be killed or seriously injured.
•
Serious injury may occur to children and adults if not secured before installation
.
•
Children should not play with or around the safe at any time.
Tip: please do not leave the emergency keys & external power box in your safe !
PARTS LIST ACTUAL MODEL MAY VARY
COMPONENT DESCRIPTION
GETTING STARTED
1.Remove the label cover with a wrench from the attachment package.
2. To expose the Emergency Key access, remove Logo Plate screws with provided tool.
3. Insert Emergency Key into key access, push and turn counter-clockwise.
4. Turn Handle clockwise to open the safe.
5. Continue with INSTALL BATTERIES.
INSTALL BATTERIES
1. Open the battery box cover plate.
2. Insert 4 AA batteries and restore battery cover. (Caution: Do not use Rechargeable Battery)
3. Continue to the next step
THIS ELECTRONIC LOCK COMES WITH TWO SETS OF PASSWORDS
1. Ex-factory personal password (1234).
2. Management password (123456).
Remark:If you forget the personal password set by yourself,the management password can directly open the safe.
Management password can reset up by yourself again when the safe is open.
Page 2
THE SETTING OF PERSONAL PASSWORD AND CHANGE
1. Open the door. Press the green (red) setting button, the buzzer will ring twice, and the yellow indicating light will be on.
2. Enter the new 3-8 bit password within 5 seconds. Press "#" to confirm, the buzzer will sound twice, and the yellow
indicating light will go out, indicating that the password setting and change are successful
MANAGEMENT PASSWORD SETTINGS AND CHANGES
1. Open the door in standby mode, press "0' button twice, press the setting button within 5 seconds, the buzzer will ring
twice, and the yellow indicating light will be on.
2. Enter the new 3-8 bit password within 5 seconds. Press "#" to confirm, the buzzer will sound twice, and the yellow
indicating light will go out, indicating that the password setting and changing are successful.
Note: both passwords need to be changed and remember by yourself.
OPEN THE SAFE
1. Enter the new password you set and press "#" to confirm.
2. The buzzer will sound twice, the green light will come on, and the electromagnet will hold for 6 seconds.
Turn the handle 85° clockwise in 3.5 seconds and the door opens,Automatic shutdown after more than 5 seconds and
reoperate.
ALARM FUNCTION
This product has the function of "setting alert" and "eliminating alert"
1. Standby mode. Press
2. After the safe alarm, enter the correct password you set.Press the
removed.
3. This product has three password input error alarm function, automatic alarm 48 seconds, enter the correct password can
remove the alarm sound
UNDER VOLTAGE INDICATION
1. Turn on the red light when the battery capacity is insufficient to remind the user to replace the battery in time.
2. If the internal power supply is insufficient, external power supply can be used.This electronic lock has the function of
protection password never disappear
Note: it is recommended to use ordinary batteries, avoid lithium batteries and different types of batteries.
Technical parameters
1. Working power: four 5th "AA" alkaline batteries
2. Working voltage range: 4V-7V
3. Working under voltage point: 4.6V plus or minus 0.20V
4 quiescent current is less than 5Ua
MOUNTING INSTRUCTIONS
The safe may be mounted to a wall or floor.
·Drill the appropriate size holes for the anchors you are using
·Carefully press the anchor into the holes at this time
· Mount the safe by running screws from inside of the safe
and securing to anchors; ensure the safe is mounted securely Floor Mounting
·Use proper drill tools depending on the type of floor you are
mounting the safe (wood, tile, or concrete)
· Measure the location of the pre-set drill holes; mark their exact position onto the floor
·Drill the appropriate size holes for the anchors you are using
·Carefully press the anchor into the holes at this time
·Mount the safe by running screws from inside of the safe and securing to anchors; ensure the safe is mounted securely
Mounting Holes
· Actual model may vary
"#"
to enter the alert mode automatically.Vibrating safe will give an immediate alarm for 48 seconds.
"#"
button to open the door and the alarm can be
 Loading...