

Page 1

EFTPOS
Merchant Facilities
—
Quick Reference Guide
Move2500/Move5000
Page 2

PAGE 2 OF 52
EFTPOS MERCHANT FACILITIES
QUICK REFERENCE GUIDE (MOVE2500/MOVE5000)
How to Use this Guide
This handy Quick Reference Guide has been designed to give you step-by-step, easy-tofollow instructions on how to correctly use your Suncorp EFTPOS terminal. Simply go to the
appropriate section, which has been tabbed for your convenience, and follow the user-friendly
advice. There’s also a Troubleshooting section to help you out with common problems, and a
list of contacts to call if you need a helping hand or further information.
Thank you for choosing Suncorp EFTPOS. We look forward to helping you receive, pay and
boost your revenue with our smart payment solutions.
Page 3

PAGE 3 OF 52
EFTPOS MERCHANT FACILITIES
QUICK REFERENCE GUIDE (MOVE2500/MOVE5000)
Contents
How to Use this Guide 2
Contact Details 5
Contact Details 6
Terminal Overview 7
Countertop Terminal Keyboard Layout 8
Mobile Terminal Keyboard Layout 8
Turning the Move 5000 ON and OFF 9
Accessing the Menu 9
Ways to Process Transactions 9
Contactless Functionality 10
Transaction Processing Retail 11
Debit Card Purchase 12
Debit Card Purchase with Cash Out 12
Debit Card Cash Out Only 13
Credit Card/Charge Card Purchase 13
Refund 14
MOTO (Mail Order/ Telephone Order) transaction** 14
Void 15
Transaction Processing Restaurant 17
Debit Card Purchase 18
Debit Card Purchase with Cash Out 19
Debit Card Cash Out Only 20
Credit Card/Charge Card Purchase 20
Refund 21
MOTO (Mail Order/ Telephone Order) transaction** 22
Void 23
Enable User ID 23
Disable User ID 23
User ID Tip Report 24
Transaction Processing Hospitality/Accommodation/Pre Authorisation 25
Debit Card Purchase 26
Debit Card Purchase with Cash Out 26
Debit Card Cash Out Only 27
Credit Card/Charge Card Purchase 27
Refund 28
MOTO (Mail Order/ Telephone Order) transaction** 29
Void 30
rad Pre-Authorisation 30
Pre-Authorisation Completion 31
Page 4

PAGE 4 OF 52
EFTPOS MERCHANT FACILITIES
QUICK REFERENCE GUIDE (MOVE2500/MOVE5000)
Merchant Functions 33
Ordering Stationery 34
Batch Totals 34
Audit and Summary Report 34
Receipt Reprint 35
Last Settlement Reprint 35
Manual Settlement 35
Surcharging 35
Setting Surcharging 36
Taxi Application 37
Replacing the Paper Roll 38
Changing the Passwords 39
Terminal Response Messages 40
Fraud Prevention Tips 41
Security & Chargeback Tips 42
Troubleshooting 45
Terminal Care and Troubleshooting 46
Manual Transaction Processing 47
Manual Transaction Processing 48
Processing a Fallback Transaction Voucher 48
Accepting payment via a Fallback Transaction Voucher 49
Processing Fallback Transaction Vouchers 50
Page 5

PAGE 5 OF 52
EFTPOS MERCHANT FACILITIES
QUICK REFERENCE GUIDE MOVE2500MOVE5000
Contact Details
Here are some handy contact numbers to help make using your Suncorp EFTPOS
terminalaseasy as possible.
Page 6

PAGE 6 OF 52
EFTPOS MERCHANT FACILITIES
QUICK REFERENCE GUIDE (MOVE2500/MOVE5000)
Contact Details
Merchant Terminal Faults
1800 836 055 (24 hours a day, 7 days a week)
Please have the following information ready:
— merchant number
— terminal number
Other Merchant Enquiries (Account Queries/Changes)
13 11 55 (Monday to Friday 8:30am – 5:00pm AEST except Brisbane public holidays)
Please have the following information ready:
— merchant number
— terminal number
Manual Authorisations – Visa and MasterCards
1300 301 221 (24 hours a day, 7 days a week)
Please have the following information ready:
— merchant number
— card details – card number, expiry date
— transaction amount
Manual Authorisations – Debit Cards
1800 836 055 (24 hours a day, 7 days a week)
Please have the following information ready:
— merchant number
— terminal number
— transaction amount
Chargeback Queries
07 3135 2988 Option 1 (Monday to Friday 8:30am – 5:00pm AEST except Brisbane public holidays)
Fax: (07) 3031 2615
Please have the following information ready:
— your name
— merchant number
— case number
— nature of query
American Express
1300 363 614
Diners Club
1300 360 060
Stationery Ordering
Stationery can be ordered either on your EFTPOS terminal or by placing an online order on
Suncorp Banks’ website www.suncorp.com.au/banking. See section on ordering stationery in
this Quick Reference Guide.
Page 7

PAGE 7 OF 52
EFTPOS MERCHANT FACILITIES
QUICK REFERENCE GUIDE MOVE2500MOVE5000
Terminal Overview
The Terminal Overview provides information on the functionality of the buttons on
yourEFTPOS Terminal and how to initiate a transaction.
Page 8
PAGE 8 OF 52
EFTPOS MERCHANT FACILITIES
QUICK REFERENCE GUIDE (MOVE2500/MOVE5000)
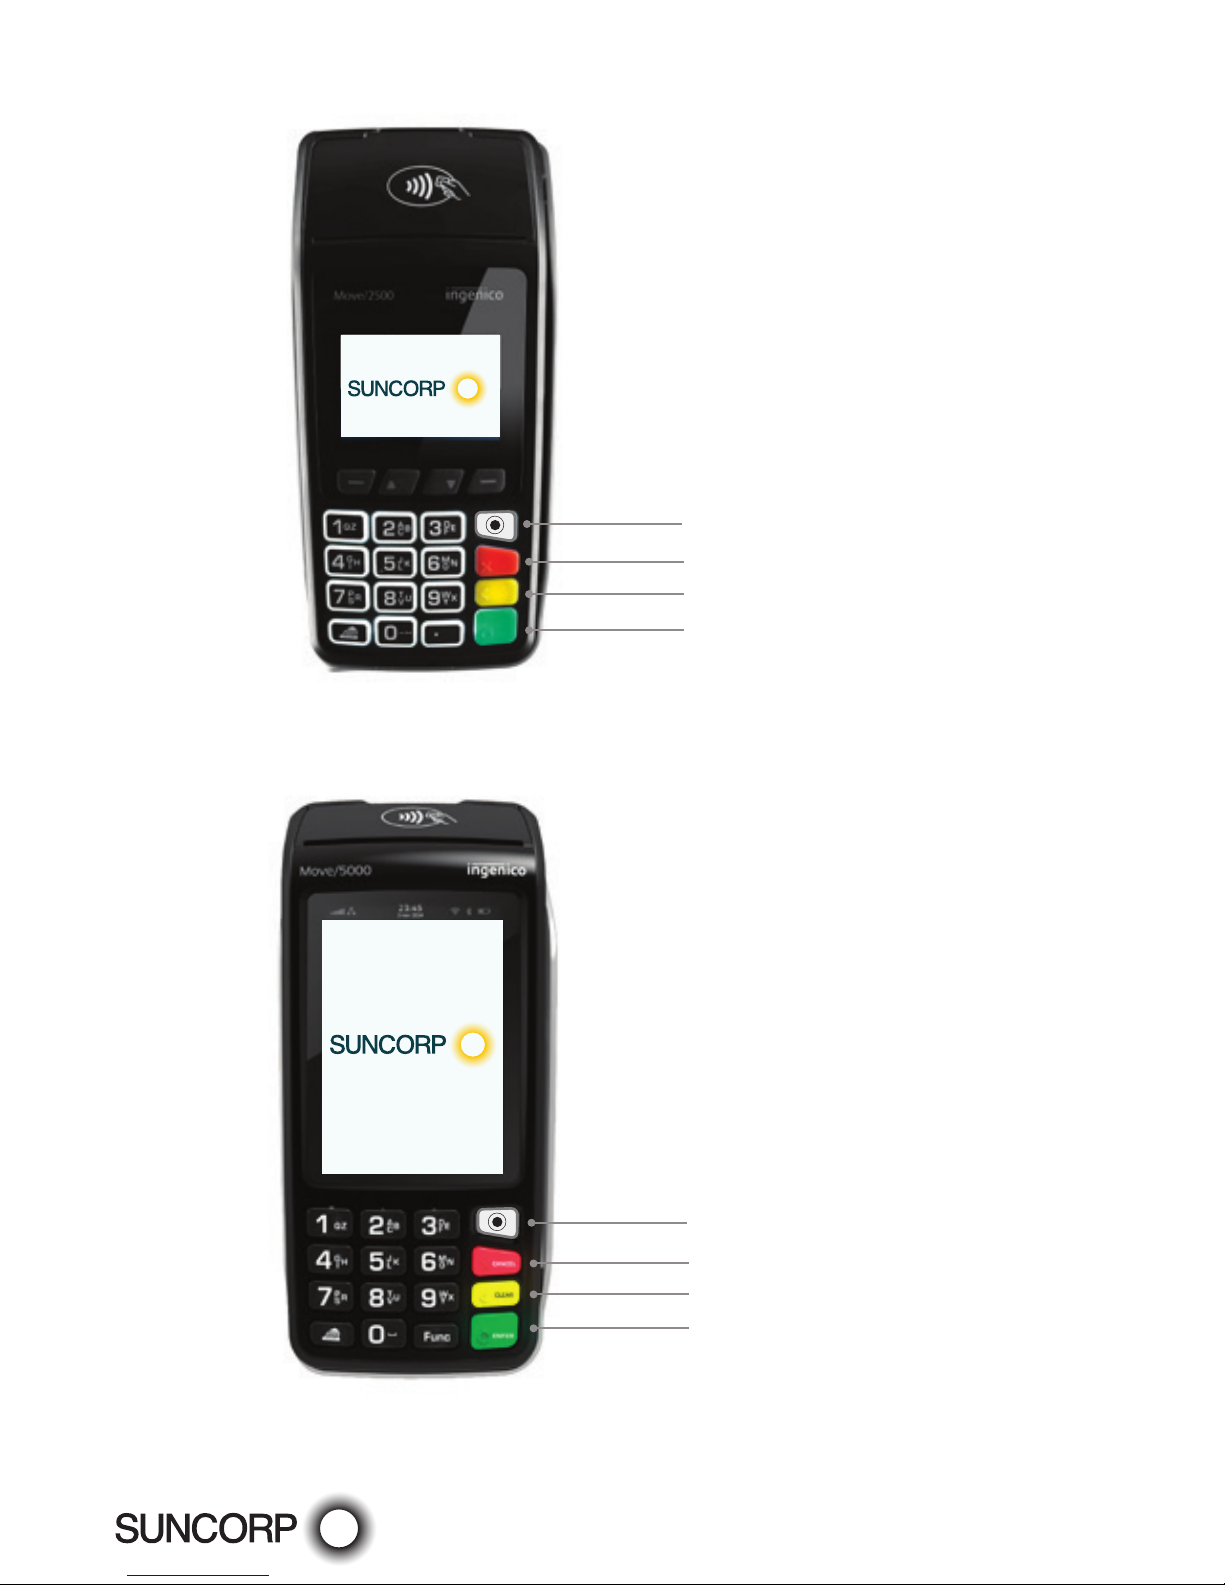
Countertop Terminal Keyboard Layout
MENU button
Enter key
Backspace/Clear key
Cancel key
Mobile Terminal Keyboard Layout
MENU button
Enter key
Backspace/Clear key
Cancel key
Page 9
PAGE 9 OF 52
EFTPOS MERCHANT FACILITIES
QUICK REFERENCE GUIDE (MOVE2500/MOVE5000)
Turning the Move 5000 ON and OFF
Turning the terminal OFF
— Press the Func and Clear button on the terminal simultaneously.
Turning the terminal ON
— Press the Enter button or place the terminal in the docking station connected to power.
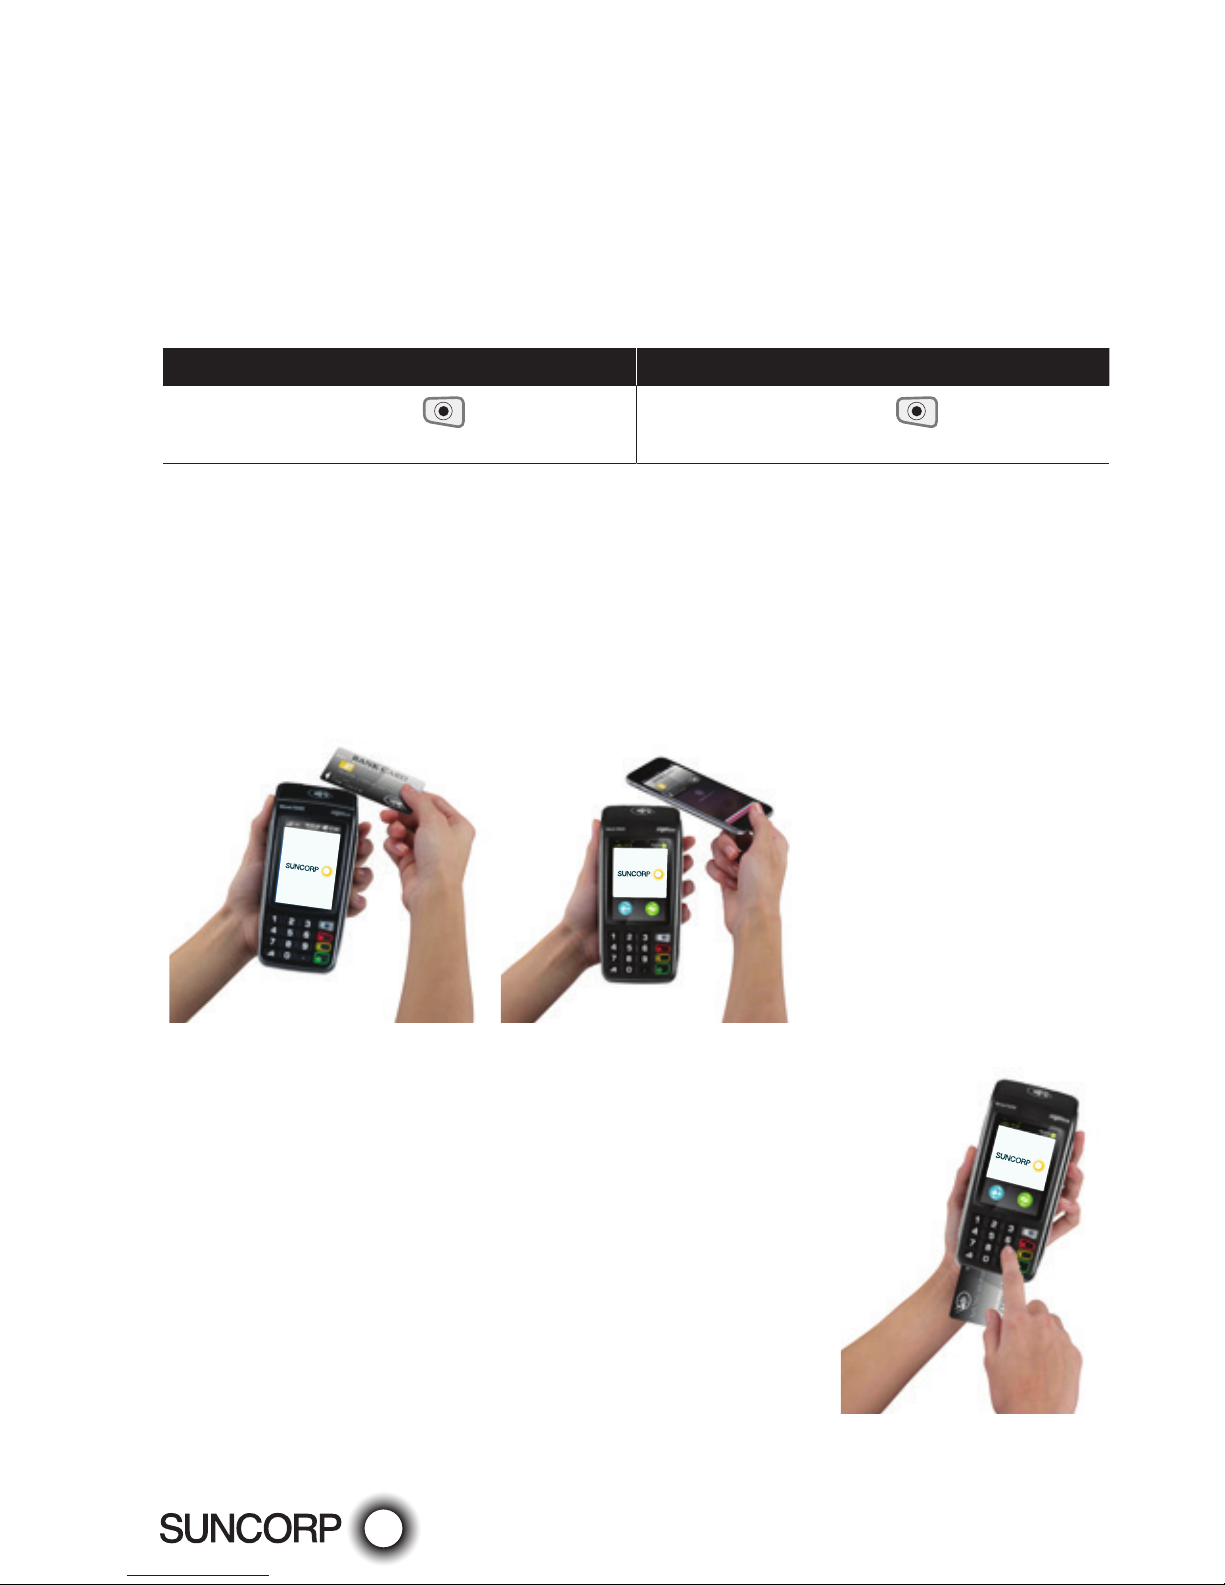
Accessing the Menu
Mobile EFTPOS Terminal (Move5000) Countertop EFTPOS Terminal (Move2500)
Press the MENU button on the right
hand side of the terminal below the screen
Press the MENU button on the right
hand side of the terminal below the screen
Ways to Process Transactions
Cards can be processed on the EFTPOS terminal in the following ways:
— Tap using the Contactless Functionality
Tap the contactless-enabled card against the contactless sign on the printer cover. Apple
Pay, Google Pay, Samsung Pay and other "Pays" are accepted in the same manner as
contactless enabled cards.
— Insert using the chip
Hold the card face-up with the chip towards the EFTPOS
terminal; insert the card as far as it will go into the chip
reader on the EFTPOS terminal. The card must remain in
the EFTPOS terminal until prompted to remove the card. If
there is an error reading the chip on the customer’s card, the
EFTPOS terminal may prompt you to swipe the card.
Page 10
PAGE 10 OF 52
EFTPOS MERCHANT FACILITIES
QUICK REFERENCE GUIDE (MOVE2500/MOVE5000)
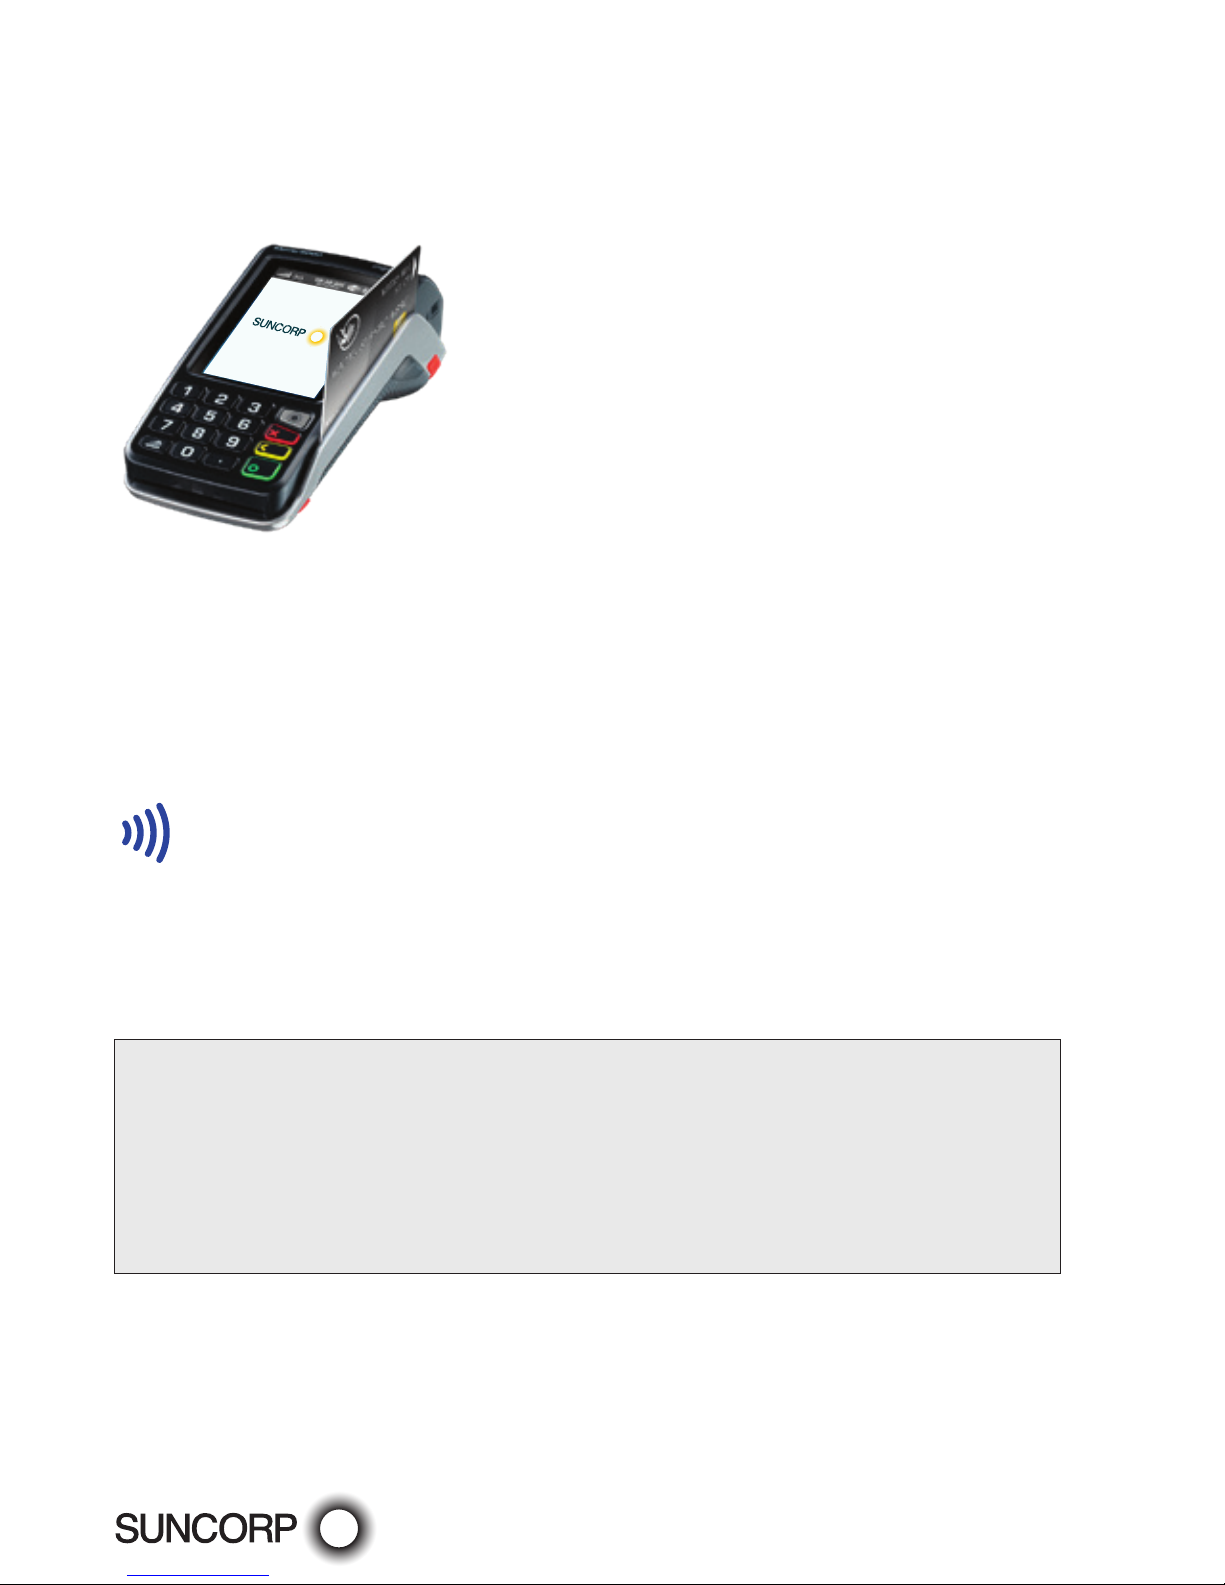
— Swipe using the magnetic stripe
Hold the card upside-down with the magnetic stripe facing inwards, swipe the card
smoothly through the card reader of the EFTPOS terminal. If you swipe a chip card
through the EFTPOS terminal, you will be prompted to insert the card into the chip reader
on the EFTPOS terminal.
Contactless Functionality
Your customer’s card must have the following symbol to use the Contactless Functionality.
Processing transactions using Contactless Functionality
— Dependant on the issuer rules, the customer will not be required to enter a PIN or sign
the receipt if the transaction is under $100.
— If the transaction is over $100, the customer will be required to enter a PIN or sign the
merchant receipt.
— Apple Pay, Google Pay, Samsung Pay and other "Pays" transactions can also be processed
on the EFTPOS terminal.
The Suncorp EFTPOS terminal has the ability to process the following Credit/Charge Cards:
— MasterCard.
— Visa.
— American Express.
— Diners Club.
— JCB Cards.
Processing of American Express, Diners Club and JCB charge card transactions can only occur once you obtain Suncorp’s
approval and you have entered into separate agreements with these specific organisations. Please advise Suncorp of the
establishment numbers for each organisation and your intent to process charge card transactions through your Suncorp
terminal.
Page 11

PAGE 11 OF 52
EFTPOS MERCHANT FACILITIES
QUICK REFERENCE GUIDE MOVE2500MOVE5000
Transaction Processing Retail
This section outlines Suncorp EFTPOS Terminal functions that are specifically
relevanttoRetail merchants including newsagents, convenience stores, supermarkets
andpharmacies, as well as Professional Practices.
Page 12

PAGE 12 OF 52
EFTPOS MERCHANT FACILITIES
QUICK REFERENCE GUIDE (MOVE2500/MOVE5000)
Debit Card Purchase
— Type in the Sale Amount.
— Press Enter.
— The screen will display PRESENT CARD - Prompt the customer to Tap, Insert or Swipe
their card.*
— If the screen displays - Select the account type – request the customer to make this
selection.
— The terminal will ask the customer to type in their PIN and press Enter.
— If Approved, the terminal will print the merchant receipt.
— Remove the merchant receipt and press Enter or Yes to print the customer receipt
(ifrequired).
— Ensure that the transaction receipt says ‘APPROVED’.
— Hand the Customer Copy receipt to the customer (if required).
* Dependant on functionality available on the customer’s card.
Debit Card Purchase with Cash Out
— Type in the Sale Amount.
— Press Enter.
— Type in the Cash Amount.
— Press Enter.
— Prompt the customer to Insert or Swipe their card.*
— If the screen displays - Select the account type – request the customer to make this
selection.
— The terminal will ask the customer to type in their PIN and press Enter.
— If Approved, the terminal will print the merchant receipt.
— Remove the merchant receipt and press Enter or Yes to print the customer receipt
(ifrequired).
— Ensure that the transaction receipt says ‘APPROVED’.
— Hand the Customer Copy receipt to the customer (if required) with the cash.
* Dependant on functionality available on the customer’s card.
Remember to clearly display your Cash out Policy.
Cash out cannot be performed on a Credit card.
Page 13

PAGE 13 OF 52
EFTPOS MERCHANT FACILITIES
QUICK REFERENCE GUIDE (MOVE2500/MOVE5000)
Transaction Processing Retail
Debit Card Cash Out Only
— Press the MENU button from the Home screen.
— Select 1 for Transaction.
— Select Cash out.
— Type in the Cash out amount.
— Press Enter.
— Prompt the customer to Insert or Swipe their card.*
— If the screen displays - Select the account type – request the customer to make this
selection.
— The terminal will ask the customer to type in their PIN and press Enter.
— If Approved, the terminal will print the merchant receipt.
— Remove the merchant receipt and press Enter or Yes to print the customer receipt
(ifrequired).
— Ensure that the transaction receipt says ‘APPROVED’.
— Hand the Customer Copy receipt to the customer (if required).
Cash out cannot be performed on a Credit Card.
Remember to clearly display your Cash out Policy.
* Dependant on the functionality available on the customer’s card.
Credit Card/Charge Card Purchase
— Type in the Sale Amount.
— Press Enter.
— The screen will display PRESENT CARD - Prompt the customer to Tap, Insert or Swipe
their card.*
— If the screen displays -Select the account type - request the customer to make this
selection.
— The terminal will ask the customer to type in their PIN number and press Enter or press
Enter for the customer to sign the receipt (if prompted to do so).
— If Approved, the terminal will print the merchant receipt.
— Remove the merchant receipt, hand to the customer to sign the receipt (if prompted to
doso by the terminal).**
— Press Enter or Yes to print the customer receipt (if required).
— Ensure that the transaction receipt says ‘APPROVED’.
— Hand the Customer Copy receipt to the customer (if required).
* Dependant on the functionality available on the customers card.
**Always verif y the customer’s signature if not a PIN transaction.
Page 14

PAGE 14 OF 52
EFTPOS MERCHANT FACILITIES
QUICK REFERENCE GUIDE (MOVE2500/MOVE5000)
Refund
— Press the MENU button from the Home screen.
— Select 1 for Transaction.
— Select Refund.
— Type in the Refund Amount.
— Press Enter.
— Type in your Refund password.
— Press Enter.
— Prompt the customer to Insert or Swipe their card.*
— Select the account type - request the customer to make this selection (if prompted to
doso).
— The terminal will ask the customer to type in their PIN number and press Enter or press
Enter for the customer to sign the receipt.
— If Approved, the terminal will print the merchant receipt.
— Remove the merchant receipt, hand to the customer to sign the receipt (if prompted to
doso by the terminal).**
— Ensure that the transaction receipt says ‘APPROVED’.
— Press Enter or Yes to print the customer receipt (if required).
— Hand the Customer Copy receipt to the customer (if required).
* Dependant on functionality available on the customers card.
**Always verif y the signature if not a PIN transaction, press Enter to confirm the signature.
Do not disclose your Refund password to any unauthorised people.
MOTO (Mail Order/Telephone Order) transaction**
Follow these steps when a Mail or Telephone Order is received (Cardholder is not present at
the time of sale)
— Press the MENU button
from the Home screen.
— Select 1 for Transaction.
— Select MOTO.
— Type in the Amount.
— Press Enter.
— Type in the full card number.
— Press Enter.
— Type in the Expiry Date.
— Press Enter.
— Type in CCV number from the card (last 3 digits on the back of the card*- if available and
requested by the terminal).
Page 15

PAGE 15 OF 52
EFTPOS MERCHANT FACILITIES
QUICK REFERENCE GUIDE (MOVE2500/MOVE5000)
Transaction Processing Retail
— Press Enter.
— Select one of the following 2 options:
1. Telephone Order
2. Mail Order
— Confirm the amount, press Enter for Yes or Cancel button for No.
— If Approved, the terminal will print the merchant receipt.
— Remove the merchant receipt.
— Press Enter or Yes to print the customer receipt (if required).
— Ensure that the transaction receipt says ‘APPROVED’.
*Visa and MasterCard Credit Cards.
**If the card holder is present and their card cannot be tapped, inserted or swiped request an alternate payment method.
This function can only be performed using Credit Cards.
This functionality is only available if enabled on your merchant profile.
Void
— Press the MENU button from the Home screen.
— Select 3 for Batch.
— Select 5 for Void.
— Type in the invoice number of the transaction to be voided.
— Press Enter.
— Type in your Void password.
— Press Enter.
— The terminal will ask you to confirm the Transaction to be Voided.
— Press the Enter button for Yes or Cancel button for No.
— The terminal will print you a merchant receipt indicating the VOIDED sale.
— The terminal will display - Verify Signature Correct?
— Press the Enter or Yes button to confirm the signature is correct.
— Press the Enter or Yes button to print a customer receipt (if required).
Do not disclose your Void password to any unauthorized people.
Only Credit card transactions can be voided.
A voided transaction will not appear on the merchant statement, cardholder statement or settlement report.
You can only void a transaction that is in the current day’s batch and it can only be voided prior to settlement.
Page 16

PAGE 16 OF 52
EFTPOS MERCHANT FACILITIES
QUICK REFERENCE GUIDE MOVE2500MOVE5000
This page left blank intentionally
Page 17

PAGE 17 OF 52
EFTPOS MERCHANT FACILITIES
QUICK REFERENCE GUIDE MOVE2500MOVE5000
Transaction Processing Restaurant
This section outlines Suncorp EFTPOS Terminal functions that are specifically relevant
toRestaurant and Café merchants utilising the tipping functionality.
The tipping functionality must be enabled on your terminal profile.
Page 18

PAGE 18 OF 52
EFTPOS MERCHANT FACILITIES
QUICK REFERENCE GUIDE MOVE2500MOVE5000
Debit Card Purchase
— Type in the Sale Amount.
— Press Enter.
— The terminal will ask if you would like to enter a Tip, press the Enter button for Yes or
Cancel button for No.
— Type in the Tip Amount (or press Enter if no tip is to be entered).
— Press Enter.
— The terminal will ask you to confirm the Total.
— Press the Enter button for Yes or Cancel button for No.
— The screen will display PRESENT CARD-Prompt the customer to Tap, Insert or Swipe
their card.*
— If the screen displays - Select the account type – request the customer to make this
selection.
— The terminal will ask the customer to type in their PIN and press Enter.
— If Approved, the terminal will print the merchant receipt.
— Remove the merchant receipt and press Enter or Yes to print the customer receipt
(ifrequired).
— Ensure that the transaction receipt says ‘APPROVED’.
— Hand the Customer Copy receipt to the customer (if required).
If User ID has been enabled on your terminal, the terminal will request a User ID to be entered, after the transaction
amount has been entered.
Tips must be entered at the time of the transaction.
* Dependant on functionality available on the customer’s card.
Page 19

PAGE 19 OF 52
EFTPOS MERCHANT FACILITIES
QUICK REFERENCE GUIDE (MOVE2500/MOVE5000)
Transaction Processing
Restaurant
Debit Card Purchase with Cash Out
— Type in the Sale Amount.
— Press Enter.
— Type in the Cash Amount.
— Press Enter.
— The terminal will ask if you would like to enter a Tip, press the Enter button for Yes or
Cancel button for No.
— Type in the Tip Amount (or press Enter if no tip is to be entered).
— Press Enter.
— The terminal will ask you to confirm the Total.
— Press the Enter button for Yes or Cancel button for No.
— The screen will display Insert or Swipe Card-Prompt the customer to Insert or Swipe
theircard.*
— If the screen displays - Select the account type – request the customer to make this
selection.
— The terminal will ask the customer to type in their PIN and press Enter.
— If approved the terminal will print the merchant receipt.
— Remove the merchant receipt and press Enter or Yes to print the customer receipt
(ifrequired).
— Ensure that the transaction receipt says ‘APPROVED’.
— Hand the Customer Copy receipt to the customer (if required) with the cash.
If User ID has been enabled on your terminal, the terminal will request a User ID to be entered after the cash amount has
been entered.
Remember to clearly display your Cash out Policy.
Cash out cannot be performed on a Credit card.
* Dependant on functionality available on the customer’s card.
Page 20

PAGE 20 OF 52
EFTPOS MERCHANT FACILITIES
QUICK REFERENCE GUIDE (MOVE2500/MOVE5000)
Debit Card Cash Out Only
— Press the MENU button the Home screen.
— Select 1 for Transaction.
— Select Cash out.
— Type in the Cash out amount.
— Press Enter.
— Prompt the customer to Insert or Swipe their card.*
— Select the account type – request the customer to make this selection.
— The terminal will ask the customer to type in their PIN and press Enter.
— If Approved, the terminal will print the merchant receipt.
— Remove the merchant receipt and press Enter or Yes to print the customer receipt (ifrequired).
— Ensure that the transaction receipt says ‘APPROVED’.
— Hand the Customer Copy receipt to the customer (if required).
Cash out cannot be performed on a Credit Card.
If User ID has been enabled on your terminal, the terminal will request a User ID to be entered after the cash amount has
been entered.
Remember to clearly display your Cash out Policy.
* Dependant on the functionality available on the customer’s card.
Credit Card/Charge Card Purchase
— Type in the Sale Amount.
— Press Enter.
— The terminal will ask if you would like to enter a Tip, press the Enter button for Yes or
Cancel button for No.
— Type in the Tip Amount.
— Press Enter.
— The terminal will ask you to confirm the Total.
— Press the Enter button for Yes or Cancel button for No.
— The screen will display PRESENT CARD - Prompt the customer to Tap, Insert or Swipe
theircard.*
— Select the account type – request the customer to make this selection.
— The terminal will ask the customer to type in their pin number and press Enter or press
Enter for the customer to sign the receipt (if prompted to do so).
— If Approved, the terminal will print the merchant receipt.
— Remove the merchant receipt, hand to the customer to sign the receipt (if prompted to
doso by the terminal).**
— Press Enter or Yes to print the customer receipt (if required).
— Ensure that the transaction receipt says ‘APPROVED’.
— Hand the Customer Copy receipt to the customer (if required).
If User ID has been enabled on your terminal, the terminal will request a User ID to be selected after the transaction
amount has been entered.
* Dependant on functionality available on the customer’s card.
**Always verif y the customer’s signature if not a PIN transaction, press Enter to confirm the signature.
Page 21

PAGE 21 OF 52
EFTPOS MERCHANT FACILITIES
QUICK REFERENCE GUIDE (MOVE2500/MOVE5000)
Transaction Processing
Restaurant
Refund
— Press the MENU button from the Home screen.
— Select 1 for Transaction.
— Select Refund.
— Type in the Refund Amount.
— Press Enter.
— Type in your Refund password.
— Press Enter.
— Prompt the customer to Insert or Swipe their card.*
— Select the account type - request the customer to make this selection (if prompted to
doso).
— The terminal will ask the customer to type in their PIN number and press Enter or press
Enter for the customer to sign the receipt.**
— If Approved, the terminal will print the merchant receipt.
— Remove the merchant receipt, hand to the customer to sign the receipt (if prompted to
do so by the terminal).**
— Ensure that the transaction receipt says ‘APPROVED’.
— Press Enter or Yes to print the customer receipt (if required).
— Hand the customer copy receipt to the customer (if required).
If User ID has been enabled on your terminal, the terminal will request a User ID to be selected after entering the refund
password.
* Dependant on functionality available on the customer’s card.
**Always verif y the signature if not a PIN transaction, press Enter to confirm the signature.
Do not disclose your Refund password to any unauthorised people.
Page 22

PAGE 22 OF 52
EFTPOS MERCHANT FACILITIES
QUICK REFERENCE GUIDE (MOVE2500/MOVE5000)
MOTO (Mail Order/Telephone Order) transaction**
Follow these steps when a Mail or Telephone Order is received (Cardholder is not present
atthe time of sale)
— Press the MENU button
from the Home screen.
— Select 1 for Transaction.
— Select MOTO.
— Type in the Sale Amount.
— Press Enter.
— Type in the full card number.
— Press Enter.
— Type in the Expiry Date.
— Press Enter.
— Type in CCV number from the card (last 3 digits on the back of the card* - if available and
requested by the terminal).
— Press Enter.
— Select one of the following 2 options:
1. Telephone Order
2. Mail Order
— Confirm the amount, press Enter for Yes or Cancel button for No.
— If Approved, the terminal will print the merchant receipt.
— Remove the merchant receipt.
— Press Enter or Yes to print the customer receipt (if required).
— Ensure that the transaction receipt says ‘APPROVED’.
*Visa and MasterCard Credit Cards
**If the card holder is present and their card cannot be tapped, inserted or swiped request an alternate payment method.
If User ID has been enabled on your terminal, the terminal will request a User ID to be entered after the transaction
amount has been entered.
This function can only be performed using Credit Cards.
This functionality is only available if enabled on your merchant profile.
Page 23

PAGE 23 OF 52
EFTPOS MERCHANT FACILITIES
QUICK REFERENCE GUIDE (MOVE2500/MOVE5000)
Transaction Processing
Restaurant
Void
— Press the MENU button from the Home screen.
— Select 3 for Batch.
— Select 5 for Void.
— Type in the invoice number for the transaction to be voided.
— Press Enter.
— Type in your Void password.
— Press Enter.
— The terminal will ask you to confirm the Transaction to be Voided.
— Press the Enter button for Yes or Cancel button for No.
— The terminal will print you a merchant receipt indicating the VOIDED sale.
— The terminal will display - Verify Signature Correct?
— Press the Enter or Yes button to confirm the signature is correct.
— Press the Enter or Yes button to print a customer receipt (if required).
Do not disclose your Void password to any unauthorised people.
Only Credit card transactions can be voided.
A voided transaction will not appear on the merchant statement, cardholder statement or settlement report.
You can only void a transaction that is in the current day’s batch and it can only be voided prior to settlement.
Enable User ID
— Press Func from the Home screen.
— Type in 57 and press Enter.
— Type in the Terminal password.
— Press Enter.
— When prompted Tip report activate?
— Press Enter.
Each transaction will request an User ID.
Disable User ID
— Press Func from the Home screen.
— Type in 57 and press Enter.
— Type in the Terminal password.
— Press Enter.
— When prompted Tip report deactivate?
— Press Enter.
Transactions will no longer prompt for an User ID.
Page 24

PAGE 24 OF 52
EFTPOS MERCHANT FACILITIES
QUICK REFERENCE GUIDE (MOVE2500/MOVE5000)
User ID Tip Report
— Press Func from the Home screen.
— Type in 58 and press Enter.
The terminal will prompt you “Clear Tip Totals” Select Enter if you would like to clear the
totals or Cancel if you don’t.
The report will print a summary of the Sales and Tips per User ID.
Page 25

PAGE 25 OF 52
EFTPOS MERCHANT FACILITIES
QUICK REFERENCE GUIDE MOVE2500MOVE5000
Transaction Processing
Hospitality/Accommodation/
Pre Authorisation
This section outlines Suncorp EFTPOS Terminal functions that are specifically relevant
tomerchants in the Hospitality/Accommodation industry and allows forpre authorisations
tobe performed. Pre authorisation is only available on credit card.
Page 26

PAGE 26 OF 52
EFTPOS MERCHANT FACILITIES
QUICK REFERENCE GUIDE (MOVE2500/MOVE5000)
Debit Card Purchase
— Type in the Sale Amount.
— Press Enter.
— The screen will display PRESENT CARD - Prompt the customer to Insert or Swipe
theircard.*
— If the screen displays -Select the account type – request the customer to make this
selection.
— The terminal will ask the customer to type in their PIN and press Enter.
— If Approved, the terminal will print the merchant receipt.
— Remove the merchant receipt and press Enter or Yes to print the customer receipt
(ifrequired).
— Ensure that the transaction receipt says ‘APPROVED’.
— Hand the Customer Copy receipt to the customer (if required).
* Dependant on functionality available on the customers card.
Debit Card Purchase with Cash Out
— Type in the Sale Amount.
— Press Enter.
— Type in the Cash Amount.
— Press Enter.
— Prompt the customer to Insert or Swipe their card.*
— If the screen displays - Select the account type – request the customer to make this
selection.
— The terminal will ask the customer to type in their PIN and press Enter.
— If approved the terminal will print the Merchant receipt.
— Remove the merchant receipt and press Enter or Yes to print the customer receipt
(ifrequired).
— Ensure that the transaction receipt says ‘APPROVED’.
— Hand the Customer Copy receipt to the customer (if required) with the cash.
* Dependant on functionality available on the customers card.
Remember to clearly display your Cash out Policy.
Cash out cannot be performed on a Credit card.
Page 27

PAGE 27 OF 52
EFTPOS MERCHANT FACILITIES
QUICK REFERENCE GUIDE (MOVE2500/MOVE5000)
Debit Card Cash Out Only
— Press the MENU button from the Home screen.
— Select 1 for Transaction.
— Select Cash out.
— Type in the Cash out amount.
— Press Enter.
— Prompt the customer to Tap, Insert or Swipe their card.*
— If the screen displays - Select the account type – request the customer to make this
selection.
— The terminal will ask the customer to type in their PIN and press Enter.
— If Approved, the terminal will print the merchant receipt.
— Remove the merchant receipt and press Enter or Yes to print the customer receipt
(ifrequired).
— Ensure that the transaction receipt says ‘APPROVED’.
— Hand the Customer Copy receipt to the customer (if required).
Cash out cannot be performed on a Credit Card.
Remember to clearly display your Cash out Policy.
* Dependant on the functionality available on the customer’s card.
Credit Card/Charge Card Purchase
— Type in the Sale Amount.
— Press Enter.
— The screen will display PRESENT CARD - Prompt the customer to Tap, Insert or Swipe
theircard.*
— If the screen displays - Select the account type - request the customer to make this
selection.
— The terminal will ask the customer to type in their PIN number and press Enter or press
Enter for the customer to sign the receipt (if prompted to do so).
— If Approved, the terminal will print the merchant receipt.
— Remove the merchant receipt, hand to the customer to sign the receipt (if prompted to
doso by the terminal).**
— Press Enter or Yes to print the customer receipt (if required).
— Ensure that the transaction receipt says ‘APPROVED’.
— Hand the Customer Copy receipt to the customer (if required).
* Dependant on the functionality available on the customer’s card.
**Always verif y the customer’s signature if not a PIN transaction, press Enter to confirm the signature.
Transaction Processing
Hospitality / Accommodation
Page 28

PAGE 28 OF 52
EFTPOS MERCHANT FACILITIES
QUICK REFERENCE GUIDE (MOVE2500/MOVE5000)
Refund
— Press the MENU button from the Home screen.
— Select 1 for Transaction.
— Select Refund.
— Type in the Refund Amount.
— Press Enter.
— Type in you Refund password.
— Press Enter.
— Prompt the customer to Insert or Swipe their card.*
— Select the account type - request the customer to make this selection (if prompted
todoso).
— The terminal will ask the customer to type in their PIN number and press Enter or press
Enter for the customer to sign the receipt.
— If Approved, the terminal will print the merchant receipt.
— Remove the merchant receipt, hand to the customer to sign the receipt (if prompted to
doso by the terminal).**
— Ensure that the transaction receipt says ‘APPROVED’.
— Press Enter or Yes to print the customer receipt (if required).
— Hand the Customer Copy receipt to the customer (if required).
* Dependant on functionality available on the customer’s card.
**Always verif y the signature if not a PIN transaction, press Enter to confirm the signature.
Do not disclose your Refund password to any unauthorised people.
Page 29

PAGE 29 OF 52
EFTPOS MERCHANT FACILITIES
QUICK REFERENCE GUIDE (MOVE2500/MOVE5000)
Transaction Processing
Hospitality / Accommodation
MOTO (Mail Order/Telephone Order) transaction**
Follow these steps when a Mail or Telephone Order is received (Cardholder is not present at
the time of sale)
— Press the MENU button
from the Home screen.
— Select 1 for Transaction.
— Select MOTO.
— Type in the Sale Amount.
— Press Enter.
— Type in the full card number.
— Press Enter.
— Type in the Expiry Date.
— Press Enter.
— Type in CCV number from the card (last 3 digits on the back of the card* - if available and
requested by the terminal).
— Press Enter.
— Select one of the following 2 options:
1. Telephone Order
2. Mail Order
— Confirm the amount, press Enter for Yes or Cancel button for No.
— If Approved, the terminal will print the merchant receipt.
— Remove the merchant receipt.
— Press Enter or Yes to print the customer receipt (if required).
— Ensure that the transaction receipt says ‘APPROVED’.
*Visa and MasterCard Credit Cards.
**If the card holder is present and their card cannot be tapped, inserted or swiped request an alternate payment method.
This function can only be performed using Credit Cards.
This functionality is only available if enabled on your merchant profile.
Page 30

PAGE 30 OF 52
EFTPOS MERCHANT FACILITIES
QUICK REFERENCE GUIDE (MOVE2500/MOVE5000)
Void
— Press the MENU button from the Home screen.
— Select 3 for Batch.
— Select 5 for Void.
— Type in the invoice number of the transaction to be voided.
— Press Enter.
— Type in your Void password.
— Press Enter.
— The terminal will ask you to confirm the Transaction to be Voided.
— Press the Enter button for Yes or Cancel button for No.
— The terminal will print you a merchant receipt indicating the VOIDED sale.
— The terminal will display - Verify Signature Correct?
— Press the Enter or Yes button to confirm the signature is correct.
— Press the Enter or Yes button to print a customer receipt (if required).
Do not disclose your Void password to any unauthorised people.
Only Credit card transactions can be voided.
A voided transaction will not appear on the merchant statement, cardholder statement or settlement report.
You can only void a transaction that is in the current days batch and it can only be voided prior to settlement.
Pre-Authorisation
— Press the MENU button from the Home screen.
— Select 1 for Transaction.
— Select Pre-Auth.
— Type in the Pre-Auth Amount.
— Press Enter.
— Prompt the customer to insert or swipe their card if they are present. If not, manually
enter the card number.*
— If the customer is present-the terminal will ask the customer to type in their PIN
number and press Enter.
— If the cardholder is not present-the terminal will request you confirm the amount, if
the amount is correct, press Enter.
— If Approved, the terminal will print the merchant receipt.
— Remove the merchant receipt, hand to the customer to sign the receipt if the customer
ispresent.**
— Press Enter or Yes to print the customer receipt (if required).
— Ensure that the transaction receipt says ‘APPROVED’.
— Hand the Customer Copy receipt to the customer (if required).
* This functionality is only available if enabled on your merchant profile.
**Remember to verify the customer’s signature.
Please note that a completion still needs to be processed to finalize the transaction.
Page 31

PAGE 31 OF 52
EFTPOS MERCHANT FACILITIES
QUICK REFERENCE GUIDE (MOVE2500/MOVE5000)
Transaction Processing
Hospitality / Accommodation
Pre-Authorisation Completion
— Press the MENU button from the Home screen.
— Select 1 for Transaction.
— Select Completion.
— Type in the Amount.
— Press Enter.
— Type in the Approval code. (The Approval Code is located on the Initial Pre-Auth receipt)
— Press Enter.
— Type in the Terminal password.
— Press Enter.
— The terminal will prompt the operator to confirm the transaction.
— Press Enter.
— Press Enter to confirm the amount.
— The terminal will print the Merchant Receipt.
— Remove the Merchant Receipt and press Enter to print the customer receipt (if required).
Page 32

PAGE 32 OF 52
EFTPOS MERCHANT FACILITIES
QUICK REFERENCE GUIDE MOVE2500MOVE5000
This page left blank intentionally.
Page 33

PAGE 33 OF 52
EFTPOS MERCHANT FACILITIES
QUICK REFERENCE GUIDE MOVE2500MOVE5000
Merchant Functions
This section outlines the functions you require your Suncorp EFTPOS Terminal
to perform for your business, as well as practical information about the operation
of the terminal itself.
Page 34

PAGE 34 OF 52
EFTPOS MERCHANT FACILITIES
QUICK REFERENCE GUIDE (MOVE2500/MOVE5000)
Ordering Stationery
Two easy ways to order.
1. Through your EFTPOS Terminal.
— Press MENU button
from the Home screen.
— Type in 4 for Terminal.
— Type in 3 for Others.
— Type in 4 for Stationery Order.
— Select the number of rolls required in multiples of 10 and press Enter.
The terminal will print a receipt confirming your order has been sent.
Please note: A maximum of 30 paper rolls can be ordered per day, if the merchant attempts
to order additional rolls the screen will display “failed already ordered”.
2. Via our website
— Go to www.suncorp.com.au/banking/business/merchant-services/existing-customers/
stationery-order.
— Complete the order and click ‘submit’.
You will receive instant confirmation that your order has been received, and your stationery
will be delivered in five to seven business days.
Please note: Manual voucher stationery ordering is only available via our website.
Batch Totals
— Press the MENU button from the Home screen.
— Select 3 for Batch.
— Select 4 for Batch Totals.
The Batch Totals will be printed.
Audit and Summary Report
— Press the MENU button from the Home screen.
— Press 2 for Print.
— Press 2 for Reports.
— Press 1 for Audit.
The Audit Report will be printed.
Or
— Press 2 for Summary.
The Summary Report will be printed.
Page 35

PAGE 35 OF 52
EFTPOS MERCHANT FACILITIES
QUICK REFERENCE GUIDE (MOVE2500/MOVE5000)
Receipt Reprint
— Press the MENU button from the Home screen.
— Select 2 for Print.
— Select 1 for Transactions.
— Select 1 for the Last Transaction or 2 for Invoice.
— If 2 for Invoice was selected, type in the invoice number and press Enter.
— Select 1 for Merchant receipt, Select 2 for Customer receipt or 3 for both Merchant and
Customer receipts.
Only transactions that are in the terminal since the last settlement can be reprinted.
Last Settlement Reprint
— Press the MENU button from the Home screen.
— Select 3 for Batch.
— Select 2 for Last Settlement.
The last successful terminal initiated settlement will be reprinted.
Manual Settlement
— Press the MENU button from the Home screen.
— Select 3 for Batch.
— Select 1 for Settle.
— Type in the Settlement Password.
— Press Enter.
The terminal will settle the transactions since the last settlement. Ensure that the settlement says ‘Settlement Confirmed’.
Please remember, your terminal can only settle once in a 24 hour period.
Surcharging
If surcharging is enabled on your terminal, after the customer has selected their account type
the terminal will prompt for the surcharge to be accepted.
It is important to remember that if your terminal is swapped out due to being faulty the
surcharge percentages/amounts must be re entered in the replacement terminal.
The surcharge amounts must not exceed the reasonable cost of acceptance.
Surcharging is not applicable to the Taxi application.
Merchant Functions
Page 36

PAGE 36 OF 52
EFTPOS MERCHANT FACILITIES
QUICK REFERENCE GUIDE (MOVE2500/MOVE5000)
Setting Surcharging
— Press the MENU button from the Home screen.
— Select 4 for Terminal.
— Select 5 for Surcharging.
— Select Enable (on the Move 5000 - F1, on the Move 2500 - select the button under the
word Enable).
— Press Enter.
Select Issuer will be displayed. Select each issuer and set the surcharging percentage/
amount. On the Move 5000 the F2 button is used to tab down to the next issuer.
Mastercard - Select percentage of total.
— Enter the surcharge percentage amount.
— Press Enter.
— Press Enter to confirm.
VISA - Select percentage of total.
— Enter the surcharge percentage amount.
— Press Enter.
— Press Enter to confirm.
EFTPOS Debit - Select Fixed Fee.
— Enter the surcharge amount.
— Press Enter.
— Press Enter to confirm.
AMEX - Select percentage of total.
— Enter the surcharge percentage amount.
— Press Enter.
— Press Enter to confirm.
Diners- Select percentage of total.
— Enter the surcharge percentage amount.
— Press Enter.
— Press Enter to confirm.
Once completed the terminal will prompt - Print Report?
— Press Enter to print the report displaying the latest surcharging percentages and
amounts. Make sure these are correct.
Page 37

PAGE 37 OF 52
EFTPOS MERCHANT FACILITIES
QUICK REFERENCE GUIDE (MOVE2500/MOVE5000)
Merchant Functions
Taxi Application
The Taxi Application is only available on the Move 5000 terminal.
Prior to processing transactions the Driver ID, Vehicle No and ABN must be set.
Set Driver ID
— Press the MENU button from the Home screen.
— Select 5 for Taxi.
— Press Enter to select Driver ID.
— Type in an alphanumeric Drivers ID up to eight characters in length.
— Press Enter.
Set Vehicle No
— Highlight Vehicle No by tapping the option on the screen.
— Type in an alphanumeric Vehicle No. up to eight characters in length.
— Press Enter.
Set ABN
— Highlight ABN by tapping the option on the screen.
— Type in the 11 character ABN.
— Press Enter.
Once set, cancel out of the menu to the Home screen to begin processing transactions.
Changing the Service Fee
The service fee is set to 5% including GST. If you require this to be changed follow the steps
below.
If the terminal is replaced due to a fault the replacement terminal will need to be
reprogrammed with the service fee if it is not 5% including GST.
— Press the MENU button
from the Home screen.
— Select 5 for Taxi.
— Highlight Service Fee by tapping the option on the screen.
— Press Enter.
— Type in the Taxi password - (This can be obtained by calling technical support).
— Press Enter.
— Type in the Surcharge which needs to be multiplied by 100, if you want 2%, type in 200.
— Press Enter.
Page 38

PAGE 38 OF 52
EFTPOS MERCHANT FACILITIES
QUICK REFERENCE GUIDE (MOVE2500/MOVE5000)
Replacing the Paper Roll
Before you can process transactions that require a receipt or record, you must install paper in
theprinter.
The EFTPOS terminals use a roll of single-ply, thermal-sensitive paper.
A pink out-of-paper indicator line appears on the edge of the paper approximately 18 inches
before the end of the roll. After this line appears, there is enough paper remaining on the roll
to conclude at least one transaction.
CAUTION: Store thermal paper in a dry, dark area. Handle thermal paper carefully: impact,
friction, temperature, humidity, and oils affect the colour and storage characteristics of the paper.
Countertop (Move2500) terminal
— Open the paper compartment by lifting the catch located at the rear of the terminal and
pull the cover to the rear of the terminal.
— Insert the paper roll in the compartment.
— Pull the paper up to the top of the terminal and hold it in this position.
— Maintain the paper and close the lid.
— Press simultaneously on both upper corners of the paper flap, until it clips in position.
—
Page 39

PAGE 39 OF 52
EFTPOS MERCHANT FACILITIES
QUICK REFERENCE GUIDE (MOVE2500/MOVE5000)
Merchant Functions
Mobile (Move5000) terminal
— Open the paper compartment by lifting the catch located at the rear of the terminal and
pull the cover to the rear of the terminal.
— Insert the paper roll in the compartment.
— Pull the paper up to the top of the terminal.
— Maintain the paper and close the lid.
— Press simultaneously on both upper corners of the paper flap, until it clips in position.
Changing the Passwords
— Please call 13 11 55 to change your terminal password.
Page 40

PAGE 40 OF 52
EFTPOS MERCHANT FACILITIES
QUICK REFERENCE GUIDE (MOVE2500/MOVE5000)
Terminal Response Messages
00 The transaction has been approved.
01 Refer the cardholder to the issuing bank.
04 Call the card issuing bank.
05 The issuing bank has chosen not to honour the transaction.
08 Approved with signature, ensure the signature on the card is matched to that on the
transaction receipt.
12 The transaction being attempted is invalid.
14 The card number is invalid.
31 The issuing bank is not supported by the current terminal software.
38 The number of PIN tries has been exceeded.
39 The incorrect account type is selected, retry the transaction selecting the correct
accounttype.
41 Call the issuing bank.
43 Call the issuing bank.
51 Another form of payment is required. Do not use a fallback voucher.
54 Card is expired.
55 Invalid PIN entered.
61 Cardholder has exceeded the maximum daily withdrawal limit on their card. Another
form of payment (cash, cheque) is required. Do not use a fallback voucher.
91 The issuing bank is not available. Communication lines are down.
Page 41

PAGE 41 OF 52
EFTPOS MERCHANT FACILITIES
QUICK REFERENCE GUIDE MOVE2500MOVE5000
Fraud Prevention Tips
The security of your Suncorp EFTPOS Terminal is of the utmost importance to your
business.Here are some handy tips to avoid fraudulent transactions and chargebacks.
Page 42

PAGE 42 OF 52
EFTPOS MERCHANT FACILITIES
QUICK REFERENCE GUIDE (MOVE2500/MOVE5000)
Security & Chargeback Tips
— Ensure your premises are secure to prevent the processing of unauthorised transactions
when unattended.
— During business hours, limit access to this equipment to authorised personnel only.
— Unauthorised transactions are a liability for your business.
— Always check the the merchant receipt to ensure that:
— the correct transaction type has been processed,
— the merchant receipt says Approved, and
— the amount is correct.
What is a Chargeback?
A chargeback can occur when a cardholder disputes a transaction processed on their card.
How to Avoid Receiving Chargebacks
When accepting credit cards face to face
— Never manually enter the card details if the card doesn’t work when tapping, inserting or
swiping. Ask the cardholder for another form of payment.
— Check the expiry date on the card.
— Check that all cards have a hologram or a holographic magnetic stripe and that it looks
three-dimensional.
— Check the authorisation response. Take appropriate action for the specific response.
— Request a signature if prompted by the terminal. Have the cardholder sign the transaction
receipt in front of you.
— Check the signature. Be sure that the signature on the card matches the one on the
transaction receipt.
— Ensure all details on transaction receipts are clear and legible.
— Ensure transaction receipts are stored in date and card number order.
— Retain all transaction receipts and or documentation pertaining to a credit card
transaction for a minimum of 13 months from the date of transaction in a secure location.
Remember, if in doubt you can always ask your customer for another form ofpayment.
Page 43

PAGE 43 OF 52
EFTPOS MERCHANT FACILITIES
QUICK REFERENCE GUIDE (MOVE2500/MOVE5000)
When accepting credit cards for Mail / Telephone Order (MOTO).
Warning Signs.
Beware of Internet, mail/telephone and e-mail orders with any combination of the following
characteristics.
— Larger than normal orders: because stolen cards or account numbers have a limited life
span, criminals need to maximise the size of their purchase.
— Orders shipped to a single address but made on multiple cards.
— Check for multiple transactions on one card or similar cards with a single shipping
address.
— Rushed orders or overnight shipping: criminals want fraudulently obtained items as soon
as possible for the quickest possible resale and aren’t concerned about the extra delivery
charges.
— Orders from Internet addresses that make use of free e-mail services: these e-mail
services involve no billing relationships, and often neither an audit trail nor verification
that a legitimate cardholder has opened the account.
— Orders shipped to an international address.
— People committing fraud will often use fake overseas addresses.
— Never send cash via Western Union to pay for the delivery of a credit card sale.
— If a sale seems too good to be true, then it probably is.
— Always obtain an authorisation when the cardholder is not present.
— Consider establishing a purchasing limit for all new customers. The limit can be based on
an average of the purchase price of the most popular product sold. Or request a deposit
in cash as a gesture of good faith.
Fraud Prevention Tips
Page 44

PAGE 44 OF 52
EFTPOS MERCHANT FACILITIES
QUICK REFERENCE GUIDE (MOVE2500/MOVE5000)
This page left blank intentionally
Page 45

PAGE 45 OF 52
EFTPOS MERCHANT FACILITIES
QUICK REFERENCE GUIDE MOVE2500MOVE5000
Troubleshooting
Your Suncorp EFTPOS Terminal is extremely easy to operate. However, if you do
experienceproblems, here are some handy hints to help you get back on track quickly.
If you still have difficulties, please call Merchant Terminal Faults on 1800 836 055
(24hoursa day, 7 days a week), and have your merchant number ready.
Page 46

PAGE 46 OF 52
EFTPOS MERCHANT FACILITIES
QUICK REFERENCE GUIDE (MOVE2500/MOVE5000)
Terminal Care and Troubleshooting
Terminal Care Please remember to keep the terminal clean and away from heat,
dust, liquid and food.
Blank Screen Ensure that all terminal power cable connections and power supply
outlets are connected and operational.
Communications Error Check all terminal phone cable connections and phone supply
outlets. Connect the phone line to a telephone to check for dial
tone and cable quality.
Clear any message bank on the line.
Disconnect call waiting.
Has the telephone line recently changed to or from a PABX system?
If so, the terminal will require a software upgrade.
Card Reader Problems Ensure that the card is being swiped in the right direction for the
magnetic stripe.
Try swiping the card in both upwards and downwards directions.
Ensure that the card is being swiped at a fast enough speed.
Try using a Cleaner Card from your stationery kit to clean the card
reader
Printing Problems Ensure that paper is in the printer.
Check for a paper jam.
Check that the paper is coming from underneath the roll and not
from over the top.
Ensure that the printer cover is properly locked in place.
Terminal displays:
“Settlement unsuccessful”.
The machine has already settled within the last 24 hour period.
The machine is trying to settle Automatically or Manually outside of
the settlement window.
“Why does my Settlement
Summary Combine Daily
figures”
“A Settlement rollover” has occurred. The machine hasn’t been
settled on a previous trading day. Please check your nominated
bank account for settlement and if any concerns then contact
Suncorp Merchant Services on 13 11 55.
What happens if my
terminal is turned off
during the allotted
settlement time?
The terminal won’t settle. The terminal will re-attempt an automatic
settlement once it is switched back on. If 24 hours have passed
since the last successful settlement, Suncorp will automatically
settle the terminal. A settlement slip will not be printed but the
funds will be credited to your nominated back account.
My settlement summary
receipt has not printed.
Reprint the settlement summary
Press the MENU button
from the Home screen.
Select 3 for Batch.
Select 2 for Last Settlement.
The last successful terminal initiated settlement will be reprinted
Page 47

PAGE 47 OF 52
EFTPOS MERCHANT FACILITIES
QUICK REFERENCE GUIDE MOVE2500MOVE5000
Manual Transaction Processing
This section explains how to process fallback Vouchers if your electronic
SuncorpEFTPOSTerminal is faulty.
Page 48

PAGE 48 OF 52
EFTPOS MERCHANT FACILITIES
QUICK REFERENCE GUIDE (MOVE2500/MOVE5000)
Manual Transaction Processing
Fallback Vouchers should only be used to process a transaction when your electronic
Suncorp EFTPOS Terminal is faulty and cannot be used to process the transaction.
Faulty EFTPOS Terminals should immediately be reported to our Merchant Terminal Fault
Helpdesk on 1800 836 055.
If your phone lines are faulty please contact 1800 836 055 to change your communication
to broadband (if available) or contact 13 11 55 to arrange a modification to a Mobile EFTPOS
terminal.
Do not process a Fallback Transaction Voucher under the following circumstances:
— Your EFTPOS Terminal has declined the transaction.
— The cardholder’s card is faulty.
— The cardholder’s card is invalid.
— The cardholder’s card is expired.
— There is a card number error.
In the above circumstances request an alternate method of payment.
Processing a Fallback Transaction Voucher
The Card must be embossed to process a Fallback Transaction Voucher (the cardholder
name and number should be raised).
Before proceeding with the transaction ensure that:
— The card presented by the customer does not appear damaged or altered.
— The name on the card presented by the customer is appropriate to the customer e.g. a
masculine name on a card presented by a female is questionable.
— The printing on the card presented by the customer should look professional.
— The validity dates on the card presented by the customer should be current (a card can
only be used from the first day of the ‘valid from’ month to the last day of the ‘until end’
month).
— The card presented by the customer contains security features such as a hologram,
signature panel and CVC (three digits on or next to the signature panel on the back of the
card). The card should have a 3-dimensional appearance.
— A signature appears in the signature panel of the customer’s card and should not appear
to have been altered.
Page 49

PAGE 49 OF 52
EFTPOS MERCHANT FACILITIES
QUICK REFERENCE GUIDE (MOVE2500/MOVE5000)
Accepting payment via a Fallback Transaction Voucher
Only original Fallback Transaction Vouchers from Suncorp Bank should be used. Photocopied
Fallback Transaction Vouchers and/or Fallback Transaction Vouchers provided by other
financial institutions should not be used.
— Phone 1300 301 221 to obtain an authorisation for all Visa/Master card transactions that
are over your floor limit.
— Phone 1800 836 055 to obtain an authorisation for all Debit card transactions that are
over your floor limit.
— If the transaction is approved, record the authorisation number provided on the Fallback
Transaction Voucher.
— Insert the customer’s card into the imprinter and place a Fallback Transaction Voucher on
top of the card. Make an imprint.
— Ensure that the imprinted details, both merchant and cardholder information are clear
(full card numbers and expiry date).
— Remove and discard the cover sheet and first layer of carbon from the Fallback
Transaction Voucher.
— Complete the Fallback Transaction Voucher in full, including the final amount.
— Request that the customer sign the Fallback Transaction Voucher.
— Compare the customer signature on the back of the card to that on the Fallback
Transaction Voucher.
— Once the transaction is successfully completed, hand the customer the yellow
Cardholder’s Copy from the Fallback Transaction Voucher.
— Maintain the green Merchant’s Copy from the Fallback Transaction Voucher for your
records for a minimum of thirteen months.
Manual Transaction Processing
Page 50

PAGE 50 OF 52
EFTPOS MERCHANT FACILITIES
QUICK REFERENCE GUIDE (MOVE2500/MOVE5000)
Processing Fallback Transaction Vouchers
To receive the funds for your Fallback Transaction Vouchers you must take the white Bank
copies of the Fallback Transaction Voucher to your local store within three business days
from the date of the transaction.
To deposit your fallback vouchers:
— Place a Merchant Summary Voucher onto your imprinter.
— Make an imprint.
— Ensure that your Merchant number and trading name are clear.
— Remove and discard the cover sheet and first layer of carbon from the Fallback
Transaction Voucher.
— Complete the Merchant Summary Voucher.
— Place the Bank copies of the Fallback Transaction Vouchers and the Bank copy of the
Merchant Summary Voucher into a Merchant Summary Envelope.
— Ensure the Merchant Summary Envelope is completed in full.
— Take the Merchant Summary Envelope to a local Suncorp Store who will forward the
envelope to Suncorp’s Electronic Banking Centre for processing.
Do not include American Express, Diners or JCB vouchers or cards as Suncorp Bank cannot
process these card types from Fallback Transaction Vouchers.
Page 51

PAGE 51 OF 52
EFTPOS MERCHANT FACILITIES
QUICK REFERENCE GUIDE (MOVE2500/MOVE5000)
Page 52

Local
store
Online
suncorp.com.au/
banking
Call
13 11 55
How to contact us
SUNCORPMETWAY LIMITED ABN 66 010 831 722
30182 010518 A
 Loading...