

Page 1
CATALINA SEMI CASSETTE AWNING
Installation Manual
1123
CATALINA SEMI CASSETTE AWNING
INSTALLATION MANUAL
Toll Free 877-792-1775 | Fax 877-792-0031
swsuncontrolpro.com | [email protected]
Page 2
CATALINA SEMI CASSETTE AWNING
Installation Manual
1 INTRODUCTION ...................................................................................................................3
1.1 Symbols used in this manual ..................................................................................................................... 3
1.2 Personnel requirements ............................................................................................................................. 3
1.3 Required equipment .................................................................................................................................. 3
1.4 Contents of packaging .............................................................................................................................. 4
2 SAFETY ................................................................................................................................4
2.1 General safety information ........................................................................................................................ 4
2.2 Requirements for working in safety ........................................................................................................... 4
2.3 Working environment ................................................................................................................................. 4
3 TECHNICAL TABLES FOR INSTALLATION .......................................................................... 5
3.1 Table of minimum dimension ..................................................................................................................... 5
3.2 Table of no. of arms, mounting brackets and cassette supports .............................................................. 5
3.3 Table for awning dimensions / no. of arm supports .................................................................................. 6
3.4 Diagrams of the covering and footprints ................................................................................................... 7
3.5 Cassette support brackets ........................................................................................................................ 8
3.6 Mounting brackets ..................................................................................................................................... 9
3.7 Exploded view of Catalina Semi Cassette Awning components ...............................................................10
1123
4 INSTALLATION OF MANUAL AWNING ................................................................................11
4.1 Fastening brackets to wall ......................................................................................................................... 11
4.2 Wall installation .......................................................................................................................................... 14
4.3 Adjustment of awning inclination............................................................................................................... 14
5 INSTALLATION OF MOTORIZED AWNING ..........................................................................16
5.1 Limit switch calibration .............................................................................................................................. 16
5.2 Electrical connections and installation ...................................................................................................... 16
6 OPTIONALS .........................................................................................................................16
6.1 Automations .............................................................................................................................................. 16
7 SPECIAL MAINTENANCE ....................................................................................................17
7.1 Troubleshooting table ................................................................................................................................ 17
22
Page 3

CATALINA SEMI CASSETTE AWNING
Installation Manual
1 INTRODUCTION
This manual was prepared by the Manufacturer to provide the necessary information to those authorized to install
and perform special maintenance on the product. It is prohibited to remove, rewrite or in any way modify the
pages of the manual and their content.
Operations must be carried out by personnel with the technical and professional skills required by current
applicable national laws or standards.
This manual must be kept complete in all its parts in an easily accessible place.
The manufacturer reserves the right to update products and corresponding manuals without the obligation to
update previous manuals.
The manufacturer reserves all rights on this manual. It may not be reproduced in any way, wholly or in part,
without the manufacturer's written authorization.
1.1 - Symbols used in this manual
The CAUTION symbols used in this manual are given below.
INFORMATION AND PRECAUTIONS
Useful advice and instructions to be observed to ensure proper installation and/or maintenance of the awning.
Failure to observe these messages may compromise the integrity and/or the resistance of the product.
CAUTION
DANGER TO OPERATOR! Instructions to be evaluated and followed carefully. Failure to comply with these
messages may compromise individual safety.
1123
1.2 - Personnel Requirements
Personnel assigned to this operation must have technical knowledge of the product obtained either through two
years' experience or by means of a suitable technical training course.
1.3 - Required Equipment
To ensure proper installation of the awning, and consequently best operation of the nished product, the following
equipment is required:
• power screwdriver
• a level
• string
• complete tool set
• equipment for working at heights (scaffolding, ladders, aerial platforms, etc.) which are compliant with current
standards of individual safety in the workplace.
CAUTION
All of the screws used on aluminum components must be tightened with a maximum force of 20Nm (=2Kgm).
Greater tightening force causes the castings to break and damage to the stainless steel screws. It is advisable
to use dynamo-metric power screwdrivers and wrenches.
CAUTION
Use low-speed power screwdrivers. Screwing in the stainless steel screws at high speed may cause the
threads to jam, especially in the case of stainless steel/stainless steel and stainless steel/ aluminum screws
and threads.
CAUTION
In the square bar supports with double screw, be sure to evenly screw the two fastening screws of the square
bar, distributing the tightening force alternatively on the two screws up to a maximum of 20 Nm. Uneven
tightening may cause abnormal tension in the casting, causing it to fail immediately, or lead to subsequent
problems caused by external stress on the awning (e.g. gusts of wind).
33
Page 4

CATALINA SEMI CASSETTE AWNING
Installation Manual
1.4 - Contents of packaging
The awning is delivered complete with arms, fabric, control (manual or motorized) and any requested optional.
INFORMATION AND PRECAUTIONS
Never move the shoulders from the position in which they are supplied.
2 SAFETY
2.1 - General Safety Information
• During all operations described in this manual, make sure that ONLY individuals involved in the work are in
the work zone (see Chap. 1.2 “Personnel requirements”) .
• Do not set objects on the fabric of the awning.
• IT IS prohibited to stand on or hang from the awning. This would create the risk of severe personal injury, as
well as damaging the awning.
• Wear personal protective equipment and clothing as required by current standards on safety in the workplace.
CAUTION
Installation, adjustment, and special maintenance of the awning must be carried out only by specialized,
skilled technical personnel.
CAUTION
IT IS necessary to ensure a distance of at least 20 INCHES between the end of the fully-opened awning
(outermost part) and any xed obstacle (wall, terrace, etc.).
CAUTION
IT IS prohibited to install or place ladders or other objects near the awning, as this would reduce the space
required for installation.
CAUTION
Never loosen the awning more than the tension in the arms as there is the risk that the awning return under
the tube and be ruined.
1123
2.2 Requirements for working in safety
• Before use, check that all temporary structures (scaffolding, ladders, etc.) and all individual safety gear
(harnesses, belts, etc.) are compliant with standards and in good condition.
• Do not set objects on the fabric of the awning.
• Always use suitable individual protection gear.
• If there is more than one installation technician, their work must be coordinated.
• Operators must work in compliance with the safety instructions given to them.
• If the awning is to be installed above ground level, the area underneath the awning must be marked off and
guarded so that no one can get underneath the hanging load.
• Firmly tie the ropes or straps around the arm supports so that it does not slip and risk falling.
2.3 Working environment
• Installation and special maintenance must be carried out in a place that is sufciently illuminated (based on
specic standards) by either natural or articial lighting. The operator must have a clear view of the work to
be performed, and he must also prevent third persons from approaching the work area around the awning.
44
Page 5
CATALINA SEMI CASSETTE AWNING
3 TECHNICAL TABLES FOR INSTALLATION
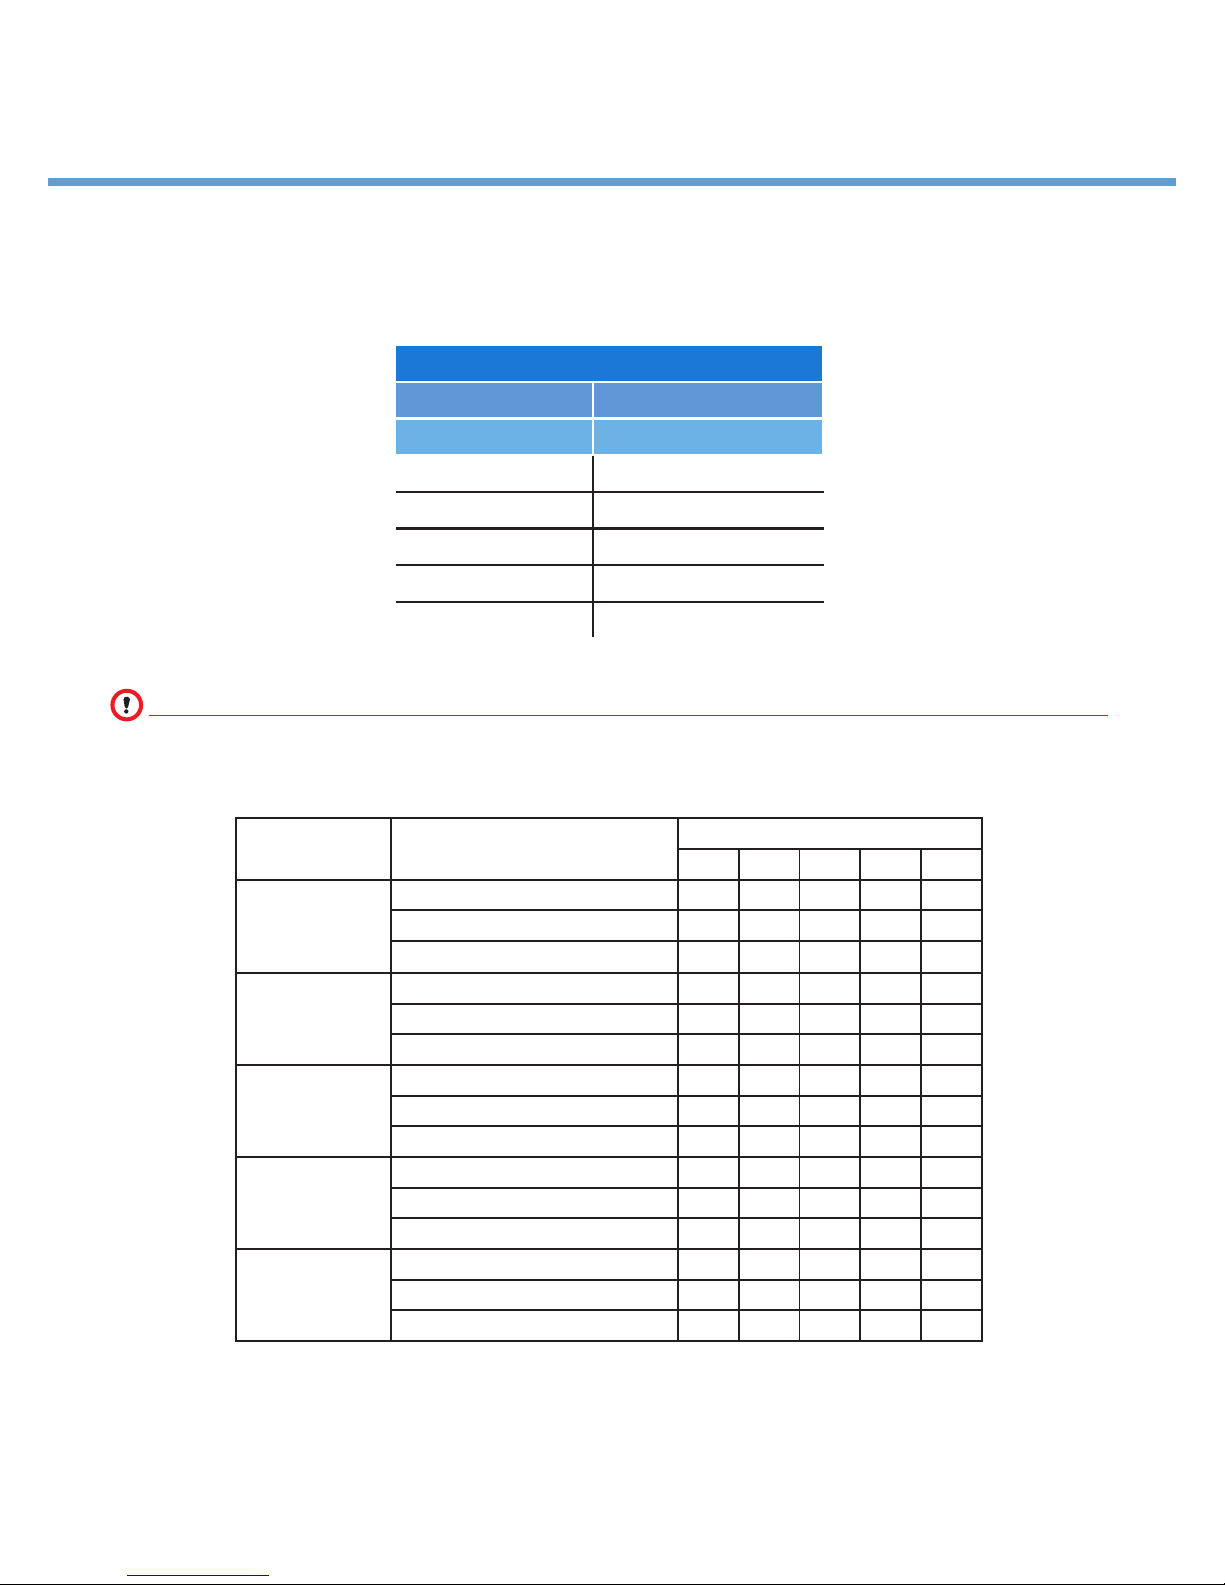
3.1 - Table of minimum dimensions
MINIMUM FOOTPRINTS
PROJECTION WIDTH (in)
ARM 1 PAIR OF ARMS
6'11" 100
8'6" 121
10'2" 140
11'9" 160
13'5" 180
Installation Manual
1123
INFORMATION AND PRECAUTIONS
It is advisable always to use an even number of arms.
3.2 TABLE OF NO. ARMS, Square Bar BRACKETS AND HOOD SUPPORTS
PROJECTION
6'11"
8'6"
10'2"
11'9"
13'5"
COMPONENTS
118 157 196 236 275
Arms 2 2 2 2 2
Mounting Brackets 3 3 3 5 5
Cassette Supports 3 4 5 6 7
Arms 2 2 2 2 2
Mounting Brackets 3 3 3 5 5
Cassette Supports - 4 5 6 7
Arms - 2 2 2 2
Mounting Brackets - 3 3 5 7
Cassette Supports - 4 5 6 7
Arms - 2 2 2 2
Mounting Brackets - 3 3 5 7
Cassette Supports - 4 5 6 7
Arms - - 2 2 2
Mounting Brackets - - 3 5 7
Cassette Supports - - 5 6 7
Width (in)
For a correct installation it is advisable to follow the instructions here above.
55
Page 6
CATALINA SEMI CASSETTE AWNING
Installation Manual
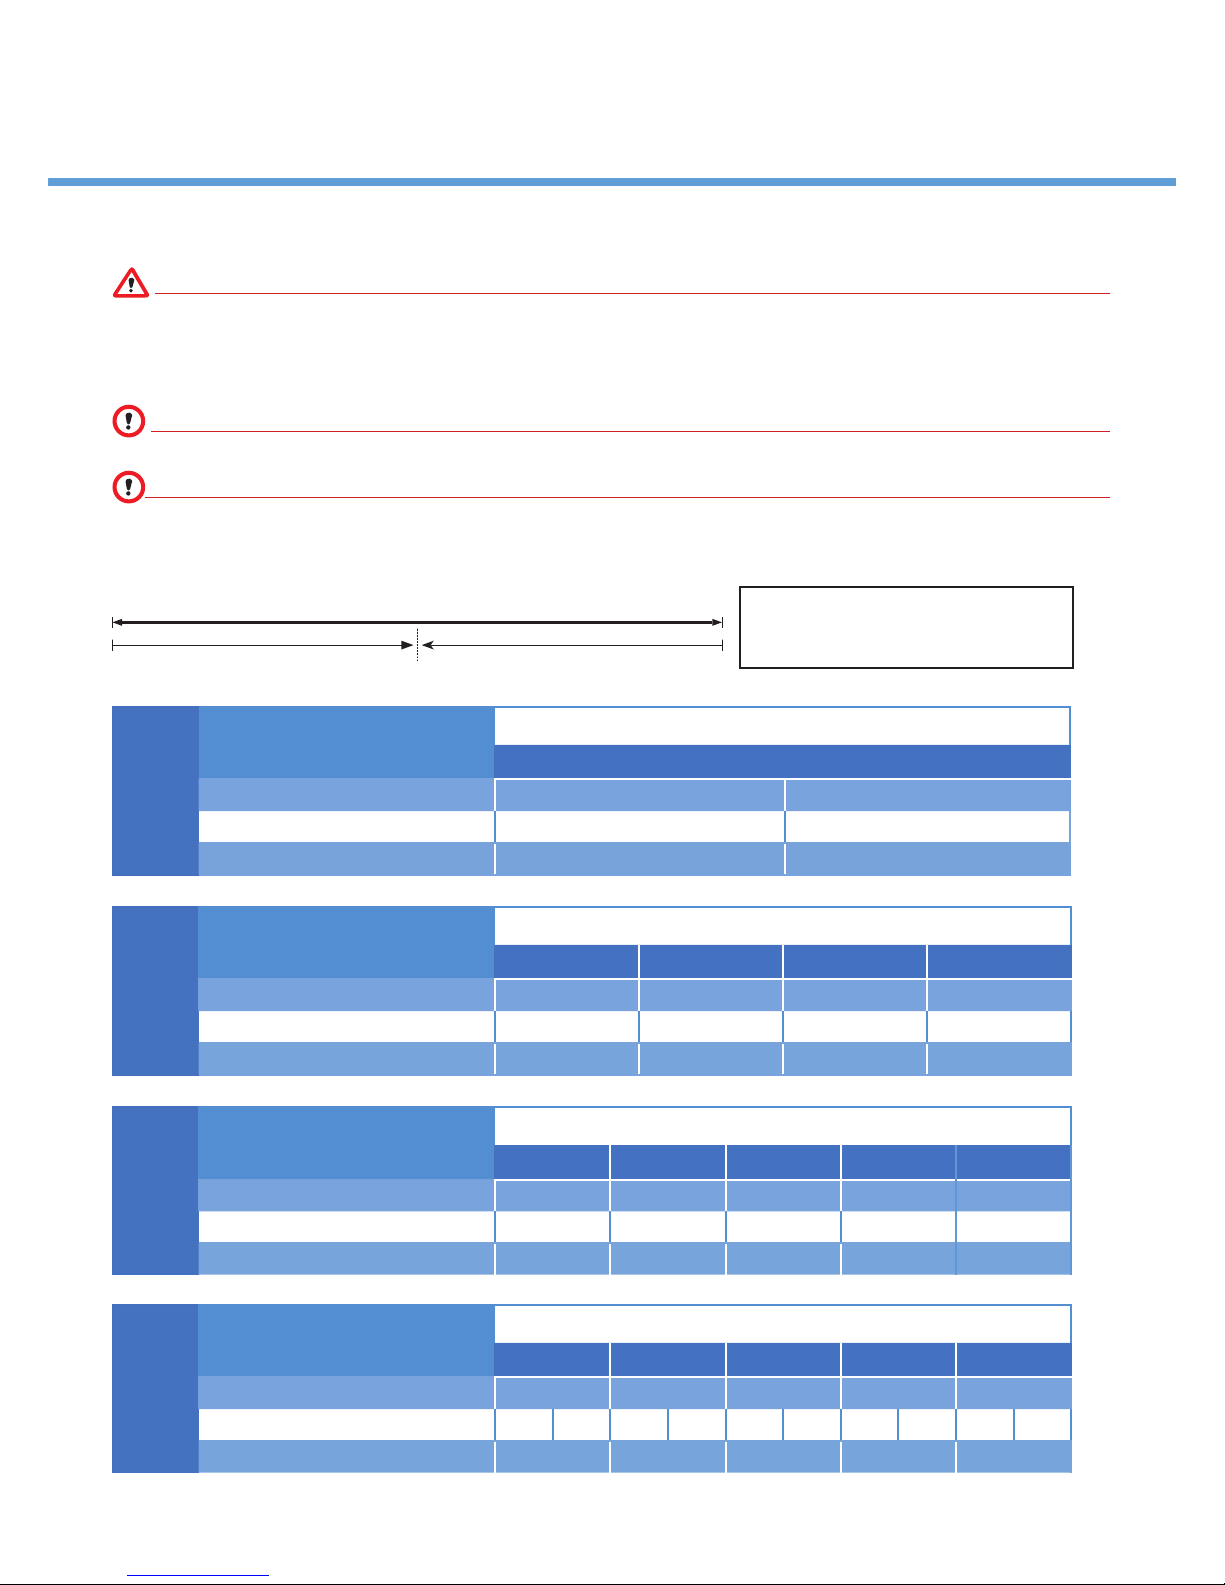
3.3 Table of awning dimensions / component placement
WARNING
THE FOLLOWING TABLES ARE PURELY INDICATIVE. TO THE BEST OF OUR KNOWLEDGE THE INFORMATION
IS UP TO DATE. SW SUN CONTROL DOES NOT PROVIDE ANY GUARANTEE REGARDING ACCURACY,
RELIABILITY, AND COMPLETENESS OF THE INFORMATION CONTAINED HEREIN. INDEED, IT IS THE USER’S
RESPONSIBILITY TO ENSURE THE SUITABILITY AND CORRECTNESS OF THIS INFORMATION.
INFORMATION AND PRECAUTIONS
For the number of accessories to install on the awning, please refer to the table above.
INFORMATION AND PRECAUTIONS
Determine the center point of the overall width of the square bar for proper component placement. Component
placement goes from square bar edge to center and is the identical on both sides of awning.
1123
L
LEFT EDGE RIGHT EDGE
WIDTH up to 118 (in)
WIDTH up to 157 (in)
WIDTH up to 196 (in)
COMPONENT PLACEMENT
6'11" 8'6"
Shoulders 4 2
Mounting Brackets (2) 7.875 7.875
2 ARMS
Additional Mounting Bracket Center Center
COMPONENT PLACEMENT
6'11" 8'6" 10'2" 11'9"
Shoulders 15.75 11.875 11.875 2
Mounting Brackets (2) 11.875 7.875 10 7.875
2 ARMS
Additional Mounting Bracket Center Center Center Center
COMPONENT PLACEMENT
6'11" 8'6" 10'2" 11'9" 13'5"
Shoulders 19.75 19.75 10.5 5 7.875
Mounting Brackets (2) 15.75 15.75 19.75 19.75 15.75
2 ARMS
Additional Mounting Bracket Center Center Center Center Center
Width = Largitezza in Italian
"L"
COMPONENT PLACEMENT
Shoulders 27.625 27.625 27.625 23 13
Mounting Brackets (4)
2 ARMS
Additional Mounting Bracket Center Center Center Center Center
WIDTH up to 236 (in)
6'11" 8'6" 10'2" 11'9" 13'5"
19.75 63 19.75 63 19.75 63 19.75 63 19.75 63
66
Page 7
CATALINA SEMI CASSETTE AWNING
Installation Manual
1123
COMPONENT PLACEMENT
WIDTH up to 275 (in)
6'11" 8'6"
Shoulders 27.625 15.75
Mounting Brackets (4)
2 ARMS
19.75 80 19.75 80
Additional Mounting Bracket Center Center
10'2" 11'9" 13'5"
Shoulders 15.75 15.75 15.75
Mounting Brackets (6) 7.875 51 94.5 7.875 51 94.5 7.875 51 94.5
2 ARMS
Additional Mounting Bracket Center Center Center
For projections of more than 118 inches, add a mounting bracket in the center of square bar.
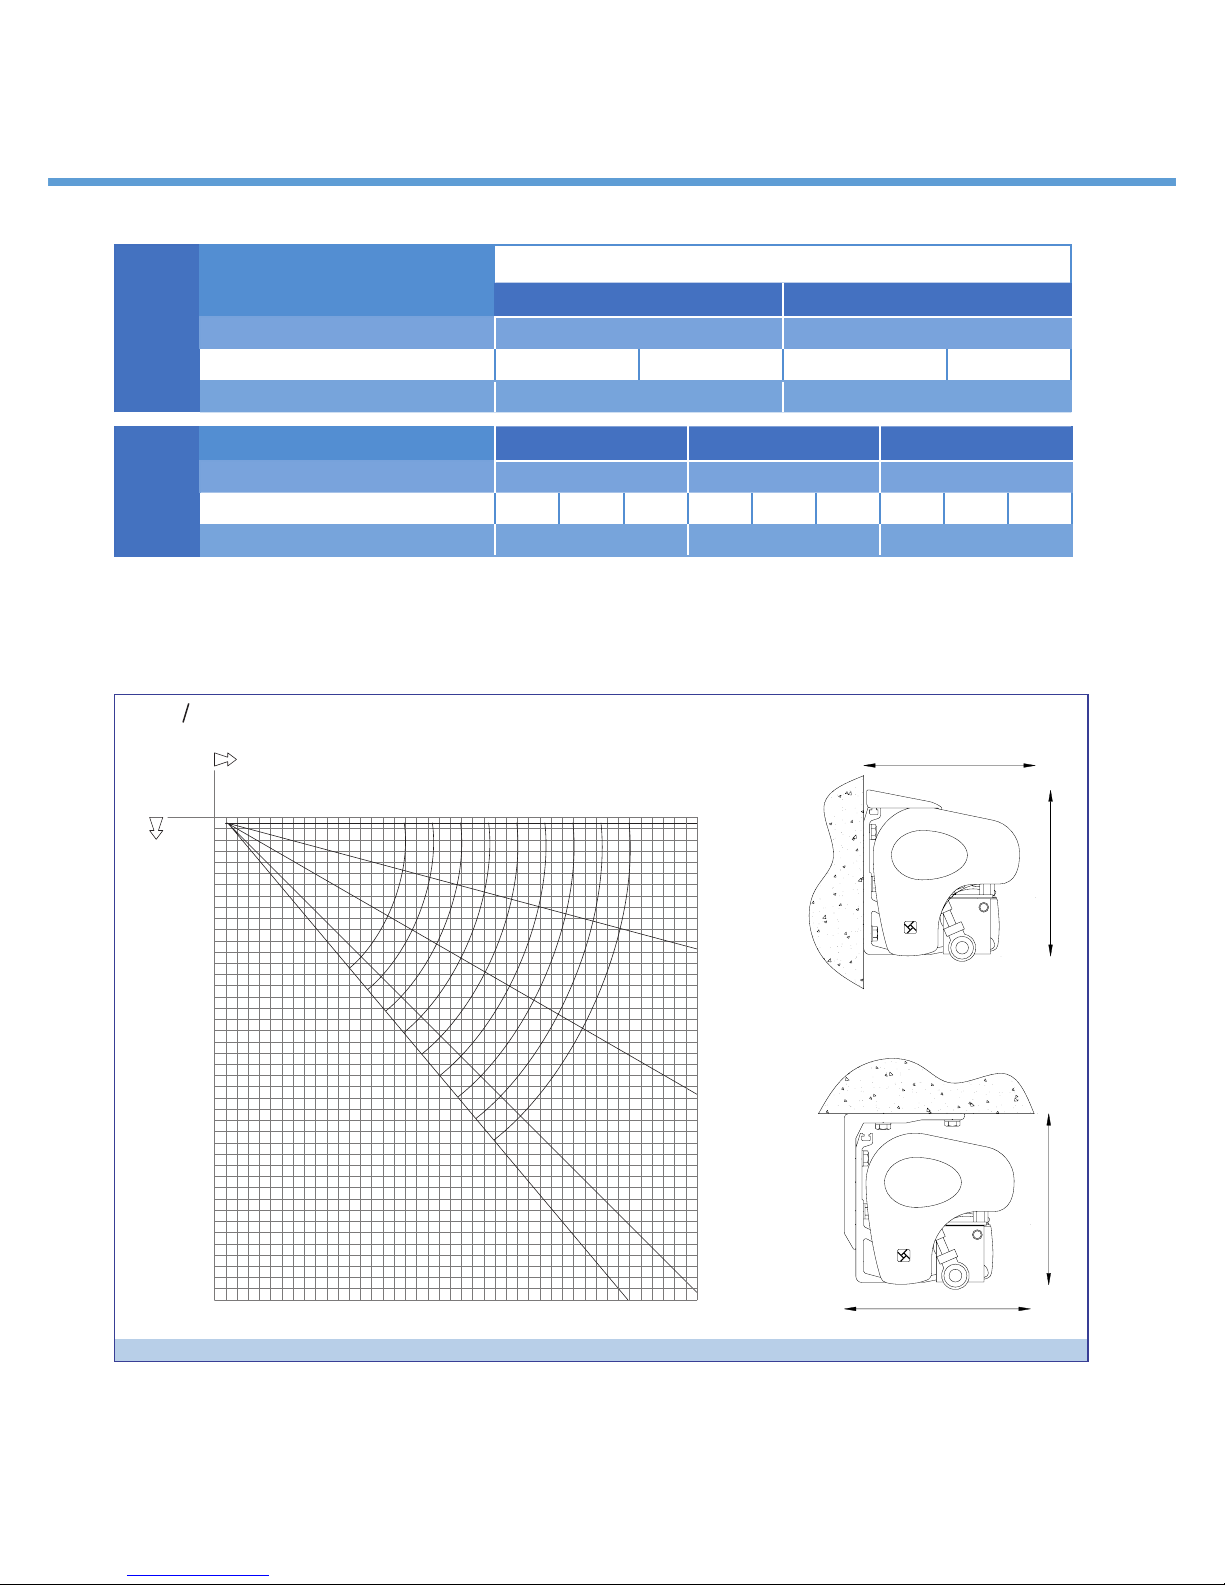
3.4 - Diagram of Covering and Footprint
WALL INSTALLATION DIAGRAM
CEILING
0
3.9375”
7.875”
11.8125”
15.75”
19.6875”
23.625”
Height
27.5625”
31.5”
35.4375”
39.375”
43.3125”
47.25”
51.1875”
55.125”
59.0625”
63”
66.9375”
70.875”
74.8125”
78.75”
82.6875”
86.625”
90.5625”
94.5”
98.4375”
102.375”
106.3125”
110.25”
114.1875”
118.125”
122.0625”
126”
129.9375”
133.875”
137.8125”
141.75
145.6875”
149.625”
153.5625”
157.5”
161.4375”
(in)
”
Projection
3.9375”
7.875”
11.8125”
WALL INSTALLATION
”
43.3125”
23.625”
15.75”
19.6875”
47.25”
27.5625”
39.375”
35.4375”
31.5”
66.9375”
51.1875”
55.125”
59.0625”
63”
70.875”
94.5”
86.625”
82.6875”
90.5625”
98.4375”
78.75”
74.8125”
110.25”
102.375”
118.125”
106.3125”
114.1875”
141.75
126”
122.0625”
129.9375”
137.8125”
133.875”
(in)
157.5”
149.625”
161.4375”
145.6875”
153.5625”
0°
15°
8.88"
CEILING INSTALLATION
30°
45°
50°
9.44”
8.66"
8.75”
FIG. 1
77
Page 8
CATALINA SEMI CASSETTE AWNING
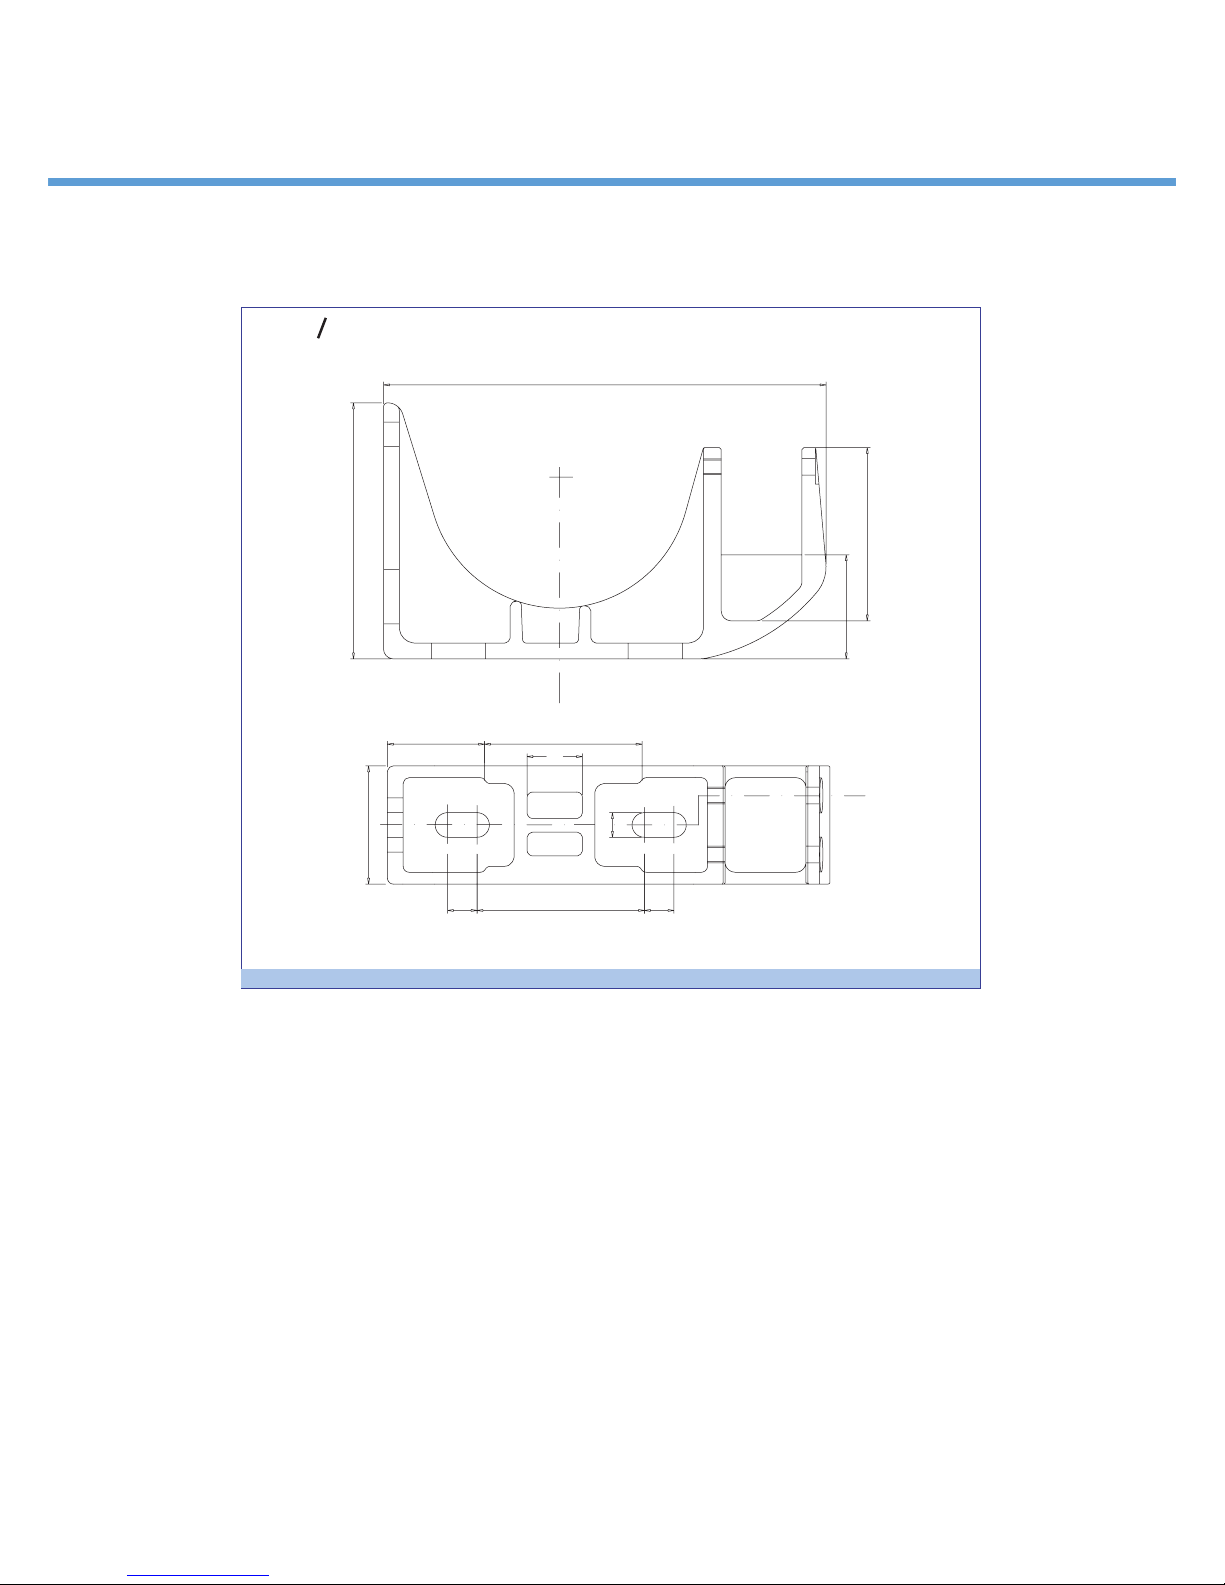
3.5 - Cassette Support Brackets
Installation Manual
1123
WALL
CEILING BRACKET
5.1
1.9
2.3
.6 .6
8.85
3.4
2
3.1
1.1
.5
3.3
FIG. 1
88
Page 9
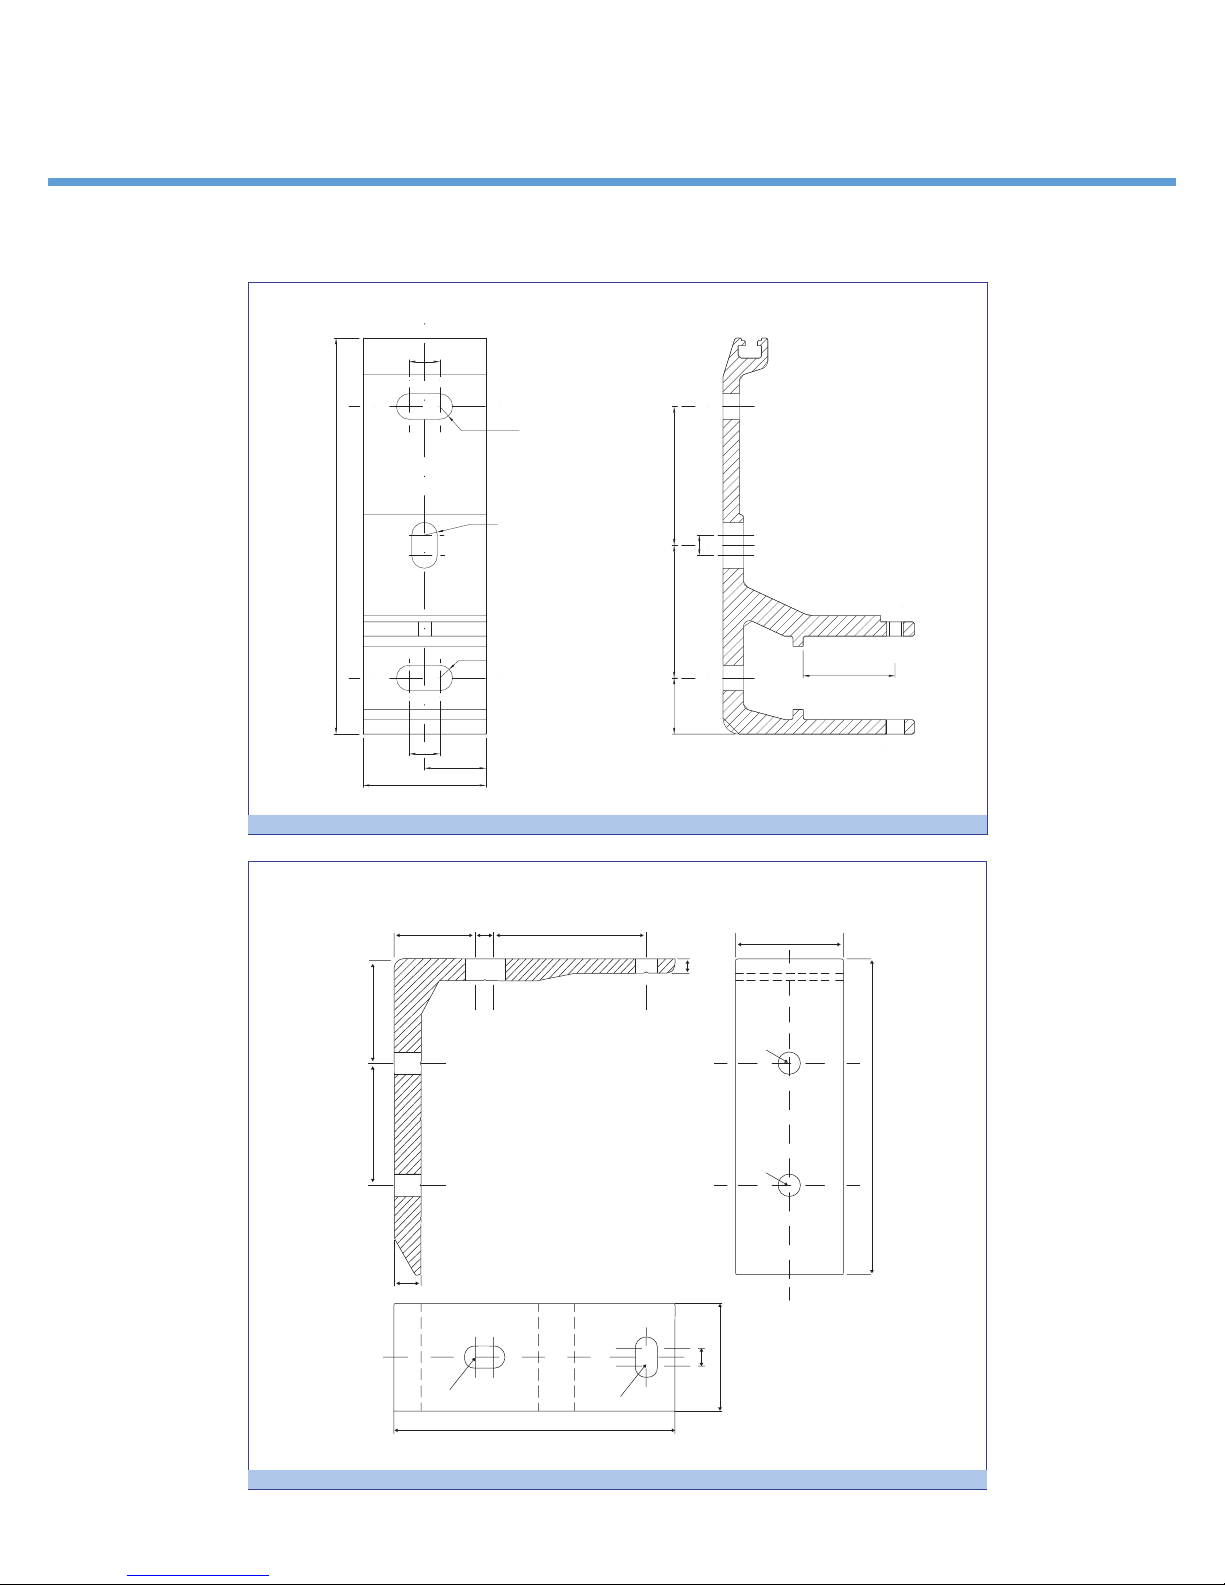
3.6 - Mounting Brackets
WALL INSTALLATION
7.64”
CATALINA SEMI CASSETTE AWNING
Installation Manual
1123
.59”
R.25”
R.25”
.39”
2.56” 2.68”
.59”
2.36”
CEILING BRACKET
2.29”
2.67”
1.18”
R.25”
1.77”
1.08”
FIG. 5
3.34”1.79” .39”
.47”.39”
R.25”
.25”
R
2.36”
6.92”
.59”
R.25”
2.36”
R.25”
6.16”
FIG. 6
99
Page 10
CATALINA SEMI CASSETTE AWNING
16
15
16
13
13
12
2
12
6
6
9
18
10
1
27
8
3
17
4
24
3
17
7
11
18
28
4
29
5
8
26
26
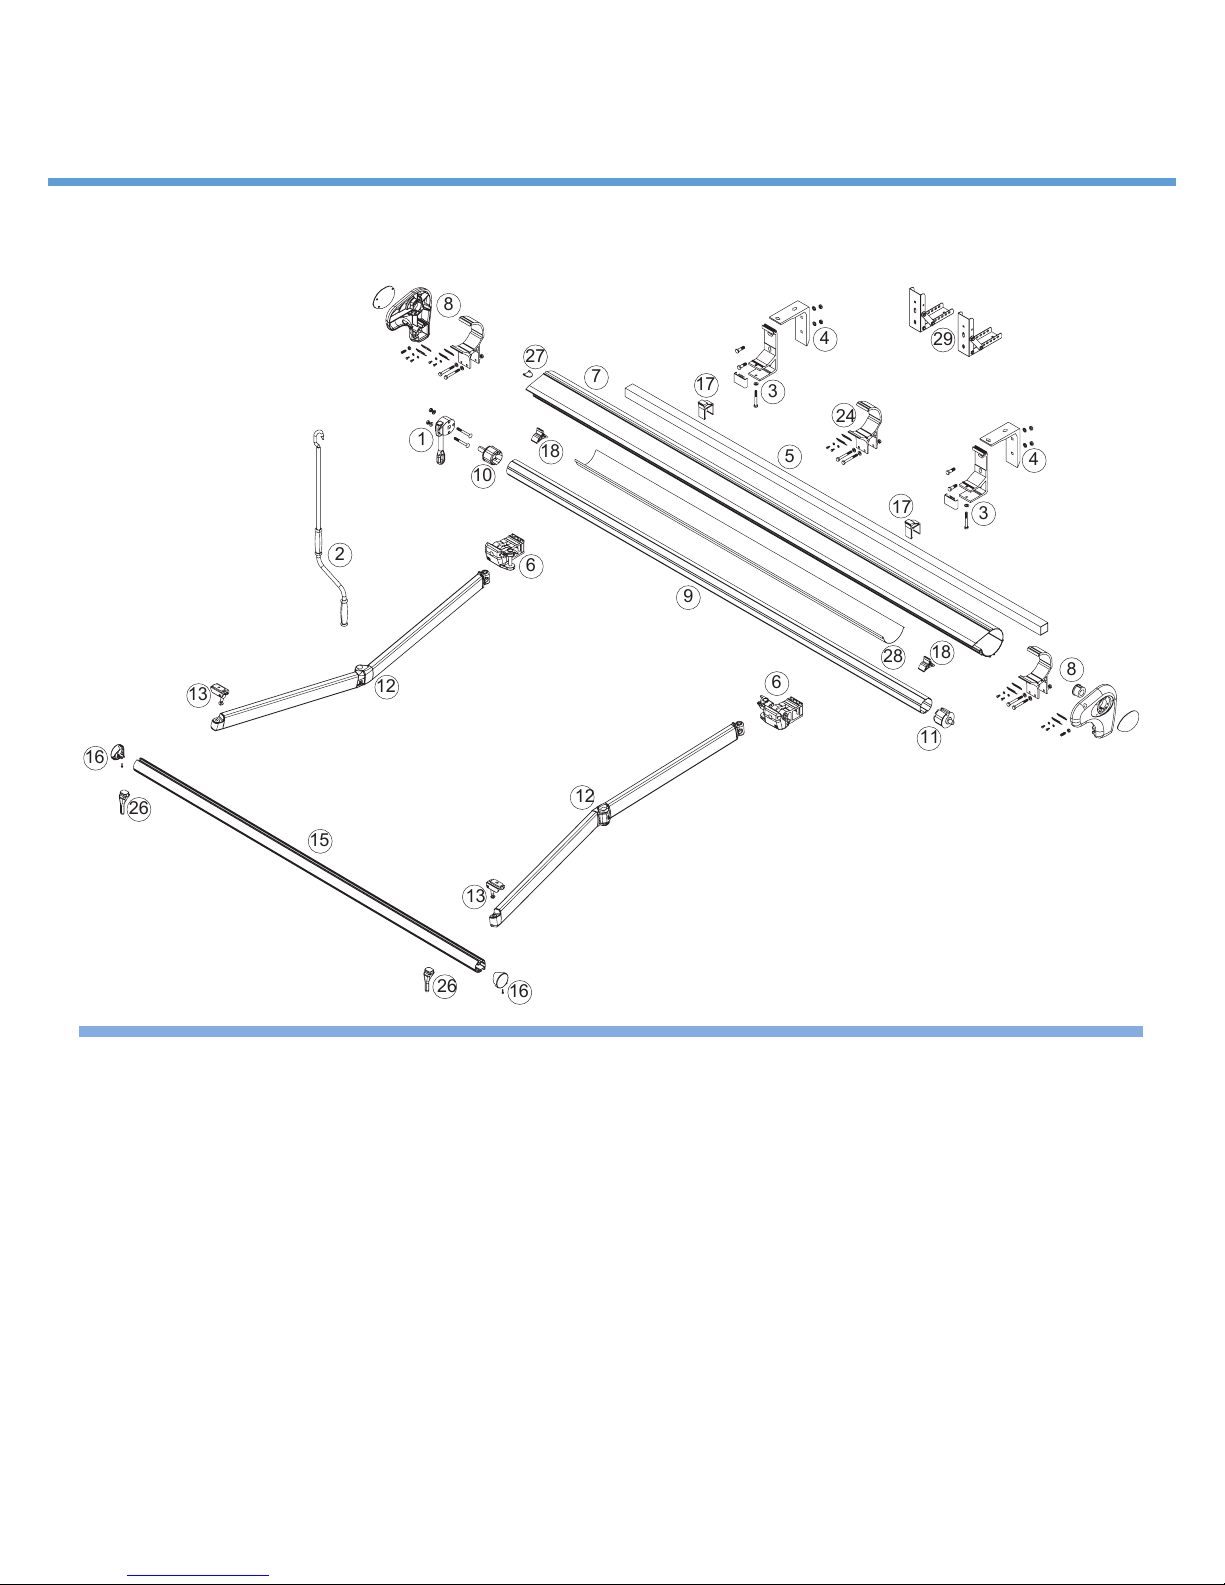
3.7 - Exploded View of Catalina Semi Cassette Awning Components
Installation Manual
1123
1 Gear
2 Hand brace
3 Wall brackets
4 Ceiling brackets
5 Square bar
6 Shoulders with tipping system
7 Cassette
8 Cassette ends covers with supports
9 Tube
10 Square pin tube cap
11 Round pin tube cap
12 Catalina arms with chain spin
13 Runners for spin arms
15 Front bar
16 Front bar end covers
17 Middle support for cassette
18 Conveyor
24 Box junction
26 Arms picking runners
27 Cap for gear hole
28 PVC fabric-saving prole
29 Roof bracket
1010
Page 11
CATALINA SEMI CASSETTE AWNING
Installation Manual
4 INSTALLATION OF MANUAL AWNING
The instructions below refer to wall-mounting; ceiling mounting is the same. If any options are in use, rst read
Chapter 6 "Optionals"
CAUTION
Ensure a minimum space of 19.75 inches between the open awning and any xed obstacle.
The awning must be installed at a minimum height of 98.5 inches. If this is not possible, for awnings equipped
with automations it is obligatory to install an acoustic CAUTION device.
INFORMATION AND PRECAUTIONS
Use the most suitable attachment hardware for the type of wall where the awning is to be installed.
INFORMATION AND PRECAUTIONS
For CEILING INSTALLATION, DO NOT FASTEN THE BRACKETS TO THE BLOCKS.
The awning may fall with the risk of serious injury to individuals and damage to the product.
INFORMATION AND PRECAUTIONS
The procedure described below refers to the model of awning with two arms. The operator must take the
necessary measures for the installation of models with more than two arms (see the tables in Chap. 3.1
4.1 - Fastening brackets to wall
INFORMATION AND PRECAUTIONS
The instructions that follow are of a general nature and must therefore be adapted to the model of awning
being assembled.
1123
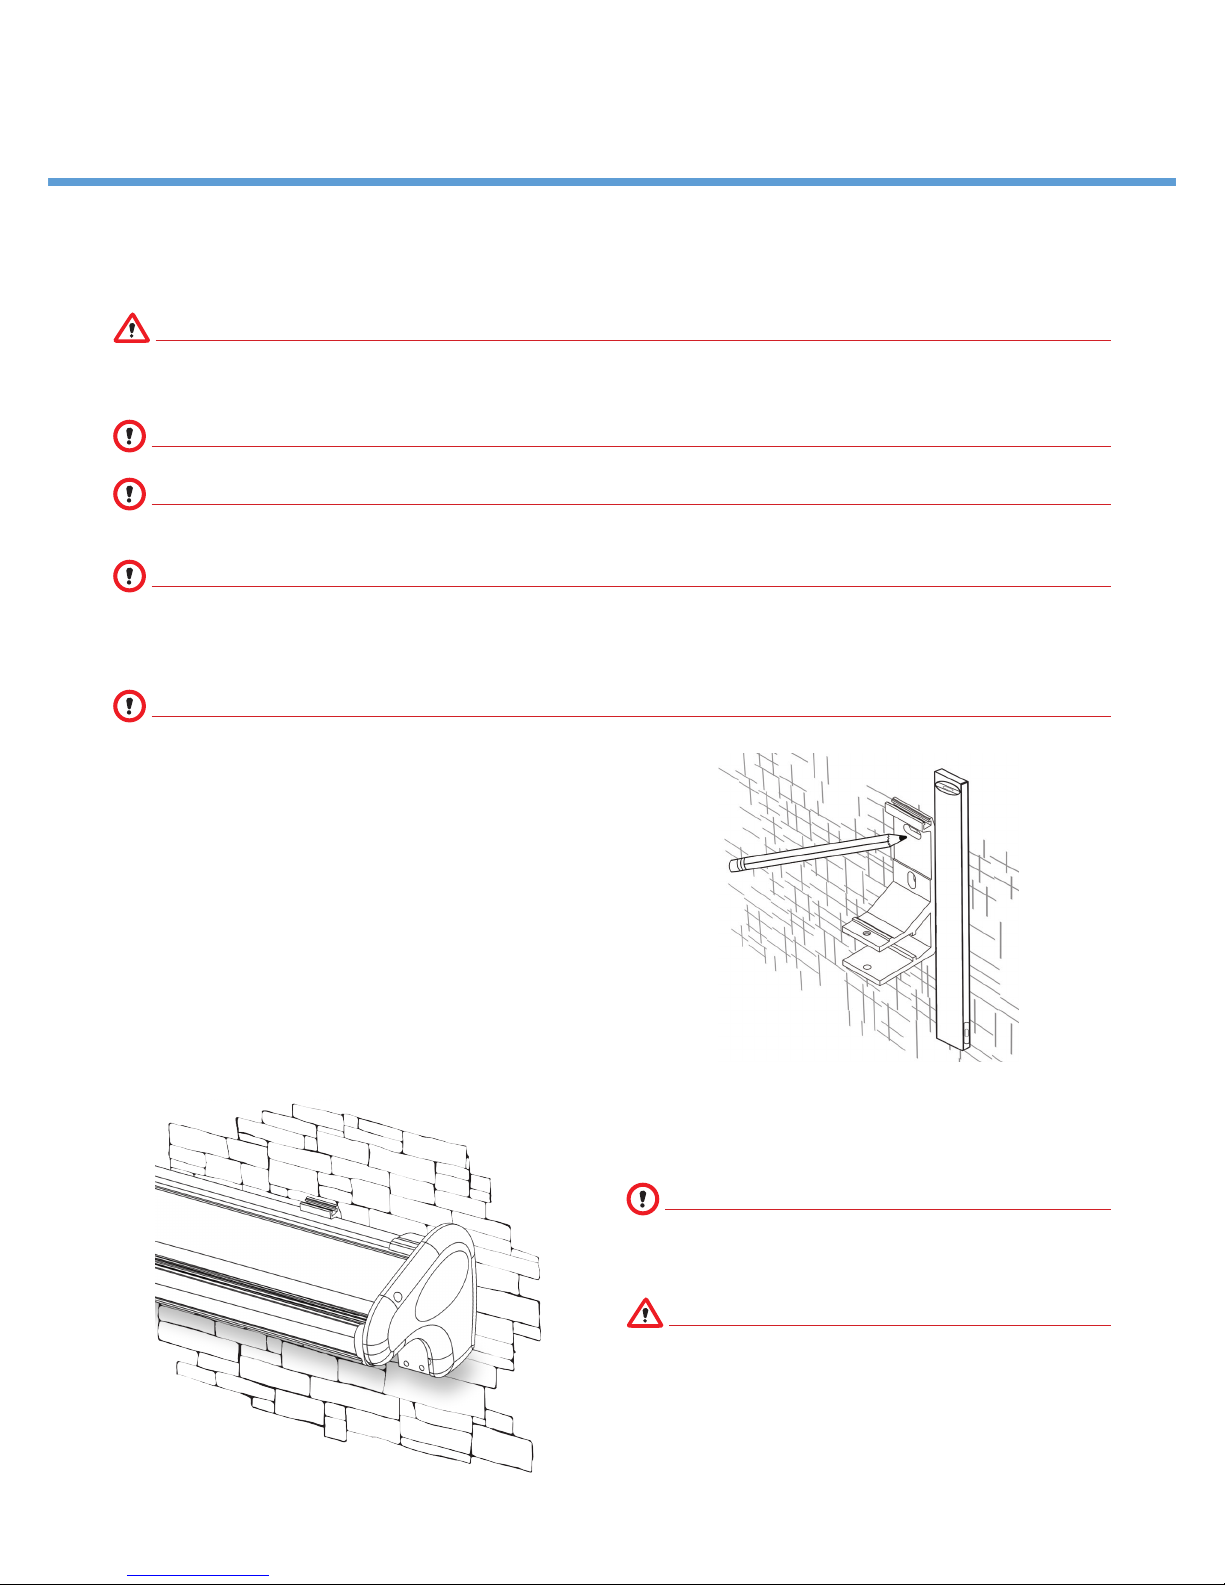
1) Before starting installation, take note of the
following information, which is indispensable to
nd the right position for fastening the brackets:
• dimensions of the awning (see Chap 3.1 and
Chap. 3.4)
• dimensions of the brackets (see Chap. 3.6)
• number of arm supports (see Chap.3.2)
• side of awning where control is located;
• dimensions of the wall/ceiling where the awning
is to be installed.
(For the support and bracket positions, see Chap. 3.3)
2) Using a string and a level, mark the position of the
holes to be made on the wall.
INFORMATION AND PRECAUTIONS
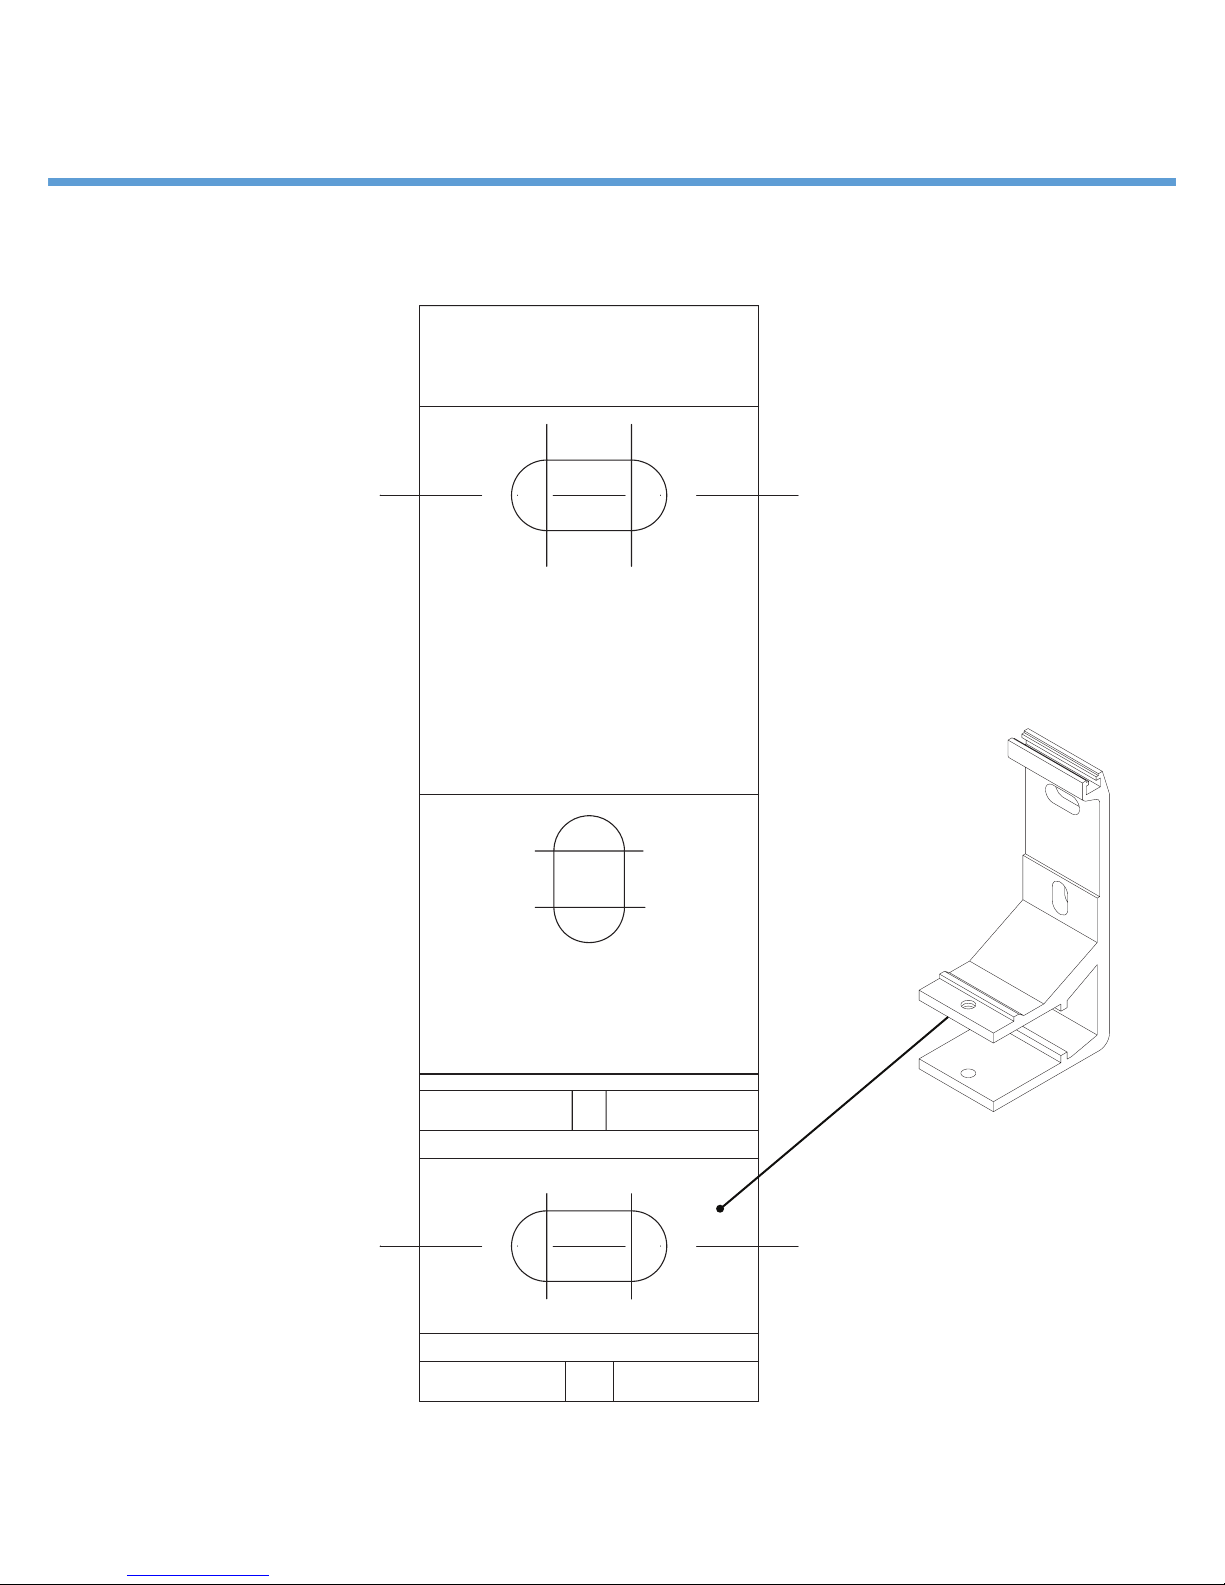
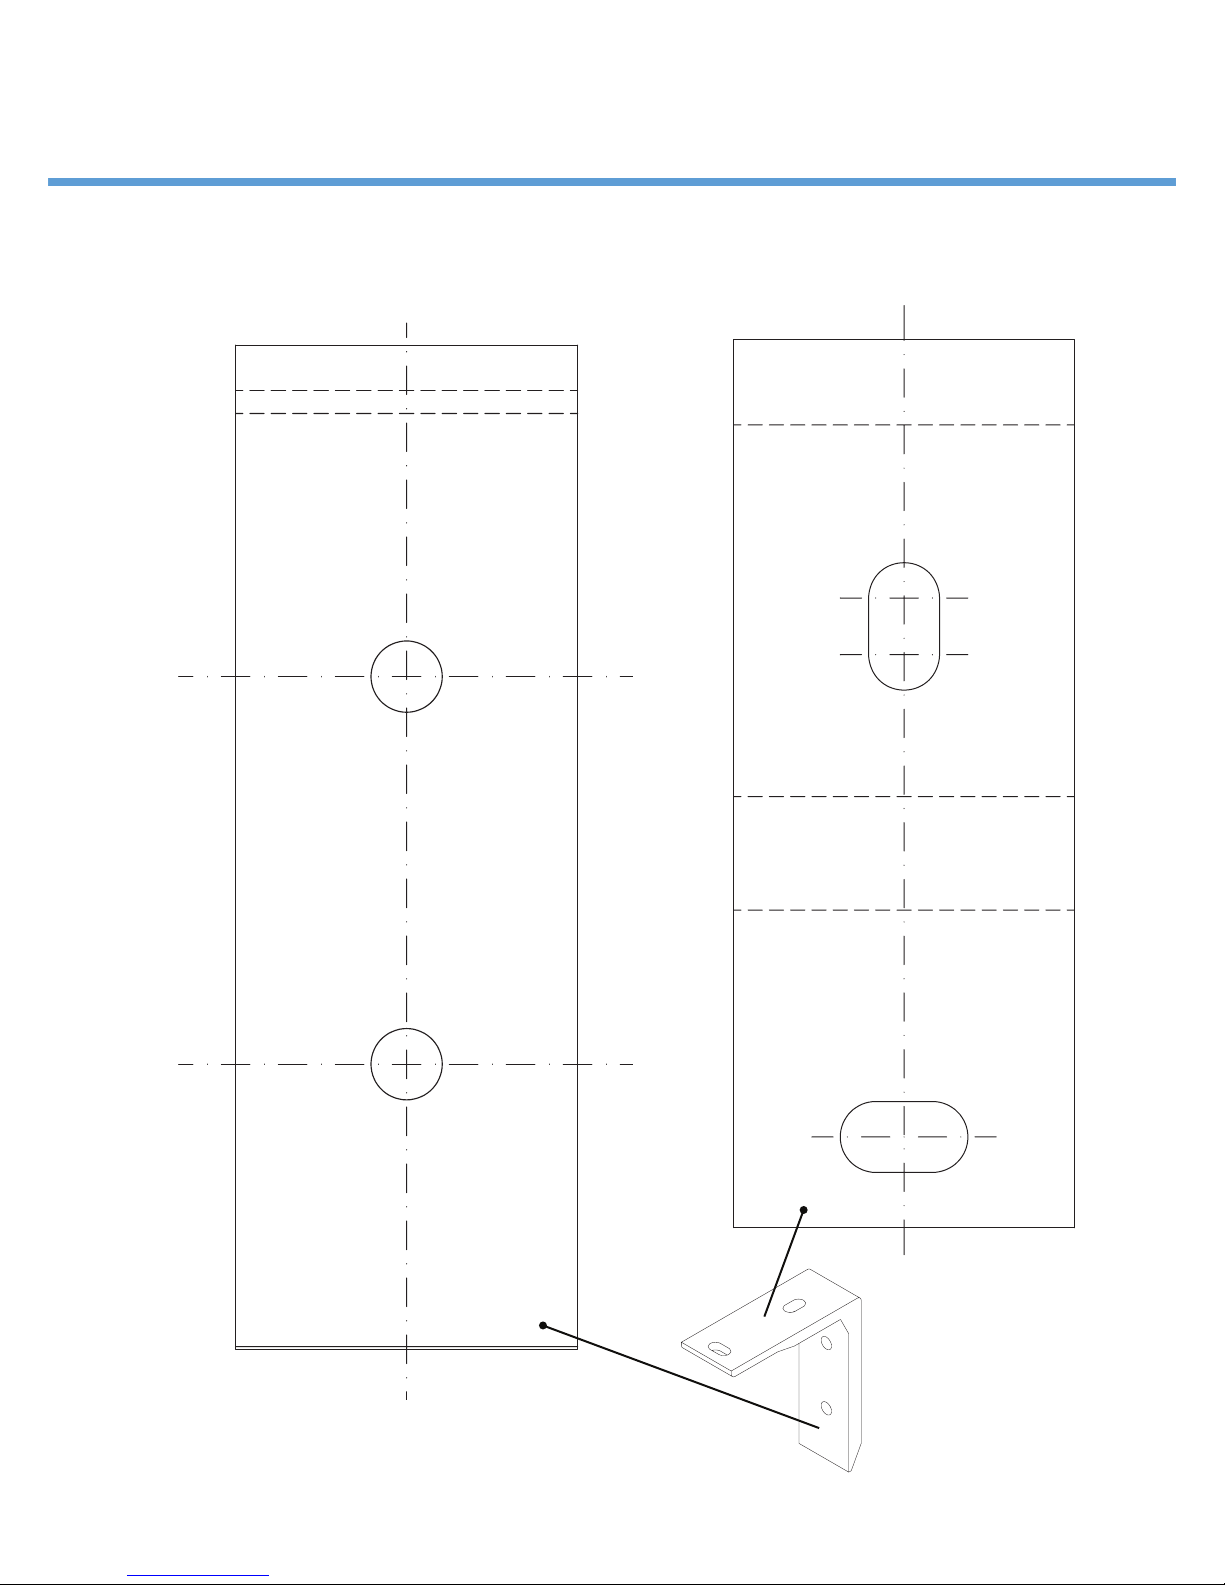
To facilitate the installation process, pages 15, 16 and
17 may be printed in A4 format for use as templates
to nd the best positions for the holes.
CAUTION
To avoid gross errors, make sure the print out scale
is 1:1, checking the measure indicated on the paper
with a ruler or caliper in relation to the dimensions
indicated on page 8 and 9.
1111
Page 12
CATALINA SEMI CASSETTE AWNING
SQUARE BAR WALL BRACKET
TEMPLATE
Installation Manual
1123
Scale 1:1
1212
Page 13
CATALINA SEMI CASSETTE AWNING
EXTRUDED WALL/CEILING SQUARE BAR BRACKET
TEMPLATE
Installation Manual
1123
Scale 1:1
1313
Page 14
CATALINA SEMI CASSETTE AWNING
FIG. 1
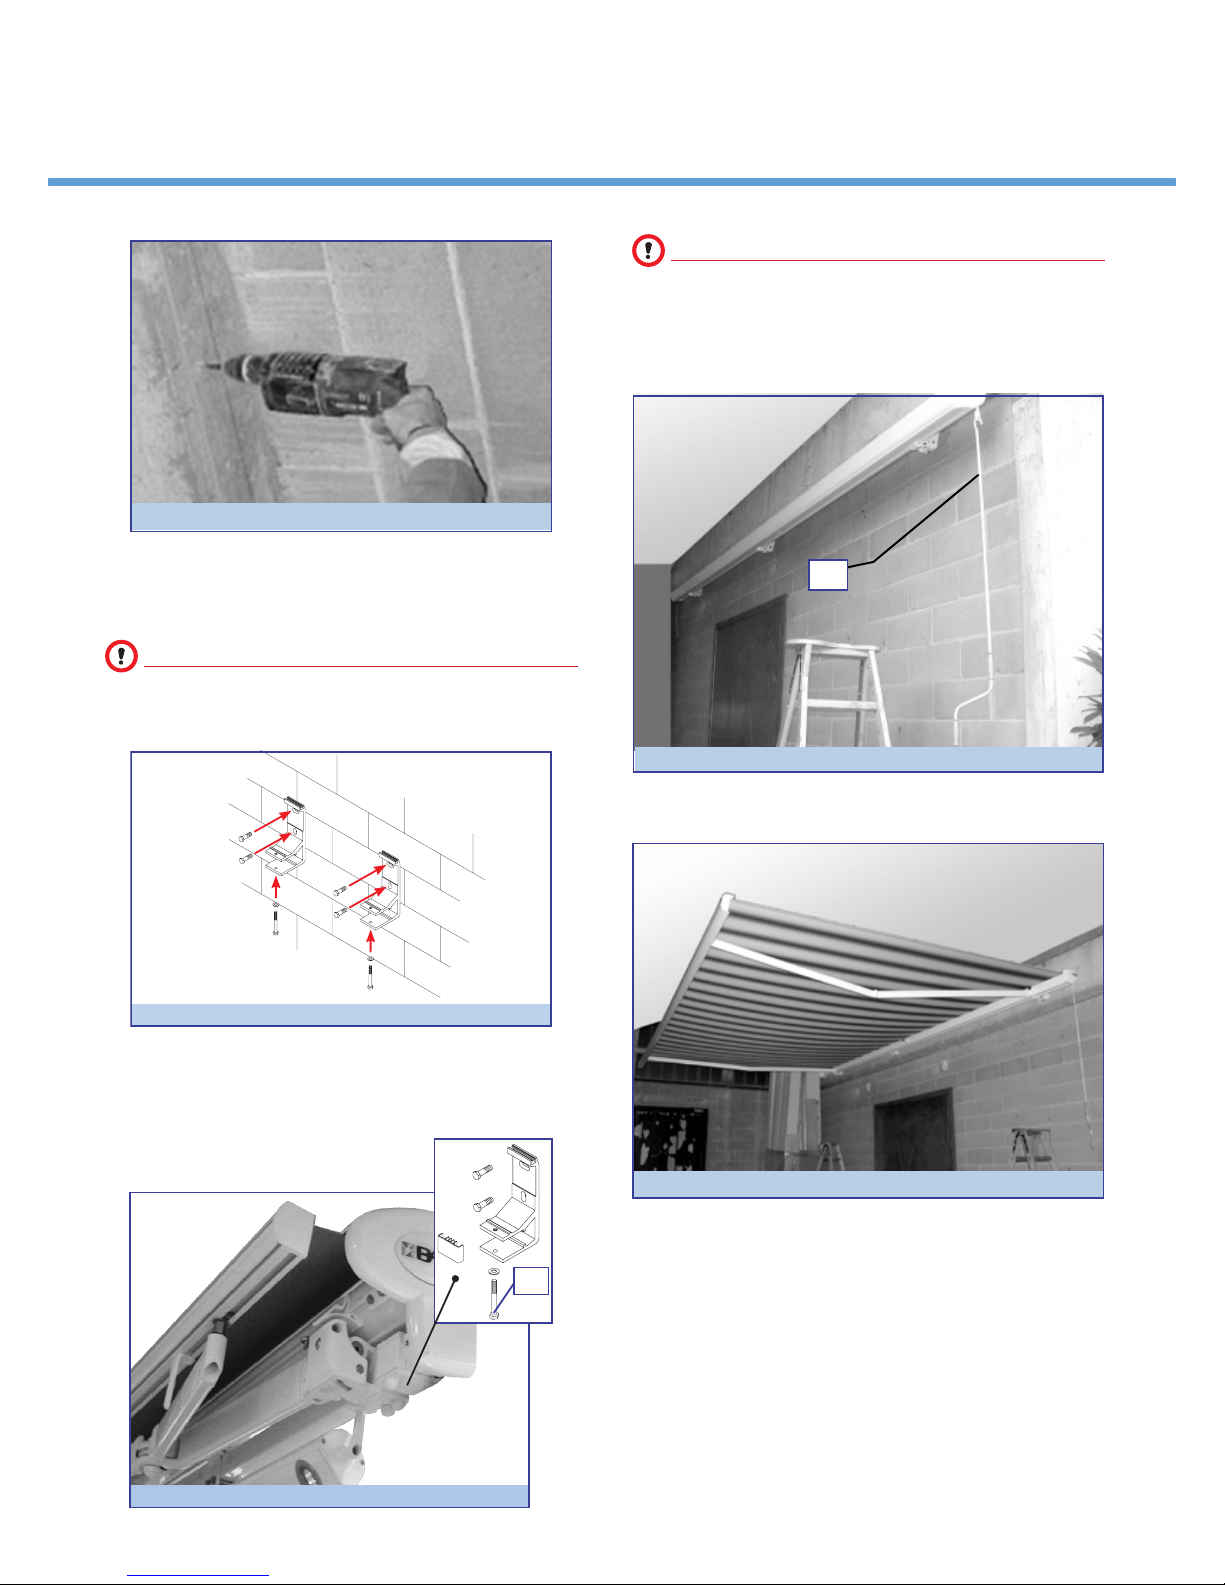
3) Make the holes in the wall using suitable drill based
on the type of wall and type of screw to be used.
4.2 - Wall installation
INFORMATION AND PRECAUTIONS
The instructions that follow are of a general nature
and must therefore be adapted to the model of
awning being assembled.
Installation Manual
1123
INFORMATION AND PRECAUTIONS
If the wall is off-square, it may difcult to install the
awning on the mounting brackets. It is therefore
advisable to check the alignment of the brackets
and to provide inserts to ensure proper alignment for
good installation. Use a string to check alignment.
B
FIG. 4
3) For a manual awning, fasten the hand brace (B) to
the gear.
1) Fix the brackets to the wall and insert the square bar
(including the awning) on the mounting brackets.
2) Center the cassette on the brackets referring
to the table “Awning Dimensions/component
placement” in Chap. 3.2.
FIG. 2
FIG. 3
FIG. 5
For ceiling-mounted awnings, follow the same
instructions as for wall installation.
A
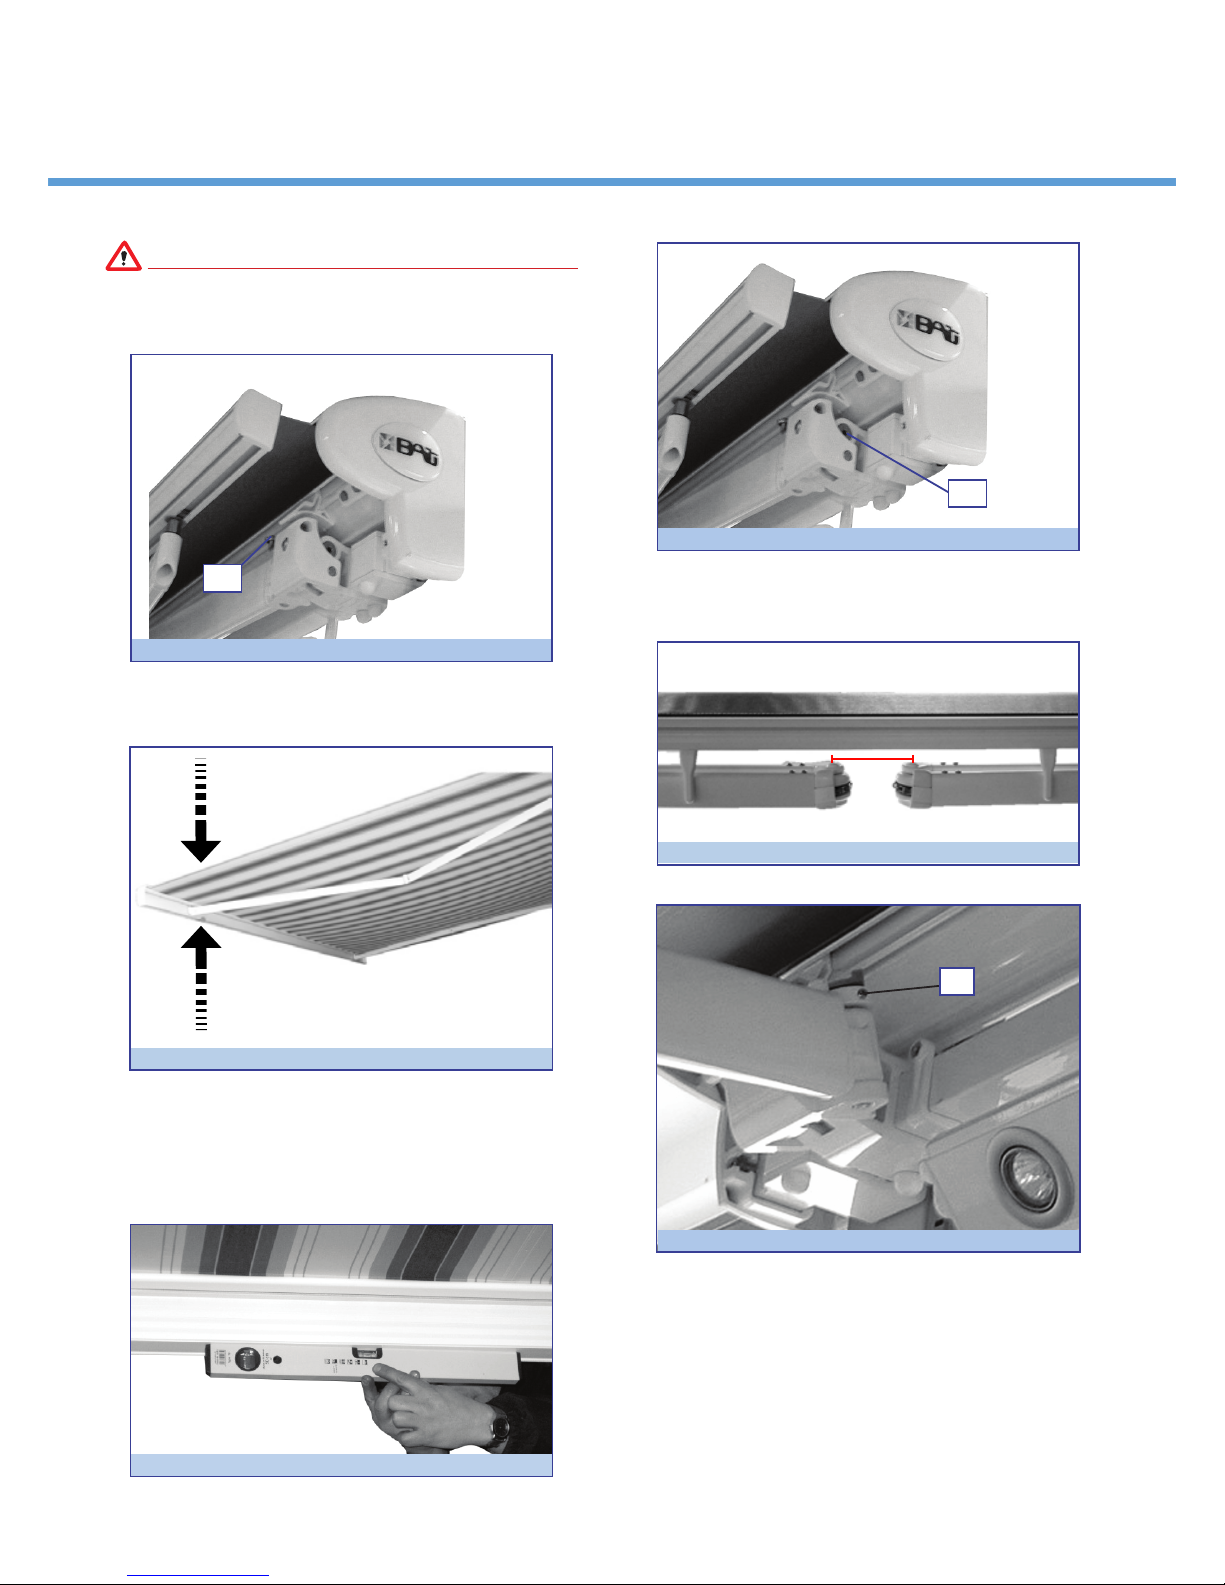
4.3 - Adjustment of Awning Inclination
For this procedure, one technician will need to work
on the brackets, and the other, only after opening the
awning, will guide the front bar so as to raise or lower
the awning easily.
1414
Page 15
CATALINA SEMI CASSETTE AWNING
FIG. 5
CAUTION
Make sure that when opening/closing the awning,
there are no individuals within its range of action
who are not involved in the work.
Installation Manual
1123
D
FIG. 4
C
FIG. 1
1) With the awning open, adjust the screw (C) Fig.
1 using a 6 mm Allen wrench until the desired
inclination is reached (see Fig. 2).
loose to increase inclination
tighten to decrease inclination
FIG. 2
2) Repeat the same steps on the other end of the
awning.
3) Adjust the position of the awning using a level,
check that the front bar is horizontal. If not, adjust
the support screw for the arm that is not level using
the procedure indicated above.
4) Once you reach the desired inclination, fasten the
awning in position by tightening the screw (D) using
a 3 mm Allen wrench.
5) Check that the elbows of the arms are parallel.
E
FIG. 6
5) Tighten the grub screw (E) to raise the elbow of the
arm, and unscrew it to lower.
FIG. 3
1515
Page 16
CATALINA SEMI CASSETTE AWNING
Installation Manual
5 INSTALLATION OF MOTORIZED AWNING
The instructions below refer to wall-mounting; ceiling mounting is the same. If any options are in use, rst read
Chapter 6 "Optionals"
CAUTION
IT IS PROHIBITED to install the motorized product in an explosive atmosphere.
CAUTION
Use a locking switch (with key) if the awning is installed in sensitive locations such as schools, colleges,
hospitals, retirement homes, etc. If the awning is equipped with a radio remote control, keep it out of the reach
of children.
CAUTION
If there is an opening/closing switch, it must be located in a protected position at a height of at least 59 inches
above ground level and in a safe place.
CAUTION
The awning must be installed at a minimum height of 98.5 inches. If this is not possible, for awnings equipped
with automations it is obligatory to install an acoustic CAUTION device.
1123
5.1 - Limit switch calibration
INFORMATION AND PRECAUTIONS
Before installation, check that the limit switch is properly calibrated. If it requires adjustment, follow the
instructions in the "Motor Manual".
5.2 - Electrical connections and installation
CAUTION
The electrical connections must be performed by qualied personnel and with the electrical energy
disconnected.
INFORMATION AND PRECAUTIONS
It is prohibited to connect two or more motors to the same switch due to the risk of induced current which
would result in damage to the motors.
Installation of the motorized awning involves the same procedure as for the manual awning, except for the
application of the hand brace (Chap. 4.2, "Wall installation", step 3).
Instructions for electrical connection and programming the type of operation are described in the "Motor Manual".
6 OPTIONALS
6.1 - Automations
(Only for motorized awnings)
WIND SENSOR, RAIN SENSOR, SUN SENSOR: installation of these optional is described in the manuals for
automations and for requested controls.
CAUTION
For awnings with automations, the awning must be installed at a minimum height of 98.5 inches; if this is not
possible, an acoustic CAUTION device must be installed.
1616
Page 17
CATALINA SEMI CASSETTE AWNING
Installation Manual
7 SPECIAL MAINTENANCE
7.1 - Troubleshooting table
MANUAL AWNING
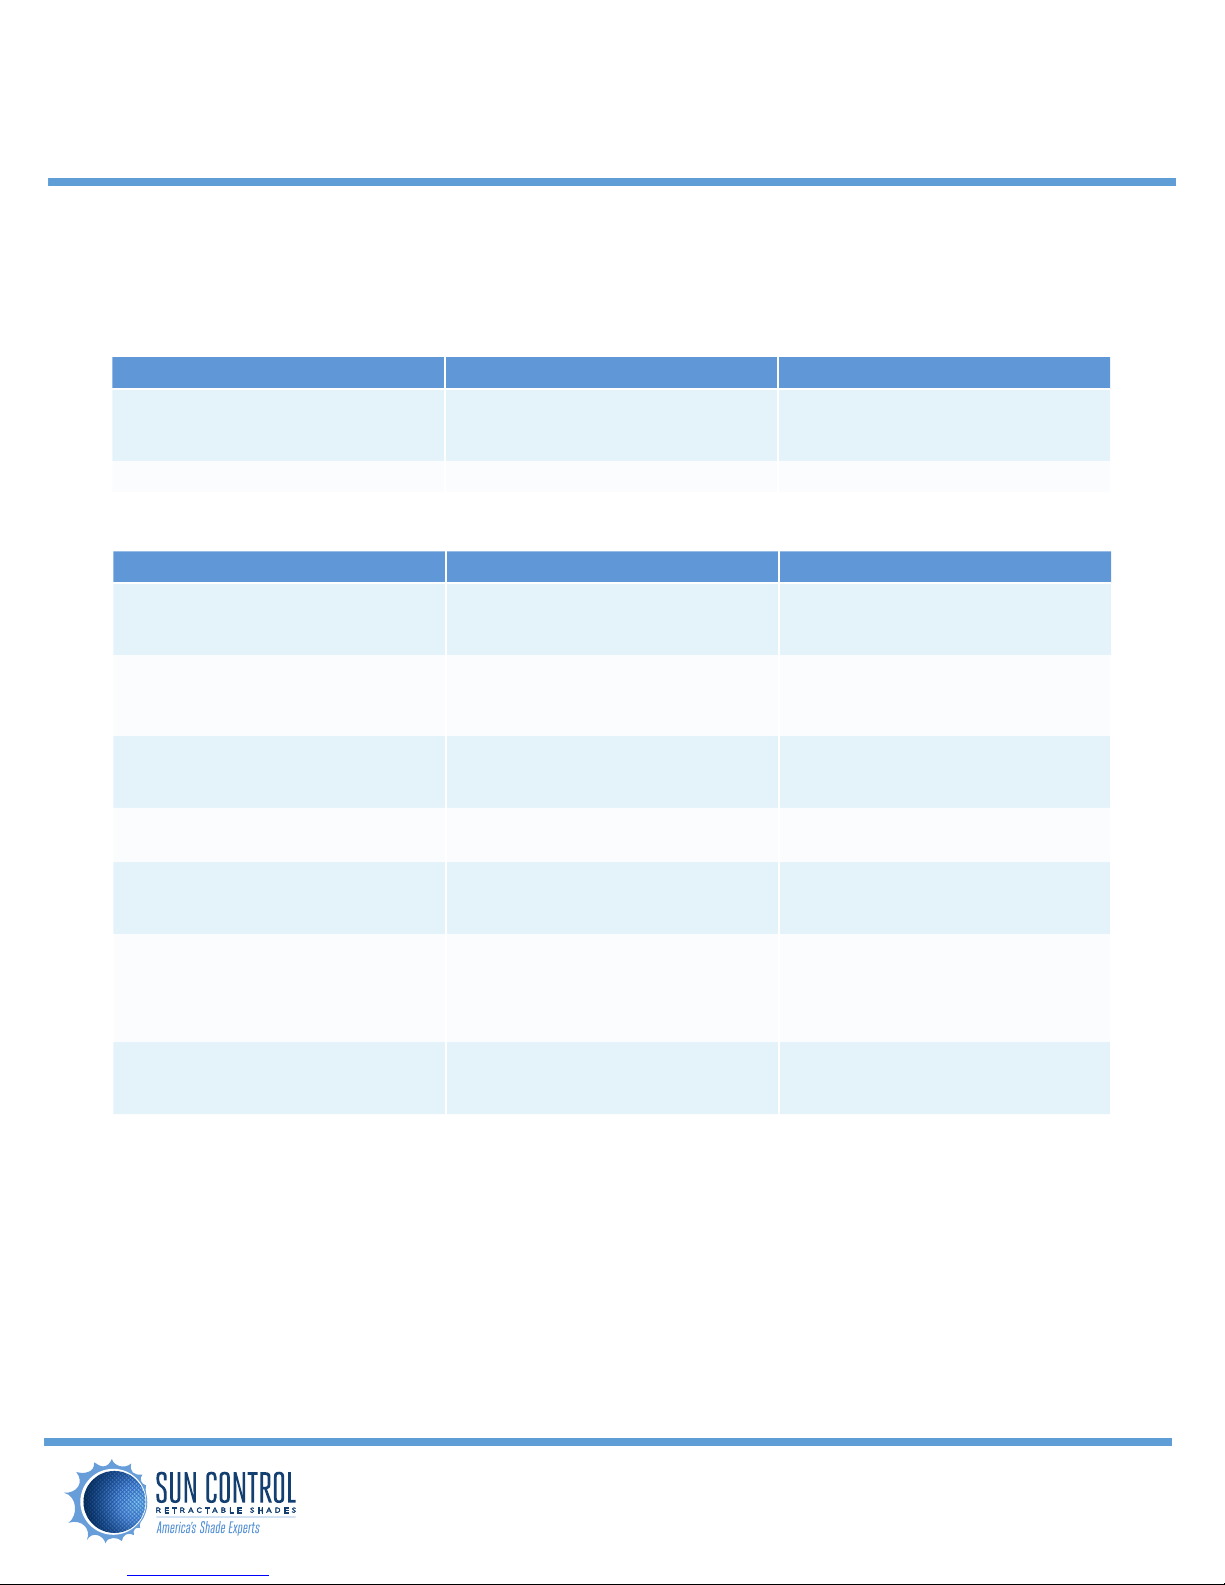
PROBLEMS CAUSES SOLUTIONS
The fabric does not roll up straight Incorrect symmetry of arms See manual for Assembly, Chap. 7
Uneven fabric Roll the fabric all the way back up
Noisy during operation Loose bolt or attachment Tighten all bolts or attachments
MOTORIZED AWNING
PROBLEMS CAUSES SOLUTIONS
The fabric does not roll up straight Incorrect symmetry of arms See manual for Assembly, Chap. 7
Uneven fabric Roll the fabric all the way back up
The awning does not fully close
Incorrect adjustment of limit switch. See manual for motor
The awning does not fully open
1123
The motor is very noisy
The motor shuts down after 4-5 min
of continuous operation
The awning does not move Power loss Breaker and GF1
The awning does not roll up in high
winds.
With radio control, the awning opens
or closes by itself.
Incorrect wiring
Motor failed
Thermal protection of motor trips Let motor cool off for a few minutes
Incorrect wiring See manual for motor
Power loss to awning or sensor
Faulty wind sensor
Sensor battery dead
Sensor power loss
See manual for motor
See instructions on automationSensor needs adjustment
Replace battery in radio remote
control
Toll Free 877-792-1775 | Fax 877-792-0031
swsuncontrolpro.com | [email protected]
1717
 Loading...