

Page 1
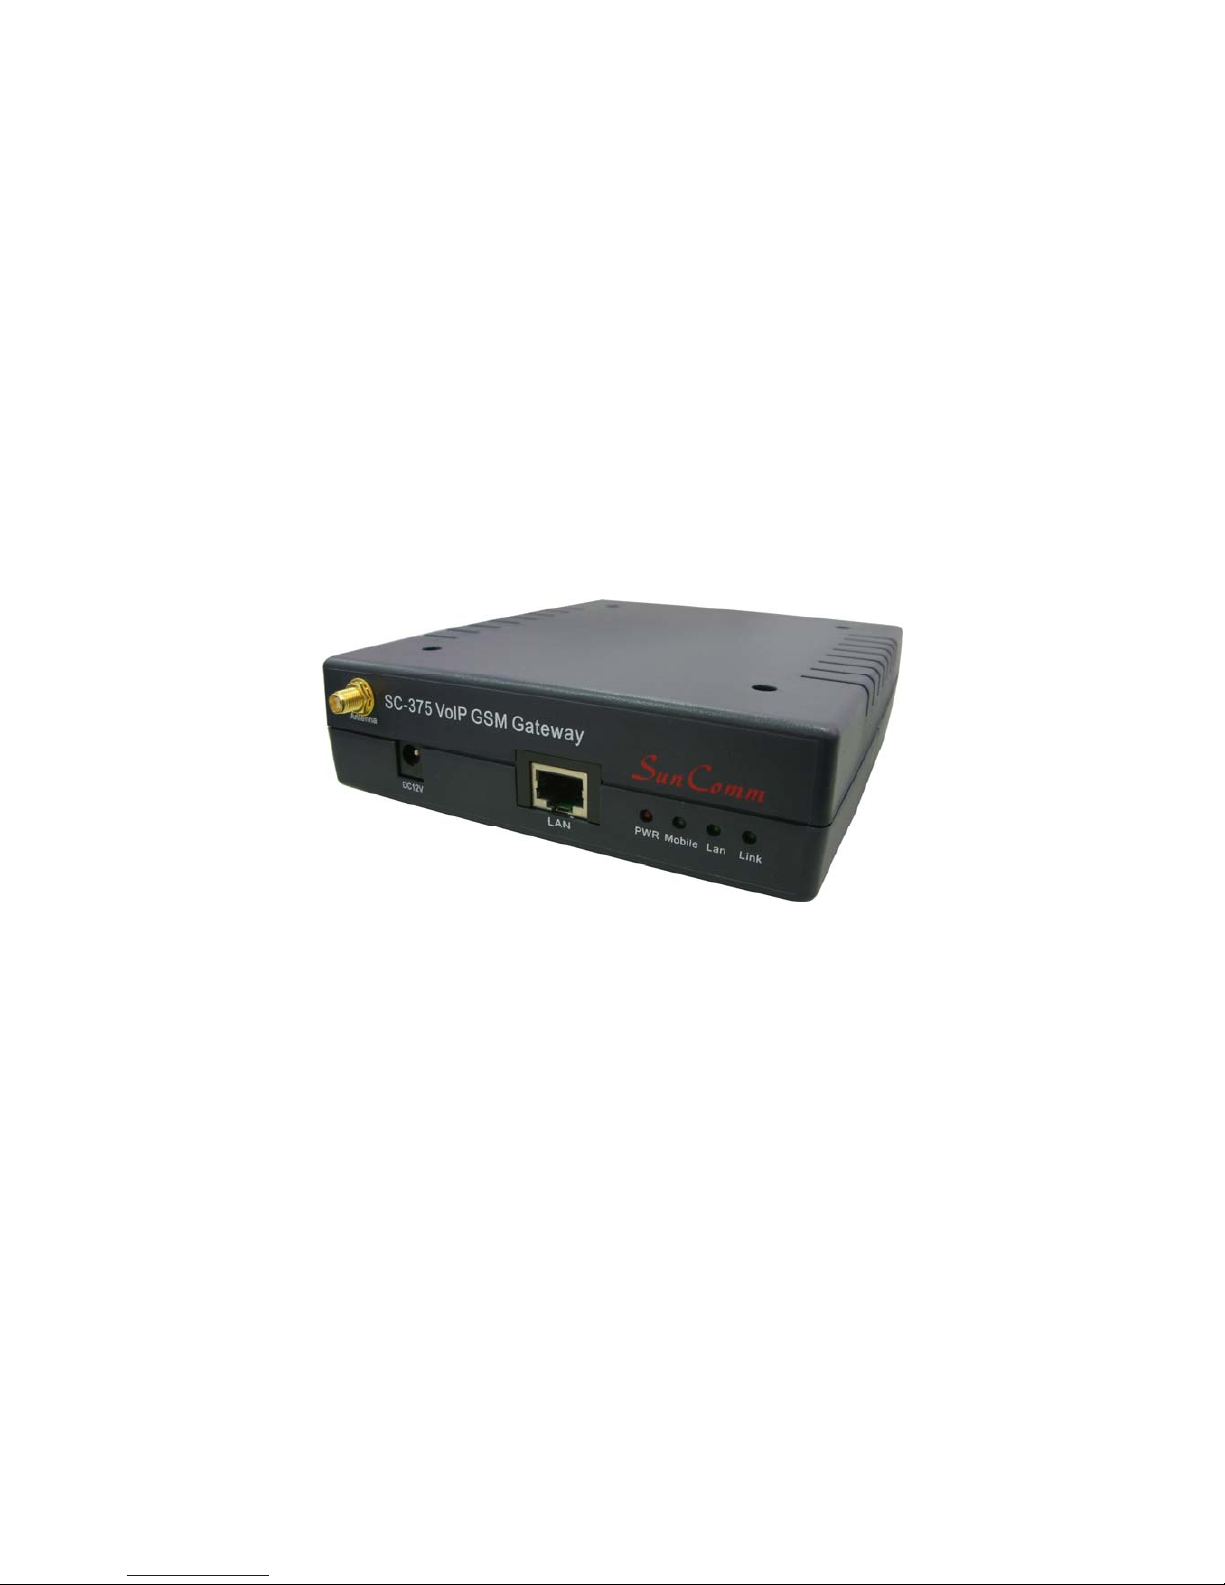
SunComm
SC-375
(Nov., 2007 Edition)
User’s Manual
Page 2

【Content】
1. INTRODUCTION................................................................................................................1
2. FUNCTIONS ........................................................................................................................ 1
3. THE CONTENTS IN PACKAGE...................................................................................... 2
4. DIMENSION AND PANEL DESCRIPTION ................................................................... 3
5. ACCESSORY ATTACHMENT......................................................................................... 4
6. SETTING AND MANAGING VIA WEB PAGE..............................................................5
7. SYSTEM INFORMATION................................................................................................. 5
8. ROUTE.................................................................................................................................. 6
9. MOBILE .............................................................................................................................12
10. NETWORK.......................................................................................................................17
11. SIP SETTING...................................................................................................................20
12. NAT TRANS.....................................................................................................................30
13.SYSTEM AUTH................................................................................................................31
14.SAVE CHANGE................................................................................................................ 32
15.UPDATE ............................................................................................................................33
16.REBOOT............................................................................................................................35
17. SETTING AND CHECKING VIA IVR.........................................................................36
18.SPECIFICATION............................................................................................................. 38
19. APPLICATIONS.............................................................................................................. 39
20. SIMPLE STEPS ............................................................................................................... 40
21. APPENDIX: SETUP SC-375 WITH ASTERISK.........................................................41
22.HOW TO SETUP ASTERISK TO RECEIVE CALLER ID FROM ..........................47
Page 3

-1-
1. Introduction
SC-375 series products provide you the best connect solution
for heterogeneous network(including:WLAN、GSM or PSTN)
You may use a SIP-protocol VoIP phone or software to connect to
the SC-375, then reach this call to the mobile network, and vice
versa. With multiple sets of SC-375, you may even build an
international call network.
2. Functions
2.1 VoIP (SIP)-GSM conversion.
2.2 VoIP (SIP)-CDMA conversion.
2.3 Voice response for setting and status enquiring. (Dial in GSM
numbers of SC-375 to get voice information or to operate.)
2.4 50 sets of LAN->MOBILE routing, and 50 sets of
MOBILE->LAN routing.
2.5 Series connections to save bills.
2.6 Standard SIP (RFC2543, RFC3261) protocol to communicate
with other gateways or PC.
2.7 settings and managing via web page
Page 4
-2-
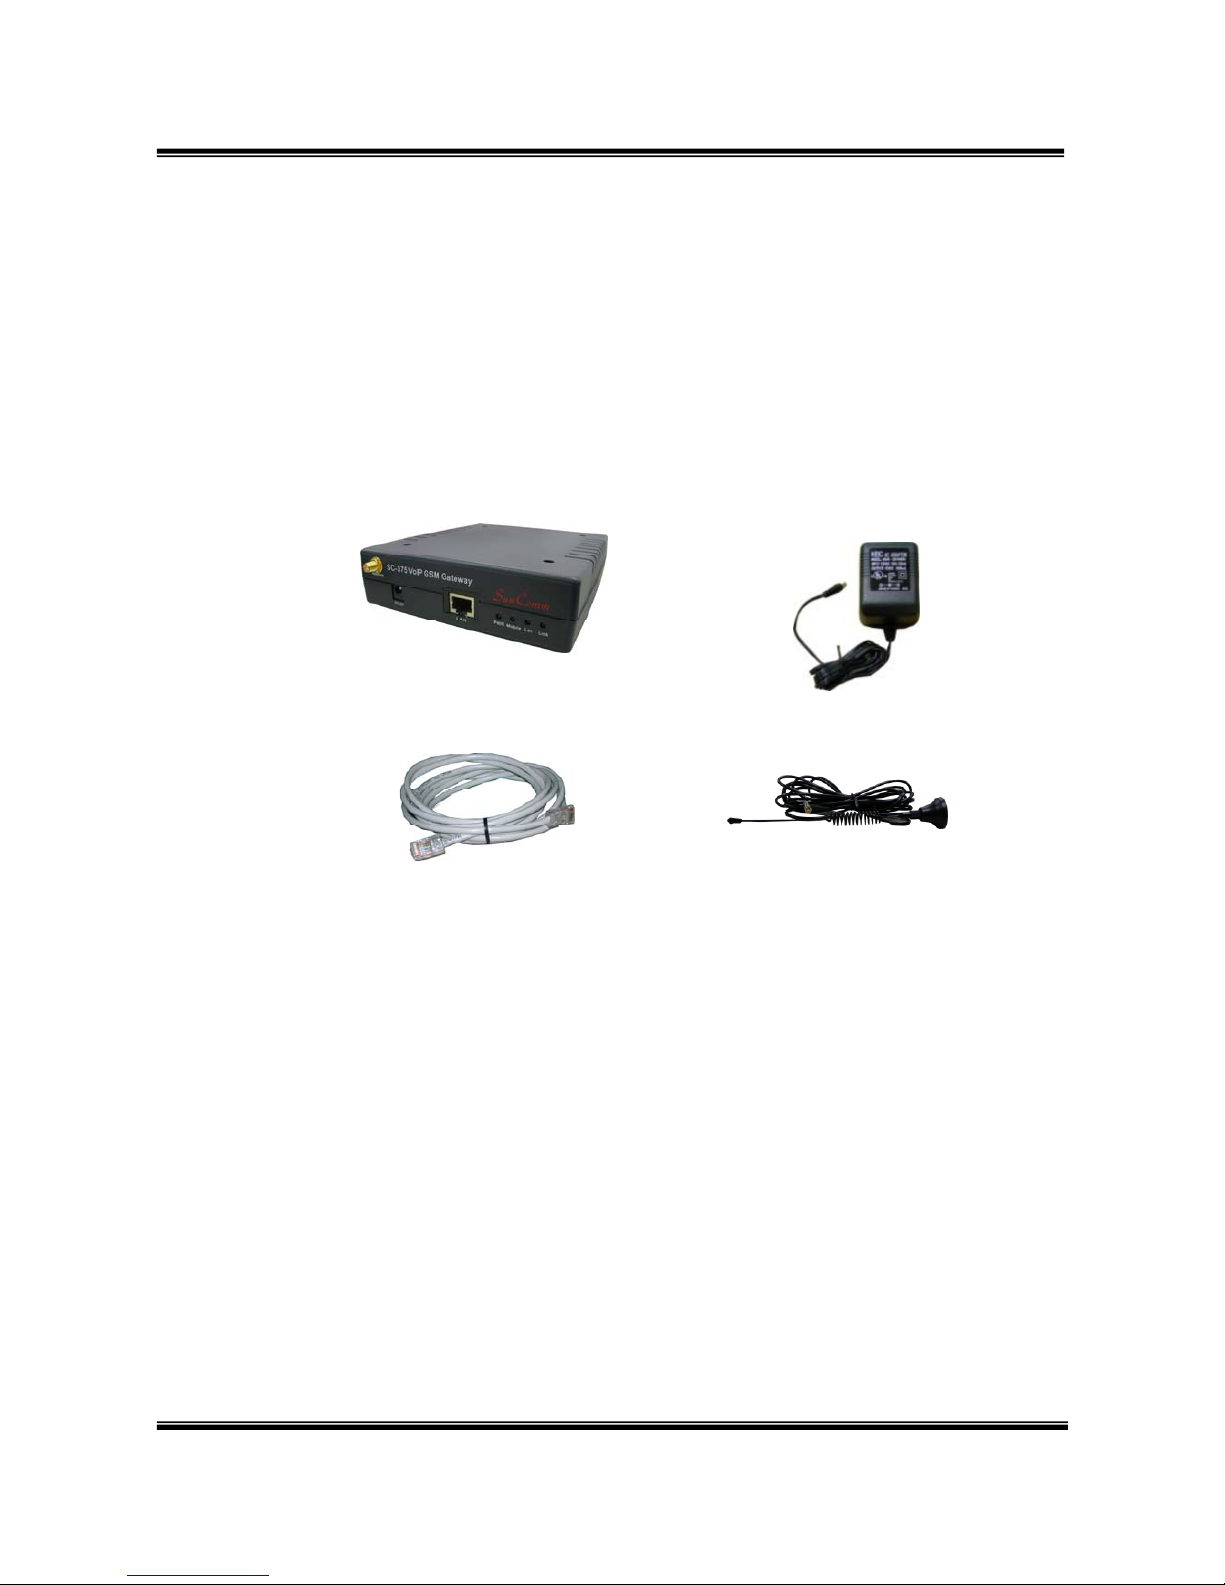
3. The contents in package
3.1 SC-375 main body
3.2 AC-DC Adaptor (110V AC – 12V DC or 220V AC – 12V DC)
3.3 Network cable
3.4 Antenna
3.5 User’s Manual
When you receive SC-375 package and find it is damaged or
incorrect, please contact your vendor.
(3.1)
(3.2)
(3.4)
(3.3)
Page 5
-3-
4. Dimension and Panel description
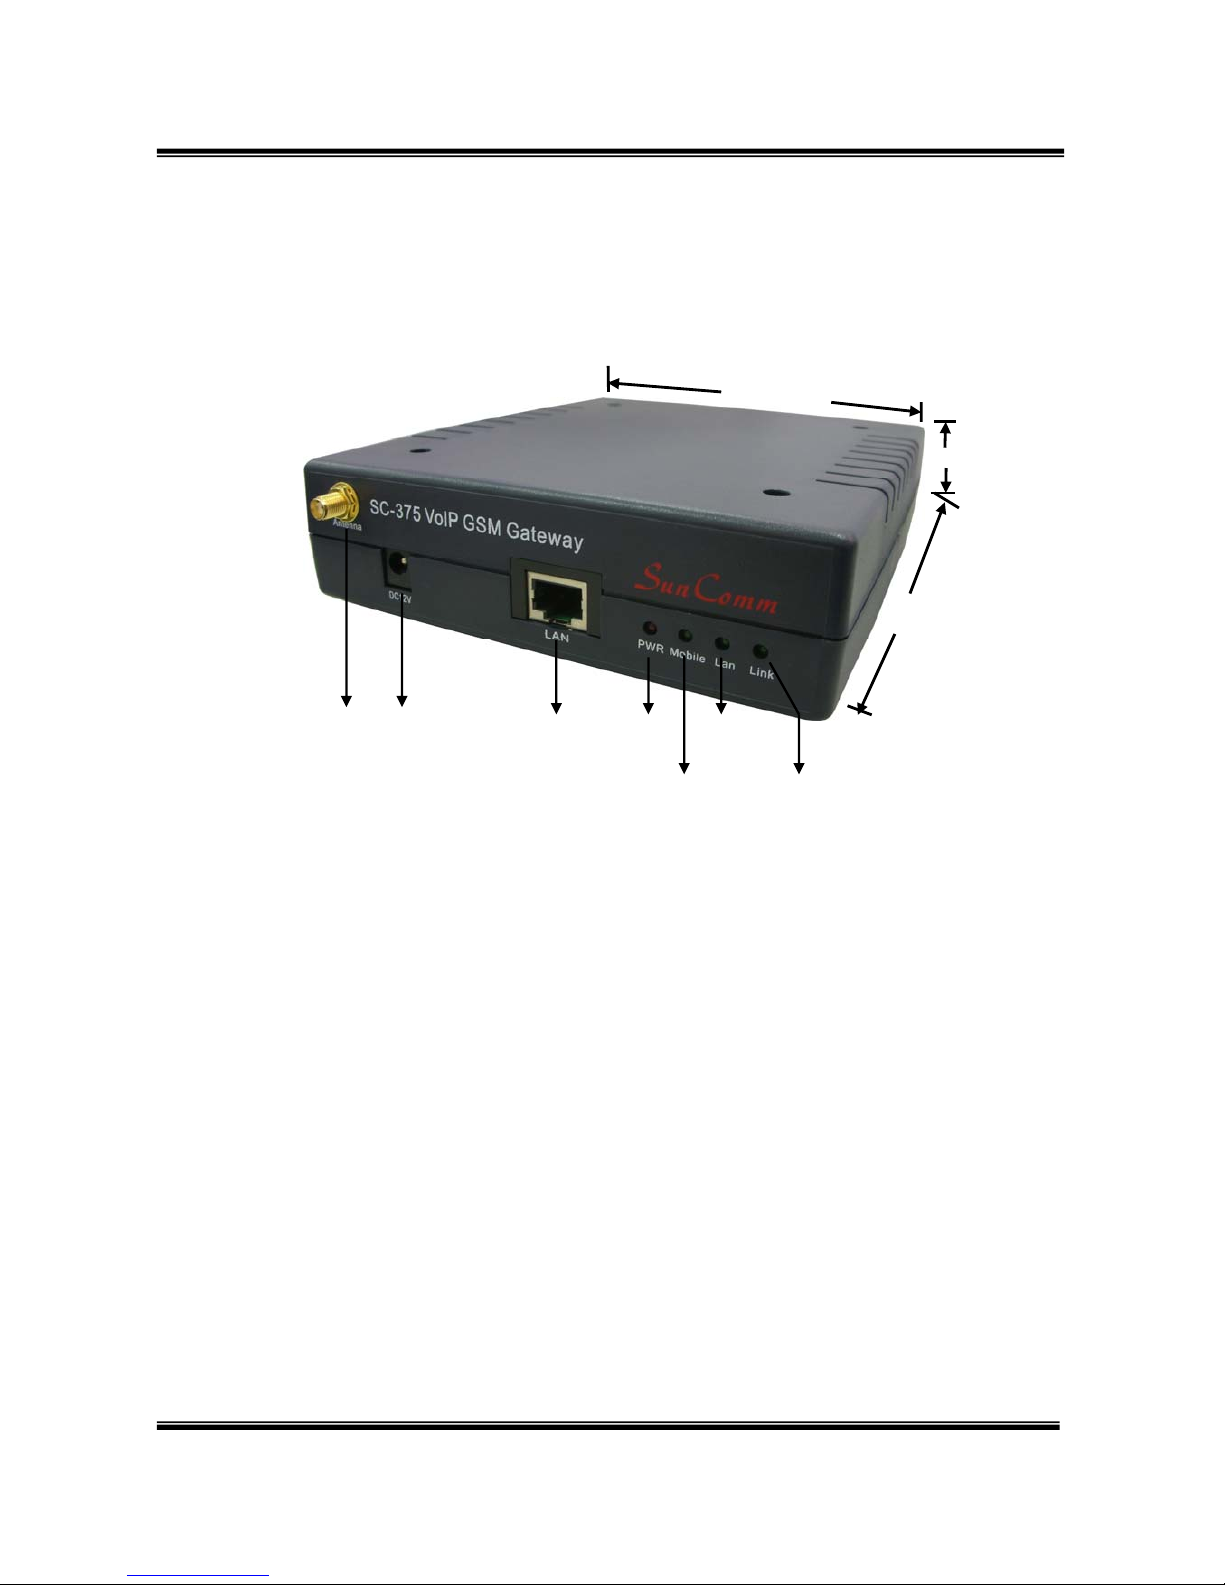
4.1 Antenna:Antenna connector.
4.2 DC 12V:Power socket.
4.3 LAN: Standard RJ-45 socket, connecting to Hub circuit.
4.4 PWR: Power indicator light, red light. Light is on when system’s
power supply is normal.
4.5 MOBILE: GSM indicator light, green light. Light flashes when
GSM status is normal; light turns on constantly when GSM is
called.
4.6 LAN: LAN indicator light, green light. Light flashes when Lan is
called; light turns off when GSM answers.
4.7 LINK: Link indicator light, green light. Light is on when network
is connected correctly.
(4.1) (4.2) (4.3) (4.4) (4.6)
(4.5) (4.7)
14.5cm
17cm
4.1
cm
Page 6
-4-
5. Accessory attachment
5.1 Connect the network cable both to your Hub and to LAN socket
of SC-375.
5.2 Connect the antenna and place it in a good receiving location
(not too close to the device).
5.3 Insert a SIM card into back of SC-375.
5.4 Plug the adapter in DC 12V socket and PWR socket. The PWR
light should turn red at the moment.
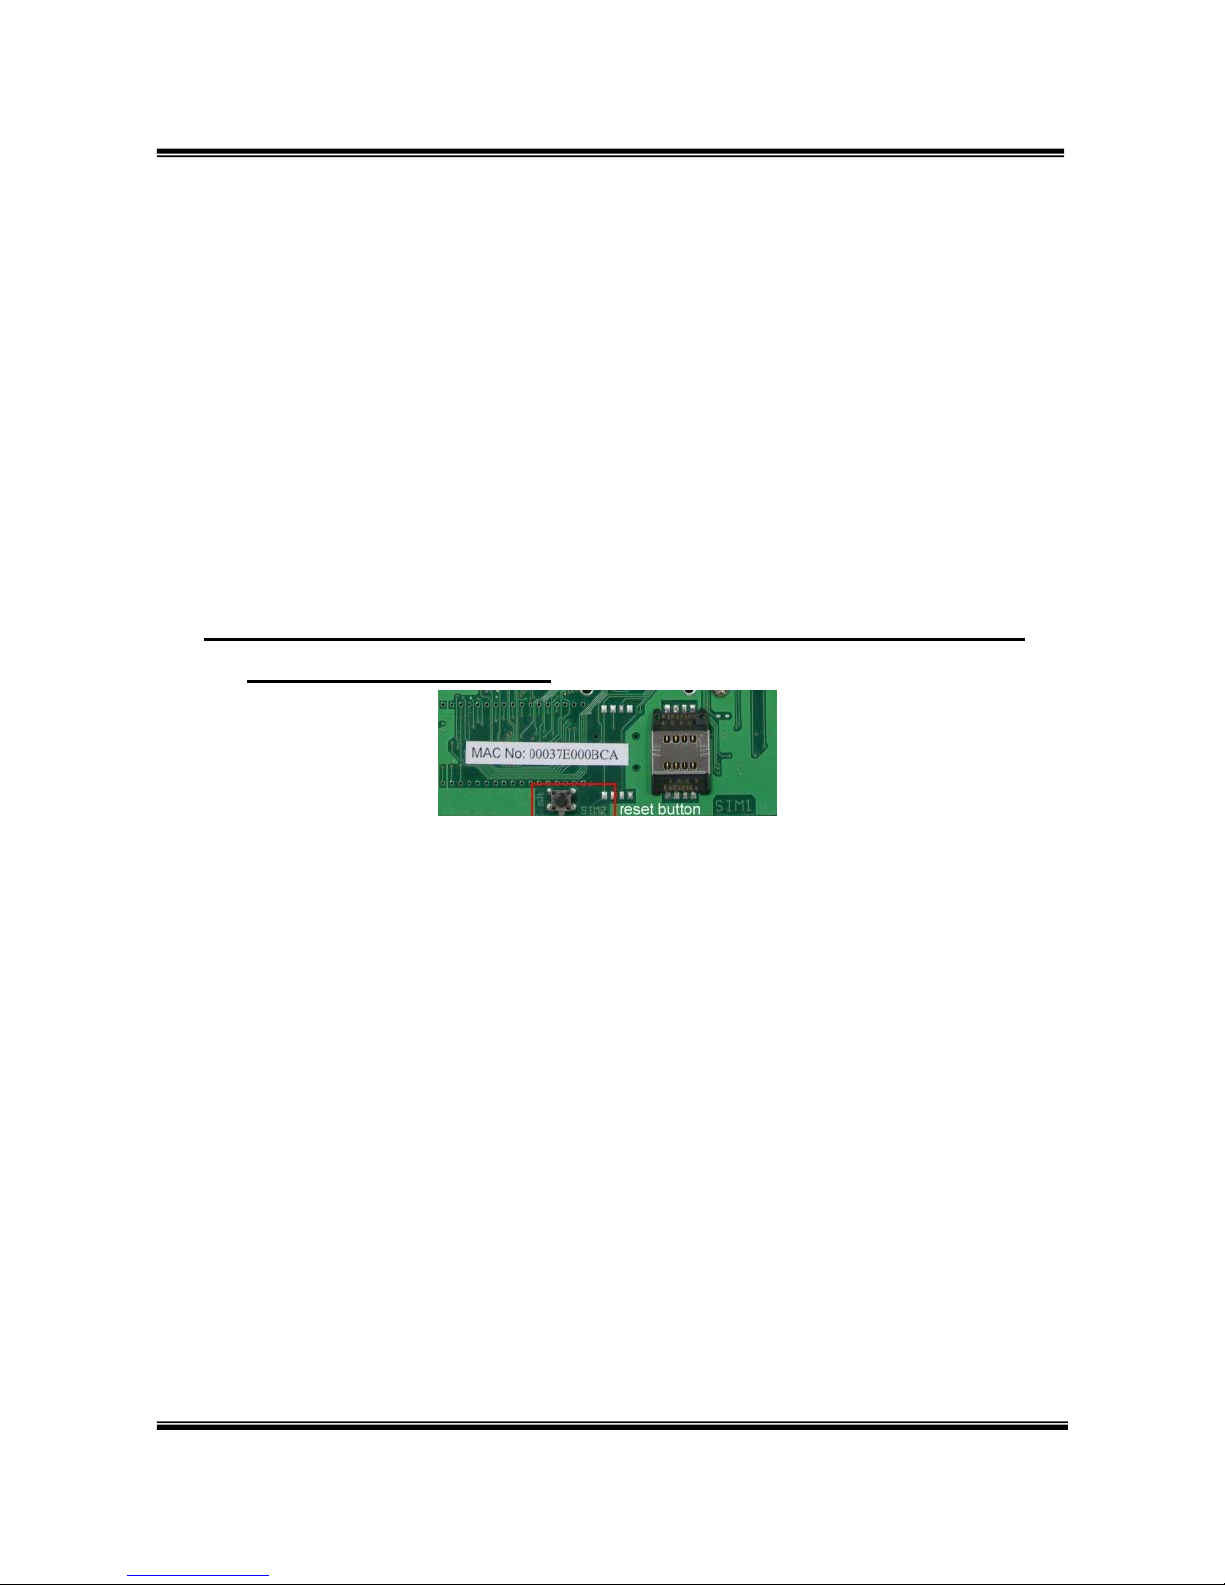
5.5 Click reset button 3 sec. SC-375 will restore default IP.
Other setting as usual.
Page 7
-5-
6. Setting and managing via web page
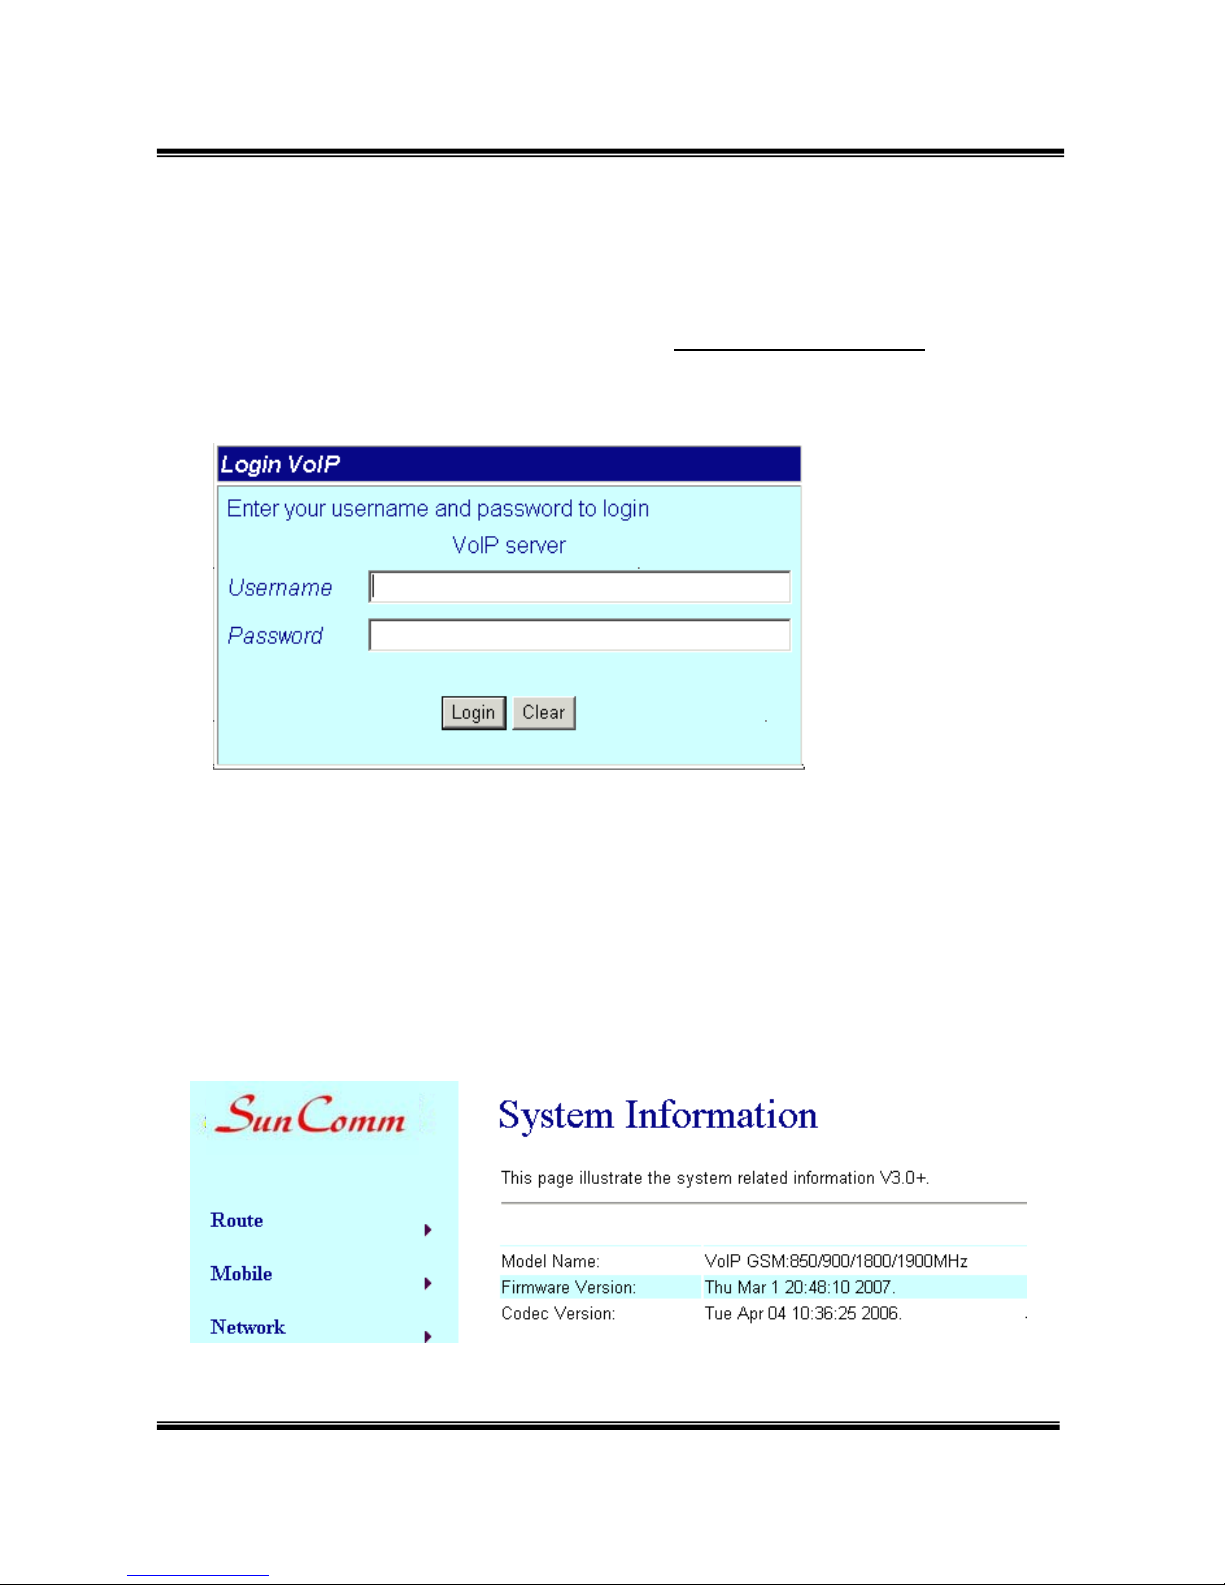
The default IP address of SC-375 is http://192.168.0.100. Before
accessing the web page, please confirm this address is available
in your network.
Enter the default username and password to login.
Default username: voip
Default password: 1234
7. System Information.
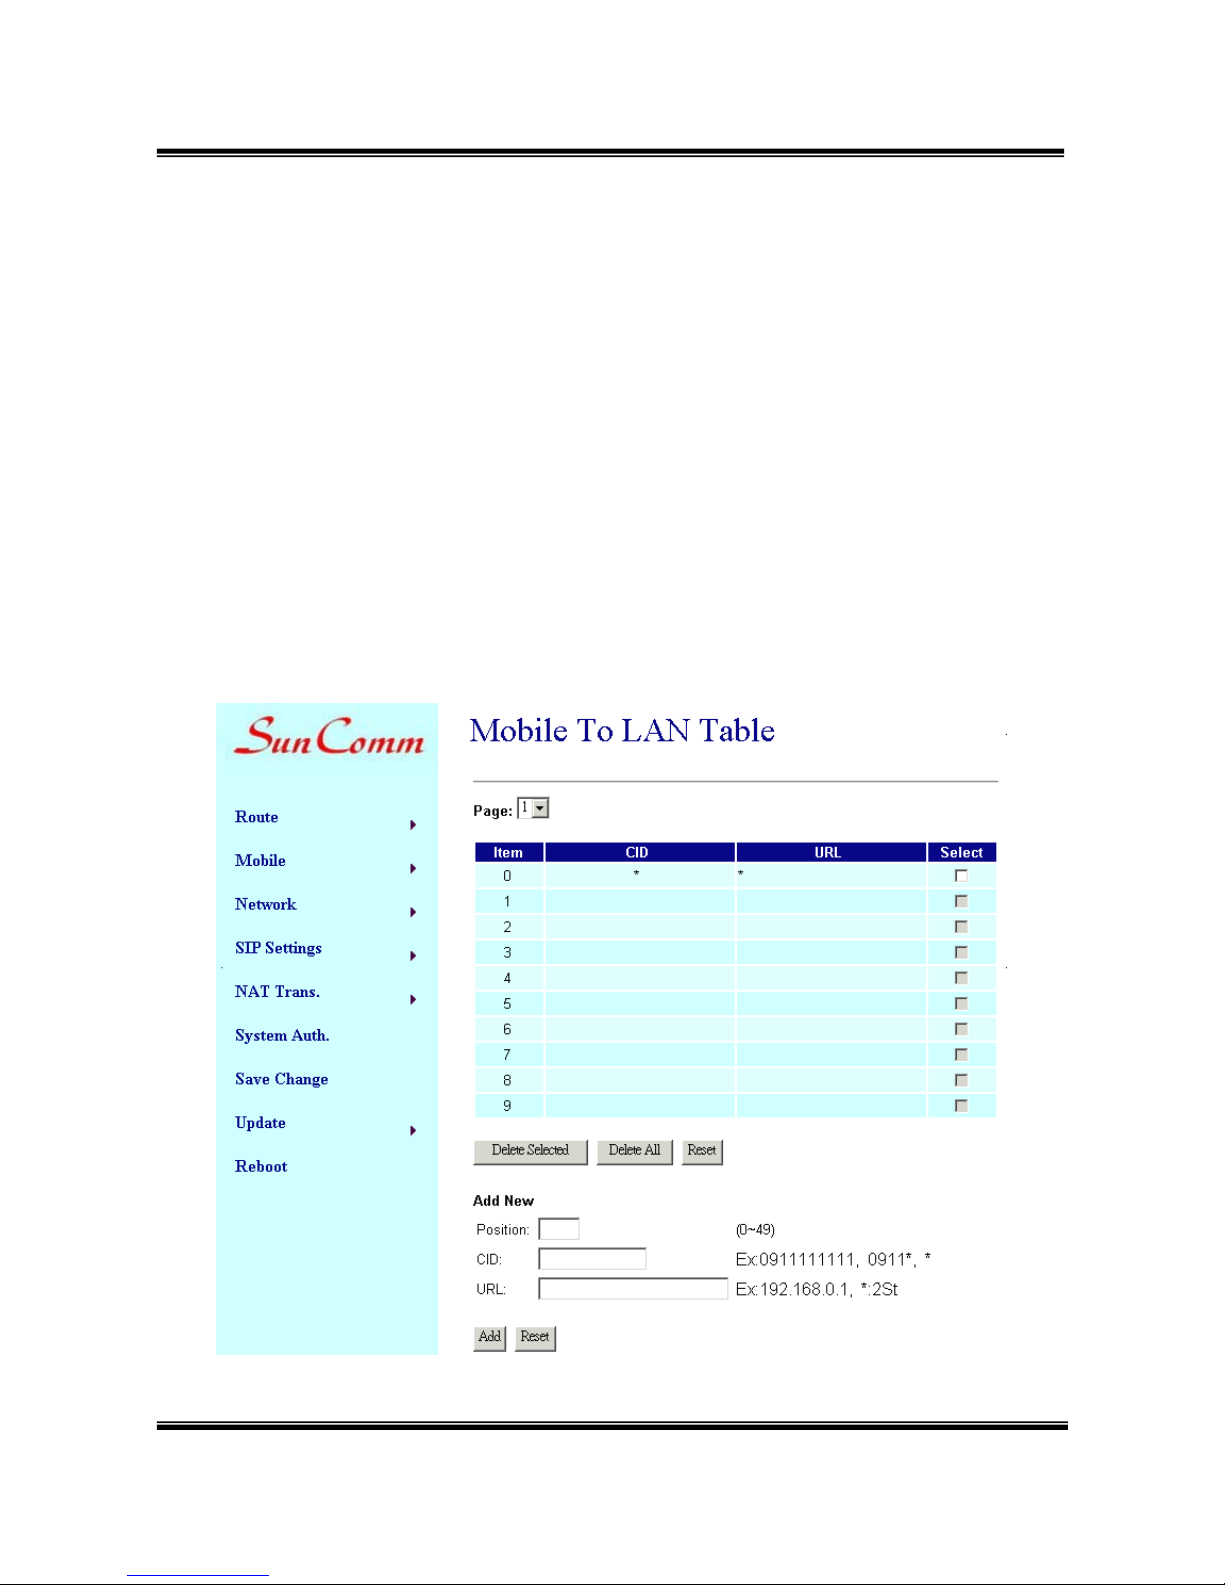
7.1 After login, you could see the system information such as: model
name, firmware version, codec version name, etc. in this page.
Page 8
-6-
7.2 You could also see the setting table in the left side. Please click on
the option you would like to set. The setting methods are indicated as
the following chapters, please input the value or select the item
according to your situation.
Note:
Please remember to save change whenever you submit any setting.
Click “Save Change” then “Save” button, the system will restart and
make the changed function/setting operative.
8. Route
8.1 Route/ Mobile to LAN Settings
In this page: Mobile To Lan Table, you could set the routing rules to
transfer the calls incoming from MOBILE to LAN. Maximum 50 sets.
Page 9

-7-
When the GSM number of the SC-375 is called, this device transfers the
call to URL according to the caller ID of the incoming call.
8.1.1 CID: caller ID, the numbers of incoming call
You could set the CID as the following formats:
(1) The complete number, e.g. 0911111111
(2) The prefix part plus *, e.g. 0911*. This format means any number
starting with 0911 will be accepted to transfer.
(3) *, this means any incoming call is accepted to transfer.
(4) N, this means the incoming call without showing its CID is accepted
to transfer.
Please note the priority of the routing rules; the CID with more digits
gets the priority.
8.1.2 URL:The IP address of destination
You could set the URL as the following formats:
(1) The complete IP address, e.g. 192.168.0.101
(2) The proxy extension numbers
(3) The phone numbers.
Note: If the device has registered at proxy server/Asterisk, you
can enter any destination phone number. Also note that
in the proxy server/Asterisk, you need to set the route of
destination phone number.
(4) Leave it blank or ‘N’, this mean to refuse to transfer.
(5) *, this means to transfer via 2-stage-dialing. The call will be
answered with a prompt dial tone for the caller to press the IP
address, proxy extension, or any phone number as destination.
Page 10

-8-
The caller press the IP address on the phone keys: 192*168*0*101#
as 192.168.0.101
8.1.3 Example of Mobile to Lan setting:
(1) Mobile to Lan: 0932*, 0911123456
When the GSM numbers of the device is called, if the caller’s prefix
numbers are 0932,
SC-375 transfers the call to 0911123456, then
0911123456 rings (while available).
Precondition:
a.
SC-375 has registered at proxy server/Asterisk
b. The proxy server/Asterisk has the route of “09”
(2) Mobile to Lan: *, *
Any incoming call gets a prompt dial tone; so the caller can enter
any IP address, sip extension, or phone number.
Precondition:
a. SIP extension or phone number needs to register at SIP Proxy
Server or Asterisk.
b. Phone number, SIP Proxy Server or Asterisk needs to set the
route of destination phone number.
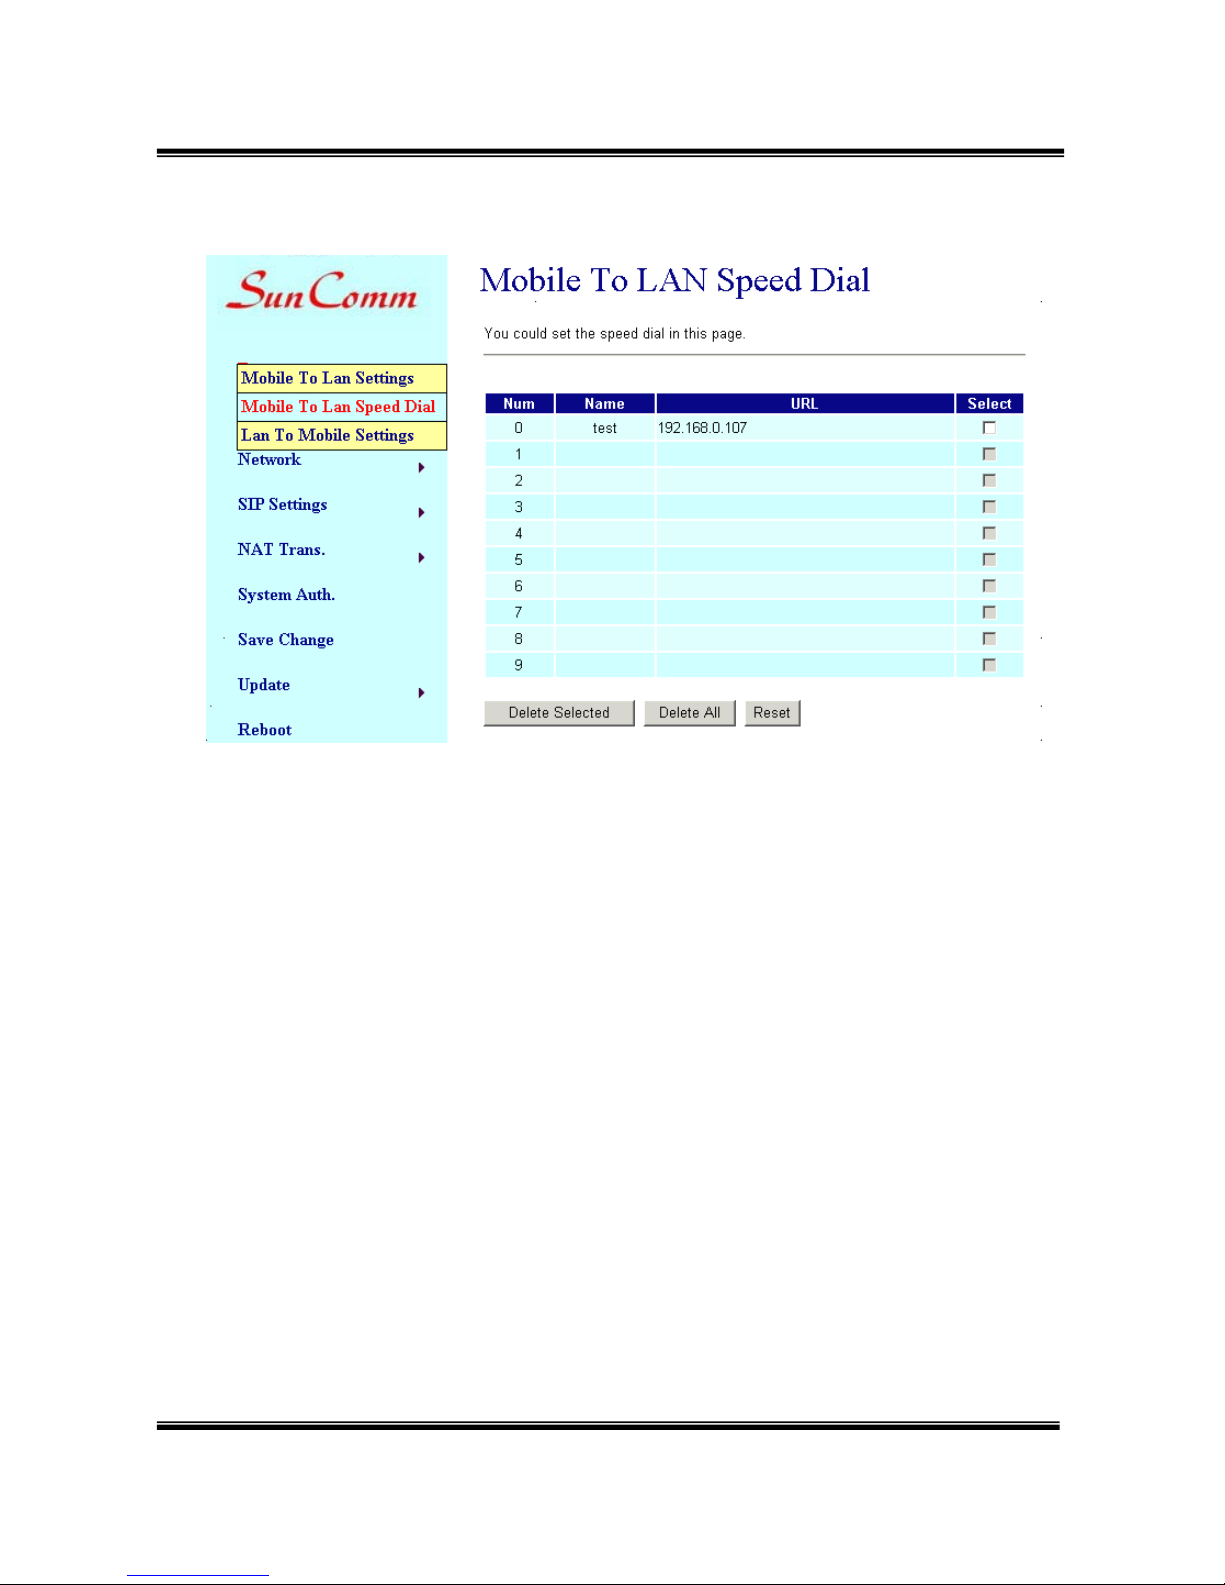
8.2 Route/ Mobile to LAN Speed Dial Settings
When you set both Mobile to LAN Speed Dial Settings and Mobile to
LAN settings at the same time, Mobile to LAN Speed Dial Settings
gets higher priority. Mobile to Lan setting will be not available.
Page 11
-9-
The call is answered with a prompt dial tone for the caller to press the
“Num”, and then the device connects the “URL” as destination.
Example: after you call the GSM number of the device and hear a dial
tone, you press 0, then the lan phone of IP address:
192.168.0.107 rings.
Page 12
-10-
8.3 Route/ LAN to Mobile Settings
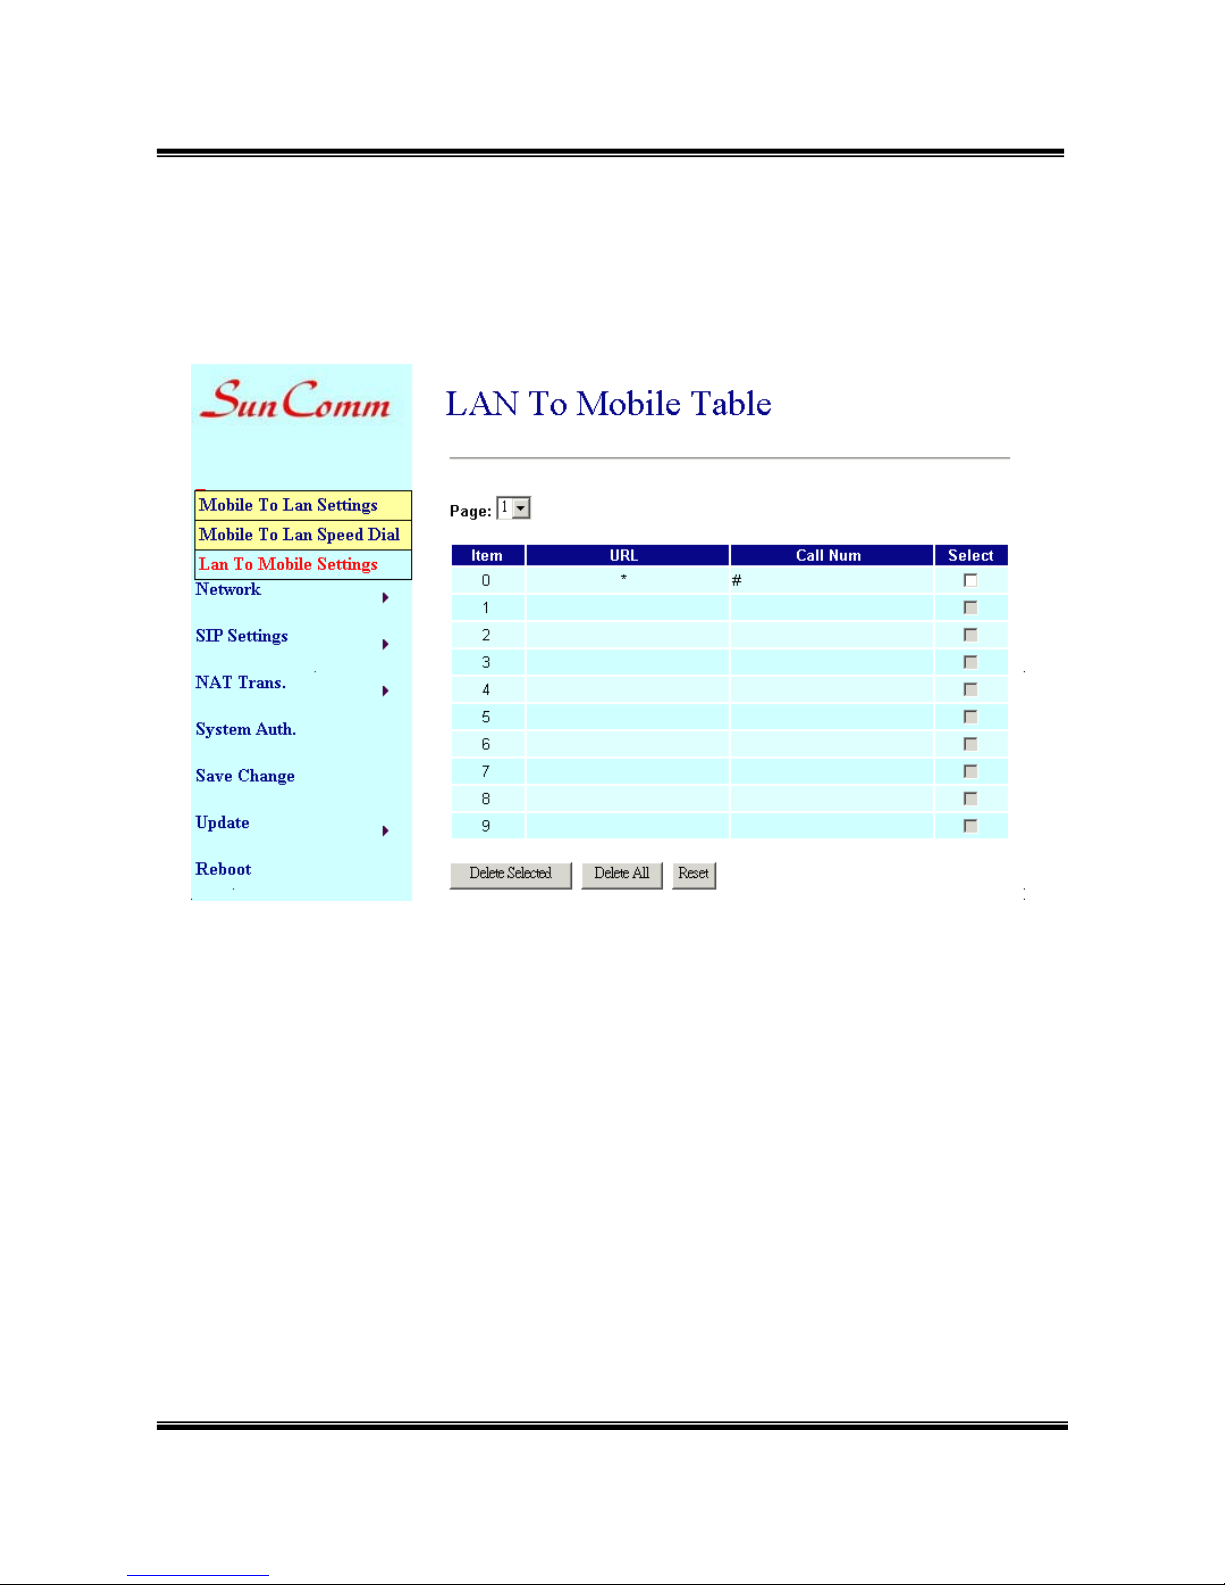
In this page: Lan To Mobile able, you could set the routing rules to
transfer the calls incoming from Lan to Mobile. Maximum 50 sets.
When the Lan of the
SC-375 is called, this device transfers the call to
Call Num according to the URL of the incoming call.
8.3.1 URL: The IP address or proxy extension numbers of the incoming
call.
You could set the URL as the following formats:
(1) The complete IP address, e.g. 192.168.0.101
(2) The proxy extension numbers, e.g. 103
(3) Part of an IP address plus *, e.g. 192.168.0.*. This means the IP
address starting with 192.168.0 would be accepted to transfer,
(4)
Part of the proxy extension numbers plus, e.g. 10*. This means the
extension numbers starting with 10 would be accepted to transfer.
Page 13

-11-
8.3.2 Call Num: the phone numbers of destination.
You could set the Call Num as the following formats:
(1) The complete number, e.g. 0911111111
(2)
*, this means to transfer via 2-stage-dialing. The call will be
answered with a prompt dial tone for the caller to press the destination
phone numbers, e.g. 0911111111
(3)
#, this allow the caller with lan phone dial directly the destination
numbers.
Precondition:
(1)
SC-375 and incoming lan Phone are both registered at proxy
server or Asterisk.
(2) Proxy server/asterisk has set the routing rules to assign
specific prefix of numbers to be transferred from
SC-375.
(3) Lan to Mobile routing sets: *, #
Usage: You could dial on your lan phone call any destination
number with prefix of “09”. When your lan phone and
SC-375 had registered and “09” prefix is setted the routing
rules at proxy server or Asterisk.
(4)
#['d'n]['a'ppp], this means to do the above routing, and to modify
the numbers.
Note: 'd'n means to delete the number of prefix,
'a'ppp means to add 'ppp' prefix.
E.g. #d2a09 means to call the registered numbers via
one-stage-dialing. The numbers are modified to: delete 2 digits of
prefix of the original numbers, then add 09 to be new prefix of the
destination numbers.
Page 14
-12-
9. Mobile
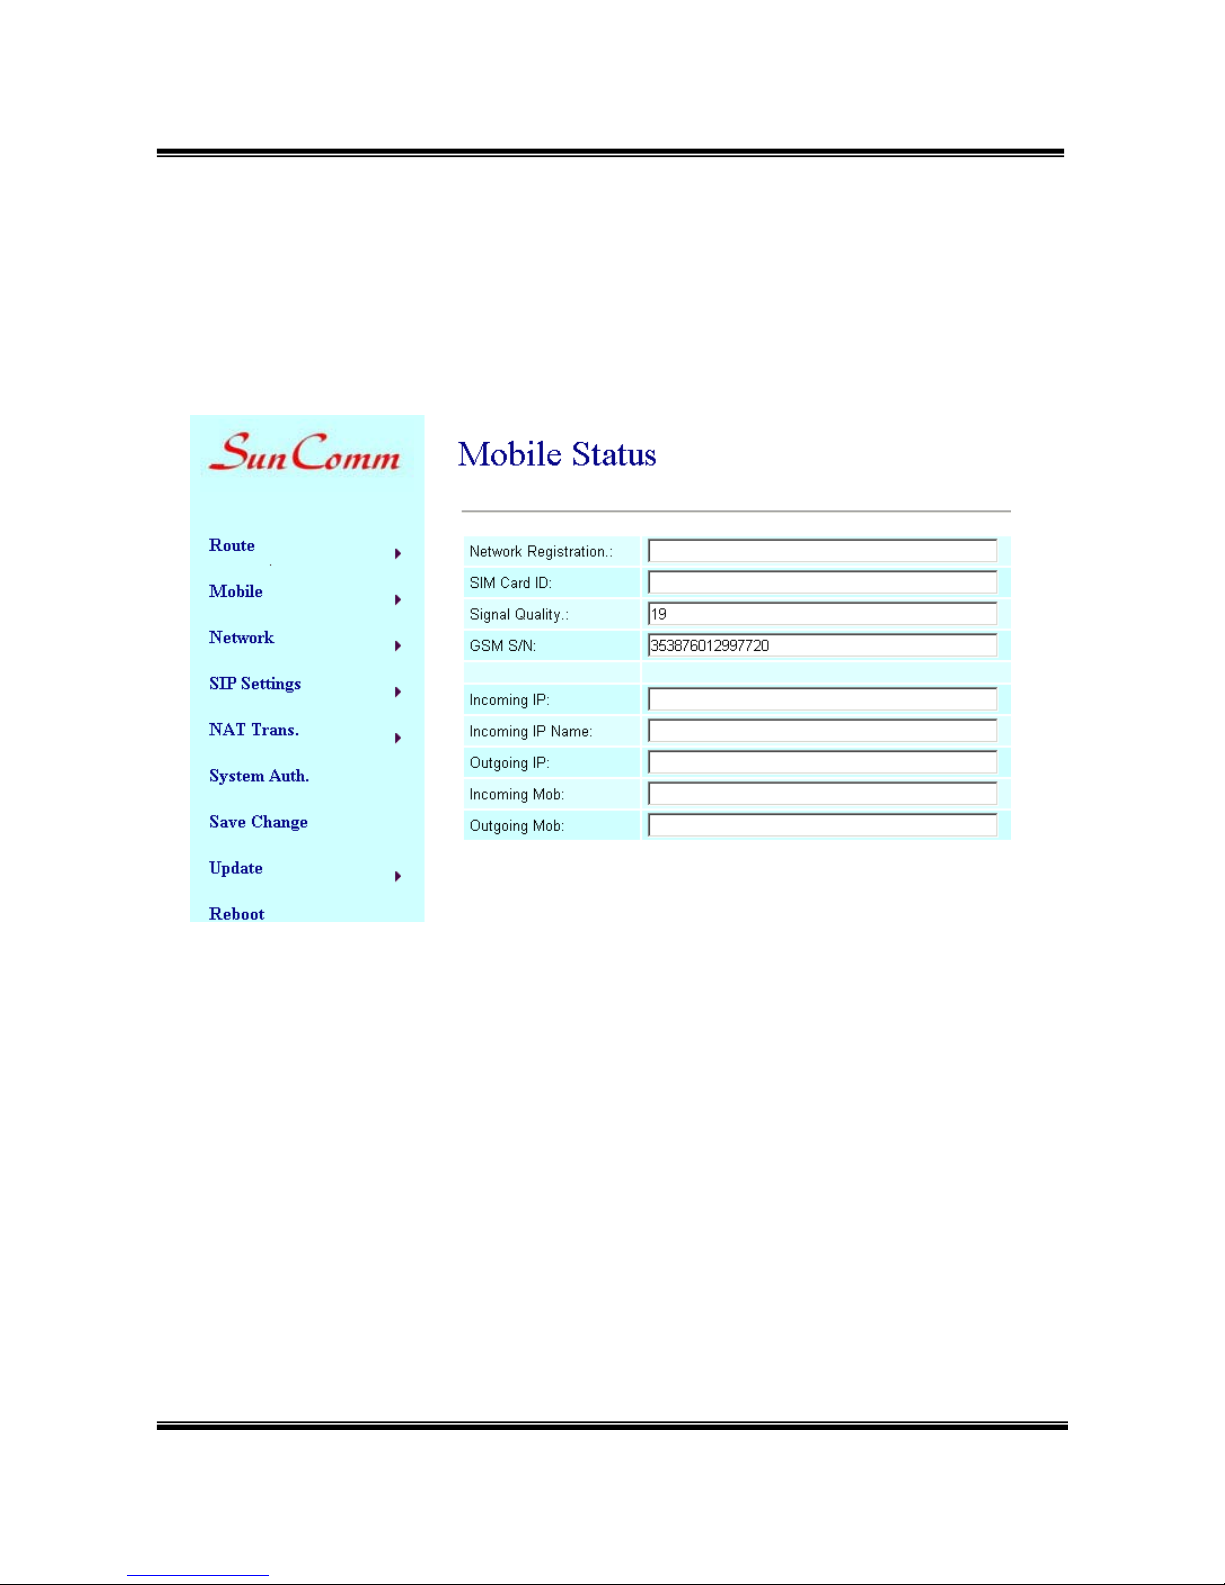
9.1 Mobile/ Mobile Status
In this page: Mobile Status, you could get the information of your GSM
network and the latest operation.
(1)Network Registration:The telecom carrier which the SIM card been
registered.
(2)SIM Card ID:SIM card ID.
(3)Signal Quality:Signal quality.
(4)GSM S/N : IMEI Number
(5)Incoming IP:The IP address of the last incoming call from LAN.
(6)Incoming IP Name: proxy server name
(7)Outgoing IP:The IP address of the last outgoing call to LAN.
(8)Incoming Mob:The caller ID of the last incoming call from MOBILE.
(9)Outgoing Mob:The called number of the last outgoing call to MOBILE.
Page 15
-13-
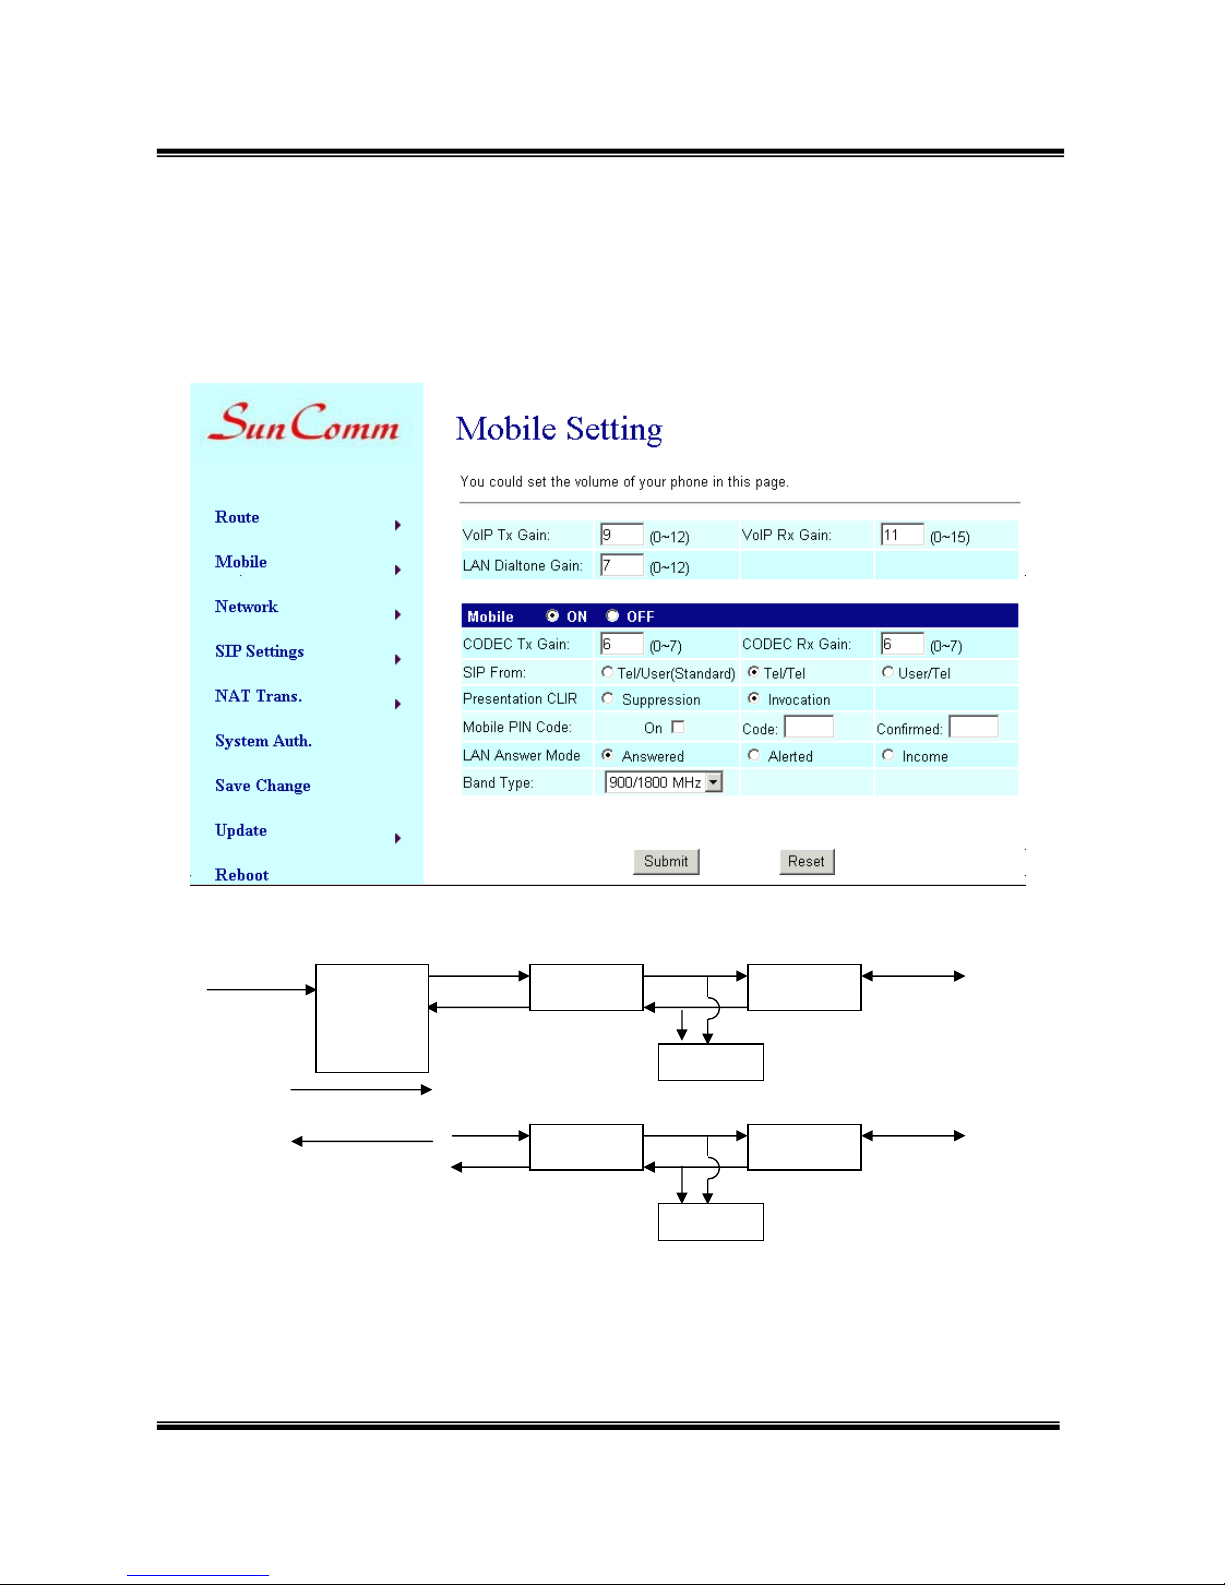
9.2 Mobile/ Mobile Setting
In this page: Mobile setting, you could adjust the parameter and click on
the option to fit your need. You could leave those default value before
you had tried the complete operation of this device.
(3)LAN Dialtone Gain: DTMF Reciver is not good,you can adjust gain
down.
(1)
(2)
(3) (5) (6)
(7) (8) (9)
(10)
(11)
(4)
GSM VoIP Codec
LAN
(6)Rx
(5) Tx
DTMF
(1)VoIP Tx Gain
(2) VoIP Rx Gain
GSM Codec
Rx
Tx
DTMF
Mobile 2:
Page 16

-14-
(4) ON/Off: If you use this channel,please click on. Otherwise,please
click off.
(5)CODEC Tx Gain: as above
(6)CODEC Rx Gain: as above
(7) SIP From: Caller ID transfer
z Tel/User(Standard): If you need to register to Asterisk and proxy
server,please choose this option. And how to transfer the caller ID
to LAN,please refer 22.How to setup Asterisk to receive Caller ID
from SC-375 (page 43)
SC-375-2 will send the message as follows in the Packet.
From: " caller number " <sip:[email protected]>;tag=51088abb
z Tel/Tel :
SC-375 will send the message as follows in the Packet.
From: "caller number" <sip: caller number @192.168.0.228>;tag=6ac93f7c
※Please note:If you choose this option,please don’t register to
Asterisk and proxy server. Please only fill proxy server ip and
choose Active: on (else field empty) in sip setting/service demain
z User/Tel
SC-375 will send the message as follows in the Packet.
From: " Username " <sip: caller number @192.168.0.228>;tag=7f130947
※If you choose this option,please don’t register to Asterisk and
proxy server. Please only fill proxy server ip,Username and
choose Active: on (else field empty) in sip setting/service
demain
(8)Presentation CLIR : If you need to block the Caller Id for call
termination,please choose Suppression
(9)Mobile PIN Code:If you need to unlock pin code via SC-375,you can
Page 17
-15-
click “On” and enter pin code.
(10)LAN Answer Mode:
Answered : when mobile answer,then connect the call
Alerted : when the mobile is ringing back tone,then connect the call
Income : when lan dial out,then connect soon
(11)Band Type:When you buy Quad band,you need to choose your
GSM frequency
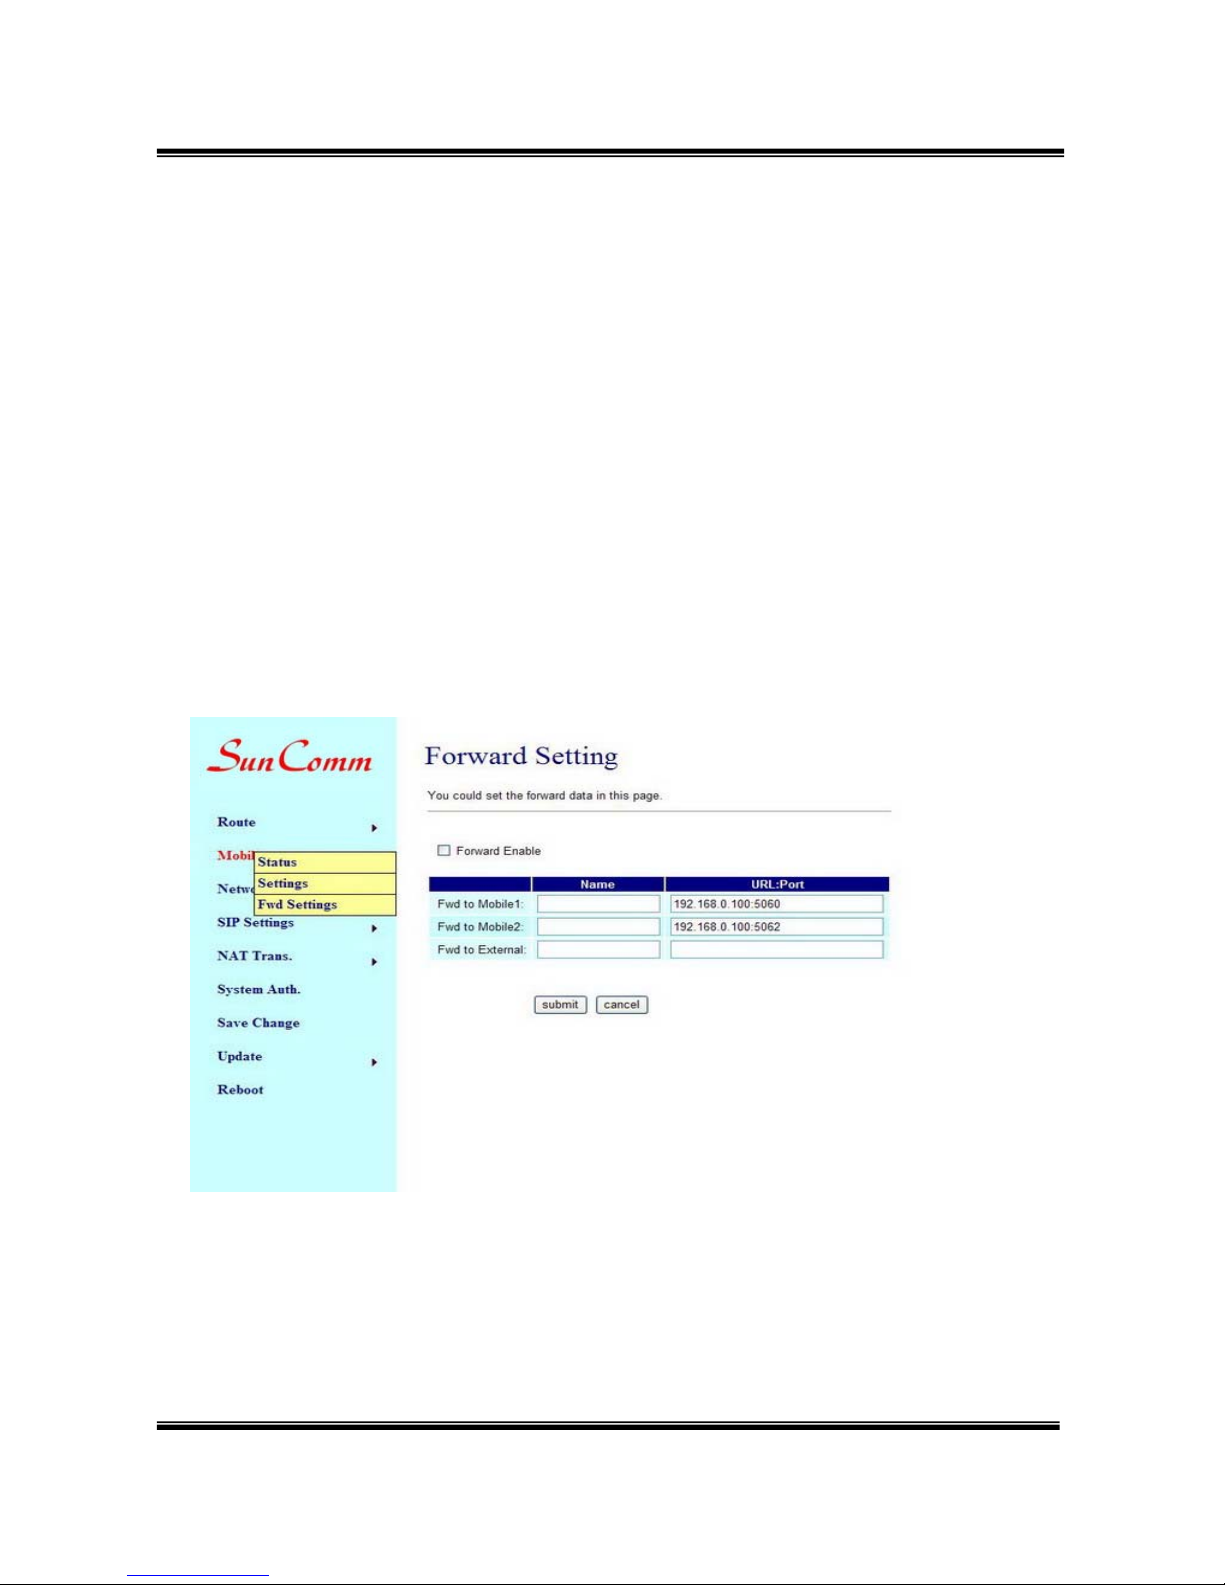
9.3 Mobile / Forward Setting :
When the first route are busying, SIP can transfer phone call to
another free route. When the device are busying, the phone call
can be transfer to another device (external equipments).
* "Forward Enable" is not motivate on Defualt value.
So please, mark "Forward Enable" this blank to motivate this function.
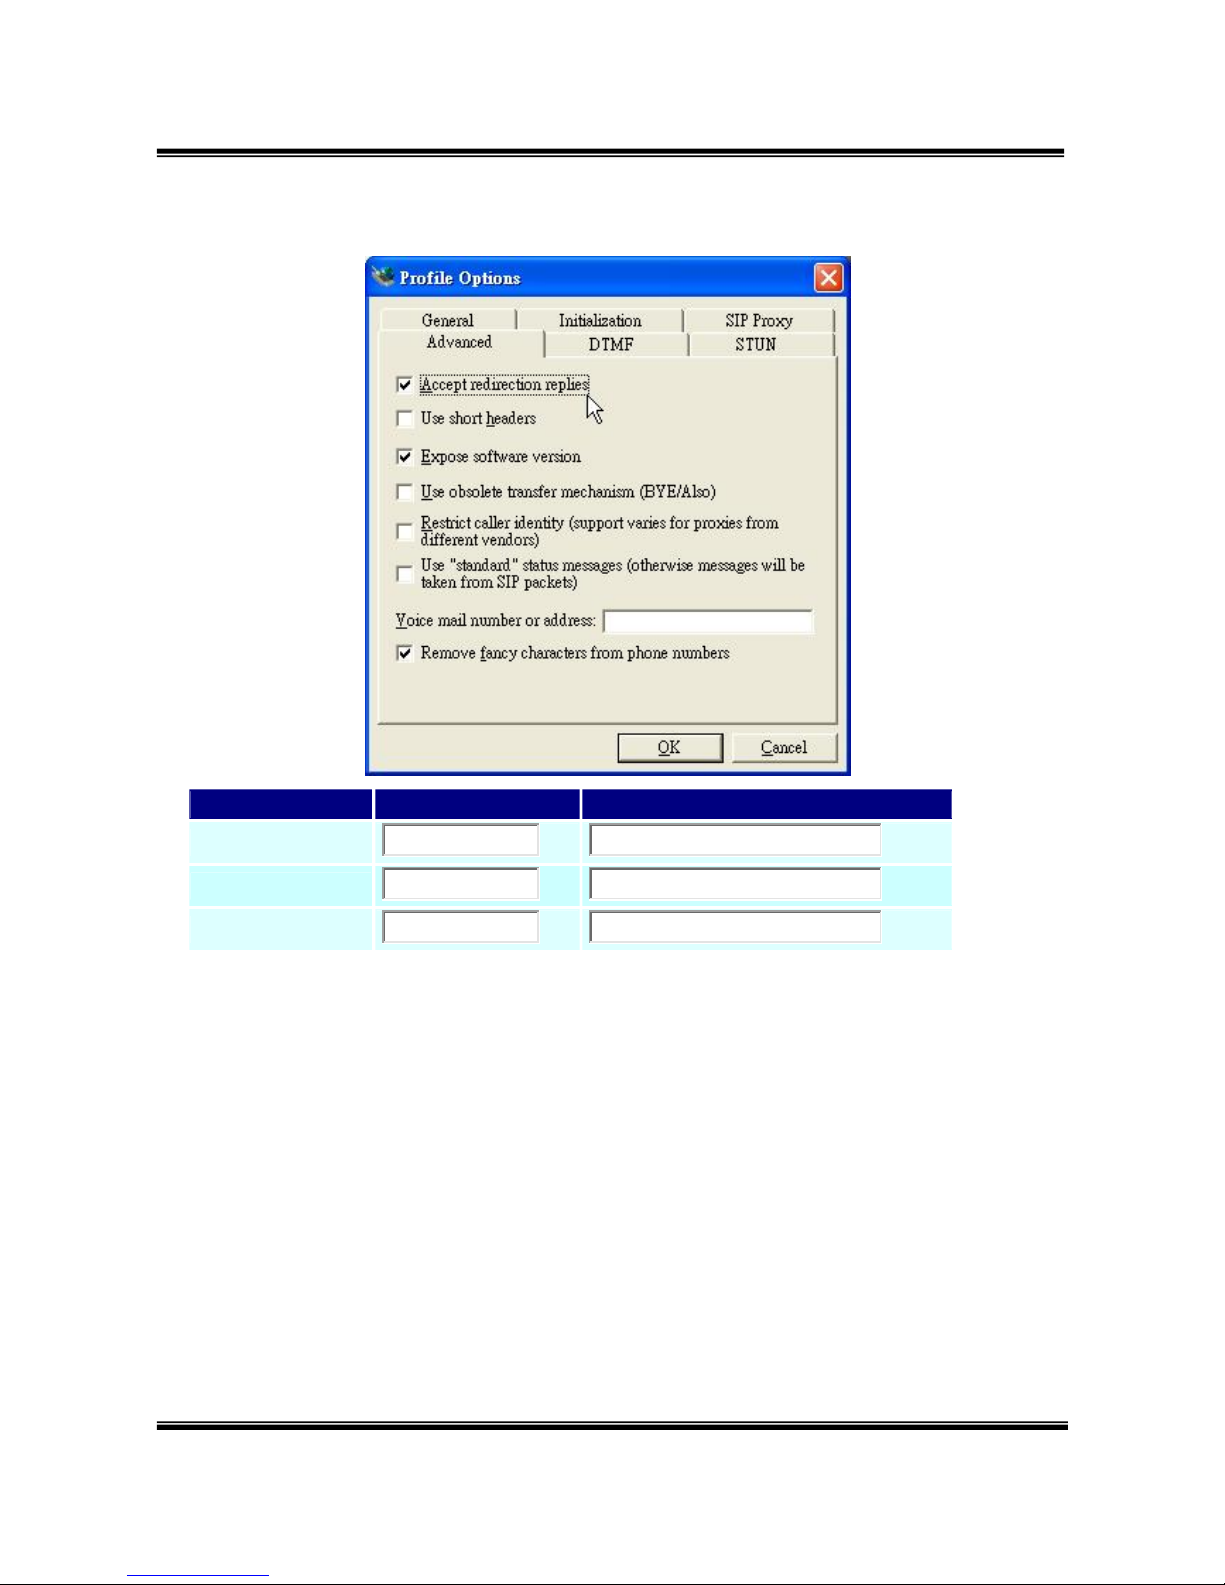
Take SJ Phone for example: Profiles -> Edit -> Advanced -> Accept
redirection replies (Turn on the "Forward Enable", therefore the SJ
Phone can designate a port which are free to use.)
Page 18
-16-
Name URL:Port
Fwd to Mobile1:
192.168.0.100:
5060
Fwd to Mobile2:
192.168.0.100:
5062
Fwd to External:
The Explanation of Picture:
Fwd to Mobile1:192.168.0.100 : 5060, it means when 5062 Port are
busying, SJ Phone can transfer the call to 5060 Port (192.168.0.100).
Fwd to Mobile2:192.168.0.100 : 5062, it means when 5060 Port are
busying, SJ Phone can transfer the call to 5062 Port (192.168.0.100).
z If both 5060 port and 5062 port are busying at same time, you can set
up "Fwd to External", then you can transfer the phone call to another
designate device.
Page 19
-17-
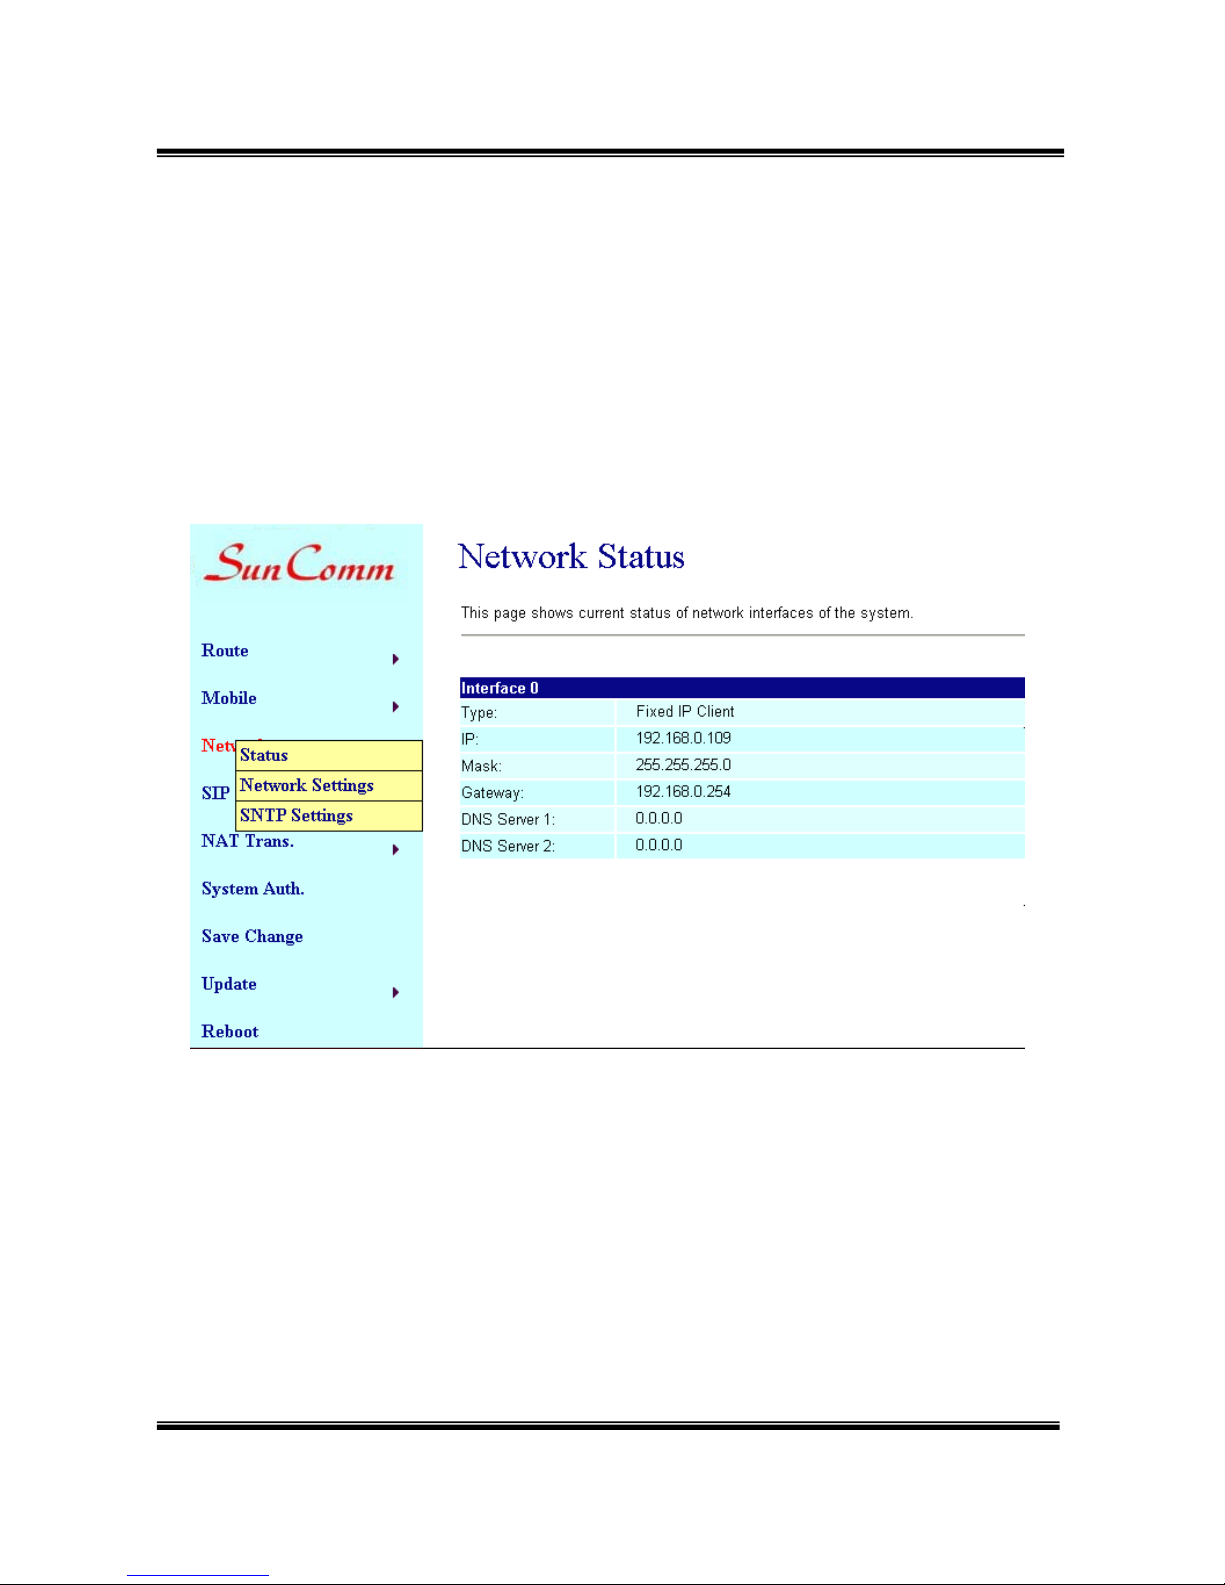
10. Network
In Network, you could check the Network status; configure the WLAN
Settings, LAN Settings and SNTP settings.
10.1 Network/ Status/ Network Status: information of current Network in
this page.
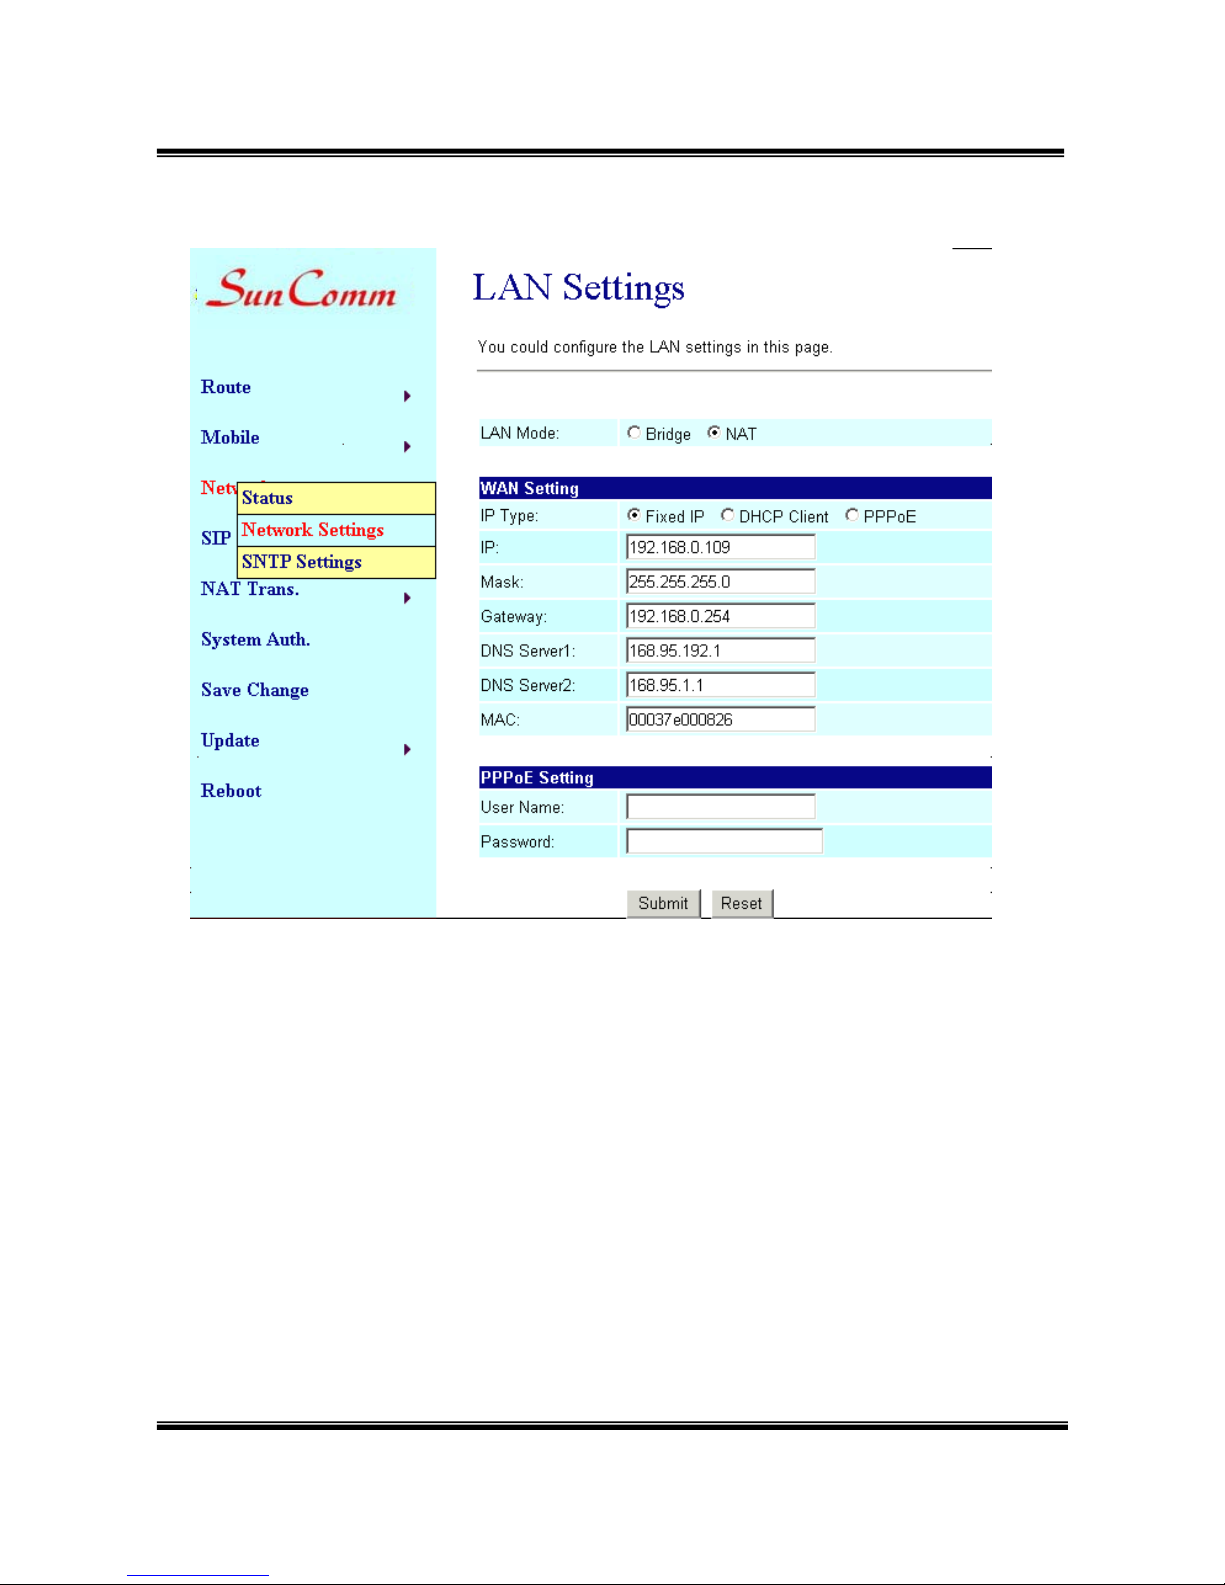
10.2 Network/ Network Settings/ Lan Settings: You can check the
current Network setting in this page.
The default IP is 192.168.0.100; you could change it to any available IP
address, or select different IP type to suit your environment.
Page 20
-18-
(1) LAN Mode: select NAT
(2) Fixed IP: the TCP/IP Configuration item is to setup the WAN port’s
network environment. You may refer to your current network
environment to configure the system properly.
(3) DHCP client: you could refer to your current network environment to
configure the system properly
(4) PPPoE: If you have the PPPoE account from your Service Provider,
please input the Username and the Password correctly.
(5) After you input or modify the value, click the Submit button.
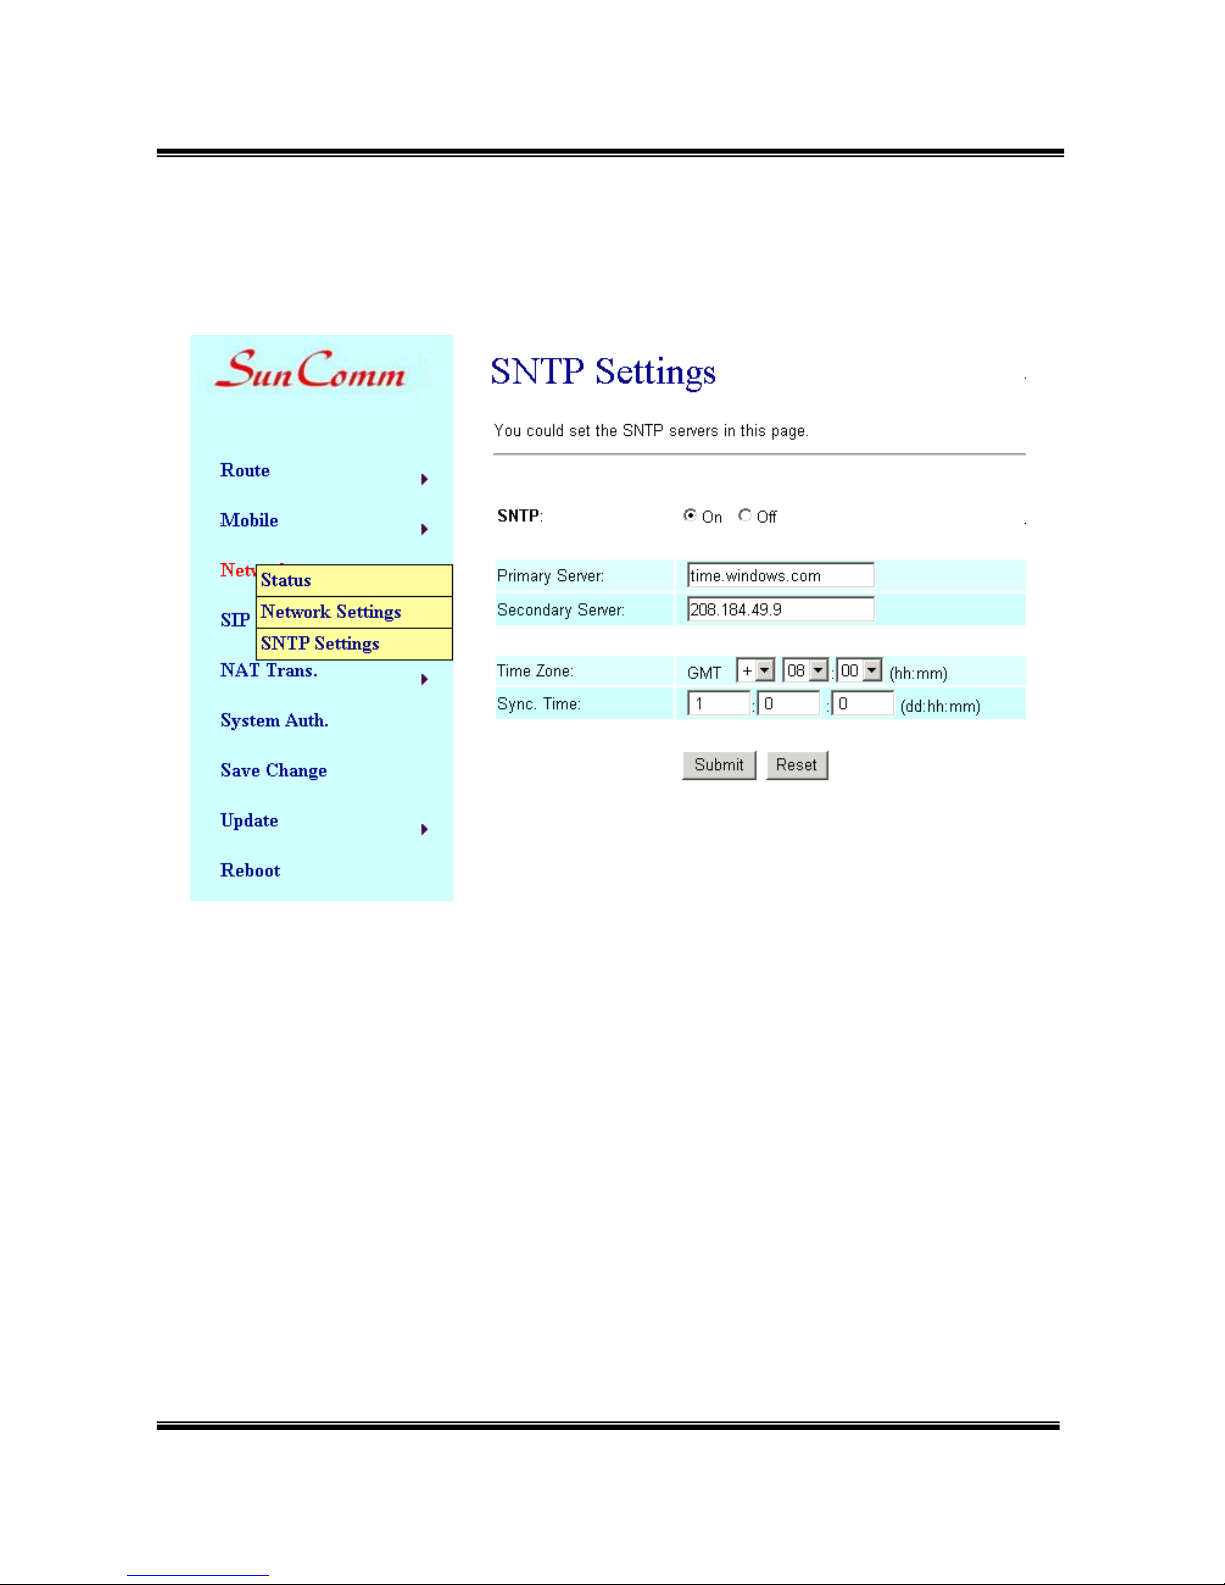
10.3 Network/ SNTP Settings:
You could select “On” to give SNTP function to this device.
Input the primary and secondary IP Address of SNTP Server to get the
Page 21
-19-
date/time information. Also you could set the Time Zone according to
your location; and set the time to synchronize. After setting, remember to
click the Submit button.
Page 22
-20-
11. SIP Setting
If you need, you could setup the Service Domain, Port Settings, Codec
Settings, RTP setting, RPort Setting and Other Settings.
If ISP provides the VoIP service, you need to input the related
information correctly to register at SIP Proxy Server.
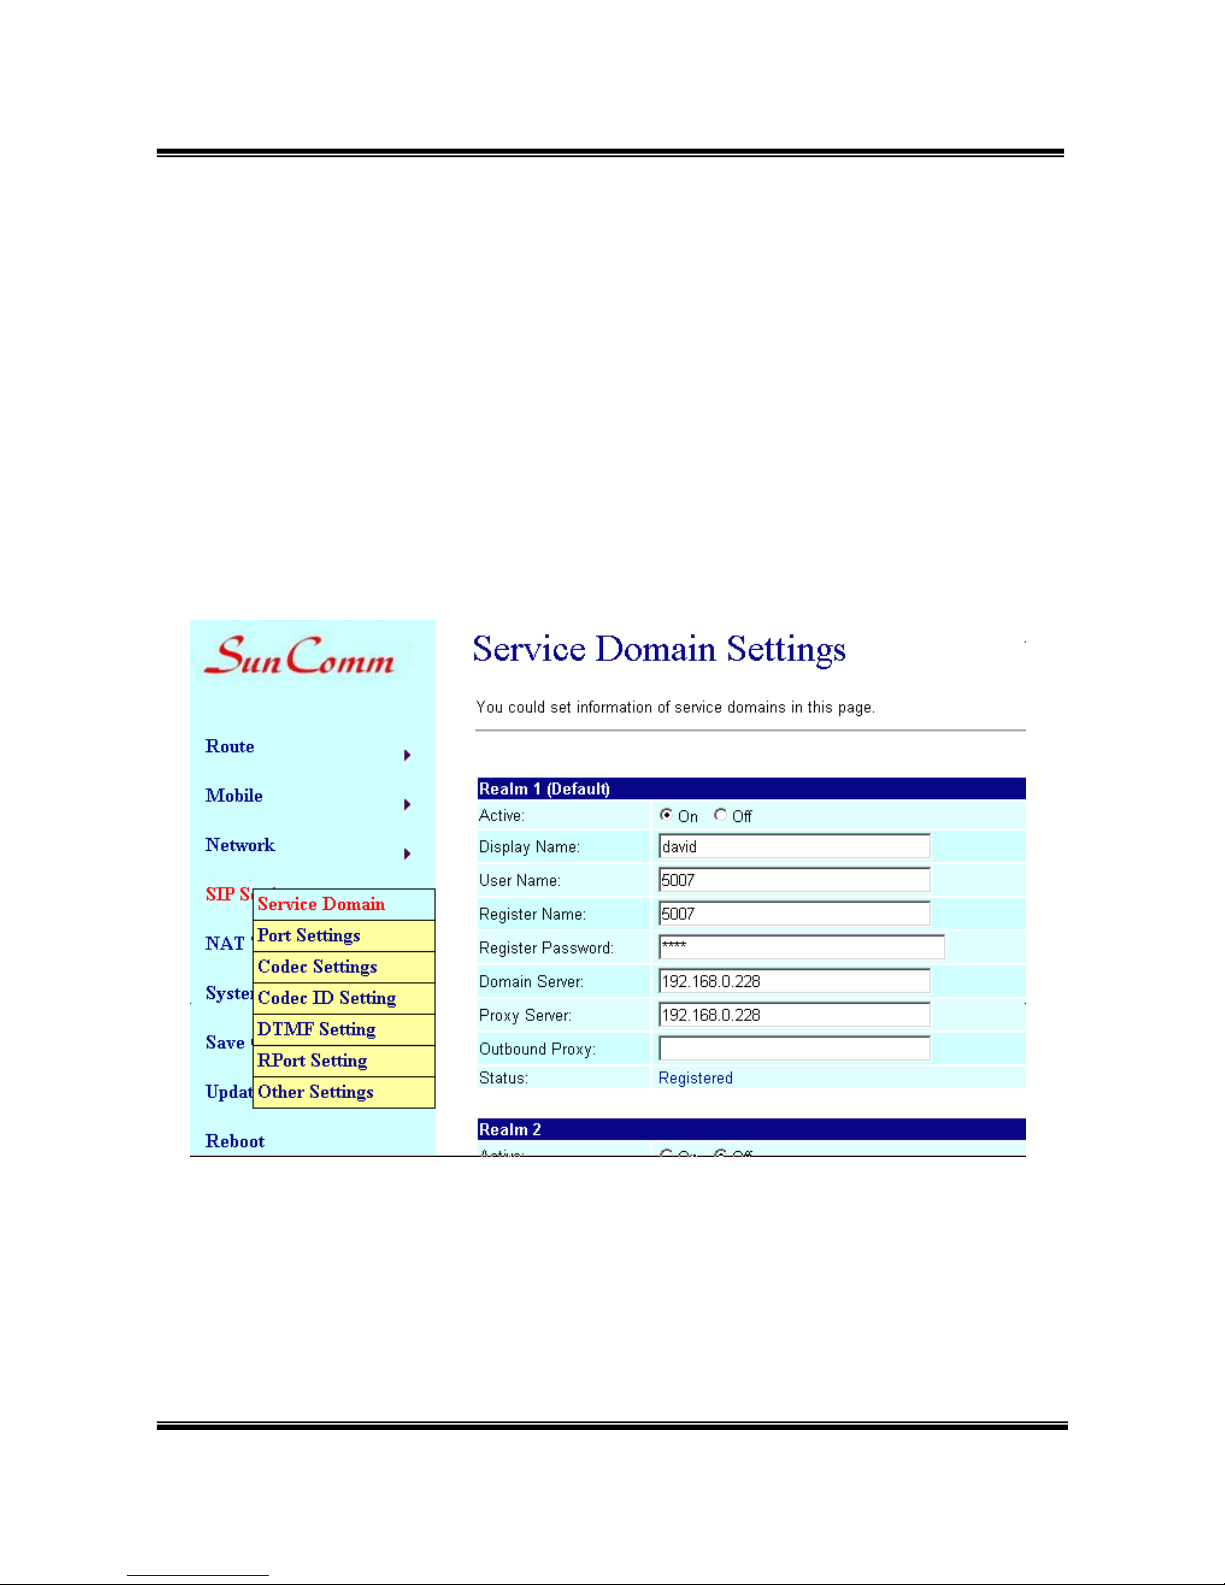
11.1 SIP Setting/ Service Domain:
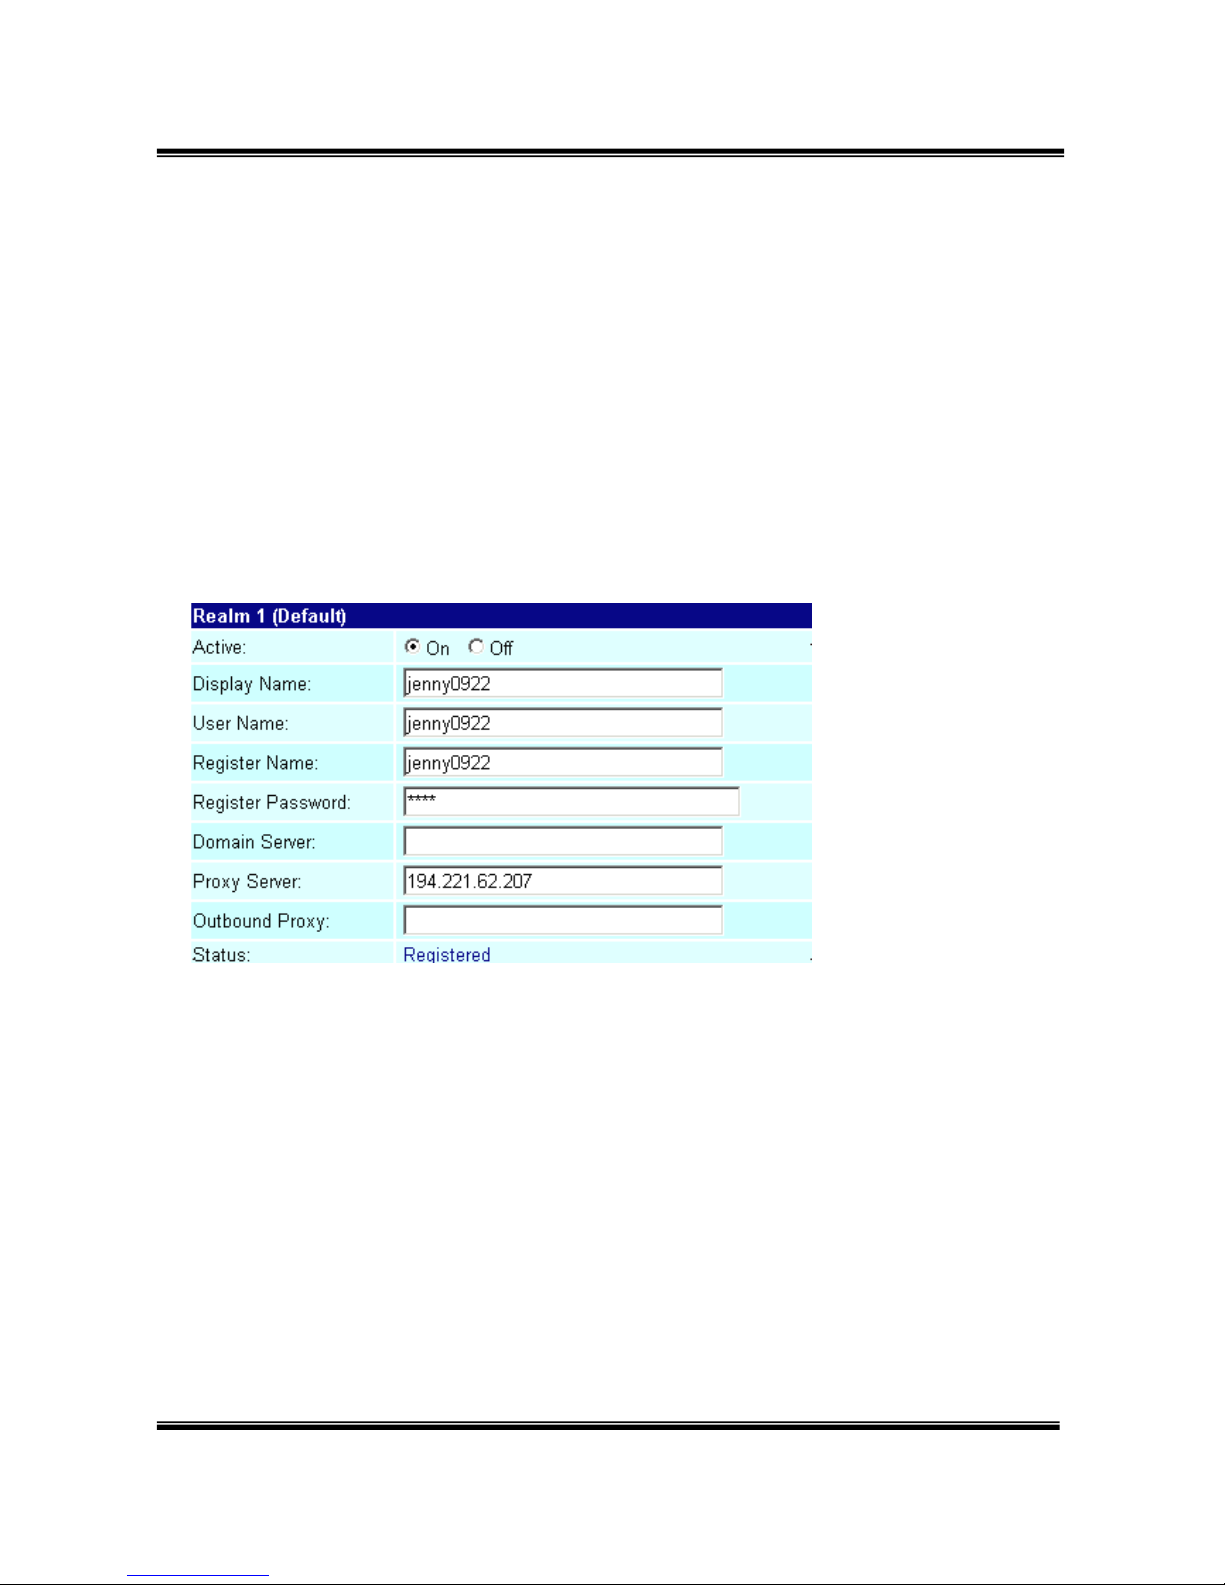
In this page, you should input the data refer to your ISP. Maximum is 3
accounts (Realm 1 to 3). You could dial out via first SIP account, and
receive via the three SIP accounts.
(1) Active: click “On” to enable the function in Service Domain, then input
the following items.
(2) Display name: input the name you would like to display.
(3) User name: input your user name in ISP.
(4) Register Name: input your register name in ISP.
(5) Register Password: input your password in ISP.
Page 23
-21-
(6) Domain Server: input the Domain Server IP address.
(7) Proxy Server: input the Proxy Server IP address.
(8) Outbound Proxy: input the Outbound Proxy IP address. If your ISP
does not provide the information, you could skip this item.
(9) After setting, click the Submit button. Remember to click “Save
Charge”
(10) You can see the Register Status in the Status item.
Example:
Register VoipBuster
Your Voipbuster username
Your Voipbuster password
Proxy Server’s IP
Page 24
-22-
11.2 Port Setting
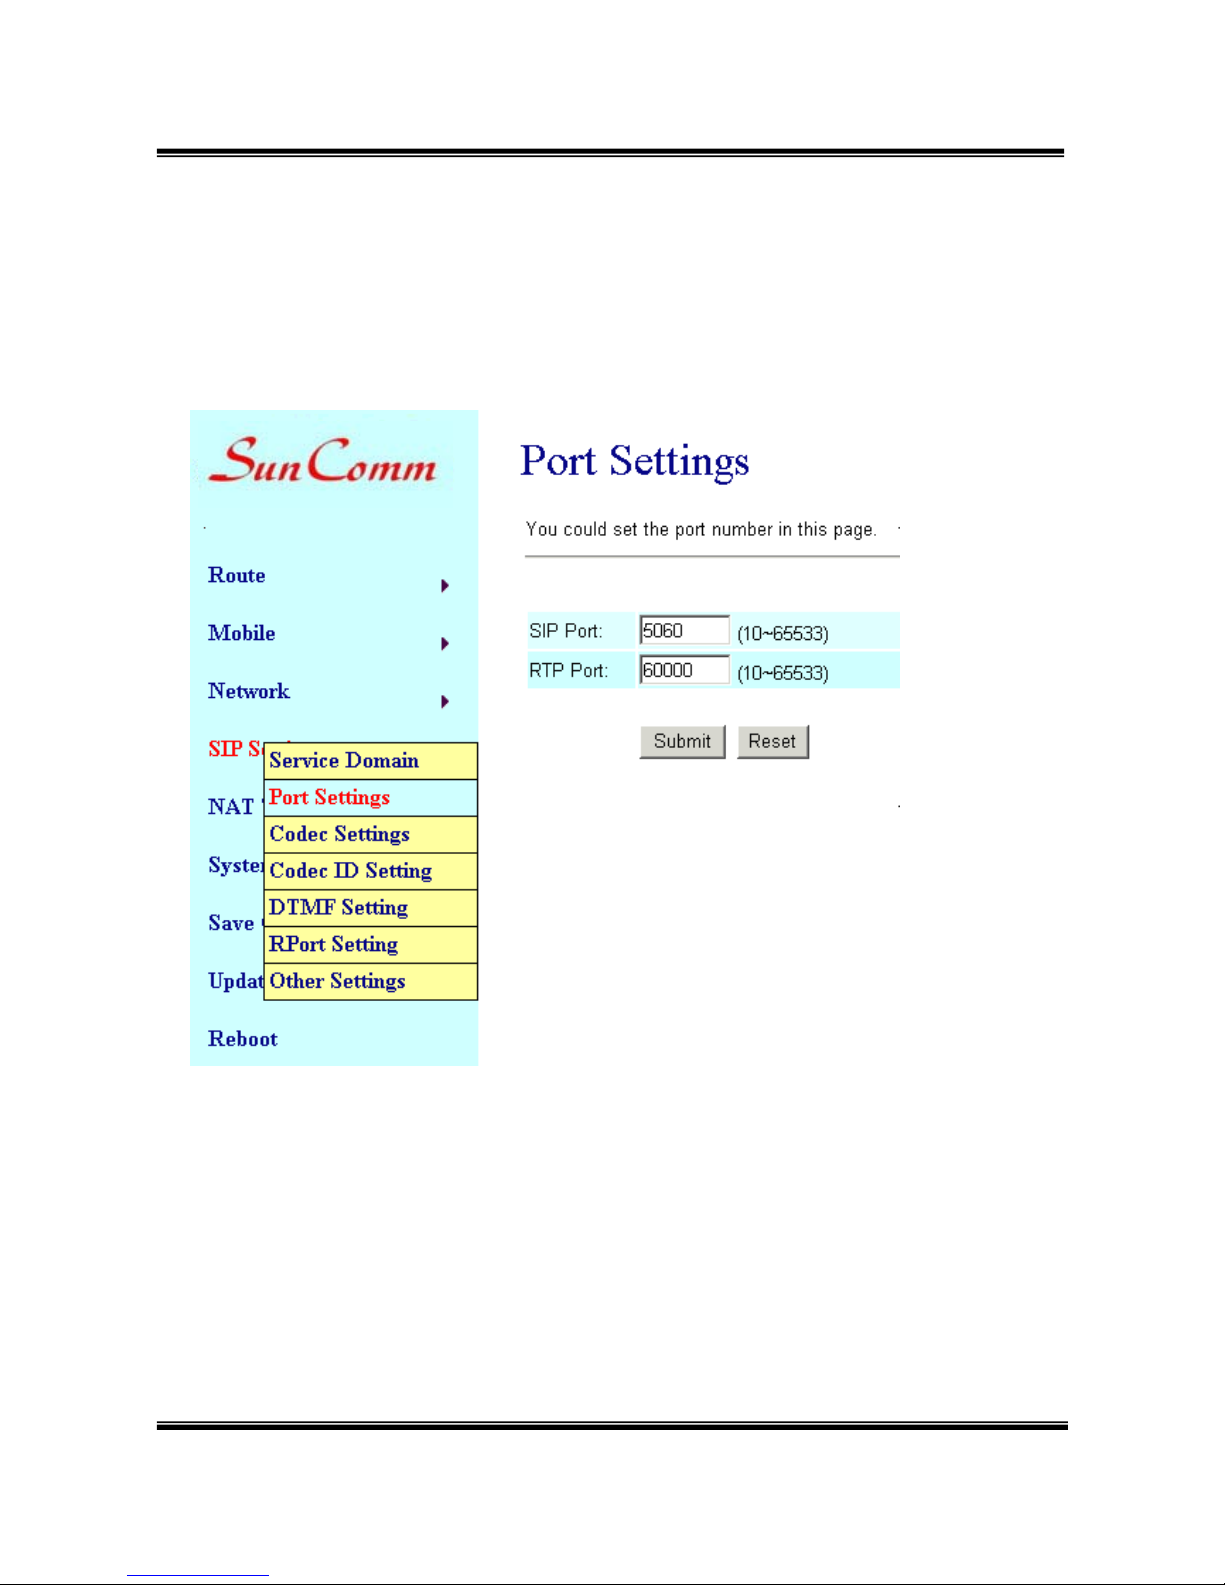
You can setup the SIP and RTP port number in this page. Each ISP
provider will have different SIP/RTP port setting, please refer to the ISP
to setup the port number correctly. After setting, remember to click the
Submit button.
Page 25
-23-
11.3 Codec Settings:
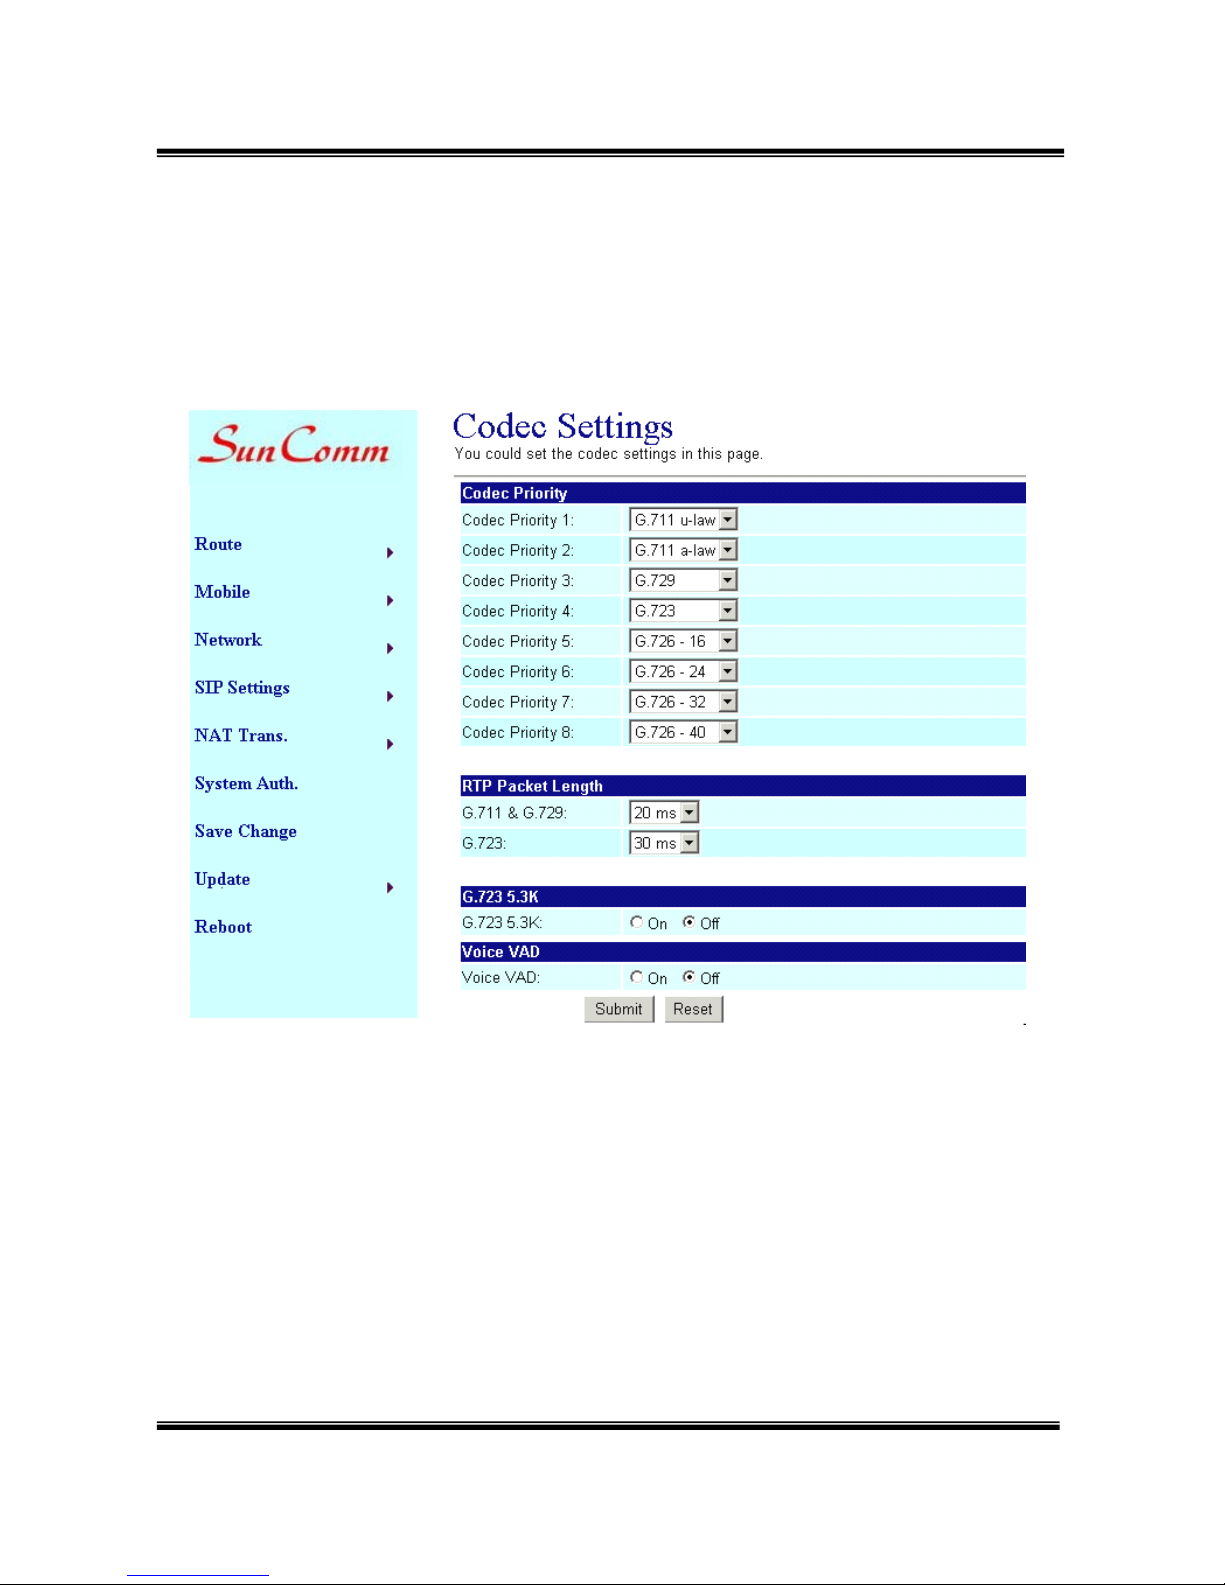
You can setup the Codec priority, RTP packet length in this page. You
need to follow the ISP suggestion to setup these items. After setting,
remember to click the Submit button.
Page 26
-24-
11.4 Codec ID Setting
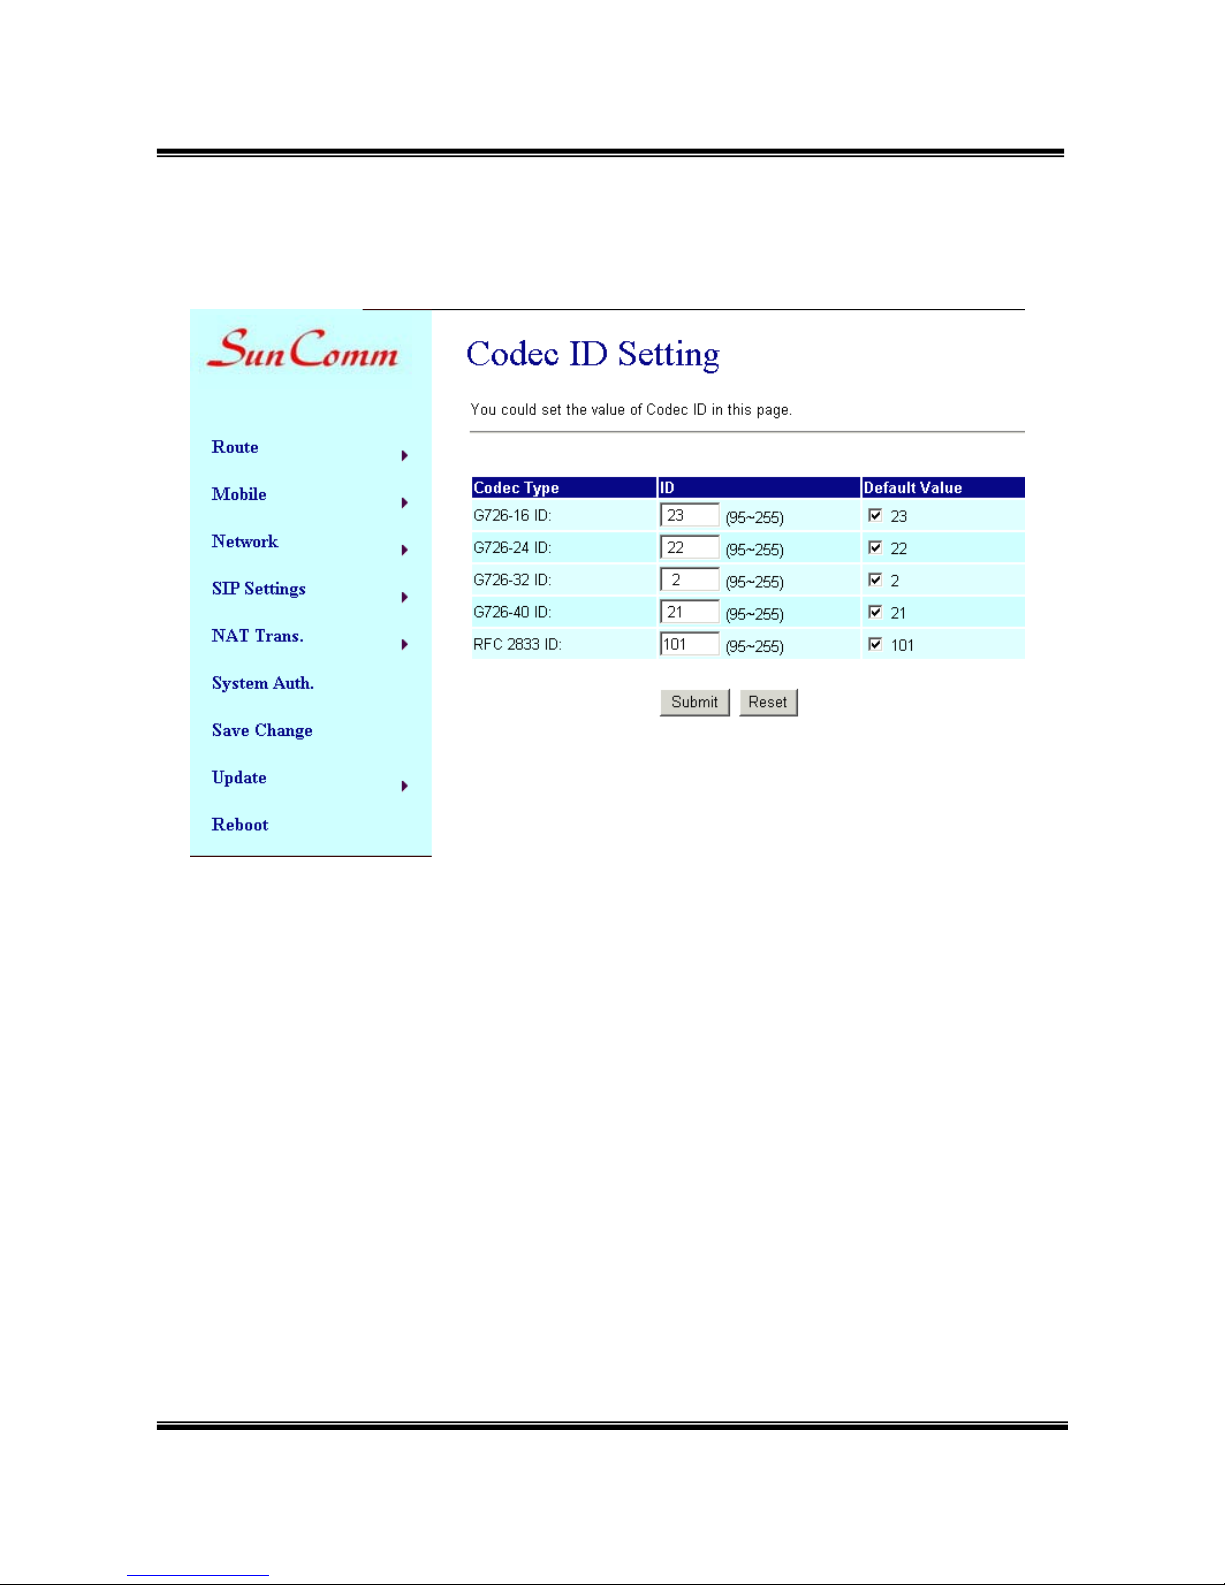
You can setup the Codec ID in this page.
Page 27
-25-
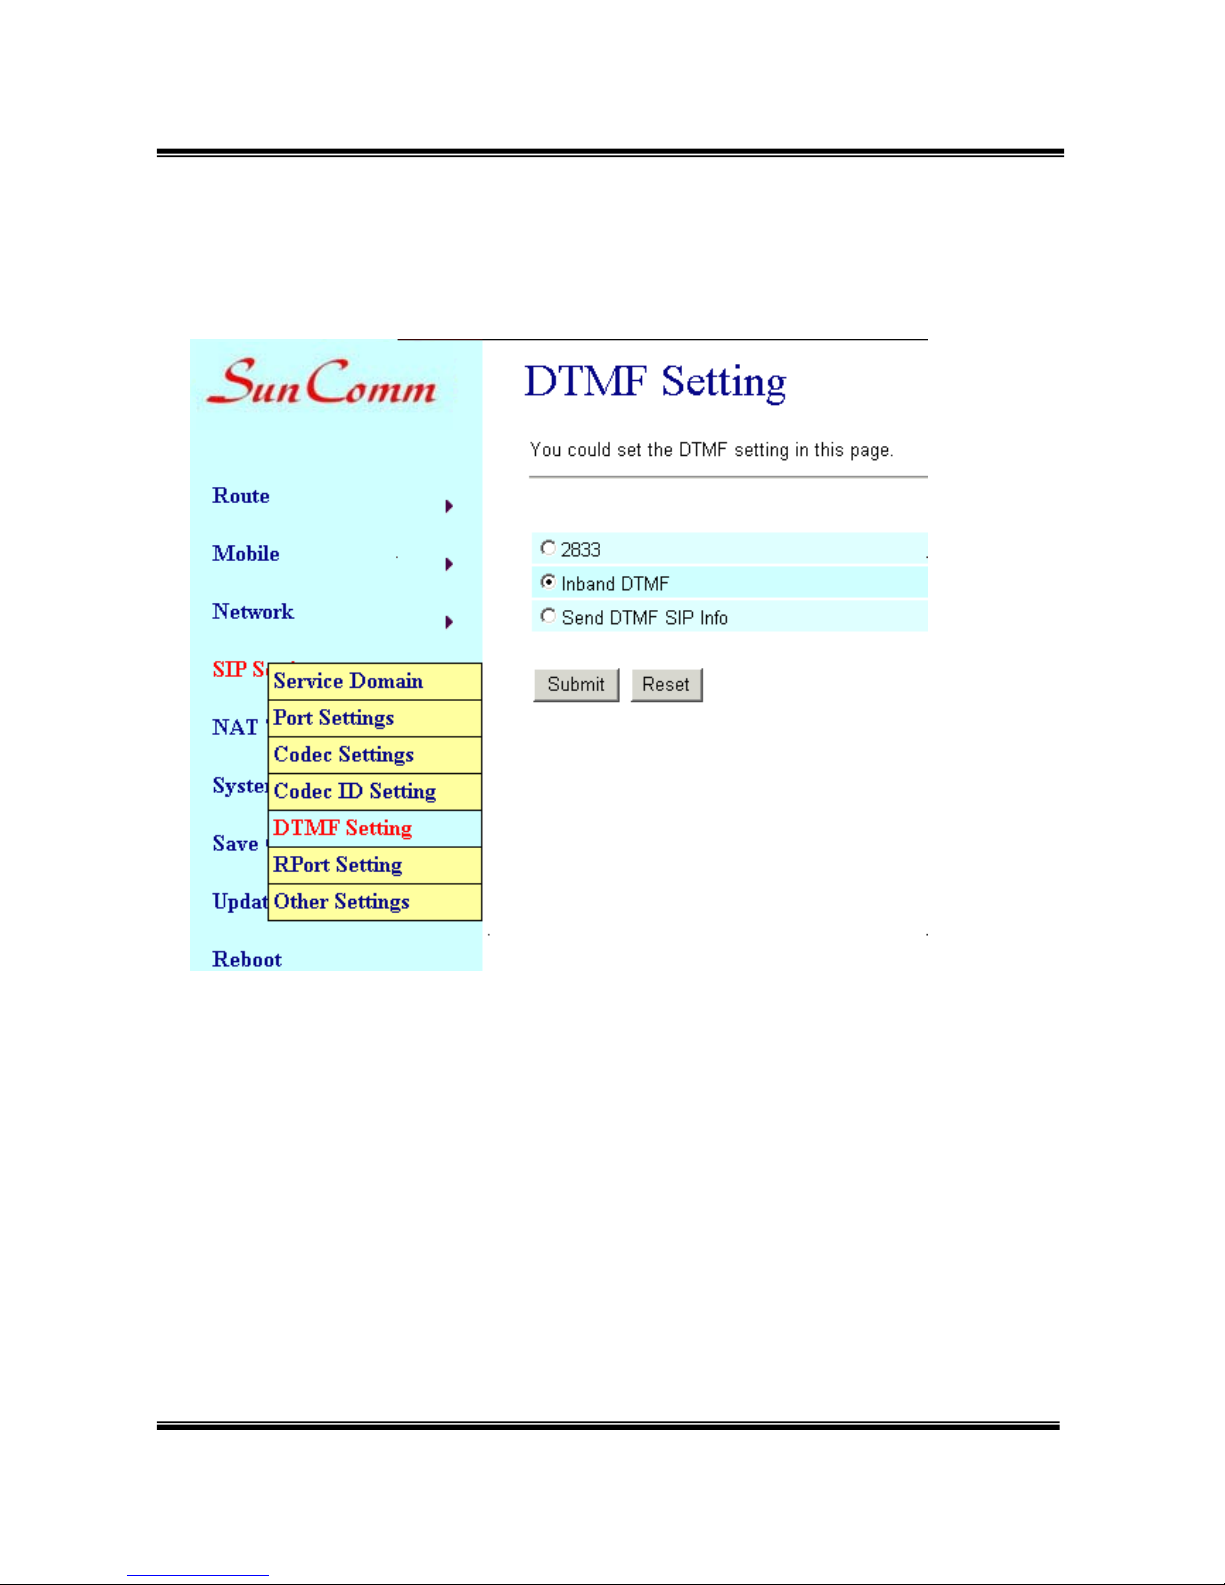
11.5 DTMF Setting
You can setup the DTMF Setting in this page.
Note:
If this device has registered at SIP Proxy Server/Asterisk, please select
“2833”. If not, please select “Inband DTMF”.
Page 28
-26-
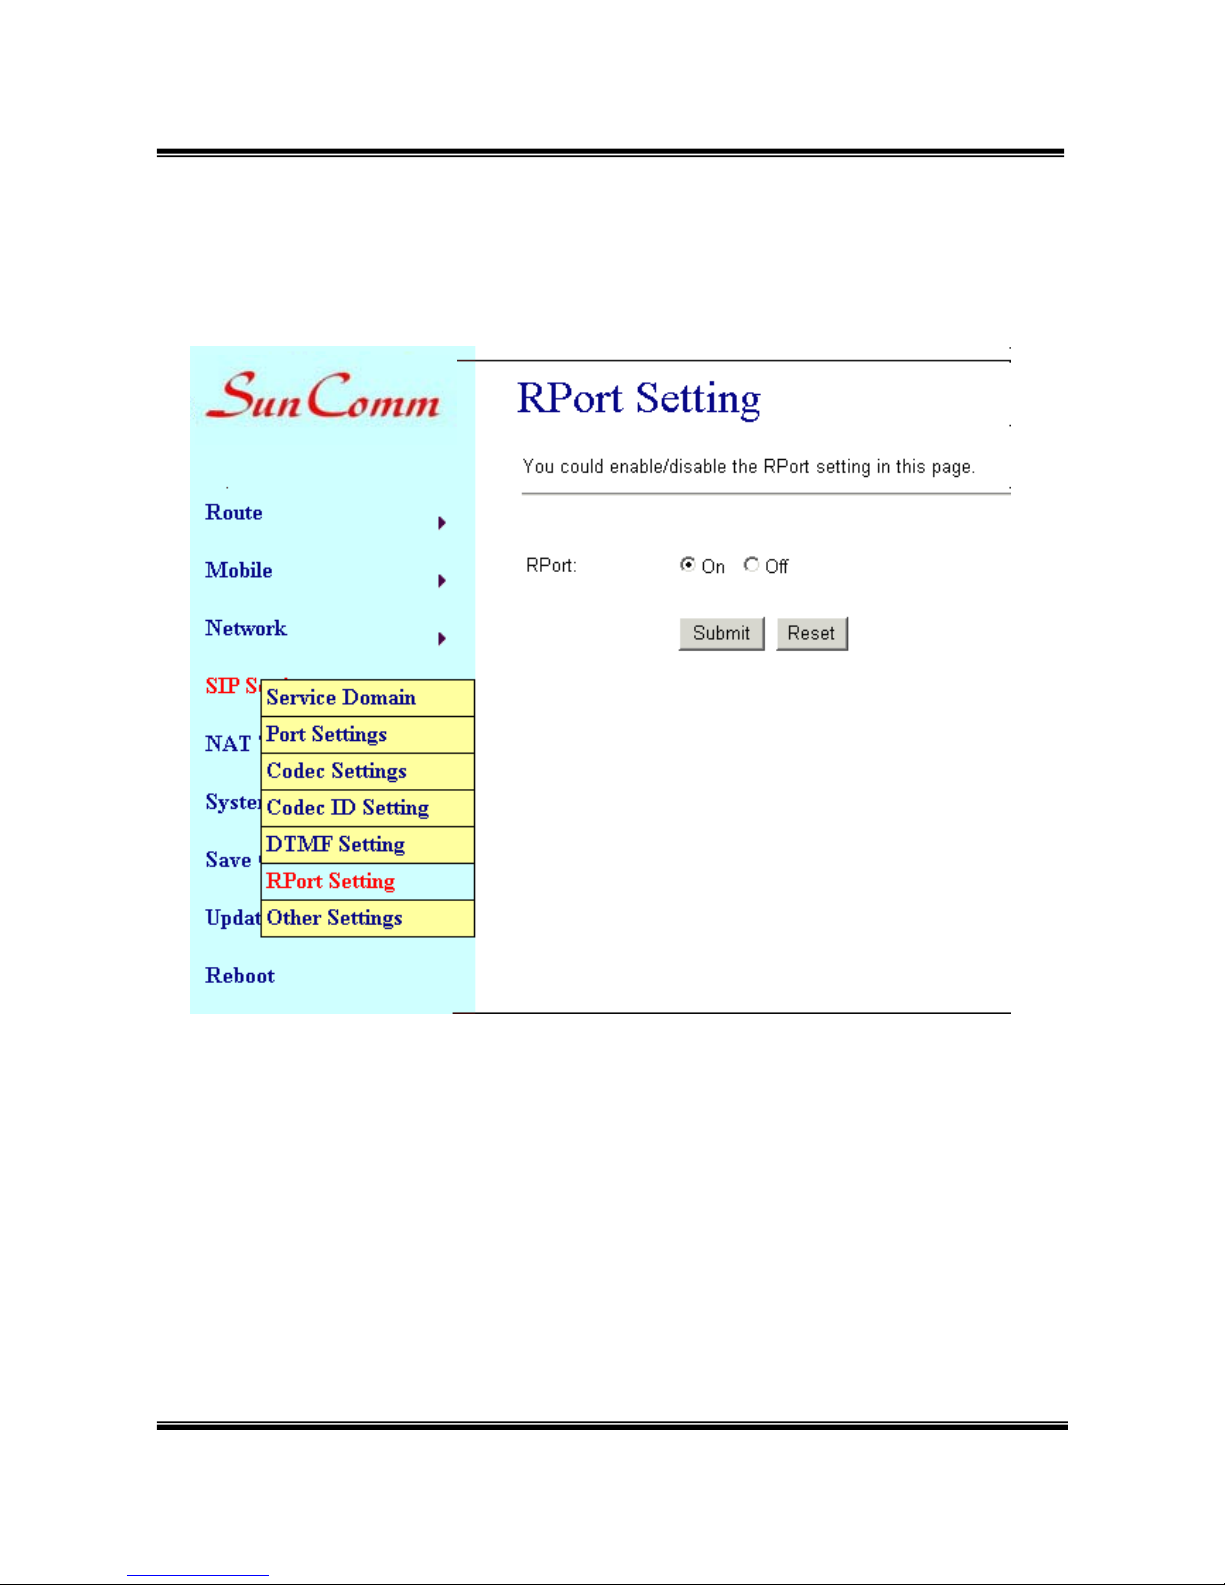
11.6 RPort Setting:
You can setup the RPort Enable/Disable according to your ISP
information. After setting, remember to click the Submit button.
Page 29
-27-
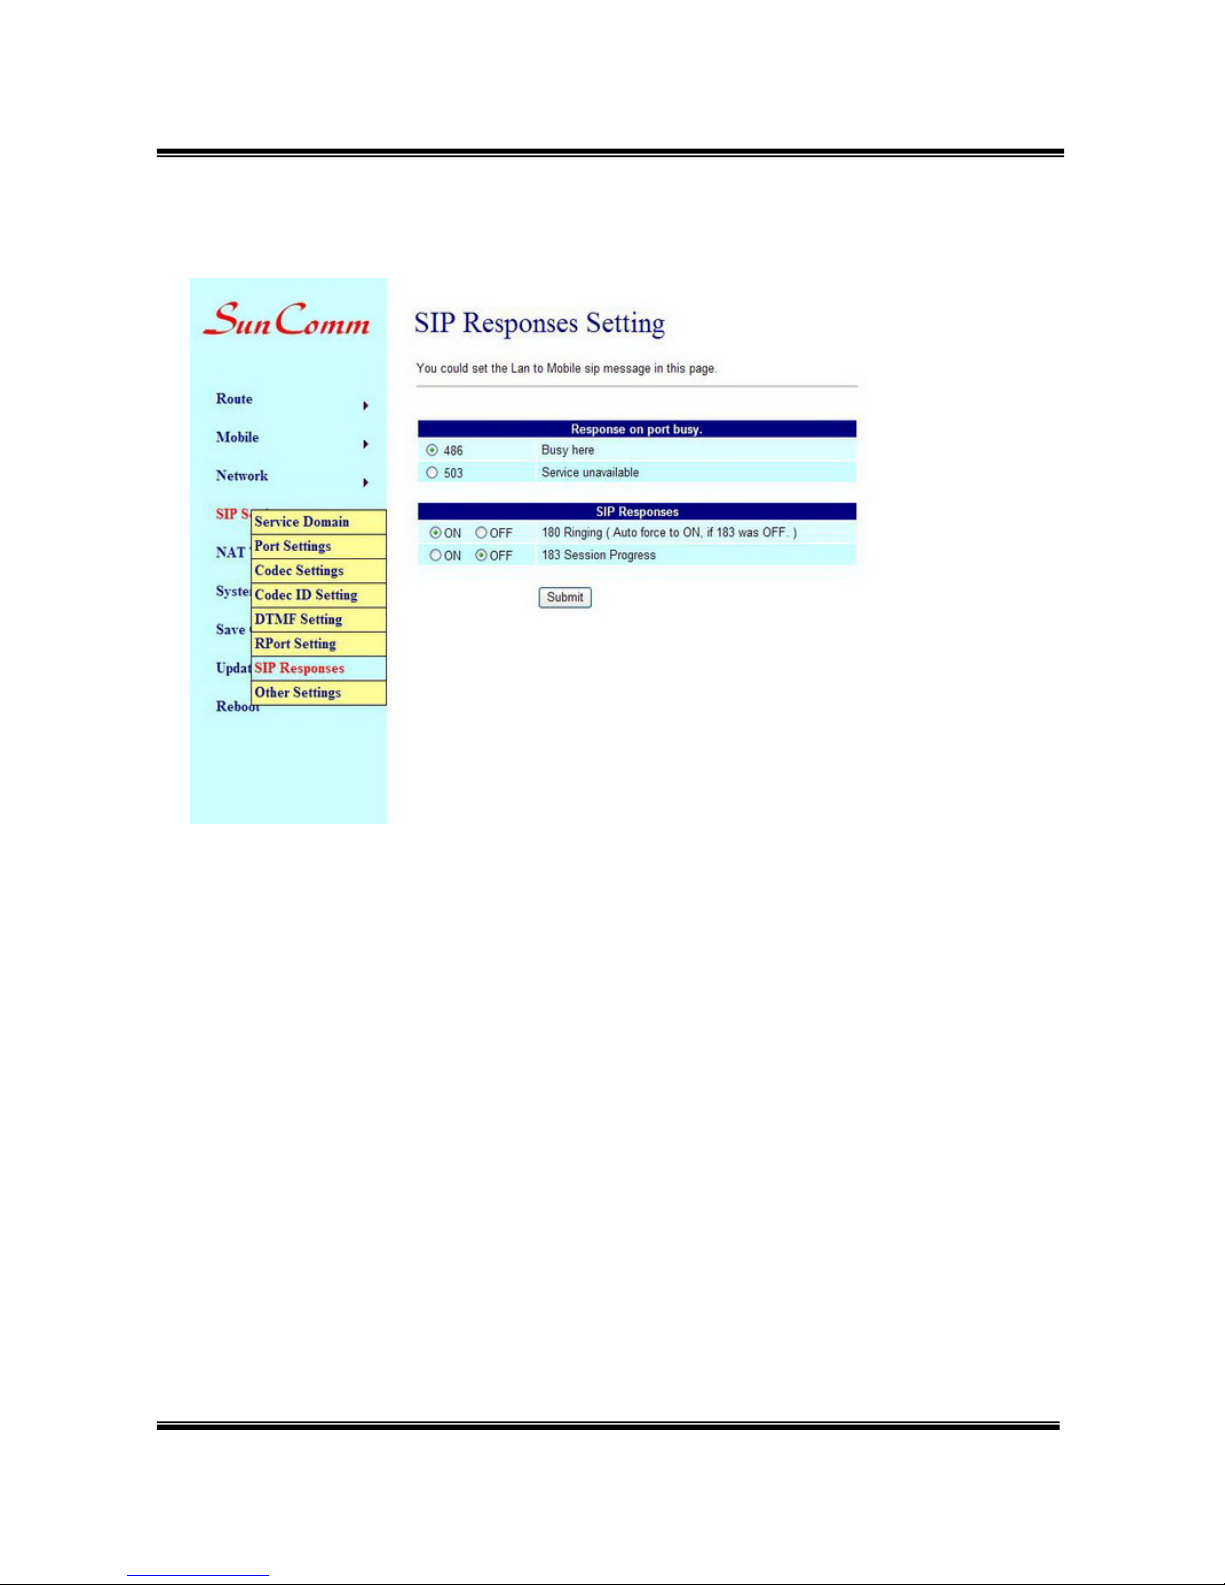
11.7 SIP Setting: SIP Responses
11.7.1 486(busy here), 503(Service unavailable): When Device are
busying, you can select 486 or 505 to response to SIP.
11.7.2 180 Ring on/off: LAN TO MOBILE two stage dialing can be
turn off, therefore there will be no the Ring Back Tone, all the phone
call will be transferred to Voice-Mail directly. (For this function, 183
must be turn on)
Page 30
-28-
11.7.3 183(Session Progress)-->[It means"on progressing"] : When
you turn 183 on, it means you can hear voicemail while GMS side are
busying. We recommend you to turn this on if you use SIP Proxy.
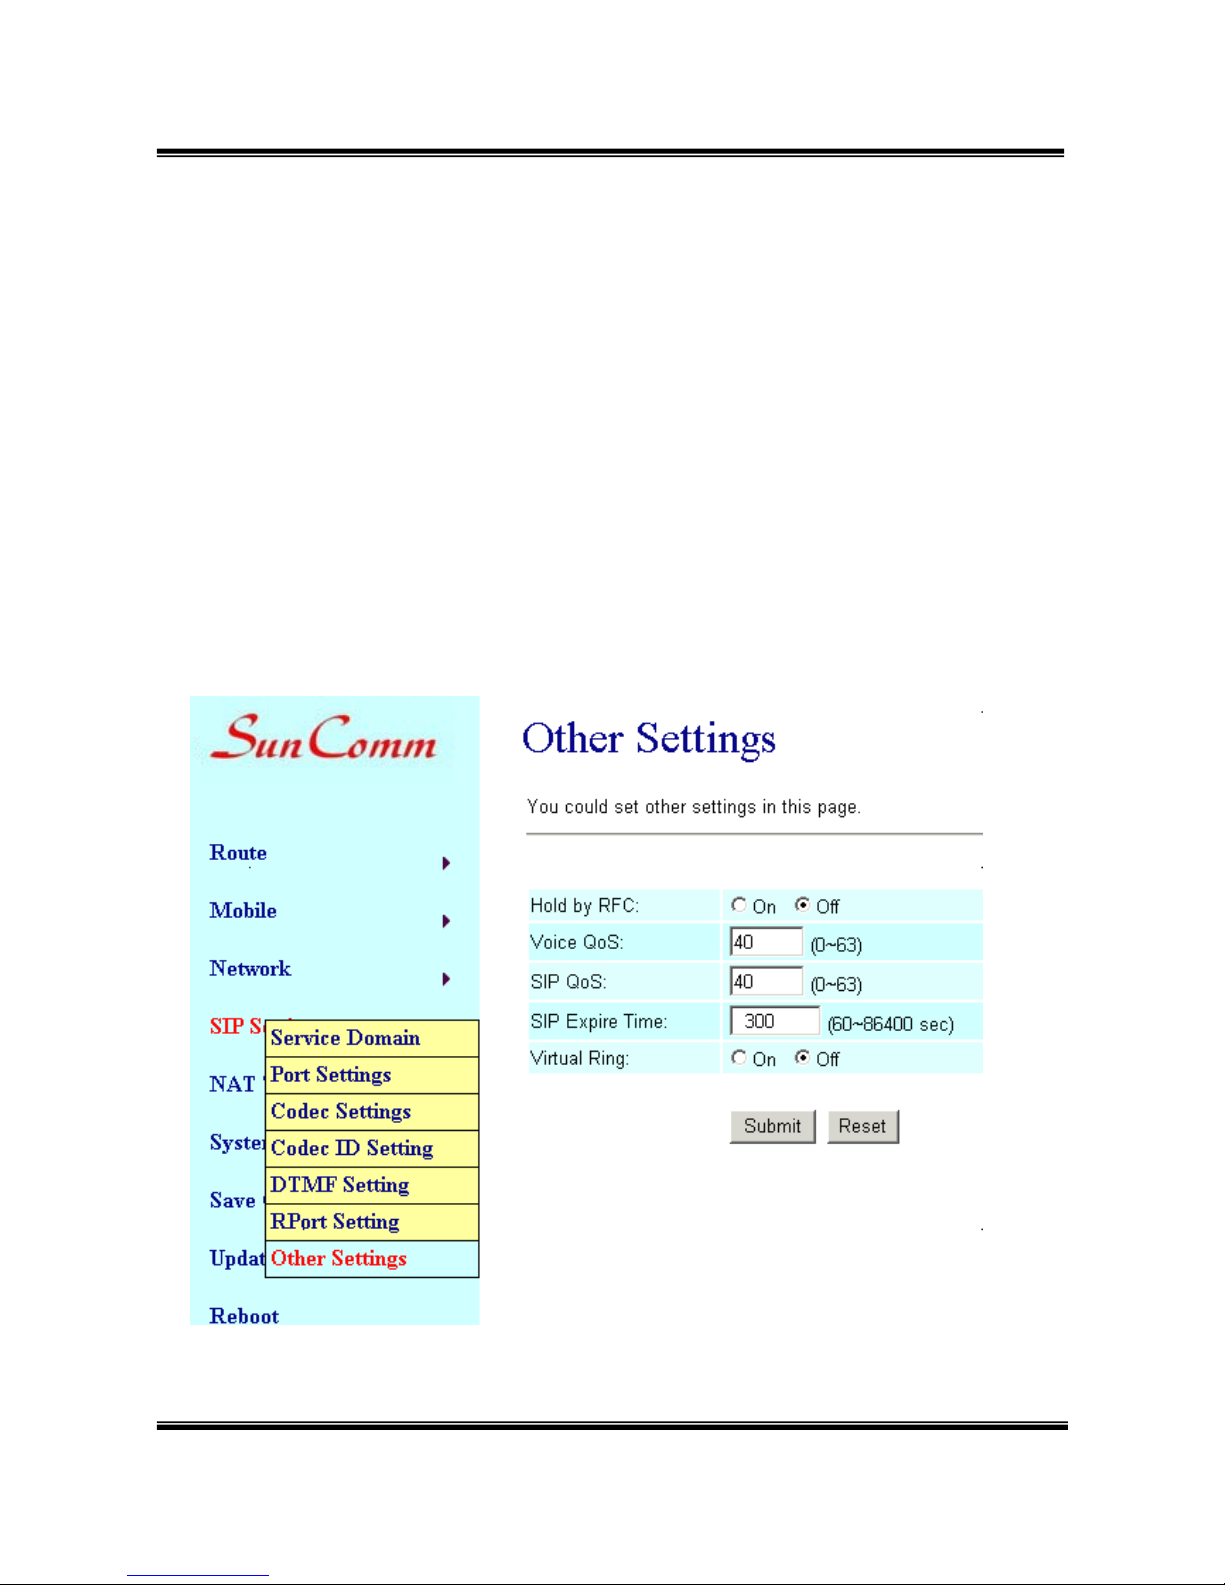
11.8 Other Settings
You could setup the RFC and QoS according to your ISP information.
After setting, remember to click the Submit button.
The QoS setting is to set the voice packets’ priority. If you set the value
higher than 0, then the voice packets get the higher priority to the
Internet. But the QoS function still need to cooperate with the others
Internet devices.
Page 31

-29-
Page 32
-30-
12. NAT Trans
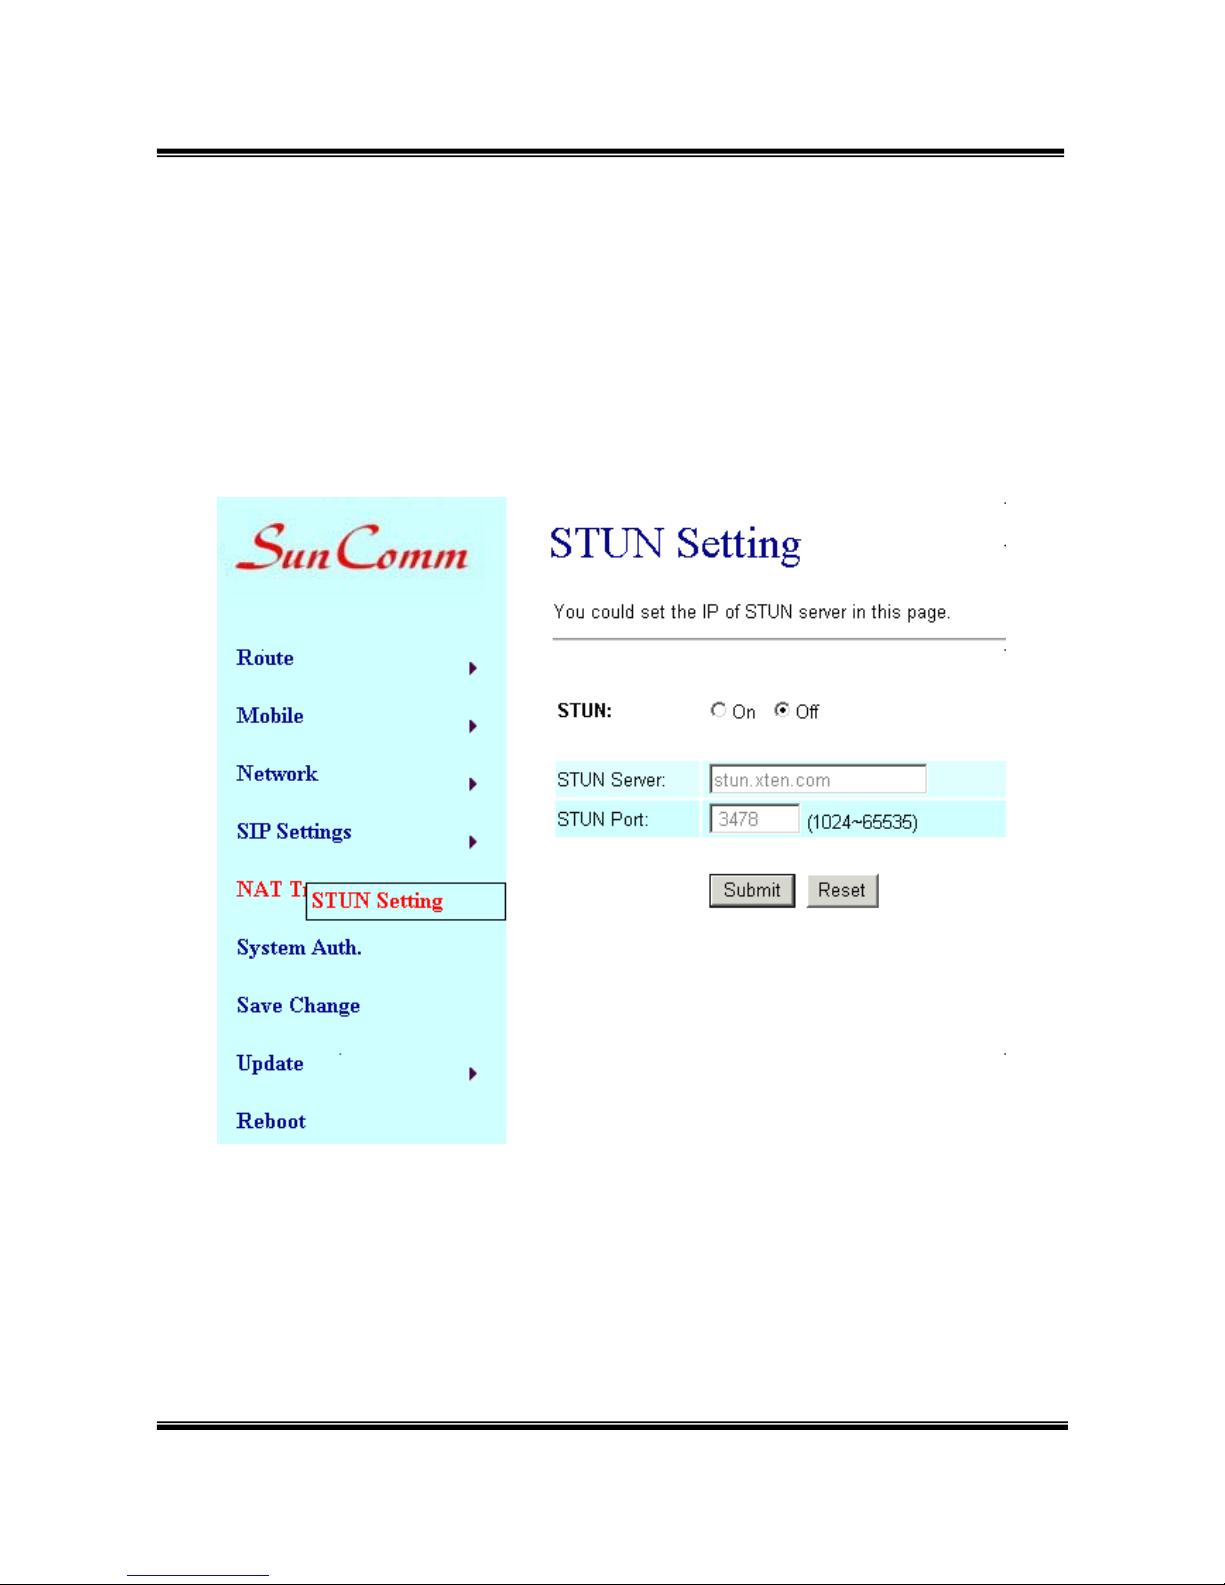
In this page: NAT Trans./ STUN, you could setup the STUN
Enable/Disable and STUN Server IP address. This function helps your
VoIP device work properly behind NAT. Change these settings
according to your ISP information. After setting, remember to click the
Submit button.
Page 33
-31-
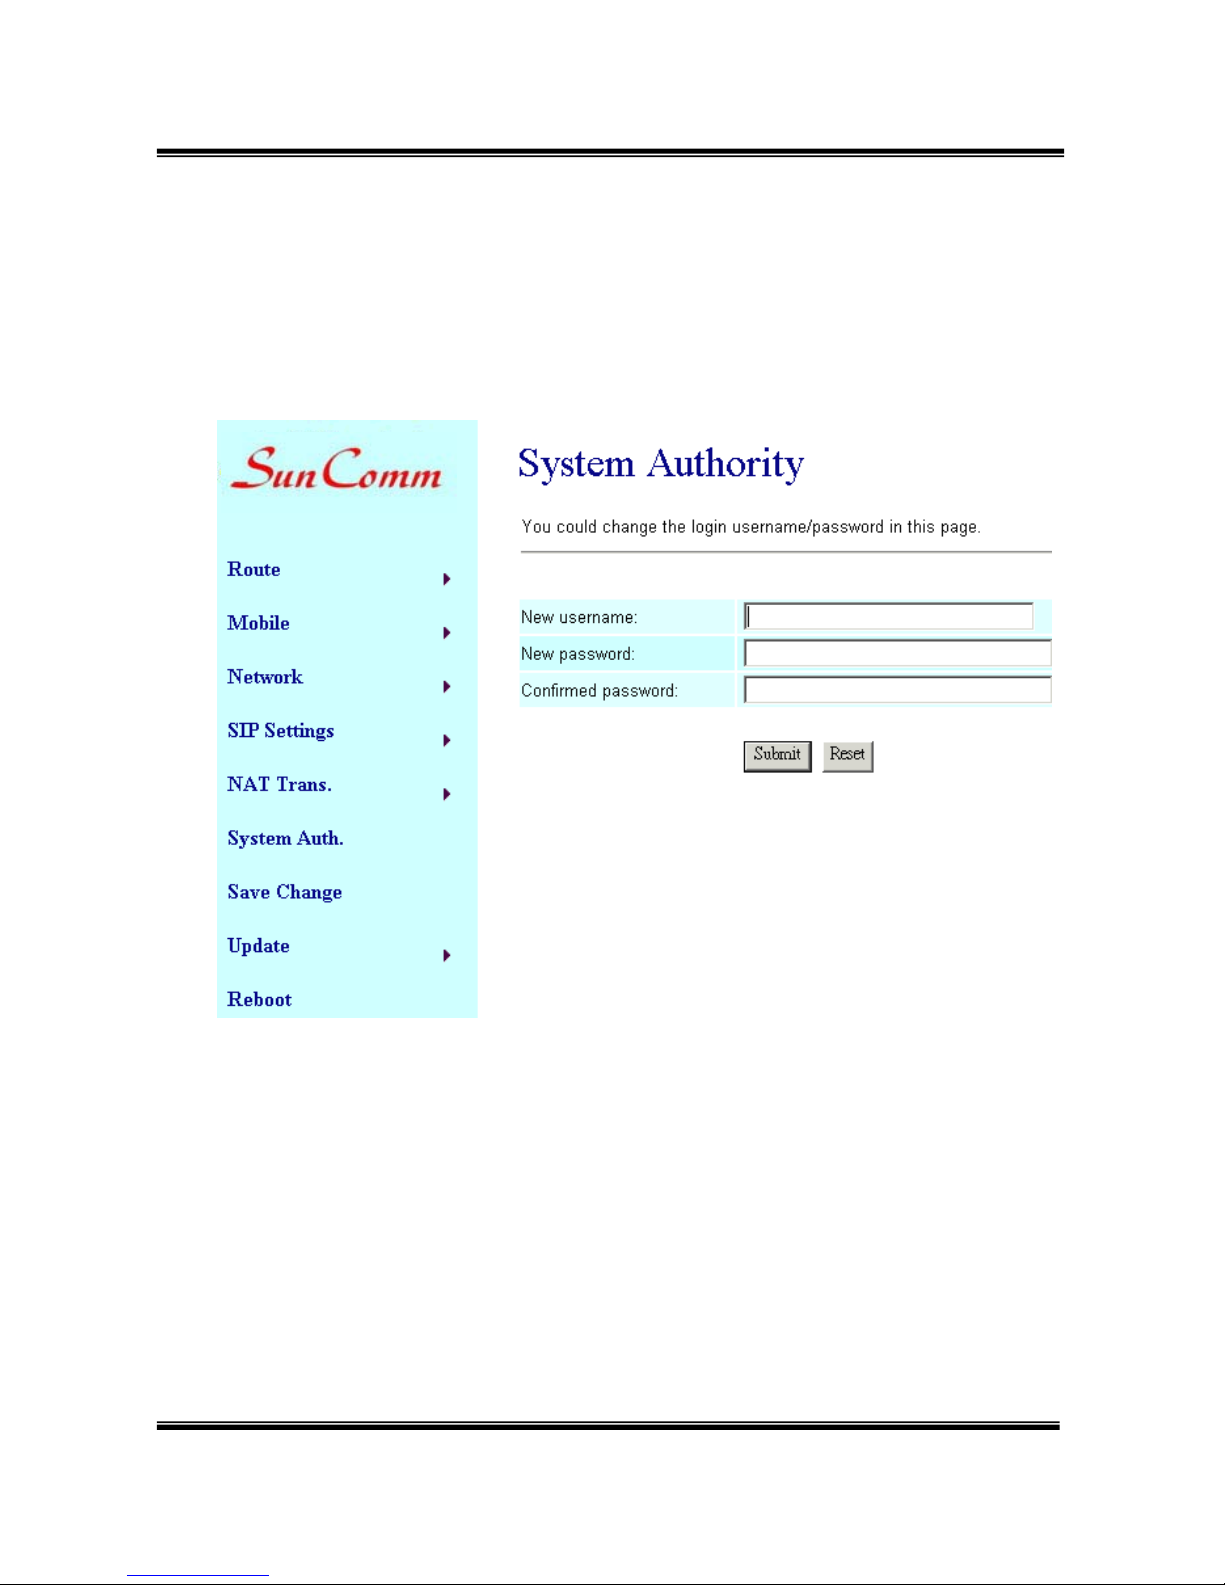
13.System Auth.
In this page: System Authority, you could change your login name and
password.
Page 34
-32-
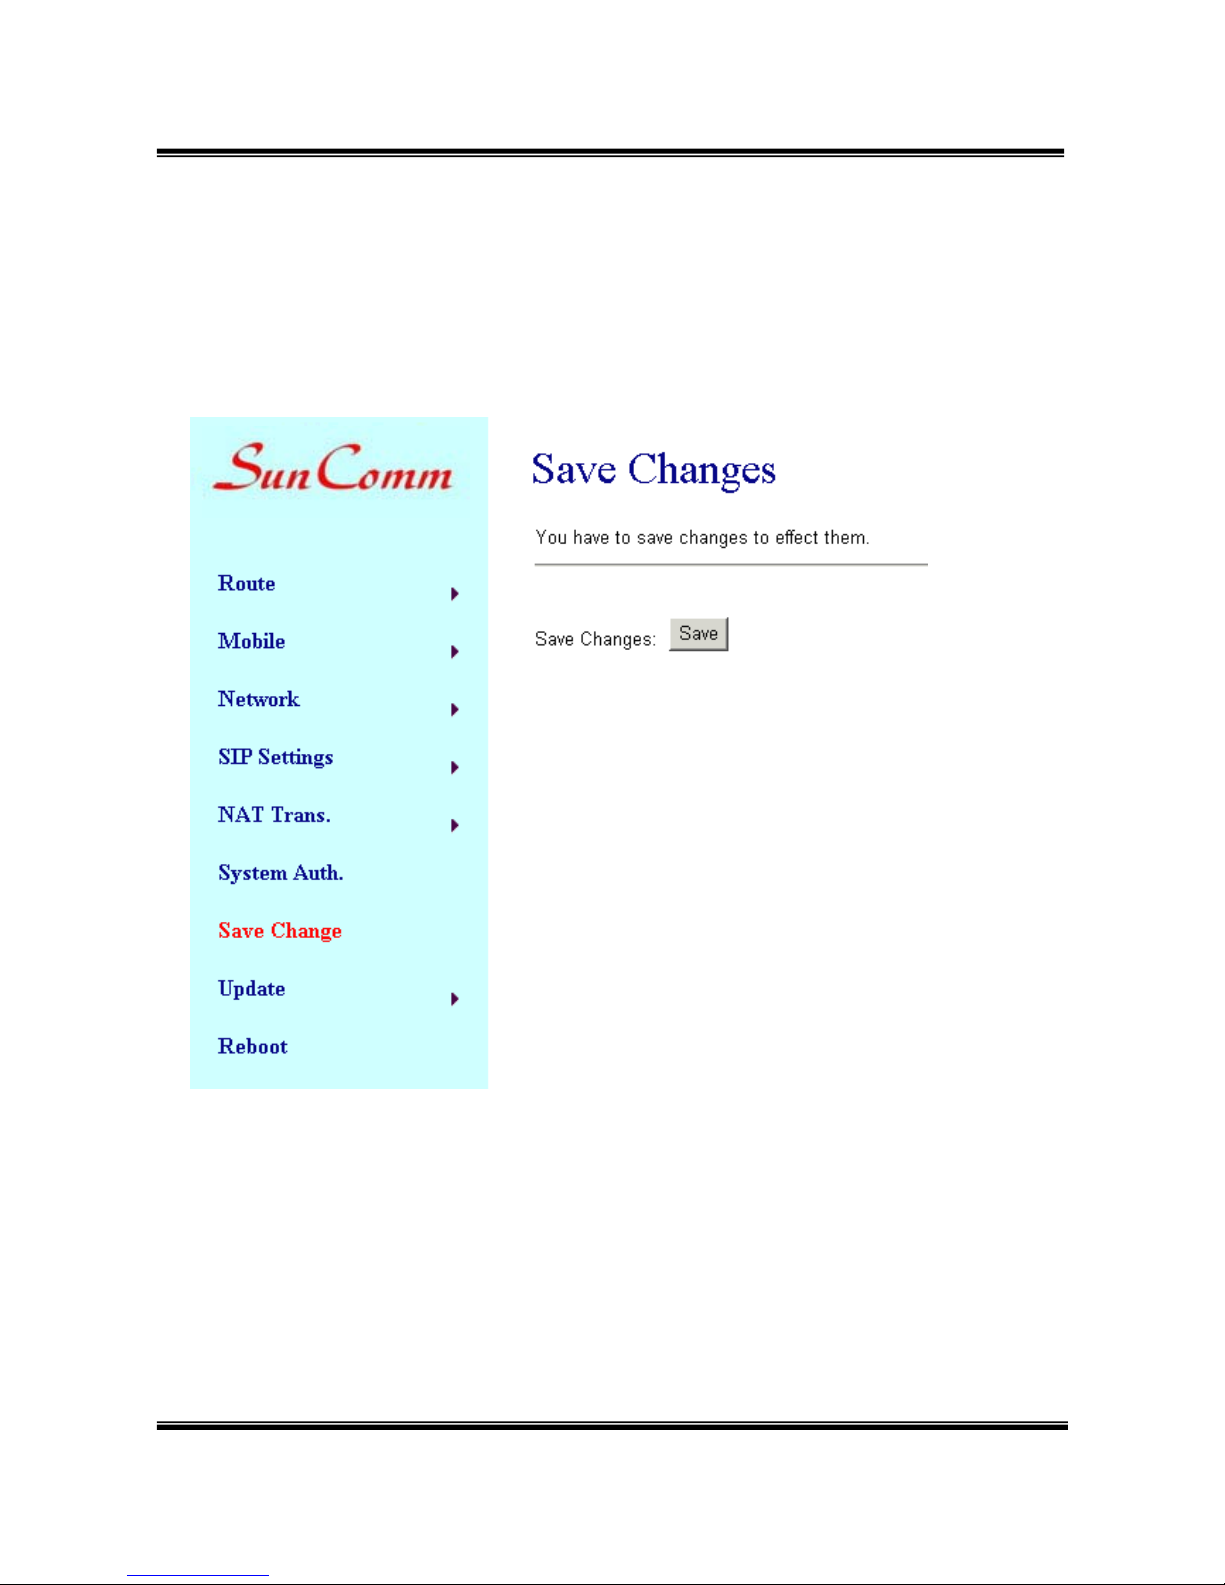
14.Save Change
Please remember this step whenever you submit any setting.
Click “Save Change” then “Save” button, the system will restart and
make the changed function/setting operative.
Page 35
-33-
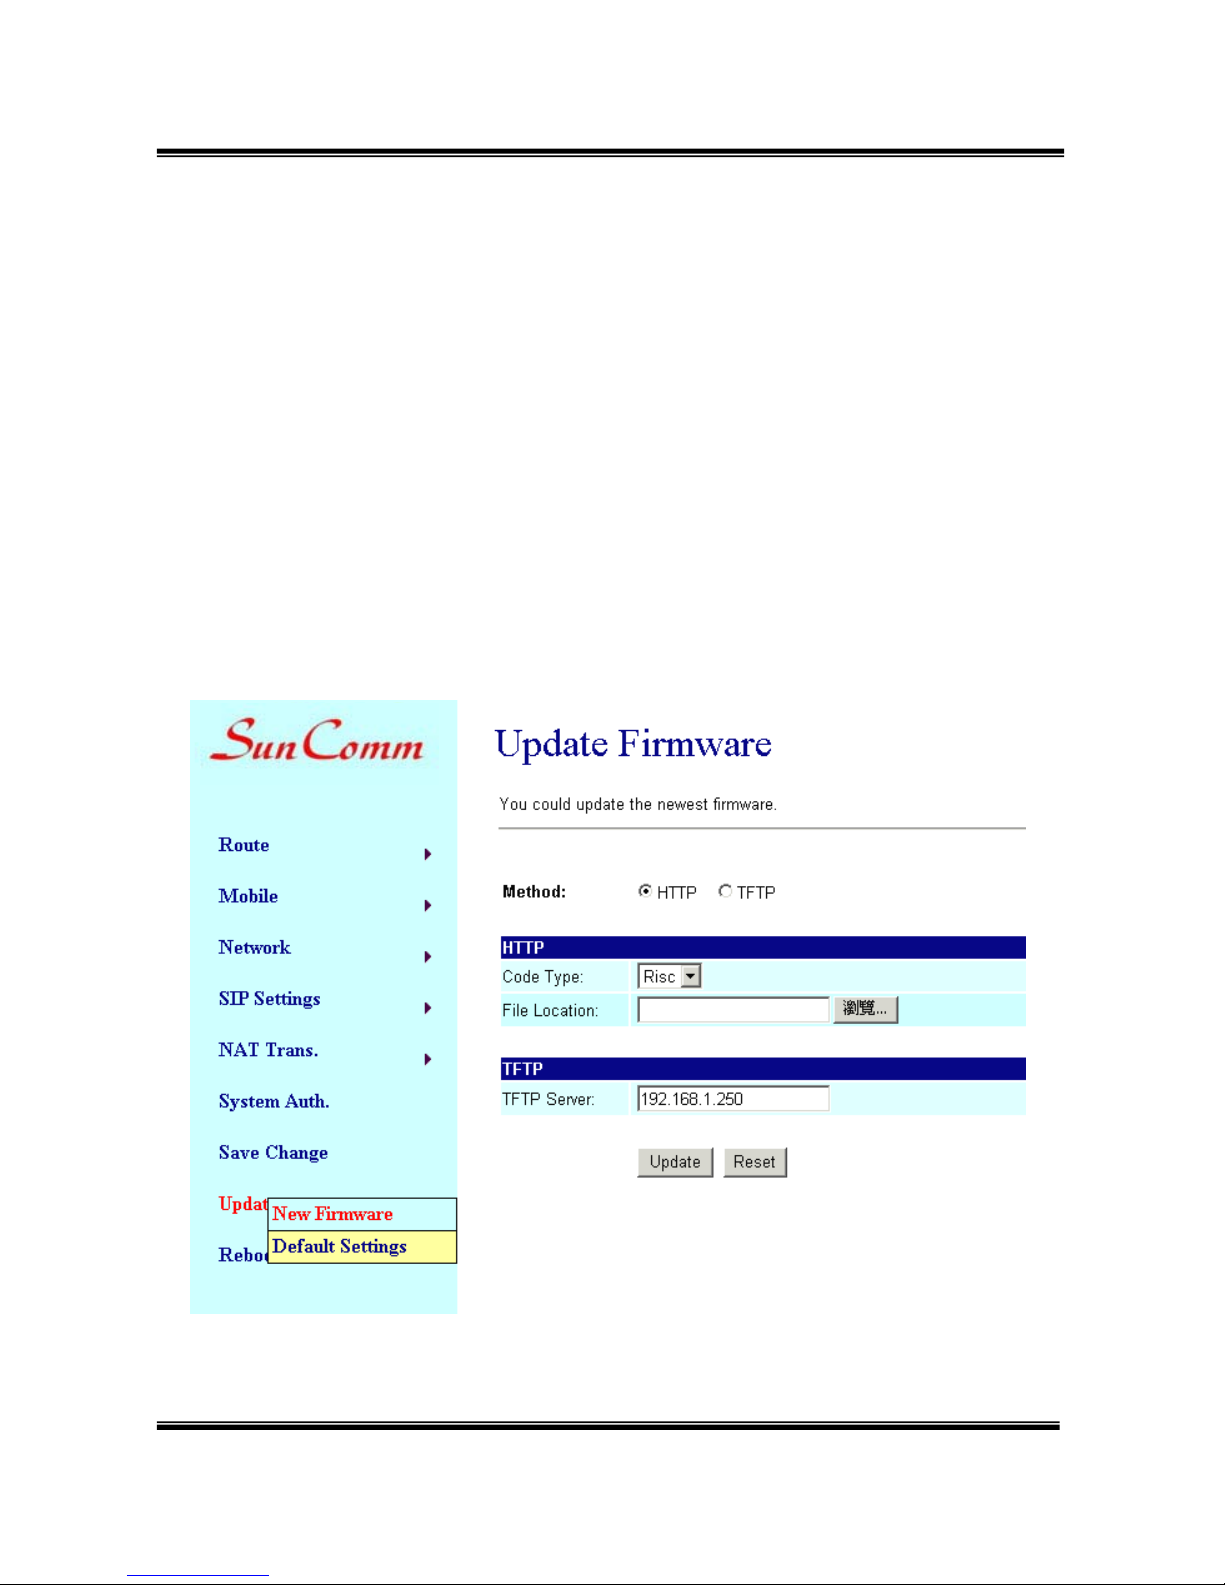
15.Update
Here you could update the latest firmware and restore the default
settings.
15.1 Update/ New Firmware/ Update Firmware
Download the latest firmware, then
(1) Method: select “HTTP”
(2) Code Type: select “Risc”.
(3) File Location: Click the “Browse” button in the right side of the File
Location for the file.
Please note: no need to unzip the firmware file.
(4) Click “Update”, it takes few minutes to generate new firmware.
Page 36
-34-
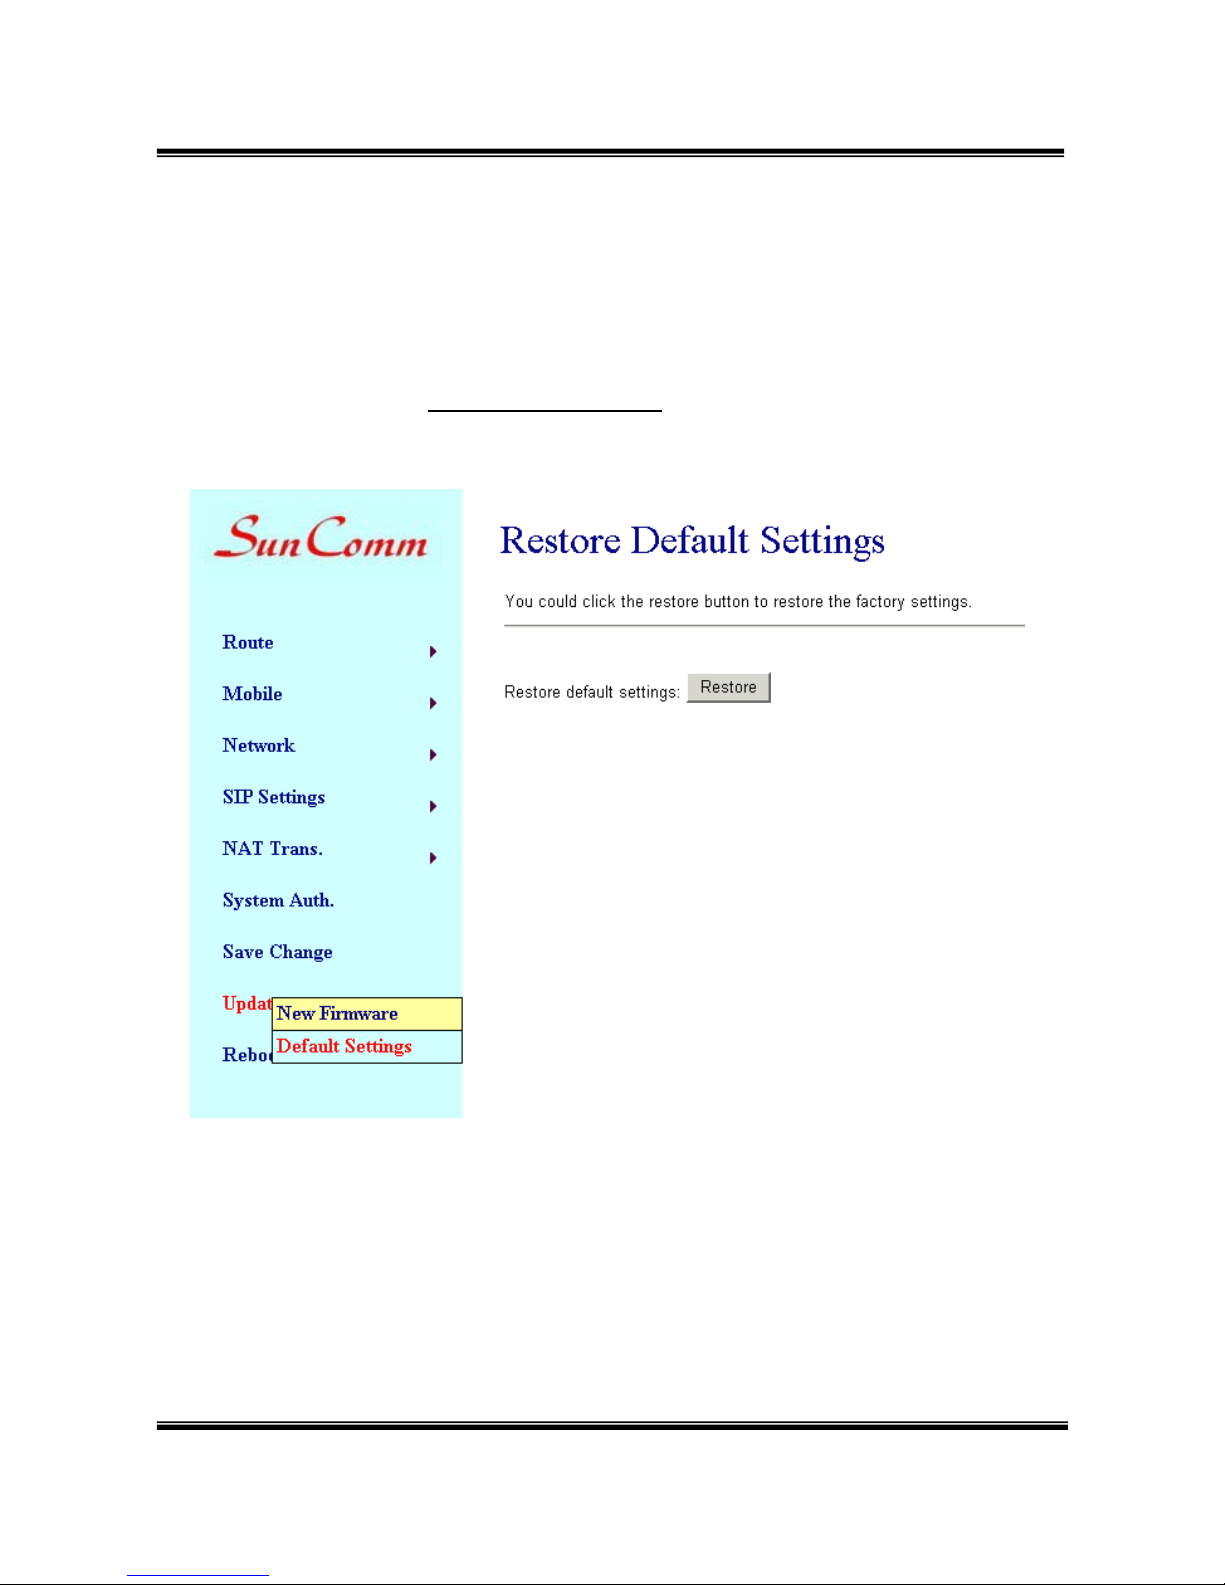
15.2 Restore Default Settings
In this page: Update/ Default Settings, you could restore the factory
default settings to the system. Click the Restore button, then the system
returns to default IP http://192.168.0.100
(the other settings e.g SIP
setting, mac address remains), and automatically restart.
Page 37
-35-
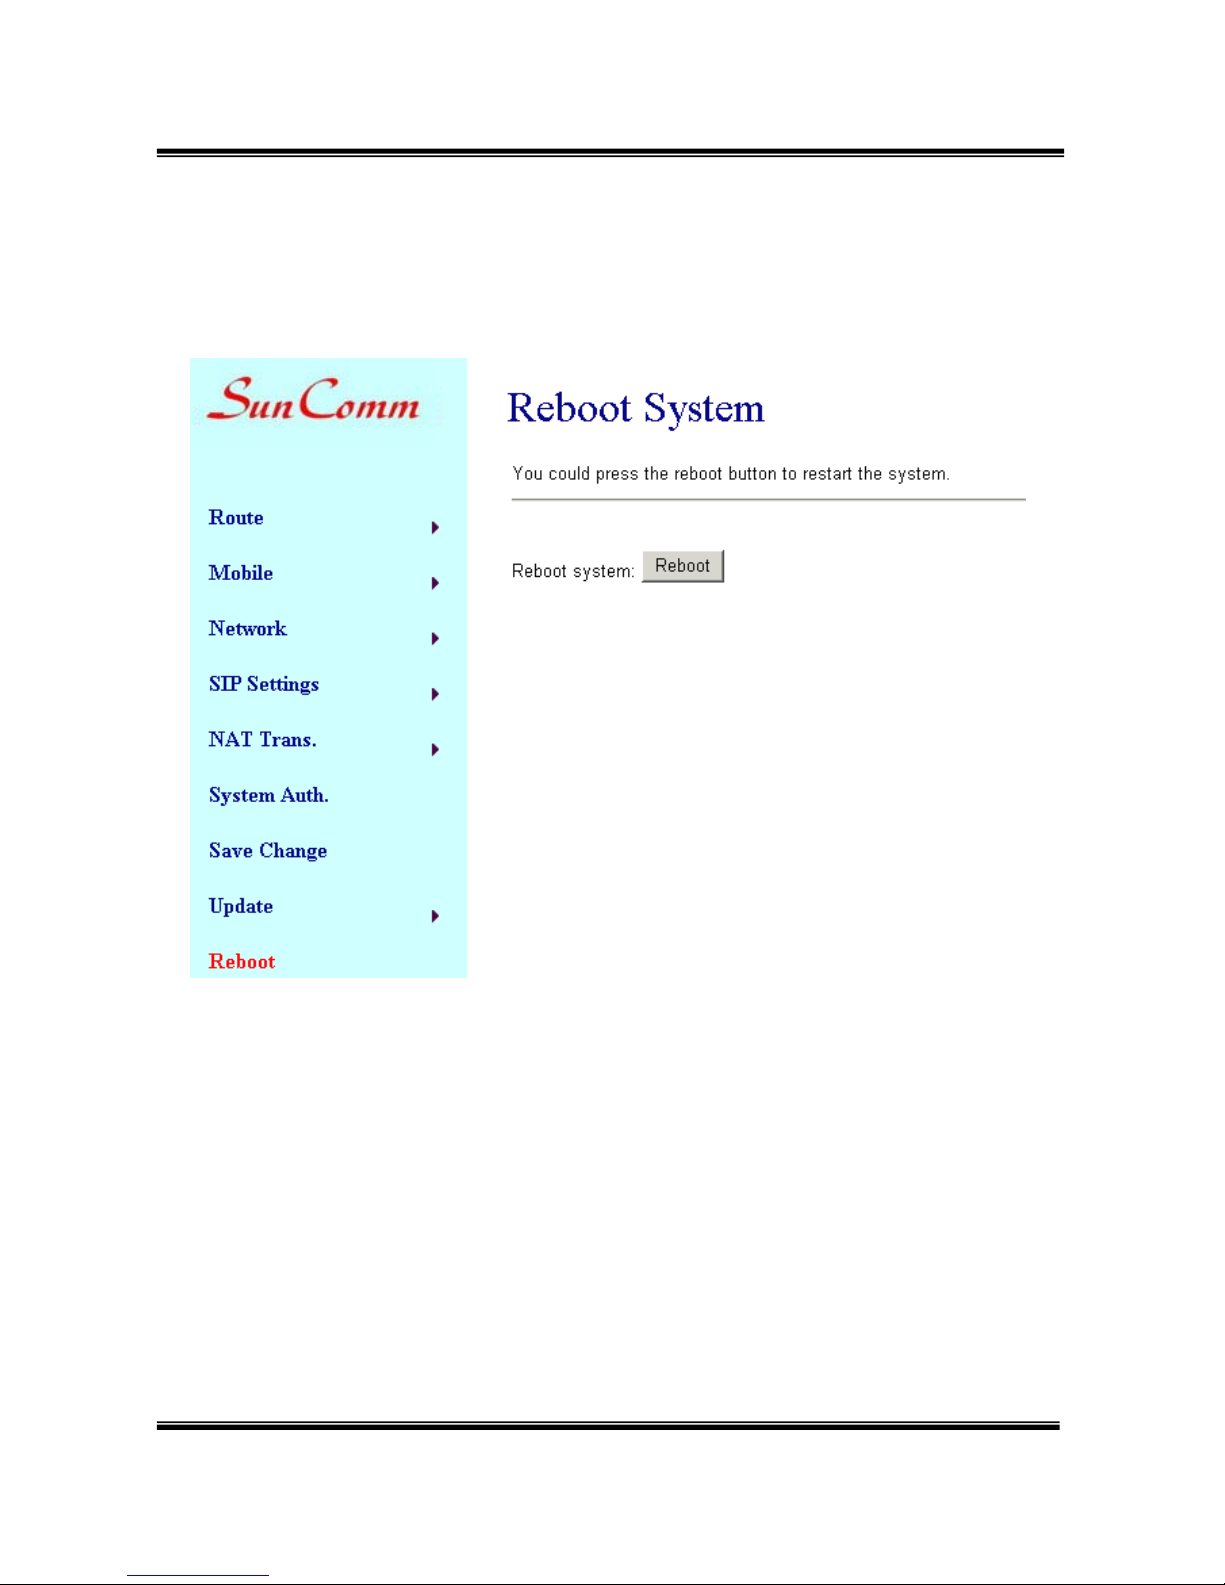
16.Reboot
In this page, you could click the Reboot button to restart the system.
Page 38

-36-
17. Setting and checking via IVR
User could get or set some parameters of the system by dialing in the
mobile numbers of the device.
The status or result is reported via
voice response system. In the first 20 seconds after power-on (when
only Mobile light flash), you could dial its mobile numbers. When you
hear the dial tone, press the following codes to set or check the device.
Item Function Code Action
1 Reboot #195#
Reboot the device
2 Factory Reset #198#
Return to default settings
3 Check IP Address #120# IVR announces the current IP
address. Default: 192.168.0.100
4 Check IP Type #121# IVR announces DHCP is on or off.
Default: off
5 Check Network
Mask
#123# IVR announces the current network
mask. Default: 255.255.255.0
6 Check Gateway
IP Address
#124# IVR announces the current gateway
IP address. Default: 192.168.0.254
7 Check Primary
DNS Server
#125#
IVR announces the current setting in
the Primary DNS field.
Default: 192.168.0.1
8 Check Firmware
Version
#128#
IVR announces the version of the
firmware.
9 Set as DHCP
client
#111#
The system is changed to DHCP
Client type
10 Set Static IP
Address
#112xxx*xx
x*xxx*xxx#
DHCP is disable and system is
changed to static IP type.
Enter IP address using numbers on
the telephone keypad. Use the *
(star) key when entering a decimal
point.
11 Set Network Mask #113xxx*xx Must set Static IP first.
Page 39

-37-
x*xxx*xxx# Enter value using numbers on the
telephone keypad. Use the * (star)
key when entering a decimal point.
12 Set Gateway IP
Address
#114xxx*xx
x*xxx*xxx#
Must set Static IP first.
Enter IP address using numbers on
the telephone keypad. Use the *
(star) key when entering a decimal
point.
13 Set Primary DNS
Server
#115xxx*xx
x*xxx*xxx#
Must set Static IP first.
Enter IP address using numbers on
the telephone keypad. Use the *
(star) key when entering a decimal
point.
Page 40

-38-
18.Specification
18.1 Protocols
SIP (RFC2543, RFC3261)
18.2 TCP/IP
IP/TCP/UDP/RTP/RTCP/
CMP/ARP/RARP/SNTP
DHCP/DNS Client
IEEE802.1P/Q
ToS/DiffServ
NAT Traversal
STUN
uPnP
IP Assignment
Static IP
DHCP
PPPoE
18.3 Codec
G.711 u-Law
G.711 a-Law
G.723.1 (5.3k)
G.723.1 (6.3k)
G.729A
G.729A/B
18.4 Voice Quality
VAD
CNG
AEC, LEC
Packet loss
18.5 GSM (
SC-375)
Dual BAND: 900/1800 MHZ
Tri BAND: 900/1800/1900 MHZ
Quad BAND: 900/1800/1900/850 MHZ
Page 41

-39-
19. Applications
1.Connect to VoipBuster
a). Register VoipBuster account at Service Domain.
b). Route setting: Mobile to Lan set: *,*
When you call in GSM number of
SC-375, you can enter destination
number that will dial out from VoipBuster. (Landline is free, GSM rate
is cheap)
2.How to apply 2 sets of
SC-375?
(1) When you call the no.1
SC-375 gsm number, it will provide dial tone
and you enter a destination number. Then no.2
SC-375 will dial this
number and connect.
Step 1:no.1
SC-375: mobile to lan set route table *,*
Step 2:no.2
SC-375:lan to mobile set route table *,#
Step 3:Additionally, two pcs
SC-375 both need to register proxy
server.
Step 4:And proxy server set the route that the prefix of destination
number to dial out from no.2
SC-375.
(2) When you call the no.1 SC-375 gsm number,no.2 SC-375 will dial
this specific number and connect
Step 1:no.1
SC-375: mobile to lan set route table *, specific
destination number
Step 2:no.2
SC-375:lan to mobile set route table *,#
Step 3:Additionally, two pcs
SC-375 both need to register proxy
server.
Step 4:And proxy server set the route that the prefix of destination
number to dial out from no.2
SC-375.
Page 42

-40-
20. Simple Steps
Step 1. Change the Network setting if you need (Network/network setting)
Step 2. Register SIP proxy Server or Asterisk or VoipBuster if you need
(SIP setting/service domain)
Step 3. Set Route ( request )
Mobile to Lan:
(1) *,* --->it is two stage dialing.
when mobile call in, SC-375 will provide dial tone and you can enter ip or
asterisk extension or phone number.
●
If you want to enter phone number, please note your asterisk need to have
route of destination number.
(2) *, specific extension or IP or phone number
when mobile call in, SC-375 will connect with this specific extension or IP or
phone number auto
●
If you want to set specific phone number, please note your Asterisk need to
have route of destination number.
Lan to Mobile:
(1) *,* --->it is two stage dialing.
when lan phone call in, SC-375 will provide dial tone and you can enter mobile
number.
(2) *, specific mobile number
when lan phone call in, SC-375 will connect with the specific mobile number
auto.
(3) *,#--->It is 1 stage dialing
When lan phone and SC-375 both register Asterisk,
you can dial any destination number from lan phone directly.
●
Please note: Asterisk need to set route of destination number that dial out
from SC-375
● All changes both need to click "save and change"
Page 43

-41-
21. Appendix: Setup SC-375 with Asterisk
21.1 Usage
A typical usage of such a gateway is to be able to give a call with your
normal mobile to any destination at voip cost :
Your mobile <----gsm network----> SC-375 <--lan--> Asterisk
<--internet--> VOIP provider <--whatever--> landline
To do such a call, you just call your SC-375 number (it has its own
simcard), then you get an invitation tone, then you dial the number which
is handled by Asterisk.
If you have some special deals with your mobile operator, like free
special number, you can call your SC-375 for free.
You can then call all around the world from your mobile at voip cost :-)
21.2 SC-375 Configuration
Once you've configured everything in the box, one good advice is to
unplug the power and to restart it. By this way you sould have all the
parameters taken into account.
To have the SC-375 to work with Asterisk, you need first to configure the
box.
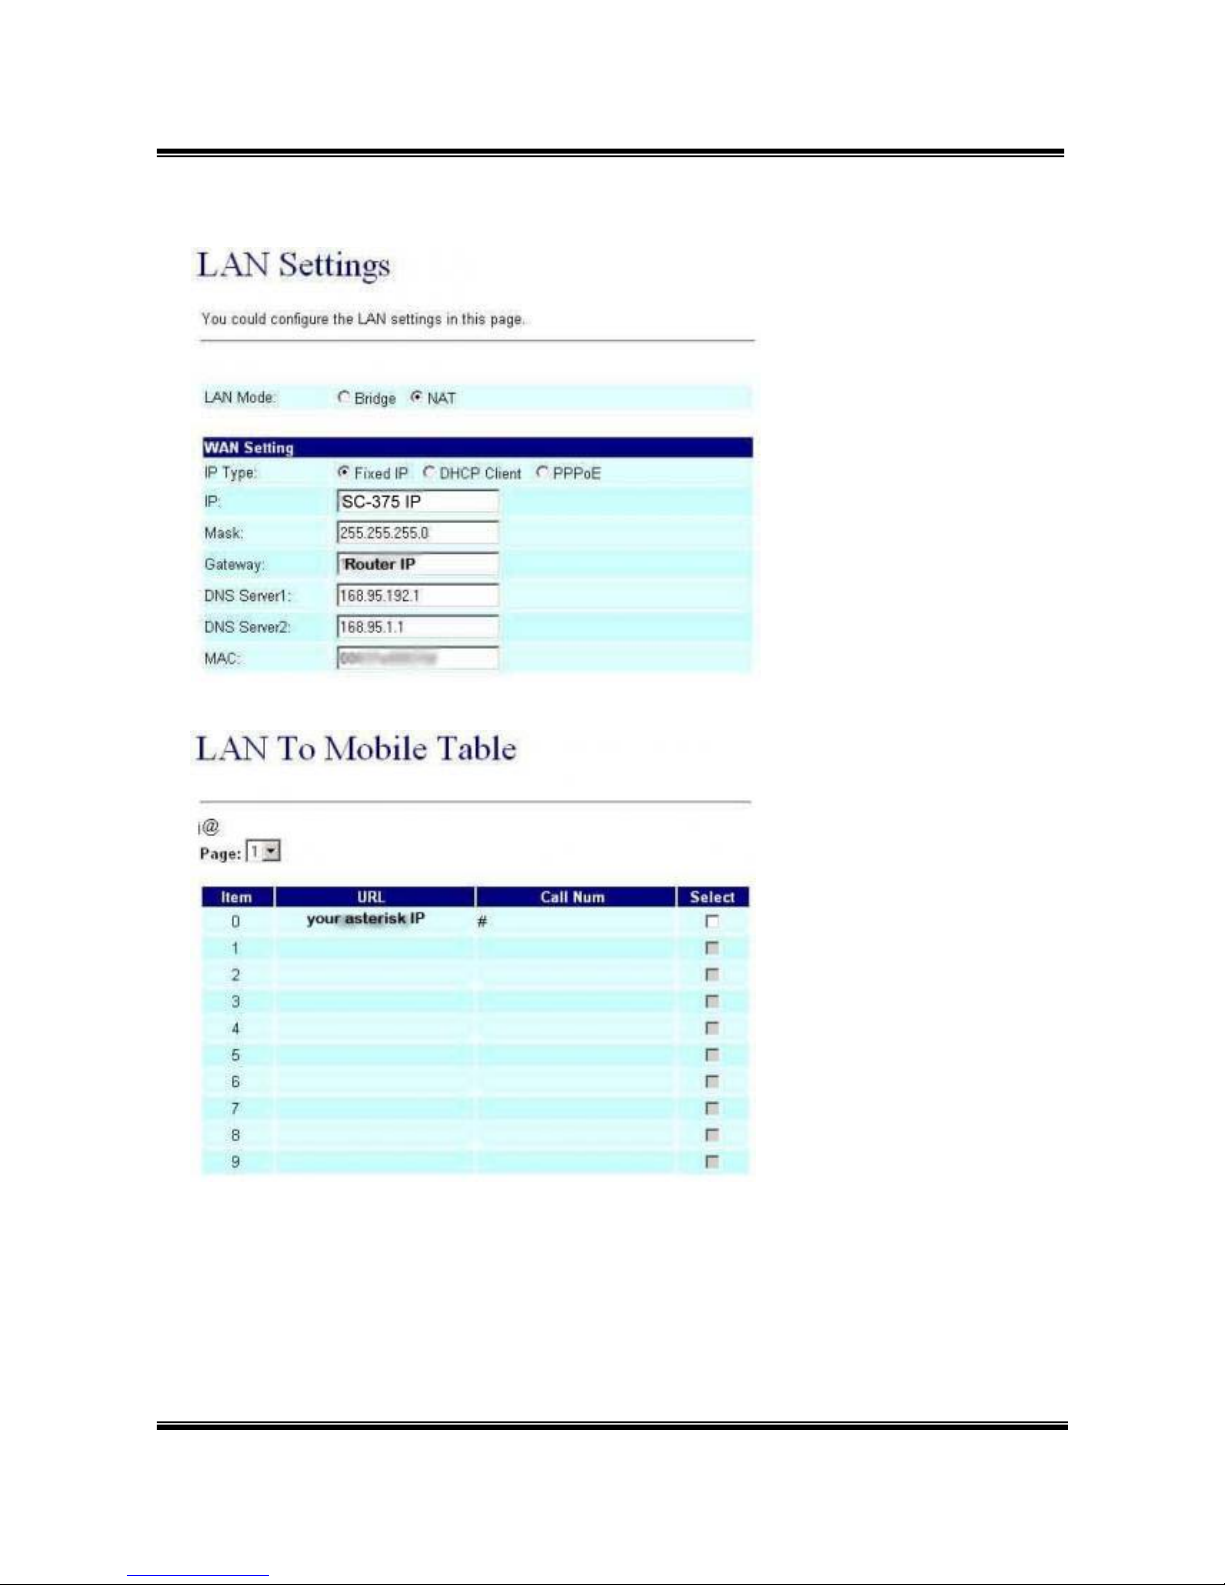
Here are some screen shots showing all the important parameters.
You have to note that in all the configuration process, the SC-375 is
considered as extension '103' of the IPBX.
In Bold are the parameters depending on your installation
Page 44
-42-
Here the '#' is important to avoid the two stage dialing when you give a
call from Asterisk to GSM.
Page 45
-43-
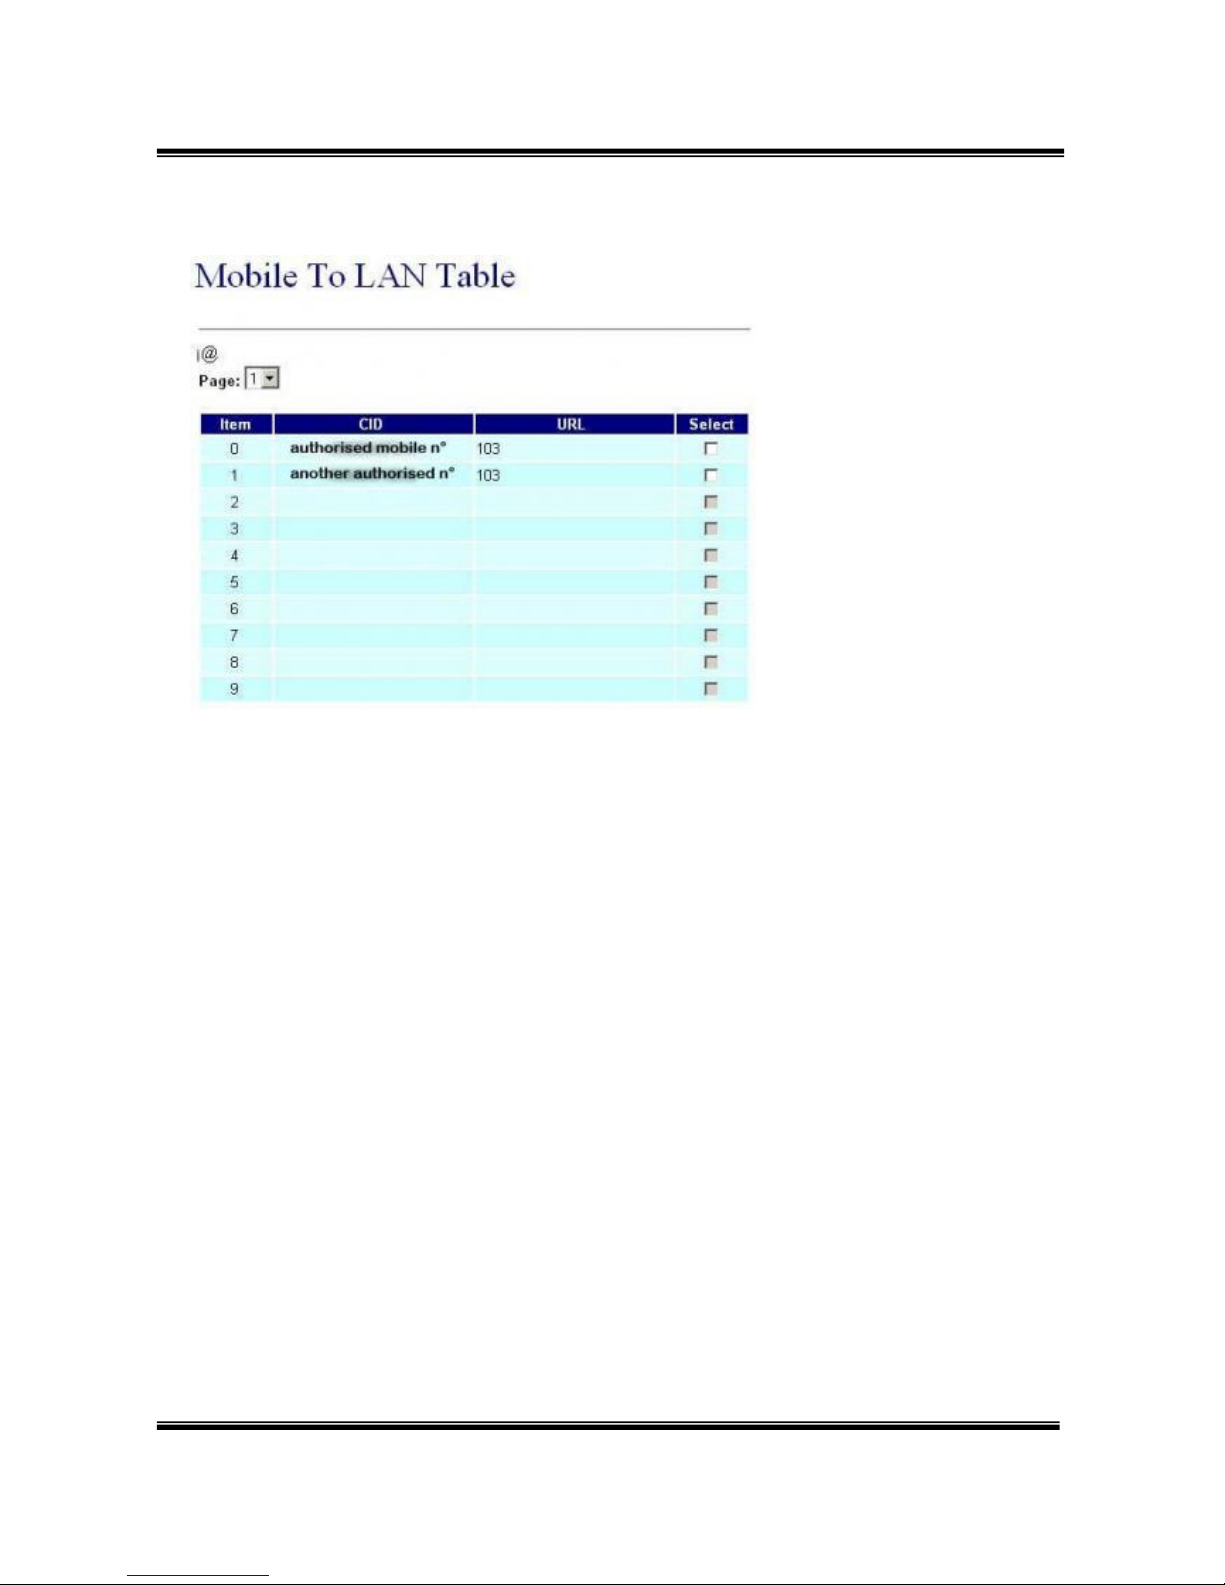
The mobile number you give in that page are the authorised mobile
which can call GSM to Asterisk.
These mobile number must be defined as your GSM provider displays
the number.
If you don't know how it is displayed, just give a call to the box and check
the number given in the 'Incoming Mob' field of the 'Mobile Status' page.
Any number which is not in that list won't have acces to the LAN side, so
to Asterisk.
If you want to allow any number, just set '*' in that field ... but beware of
the bill ;-)
Page 46
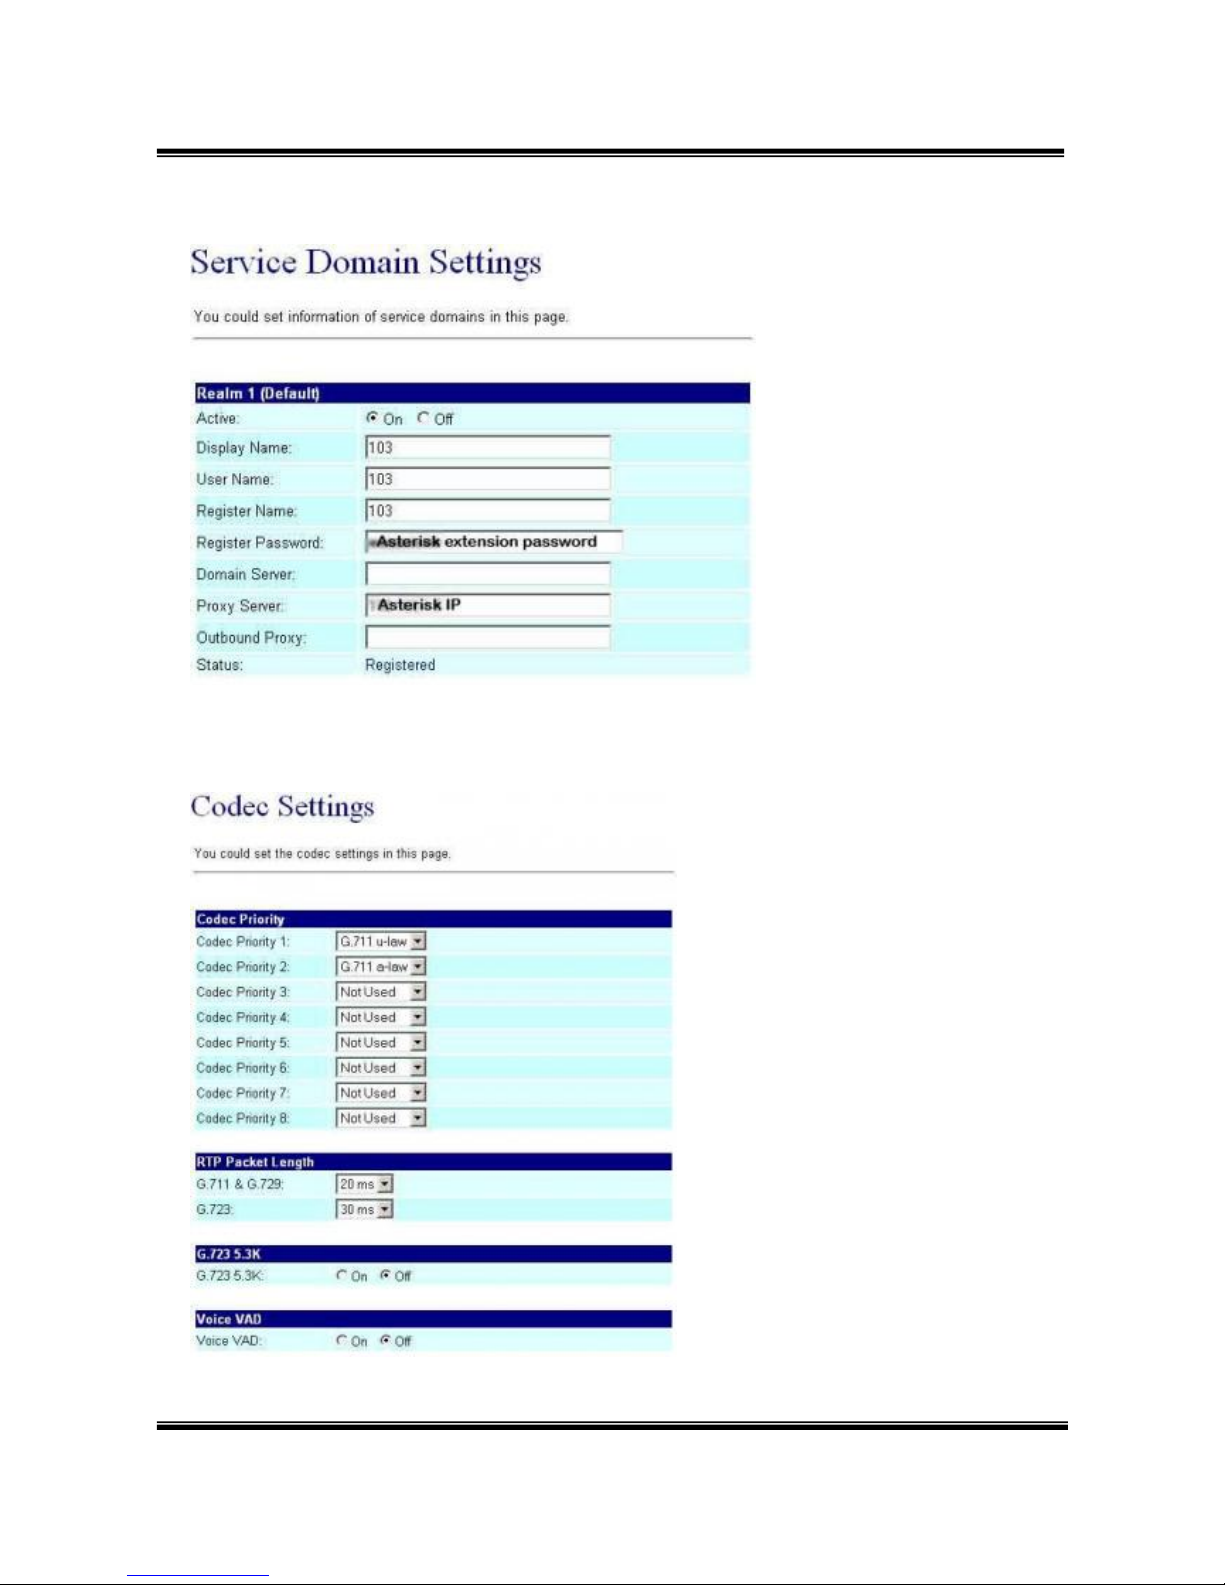
-44-
Once Asterisk configuration is made, you should get 'Registered' on the
Realm1.
Page 47
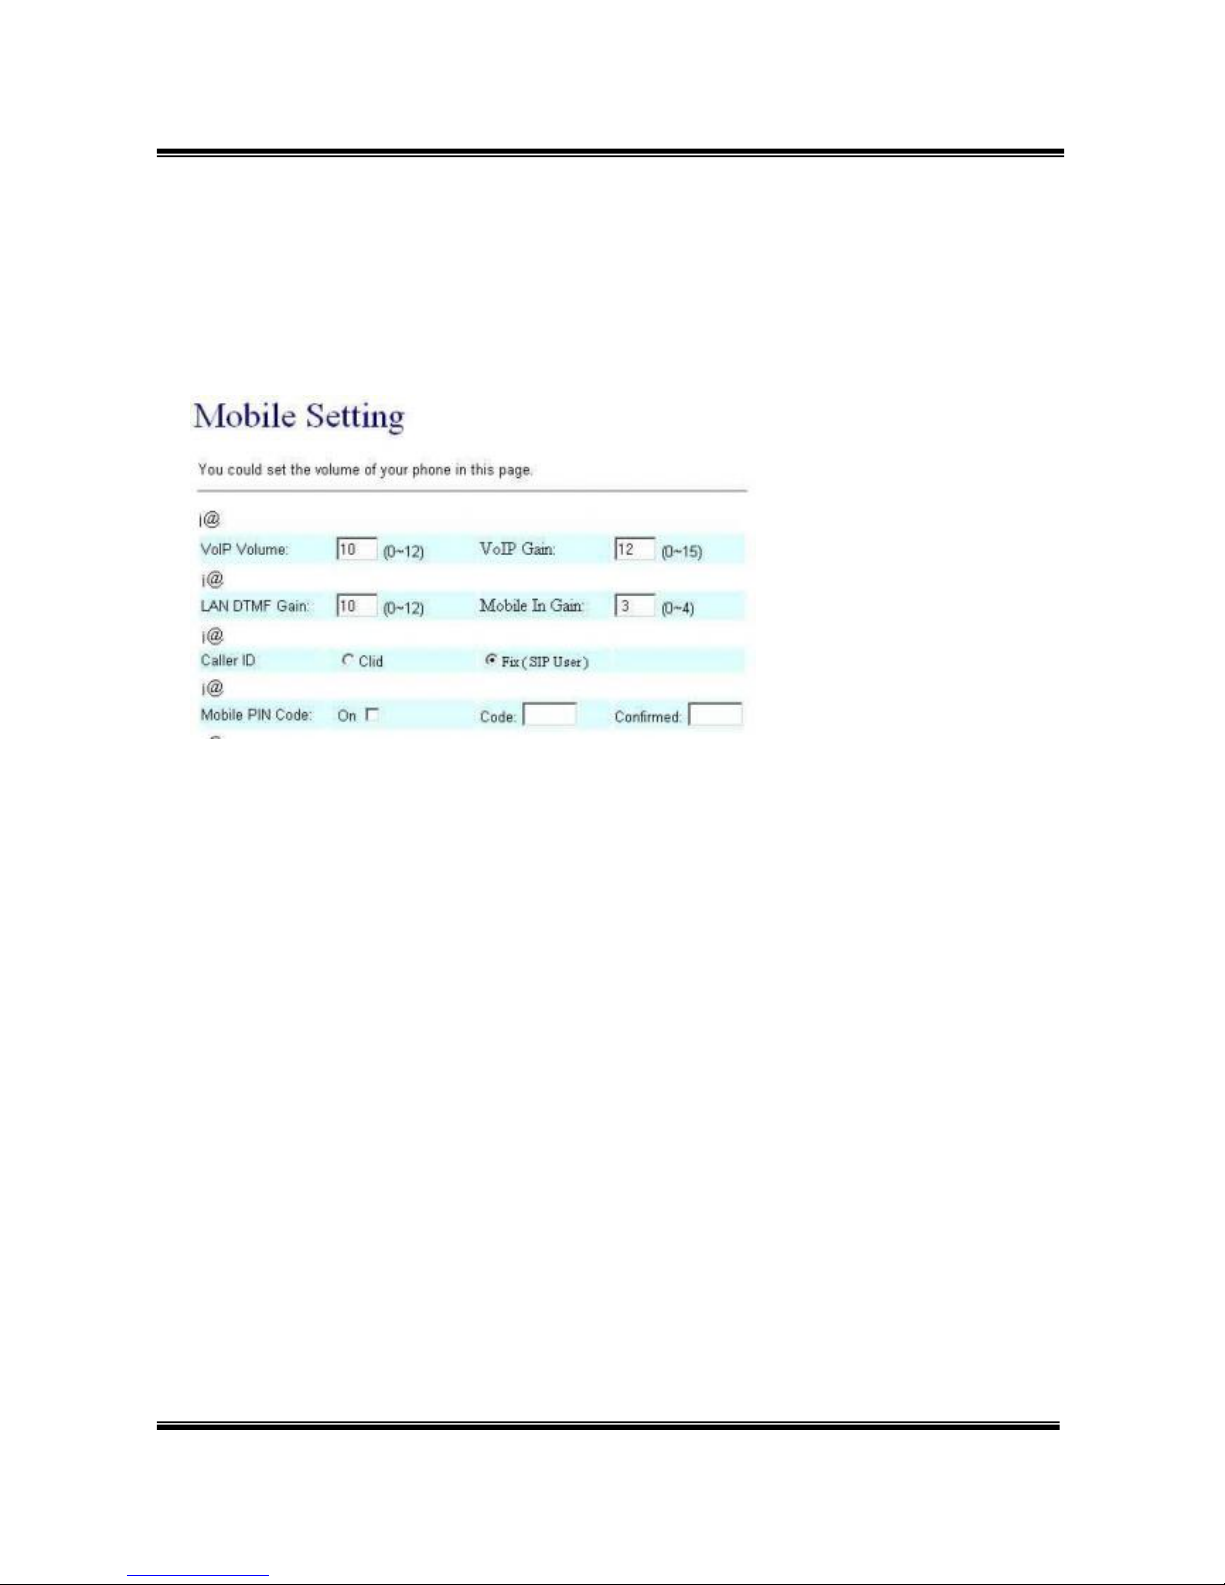
-45-
It is very important to use only ulaw or alaw as all DTMF is inband.
So if you want to be able to do some DISA when you call from GSM to
Asterisk, it has to be one of these 2 codecs.
These settings seem to be ok, just adjust ...
21.3 Antenna position
Another important thing is to properly place the provided antenna.
If your gsm reception is good, you should get around 18 or 19 as Signal
Quality in the "Mobile Status" page.
With that level of signal quality, your audio quality will be very good.
On the other end, I've experienced that with a signal quality down to 11,
audio becomes very jerky.
So, maximum signal quality = maximum audio quality.
21.4 Asterisk configuration
Once the SC-375 is set, you have to configure Asterisk.
On that side, you have to setup files as follow :
21.5 sip.conf
; GSM VOIP Gateway SC-375
[103]
Page 48

-46-
type=friend
username=103
fromuser=103
regexten=103 ; When they register, create extension 401
secret=xxxxxxx ; Asterisk extension password
context=gateway ; Incoming calls context
dtmfmode=inband ; Very important for DISA to work
call-limit=1 ; Limit to 1 call max
callerid=GSM Gateway <103>
host=dynamic
nat=no ; Gateway is not behind a NAT router
canreinvite=no ; Typically set to NO if behind NAT
insecure=very
qualify=yes
disallow=all
allow=ulaw ; prefered codec for DTMF detection
allow=alaw
21.6 extensions.conf
; ******* GSM Gateway incoming calls **********
[gateway]
exten => _103,1,Answer()
exten => _103,2,DigitTimeout(3) ; give enough time to do second stage
dialing
exten => _103,3,ResponseTimeout(5)
exten => _103,4,DISA(no-password|outgoing) ; here 'outgoing' is the
normal context to deal with the dial plan
[outgoing]
...
; example of LAN to GSM call
; call the SC-375 sim card mail box thru GSM
exten => _888,1,SetCallerID("xxxxxxxxxx")
exten => _888,2,Dial(SIP/${EXTEN}@103,60,r)
exten => _888,3,Hangup()
Page 49

-47-
22.How to setup Asterisk to receive Caller ID from
Test version
trixbox-2.2
SIP Softphone
z SJPhone 1.60.289a
z X-Lite 1105x
Modify file
z Add the following setting to/etc/asterisk/sip.conf
[1000]
type=friend
secret=1000
qualify=yes
nat=yes
host=dynamic
canreinvite=no
context=internal
[1001]
type=friend
secret=1001
qualify=yes
nat=yes
host=dynamic
canreinvite=no
context=internal
[1002]
type=friend
secret=1002
Page 50

-48-
qualify=yes
nat=yes
host=dynamic
canreinvite=no
context=internal
z Add the following setting to /etc/asterisk/extensions.conf
[internal]
exten => 1000,1,Dial(SIP/1000)
exten => 1001,1,Dial(SIP/1001)
exten => 1002,1,Dial(SIP/1002)
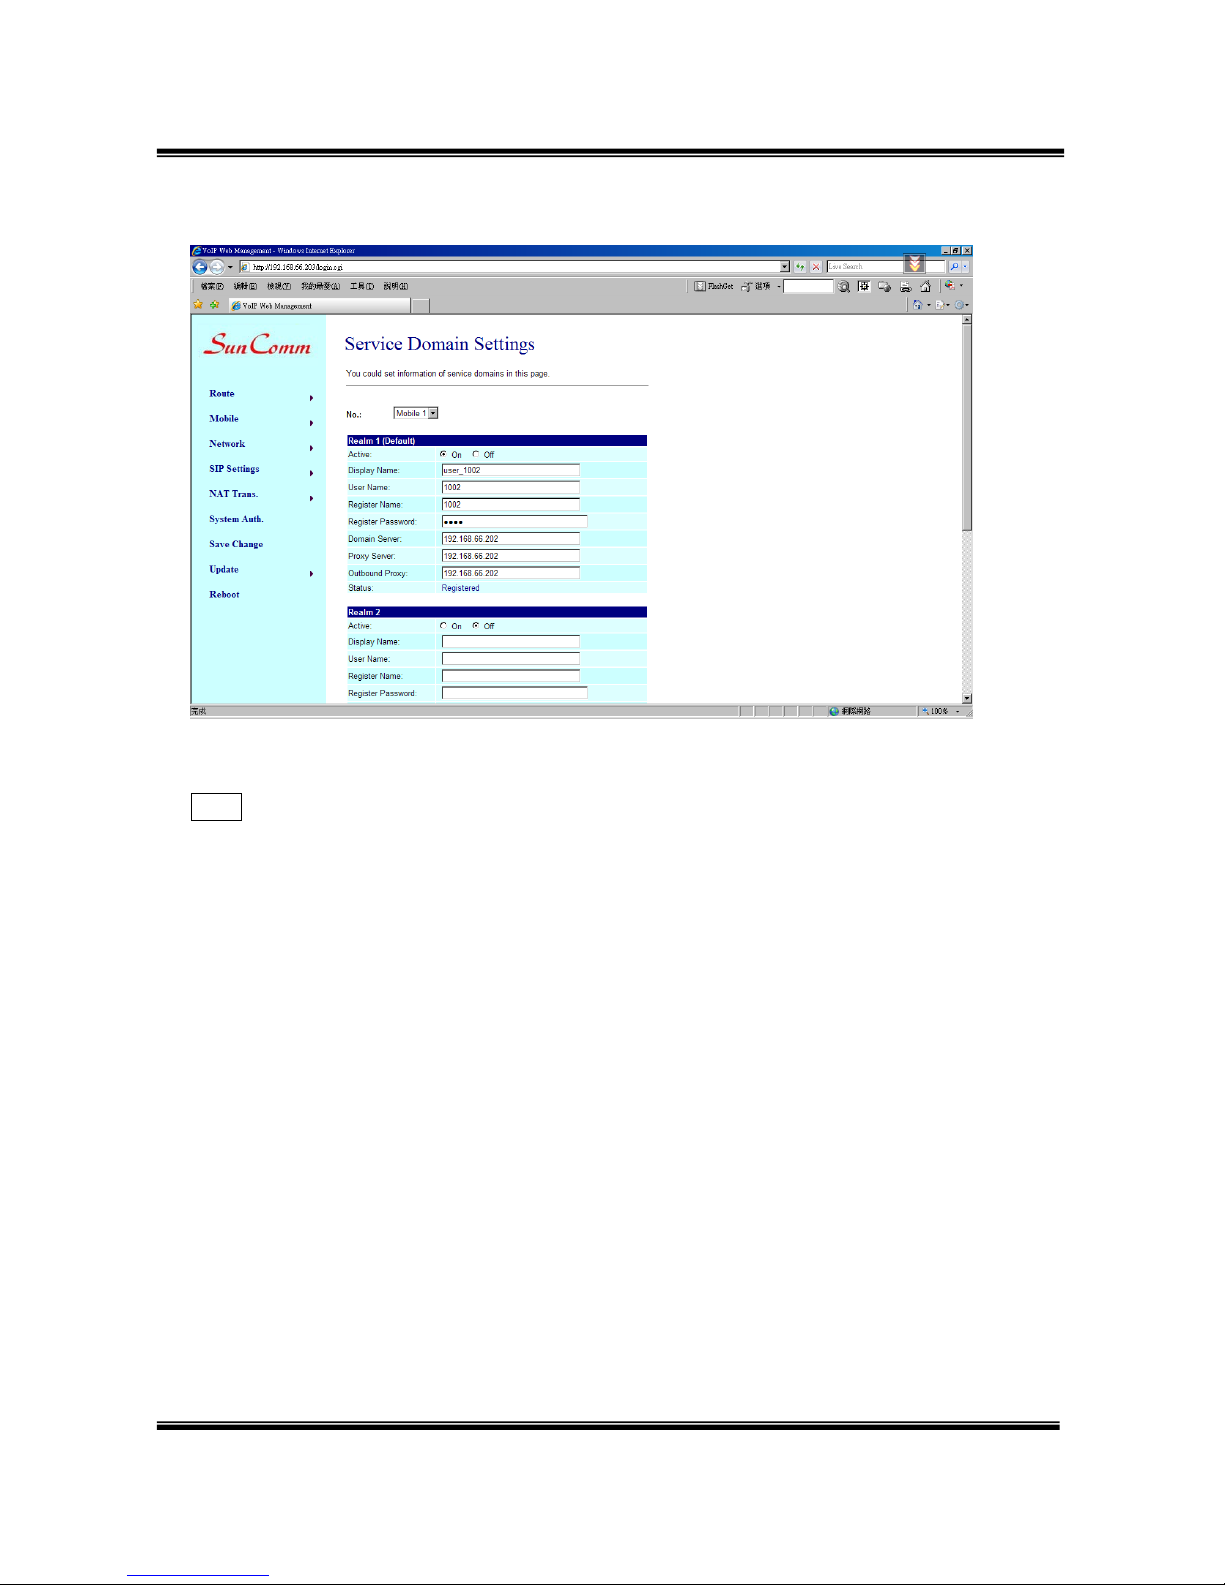
configure:
trixbox-2.2: address=192.168.66.202:5060
SJPhone: address=192.168.66.145:5060; username=1000,
displayname=user_1000
X-Lite: address=192.168.66.145:7331; username=1001, displayname=user_1001
SC-375: address=192.168.66.203:5060; username=1002, displayname=user_1002
Page 51
-49-
test1
pstn Æ call 0928492911(mobile number) Æ SC-375 Æ hear the second dial tone,call
SoftPhone’s number Æ SoftPhone Æ show pstn caller id
This Is X-Lite receiving packet, red word is pstn number. Test ok.
INVITE sip:[email protected]:7331 SIP/2.0
Via: SIP/2.0/UDP 192.168.66.202:5060;branch=z9hG4bK3d0bbaf7;rport
From: "035678238" <sip:[email protected]>;tag=as580472a7
To: <sip:[email protected]:7331>
Contact: <sip:[email protected]>
Call-ID: [email protected]
CSeq: 102 INVITE
User-Agent: Asterisk PBX
Max-Forwards: 70
Date: Tue, 22 May 2007 02:50:37 GMT
Allow: INVITE, ACK, CANCEL, OPTIONS, BYE, REFER, SUBSCRIBE, NOTIFY
Page 52

-50-
Content-Type: application/sdp
Content-Length: 242
v=0
o=root 2737 2737 IN IP4 192.168.66.202
s=session
c=IN IP4 192.168.66.202
t=0 0
m=audio 15852 RTP/AVP 0 8 101
a=rtpmap:0 PCMU/8000
a=rtpmap:8 PCMA/8000
a=rtpmap:101 telephone-event/8000
a=fmtp:101 0-16
a=silenceSupp:off - - - -
SIP/2.0 200 Ok
Via: SIP/2.0/UDP 192.168.66.202:5060;branch=z9hG4bK3d0bbaf7;rport
From: "035678238" <sip:[email protected]>;tag=as580472a7
To: <sip:[email protected]:7331>;tag=677373503
Contact: <sip:[email protected]:7331>
Call-ID: [email protected]
CSeq: 102 INVITE
Content-Type: application/sdp
Server: X-Lite release 1105x
Content-Length: 254
v=0
o=1001 4804366 4807851 IN IP4 192.168.66.145
s=X-Lite
c=IN IP4 192.168.66.145
t=0 0
m=audio 8000 RTP/AVP 0 8 3 101
a=rtpmap:0 pcmu/8000
Page 53

-51-
a=rtpmap:8 pcma/8000
a=rtpmap:3 gsm/8000
a=rtpmap:101 telephone-event/8000
a=fmtp:101 0-15
a=sendrecv
test 2
SoftPhone Æ call 1002 Æ SC-375 Æ hear second dial tone and call pstn Æ pstn
answer Æ show caller id-mobile number 0928492911
This Is X-Lite receiving packet. Test ok.
INVITE sip:[email protected] SIP/2.0
Via: SIP/2.0/UDP
192.168.66.145:7331;rport;branch=z9hG4bK4C4315351FC84CA582D14FB8C25F
C3BF
From: user_1001 <sip:[email protected]:7331>;tag=1121869743
To: <sip:[email protected]>
Contact: <sip:[email protected]:7331>
Call-ID: [email protected]
CSeq: 63148 INVITE
Proxy-Authorization: Digest
username="1001",realm="asterisk",nonce="0d3b2879",response="8aaaaa5b5ad53
654bf0a2ab0fa9bb118",uri="sip:[email protected]",algorithm=MD5
Max-Forwards: 70
Content-Type: application/sdp
User-Agent: X-Lite release 1105x
Content-Length: 254
v=0
o=1001 5111461 5111501 IN IP4 192.168.66.145
s=X-Lite
Page 54

-52-
c=IN IP4 192.168.66.145
t=0 0
m=audio 8000 RTP/AVP 0 8 3 101
a=rtpmap:0 pcmu/8000
a=rtpmap:8 pcma/8000
a=rtpmap:3 gsm/8000
a=rtpmap:101 telephone-event/8000
a=fmtp:101 0-15
a=sendrecv
SIP/2.0 200 OK
Via: SIP/2.0/UDP
192.168.66.145:7331;branch=z9hG4bK4C4315351FC84CA582D14FB8C25FC3BF
;received=192.168.66.145;rport=7331
From: user_1001 <sip:[email protected]:7331>;tag=1121869743
To: <sip:[email protected]>;tag=as2a2fbf98
Call-ID: [email protected]
CSeq: 63148 INVITE
User-Agent: Asterisk PBX
Allow: INVITE, ACK, CANCEL, OPTIONS, BYE, REFER, SUBSCRIBE, NOTIFY
Contact: <sip:[email protected]>
Content-Type: application/sdp
Content-Length: 242
v=0
o=root 2737 2737 IN IP4 192.168.66.202
s=session
c=IN IP4 192.168.66.202
t=0 0
m=audio 13798 RTP/AVP 0 8 101
a=rtpmap:0 PCMU/8000
a=rtpmap:8 PCMA/8000
a=rtpmap:101 telephone-event/8000
Page 55

-53-
a=fmtp:101 0-16
a=silenceSupp:off - - - -
register issue
The packet date from Asterisk as follows.
Please note, user_1002’s display name don’t appear
So the website’s Display Name is not available
<-- SIP read from 192.168.66.203:5060:
REGISTER sip:192.168.66.202 SIP/2.0
Via: SIP/2.0/UDP
192.168.66.203:5060;rport;branch=z9hG4bK590e92b551233a10a0ae71944c19b5
aa
From: <sip:[email protected]>;tag=4e36d8f1
To: <sip:[email protected]>
Call-ID: [email protected]
Contact: <sip:[email protected]:5060>
CSeq: 10 REGISTER
Expires: 300
Authorization: Digest
username="1002",realm="asterisk",nonce="3ca93a1e",response="4d39ccb0dae64
bb2f1341e9896ac1ea7",uri="sip:192.168.66.202",algorithm=MD5
User-Agent: CMI CM5K
Content-Length: 0
--- (11 headers 0 lines) ---
Using latest REGISTER request as basis request
Sending to 192.168.66.203 : 5060 (NAT)
Transmitting (NAT) to 192.168.66.203:5060:
SIP/2.0 100 Trying
Via: SIP/2.0/UDP
192.168.66.203:5060;branch=z9hG4bK590e92b551233a10a0ae71944c19b5aa;rec
Page 56

-54-
eived=192.168.66.203;rport=5060
From: <sip:[email protected]>;tag=4e36d8f1
To: <sip:[email protected]>
Call-ID: [email protected]
CSeq: 10 REGISTER
User-Agent: Asterisk PBX
Allow: INVITE, ACK, CANCEL, OPTIONS, BYE, REFER, SUBSCRIBE, NOTIFY
Contact: <sip:[email protected]>
Content-Length: 0
---
Transmitting (NAT) to 192.168.66.203:5060:
SIP/2.0 401 Unauthorized
Via: SIP/2.0/UDP
192.168.66.203:5060;branch=z9hG4bK590e92b551233a10a0ae71944c19b5aa;rec
eived=192.168.66.203;rport=5060
From: <sip:[email protected]>;tag=4e36d8f1
To: <sip:[email protected]>;tag=as13a32ae8
Call-ID: [email protected]
CSeq: 10 REGISTER
User-Agent: Asterisk PBX
Allow: INVITE, ACK, CANCEL, OPTIONS, BYE, REFER, SUBSCRIBE, NOTIFY
WWW-Authenticate: Digest algorithm=MD5, realm="asterisk", nonce="5def9231"
Content-Length: 0
---
Scheduling destruction of call
'[email protected]' in 15000 ms
asterisk1*CLI>
<-- SIP read from 192.168.66.203:5060:
REGISTER sip:192.168.66.202 SIP/2.0
Page 57

-55-
Via: SIP/2.0/UDP
192.168.66.203:5060;rport;branch=z9hG4bK672fa67f59c2223275f5ee286d27597a
From: <sip:[email protected]>;tag=4e36d8f1
To: <sip:[email protected]>
Call-ID: [email protected]
Contact: <sip:[email protected]:5060>
CSeq: 11 REGISTER
Expires: 300
Authorization: Digest
username="1002",realm="asterisk",nonce="5def9231",response="046a412f4e7ed4
e98fd507416994a80a",uri="sip:192.168.66.202",algorithm=MD5
User-Agent: CMI CM5K
Content-Length: 0
--- (11 headers 0 lines) ---
Using latest REGISTER request as basis request
Sending to 192.168.66.203 : 5060 (NAT)
Transmitting (NAT) to 192.168.66.203:5060:
SIP/2.0 100 Trying
Via: SIP/2.0/UDP
192.168.66.203:5060;branch=z9hG4bK672fa67f59c2223275f5ee286d27597a;recei
ved=192.168.66.203;rport=5060
From: <sip:[email protected]>;tag=4e36d8f1
To: <sip:[email protected]>
Call-ID: [email protected]
CSeq: 11 REGISTER
User-Agent: Asterisk PBX
Allow: INVITE, ACK, CANCEL, OPTIONS, BYE, REFER, SUBSCRIBE, NOTIFY
Contact: <sip:[email protected]>
Content-Length: 0
Page 58

-56-
---
12 headers, 0 lines
Reliably Transmitting (NAT) to 192.168.66.203:5060:
OPTIONS sip:[email protected]:5060 SIP/2.0
Via: SIP/2.0/UDP 192.168.66.202:5060;branch=z9hG4bK7b92dd8a;rport
From: "Unknown" <sip:[email protected]>;tag=as5dee3942
To: <sip:[email protected]:5060>
Contact: <sip:[email protected]>
Call-ID: [email protected]
CSeq: 102 OPTIONS
User-Agent: Asterisk PBX
Max-Forwards: 70
Date: Tue, 22 May 2007 03:11:54 GMT
Allow: INVITE, ACK, CANCEL, OPTIONS, BYE, REFER, SUBSCRIBE, NOTIFY
Content-Length: 0
---
Transmitting (NAT) to 192.168.66.203:5060:
SIP/2.0 200 OK
Via: SIP/2.0/UDP
192.168.66.203:5060;branch=z9hG4bK672fa67f59c2223275f5ee286d27597a;recei
ved=192.168.66.203;rport=5060
From: <sip:[email protected]>;tag=4e36d8f1
To: <sip:[email protected]>;tag=as13a32ae8
Call-ID: [email protected]
CSeq: 11 REGISTER
User-Agent: Asterisk PBX
Allow: INVITE, ACK, CANCEL, OPTIONS, BYE, REFER, SUBSCRIBE, NOTIFY
Expires: 300
Contact: <sip:[email protected]:5060>;expires=300
Date: Tue, 22 May 2007 03:11:54 GMT
Content-Length: 0
Page 59

-57-
SunComm
Technology Co., Ltd.
Tel: 886-2-32341496
Fax: 886-2-32341393
E-mail: [email protected] Website: www.suncomm.com.tw
 Loading...