

Page 1
ITM./ART. 774098
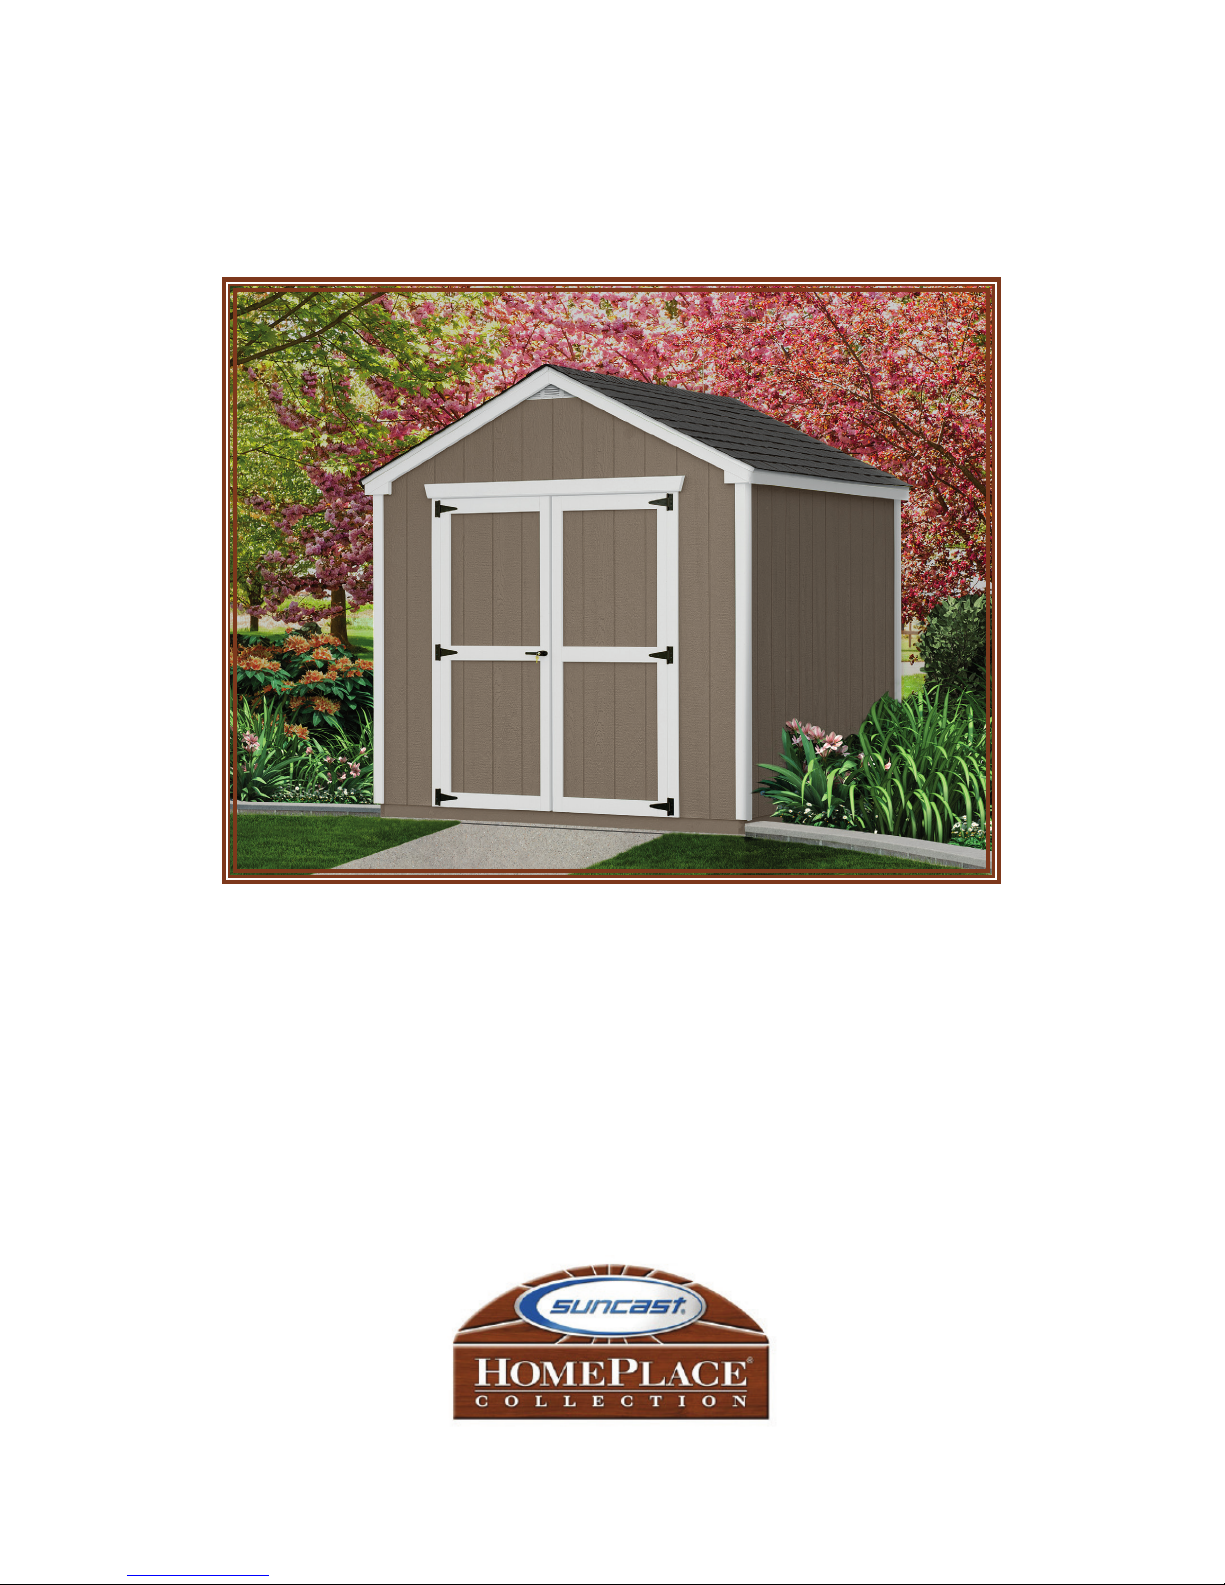
8x8 Wooden Shed
Assembly Manual
(Shown with customer-supplied paint and shingles)
Questions? Call toll-free 866-768-8465
Monday-Friday, 8:00 a.m. to 5:00 p.m. EST
0660154
© SuncaSt corporation
Page 2
IMPORTANT
• Basic carpentry skills are required to construct this shed. Professional installation is
recommended if you are unfamiliar with basic wood-frame construction.
Before You Begin...
• Consult your local authorities for any permits required to construct shed.
Prior to the construction of your shed, check with the local building code official to review any required
permits or building limitations.
• A level foundation is required before shed construction can begin.
Crushed Rock is required as a base. It should be 3/4 inch stone, at least 4 inches deep. It is very
important to assemble the unit on a firm, level surface.
• Read instructions thoroughly prior to assembly.
is not responsible for replacing parts lost or damaged due to incorrect assembly.
This kit contains parts that can be damaged if assembled incorrectly or in the wrong sequence. Suncast
• Check for all parts before you begin assembly.
• This product contains parts that are used in different orientations to construct the shed.
Please take note of the orientation of the parts shown throughout this instruction manual. Failure to follow
instructions could result in damage to parts. Suncast is not responsible for replacing parts lost or
damaged due to incorrect assembly.
Using the provided parts check list on pages 4 - 7 verify that you have all the parts required to construct
your shed model. COMPLETE SITE PREPARATION BEFORE UNPACKING ALL PARTS.
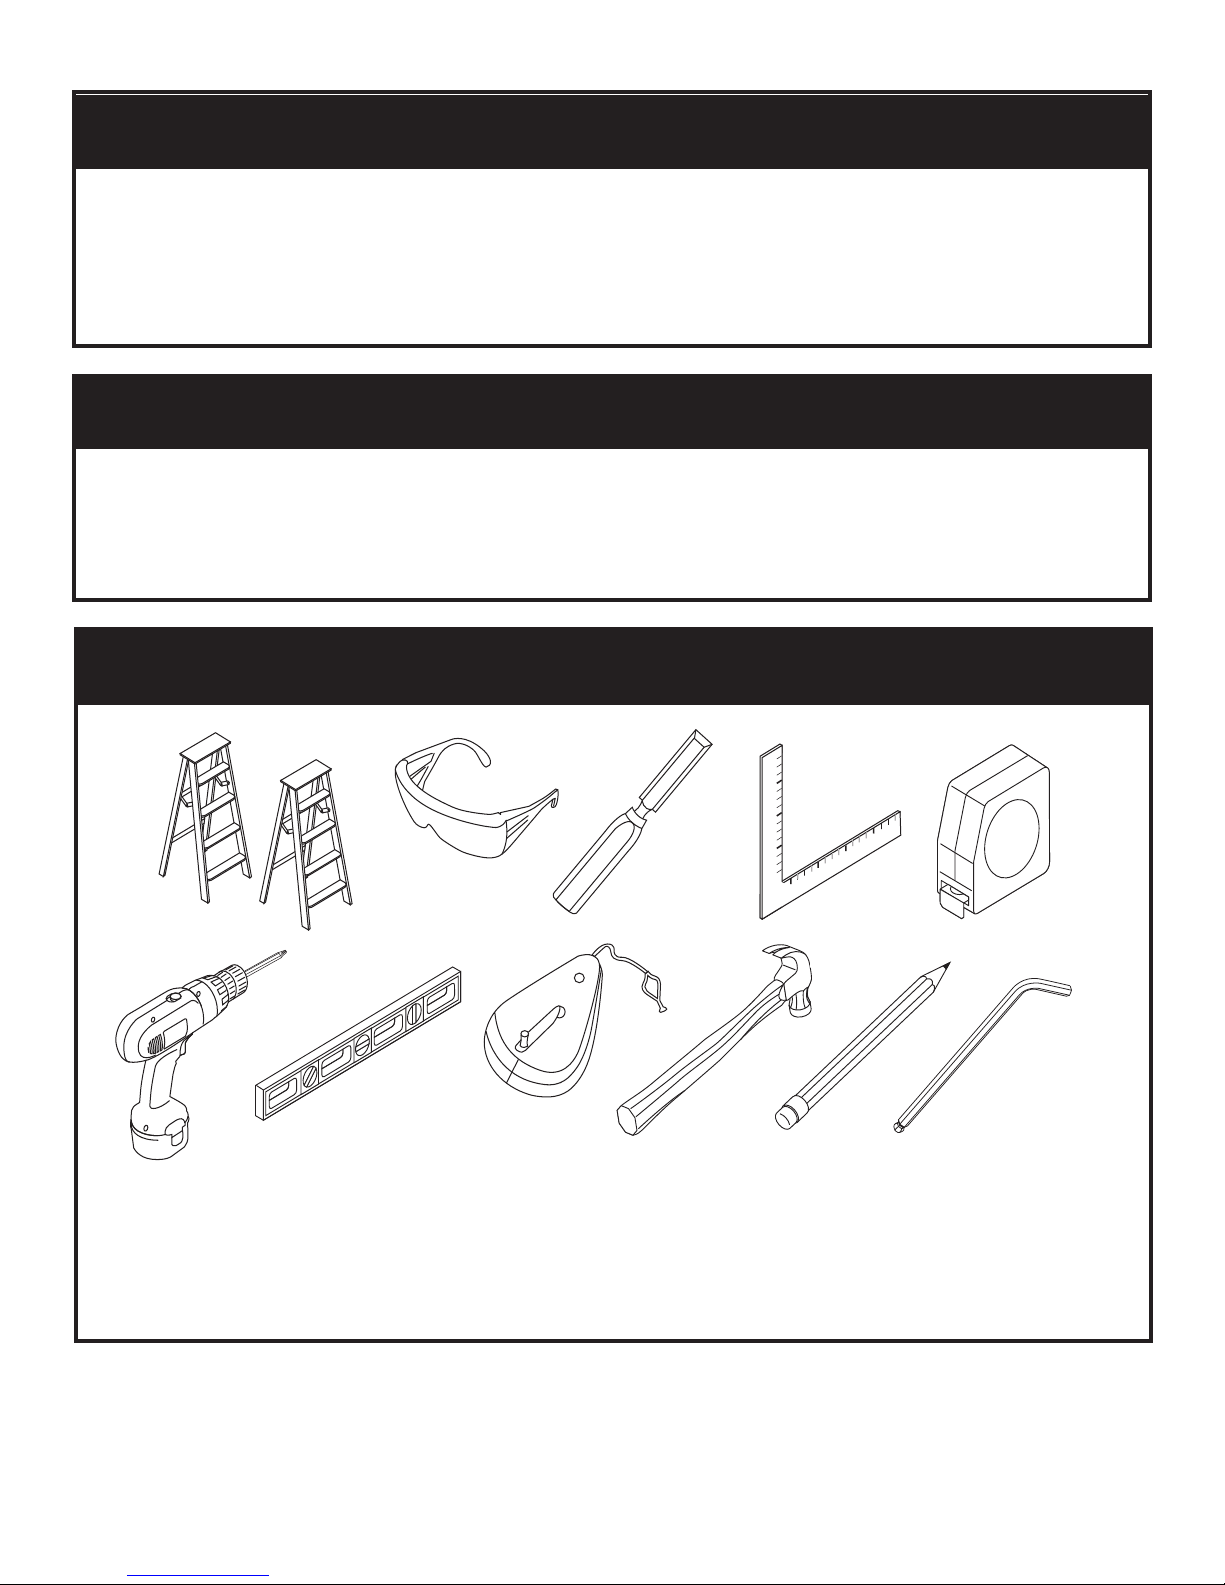
• Gather required tools as listed on page 3.
• Shingles and paint not included. Follow manufacturer’s recommendation
for application of shingles and paint when shed assembly is complete.
• Assistance is required during entire assembly. Three people recommended.
CAUTION
• Proper site preparation required.
• Shed not intended for storage of flammable or caustic chemicals.
• Store heavy items near the bottom of shed.
• Shed not intended for use by children.
• DO NOT stand, sit, or store items on storage shed roof.
• Repair or replace broken parts immediately.
• Suncast is not responsible for damage caused by weather or misuse.
• At regular intervals inspect your shed to make sure that assembly integrity has been maintained.
• Periodically check that the location you have chosen to set your shed is still level.
• This kit contains parts with metal edges. Please be careful when handling.
• Hot items, such as recently used grills, blowtorches, etc., must not be stored in the shed.
page 2
Page 3
Piezas – BMDB12000
Tools needed for installation
5/32
Tools Needed for Installation
Shed Safety and Care
• Unit must be stored completely packaged in a cool, dry place until ready to assemble.
• Many wood pieces (e.g. wall studs) are able to be installed with either end up or down, or turned 180
degrees. In these cases, look at the pieces before attaching them and decide which position is best.
For example, you may hide a blemish on a stud by fastening siding to that side of the stud.
• Look at all the trim pieces before installing, and choose the best ones for the front of the shed.
• Keep roof clean of snow and leaves.
Assembly Day Tips
Assembly Day Tips
• Complete site preparation before unpacking parts and beginning assembly.
• DO NOT attempt to assemble on a day with strong winds.
• DO NOT attempt to assemble on days when temperature is below 32 degrees.
• Wear light duty work gloves while assembling shed.
page 3
Page 4
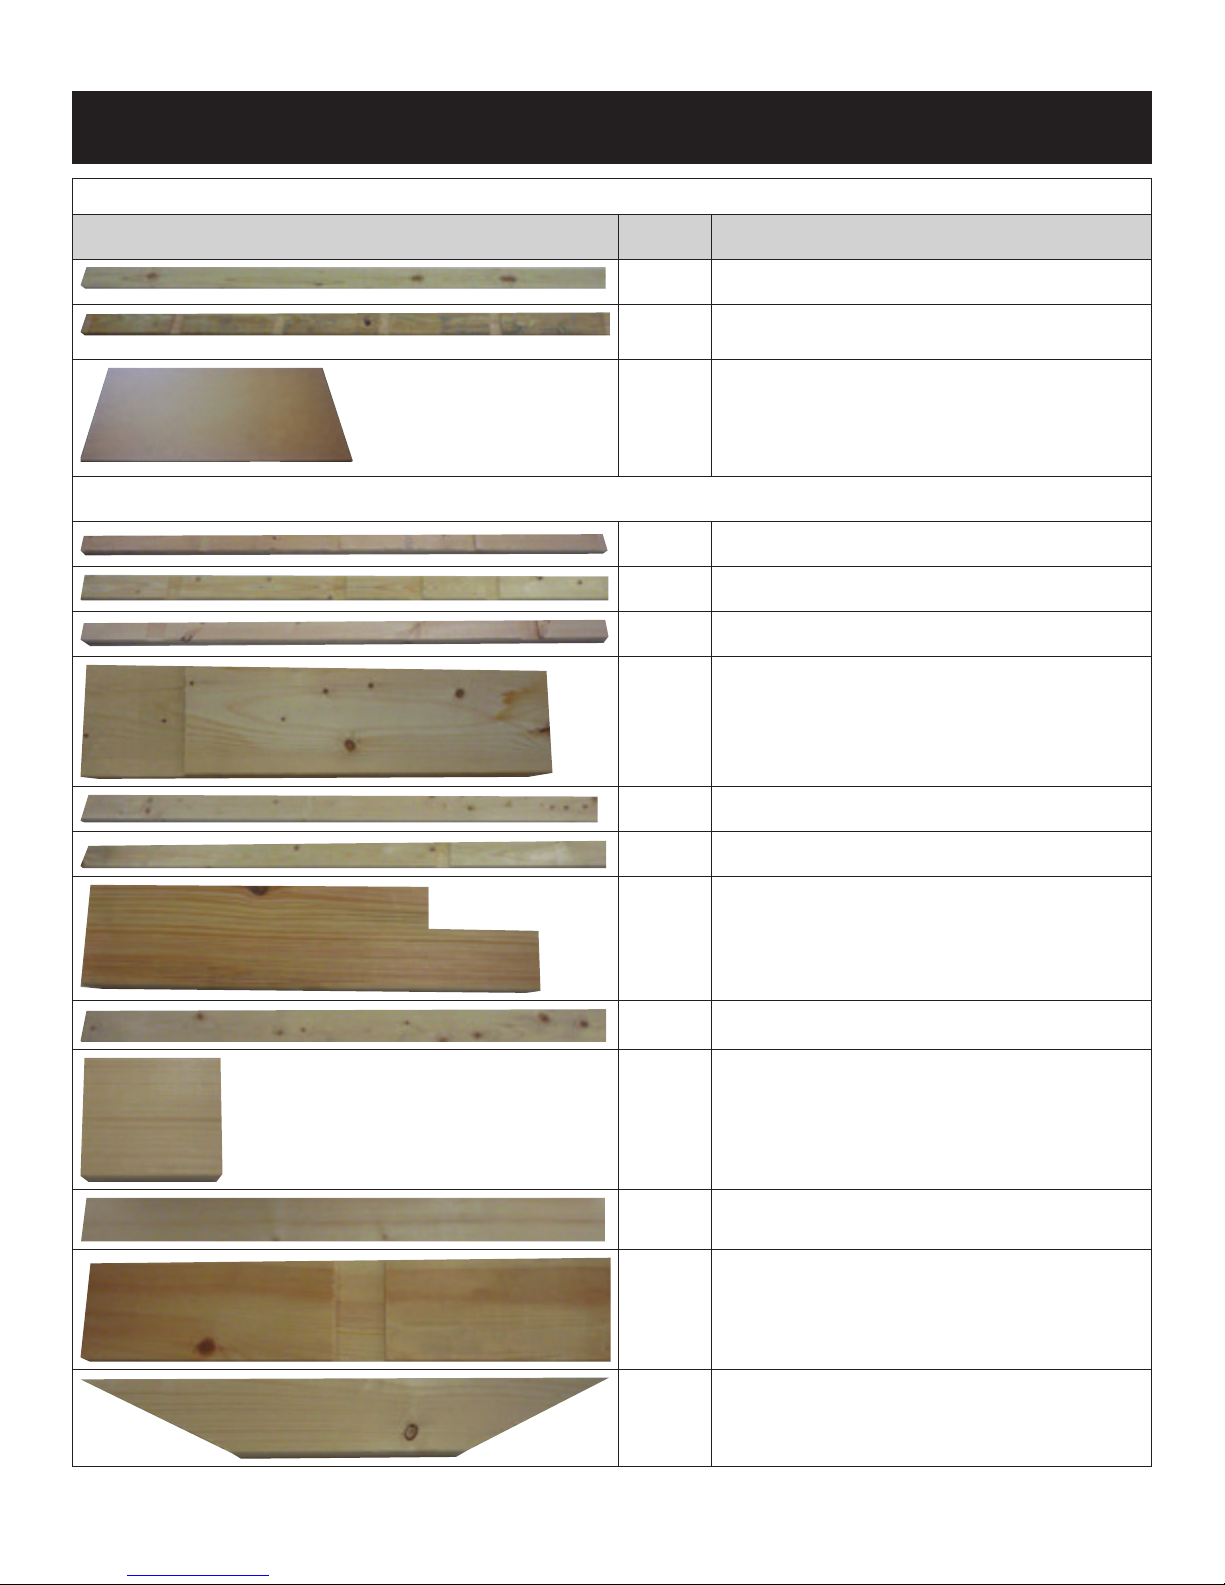
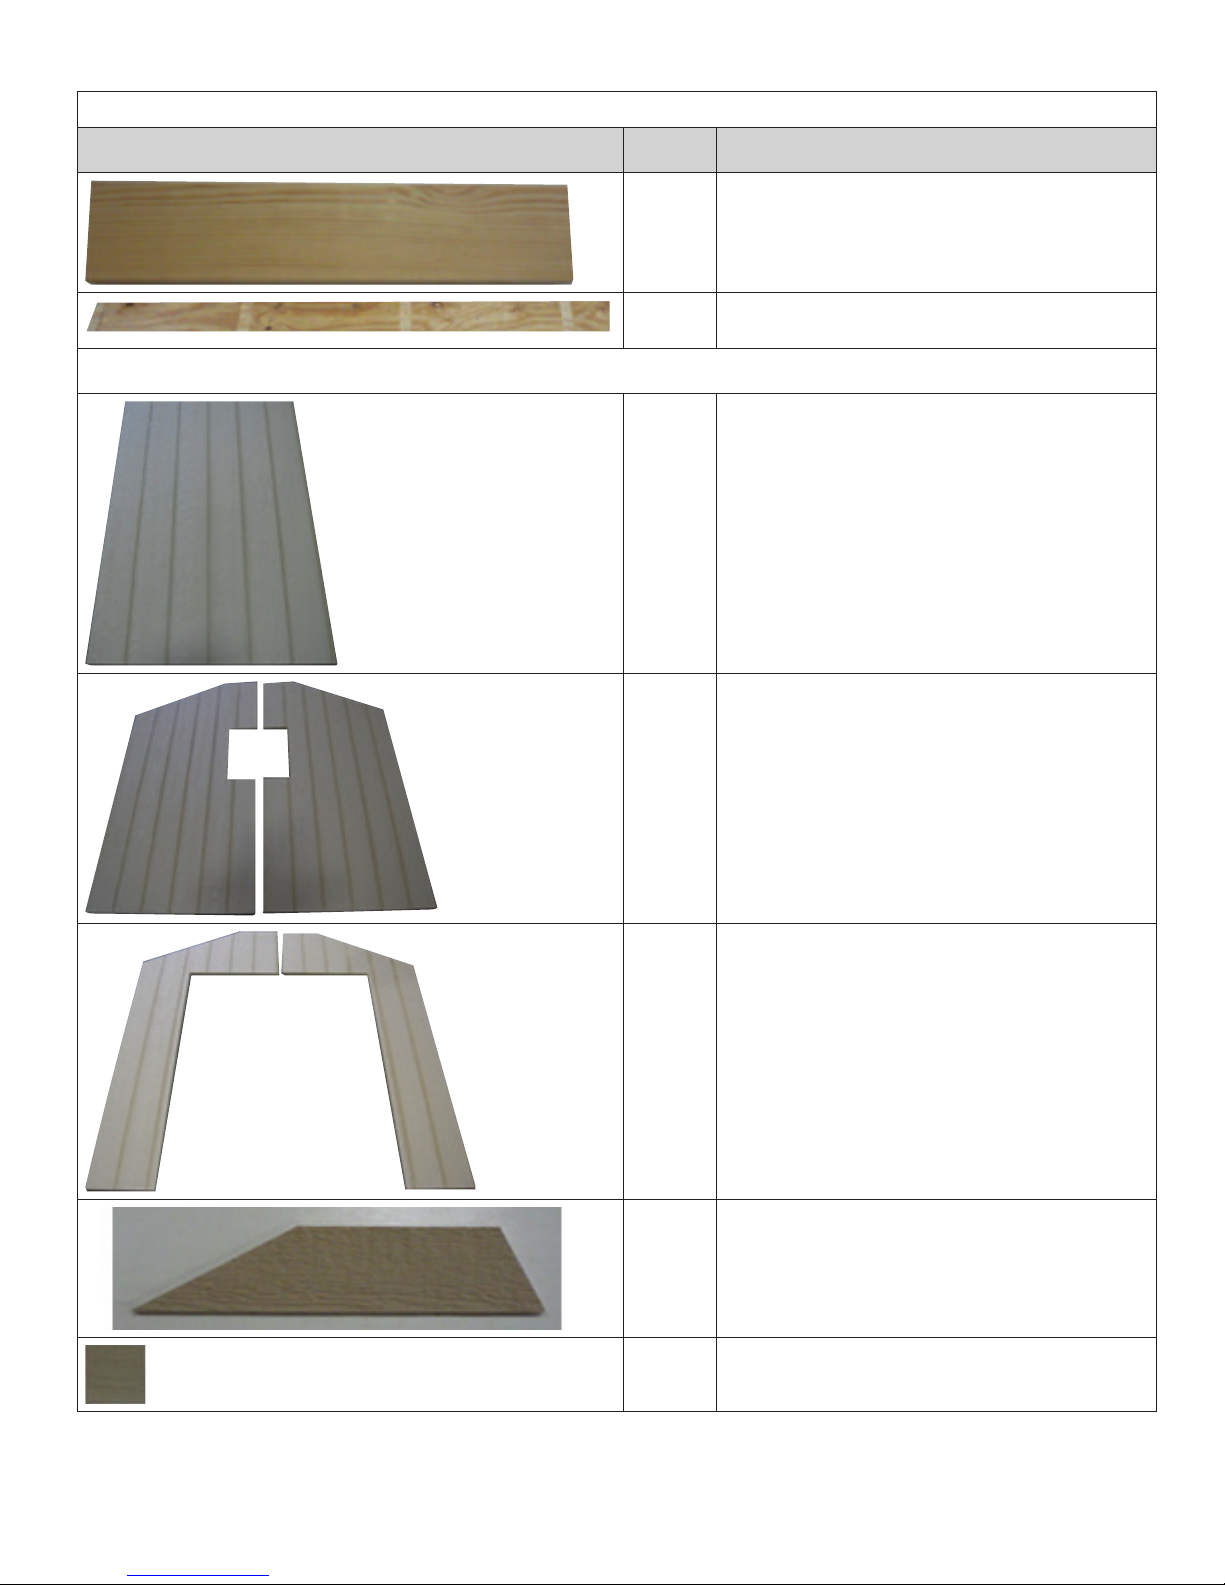
Parts
FLOOR
WALL FRAMING
Quantity Description
7 Joists: Pressure-Treated 2x4, 93-1/2”L
Band Boards: Pressure-Treated 2x4, 96”L with dados
2
16” on center
Floor Decking: LP Smart Floor,
2
48” x 96” sheets
4 Top/ bottom plates: 2x4, 96” L with dados 24” on center
2 Top/ bottom plates: 2x4, 89” L with dados for window
1 Top plate: 2x4, 89” L with dados for door
2 Bottom plate: 2x4, 14-3/4” L with dados for door
16 Studs: 2x4, 72” L
2 Studs: 2x4, 72”L with dados for window
4 Corner blocks: 2x4, 15”L with notch
1 Door header: 2x4, 59-1/2” L
1 Framing vertical above window: 2x4, 4”L
1 Framing vertical below window: 2x4, 42-3/4”L
Window horizontal framing: 2x4, 18-3/4”L, with dados
2
for vertical parts
2 Gable braces: 2x4, 24-1/2”L, with angle cuts
page 4
Page 5
WALL FRAMING CONTINUED
WALL SIDING
Quantity Description
2 Gable braces: 2x4, 17”L
Soffit: 9/16” thick plywood, 5-3/4” x 96” with dados for
2
rafters
4 Siding for side walls: 48” x 75-1/2”
Siding for gable end: 48” x 96” with window cutouts and
2
angle cuts
Siding for gable end: 48” x 96” with door cutouts and
2
angle cuts
4 Filler piece for gable ends: 3” x 14” with angle cuts
Parts
4 Filler piece for gable ends: 2” x 2”
page 5
Page 6
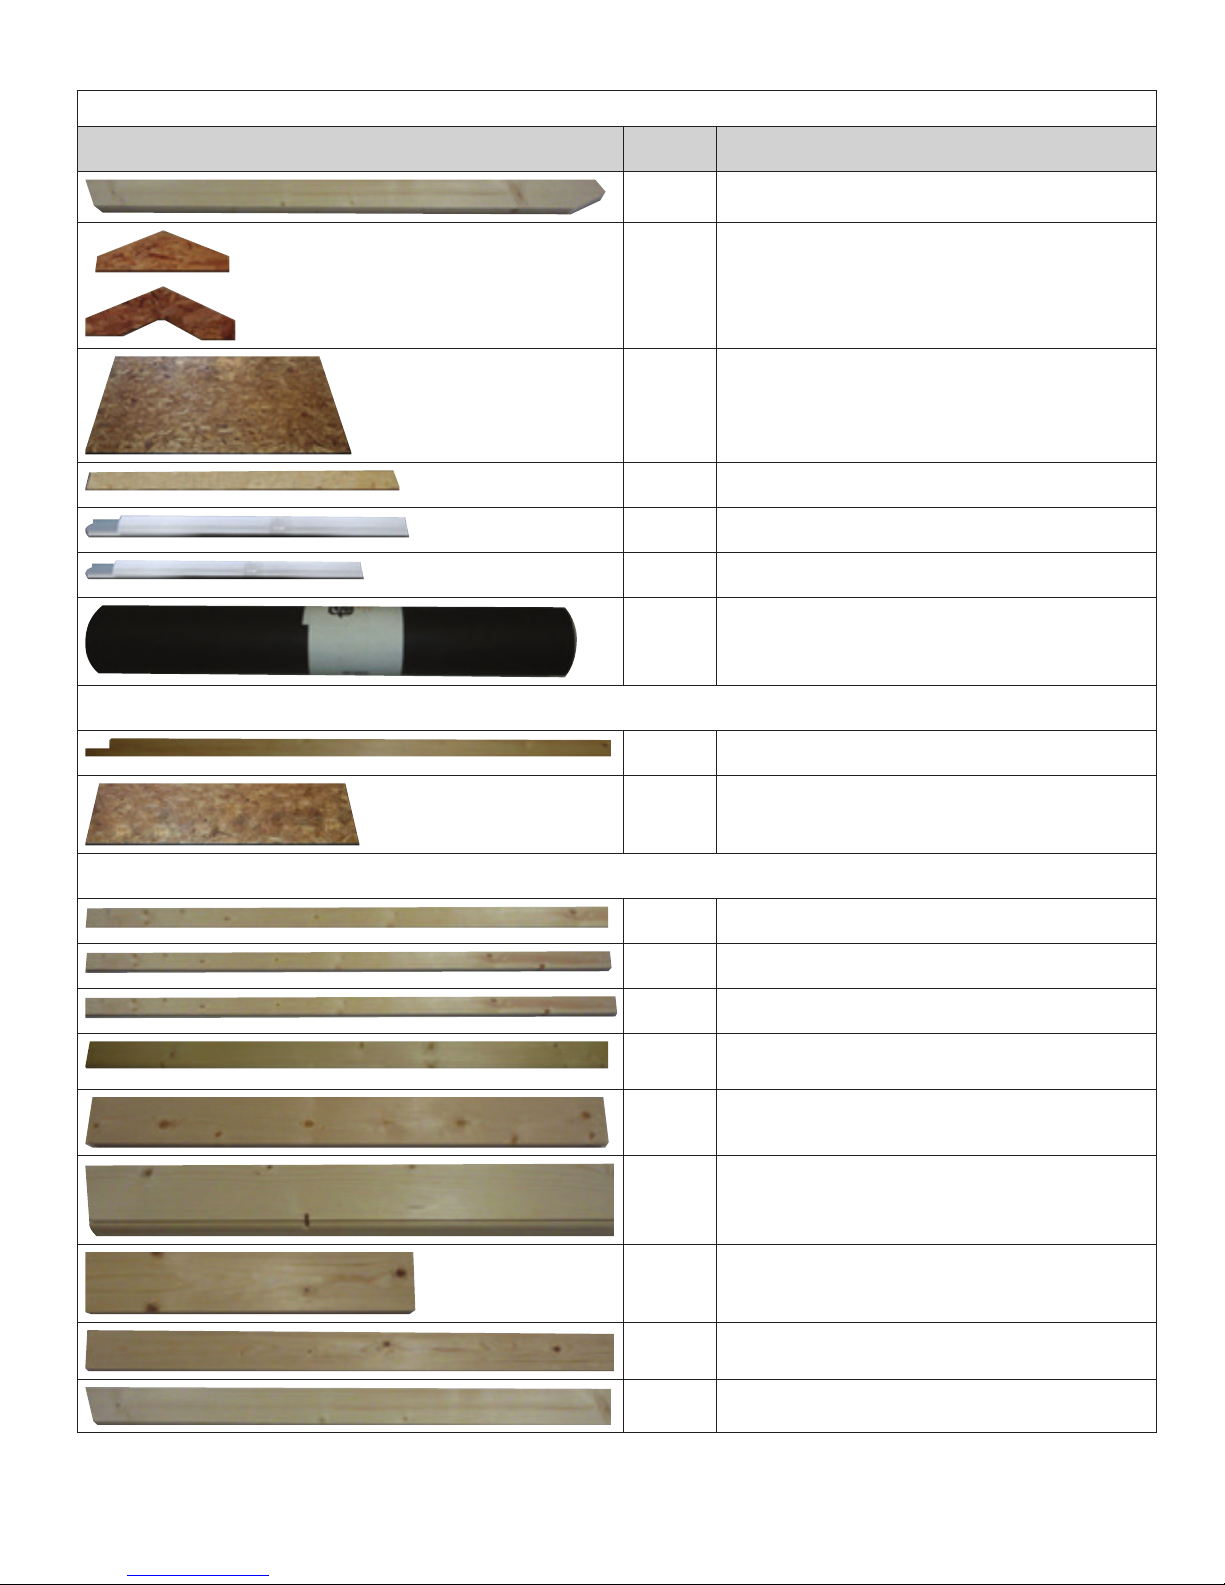
ROOF
Quantity Description
10 Rafters: 2x4, 55-7/8”L with heel and angle cuts
Gussets: 6” x 16” OSB with angle cuts (2 also with
special cutout for vent)
8
Roof Sheeting: 48” x 96” OSB
2
Roof Sheeting: 7-3/4” x 96” OSB
2
Drip Edge: 57-1/2”
4
Drip Edge: 51”
4
Felt paper for roof: 40’
1
LOFT
TRIM
1 Framing: 2x4, 96”L with notch on each end
1 Loft decking: 24” x 89” OSB
4 Corner Trim: 1x3, 74-1/2”L
4 Corner Trim: 1x3, 75-1/2”L
2 Door Side Trim: 1x3, 73-1/4”L
Door Top Trim: 2x4, 66-1/2”L with angled ends (routed
1
edge)
2 Window Side Trim: 1x3, 26-5/8”L
Window Top Trim: 2x4, 25”L with angled ends (routed
1
edge)
1 Window Bottom Trim: 1x4, 18-7/8”
4 Fascia: 1x4, 49-7/8”L
4 Gable Trim: 2x4, 55-7/8”L with angle cut (no heel cut)
page 6
Page 7
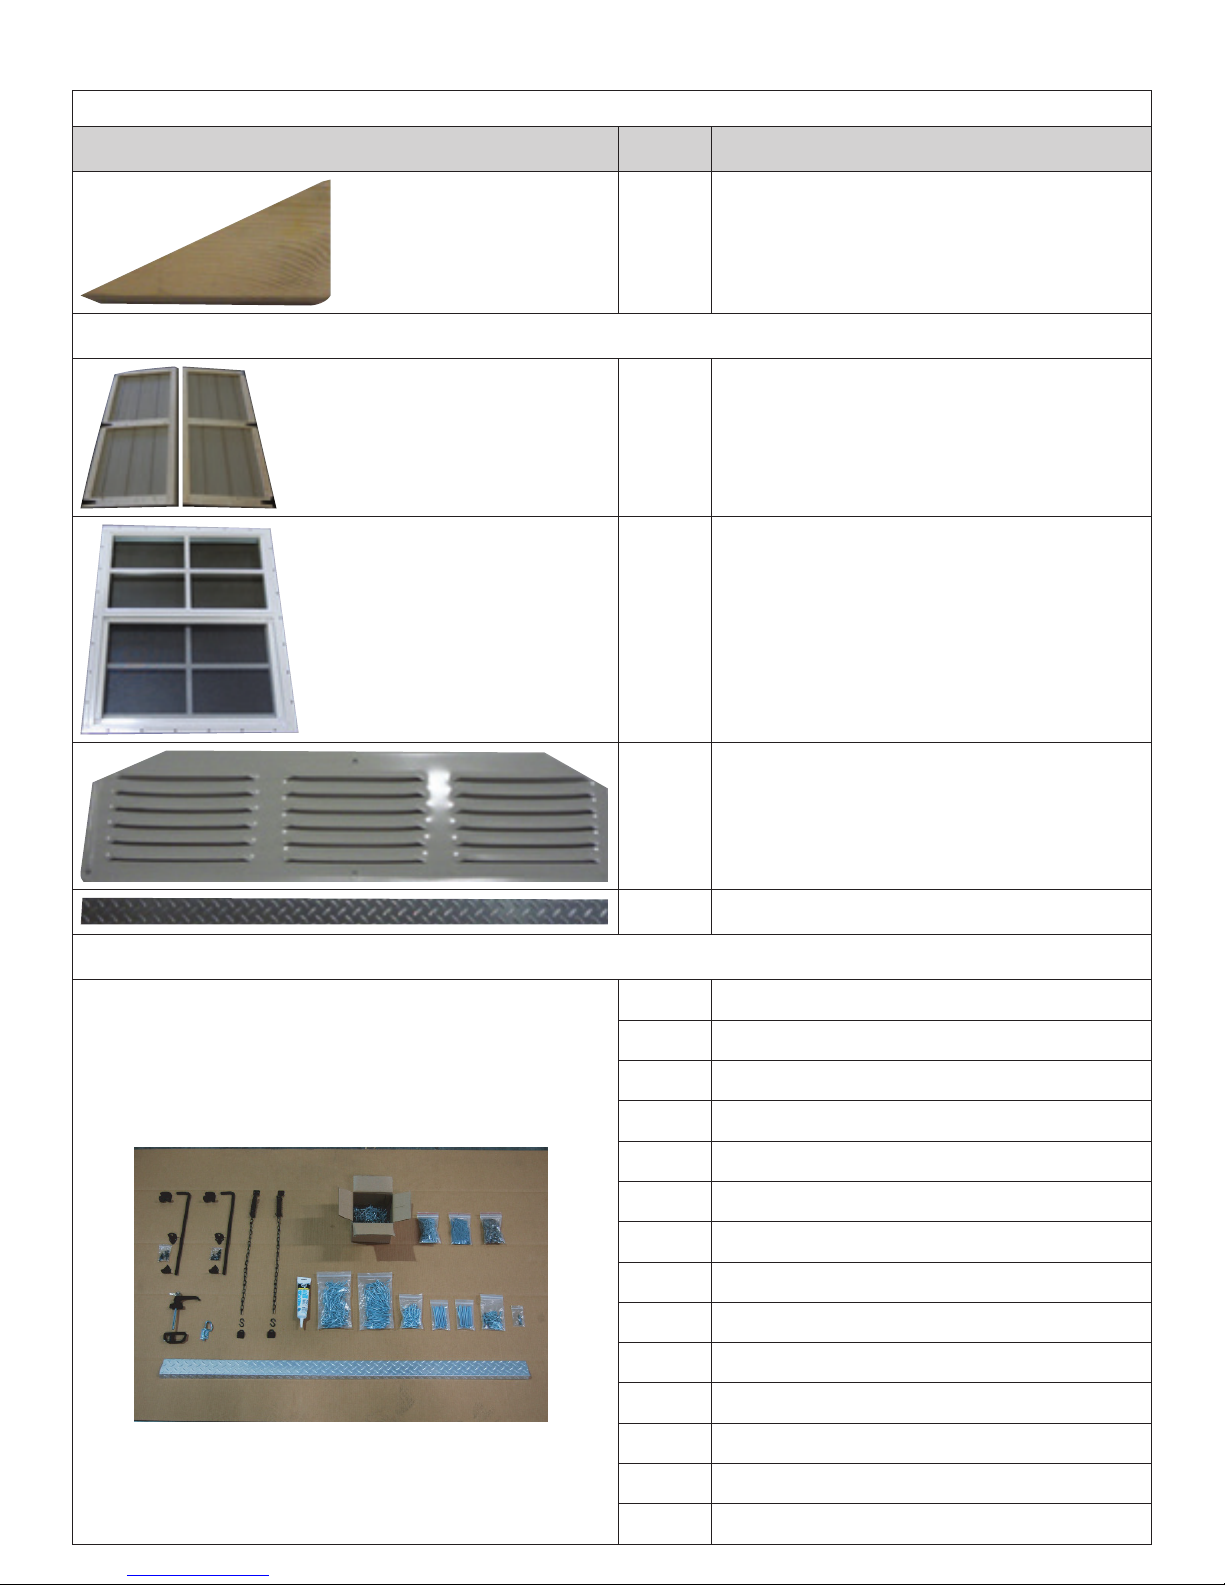
TRIM CONTINUED
MISCELLANEOUS PARTS
Quantity Description
4 Gable Bottom Corner Trim Block: 2x4, 6”L, with angle cut
2 Doors with trim: 30” x 73”
1 Window: 18” x 23”
HARDWARE
Suncast provides extra hardware for customer convenience. In
some cases, there will be extra small fasteners once the assembly
is complete.
2 Vents: 4” x 16” aluminum
1 Threshold “Diamond” Plate: 59-3/8” with pre-drilled hole
65 2" Screws
30 2" inch Screws , black (with #2 square bit)
240 3" inch Screws
24 4" inch Screws
700 6d Galvanized Nails
1 lb. 2" inch Finish Nails
1 lb. 3" inch Finish Nails
1 lb. 3/4" Roofing Nails
1 “L” Latch Outside door handlle
1 “D” Latch: Inside door handle
1 Top door latch: Barrel bolt
2 Cane latches
2 Door chain/spring
1 Caulk: 5.5 oz. tube
page 7
Page 8
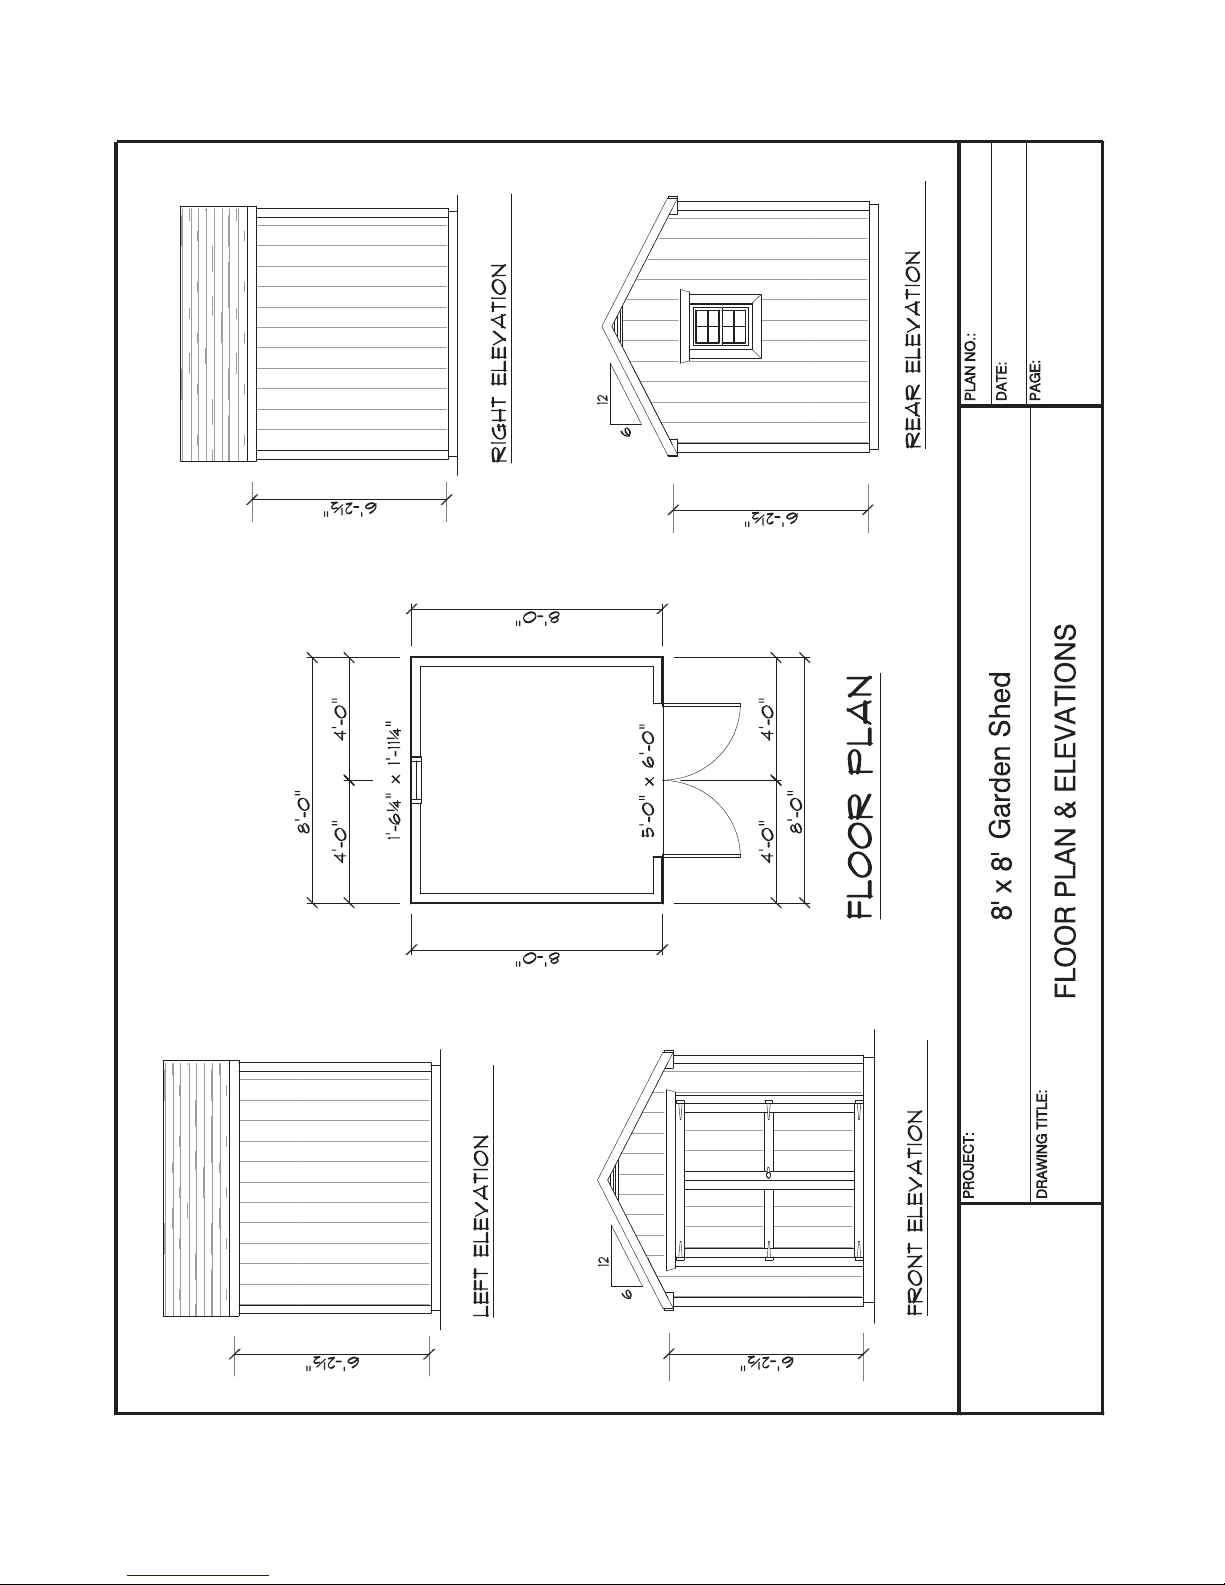
page 8
Page 9
page 9
Page 10
page 10
Page 11
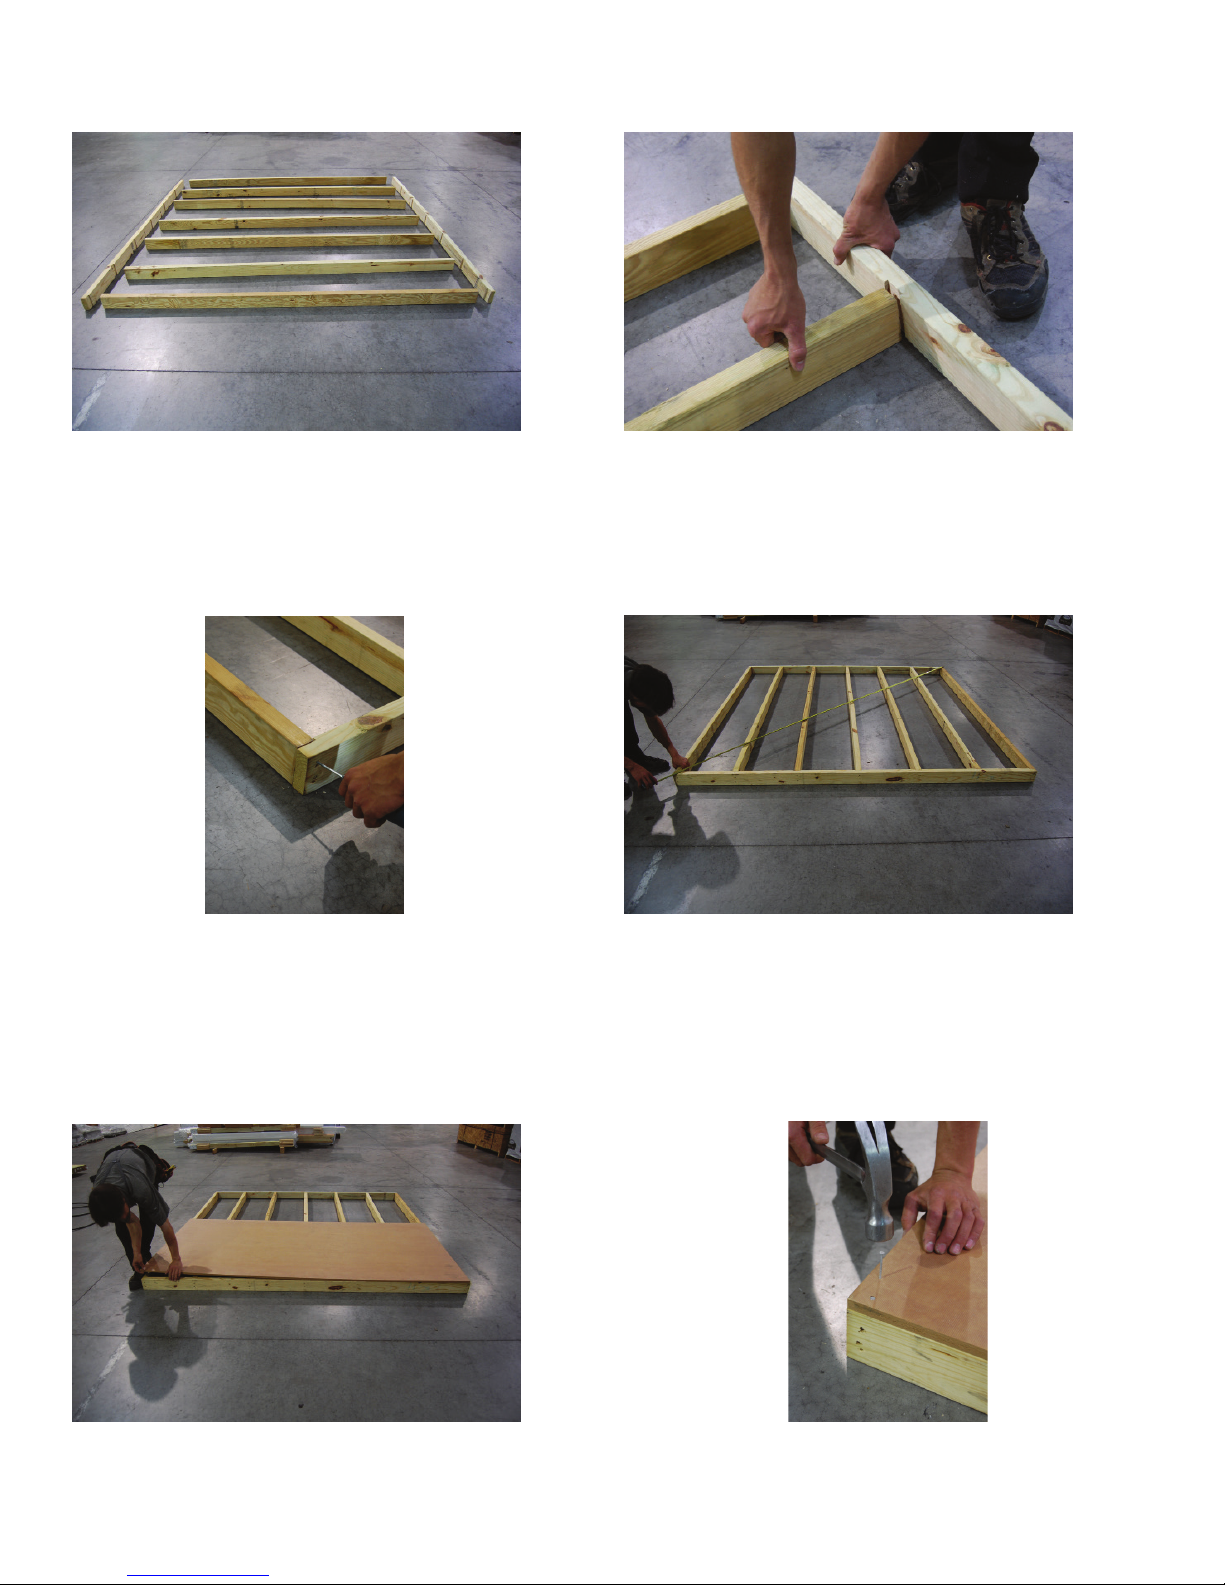
1. Layout oor joists as shown. 2. Line up and insert oor joists into perimeter
bands.
3. Insert 3” screws through pre-drilled holes into
oor joists.
5. Position rst piece of ooring on top of
assembled frame, keeping it ush on the side and
front corner.
4. Measure the assembled oor framing to
ensure that the oor is square. It should
measure 135-5/8” across both diagonal
measurements. Adjust as needed.
6. Nail oor decking onto framing, starting with
the corner, using 2” nails every 8 inches.
page 11
Page 12
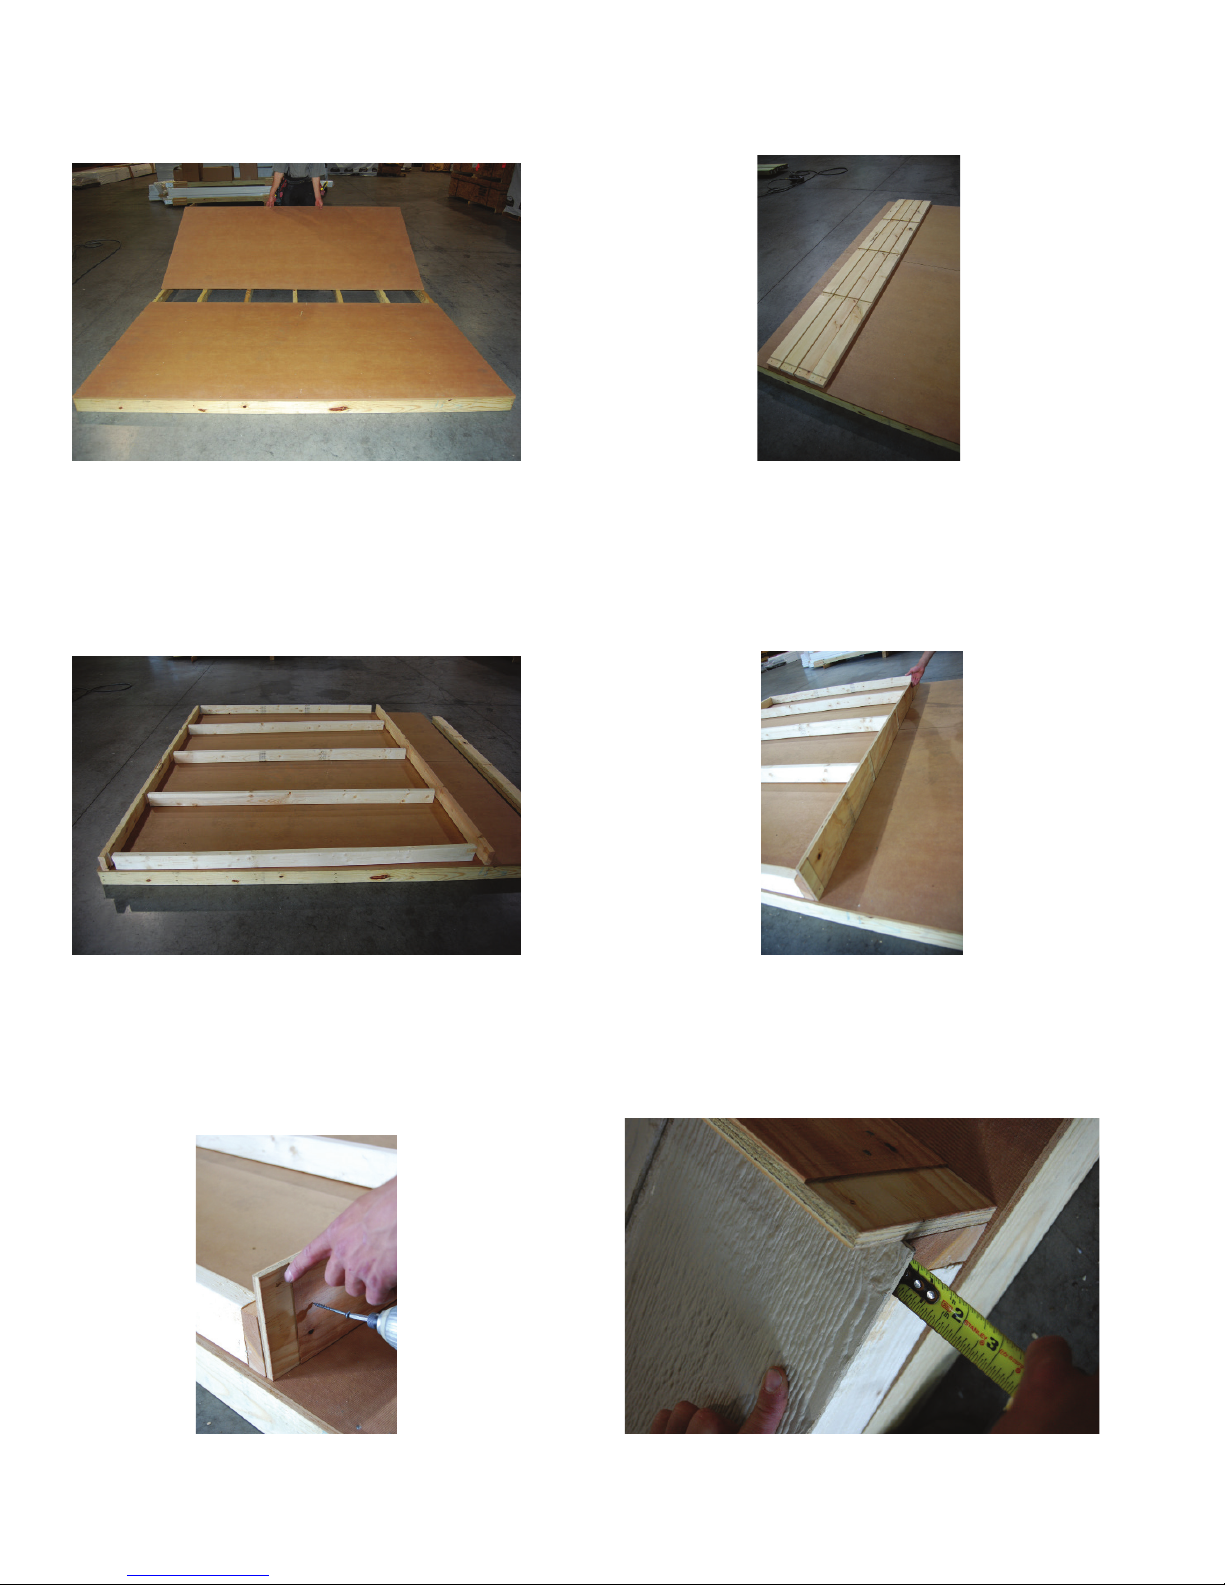
7. Position second piece of ooring and fasten
with nails.
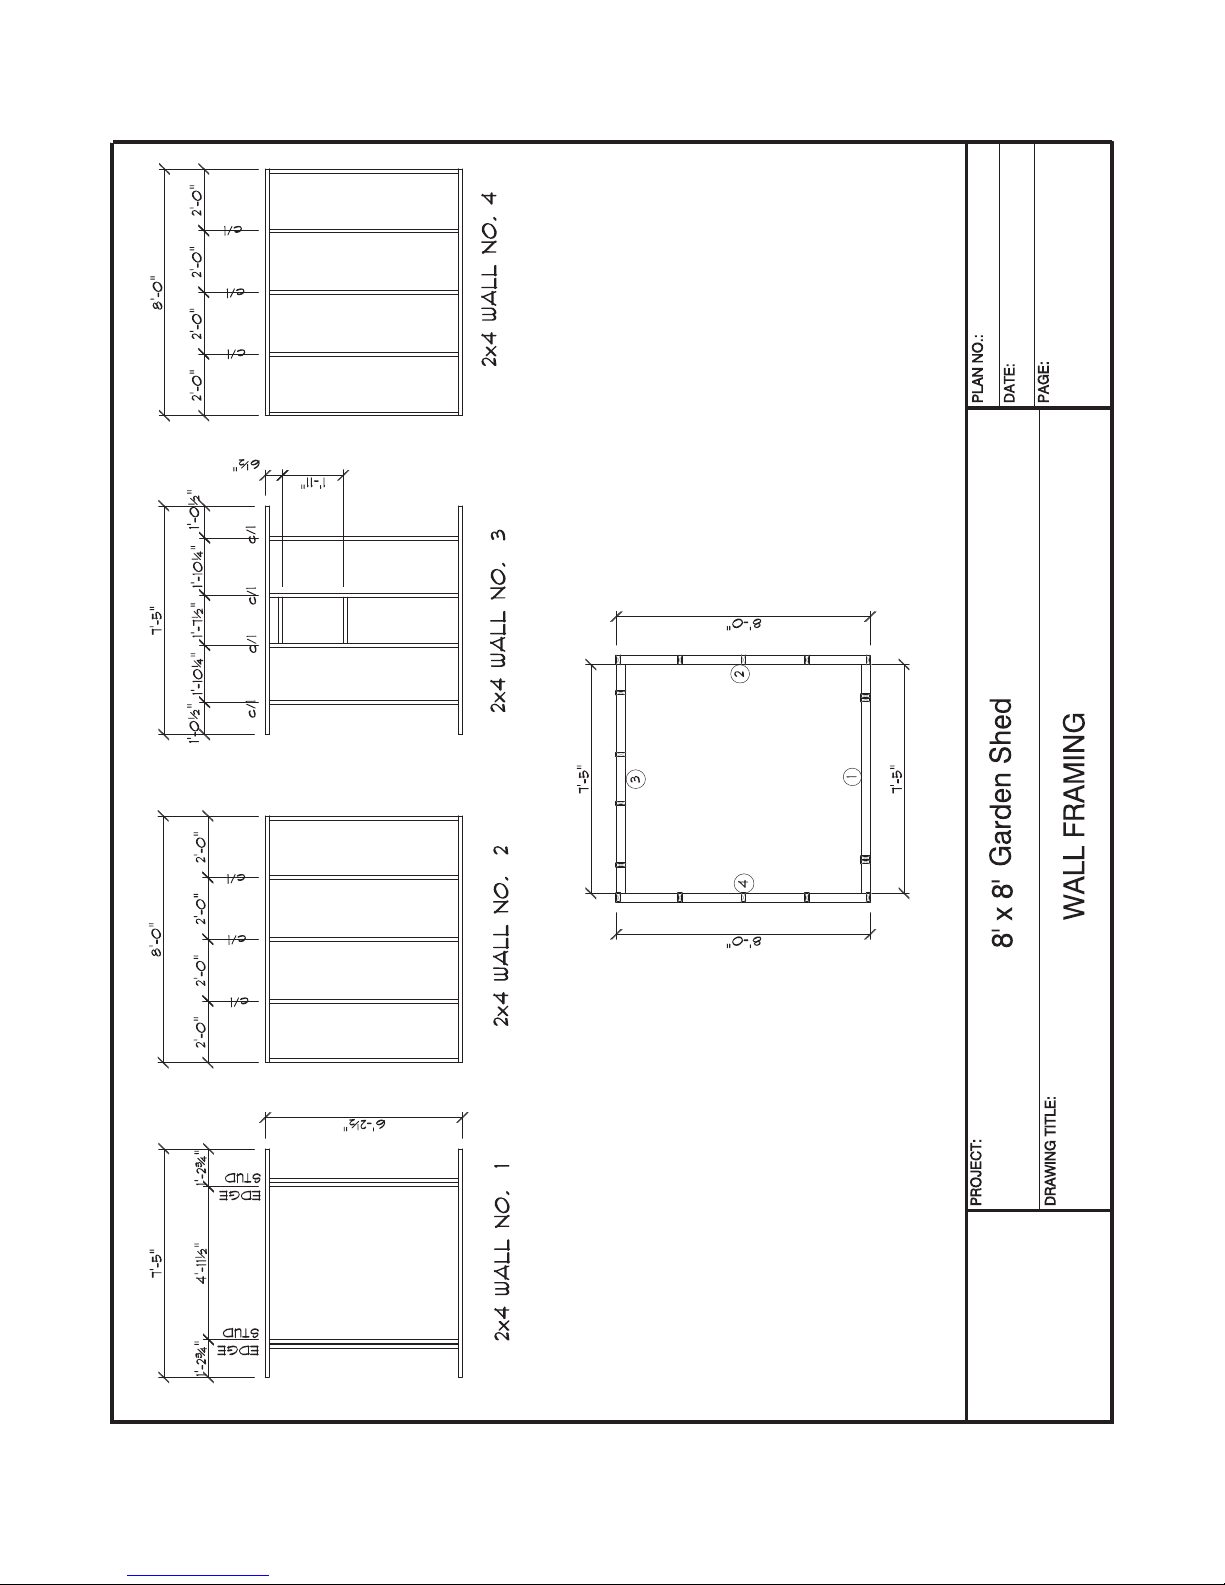
8. Layout side wall plates. Side wall plates are
the same for both sides.
9. Position studs as shown. Insert 3” screws
through wall plate into studs.
11. Insert two 2” screws, one on each side of the
rafter notch.
10. With pre-drilled holes turned towards the
outside, keep soft board ush with the end of
the wall plate and fasten using 2” screws.
12. Position siding on sidewall, making sure that
the overlap extends 3/8” past the wall framing
and 1” at the bottom.
page 12
Page 13
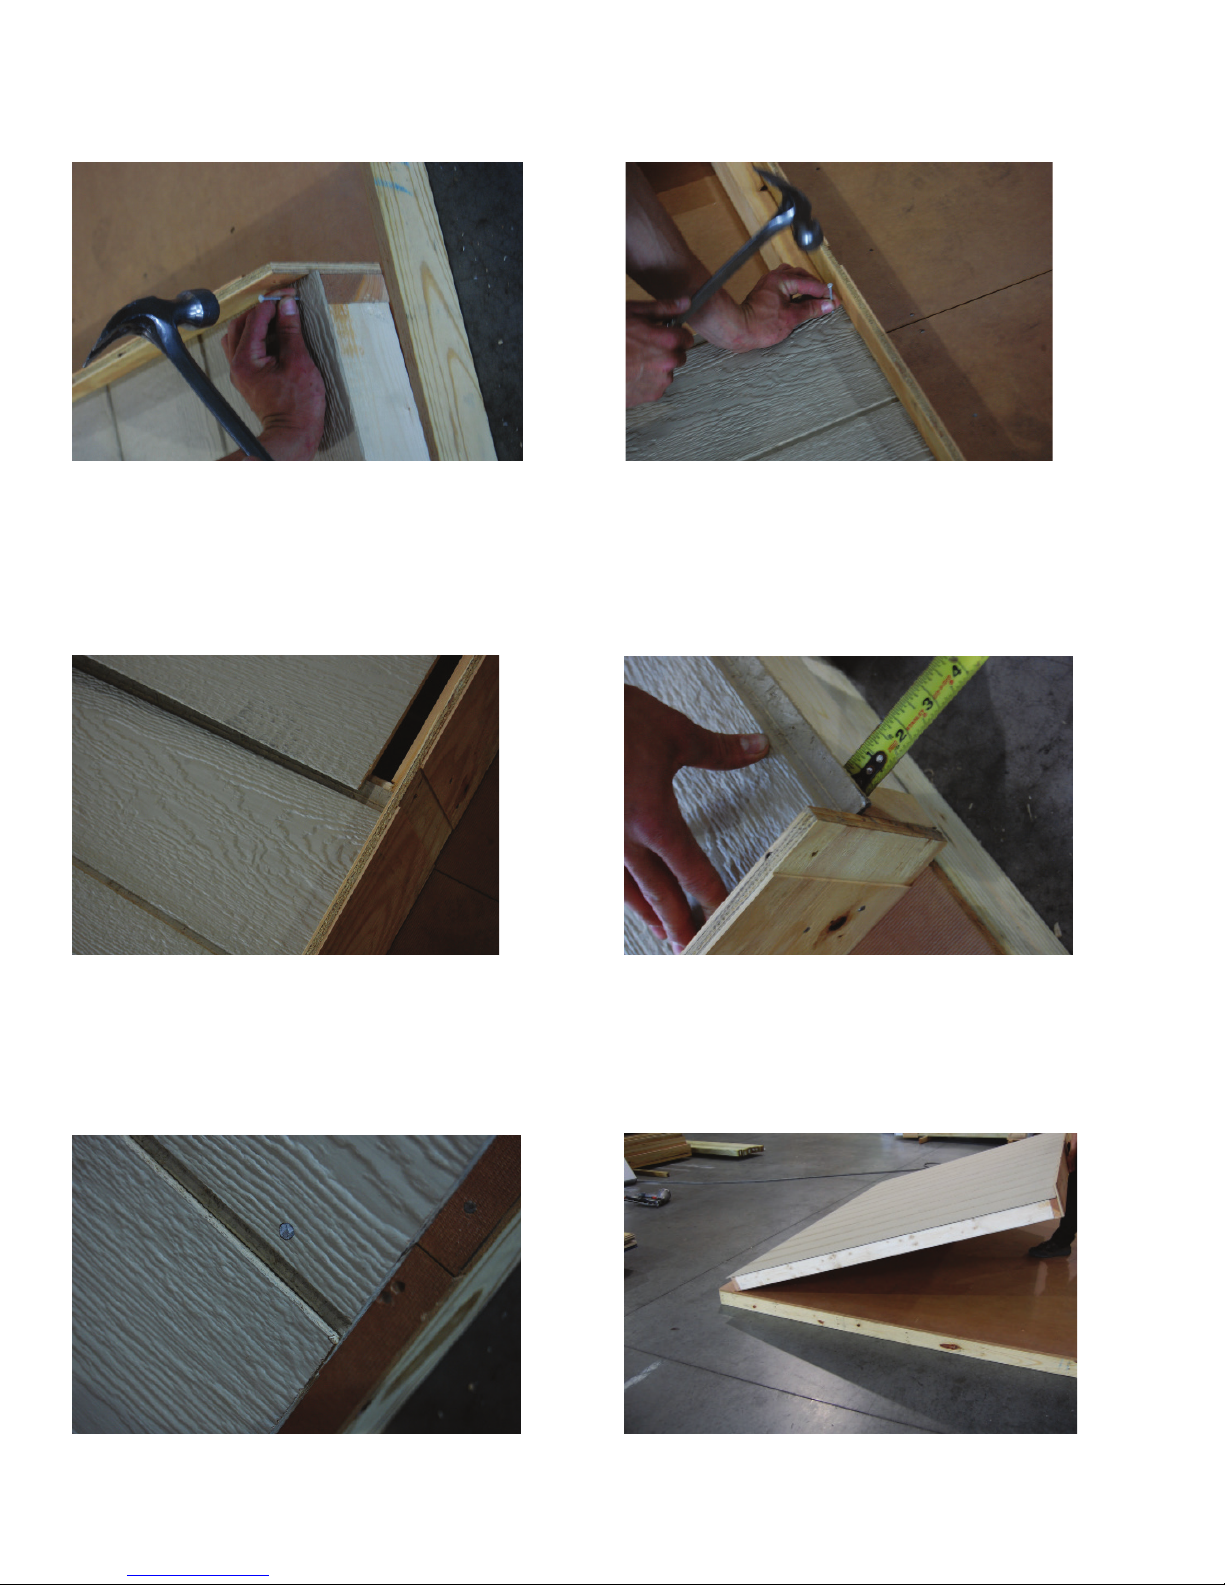
13. Nail the siding in the top right corner. Be
sure to nail the top right corner rst, then the
bottom right corner.
14. Nail the opposite top and bottom sides.
15. Position siding on the other half of the
side wall.
17. Nail the four corners. Nail the siding every 8”
around the perimeter, and also on the studs. The
overlap will look like this:
16. Make sure that the overhang (underlap) on
the siding at the back is 3/8” or less.
18. Lift the left wall into place; two people
are required for this step.
page 13
Page 14
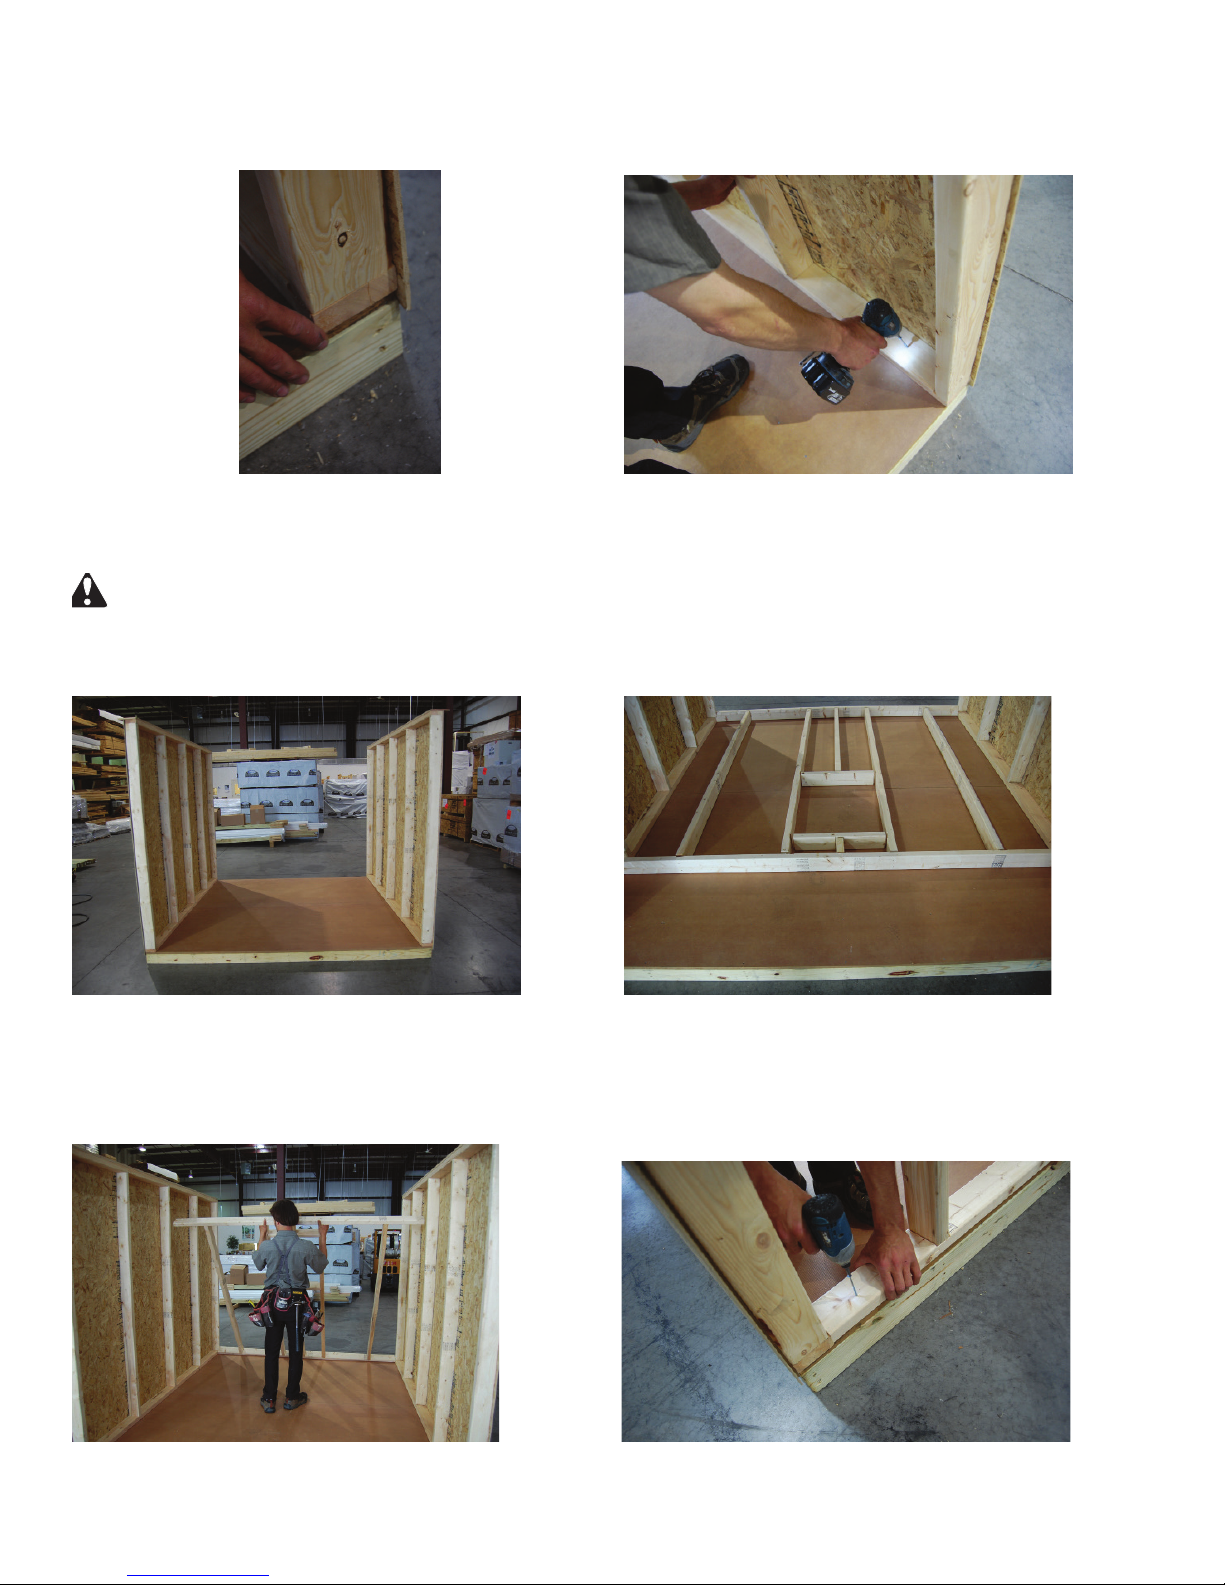
19. Make sure the bottom plate of the wall is
ush with the edge of the oor at both ends.
20. Attach the bottom plate to the oor by placing
3” screws 16” apart.
21. Repeat steps 8 to 20 for opposite wall.
22. Layout back wall plates, studs, and window
2x4’s as shown. Fasten together with 3” screws.
Each side wall should be supported in
place until back wall is installed. At least
3 people needed for steps 22 to 27.
23. Lift back wall into place as shown. 24. Secure bottom plate of back wall with 3”
screws on both ends.
page 14
Page 15
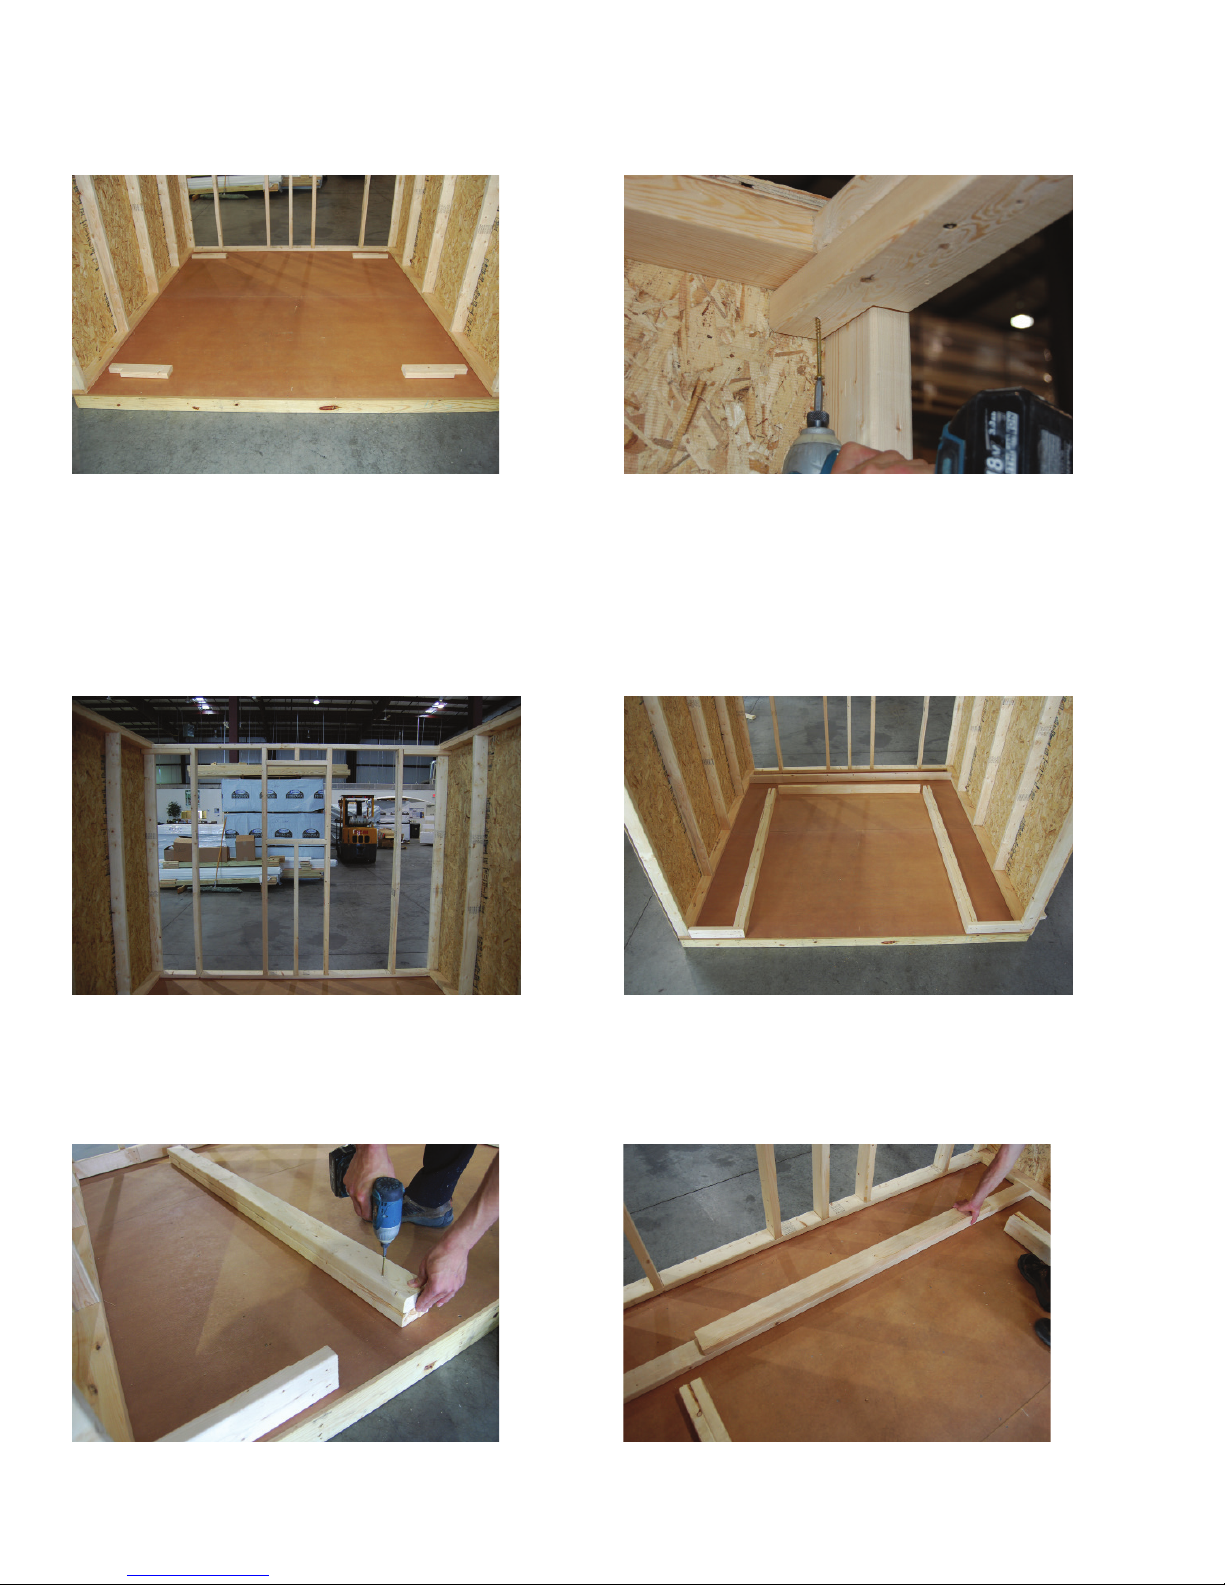
25. Layout upper corner blocks as shown.
These four blocks will be installed at the top
of the walls at each corner.
26. Insert corner block and fasten with 3” screws
for the two back wall corners.
27. Back wall will look as pictured, with the
blocks installed. Fasten bottom plate to oor
with 3” screws every 12 inches.
29. Fasten together the two 2x4’s that will
go beside the door.
28. Locate the front wall boards and layout
2 x 4 studs as shown.
30. Keep the 2x4 59-1/2” header ush with
the inside notch of the top plate and fasten
using 3” screws.
page 15
Page 16
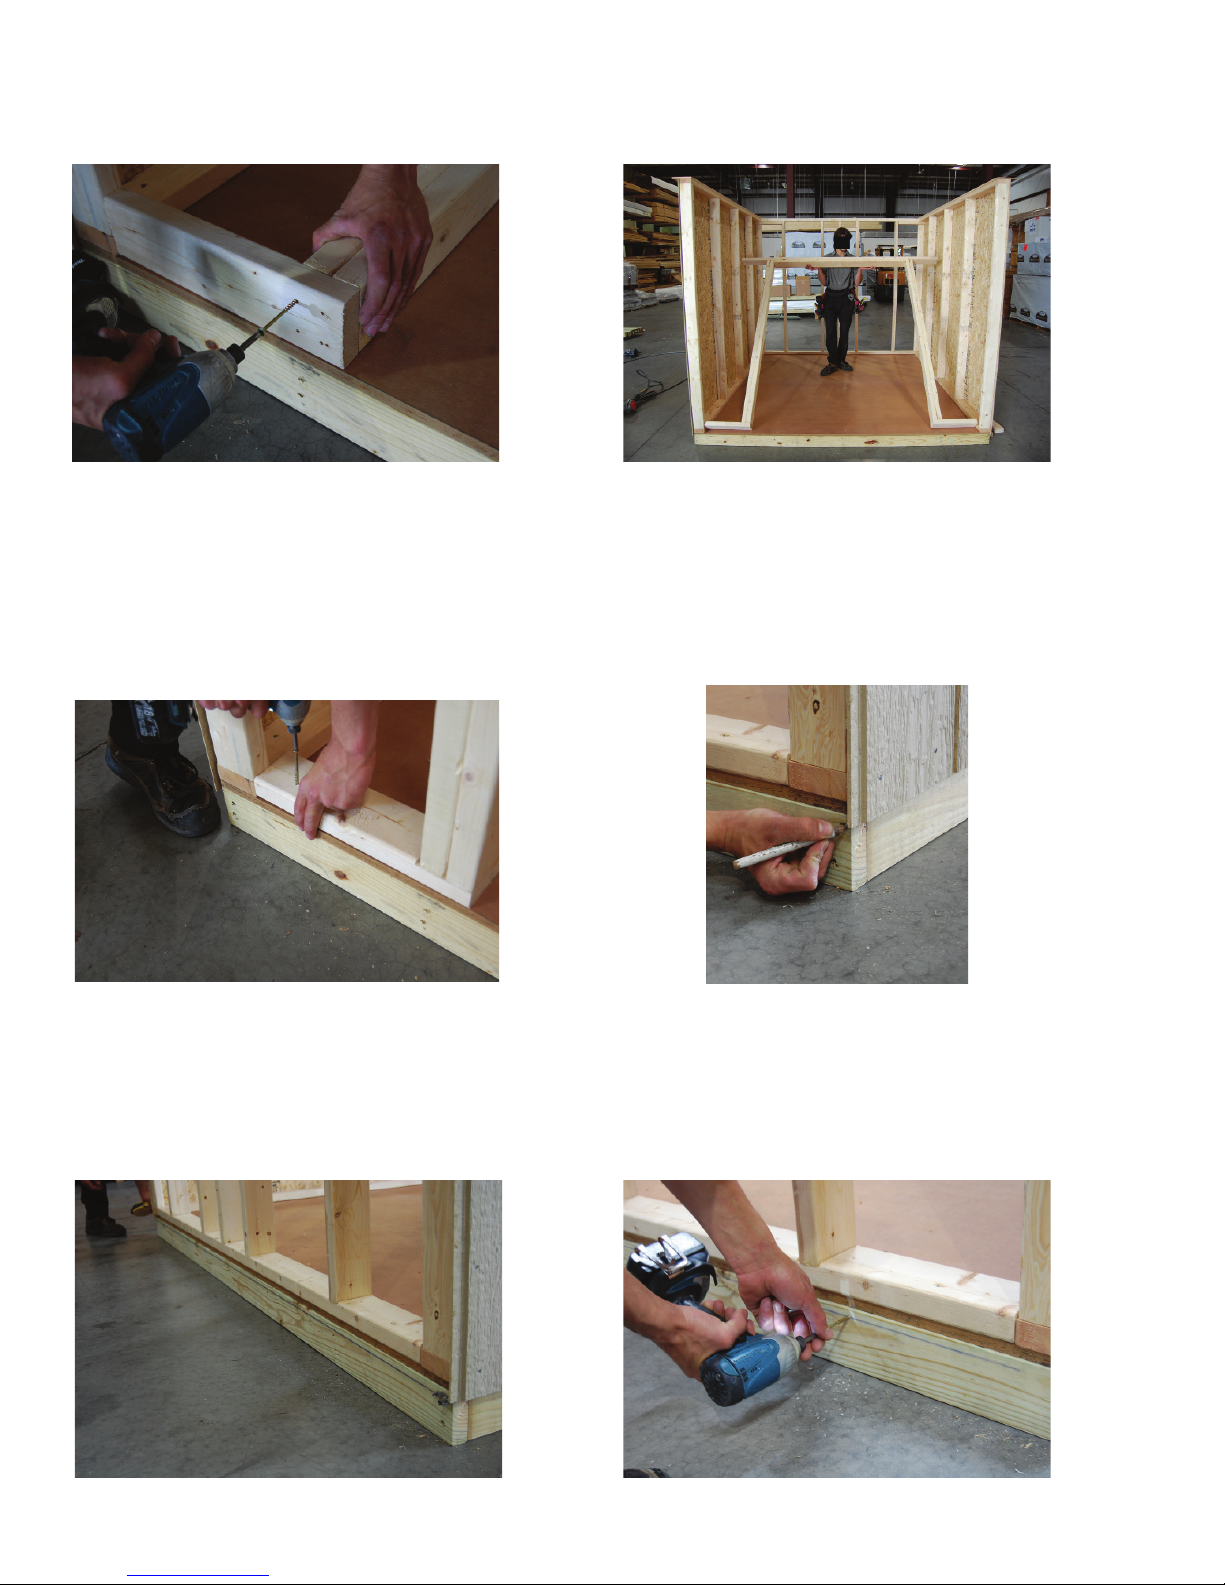
31. Fasten the side 2x4’s (door jambs) to the top
and bottom plates.
32. Lift front wall into place.
33. Secure using 3” screws; fasten bottom
plate onto the oor, keeping it ush to the
outside of oor and snug against side walls.
35. Using a chalk line, snap a line that connects
the bottom of the siding on the one side, to
the bottom of the siding on the other. This will
be the bottom of the siding on the end wall.
34. With a pencil, make a horizontal line/mark
even with the bottom of the side wall paneling as
shown. Place a screw on that mark.
36. Add screws every 24” along the chalk line.
These will be used to rest your siding on.
page 16
Page 17
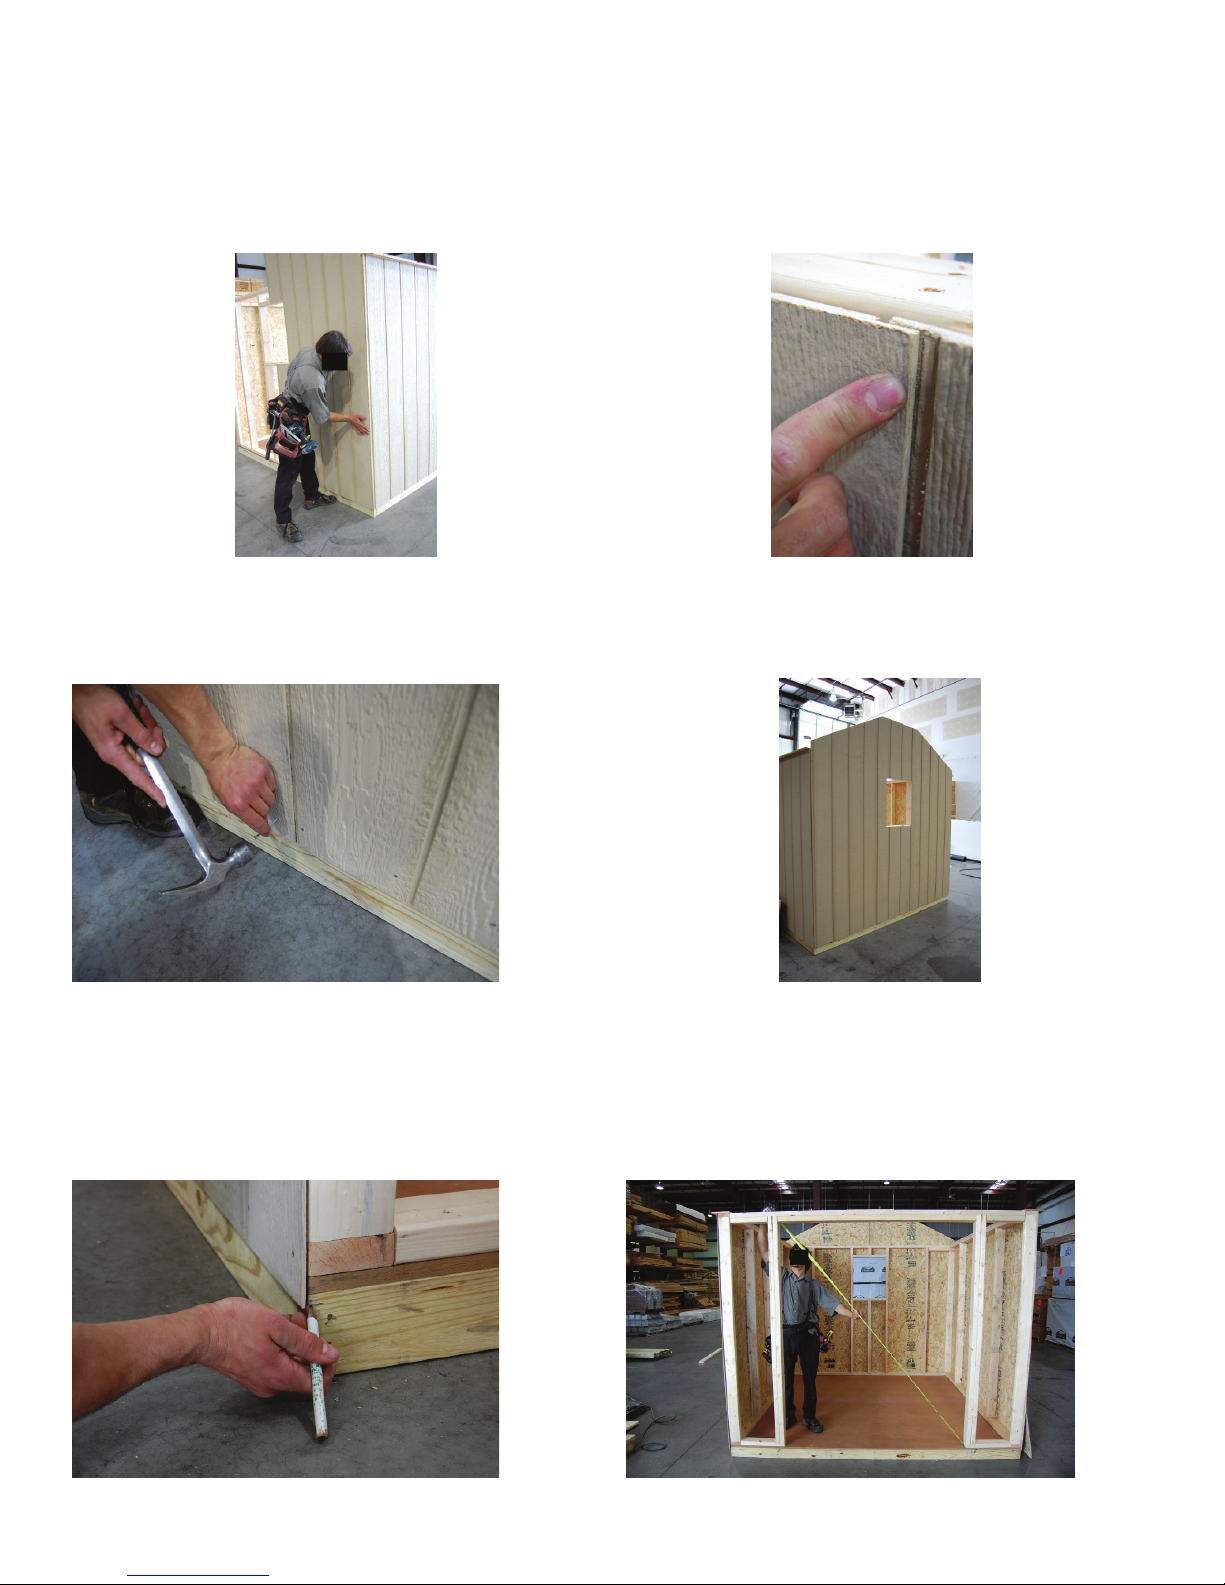
37. Line up bottom of siding with chalk line.
NOTE: You may have to push the side walls in or
out to square the corner.
Nail the two bottom corners, then the top corners.
38. Position the second piece of siding, ensuring
it is properly overlapped.
39. Nail the siding at the top and bottom
corners, nailing the two bottom corners rst.
41. Repeat the process for the front wall,
marking and snapping a chalk line for the
bottom of the siding, as shown in Steps 34 to 36.
40. Back wall should now look like this. Remove
the screws that the siding was resting on.
42. Measure the diagonal of the door opening
to make sure the opening is square, prior to
installing the siding on the front. The opening
is square when both diagonal measurements
are the same.
page 17
Page 18
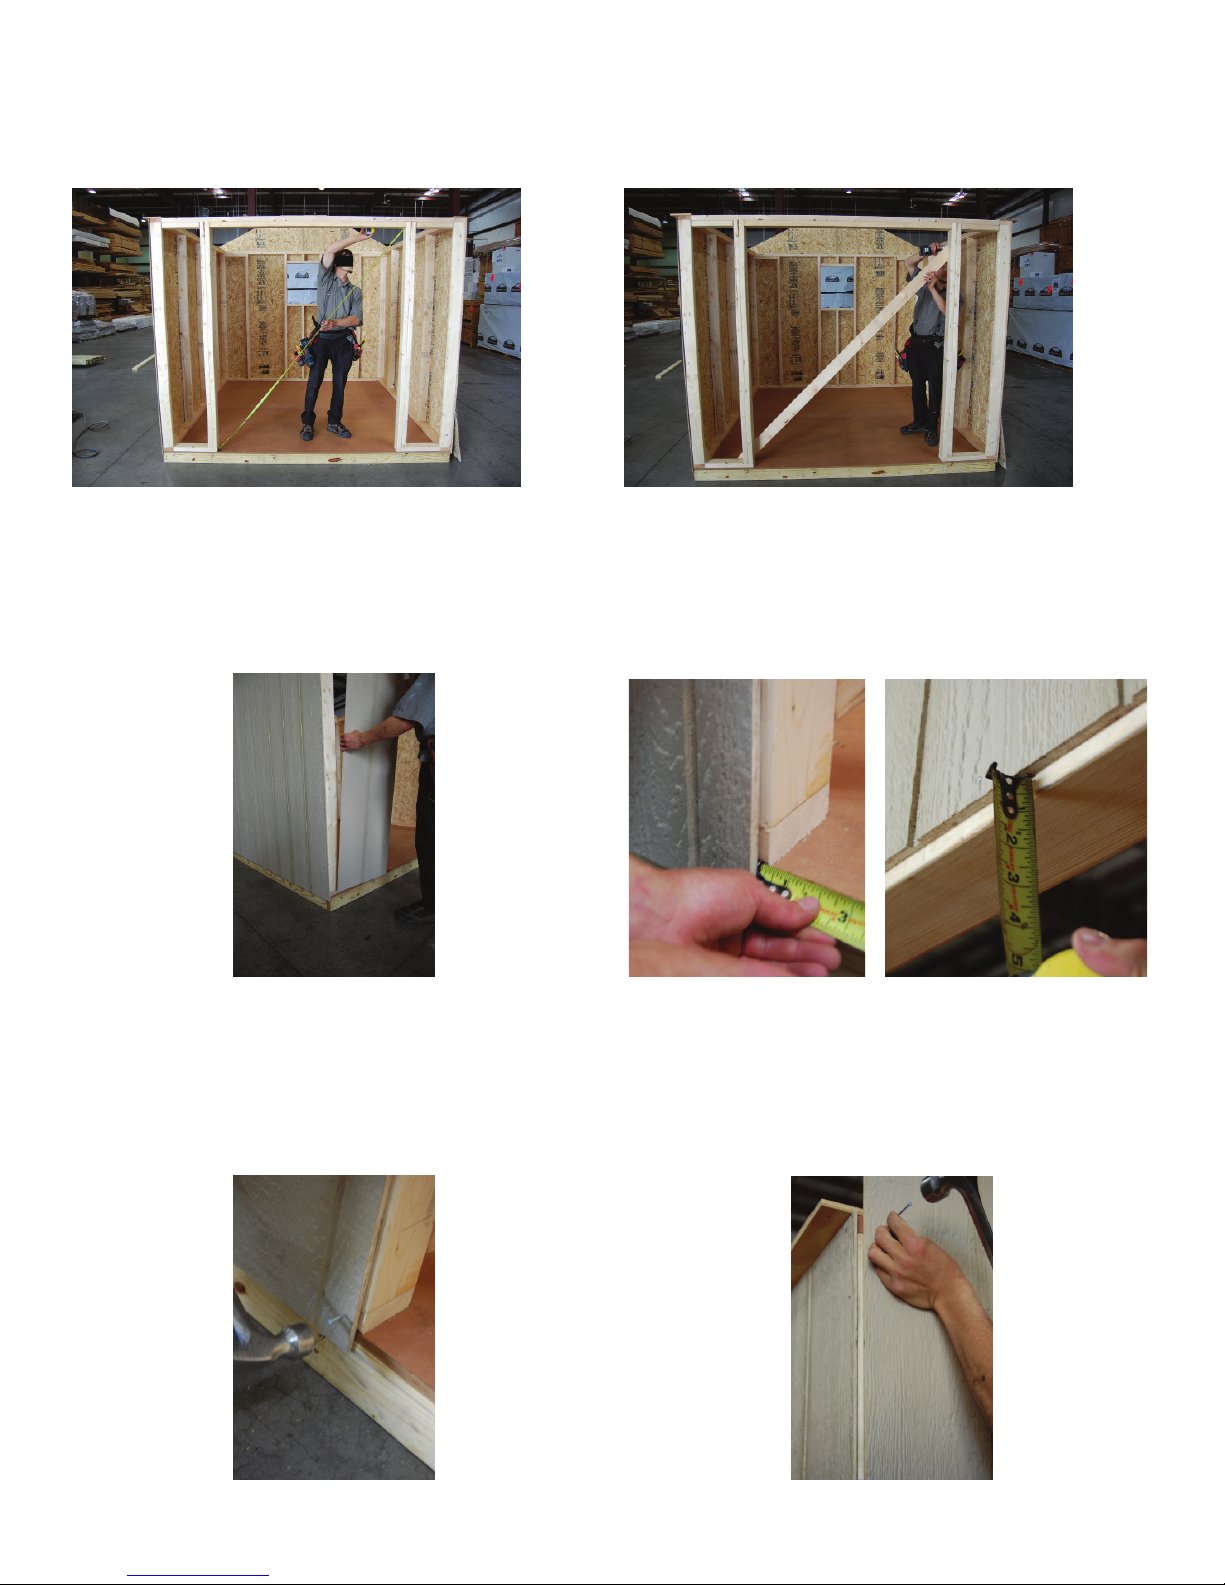
43. If door opening is not square, push
gently on the top of one of the side walls
until square.
44. Temporarily attach a 2x4 (which will later be
used for loft framing) as shown. Use a 3”
screw on each end.
45. Rest the left side siding on the previously
inserted screws.
47. Nail the front siding in place at the bottom
right corner, then the bottom left corner.
46. Siding should be 3/8” from the edge of the
2x4 on the side of the door opening and 3/4” from
the bottom of the header. This is your door slam.
48. Nail the top left corner. Be sure door jamb
reveal is the same at the top and bottom.
page 18
Page 19
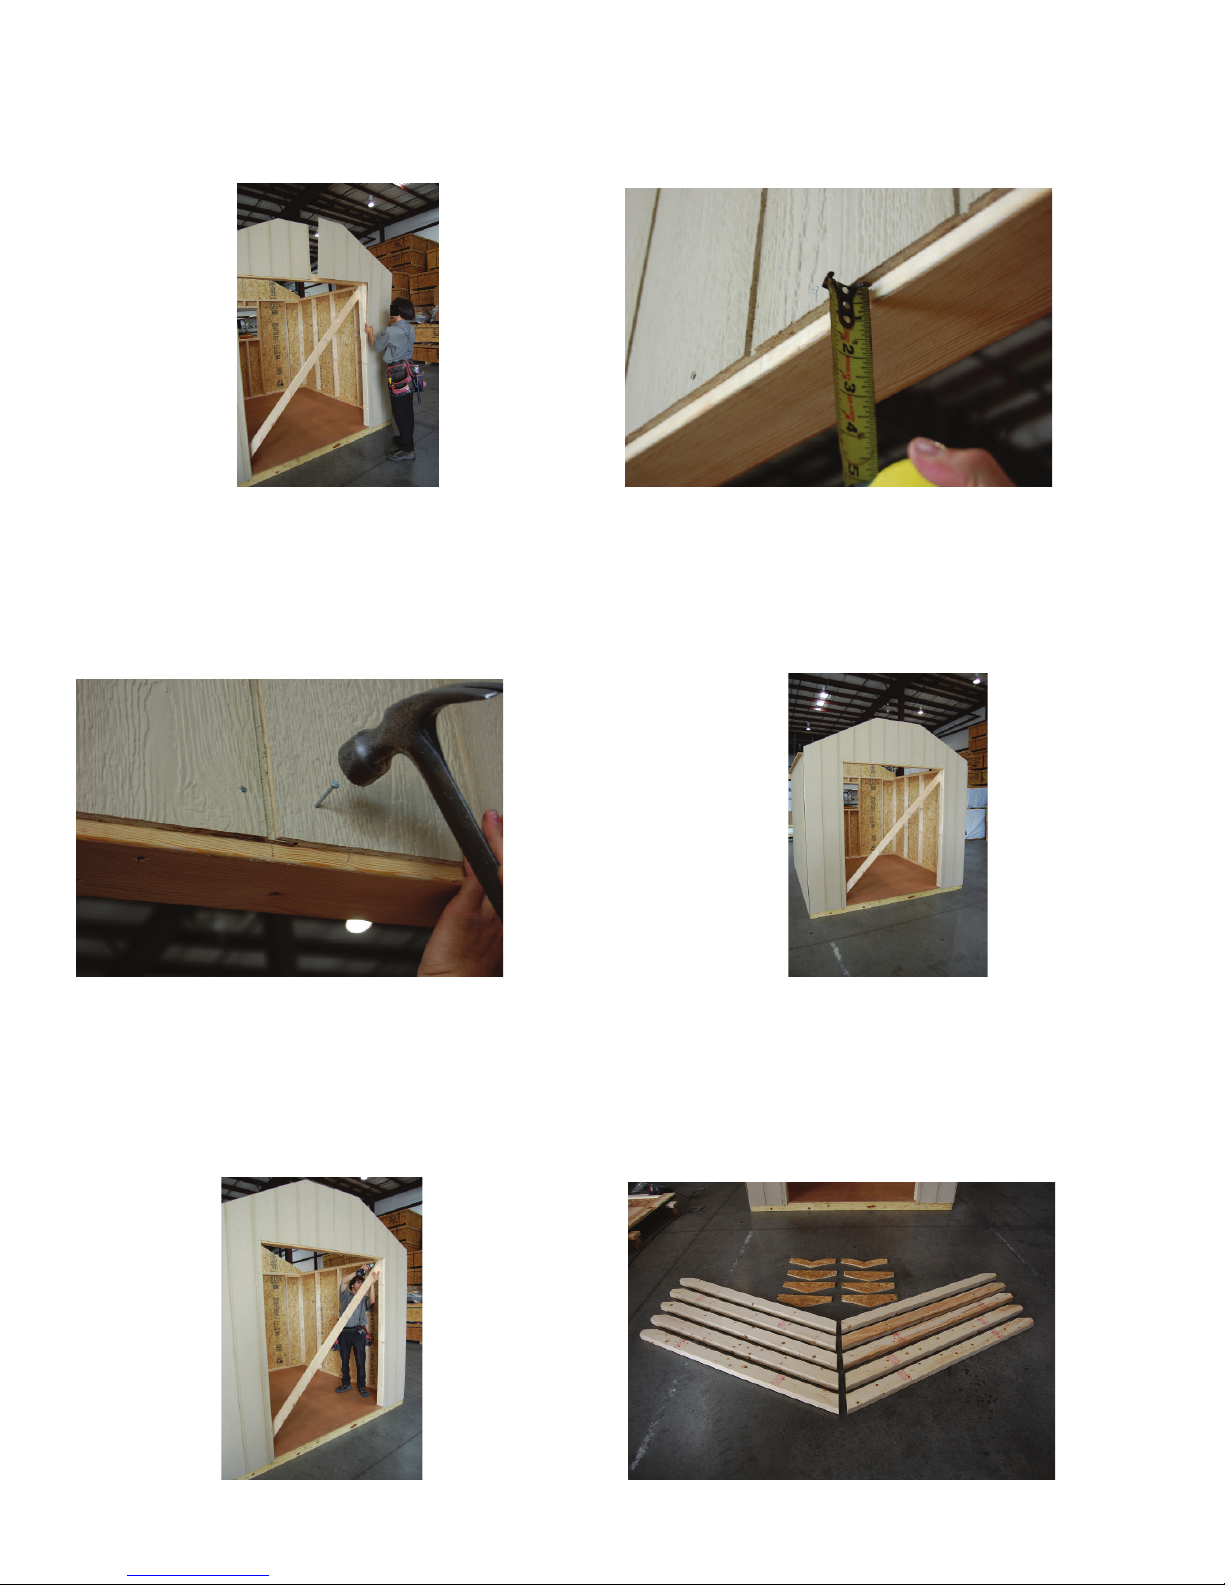
49. Install siding on the right side next.
50. Keep the siding up 3/4” from the bottom of
the header. This is your door slam.
51. When fastening the right-hand siding panel,
nail top left corner rst.
53. Remove the temporary brace across the
door opening.
52. Front wall should now look as pictured.
Install corner blocks on front wall, as shown
in Step 26.
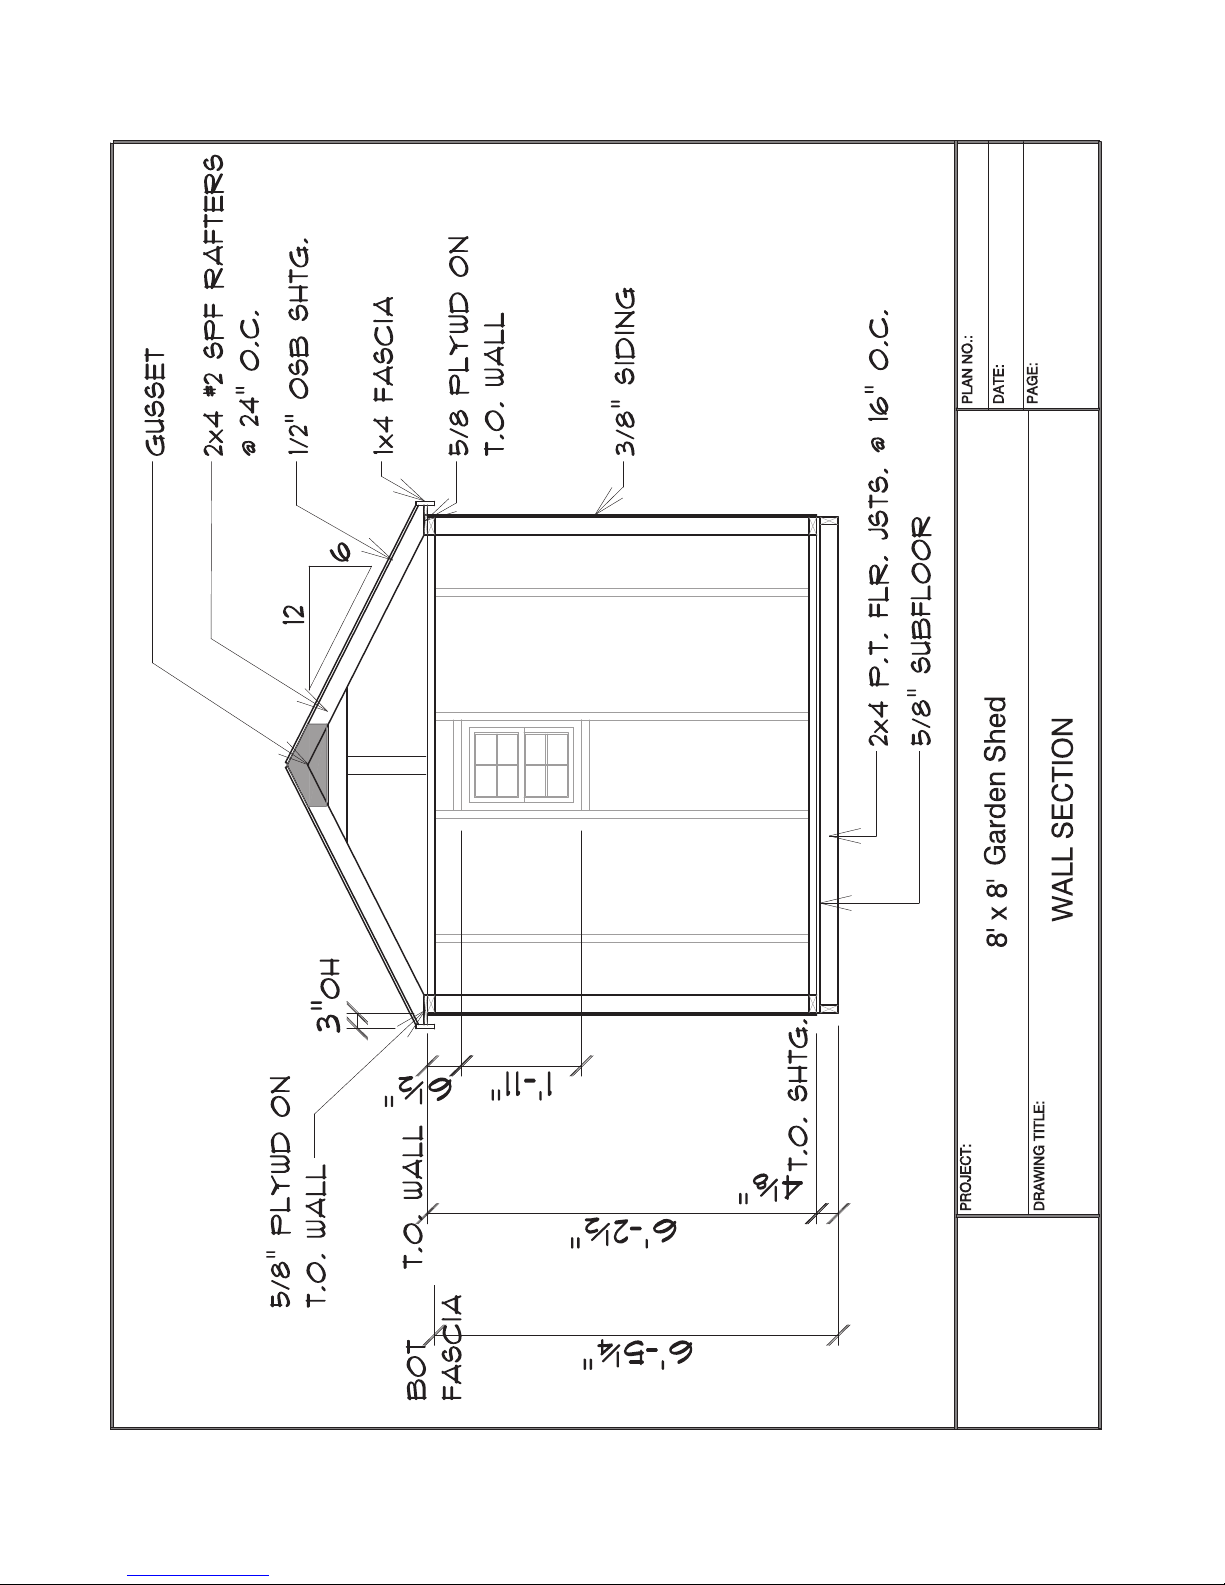
54. Locate the parts for the rafters, as shown.
Be sure rafters all have heel cuts. The rafters
without heel cuts will be used later for gable trim.
page 19
Page 20
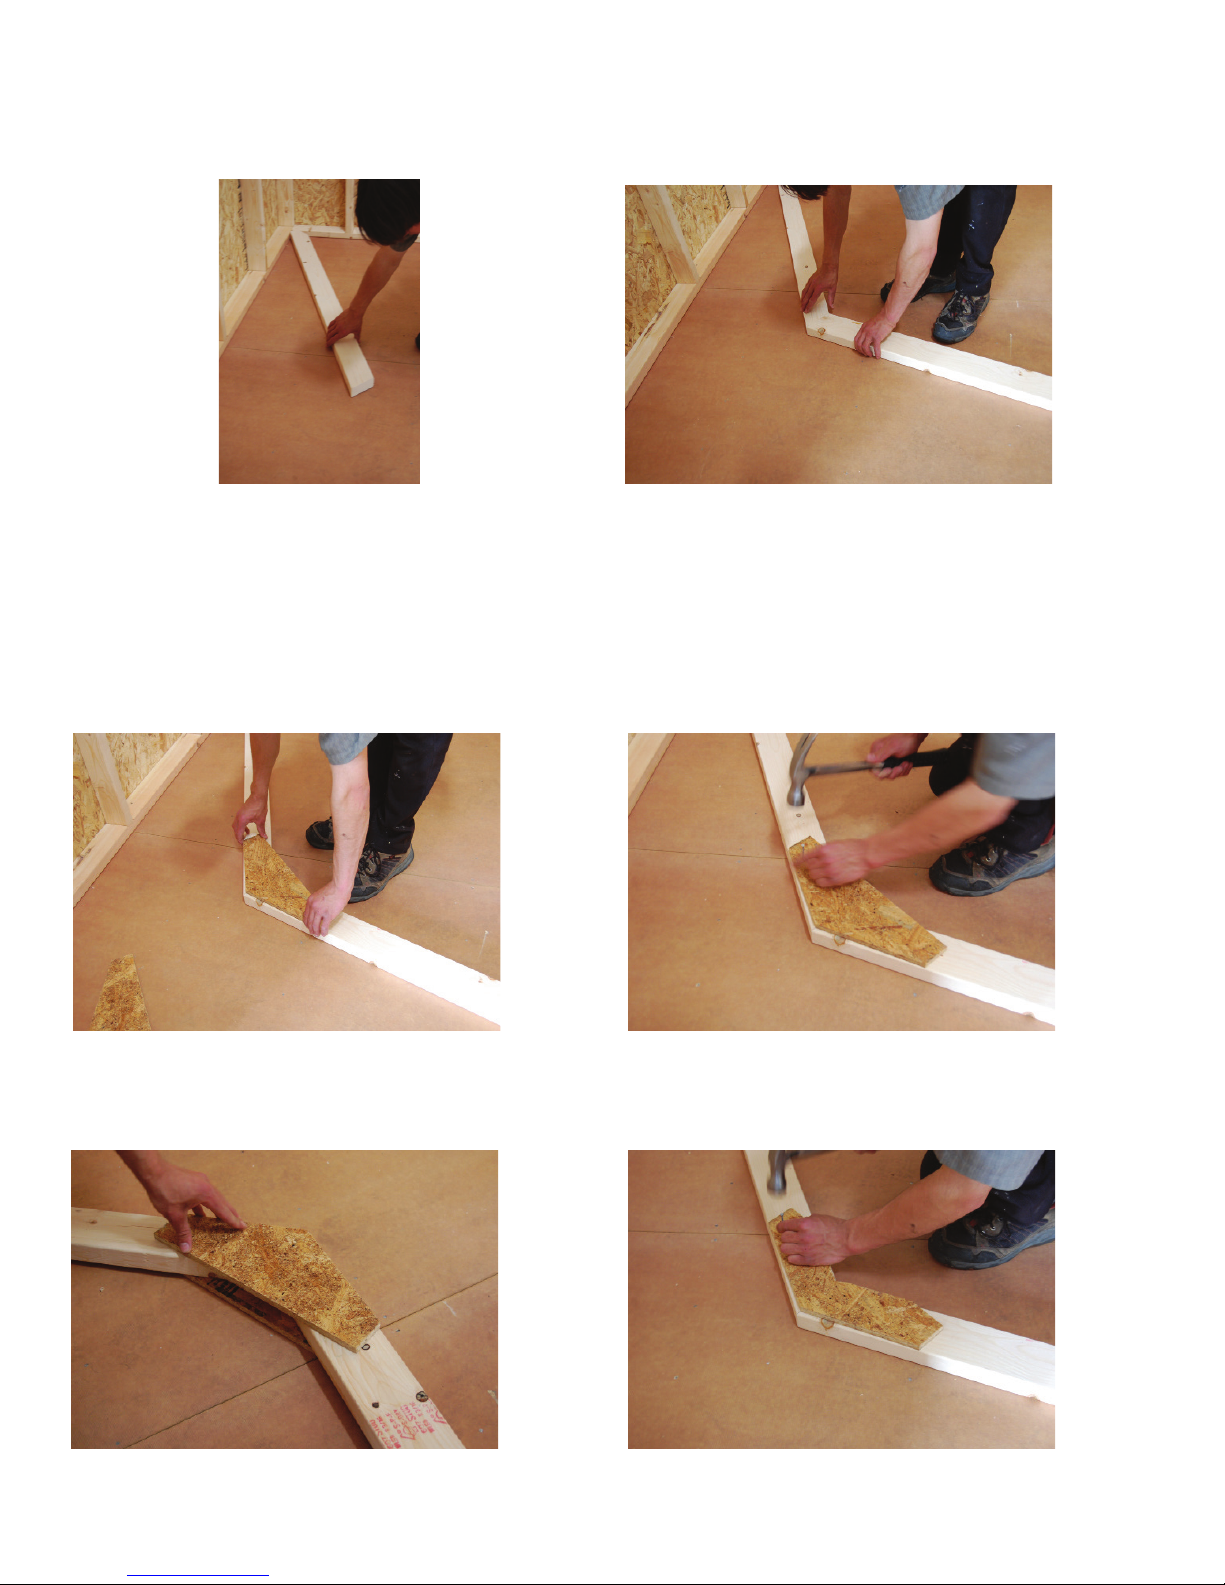
55. Lay one side of a rafter against the corner,
as shown.
56. Place a rafter on the other side.
57. Place the gusset over the rafter at the
top point. Two of the rafters should have
a gusset that is cut out for the vent. Use
these rafters at each end of the building so
the vent is exposed on the inside.
59. Repeat steps 55 to 58 for remaining two
inner rafters.
58. Nail the gusset onto the rafter, using 2” nails.
Use 9 nails on each gusset, on each side of the
rafter. Nail 5 nails about 2” apart along the top
edge of the rafter, and 4 nails along the bottom
edge of the rafter. Repeat on other side.
Ensure that the rafters are properly aligned to
each other while fastening the gussets.
60. Repeat steps 55 to 58 for end rafters. The
end rafters have one gusset on the “inside”
side only.
page 20
Page 21
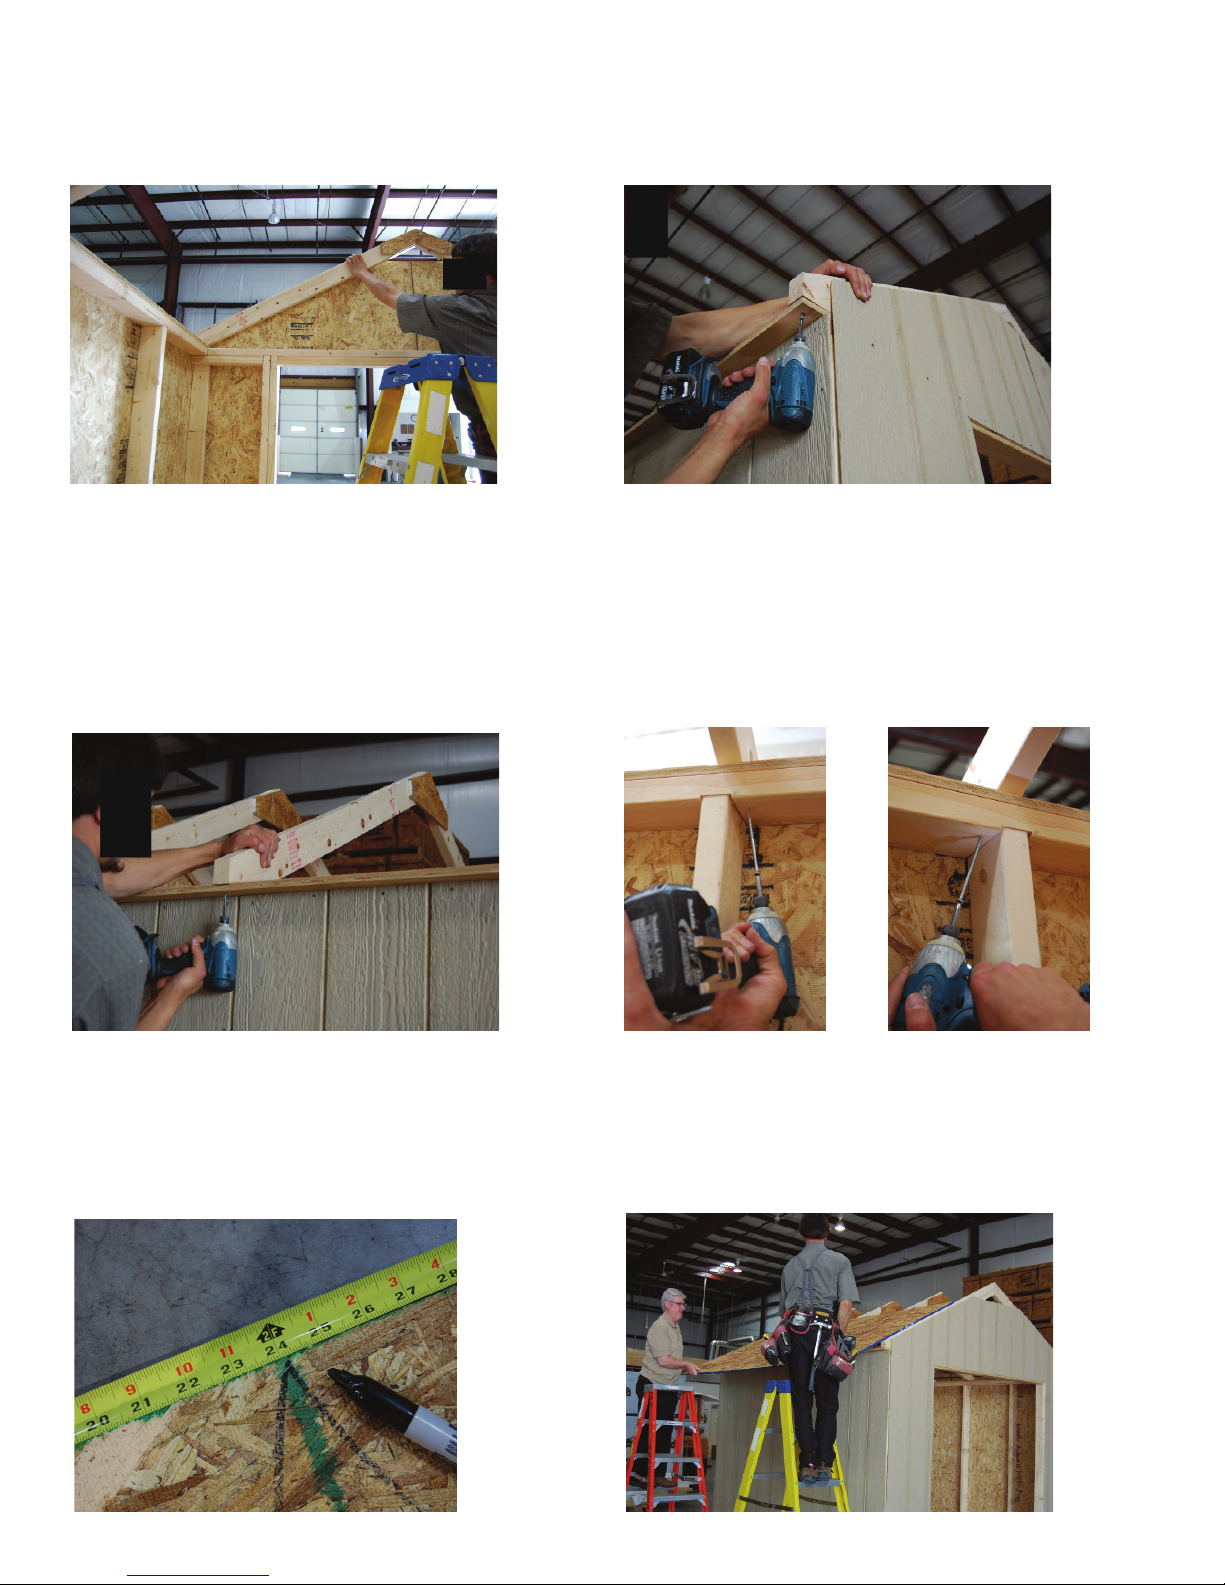
61. Place the rafter against the back side
(two people are needed to lift the rafter into place).
62. Keeping the rafter ush with the outside of
the soft, fasten with 2” screws.
63. Repeat with the rest of the rafters,
inserting the rafters into the notched
portion of the soft.
65. With roof sheeting on the ground, make
marks at 24”, 48”, and 72” on the roof
sheeting, as shown.
64. Insert a 4” screw on each side of the studs,
angled up into the rafters.
66. With the assistance of another person, install
the rst piece of the roof sheeting. KEEP THE
SMOOTH SIDE DOWN and the TEXTURED
SIDE UP! Keep the sheeting ush with the very
bottom of the rafters and with the very ends of the
outside rafters.
page 21
Page 22
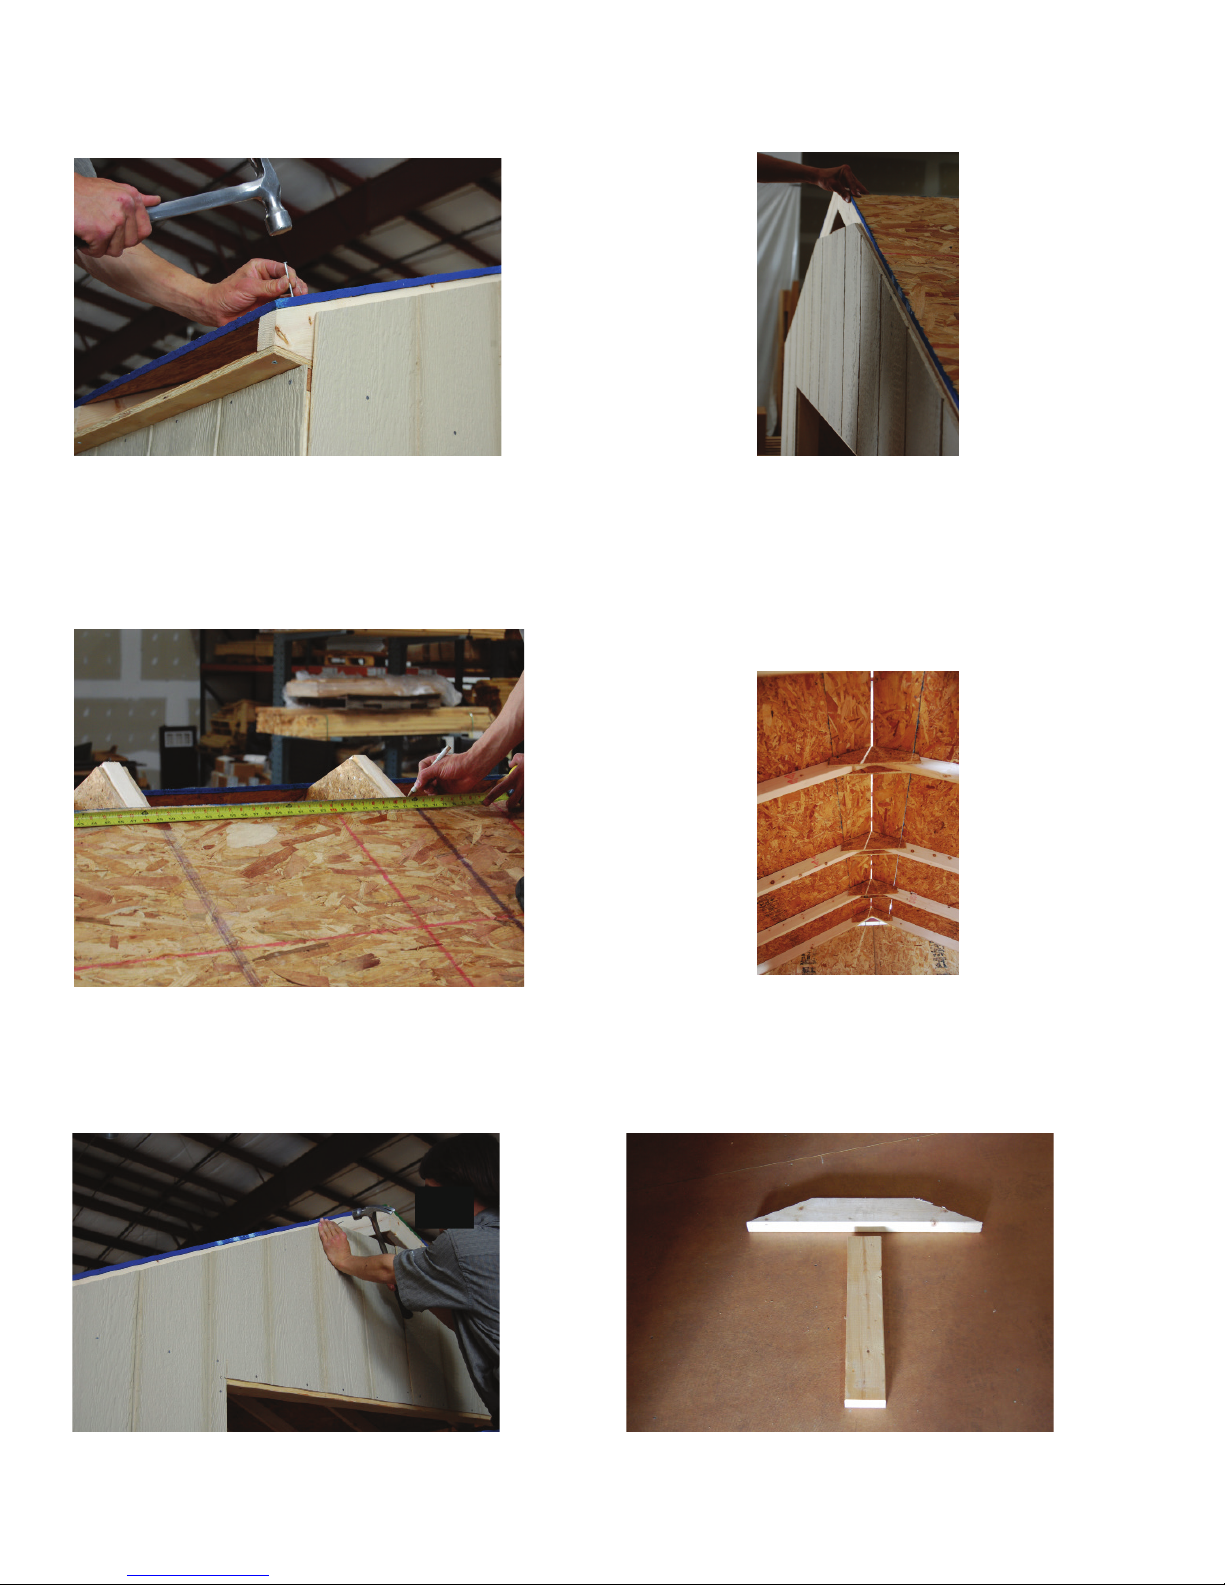
67. Nail the sheeting on the bottom side rst. 68. Move the 2x4 rafters to line up perfectly with
the roof sheeting.
69. Move the rafters so that the marks made
in step 110 are directly over the center of
each rafter; nail every 8” on each rafter.
71. Nail the siding on the front and on the back
into the rafter.
70. Attach the remaining piece of roof
sheeting. There will be a small gap between the
two top pieces of the roof sheeting on both sides.
72. Locate the pictured parts; these will go
inside the end walls.
page 22
Page 23
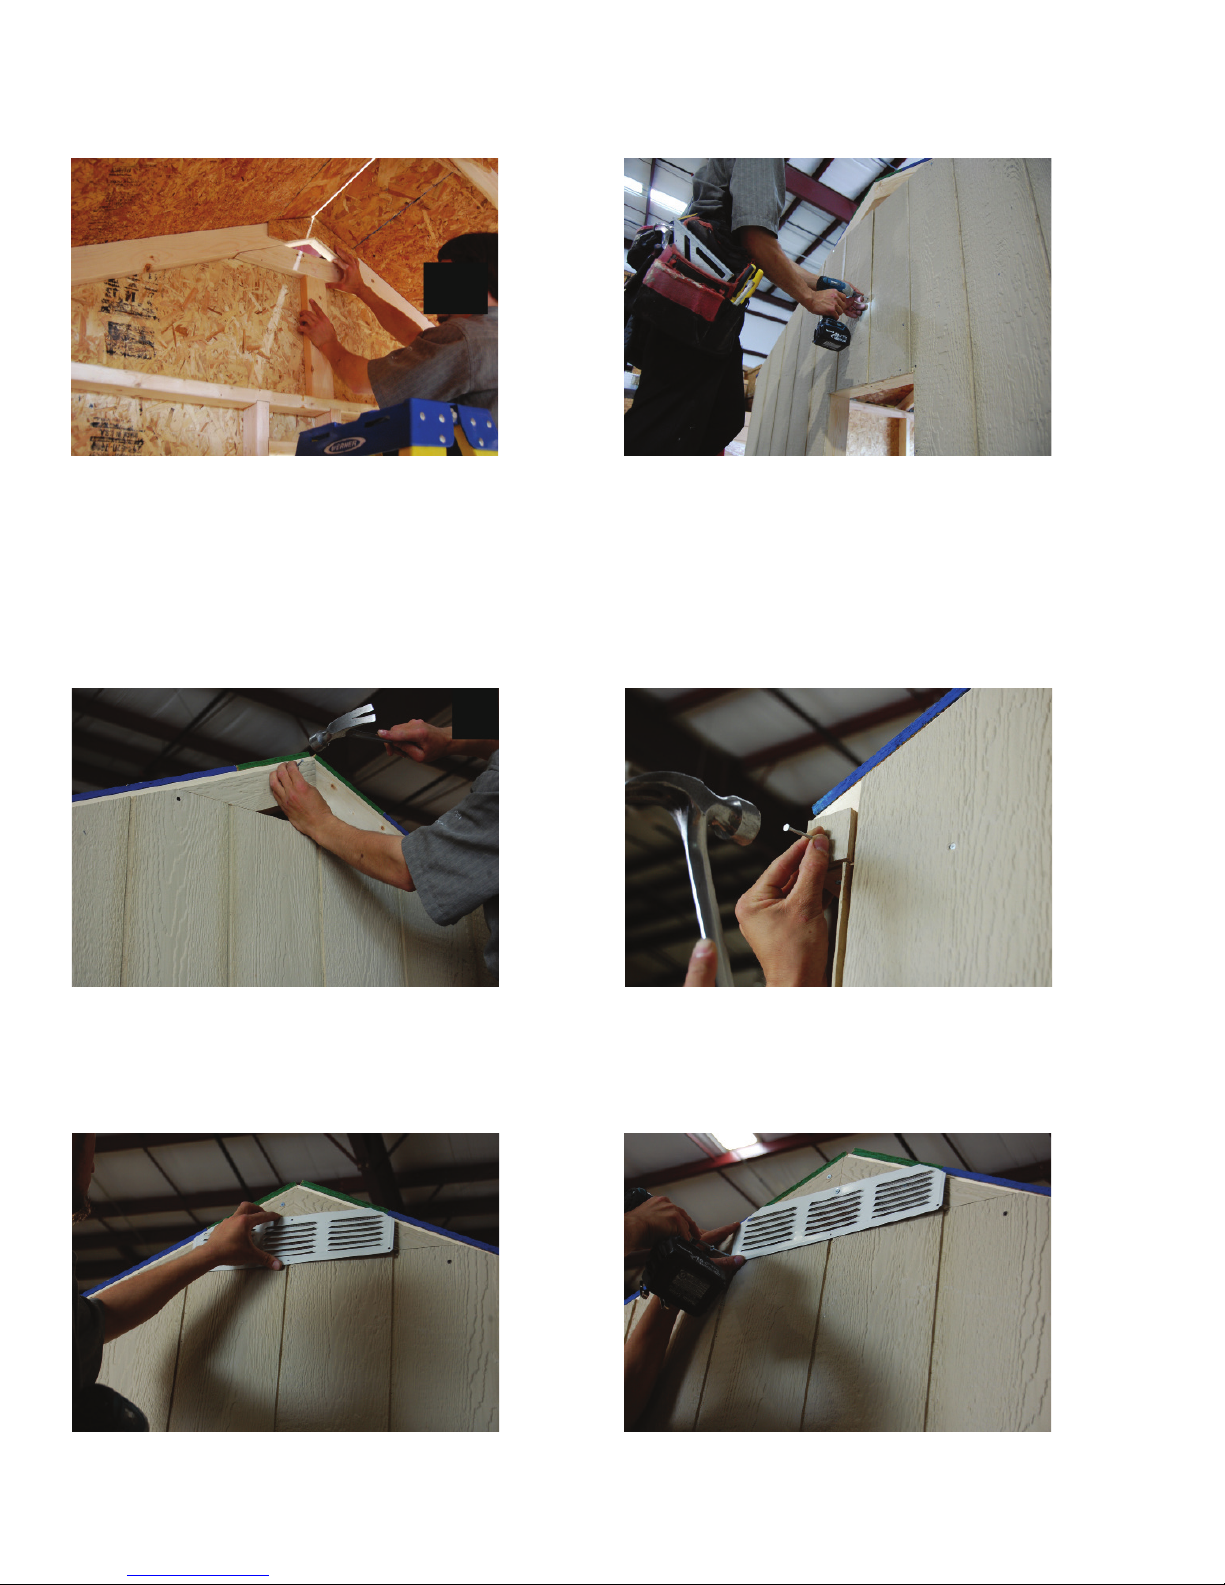
73. Attach the 2x4 with the angle cuts, with a
screw through each pre-drilled hole.
74. Using 2” screws, fasten from the outside,
through the siding into the vertical 2x4.
75. Nail siding spacers on each corner
using 2” nails.
77. Attach metal vent, using one 2” screw in
the center.
76. Nail siding blocks, one at each corner,
with 2” nails.
78. Making sure the vent is level, screw in the
bottom corners.
page 23
Page 24
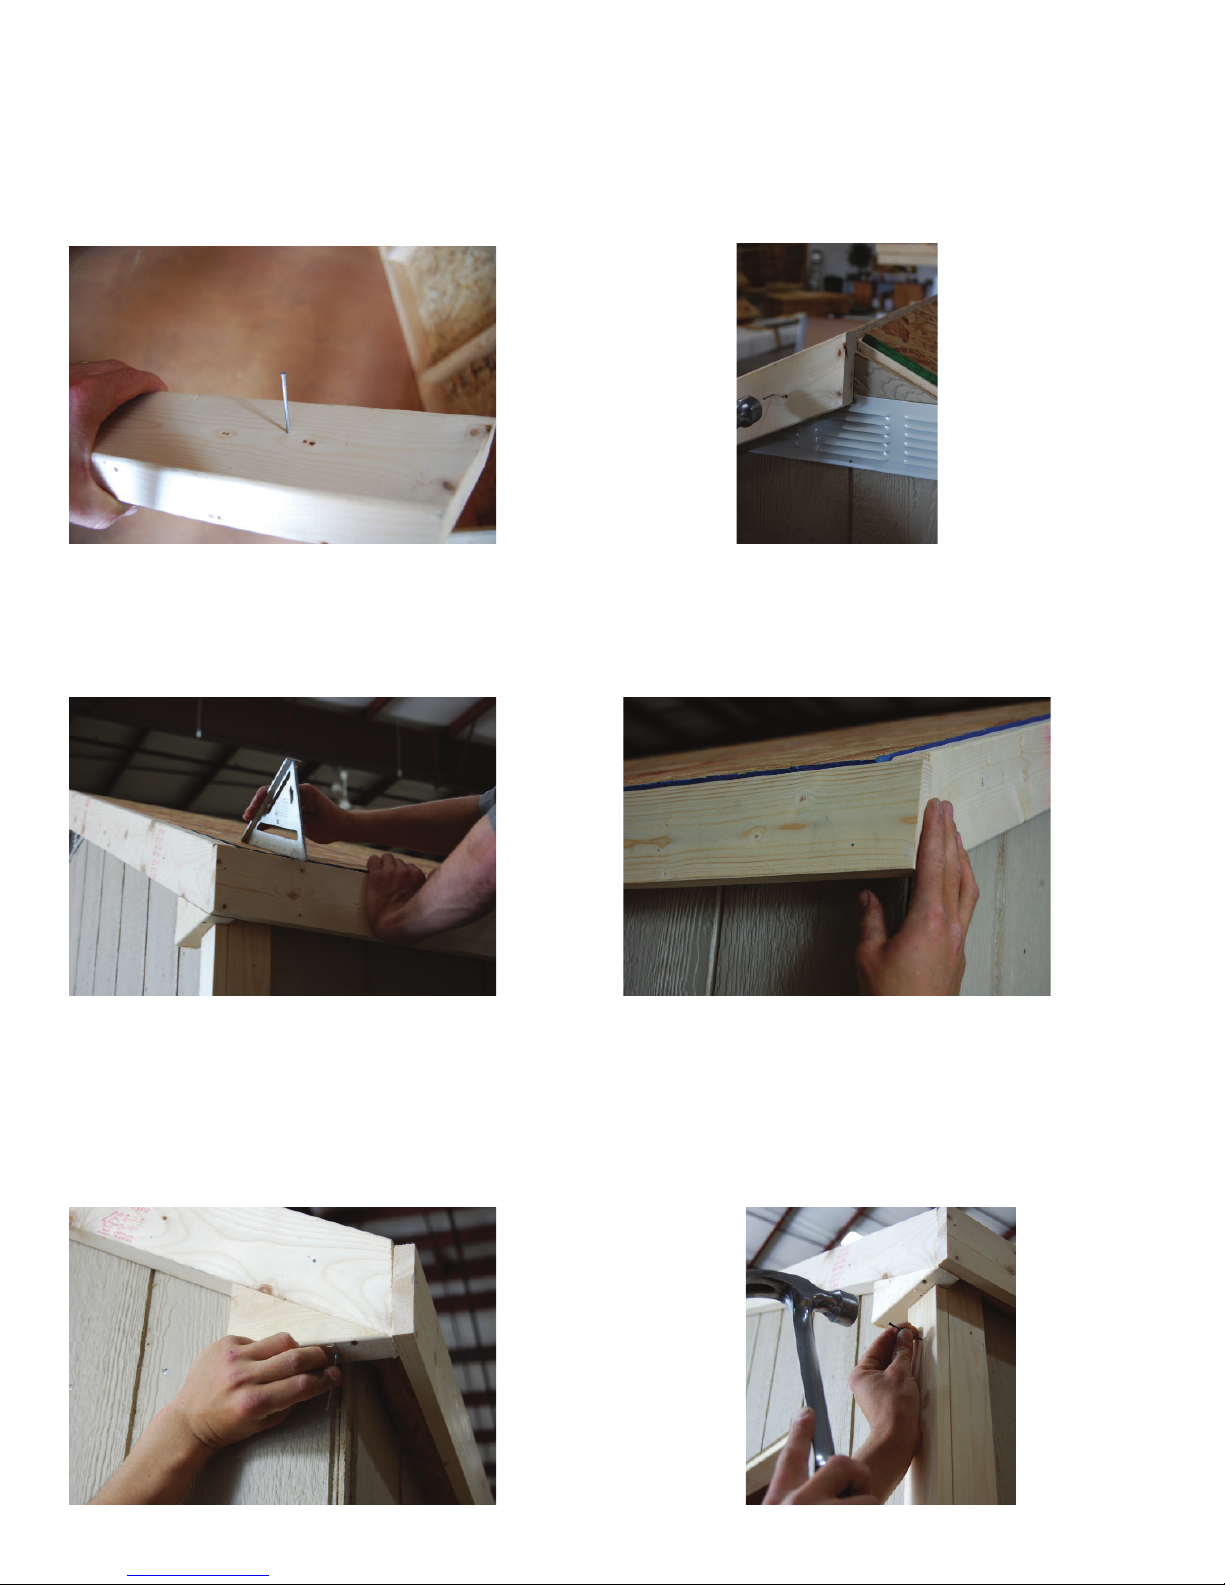
79. Start 3” trim nails into the front roof trim.
80. Make sure the point of the 2x4 trim is
exactly centered at the very top of the roof
sheeting, and the bottom of the trim is ush with
the end of the rafter and the top of the roof
sheeting. Place nails every 12” into the rafter.
81. Locate the 1x4 fascia pieces. When
installing, make sure that the fascia is even
with the top of the roof sheeting.
83. Install the triangle trim at all four corners.
Use a 3” trim nail, spacing 2.5” from the point.
82. Install faceboards, keeping them ush with
the front. Place two nails into the end of
each rafter.
84. Install corner trim as shown. The long trim
piece goes on the side, the short trim piece goes
on the front/back. NOTE: Install side trim rst,
keeping it ush with front/back siding.
page 24
Page 25
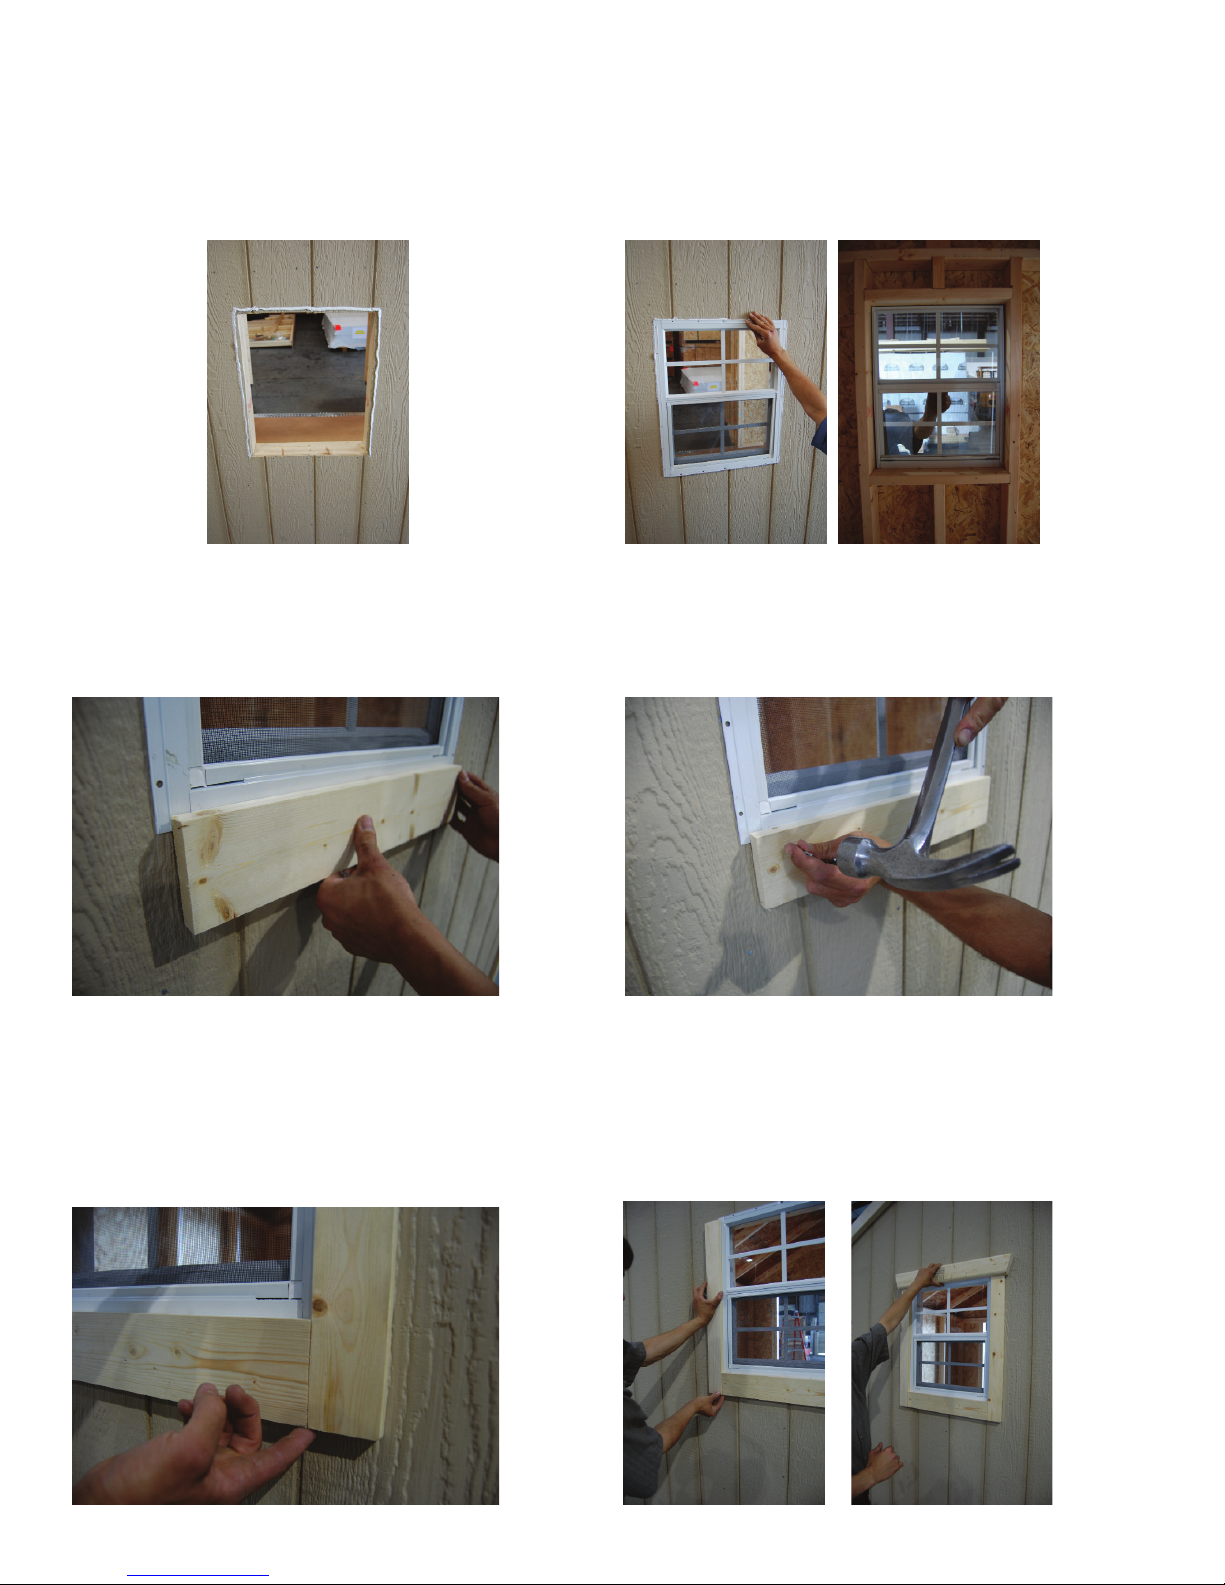
85. Apply caulk on top and sides of the window
opening.
86. Install window in the opening and make
sure it is centered; fasten with a screw at
the top edge. Continue fastening with screws
around the perimeter of the window. Caulk the
top and sides of the window frame.
87. Install 1x4 trim around the window,
starting with the bottom piece. Place the
1x4 trim even with the ridge on the window
ange as shown.
89. Attach 1”x3” side trim to window,
keeping the trim ush at the bottom.
88. Using 1-1/2” inch trim nails, attach the trim.
90. Install top 2x4 trim, using 3” trim nails.
Caulk top of 2x4 trim.
page 25
Page 26
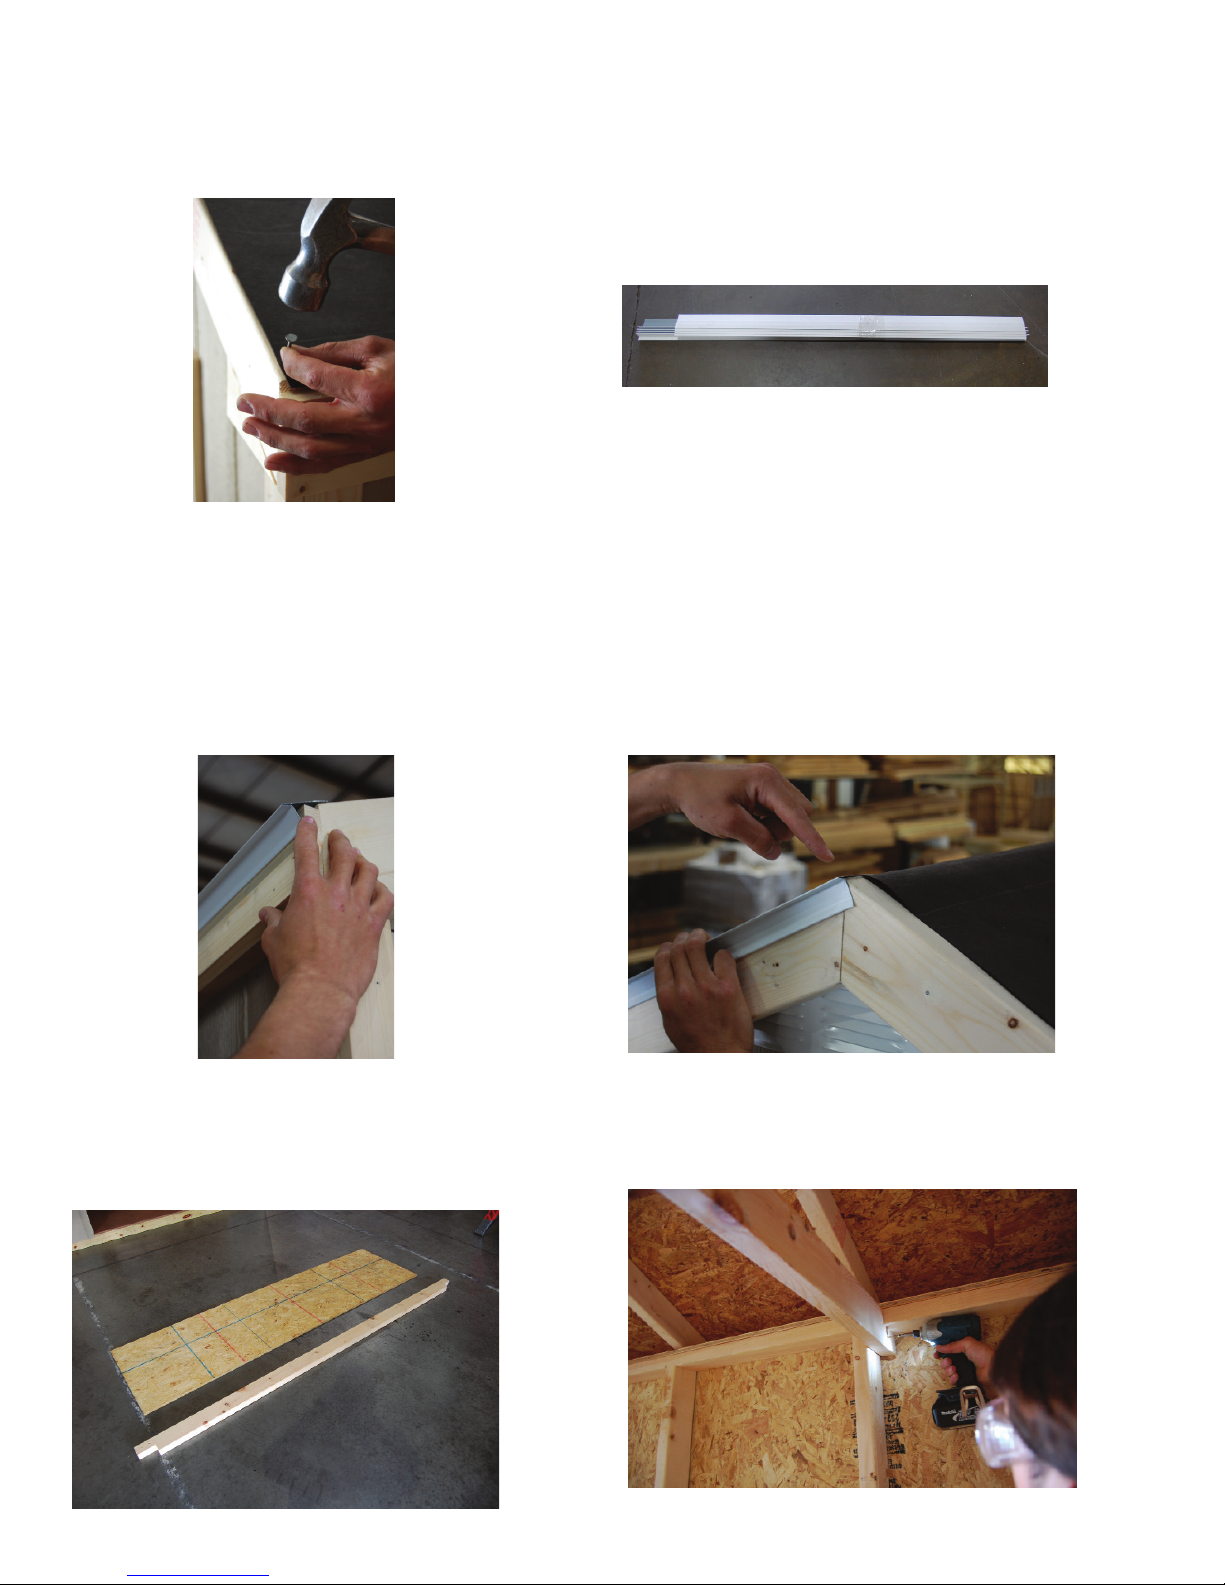
91. Install felt paper, keeping it even with the
bottom and end. Use 3/4” roong nails
and only nail directly above each rafter.
92. Locate the metal drip edge pieces that will
go around the perimeter of the roof. Use
the 4 pcs. of 57-1/2” for the gable ends,
and use the 4 pcs. of 51” for the sides.
93. Using the 51” drip edge piece, start at the
front of the shed. Keep the drip edge ush with
the front end and nail it into the rafter using 3/4”
roong nails.
Attach second piece of 51” drip edge and keep
ush with back end. Drip edge will overlap front
piece by about 1 inch. Repeat on other side.
95. Locate the 2x4 Loft framing and Loft
decking parts pictured below. Place the
2x4 behind the studs on each side of the
building that are closest to the back wall.
94. Using the 57- 1/2” drip edge piece, install
the drip edge on the back side roof, keeping the
top of the drip edge perfectly ush with the connecting point of the two rafters. Repeat on other
three roof gable ends.
96. Using a 3” screw, attach the 2x4 to the studs
from the other side as shown.
page 26
Page 27
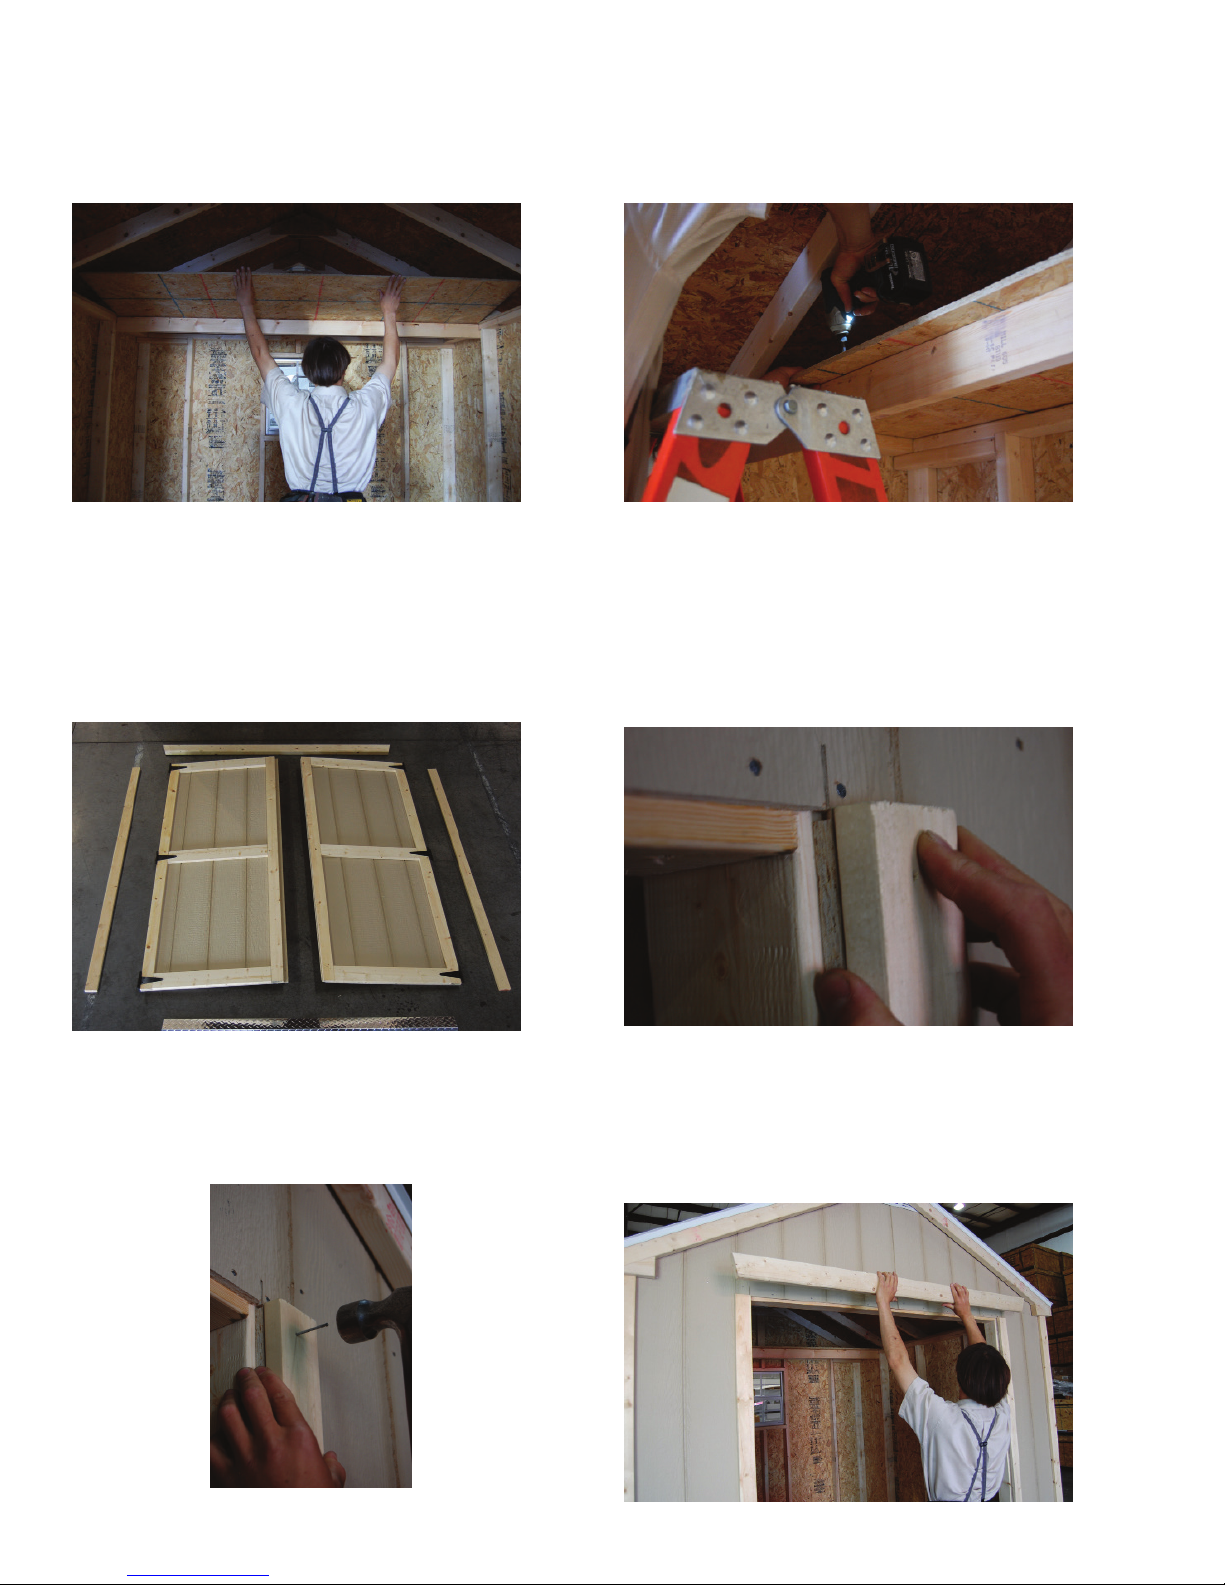
97. Position the sheeting into the loft as shown. 98. Fasten the sheeting to the 2x4 using 2”
screws placed 12 inches apart.
99. Locate the parts for the doors.
101. Using a 2” trim nail, place a nail at the
top of the trim. Repeat on the other side.
100. Install the trim. Hold the 1x3 trim on the
right side of the door opening. Place the top ush
with the top of the siding at the opening, and ush
with the siding on the left side of the trim.
102. Center the 2x4 top trim above the door
opening. Using 3” trim nails, attach two nails
every 20”. One nail 1/2” from the top, and a
second nail 1/2” from the bottom.
page 27
Page 28
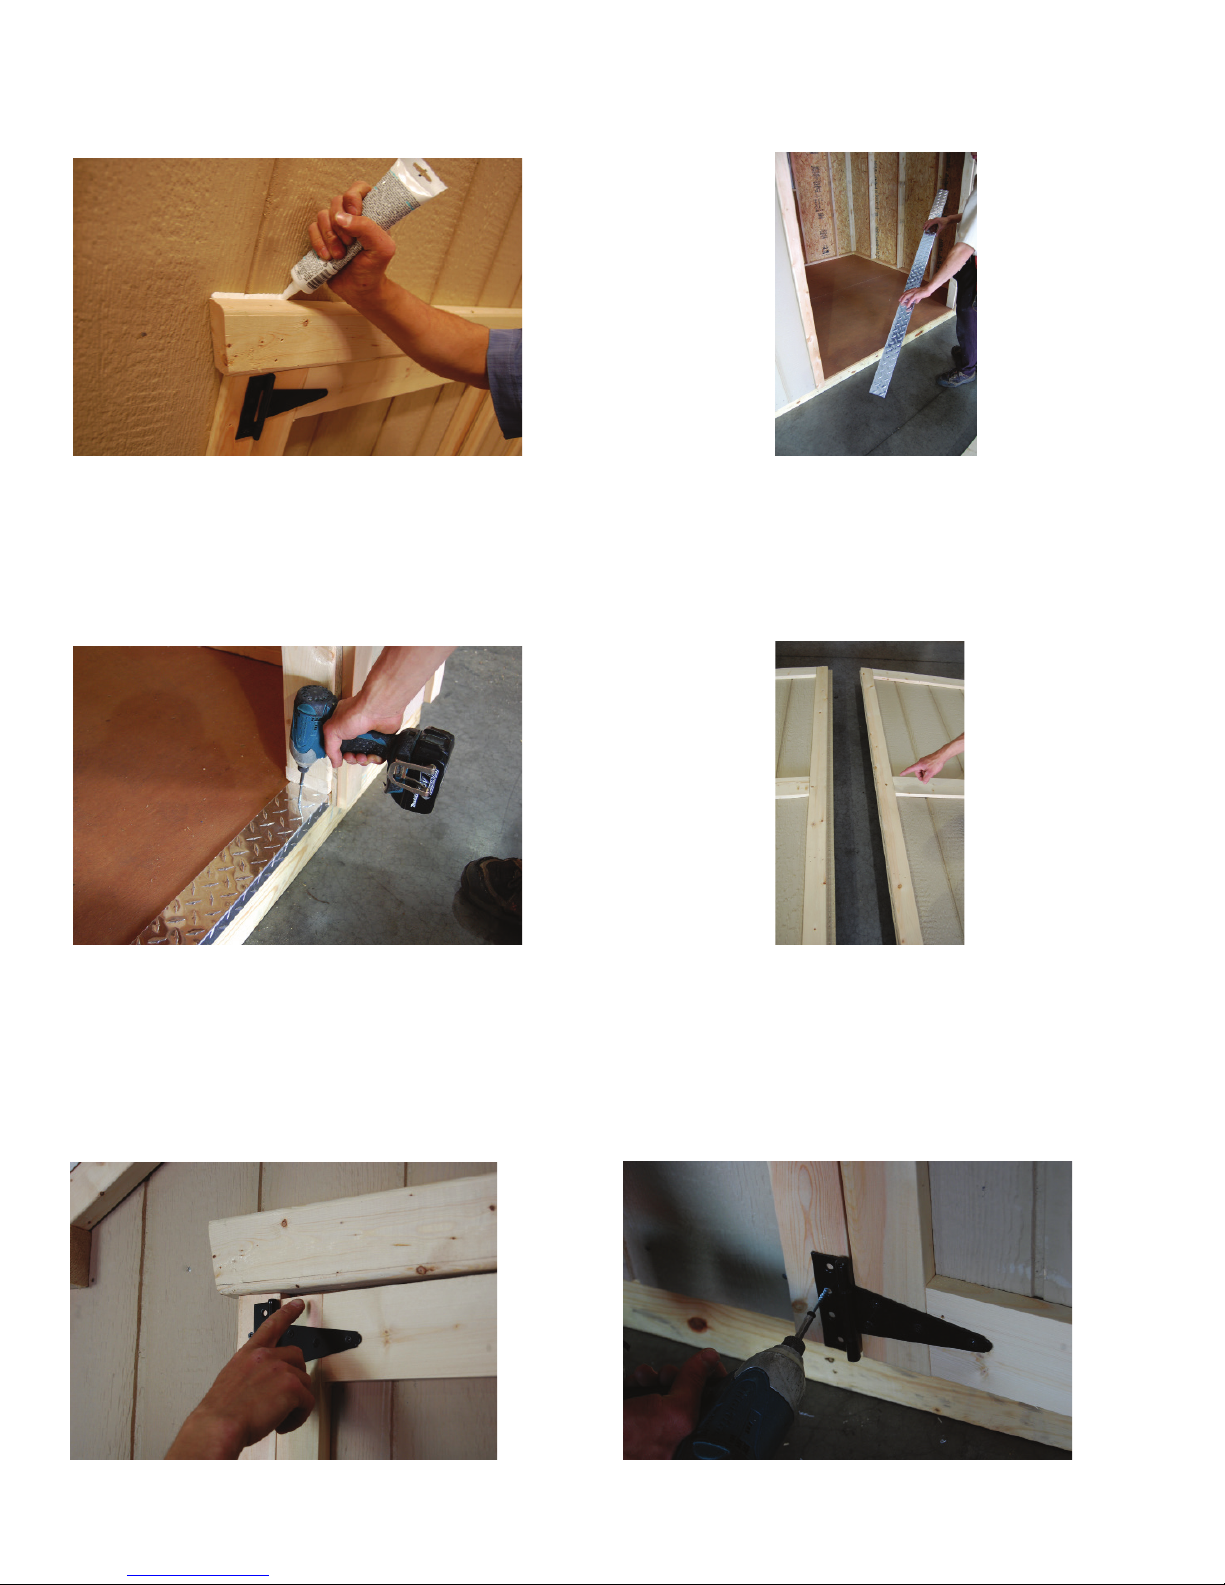
103. Caulk top of trim. 104. Place metal threshold in the door opening.
105. Fasten with 2” screws every 16 inches,
noting the pre-drilled holes.
107. Install the left door rst, keeping a 1/4” gap
between the top of the door and the 2x4 trim
above the door. Using the 2” black screws,
fasten the hinges at the top.
106. Make sure the door with a hole for the latch
will be installed on the right.
108. Using the 2” black screws, fasten the
hinges at the bottom.
page 28
Page 29
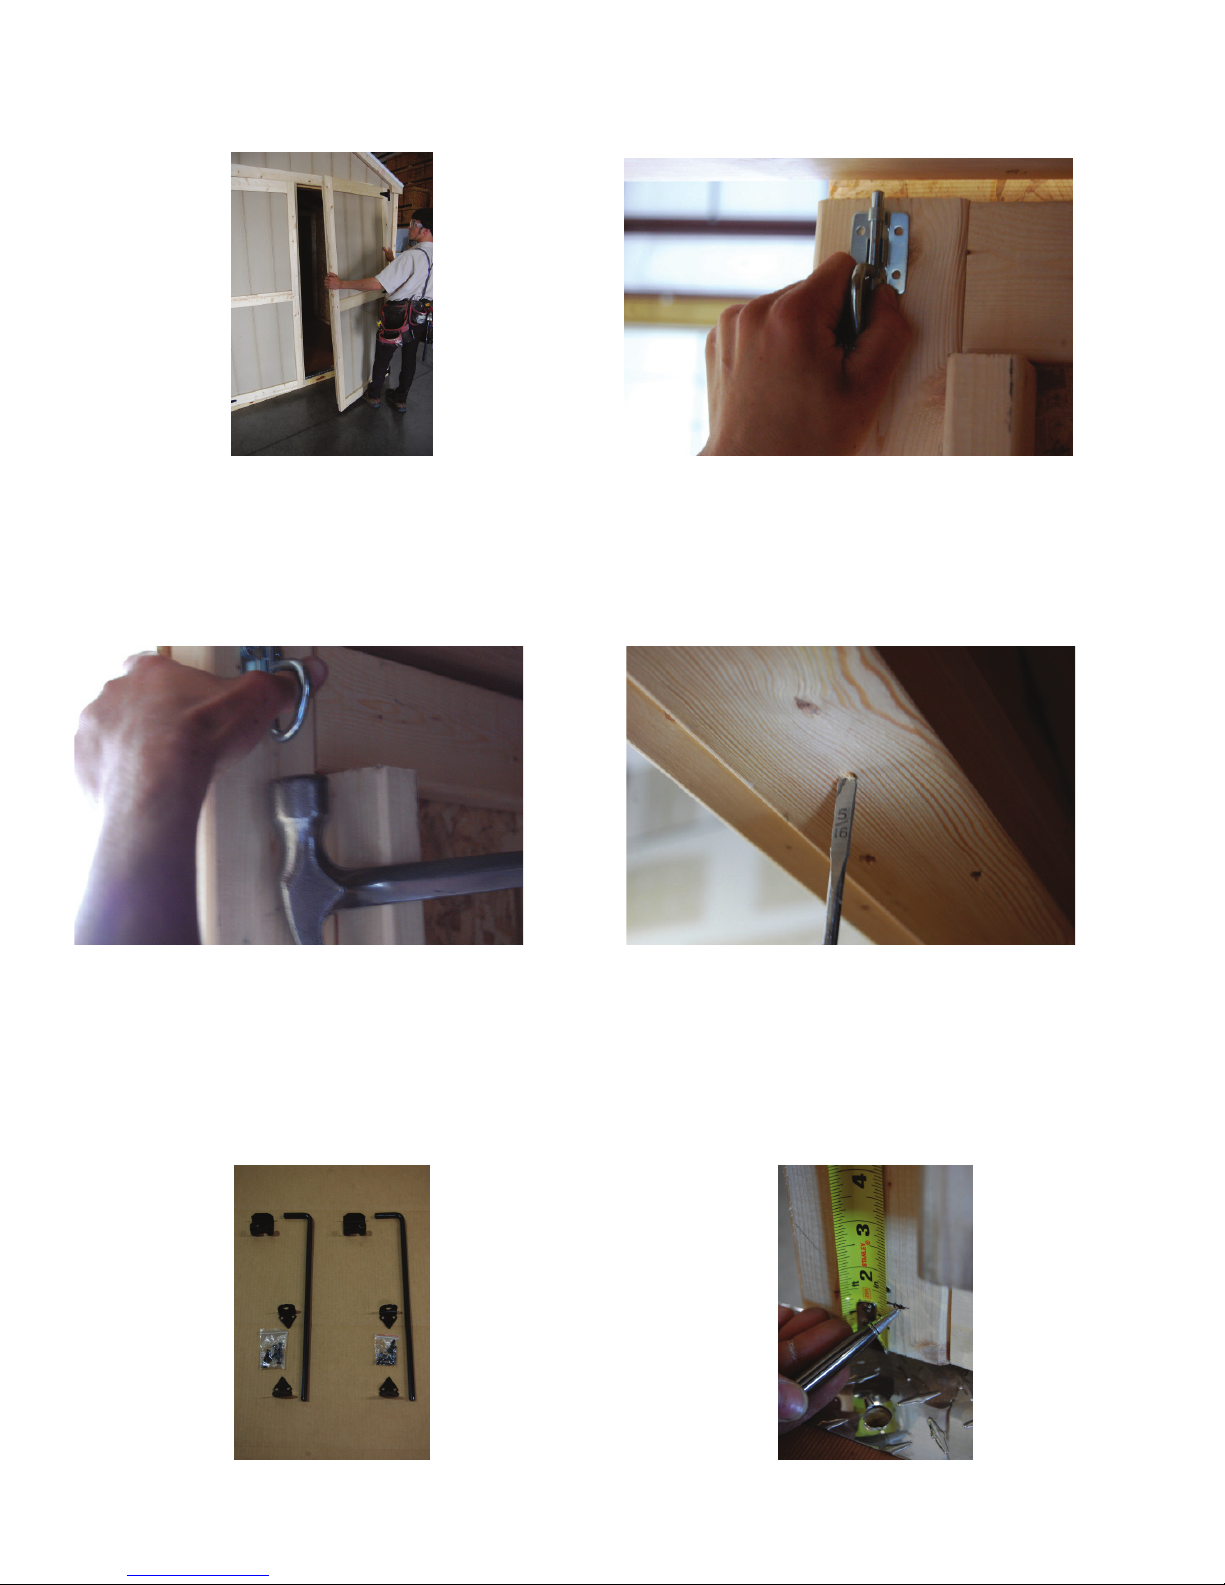
109. Repeat Steps 107 and 108 to install the
right door.
110. Install the D-ring latch at the top of Left Door.
111. Tap lightly on the top D-latch with a hammer,
112. Drill the indentation using a 5/16” drill bit.
to make an indentation in the 2x4 header.
113. Locate cane bolts. 114. On the vertical 2x4 inside the Left Door,
make a mark at 1-1/2”, 6” and at 19”.
page 29
Page 30
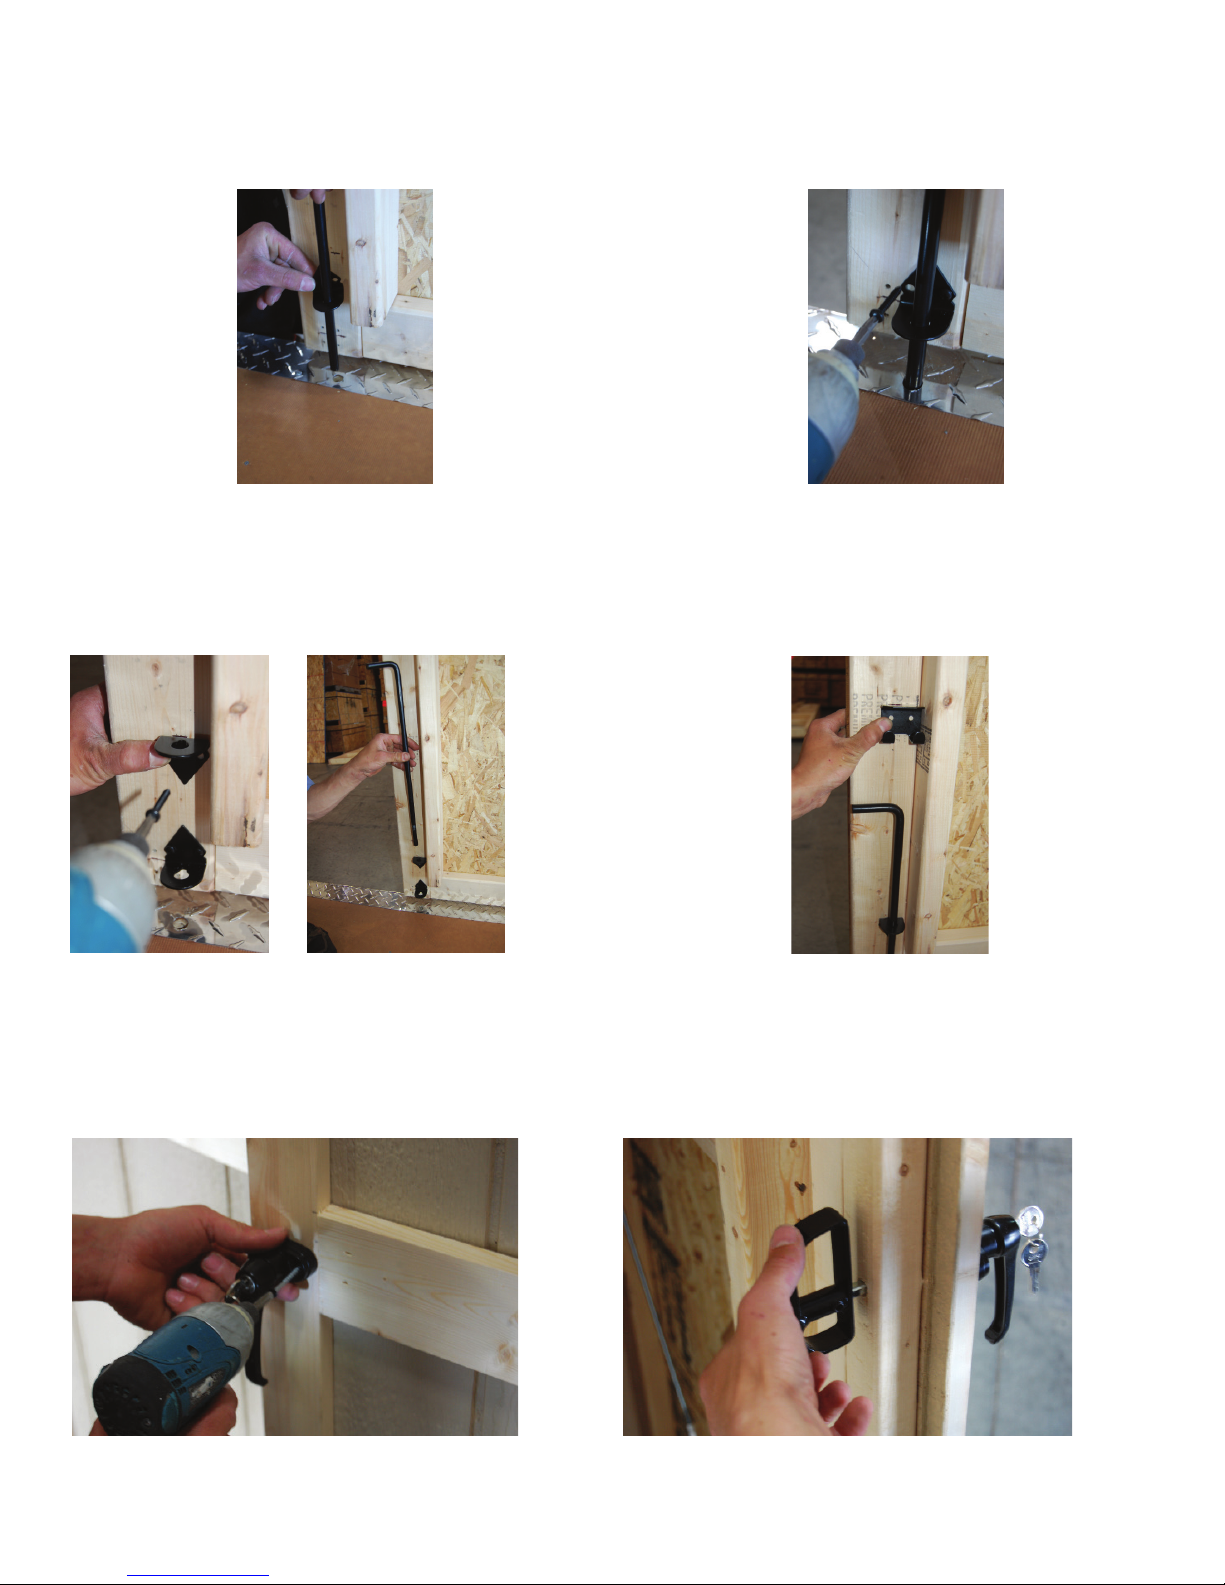
116. Attach bottom bracket above the lower mark.115. Position cane bolt as shown.
117. Attach 2nd bracket at the 6” mark and insert
cane bolt.
119. Install the door latch from the outside of the
door, using the black screws as shown.
118. Attach top bracket at the 19” mark. Repeat
on other side.
120. Place the D-latch inside and fasten with an
allen wrench.
page 30
Page 31
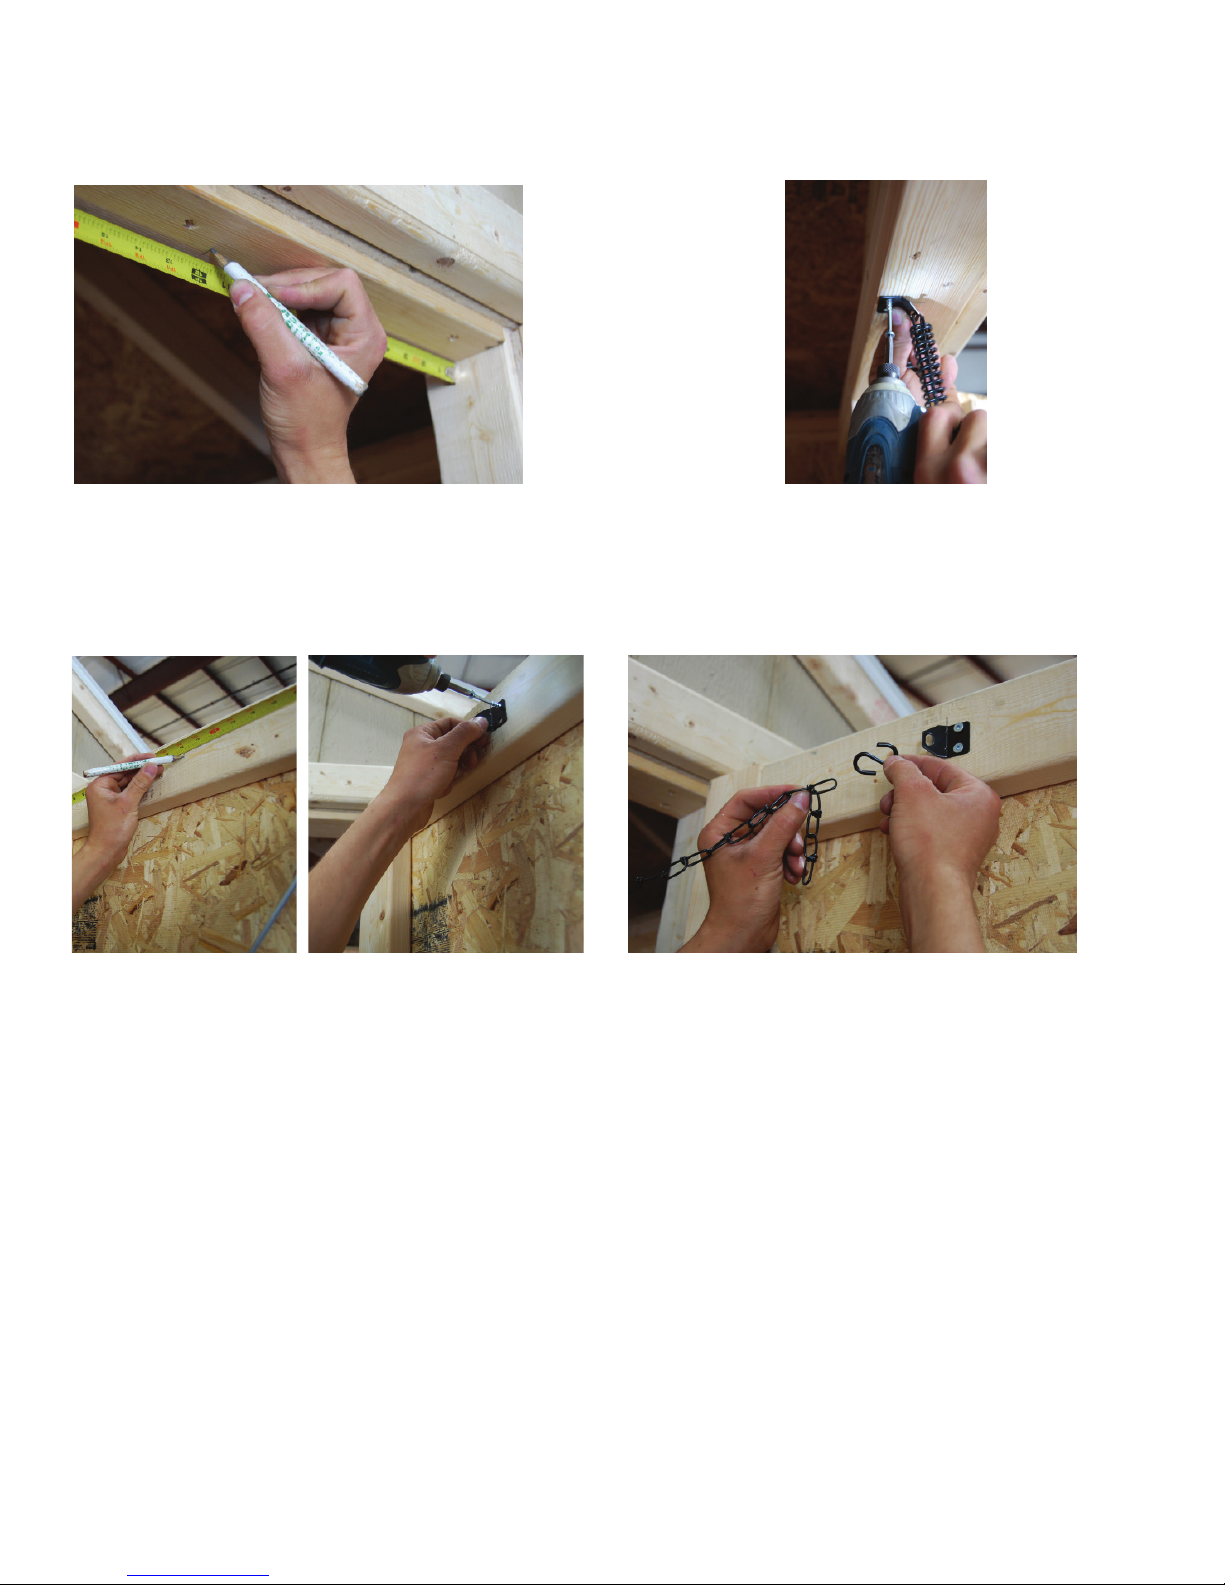
121. Measure 12” from the right side of the
opening and make a mark at 12”.
122. Attach door closer spring bracket as shown
using 2” screws. Fasten towards the inside of the
door header.
123. Measure 14” out from the edge of the door
and make a mark. Attach bracket.
124. Attach door closer spring as shown,
and adjust as desired.
page 31
 Loading...