

Page 1
Operating Instructions
THE CAGE
SUNBOUNCE.COM
Page 2
1
2
3
a)
b)
c)
d)
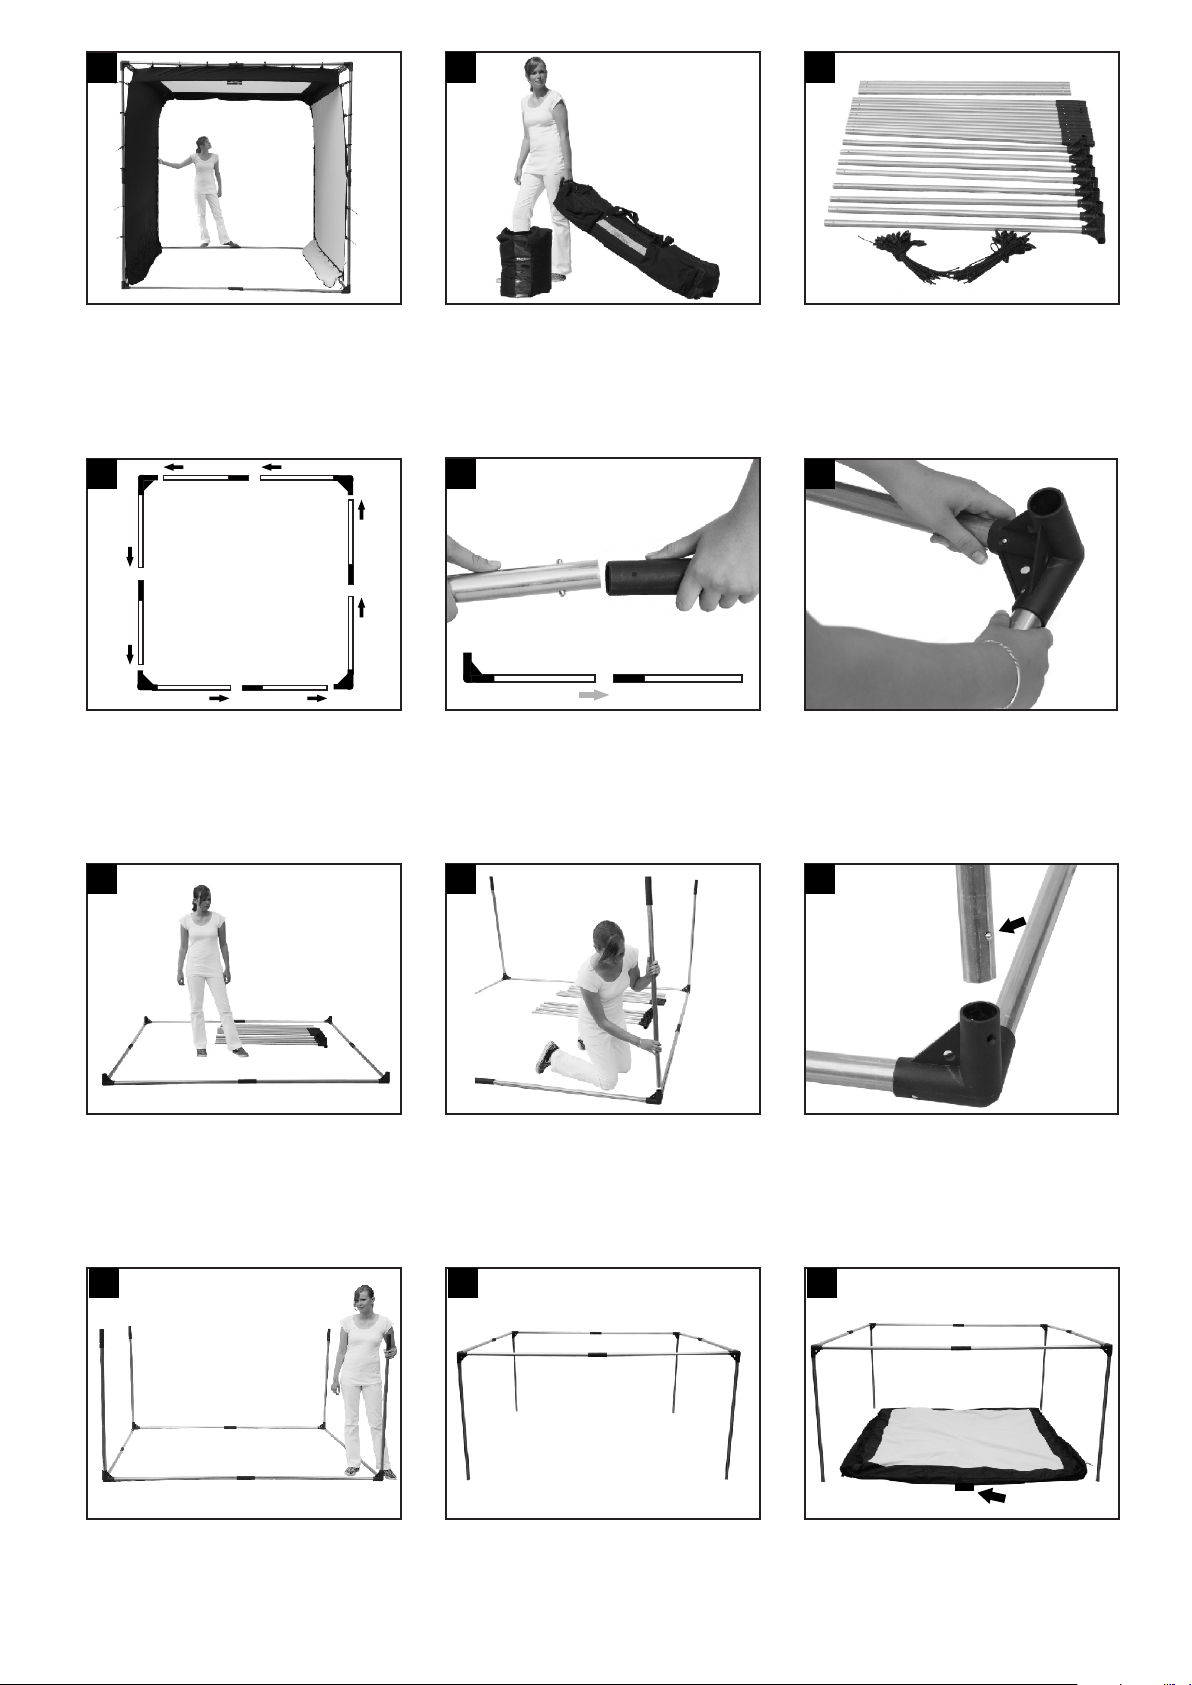
The cage consists of a tubular frame which
forms a cube, a fabric with two side panels,
and a back panel with a roof.
4 5 6
Following parts belong to the tubular frame:
a) 4 poles without connecting elements
b) 12 poles with connecting elements
c) 8 poles with corner connecting elements
d) 60 BUNGEE-SNAKES
b)
c)
b)
c)
c)
b)
c)
b)
Scope of delivery
Aluminum and plastic parts for the tubular
frame (ROLLERBAG optional), fabric
(SCREEN-SAVER optional).
c)
Take 4 pole pieces with a corner connecting
element (c). Connect each of them with a
pole with a straight connecting element (b).
b)
7 8 9
Following parts belong to the tubular frame:
a) 4 poles without connecting elements
b) 12 poles with connecting elements
c) 8 poles with corner connecting elements
d) 60 BUNGEE-SNAKES
Now attach the four corner elements to the
even ends of the poles. Make sure that the
safety buttons lock into the designated
holes.
While putting the square onto the floor,
make sure that the holes of the corner
connecting elements are upturned.
10
You have assembled the lower half of the
tubular frame.
Repeat these steps with the left-over frame
pieces and you'll have the upper half of the
tubular frame.
a)
Take frame pieces (a) with connecting
elements at the end. Insert them from the
top into each corner connecting element.
Make sure that the safety buttons lock into
the designated holes.
11 12
Set up the upper half of the frame in a way
that allows you to conveniently hook in the
fabric and adjust it.
Spread out the fabric. The white diffusor
fabric needs to point upwards. On one of
the four sides you will find a tag (Greg
Gorman). This tag indicates where to find
the open side of the fabric.
Page 3
13 14 15
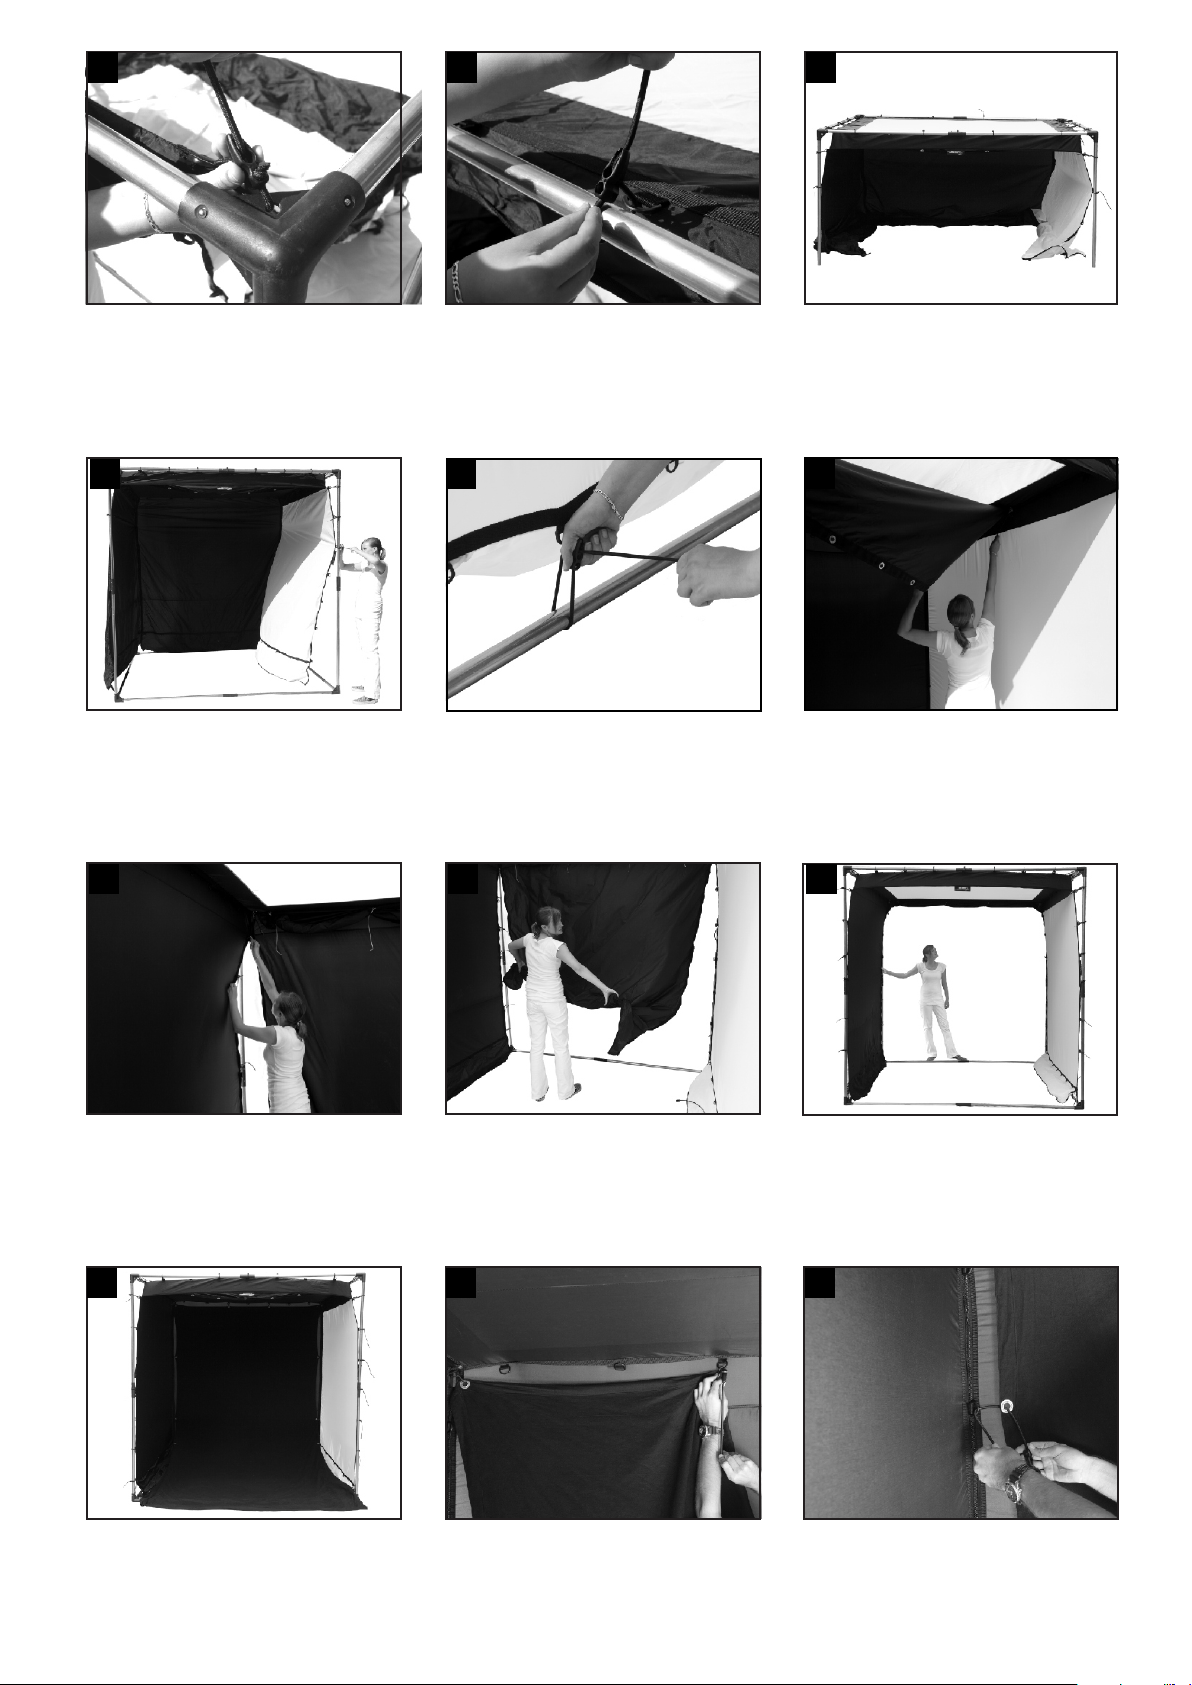
Attach the fabric to the corners of the frame.
Take a BUNGEE-SNAKE and thread it in
the plastic ring at the corner of the fabric, as
well as in the hole at the inside of the corner
connection.
There are plastic loops alongside the edges
of the fabric. Every second loop needs to be
mounted to the frame – use BUNGEESNAKES.
Lift up the upper part of the tubular frame
and place it on the connecting elements of
the lower half of the frame. If you have an
assistant, lift up two diagonally opposite
corners at the same time.
16 17 18
Make sure that all safety buttons lock into
the designated holes. Secure THE CAGE
against wind (as shown in 25-27). Then,
mount the side panels to the frame using
BUNGEE-SNAKES.
Also, mount the side panels to the frame at
the bottom edge (with BUNGEE-SNAKES).
The upper side of the CAGE can be used
as a diffusor. To do so, open the zippers on
the side of the black cover panel and roll
them up towards the back. Attach the rolledup cover panel with the yellow strings.
19 20 21
The black back panel can be opened. Just
unzip the two zippers on the sides.
Roll up the rear panel and attach it with the
four yellow strings.
THE CAGE with opened rear panel.
22 23 24
You can mount arbitrary backdrops into THE
CAGE. As an optional supply you can order
a black duvetine fabric with hooks at the
upper edge and on the sides.
Attach the backdrop fabric to the plastic
loops at the rear panel. Thread BUNGEESNAKES in the fabric loops and tie them.
Attach the fabric to the loops on the side
and straighten it out. Pull the hanging fabric
to the front and you'll create a cove.
Page 4
25 26 27
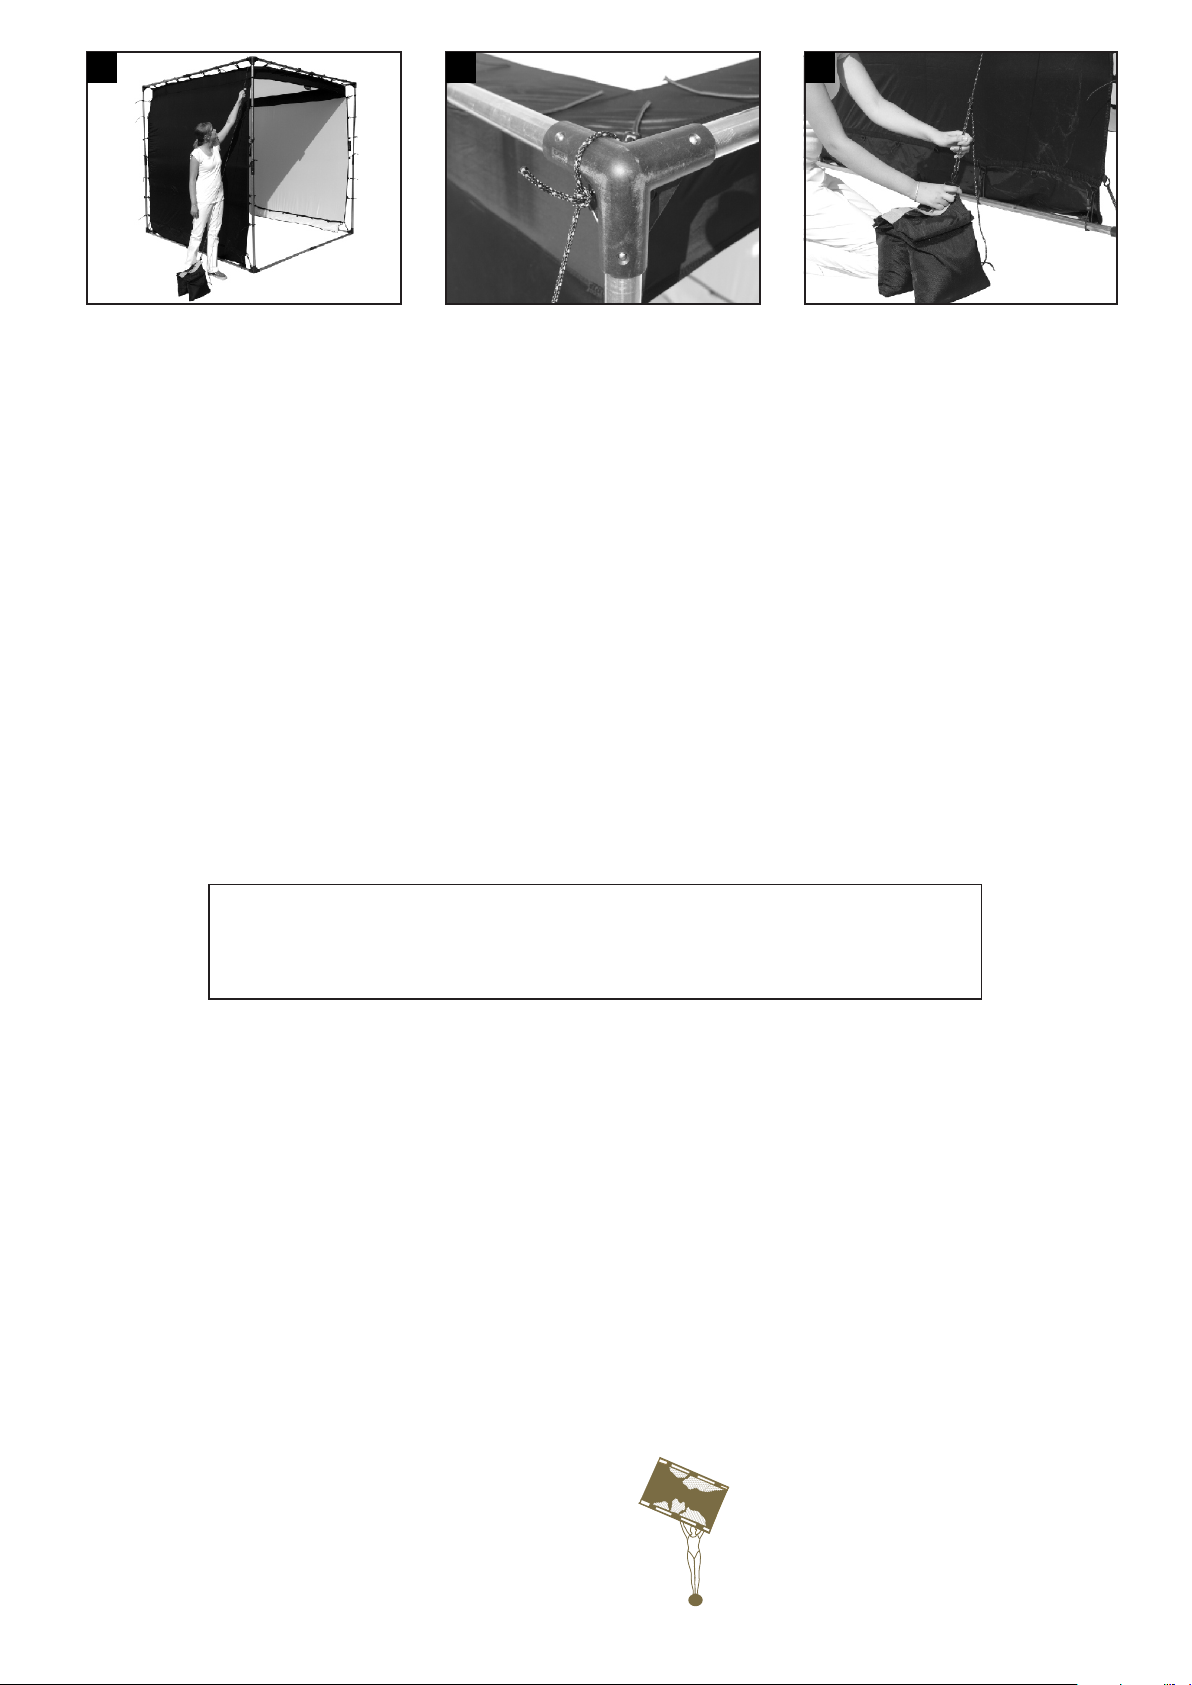
THE CAGE needs to be secured with
sandbags or tent pegs at any time. Even if
there is no wind during the set-up process.
Be aware that even in interior spaces strong
wind can occur unexpectedly due to open
doors or windows.
For security purposes attach one rope to
each corner connecting element of the four
cube corners. The rope needs the be pulled
around the pole and through the hole of the
corner connection. Then it needs to be
fastened.
The other end of the rope needs to be
mounted to a sandbag or a strong tent peg.
Depending on the wind force it might be
necessary to use more than one sandbag
for each rope.
Safety instructions!
Keep a distance of 5 feet or more between hot lights and the fabric. Extend the distance when using bigger light sources. You can
test the heat which hits the fabric by carefully approaching the hot area with your hand. If you can bear it easily, the distance is
OK for the moment. Please repeat this test frequently, since the lights will get hotter and the room temperature can increase, too.
In order to prevent overheating and to eliminate fire hazard, please make adjustments according to the temperature changes. Be
aware that loose fabric parts may not get closer to the light sources as defined above.
Turning the fabric
You can position the white side panel either to the right or to the left of THE CAGE. All you need to do is turn the fabric inside out
before mounting it to the frame. The fabric has plastic loops both on the inside and outside for attachment to the tubular frame.
Be aware that the black cover inside of the roof can only be zipped and unzipped from one side. Remember to zip or unzip the
cover before turning it.
California Sunbounce and their dealers will assume no liability for damage, secondary/consequential damage
or personal injury that may occur from ownership or use of this product.
Stand 2011/03/30
For further products, application examples, free videos and instructional manuals visit our website:
www.sunbounce.com
SUNBOUNCE GmbH · Buchenring 8 - 10 · 21272 Egestorf · Germany
Telefon: +49 (0) 4175 - 80 88 79 87 · Telefax: +49 (0) 4175 - 80 88 79 67
E-Mail: [email protected] · Internet: www.sunbounce.com
© 2013 SUNBOUNCE GmbH. All rights reserved.
SUNBOUNCE.COM
 Loading...