

Page 1
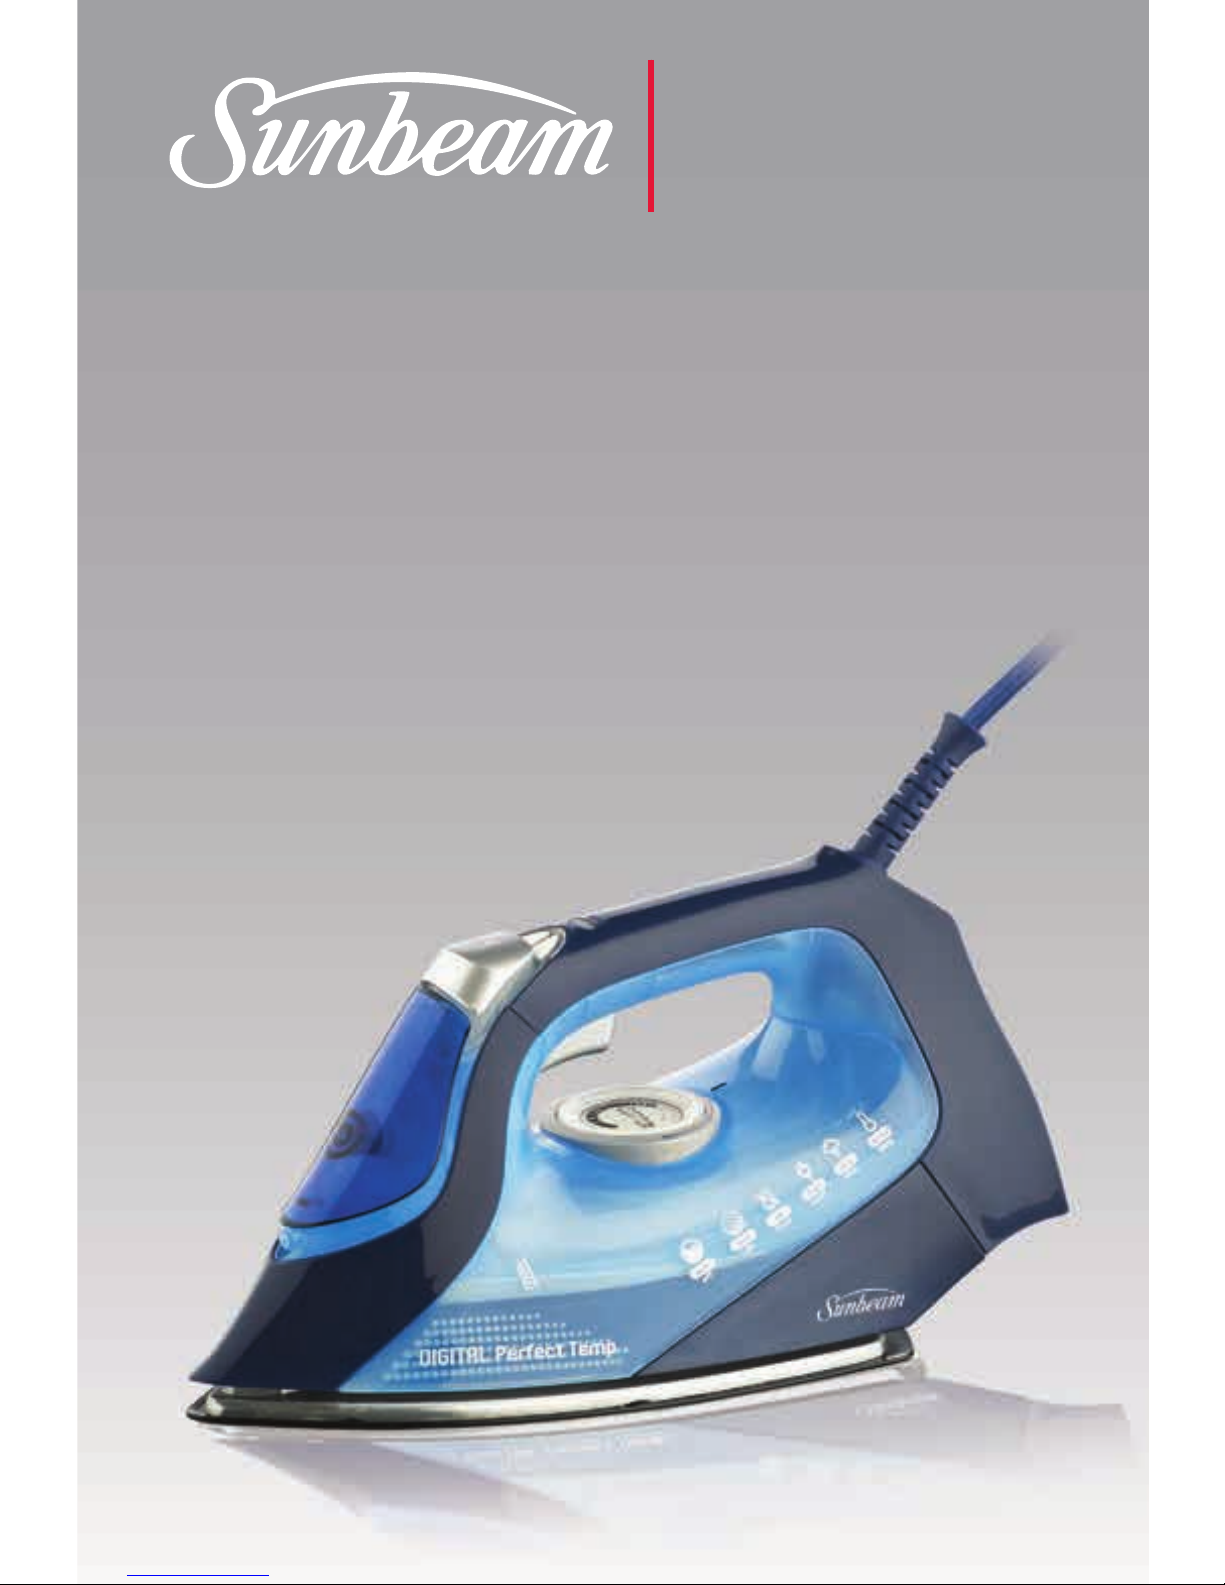
Solus® PerfectTemp
™
Digital Resilium
®
Shot & Spray Iron with Safety Auto-Off
User Guide
SR7001
MASTER
SERIES
Page 2
Should you experience any
difficulties with your product
during the warranty period,
please contact our customer
service line for advice on 1300
881 861 in Australia, or 0800
786 232 in New Zealand.
Replacement
Guarantee
2
Year
Australia
www.sunbeam.com.au
1300 881 861
Units 5 & 6,
13 Lord Street,
Botany NSW 2019
Australia
New Zealand
www.sunbeam.com.nz
0800 786 232
Level 6, Building 5,
Central Park,
660-670 Great South Road
Greenlane, Auckland
New Zealand
Important instructions –
retain for future use.
Sunbeam’s Safety Precautions 3
Features of your Solus Iron 4
Using your Solus Iron 6
The Safety Auto-Off Feature 7
Care and Cleaning of your Solus Iron 8
Troubleshooting 8
Ironing Tips & Tricks 9
Ironing Chart 10
Contents
Page 3

3
Sunbeam’s Safety Precautions
Sunbeam is very safety conscious when
designing and manufacturing consumer
products, but it is essential that the product user
also exercise care when using an electrical
appliance. Listed below are precautions which
are essential for the safe use of an electrical
appliance:
• Read carefully and save all the instructions
provided with an appliance.
• Always turn the power off at the power outlet
before you insert or remove a plug. Remove by
grasping the plug - do not pull on the cord.
• Turn the power off and remove the plug when
the appliance is not in use and
before cleaning.
• Do not use your appliance with an extension
cord unless this cord has been checked and
tested by a qualified technician or service
person.
• Always use your appliance from a power
outlet of the voltage (A.C. only) marked
on the appliance.
• This appliance is not intended for use by
persons (including children) with reduced
physical, sensory or mental capabilities, or
lack of experience and knowledge, unless they
have been given supervision or instruction
concerning use of the appliance by a person
responsible for their safety.
• Children should be supervised to ensure that
they do not play with the appliance.
• The temperature of accessible surfaces may
be high when the appliance is operating.
• Never leave an appliance unattended while in
use.
• Do not use an appliance for any purpose
other than its intended use.
• Do not place an appliance on or near a hot gas
flame, electric element or on a heated oven.
• Do not place on top of any other appliance.
• Do not let the power cord of an appliance
hang over the edge of a table or bench top
or touch any hot surface.
• Do not operate any electrical appliance with
a damaged cord or after the appliance has
been damaged in any manner. If damage
is suspected, return the appliance to the
nearest Sunbeam Appointed Service Centre for
examination, repair or adjustment.
• For additional protection, Sunbeam
recommend the use of a residual current
device (RCD) with a tripping current not
exceeding 30mA in the electrical circuit
supplying power to your appliances.
• Do not immerse the appliance in water
or any other liquid unless recommended.
• Appliances are not intended to be operated
by means of an external timer or separate
remote control system.
• This appliance is intended to be used in
household and similar applications such
as: staff kitchen areas in shops, offices and
other working environments; farm houses; by
clients in hotels, motels and other residential
type environments; bed and breakfast type
environments.
SAFETY PRECAUTIONS FOR YOUR IRON
• Do not leave a hot iron within reach of
children. If they come into contact with a
hot iron it could lead to serious burns.
• Iron only on an ironing board.
• An iron takes approximately 30 minutes to
cool down. Allow the iron to cool completely
before storing.
• Do not wind the cord around the soleplate
while the iron is still hot.
• Do not leave the iron unattended while it is
plugged into the power outlet.
• Always unplug the iron from the power outlet
before filling or emptying the water tank.
• The iron must be used and rested on a stable
surface.
• The iron is not to be used if it has been
dropped, if there are visible signs of
damage or if it is leaking.
• This iron features an “auto-off” function,
which is an additional safety feature
designed to disconnect power to the heating
element if the iron has not been used for a
certain period of time.
• When placing the iron on its heel rest,
ensure the surface on which it is placed is
stable.
If you have any concerns regarding the performance and use of your appliance,
please visit www.sunbeam.com.au or contact the Sunbeam Consumer Service Line.
Ensure the above safety precautions are understood.
Page 4
COTTON
4
Features of your Sunbeam
Solus Iron
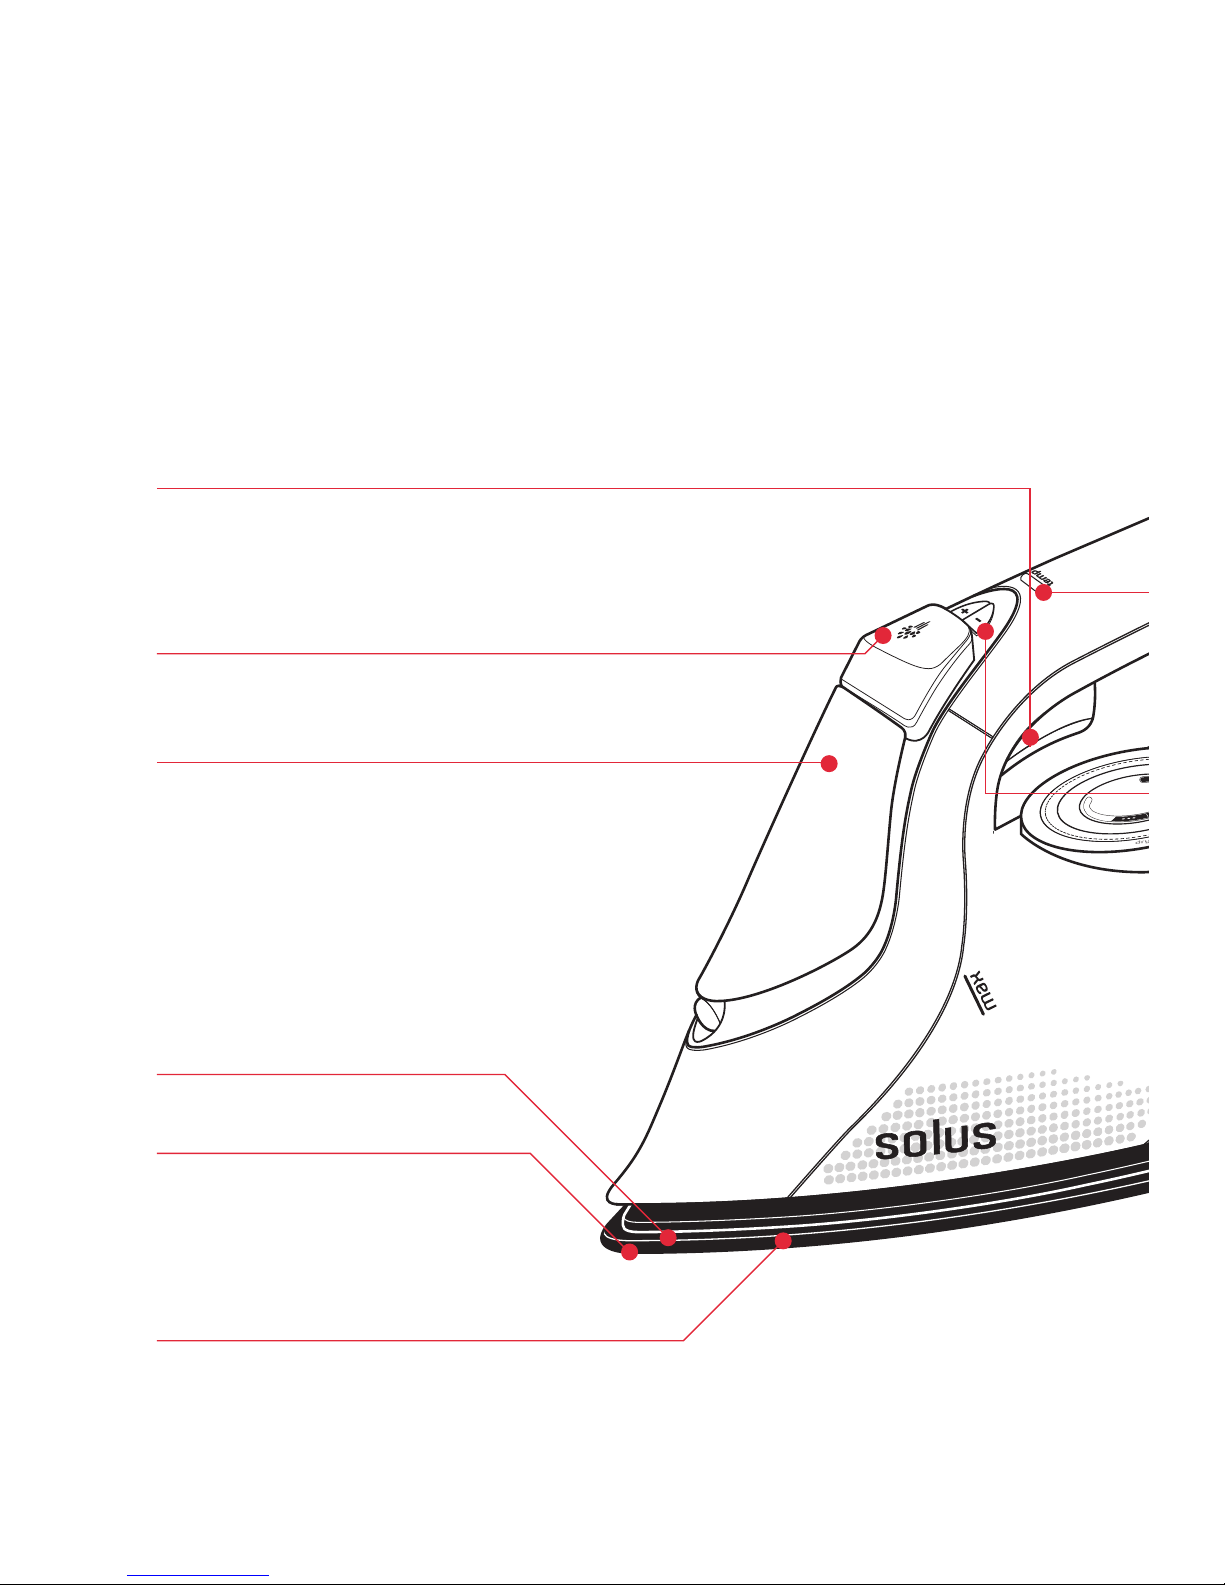
Extreme shot of steam
Squeezing the shot of steam trigger instantly
produces a concentrated, high-pressure shot of
steam to remove stubborn wrinkles.
Vertical shot of steam
Squeezing the shot of steam trigger with the iron
in an upright position produces a vertical shot of
steam, which is ideal for steaming curtains and
suits, and removing creases from delicate fabrics.
Fine spray mist
Pressing the spray button provides a fine mist
spray to dampen hard-to-iron fabrics.
Water tank with easy-fill water inlet
Holds 300ml of water for continual high
steam performance without having to refill
the tank regularly.
Drip-stop steam system
The drip-stop steam system automatically stops
water flowing to the steam chamber should the
temperature fall too low to generate steam.
This prevents dripping, even at low
temperatures.
Full length button groove
For ironing around buttons.
2400 watts for fast heat up
Provides faster initial heat up and rapid
heat recovery during ironing. The 2400W
element helps to maintain your selected
temperature, and provides superior shot
of steam output.
Resilium® non-scratch soleplate
Resilium® is a durable, scratch resistant surface
that provides a superior glide and prevents
rucking. Exclusive to Sunbeam, this premium
soleplate features 172 steam holes to maximise
steam distribution.
Page 5
COTTON
5
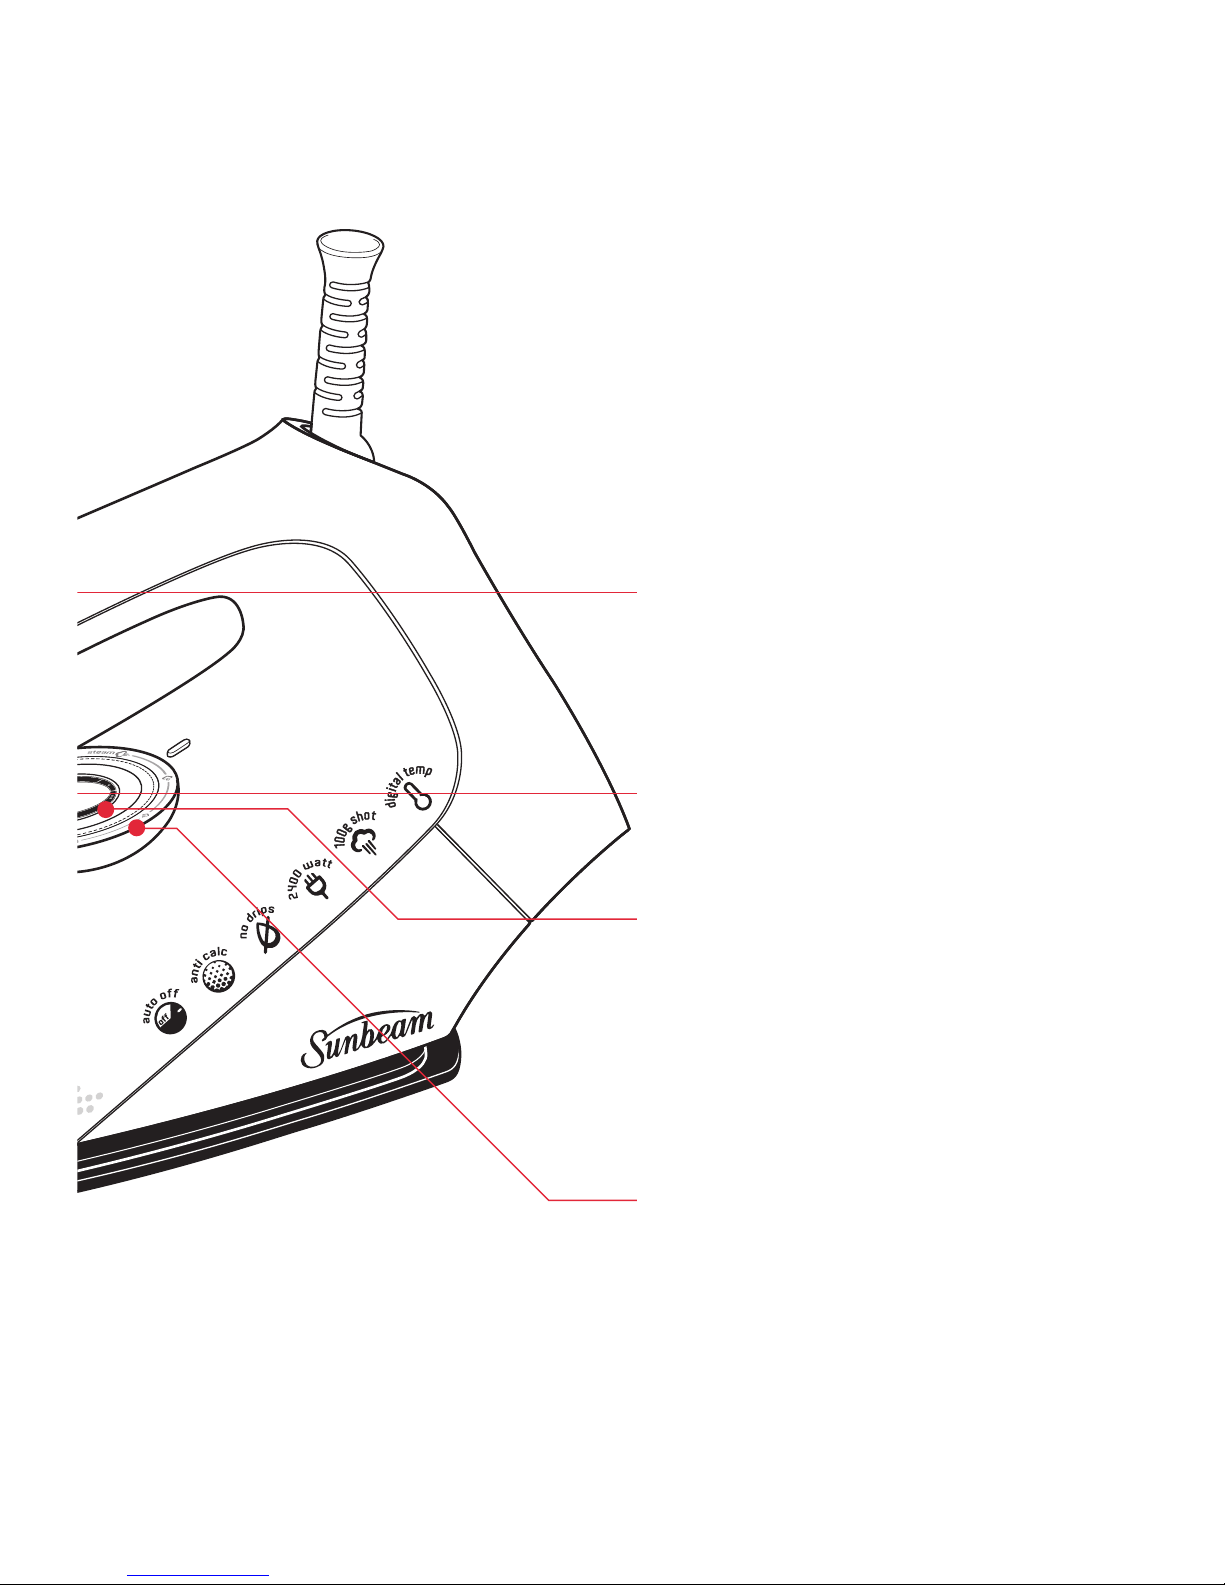
Digital thermostat
The digital thermostat provides precise
temperature control, allowing you to select
the exact temperature recommended for each
garment. It eliminates temperature overshoot
and minimises temperature fluctuations.
This ensures consistently superior results and
prevents scorching.
Temperature alert
The light located on the iron handle indicates
when the iron soleplate has reached the
selected temperature.
Green = ready to iron
Orange = heating up
Red = too hot, cooling down
Temperature control
Use the + and - buttons to select the desired
temperature setting for each garment, as
displayed on the LCD.
LCD screen
The illuminated LCD displays the selected
fabric setting.
Safety auto-off
The iron automatically switches itself off if
left in the ironing position (horizontal) for 30
seconds, or in the heel rest position (vertical)
for 15 minutes. (For more information on the
safety auto off feature see page 7).
Variable steam dial
Allows you to select the desired steam output
for each garment. Alternatively, select the DRY
setting to iron without steam.
Anti-calc
The built-in anti-calc cartridge removes
minerals from tap water to prevent scale build
up inside the soleplate and steam chamber,
prolonging the life of your iron.
Page 6

Before first use
Remove any adhesive stickers, plastic covers
or cardboard sleeves from the soleplate.
Ensure that all adhesive is removed by
rubbing the soleplate with a cloth
dampened with methylated spirits.
Fill the water tank and empty the water. This
will rinse out any foreign particles remaining
in the water tank from the manufacturing
process.
NOTE: When turned on for the first time,
your new iron may give off vapours for up
to 10 minutes. This is due to the initial
heating of the materials used. It is safe, not
detrimental to the performance of the iron,
and will not reoccur.
Filling the iron with water
Before filling the iron with water ensure the
power is turned off and the plug is removed
from the power outlet. The iron can be filled
with water while it is hot.
Place the iron on its heel and open the water
inlet cover.
Slowly pour water into the water inlet until
the maximum water level is reached. Do not
exceed the maximum water level indicator.
Push the water inlet cover firmly to close.
NOTE: The anti-calc cartridge and special
soleplate design allows you to use tap water
with your Solus iron without affecting the
steam performance. However in very hard
water areas, Sunbeam recommends the use
of distilled water, or water which has been
demineralised.
For best performance, we recommend the use
of Sunbeam Demineralised Water, available
from selected retailers. Use as a direct
replacement for tap water to prolong the life
of your iron.
Do not fill the iron with fabric conditioner,
starches or any other solution as these will
damage the steam mechanism. Do not use
contaminated water.
Using your iron
1. Insert the plug into a 230/240 volt power
outlet and turn the power on. The LCD
screen and the orange temperature alert
light (located on top of the handle) will
illuminate to indicate that the iron is
switched on and heating.
2. Use the temperature +/- buttons to select
the desired temperature. The bars on the
LCD will flash as the iron heats up to the
selected temperature setting. As each
incremental temperature is reached the bars
will display solidly. When the temperature
alert light changes to green, the iron has
reached the selected temperature and is
ready to use.
NOTE: When the temperature is changed from
a high setting to a lower temperature setting
during ironing, the temperature alert light will
change to red. This indicates that the iron
is cooling to the selected temperature. To
ensure that the iron has reached the selected
temperature and is not too hot, wait until
the temperature alert light illuminates green
before ironing.
Dry ironing
Follow steps 1 and 2 above.
3. Select DRY on the steam dial.
This will cut off the steam flow if there
is water in the tank.
Steam ironing
Follow steps 1 and 2 above.
NOTE: When steam ironing, ensure that the
temperature is set to the silk setting or above,
and that the tank is at least 1/4 full of water.
3. Turn the steam dial to the desired
steam setting.
6
Using your Sunbeam Solus Iron
Page 7
Using the shot of steam
The shot of steam can be used when dry
or steam ironing, when the temperature is
set above the two dot (••) setting.
1. Ensure the tank is at least 1/4 full of
water.
2. Select the desired temperature and wait
until the temperature alert light
illuminates green.
3. Squeeze the shot of steam trigger several
times with the iron on the soleplate to
prime the pump.
Note: If the tank has run dry, it may be
necessary to re-prime the pump after filling
the iron with water.
Using the spray mist
The spray mist can be used whether dry or
steam ironing to pre-dampen hard to iron
fabrics.
1. Ensure the tank is at least 1/4 full of
water.
2. Press the spray button during ironing to
release a fine mist from the spray nozzle.
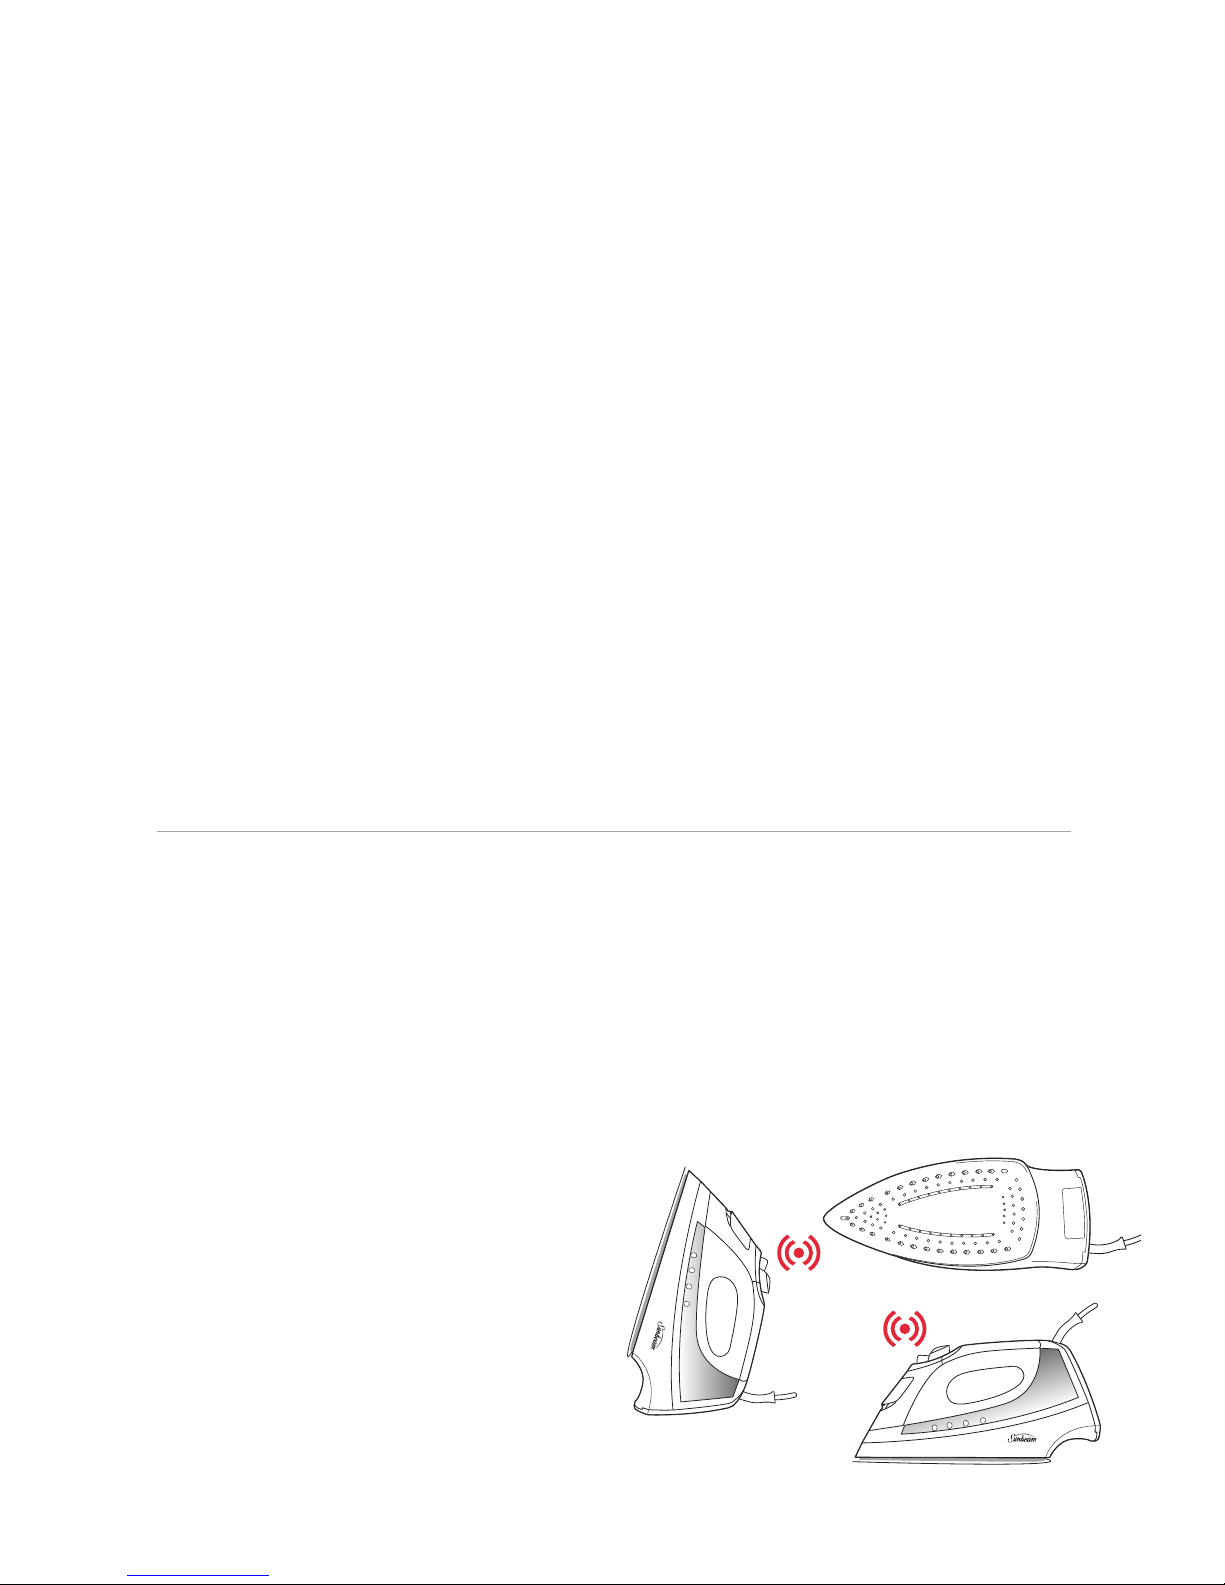
The safety auto-off mechanism automatically
turns the iron off if you forget.
The iron will automatically shut off if left
on the heel rest (vertical) for 15 minutes
without being moved, or in the ironing
position (horizontal) for 30 seconds, or if it
is knocked onto its side (See figure 2).
Should you leave the iron unattended, the
LCD screen and the red temperature alert
light will flash, and a warning beep will
sound to let you know that the auto-off
function has been activated.
Power to the iron's heating element will be
cut and the iron will start to cool. After 30
seconds the frequency of the beep alarm will
decrease.
Once the iron is moved the power will
reconnect. Allow the iron to heat until the
temperature alert light illuminates green,
and continue ironing as normal.
7
Using your Sunbeam Solus Iron (continued)
The 3-Way safety auto-off feature
Figure 2
30 seconds
15 mins
Page 8

After each use
1. Turn the power off and remove the plug
from the power outlet.
2. Allow the iron to cool before winding
the cord around the built-in cord wrap.
Storage
Always store the iron on its heel rest.
Do not store the iron with the soleplate
facing down, or in the carton.
Cleaning
To clean the exterior of your iron, wipe
over with a damp soft cloth and wipe dry.
Caution: Do not use harsh abrasives,
chemical cleaners or solvents to clean the
exterior of your iron as these will damage the
surface.
Cleaning the steam holes
To remove build up from the steam holes
which may affect steam performance,
use a cotton wool tip moistened in
methylated spirits.
Cleaning the Resilium
®
soleplate
Wipe with a soft damp cloth and wipe dry.
Caution: Do not use scouring pads, abrasives
or harsh cleaners to clean your Resilium
®
,
soleplate, as these will scratch and damage
the surface.
8
Care and Cleaning
Troubleshooting
If the following conditions occur
simultaneously, it indicates a possible fault
within the thermistor. These conditions
will persist until the soleplate thermistor is
working correctly.
• The temperature alert light flashes red
continuously, and
• The LCD backlight remains lit, and
• The temperature cannot be changed from
the MAX setting, and the circular graphic
flashes and counts up to the MAX segment
continuously.
To reset the iron, simply switch it off at
the power outlet, switch it back on again
and wait 15 seconds. The iron should now
operate normally. If the fault occurs regularly
return the iron, along with your purchase
receipt, to the place of purchase for a
replacement or refund.
Note: the fault conditions described above
are different to what occurs when the safety
auto-off feature is activated. When the iron
is in the auto-off mode the LCD backlight
will flash, the temperature alert light on the
handle will flash red, and a warning beep
will sound.
Page 9

Tip # 27 - Iron shirts like a pro
Start with the collar, working from the outer
edges into the middle. Iron the shoulder
next, followed by the cuffs and sleeves.
Place the collar at the narrow end of the
board so that one front panel of the shirt
is extended flat. Iron the front panel from
shoulder to shirt tail. Rotate to iron the
back of the shirt. Rotate and complete the
remaining front panel.
Tip # 34 - Tips for T-shirts
Straighten seams on t-shirts before hanging
out to dry. To avoid damage to printed
graphics and logos turn the t-shirt inside out
and iron the reverse side of the print. Never
iron areas of your t-shirt where perspiration
marks are visible as the heat of the iron will
permanently fix the stain.
Tip # 54 - Hung out to dry
When washing is complete, remove shirts
from the machine immediately, shake them
out and hang them on coat hangers to air dry
– this will keep wrinkles to a minimum.
Tip # 18 - Selecting the right temperature
If you are unsure of the correct setting for a
particular garment, test a small area such as
a seam or inside hem before ironing a visible
area. Start with a low temperature and slowly
increase the heat to find the best setting.
Tip # 33 - Don’t be afraid to iron silk
Don’t be afraid to iron silk. Although delicate
in appearance, silk is the strongest and most
resilient of all natural fibres. To achieve the
best results, set to a low cotton setting and
use regular shots of steam. Always use a
pressing cloth to avoid shine marks.
Tip # 13 - Ironing the seam
Always press seams in the same direction
they were made. When a garment is
produced, the fibres will naturally settle
in the direction they were initially pressed,
so it’s best not to iron against the grain.
Tip # 26 - Sort types of fabric
Sort articles to be ironed according to the
type of fabric. This will reduce the need to
adjust the temperature constantly. Start with
articles requiring lower temperatures and
work your way through to items requiring
higher settings.
Tip # 2 - Summer frocks and frills
Steam is the key when ironing delicate
summer fabrics such as muslin, cotton and
linen. Don’t press down with the iron, simply
hover above the garment and steam it using
a vertical shot of steam. Ruffling, netting,
tulle or intricate hand detailing is also best
ironed using this method.
Tip # 5 - Pressing your winter woollies
Steam is crucial when pressing your winter
woollies. Woollen garments can be hung and
steamed using the vertical shot of steam
feature. After steaming, brush the garment
with your hand to plump up woollen fibres.
If ironing the garment flat it is best to use
a pressing cloth. Don’t be afraid to apply
pressure – steam and hold.
Tip # 42 - Table settings to impress
To avoid unwanted creases always iron
your table cloth after taking it out of the
cupboard. A dinner party is a special
occasion, so treat the table cloth as you
would your own outfit. For best results, lay
towels across your table and iron the table
cloth over the towels. This will save you time
and ensure a beautifully presented table
setting.
9
Ironing Tips and Tricks
Page 10
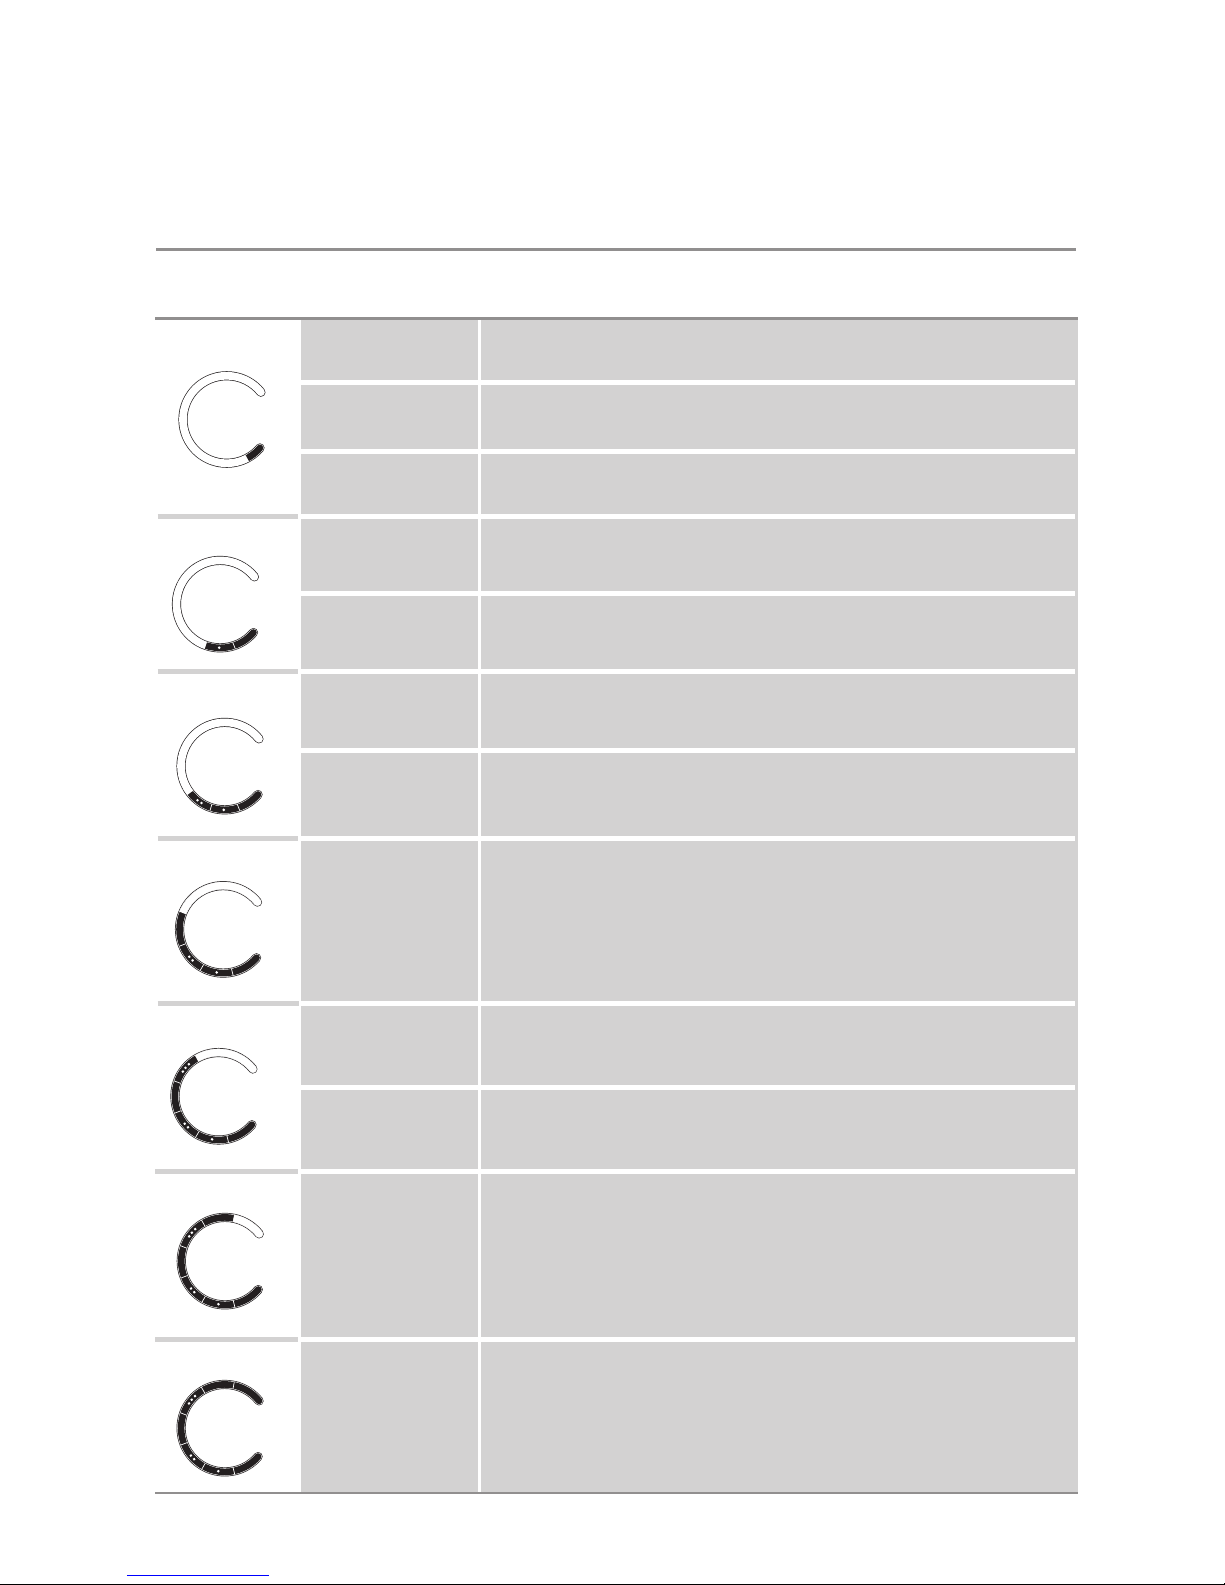
Ironing Chart
10
TEMPERATURE
SETTING
FABRIC IRONING RECOMMENDATION
minimum
Acrylic
Dry iron on wrong side.
Acetate
Dry iron on wrong side while still damp or use spray to
dampen.
Nylon
Iron on wrong side while still damp or use spray to dampen.
synthetic
Polyester & Rayon
Iron on wrong side of fabric.
Viscose
Mainly dry iron. Steam can be used under manufacturer’s
instructions.
silk
Silk
Iron on wrong side. Use an ironing cloth to prevent shine
marks.
Cotton Blends
Check label and follow manufacturer’s instructions.
Use setting for the fibre requiring the lowest setting.
wool
Wool & Wool
Blends
Steam iron on wrong side or use an ironing cloth.
cotton
Cotton
Dry iron while still damp or use spray to dampen.
Use steam medium to high.
Corduroy
Steam iron on wrong side or use an ironing cloth.
linen
Linen
Iron on wrong side or use an ironing cloth to prevent shine
marks, especially with dark colours.
Dry iron while still damp or use spray to dampen.
Use steam medium to high.
maximum
Denim
Use maximum steam.
MIN
SYNTH
SILK
WOOL
COTTON
LINEN
MAX
Page 11

This Sunbeam product is covered by a
2 year replacement or repair warranty,
which is in addition to your rights under the
Australian Consumer Law (if your product
was purchased in Australia) or New Zealand
Consumer Guarantees Act (if your product
was purchased in New Zealand).
Upon receipt of your claim, Sunbeam will
seek to resolve your difficulties or, if the
product is defective, advise you on how to
obtain a replacement or refund.
To assist us in managing warranty claims,
we recommend you register your product
as soon as practicable after purchase by
creating a MySunbeam account on our
website and uploading a copy of your
original receipt.
In order to make a claim under our
warranty, you must have the original proof
of purchase documentation for the
product and present it when requested (if
not already uploaded to our website).
Should your product develop any defect
within 2 years of purchase because of
faulty materials or workmanship, we will
replace or repair it, at our discretion, free
of charge. A product presented for repair
may be replaced by a refurbished product
of the same type rather than being
repaired. Refurbished parts may be used
to repair the product.
Our replacement or repair warranty only
applies where a defect arises as a result
of faulty material or workmanship during
the warranty period. Your warranty does
not cover misuse or negligent handling
(including damage caused by failing to use
the product in accordance with this
instruction booklet), accidental damage,
or normal wear and tear.
Your warranty does not:
• cover freight or any other costs incurred
in making a claim, consumable items,
accessories that by their nature and
limited lifespan require periodic renewal
(such as filters and seals) or any
consequential loss or damage; or
• cover damage caused by:
- power surges, power dips, voltage
supply problems, or use of the product
on incorrect voltage;
Should you experience any
difficulties with your product
during the warranty period,
please contact our customer
service line for advice on 1300
881 861 in Australia, or 0800
786 232 in New Zealand.
Replacement
Guarantee
2
Year
- servicing or modification of the
product other than by Sunbeam or an
authorised Sunbeam service centre;
- use of the product with other
accessories, attachments, product
supplies, parts or devices that do not
conform to Sunbeam specifications; or
- exposure of the product to
abnormally corrosive conditions; or
• extend beyond 3 months if the product
is used in commercial, industrial,
educational or rental applications.
The benefits given to you by our
warranty are in addition to other rights
and remedies under law in relation to
the product.
In Australia our goods come with
guarantees that cannot be excluded
under the Australian Consumer Law. You
are entitled to a replacement or refund
for a major failure and for compensation
for any other foreseeable loss or
damage. You are also entitled to have the
goods repaired or replaced if the goods
fail to be of acceptable quality and the
failure does not amount to a major
failure.
Our goods also come with guarantees
that cannot be excluded under the New
Zealand Consumer Guarantees Act.
If your warranty claim is not accepted, we
will inform you and if requested to do so
by you, repair the product provided you
pay the usual charges for such repair.
You will also be responsible for all freight
and other costs.
Should your product require repair or
service after the warranty period, contact
your nearest Sunbeam service centre.
For a complete list of Sunbeam’s service
centres, visit our website or call our
customer service line for advice on 1300
881 861 in Australia, or 0800 786 232 in
New Zealand.
Australia
www.sunbeam.com.au
1300 881 861
Units 5 & 6,
13 Lord Street,
Botany NSW 2019
Australia
New Zealand
www.sunbeam.com.nz
0800 786 232
Level 6, Building 5,
Central Park,
660-670 Great South Road
Greenlane, Auckland
New Zealand
Page 12

Solus
Digital Resilium
User Guide
Need help with your appliance?
Contact our customer service team
or visit our website for information
and tips on getting the most from
your appliance.
Australia | visit www.sunbeam.com.au
phone 1300 881 861
mail Units 5 & 6, 13 Lord Street,
Botany NSW 2019 Australia.
New Zealand | visit www.sunbeam.co.nz
phone 0800 786 232
mail Level 6, Building 5, Central Park,
660–670 Great South Road,
Greenlane, Auckland.
Sunbeam Corporation Limited | ABN 45 000 006 771
Sunbeam Corporation is a division of GUD Holdings Limited.
Sunbeam is a registered trademark.
Solus, PerfectTemp and Resilium are registered trademarks
of Sunbeam Corporation.
Designed and engineered in Australia.
Made in China to Sunbeam’s specification.
Due to minor changes in design or otherwise,
the product you buy may differ slightly from the one shown here.
Approved by the appropriate electrical regulatory authorities.
©Copyright Sunbeam 2014.
1/14
 Loading...