

Page 1

MODEL: SMW999
Microwave Oven Owner's Manual
Please read these instructions carefully before installing and operating the oven. Keep
them for further reference.
Record in the space below the SERIAL NO. found on the nameplate on your oven and
retain this information for future reference.
SERIAL NO.
Page 2
PRECAUTIONS TO AVOID POSSIBLE EXPOSURE
TO EXCESSIVE MICROWAVE ENERGY
1. Do not attempt to operate this oven with the door open since open-door operation
can result in harmful exposure to microwave energy. It is important not to defeat or
tamper with the safety interlocks.
2. Do not place any object between the oven front face and the door or allow soil or
cleaner residue to accumulate on sealing surfaces.
3. Do not operate the oven if it is damaged. It is particularly important that the oven
door close properly and that there is no damage to the :
a. Door ( bent ),
b. Hinges and latches (broken or loosened).
c. Door seals and sealing surfaces.
4. The oven should not be adjusted or repaired by anyone except properly qualified
service personnel.
CONTENT
PRECAUTIONS TO AVOID POSSIBLE EXPOSURE TO EXCESSIVE MICROWAVE
ENERGY........................................................................................................................................1
IMPORTANT SAFETY INSTRUCTIONS .......................................................................................2
SPECIFICATION ...........................................................................................................................3
INSTALLATION ..............................................................................................................................3
GROUNDING INSTRUCTIONS ....................................................................................................3
RADIO INTERFERENCE ..............................................................................................................4
MICROWAVE COOKING PRINCIPLES ........................................................................................4
UTENSILS GUIDE .........................................................................................................................2
PART NAMES................................................................................................................................2
CONTROL PANEL.........................................................................................................................6
HOW TO SET THE OVEN CONTROLS ........................................................................................7
Setting The Digital Clock.................................................................................................................... 7
Microwave Cooking........................................................................................................................... 7
Grill......................................................................................................................................................... 7
Combination Cooking ....................................................................................................................... 7
Pizza....................................................................................................................................................... 7
Coffee/Milk .......................................................................................................................................... 8
Auto Cook ............................................................................................................................................ 8
Defrost ................................................................................................................................................... 9
Express Cooking .................................................................................................................................. 9
Child Lock ............................................................................................................................................ 9
Special Feature ................................................................................................................................... 9
CLEANING AND CARE .................................................................................................................9
BEFORE YOU CALL FOR SERVICE ..........................................................................................10
1
Page 3

IIMMPPOORRTTAANNTT SSAAFFEETTYY IINNSSTTRRUUCCTTIIOONNSS
When using electrical appliance basic safety precautions should be followed, including the
following:
WARNING: To reduce the risk of burns, electric shock, fire, injury to persons or exposure to
excessive microwave energy:
1. Read all instructions before using the appliance.
2. Use this appliance only for its intended use as described in this manual. Do not use corrosive
chemicals or vapors in this appliance. This type of oven is specifically designed to heat, cook
or dry food. It is not designed for industrial or laboratory use.
3. Do not operate the oven when empty.
4. Do not operate this appliance if it has a damaged cord or plug, if it is not working properly or if
it has been damaged or dropped. If the supply cord is damaged, it must be replaced by the
manufacturer or its service agent or a similarly qualified person in order to avoid a hazard
5. WARNING: Only allow children to use the oven without supervision when adequate
instructions have been given so that the child is able to use the oven in a safe way and
understands the hazards of improper use.
6. To reduce the risk of fire in the oven cavity:
a. When heating food in plastic or paper container, keep an eye on the oven due to the
possibility of ignition.
b. Remove wire twist-ties from paper or plastic bags before placing bag in oven.
c. If smoke is observed, switch off or unplug the appliance and keep the door closed in order
to stifle any flames.
d. Do not use the cavity for storage purposes. Do not leave paper products, cooking utensils
or food in the cavity when not in use.
7. WAR NING: Liquid or other food must not be heated in sealed containers since they are liable
to explode.
8. Microwave heating of beverage can result in delayed eruptive boiling, therefore care has to be
taken when handle the container.
9. Do not fry food in the oven. Hot oil can damage oven parts and utensils and even result in skin
burns.
10. Eggs in their shell and whole hard-boiled eggs should not be heated in microwave ovens since
they may explode even after microwave heating has ended.
11. Pierce foods with heavy skins such as potatoes, whole squash, apples and chestnuts before
cooking.
12. The contents of feeding bottles and baby jars should be stirred or shaken and the temperature
should be checked before serving in order to avoid burns.
13. Cooking utensils may become hot because of heat transferred from the heated food.
Potholders may be needed to handle the utensil.
14. Utensils should be checked to ensure that they are suitable for use in microwave oven.
15. WAR NING: It is hazardous for anyone other than a trained person to carry out any service or
repair operation which involves the removal of any cover which gives protection against
2
Page 4
exposure to microwave energy.
SSPPEECCIIFFIICCAATTIIOONN
Power Consumption: 120V~60Hz, 1350W(Microwave)
120V, 1000W(Heater)
Rated Microwave Power Output: 900W
Operation Frequency: 2450MHz
Outside Dimensions: 305mm(H)×508mm(W)×400mm(D)
Oven Cavity Dimensions: 215mm(H)×350mm(W)×330mm(D)
Oven Capacity: 23Litres
Cooking Uniformity: Turntable System{Φ314mm}
Net Weight: Approx.16.5kg
IINNSSTTAALLLLAATTIIOONN
1. Make sure that all the packing materials
are removed from the inside of the door.
2. Check the oven for any damage, such
as misaligned or bent door, damaged
door seals and sealing surface, broken
or loose door hinges and latches and
dents inside the cavity or on the door. If
there is any damage, do not operate the
oven and contact qualified service
personnel.
3. This microwave oven must be placed on
a flat, stable surface to hold its weight
and the heaviest food likely to be cooked
in the oven.
4. Do not place the oven where heat,
moisture, or high humidity are generated,
or near combustible materials.
5. For correct operation, the oven must
have sufficient airflow. Allow 20cm of
space above the oven, 10cm at back
and 5cm at both sides. Do not cover or
block any openings on the appliance. Do
not remove feet.
6. Do not operate the oven without glass
tray, roller support, and shaft in their
proper positions.
7. Make sure that the power supply cord is
undamaged and does not run under the
oven or over any hot or sharp surface.
8. The socket must be readily accessible
so that it can be easily unplugged in an
emergency.
9. Do not use the oven outdoors.
GGRROOUUNNDDIINNGG IINNSSTTRRUUCCTTIIOONNSS
This appliance must be grounded. In the
event of an electrical short circuit, grounding
3
Page 5

reduces risk of electric shock by providing an
escape wire for the electric current.
WAR NING Improper use of the grounding
plug can result in a risk of electric shock.
ELECTRICAL REQUIREMENTS
The electrical requirements are a 120 volt 60
Hz, AC only, 20 amp. It is recommended that
a separate circuit serving only the oven be
provided. The oven is equipped with a
3-prong grounding plug. It must be plugged
into a wall receptacle that is properly installed
and grounded.
EXTENSION CORD
1. If it is necessary to use an extension cord,
use only a 3-wire extension cord that has a
3-blade grounding plug and a 3-slot
receptacle that will accept the plug on the
RRAADDIIOO IINNTTEERRFFEERREENNCCEE
1. Operation of the microwave oven can
cause interference to your radio, TV, or
similar equipment.
2. When there is interference, it may be
reduced or eliminated by taking the
following measures:
a. Clean door and sealing surface of
the oven.
b. Reorient the receiving antenna of
microwave oven. The marked rating of the
extension cord shall be equal to or greater
than the electrical rating of the appliance, or
2. Do not use an extension cord. If the power
supply cord is too short, have a qualified
electrician or serviceman install an outlet
near the appliance.
Notes:
If you have any questions about the
grounding or electrical instructions, consult a
qualified electrician or service person.
Neither Sunbeam nor the dealer can accept
any liability for damage to the oven or
personal injury resulting from failure to
observe the electrical connection procedures.
radio or television.
c. Relocate the microwave oven with
respect to the receiver.
d. Move the microwave oven away
from the receiver.
e. Plug the microwave oven into a
different outlet so that microwave oven
and receiver are on different branch
circuits.
MMIICCRROOWWAAVVEE CCOOOOKKIINNGG PPRRIINNCCIIPPLLEESS
1. Arrange food carefully. Place thickest
areas towards outside of dish.
2. Watch cooking time. Cook for the
shortest amount of time indicated and
add more as needed. Food severely
overcooked can smoke or ignite.
3. Cover foods while cooking. Covers
prevent spattering and help foods to
cook evenly.
4. Turn foods over once during
microwaving to speed cooking of such
foods as chicken and hamburgers. Large
items like roasts must be turned over at
least once.
5. Rearrange foods such as meatballs
halfway through cooking both from top to
bottom and from the center of the dish to
the outside.
4
Page 6
UUTTEENNSSIILLSS GGUUIIDDEE
1. The ideal material for a microwave
utensil is transparent to microwave, it
allows energy to pass through the
container and heat the food.
2. Microwave cannot penetrate metal, so
metal utensils or dishes with metallic trim
should not be used.
3. Do not use recycled paper products
when microwave cooking, as they may
contain small metal fragments which
may cause sparks and/or fires.
Cookware Microwave Grill Combination
Heat–Resistant Glass Yes Yes Yes
Non Heat–Resistant Glass No No No
Heat–Resistant Ceramics Yes Yes Yes
Microwave–Safe Plastic Dish Yes No No
Kitchen Paper Yes No No
Metal Tray No Ye s No
Metal Rack No Ye s No
Aluminum Foil & Foil Containers No Yes No
4. Round /oval dishes rather than
square/oblong ones are recommend, as
food in corners tends to overcook.
5. Narrow strips of aluminum foil may be
used to prevent overcooking of exposed
areas. But be careful don’t use too much
and keep a distance of 1 inch (2.54cm)
between foil and cavity.
The list below is a general guide to help you
select the correct utensils.
Cooking
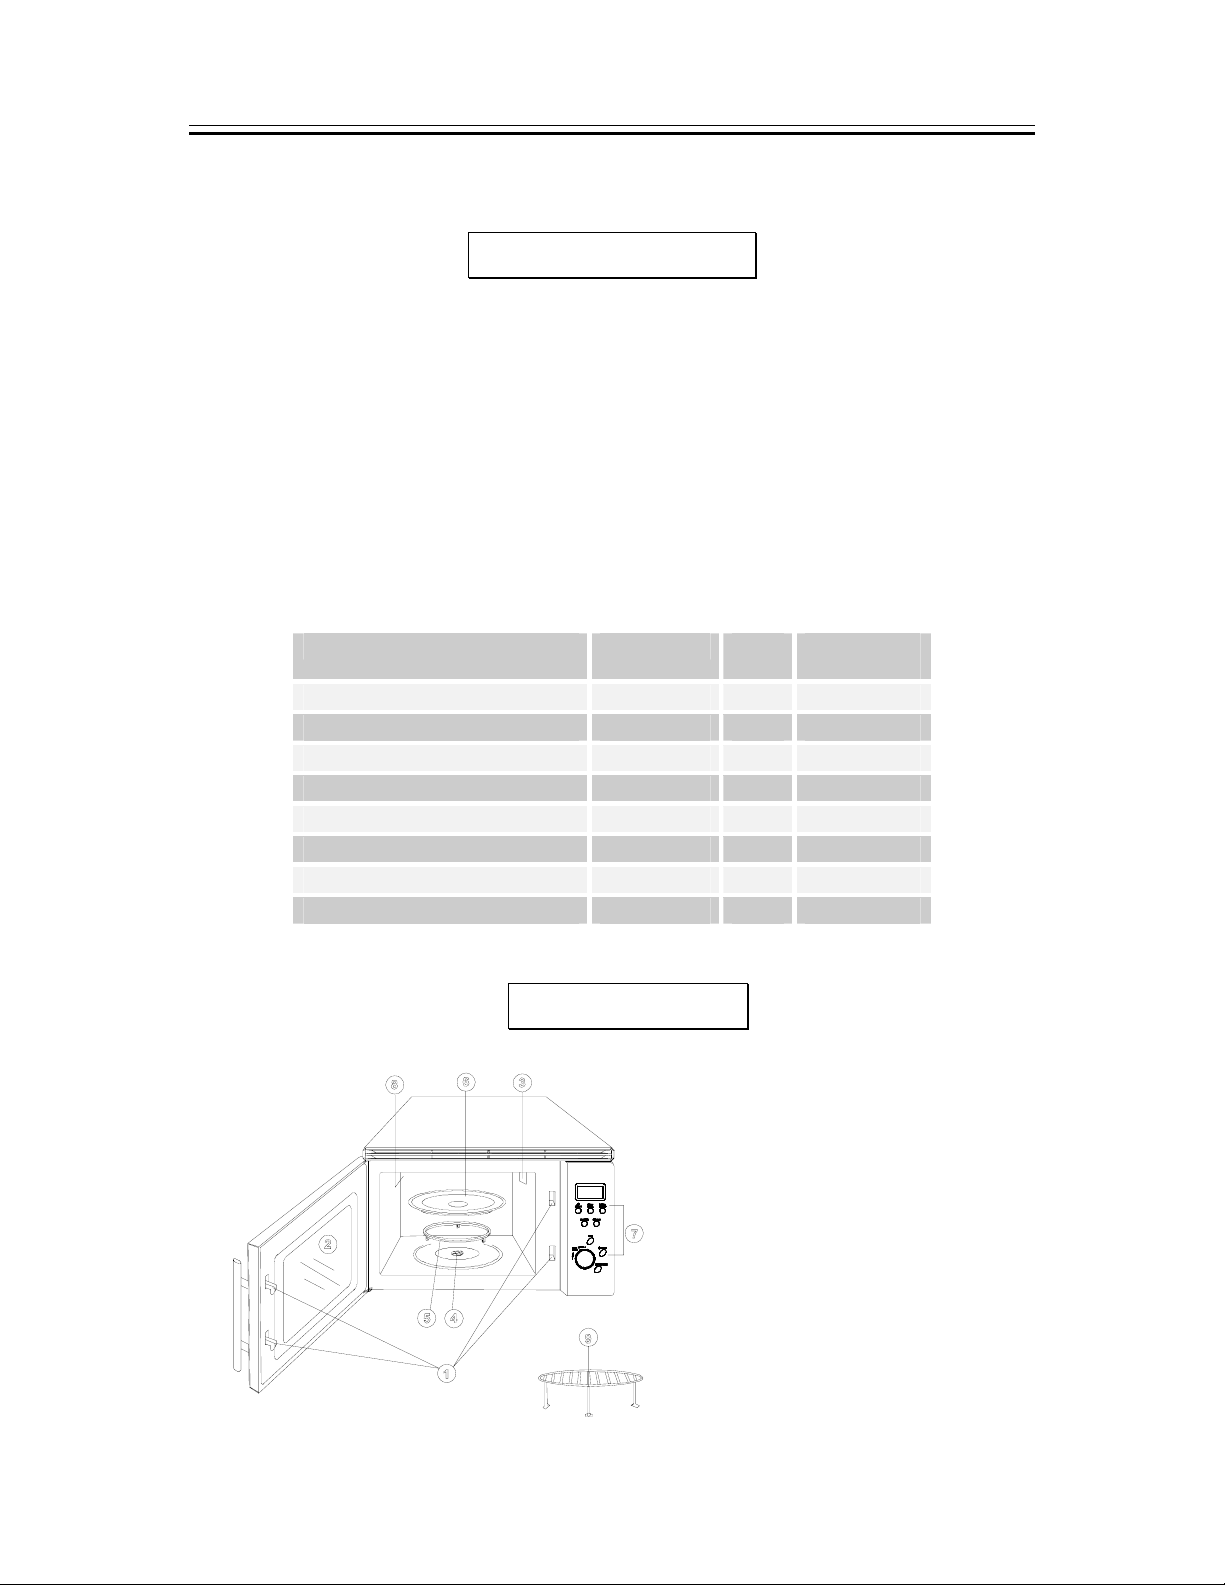
PPAARRTT NNAAMMEESS
1. Door Safety Lock System
2. Oven Window
3. Oven Air Vent
4. Shaft
5. Roller Ring
6. Glass Tray
7. Control Panel
8. grill heater
9. metal rack
2
Page 7
CCOONNTTRROOLL PPAANNEELL
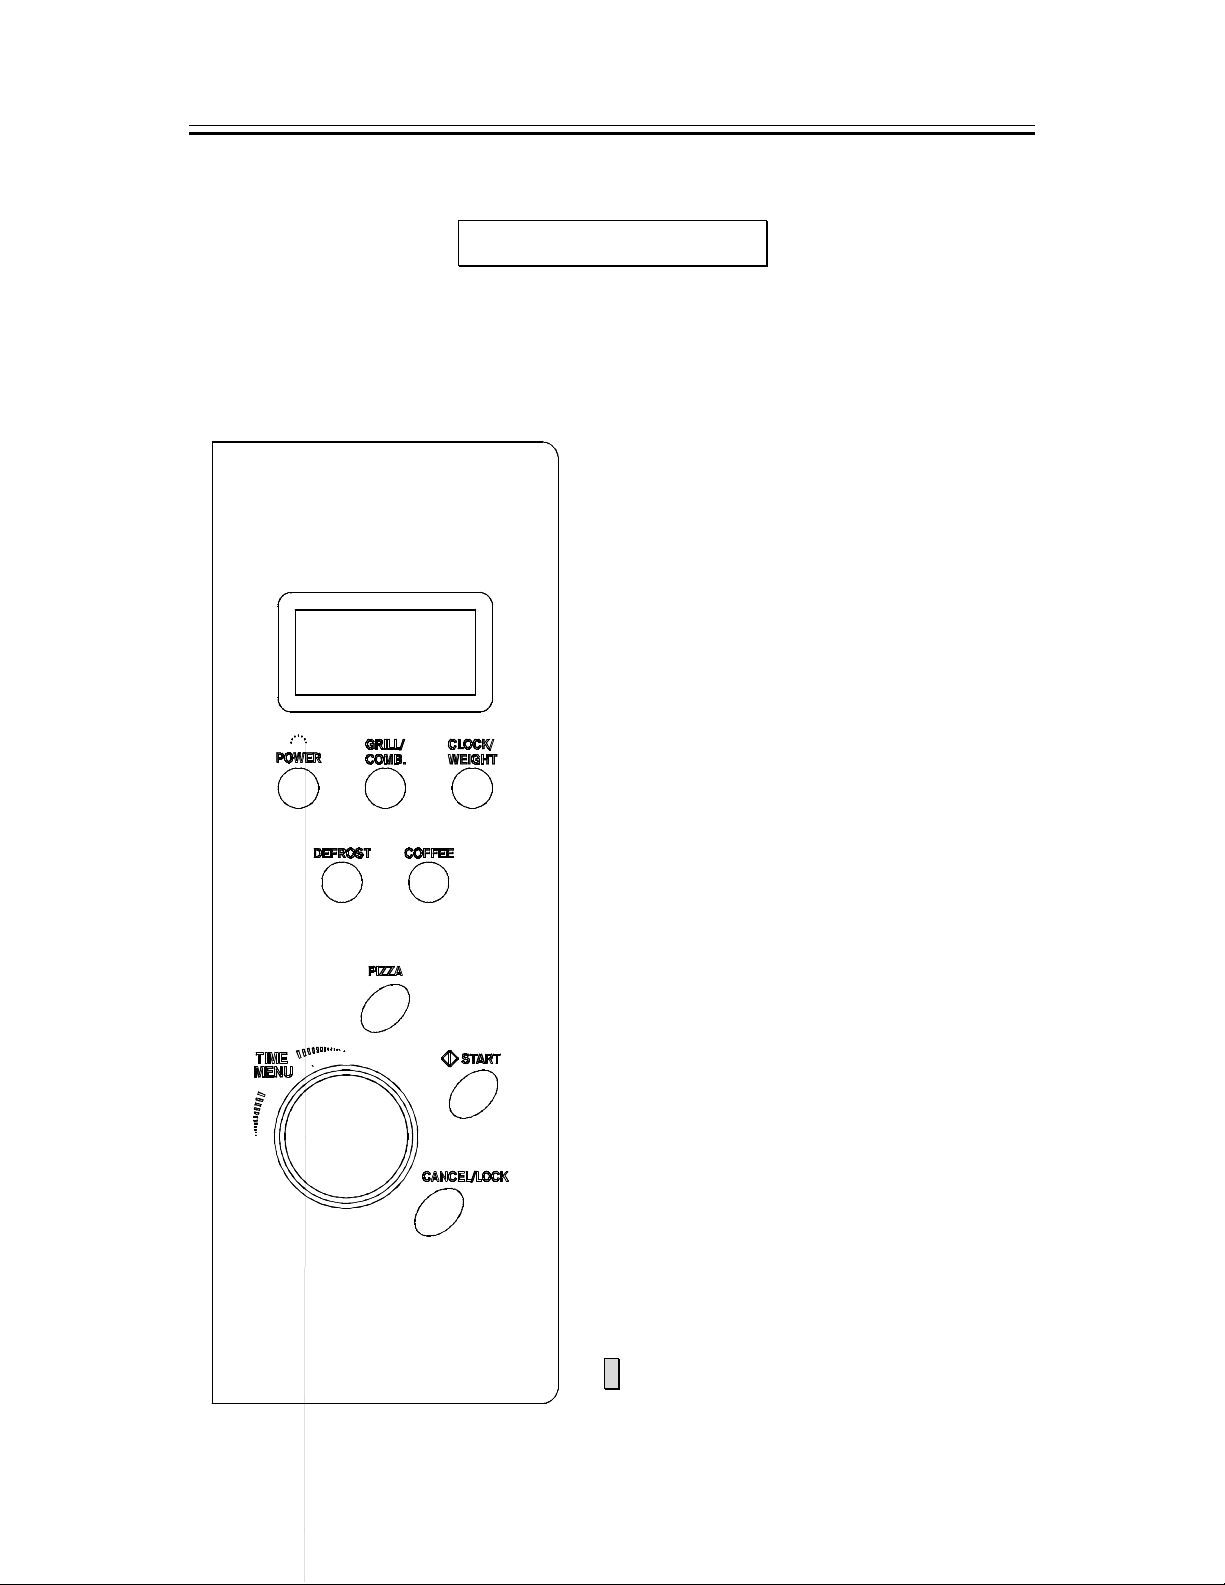
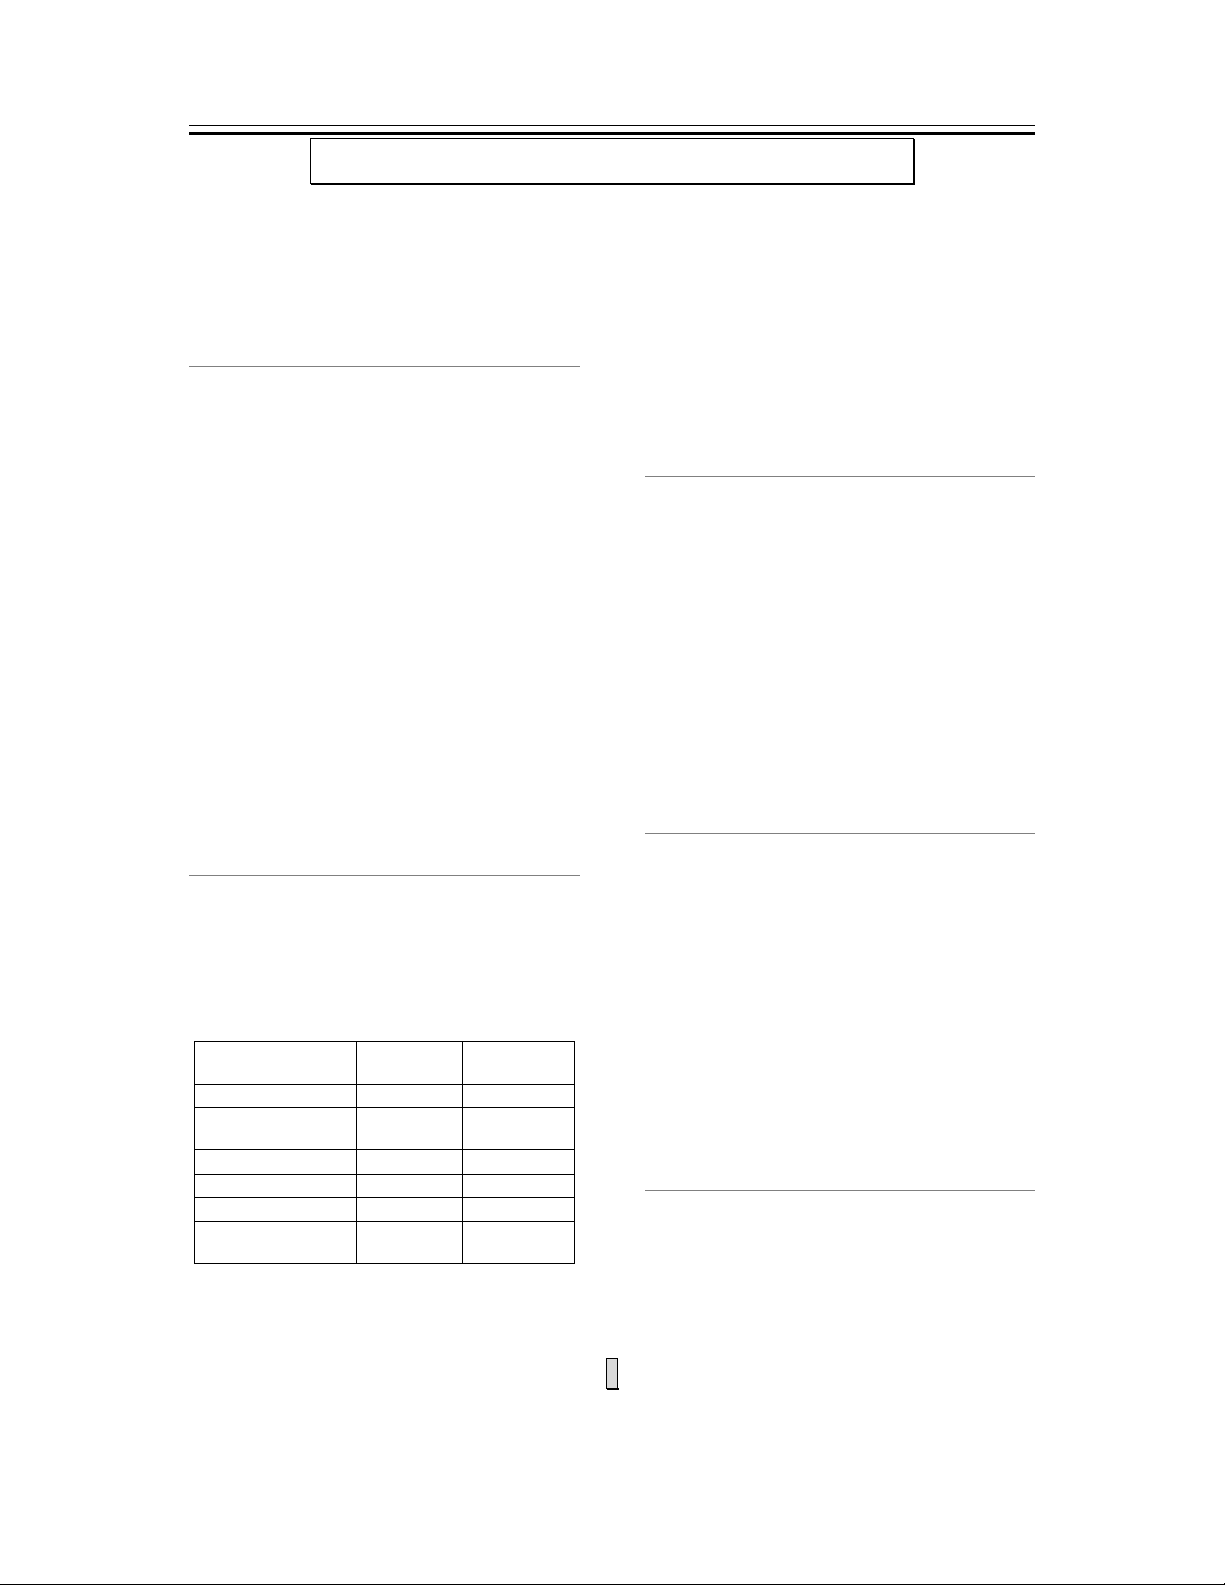
Q POWER
Ù Touch this pad a number of times to set microwave cooking power level.
Q GRILL/COMB.
Ù Press once or twice to broil or cook with
combined microwave and grill power setting.
Q CLOCK/WEIGHT
Ù Press and hold down to set the digital clock.
Ù Press a number of times to indicate food
weight.
Q START
Ù Press to start a cooking program.
Ù Simply touch it a number of times to start the
oven quickly at full power.
Q CANCEL/LOCK
Ù Press to cancel setting or reset the oven
before setting a cooking program.
Ù Press once to temporarily stop cooking, or
twice to cancel cooking altogether.
Ù Press and hold down to set or release child
lock.
Q TIME/MENU
Ù Turn the dial to set the oven clock time or input
cooking time.
Ù Turn the timer/menu dial to indicate the type of
food you want to cook by weight
Q PIZZA
Ù Instant settings to bake pizza
Q DEFROST
Ù Touch to defrost food by entering defrosting
time.
Q COFFEE/MILK
Ù Instant settings to heat coffee or milk
6
Page 8
HHOOWW TTOO SSEETT TTHHEE OOVVEENN CCOONNTTRROOLLSS
Each time a button is pressed, a beep will
sound to acknowledge the press.
Setting The Digital Clock
When the oven is first plugged in, the display
shows “1:01”, you can set the clock time now
or later. To start setting the clock time, press
and hold down ADJUST/CLCOK button, then
you can choose to set the clock time in
12-hour or 24-hour cycle.
FOR EXAMPLE: Suppose you want to set
the oven clock time to 8:30.
1. Press and hold down the
CLOCK/WEIGHT button until 12 H
appears (press it once again to set it in
24 Hour cycle).
2. Turn TIME/MENU to set 8 o’clock.
3. Press CLOCK/WEIGHT. button.
4. Turn TIME/MENU to set 30 min.
5. Press CLOCK/WEIGHT. to confirm the
setting.
1. Press POWER button 3 times.
2. Turn TIME/MENU to 1:00.
3. Press START button.
Note: once the cooking starts, you can add to
or reduce cooking time by rotating the
TIME/MENU knob.
Grill
The longest cooking time is 60 minutes. The
grill cooking is particularly useful for thin
slices of meat, steaks, chops, kebabs,
sausages of piece of chicken. It is also
suitable for hot sandwiches and au gratin
dishes.
For example, suppose you want to grill for 12
minutes.
1. Press GRILL/COMBI button once.
2. Turn the TIME/MENU to 12:00.
3. Press START button.
Microwave Cooking
For microwave cooking, just press the
POWER pad a number of times to select a
cooking power level, and then use the
TIME/MENU dial to set a desired cooking
time. The longest cooking time is 60 minutes.
Select power level by pressing the POWER
button.
PRESS POWER
BUTTON
Once 100%
Twice 80% MEDIUM
3 times 60%
4 times 40%
5 times 20%
6 times 0
For example, suppose you want to cook for 1
minute at 60% of microwave power.
COOKING
POWER
Description
HIGH
HIGH
MEDIUM
DEFROST
LOW
COOL
7
Combination Cooking
The longest cooking time is 60 minutes which
is divided between microwave and grill
cooking. It is best used to cook foods such as
fish, potatoes or au gratin, as well as
puddings, omelettes, baked potatoes and
poultry.
FOR EXAMPLE: Suppose you want to set
combination cooking for 25 minutes.
1. Press GRILL/COMB. button twice.
2. Turn TIME/MENU to 25:00.
3. Press START button.
Pizza
Press this button once to cook a piece of
pizza weighing about 350g. The cooking time
and power is automatically set. After you
press the START button, the oven starts
cooking.
Page 9
Beeps can be heard at the end of the cooking;
now you open the door and check the
doneness of the food. If it’s not quite
satisfactory, close the door and press START
up to 5 times to add to cooking time in 2
minutes increments.
Coffee/Milk
Press this button up to 3 times to cook coffee
or milk of varied quantity, which, if measured
in normal size cup, is up to 3 cups.
Quantity Press COFFEE/MILK pad
One cup once
Two cup twice
three cup thrice
The cooking time and power is automatically
set. After you press the START button, the
oven starts cooking.
Note: never cook liquids in sealed container,
and always handle with extreme care of
microwave boiled liquids.
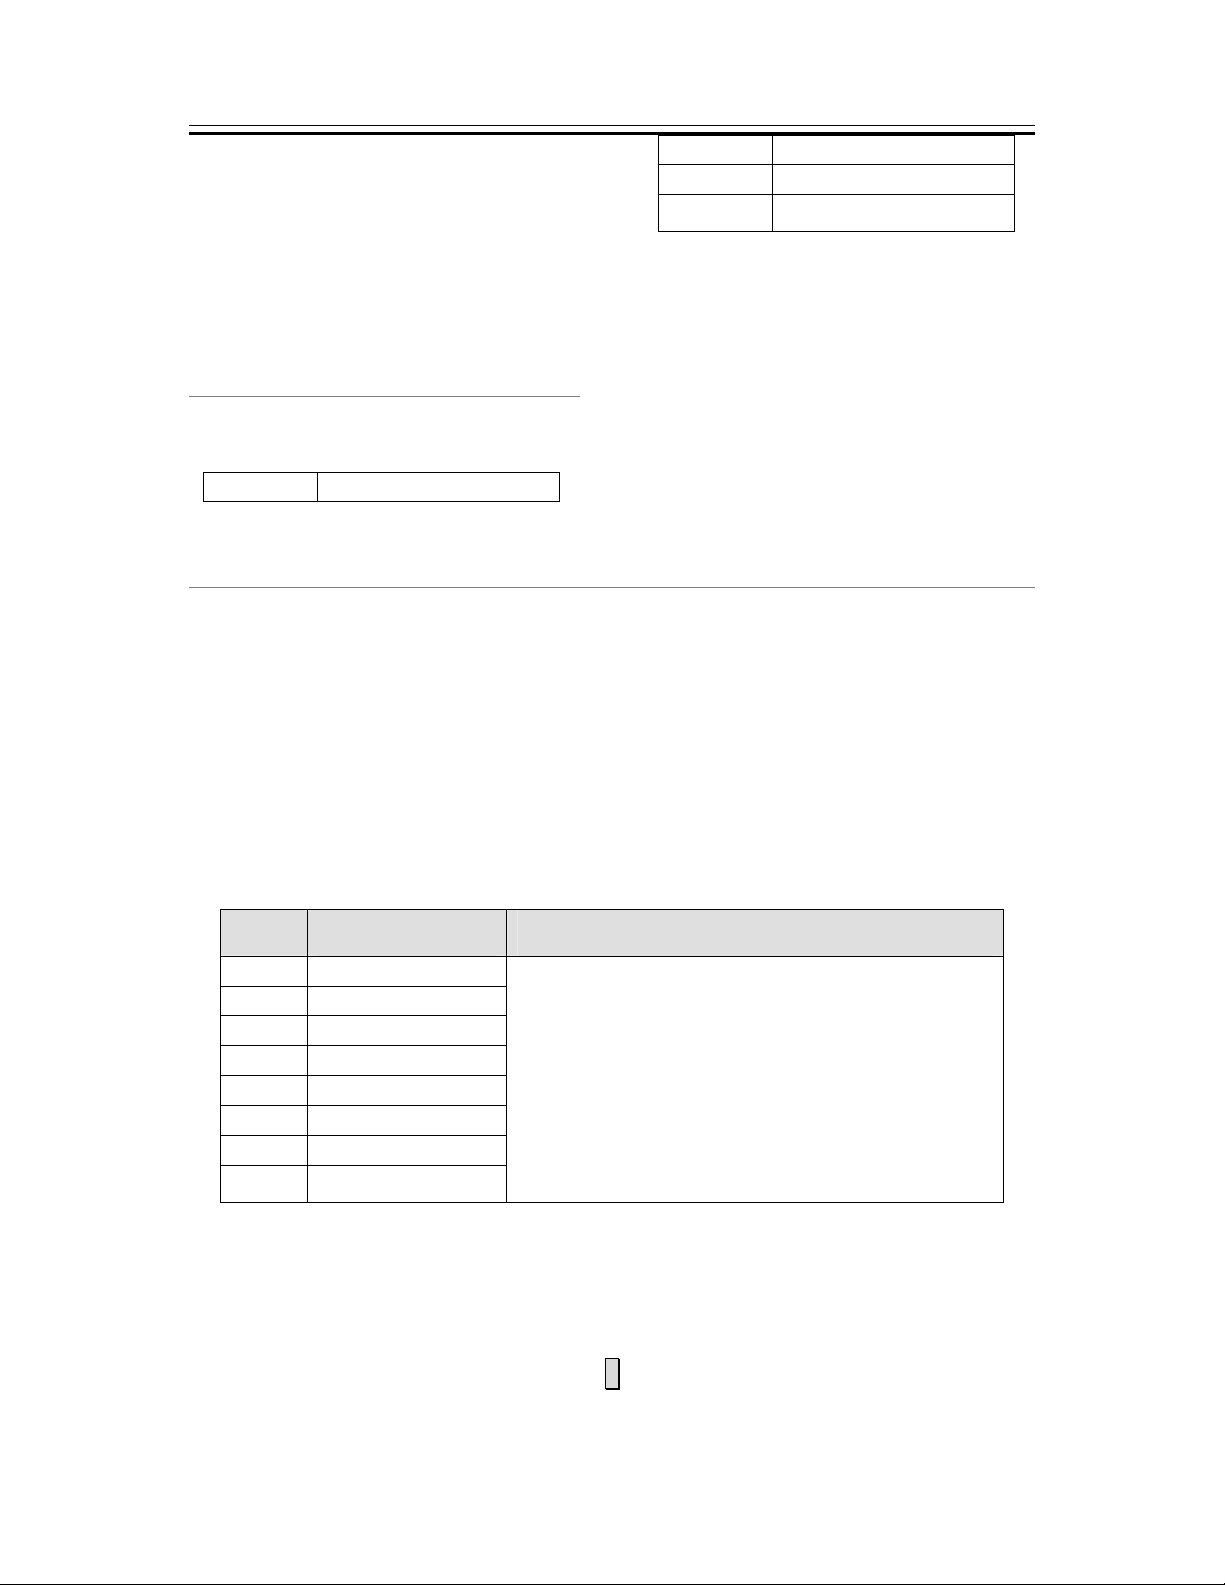
Auto Cook
For food or the following cooking mode, it is not necessary to program the duration and the cooking
power. It is sufficient to indicate the type of food that you wish to cook as well as the weight of this
food. In order to do this, turn the TIME/MENU dial to select a category of food/cooking mode. then
press the CLOCK/WEIGHT button a number of times to indicate the number of servings or weight
of food to be cooked. The oven begins cooking once the START button is engaged.
For example, to cook 450g of potato.
1. Rotate TIME/MENU until the display shows Auto Cook Code 4.
2. Press the CLOCK/WEIGHT pad three times to indicate food weight 450g.
3. Press START button.
Auto Cook Code/Menu
Code Food/cooking
mode
1 Popcorn
2 Spaghetti
3 Reheat
Press CLOCK/WEIGHT dial to indicate weight of
food
Weight parameters are used to determine the
time needed to do the job. As you press the
CLOCK/WEIGHT button, a number of pre-set
4 Potato
5 Bread
6 Vegetable
7 Beef
8 Chicken
weight parameters display, when it comes up
of the right figure which matches the weight of
the food you have placed into the oven, push
the START button.
Please note: The result of Auto Cook depends on a number of factors such as the shape of food,
and personal taste as to the doneness of food.
For some food, at the middle of cooking time, you may need to open the door and check its
doneness or turn food over to obtain uniform cooking; But be careful to handle with care of very hot
8
Page 10
food in the oven. To resume cooking, just close the door, the oven will cook for the remaining time.
minutes using this feature:.
Ú Press CANCEL/LOCK button.
Defrost
The oven can be used to defrost meat,
poultry, and seafood.
FOR EXAMPLE: Suppose you want to
defrost 600g of shrimp.
1. Press DEFROST once.
2. Turn the TIME/MENU dial to indicate
defrosting time.
3. Press START button.
Note: once the defrosting starts, you can add
to or reduce defrosting time by rotating the
TIME/MENU knob.
Ú Press START button 4 times, the oven
starts working immediately at full power.
Child Lock
Use to prevent unsupervised operation of the
oven by little children. The CHILD LOCK
indicator will show up on display screen, and
the oven can not be operated while the
CHILD LOCK is set.
To set the CHILD LOCK: Press and hold the
CANCEL/LOCK button for 3 seconds, a beep
sounds and LOCK indicator lights.
To cancel the CHILD LOCK: Press and hold
the CANCEL/LOCK button for 3 seconds until
lock indicator on display goes off.
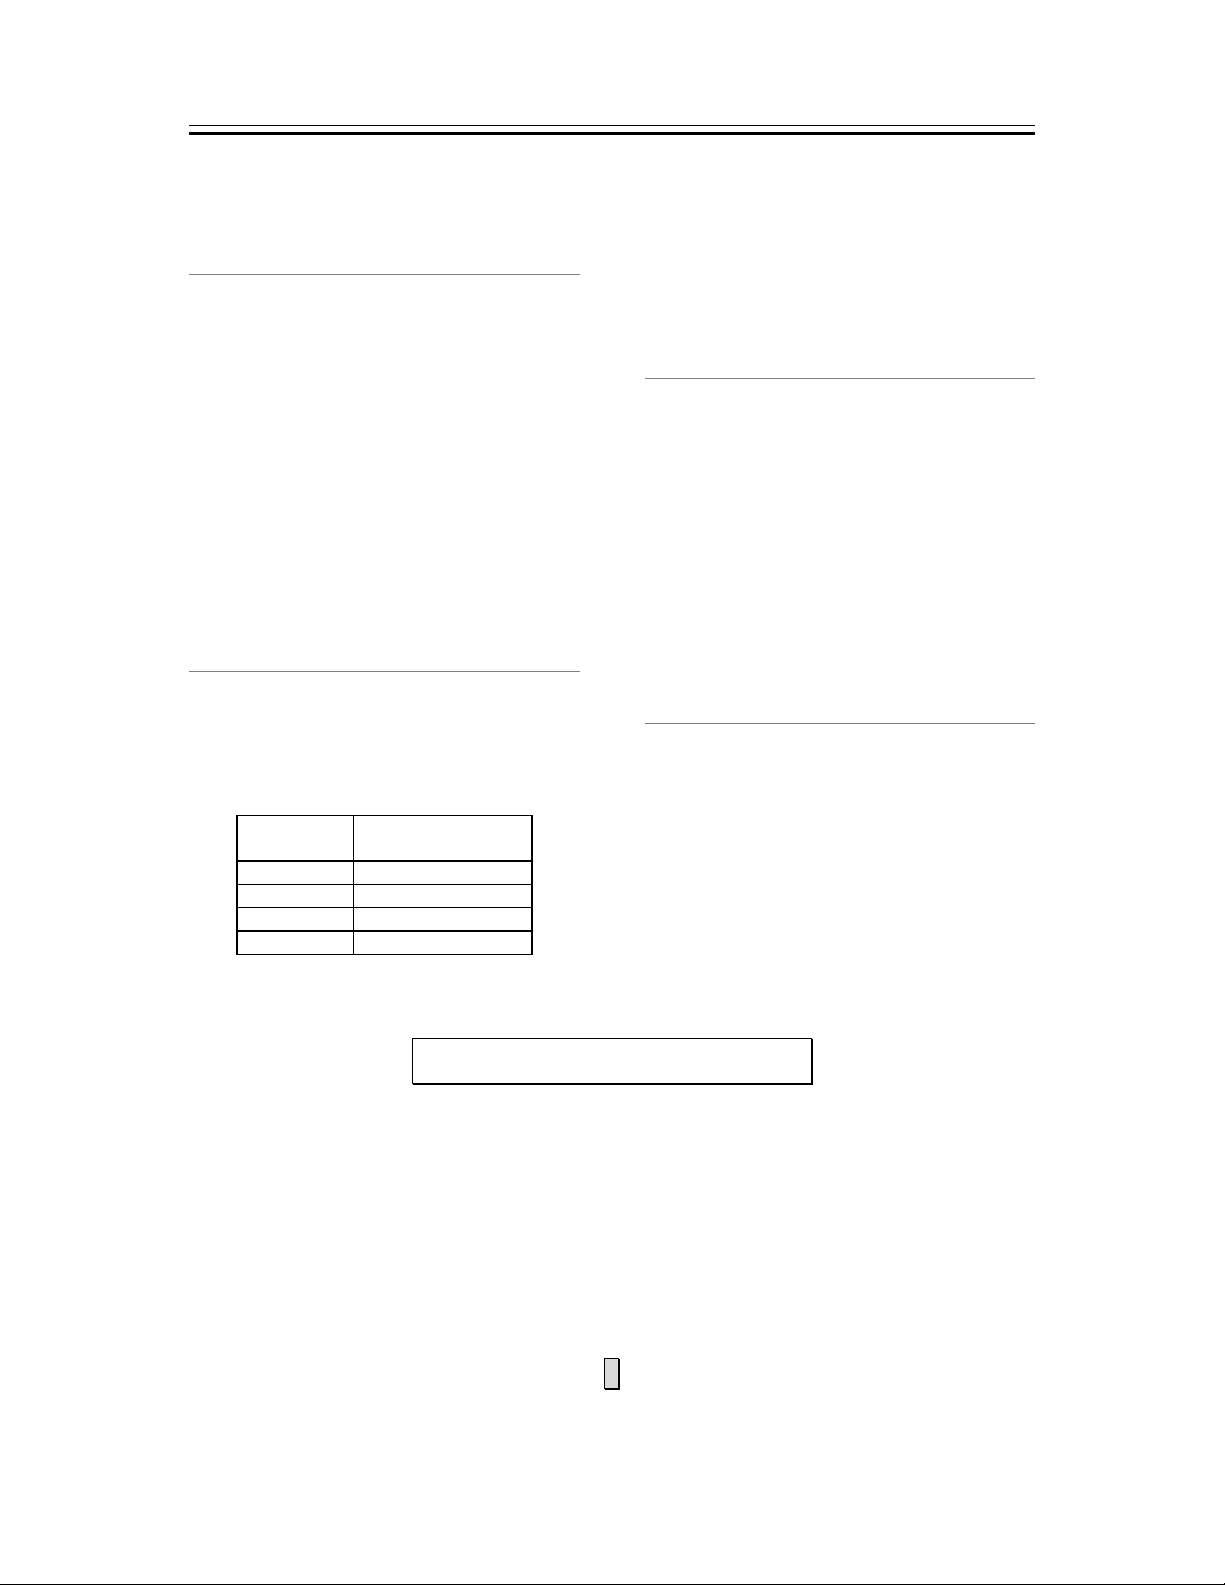
Express Cooking
The oven will operate at HIGH power (100%
power output) for EXPRESS cooking
program.
To use this feature, press START button a
number of times to specify cooking time, the
oven will start immediately.
COOKING
TIME
0:30 once
1:00 twice
1:30 thrice
… …
For example, to set the oven to cook for 2
PRES START
BUTTON
Special Feature
AUTO REMINDER
After a cooking or defrosting program has
completed, the oven will automatically
continue to sound three beeps every two
minutes until the oven door is opened or the
CANCEL/LOCK button is pressed.
CCLLEEAANNIINNGG AANNDD CCAARREE
1. Turn off the oven and remove the power plug from the wall socket before cleaning.
2. Keep the inside of the oven clean. When food splatters or spilled liquids adhere to oven walls,
wipe with a damp cloth. Mild detergent may be used if the oven gets very dirty. Avoid the use of
spray and other harsh cleaners as they may stain, streak or dull the door surface.
3. The outside surfaces should be cleaned with a damp cloth. To prevent damage to the operating
parts inside the oven, water should not be allowed to seep into the ventilation openings.
9
Page 11

4. Wipe the door and window on both sides, the door seals and adjacent parts frequently with a
damp cloth to remove any spills or spatters. Do not use abrasive cleaner.
5. Do not allow the control panel to become wet. Clean with a soft, damp cloth. When cleaning
the control panel, leave oven door open to prevent oven from accidentally turning on.
6. If steam accumulates inside or around the outside of the oven door, wipe with a soft cloth. This
may occur when the microwave oven is operated under high humidity conditions. In such case,
it is normal.
7. It is occasionally necessary to remove the glass tray for cleaning. Wash the tray in warm sudsy
water or in a dishwasher.
8. The roller ring and oven floor should be cleaned regularly to avoid excessive noise. Simply
wipe the bottom surface of the oven with mild detergent. The roller ring may be washed in mild
sudsy water or dishwasher. When removing the roller ring from cavity floor for cleaning, be
sure to replace in the proper position.
9. Remove odors from your oven by combining a cup of water with the juice and skin of one
lemon in a deep microwaveable bowl, microwave for 5 minutes. Wipe thoroughly and dry with a
soft cloth.
10. When it becomes necessary to replace the oven light, please consult a dealer to have it
replaced.
BBEEFFOORREE YYOOUU CCAALLLL FFOORR SSEERRVVIICCEE
IF THE OVEN FAILS TO OPERATE
1. Check to ensure that the oven is plugged in securely. If it is not, remove the plug from the
outlet, wait 10 seconds, and plug it in again securely.
2. Check for a blown circuit fuse or a tripped main circuit breaker. If these seem to be operating
properly, test the outlet with another appliance.
3. Check to ensure that the control panel is programmed correctly and the timer is set.
4. Check to ensure that the door is securely closed engaging the door safety lock system.
Otherwise, the microwave energy will not flow into the oven.
IF NONE OF THE ABOVE RECTIFY THE SITUATION, THEN CONTACT A QUALIFIED
TECHNICIAN. DO NOT TRY TO ADJUST OR REPAIR THE OVEN YOURSELF.
10
 Loading...