

Page 1
Power Boost Handheld Garment Steamer
User Guide
SGC2000
Page 2
Contents
Sunbeam’s Safety Precautions 3
Before First Use 4
Sunbeam Power Boost Handheld Garment Steamer 4
Features of your Sunbeam Steamer 5
Operating Instructions 5-8
Care And Cleaning 9
Troubleshooting 11
Warranty 12
Thank you for purchasing the Sunbeam Power Shot Handheld Garment Steamer. With
continuous steam technology and powerful shot of steam, this Steamer will bring out the best
in garments, linens, drapes and more-quickly and efficiently! .
Important Instructions - Retain For Future Use
2
Page 3

Sunbeam’s Safety Precautions
When using electrical appliances, basic safety precautions should always be followed
including the following:
Read all instructions
1. Use appliance only for its intended use.
2. To reduce the risk of electric shock, do not immerse the appliance in water or other
liquids.
3. Always turn the appliance to “Off” before plugging or unplugging the appliance from the
electrical outlet. Never pull the cord to disconnect from outlet; instead, grasp plug and
pull to disconnect.
4. Do not allow cord to touch hot surfaces. Let appliance cool completely before putting away.
Loop cord loosely around appliance when storing.
5. Make sure unit is off, unplugged and allow it to cool completely before filling or cleaning.
6. Always disconnect appliance from electrical outlet when filling with water or emptying,
and when not in use.
7. Do not operate appliance with a damaged cord, or if the appliance has been dropped or
damaged. To reduce the risk of electric shock, do not disassemble or attempt to repair
the appliance, take it to a qualified service center for examination and repair. Incorrect
reassembly or repair could cause a risk of fire, electric shock, or injury to persons when
the appliance is used.
8. This appliance is not intended for use by persons (including children) with reduced
physical, sensory or mental capabilities, or lack of experience and knowledge, unless they
have been given supervision or instruction concerning use of the appliance by a person
responsible for their safety.
9. Burns could occur from touching hot metal parts, hot water, or steam. Use care when you
turn a steam appliance upside down – there may be hot water in the reservoir.
10. To reduce the risk of contact with hot water emitting from steam vents, check appliance
before each use by holding it away from body and operating steam button.
11. To reduce the likelihood of circuit overload, do not operate another high wattage appliance
on the same circuit.
12. If an extension cord is absolutely necessary, a cord with an ampere rating equal to or
greater than the maximum rating of the iron shall be used. A cord rated for less amperage
can result in a risk of fire or electric shock due to overheating. Care shall be taken to
arrange the cord so that it cannot be pulled or be tripped over.
13. When filling the water tank, watch for water that can drip onto the floor and cause you to
slip and fall.
14. When using the shot of steam, be careful.
CAUTION: Hot water may eject from the exit.
15. Appliance may cause personal injury or be damaged if dropped.
16. The use of attachments not recommended or sold by the appliance manufacturer may
cause injuries or void your warranty.
17. To avoid personal injury and damage to the appliance, only add water to the water tank.
NEVER add cleaning solutions, perfumes, oils or any other chemical additives.
18. Care should be taken when using the appliance due to the emission of steam.
19. Children should be supervised to ensure that they do not play with the appliance.
SAVE THESE INSTRUCTIONS
HOUSEHOLD USE ONLY
3
Page 4
Before First Use
• Unpack your Steamer; remove and peel off any labels adhered to the unit.
• Remove and save instruction manual.
• Wipe outside of the unit with a damp cloth or sponge to remove any dust. Dry thoroughly.
• Keep unit on a flat, level surface.
• When using your Steamer for the first time, you may notice a small amount of smoke and
a slight odour. This is normal when heating the appliance for the first time and there is no
reason for concern.
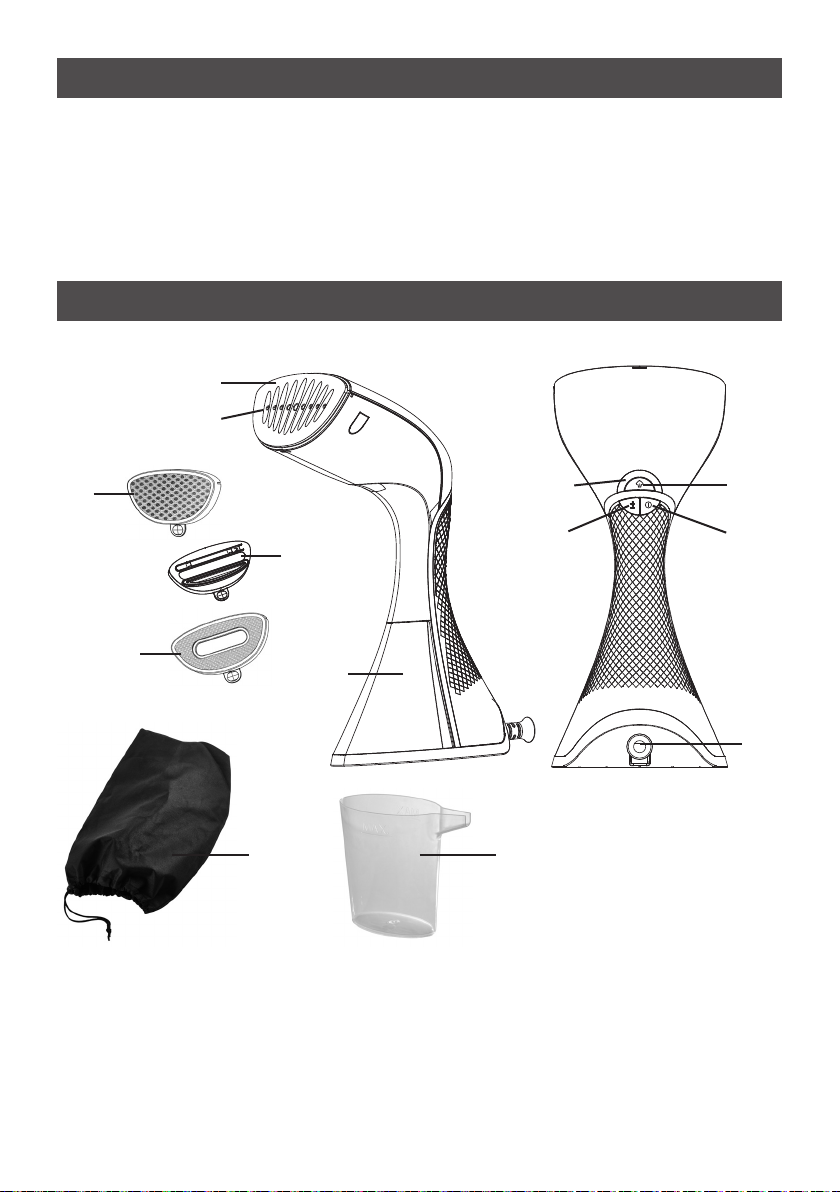
Sunbeam Power Boost Handheld Garment Steamer
6
7
10
9
11
8
12
1. «ON» (|) - «OFF» (O) button
2. Continuous steam / shot of steam button
3. Power / pre-heating / steam mode / shot
of steam / auto-off / descale indicator
4. Steam mode selection button
5. 3m power cord
6. CeraFlow ceramic press plate
3
4
13
7. Steam holes
8. Detachable water tank
9. Fabric Brush
10. Steam Diffuser
11. Lint Pad
12. Travel bag
13. Fill cup
2
1
5
4
Page 5
LED indicators on your handheld garment steamer
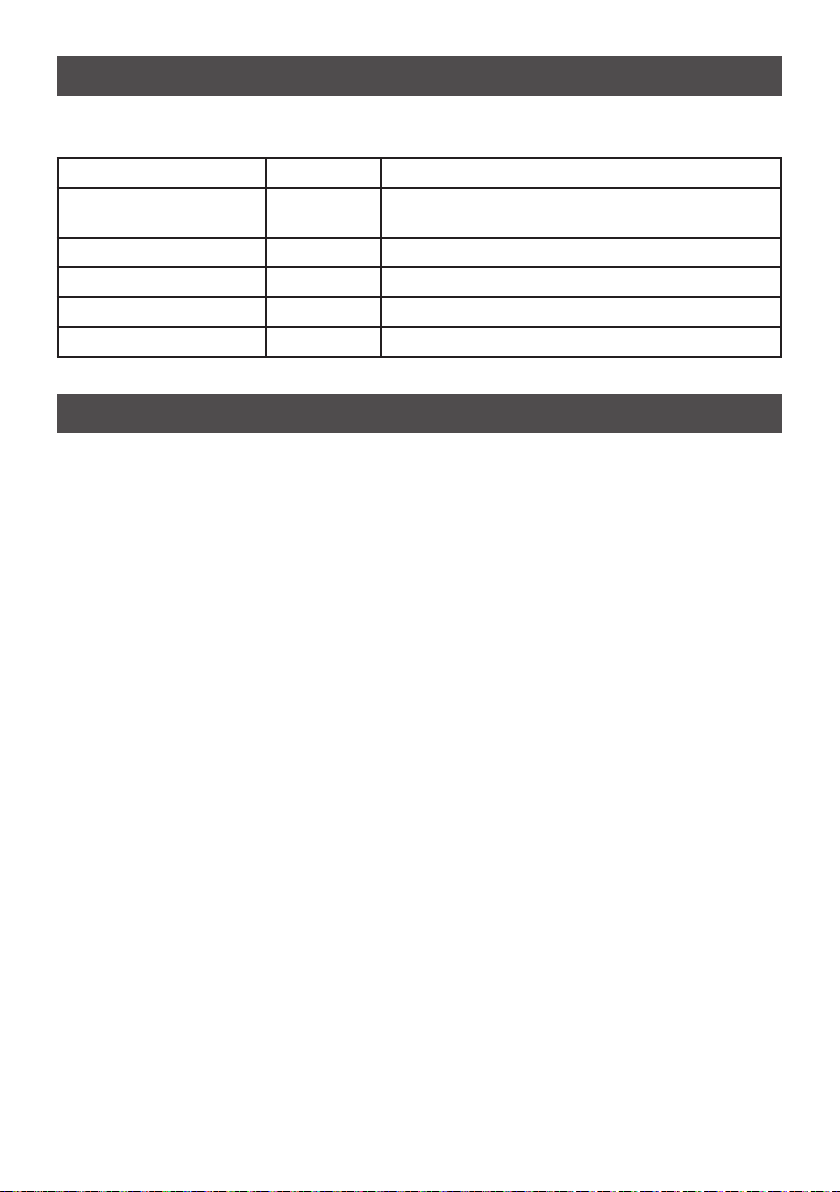
Your handheld garment steamer has LED indicators to alert you of the following states:
State LED Colour Indication
Pre-heating Red Flashes every second 35 times and illuminates
solid when ready to use.
Auto-off Blue Breathes slowly on and off.
De-scale reminder Red Flashes every second.
Cleaning / dr ying mode Red 3 red lights flash.
Shot of steam Red 3 red lights illuminate in succession
Features of your Sunbeam Steamer
Heated press bar – Works like an iron soleplate to press wrinkles out.
Wide steam exit – Provides wide coverage of steam for your garments and fabrics.
Continuous Steam – Gives you the option to steam on demand for up to 16 minutes of
continuous steam. There are 3 steam settings for different fabric types.
Boost Shot of Steam – Gives you a highly concentrated shot of steam for a short period of
time.
Removable water tank – Easy to remove for quick refills. A water inlet tube inside the
water transmits the water from the tank to steamer head.
5
Page 6
Operating Instructions
FILLING WATER TANK
Warning: To avoid personal injury and damage to the unit, only add water to the water tank.
NEVER add cleaning solutions, perfumes, oils or any other chemical additives.
Note: Your Steamer is designed to be used with tap water. However, if you have hard water,
we recommend using distilled water for better results.
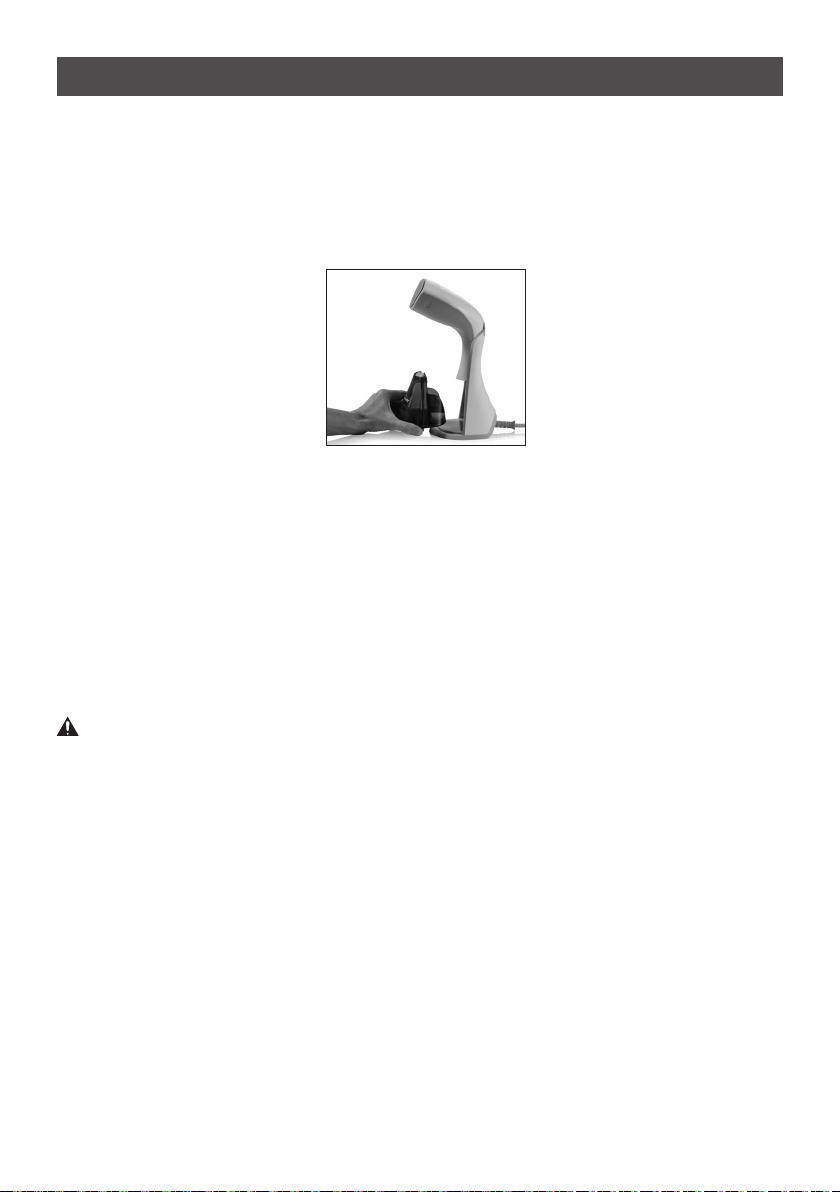
1. Make sure the unit is unplugged.
2. Stand the unit on a flat, stable surface and grasp the handle.
Figure 1
3. Pull the water tank out away from the steamer body.
4. The fill inlet is located on the top of the tank.
Note: If you need to add water while steaming, unplug the steamer, wait until it cools
and follow above steps. If a loud vibrating noise is heard, then the water level is low and
needs to be refilled.
5. Remove the rubber inlet cover and using the water cup, fill the tank to the MAX line.
6. Close the inlet cover and wipe off any water on the tank surface.
7. Return the tank to the garment steamer, making sure that it snaps securely into place.
OPERATING INSTRUCTIONS
Warning: Never use steam on silks or synthetics.
Note: Before first use or if the Steamer has not been used for a long period of time, it will
be necessary to prime the appliance. See ‘Cleaning your handheld garment steamer before
use’ for instructions.
1. Fill the water tank to the max line with tap water. CAUTION, in hard water areas – we
recommend using distilled water.
2. Plug the unit into the electrical mains outlet.
3. Press the «ON» (|) - «OFF» (O) button to turn the Steamer «ON» (|).
4. The power indicator will illuminate and will flash every second whilst the unit pre-heats.
5. Allow the Steamer to warm up. This can take up to 35 seconds. Note: You may hear a
tapping noise during the heat-up cycle. This is normal.
6. When the power indicator stops flashing and illuminates solid, the appliance is ready to
use.
7. This Steamer has 3 options for steam. To select a steam setting press the +/- button to
cycle through the modes.
a. One light will illuminate to indicate ‘Low’ mode for delicate fabrics or freshening
lightly wrinkled garments.
6
Page 7
b. Two lights indicate ‘Normal’ mode for everyday cottons and polyester fabrics with
moderate wrinkles.
c. Three lights indicate ‘Turbo’ mode for thicker fabrics and heavily wrinkled fabrics.
8. Position the steam nozzle away from you and others. Press the steam button once
to release continuous vertical and horizontal steam. Note: Once the steam button is
pressed this will lock into steam mode.
9. To stop the steam, press the steam button .
10. To switch off the Steamer, press and hold the «ON» (|) - «OFF» (O) button until the
garment steamer switches off. This may take a few seconds.
11. Unplug the device when not in use. Empty the water tank and allow the handheld
garment steamer to cool down before storing.
USING BOOST SHOT OF STEAM
1. To operate shot of steam, double press the steam button quickly.
2. The steam mode indicator lights will illuminate in succession.
3. The Steamer will generate a highly concentrated shot of steam for a short period of
time.
USING THE ATTACHMENTS
The below attachments can be used with the Steamer:
i. Fabric brush - separates the fibres on thicker fabrics for better steam penetration.
ii. Steam Diffuser - for even steam distribution and prevents water drips.
iii. Lint pad - removes hair, fur and dust.
Warning: Make sure the Steamer is unplugged and cool before applying attachments.
If the unit has been in use, allow the unit to cool down completely first before changing
attachments as the press plate will still be hot.
1. To affix an attachment, snap the attachment over the press plate.
7
Page 8

USING YOUR STEAMER VERTICALLY
You can use your Steamer in the vertical position to press with steam hanging garments and
drapes.
Caution: Heated press bar gets hot. Do not touch!
1. Hang your garment to be steamed on a clean, rust-free hanger.
Caution: Burns could occur from touching hot metal parts, hot water, or steam. Use
care when you turn a steam appliance upside down – there may be hot water in the
water tank.
2. Press the Steam button on.
3. Hold your Steamer by the handle in vertical position with the head pointing toward the
fabric and away from you and your body.
Warning: Steam is hot. Always point steamer exit away from yourself, other persons,
pets, plants and walls. Never steam clothes while they are being worn.
4. With your free hand, pull the fabric tight.
5. Touch the fabric lightly with the heated press bar, moving it in a downward motion,
beginning at the top of the garment and moving downward.
Caution: The heated press bar gets hot, do not touch.
6. Repeat this step until fabric is wrinkle free.
Tip: For more difficult wrinkles, try steaming from the underside of the fabric.
STEAMING HORIZONTALLY
You can also use your Steamer as an iron to refresh sheets, pillows, mattress, sofas and
more.
1. Once the Steamer has reached set temperature, use steam, and hold the steamer in a
horizontal position, moving it continuously over the fabric being steamed.
Caution: The heated press plate gets hot, do not touch.
Caution: Burns could occur from touching hot metal parts, hot water, or steam. Use
care when you turn a steam appliance upside down – there may be hot water in the
reservoir.
TIPS FOR APPLYING STEAM
• Improper use of the Steamer can cause property damage due to the steam. Always
read the instructions in this manual before using your Steamer.
• Do not operate the Steamer with an empty water tank. To add water during operation,
turn steamer off, wait for it to cool down then remove water tank and refill.
• Always read the fabric care labels to help determine fabric type to be steamed. If
unsure of fabric’s fibre test a small hidden area, such as an inside seam or hem,
before steaming.
• For more difficult wrinkles, try steaming from the underside of the fabric.
• When steaming, touching fabric lightly with the steam nozzle can help in wrinkle
removal. It is important to make contact with the garment and/or fabric.
• Heavier fabrics require more steam.
• Only use water in the unit. Do not add cleaning solutions, scented perfumes, oils or
any other chemicals to the water that can cause damage to the appliance.
• When hanging garment on a door while steaming, be careful not to damage the door
with steam.
8
Page 9

• After use, empty water tank by turning it upside down to ensure all water empties out
and avoid leaks.
• When steaming, move the steamer continuously over the item being pressed. Do not
keep steamer over an area for any period of time to avoid damage to the fabric.
SAFETY AUTO OFF FEATURE
Warning: ALWAYS disconnect your handheld garment steamer from the mains supply
socket after use. NEVER leave the appliance unattended with the auto shut off function in
operation.
An electronic safety device will automatically switch the heating element off when the
appliance has been powered on continuously for 15 minutes. To indicate that the heating
element has been switched off, the power indicator light will illuminate and slowly breath on
and off. To re-activate the handheld garment steamer:
1. Press the «ON» (|) - «OFF» (O) button to turn the handheld garment steamer «ON» (|).
2. The power indicator will illuminate and will flash every second whilst the unit pre-heats.
3. Allow the Steamer to warm up. This can take up to 35 seconds.
4. When the power indicator stops flashing and illuminates solid, the appliance is ready to
use.
Care And Cleaning
CLEANING
1. Make sure unit is off, unplugged and allow it to cool completely before cleaning.
2. If there is water in the water tank, remove the tank and turn it upside down to ensure all
the water empties out.
3. Wipe exterior surfaces with a soft, damp cloth. Dry thoroughly.
Warning: Never immerse steamer, cord or plug in water or any other liquid.
• Do not use abrasive cleaners or scouring pads that can scratch the surface.
• Do not place in the dishwasher.
CLEANING WITH VINEGAR AND WATER
It is recommended to clean your Steamer every two months to reduce mineral buildup that
can affect the performance of your unit.
1. Turn off the unit and let it cool completely.
2. Remove water tank and make sure it is empty.
3. Fill water tank with a solution of 50% white vinegar and 50% water up to the max level.
4. Plug unit into electrical outlet and press the continuous steam button to run a full
steaming cycle.
5. Once steaming is finished, fill with clean water and repeat process until the vinegar
odour is eliminated.
9
Page 10

DESCALING INSTRUCTIONS
Warning: Do not use harsh abrasives, chemical cleaners or solvents to descale your
Steamer.
Warning: We advise you do this operation in a vented room.
After accumulative use, the steam mode indicator lights will flash to indicate that the
Steamer. requires descaling. Descaling helps to removes scale and impurities to prolong
the life of your appliance. If the water in your area is very hard, the descaling should be
performed more frequently.
1) Remove the water tank.
2) Remove the rubber inlet cover.
3) Using the water fill cup, fill the water tank to the max line with tap water. However, if you
have hard water, we recommend using distilled water for better results.
4) Close the inlet cover and wipe off any water on the water tank surface.
5) Return the water tank to the Steamer, making sure that it snaps securely into place.
6) Plug the unit into the electrical mains outlet.
7) Press the «ON» (|) - «OFF» (O) button to turn the Steamer «ON» (|).
8) The power indicator will illuminate and will flash every second whilst the unit pre-heats.
9) Allow the Steamer to warm up. This can take up to 35 seconds.
10) When the power indicator stops flashing and illuminates solid, the appliance is ready to
use.
11) Stand the Steamer on its base on a flat, stable and heat-resistant surface.
12) Position the steam nozzle away from you and others.
13) Press and hold the +/- steam setting button and steam button at the same time for 5
seconds.
14) The Steamer will enter a cleaning cycle for 1 minute. The steam mode indicator lights
will blink quickly whilst in cleaning mode.
15) Once the cleaning cycle is complete, the unit will automatically enter drying mode for
20 seconds. The drying cycle is complete once the steam mode indicator lights stops
blinking.
16) The steam setting will return to the previous selection.
STORAGE
Wind cord in loops and store the unit upright on a clean and dry flat surface. Ensure the
water tank is empty. If not, remove it and turn it upside down to empty tank.
10
Page 11
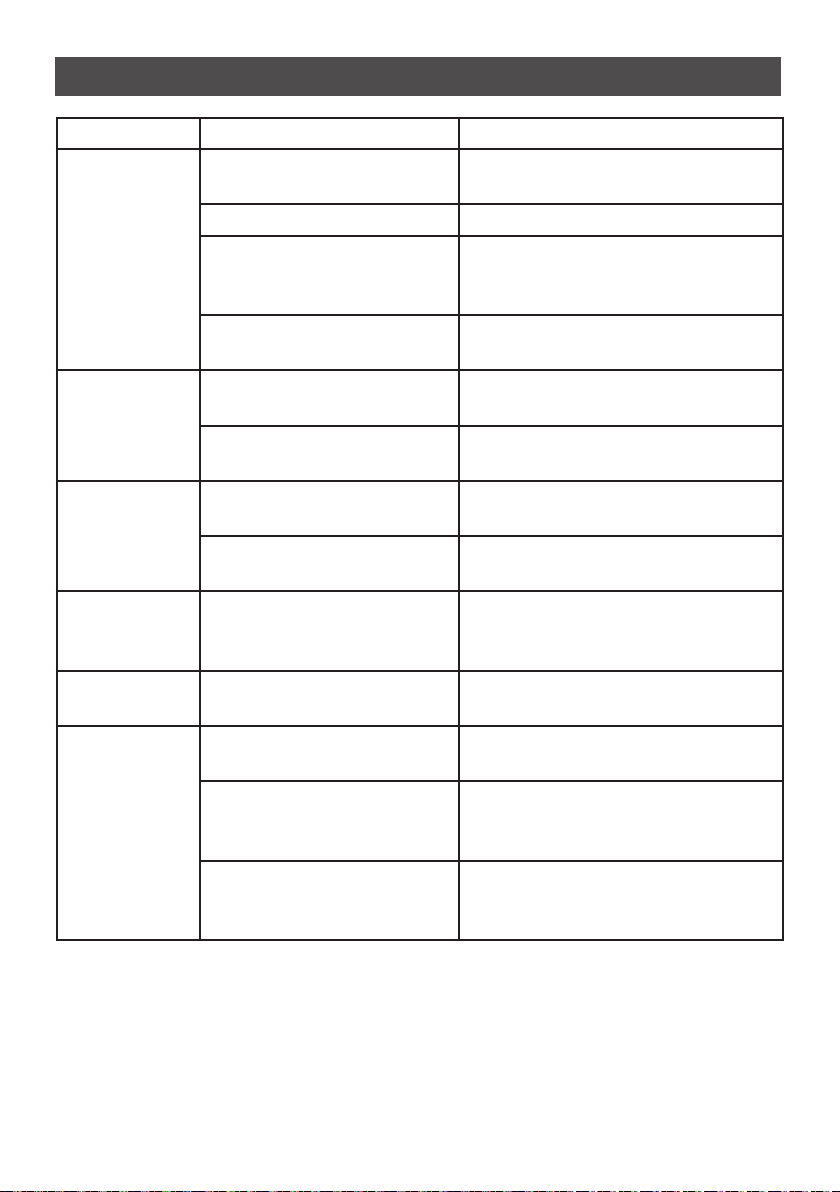
Troubleshooting
Problems Possible Causes Solutions
There is no
steam.
There is noise
emitting from
the appliance.
The appliance
does not heat
up.
The water
tank is
leaking.
Steam rate
decreases.
The steam
leaves
stains on the
fabric or the
appliance
spits.
The appliance is not plugged
in, or not switched on.
The water level is too low. Unplug your appliance and refill it.
The water tank is not fully
in place.
The appliance is in auto-off
mode.
The water level is too low
and the pump is pulling air.
The appliance is heating
up.
The appliance is not plugged
in, or not switched on.
The appliance is in auto-off
mode.
The water tank is not fully
in place or the fill inlet
cover is not closed properly.
Calc build up. Refer to the ‘Descaling
You are using water with
additives.
The appliance has not been
cleaned enough after the
descaling operation.
You are using liquids other
than water to descale the
product.
Check that your appliance is
correctly plugged in and switched on.
Ensure that the fill inlet cover is
closed and that the water tank
snaps when put into place.
Refer to the ‘Auto shut off feature’
section.
Unplug your appliance and refill it.
This is normal when the appliance
is heating up.
Check that your appliance is
correctly plugged in and switched on.
Refer to the ‘Auto shut off feature’
section.
Ensure that the fill inlet cover is
closed and that the water tank
snaps when put into place.
instructions’ section.
Never add any additive in the water
tank.
Refer to the ‘Descaling
instructions’ section.
Use only water during descaling
operation. We recommend using
distilled water.
11
Page 12
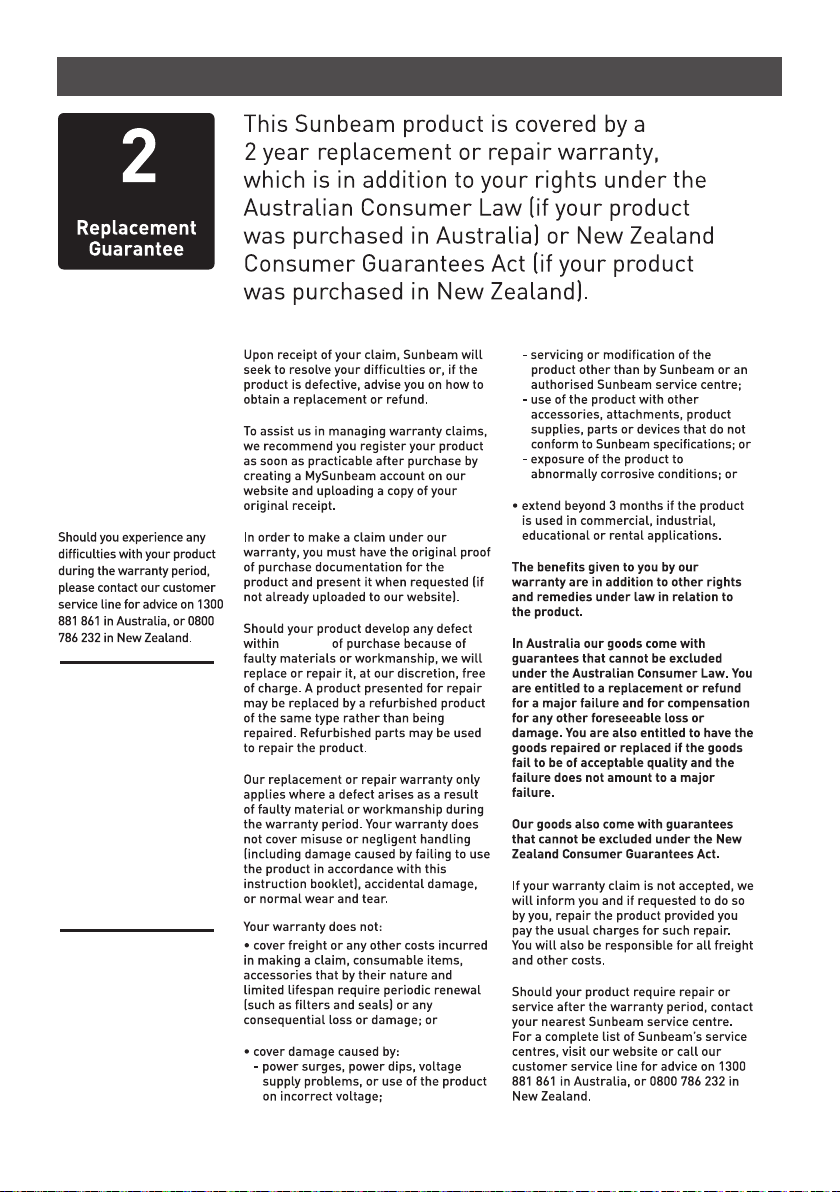
Warranty
Year
2 years
Australia
www.sunbeam.com.au
1300 881 861
New Zealand
www.sunbeam.co.nz
0800 786 232
12
Page 13

Need help with your appliance?
Contact our customer service team or visit our
website for information and tips on getting the
most from your appliance.
Australia | visit www.sunbeam.com.au
phone 1300 881 861
New Zealand | visit www.sunbeam.co.nz
phone 0800 786 232
Newell Australia Pty Ltd. ABN 68 075 071 233
Sunbeam is a registered trade mark.
Made in China to Sunbeam’s specification.
Due to minor changes in design or otherwise,
the product you buy may differ slightly from the one shown here.
Approved by the appropriate electrical regulatory authorities.
©Copyright Sunbeam 2024.
04/24
SGC2000_24EM1 (ANZ)_GCDS-JC
PN: NWL0001663801
 Loading...