

Page 1
MASTER
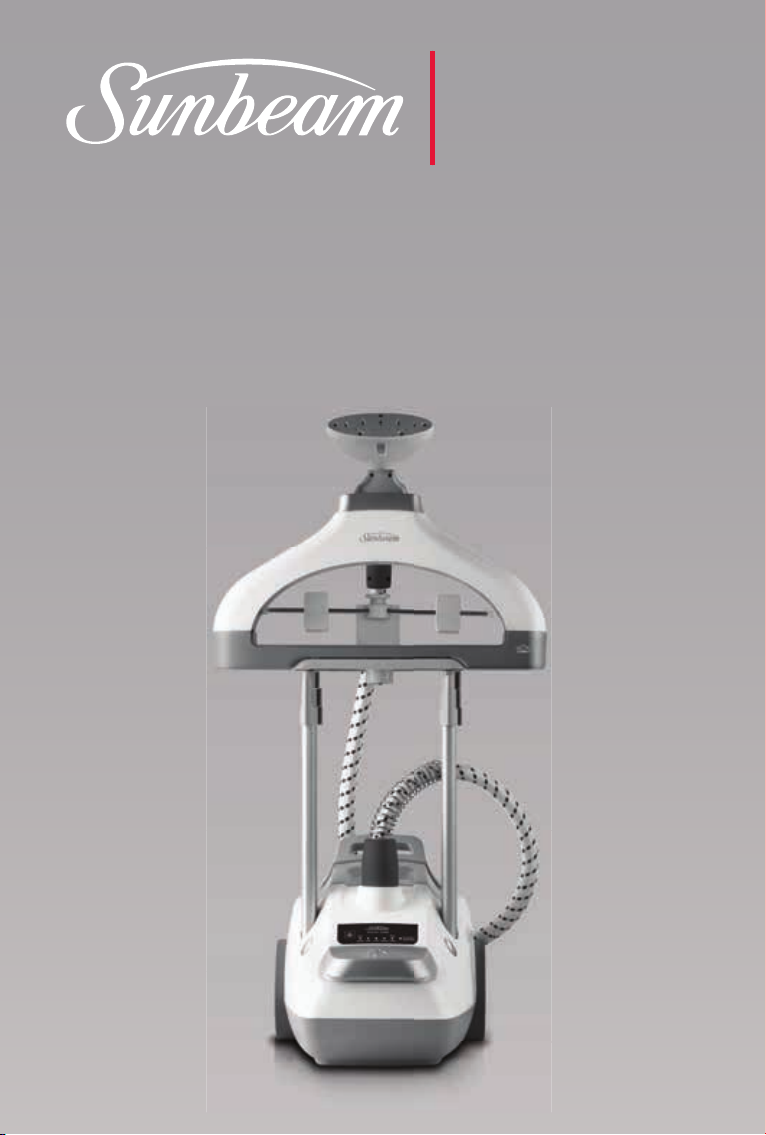
Butler Turbo
Garment Steamer
User Guide
SERIES
SG3000
Page 2

Contents
Sunbeam’s Safety Precautions 1
Assembling your Sunbeam
Garment Steamer 2
Features of your Sunbeam
Garment Steamer 3
Using your Sunbeam
Garment Steamer 4
Steam Setting Chart 5
Care and Cleaning 6
Troubleshooting Guide 8
Important instructions –
retain for future use.
Page 3

Sunbeam’s Safety Precautions
SAFETY PRECAUTIONS FOR YOUR GARMENT
STEAMER
• Do not leave a hot garment steamer within reach
of children. If they come into contact with a hot
garment steamer it could lead to serious burns.
• Unplug the appliance during filling and cleaning.
• Care should be taken when using the appliance
due to the emission of steam.
• The garment steamer must not be stored whilst
it is plugged into the power outlet.
• The On/Off button on the unit is for functional
use only during operation, and is not intended
to provide disconnection from the power outlet.
Sunbeam is very safety conscious when designing and
manufacturing consumer products, but it is essential
that the product user also exercise care when using
an electrical appliance. Listed below are precautions
which are essential for the safe use of an electrical
appliance:
• Read carefully and save all the instructions provided
with an appliance.
• Always turn the power off at the power outlet before
you insert or remove a plug. Remove by grasping the
plug - do not pull on the cord.
• Turn the power off and remove the plug when the
appliance is not in use and before cleaning.
• Do not use your appliance with an extension cord
unless this cord has been checked and tested by a
qualified technician or service person.
• Always use your appliance from a power outlet of the
voltage (A.C. only) marked on the appliance.
• This appliance is not intended for use by persons
(including children) with reduced physical, sensory
or mental capabilities, or lack of experience and
knowledge, unless they have been given supervision
or instruction concerning use of the appliance by a
person Responsible for their safety.
• Children should be supervised to ensure that they
do not play with the appliance.
• The temperature of accessible surfaces may be high
when the appliance is operating.
• Never leave an appliance unattended while in use.
Before storing the garment steamer after use,
it must be unplugged from the power outlet.
• The garment steamer takes approximately 2
hours to completely cool down. Allow the garment
steamer to cool completely before storing.
• Do not leave the garment steamer unattended
while it is plugged into the power outlet.
• This garment steamer features an “auto-off”
function, which is an additional safety feature
designed to disconnect power to the heating
element if the garment steamer has run out
of water.
• Do not use an appliance for any purpose other than
its intended use.
• Do not place an appliance on or near a hot gas
flame, electric element or on a heated oven.
• Do not place on top of any other appliance.
• Do not let the power cord of an appliance hang over
the edge of a table or bench top or touch any hot
surface.
• Do not operate any electrical appliance with a
damaged cord or after the appliance has been
damaged in any manner. If damage is suspected,
return the appliance to the nearest Sunbeam
Appointed Service Centre for examination, repair or
adjustment.
• For additional protection, Sunbeam recommends the
use of a residual current device (RCD) with a tripping
current not exceeding 30mA in the electrical circuit
supplying power to your appliances.
• Do not immerse the appliance in water or any other
liquid unless recommended.
• Appliances are not intended to be operated by means
of an external timer or separate remote control
system.
• This appliance is intended to be used in household
and similar applications such as: staff kitchen areas
in shops, offices and other working environments;
farm houses; by clients in hotels, motels and other
residential type environments; bed and breakfast type
environments.
If you have any concerns regarding the performance and use of your appliance,
please visit www.sunbeam.com.au or contact the Sunbeam Consumer Service Line.
Ensure the above safety precautions are understood.
1
Page 4
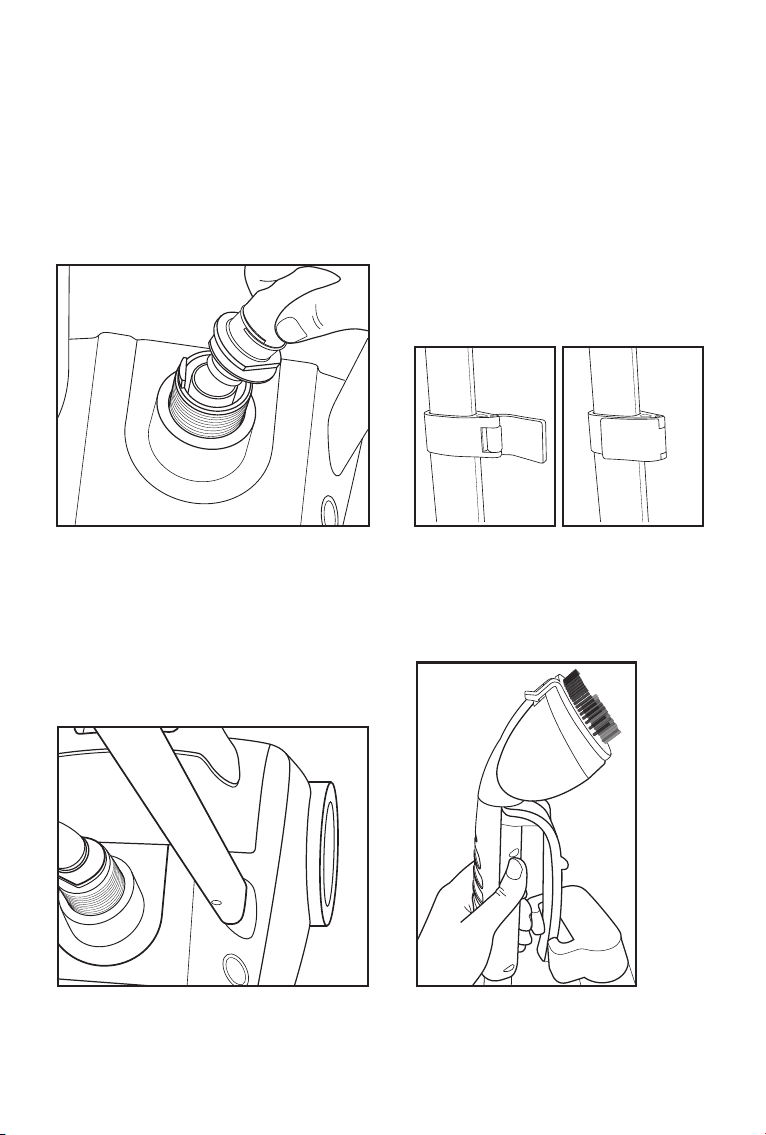
Assembling your Sunbeam
Garment Steamer
The steam hose
• Screw the steam hose into the base.
Screw tight.
The twin poles
• There are 2 poles. One end will have a
small hole. Face this to the front of the
unit and insert into the pole space on
the base. Push the pole down firmly, and
press the ‘Push’ button until you hear a
click. The poles should be firm inside the
base. Repeat with the other pole.
• The poles are telescopic for easy storage.
There are 3 sections per pole. Starting at
the bottom, open the clip on the first pole
and pull upwards so that the telescopic
poles inside can be drawn upwards. When
it’s at the maximum length, close the clip.
Repeat with the other section of pole.
Garment hanger
• Insert the garment hanger on top of the
poles
• For easy storage, the hand steam guard
rests on the garment hanger.
PUSH
2
Page 5

Features of your Sunbeam
Garment Steamer
Hand Steam Guard
For comfort
Rotating Garment hanger
Use the hanger, the clips or the coat
hanger hook.
40 Sec Quick Start
Ready in 40 seconds, so you can start immediately.
2000W Fast Heat Up
Powerful 2000 watt element provides the fastest
heat up, and higher steam performance.
Steam hose
Twin poles
For better garment support to make steaming
even easier. Telescopic poles for easy storage.
Large 3L removable tank
So you can steam for longer without
having to refill.
5 Steam Settings
From 17g/min to 40g/min to best
suit delicate synthetics to linen.
Steam Brush
Steam Cap
Power On / Off button
Tilt and Roll
Safety Auto Standby
3
Page 6

Using your Garment Steamer
Before first use
• Remove any adhesive stickers, plastic
covers or cardboard sleeves from the
garment steamer.
• Fill the water tank and then empty out
the water. This will rinse out any foreign
particles remaining in the water tank from
the manufacturing process.
NOTE: When turned on for the first time,
your new garment steamer may give off
vapours for up to 10 minutes. This is due to
the initial heating of the materials used. It is
safe, and not detrimental to the performance
of the garment steamer.
Filling the tank with water
• Remove the tank from the unit and
remove the tank lid. Then fill with water
from the tap. Do not exceed the maximum
water level indicator. Tighten the tank lid,
then reinsert the water tank and ensure
it’s firmly in position.
Using your garment steamer
1. Insert the plug into a 230-240 volt power
outlet and turn the power on.
2. Place the unit on the floor. The unit must
be lower than the steam hose
3. Push the power button to turn the unit on.
The boiler will begin heating and
the Steam light will illuminate.
4. Select the desired steam setting for your
fabric. See Steam Settings list below.
The Steam light will go out once the
garment steamer has reached the selected
temperature.
5. Before using the garment steamer on a
garment, direct a shot of steam into the
air to release any remaining condensation.
6. Ensure to always hold the steam hose
using the hand steam guard for safety
For best performance, we recommend the
use of Sunbeam Demineralised Water as
mineral deposits can build up in a garment
steamer requiring the unit to be calc
cleaned.
Steam light Water light
4
Page 7

Using your Garment Steamer continued
NOTE: The steam light illuminates to indicate
the garment steamer is heating and goes out
when it has reached temperature selected
for your steam setting. The light will cycle
on and off during use as the garment
steamer maintains the selected temperature.
Steam will begin around 40 seconds
from switching the unit on, this will be
longer if the tank water is cool.
NOTE: The steam will be irregular. This is
normal. When the steam hose is bent, the
passage of steam is restricted, and the steam
may condense back into water. The water light
may flash and the unit may beep as a reminder
to straighten the hose before using again.
Water light
When the unit detects an irregularity with
the water, the Water light on the panel will
flash, and the unit will beep as a reminder.
This will occur for 2 reasons:
1. The water level in the tank is low. Simply
refill the tank.
2. The steam hose is bent. Simply lift the
steam hose head and straighten the hose,
before using again. This will allow the
condensation to flow back down to the
tank.
Safety Auto Standby
When the water is running out, the ‘Water’
light on the panel will flash, and the unit
will beep to let you know to add more water.
If there is no water in the tank, the unit will
go into standby mode and stop heating.
The unit will beep and the flashing light will
continue until you add more water, or press
the large on/off button to turn the unit off.
Accessories
Ensure the unit is switched off and cool before
you add the accessories.
• The Steam Brush simply clicks onto
the steam head. It helps to open up
the weave of fabrics to improve steam
penetration. Steam in the direction of the
nap or weave of the fabric. Do not use the
Steam Cap with the Steam Brush.
• The Steam Cap is ideal to use most of the
time as it assists in even steam dispersal,
in preventing spotting and in protecting
delicate fabrics (such as silk) from water
droplets. Simply place over the steam
head, but do not use with the Steam
Brush. When finished, remove the Steam
Cap to ensure it dries completely.
Steam Setting Chart
Steam Setting Fabric
1. Synthetics. Nylon, Polyester, Rayon
2.
3. Wool, Cotton Blends
4. Cotton, Corduroy
5. Linen, Jeans
Silk
5
Page 8

Care and Cleaning
After each use
1. Turn the power off and remove the plug
from the power outlet.
2. Allow the garment steamer to cool before
storing.
Storage
Empty the water tank before storage.
Cleaning
To clean the exterior of your garment
steamer, wipe over with a damp soft cloth
and wipe dry.
Caution: Do not use harsh abrasives,
chemical cleaners or solvents to clean the
exterior of your garment steamer as these
will damage the surface.
Cleaning the steam holes from the steam hose
head
To remove build up from the steam holes
which may affect steam performance, use
a cotton wool tip moistened in methylated
spirits
Calc Clean Instructions – using descaling
tablets
Mineral deposits in tap water solidify when
the water is heated and can build up in
the unit of the garment steamer which can
affect steam performance. It is important
to regularly flush out the unit to maintain
the best performance. We recommend calc
cleaning every month. Use Ironing System
descaling tablets. We recommend using
Sunbeam Ironing System Descaling Tablets
(SR0100).
1. Dissolve 1 x 6g tablet in 400ml of warm
water (90 degrees is recommended) in a
jug before use.
2. Turn the unit off and wait for it to cool
completely (approx 2 hours).
CAUTION: The water in the unit and in the
tank may be hot after use. Ensure to let
the garment steamer cool down.
3. Pour out all remaining water from the
water tank into the sink. Lift the base unit
and pour out any remaining water from
the unit into the sink. You may want to
unscrew the steam hose for ease.
4. Then carefully pour the descaling solution
into the base unit. Leave for 2 minutes.
Gently shake the base unit back and forth
to dislodge any scale build up inside the
unit. Leave for 2 minutes.
5. Then pour out all remaining liquid from
the unit into the sink.
6. Rinse by repeating process with 400ml
of water (90 degrees is recommended),
shake and empty the unit again.
Repeat rinsing process at least 2 times.
6
Page 9

Care and Cleaning continued
Calc Clean instructions – using lemon juice
Alternatively, if you do not have Sunbeam
Ironing System Descaling Tablets, you can
use lemon juice to remove the scale build
up from inside the unit
1. Turn the unit off and wait for it to cool
completely (approx 2 hours).
2. Pour out all remaining water from the
water tank into the sink. Lift the unit
and pour out any remaining water from
the unit into the sink. You may want to
unscrew the steam hose for ease.
3. In a small jug, add 3 tbs lemon juice
to 400ml of warm water (90 degrees is
recommended) and stir to mix.
4. Then carefully pour the descaling solution
into the base unit. Leave for 2 minutes.
Gently shake the base unit back and forth
to dislodge any scale build up inside the
unit. Leave for 10 minutes. Shake again.
5. Then pour out all remaining liquid from
the unit into the sink.
6. Rinse by repeating process with 400ml
of water (90 degrees is recommended),
shake and empty the unit again.
Repeat rinsing process at least 2 times.
7
Page 10

This Sunbeam product is covered by a
24 month replacement or repair warranty,
which is in addition to your rights under the
Australian Consumer Law (if your product
was purchased in Australia) or New Zealand
Consumer Guarantees Act (if your product
was purchased in New Zealand).
Upon receipt of your claim, Sunbeam will
seek to resolve your difficulties or, if the
product is defective, advise you on how to
obtain a replacement or refund.
To assist us in managing warranty claims,
we recommend you register your product
as soon as practicable after purchase by
creating a MySunbeam account on our
website and uploading a copy of your
original receipt.
In order to make a claim under our
warranty, you must have the original proof
of purchase documentation for the
product and present it when requested (if
not already uploaded to our website).
Should your product develop any defect
within 24 months of purchase because of
faulty materials or workmanship, we will
replace or repair it, at our discretion, free
of charge. A product presented for repair
may be replaced by a refurbished product
of the same type rather than being
repaired. Refurbished parts may be used
to repair the product.
Our replacement or repair warranty only
applies where a defect arises as a result
of faulty material or workmanship during
the warranty period. Your warranty does
not cover misuse or negligent handling
(including damage caused by failing to use
the product in accordance with this
instruction booklet), accidental damage,
or normal wear and tear.
Your warranty does not:
• cover freight or any other costs incurred
in making a claim, consumable items,
accessories that by their nature and
limited lifespan require periodic renewal
(such as filters and seals) or any
consequential loss or damage; or
• cover damage caused by:
- power surges, power dips, voltage
supply problems, or use of the product
on incorrect voltage;
Should you experience any
difficulties with your product
during the warranty period,
please contact our customer
service line for advice on 1300
881 861 in Australia, or 0800
786 232 in New Zealand.
Replacement
Guarantee
24
Month
- servicing or modification of the
product other than by Sunbeam or an
authorised Sunbeam service centre;
- use of the product with other
accessories, attachments, product
supplies, parts or devices that do not
conform to Sunbeam specifications; or
- exposure of the product to
abnormally corrosive conditions; or
• extend beyond 3 months if the product
is used in commercial, industrial,
educational or rental applications.
The benefits given to you by our warranty
are in addition to other rights and
remedies under law in relation to the
product.
In Australia our goods come with
guarantees that cannot be excluded under
the Australian Consumer Law. You are
entitled to a replacement or refund for a
major failure and for compensation for any
other foreseeable loss or damage. You are
also entitled to have the goods repaired or
replaced if the goods fail to be of
acceptable quality and the failure does not
amount to a major failure.
Our goods also come with guarantees that
cannot be excluded under the New Zealand
Consumer Guarantees Act.
If your warranty claim is not accepted, we
will inform you and if requested to do so by
you, repair the product provided you pay
the usual charges for such repair. You will
also be responsible for all freight and other
costs.
Should your product require repair or
service after the warranty period, contact
your nearest Sunbeam service centre. For
a complete list of Sunbeam’s service
centres, visit our website or call our
customer service line for advice on 1300
881 861 in Australia, or 0800 786 232 in
New Zealand.
Australia
www.sunbeam.com.au
1300 881 861
Units 5 & 6,
13 Lord Street,
Botany NSW 2019
Australia
New Zealand
www.sunbeam.com.nz
0800 786 232
Unit 3, Building D,
26 Vestey Drive,
Mt Wellington
Auckland
New Zealand
Troubleshooting Guide
Problem Possible Reason Solution
Water Light
When the Butler Turbo
detects an irregularity
with the water, the
water light on the
panel will flash, and
the unit will beep as
a reminder. This will
occur for 2 reasons:
Water is spitting from
the steam hose.
There is some spotting
on my garments
8
The water level in the tank
is low.
The steam hose is bent,
so steam condenses back
into water and will flow
down into the tank.
The unit has been left and
water residue has built up in
the steam hose
The garment steamer unit
is not on the floor, and/
or the steam hose is bent
and steam is condensing in
the steam hose. The steam
hose needs to be straight
and higher than the unit, so
steam can rise up the steam
hose.
The unit needs a calc clean Follow the Care Instructions
Simply refill the tank.
Please straighten the hose.
Ensure the unit is on the floor.
Wait for the unit to reach
temperature so steam can build.
Lift the steam hose head and
straighten the hose. This will
allow the condensation to flow
back down to the unit.
on page 6 and calc clean your
machine.
Page 11

24
Month
Replacement
Guarantee
This Sunbeam product is covered by a
24 month replacement or repair warranty,
which is in addition to your rights under the
Australian Consumer Law (if your product
was purchased in Australia) or New Zealand
Consumer Guarantees Act (if your product
was purchased in New Zealand).
Should you experience any
difficulties with your product
during the warranty period,
please contact our customer
service line for advice on 1300
881 861 in Australia, or 0800
786 232 in New Zealand.
Australia
www.sunbeam.com.au
1300 881 861
Units 5 & 6,
13 Lord Street,
Botany NSW 2019
Australia
New Zealand
www.sunbeam.com.nz
0800 786 232
Unit 3, Building D,
26 Vestey Drive,
Mt Wellington
Auckland
New Zealand
Upon receipt of your claim, Sunbeam will
seek to resolve your difficulties or, if the
product is defective, advise you on how to
obtain a replacement or refund.
To assist us in managing warranty claims,
we recommend you register your product
as soon as practicable after purchase by
creating a MySunbeam account on our
website and uploading a copy of your
original receipt.
In order to make a claim under our
warranty, you must have the original proof
of purchase documentation for the
product and present it when requested (if
not already uploaded to our website).
Should your product develop any defect
within 24 months of purchase because of
faulty materials or workmanship, we will
replace or repair it, at our discretion, free
of charge. A product presented for repair
may be replaced by a refurbished product
of the same type rather than being
repaired. Refurbished parts may be used
to repair the product.
Our replacement or repair warranty only
applies where a defect arises as a result
of faulty material or workmanship during
the warranty period. Your warranty does
not cover misuse or negligent handling
(including damage caused by failing to use
the product in accordance with this
instruction booklet), accidental damage,
or normal wear and tear.
Your warranty does not:
• cover freight or any other costs incurred
in making a claim, consumable items,
accessories that by their nature and
limited lifespan require periodic renewal
(such as filters and seals) or any
consequential loss or damage; or
• cover damage caused by:
- power surges, power dips, voltage
supply problems, or use of the product
on incorrect voltage;
- servicing or modification of the
product other than by Sunbeam or an
authorised Sunbeam service centre;
- use of the product with other
accessories, attachments, product
supplies, parts or devices that do not
conform to Sunbeam specifications; or
- exposure of the product to
abnormally corrosive conditions; or
• extend beyond 3 months if the product
is used in commercial, industrial,
educational or rental applications.
The benefits given to you by our warranty
are in addition to other rights and
remedies under law in relation to the
product.
In Australia our goods come with
guarantees that cannot be excluded under
the Australian Consumer Law. You are
entitled to a replacement or refund for a
major failure and for compensation for any
other foreseeable loss or damage. You are
also entitled to have the goods repaired or
replaced if the goods fail to be of
acceptable quality and the failure does not
amount to a major failure.
Our goods also come with guarantees that
cannot be excluded under the New Zealand
Consumer Guarantees Act.
If your warranty claim is not accepted, we
will inform you and if requested to do so by
you, repair the product provided you pay
the usual charges for such repair. You will
also be responsible for all freight and other
costs.
Should your product require repair or
service after the warranty period, contact
your nearest Sunbeam service centre. For
a complete list of Sunbeam’s service
centres, visit our website or call our
customer service line for advice on 1300
881 861 in Australia, or 0800 786 232 in
New Zealand.
Page 12

Need help with your appliance?
Contact our customer service team
or visit our website for information
and tips on getting the most from
your appliance.
Australia | visit www.sunbeam.com.au
phone 1300 881 861
mail Units 5 & 6, 13 Lord Street,
Botany NSW 2019 Australia.
New Zealand | visit www.sunbeam.co.nz
phone 0800 786 232
mail Level 6, Building 5, Central Park,
600-670 Great South Road,
Greenlane, Auckland, New Zealand.
Sunbeam Corporation Limited | ABN 45 000 006 771
Sunbeam Corporation is a division of GUD Holdings Limited.
Sunbeam is a registered trade mark.
Sunbeam Butler Turbo is a trademark of Sunbeam Corporation.
Made in China to Sunbeam’s specification.
Due to minor changes in design or otherwise,
the product you buy may differ slightly from the one shown here.
Approved by the appropriate electrical regulatory authorities.
©Sunbeam Corporation Limited 2015.
10/15
 Loading...