

Page 1
TRUSTED FOR OVER
100 YEARS
Instruction Leaflet
PLEASE READ AND SAVE THESE IMPORTANT INSTRUCTIONS
NOTE: A Phillips screwdriver is required for assembly.
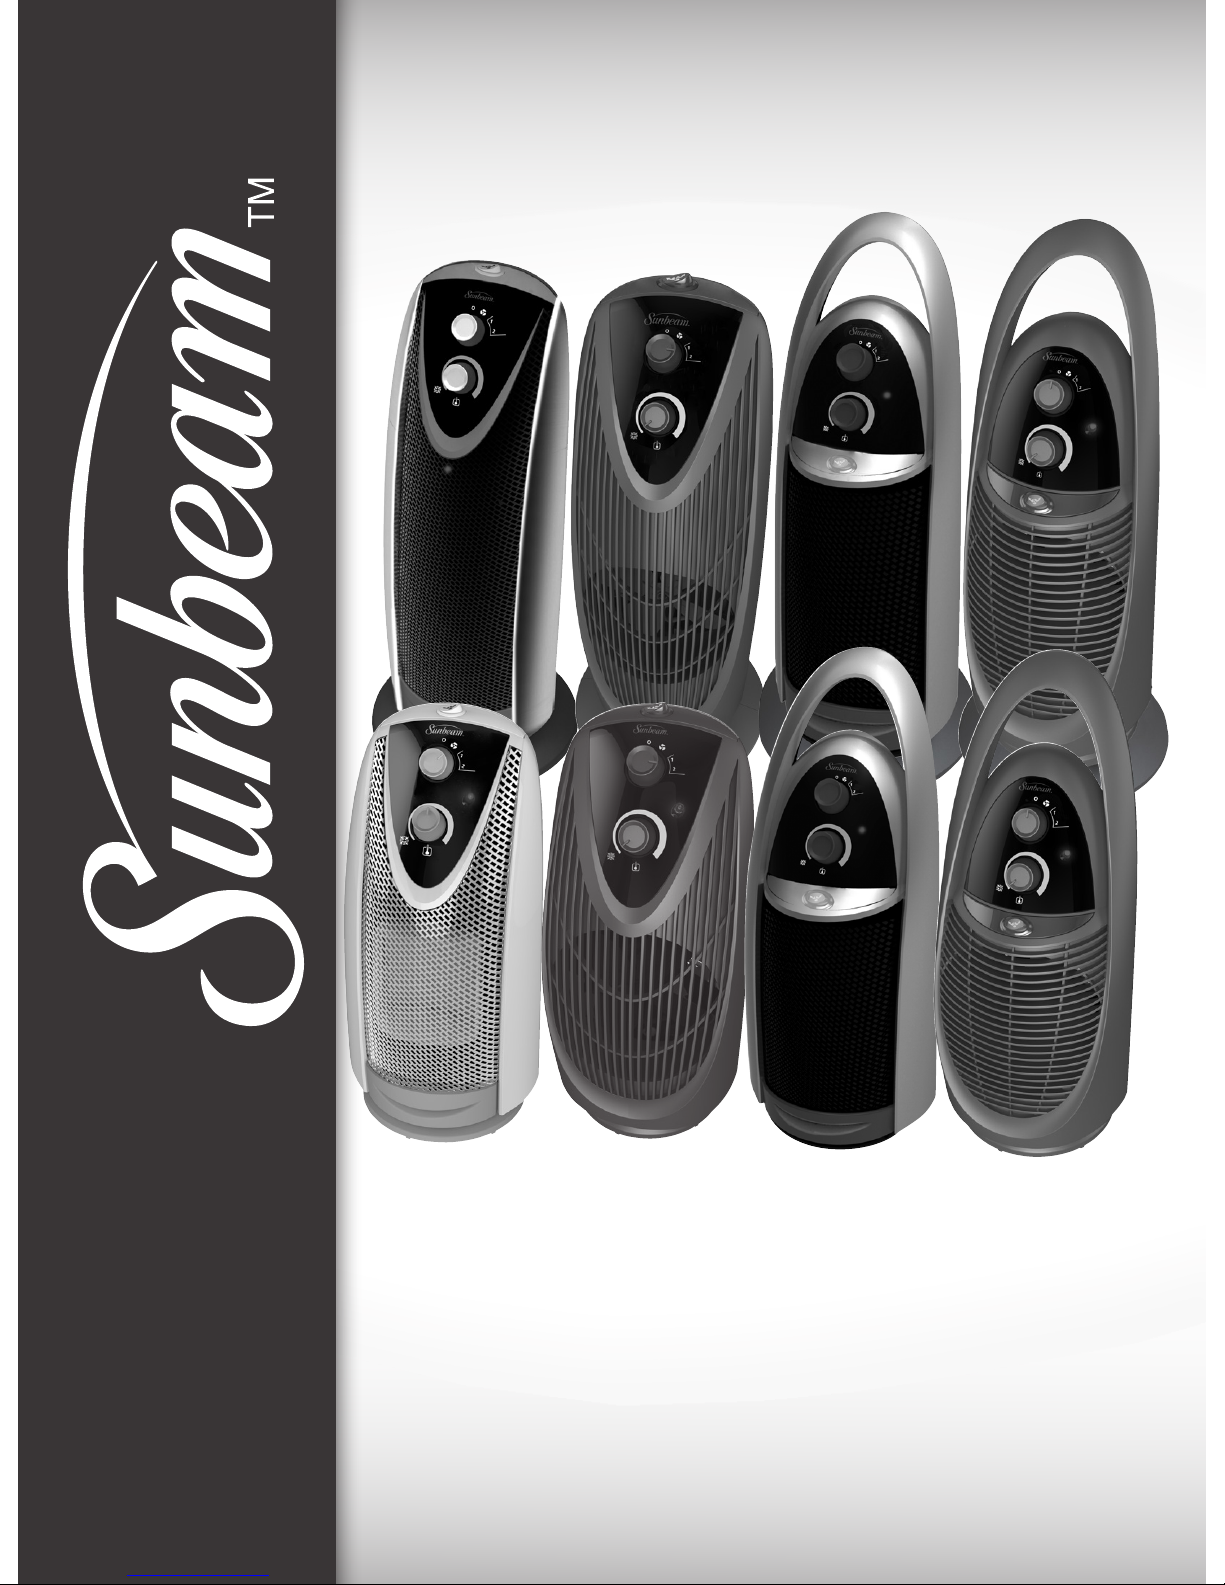
* Fan-Forced Heaters may appear with a different grill design
Heater with Adjustable Thermostat
Page 2
PLEASE READ AND SAVE THESE
IMPORTANT SAFETY INSTRUCTIONS
When using electrical appliances, basic safety precautions
should always be followed to reduce the risk of fire, electric
shock, and injury to persons, including the following:
1. Read all instructions before using the appliance.
2. To avoid fire or shock hazard, plug the appliance
directly into a 120V AC electrical outlet.
3. The heater is hot when in use. To avoid burns, DO NOT let
bare skin touch hot surfaces. If provided, use handles
when moving this heater. Keep combustible materials,
such as furniture, pillows, bedding, papers, clothes, and
curtains at least 3 ft (0.9 m) from the front of the heater
and keep them away from the sides and rear.
4. DO NOT run cord under carpeting. DO NOT cover
cord with throw rugs, runners, or the like. Arrange
cord away from traffic area and where it will not be
tripped over.
5. This heater is not intended for use in bathrooms,
laundry areas and similar indoor location. NEVER
locate heater where it may fall into a bathtub or
other water container.
6. Extreme caution is necessary when any heater is
used by, or near children or invalids, and whenever
the heater is left operating and unattended.
7. Always unplug the heater when not in use.
8. When unplugging, be sure to pull by the plug and
not the cord.
9. DO NOT insert or allow foreign objects to enter any
ventilation or exhaust opening as this may cause an
electric shock or fire, or damage the heater.
10. DO NOT operate heater with a damaged cord or
plug, or after the heater malfunctions, has been
dropped or damaged in any manner. Return
appliance to manufacturer for examination, electrical
or mechanical adjustment, or repair.
11. A heater has hot and arcing or sparking parts inside.
DO NOT use it in areas where gasoline, paint, or
flammable liquids are used or stored.
12. Use appliance only for intended household use as
described in this manual. Any other use not
recommended by the manufacturer may cause fire,
electric shock, or injury to persons. The use of
attachments not recommended or sold by the
manufacturer may cause hazards.
13. DO NOT use outdoors.
14. To prevent a possible fire, DO NOT block air intakes or
exhaust in any manner. DO NOT use on soft surfaces,
like a bed, where openings may become blocked.
15. To disconnect heater, turn controls to OFF, then
remove plug from outlet.
16. Avoid the use of an extension cord because the
extension cord may overheat and cause a risk of
fire. However, if you have to use an extension cord,
the cord shall be No. 14 AWG minimum size and
rated not less than 1875 watts.
17. If the heater will not operate, see specific instructions
on Auto Safety Shut-off.
18. DO NOT attempt to repair or adjust any electrical or
mechanical functions on this unit. Doing so will void
your warranty. The inside of the unit contains no user
serviceable parts. All servicing should be performed
by qualified personnel only.
19. Discontinue use if plug or outlet is hot. It is
recommended that the outlet be replaced if plug or
outlet is hot to touch.
20. CAUTION: In order to avoid a hazard due to
inadvertent resetting of the thermal cutout, this appliance
must not be supplied through an external switching
device, such as a timer, or connected to a circuit that is
regularly switched on and off by the utility.
21. WARNING: In order to avoid overheating, do not
cover the heater.
THIS APPLIANCE HAS A POLARIZED PLUG (one blade is wider than the
other). To reduce the risk of electric shock, this plug is intended to fit in a
polarized outlet only one way. If the plug does not fit fully in the outlet,
reverse the plug. If it still does not fit, contact a qualified electrician to
install the proper outlet.
DO NOT ATTEMPT TO MODIFY THIS PLUG OR DEFEAT THIS
SAFETY FEATURE IN ANY WAY.
Page 3
ASSEMBLY INSTRUCTIONS
22. WARNING: This heater is not equipped with a
device to control the room temperature. Do not use
this heater in small rooms when they are occupied by
persons not capable of leaving the room on their
own, unless constant supervision is provided.
SAVE THESE
INSTRUCTIONS
TECHNICAL SPECIFICATIONS
• Amps:12.5
• Wattage:1500W(+5%–10%)
• Workingvoltage:120VAC/60Hz
NOTE: Low Heat setting may be 1000W on some models.
ASSEMBLY INSTRUCTIONS
NOTE: A Phillips screwdriver is required for assembly.
Unpack your heater from box, being careful to remove
all parts from plastic bags and remaining packaging.
Please save the carton for off-season storage.
Some models are packed with separate base and pedestal
in the box. Carefully remove all parts from plastic bags.
To prevent scratches, place all parts onto a cloth before
assembly. Follow the below instructions for Pedestal/Base
assembly:
Pedestal Assembly (if no pedestal is included in this
model, move to Base Assembly)
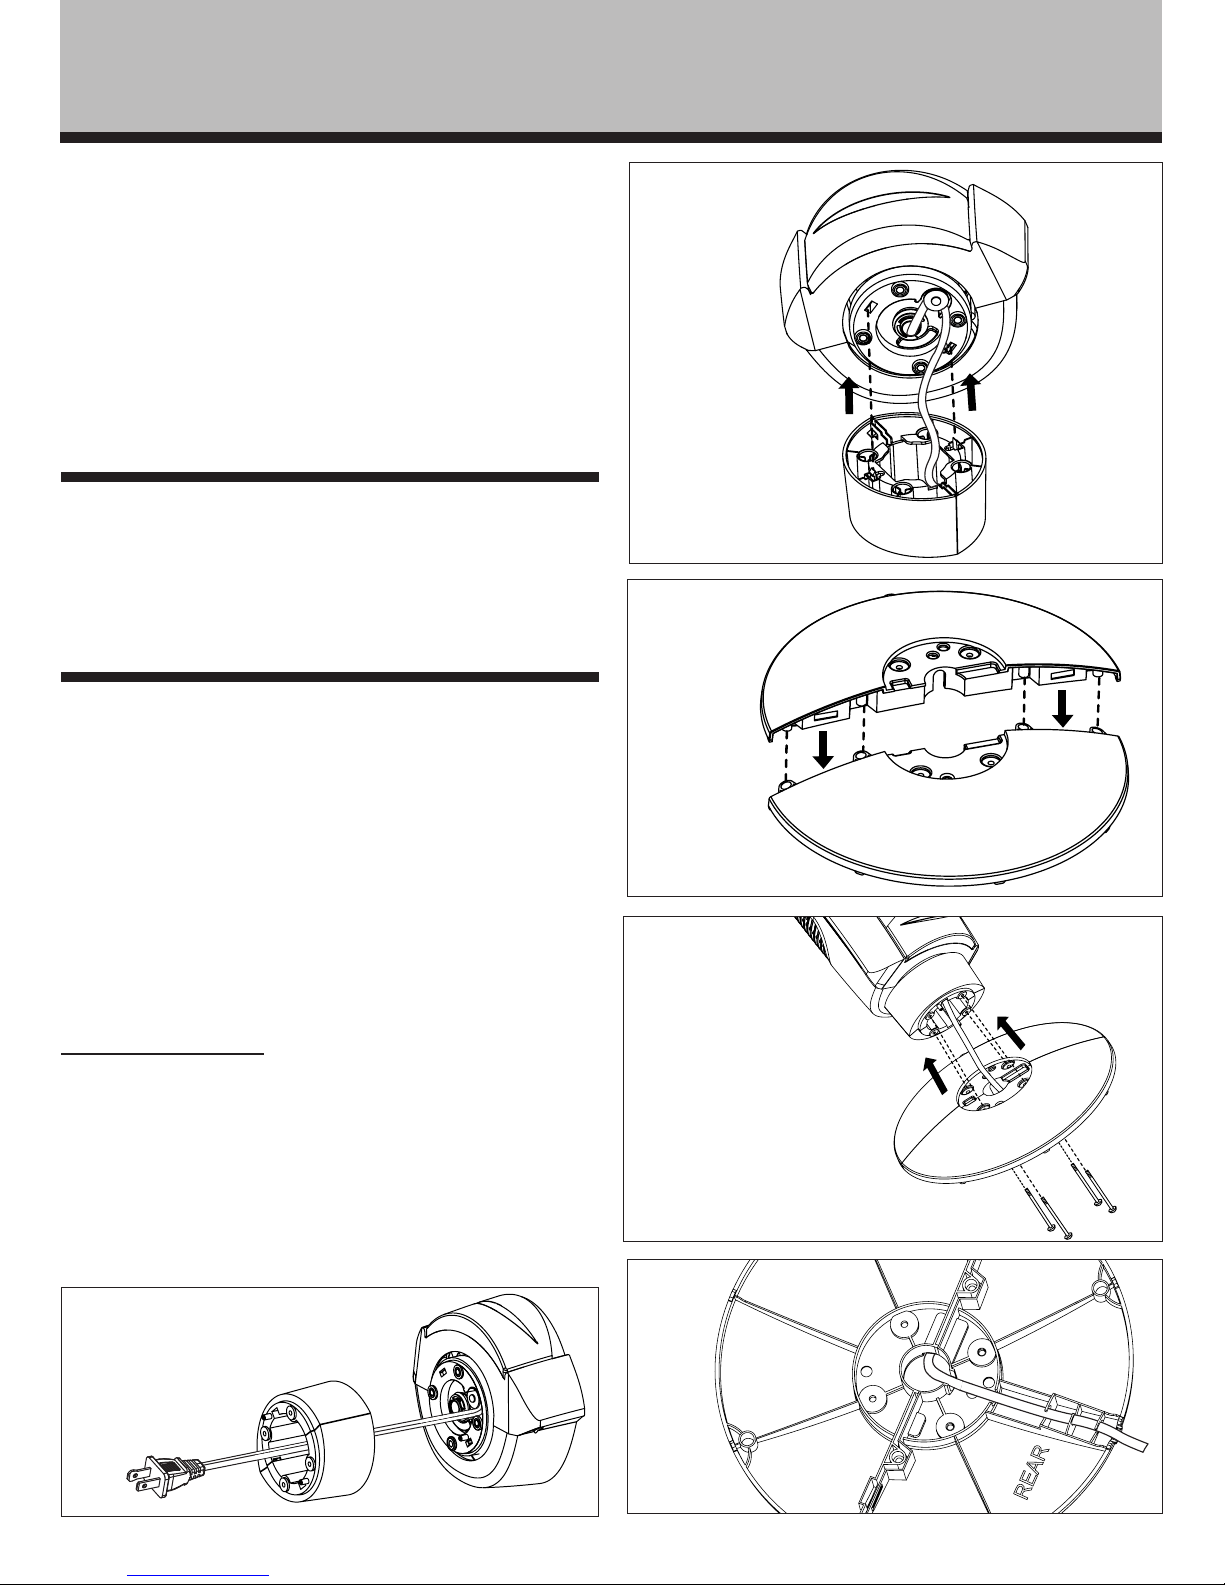
Step 1: Run the power cord through the center of the
assembled pedestal. Snap pedestal into the
bottom of the heater housing. Refer to Figure 1, 2.
Figure 1
Figure 3
Figure 5
Figure 2
Figure 4
Page 4
Base Assembly
Step 1: If the base is in two halves, snap them
together by sliding slots of one base half into
slots of second base half. Refer to Figure 3.
Step 2: Run the power cord through the center of the
assembled base. To assemble the base to the
unit (either one or two-piece base) first make
sure the side marked “Rear” is facing the
back of the heater. Line up holes of the base
with holes on bottom of pedestal (or heater
housing if no pedestal is included), and secure
with 4 provided screws. Refer to Figure 4.
Step 3: Lace the power cord through the cord minders
on the underside of the base. Refer to Figure 5.
Step 4: Turn the heater right side up on a flat level
surface prior to beginning operation.
OPERATING INSTRUCTIONS
1. Make sure the unit is in the OFF ( ) position
before plugging the heater into the outlet.
2. Place heater on a firm, level surface.
3. Plug heater into a standard outlet. Once plugged in,
the Power Light will illuminate.
NOTE: Remove the plastic film from the control panel
before using (if included).
NOTE: Avoid overloading your circuit by not using other
high wattage appliances in the same outlet. At 1500
watts, this unit draws 12.5 Amps.
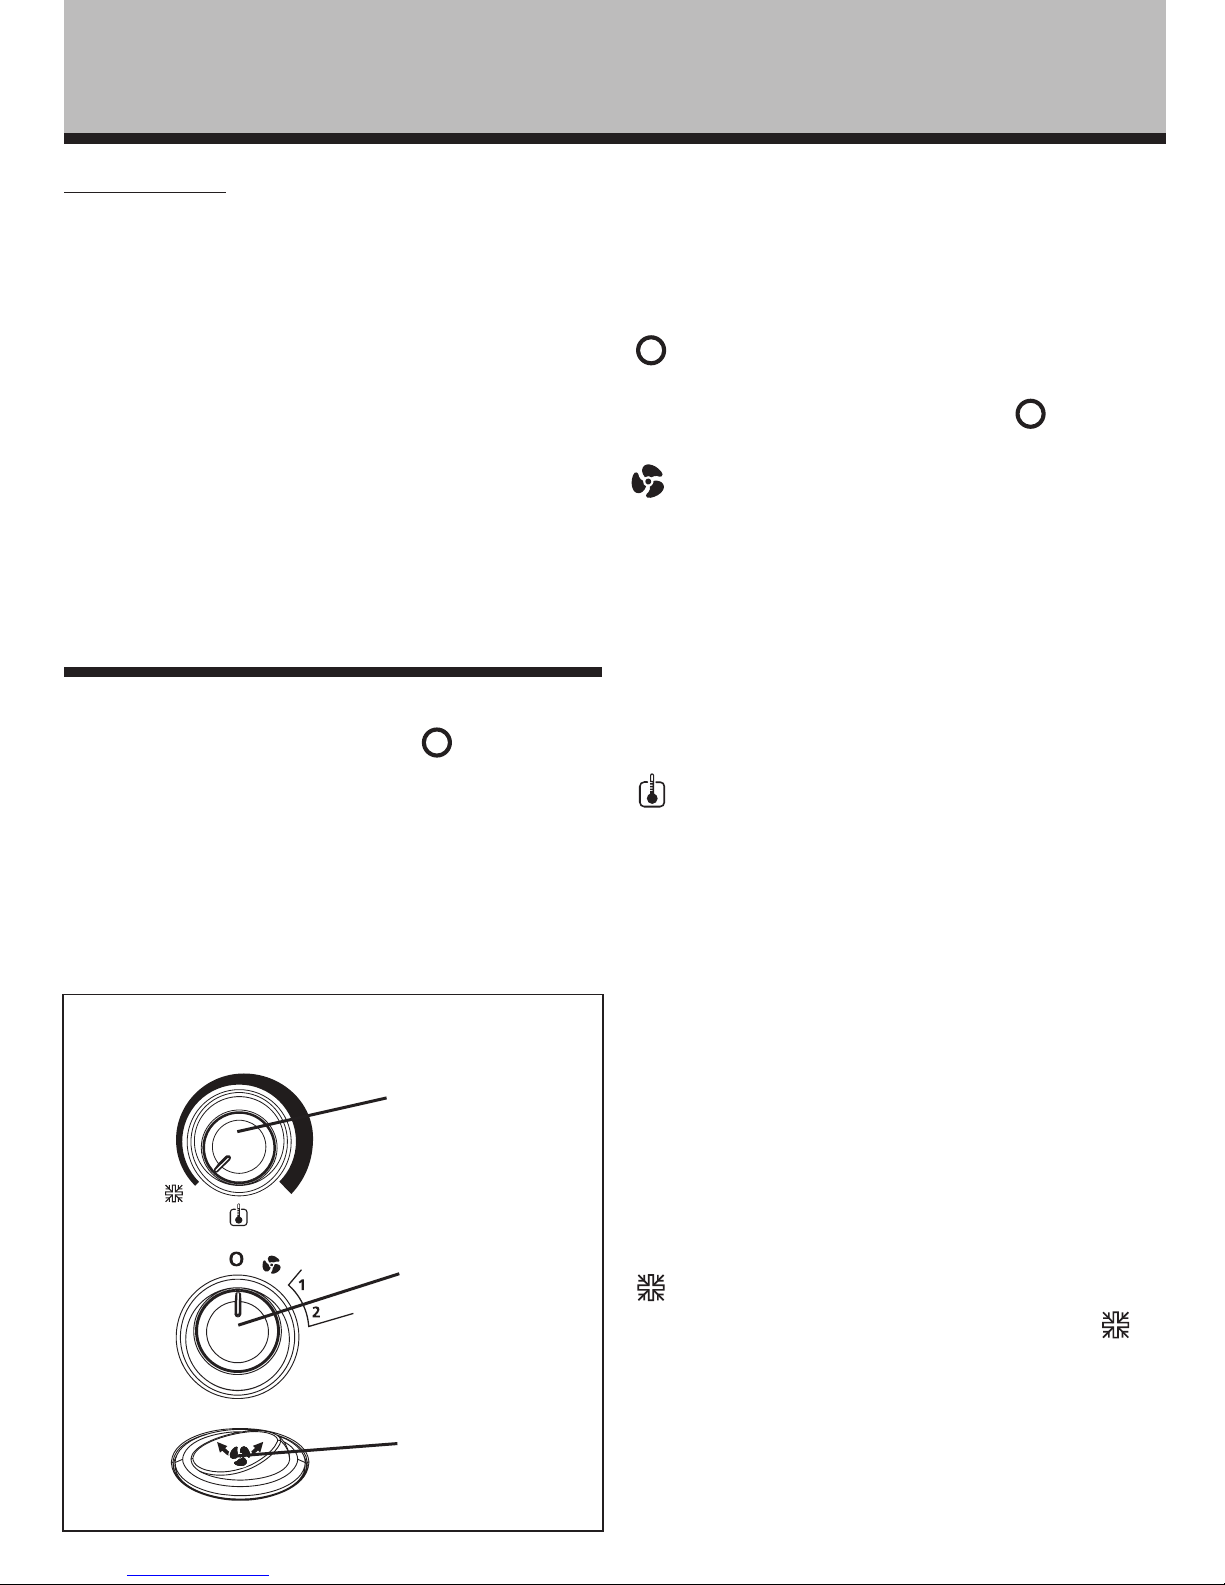
Mode Control
Turn the Mode Control to the desired setting:
- Off Mode
If you want to shut off the heater at any time during
operation, turn the Mode Control to Off (
) position.
Power Light will remain lit until the heater is unplugged.
- Fan only Setting
Heater will run at fan-only operation without heat output.
1 - LOW Heat
The heater will run continuously at 750W.
2 - HIGH Heat
The heater will run continuously at 1500W.
NOTE: To start the heater operation, make sure the
Thermostat Control is turned fully clockwise to the highest
position.
- Thermostat Control
1. Before setting the thermostat, allow heater to operate
and warm up the room. Set the thermostat to the
highest setting to start the heater.
2. When the desired temperature comfort level is
reached, lower the thermostat setting until the fan/
heater stops operating. This is done by moving the
Thermostat Control counter-clockwise.
3. The thermostat will now automatically maintain the
pre-set temperature level by turning the heater ON
and OFF.
NOTE: It is normal for the heater to cycle ON and OFF as
it maintains the preset temperature. To prevent the unit
from cycling, turn the thermostat control clockwise to the
highest setting or operate in manual mode at either High
(2) or Low (1) setting.
- FrostProtectTM setting
Turn the Thermostat Control to the FrostProtect
TM
( )
setting, the heater will turn on automatically if the
temperature goes below 5°C.
CAUTION: FRONT GRILL IS HOT WHEN UNIT IS IN
OPERATION.
FEATURES - OPERATIONS
Figure 6 CONTROL PANEL
Mode Control
(Settings: Off, Fan
only, Low Heat,
High Heat)
Thermostat Control
with FrostProtect™
Setting
Oscillation Switch
(if applicable)
Page 5
For models with Oscillation
Oscillation
Press the Oscillation Switch ( ) to activate or stop
oscillation feature.
NOTE: Please do not manually turn the heater on the
base. It is designed to turn only by motorized oscillation.
CLEANING/MAINTENANCE
Always unplug the heater before cleaning and allow the
heater to cool down.
1. Clean the unit with a soft cloth moistened with a mild
soap solution.
2. NEVER use abrasive or flammable solvents to clean
the unit.
3. After cleaning, be sure to completely dry the unit
with a cloth or towel.
4. Store heater in a cool, dry location.
5. It is recommended that you store the unit in its
original carton.
TIP: Over time, dust may accumulate on the front
grills. This can be removed by wiping the unit with a
damp cloth.
AUTO SAFETY SHUT-OFF
This heater is equipped with a technologically-advanced
safety system that requires the user to reset the heater if
there is a potential overheat situation. When a potential
overheat temperature is reached, the system will
automatically shut the heater off. It can only resume
operation when the user resets the unit.
To Reset the Heater:
1. Turn Mode Control to OFF ( ) and Thermostat
Control fully clockwise to the highest position.
2. Unplug unit, wait 30 minutes.
3. Plug in and turn ON.
FOR MODELS WITH TIP OVER
PROTECTION
Tip Over Shut-Off:
When the unit is accidentally knocked over, it will
instantly shut off. The unit may also shut off if it is
moved or bumped. To reset, simply place the heater in an
upright position and it will operate normally.
NOTE: If unit does not turn on when placed in the
upright position, turn the Mode Control to the desired
heat setting and heater will resume operation.
TROUBLESHOOTING
General Information:
Environmental Factors - There are a number of factors
that will affect your desired comfort level. These factors
can include insulation, open or drafty doors and windows,
and outside temperature. Please check and take action if
any of these potential problems are affecting your
heaters ability to adequately warm your room.
Supplemental Heat - Portable electric heaters are
intended for supplemental heating of rooms to heat the
room your in and turn down the central heat thermostat.
They are not intended to replace central heating systems.
Do NOT attempt to repair or adjust any electrical
or mechanical functions on this heater. Doing so
will void warranty. The inside of the heater
contains no user serviceable parts. All servicing
should be performed by qualified personnel only.
CLEANING / MAINTENANCE
AUTO SAFETY SHUT-OFF
If you have any questions regarding your product or
would like to learn more about other SunbeamTM
products, please contact our Consumer Service
Department at 1-888-264-9669 or visit our website at
www.sunbeam.ca. For inquiries regarding recycling and
proper disposal of this product, please contact your local
waste management facility.
Page 6
TROUBLESHOOTING
Troubleshooting for your Heater
Trouble Probable Cause Solution
• Heater Does
Not Turn On.
☛ Tip-over switch engaged (only applicable
on models with tip-over protection).
☛ Manual user reset is activated.
☛ Not plugged in properly.
☛ Electrical outlet does not hold plug in
securely.
☛ Thermostat set too low.
☛ Obstruction causing the heater not to
operate.
☛ Circuit breaker trips.
✔ Set heater upright on a level surface.
✔ Follow reset instructions listed in this manual.
✔ Ensure plug is properly inserted. Make sure
electrical outlet and circuit breaker are working.
✔ Have outlet replaced by a licensed electrician.
✔ Turn Thermostat Control clockwise until the
heater restarts.
✔ Unplug the heater and remove all obstructions.
Position your heater 36" (0.9m) away from all
objects.
✔ Make sure no other high wattage appliances
are operating on the same circuit and reset
breaker if needed.
• Not Enough
Heat.
☛ Heater is in Low Heat or 1 setting.
☛ Thermostat set too low.
✔ Change setting to 2 (High Heat).
✔ Turn Thermostat Control clockwise until the
heater restarts.
• Heater Cycles
ON and OFF
Frequently.
☛ The thermostat automatically turns
the heater on and off to maintain
selected comfort level.
✔ To make this occur less frequently adjust the
thermostat control clockwise to the highest
setting or operate in manual mode at either
High (2) or Low (1) setting.
• Heater is
Blowing Cold
Air.
☛ Mode Control is set to Fan only
setting.
✔ Turn Mode Control to the 1 (Low Heat) or 2
(High Heat) setting.
• Fan Speed
Doesn't
Change.
☛ High Heat and Low Heat settings control
the heat output of the heater and not
the fan speed. Fan runs at the same
speed on all settings.
✔ Run heater in the 2 setting (High Heat) for
maximum heat output.
• Unexpected
Noise.
☛ You may hear a popping or crackling
sound as the heater heats up. This is
normal and safe operation. Once the
heater heats up, the crackling sound
will go away.
✔ If the noise persists call Sunbeam at
1-888-264-9669.
• Unexpected
Smell.
☛ There may be an odor or vapor
coming from the heater the first time
you use it or after prolonged or
seasonal storage.
✔ This is normal and is the result of dust or
other debris accumulating on the heating
element. Make sure the heater is in a well
ventilated area and continue running until the
odor or vapor goes away.
Page 7

WARRANTY INFORMATION
1 YEAR LIMITED WARRANTY
Sunbeam Products, Inc. doing business as Jarden Consumer Solutions or if in Canada, Sunbeam Corporation (Canada)
Limited doing business as Jarden Consumer Solutions (collectively “JCS”) warrants that for a period of one year from
the date of purchase, this product will be free from defects in material and workmanship. JCS, at its option, will repair
or replace this product or any component of the product found to be defective during the warranty period.
Replacement will be made with a new or remanufactured product or component. If the product is no longer available,
replacement may be made with a similar product of equal or greater value. This is your exclusive warranty. Do NOT
attempt to repair or adjust any electrical or mechanical functions on this product. Doing so will void this warranty.
This warranty is valid for the original retail purchaser from the date of initial retail purchase and is not transferable.
Keep the original sales receipt. Proof of purchase is required to obtain warranty performance. JCS dealers, service
centers, or retail stores selling JCS products do not have the right to alter, modify or any way change the terms and
conditions of this warranty.
This warranty does not cover normal wear of parts or damage resulting from any of the following: negligent use or
misuse of the product, use on improper voltage or current, use contrary to the operating instructions, disassembly,
repair or alteration by anyone other than JCS or an authorized JCS service center. Further, the warranty does not
cover: Acts of God, such as fire, flood, hurricanes and tornadoes.
What are the limits on JCS’s Liability?
JCS shall not be liable for any incidental or consequential damages caused by the breach of any express, implied or
statutory warranty or condition.
Except to the extent prohibited by applicable law, any implied warranty or condition of merchantability or fitness for
a particular purpose is limited in duration to the duration of the above warranty.
JCS disclaims all other warranties, conditions or representations, express, implied, statutory or otherwise.
JCS shall not be liable for any damages of any kind resulting from the purchase, use or misuse of, or inability to use
the product including incidental, special, consequential or similar damages or loss of profits, or for any breach of
contract, fundamental or otherwise, or for any claim brought against purchaser by any other party.
Some provinces, states or jurisdictions do not allow the exclusion or limitation of incidental or consequential damages
or limitations on how long an implied warranty lasts, so the above limitations or exclusion may not apply to you.
This warranty gives you specific legal rights, and you may also have other rights that vary from province to province,
state to state or jurisdiction to jurisdiction.
How to Obtain Warranty Service
In the U.S.A.
If you have any question regarding this warranty or would like to obtain warranty service, please call
1-888-264-9669 and a convenient service center address will be provided to you.
In Canada
If you have any question regarding this warranty or would like to obtain warranty service, please call
1-888-264-9669 and a convenient service center address will be provided to you.
Page 8

Printed In China
© 2014 Sunbeam Products, Inc. doing business as Jarden Consumer Solutions. All rights reserved. Imported and
distributed by Sunbeam Corporation (Canada) Limited doing business as Jarden Consumer Solutions, 20B Hereford
Street, Brampton, Ontario L6Y 0M1.
TRUSTED FOR OVER
100 YEARS
WARRANTY INFORMATION
In the U.S.A., this warranty is offered by Sunbeam Products, Inc. doing business as Jarden Consumer Solutions located
in Boca Raton, Florida 33431. In Canada, this warranty is offered by Sunbeam Corporation (Canada) Limited doing
business as Jarden Consumer Solutions, located at 20 B Hereford Street, Brampton, Ontario L6Y 0M1. If you have any
other problem or claim in connection with this product, please write our Consumer Service Department. PLEASE DO
NOT RETURN THIS PRODUCT TO ANY OF THESE ADDRESSES OR TO THE PLACE OF PURCHASE.
 Loading...