

Page 1

Model • Modèle • Modelo
SBCR122BSL
COMPACT REFRIGERATOR
RÉFRIGÉRATEUR COMPACT
REFRIGERADOR COMPACTO
Owner’s Use and Care Guide
Guide d’utilisation et soins de Propriètaire
Manual del propietario
•
•
•
V1.03.11 DM
Page 2

COMPACT REFRIGERATOR
Owner’s Use and Care Guide ..............................................
• Safety Instructions
• Installation Instructions
• Features
• Operating Instructions
• Care and Maintenance
• Troubleshooting
• Warranty
RÉFRIGÉRATEUR COMPACT
Guide d’utiliser et soin de propriètaire ..............................
• Consignes de sécurité
• Consignes de Installation
• Caracteristiques
• Opération
• Soins et entretien
• Dépannage
• Garantie
REFRIGERADOR COMPACTO
Guía para utilizar y cuidar del Proprietario ........................
• Instruciónes de Seguridad Importantes
• Instrucciones d’instalación
• Caracteristicas
• Instruciónes Operadoras
• Limpieza y Mantenimiento
• Solución Sugeridad
• Garantia
2-8
9-15
CONTENTS
16-22
CAUTION
Read and follow all safety rules and
operating instructions before first use of this
product.
Veuillez lire attentivement les consignes de
sécurité et les instructions d’utilisation avant
l’utilisation initiale de ce produit.
PRECAUTION
Lea y observe todas las reglas de seguridad y
las instrucciones de operación antes de usar
este producto por primera vez.
PRECAUCION
1
Page 3

READ ALL SAFETY INFORMATION BEFORE USING
SAVE THESE INSTRUCTIONS
IMPORTANT SAFETY INFORMATION
ELECTRICAL REQUIREMENTS
This appliance must be grounded. In the event of an electrical short circuit, grounding reduces the risk of electrical
shock by providing an escape wire for the electrical
current.
This appliance is equipped with a cord having a grounding
wire with a grounding plug. The plug must be plugged into an
outlet that is properly installed and grounded.
DO NOT USE AN EXTENSION CORD
Use an exclusive wall outlet. Do not connect your refrigerator to extension cords or together with any other appliance
in the same wall outlet. Do not splice the cord.
IMPORTANT WARNING:An empty refrigerator is a very
dangerous attraction to children. Remove either the gasket,
latches, lids or doors from unused appliances, or take some
other action that will guarantee it harmless.
DANGER: Risk of Child Entrapment! Before you throw
away your old refrigerator/freezer:
• Take off the doors.
• Leave the shelves in place so that children may not easily
climb inside.
DON’T WAIT! DO IT NOW!
INSTALLATION INSTRUCTIONS
Remove exterior and interior packaging, wipe the outside
thoroughly with a soft dry cloth and the inside with a wet, lukewarm cloth. Avoid placing the unit in a narrow recess or near
any heat source, direct sunlight, or moisture. Let air circulate
freely around the unit. Keep the rear of the refrigerator 5
inches away from the wall.
Location
1) Select a place with a level floor.
2) Allow 5 inches of space between the back of the refrigera-
tor and any adjacent wall.
3) Avoid direct sunlight and heat. Direct sunlight may affect
the acrylic coating. Heat sources nearby will cause
higher electricity consumption.
4) Avoid damp places. Too much moisture in the air will
cause frost to form very quickly on the evaporator, and
your refrigerator will have to be defrosted more
frequently.
LOCATION
Improper use of the grounding plug can result in a risk of
electric shock. Consult a qualified electrician or serviceman
if the grounding instructions are not completely understood,
or if doubt exists as to whether the appliance is properly
grounded.
WARNING
2
Page 4
INSTALLATION INSTRUCTIONS
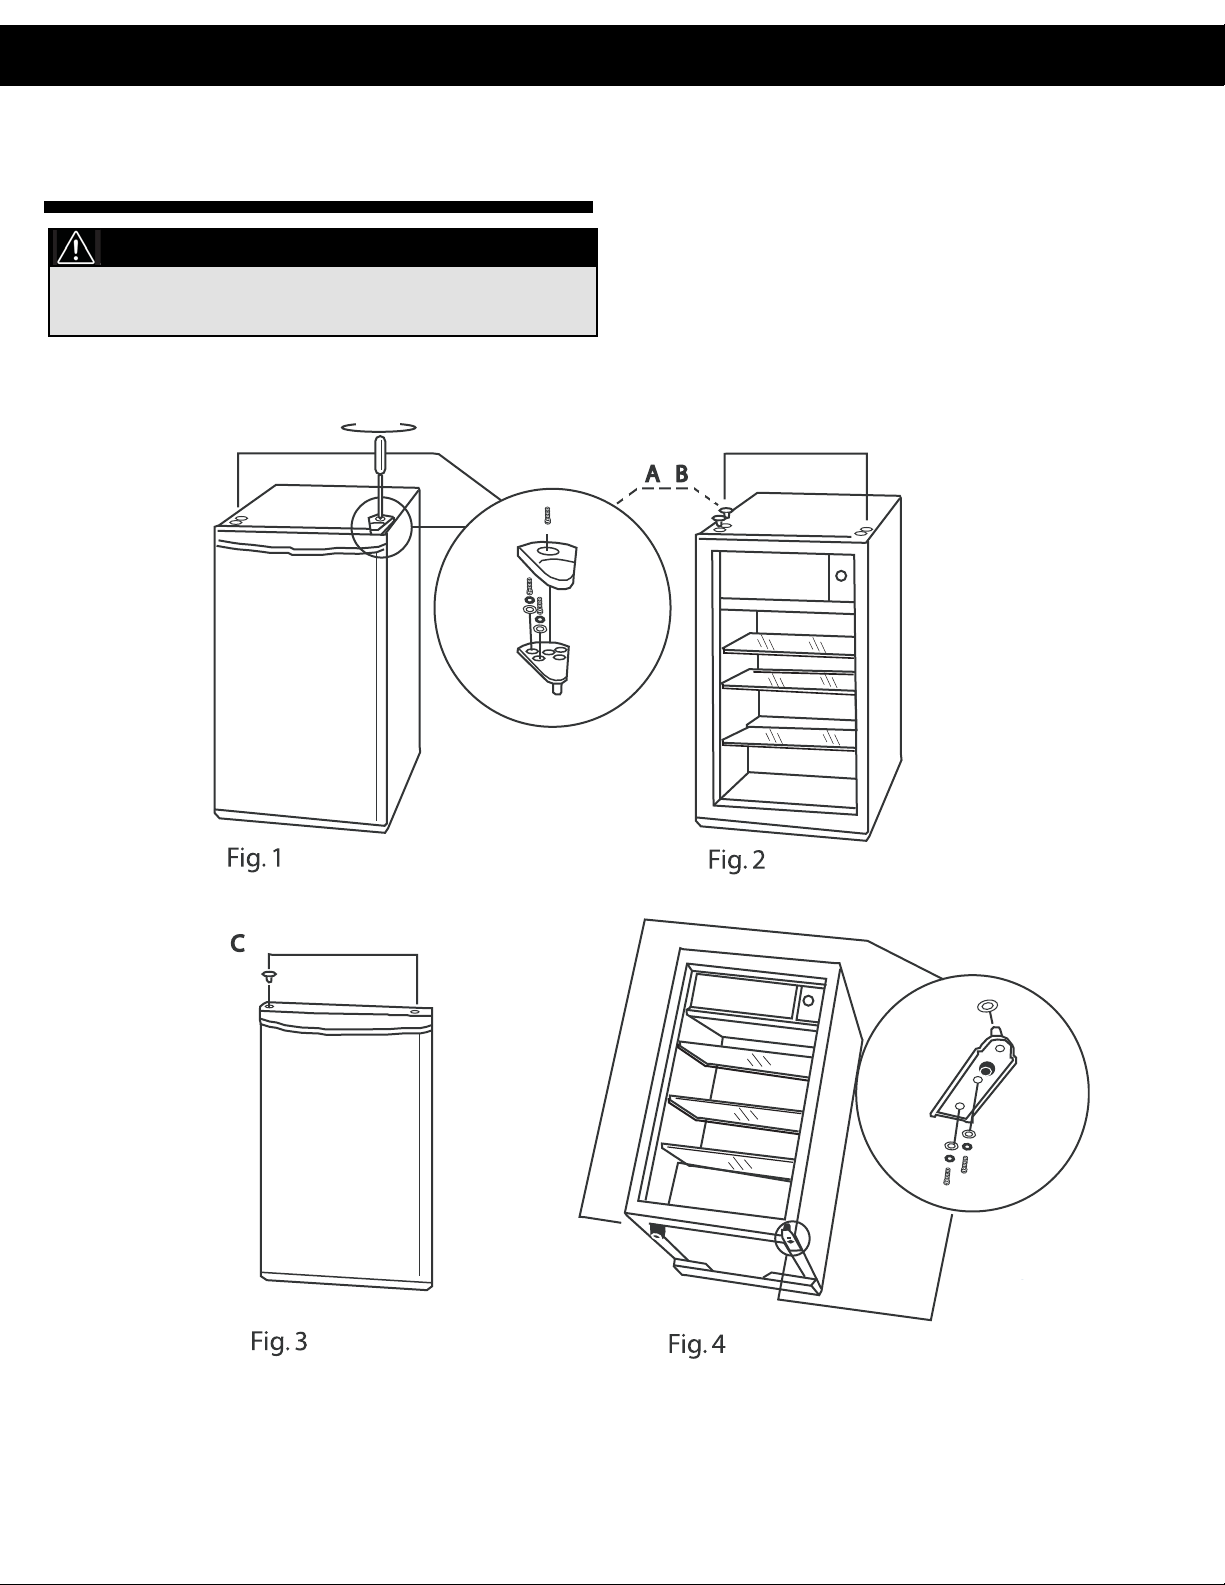
DOOR REVERSAL
INSTRUCTIONS
If you find the direction of opening the door on your
appliance inconvenient, you can change it by following
the steps shown in the below diagrams.
To avoid personal injury to yourself and/or property, we
recommend someone assist you during the door reversal
process.
CAUTION
3
Page 5
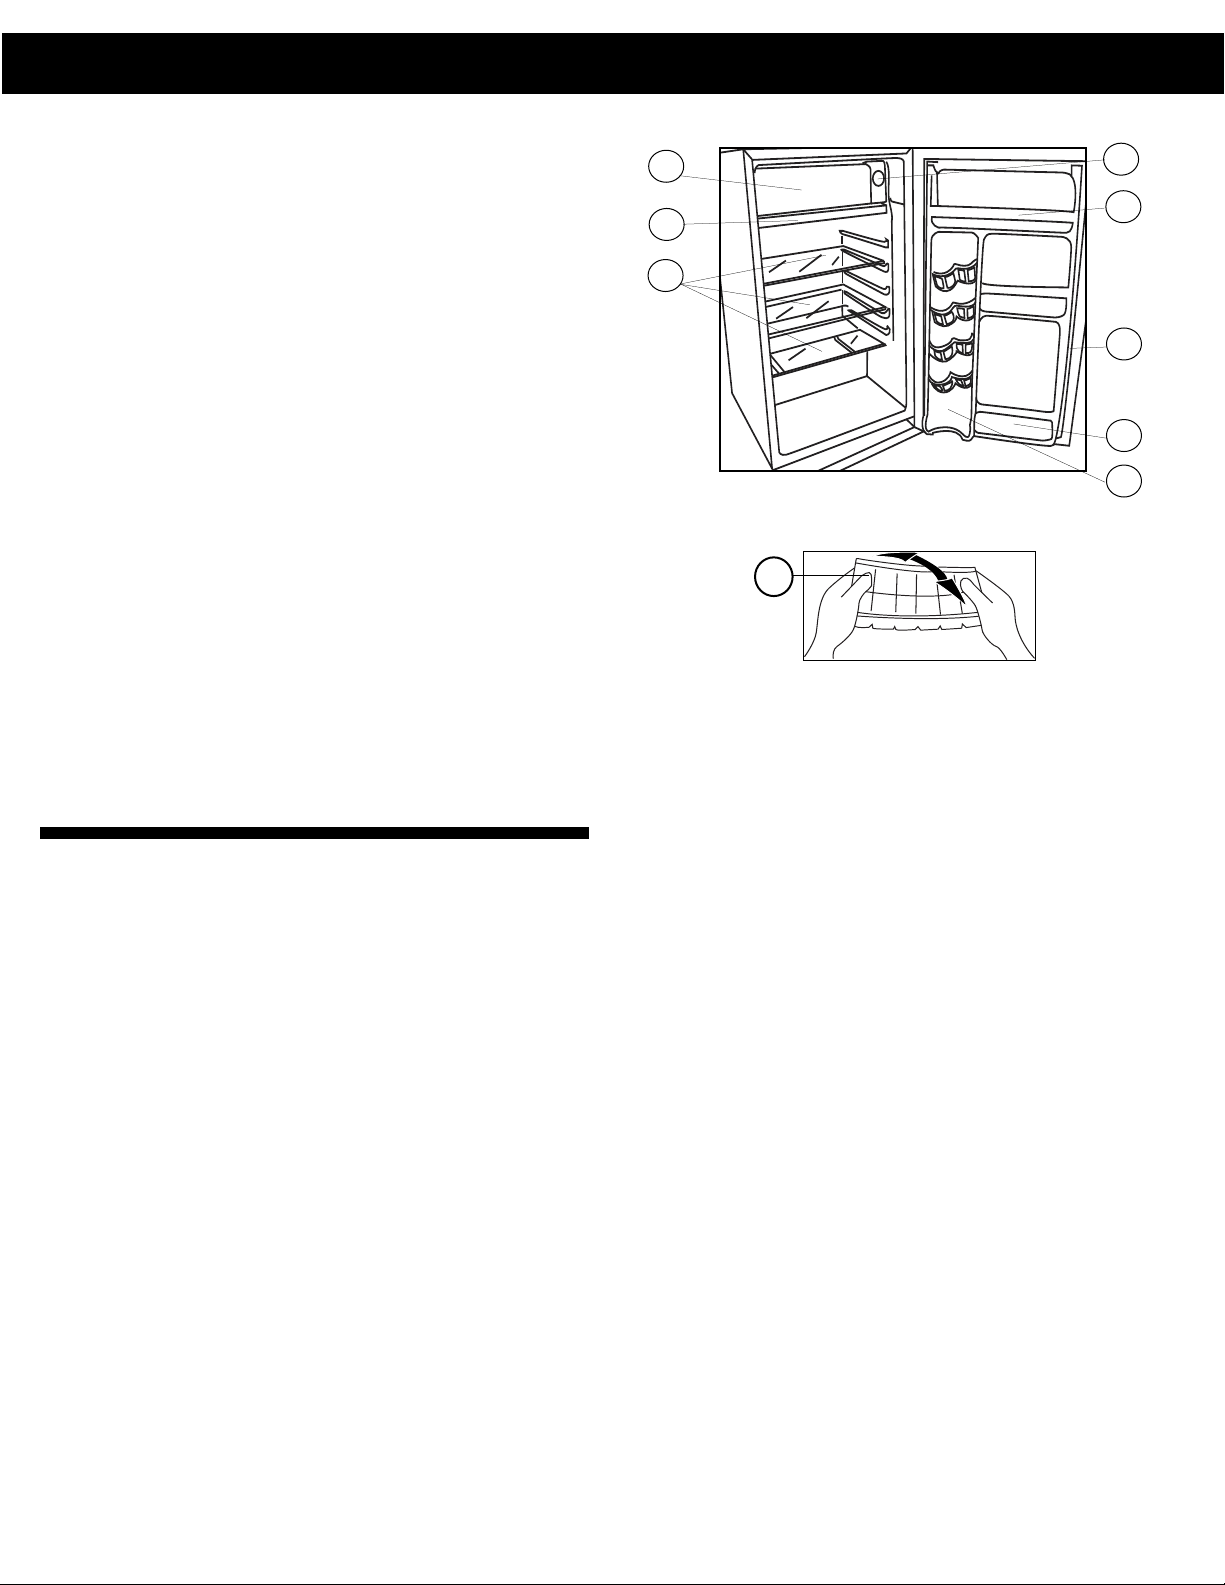
FEATURES
1) THERMOSTAT DIAL: For controlling the temperature
inside the refrigerator; the compressor activates as
soon as the temperature rises above the desired level.
2) FREEZER COMPARTMENT WITH FREEZER DOOR:
Separate freezer section holds ice cube tray and small
items.
3) ICE CUBE TRAY: Ice cubes are easily removed
from tray.
4) GLASS SHELVES
5) DRIP TRAY: Catches the water that drips off the
evaporator when defrosting.
6) MAGNETIC GASKET: Tight fitting door seal keeps all
the cooling power locked inside. No hooks or latches.
7) BOTTLE RACK: For tall, medium, and large bottles,
cans or jars.
8) CANSTORTMDoor Liner: Holds 355mL cans of pop,
juice, or beer.
9) EGG TRAY
Ice cube tray is flexible. Twist tray to remove ice cubes. If the
ice cube tray is frozen hard to the evaporator surface, run a
little water over the tray. Never use a knife or other metal
instrument to remove ice cube tray as this may damage the
evaporator.
ICE CUBE TRAY
5
1
2
4
6
7
8
9
3
4
Page 6

OPERATING INSTRUCTIONS
To start the refrigerator, turn the temperature control knob to
the position corresponding to the desired cooling (on the
graduated blue dial) in Fig. A. The refrigerator temperature
will vary depending on the quantity of the food stored, and on
the frequency with which the door is opened.
To turn the control to the “OFF” position, rotate the control
knob to the “0” setting. After defrosting and if the refrigerator
has been left out of use for some time, set the control to
maximum for 2 to 3 hours before turning to the desired position. If the refrigerator is not to be used for long time periods, disconnect the plug and leave the door partially open.
This will help reduce the mold/mildew from accumulating
inside the refrigerator cabinet.
TEMPERATURE SELECTION
To avoid vibration, the unit must be set level. This is accomplished by adjusting the (1) front leveling leg located under the
refrigerator. The temperature of the refrigerator is controlled by setting the thermostat knob to a desired setting.
Fig. A
CARE AND MAINTENANCE
DEFROSTING
This refrigerator is equipped with a “Push Button”
(semi-automatic) defrost thermostat system. To
activate the defrost cycle, simply push (in) the red defrost
button located in the center of the control knob/dial (do not
turn the control knob/dial to zero/off). The defrost cycle is initiated immediately. When defrosting is complete, the “Push
Button” will release (pop-out) automatically and resume normal operating conditions at the same temperature setting.
NOTE: If the “Push Button” is activated (pushed-in)
accidentally, it will not be possible to “manually”
pull-out the push button (deactivate the defrost cycle). You
must let the defrost cycle run its course. (or) Apply (hold) a
dishcloth soaked in hot water against the thermostat capillary
line and bracket, located on the underside of the freezer
compartment. The heat transfer from the dish cloth will cause
a temperature rise on the thermostat capillary (sensing line),
causing the internal contacts to close. This will resume normal operating conditions. It may take several minutes and/or
repeat applications before the push button will release.
Defrosting of your refrigerator should take place
whenever ice build-up inside the freezer compartment reaches 1/4” (6mm) thick. Defrosting may take a few hours,
depending on the amount of accumulated ice and ambient
indoor temperature. To speed up the defrosting process,
remove all frozen foods from the freezer section. Leaving the
door partially ajar for a short period of time will also speed up
the process.
Important: You must remember to close the refrigerator door
before the defrost cycle terminates and normal operating
conditions resume automatically. The drip tray should be in
position directly below the freezer compartment to catch condensed water during defrosting.
Note: Never use sharp or pointed instruments to
remove ice from the freezer compartment. The freezer
compartment contains refrigerated gas lines and if
accidentally punched/pierced, will render the
refrigerator inoperable and void the manufacturers warranty.
DO NOT ALLOW THE REFRIGERATOR TO CONTINUE
OPERATION IF THE FREEZER COMPARTMENT IS
PIERCED.
After defrosting is complete, set the control to maximum for 2
to 3 hours before returning to the desired position. When the
refrigerator is not to be used for a long period of time, disconnect the appliance from the electrical supply and leave the
door partially open. This will help to reduce mold and mildew
build-up.
Note: Wait 3 to 5 minutes before attempting to restart the
refrigerator if operation has been interrupted.
5
Page 7

CARE AND MAINTENANCE
CLEANING
To clean the inside, use a soft cloth and a mixture of one
tablespoon of baking soda to one quart of water. Other
cleaning options are a mild soap suds solution, or mild detergent. Wash glass shelves in a mild detergent solution, then
dry and wipe with a soft cloth. Clean the outside with a soft
damp cloth and some mild detergent or appliance cleaner.
POWER FAILURE
Most power failures are corrected within an hour or two and
will not affect your refrigerator temperatures. However, you
should minimize the number of door openings while the
power is off. During power failures of longer duration, take
steps to protect your food by placing dry ice on top of
packages.
IF YOU MOVE
Remove or securely fasten down all loose items inside the
unit. To avoid damaging the leveling legs, turn them all the
way into the base.
VACATION TIME
For short vacation periods, leave the control knob at its normal setting. During longer absences:
(a) remove all foods.
(b) disconnect power cord from electrical outlet.
(c) clean the refrigerator thoroughly, including drip tray
(defrost pan), located on the bottom of the unit.
(d) leave door open to avoid possible formations of
condensate, mold or odors.
Some Important Rules for the Correct Use of the
Refrigerator
• Never place hot foods in the refrigerator.
• Never place spoiled foods in the unit.
• Don’t overload the unit.
• Don’t open the door unless necessary.
• Should the refrigerator be stored without use for long
periods, it is suggested, after a careful cleaning, to leave
the door ajar to allow the air to circulate inside the unit in
order to avoid the possibility of condensation, mold or
odors.
FOOD STORAGE SUGGESTIONS
Fresh Food Compartment
• Never cover food compartment shelves with aluminum foil
or any other shelf covering material which may prevent air
circulation.
• Always remove porous store wrapping paper from meats,
poultry and fish. Meats should be wrapped individually and
placed in a dish for storage. Wrap fish and poultry in foil or
heavy waxed paper. Most fish should be used the same
day of purchase. Packaged meats such as ham, bacon,
dried beef, or frankfurter, store best in their original packages.
• Allow warm foods to cool to room temperature before
placing them in the refrigerator.
• Always cover open dishes of food, especially leftovers.
Use leftovers within 2 or 3 days.
6
Page 8

TROUBLESHOOTING
Occasionally, a problem is minor and a service call may not be necessary- use this troubleshooting guide for a possible
solution. If the unit continues to operate improperly, call an authorized service depot or Danby’s Toll Free Number
1-800-263-2629 for assistance.
PROBLEM POSSIBLE CAUSE SOLUTION
1) Does not work.
• No power to unit.
• Power cord is unplugged.
• Wrong voltage is being used.
• Check connection of power
cord to power source.
• Plug in unit.
• Use proper voltage.
2) Refrigerator runs
continuously.
• Temperature set too low.
• Door is not closed.
• Hot food inserted.
• Door opened too long or too
often.
• Close proximity to heat
source or direct sunlight.
• Set temperature control to
warmer setting
• Close door securely.
• Be sure food is at room
temperature before inserting.
• Minimize lid openings/
duration.
• Do not place unit close to
heat sources or direct
sunlight.
3) Internal temperature not
cold enough.
• No power to unit.
• Power cord is unplugged.
• Temperature set too high.
• Lid is not closed.
• Hot food inserted.
• Lid opened too long or too
often.
• Air flow obstruction.
• Wrong voltage is being used.
• Close proximity to heat
source or direct sunlight.
• Check connection of power
cord to power source.
• Plug in unit.
• Check setting and increase
as needed.
• Close lid securely.
• Be sure that food is at room
temperature.
• Minimize lid openings/
duration.
• Allow room for air to
circulate around unit.
• Use proper voltage.
• Do not place unit close to
heat sources or direct
sunlight.
PROBLEM
POSSIBLE CAUSE
POSSIBLE SOLUTION
7
Page 9

LIMITED COMPACT REFRIGERATOR WARRANTY
This quality product is warranted to be free from manufacturer’s defects in material and workmanship, provided that the unit is used under the normal operating
conditions intended by the manufacturer.
This warranty is available only to the person to whom the unit was originally sold by Danby Products Limited (Canada) or Danby Products Inc. (U.S.A.) (hereafter
“Danby”) or by an authorized distributor of Danby, and is non-transferable.
TERMS OF WARRANTY
Plastic parts, are warranted for thirty (30) days only from purchase date, with no extensions provided.
First Year
During the first twelve (12) months, any functional parts of this product found to be defective, will be repaired or replaced, at warrantor’s
option, at no charge to the ORIGINAL purchaser.
To obtain
Danby reserves the right to limit the boundaries of “In Home Service” to the proximity of an Authorized Service Depot. Any appliance
Service
requiring service outside the limited boundaries of “In Home Service” ,
it will be the consumer’s responsibility to transport the appliance
(at their own expense) to the original retailer (point of purchase) or a service depot for repair. See “Boundaries of In Home Service”
below. Contact your dealer from whom your unit was purchased, or contact your nearest authorized Danby service depot, where service
must be performed by a qualified service technician.
If service is performed on the units by anyone other than an authorized service depot, or the unit is used for commercial application, all
obligations of Danby under this warranty shall be void.
Boundaries of
If the appliance is installed in a location that is 100 kilometers (62 miles) or more from the nearest service center your unit must be
In Home Service
delivered to the nearest authorized Danby Service Depot, as service must only be performed by a technician qualified and certified for
warranty service by Danby. Transportation charges to and from the service location are not protected by this warranty and are the
responsibility of the purchaser.
Nothing within this warranty shall imply that Danby will be responsible or liable for any spoilage or damage to food or other contents of this appliance, whether
due to any defect of the appliance, or its use, whether proper or improper.
EXCLUSIONS
Save as herein provided, Danby, there are no other warranties, conditions, representations or guarantees, express or implied, made or intended by Danby or its
authorized distributors and all other warranties, conditions, representations or guarantees, including any warranties, conditions, representations or guarantees
under any Sale of Goods Act or like legislation or statue is hereby expressly excluded. Save as herein provided, Danby shall not be responsible for any damages
to persons or property, including the unit itself, howsoever caused or any consequential damages arising from the malfunction of the unit and by the purchase of
the unit, the purchaser does hereby agree to indemnify and hold harmless Danby from any claim for damages to persons or property caused by the unit.
GENERAL PROVISIONS
No warranty or insurance herein contained or set out shall apply when damage or repair is caused by any of the following:
1) Power failure.
2) Damage in transit or when moving the appliance.
3) Improper power supply such as low voltage, defective house wiring or inadequate fuses.
4) Accident, alteration, abuse or misuse of the appliance such as inadequate air circulation in the room or abnormal operating conditions
(extremely high or low room temperature).
5) Use for commercial or industrial purposes (ie. If the appliance is not installed in a domestic residence).
6) Fire, water damage, theft, war, riot, hostility, acts of God such as hurricanes, floods etc.
7) Service calls resulting in customer education.
8) Improper Installation (ie. Building-in of a free standing appliance or using an appliance outdoors that is not approved for outdoor application).
Proof of purchase date will be required for warranty claims; so, please retain bills of sale. In the event warranty service is required, present this document to our
AUTHORIZED SERVICE DEPOT.
Danby Products Limited
PO Box 1778, Guelph, Ontario, Canada N1H 6Z9
Telephone: (519) 837-0920 FAX: (519) 837-0449
Danby Products Inc.
PO Box 669, Findlay, Ohio, U.S.A. 45840
Telephone: (419) 425-8627 FAX: (419) 425-8629
04/09
1-800-263-2629
Warranty Service
In home Service on models 3.0 cu.ft or greater.
Page 10

LISEZ TOUTES LES INFORMATIONS DE SÉCURITÉ AVANT DE FAIRE FONCTIONNER L’APPAREIL
SAUVEGARDE CES INSTRUCTIONS
CONSIGNES DE SÉCURITÉ IMPORTANT
CONDITIONS ÉLECTRIQUES
Cet appareil doit être mis à la terre. En cas de court-circuit,
la mise à la terre réduit les risques de décharge électrique en
fournissant un échappatoire au courant électrique.
L’appareil est muni d’un cordon électrique comprenant un fil
de mise à la terre et une fiche de terre. Branchez la fiche
dans une prise de courant correctement installée et mise à la
terre.
N’UTILISER JAMAIS DE FIL DE RALLONGE: S’il est possible, brancher le réfrigérateur à son propre circuit. Ainsi,
les autres appareils ou la surcharge des lampes du domicile ne peuvent pas surcharger et interrompre le courant
électrique. Une connexion desserrée peut se doubler à un
autre appareil dans la même prise murale.
PRÉCAUTION IMPORTANTE: Un vide est une attraction
dangereuse aux enfants. Enlever les joints étanches, les
loquets, les couvercles ou les portes des appareils qui ne sont
pas utiliser, ou faites de soit que l’appareil ne présente aucun
danger.
DANGER: Risque des enfants deviennent coincer dans l’appareil. Avant de jeter votre ancien réfrigérateur.
• Enlevez les portes.
• Laissez les étagères a ses places afin que des enfants ne
puissant pas monter facilement dans l’appareil.
N’ATTENDEZ PAS! FAITES-LE
IMMÉDIATEMENT!
CONSIGNES D’INSTALLATION
Enlevez les emballages extérieurs et intérieurs. Essuyez
complètement l’extérieur avec un linge doux sec et
l’intérieur avec un linge humide tiède. Il ne faut jamais situer
l’appareil dans un reocin étroit, proche d’une source d’air
chaud. L’air doit circuler à l’entour de l’appareil. Eloigner le
réfrigérateur au moins 5 pouces du mur.
1) Choisir une place qui a un plancher à niveau.
2) Éloigner l'appareil de 5 pouces des murs arrière et de côte.
3) Éviter les rayons de soleil et la chaleur directs qui peuvent
affecter la surface en acrylique. Les sources de chaleur
rapprochées augmentent la consommation d’énergie.
4) Éviter les endroits très humides. L’humidité élevée dans
l’air occasionne la formation rapide de gèle sur l’évaporateur et le
réfrigérateur
.Le
réfrigérateur
devra être dégivré
fréquemment.
EMPLACEMENT
Consultez un électricien ou un technicien qualifié si vous ne
comprenez pas bien les instructions de mise à la terre ou si
vous avez un doute quelconque sur la bonne mise à la terre
de l’appareil.
AVERTISSEMENT
9
Page 11

CONSIGNES D’INSTALLATION
INSTRUCTIONS DE PORTE
RÉVERSIBLE
Pour éviter de se blesser ou endommager l'appareil, on vous
recommande d'avoir quelqu'un vous aide pendant ce
processus.
ATTENTION:
Si vous trouvez que la direction de l’ouverture de la porte
de votre réfrigérateur est inconvénient, elle peut être
changée. Des trous qui se trouvent sur le côté opposé de
la porte ont été percés à l’usine.
10
Page 12

CARACTERISTIQUES
1) CADRAN DU THERMOSTAT: Régle la température
intérieure du réfrigérateur; le compresseur en marche dès
que la température dépasse le niveau désiré.
2) COMPARTIMENT DE CONGÉLATEUR AVEC PORTE:
Section séparée pour la congélation contient les moules à
glaçon.
3) MOULE À GLAÇON: Démoulage facile des glaçons.
4) ÉTAGÈRES EN VERRE
5) BAC D’ÉCOULEMENT: Pour récupérer l’eau qui coule de
l’évaporateur pendant le dégivrage.
6) JOINT ÉTANCHE MAGNETÍQUE: Le joint étanche
empêche l’air frais de s’échapper.
7) PORTE-BOUTEILLES: Pour les bouteilles, boîtes
métalliques et bocaux.
8) Paroi de Porte CANSTORTM: Range les boites de
boisson gazeuse, jus ou bierre de 355mL.
9) CASIER POUR DES OEUFS
Le moule à glaçon est flexible. Tourner-le pour enlever les
glaçons. Si le moule est surgelé et collé à la surface de l’évaporateur, verser un peu d’eau tiède. Ne jamais utiliser de
couteaux ou d’autres instruments en métal pour enlever le
moule à glaçons car ceux-ci peuvent endommager
l’évaporateur.
GLAÇONS
11
5
1
2
4
6
7
8
9
3
Page 13

OPÉRATION
CHOIX DE LA TEMPÉRATURE:
Pour éviter la vibration, l'appariel doit être absolument horizontal. Les deux premiers pieds de nivellement au-dessous de
réfrigérateur peuvent être ajuster. La température à l’intérieur du réfrigérateur est contrôlée en réglant le cadran du thermostat
(au plafond de l’intérieure du caisson) à la température désirée.
Pour mettre le réfrigérateur en marche, tournez le cadran du
thermostat à la position qui correspond à la température
désirée sur le cadran bleu à échele. Fig. A.La température du
réfrigérateur varie selon la quantité d’aliments rangés dans
l’appareil et le nombre de fois que la porte est ouverte.
La température du réfrigérateur fluctuera en fonction de la quantité de
nourriture entreposée et de la fréquence de l'ouverture de la porte.
Pour tourner le bouton de commande à la position “OFF”, tournez-le
jusqu’à la configuration de “0”.Après le dégivrage et lorsque le réfrigérateur a été hors service pour quelque temps, réglez le cadran au maximum pour 2 à 3 heures avant de le régler à la température désirée.
Si le réfrigérateur reste inutilisé pour de longues périodes de temps,
débranchez la fiche et laissez la porte entrouverte. Ceci aidera à éviter
l'accumulation de moisissures dans la cavité du réfrigérateur.
SOINS ET ENTRETIEN
DÉGIVRAGE
Ce réfrigérateur fonctionne avec un pousse-bouton (semiautomatique) système de dégivrage avec thermostat. Pour
activer le cycle de dégivrage, poussez le bouton dedégivrage
rouge qui se trouve au centre de contrôle (ne tournez pas le
bouton de contrôle à zéro/éteinte). Le cycle de dégivrage
commence immédiatement. Quand la décongelation est complète le pousse-bouton se dégagera automatiquement et
résume les conditions normales d’opération au mime réglage
de température.
Note: Si par hasard vous activez le pousse-bouton, il ne sera
pas possible de le sortir à la main (de déactiver le cycle de
dégivrage). C’est nécessaire de laisser continuer le cycle de
dégivrage. (ou)
Appliquez une lavette trempée dans l'eau
chaud contre la ligne du thermostat capillaire et le support,
situé au dessous du compartiment du congélateur. La temperture augmentera dès que la chaleur de la lavette touche la
ligne du thermostat capillaire (linge de détecteur) qui causera
les contacts internes à fermer. Les conditions normales
d'opération résumeront. Ça pourrait prendre quelques minutes
ou vous pouvez répéter les applications avant que le poussebouton dégage.
Il est nécessaire de dégivrer le congélateur chaque fois que
l’accumulation de glace arrive à un epaisseur de 1/4 po
(6mm). Ca pourrait prendre quelques heures pour dégivrer le
congélateur, dépendent de la quantité de glace accumulée et
la température ambiante de la pièce. Pour accélérer le
processus de décongelation, enlevez tout les produits
surgéles du congélateur. En laissant la porte entreb, illée
pour un peu de temps pourrait accélérer le processus.
Important: N’oubliez pas de fermer la porte du réfrigérateur
avant que la décongélation se termine et les conditions normales d’opération résument automatiquement le plateau d’égoutterent devrait lire en place directement sous le compartiment du congélateur pour atraper l’eau évaporé durant la
décongélation.
Avis Important: N’utiliser jamais de ustensiles tranchants ou
aiguisés pour dégivrer/enlever la glace du compartiment de
congélation/évaporation. Le compartiment de
congélation/évaporation contient des tuyaux de gaz réfrigérés
et si ils sont crévés ou percés, le réfrigérateur sera
inopérable et la garantie de fabricant sera rendu nul.
SI LE COMPARTIMENT DE CONGELATION EST PERCE,
ETEINDRE LE REFRIGERATEUR.
Après le dégivrage est fini, tourner la commande de
température au refroidissement maximum pendant 2 à 3
heures avant le tourner au réfroidissement désiré. Si on n’utilise pas le réfrgerateur pendant longtemps, débrancher l’appareil et laisser la porte partiellement ouverte pour réduire
l’accumulation de moissure.
Remarque: Si le fonctionnement a été interrompu, attendre 3
à 5 minutes avant mettre le réfrigérateur en marche.
Fig. A
12
Page 14

SOINS ET ENTRETIEN
ENTRETIEN
Pour nettoyer l'intérieur, utilisez un chiffon doux et une solution composée d'une pinte d'eau et d'une cuillerée à savon
de poudre à pâte. Comme autre solution de nettoyage,
utilisez une solution comportant un savon ou un détergent
doux. Lavez les tablettes en verre à l'aide d'une solution
comportant un détergent doux; séchez les tablettes et
essuyez-les à l'aide d'un chiffon doux. Nettoyez l'extérieur à
l'aide d'un chiffon humide doux et d'un peu de détergent doux
ou d'un produit de nettoyage des appareils électroménagers.
PANNE D’ÉLECTRICITÉ
La plupart des pannes d'électricité sont corrigées dans un
délai d'une heure et n'ont pas d'effets sur la température du
réfrigérateur. Il est nécessaire de réduire le nombre d'ouverture de la porte pendant une panne.Pendant les pannes qui
durent plus qu’une heure, protéger vos aliments en déposant
un bloc de glace sèche par-dessus les emballages. Si la
glace n’est pas disponible, essayer d’utiliser temporairement
de l’espace de votre entrepôt à froid régional.
DÉMÉNAGEMENT
Enlever ou immobiliser toutes les pièces amovibles (c’-à-d;
les clayettes) à l’intérieur du réfrigérateur. Serrer les vis à niv-
ellement à la base afin de ne pas les endommager.
PENDANT LES VACANCES
Si vous prenez une vacance de courte durée, laissez le bouton de commande à son réglage normal. Si l'absence doit
durer longtemps,
(a) enlever tous les aliments.
(b) débanchez l'appareil de la prise murale.
(c) Nettoyez le réfrigérateur complètement, en
incluant le plateau d’égouttage (bac de décongélation)
situé dans le bas de l’appareil.
(d) Laisser la porter ouverte pour éviter les mauvais odeurs.
Importantes consignes de sécurité pour
l’utilisation du réfrigérateur
• Ne jamais ranger d’aliments chauds dans le
réfrigérateur.
• Ne jamais surchargé l’appareil.
• Ouvrer la porte seulement si nécessaire.
• Pour un rangement prolongé de l’appareil, il est suggéré de laver l’appareil, de laisser la porte ouverte afin
de fournir une circulation d’air à l’intérieur du meuble et
d’éviter le développement de condensation, de moisi et
d’odeurs.
Compartiments pour Aliments Frais
• Ne jamais recouvrir les clayettes du compartiment de papier d’aluminium ou autres matériaux car ceci peut empêcher la circulation
d’air.
• Enlever toujours les emballages perméables du marchand qui recouvrent la viande, volaille et lepoisson. Les viandes doivent être emballées individuellement, et déposées dans un récipient pour le rangement. Emballer la volaille ou le poisson dans du papier aluminium ou
du papier ciré épais. Faites cuire la plupart de sorte de poissons le
jour de l'achat. Les viandes emballées par le marchand, telles que le
jambon, le bacon, le boeuf sec, ou les saucisses fumées se rangent
très bien dans leur emballage.
• Laisser refroidir les aliments à la température de la pièce avant de les
ranger dans le réfrigérateur.
• Toujours recouvrir les aliments, surtout les restants. Utiliser les
restants avant 2 à 3 jours.
RANGEMENTS DES ALIMENTS
13
Page 15

DÉPANNAGE
De temps en temps, un problème est mineur et un appel de service peut ne pas être nécessaire. Utilisez ce guide de
dépannage pour trouver une solution possible. Si l’unité continue de fonctionner incorrectement, appelez un dépôt de
service autorisé ou le numéro sans frais pour obtenir de l’assistance. Tel: :1-800-263-2629
PROBLEME CAUSE PROBABLE SOLUTION
1) Ne fonctionne pas.
• Pas de tension à l’unité.
• Le cordon d’alimentation est
débranché.
• Le mauvais voltage est
utilisé.
• Vérifiez la connexion du
cordon d’alimentation.
• Branchez l’appareil.
• Utilisez le voltage
approprié.
2) Le réfrigérateur
fonctionne sans arrêt.
• La température est trop
basse
• La porte n’est pas
fermée.
• De la nourriture chaude a été
insérée.
• La porte est ouverte trop
souvent/longtemps.
• Proximité d’une source de
chaleur ou source de soleil.
• Baissez le contrôle de
température.
• Fermez la porte.
• Assurez-vous que la
nourriture est frais avant de
la placer dans l’appareil.
• Minimisez l’ouverture de la
couvercle.
• Ne placez pas l’appareil près
d’une ou exposition directe
aux rayons du chaleur/du
soleil.
3) La température interne
n’est pas assez froide.
• Pas de tension à l’unité.
• Le cordon d’alimentation est
débranché.
• Température trop élevée
• La porte n’est pas
fermée.
• La nourriture est chaude.
• La pcouvercle est ouverte
trop souvent/longtemps.
• Obstruction de la
circulation de l’air.
• Le mauvais voltage est
utilisé.
• Proximité d’une source de
chaleur ou exposition directe
aux rayons du soleil.
• Vérifiez la connexion du
cordon d’alimentation.
• Branchez l’appareil.
• Vérifiez le réglage et
augmentez-le au besoin.
• Fermez la porte.
• Assurez-vous que la
nourriture est frais avant de
la placer dans l’appareil.
• Minimisez l’ouverture de la
couvercle.
• Laissez l’air circuler dans la
pièce autour de l’appareil.
• Utilisez le voltage
approprié.
• Ne placez pas l’appareil près
d’une ou exposition directe
aux rayons du chaleur/du
soleil.
PROBLEME
CAUSE PROBABLE
SOLUTION
14
Page 16

GARANTIE LIMITÉE DE RÉFRIGÉRATEUR
COMPACT
Cet appareil de qualité est garantie exempt de tout vice de matière première et de fabrication, s’il est utilisé dans les conditions normales recommandées par
le fabricant.
Cette garantie n’est offerte qu’à l’acheteur initial de l’appareil vendu par Danby Products Limited (Canada) ou Danby Products Inc. (E.- U. d’A) (ci-après “Danby”)
ou par l’un des ses distributeurs agréés et elle ne peut être transférée.
CONDITIONS
Les pièces en plastique sont garanties pour trente (30) jours seulement à partir de la date de l’achat, sans aucune prolongation prévue.
Première 12 mois
Pendant les douze (12) mois, toutes pièces fonctionnelles de ce produit s’avèrent défectueuses, seront réparées ou remplacées, selon le
choix du garant, sans frais à l’acheteur INITIAL.
Pour bénéficier du
Le client sera responsable pour le transport et tous les frais d’expédition de tout appareil exigeant le service au dépot de service
Service
autorisé le plus proche. S’adresser au détaillant qui a vendu l’appareil, ou à la station technique agréée de service la plus proche, où
les réparations doivent être effectuées par un technicien qualifié. Si les réparations sont effectuées par quiconque autre que la station
de service agréée où à des fins commerciales, toutes les obligations de Danby en vertu de cette garantie seront annulées.
Limites de l’entretien
Si l'appareil est installé à plus de 100 kilomètres (62 milles) du centre de service le plus proche, il doit être livré à l'atelier de
à domicile
réparation autorisé par Danby le plus proche, car l'entretien doit uniquement être réalisé par un technicien qualifié et certifié pour
effectuer un entretien couvert par la garantie de Danby. Les frais de transport entre votre domicile et le lieu de l'entretien ne sont pas
couverts par la présente garantie et doivent être acquittés par l'acheteur.
Cette garantie indique en aucun temps la responsabilité de Danby de l’avarie ou dommage de la vin ou autre contenu, soit par les vices de l’appareil, ou soit parl’utilisation convenable ou inexacte.
EXCLUSIONS
En vertu de la présente, il n’existe aucune autre garantie, condition ou représentation, qu’elle soit exprimée ou tacite, de façon manifeste ou intentionnelle, par
Danby ou ses distributeurs agréés. De même, sont exclues toutes les autres garanties, conditions ou représentations, y compris les garanties, conditions ou
représentations en vertu de toute loi régissant la vente de produits ou de toute autre législation ou règlement semblables.
En vertu de la présente, Danby ne peut être tenue responsable en cas de blessures corporelles ou des dégâts matériels, y compris à l’appareil, quelle qu’en soit
les causes. Danby ne peut pas être tenue responsable des dommages indirects dus au fonctionnement défectueux de l’appareil. En achetant l’appareil, l’acheteur accepte de mettre à couvert et de dégager Danby de toute responsabilité en cas de réclamation pour toute blessure corporelle ou tout dégât matériel
causé par cet appareil.
CONDITIONS GÉNÉRALES
La garantie ou assurance ci-dessus ne s’applique pas si les dégâts ou réparations sont dus aux cas suivants:
1) Panne de courant.
2) Dommage subis pendant le transport ou le déplacement de l’appareil.
3) Alimentation électrique incorrecte (tension faible, câblage défectueux, fusibles incorrects).
4) Accident, modification, emploi abusif ou incorrect de l’appareil tel qu'une circulation d'air inadéquate dans la pièce ou des conditions de fonctionnement
anormales (température extrêmement élevée ou basse).
5) Utilisation dans un but commercial ou industriel (à savoir, si l'appareil n'est pas installé dans un domicile résidentiel).
6) Incendie, dommage causés par l’eau, vol, guerre, émeute, hostilités, cas de force majeure (ouragan, inondation, etc.).
7) Visites d’un technicien pour expliquer le fonctionnement de l’appareil au propriétaire.
8) Installation inappropriée (par exemple, encastrement d'un appareil autoportant, ou utilisation extérieure d'un appareil non conçu à cet effet).
Une preuve d’achat doit être présentée pour toute demande de réparation sous garantie. Prière de garder le reçu. Pour faire honorer la garantie, présenter ce
document à la station technique agréée ou s’adresser à:
Danby Products Limited
PO Box 1778,Guelph, Ontario, Canada N1H 6Z9
Telephone: (519) 837-0920 FAX: (519) 837-0449
Danby Products Inc.
PO Box 669, Findlay, Ohio, U.S.A. 45840
Telephone: (419) 425-8627 FAX: (419) 425-8629
04/09
1-800-263-2629
Service sous-garantie
Service au domicile sur modèles de 3,0 pi3 ou plus grands.
Page 17

COMPACT REFRIGERATOR
RÉFRIGÉRATEUR COMPACT
REFRIGERADOR COMPACTO
Model • Modèle • Modelo
SBCR122BSL
REFRIGERADOR COMPACTO
El número de modelo se puede encontrar en la placa serial
situada en el panel trasero de la unidad.
Todas las piezas de reparación disponibles para la compra o
la orden especial cuando usted visita su depósito más cercano del servicio. Para pedir servicio y/o la localización del
depósito del servicio lo más cerca posible usted, llama
Danby gratis.
Al pedir servicio o pidiendo piezas, proporcione siempre la
información siguiente:
• Tipo de Producto
• Número de Modelo
• Descripción de la Parte
RÉFRIGÉRATEUR COMPACT
Le numéro de modèle se trouve sur la plaque
d’information sur la paroi arriere de l’appareil.
Toutes les pieces de rechange ou commandes speciales
sont disponsibles de votre centre regional de service
autorise. Pour exiger le service et-ou le nom de votre
centre de service regional, signalez le numéro sans frais
de Danby.
Ayez les renseignements suivants á la portée de la main
lors de la commande de pièce ou service:
• Genre de produit
• Numéro de modèle
• Description de la pièce
COMPACT REFRIGERATOR
The model number can be found on the serial plate located
on the back panel of the unit.
All repair parts available for purchase or special order when
you visit your nearest service depot. To request service
and/or the location of the service depot nearest you, call
Danby toll free.
When requesting service or ordering parts, always provide
the following information:
• Product Type
• Model Number
• Part Description
Danby Products Limited, Guelph, Ontario, Canada N1H 6Z9
Danby Products Inc. Findlay, Ohio, U.S.A. 45840
Tel: 1-800-26-
(1-800-263-2629)
 Loading...