

Page 1

User Manual
REMOTE WARMING PRODUCTS
P.N. 112865
Page 2

IMPORTANT INSTRUCTIONSDO NOT DESTROY
As with all electrical products, misuse of product or failure to
properly follow the instructions may cause overheating, fire, or
personal injury. Please read the product label and all of the
instructions before using your warming product.
1. Do not use this warming product with an infant, a child, an
incapacitated person, a paraplegic, a quadriplegic, a diabetic,
one insensitive to heat such as a person with poor blood
circulation, or anyone who cannot clearly understand the
instructions and/or operate the controls.
2. Do not use with damaged cords. Damaged cords can lead to fire.
Do not trap, fold, cross, or pinch cords between bed slats,
mattress, or springs, or against walls, footboards, or bed frame.
3. Do not dry clean this warming product. Cleaning liquid may
damage the insulation of the heating element. Improper
laundering may cause problems with the heating wire which can
lead to fire.
4. Do not pinch, flex, or expose the heating wire to rubbing. A
damaged heating wire may result in possible overheating or fire.
5. Turn off the control for the warming product when not using.
6. Keep control away from an open window.
7. Do not use pins; they may damage the electric wiring.
8. Be sure this blanket/mattress pad is used only on an AC supply
current circuit of 110-120 volts. Do not use with an extension
cord.
9. May experience increased heat in areas where warming product
is bunched or folded while in use.
10. Keep all dogs, cats, and other pets away from this warming
product. This is an electrical appliance that they can damage or
be injured by.
11. Do not use blanket/mattress pad on a waterbed, sofa, bunk
bed, or mechanically adjustable bed.
12. Do not use another electronic heating device in conjunction with
your warming product.
13. Use the proper size blanket/mattress pad for your bed. For
example, use a Twin Size warming blanket on a Twin Size bed.
14. If the following Important Instructions are not followed the
warming product will not operate properly.
15. If you see the warming product operating improperly, unplug it
immediately and call Sunbeam Consumer Service at the 800
number listed under “How to Obtain Warranty Service”.
Warnings and Safeguards
Page 3

1
Welcome
Thank you for choosing a Sunbeam
®
warming product. With your purchase
you’ve made a real investment in your
comfort and can look forward to
staying warm and cozy for many cool
days to come.
With over 50 years of experience and
over 25 million households using a
Sunbeam®warming product, you can
rest comfortably knowing that
Sunbeam®is the brand to trust…
for quality and performance.
So get ready for a more restful sleep.
Remote Controller Matrix . . . . . . . . . . . . . . . . . . . . . . . . . . . . . . . . . . . . . . . 2
Auto-Off & Pre-Heat features . . . . . . . . . . . . . . . . . . . . . . . . . . . . . . . . . . . 2
Fold Test . . . . . . . . . . . . . . . . . . . . . . . . . . . . . . . . . . . . . . . . . . . . . . . . . . . . 3
Remote Control . . . . . . . . . . . . . . . . . . . . . . . . . . . . . . . . . . . . . . . . . . . . . 3-5
Installing the batteries . . . . . . . . . . . . . . . . . . . . . . . . 3
Warming Blanket/Mattress Pad Set Up . . . . . . . . . . . . . 4
Using your control(s) . . . . . . . . . . . . . . . . . . . . . . . . . 5
Setting the dual remotes . . . . . . . . . . . . . . . . . . . . . . 5
Step-by-Step . . . . . . . . . . . . . . . . . . . . . . . . . . . . . . 5
Multiple Remote Control Warming Products . . . . . . . . . . . . . 6
Changing the remote settings . . . . . . . . . . . . . . . . . . . 6
Changing the base unit settings . . . . . . . . . . . . . . . . . . 6
Care and cleaning . . . . . . . . . . . . . . . . . . . . . . . . . . . . . . . . . . . . . . . . . . . . . 7
Frequently asked questions . . . . . . . . . . . . . . . . . . . . . . . . . . . . . . . . . . . 8-9
War ranty . . . . . . . . . . . . . . . . . . . . . . . . . . . . . . . . . . . . . . . . . . . . . . . . . . . 10
How to obtain warranty service . . . . . . . . . . . . . . . . . . 11
Ta ble of contents
Page 4

2
Remote Controller feature matrix
Part Number Cordless Backlit Auto-Off Warming Silent Pre-Heat Easy Easy Grip
Operation Display Settings Operation Operation
❂❂10 hour 10 ❂❂ ❂❂
I
85R (Single Control)
I
85RKQ (Dual Control)
Auto-Off & Pre-Heat features
Auto-Off Feature for Blanket and Mattress Pad Controls:
The “Auto-Off” feature is designed for safety and conservation of
energy by automatically turning your warming product off after 10
hours of continuous use.
The Auto-Off function engages 10 hours after the control
is turned “ON”.
For Dual Control: Each control operates independently and will turn off
10 hours after the control is turned “ON”.
Pre-heat:
1 To use the preheat feature, simply press the round “On/Off” button and then
press the “Preheat” button. The preheat function will heat the bed
for a period of 30 minutes.
2 To reset the preheat feature, simply press the “On/Off” button OFF.
3 To turn back ON repeat step 1.
To restart all warming products after a power failure:
Press the “On/Off”, the warming product will begin to warm.
Note: After a power outage, the “Auto-Off” feature automatically resets the timer.
Page 5
3
Fold test
Before initial use:
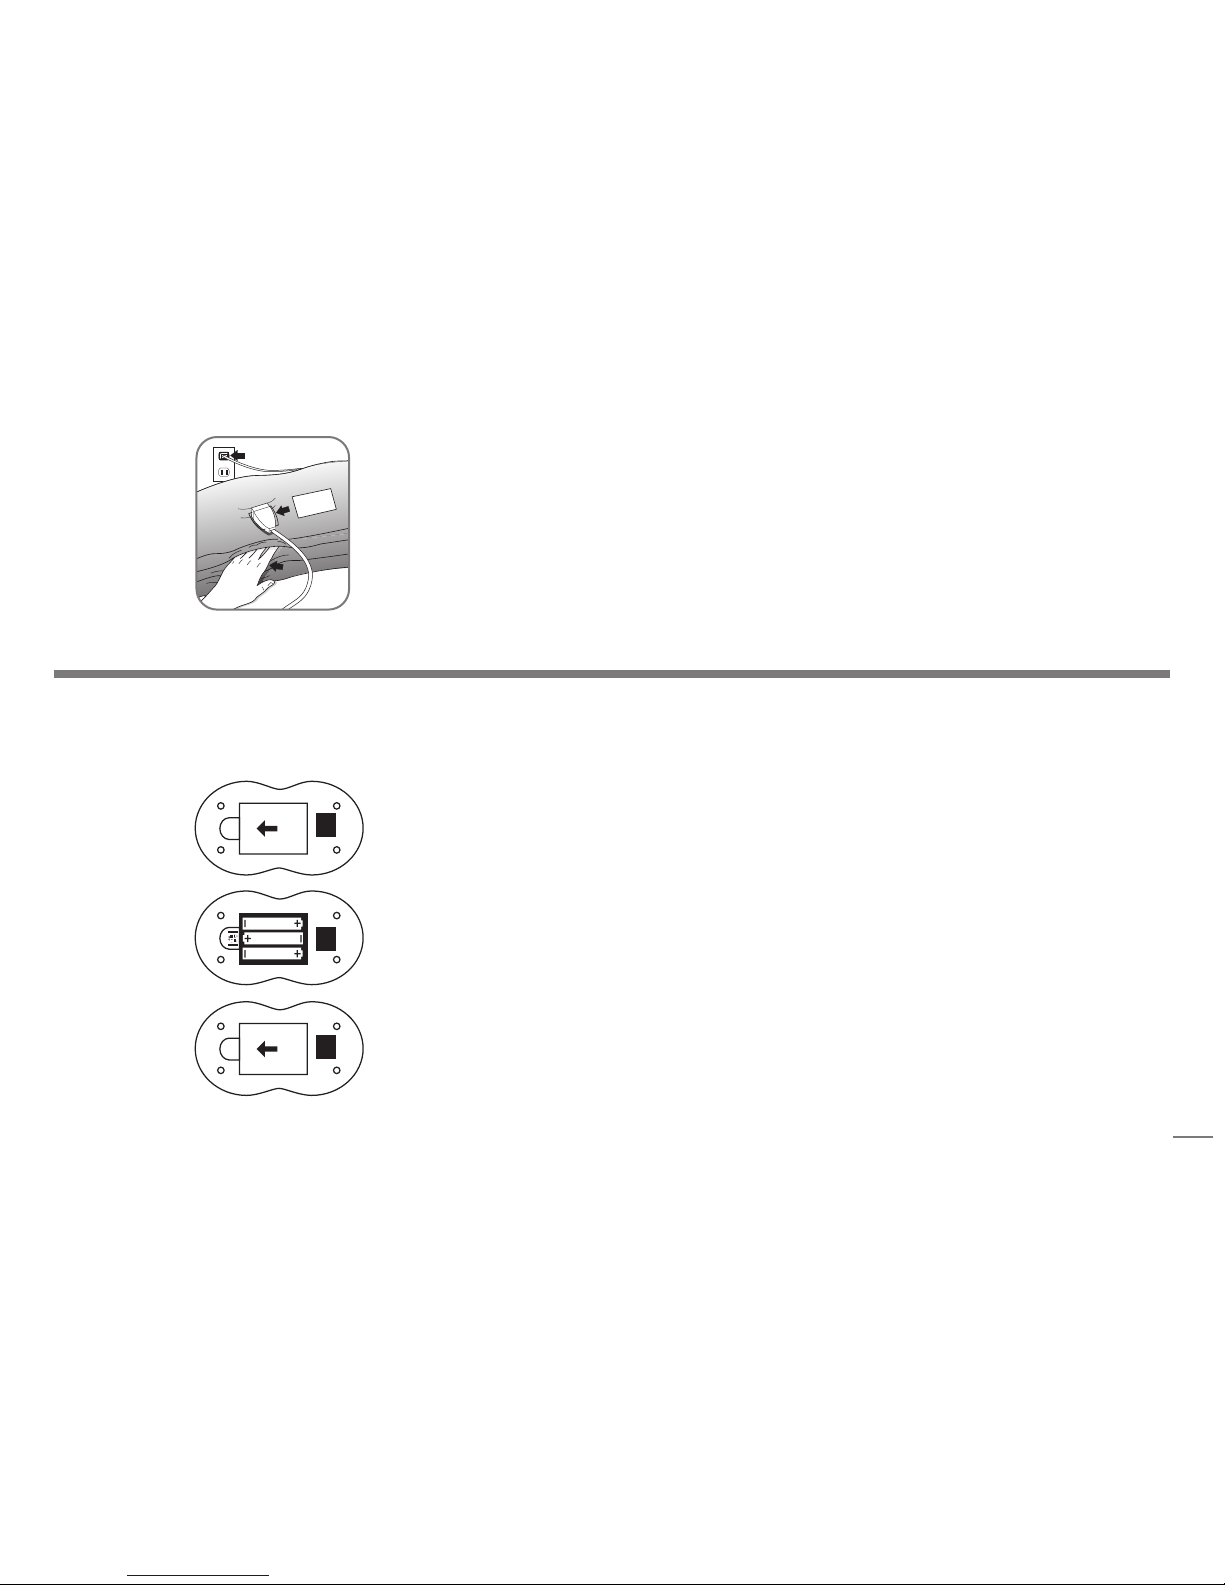
1 Remove product from vinyl storage bag /box.
2 Pull controls from center fold of the warming product.
3 Make sure the base unit cord is connected to the
blanket/mattress pad module then plug the power cord
into an outlet.
CAUTION: Do not continue the fold test for more than seven minutes. DO NOT attempt to make any internal adjustments to this appliance. If you have followed each step of the fold test and the
warming product does not heat, stop using it immediately, disconnect the power cord and contact Consumer Services at the 800 number listed under How to Obtain Warranty Service (page 11).
1 Remove the battery compartment door from the back of the
remote control.
2 Insert three AAA batteries, matching the + and - markings in
the battery compartment to the markings on the batteries.
3 Replace the battery compartment door.
4 If your blanket/mattress pad has two remote controls, repeat
steps 1 – 3 to install batteries in the second remote control.
(Three AAA batteries per control not included)
4 Press “On/Off” button, then turn the control to the
highest setting and wait five to seven minutes.
5 Put your hand between the folds and you should feel the
blanket/mattress pad warming. Note: Remember, the
warming product is not a heating pad. It will not feel
hot to the touch when laid out flat in a normal manner.
1
2
3
Installing the Batteries:
Page 6
Features:
• REMOTE CONTROL – cordless operation
• AUTO-OFF – 10 hour independent auto-off (see page 2)
• ELECTRONIC DIGITAL CONTROL – for easy setting with backlit LCD
• PRE-HEAT – for cozy warmth before bedtime (see page 2)
• 10 TEMPERATURE SETTINGS – select your personal comfort level
• SOLID STATE – for accurate and consistent heat control
• EASY GRIP – ergonomic control for easy operation
• AUDIBLE BEEP – indicates setting change
I
85R (Single Control)
I
85RKQ (Dual Control)
Remote
4
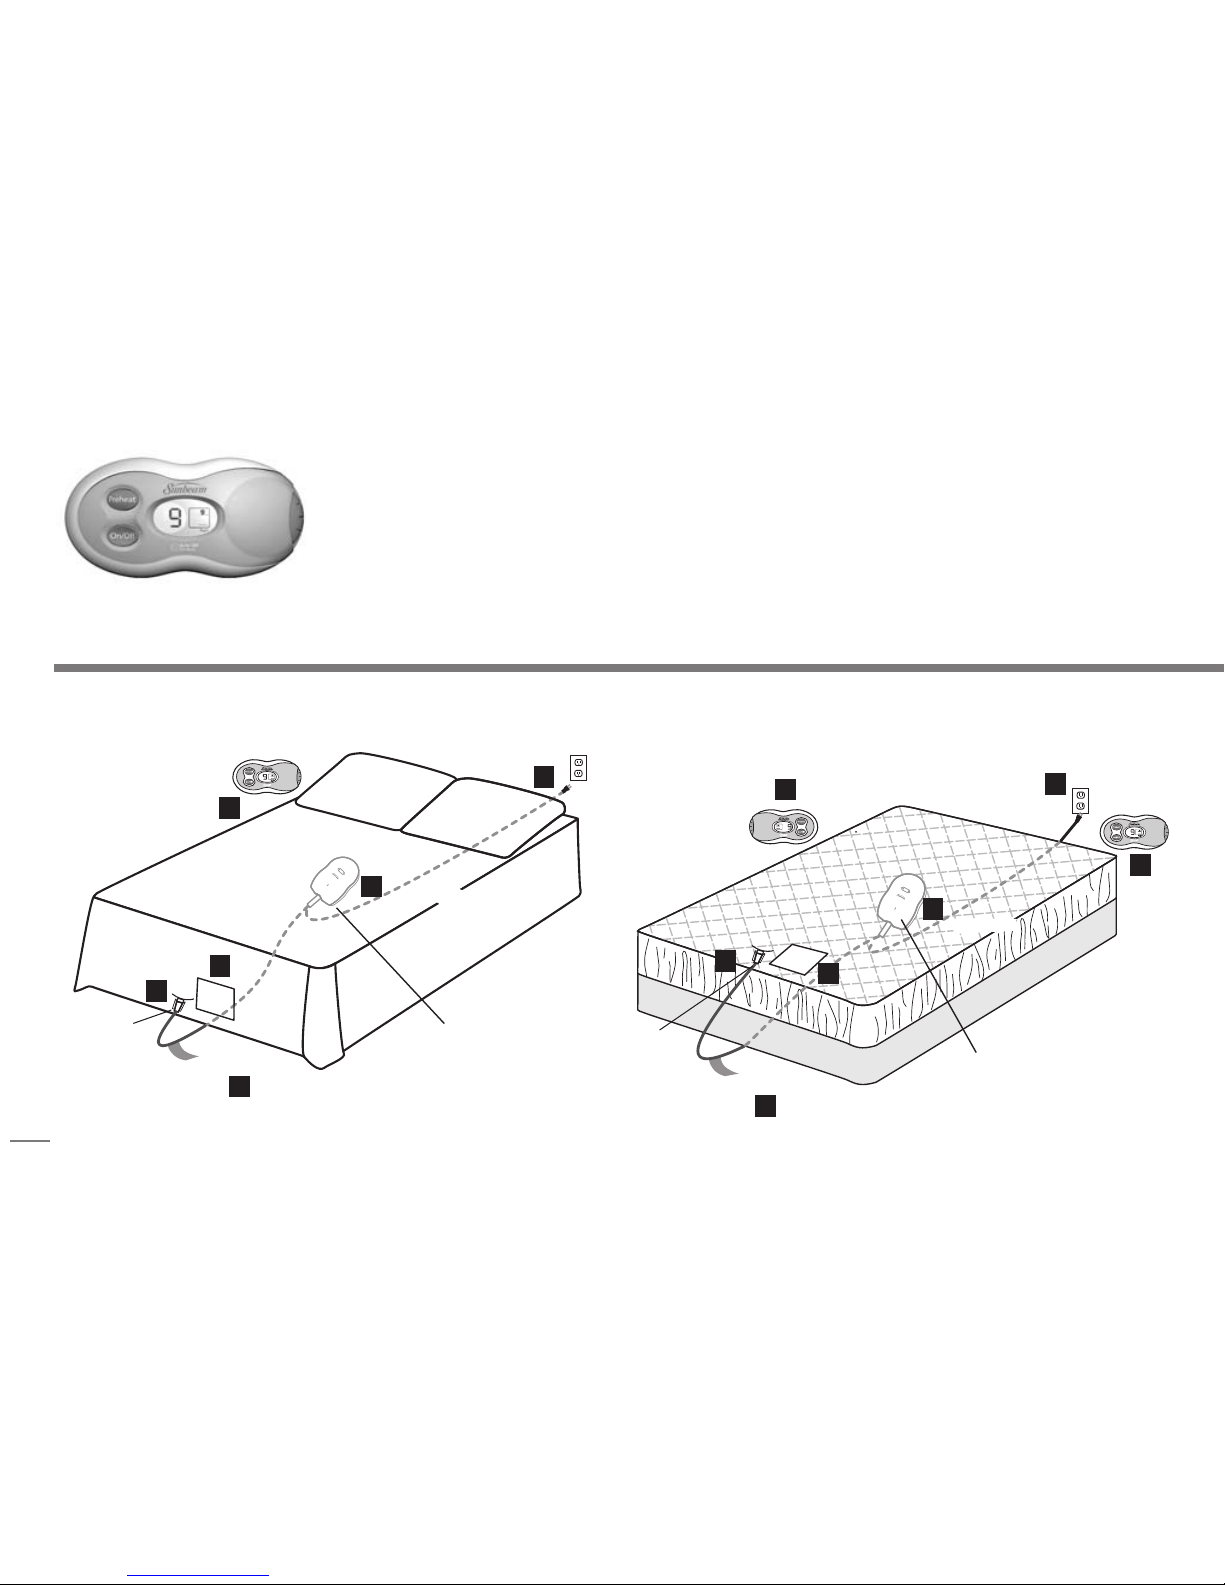
DUAL CONTROL SET UP for both mattress pad and blanket
run cord
under the bed
Base Unit
(under the bed)
Flag Tag
Cord Connector
Module
Label
Left Side
Right Side
Power Cord
run cord
under the bed
Base Unit
(under the bed)
Flag Tag
Cord Connector
Module
Label
Power
Cord
Left Side
Right Side
1
2
3
4
5
6
1
2
3
4
5
6
5
SINGLE CONTROL SET UP for both mattress pad and blanket
Page 7
5
1 Place the warming blanket/mattress pad on the bed with the label at the
foot of the bed facing outward (see diagram, page 4).
2 Make sure the base unit cord is connected into the module at the bottom of
the warming blanket/mattress pad until the plastic hinges click into place.
CAUTION: Cord must be COMPLETELY CONNECTED. A risk of fire could
result from a loose connection.
3 Run the base unit cord on the floor under the bed. Do not sandwich cord
between the mattress and box spring. Avoid any tangling or pinching.
4 Place the base unit on the floor under the bed.
5 Place the remote control(s) where it is convenient for you.
6 Plug power cord into a 110-120 volt wall outlet.
*Please see page 6 if you have more than one Sunbeam Remote Control Warming Product.
2
Step-by-step
CAUTION: Do not plug main
power cord into the wall
outlet until you have
completely set up your
warming product per the
instructions.
• Disconnect power cord
from wall before detaching control from warming
product.
• Always make sure cords are NOT trapped or pinched
between bed slats, mattress, springs, against wall,
foot board or bed frame, or between furniture, walls
or chairs.
CAUTION: Do not attempt to force the plug. This
appliance has a polarized plug (one blade is wider than
the other). To reduce the risk of electrical shock, this
plug is intended to fit only one way into an outlet. If the
plug does not fit in the outlet, reverse the plug. If it still
does not fit, contact a qualified electrician.
IMPORTANT
Using your Remote Control(s):
1 To turn the warming blanket/mattress pad ON, simply press the
“On/Off” button. The backlit display light will illuminate and begin to
warm at the comfort setting last used.
CAUTION: ALWAYS turn the warming blanket/mattress pad “Off”
when not in use.
2 To turn the warming blanket/mattress pad OFF simply press the
“On/Off”.
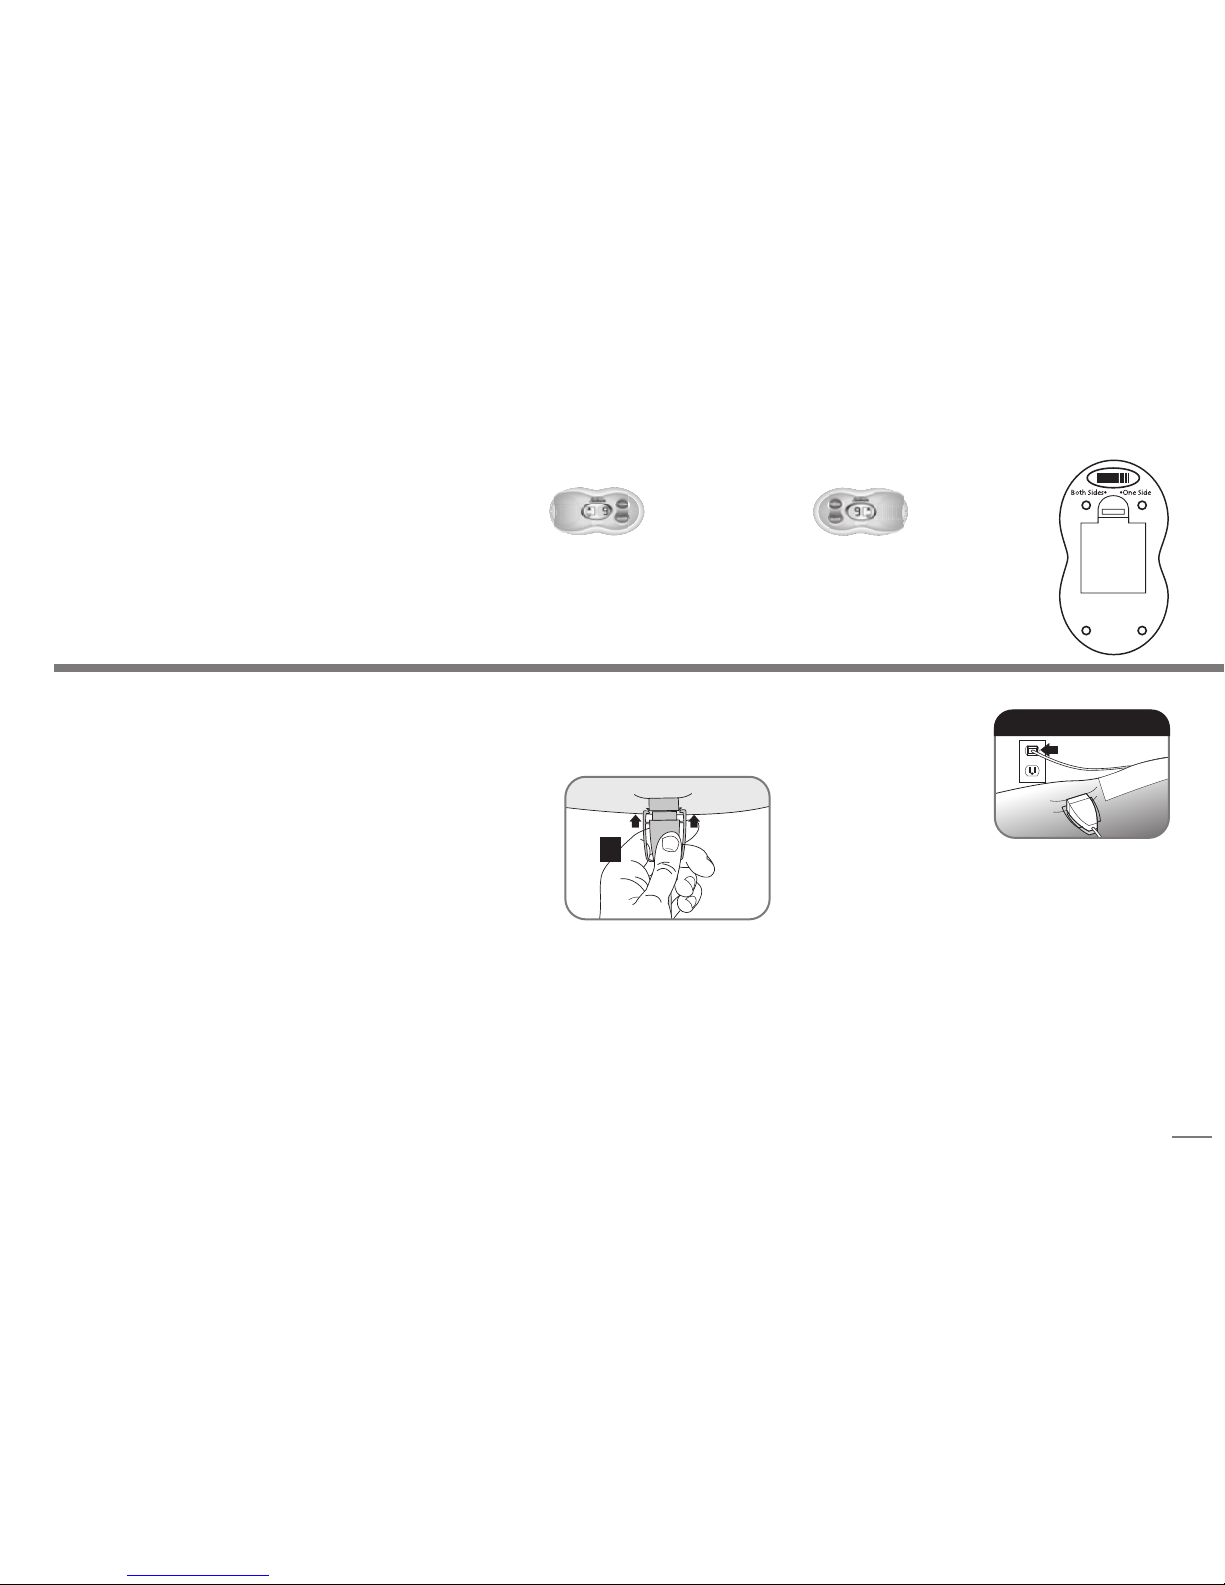
Dual operation settings:
Each person can have complete control over his/her comfort level for ultimate personalized warmth.
The “left” control operates the left side. The “right” control operates the right side.
Either “left” or “right” control can be set to operate the entire blanket/mattress pad.
• Locate the dual control setting switch (on back of each control, above battery panel).
• Set switch to preferred operating setting – Both sides or one side only
Page 8
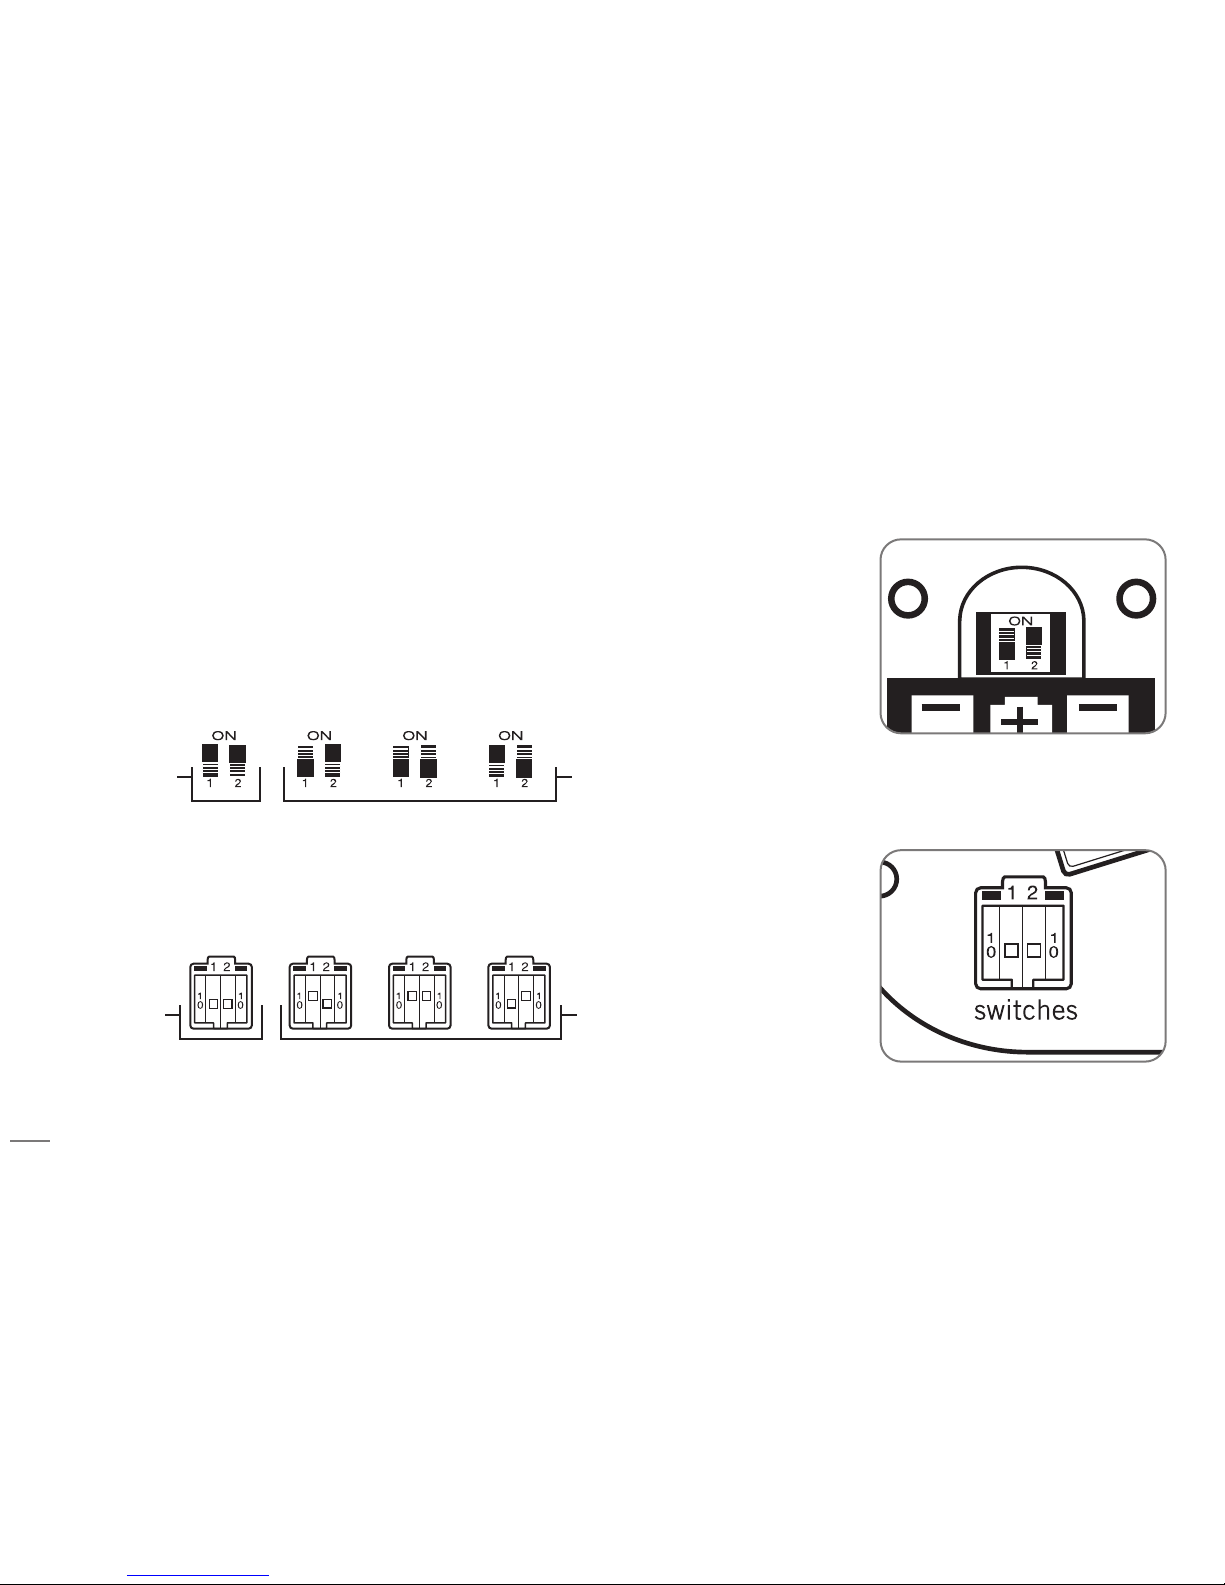
If you own two or more Sunbeam®remote controlled warming products (in your home), interference is likely to occur. To avoid interference
between multiple remote controlled warming products, you must change the address of both the remote control and the base unit of the
second warming product.
To change the address of your SECOND warming product:
Remote Control:
1 Open the battery door on the remote control(s). You will see a small square silver colored switch under the battery door latch.
2 You will see two small switches labeled “1” and “2”. To change the address of the remote, carefully move one of the switches to the up
position with a small screwdriver.
Once the address has changed on the controller, you must set the base unit switch to match.
Base Unit:
1 Unplug the base unit and turn it over. Carefully insert a small screwdriver blade in the slot of the small 1/2 in. square cover over
the switches and lift the cover off the base.
2 To change the address of the remote, carefully move one of the switches to the up position with a small screwdriver to match
your remote control.
The remote control and base unit address settings must be identical.
3 Snap the cover back into place, plug in the base unit and check that the base unit can receive instructions from the remote (the base unit
should beep when the on/off button is pushed or the comfort level is set on the remote).
Note: Repeat steps above using suggested settings for any additional remote controlled warming products.
WARNING: Changes or modifications to this unit not expressly approved by the party
responsible for compliance could void the user’s authority to operate equipment.
Multiple Remote Control Warming Products
6
3 alternate address options
standard address
3 alternate address options
standard address
Remote controller
Base unit
Page 9

(We recommend washing your warming blanket before initial use.)
Before washing or storing your warming product:
IF YOU DO NOT FOLLOW THIS SEQUENCE THE WARMING PRODUCT WILL NOT WORK.
1 Disconnect power cord from wall before detaching control from warming
product.
2 Disconnect the power cord from the module.
3 Carefully follow all washing instructions of your warming product to avoid
shrinkage or possible damage.
DO NOT
• DO NOT dry clean your blanket/mattress pad. Dry cleaning solvents may
damage the warming element.
• DO NOT use bleach or cleaning fluids.
• DO NOT use a wringer.
• DO NOT iron the blanket/mattress pad.
• DO NOT use mothballs or sprays of any kind.
• DO NOT turn the blanket/mattress pad on until it is completely dry.
Taking care of your warming product is easy and safe as long as you follow a few
simple steps.
Machine Washing
1 Presoak the blanket/mattress pad for 15 minutes in mild soap
and lukewarm water.
2 Wash in mild soap and lukewarm water on the delicate or gentle cycle in the
washer for two minutes. Remember, do not use bleach.
3 Rinse in fresh, lukewarm water.
4 Spin dry in the washing machine. Then gently stretch to its original size.
Machine Drying
Caution: Do not use commercial dryers or the dryers at your local laundromat. They
get too hot and would damage the wiring of the warming product.
1 Preheat the dryer on the low temperature setting for 2 minutes.
2 Place blanket/mattress pad into the dryer and tumble dry for
10 minutes at a low temperature.
3 Remove the blanket/mattress pad while it is still damp and
gently stretch it to its original size.
4 Continue to air dry over a clothesline or a shower rod. DO NOT use clothespins.
5 Warming product must be completely dry before using.
Hand Washing
1 Presoak the blanket/mattress pad for 15 minutes in mild soap and lukewarm
water.
2 Gently squeeze the soap suds through a few times.
3 Rinse in fresh, lukewarm water.
Air Drying
1 Gently stretch the blanket/mattress pad back to its original size.
2 Air dry over a clothesline or hang over a shower rod. DO NOT use clothespins.
3 Warming product must be completely dry before using.
Care and cleaning
OF YOUR WARMING PRODUCT
7
Page 10

8
Frequently asked questions
OF YOUR WARMING PRODUCT
A EMF stands for Electromagnetic Field. This is an electrical field that surrounds any
wire that has current flowing along its length. Although several studies have been
conducted to evaluate the impact, EMFs have not been proven to be harmful. In
any event, Sunbeam has reduced the strength of EMFs in its warming
blankets/mattress pads to very low levels.
Q What do I do if my pet chews the cord, I lose my controller, or the controller does
not operate properly?
A Please stop using the warming product immediately. Call our Consumer Service
number listed under How to Obtain Warranty Service and ask for instructions on
how and where to send the warming product.
Q My control feels warm to the touch. Should I be concerned?
A No. The control will feel warm to the touch when functioning properly.
Q My warming blanket or warming mattress pad doesn’t
heat properly.
A Check to make sure the cord is plugged into the module
and the power cord is firmly connected to the wall outlet.
Check that the control is “On”. If the system still fails to
heat, try the following fold test to see if it is operating.
1 Fold the warming blanket/warming mattress pad
three times over.
2 Reconnect the control to the module and plug the power
cord into the wall outlet.
Q Who should NOT use the warming blanket or warming mattress pad?
A The following people should NOT use the warming blanket or warming
mattress pad:
• An infant
• A child
• An incapacitated person
• A paraplegic
• A quadriplegic
• A diabetic
• Anyone insensitive to heat such as a person with poor blood circulation
• Anyone who cannot clearly understand the
instructions and/or operate the controls
Q What do the Underwriters Laboratories (UL) or (ETL) labels mean? What do either
of these labels mean about safety of Sunbeam warming products?
A Underwriters Laboratories (UL) develops product safety standards for a large range
of products and performs independent tests based on these standards. Products
tested by UL and which have passed all the safety standards are permitted to bear
the UL label. Intertek Testing Services (ETL) is a certified, independent testing
organization that tests products in accordance with UL safety standards and issues
the ETL label for those products that meet the relevant UL standards. All Sunbeam
products are tested to UL standards and bear either the UL or ETL label to indicate
that the product meets or exceeds UL/ETL safety standards for warming products.
Q I have heard that some warming products have Electromagnetic Fields (EMFs).
What is this?
Page 11

3 Press “On/Off” button, then turn the control to the highest setting and wait five to
seven minutes.
4 Put your hand between the folds and you should feel the blanket/mattress pad
warming. Note: Remember, the warming product is not a heating pad.
It will not feel hot to the touch when laid out flat in a normal manner.
Caution: Do not continue the test for more than seven minutes. DO NOT attempt to
make any internal adjustments to this appliance. If you have tried all of the
solutions above and the warming product still doesn’t work, stop using it
immediately, disconnect the power cord and contact our consumer service at the
800 number listed under How to Obtain Warranty Service.
Q What does a flashing light mean on my base unit?
A This remote controlled warming product is designed to notify you in the event that
a problem has been discovered by flashing the light on the base unit. Follow
instructions on the flag tag to reset base unit. First, check the blanket/mattress
pad for visual damage. If no visual damage is found, unplug the system from wall
outlet. Check that the base unit is well connected to the module. Plug the power
cord into the wall outlet. Set the base unit to “On.” If the system still does not
operate after two or three times trying to reset, disconnect the power cord and
contact consumer service at 800-892-7684.
9
Page 12

10
Sunbeam Products Inc. (“Sunbeam”) warrants that for a period stated below from
the date of purchase, this product will be free from defects in material and
workmanship.
• All warming products branded Arlington™ will carry a ONE year limited warranty.
• All warming products branded Sunbeam
®
Select™, SlumberRest®Cuddler™,
Cuddle Up
®
, and American Heritage Collection™ will carry a TWO year limited
warranty.
• All other warming products branded Sunbeam
®
and SlumberRest® will carry a
FIVE year limited warranty.
Sunbeam, at its option, will repair or replace this product or any component of the
product found to be defective during the warranty period. Replacement will be made
with a new or remanufactured product or component. If the product is no longer
available, replacement may be made with a similar product of equal or greater
value. This is your exclusive warranty. This warranty is valid for the original retail
purchaser from the date of initial retail purchase and is not transferable. Keep the
original sales receipt. Proof of purchase is required to obtain warranty performance.
Sunbeam dealers, service centers, or retail stores selling Sunbeam products do not
have the right to alter, modify, or any way change the terms and conditions of this
warranty. This warranty does not cover normal wear of parts or damage resulting
from any of the following: negligent use or misuse of the product, use on improper
voltage or current, use contrary to the operating instructions, disassembly, repair or
alteration by anyone other than Sunbeam or an authorized service center. Further, the
warranty does not cover Acts of God, or Nature, such as fire, flood, hurricanes and
tornadoes. Sunbeam shall not be liable for any incidental or consequential damages
caused by the breach of any express or implied warranty. Except to the extent
prohibited by applicable law, any implied warranty of merchantability or fitness for a
particular purpose is limited in duration to the duration of the above warranty. Some
states, provinces or jurisdictions do not allow the exclusion or limitation of incidental
or consequential damages or limitations on how long an implied warranty lasts, so the
above limitations or exclusion may not apply to you. This warranty gives you specific
legal rights, and you may also have other rights that vary from state to state.
Limited Warranty
Page 13

DO NOT RETURN THIS PRODUCT TO THE PLACE OF PURCHASE.
How to obtain warranty service:
We’re Here to Help. For any questions you may have about your warming product,
please contact Sunbeam Consumer Service: 1-800-892-7684, or visit our web site at:
www.sunbeambedding.com.
©2003 Sunbeam Products, Inc. All rights reserved. Sunbeam®, SlumberRest®, Cuddle
Up®, The Throw with a Brain® are registered trademarks and Arlington™, Select™,
American Heritage Collection™ and Cuddler™ are trademarks of Sunbeam Products, Inc.,
Boca Raton, FL 33431
Distributed by Sunbeam Products, Inc. Printed in U.S.A.
11
Page 14

PRODUCT REGISTRATION
Complete the attached registration form and return today
to receive these 3 important benefits:
CONFIRM YOUR WARRANTY:
Your prompt product registration confirms your right to the protection available
under the terms and conditions of your Sunbeam warranty.
PROTECT YOUR PRODUCT:
We will keep the model number and date of purchase of your new Sunbeam
product on file to help you refer to this information when necessary.
HELP US DEVELOP NEW PRODUCTS:
We value your input! Your responses will help us bring you new products
specifically designed to meet your needs.
▲
▲▲
REGISTER ONLINE AT: WWW.SUNBEAMBEDDING.COM
OR
MAIL TO:
SUNBEAM PRODUCT REGISTRATION DEPARTMENT
PO BOX 5190
KALAMAZOO MI 49003-9900
Please do not send product or other correspondence to this address.
Page 15

1
Initial:
State:
First name:
Last name:
Zip code:
Address: (number and street)
City:
Apt number:
Date of your birth:
Including yourself
, what is the total number of people
living in your household?
(Examples: 01, 02, 03, 04...)
Month Day Year
Date of birth (month/year) of the other adults and children in
your household:
Male Female
1. 2.
1. 2.
For your primary residence, do you:
1. Own 2. Rent
1619172018
Month Year
Male Female
1. 2.
1. 2.
Date of purchase:
3
Education:
(Please check which category applies to you):
1. Some high school 3. College degree
2. Completed high school 4. Graduate degree
Your marital status: 1. Married 2. Single
Your gender: 1. Male 2. Female
Month Year
Month Year
Month Year
Month Day Year
15
In the last six (6) months has anyone in your household
purchased any of the following items through the mail and/or
over the internet?
A. Mail B. Internet
1. Books/magazines
2. Children’s products
3. Clothes
4. Insurance/financial products
5. Music/video/DVD
6. Travel
7. Other
21
22
24
Please fill-out and return this card within 10 days!
021 T
I use these credit cards:
1. American Express 4. Visa
2. Gas/Retail 5. Other_____________
3. Master Card 6. Do not have credit cards
23
▼
▼
▼
Purchase price: $ .00
PLEASE FOLD AND SEAL WITH TAPE BEFORE MAILING. DO NOT STAPLE.
6
2
E-mail address: (EXAMPLE: yourname@yourhost.com)
1. Yes! I want to receive offers or communications from Sunbeam via e-mail.
2. Yes! I want to receive offers or communications that may interest me from other companies via e-mail. I understand this e-mail address
may be shared with and/or combined with information from other sources.
Thank you! We appreciate your responses to this questionnaire. The information you choose to share with us will be used by us and our marketing partners to offer you
product information and other communications that may interest you. If you prefer not to be contacted about these special offers, please check here
Product purchased:
1. Warming blanket 3. Warming throw
2. Warming mattress pad
4
Style number:
5
Store where purchased:
7
Please describe this purchase:
1. A first time purchase
2. A replacement to this brand
3. A replacement of another brand
4. An additional purchase
5. Received as a requested gift
6. Received as a surprise gift
8
What do you consider the most important factors influencing
your decision to purchase this warming product?
1. Color/style 7. Warranty
2. Replacement of existing 8. Auto-off feature
3. Value for price 9. Large number of heat settings
4. Friend/relative’s 10. Energy savings
recommendation 11. Cold weather
5. Advertising 12. Gift for someone else
6. Brand name I trust 13. Other_______________
10
How often do you turn on/plan on turning on your warming product
(using its heating capacity)? (Check all that apply)
B. Once C. Once
A. Everyday a week a month
1. In the winter
2. In the fall
3. In the spring
4. In the summer
11
What is the approximate temperature your home thermostat is set
to through out the night during winter?
1. Under 55 4. 66-70
2. 56-60 5. 71-75
3. 61-65 6. Over 75
12
How often do you purchase this type of product?
1. Received as a gift 4. Every 4-5 years
2. First time purchase 5. Every 6-9 years
3. Every 1-3 years 6. Every 10+ years
13
Which of the following products do you have or plan to own?
1. Warming blanket 3. Electric throw
2. Warming mattress pad
14
We appreciate your responses to this questionnaire and the information you provide will be used by us and our
marketing partners to offer you product information and other communication that may interest you.
This information in no way will have an effect on your warranty terms.
How did you first learn about this product?
1. Inside the store 3. News story-public relations
2. Advertisement 4. Tr usted brand
9
Someone in my home participates in the following activities:
(Check all that apply)
1. Crafts 10. Outdoor activities
2. Cultural arts/events 11. Own a pet
3. Do-it-yourself 12. Personal computing
4. Enter sweepstakes/contests 13. Read books
5. Finance/investments 14. Self improvement
6. Fitness/exercising/jogging 15 . Sports
7. Gardening 16. Travel
8. Gourmet cooking 17. TV shopping
9. Home decorating 18. Watch sports on TV
RPOB 9/02
Page 16

Manual del Usuario
PRODUCTOS DE CALOR A CONTROL REMOTO
P.N. 112865
Page 17

INSTRUCCIONES IMPORTANTES,
NO DESTRUYA ESTA COPIA
Advertencias y salvaguardas
Al igual que con todos los productos eléctricos, el uso incorrecto o el
incumplimiento de las instrucciones puede causar sobrecalentamiento,
incendio o lesiones personales. Por favor lea la etiqueta del producto y
todas las instrucciones antes de utilizar su producto de calor.
1. No utilice este producto de calor con bebés, niños, personas
discapacitadas, parapléjicos, cuadripléjicos, diabéticos, personas
insensibles al calor como quienes sufren problemas de circulación,
o cualquier otra persona que no pueda comprender claramente las
instrucciones y/u operar los controles.
2. No utilice con cables dañados. Los cables dañados pueden llevar a
que se produzca un incendio. No encierre, doble, cruce ni pinche los
cables entre los listones, el colchón o los resortes de la cama ni
contra paredes, respaldares ni el bastidor de la cama.
3. No lave en seco este producto de calor. El líquido de limpieza
puede dañar el aislamiento del elemento de calentamiento. El
lavado incorrecto puede causar problemas con el alambre de
calentamiento, lo cual puede causar un incendio.
4. No pinche, flexione ni exponga el alambre de calentamiento a
frotación. Un alambre de calentamiento dañado puede traer como
resultado el posible sobrecalentamiento o la aparición de fuego.
5. Apague el control del producto de calor cuando no lo use.
6. Mantenga el control alejado de una ventana abierta.
7. No utilice alfileres; estos pueden dañar el cableado eléctrico.
8. Asegúrese de que esta manta/funda de colchón se emplee
solamente en un circuito de electricidad de CA de 110-120 voltios.
No la utilice con un cable de extensión.
9. Puede haber un aumento del calor en áreas donde el producto de
calor se amontone o pliegue durante su uso.
10. Mantenga todos los perros, gatos y otras mascotas alejadas de este
producto de calor. Éste es un aparato eléctrico que pueden dañar o
con el que se pueden lesionar.
11. No utilice esta manta/funda de colchón en una cama de agua, sofá,
cama de litera o cama ajustable.
12. No utilice otro dispositivo de calor electrónico conjuntamente con su
producto de calor.
13. Utilice la manta/funda de colchón del tamaño apropiado para su
cama. Por ejemplo, utilice una manta de calor de 1 plaza (tamaño
twin) en una cama del mismo tamaño.
14. Si no se siguen las Instrucciones Importantes, el producto de calor
no funcionará de manera correcta.
15. Si observa que el producto de calor no está funcionando
debidamente, desenchúfelo inmediatamente y llame al Servicio al
Cliente de Sunbeam al número 800 que aparece bajo “Cómo
obtener servicio en garantía”.
Page 18

Bienvenido
Gracias por elegir un producto de
calor Sunbeam®. Con su compra ha
realizado una verdadera inversión
en su comodidad y puede esperar
mantenerse abrigado y cómodo
durante muchos días fríos por venir.
Con más de 50 años de experiencia y
25 millones de familias que disfrutan
los productos de calor Sunbeam®,
puede descansar cómodamente,
sabiendo que Sunbeam®es la marca
en la que puede confiar… por su
calidad y rendimiento. Entonces
prepárese para un sueño mucho más
reparador.
Matriz del control remoto . . . . . . . . . . . . . . . . . . . . . . . . . . . . . . . . . . . . . . . 2
Característica de apagado automático y precalentamiento . . . . . . . . . . . . 2
Prueba de los pliegues . . . . . . . . . . . . . . . . . . . . . . . . . . . . . . . . . . . . . . . . . 3
Control remoto . . . . . . . . . . . . . . . . . . . . . . . . . . . . . . . . . . . . . . . . . . . . . 3-5
Cómo instalar las pilas . . . . . . . . . . . . . . . . . . . . . . . 3
Programación de la manta/funda de colchón eléctrica . . . 4
Cómo usar su(s) control(es) . . . . . . . . . . . . . . . . . . . . . 5
Instalación de los controles remotos duales . . . . . . . . . .5
Paso a paso . . . . . . . . . . . . . . . . . . . . . . . . . . . . . . . 5
Varios productos de calor a control remoto . . . . . . . . . . . . . . . . . . . . . . . . 6
Cómo cambiar las definiciones del control remoto . . . . . 6
Cómo cambiar las definiciones de la unidad base . . . . . 6
Cuidado y limpieza . . . . . . . . . . . . . . . . . . . . . . . . . . . . . . . . . . . . . . . . . . . . 7
Preguntas frecuentes . . . . . . . . . . . . . . . . . . . . . . . . . . . . . . . . . . . . . . . 8-9
Garantía . . . . . . . . . . . . . . . . . . . . . . . . . . . . . . . . . . . . . . . . . . . . . . . . . . . . 10
Cómo solicitar servicio en garantía . . . . . . . . . . . . . . . 11
Índice temático
1
Page 19

2
Matriz de la característica del control remoto
Número de parte Operación Pantalla Apagado Definiciones Operación Precalentamiento Fácil Agarre
inalámbrica luminada automático de calentamiento silenciosa operación simple
❂❂10 horas 10 ❂❂ ❂❂
I
85R (Control único)
I
85RKQ (Control dual)
Característica de apagado automático y precalentamiento
Característica de apagado automático para los controles de
la Manta y Funda de colchón:
La característica de “Auto-Off” (apagado automático) ha sido
diseñada para brindar seguridad y para conservar la energía, ya
que apaga automáticamente su producto de calor después de 10
horas de uso continuo.
La función de apagado automático cuenta 10 horas a partir del momento en que se encendió
el control.
Para control dual: Cada control funciona en forma independiente y se apagará 10 horas
después de haberlo encendido.
Precalentamiento:
1 Para utilizar la característica de precalentamiento, simplemente oprima el botón redondo
“On/Off” (encendido y apagado) y luego oprima el botón “Preheat” (precalentamiento). La
función de precalentamiento calentará la cama durante un período de 30 minutos.
2 Para reiniciar la característica de precalentamiento, simplemente oprima el botón “On/Off”
para apagar.
3 Para volver a encender, repita el paso 1.
Para volver a encender todos los productos de calor
después de un apagón:
Presione el botón “On/Off”, el producto de calor comenzará a calentarse.
Nota: Después de un apagón, la característica de apagado automático vuelve a iniciar
el temporizador.
Page 20

3
Prueba
de los
pliegues
Antes del primer uso:
1 Quite el producto de la bolsa de almacenamiento de
vinilo/caja.
2 Jale los controles del pliegue del centro del producto de
calor.
3 Asegúrese de que el cable de la unidad base esté
conectado al módulo de la manta/funda de colchón y
enchufe el cable de alimentación al tomacorriente.
PRECAUCIÓN: No continúe la prueba de los pliegues durante más de siete minutos. NO trate de efectuar ajustes internos a este aparato. Si siguió cada paso de la prueba de los pliegues y el producto de calor
no calienta, deje de usarlo inmediatamente, desconecte el cable de alimentación y comuníquese con Servicio al Cliente llamando a la línea 800 que aparece bajo Cómo obtener servicio en garantía (page 11).
1 Retire la tapa del compartimiento de las pilas de la parte de
atrás del control remoto.
2 Coloque tres pilas AAA, haciendo coincidir los polos + y - de
las pilas con los que figuran dentro del compartimiento de
las pilas.
3 Vuelva a colocar la tapa del compartimiento de las pilas.
4 Si su manta/funda de colchón tiene dos controles remotos, repita
los pasos 1 a 3 para instalar las pilas en el segundo control
remoto. (No se incluyen las tres pilas AAA para cada control)
4 Presione el botón “On/Off”. Luego coloque el control en
la posición más alta y espere de cinco a siete minutos.
5 Coloque su mano entre los dobleces y debería sentir la
manta/funda de colchón calentándose. Nota: Recuerde
que el producto de calor no es una almohadilla que
irradia calor. No se sentirá caliente al tacto cuando se
coloque estirado en forma normal.
1
2
3
Cómo instalar las pilas
Page 21

Características:
• CONTROL REMOTO: Operación inalámbrica
• APAGADO AUTOMÁTICO: Apagado automático independiente a las
10 horas (ver página 2)
• CONTROL DIGITAL ELECTRÓNICO: Para una programación fácil
con LCD iluminada
• PRECALENTAMIENTO: Para lograr una calidez acogedora antes
de irse a dormir (ver página 2)
• DIEZ VALORES DE TEMPERATURA: Seleccione su zona de confort personal
• ESTADO SÓLIDO: Para un control de temperatura exacto y constante
• AGARRE SIMPLE: Control ergonómico para una fácil operación
• BEEP AUDIBLE: Indica un cambio de definición
I
85R (Control único)
I
85RKQ (Control dual)
Control
remoto
4
INSTALACIÓN DEL CONTROL DUAL para la funda de colchón
y la manta
coloque el cable
debajo de la cama
Unidad base
(debajo de la cama)
Etiqueta
del cable
Conector
del cable
Módulo
Etiqueta
Lado izquierdo
Lado derecho
Cable de
alimentación
coloque el cable
debajo de la cama
Unidad base
(debajo de la cama)
Etiqueta
del cable
Conector
del cable
Módulo
Etiqueta
Cable de
alimentación
Lado izquierdo
Lado derecho
1
2
3
4
5
6
1
2
3
4
5
6
INSTALACIÓN DEL CONTROL ÚNICO para la funda de colchón
y la manta
Page 22

5
1 Coloque la manta/funda de colchón eléctrica en la cama con la etiqueta
hacia afuera en el extremo de los pies (ver diagrama, página 4).
2 Asegúrese de que el cable de la unidad base esté conectado al módulo en
la parte inferior de la manta/funda de colchón eléctrica hasta que las
trabas e plástico encajen en su lugar.
PRECAUCIÓN: El cable debe estar COMPLETAMENTE CONECTADO. Una
conexión suelta puede tener como consecuencia un riesgo de incendio.
3 Coloque el cable de la unidad base sobre el piso, debajo de la cama. No
coloque el control entre la manta y los resortes de la cama. Evite enredarlo o pincharlo.
4 Coloque la unidad base en el piso debajo de la cama.
5 Coloque el/los control(es) remoto(s) donde sea más conveniente para usted.
6 Enchufe el cable de alimentación a un tomacorriente de pared de 110-120 voltios.
*Consulte la página 6 si tiene más de un Producto de calor a control remoto Sunbeam.
2
Paso a paso
PRECAUCIÓN: No enchufe
el cable de alimentación al
tomacorriente hasta que
haya instalado completamente el producto de calor
según las instrucciones.
• Desconecte el cable de alimentación de la pared antes
de separar el control del producto de calor.
• Asegúrese siempre de que los cables NO estén
encerrados ni pinchados entre listones de la cama,
colchones, resortes, contra la pared, el respaldar o el
bastidor de la cama, ni entre muebles, paredes o sillas.
PRECAUCIÓN: No trate de introducir el enchufe por la
fuerza. Este aparato tiene un enchufe polarizado (una pata
es más ancha que la otra). Para reducir el riesgo de
descargas eléctricas, este enchufe ha sido diseñado para
ser colocado sólo de una manera en el tomacorriente. Si el
enchufe no cabe en el tomacorriente, gire el enchufe. Si
aun así no calza, consulte a un electricista calificado.
IMPORTANTE
Cómo usar su(s) control(es) remoto(s):
1 Para encender la manta/funda de colchón eléctrica, simplemente oprima
el botón “On/Off”. La luz de la pantalla iluminada se encenderá y
comenzará a calentar en la última posición de confort utilizada.
PRECAUCIÓN: SIEMPRE ponga en la posición “Off” (apagado)
la manta/funda de colchón eléctrica cuando no la use.
2 Para apagar la manta/funda de colchón eléctrica, simplemente
oprima el botón “On/Off”.
Definiciones de la operación dual:
Cada persona puede tener un control completo sobre su nivel de confort personal para lograr la mejor
calidez personalizada.
• Ubique el interruptor de definición del control dual (en el reverso de cada control, sobre el panel
de las pilas).
• Coloque el interruptor en la definición de operación deseada. Ambos lados o uno solo
El botón “left” (izquierda) hace funcionar el lado izquierdo.
El botón “right” (derecha) hace funcionar el lado derecho.
Se puede utilizar cualquiera de los controles, ya sea “left” o “right” para hacer funcionar toda la manta/funda de colchón.
Page 23

interruptores
Si cuenta con dos o más productos de calor a control remoto Sunbeam® (en su hogar), es posible que se produzca interferencia. Para evitar todo tipo de interferencia entre varios productos de calor a control remoto, debe cambiar la configuración del control remoto y de la unidad base del segundo producto de calor.
Para cambiar la configuración de su SEGUNDO producto de calor:
Control remoto
1 Abra la tapa de las pilas en el/los control(es) remoto(s). Podrá ver un pequeño interruptor cuadrado de color plateado debajo del cierre de
seguridad de la pila.
2 Podrá ver dos pequeños interruptores etiquetados “1” y “2”. Para cambiar la configuración del control remoto, mueva cuidadosamente uno
de los nterruptores hasta la posición de arriba con un pequeño destornillador.
Una vez que ha cambiado la configuración en su control remoto, debe definir la unidad base para que coincida.
Unidad base:
1 Desenchufe la unidad base y dele la vuelta. Cuidadosamente inserte un destornillador pequeño en la ranura de la pequeña tapa cuadrada
de 1/2 pulgada sobre los interruptores y levante la tapa fuera de la base.
2 Para cambiar la configuración del control remoto, mueva cuidadosamente uno de los interruptores hasta la posición de arriba utilizando un
destornillador pequeño para que coincida con su control remoto.
Las definiciones de las configuraciones del control remoto y de la unidad base deben coincidir.
3 Vuelva a colocar la tapa en su lugar, enchufe la unidad base y verifique que la misma pueda recibir instrucciones del control remoto (la
unidad base debe hacer un beep cuando se presiona el botón on/off o cuando se define el nivel de confort en el control remoto).
Nota: Repita los pasos que aparecen más arriba utilizando las definiciones sugeridas para cualquier otro producto de calor operado con control remoto.
ADVERTENCIA: Los cambios o modificaciones que se realicen
a esta unidad y no estén expresamente aprobados por la parte
responsable del cumplimiento podrán anular la facultad del
usuario para operar el equipo.
Varios productos de calor a control remoto
6
3 opciones de
configuración alternativas
configuración
estándar
3 opciones de
configuración alternativas
configuración
estándar
Control remoto
Unidad base
Page 24

(Recomendamos que lave su manta eléctrica antes del primer uso).
Antes de lavar o almacenar su producto de calor:
SI NO SIGUE ESTA SECUENCIA, EL PRODUCTO DE CALOR NO FUNCIONARÁ.
1 Desconecte el cable de alimentación de la pared antes de separar el control del
producto de calor.
2 Desconecte siempre el cable de alimentación del módulo.
3 Siga cuidadosamente todas las instrucciones de lavado de su producto de calor
para evitar que se encoja o se dañe.
NO
• NO limpie en seco su manta/funda de colchón. Los solventes de limpieza en seco
dañarán el elemento de calentamiento.
• NO utilice blanqueador ni líquidos de limpieza.
• NO utilice un exprimidor.
• NO planche la manta/funda de colchón.
• NO utilice bolitas de naftalina ni aerosoles de ningún tipo.
• NO encienda la manta/funda de colchón hasta que esté completamente seca.
Será fácil y seguro cuidar de su producto de calor siguiendo estos pasos simples.
Lavado a máquina
1 Remoje previamente la manta/funda de colchón durante 15 minutos en detergente
suave y agua tibia.
2 Lave con detergente suave y agua tibia en el ciclo delicado o suave en la lavadora
por dos minutos. Recuerde, no utilice blanqueador.
3 Enjuague en agua limpia y tibia.
4 Seque en centrifugado en la lavadora. Luego estírela suavemente a su
tamaño original.
Secado a máquina
Precaución: No utilice secadoras comerciales ni secadoras en su lavandería del
barrio. Estas secadoras se calientan demasiado y pueden dañar el cableado del
producto de calor.
1 Precaliente la secadora en el ciclo de baja temperatura por 2 minutos.
2 Coloque la manta/funda de colchón dentro de la secadora y seque durante
10 minutos a temperatura baja.
3 Extraiga la manta/funda de colchón mientras continúa húmeda y estírela
suavemente a su tamaño original.
4 Siga secando al aire sobre una cuerda o en la varilla de la cortina de baño.
NO utilice ganchillos de ropa.
5 El producto de calor debe estar completamente seco antes de usar.
Lavado a mano
1 Remoje previamente la manta/funda de colchón durante 15 minutos en detergente
suave y agua tibia.
2 Exprima la espuma del detergente suavemente varias veces.
3 Enjuague en agua limpia y tibia.
Secado al aire
1 Estire suavemente la manta/funda de colchón a su tamaño original.
2 Seque al aire sobre una cuerda o cuélguela en la varilla de cortina de baño.
NO utilice ganchillos de ropa.
3 El producto de calor debe estar completamente seco antes de usar.
Cuidado y limpieza
DE SU PRODUCTO DE CALOR
7
Page 25

Preguntas frecuentes
SOBRE SU PRODUCTO DE CALOR
P He oído que algunos productos de calor tienen Campos electromagnéticos
Electromagnetic Fields, EMF). ¿Qué es esto?
R EMF significa Electromagnetic Field, es decir Campo Electromagnético. Se refiere a
un campo eléctrico que rodea a cualquier cable con corriente fluyendo. Si bien se
han realizado varios estudios para evaluar el impacto de los EMF, no se ha
comprobado que sean dañinos. En todo caso, Sunbeam ha reducido la fuerza de
los EMF en sus mantas/fundas de colchón eléctricas a niveles muy bajos.
P ¿Qué debo hacer si mi mascota muerde el cable, si pierdo el control remoto o si
éste no funciona correctamente?
R Por favor deje de usar el producto de calor inmediatamente. Llame al número de
nuestro Servicio al Cliente que aparece bajo Cómo obtener servicio en garantía y
solicite las instrucciones sobre cómo y dónde enviar el producto de calor.
P Mi control se siente caliente al tacto. ¿Debería estar
preocupado?
R No. El control se siente caliente al tacto cuando está
funcionando correctamente.
P Mi manta o funda de colchón eléctricas no calientan
correctamente.
R Verifique que el cable esté enchufado al módulo y el
cable de alimentación esté conectado firmemente al
tomacorriente en la pared. Verifique que el control esté
en posición “On” (encendido). Si el sistema sigue sin
calentar, haga la siguiente prueba de los pliegues para ver si está funcionando.
1 Pliegue la manta/funda de colchón eléctricas en tres.
P ¿Quién NO debería usar la manta o funda de colchón eléctricas?
R Las siguientes personas NO deberían usar la manta o funda de colchón eléctricas:
• Bebés
• Niños
• Personas discapacitadas
• Parapléjicos
• Cuadripléjicos
• Diabéticos
•
Todas las personas insensibles al calor como quienes sufren problemas de circulación
• Cualquier persona que no puede comprender claramente las
instrucciones y/u operar los controles
P¿Qué significan las etiquetas del Underwriters Laboratories (UL) o (ETL)?
¿Qué significan estas etiquetas acerca de seguridad en los productos de
calor Sunbeam?
R Underwriters Laboratories (UL) desarrolla estándares de seguridad de productos
para una gran variedad de productos y realiza pruebas independientes en base a
estos estándares. Los productos examinados por UL y que han pasado todos los
estándares de seguridad pueden llevar la etiqueta de UL. Intertek Testing Services
(ETL) es una organización certificada independiente que examina productos de
acuerdo con los estándares de seguridad de UL y emite la etiqueta de ETL para
aquellos productos que satisfacen los estándares UL relevantes. Todos los
productos Sunbeam son probados según los estándares de UL y llevan la etiqueta
UL o ETL para indicar que el producto satisface o excede la seguridad UL/ETL para
los productos de calor.
8
Page 26

2 Vuelva a conectar el control al módulo y enchufe el cable de alimentación a un
tomacorriente de pared.
3 Presione el botón “On/Off” . Luego coloque el control en la posición más alta y
espere de cinco a siete minutos.
4 Coloque su mano entre los pliegues y debería sentir la manta/funda de colchón
calentándose. Nota: Recuerde que el producto de calor no es una almohadilla
que irradia calor. No se sentirá caliente al tacto cuando se coloque estirado de
forma normal.
Precaución: No continúe la prueba por más de siete minutos. NO trate de efectuar
ajustes internos a este aparato. Si ha intentado todas las soluciones antes
mencionadas y el producto de calor sigue sin funcionar, deje de usarlo de inmediato,
desconecte el cable de alimentación y comuníquese con nuestro Servicio al Cliente al
número 800 que aparece bajo Cómo obtener servicio en garantía.
P ¿Qué significa una luz que titila en mi unidad base?
R Este producto de calor operado con control remoto está diseñado para notificarle
en caso de que se produzca un problema, haciendo titilar la luz de la unidad base.
Siga las instrucciones que aparecen en la etiqueta para reiniciar la unidad base.
Primero, controle que la manta/funda de colchón no tenga daños visibles. Si no
encuentra daños visibles, desenchufe el sistema del tomacorriente de la pared.
Verifique que la unidad base esté bien conectada al módulo. Enchufe el cable de
alimentación a un tomacorriente de pared. Ponga la unidad base en “On”. Si el
sistema no funciona después de intentar reiniciarla dos o tres veces, desconecte el
cable de alimentación y comuníquese con Servicio al Cliente al 800-892-7684.
9
Page 27

Sunbeam Products Inc. (“Sunbeam”) garantiza que, por el período a partir de la
fecha de compra que se indica a continuación este producto estará libre de defectos
de materiales y mano de obra.
• Todos los productos de calor marca Arlington™ tienen una garantía limitada de
UN año.
• Todos los productos de calor marca Sunbeam
®
Select™, SlumberRest®Cuddler™,
Cuddle Up, y American Heritage Collection™ tienen una garantía limitada de
DOS años.
• Todos los demás productos de calor marca Sunbeam
®
y SlumberRest®menos
SlumberRest
®
Luxury Pillow Top Martes Pad tienen una garantía limitada de
CINCO años.
Sunbeam, a su elección, reparará o reemplazará este producto o cualquier
componente del mismo que tenga defectos durante el período de garantía. El
reemplazo se realizará por un producto o componente nuevo o reparado. Si el
producto ya no estuviera disponible, se lo reemplazará por un producto similar de
valor igual o superior. Ésta es su garantía exclusiva. La garantía es válida para el
comprador minorista original a partir de la fecha de la compra original y no es
transferible. Conserve el recibo de compra original. Se requiere que presente un
recibo de compra para solicitar servicio en garantía. Los agentes y centros de
servicio de Sunbeam o las tiendas minoristas que venden productos Sunbeam no
tienen derecho a adulterar, modificar o cambiar de cualquier otro modo los términos
y las condiciones de esta garantía. Esta garantía no cubre el desgaste normal de las
piezas ni los daños que se produzcan como resultado de: uso negligente o mal uso
del producto, uso con tensión o corriente inapropiada, uso contrario a las
instrucciones de operación, desarmado, reparación o alteración por un tercero que
no sea Sunbeam o un Centro de Servicio Autorizado. Asimismo, la garantía no cubre
fuerza mayor ni desastres naturales tales como incendios, inundaciones, huracanes
y tornados. Sunbeam no será responsable de daños incidentales o emergentes
causados por el incumplimiento de alguna garantía expresa o implícita. Excepto en la
medida prohibida por la ley aplicable, cualquier garantía implícita de comerciabilidad
o aptitud para un fin determinado se limita en cuanto a su duración a la duración de
la garantía antes mencionada. Algunos estados, provincias o jurisdicciones no
permiten la exclusión o limitación de los daños incidentales o emergentes ni las
limitaciones a la duración de las garantías implícitas, de modo que es posible que la
exclusión o las limitaciones antes mencionadas no se apliquen en su caso. Esta
garantía le otorga derechos legales específicos y es posible que tenga otros derechos
que varíen entre un estado y otro.
Garantía limitada
10
Page 28

NO DEVUELVA ESTE PRODUCTO AL LUGAR DONDE LO COMPRÓ.
Cómo solicitar servicio en garantía
Estamos aquí para ayudarlo. Si tiene alguna pregunta sobre su producto de calor,
comuníquese con el Servicio al Cliente de Sunbeam: 1-800-892-7684, o visite nuestro
sitio Web en: www.sunbeambedding.com.
©2003 Sunbeam Product, Inc. Todos los derechos reservados. SlumberRest®, Cuddle
Up®, The Throw with a Brain® son marcas comerciales registradas y Arlington™,
Select™, American Heritage Collection™, Cuddler™ son marcas registradas de
Sunbeam Products, Inc.
Distribuido por Sunbeam Products, Inc. Impreso en U.S.A.
11
Page 29

REGISTRO DE PRODUCTO
Complete la forma de registro de producto adjunta y envíela
hoy para recibir 3 beneficios importantes:
CONFIRMAR SU GARANTÍA:
El registro inmediato del producto confirma su derecho a la protección que está
disponible en virtud de los términos y condiciones de su garantía Sunbeam.
PROTEGER SU PRODUCTO:
Conservaremos el número de modelo y la fecha de compra de su nuevo
producto Sunbeamen nuestros archivos para ayudarle a hacer referencia a esta
información cuando sea necesario.
AYÚDENOS A DESARROLLAR NUEVOS PRODUCTOS:
¡Valoramos su opinión! Sus respuestas nos ayudarán a brindarle nuevos
productos diseñados específicamente para satisfacer sus necesidades.
▲
▲▲
INSCRÍBASE EN LÍNEA EN WWW.SUNBEAMBEDDING.COM
O
Enviar por correo a:
SUNBEAM PRODUCT REGISTRATION DEPARTMENT
PO BOX 5190
KALAMAZOO MI 49003-9900
Favor de no enviar productos u otra correspondencia a esta dirección.
Page 30

1
Inicial:
Estado:
Nombre:
Apellido:
Código postal:
Dirección: (número y calle)
Ciudad:
Número de dpto.:
Fecha de su
cumpleaños:
Incluido usted,
¿cuántas personas en total viven en
su hogar?
(Ejemplos: 01, 02, 03, 04...)
Mes Día Año
Fecha de nacimiento (mes / año) de los otros adultos y niños
que viven en su hogar:
Hombre Mujer
1. 2.
1. 2.
Residencia principal: Usted
1. Es dueño 2. Alquila
1619172018
Mes Año
Hombre Mujer
1. 2.
1. 2.
Fecha de compra:
3
Educación:
(Sírvase marcar la categoría que corresponda):
1. Secundaria incompleta 3.
Título de instituto de enseñanza superior
2. Secundaria completa 4. Título universitario
Estado civil: 1. Casado 2. Soltero
Sexo: 1. Hombre 2. Mujer
Mes Año
Mes Año
Mes Año
Mes Día Año
15
En los últimos seis (6) meses, ¿alguien en su familia ha
comprado alguno de los siguientes artículos por correo
y/o por Internet?
A. Correo B. Internet
1. Libros / revistas
2. Productos para niños
3. Ropa
4. Productos de seguros / financieros
5. Música / videos / DVD
6. Viajes
7. Otro
21
22
24
¡Sírvase llenar esta tarjeta y reenviarla dentro de los 10 días!
021 T
Utilizo las siguientes tarjetas de crédito:
1. American Express 4. Visa
2.
De gasolinera / De tienda minorista
5. Otra_____________
3. Master Card 6.
No tengo tarjetas de crédito
23
▼
▼
▼
Precio de compra: $ .00
DOBLE Y CIERRE CON CINTA ADHESIVA ANTES DE ENVIARLO POR CORREO. NO ENGRAPE.
6
2
Dirección de correo electrónico: (EJEMPLO: sunombre@suservidor.com)
1. ¡Sí! Deseo recibir ofertas y correspondencia de Sunbeam por correo electrónico.
2. ¡Sí! Deseo recibir ofertas o correspondencia que puedan interesarme de otras compañías por correo electrónico. Entiendo que esta
dirección de correo electrónico puede compartirse y/o combinarse con información de otras fuentes.
¡Gracias! Le agradecemos que haya respondido este cuestionario. Utilizaremos la información que decida compartir con nosotros junto con nuestros asociados de marketing para
ofrecerle información sobre los productos y otra correspondencia que pueda ser de su interés. Si prefiere no recibir ninguna de nuestras ofertas especiales, sírvase marcar aquí
Producto comprado:
1. Manta eléctrica 3. Cobertor eléctrico
2. Funda de colchón eléctrica
4
Número de estilo:5Tienda donde se compró el producto:
7
Sírvase describir esta compra:
1. Compra por primera vez
2. Reemplazo de esta marca
3. Reemplazo por otra marca
4. Compra adicional
5. Recibido como regalo solicitado
6. Recibido como regalo sorpresa
8
¿Cuáles considera que son los factores más importantes que
influenciaron su decisión de comprar este producto de calor?
1. Color / estilo 7. Garantía
2. Reemplazo del existente 8. Función de apagado automático
3. Valor por el precio 9.
Gran cantidad de definiciones de temperatura
4. Recomendación de un 10. Ahorro de energía
amigo / pariente 11. Clima frío
5. Publicidad 12. Regalo para alguien más
6. Marca en la que confío 13. Otro_______________
10
¿Con qué frecuencia enciende / planea encender su producto de calor
(utilizando la capacidad de calentamiento)? (Marque todos los que correspondan)
A. Todos B. Una vez C. Una vez
los días por semana al mes
1. En invierno
2. En otoño
3. En primavera
4. En verano
11
¿A qué temperatura está regulado aproximadamente el termostato
de su hogar en la noche durante el invierno?
1. Por debajo de 55 4. 66-70
2. 56-60 5. 71-75
3. 61-65 6. A más de 75
12
¿Con qué frecuencia compra este tipo de productos?
1. Lo recibí de regalo 4. Cada 4-5 años
2. Primera vez que lo compró 5. Cada 6-9 años
3. Cada 1-3 años 6. Cada 10 años o más
13
¿Cuáles de estos productos tiene o planea tener?
1. Manta eléctrica 3. Cobertor eléctrico
2. Funda de colchón eléctrica
14
Le agradecemos sus respuestas a este cuestionario; utilizaremos la información que usted nos proporcione junto con
nuestros asociados de marketing para ofrecerle información sobre los productos y otra correspondencia que pudiera
interesarle. Esta información no afecta de ninguna forma los términos de su garantía.
¿Cómo se enteró de la existencia de este producto?
1. En la tienda 3. Por las noticias – relaciones públicas
2. Publicidad 4. Marca de confianza
9
Alguien en mi familia participa en las siguientes actividades:
(Marque todos los que correspondan)
1. Manualidades 10.
Actividades al aire libre
2. Artes / eventos culturales 11. Tiene mascota
3. Hágalo usted mismo 12. Computadora personal
4. Sorteos / concursos 13. Lee libros
5. Finanzas / inversiones 14.
Actividades de autoayuda
6.
Acondicionamiento físico / ejercicio
15. Deportes
7. Jardinería 16. Viajes
8. Cocina Gourmet 17. Compras por TV
9. Decoración del hogar 18.
Ve los deportes por televisión
RPOB 9/02
 Loading...