

Page 1
— — —
FOLD
— — —
— — —
FOLD
— — —
— — —
FOLD
— — —
— — —
FOLD
— — —
— — —
FOLD
— — —
— — —
FOLD
— — —
— — —
FOLD
— — —
— — —
FOLD
— — —
www.sunb eam.ca
P.N.120329 Rev.B
MODELS /
MODÈLE S
Us er Ma nua l
Mixmaster®Stand Mixer
No tic e d’e mpl oi
Batteur sur socle Mixmaster
MD
2379-33 , 2 385-33,
2623-33 & 2594 -33
IMPORTANT SAFEGUARDS
When usingelectrical appliances, basicsafety precautionsshould always befollowed including
the following:
READ ALL INSTRUCTIONS BEFORE USE
1. Toprotect againstrisk of electricalshock, do notput mixer inwater orother liquid. Thismay cause
personal injuryor damage tothe product.
2. Closesupervision is necessarywhen mi
xer i
s usedby or nearchildren or incapacitated persons.
3. Unplugfrom outlet whilenot inuse, before puttingon or takingoff parts, andbefore cleaning.
4. Avoidcontacting moving parts.Keep hands, hair,clothing, as wellas spatulas and otherutensils
away frombeaters during operationto reduce the riskof injury to personsand/or damage to the
mixer.
5.
Do not operatemixer with a damagedcord or plug orafter the appliance malfunctionsor is dropped
or damagedin any manner. Ifthe mixerbecomes damaged pleasecontact Consumer Servicesfor
assistance. (1-800-458-8407in the U.S.or 1-800-667-8623 inCanada)
6.
The useof attachments notrecommended or sold byJarden Consumer Solutions orthe manufacturer
may causefire, electrical shockor injury.
7. Donot use outdoorsor for commercialpurposes.
8. Donot let cordhang over edgeof table orcountertop or touchhot surfaces,including the stove.
9. Removebeaters from mixerbefore washing
.
10.Do not placemixer or bowls onor near a hotgas or electric burner, ina heatedoven (microwave,
convention, convection,etc.), or on anyother heated surface.
11. Do not usemixer forother than intendeduse.
12. Do not leavemixer unattendedwhile it isoperating.
13. Any servicing,other than cleaningand usermaintenance should beperformed by anyauthorized
service representative.
14. When mixingliquids, especially hotliquid, usea tall containeror make smallqua
ntitie
s ata time
to reducespillage.
15. Don’tAbuse Cord. Never carry themixer by thecord oryank it todisconnect from anoutlet;
instead, graspthe plug andpull to disconnect.
SAFETY
THIS UNIT IS FOR HOUSEHOLD USE ONLY
The motorof your
MIXMASTER®Mixer
is protectedby a heatcured insulation.
This isa
standard process.Du eto the heatcuring of theinsulation, you mayexperien cean
odor andpossibly a slightwisp of smoke fromyour mixer’smotor. Thiseffect will disappear
after t
he firstfew uses.
SPECIAL INSTRUCTIONS
FOR PRODUCTS PURCHA SED IN THE U.S. AND CANADA ONLY
Toreduce the riskof electrical shock,this appliance isequipped witha polarized plug(one
blade iswider than theother). This plug fitsa polarized outlet onlyone way; if theplug does
not fitfully into theoutlet, reverse the plug.If it still doesnot fit, contact aqualified electrician.
Do notattempt to defeatthis safety feature. Also,do not pull, twistor otherwise abuse
the
p
ower cord;instead, grasp theplug and pull toremove from the outlet.
CONSIGNES IMPORTANTES
L’utilisationde tout électroménager exigecertaines précautionsfondamentales, ycompris lessuivantes:
LISEZ LES INSTRUCTIONS AVANT L’EMPLOI
1. Pour évitertout risque dechoc électrique, n’immergez lebatteur ni dans l’eauni dans un autre
liquide. Cecipourrait causer desblessures ou abîmer l’appareil.
2. Redoublez devigilance lorsque lebatteur est utilisé pardes enfants o
u pardes personnes
handicapées, oubien en leurprésence.
3.
Débranchez lebatteur en find’utilisation, avant demonter ou dedémonter toute pièceet avant de
le nettoyer
.
4. Évitez toutcontact avec lespièces mobiles. Gardez mains,cheveux et vêtements– ainsi que
spatules ouautres ustensiles decuisine – à l’écartdes fouets pendant l’emploi,afin de limiter les
risques deblessures ou d’endommagementdu batteur.
5. Ne faites
pas
fonctionner unbatteur dont lecordon d’alimentation ou lafiche est endommagé,
qui amal fonctionné, aété échappé ou endommagéd’une façon quelconque. Sile batteur a été
abîmé, veuillezentrer en rapportavec le service àla clientèle. (Composez le1 800 458-8407aux
États-Unis oule 1 800667-8623 au Canada.)
6. L’utilisationd’accessoires non conseillésou venduspar Jarden ConsumerSolutions ou le
constructeur présentedes risques d’incendie,de choc électriqueou de blessurescorporelles.
7. N’
employez c
et appareilni en pleinair ni a desfins commerciales.
8. Ne laissez
pas
pendre lecordon au bordde la table oudu plan de travailet veillez à cequ’il ne
touche pasà des surfaceschaudes, notamment à lacuisinière.
9. Séparez lesfouets du batteuravant de les laver.
10.
Ne placezpas le batteursur ou à proximitéd’un brûleur chaud oudans un four allumé
(four à
micro-ondes, decuisinière ordinaire, àconvection, ou autre),ou sur touteautre surface chaude.
11. N’utilisez
pas
le batteurà des finsautres que celles auxquellesil est destiné.
12. Ne laissez
jamais
le batteursans surveillance quandil fonctionne.
13.Le service,outre l’entretien quepréconise la notice d’emploi,et les réparationsne doivent êtreexécutés
que parle personnel compétentautorisé.
14
.
Lors dumélange de liquides,et tout particulièrementde liquide chaud,servez-vous du grandbol ou bien
ne travaillezque de faiblesvolumes à la foispour éviter les éclaboussures.
1
5
.
Ne maltraitezpas le cordon– ne portez jamaisle batteur en letenant par son cordonet ne tirez pasle
cordon d’uncoup sec pourle débrancher: tenezla fiche entrele pouceet l’index pourla sortir dela prise.
SÉCURITÉ
CET APPAREIL N’EST DESTINÉ QU’À L’USAGE DOMESTIQUE
Le moteurdu batteur
MIXMASTERMDest protégépar une isolationthermodurcie
, unprocédé standard.
Par suitedu thermodurcissement del’isolation, il estpossible qu’il sedégage une certaineodeur et
peut-être mêmeun petitruban de fuméedu moteur dubatteur. Absolumentnormal, ce phénomène
cessera aprèsquelques utilisations.
INSTRUCTIONS SPÉCIALES
POUR LES PRODUITS ACHETÉS AUX ÉTATS-UNIS ET AU CANADA
Pour réduirele risque dechoc électrique, cet appareilest équipé d’une fichepolarisée (ayant une lame
plus largeque l’autre). Lafiche n’enfonce dans lesprises polarisées que d’unefaçon ; sielle ne rentre
pas complètementdans la prisede courant, inversez-la. S
i ellen’enfonce toujours pasentièrement,
contactez unélectricien compétent.Ne modifiez ledispositif de sécuritéde la ficheen aucunefaçon.
De plus,ne donnez pasde coups secs surle cordon, ne letortillez pas et nele maltraitez pas; pourle
débrancher,tenez la ficheentre le pouceet l’index et tirez-ladoucement hors dela prise.
If theuse of anextension cord is necessary, pleasefollow these guidelines:
•
Use onlyextension cords havingan electrical rating notless than the ratingof the mixer.
•
Examine theextension cord beforeusing and do notuse if the extensioncord is damaged.
• Do notabuse the extensioncord and donot yank on anycord to disconnect.
• Keep allcords away fromheat and sharpedges.
SAVE THESE INSTRUCTIONS
WELCO ME
Congratulation so ny our purchase ofa SUNBEAM®MIXMASTER®Stand Mixer!
To learn moreab out SUNBEAM
®
products, please visit usat www.sunbeam.com.
CARING FOR YOUR MIXER
CLEANING YOUR MIXER
Unplug mixerfrom wall outlet.
Toclean the mixer, wipethe mixer head,stand and turntablewith a damp cloth,then dry.
DO NOT IMMERSETHE STANDMIXER IN WATER.
Avoid theuse of abrasive
cleaners, asthey may damagethe finish of themixer. Wash thebeaters and bowlsin hot, soapy
water aftereach use. Rinsethoroughly and dry.Beaters and bowlsmay also bewashed inan
automatic dishwasher.
If mixing bowlsare scratched orchipped, do notuse mixer.
STORING YOUR MIXER
Store themixer in adry location, such ason a countertop ortable top, or ina closet
or cupboard.Insert the beatersinto the proper sockets.Place the dough hooksand
other attachmentsin the mixingbowl.
Store thebowl(s) on theturntable. Wind theelectric cord intoa coil, thensecure it with a
twist fastener.
MAINTENANCE
The motorof your standmixer has been carefullylubricated at the factoryand does not require
any additionallubricant. Other thanthe recommended cleaning, nofurther user maintenance
s
hould benecessary.
For servicingor repairs pleasecontact Consumer Services forassistance. (1-800-458-8407
in the
U.S. or1-800-667-8623 in Canada)
HELPFUL HINTS
• When mixingliquids, especially hotliquid, use thelarge mixing bowl ormake small quantities
at atime to reducespillage.
• Ingredients shouldbe added tothe mixing bowlas they arespecified inthe recipe.
• Use themixing speed thatis recommended inthe recipe. Use themixing guide on thespee
d
c
ontrol dialof the mixerto help you findthe correct speed touse.
• If timesare specified inthe recipe, usethem! BE CAREFUL NOTTO OVER MIX. Over
mixing cancause the mixtureto become very tough.
• Should anobject, such asa spatula, fallinto the bowlwhile themixer is operating,turn the
mixer OFFimmediately, thenremove the object.
• For easierclean-up, remove beatersand rinse immediatelywith warm water.
S’il estindispensable d’utiliserune rallonge, observezles conseils s
uivants:
•
N’employez qu’unerallonge dont lapuissance nominale soit aumoins égale à celledu batteur.
•
Examinez soigneusementla rallonge avantde l’employer etne l’utilisez passi elle présentele moindre
endommagement.
• Traitezla rallonge avecdélicatesse etne la tirezpas brusquement pourla débrancher auniveau de
la prisede courant.
• Éloignez larallonge de lachaleur et dessurfaces ou arêtes coupantes.
GARDEZ CES INSTRUCTIONS
BIENV ENUE
Nous vous félicitons d’avoir sélectionné ceb atteur sur socleMI XMASTERMDde SUNBEAMMD!
Pour vous familiariser avec lespr oduits SUNBEAM
MD
, visitez notre siteWeb au www.sunbeam.ca.
SOINS À APPORTER AU BATTEUR
NETTOYAGE DU BATTEUR
Débranchez lemélangeur de laprise.
Pour nettoyerle batteur,passez un lingehumide sur latête, sur lesocle et surle plateau tournantpuis
asséchez-les.
NE PLONGEZ PAS LESOCLE DANS L’EAU.
Évitez l’emploide produits abrasifs,
ils endommagentirrémédiabl
ement lefini. Lavez lesfouets et les bolsà l’eau savonneuse chaudeaprès
chaque utilisation; rincez-lesà fond et asséchez-les.Les fouets et lesbols de malaxage sontégalement
lavables aulave-vaisselle.
RANGEMENT DU BATTEUR
Rangez lebatteur en lieupropre et sec –sur un plan detravail, une table, dansun placard ou surune
étagère, parexemple. Placez lesfouets dans leurs douillesrespectives et les crochetspétrisseurs ou
autres accessoiresdans les bols.
Posez l
es bolssur le plateautournant. Enroulez le cordond’alimentation puis attachez-leà l’aide d’un
lien souple.
ENTRETIEN
Le moteura été soigneusementlubrifié à l’usine etne nécessite pas degraissage ultérieur.Outre le
nettoyage conseillé,le batteur nerequiert aucun entretiensupplémentaire de lapart de l’utilisateur.
Pour toutservice ou touteréparation, veuillez entrer enrapport avec le serviceà la clientèle. (Composez
le 1800 458-8407
aux États-Unisou le 1800 667-8623 au Canada.)
CONSEILS PRATIQUES
• Quand vousmalaxez des liquides– et toutspécialement s’ils sontchauds –servez-vous du grand
bol oumalaxez par petitesquantités afin de réduireles éclaboussures.
• Déposez lesingrédients dans lebol dans l’ordrequ’indique la recette.
• Utilisez lavitesse de malaxagequ’indique la recette.Servez-vous du guide demalaxage du variateur
de vitessepour vous aiderà trouver la vitesseappropriée.
• Si larecette in
dique l
a duréede malaxage, observez-la! NE MALAXEZPAS PLUS QUE
NÉCESSAIRE. Unepréparation battue defaçon excessive peut devenirextrêmement ferme.
• Si unobjet, une spatulepar exemple, tombedans le bol aucours du malaxage, ARRÊTEZ
immédiatement lebatteur puis retirezl’article en question.
• Pour simplifierle nettoyage, démontezles fouets dèsque vous cessez deles utiliser et rincez-lessans
délai àl’eau tiède.
One-Year Limited Warranty
SunbeamProducts, Inc. doing business as Jarden Consumer Solutionsor ifin Canada,Sunbeam
Corporation(Canada) Limiteddoing business as Jarden Consumer Solutions(collectively “JCS”)
warrantsthat fora periodof oneyear from thedate ofpurchase, thisproduct willbe freefrom defects
in material and workmanship. JCS,at itsoption, will repair orreplace this productor anycomponent
of theproduct found tobe defective duringthe warrant
y period. Replacementwill bemade with a
new orremanufacturedproduct orcomponent. If theproduct is nolonger available, replacementmay
be madewith asimilar productof equal orgreater value. This isyour exclusive warranty. DoNOT
attemptto repairor adjustany electricalor mechanicalfunctionson thisproduct. Doing sowill void
thiswarranty.
Thiswarranty isvalid forthe originalretail purchaserfrom the dateof initial retail purchase and is not
transferable.
Keepthe originalsales receipt. Proofof purchaseis required toobtain warranty
performance.JCS dealers, service centers,or retailstores selling JCSproducts do not have theright to
alter,modify orany waychange the terms andconditions ofthis warranty.
Thiswarranty doesnot cover normal wearof partsor damage resulting fromany ofthe following:
negligentuse ormisuse ofthe product,use onimproper voltage orcurrent,use contraryto the
operatinginstructions
, disassembly, repair oralterationby anyoneother thanJCS oran authorizedJCS
servicecenter. Further,the warrantydoes notcover: Actsof God,such as fire, flood,hurricanesand
tornadoes.
Whatare thelimits on JCS'sLiability?
JCS shallnot beliable forany incidentalor consequentialdamagescaused bythe breachof any
express,implied orstatutorywarranty orcondition.
Exceptto theextent prohibited byapplicable law, anyimplied warrantyor conditionof
merc
hantabilityor fitness for aparticularpurpose islimited in durationto theduration ofthe above
warranty.
JCS disclaims allother warranties,conditions orrepresentations,express,implied, statutory or
otherwise.
JCS shallnot beliable forany damages of any kind resulting from thepurchase, useor misuseof, or
inabilityto usethe product includingincidental, special,consequential or similardamages orloss of
profits,or forany breachof contract,fundamen
tal orotherwise, orfor anyclaim broughtagainst
purchaserby anyother party.
Someprovinces, states orjurisdictionsdo notallow theexclusionor limitationof incidentalor
consequentialdamages orlimitationson howlong animplied warranty lasts,so theabove limitations
or exclusion may notapply toyou.
Thiswarranty givesyou specific legalrights,and youmay alsohave otherrights that varyfrom
provinceto province,state tostate orjurisdictionto jurisdict
ion.
How toObtain Warranty Service
In theU.S.A.
If youhave anyquestionregarding thiswarranty orwould like toobtain warranty service,
pleasecall 1800 458-8407and aconvenientservice centeraddress willbe provided toyou.
In Canada
If youhave anyquestionregarding thiswarranty orwould like toobtain warranty service,
pleasecall 1800 667-8623and aconvenientservice center addresswill beprovided toyou.
In theU.S.A., this warranty isofferedby SunbeamProdu
cts,Inc. doingbusiness Jarden Consumer
Solutionslocated inBoca Raton, Florida 33431.In Canada,this warranty isofferedby Sunbeam
Corporation(Canada) Limiteddoing business as Jarden Consumer Solutions,located at20B Hereford
Street,Brampton, Ontario L6Y0M1. If youhave anyother problemor claim inconnection withthis
product,please writeour ConsumerService Department.
P
LEASE DONOT RETURN THISPRODUCT TO ANYOF THESE ADDRESSES
OR TO THEPLACE OFPURCHASE
.
Garantielimitée deun an
SunbeamProducts,Inc.faisantaffairessouslenom deJardenConsumerSolutionsou,si auCanada,
|SunbeamCorporation(Canada)Limitedfaisantaffairessouslenom deJardenConsumerSolutions
(collectivement« JCS») garantitquepourune périodede unan àpartirde ladated'achat,ceproduitsera
exemptde défautsde pièceset de main-d'oeuvre.JCS,à sadiscrétion,répareraou remplaceraceproduitou
toutcomposantduproduitdéclarédéfectueuxpendantla périodede garantie.Leproduitoucomposantde
remplacementserasoitneufsoitréusiné.Sile produitn'estplusdisponible,il seraremplacéparunproduit
similairedevaleurégaleousupérieure.Ils'agitde votregarantieexclusive.N'essayezPASde réparerou
d'ajustertoutefonctionélectriqueou mécaniquedece produit,celaannulera cettegarantie.
Cettegarantieestvalidepourl'acheteurinitialdu produità ladated'achatinitialeetne peutêtretransférée.
Conservezvotrefactured'achatoriginale.Lesdétaillantsetles centresde serviceJCS oulesmagasinsde détail
vendantlesproduitsJCSn'ontpasle droitd'altérer,de modifierou dechangerde touteautremanièrelestermes
etles conditionsdecettegarantie.
Cettegarantienecouvrepasl'usurenormaledespiècesou lesdommagesrésultantdetoutecausesuivante:
utilisationnégligenteoumauvaiseutilisationdu produit,utilisationd'unvolt
ageou d'uncourantincorrects,
utilisationcontraireauxinstructionsd'utilisation,démontage,réparationou altérationparquiconqueautreque
JCSou uncentrede serviceautoriséde JCS.En outre,lagarantienecouvrepas: lescatastrophesnaturelles
commeles feux,lesinondations,les ouraganset lestornades.
Quellessontleslimitesderesponsabilitéde JCS?
JCSne serapastenu responsabledetoutdommageconséquent ouaccessoirecausépar laviolationdeto
ute
garantieouconditionexpresse,impliciteou réglementaire.
Saufsicelaest interditpar lesloisen vigueur, toutegarantieou conditionimplicitede valeurmarchandeou
adéquationà unusageparticulierestlimitéeenduréeà laduréede lagarantieénoncéeci-dessus.
JCSexcluttouteautregarantie,conditionou représentation,expresse,implicite,réglementaireou autre.
JCSne serapastenu responsabledetoutdommagedetoutesorterésultantde l'achat,de l
'usageou dumauvais
usage,ou del'incapacitéàutiliserleproduitycomprislesdommagesou lespertesdeprofitsconséquents,
accessoires,particuliersou similaires,oupourtouteviolationde contrat,fondamentaleou autre,oupourtoute
réclamationportéeà l'encontredel'acheteurpar touteautrepartie.
Certainesprovinces,étatsou juridictionsne permettentpasd'exclusionoude limitation pourdes dommages
conséquentsou accessoiresoude limitationssu
rla duréedela garantieimplicite,dece faitleslimitationsou
exclusionsci-dessuspeuventnepas s'appliquerà votrecas.
Cettegarantievousdonnedesdroitsjuridiquesparticuliersetvouspouvezégalementdisposerd'autresdroits
pouvantvarierd'uneprovinceà l'autre,d'unétat àl'autreou d'unejuridictionà l'autre.
Commentobtenirle Serviceaux termesdela garantie
AuxÉ.U.
Sivousavezdes questionsconcernantcettegarantieou sivoussouhaitezobtenir
leserviceauxtermesdela
garantie,veuillezappelerau 1800458-8407et l'adressed'uncentredeserviceappropriévousserafournie.
AuCanada
Sivousavezdes questionsconcernantcettegarantieou sivoussouhaitezobtenirle serviceaux termesdela
garantie,veuillezappelerau 1800667-8623et l'adressed'uncentredeserviceappropriévousserafournie.
AuxÉ.U.,cettegarantieestofferteparSunbeamProducts,Inc. faisantaffairessouslenom deJardenConsume
r
Solutions,situéà BocaRaton,Floride33431.AuCanada,cettegarantieestofferteparSunbeamCorporation
(Canada)Limitedfaisantaffairessousle nomde JardenConsumerSolutions,situéau 20BHereford Street,
Brampton,OntarioL6Y0M1.Pour toutautreproblèmeou réclamationen relationavecce produit,veuillez
écrireà notredépartementdu Serviceà laclientèle.
VEUILLEZNEPASRETOURNERCE PRODUITÀ AUCUNEDE CESADRESSESOUÀ
L'ÉTABLISSEMENTD'ACHAT.
For productquestions:
Sunbeam ConsumerService
Canada :1.800.667.8623
USA :1.800.458.8407
www.sunbeam.ca
©2010 SunbeamProducts, Inc. doing businessas Jarden Consumer Solutions.
All rightsreserved.
Imported anddistributed by Sunbeam Corporation(Canada) Limited,
doing businessas Jarden Consumer Solutions,
20B HerefordStreet, Brampton, Ontario L6Y 0M1.
Pour toutequestion quant à ceproduit, appelez le
service àla clientèle de Sunbeam:
au Canada: 1800 667.8623
aux États-Unis: 1800 458.8407
www.sunbeam.ca
©2010 SunbeamProducts, Inc. faisant affairessous le nom de Jarden ConsumerSolutions.
Tous droitsréservés.
Importé etdistribué par Sunbeam Corporation(Canada) Limited
faisant affairessous le nom deJarden Consumer Solutions,
20B HerefordStreet, Brampton (Ontario) L6Y 0M1.
GSC-ER0710-174810
Printed inChina Imprimé enChine
Page 2
— — —
FOLD
— — —
— — —
FOLD
— — —
— — —
FOLD
— — —
— — —
FOLD
— — —
— — —
FOLD
— — —
— — —
FOLD
— — —
FIGURE 4
POWER/SPEED INDICATOR LIGHT
TÉMOIN DE SOUSTENSION ET DE
VITESSE
SPEED CONTROL DIAL
VARIATEUR DE VITESSE
FIGURE 2
CONE
BEATER
FOUET
CONIQUE
FIGURE 3
F
IGURE 1
A. BOUTON D’ÉJECTION DES ACCESSOIRES –
Placé surla poignée, ilsert à
éjecter lesfouets à palesou les crochetspétrisseurs pour permettrede les
laver aisément.
B. TÊTE ET BATTEURSD ÉCENTRÉS –
La têtedu batteur MIXMASTERMDet
les fouetssont décentrés parrapport au bolde malaxage afin quevous
puissiez facilementajouter des ingrédientsau cours dufonctionnement.
C. BOLS DEMAL AXAGEE NACIER INOXY DABLE–
De 2,2litres et 4,4litres,
sont parfaitspour amalgamer petiteset grandes quantitésd’ingrédients.
(PASTOUS MODÈLES)
D. SÉLECTEUR DEBO LDE MALAXAGE –
Vousfaites glisser le levierà gauche
pour utiliserle petit bolou à droitepour employer le grand.
E. PLATEAU TOURNANT –
Étudié pouraccueillir le petitbol ou legrand bol
et lesfaire tourner durantle malaxage.
F. TÊTE BASCULANTE ET VERROUILLABLE –
La têtedu batteur
MIXMASTERMDbascule etse verrouille commodémentpour faciliter le
retrait desbols de malaxageet des accessoires.
G. GÂCHETTE DEDÉG AGEMENT DUBATTE UR–
Libère latête du batteuret
permet dela séparer dusocle pour lenettoyage et le rangement.
H. VARIATEUR DE VITESSE ET TÉMOIN –
Le témoinlumineux MARCHE-
ARRÊT sertégalement à indiquerla vitesse defonctionnement.
I. VARIATEUR À 12 VITESSES –
Les 12vitesses à miseen marche progressive
assurent uncontrôle supérieur dumalaxage ;la vitesse choisieest en outre
maintenue, quelleque soit ladensité du mélange.
J. POI GNÉEDO UCEAU TOUCHE R,DE BONNE TENUE EN MAIN –
Confortable, lapoignée moulée fournitune préhension sûre.
K. SURPUISSANCE BURST OF POWERMD–
Vousappuyez sur le boutonpour
augmenter automatiquementla vitesse desfouets et obtenirun surcroît de
puissance immédiat.
L. FOUETS À PALES CHROMÉS –
Pratiques pourmettre le beurreet le sucre
en crèmeou malaxer lespréparations à gâteauxdenses.
M.CROCHE TSPÉTR ISSEURS CHROMÉS –
Simplifient lepétrissage des pâteset
des autrespréparations lourdes. (PASTOUS MODÈLES)
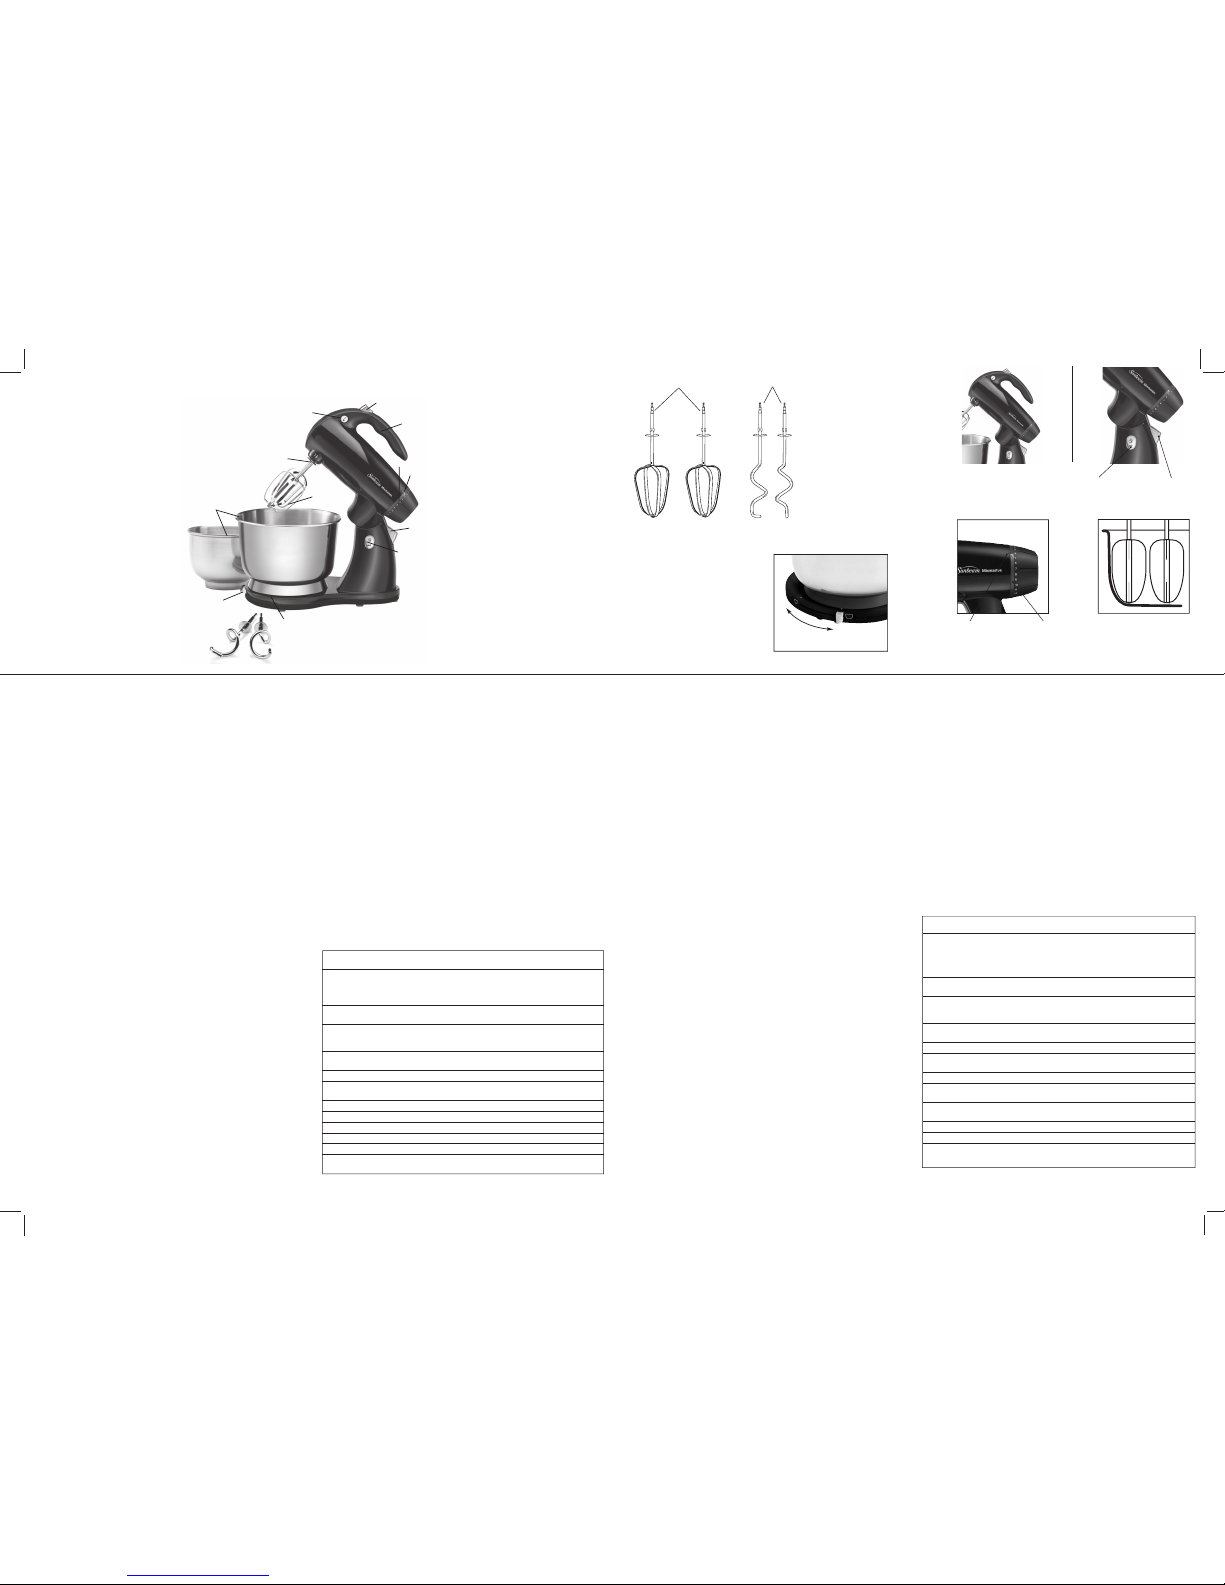
A. ATTACHMENT EJECTB UTTON –
The ejectbutton, located onthe side
of thehandle, releases thebeaters or doughhooks for easy cleaning.
B. OFF-CENTER HEAD AND BEATERS –
The headof the MIXMASTER
®
Stand Mixerand beaters arepositioned off-center tothe bowl tomake
it easierto add ingredientsduring mixing.
C. STAINLESS STEEL MIXING BOWLS –
2.0 and4.0 quart mixingbowls
are idealfor mixing largeor small quantitiesof ingredients. (NOTALL
MODELS)
D. TURNTABLEB OWLSE LECTOR –
Simply slidethe bowl selector
lever tothe left whenusing the smallbowl and to theright when
using thelarge bowl.
E. TURNTABLE –
Designed tofit both thelarge and smallbowl, the
turntable allowsthe bowl toturn while mixing.
F. TILT BACK LOCKING HEAD BUTTON –
The headof the
MIXMASTER®Stand Mixertilts back andlocks securely into
position toallow easy removalof mixing bowlsand attachments.
G. MIXERRE LEASET RIGGER –
Remove themixer head fromthe base
for convenientcleaning and storage.
H. POWER/SPEED INDICATOR LIGHT –
The ON/OFFlight is
also usedto indicate speedsetting.
I. 12 VARIABLE SPEEDS –
The 12variable speeds with
softstart ensuresuperior mixing controland maintains
speed regardlessof the mixingload.
J. SOF TGRIP HANDLE –
The softgrip molded handlegives you
comfort anda firmer gripwhile mixing.
K. BURST OFPO WER®BUTTON –
Press downon button to
automatically increasethe beater speedfor an
immediate burstof power.
L. CHROME PLATED BEATERS –
For creamingbutter and sugar,plus
mixing heavycake mixes.
M.CHROME PLATED DOUGH HOOKS –
Dough hookstake the
hard workout of kneadingdough and otherheavy mixtures.
(NOT ALLMODELS)
M
L
A
B
F
C
D
G
M
L
I
H
E
J
K
FEATURES OF YOUR STAND MIXER CARACTÉRISTIQUES DU BATTEUR SUR SOCLE
PREPARING THE STAND MIXER FOR USE
Before preparingthe mixer for use,be sure the speed control dial isin the OFFposition and
the electriccord is unplugged. Besure to wash bowls and attachments beforeinitial use.
ATTACHING THE TURNTABLE
Place therevolving turntable into thebase of the stand by pressing the turntableinto the
center holeof the adjustable slotuntil it snaps into place.
ADJUSTING THE TURNTABLE
The turntablemust be adjusted dependingupon which bowl size is being used.To adjust,
press downon the TurntableBowl Selector Switch andslide the switch to the proper icon.
(See Figure1)
ATTACHING AND REMOVING THE MIXING HEAD
To attachthe mixing head, press in on the mixer-releasetrigger, locatedat the rear of the
stand. Placethe mixer head onthe stand so that the metal pivot onthe bottom of the mixer
head goesinto the latched openingon top of the stand. As you releasepressure from the
mixer-release trigger,the top of thelatch should clamp around the metal pivot. Oncethe
mixing headis lowered into position,it will lock into place. (See Figure2A)
RAISING AND LOWERING THE MIXING HEAD
Press thehead lock button locatedon the neck of the
stand mixer
. Whilethe button is
depressed, holdthe handle and easethe head of the
stand mixer
back. TheMIXMASTER
®
mixer headwill lock into thisposition. Tolower the mixing head, press the head lock
button. Whilethe button is depressed,hold the handle and ease the head ofthe
stand mixer
down. A“click” sound will indicatewhen the mixer head has locked intoposition.
(See Figure2B) Be surethe mixer head is securelyin position before using.
NOTE:
This
mixer isNOT intended for useaway from the stand.
INSTALLING THE ATTACHMENTS
Be surethe speed control dialis in the OFF position and unplugelectric cord fromthe electrical
outlet.
Lift mixerhead up and backto pull it out of the way ofthe bowl. (See Figure2B)
NOTE:
It isimportant that the beatersor dough hooks go into the correct sockets,
otherwise themixer will not giveyou the proper mixing action. Do notrisk ruining arecipe
or damagingyour mixer.Read the following instructionscarefully.
Insert thebeaters or dough hooks,one at a time, using a combination pressingand twisting
motion, until theysnap into position. If anattachment does not properly snap into place,
pull itout of the socketand rotate it one quarter turn. Reinsert thebeater or dough hook
into thesocket until it snapsinto position.
BEATERS
One ofthe beaters is shapedlike a cone and has a nylon buttonon the bottom. It goes into
the socketon the side ofthe mixer nearest the side of thebowl. The otherbeater goes into
the socketnearest the center ofthe bowl. (See Figure4) See beater symbols located on the
bottom ofthe mixer head.
DOUGH HOOKS
The doughhook with the smallerwasher and foot goes into the socketon the sideof the
mixer nearestthe side of thebowl. The other dough hook with the largewasher goes into
the socketnearest the center ofthe bowl. See the dough hook symbolslocated on the
bottom ofthe mixer head.
PREPARATION
ADDING THE MIXING BOWL
Once youhave selected the bowlyou wish to use, move the turntablebowl selector switchto
the propersetting – the largebowl icon if you are using the largebowl, and the small bowl
icon ifyou are using thesmall bowl. Place the desired mixing bowl ontothe turntable.
NOTE:
Mixing bowlsshould NEVER be usedin a conventional oven, microwave oven,
on topof the range oron any other heated surface. If mixingbowls are scratched
or chipped,do not use themixer.
OPERATING INSTRUCTIONS
ABOUT THE SPEED CONTROL DIAL
The speedcontrol dial is usedfor turning the mixer ON and OFFand for selectingits
12 mixingspeeds.
(See Figure3)
Rotate thespeed control dial ina clockwise direction to increase mixing speed,and in
a counterclockwise directionto decrease mixing speed.
As yourotate the speed controldial, notice that a numbered speed isaligned with the
indicator lighton the side ofthe mixer head. This numbered speed indicatesthe speed at
which themixer is operating.
Rotate thespeed control dial untilthe indicator is opposite the numbered speedyou wish
to use.
MIXING GUIDE
Please keepin mind that thevarious mixing tasks and related speeds listed inthe following
table mayvary slightly from recipeto recipe.
For mostrecipes, it is betterto begin your mixing on a slower speeduntil the ingredients
begin combining,then move to theappropriate speed range for the particular task.
When mixinglarger quantities you mayneed to increase the speed due tothe amount of
mixing requiredand the larger loadon the machine.
When buildingup a recipe thatrequires the addition of dry ingredients, suchas flour,slow
the speeddown while these ingredientsare being added to avoid a snow stormeffect. Once
the
extra ingredientsbegin combining, slowly increaseto the appropriate speed for the
particular mixingtask.
Use thechart below to determinethe best setting to use when preparing yourfavorite recipes.
TILT BACK LOCKING HEAD BUTTON
TURNTABLE BOWL SELECTOR
Slidethe bowl selectorlever to theleft whenusing the small
bowland to theright when usingthe largebowl.
MIXER RELEASE TRIGGER
BOUTON DE VERROUILLAGE DE
LA TÊTE BASCULANTE
SÉLECTEUR DE BOL DE MALAXAGE
Vousfaites coulisser lelevier à gauchepour employerle petit
bolde malaxage età droite pouremployer legrand.
GÂCHETTE DE DÉGAGEMENT
DU BATTEUR
SPEED
SETTING MIXING GUIDE EXAMPLE
1 Fold-Knead Use whenmixing dry ingredients orwhen folding two
portions ofa recipe together, suchas a beaten eggwhite into
a batteror when directions callfor LOW speed. Use for
kneading bread.
2 Stir Use whenstirring liquid ingredients orwhen gentle action
is neededto moisten dry ingredients.
3 Blend Use whenquick breads require a brisk action, justenough
to blendingredients but not enoughto develop
a smoothbatter.
4 Mix Use when mixing dry ingredients and liquid ingredients
together alternately ina recipe.
5 Combine Use whenrecipe calls for combiningingredients together.
6 Cake Mixes Usewhen preparing packaged cake mixes orwhen directions
call forMEDIUM speed.
7 Cream Usewhen creaming sugar and butter together.
8 Whip Use to whip potatoesor to develop a smooth batter.
9 Whip/Cream Use towhip cream or todevelop a light, fluffy texture.
10 Desserts Use to beat airinto whipped desserts.
11 Frostings Use when preparing light, fluffy frostingsand candies.
12 Egg Whites Use when aerating eggs and egg whites.
Use whendirections call for HIGHspeed.
Note: Dueto variations iningredient temperatures andquantities, the MixingGuide speedsare only suggested.
If necessary, adjustspeeds asneeded to achievedesired results.
2,2 L
4,4 L
(A) (B)
PRÉPARATION EN VUE DE L’UTILISATION
Avant de commencerà préparer le batteur pour l’employer,assurez-vous que le variateurde
vitesse soità la position OFF(arrêt) et que le cordon d’alimentation soitdébranché. Lavez
bien sûrles bols et lesaccessoires avant la toute première utilisation.
MISE EN PLACE DU PLATEAU TOURNANT
Fixez leplateau tournant à labase du socle, en l’enfonçant dans letrou central dela fente
réglable jusqu’àce qu’il s’enclenche avecun déclic.
AJUSTEMENT DU PLATEAU TOURNANT
Le plateautournant doit être régléen fonction du bol de malaxage employé.Pour faire la
modification, appuyez sur le levier du sélecteurde bol et faites-le coulisser jusqu’à l’icône
voulue. (Voyez la figure 1)
MONTAGE ET DÉMONTAGE DE LA TÊTE DU BATTEUR
Pour fixerla tête du batteur, appuyez sur la gâchette de dégagement(elle se trouve à
l’arrière dusocle). Placez la têtesur le socle de telle façon quele pivot enmétal situé à la
partie inférieurede la tête dubatteur s’enclenche dans le dispositif de blocage duhaut du
socle. Tandis que vous réduisezvotre pression sur la gâchette, le dispositif deblocage du
haut dusocle s’enclenche avec lepivot de métal. Une fois la têteen position baissée,le
dispositif sebloque. (Voyezla figure 2A)
LEVÉE ET BAISSÉE DE LA TÊTE
Appuyez surle bouton de verrouillagede la tête basculante (au haut dupied du socle).
Alors quele bouton est enfoncé,saisissez la poignée puis tirez la tête dubatteur en arrière.
La têtedu MIXMASTERMDse bloqueradans cette position. Pourbaisser la tête, appuyez sur
le boutonde verrouillage de latête. Alors que le bouton est enfoncé,saisissez la poignée
pour abaisserla tête. Vousentendrez un «clic» qui signale quela tête estbloquée en
position. (Voyez la figure 2B)Assurez-vous que la tête soit sûrement fixée avantl’utilisation.
REMARQUE:
Ce batteurn’est PASconçu pour fonctionner lorsque libéré de sonsocle.
MONTAGE DES ACCESSOIRES
Assurez-vous quele variateur de vitessesoit réglé à l’arrêt (OFF) puis débranchezle cordon àla
prise.
Levez latête et tirez-la enarrière pour l’écarter du bol. (Voyezla figure 2B)
REMARQUE:
Il estprimordial que les fouetsou crochets soient insérés dans les douilles
appropriées pourmalaxer convenablement les ingrédients.Ne risquez ni l’échec de la recette
ni l’endommagementdu batteur. Lisezattentivement les instructions qui suivent.
Insérez lesfouets ou les crochetsun par un, en enfonçant et entournant simultanément
jusqu’à ceque l’accessoire soit correctementencliqueté. Si l’un d’eux ne s’adapte pas
convenablement, sortez-le de la douille et tournez-led’un quart de tour.Insérez-le alors de
nouveau dansla douille jusqu’à cequ’il soit parfaitement encliqueté.
FOUETS
Le fouetde forme conique comporteun bouton de nylon à sa partie inférieure.C’est celui
que vousenfoncez dans la douillela plus proche de la paroi périmétriquedu bol. L’autre
fouet estdestiné à la douillela plus proche du centre du bol. (Voyez lafigure 4) Les
symboles desfouets sont représentés surla partie inférieure de la tête dubatteur.
CROCHETS PÉTRISSEURS
Le crochetà petite rondelle etpetit pied se place dans la douille laplus proche de la paroi
périmétrique dubol. L’autre crochetest destiné à ladouille la plus proche du centre du bol.
Les symbolesdes crochets sont représentéssur la partie inférieure de la tête dubatteur.
PRÉPARATION
MISE EN PLACE DU BOL DE MALAXAGE
Quand vousavez décidé quel bolutiliser, faitesglisser le levier du sélecteur de bol(du
plateau tournant) àla position voulue – àl’icône du grand bol si vous employez legrand
bol ouà l’icône du petitbol si vous employez le petit bol.
Posez alorsle bol de malaxage
désiré surle plateau tournant.
REMARQUE :
Les bolsne devraient JAMAIS êtremis dans un four de cuisinière, dansun
four àmicro-ondes, sur un foyerde cuisinière ou sur toute autre surface chauffée.
MODE D’EMPLOI
VARIATEUR DE VITESSE
Le variateurde vitesse sert àMETTRE le batteur EN MARCHE, à l’ARRÊTER età
sélectionner l’unedes 12 vitesses. (Voyez lafigure 3)
Vous tournez levariateur de vitesse dans le sens desaiguilles d’une montrepour augmenter
la vitesseet dans le senscontraire des aiguilles d’une montre pour la réduire.
Alors quevous tournez le variateurde vitesse, vous remarquerez qu’un numéro de vitesse
coïncide
avec letémoin lumineux du hautde la tête. Le nombre indique la vitesseà laquelle
fonctionne lebatteur.
Faites tournerle variateur de vitessejusqu’à ce que le nombre de la vitessedésirée
corresponde avecle témoin.
GUIDE DE MALAXAGE
Rappelez-vous queles différents malaxages etles vitesses données au tableau suivant
risquent devarier légèrement d’une recetteà une autre.
Il estgénéralement préférable de débuterle malaxage à une vitesse inférieure à lavitesse
jugée appropriéejusqu’à ce que lesingrédients commencent à se mélanger puis depasser
à lavitesse préconisée pour l’achever.
Dans lecas des grosses quantités,il vous faudra peut-être augmenter la vitessedu batteur
par suitedu gros malaxage requiset du poids accru des ingrédients.
Quand unerecette requiert l’addition d’ingrédients– de farine, par exemple – réduisezla
vitesse defonctionnement pour les ajouterafin d’éviter la formation d’un
nuage defarine.
Une foisque les nouveaux ingrédientscommencent à s’amalgamer,revenez lentement à la
vitesse appropriéepour le genre demalaxage.
Utilisez letableau ci-dessous pour établirles vitesses propres à procurer les résultats
escomptés pourvos recettes favorites.
RÉGLAGE GUIDE DE
DE VITESSE MALAXAGE EXEMPLE
1 Mélanger Àutiliser pour mélangerdes ingrédientssecs, incorporer
délicatement, des ingrédientsde larecette àd’autres –des œufsmontés
pétrir en neige dans unepâte, parexemple –ou lorsquela recette
requiert unmalaxage àBASSE VITESSE. Sert aussià pétrir
la pâte àpain.
2 Brasser Àutiliser pourajouter des ingrédientsliquides oulorsqu’un
mélange délicatest requispour mouiller des ingrédients secs.
3 Mélanger Àutiliser lorsque despains éclairsnécessitent unmélange
bref, quisoit suffisantpour mélanger les ingrédients sans
homogénéiserla pâte.
4 Malaxer À utiliser pour amalgamer en alternantles ingrédients secs
et liquidesd’une recette.
5 Combiner Àutiliser lorsque la recetteindique detout mélanger.
6 Préparation À utiliserpour lesmélanges àgâteaux préemballés et
pour gâteaux quand lemalaxage doitse faireà VITESSEMOYENNE.
7 Mettre encrème À utiliserpour mettrele beurreet lesucre encrème.
8 Fouetter À utiliserpour fouetter les pommesde terreainsi quepour
homogénéiserles pâtes.
9 Fouetter/crémer À utiliserpour fairela crèmefouettée ainsi que pourobtenir
une texturetrès légère.
10 Desserts À utiliser pourcharger les dessertsde minuscules bulles d’air.
11 Glaçages À utiliser pour préparerdes confiseries et desglaces légères.
12 Blancs d’œufs À utiliserpour monterles œufset les blancsd’œufs ainsi
que quandle malaxagedoit sefaire àGRANDE VITESSE.
Remarque:Par suitedes variations queprésentent lesingrédients (températureet quantité,par exemple)les
vitessesdu guidede malaxagene sontfournies qu’àtitre indicatif.Ajustez lesvitesses au besoin pour obtenir
les résultatsrecherchés.
 Loading...