

Page 1

Kettle BBQ
Compact Electric BBQ Oven
Instruction Booklet
HG5400
Please read these instructions carefully
and retain for future reference.
Page 2

Contents
Sunbeam’s Safety Precautions 3
Features of your Kettle BBQ 4
Using your Kettle BBQ 6
BBQ Oven Cooking in your Kettle BBQ 8
Tips to cooking a great steak 9
Tips to cooking great fish fillets 9
Care and Cleaning 10
Guide to Meat and Poultry Cooking Times
and Temperatures 11
Recipes 13
Important instructions – retain for
future use.
Page 3

Sunbeam’s Safety Precautions
SAFETY PRECAUTIONS FOR YOUR
KETTLE BBQ
• Do not immerse the control probe in water or any
other liquid.
• Do not use the control probe in any other
appliance.
• Do not leave the control probe in the appliance
when storing outdoors.
• For indoor use, adequate ventilation or an
exhaust fan is recommended.
Sunbeam is very safety conscious when designing
and manufacturing consumer products, but it is
essential that the product user also exercise care
when using an electrical appliance. Listed below are
precautions which are essential for the safe use of
an electrical appliance:
• Read carefully and save all the instructions
provided with an appliance.
• Always turn the power off at the power outlet
before you insert or remove a plug. Remove by
grasping the plug - do not pull on the cord.
• Turn the power off and remove the plug when the
appliance is not in use and before cleaning.
• Do not use your appliance with an extension cord
unless this cord has been checked and tested by
a qualified technician or service person.
• Always use your appliance from a power outlet of
the voltage (A.C. only) marked on the appliance.
• This appliance is not intended for use by persons
(including children) with reduced physical,
sensory or mental capabilities, or lack of
experience and knowledge, unless they have been
given supervision or instruction concerning use
of the appliance by a person responsible for their
safety.
• Children should be supervised to ensure that they
do not play with the appliance.
• The temperature of accessible surfaces may be
high when the appliance is operating.
• Never leave an appliance unattended while in
use.
If you have any concerns regarding the performance and use of your appliance,
please visit www.sunbeam.com.au or contact the Sunbeam Consumer Service Line.
Ensure the above safety precautions are understood.
• Use well away from walls and curtains.
• Do not leave plastic utensils in contact with
appliance while cooking.
• Only use appliance fully assembled with all parts
correctly in place, as specified in this instruction
book.
• Do not use the stand for any purpose other
than to support your Kettle BBQ Oven.
• Use only the supplied temperature control probe,
model TC0720 with this product.
• Do not use an appliance for any purpose other
than its intended use.
• Do not place an appliance on or near a hot gas
flame, electric element or on a heated oven.
• Do not place on top of any other appliance.
• Do not let the power cord of an appliance hang
over the edge of a table or bench top or touch any
hot surface.
• Do not operate any electrical appliance with a
damaged cord or after the appliance has been
damaged in any manner. If damage is suspected,
return the appliance to the nearest Sunbeam
Appointed Service Centre for examination, repair
or adjustment.
• For additional protection, Sunbeam recommend
the use of a residual current device (RCD)
with a tripping current not exceeding 30mA in
the electrical circuit supplying power to your
appliances.
• Do not immerse the appliance in water
or any other liquid unless recommended.
• Appliances are not intended to be operated
by means of an external timer or separate remote
control system.
• This appliance is intended to be used in
household and similar applications such as: staff
kitchen areas in shops, offices and other working
environments; farm houses; by clients in hotels,
motels and other residential type environments;
bed and breakfast type environments.
3
Page 4
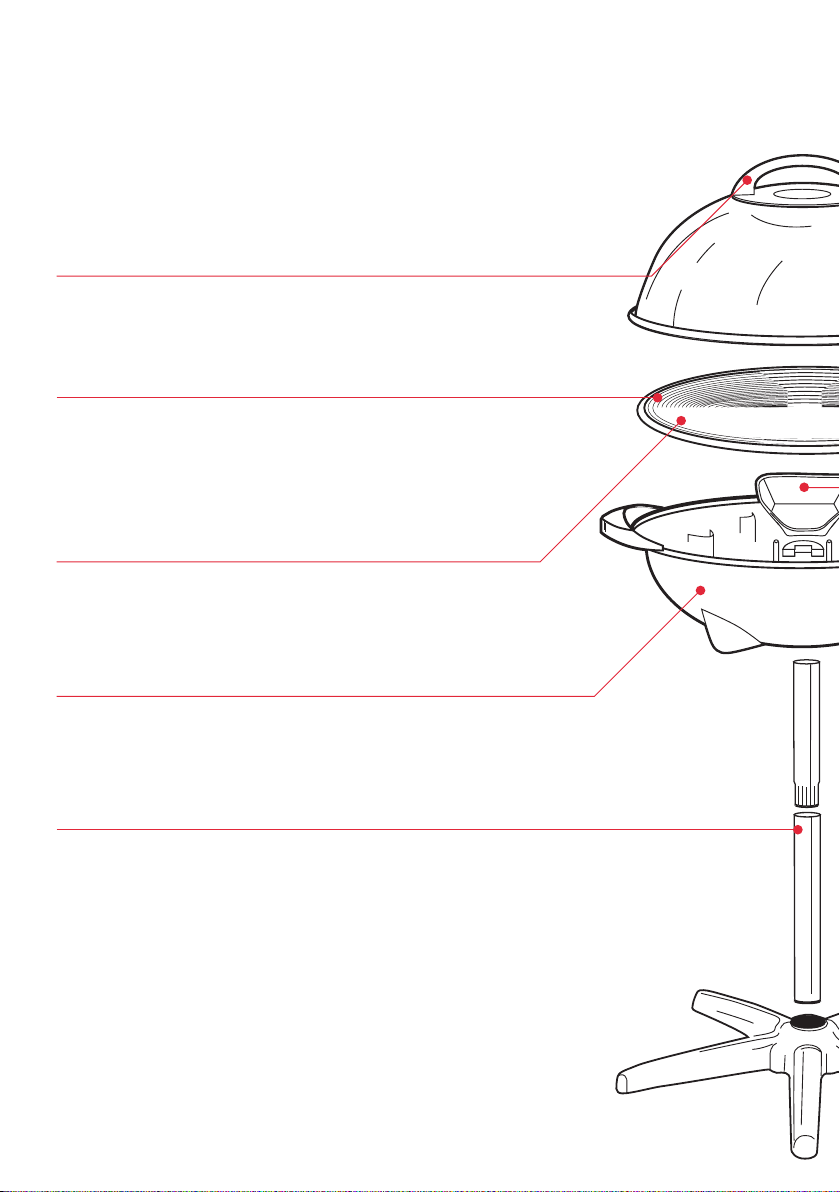
Features of your Kettle BBQ
Cool touch handles
Cool touch handles on the hotplate and base
for easy assembly and portability.
Ribbed Hotplate
Seals in the juices and flavours of your
favourite foods, while allowing the fats to drip
through the drainage holes for healthy, fat free
cooking.
Powerful 2400 watt element
The cast-in element is oval in shape for even
heat distribution and a super fast heat-up.
Moulded base
Made from durable, heat resistant nylon, the
base supports the hotplate and drip tray.
Space saving stand
4
Page 5
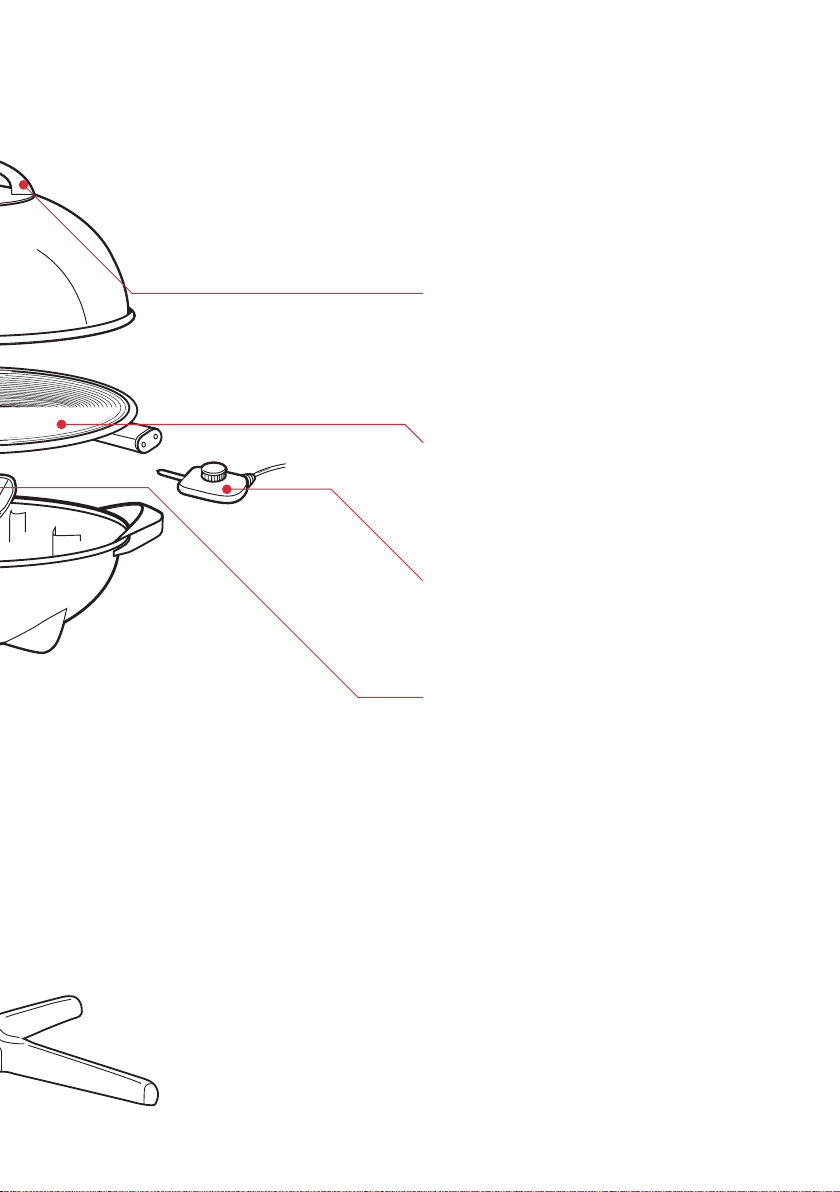
High domed lid with adjustable steam vent
Seals in the heat and moisture for natural
convection cooking. The lid also features a
handy hook for storage on the side of the
BBQ when used with the stand.
Flat hotplate
Ideal for frying a variety of foods including
eggs, bacon, tomatoes, onions and
mushrooms.
Removable control probe
The control probe is removable to allow for
easy cleaning and outdoor storage.
Removable drip tray
Collects the fats and juices during cooking
and is dishwasher safe for easy cleaning.
Weatherproof parts
Allow for outdoor storage.
5
Page 6
Using your Kettle BBQ
Before first use
Remove any stickers from the hotplate. Wash
the hotplate and drip tray in warm soapy
water using a mild household detergent. Dry
hotplate and drip tray thoroughly.
Important: Do not immerse temperature
control probe in water or any other liquid.
To clean, wipe with a damp cloth and dry
thoroughly.
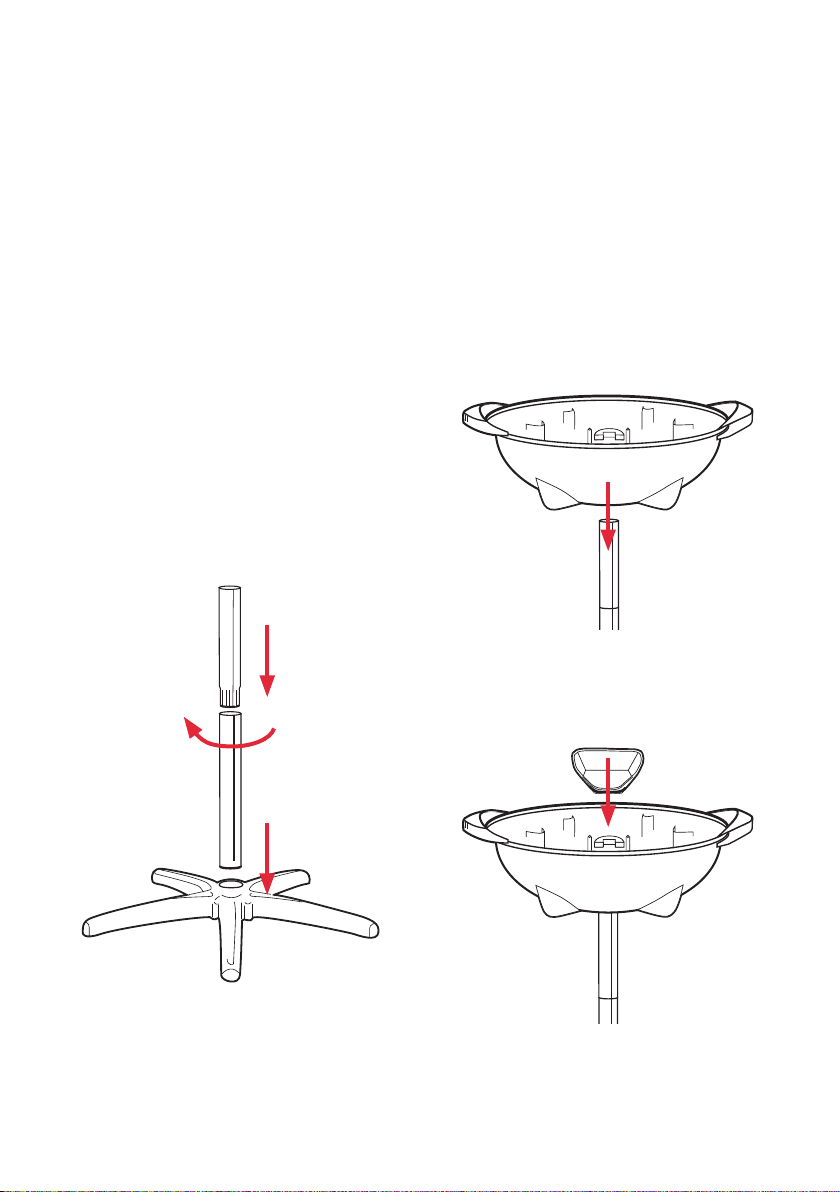
To assemble the stand.
1. Assemble pedestal tube. Insert top tube
into bottom tube, ensuring the screw is
aligned to the slotted nut. Tighten the top
tube clockwise until it is secure.
Turn the upper tube
clockwise until it
is secure to the
bottom tube.
2. Place pedestal base on a flat, level
surface.
3. Insert slotted end of assembled pedestal
tube into centre hole of pedestal base and
push down firmly.
4. Place grill base on top of pedestal tube
assembly, ensuring hole in centre of grill
base engages with tube.
5. Place grease tray securely into position
inside grill base. When properly placed, it
is held firmly with pointed end in centre
of grill base.
6
Page 7
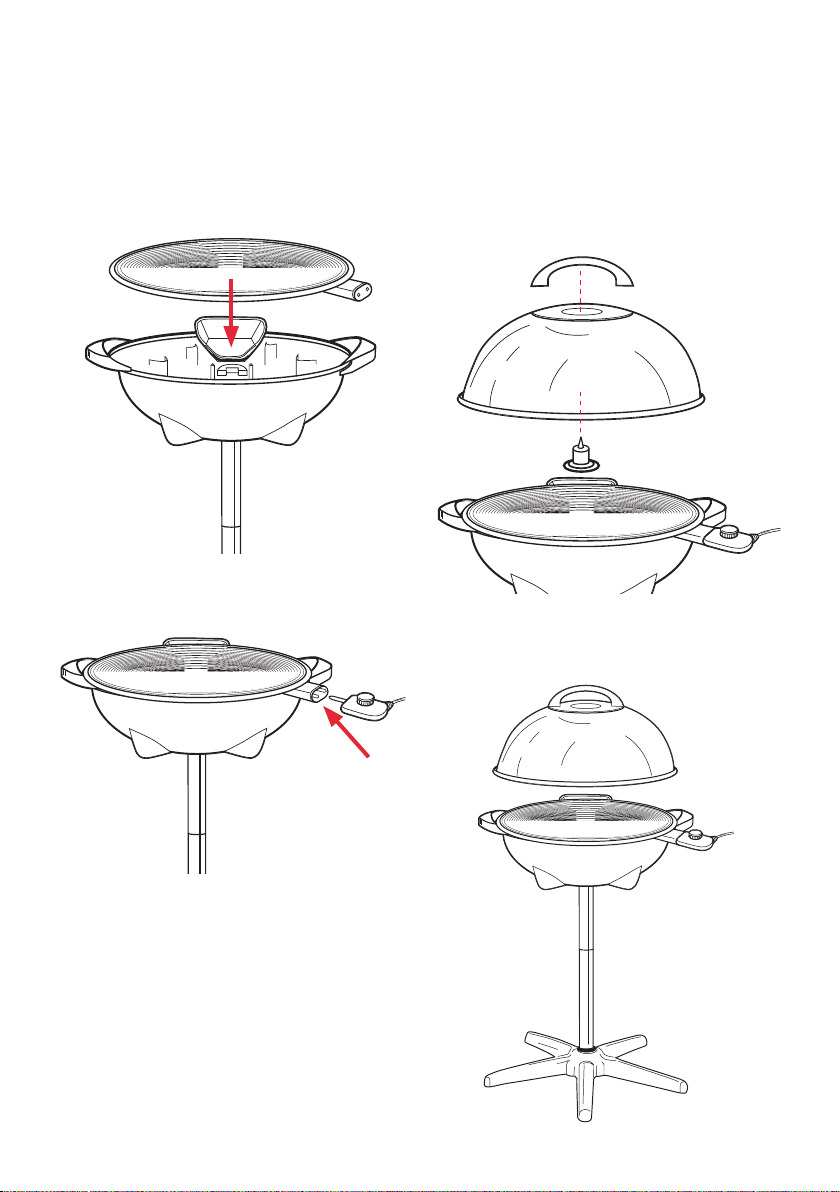
Using your Kettle BBQ (continued)
6. Position grill securely on grill base.
7. Position probe receptacle through probe
cutout in top side of grill base.
8. Attach lid handle to lid from the inside
using rubber-ringed
9. Place lid over grill. Your grill is now ready
for use.
7
Page 8

Using your Kettle BBQ (continued)
Heading
Using your Kettle BBQ.
1. Insert the Heat Control Probe fully into the
socket of the hotplate.
2. Plug the cord into a 230-240 volt
power outlet and turn the power on. An
extension cord that has been checked
and tested by your electricity supplier or
a qualified technician may be used with
your Kettle BBQ.
3. Set the control probe dial to the desired
heat setting.
Remove the lid from the Kettle BBQ and
allow to heat up. When the thermostat
light on the control probe switches off,
the desired cooking temperature has been
reached and the Kettle BBQ is ready to
use.
For oven style cooking, set the dial to
Super Sear setting, replace the lid and
pre-heat for approximately 10 minutes.
Note: The thermostat light on the control
probe indicates the Kettle BBQ is heating.
This light will remain ON until the set
temperature has been reached and then
will cycle ON and OFF throughout cooking.
This will ensure that the Kettle BBQ always
maintains the selected temperature. The
pre-heat time will depend on the heat setting
selected.
8
Page 9

HeadingBBQ Oven Cooking in your
Kettle BBQ
BBQ Oven Cooking
BBQ Oven cooking allows you to roast meats
and vegetables efficiently, while sealing in
the flavoursome juices.
The result is oven style, tender meat, with
wholesome crisp vegetables.
For a perfect result every time, read the BBQ
Oven Basics section below.
BBQ Oven Basics
• For optimum results, the Kettle BBQ
should always be preheated for 10 minutes
with the lid on.
• Avoid removing the lid continually during
the cooking time. The heat loss will only
lengthen the cooking time.
• All meats should be fully thawed or at
room temperature before cooking.
• Baste the meat during the last ½ hour
of cooking. Excess basting will cause
the meat to burn or darken if left on
throughout the entire cooking time.
• Meats such as beef, pork, chicken and
poultry require approximately 1½ - 2 hours
to cook, depending on the weight and size.
• After initially browning meat on the
grill plate, cook on a roasting rack. This
prevents excess browning on one side and
eliminates turning the meat over.
Note: Caution should be taken when using a
metal rack on the grill plate. Ensure there are
no sharp edges that could scratch the nonstick coating.
• Avoid overcooking meats. The longer the
cooking time, the less tender the meat will
be.
• Use a meat thermometer to take the
guesswork out of the BBQ cooking.
The guides on the thermometer will
indicate the temperature of the food. The
temperature guide on the thermometer will
tell you when the meat is cooked to your
desired choice. For an accurate reading,
always insert the thermometer into the
thickest part of the meat.
• Rest meat, covered, for about 10 minutes
before carving. This allows the juices to
settle.
9
Page 10

Tips to cooking a great steak
• Ensure that the Kettle BBQ has been
preheated on SuperSear for 10 minutes
or until the light on the control probe has
switched off.
• Rub a small amount of oil onto both sides
of the steak. Place steak onto the hot
ribbed or flat plate. The time taken to cook
a steak will depend on the thickness of the
steak. A thin steak will not take long at all.
• Only turn steaks once. Turning several
times or pressing down with tongs will only
dry the steak out.
• To cook a rare steak, cook for 2-3 minutes,
depending on thickness, turn once and
cook the other side for a further 2-3
minutes. The steak will be very soft to
touch.
• To cook a medium steak, cook for 4-6
minutes. The juices on the top of the steak
will start to pool. Turn steak over and cook
for a further 4-6 minutes. The steak will be
tender to touch but not too soft.
• To cook a well done steak, cook for 7-9
minutes, the juices will pool on the top of
the steak and the colour of the steak will
change up the sides of the steak the entire
way. Turn steak over once and cook until
the steak feel quite firm to touch.
• Remove steaks from Kettle BBQ and rest,
covered, for a few minutes before serving.
Tips to cooking great fish fillets
• Ensure that the Kettle BBQ has been
preheated on SuperSear for 10 minutes
or until the light on the control probe has
switched off.
• Lightly coat the fillets in a little oil and
season with salt and pepper, if desired.
• The time taken to cook a fish fillet will
depend greatly on the thickness of the
fillet.
• Most fish fillets are cooked until they are
just cooked through. Although fish such as
tuna or salmon can be cooked so that it is
still medium to rare on the inside.
• Place fillets onto the hot ribbed or flat
plate. Do not attempt to move the fillets for
at least a few minutes; this will only break
10
up the fillet. Once the fish has formed a
crust on the bottom and the colour of the
fillets has started to change on the sides
you can turn it over.
• Using a non-stick spatula, carefully turn
the fish over. Only turn once. Cook the fish
until it is just cooked through, the fish will
still cook slightly once removed from the
grill.
• A good way to tell if your fish is cooked
through is to place a small, thin knife
into the thickest part of the fish. If the
knife feels warm to touch then the fish
is cooked. If it is cool then cook for a
little longer. The colour of the fillet will
have turned from being transparent to an
opaque colour.
Page 11

Heading
Care and Cleaning
Always turn the power off and remove the
plug from the power outlet and the probe
from the probe inlet, after use and before
cleaning. Allow the BBQ oven to cool before
cleaning.
Control probe
If cleaning is necessary, wipe over with a
damp cloth.
Note: Before inserting the control probe
into the probe inlet, ensure the interior of
the inlet is completely dry. To do this wipe
interior of probe inlet with a dry cloth or
shake out excess water vigorously.
Important: Do not immerse the control probe
in water or any other liquid.
Do not knock or drop the probe as this can
damage the probe. If damage is suspected,
return the control probe to your nearest
Sunbeam Service Centre for inspection. Refer
to the separate warranty and service centre
booklet.
Hotplate and drip tray
The element in the hotplate is cast in, so it
is safe to fully immerse in water. Wash the
hotplate and drip tray in warm soapy water
using a mild household detergent and a soft
washing sponge.
A bottle brush may be used to clean the
drainage holes in the ribbed hotplate.
The hotplate and drip tray are also
dishwasher safe.
Note: Do not use abrasives or metal scourers
as they will scratch the non-stick cooking
surface. Dry the hot plate and drip tray
thoroughly before storing.
Moulded base and lid
The base and lid can be wiped over with a
damp cloth or washed in warm soapy water
using a mild household detergent and a soft
washing sponge. Do not use abrasives or
metal scourers as they may scratch these
parts.
Note: Do not place the moulded base or lid in
a dishwasher.
Stand
The stand can be wiped over with a damp
cloth.
Note: Do not place any part of the stand in a
dishwasher.
Storage
Always dry and assemble the Kettle King
before storing. Ensure the drip tray and
hotplate are correctly positioned.
For outdoor storage of your Kettle King,
remove the control probe and store in a safe,
dry place.
11
Page 12

Guide to Meat and Poultry Cooking
Times and Temperatures
Note: All times stated in recipes and on the chart below are approximate. Cooking times will
vary depending on the cut, size and weight of the meat.
All times are in hours and minutes unless otherwise specified.
MEAT & POULTRY
TYPE 1.5KG 2KG 3KG
Beef (rare) 1hr 20min 1hr 50min 3hrs
Beef (medium) 1hr 30min 2hr 3hrs 15min
Beef (well done) 1hr 50min 2hr 20min 3hrs 35min
Lamb (rare) 1hr 30min 2hrs 3hrs
Lamb (medium) 2hrs 2hr 25min 3hrs 25min
Lamb (well done) 2hr 30min 2hr 55min 3hrs 30min
Pork 1hr 45min 2hr 55min 3hrs 30min
Ham Approx. 20min/kg
Turkey Approx. 30min/kg
CHICKEN
SIzE WEIGHT/KG COOKING TIME
Number 10 1.0 1hr 15min
Number 15 1.5 1hr 45min
Number 20 2.0 2hr 15min
12
Page 13

Guide to Meat and Poultry Cooking Times and Temperatures
(continued)
Cooking chart for meat temperature
The correct internal temperature of the meat will determine when it is cooked. Meat
thermometers are available from supermarkets or department stores.
Use the guide displayed on the meat thermometer to determine when the meat is cooked. We
have listed a guideline of temperatures below.
TYPE INTERNAL TEMPERATURE ˚C INTERNAL TEMPERATURE ˚F
Beef, Lamb (rare) 60˚C 140˚F
Beef, Lamb (medium) 65˚C - 70˚C 150˚F - 160˚F
Beef, Lamb (well done) 75˚C 170˚F
Pork 70˚C - 75˚C 160˚F - 170˚F
Ham 71˚C 160˚F
Turkey 75˚C 170˚F
Chicken min 75˚C 170˚F
Hamburgers 75˚C 170˚F
Sausages 75˚C 170˚F
13
Page 14

Recipes
Barbecue Chilli Lime Prawns Serves 4
1 kg green prawns
1 teaspoon palm sugar
2 tablespoons peanut oil
¼ cup lime juice
2 red chillies, seeded and finely chopped
1 tablespoon sweet chilli sauce
2 tablespoons chopped fresh coriander
1. Pre-heat Kettle BBQ on SuperSear for
10 minutes.
2. Shell and devein prawns leaving tails
intact. Combine prawns and remaining
ingredients in a bowl and refrigerate for 1
hour.
3. Cook prawns on either the hot ribbed or
flat plate for about 3 minutes on each
side or until just cooked through.
4. Serve with steamed jasmine rice.
Baby Octopus Serves 4
1 kg cleaned baby octopus
2 cloves garlic, crushed
¼ cup olive oil
¹/³ cup balsamic vinegar
½ cup basil leaves, shredded
2 tablespoons brown sugar
sea salt and freshly ground black pepper
1. Cut octopus in half if they are slightly
large. Ensure that the beaks have been
removed from the centre.
2. Place octopus in a large bowl and cover
with boiling water. Allow to stand for 2
minutes then drain well.
3. Place octopus in a clean bowl with
remaining ingredients; refrigerate
overnight.
4. Preheat Kettle BBQ on SuperSear for 10
minutes. Drain octopus then place on
hot ribbed or flat plate. Cook for about 5
minutes or until they have changed to a
golden colour.
14
Page 15

Recipes (continued)
Honey Soy Chicken Wings Serves 4
1½ kg chicken wings
¹/³ cup honey
½ cup low salt soy sauce
2 teaspoons Chinese cooking wine (optional)
2 cloves garlic, crushed
3 teaspoons grated fresh ginger
1. Cut wings at joints and discard tips.
2. Combine remaining ingredients and
chicken in a baking dish and marinate for
at least 2 hours.
3. Preheat Kettle BBQ on SuperSear for 10
minutes. Remove wings from marinade;
reserve liquid.
4. Cook wings on hot ribbed or flat plate,
on both sides, brushing with reserved
marinade. Turn wings often. Cook for
about 15 minutes or until browned and
cooked through.
5. Serve with rice.
Tip: Chinese cooking wine is available from
Asian grocery stores. If you cannot find it
simply replace with sherry or omit completely.
Souvlaki Lamb Skewers makes about 22
skewers
1 kg diced lamb (2 cm pieces)
2 cloves garlic, crushed
1 tablespoon chopped fresh oregano
2 tablespoons lemon juice
¼ cup olive oil
1 yellow capsicum
1 red capsicum
1 large red onion
22-24 small bamboo skewers
1. Combine lamb, garlic, oregano, lemon
juice and olive oil, mix until combined.
2. Place lamb in marinade. Refrigerate for
several hours or overnight.
3. Cut capsicum and onions into pieces
slightly smaller that the lamb. Skewer
about 3 pieces each of meat and
vegetables onto the bamboo skewers.
4. Preheat Kettle BBQ on SuperSear for 10
minutes.
5. Cook skewers on hot ribbed or flat plate
turning until browned on all sides and
cooked as desired.
15
Page 16

Recipes (continued)
Beef Skewers with Satay Makes approx
Dipping Sauce 24 skewers
1 kg rump steak
2 tablespoons soy sauce
1 teaspoon sesame oil
1 clove garlic, crushed
1 tablespoon grated fresh ginger
24 small wooden skewers
Satay sauce
1 cup crunchy light peanut butter
½ cup water
1 tablespoon soy sauce
1 tablespoon lemon juice
1 tablespoon sweet chilli sauce
(no seed variety)
1 clove garlic, crushed
1 teaspoon palm sugar
1. Trim fat from steak and cut into 2 cm
cubes. Combine steak with soy, sesame
oil, garlic and ginger in a large bowl.
Refrigerate for several hours or overnight.
2. To make satay sauce, combine all
ingredients in a small saucepan. Cook,
over a low heat until the ingredients come
together and thicken slightly.
Tip: If making sauce in advance and then
reheating, you may need to add a little water
to thin the mixture down.
3. Preheat Kettle BBQ on SuperSear for 10
minutes. Thread meat onto skewers.
4. Cook skewers on hot ribbed or flat plate
until browned all over and just cooked
through. Brush with a small amount of the
peanut sauce before serving if desired or
leave plain and serve sauce as a dipping
sauce.
Spicy Middle Eastern
Chicken Skewers Serves 4
750g thigh fillets
1 tablespoon lemon juice
1 tablespoon Moroccan seasoning spice mix
1 clove garlic, crushed
2 tablespoons olive oil
12 small wooden skewers
1. Trim fat from thigh fillets and cut into bite
size pieces.
2. Combine remaining ingredients in a large
bowl. Refrigerate for several hours or
overnight.
3. Pre heat Kettle BBQ on SuperSear for 10
minutes.
4. Thread chicken onto skewers. Cook
skewers on hot ribbed or flat plate, turning
until chicken is browned and cooked
through.
Serving suggestion: Serve chicken with a
cucumber mint dipping sauce.
16
Page 17

Recipes (continued)
Steamed Salmon Parcels Serves 4
4 x 180g Atlantic salmon fillets
1 stalk lemon grass, white only, chopped
finely
4 eschalots, sliced thinly
¹/³ cup coriander leaves
1 large red chilli, seeded and sliced
2 cloves garlic, crushed
2 teaspoons grated fresh ginger
½ cup coconut milk
Sea salt
Freshly ground black pepper
1 tablespoon peanut oil
4-6 baby bok choy, quartered
Steamed jasmine rice, to serve
1. Preheat Kettle BBQ on SuperSear with the
lid on for 10 minutes.
2. Combine the lemon grass, eschalots,
coriander, chilli, garlic, ginger, coconut
milk, salt and pepper in a bowl and mix
well.
3. Place each piece of salmon on four
individual pieces of aluminium foil. Divide
the coconut mixture evenly over the tops
of the salmon. Fold each piece of foil up
to make 4 sealed parcels.
4. Place parcels on the hot ribbed or flat
plate with the lid on for about 12-15
minutes or until cooked as desired.
Remove from heat.
5. Heat oil on flat plate of Kettle BBQ and
quickly cook bok choy until just wilted;
season with salt and pepper.
6. Serve salmon with bok choy and steamed
jasmine rice.
Grilled Fish with Garlic and Lemon Serves 4
4 fillets (800g) white fish fillets of choice
¼ cup olive oil
2 cloves garlic, crushed
¼ cup lemon juice
2 eschalots, minced
¼ cup shredded fresh basil leaves
Sea salt
Freshly ground black pepper
Salad, to serve
Lemon wedges, to serve
1. Place fish in a shallow dish. In a small
bowl combine the oil, garlic, lemon juice,
eschalots, basil, salt and pepper and mix
well.
2. Pour marinade over fish and allow to sit at
room temperature for 15 minutes or in the
refrigerator for no more than 1 hour.
3. Heat Kettle BBQ on SuperSear for 10
minutes. Cook fish on hot ribbed or flat
plate for 3-5 minutes on both sides until
just cooked through.
Note: Cooking time will vary depending on the
thickness of each fillet.
4. Serve fish with salad and lemon wedges
17
Page 18

Recipes (continued)
Grilled Chicken Breast Serves 6
with Salsa Verde
1-2 tablespoons olive oil
6 chicken breast fillets
Salsa Verde
1 cup flat leaf parsley
½ cup dill
½ cup mint leaves
2 cloves garlic
1 tablespoon small capers
1 tablespoon grated lemon rind
Sea salt and freshly ground black pepper
¾ cup extra virgin olive oil
1. Preheat Kettle BBQ on SuperSear for 10
minutes.
2. Rub oil onto chicken breast fillets.
Cook chicken on hot ribbed or flat plate
uncovered, until browned on both sides
and cooked through. Remove from heat
and serve with Salsa Verde
3. To make the Salsa Verde, blend or process
all ingredients until a chunky sauce
texture is achieved.
Tip: Salsa Verde also goes very well with pan
fried fish fillets.
Beef fajitas Serves 4
600g skirt steak
½ cup orange juice
½ cup pineapple juice
½ cup soy sauce
1 red capsicum, sliced
1 yellow capsicum, sliced
1 red onion, sliced
½ iceberg lettuce, shredded
1 cup grated cheese
½ cup sour cream
½ cup salsa
1 avocado, chopped
8-12 flour tortillas, warmed
1. Trim any fat from beef. Place beef in a
deep dish and pour over the combined
juices and soy sauce. Marinate in
refrigerator for at least 2 hours.
2. Pre-heat Kettle BBQ on SuperSear for 10
minutes. Remove beef from marinade;
reserve liquid. Cook beef on hot ribbed or
flat plate for about 5 minutes each side or
until cooked as desired. Remove from grill
and cover with foil while the vegetables
cook.
3. Place vegetables on ribbed or flat plate
and cook for 2-3 minutes. Pour over some
of the reserved liquid over the vegetables
and cook for a further 1 minute. Remove
from heat.
4. Slice beef across the grain into thick
slices.
5. To serve fajitas, place a little of each
of the beef, vegetables and remaining
ingredients in the flour tortilla and roll up.
18
Page 19

Recipes (continued)
Heading
Grilled swordfish Serves 4
4 pieces swordfish
2 cloves garlic, crushed
¹/³ cup white vinegar
¹/³ cup olive oil
¼ cup shredded basil leaves
Salad
250g baby rocket
100g semi dried tomatoes
150g feta cheese
100g katamata olives
1. Place swordfish in a large dish and pour
over two thirds of the combined dressing
ingredients. Cover and refrigerate for 1
hour.
2. Pre-heat Kettle BBQ on SuperSear for 10
minutes.
3. Cook swordfish on hot ribbed or flat plate
for about 3 minutes each side or until
cooked as desired.
4. Serve swordfish over salad and drizzle with
remaining dressing.
Marinated Lamb Roast Serves 4
1 tablespoon olive oil
1 tablespoon chopped fresh rosemary
2 cloves garlic, crushed
1 teaspoon grated lemon rind
2 tablespoons lemon juice
2 teaspoons Dijon mustard
¼ cup mango chutney
1kg boned and rolled shoulder of lamb
1. Combine oil, rosemary, garlic, rind, juice,
mustard and chutney in a large zip lock
bag or large dish. Place lamb in marinade;
cover and refrigerate for 4 hours or
overnight.
2. Preheat Kettle BBQ on SuperSear with the
lid on for 10 minutes.
3. Drain marinade from lamb; reserve
marinade. Place lamb on a piece of
aluminium foil that has been folded
over 2-3 times. Cook lamb with the lid
on, brushing the lamb occasionally with
marinade, for about 1 hour or until just
cooked through.
4. Stand lamb, covered, for 10 minutes
before carving.
19
Page 20

Recipes (continued)
Heading
Roast Pork Serves 4-6
1.6kg rolled loin of pork
olive oil
2 teaspoons fine table salt
freshly ground black pepper
1. Preheat Kettle BBQ on SuperSear with the
lid on for 10 minutes.
2. Brush meat lightly with oil and rub salt
over rind
3. Place pork onto grill plate, rind side up,
cook, covered, for approximately 1 hour
then turn pork over and cook for a further
30 minutes or until the rind has crackled
and the pork is cooked as desired. Rest
meat from 10 minutes before carving.
Tip: If the pork will not sit flat when crisping
the rind use some aluminium foil on either
side to keep in place.
Roast Chicken with Stuffing Serves 4
1.5kg whole fresh chicken
1 lemon, halved
1 tablespoon (20g) butter, melted
1 tablespoon olive oil
2 teaspoons fresh thyme leaves
Seasalt and freshly ground black pepper
1. Wash and clean chicken thoroughly.
Pat dry with paper toweling.
2. Place lemon halves inside the cavity of the
chicken. Tuck the wings back and tie the
base of the chicken with cooking string
so that the legs are crossed and securely
positioned.
3. Preheat Kettle BBQ on SuperSear for 10
minutes with the lid on. Combine butter,
oil, thyme, salt and pepper and brush with
the mixture.
4. Place chicken on a roasting rack and cook
for 1 hour and 45 minutes or unil cooked
through.
Tip: If cooking roast vegetables, place in
Kettle BBQ halfway through cooking.
20
Page 21

Recipes (continued)
Heading
Grilled Vegetable Salad with Haloumi Serves 4
1 red capsicum
1 yellow capsicum
2 zucchini
2 baby eggplant
200g Haloumi cheese, sliced
200g baby rocket
1 red onion, sliced
Red Wine Dressing
1 tablespoon red wine vinegar
3 tablespoons extra virgin olive oil
1 teaspoon caster sugar
1 teaspoon Dijon mustard
1 teaspoon sea salt
1. Pre-heat Kettle BBQ on SuperSear with lid
on for 10 minutes.
2. Place whole capsicums on hot or ribbed
flat plate and cook, covered, turning every
5 minutes until the skin has blackened.
Remove from plate and place into a
plastic bag for 5-10 minutes. Once cool,
remove skin from capsicum, discard seeds
and membranes. Slice into thick slices.
3. Meanwhile slice the zucchini and
eggplants into thin strips and cook on the
ribbed or flat plate on both sides until
tender. Remove from heat and allow to
cool.
4. Cook the haloumi on the hot ribbed or flat
plate for about 1 minute or until heated
through.
5. Combine the dressing ingredients in a
jar and shake well; pour over the grilled
vegetables, baby rocket and red onion,
toss to combine.
6. Divide salad onto 4 plates and top with
haloumi cheese
Grilled Mushrooms Serves 6
as part of a meal
6 large flat mushrooms
¼ cup olive oil
2 cloves garlic, chopped finely
2 tablespoons chopped fresh basil
sea salt and freshly ground pepper
1. Pre-heat Kettle BBQ on SuperSear with
the lid on for 10 minutes.
2. Peel mushrooms and remove stems.
3. Place mushrooms onto the hot ribbed
or flat plate with the underside face up.
Sprinkle with olive oil, garlic, basil and
salt and pepper.
4. Cook mushrooms, covered for about 10-15
minutes or until cooked as desired.
21
Page 22

Recipes (continued)
Crunchy corn cobs in husks Serves 6
6 corn cobs with husks on
125g butter, softened
2 bacon rashers, chopped finely
2 tablespoons chopped fresh basil
1. Preheat Kettle BBQ on SuperSear for 10
minutes.
2. Carefully pull back husks from corn cobs
but do not remove completely; discard
silks.
3. Combine the butter, bacon and basil
together. Using a knife or your fingers
spread the butter mixture generously over
the kernels. Pull husks back over corn.
4. Cook corn on the hot ribbed or flat plate,
turning occasionally for about 10 minutes.
5. To serve, pull back husks and enjoy!
Potatoes with sour cream Serves 6
and sweet chilli sauce as part of a meal
1kg baby new potatoes
1-2 tablespoons oil
2 teaspoons sea salt
freshly ground pepper
¹/³ cup sweet chilli sauce
1 cup light sour cream
1. Cook potatoes in a pot of boiling water
until just cooked; drain.
2. Preheat Kettle BBQ on SuperSear for 10
minutes. Cut potatoes in half and toss in
oil and salt. Place potatoes in a bowl and
toss with the oil, salt and pepper.
3. Cook on the hot ribbed or flat plate,
turning occasionally, for about 5-10
minutes or until crisp.
4. Serve with sweet chilli sauce and light
sour cream.
22
Page 23

Recipes (continued)
Caramelised bananas with Hot Chocolate Sauce
and Whipped Cream Serves 4
4 large bananas
¼ cup firmly packed brown sugar
1 teaspoon cinnamon
Whipped cream, to serve
Hot chocolate sauce
100g dark chocolate, chopped
30g white marshmallows, chopped
150ml thickened cream
1. Preheat Kettle BBQ on SuperSear for 10
minutes.
2. Cut bananas in half lengthways, leaving
the skin on. Sprinkle the combined sugar
and cinnamon over the cut bananas. Press
gently into the banana.
3. Place bananas, cut side down and cook
on the hot ribbed or flat plate uncovered,
for about 6 minutes or until the sugar has
caramelised and the banana has softened.
Serve bananas with hot chocolate sauce
and whipped cream.
4. To make the hot chocolate sauce, combine
all ingredients in a small saucepan and
cook, stirring, over a low heat, until
melted.
Grilled Mango Cheeks
with Sweet Lime Ricotta Cream Serves 4-8
4 large mangos
2 tablespoons caster sugar
Ricotta Cream
300g fresh ricotta
2 tablespoons icing sugar, sifted
½ teaspoon vanilla essence
1 teaspoon grated lime zest
1 tablespoon lime juice
1. To make the ricotta cream, process the
ricotta, icing sugar, vanilla, lime zest and
juice in a food processor or mixer until
smooth. Transfer mixture to a bowl, cover
and refrigerate for 1 hour.
2. Preheat Kettle BBQ on SuperSear for 10
minutes.
3. Cut 2 large cheeks (wide sides) from the
mango. Cut into flesh of mango in a criss
cross design, making sure that you don’t
cut through the skin.
4. Sprinkle the mango cheeks with the caster
sugar and place on hot grill flesh side
down, for about 5 minutes or until the
sugar browns.
5. Remove mango cheeks from Kettle King.
Carefully push mango from the skin side
so that the flesh all separates. Serve
mango cheeks topped with the lime ricotta
cream. Serve immediately.
Tip: Remove flesh from remaining mango
seeds. Roughly chop and freeze in ice cube
trays and use in smoothies.
23
Page 24

Notes
Page 25

Notes
Page 26

Notes
Page 27

12 Month Replacement Guarantee
In the unlikely event that this appliance develops any malfunction
within 12 months of purchase (3 months commercial use) due to
faulty materials or manufacture, we will replace it for you
free of charge.
Should you experience any difficulties with
your appliance, please phone our customer
service line for advice on 1300 881 861 in
Australia, or 0800 786 232 in New Zealand.
Alternatively, you can send a written claim
to Sunbeam at the address listed below.
On receipt of your claim, Sunbeam will
seek to resolve your difficulties or, if the
appliance is defective, advise you on how
to obtain a replacement or refund.
Your Sunbeam 12 Month Replacement
Guarantee naturally does not cover misuse
or negligent handling and normal wear and
tear.
Similarly your 12 Month Replacement
Guarantee does not cover freight or any other
costs incurred in making a claim. Please
retain your receipt as proof of purchase.
The benefits given to you by this guarantee
are in addition to your other rights and
remedies under any laws which relate to the
appliance.
Our goods come with guarantees that cannot
be excluded under the Australian Consumer
Law and under the New Zealand Consumer
Guarantees Act.
In Australia you are entitled to a
replacement or refund for a major failure and
for compensation for any other reasonably
foreseeable loss or damage. You are also
entitled to have the goods repaired or
replaced if the goods fail to be of acceptable
quality and the failure does not amount to
a major failure.
Should your appliance require repair or
service after the guarantee period, contact
your nearest Sunbeam service centre.
For a complete list of Sunbeam’s authorised
service centres visit our website or call:
Australia
www.sunbeam.com.au
1300 881 861
Units 5 & 6, 13 Lord Street
Botany NSW 2019 Australia
New zealand
www.sunbeam.co.nz
0800 786 232
26 Vestey Drive, Mt Wellington
Auckland, New Zealand
Page 28

Need help with your appliance?
Contact our customer service team or visit
our website for information and tips on
getting the most from your appliance.
In Australia
Visit www.sunbeam.com.au
Or call 1300 881 861
In New Zealand
Visit www.sunbeam.co.nz
Or call 0800 786 232
is a registered trademark.
‘Kettle BBQ’ is a trademark of Sunbeam Corporation.
Made in China.
Due to minor changes in design or otherwise,
the product may differ from the one shown in this leaflet.
© Copyright.
ABN 45 000 006 771
Units 5 & 6, 13 Lord Street
Botany NSW 2019 Australia
Unit 3, Building D
26 Vestey Drive
Mt Wellington Auckland
New Zealand
Sunbeam Corporation is a division of GUD Holdings Ltd.
Sunbeam Corporation Limited 2011.
8/11
 Loading...