

Page 1

heated bedding
USER MANUAL
TRUSTED FOR OVER
100 YEARS
Includes
QUICK
SET-UP
GUIDE
pages 4-5
P.N. 191502 Rev. A
Sunbeam HeatedBedding IB_17ESM1.indd 1 2/3/17 09:09
Page 2

E2
For questions or support, please visit www.sunbeambedding.com.
IMPORTANT SAFETY
INSTRUCTIONS
DO NOT DESTROY
When using electrical appliances, basic safety precautions should always be
followed to reduce the risk of fire, electric shock, and/or injury to persons.
Misuse or failure to follow these warnings and instructions may cause
overheating, fire, personal injury and/or property damage:
1. Be sure to read carefully all instructions before using this heated
product.
2. Do not use this heated product with an infant, child, incapacitated
or immobile person, paraplegic or quadriplegic, a diabetic, anyone
insensitive to heat, such as a person with poor blood circulation,
or anyone who cannot clearly understand the instructions and/or
operate the controls.
3. Do not tuck in, pinch, flex or expose the wired heating area of this
heated product.
4. Do not route electrical cords between the mattress and box spring.
Do not allow the cords to be pinched. Do not use with damaged cords.
Damaged cords can lead to overheating or fire.
5. Keep the control away from drafty areas that may become damp or
wet such as an open window.
6. Do not use pins or other metallic means – They may damage the
electric wiring.
7. Do not use if wet. If a spill occurs, turn heated product off, unplug,
and dry before re-using.
8. Controller is not waterproof. Do not immerse in water or other liquids.
9. Be sure that this heated product is used only on an AC supply circuit
of the proper voltage. Do not use with an extension cord. Do not use
with generators, power converters or inverters.
10. Turn off or unplug this heated product when not in use.
11. Excessive heating may result from folding or bunching this heated
product while in use.
12. Examine the heated product, cord and controller before each use
for signs of wear or damage. If improper operation, wear or damage
Sunbeam HeatedBedding IB_17ESM1.indd 2 2/3/17 09:09
Page 3
E3
For questions or support, please visit www.sunbeambedding.com.
is observed, discontinue its use immediately, unplug it, and call
Sunbeam Consumer Care in the U.S. at 800-892-7684, or in Canada at
800-667-8623.
13. For throw blankets and back/body pads only: Do not use with rocking
chairs, recliners, chairs with casters or wheels, or other furniture
subject to movement.
14. Do not use this heated product on a waterbed, bunk bed,
mechanically adjustable bed or a child’s crib/bed.
15. Do not use in conjunction with another electrically heated product.
16. Do not tuck in the supply cord or control in a sofa or other furniture.
All portions of this heated product should be visible at all times.
17. Wrapping of cord around the controller may damage the cord. Loop
loosely when storing. Allow to cool before storing and do not crease
by placing items on top of it. Store in the original packaging, in a cool,
dark, dry place.
18. Do not dry clean this heated product. Cleaning solvents may damage
the insulation of the heating element. Improper laundering may cause
problems with the heating wire, which can lead to fire.
19. Keep all dogs, cats and other pets away from this heated product.
This is an electrical appliance that they can damage or be injured by.
20. If provided with a detachable controller, use only with the provided
controller.
21. Do not use this heated product with analgesic creams, liniments,
salve or ointment preparations. Skin burns could result.
22. Check with your healthcare provider before using with a pacemaker
or any medical devices.
23. Not for hotel, motel, hospital or other institutional use.
SAVE THESE INSTRUCTIONS
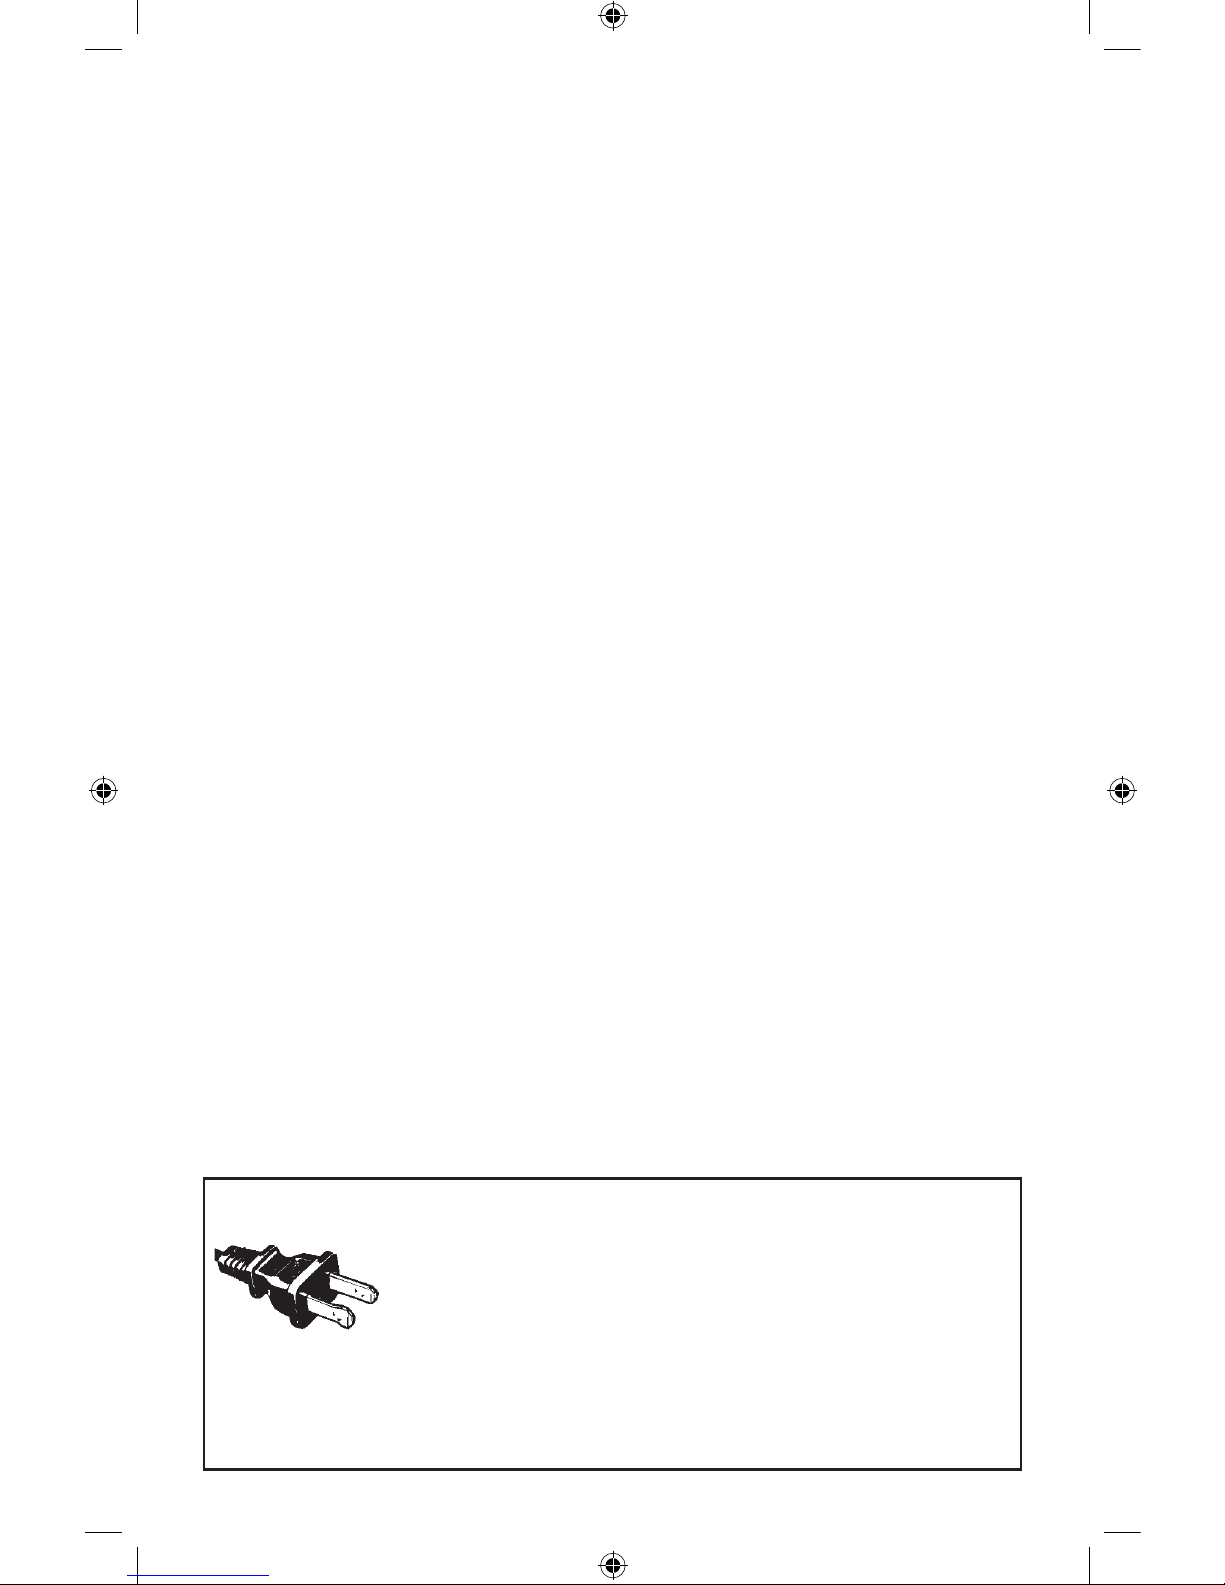
NORTH AMERICAN MODELS WITH POLARIZED PLUGS:
POLARIZED PLUG
This appliance has a polarized plug (one blade is wider
than the other). To reduce the risk of electric shock, this
plug is intended to fit into a polarized outlet only one
way. If the plug does not fit fully into the outlet, reverse
the plug. If it still does not fit, contact a qualified electrician. Do not
attempt to modify the plug in any way. If the plug fits loosely into the AC
outlet or if the AC outlet feels warm do not use that outlet.
Sunbeam HeatedBedding IB_17ESM1.indd 3 2/3/17 09:09
Page 4
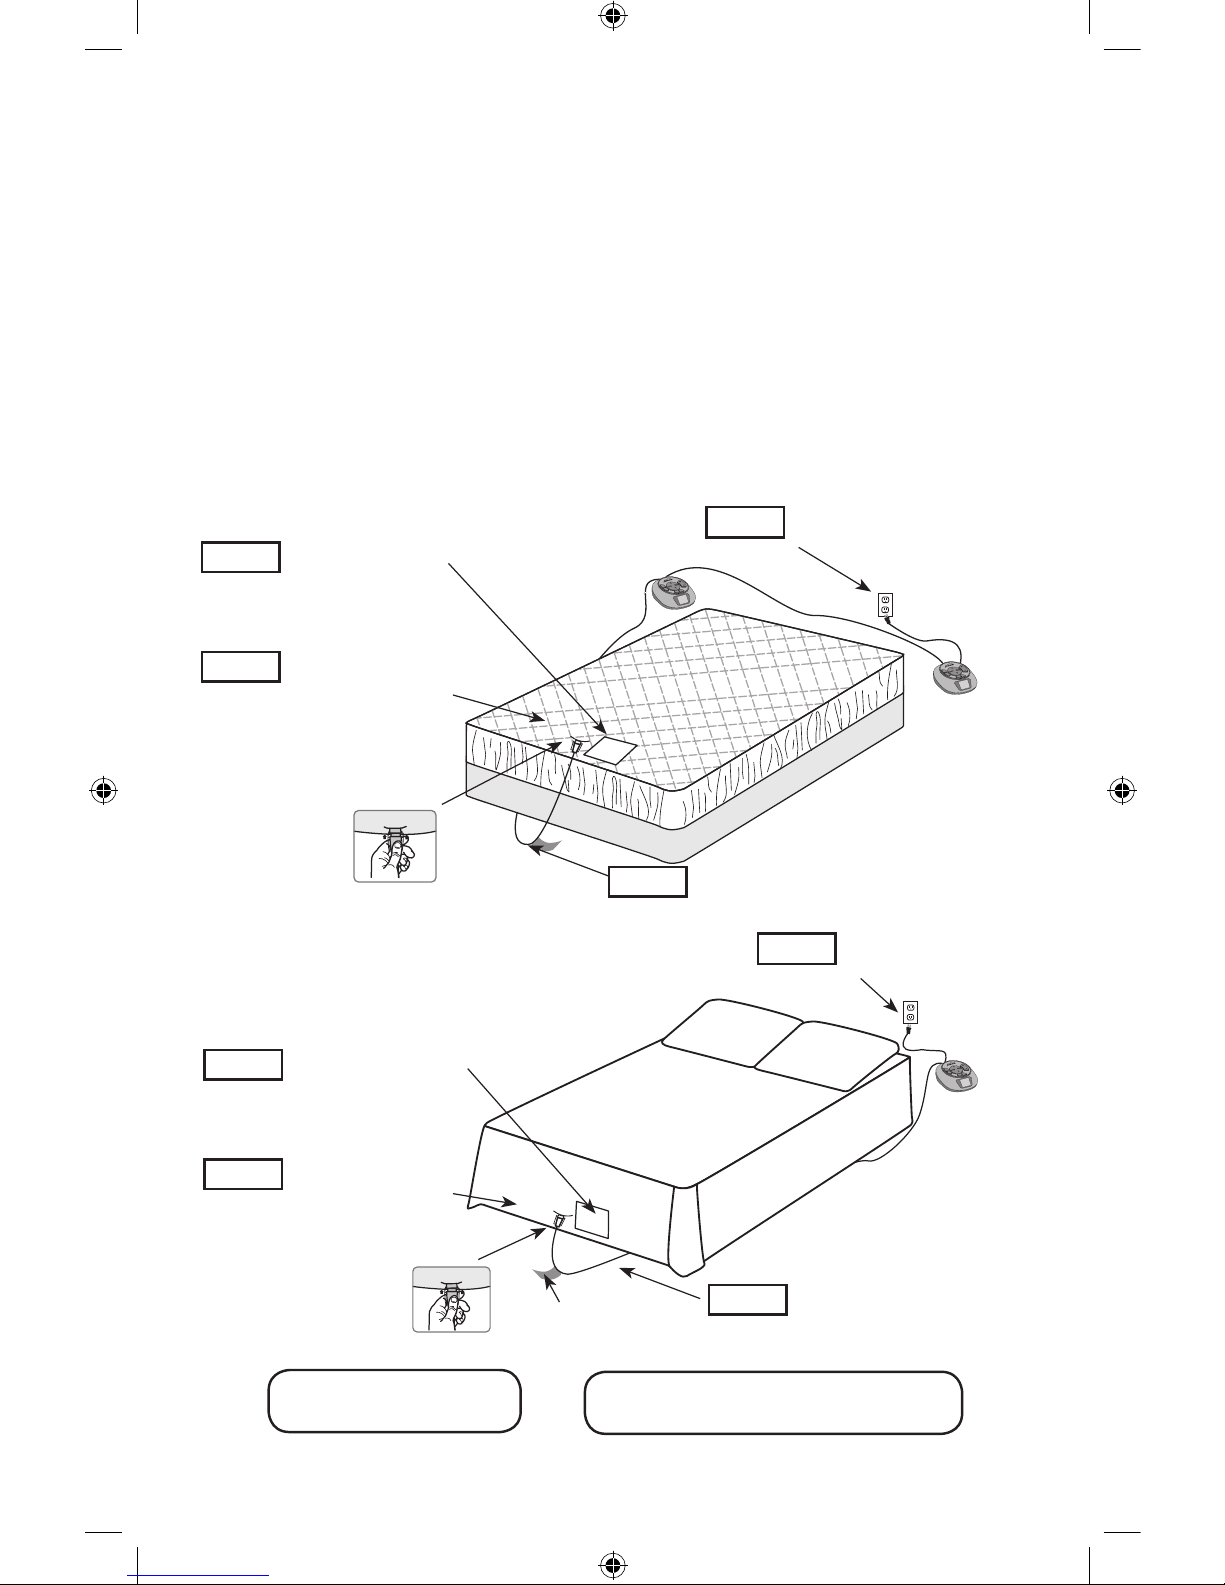
Control
Flag Tag
Label
Power Cord
Module
Left Side
Right Side
Control Cord
Connector
Left (Secondary)
Control
Flag Tag
Label
Power Cord
Module
Left Side
Right Side
Right
(Primary) Control
(Label on back
of control)
Control Cord
Connector
E4
For questions or support, please visit www.sunbeambedding.com.
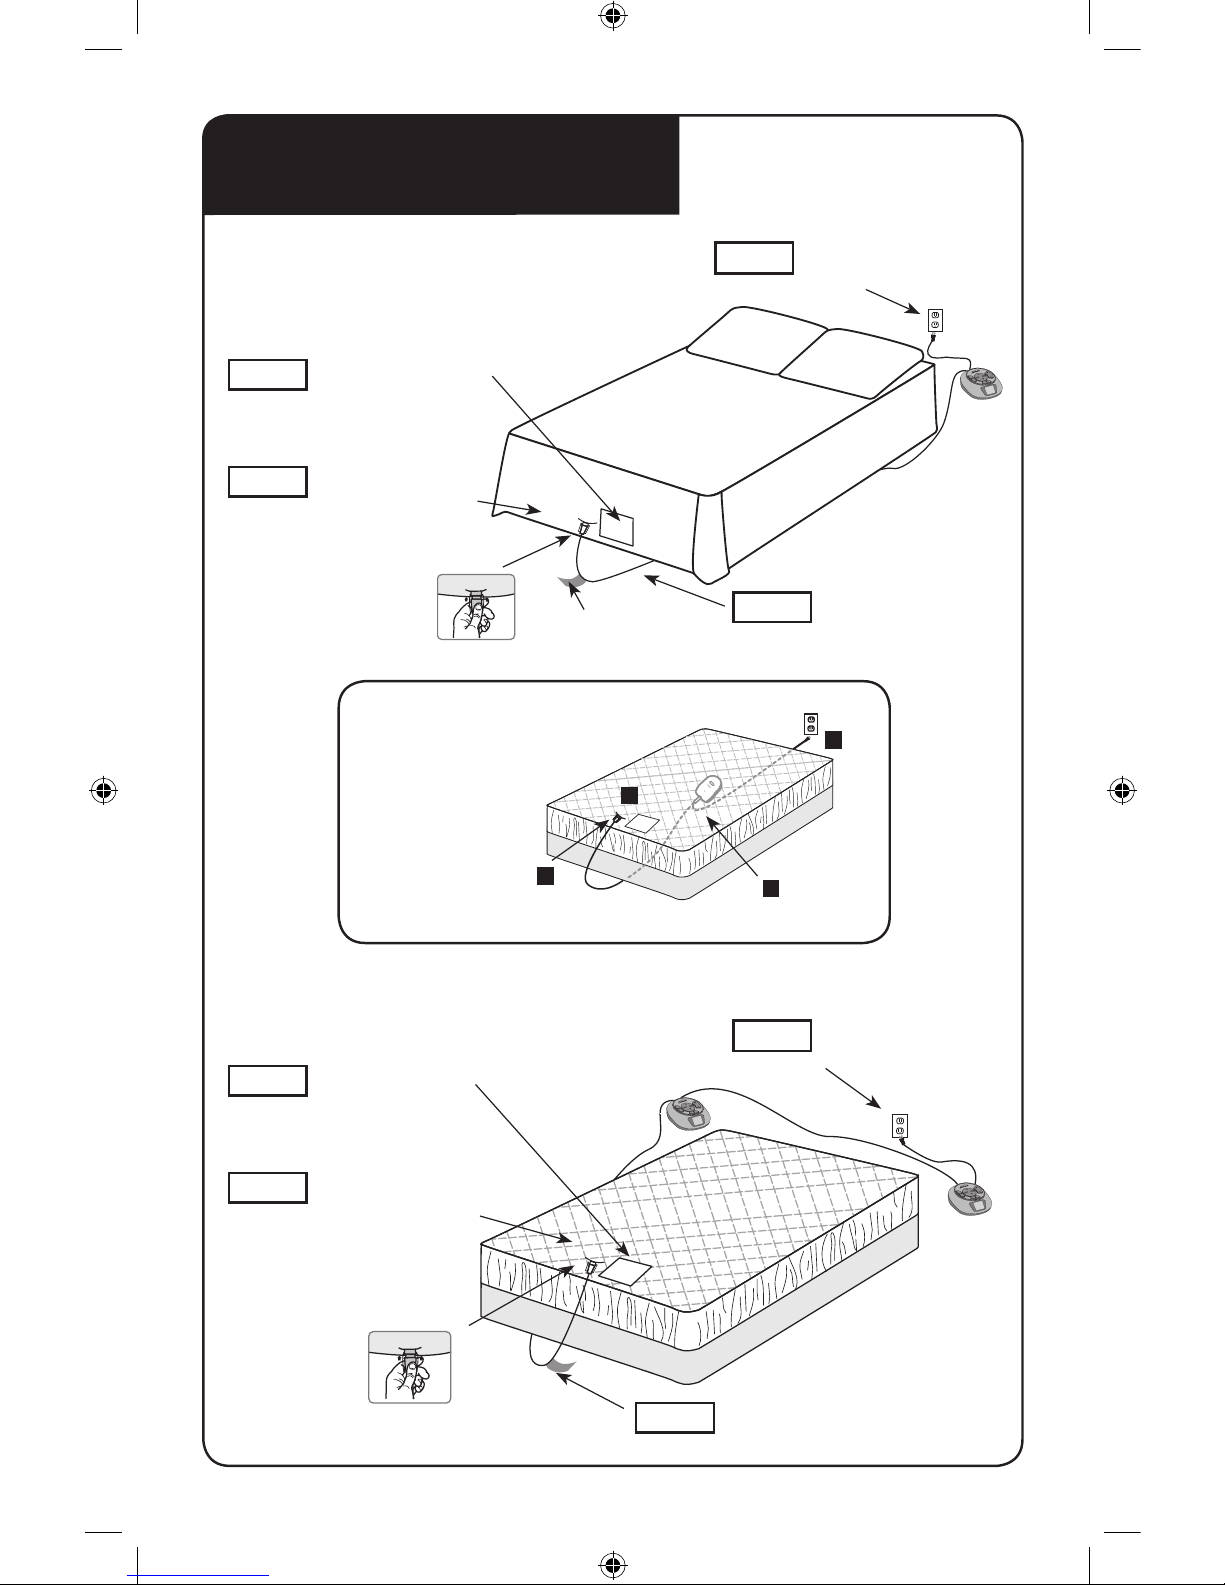
TWIN/FULL
SINGLE CONTROL SET-UP
STEP 1
Place on bed with
label at foot of bed
facing out
STEP 2
Connect the Control
Cord connector and
module securely
STEP
3
Run Control Cord
under the bed
STEP
4
Plug Power Cord
into wall
QUEEN/KING/CALIFORNIA KING
DUAL CONTROL SET-UP
STEP 1
Place on bed with
label at foot of bed
facing out
STEP 2
Connect the Control
Cord connector and
module securely
STEP
3
Run Control Cord
under the bed
STEP
4
Plug Power Cord
into wall
QUICK SET-UP GUIDE
Mattress Pad & Blanket
1
3
2
4
BASE UNIT FOR
REMOTE CONTROL
SET-UP
Run Base Unit Cord under the bed
Module
Sunbeam HeatedBedding IB_17ESM1.indd 4 2/3/17 09:09
Page 5
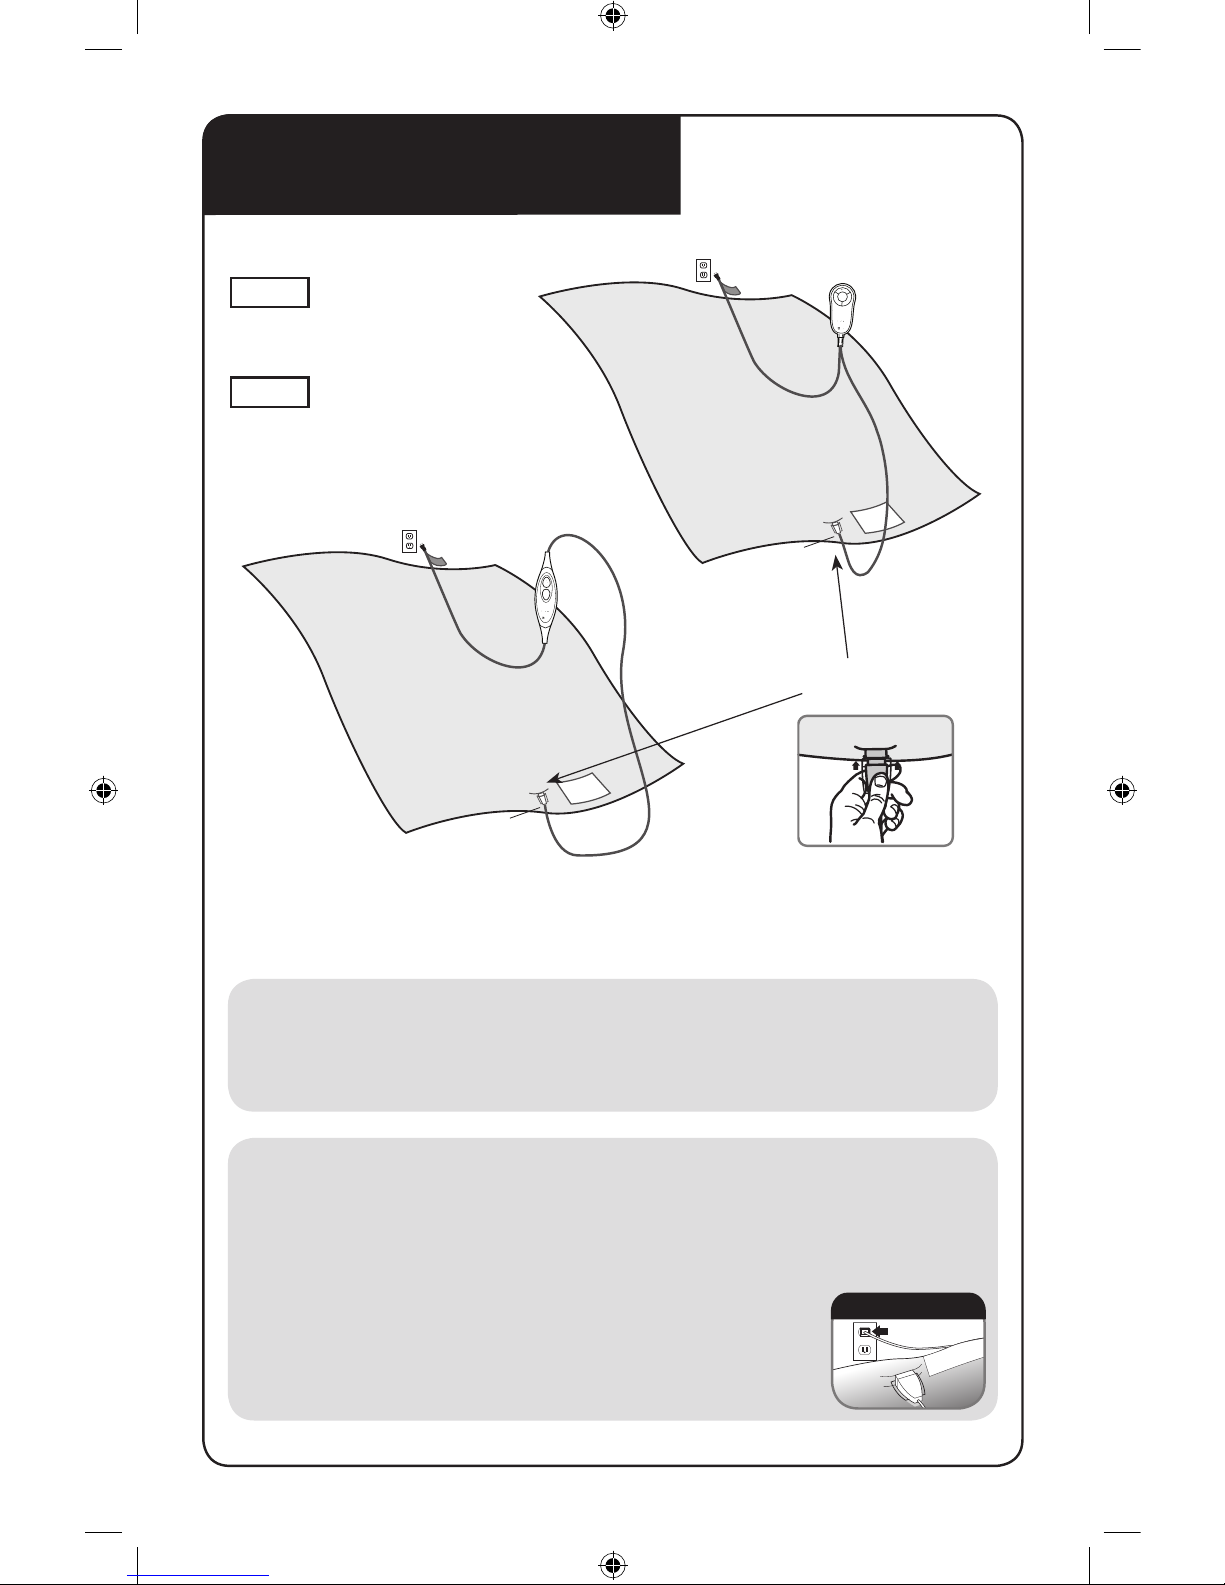
Module
Control
Power
Cord
Flag Tag
Throw Cord
Connector
Throw Cord
Label
Module
Control
Power
Cord
Flag Tag
Throw Cord
Connector
Throw Cord
Label
Control Cord
Connector
E5
For questions or support, please visit www.sunbeambedding.com.
STEP 1
Connect the Control
Cord connector and
module securely
STEP 2
Plug Power Cord
into wall
Control Cord
Connector
CAUTION:
• Always make sure cords and controls are NOT trapped or
pinched between bed slats, mattress, springs, against wall,
foot board or bed frame, or between furniture, walls or chairs.
• Do not plug main power cord into the wall
outlet until you have completely set up your
heated product per the instructions.
PLEASE follow these directions in the order they are given to
ensure your product will work correctly. Do not turn on the
product until it has been fully assembled.
QUICK SET-UP GUIDE
Heated Throw
IMPORTANT
Sunbeam HeatedBedding IB_17ESM1.indd 5 2/3/17 09:09
Page 6

E6
For questions or support, please visit www.sunbeambedding.com.
Table of Contents
Quick Set-Up Guide ................................................................................................ 4-5
Heated Blanket, Mattress Pad and Comforter
Setup ..................................................................................................................... 7
Controllers ......................................................................................................... 8-9
Heated Throw
Setup ................................................................................................................... 10
Control Features .................................................................................................. 10
Care and Cleaning ................................................................................................... 11
Frequently Asked Questions ............................................................................... 12-13
Warranty............................................................................................................. 14-15
How to Obtain Warranty Service ............................................................................... 15
DO NOT RETURN THIS PRODUCT TO THE PLACE OF PURCHASE.
If you have any questions while setting up or using your product,
please visit us on the World Wide Web at: www.sunbeam.com or
contact Sunbeam Consumer Care in the U.S. at (800) 892-7684
or in Canada at (800) 667-8623.
CAUTION: Do not plug main power cord into the wall outlet until you have
completely set up your heated product per the instructions.
• Disconnect power cord from wall before detaching control from heated product.
• Always make sure cords and controls are NOT trapped or pinched between bed slats,
mattress, springs, against wall, foot board or bed frame, or between furniture, walls or chairs.
CAUTION: Do not attempt to force the plug. This appliance has a polarized plug
(one blade is wider than the other). To reduce the risk of electrical shock, this plug
is intended to fit only one way into an outlet. If the plug does not fit in the outlet, reverse the plug. If it
still does not fit, contact a qualified electrician. Do not attempt to defeat this safety feature.
IMPORTANT
Sunbeam HeatedBedding IB_17ESM1.indd 6 2/3/17 09:09
Page 7
Control
Flag Tag
Label
Power Cord
Module
Left Side
Right Side
Control Cord
Connector
Left (Secondary)
Control
Flag Tag
Label
Power Cord
Module
Left Side
Right Side
Right
(Primary) Control
(Label on back
of control)
Control Cord
Connector
E7
For questions or support, please visit www.sunbeambedding.com.
1 Place the heated blanket/mattress pad on the bed with the label at the foot of the bed facing upward.
2 Connect the cord into the module at the bottom of the heated blanket/ mattress pad until the plastic
hinges click into place.
CAUTION: Cord must be COMPLETELY CONNECTED. A risk of fire could result from a loose connection.
3 Run the control cord on the floor under the bed. Do not sandwich cord between the mattress and box
spring. Avoid any tangling or pinching.
4 Plug power cord into a 110-120 volt wall outlet.
CAUTION: Do not use with generator power or inverter.
Control Placement:
• Dual Control for heated blanket or mattress pad – place primary control (label on back of
control) on the right side of the bed.
Heated Blanket, Mattress Pad and
Comforter Setup
See Control Features on page 8
for your individual control.
If there is a flashing light or your control displays
a flashing “F” , “F1” or “F2” see page 13.
• Single Control for heated blanket or mattress pad –
the control can be placed on either side of the bed.
STEP 1
Place on bed with
label at foot of bed
facing out
STEP 2
Connect the Control
Cord connector and
module securely
STEP
3
Run Control Cord
under the bed
STEP
4
Plug Power Cord
into wall
STEP 1
Place on bed with
label at foot of bed
facing out
STEP 2
Connect the Control
Cord connector and
module securely
STEP
3
Run Control Cord
under the bed
STEP
4
Plug Power Cord
into wall
Sunbeam HeatedBedding IB_17ESM1.indd 7 2/3/17 09:09
Page 8
E8
For questions or support, please visit www.sunbeambedding.com.
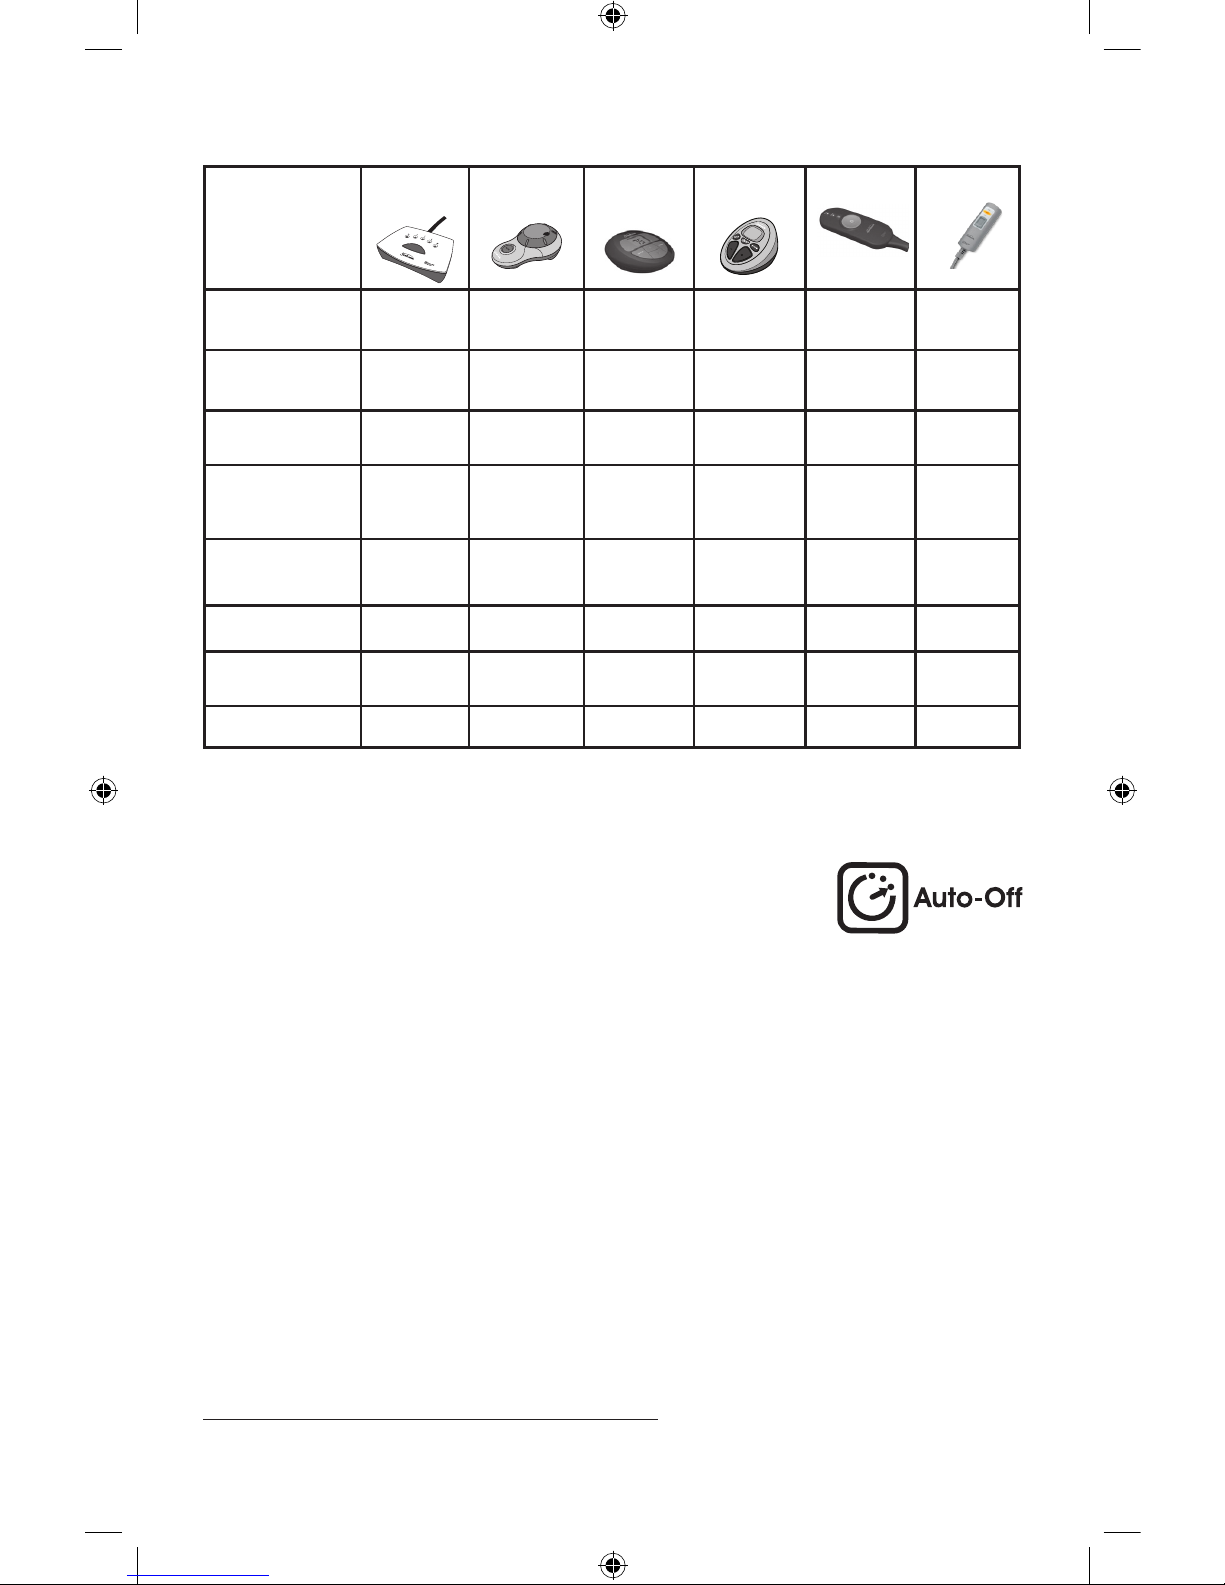
Control Chart
* S85KQA only
If your controller does not appear on the chart, please visit our website for more information.
Control Features
(for all controllers, see page 9 for detailed features.)
Auto-Off Feature:
The “Auto-Off” feature is designed for conservation of energy by automatically turning your blanket or
mattress pad off after 10 hours of continuous use (3 hours for throws).
For Dual Controls:
Each control operates independently and will turn off 10 hours after the control is turned “On”.
Auto-Off Select* Feature (selected models only):
Some models with the “Auto-Off” feature (see control chart) offer an “Auto-Off Select” button that can
disable the “Auto-Off” feature so the heated product will not automatically turn off.
Controls with the “Auto-Off Select” feature have the “Auto-Off” active as the default so the heated product
will automatically turn off after 10 hours.
To disable the “Auto-Off”, press the “Auto-Off Select” button. The word “StayOn” will appear in the digital
display to indicate the “Auto-Off” feature is deactivated and the heated product will NOT automatically turn
off after 10 hours. The heated product will remain on until the product is manually turned off by pressing the
“On/Off” button.
To activate auto-off, press the “Auto-Off Select” button. The word “AutoOff” will appear in the digital display to
indicate the “Auto-Off” feature is activated and the heated product will automatically turn off after 10 hours.
Note: After a power outage, the “Auto-Off” feature automatically resets the timer.
To restart all heated products after a power failure:
Press the power button and the heated product will begin to warm.
OneSet
™
Easy Set™ Pro SleekSet
™
SelectTouch™ Prime Style™ II
AA85
Throw
Elite Style™ II
T85B
Throw
Style #
(Single Control)
Y85 S85A Z85 P85A
Style #
(Dual Control)
Y85KQ
S85KQA Z85KQ P85KQA
Backlit
Display
b b
Ambient
Temperature
Compensation
b
Auto-Off 10 hour
10 hour*
(S85A,
S85KQA)*
10 hour Select 3 hour 3 hour
Warming Settings 5 10 10 20 3 3
Preheat
b b
Easy Grip
b b b
Sunbeam HeatedBedding IB_17ESM1.indd 8 2/3/17 09:09
Page 9

E9
For questions or support, please visit www.sunbeambedding.com.
Preheat Feature (selected models only):
The preheat function will heat the bed for a period of 30 minutes and the control will return to its original
setting.
1 To use the preheat feature, simply turn on the warming product by pressing the “On/Off” button and
then press the “Preheat” button. The display will show “PH” while the function is activated.
2 To reset the preheat feature, simply turn off the control by pressing the “On/Off” button and then turn it
back on by pressing the “On/Off” button.
Using Your Control:
1 To turn the control on, press the “On/Off” button.
Note: For SelectTouch™ and SleekSet™ controls, the backlit display light will reset itself by flashing “88”
and then will return to the previous setting and will begin to warm.
2 Note: For OneSet™ control, press the button to turn on to the lowest heat setting. Repeat pressing the
button to scroll to desired heat setting (5 total). To turn off, scroll through heat settings until all LED
indicator lights turn off.
3 Adjust the warming setting to your personal comfort by rotating the top knob left or right for
Easy Set™ controls.
4 Note: For SelectTouch™ controls, press the large left button with the “-” sign to lower the heat setting
and the large right button with the “+” sign to increase your heat setting.
5 Note: For SleekSet™ controls press the upper button with the up arrow to increase your heat setting and
the lower button with the down arrow to lower the heat setting
6 To turn the heated blanket/mattress pad OFF, press the “On/Off” button.
CAUTION: ALWAYS turn the heated blanket/mattress pad “OFF” when not in use.
Sunbeam HeatedBedding IB_17ESM1.indd 9 2/3/17 09:09
Page 10
E10
For questions or support, please visit www.sunbeambedding.com.
Module
Control
Power
Cord
Flag Tag
Throw Cord
Connector
Throw Cord
Label
Module
Control
Power
Cord
Flag Tag
Throw Cord
Connector
Throw Cord
Label
Heated Throw Setup
When setting up your heated throw, be sure to follow the steps below in order.
1 Locate the heated throw’s information label near the module.
2 Connect the cord into the module at the bottom of the heated throw until
the plastic hinges click into place. CAUTION: Cord must be COMPLETELY CONNECTED. A risk of fire
could result from a loose connection.
3 Plug the [heated throw] power cord into a 110-120 volt wall outlet.
CAUTION: Do not plug main power cord into the wall outlet until you have completely set up your heated
product per the instructions.
• Disconnect power cord from wall before detaching control from heated product.
• Always make sure cords and controls are NOT trapped or pinched between bed slats, mattress,
springs, against wall, foot board or bed frame, or between furniture, walls or chairs.
• Do not wrap control in throw when in use.
• Do not use with generator power.
Using Your Heated throw Control:
1 To turn on the throw press the button in the middle of the control.
The indicator light will glow, depending on which setting the heated
throw is set, and the heated throw will begin to warm.
CAUTION: ALWAYS turn the heated throw “OFF” and disconnect the
power cord from the outlet when not in use.
2 To turn the heated throw OFF press the button through the different
settings until the temperature setting lights are not glowing.
2
1
3
2
1
3
If there is a flashing light
on your control, see page 13.
Sunbeam HeatedBedding IB_17ESM1.indd 10 2/3/17 09:09
Page 11

E11
For questions or support, please visit www.sunbeambedding.com.
Care and Cleaning OF YOUR HEATED BEDDING PRODUCT
CAUTION: Do not dry clean. Do not use bleach. Do not use wringer. Do
not iron. Do not immerse control or cord in water or other liquids. Do
not use mothballs or sprays of any kind. Do not reconnect the heated
product until it is completely dry.
We recommend washing before initial use.
Before Washing or Storing Your Heated Bedding Product
1 Disconnect power cord from wall BEFORE detaching control cord from the heated product.
2 Ensure that no cords are still connected and none of the wires have worn through the fabric.
3 Carefully follow all washing instructions or your heated product may shrink and possibly cause a fire
hazard.
Washing Instructions
1 Machine wash in cold water, gentle cycle or hand wash.
Caution: Do not use commercial dryers or the dryers at your local laundromat. They get too hot and
would damage the wiring of the heated product.
2 Tumble dry low, delicate cycle.
3 Remove the blanket/mattress pad/throw while still damp and gently stretch to its original size.
4 Drape the heated product over a clothesline or a shower rod. DO NOT use clothespins
5 Heated product must be COMPLETELY dry before reconnecting the power plug or control plug.
Hang to Dry
1 While still damp, gently stretch the blanket/mattress pad/throw back to its original size.
2 Drape the heated product over a clothesline or hang over a shower rod. DO NOT use clothespins.
3 Heated product must be COMPLETELY dry before reconnecting the power plug or control plug.
Sunbeam HeatedBedding IB_17ESM1.indd 11 2/3/17 09:09
Page 12

E12
For questions or support, please visit www.sunbeambedding.com.
Frequently Asked Questions
ABOUT YOUR HEATED BEDDING PRODUCT
Q Who should NOT use the heated blanket, heated mattress pad or heated throw?
A The following people should NOT use the heated blanket, heated mattress pad
or warming throw:
• An infant
• A child
• An incapacitated or immobile person
• A paraplegic
• A quadriplegic
• A diabetic
• Anyone insensitive to heat such as a person with poor blood circulation
• Anyone who cannot clearly understand the instructions and/or operate the controls
Q What do I do if my pet chews the cord, I lose my control or the control does not operate
properly?
A Please stop using the heated product immediately. Call our Consumer Service number
listed under How to Obtain Warranty Service and ask for instructions on how and where to send
the heated product.
Q My control feels warm to the touch. Is this a problem?
A No. The control will feel warm to the touch when functioning properly.
Q My heated blanket/heated mattress pad/heated throw doesn’t heat properly.
A Your heated product is not a heating pad. It will not feel hot to the touch when laid out flat
in a normal manner. Try the following fold test to see if it is operating
properly:
1 Fold the heated blanket, heated mattress pad or warming throw 3
times over.
2 Make sure the control cord is connected to the module and then plug
the power cord into an outlet.
3 Turn on your heated product, then turn the control to the highest
setting and wait 5 to 7 minutes.
4 Put your hand between the folds and you should feel the blanket/ mattress pad/throw
warming up.
Caution: DO NOT continue the test for more than 7 minutes. DO NOT attempt to make any internal
adjustments to this appliance. If you have tried all of the solutions above and the heated product
still doesn’t work, stop using it immediately, disconnect the power cord and contact Consumer
Care.
Sunbeam HeatedBedding IB_17ESM1.indd 12 2/3/17 09:09
Page 13

E13
For questions or support, please visit www.sunbeambedding.com.
Q What does “F1” or “F2” mean on my Electronic Digital Control?
A The digital controls are designed to notify you in the event that a problem has been discovered
by flashing “F1” or “F2” on the display.
F1
Models: SelectTouch™ and SleekSet
™
Follow reset instructions below.
F2
Models: SelectTouch™ and SleekSet™
Follow reset instructions below.
Reset Instructions
1.) Follow the instructions on the flag tag attached to the control cord to reset control.
2.) Check the blanket/mattress pad for visual damage.
3.) If no visual damage is found, unplug the system from wall outlet.
4.) Check that the control is well-connected to the module.
5.) Plug the power cord into the wall outlet.
6.) Set the control to “On”.
7.) If the system does not operate after 2 or 3 times trying to reset, disconnect the power cord
and contact Consumer Care.
Q What does a flashing light mean on my OneSet™, Easy Set™, Prime Style™ AO
or Elite Style™ control?
A These controls are designed to notify you in the event that a problem has been discovered
by flashing the light on the control. Follow instructions on the flag tag to reset control. First,
check the heated product for visual damage. If no visual damage is found, unplug the system
from wall outlet. Check that the control is well-connected to the module. Plug the power cord
into the wall outlet and turn the control On. If the product still does not operate after 2 or 3
times trying to reset, disconnect the power cord and contact Consumer Care.
MODULE
Ensure the Control Cord connector and module are securely
fastened by inserting until hooks are in locked position.
Sunbeam HeatedBedding IB_17ESM1.indd 13 2/3/17 09:09
Page 14

E14
For questions or support, please visit www.sunbeambedding.com.
PLEASE DO NOT RETURN THIS PRODUCT TO PLACE OF PURCHASE.
Limited Warranty
Sunbeam Products, Inc. doing business as Jarden Consumer Solutions or if in Canada, Sunbeam
Corporation (Canada) Limited doing business as Jarden Consumer Solutions (collectively “JCS”) warrants
that for a period stated below from the date of purchase, this product will be free from defects in
material and workmanship.
• All heated products branded “Arlington™” will carry a ONE year limited warranty.
• All heated products branded “Sunbeam® Home Choice™” will carry a TWO year limited warranty.
• All heated mattress pads will carry a THREE year limited warranty, with the exception of
“Arlington™” and “Sunbeam® Home Choice™.”
• All heated water-resistant mattress pads will carry a FIVE year limited warranty, with the exception
of “Arlington™” and “Sunbeam® Home Choice™. All other heated products branded “Sunbeam®”
and “SlumberRest®” will carry a FIVE year limited warranty.
JCS, at its option, will repair or replace this product or any component of the product found to be defective
during the warranty period. Replacement will be made with a new or remanufactured product or component. If
the product is no longer available, replacement may be made with a similar product of equal or greater value.
This is your exclusive warranty. Do NOT attempt to repair or adjust any electrical or mechanical functions on
this product. Doing so will void this warranty.
This warranty is valid for the original retail purchaser from the date of initial retail purchase and
is not transferable. Keep the original sales receipt. Proof of purchase is required to obtain warranty
performance. JCS dealers, service centers, or retail stores selling JCS products do not have the right to
alter, modify or any way change the terms and conditions of this warranty.
This warranty does not cover normal wear of parts or damage resulting from any of the following:
negligent use or misuse of the product, use on improper voltage or current, use contrary to the operating
instructions, disassembly, repair or alteration by anyone other than JCS or an authorized JCS service
center. Further, the warranty does not cover: Acts of God, such as fire, flood, hurricanes and tornadoes.
What are the limits on JCS’s Liability?
JCS shall not be liable for any incidental or consequential damages caused by the breach of any express,
implied or statutory warranty or condition.
Except to the extent prohibited by applicable law, any implied warranty or condition of merchantability or
fitness for a particular purpose is limited in duration to the duration of the above warranty.
JCS disclaims all other warranties, conditions or representations, express, implied, statutory or otherwise.
JCS shall not be liable for any damages of any kind resulting from the purchase, use or misuse of, or
inability to use the product including incidental, special, consequential or similar damages or loss
of profits, or for any breach of contract, fundamental or otherwise, or for any claim brought against
purchaser by any other party.
Some provinces, states or jurisdictions do not allow the exclusion or limitation of incidental or
consequential damages or limitations on how long an implied warranty lasts, so the above limitations or
exclusion may not apply to you.
This warranty gives you specific legal rights, and you may also have other rights that vary from
province to province, state to state or jurisdiction to jurisdiction.
Sunbeam HeatedBedding IB_17ESM1.indd 14 2/3/17 09:09
Page 15

E15
For questions or support, please visit www.sunbeambedding.com.
PLEASE DO NOT RETURN THIS PRODUCT TO PLACE OF PURCHASE
We’re Here to Help, Please contact Jarden Consumer Care Centers listed below:
How to Obtain Warranty Service
In the U.S.A.
If you have any question regarding your heated product, this warranty or would like to obtain
warranty service, please visit our web site at: www.sunbeam.com or contact Jarden Consumer Care
at 1-800-892-7684 and a convenient service center address will be provided to you.
In Canada
If you have any question regarding your heated product, this warranty or would like to obtain
warranty service, please visit our web site at: www.sunbeam.com or contact Jarden Consumer Care
at: 1-800-667-8623 and a convenient service center address will be provided to you.
In the U.S.A., this warranty is offered by Sunbeam Products, Inc. doing business as Jarden Consumer
Solutions located in Boca Raton, Florida 33431. In Canada, this warranty is offered by Sunbeam Corporation
(Canada) Limited doing business as Jarden Consumer Solutions, located at 20B Hereford Street, Brampton,
Ontario L6Y 0M1. If you have any other problem or claim in connection with this product, please contact our
Consumer Service Department. PLEASE DO NOT RETURN THIS PRODUCT TO ANY OF THESE ADDRESSES OR
TO THE PLACE OF PURCHASE.
FCC CERTIFIED
This product complies with part 15 of the FCC Rules. Operation is subject to the following two conditions:
(1) This product may not cause harmful interference, and
(2) this product must accept any interference received, including interference that may cause undesired
operation.
Note: This product has been tested and found to comply with the limits for a Class B digital device,
pursuant to part 15 of the FCC Rules. These limits are designed to provide reasonable protection against
harmful interference in a residential installation. This product generates, uses and can radiate radio
frequency energy and, if not installed and used in accordance with the instructions, may cause harmful
interference to radio communications. However, there is no guarantee that interference will not occur in
a particular installation. If this product does cause harmful interference to radio or television reception,
which can be determined by turning the product off and on, the user is encouraged to try to correct the
interference by one or more of the following measures:
— Reorient or relocate the receiving antenna.
— Increase the separation between the product and receiver.
— Connect the product into an outlet on a circuit different from that to which the receiver is connected.
— Consult the dealer or an experienced radio/TV technician for help.
Changes or modifications not expressly approved by the party responsible for compliance could void the
user’s authority to operate the equipment.
ICES CERTIFIED
This product complies with CAN ICES-3 (B)/NMB-3(B).
Printed in China
© 2017 Sunbeam Products, Inc., doing business as Jarden Consumer Solutions. All rights reserved.
Distributed by Sunbeam Products, Inc., doing business as Jarden Consumer Solutions, Boca Raton, FL 33431.
Sunbeam Products, Inc. is a subsidiary of Newell Brands, Inc. (NYSE: NWL). Made in China.
For inquiries regarding recycling and proper disposal of this product, please contact your local waste
management facility.
Sunbeam HeatedBedding IB_17ESM1 GCDS-SUN48990-JC
Sunbeam HeatedBedding IB_17ESM1.indd 15 2/3/17 09:09
Page 16

Note s/Notas
Sunbeam HeatedBedding IB_17ESM1.indd 16 2/3/17 09:09
Page 17

CONFIANZA DESDE
HACE 100 AÑOS
ropa de
cama eléctrica
MANUAL DEL USUARIO
Incluye
GUÍA
RÁPIDA DE
INSTALACIÓN
páginas 5-6
Sunbeam HeatedBedding IB_17ESM1.indd 1 2/3/17 09:09
Page 18

S2
Si tiene alguna pregunta o requiere asistencia, por favor visite: www.sunbeambedding.com
INSTRUCCIONES
IMPORTANTES DE
SEGURIDAD
NO DESTRUIR
Al usar aparatos eléctricos, siempre deben aplicarse las medidas de seguridad
básicas para reducir el riesgo de que se produzca un incendio, una descarga
eléctrica o lesiones. Usar este producto de manera incorrecta o no tomar en cuenta
las siguientes advertencias e instrucciones puede ocasionar que el producto se
sobrecaliente o que se produzcan incendios, lesiones personales o daños:
1. Asegúrese de leer cuidadosamente todas las instrucciones antes de
usar este producto de calefacción.
2. Este producto de calefacción no debe usarse para cubrir a bebés, niños,
personas discapacitadas o que no pueden moverse, parapléjicas o
cuadripléjicas, diabéticas, personas que no son sensibles al calor, por
ejemplo, personas con problemas de circulación sanguínea ni personas que
no puedan comprender claramente las instrucciones y usar los controles.
3. No cubra, aplaste, doble ni exponga el área de cables de calefacción
de este producto.
4. No coloque los cables eléctricos entre el colchón y la base de la
cama. Asegúrese de que nada aplaste los cables. No use el producto
si los cables están dañados. Los cables dañados pueden ocasionar
que el producto se sobrecaliente o incluso un incendio.
5. Mantenga el control lejos de las corrientes de aire o las áreas
húmedas o que puedan mojarse, por ejemplo, las ventanas abiertas.
6. No use alfileres u otros objetos metálicos, pues pueden dañar el
cableado eléctrico.
7. No use el producto si está húmedo. Si se derrama algún líquido cerca del
producto, apáguelo, desconéctelo y séquelo antes de volverlo a usar.
8. El control no es resistente al agua. No debe sumergirse en agua ni en
ningún otro líquido.
9. Asegúrese de usar este producto de calefacción solamente con
un circuito de suministro de CA con el voltaje adecuado. No use el
producto con una extensión. No use el producto con generadores,
convertidores ni inversores de alimentación.
Sunbeam HeatedBedding IB_17ESM1.indd 2 2/3/17 09:09
Page 19

S3
Si tiene alguna pregunta o requiere asistencia, por favor visite: www.sunbeambedding.com
10. Apague o desconecte este producto de calefacción cuando no lo esté
usando.
11. Si el producto está doblado o fruncido, puede sobrecalentarse
mientras están en uso.
12. Examine el producto de calefacción, el cable y el control antes de
cada uso, para asegurarse de que no presente señales de desgaste ni
daño. Si no puede manipularse correctamente, o si el producto está
desgastado o dañado, deje de usarlo inmediatamente, desconéctelo y
llame a Servicio al Cliente de Sunbeam en EE. UU. al 800-892-7684, o
en Canadá al 800-667-8623.
13. Si se trata exclusivamente de mantas y almohadillas para la espalda/
la parte superior del cuerpo: No las use en mecedoras, sillones
reclinables, sillas con ruedas ni ningún otro asiento que se mueva.
14. No use este producto de calefacción en una cama de agua, litera, cama
ajustable por medios mecánicos o cunas/camas para niños pequeños.
15. No se use junto con ningún otro producto eléctrico de calefacción.
16. No esconda el cable de alimentación ni el control en los dobleces de
sofás ni otros tipos de muebles. Todas las partes de este producto de
calefacción deben encontrarse a la vista en todo momento.
17. Enrollar el cable apretadamente alrededor del control podría dañarlo.
Enróllelo sin estirar demasiado, cuando guarde el producto. Deje que
el producto se enfríe antes de guardarlo, y no coloque objetos encima
de él, para que no se doble. Guárdelo en su funda original, en un lugar
fresco, oscuro y seco.
18. Este producto de calefacción no debe lavarse en seco. Las sustancias
solventes de limpieza pueden dañar el aislamiento del elemento
calefactor. Lavar el producto de manera incorrecta puede ocasionar
problemas con el cable de calefacción e incluso provocar un incendio.
19. Mantenga alejados de este producto eléctrico de calefacción a los perros,
gatos y otras mascotas, pues podrían dañarlo o lastimarse con él.
20. Si el producto cuenta con un control desmontable, úselo solamente con él.
21. No use este producto de calefacción en conjunto con cremas
analgésicas, linimentos, ungüentos ni pomadas preparadas. Hacerlo
podría ocasionar quemaduras.
22. Hable con su proveedor de cuidados médicos antes de usar el
producto, si tiene un marcapasos o algún otro dispositivo médico.
23. Este producto no está diseñado para usarse en hoteles, moteles,
hospitales ni ninguna otra institución.
Sunbeam HeatedBedding IB_17ESM1.indd 3 2/3/17 09:09
Page 20

S4
Si tiene alguna pregunta o requiere asistencia, por favor visite: www.sunbeambedding.com
GUARDE ESTAS INSTRUCCIONES
MODELOS ESTADOUNIDENSES CON ENCHUFES POLARIZADOS:
ENCHUFE POLARIZADO
Este producto tiene un enchufe polarizado. Para disminuir
el riesgo de descarga eléctrica, este enchufe está diseñado
para insertarse en un tomacorriente polarizado en un
solo sentido. Si el enchufe no entra completamente en
el tomacorriente, inviértalo. Si aun así no entra, contacte a un electricista
calificado. No intente modificar el enchufe de ninguna manera. Si el enchufe
encaja suelto en el tomacorriente de CA o si el tomacorriente de CA se siente
caliente, no utilice ese tomacorriente.
Sunbeam HeatedBedding IB_17ESM1.indd 4 2/3/17 09:09
Page 21

Control
Etiqueta del cable
Etiqueta
Cable de
alimentación
Módulo
Lazo izquierdo
Lazo derecho
Conector en el
Cable del Control
Control izquierdo
(Secundario)
Control derecho
(Primaria)
(Etiqueta en el
reverso del control)
Etiqueta del cable
Label
Etiqueta
Cable de
alimentación
Módulo
Lazo izquierdo
Lazo derecho
Conector en el
Cable del Control
S5
Si tiene alguna pregunta o requiere asistencia, por favor visite: www.sunbeambedding.com
1
3
2
4
TAMAÑO INDIVIDUAL/
MATRIMONIAL INSTALACIÓN
DEL CONTROL ÚNICO
PASO 1
Coloque el producto
sobre la cama con la
etiqueta hacia afuera en
el extremo de los pies
PASO 2
Conecte el cable del
control y el módulo
firmemente
PASO
3
Deslice el cable del
control debajo de
la cama
PASO
4
Enchufe el cable de
alimentaión a la pared
TAMAÑO QUEEN/KING/CALIFORNIA KING
INSTALACIÓN CON DOS
CONTROLES
PASO 1
Coloque el producto
sobre la cama con
la etiqueta hacia
afuera en el extremo
de los pies
PASO 2
Conecte el cable del
control y el módulo
firmemente
PASO
3
Deslice el cable del control
debajo de la cama
PASO
4
Enchufe el cable
de alimentaión
a la pared
UNIDAD BASE PARA
INSTALACIÓN DEL
CONTROL
REMOTO
Deslice el cable de la unidad base
debajo de la cama
Módulo
GUÍA RÁPIDA DE INSTALACIÓN
Almohadilla del colchón y Frazada
Sunbeam HeatedBedding IB_17ESM1.indd 5 2/3/17 09:09
Page 22

Módulo
Control
Cable de
alimentación
Etiqueta
del Cable
Conector en el
Cable del cobertor
Cable
del coberto
r
Etiqueta
Módulo
Control
Cable de
alimentación
Etiqueta
del Cable
Conector en el
Cable del cobertor
Cable
del cobertor
Etiqueta
Control Cord
Connector
S6
Si tiene alguna pregunta o requiere asistencia, por favor visite: www.sunbeambedding.com
PASO 1
Conecte el cable del
control y el módulo
firmemente
PASO 2
Enchufe el cable
de alimentaión a
la pared
Contector en el
Cable del Control
PRECAUTIÓN:
• Siempre verifique que los cables y controles NO se
encuentren atrapados o pinchados entre los listones de
la cama, el colchón, los resortes, o contra la pared, el pie
de cama, marco de la cama o entre los muebles, paredes
o sillas.
• No enchufe el cable de alimentación principal al tomacorriente de pared
hasta que haya instalado correctamente su producto de calor según las
instrucciones.
POR FAVOR siga estas instrucciones en el orden en
que se proveen para asegurar que su producto funcione
correctamente. No encienda el producto hasta que haya sido
completamente instalado.
GUÍA RÁPIDA DE INSTALACIÓN
Manta de calor
IMPORTANTE
Sunbeam HeatedBedding IB_17ESM1.indd 6 2/3/17 09:09
Page 23

S7
Si tiene alguna pregunta o requiere asistencia, por favor visite: www.sunbeambedding.com
Tabla de contenido
Guía rápida de Instalación .................................................................................... 5-6
Manta, Funda y Edredón
Instalación............................................................................................................. 8
Controles ......................................................................................................... 9-10
Manta de Calor
Instalación........................................................................................................... 11
Características del control .................................................................................. 11
Cuidado y limpieza .............................................................................................. 12
Preguntas frecuentes .................................................................................... 13-14
Garantía ........................................................................................................ 15-16
Cómo obtener servicio en garantía .......................................................................16
NO DEVUELVA ESTE PRODUCTO AL LUGAR DONDE LO COMPRÓ.
Si tiene alguna pregunta al instalar o usar su producto, visítenos
en el sitio Web en: www.sunbeam.com o comuníquese
con Atención al Cliente de Sunbeam al: (800) 892-7684.
PRECAUCIÓN: No enchufe el cable de alimentación principal al tomacorriente de pared
hasta que haya instalado correctamente su producto de calor según las instrucciones.
• Desconecte el cable de alimentación de la pared antes de separar el control del
producto de calor.
• Siempre verifique que los cables y controles NO se encuentren atrapados o
pinchados entre los listones de la cama, el colchón, los resortes, o contra la
pared, el pie de cama, marco de la cama o entre los muebles, paredes o sillas.
PRECAUCIÓN: No trate de introducir el enchufe por la fuerza. Este aparato tiene un enchufe polarizado
(una pata es más ancha que la otra). Con el fin de reducir el riesgo de choque eléctrico, este enchufe
sólo podrá introducirse de una manera en el tomacorriente. Si el enchufe no calza en el tomacorriente,
gire el enchufe. Si aun así no calza, consulte a un electricista calificado. No intente anular esta función
de seguridad.
IMPORTANTE
Sunbeam HeatedBedding IB_17ESM1.indd 7 2/3/17 09:09
Page 24

Control izquierdo
(Secundario)
Control derecho
(Primaria)
(Etiqueta en el
reverso del control)
Etiqueta del cable
Label
Etiqueta
Cable de
alimentación
Módulo
Lazo izquierdo
Lazo derecho
Conector en el
Cable del Control
C
ontrol
Etiqueta del cable
Etiqueta
Cable de
alimentación
Módulo
Lazo izquierdo
Lazo derecho
Conector en el
Cable del Control
S8
Si tiene alguna pregunta o requiere asistencia, por favor visite: www.sunbeambedding.com
1 Coloque la manta/funda de colchón de calor en la cama con la etiqueta hacia arriba en el extremo de los pies.
2 Conecte el cable al módulo ubicado en la parte inferior de la manta/funda de colchón de calor hasta que
las trabas de plástico encajen firmemente en su lugar. PRECAUCIÓN: El cable debe estar COMPLETAMENTE
CONECTADO. Una conexión suelta puede tener como consecuencia un riesgo de incendio.
3 Deslice el cable del control sobre el piso, debajo de la cama. No coloque el cable entre el colchón y
los resortes de la cama. Evite enredarlo o pincharlo.
4 Enchufe el cordón eléctrico en un tomacorriente de pared de 110 a 120 voltios. PRECAUCIÓN: No use
con la electricidad de un generador o inversor.
Colocación del control:
• Control dual para manta, funda y edredón de colchón eléctrica: Coloque el control
primario (etiqueta en el reverso del control) en el lado derecho de la cama.
Instalación de la manta, funda y
edredón para colchón de calor
Vea las Características del control correspondientes
a su control individual en la página 8.
Si hay una luz que titila o la pantalla de su control
muestra “F”, “F1” o “F2” vea la página 13.
• Control único para manta o funda de colchón
eléctrica: El control se puede colocar en cualquiera
de los dos lados de la cama.
PASO 1
Coloque el producto
sobre la cama con
la etiqueta hacia
afuera en el extremo
de los pies
PASO 2
Conecte el cable del
control y el módulo
firmemente
PASO
3
Deslice el cable del control
debajo de la cama
PASO
4
Enchufe el cable de
alimentaión a la pared
PASO 1
Coloque el producto
sobre la cama con la
etiqueta hacia afuera en
el extremo de los pies
PASO 2
Conecte el cable del
control y el módulo
firmemente
PASO
3
Deslice el cable del control
debajo de la cama
PASO
4
Enchufe el cable de
alimentaión a la pared
Sunbeam HeatedBedding IB_17ESM1.indd 8 2/3/17 09:09
Page 25

S9
Si tiene alguna pregunta o requiere asistencia, por favor visite: www.sunbeambedding.com
Características del Control
(Para todos los controles, vea la página 9 para características detalladas)
Función de apagado automático:
La función de “Apagado automático” ha sido diseñada para conservación de la energía, ya que apaga su manta o
funda de colchón automáticamente después de 10 horas de uso continuo (3 horas para cobertores).
Para controles duales:
Cada control funciona en forma independiente y se apagará 10 horas a partir del momento en que se encendió el
control.
Función Seleccionar Apagado Automático*: (sólo para los modelos seleccionados)
Algunos modelos con la función “Apagado automático” (vea la sinopsis de controles) ofrecen un botón “Seleccionar
apagado automático” que puede deshabilitar la función “Apagado automático” para que el producto de calor no se
apague automáticamente.
Los controles con la función “Seleccionar apagado automático” tienen el “Apagado automático” activo de forma
predeterminada por lo tanto el producto de calor se apagará automáticamente después de 10 horas.
Para deshabilitar el “Apagado automático”, presione el botón “Auto-Off Select”. Aparecerá la palabra “StayOn” en
la pantalla digital para indicar que la función “Apagado automático” está desactivada y el producto de calor NO
se apagará automáticamente después de 10 horas. El producto de calor permanecerá encendido hasta que se lo
apague manualmente presionando el botón “On/Off”.
Para activar el apagado automático, presione el botón “Auto-Off Select”. Aparecerá la palabra “AutoOff” en la
pantalla digital para indicar que la función “Apagado automático” está activada y el producto de calor se apagará
automáticamente después de 10 horas.
Nota: Después de un corte de suministro eléctrico, la función “Apagado automático” vuelve a configurar
automáticamente el temporizador.
Tabla de Control
*solamente en S85KQA
Si su control no aparece en la tabla, por favor visite nuestra página Web para mayor información.
OneSet
™
Easy Set™ Pro SleekSet
™
SelectTouch™ Prime Style™ II
AA85
Cobertor
Elite Style™ II
T85B
Cobertor
No. de Modelo
(Control Único)
Y85 S85A Z85 P85A
No. de Modelo
(Control Dual)
Y85KQ
S85KQA Z85KQ P85KQA
Pantalla
Illuminada
b b
Compensación
de Temperatura
Ambiente
b
Apagado
Automático
10 horas
10 horas*
(S85A,
S85KQA)*
10 horas Select 3 horas 3 horas
Niveles de
Temperatura
5 10 10 20 3 3
Precalentamiento
b b
Agarre Simple
b b b
Sunbeam HeatedBedding IB_17ESM1.indd 9 2/3/17 09:09
Page 26

S10
Si tiene alguna pregunta o requiere asistencia, por favor visite: www.sunbeambedding.com
Para volver a encender todos los productos de calor después de un apagón:
Oprima el botón de encendido y el producto de calor comenzará a calentar.
Precalentamiento: (Modelos selectos únicamente)
La función de precalentamiento calienta la cama por 30 minutos. Después, el control retornará a su configuración original.
1 Para utilizar la función de precalentamiento, oprima el botón “On/Off” (encendido/apagado) y luego oprima el
botón “Preheat” (precalentamiento). La pantalla mostrará “PH” mientras esta función se encuentre activada.
2 Para reiniciar la función de precalentamiento, simplemente apague el control oprimiendo el botón
“On/Off” y vuelva a encenderlo, oprimiendo el botón “On/Off” de nuevo.
Cómo usar su control:
1 Para encender el control, simplemente oprima el botón “On/Off”.
Nota: Para los controles SelectTouch™ y SleekSet™, la luz de la pantalla iluminada se reiniciará haciendo titilar el
número“88” y luego volverá al valor anterior y comenzará a calentar.
2 Nota: Para el control OneSet™, presione el botón para encender la configuración de calor más baja. Repita
presionando el botón hasta desplazarse a la temperatura deseada (5 en total). Para apagar, desplácese por los
ajustes de calor hasta que todas las luces indicadoras LED se apaguen.
3 Ajuste la configuración de calentamiento para su comodidad personal rotando la perilla superior hacia la izquierda
o hacia la derecha para los controles Easy Set™.
4 Nota: Para los controles SelectTouch™, presione el botón grande a la izquierda con el signo “-” para bajar la
configuración del calor y el botón grande a la derecha con el signo “+” para aumentar la configuración del calor.
5 Nota: Para SleekSet™ controles pulse el botón superior con la flecha hacia arriba para aumentar el
nivel de calor y el botón inferior con la flecha hacia abajo para bajar el nivel de calor.
6 Para apagar la manta/funda para colchón de calor, simplemente oprima el botón “On/Off”.
PRECAUCIÓN: SIEMPRE apague la manta/funda para colchón de calor cuando no la utilice.
Instalación de la Manta de Calor
Al instalar su Manta de Calor, asegúrese de seguir los pasos siguientes en el orden indicado.
1 Ubique la etiqueta de información de la Manta de Calor cerca del módulo.
2 Conecte el cable al módulo ubicado en la parte inferior de la Manta de Calor hasta que las trabas de
plástico encajen firmemente en su lugar.
PRECAUCIÓN: El cable debe estar COMPLETAMENTE CONECTADO. Una conexión suelta puede tener como
consecuencia un riesgo de incendio.
3 Enchufe el cordón de alimentación de la Manta de Calor en un tomacorriente de pared de 110-120
voltios.
PRECAUCIÓN: No enchufe el cable de alimentación principal al tomacorriente de pared hasta que haya
instalado correctamente su producto de calor según las instrucciones.
• Desconecte el cable de alimentación de la pared antes de separar el control del producto de calor.
• Siempre verifique que los cables y controles NO se encuentren atrapados o pinchados entre los listones
de la cama, el colchón, los resortes, o contra la pared, el pie de cama, marco de la cama o entre los
muebles, paredes o sillas.
• NO envuelva el control en el cobertor cuando esté en uso.
• NO lo use con un generador de energía.
Usando el Control de su Manta de Calor:
1 Para encender la Manta presione el botón ubicado al medio del control.
La luz indicadora se iluminará, dependiendo de cual posición haya
fijado la Manta de Calor, y empezará a calentar.
PRECAUCIÓN: SIEMPRE apague el cobertor eléctrico y desenchufe
el cable de alimentación del tomacorriente cuando no use el cobertor.
2 Para apagar (posición “OFF”) la Manta de Calor, oprima el botón pasando por cada uno de los valores de
temperatura hasta que las luces de nivel de temperatura dejen de brillar.
Si hay una luz que titila en
su control, vea la página 13.
Sunbeam HeatedBedding IB_17ESM1.indd 10 2/3/17 09:09
Page 27

S11
Si tiene alguna pregunta o requiere asistencia, por favor visite: www.sunbeambedding.com
Módulo
Control
Cable de
alimentación
Etiqueta
del Cable
Conector en el
Cable del cobertor
Cable
del cobertor
Etiqueta
Módulo
Control
Cable de
alimentación
Etiqueta
del Cable
Conector en el
Cable del cobertor
Cable
del coberto
r
Etiqueta
2
1
3
2
1
3
Cuidados y Limpieza DE SU PRODUCTO CALEFACTOR PARA CAMA
ADVERTENCIA: No lo lave en seco. No lo lave con cloro. No lo exprima.
No lo planche. Ni sumerja el control ni el cable en agua ni en ningún
otro líquido. No use bolas de alcanfor ni aerosoles de ningún tipo en el
producto. No vuelva a conectar el producto calefactor hasta que esté
perfectamente seco.
Se recomienda lavar el producto antes del primer uso.
Antes de lavar o almacenar su Ropa de Cama de Calor:
1 Desconecte el cable de alimentación del enchufe ANTES de desconectar el cable del control del
producto calefactor.
2 Asegúrese de que no haya cables conectados y de que ninguno de ellos haya agujerado la tela.
3 Siga cuidadosamente cada una de las instrucciones de lavado; de otra manera, el producto podría
encoger y posiblemente representar un peligro de incendio.
Instrucciones de Lavado
1 Lave el producto en la lavadora con agua fría y en el ciclo de ropa delicada o lavar a mano.
Advertencia: No use las secadoras comerciales o las de su lavandería local. Se calientan demasiado y
pueden dañar el cableado del producto de calefacción.
2 Use el ciclo de secado de intensidad baja, para ropa delicada.
3 Saque la cobija/colchón o almohadilla/manta mientras aún está mojada y estírela suavemente hasta
que recupere su tamaño normal.
4 Coloque el producto de calefacción sobre un tendedero o el tubo de la cortina del baño. NO use pinzas.
5 El producto de calefacción debe estar PERFECTAMENTE seco antes de que pueda volver a conectar el
enchufe de alimentación o el del control.
Secado a Mano
1 Mientras aún está mojada, estire suavemente la cobija/colchón o almohadilla/manta hasta que
recupere su tamaño normal.
2 Coloque el producto de calefacción sobre un tendedero o el tubo de la cortina del baño. NO use pinzas.
3 El producto de calefacción debe estar PERFECTAMENTE seco antes de que pueda volver a conectar el
enchufe de alimentación o el del control.
Sunbeam HeatedBedding IB_17ESM1.indd 11 2/3/17 09:09
Page 28

S12
Si tiene alguna pregunta o requiere asistencia, por favor visite: www.sunbeambedding.com
Preguntas frecuentes
DE SU PRODUCTO DE ROPA DE CAMA DE CALOR.
Q ¿Quién NO debería usar la manta, funda de colchón o Manta de Calor?
A Las siguientes personas NO deberían usar la manta, funda de colchón o cobertor eléctrico:
• Bebé
• Niño
• Persona discapacitada o inmobilizada
• Parapléjico
• Cuadripléjico
• Diabético
• Toda persona insensible al calor, como quien sufre problemas de circulación
• Toda persona que no pueda comprender claramente las instrucciones y/u operar los
controles
Q ¿Qué debo hacer si mi mascota muerde el cable, si pierdo el control o si éste no funciona
correctamente?
A Por favor, deje de usar el producto de calor inmediatamente. Llame al número de nuestro
Servicio al Cliente que aparece en la sección Cómo Obtener Servicio de Garantía y solicite
las instrucciones sobre cómo y dónde enviar el producto de calor.
Q Mi control se siente caliente al tacto. ¿Esto es un problema?
A No. El control se siente caliente al tacto cuando está funcionando correctamente.
Q Mi manta/funda de colchón/Manta de Calor no calientan correctamente.
A Recuerde, el producto de calor no es una almohadilla de calor. No se sentirá caliente al tacto
cuando se coloque estirado de forma normal. Realice la siguiente
prueba de los pliegues para ver si está funcionando correctamente.
1 Pliegue la manta, funda de colchón o cobertor eléctricos en tres.
2 Asegúrese de que el cable del control esté conectado al módulo y
enchufe el cable de alimentación al tomacorriente.
3 Oprima el botón “On/Off” o el botón “On”. Luego coloque el control
en la posición más alta y espere de cinco a siete minutos.
4 Coloque la mano entre los pliegues, deberá sentir cómo se calienta
la manta/funda de colchón/cobertor
Precaución: No continúe la prueba por más de siete minutos NO trate de efectuar ajustes internos
a este aparato. Si ha intentado todas las soluciones y el producto de calor sigue sin funcionar,
deje de usarlo de inmediato, desconecte el cable de alimentación y comuníquese con Atención al
cliente.
Sunbeam HeatedBedding IB_17ESM1.indd 12 2/3/17 09:09
Page 29

S13
Si tiene alguna pregunta o requiere asistencia, por favor visite: www.sunbeambedding.com
Q ¿Qué significa “F1” o “F2” en mi Control electrónico digital?
A Los controles digitales están diseñados para notificarle en caso de que se detecte un problema
haciendo titilar “F1” o “F2” en la pantalla.
F1
Modelos: SelectTouch™ y SleekSet
™
Siga las instrucciones para reiniciar a continuación.
F2
Modelos: SelectTouch™ y SleekSet™
Siga las instrucciones para reiniciar a continuación.
Instrucciones para Reiniciar
1.) Siga las instrucciones que se encuentran en la etiqueta anexada al cable del control para
reiniciar el control.
2.) Verifique visualmente que la almohadilla de la manta/el colchón no esté dañada.
3.) Si no encuentra daños, desenchufe el sistema del tomacorriente de la pared.
4.) Verifique que el control esté bien conectado al módulo.
5.) Enchufe el cable de electricidad en el tomacorriente de la pared.
6.) Configure el control en “On”.
7.) Si el sistema no funciona después de 2 o 3 veces de tratar de reiniciarlo, desconecte el
cable de electricidad y contáctese con Atención al consumidor.
Q ¿Qué significa una luz que titila en mi control OneSet™, Easy Set™, Prime Style™ AO o
Elite Style™ control?
A Estos controles están diseñados para notificarle en caso de que se produzca un problema,
haciendo titilar la luz del control. Siga las instrucciones que aparecen en la etiqueta
para reiniciar el control. Primero, verifique el producto de calor para detectar visualmente
algún daño. Si no encuentra daños visibles, desenchufe el sistema del tomacorriente de
pared. Verifique que el control esté conectado firmemente al módulo. Enchufe el cable de
alimentación en el tomacorriente de pared y encienda el control. Si el producto sigue sin
funcionar después de intentar reiniciarlo 2 ó 3 veces, desconecte el cable de alimentación y
comuníquese con Atención al cliente.
MODULE
Asegúrese de que el conector del control del cordón y el módulo estén seguramente
abrochados, introduciéndolos hasta que los ganchos estén en la posición de asegurado.
Sunbeam HeatedBedding IB_17ESM1.indd 13 2/3/17 09:09
Page 30

S14
Si tiene alguna pregunta o requiere asistencia, por favor visite: www.sunbeambedding.com
NO DEVUELVA ESTE PRODUCTO AL LUGAR DONDE LO COMPRÓ.
Garantía limitada
Sunbeam Products, Inc. operando como Jarden Consumer Solutions o si es en Canadá Sunbeam
Corporartion (Canada) Limited operando como Jarden Consumer Solutions (conjuntamente “JCS”)
garantiza que por un período mencionado debajo desde la fecha de compra, este producto no tendrá
defectos en el material ni en la mano de obra.
• Todos los productos de calor de la marca “Arlington™” tendrán UN año de garantía limitada.
• Todos los productos de calor de las marcas “Sunbeam® Home Choice™,” tendrán DOS años de
garantía limitada.
• Todos los protectores de colchón térmico tienen una garantía limitada de tres años ,
con la excepción de las marcas “Arlington™” y “Sunbeam® Home Choice™”.
• Todas las colchas de microvisón tienen una garantía limitada de SIETE años.
• Todos los protectores de colchón térmico resistentes al agua tiene una garantía limitada de
cinco años, con la excepción de “Arlington™” y “Sunbeam® Home Choice™”. Todos los productos
térmicos “Sunbeam®” y “SlumberRest®” tienen una garantía limitada de cinco años .
JCS, a su entera discreción, reparará o reemplazará este producto o cualquiera de sus componentes, si se
detectan defectos durante el período de garantía. El reemplazo se efectuará por un producto o componente
nuevo o refabricado. Si el producto ya no está disponible, el reemplazo puede efectuarse por un producto
similar de igual o mayor valor. Ésta es su garantía exclusiva. NO intente reparar ni arreglar ninguna de las
funciones eléctricas o mecánicas de este producto. Si lo hace se anulará la garantía.
Esta garantía es válida para el comprador minorista original a partir de la fecha de compra minorista
inicial y no es transferible. Conserve el recibo de venta original. Necesitará el comprobante de compra para
poder utilizar la garantía. Los distribuidores, los centros de servicio o las tiendas minoristas de JCS que
vendan productos JCS no tienen derecho a alterar, modificar o cambiar de ninguna forma los términos y las
condiciones de esta garantía.
Esta garantía no cubre el desgaste normal de las piezas ni el daño causado por alguno de los siguientes:
el uso negligente o mal uso del producto, el uso con voltaje o corriente no adecuados, el uso contrario a las
instrucciones de funcionamiento, el desarmado, la reparación o la alteración efectuados por cualquier otra
persona no perteneciente al personal de JCS o a un centro de servicio autorizado. Además, la garantía no
cubre: Los actos fortuitos, como los incendios, las inundaciones, los huracanes y los tornados.
¿Cuáles son los límites en la responsabilidad de JCS?
JCS no será responsable de ningún daño incidental o consecuente provocado por el incumplimiento de algunas
de las garantías expresas, implícitas o garantía estatutaria o condición.
Excepto en la medida prohibida por la legislación pertinente, cualquier garantía implícita o condición de
comerciabilidad o idoneidad para un fin en particular está limitada por la duración de la garantía anterior.
JCS renuncia a todas las demás garantías, condiciones o representaciones, expresas, implícitas, estatutarias
u otras.
JCS no será responsable por ningún daño de ningún tipo que resulte de la compra, uso o mal uso de, o
imposibilidad de usar el producto incluyendo daños accidentales, especiales, consecuenciales o similares o
pérdida de ganancia, o por ningún incumplimiento de contrato, fundamental o de otra forma, o por ningún
reclamo en contra del comprador por otra parte.
Algunas provincias, estados o jurisdicciones no permiten la exclusión o limitación de daños incidentales o
consecuenciales ni limitaciones sobre cuánto dura una garantía implícita, por lo tanto las limitaciones o
exclusiones anteriores posiblemente no se apliquen para usted.
Esta garantía le brinda derechos legales específicos, y es posible que tenga otros derechos que varíen entre
estados, provincias o jurisdicciones.
Sunbeam HeatedBedding IB_17ESM1.indd 14 2/3/17 09:09
Page 31

S15
Si tiene alguna pregunta o requiere asistencia, por favor visite: www.sunbeambedding.com
NO DEVUELVA ESTE PRODUCTO AL LUGAR DONDE LO COMPRÓ.
Estamos aquí para ayudarlo, comuníquese con los Centros de Atención al Consumidor de
Sunbeam que se mencionan a continuación:
Cómo Obtener Servicio en Garantía
En Estados Unidos
Si tienen alguna pregunta sobre su producto de calor, sobre esta garantía o si desea obtener un servicio
de garantía, visite nuestro sitio Web en: www.sunbeam.com o comuníquese con Atención al Consumidor
de Jarden at 1-800-892-7684 y le proporcionarán la dirección de un centro de servicio conveniente.
En Canadá
Si tienen alguna pregunta sobre su producto de calor, sobre esta garantía o si desea obtener un servicio
de garantía, visite nuestro sitio Web en: www.sunbeam.com o comuníquese con Atención al consumidor
de Jarden at 1-800-667-8623 y le proporcionarán la dirección de un centro de servicio conveniente.
En Estados Unidos, esta garantía es ofrecida por Sunbeam Products, Inc. operando como Jarden Consumer
Solutions ubicado en Boca Raton, Florida 33431. En Canadá, esta garantía es ofrecida por Sunbeam
Corporation (Canada) Limited, ubicado en 20 B Hereford Street, Brampton, Ontario L6Y 0M1. Si usted
tiene algún otro problema o reclamo relacionado con este producto, comuníquese con el Departamento de
Servicio al Consumidor. NO DEVUELVA ESTE PRODUCTO A NINGUNA DE ESTAS DIRECCIONES NI AL LUGAR DE
COMPRA.
DECLARACIÓN DE LA COMISIÓN FEDERAL DE COMUNICACIONES (FCC POR SUS SIGLAS EN
INGLES)
Este producto cumple con la sección 15 de la reglamentacion de la FCC. El funcionamiento está sujeto
a las dos condiciones siguientes: (1) Este producto no puede causar interferencia dañina, y (2) este
producto debe aceptar cualquier interferencia recibida, incluyendo interferencia que pueda causar un
funcionamiento no deseado.
Nota: Este producto se ha probado y se encontró que cumple con los límites para un dispositivo digital
de clase B, según la sección 15 de la reglamentacion de la FCC. Estos límites están diseñados para
proporcionar una protección razonable contra interferencia dañina en una instalación residencial. El
producto genera, usa y puede irradiar energía de radiofrecuencia y, si no se instala y usa de acuerdo
con las instrucciones, puede ocasionar interferencia dañina a las radiocomunicaciones. Sin embargo, no
hay garantía de que no ocurrirá interferencia en una instalación determinada. Se puede determinar si el
producto produce interferencia dañina a la radio o a la televisión al apagarlo o encenderlo. Si produce
interferencia, se puede corregir con una o más de las siguientes medidas:
- Reoriente o reubique la antena receptora.
- Aumente la separación entre el producto y receptor.
- Conecte el producto en un tomacorriente o un circuito diferente al que esté conectado el receptor.
- Consulte a su distribuidor o a un técnico de radio o televisión.
Los cambios o modificaciones no aprobados expresamente por la parte responsable del cumplimiento
podrían invalidar la autoridad del usuario para usar el equipo.
CERTIFICACIÓN ICES
Este producto cumple con lo establecido en CAN ICES-3 (B)/NMB-3(B).
Impreso en China
© 2017 Sunbeam Products, Inc. operando bajo el nombre de Jarden Consumer Solutions. Todos los
derechos reservados. Distribuido por Sunbeam Products, Inc. operando bajo el nombre de Jarden
Consumer Solutions, Boca Raton, Florida 33431.
Sunbeam Products, Inc. es una filial de Newell Brands, Inc. (NYSE: NWL). Hecho en China.
Para preguntas relacionadas con el reciclaje y la correcta eliminación de este producto, por favor
póngase en contacto con su centro local de gestión de residuos.
Sunbeam HeatedBedding IB_17ESM1.indd 15 2/3/17 09:09
Page 32

Note s/Notas
Sunbeam HeatedBedding IB_17ESM1.indd 16 2/3/17 09:09
 Loading...