

Page 1

©2011 Sunbeam Products, Inc., doing business as Jarden Consumer Solutions.
All rights reserved.
In the U.S., dis tributed by Sunbeam Prod ucts, Inc ., doing b usiness as
Jarden Consumer Solutions, Boca Raton, FL 33431.
In Canada, imported and distributed by Sunbeam Corporation (Canada), Limited,
doing business as Jarden Consumer Solutio ns, Brampton, ON L6Y 0M4.
SPR -061711-218
©2011 Sunbeam Products, Inc., faire les affaires comme Jarden Consumer Solutions.
Tous droits réservés.
Aux Ét ats-Unis, d istribué pa r Sunbeam Pr oducts, I nc., faire les affai res comme
Jarden Consumer Solutions, Boca Raton, FL 33431.
Au Canada, importé et distribué par Sunbeam Corporation (Canada), Limited,
faire les affaires comme Jarden Consumer Solutions, Brampton, ON L6Y 0M4.
©2011 Sunbeam Products, Inc., haciendo negocios como Jarden Consumer Solutions.
Todos los derechos reservados.
En los EE.UU., distribuido por Sunbeam Products, Inc., hacienda negocios como
Jarden Consumer Solutions, Boca Ratón, FL 33431.
En Canadá, importado y distribuido por Sunbeam Corporation (Canadá), Limited,
hacienda neg ocios como Jarden Consumer Solutions, Brampton, ON L6Y 0M4.
www.sunbeamhospitality.com
For product questions:
Sunbeam Consumer Service
USA: 1.8 88.878.6232 E xt. 65103
Canada: 1.800.667.8623
Printed in China Imprimé en Chine Impreso en China
P. N . 14 18 6 6
Instruction Manual Wa l l Mo u n t 1500-Wa t t Ha i r Dr ye r
Manuel d’Emploi Sè c H e -cH e v e u x Mur a l 1500 Wa t t S
Manual de Instrucciones Se c a D o r D e Pe l o D e Pa r e D 1500 va t i o S
www.sunbeamhospitality.com
Models/Modèle/Modelo
HD3002, HD3003
Page 2
2
3
IMPORTANT SAFETY
INSTRUCTIONS
When using electrical appliances, especially when children are present, basic safety
precautions should always be followed, including the following:
READ AND SAVE ALL INSTRUCTIONS BEFORE USING
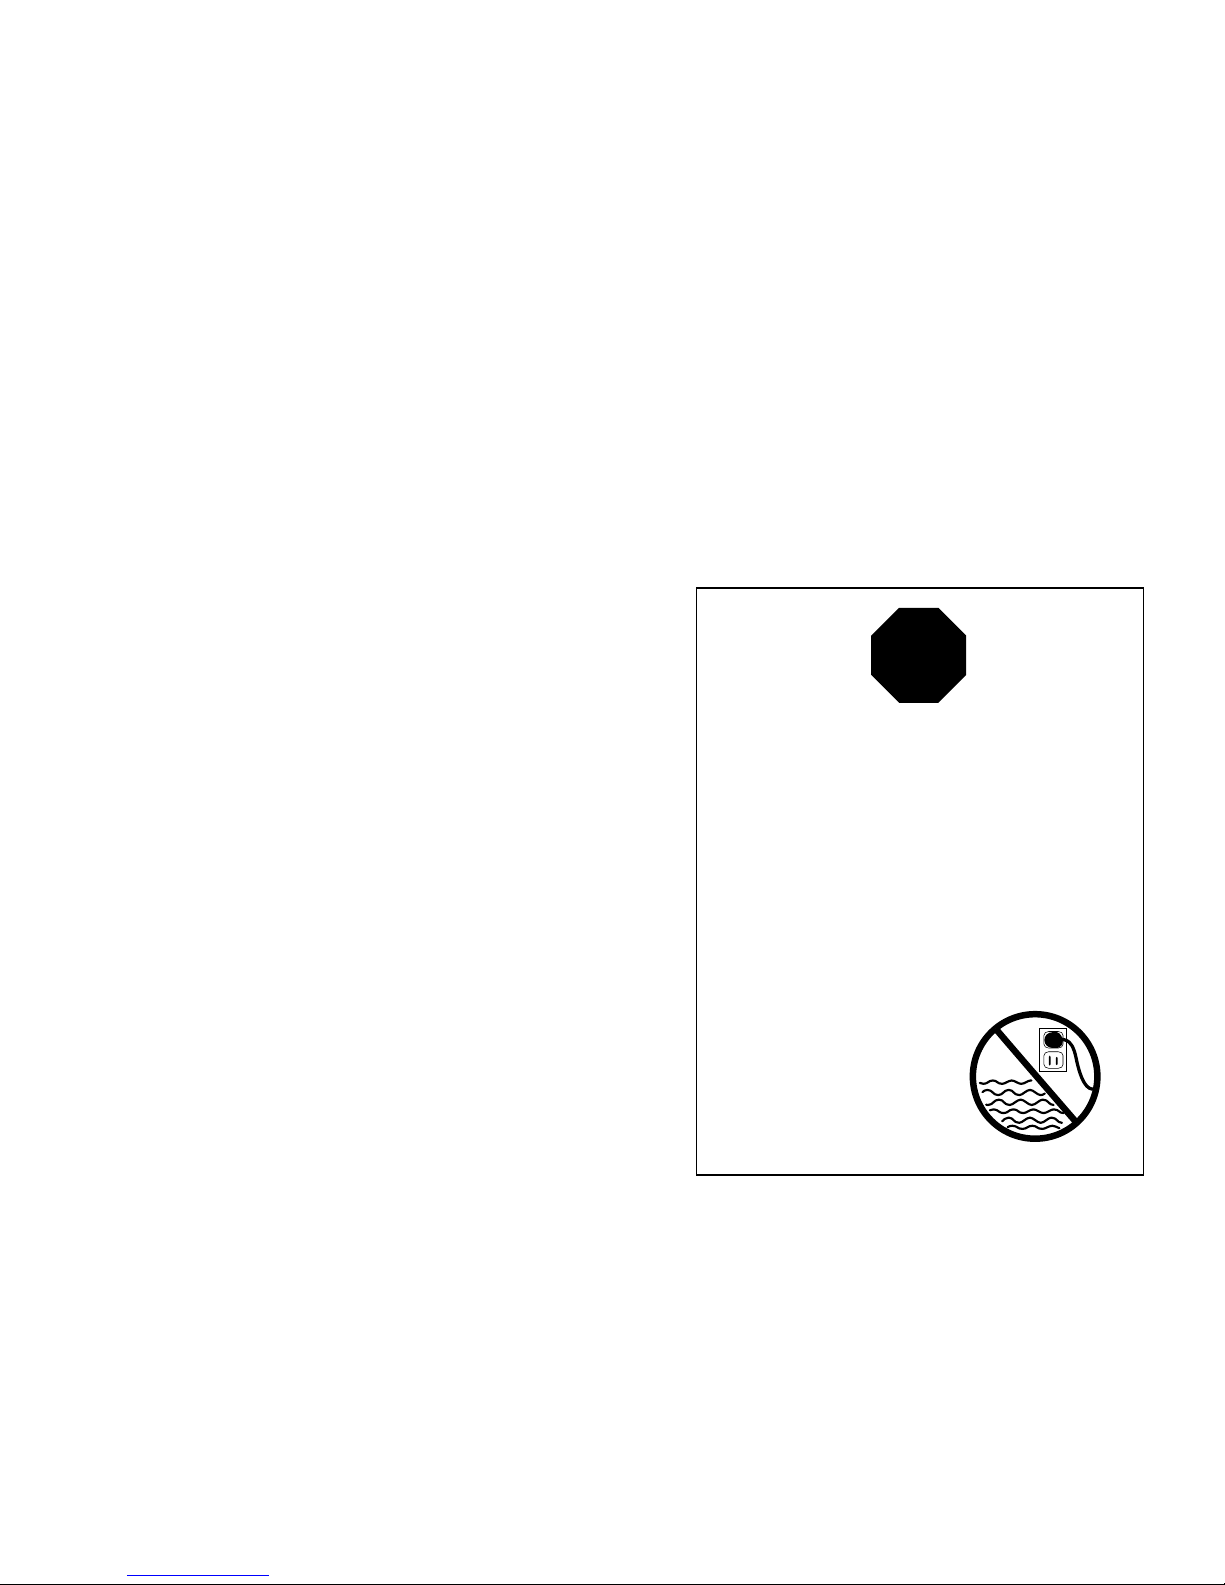
KEEP AWAY FROM WATER
DANGE R – As with most electrical appliances, electrical parts are electrically live even
when the switch is off. To reduce the risk of death by electric shock:
1. Do not install or store appliance where it can fall or be pulled into a bathtub or sink.
2. Always unplug this appliance from the electrical outlet immediately after using and
before cleaning.
3. Do not use while bathing.
4. Do not place in or drop into water or other liquid.
5. If appliance falls into water, unplug it immediately.
Do not reach into water.
WARN ING – To reduce risk of burns, electrocution, fire or injury
to persons:
1.
Close supervision is necessary when this appliance is used by, on or near
invalids or
disabled persons. This appliance should not be used by or on children.
2. Use this appliance only for its intended use as described in this manual.
Do not use attachments not recommended by the manufacturer.
3. Never operate this appliance if it has a damaged cord or plug, if it is not working
properly, if it has been dropped or damaged or if it has been dropped into water.
Contact your nearest authorized SUNBEAM Hospitality Distributor.
4. Keep the cord away from heated surfaces.
5.
Never block the air openings of the appliance or place it on a soft surface,
such as
a bed or couch, where the air openings may be blocked. Keep the air openings free
of lint, hair, etc.
6. Never use while sleeping.
7. Never drop or inser t any object into any opening.
8. Do not use outdoors or operate where aerosol (spray) products are being used,
or where oxygen is being administered.
9. Do not direct hot air toward eyes or other heat-sensitive areas.
10. The unit may be hot during use. Allow to cool before handling. To avoid burn hazard,
do not let bare skin touch heated sur faces.
11. Do not place appliance on any surface while it is operating.
12. While using the appliance, keep your hair away from the air inlets.
13. Do not wrap cord around dryer. Continuous stress on the cord can damage cord
insulation and result in a shock, fire or burn hazard.
14. Do not operate this appliance with a voltage converter or extension cord.
15. An appliance should never be left unattended when plugged in.
16. Periodically inspect wall unit for secure mounting.
OPERATE ON 125 V AC / 60 HZ ONLY
To reduce the risk of electrical shock, this appliance has a polarized plug (one blade is wider
than the other). This plug fits a polarized outlet only one way; if the plug does not fit fully
into the outlet, reverse the plug. If it still does not fit, contact a qualified electrician.
Do not attempt to defeat this safety feature.
CAUTI ON – Never allow the power supply cord to be pulled, twisted or severely bent.
Never wrap the cord tightly around the dryer. Damage will occur at the high flex point of
entry into the dryer, causing it to rupture, arc and shor t. Inspect the cord frequently for
damage. Stop use immediately if damage is visible or unit stops or operates intermittently.
SAVE THESE INSTRUCTIONS
STOP
Th i s Me s s a g e i s ab o u T :
Ground Fault Circuit Interrupters
If you must use your hair dryer in the bathroom,
install a GFCI Now!
Your local electrician can help you decide which type is best for you
— a portable unit that plugs into the electrical outlet or a permanent
unit installed by your electrician. The National Electrical Code now
requires GFCIs in bathrooms, garages and outdoor outlets of all
new homes.
Why do you need a GFCI
Electricity and water do not mix. If you hair dryer falls in water while
plugged in, the electrical shock can kill you…even if the switch if
“OFF”. A regular fuse or circuit breaker will not protect you under
these circumstances. A GFCI offers you far greater protection.
A GFCI can save your life!
Compared to that, the price is small!
Don’t wait…install one now!
GFCI is a sensitive device which
reacts immediately to a small
electric current leak by stopping
the electricity flow.
Page 3
4
5
Operating Instructions
This dryer is equipped with an appliance leakage circuit interrupter (ALCI) for your safety. This
device is designed to make the appliance inoperable under some abnormal conditions (such
as accidental immersion in water).
After the appliance is plugged in, you must check your protective device as follows:
1. Press the “Reset” button on the ALCI device.
2. Press the “Test”’ button. The “Reset” button will pop out. This veries that the protective
device is working properly.
3. Press the “Reset” button once more to reactivate the safety device and use your appliance.
REPEAT THE ABOVE PROCEDURE BEFORE EACH USE
TO CONFIRM THAT THE PROTECTIVE DEVICE IS OPERATING.
To Use Your Hair Dryer
The Hair Dryer has three heat/air speed settings. To control the heat/air speed settings,
toggle the switch to the desired temperature and speed.
With the control setting switch in the “OFF” position, plug the Hair Dryer into a standard 125volt AC outlet. Select the setting that is most appropriate to your needs and that will deliver
the best results.
When nished using the Hair Dryer, move the control switch to the “OFF” position and unplug
the cord from the outlet.
Additional Information
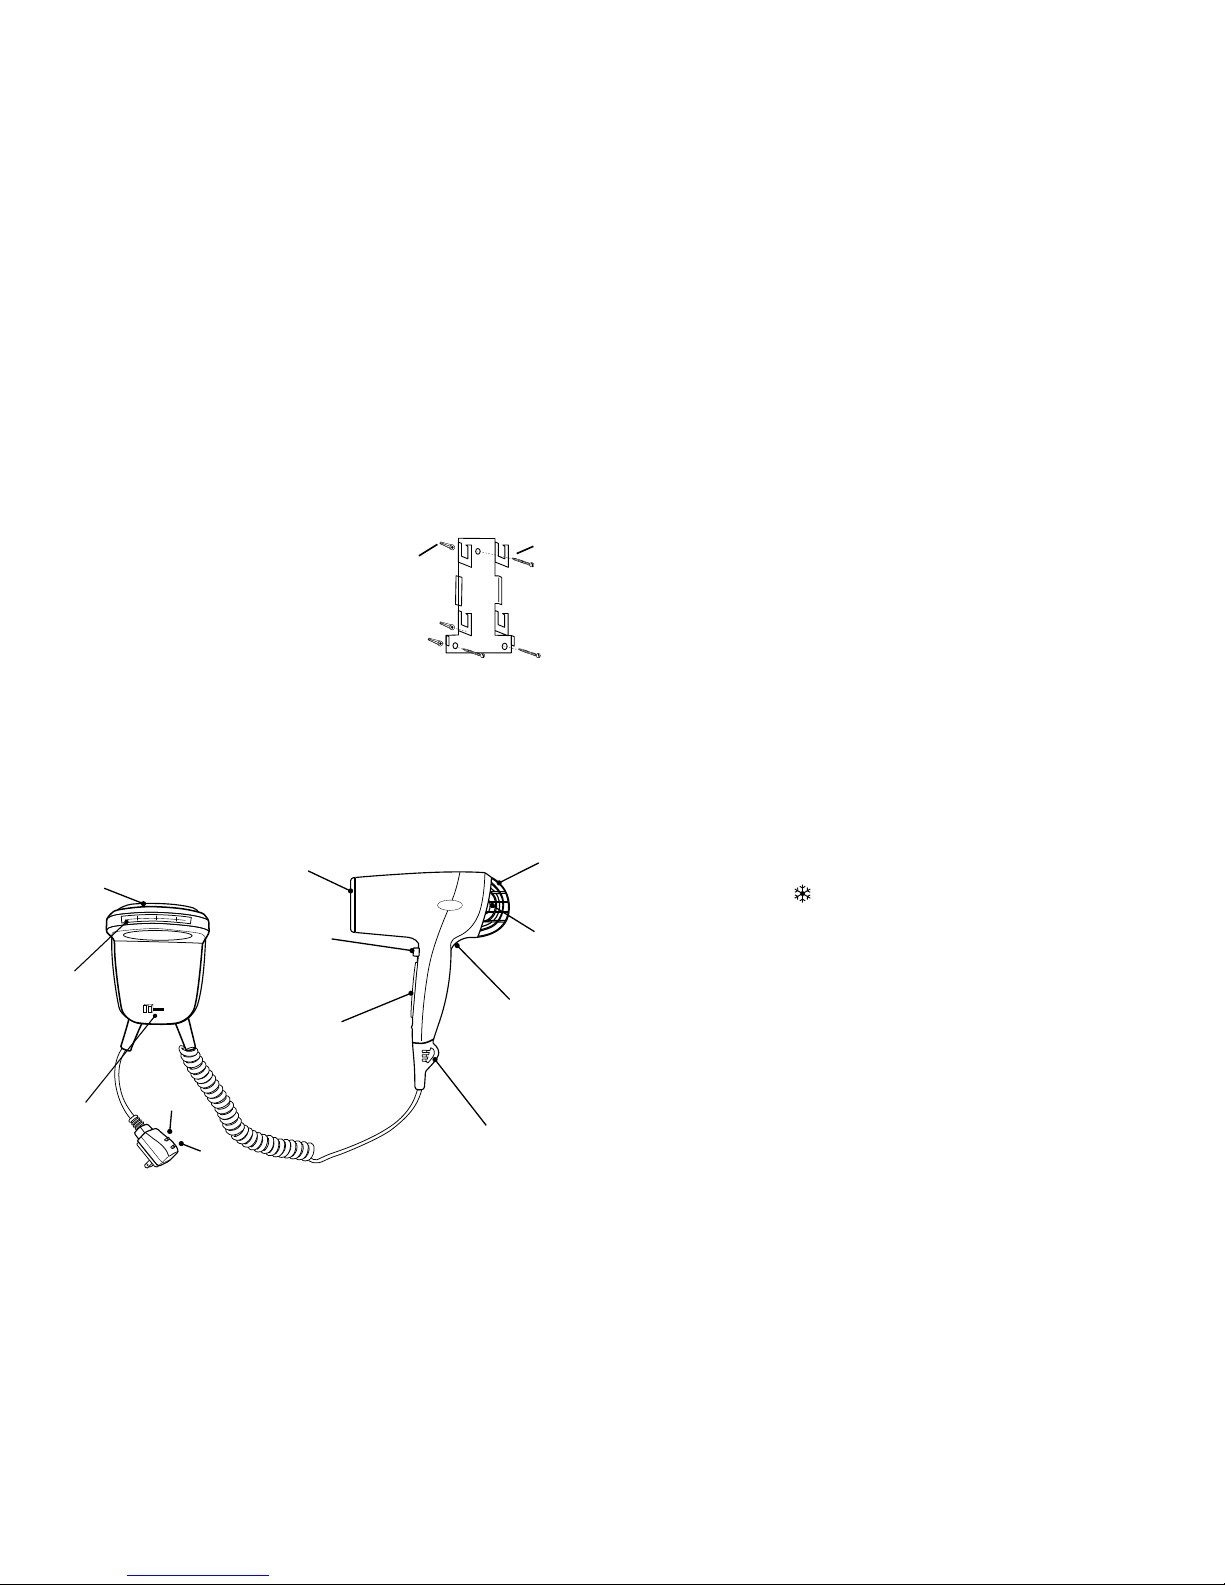
COOL SHOT BUTTON (Refer to Diagram)
To nish styling, use the
Cool Shot Button to deactivate heat ow from the dryer.
DISPOSABLE LINT FILTER
Disposable Lint Filter should be replaced every 6 months. Open hinged rear cover, remove
and discard lint lter and replace with new one.
DUAL WATTAGE SWITCH
This switch allows the Hair Dryer to change from 1500 to 1200 watts. The switch is located
under the hinged rear cover.
NIGHTLIGHT (Model HD3003 only)
Use the Dimmer Switch located on the lower portion of the wall mount to turn the nightlight
on/o and to adjust desired brightness.
MOUNTING INSTRUCTIONS
For use on sheetrock or wood walls only.
The Sunbeam®Wall Mount hair dryer is designed for
installation on sheetrock or wood walls only. To mount
onto wall, be sure there are no hidden electrical circuits
or pipes in the mounting location.
1. Remove wall bracket from the unit.
2. Use the bracket as a template to mark the position of
holes for drilling close to electrical outlet, away from
tub or sink.
3. Drill three 3/16 inch holes.
4. Insert the three anchor bushings by tapping lightly
with a hammer until the shoulder of the bushing rests
against the wall.
5. Position wall bracket and tighten the t wo bottom
screws first, then tighten the top screw. (Anchor
bushings and screws are provided for you).
6. Match the slots on the back of the mounting base with
the hooks on the bracket.
7. Press base onto the hooks and slide down to insure
secure mounting.
8. Plug the unit into the nearby electrical outlet (125 volt,
60 cycle AC only).
DANGE R – To reduce risk of electrocution, do not install where unit can fall into tub or sink.
BRACKET
Screw
Anchor
Bushing
Note: HD3002 and HD3003
have been designed to be
compatible with existing
1632-040/1632-020 hair
dryer brackets
Features of Your Hair Dryer
Hinged Air
Intake Grill
Cool Shot
Button
Cord Guard
Air Outlet
Wall Mounted
Base
3 Speed/Heat
Slide Switch
Nightlight
(Model
HD3003 only)
Nightlight
On/Off
Dimmer Switch
(Model
HD3003 only)
Disposable
Lint Filter
Dual
Wattage Switch
Test
Button
Reset
Button
Page 4

6
7
Two (2) Year Limited Hospitality Warranty
Sunbeam Products, Inc, d/b/a Jarden Consumer Solutions or if in Canada, Sunbeam
Corporation (Canada) Limited doing business as Jarden Consumer Solutions (collectively
“JCS”) warrants that for a period of two (2) years from the date of purchase, this product will
be free from defects in material and workmanship. JCS, at its option, will repair or replace
this product or any component of the product found to be defective during the warranty
period. Replacement will be made with a new, or remanufactured product or component. If
the product is no longer available, replacement may be made with a similar product of equal
or greater value. This is your exclusive warranty.
This warranty is valid for the original hospitality industry purchaser from the date of such
initial purchase and is not transferable. JCS dealers, service centers, or stores selling JCS
products do not have the right to alter, modify or in any way change the terms and
conditions of this warranty.
This warranty does not cover normal wear of parts or damage resulting from any of the
following: negligent use or misuse of the product, use on improper voltage or current, use
contrary to the operating instructions, disassembly, repair or alteration by anyone other than
JCS or an authorized service center. Further, the warranty does not cover Acts of God, such
as fire, flood, hurricanes and tornadoes.
JCS shall not be liable for any incidental or consequential damages caused by the breach
of any express, implied or statutory warranty or condition.
Except to the extent prohibited by applicable law, any implied warranty of merchantability
or fitness for a particular purpose is limited in duration to the duration of the above
warranty.
JCS disclaims all other warranties, conditions or representations, express, implied, statutory
or otherwise.
Some states, provinces or jurisdictions do not allow the exclusion or limitation of incidental
or consequential damages or limitations on how long an implied warranty lasts, so the
above limitations or exclusion may not apply to you.
This warranty gives you specific legal rights, and you may also have other rights that vary
from state to state or province to province.
This warranty is only applicable to products purchased by members of the hospitality
industry and not to consumer sales.
How to Obtain Warranty Service
Contact your JCS authorized dealer.
www.sunbeamhospitality.com
Caution
Use your SUNBEAM® Hospitality Hair Dryer with care. Directing a high volume of heat
continuously to one area can overheat hair and scalp. When using a High heat setting, hold
the blower opening a few inches away from the hair, drying one section at a time. Work layers
of hair in quick strokes. Keep the dryer in motion until drying and styling are complete.
Important Information
1. If the Hair Dryer has been accidentally immersed in water, contact your nearest authorized
SUNBEAM Hospitality distributor. DO NOT ATTEMPT TO USE THE HAIR DRYER AGAIN.
2. If the RESET button pops out during use and the Hair Dryer stops working, this may
indicate a malfunction. Allow the Hair Dryer to cool before pressing RESET button and try
again. If RESET button pops out again, contact your nearest authorized SUNBEAM
Hospitality distributor.
3. If the Hair Dryer does not function as described in the test procedure above, contact your
nearest authorized SUNBEAM® Hospitality distributor.
Maintenance, Care and Cleaning
For proper operating performance, the DRYER MUST BE KEPT CLEAN. Blocked or clogged air
intake openings will cause the Hair Dryer to overheat.
1. Always unplug Hair Dryer from outlet when Hair Dryer is not in use or when cleaning it.
2. To clean the exterior surface: wipe with a slightly damp cloth.
NOTE: NE VER IMMERSE HAIR DRYE R IN WATER.
3. Air intake (disposable lint filter): Replace every 6 months. Open rear hinged cover;
remove and discard disposable lint filter. Replace with new filter.
4. Handle the cord carefully to prevent twisting, pulling or jerking that will damage it.
The Hair Dryer requires no special maintenance or servicing. No lubrication is needed.
Repairs, when necessary, must be performed by a recognized service facility.
Storage
1. Always store dryer inside the base.
2. Do not mount or store dryer in an area with excessive heat or moisture.
3. Do not wrap cord around dryer. Allow to hang loosely from dryer.
4. Do not hang dryer by cord or use cord as a handle.
5. Store in a cool, dry place and out of reach of children.
6. Store where dryer will not be accidentally damaged from bumping or falling.
Do not put anything on top of dryer.
Page 5

8
9
MISES EN GARDE IMPORTANTES
Lors de l’utilisation d’appareils électriques, surtout à proximité d’enfants, des
mesures de sécurité de base doivent toujours être suivies , incluant celles qui suivent:
LISEZ TOUTES LES INSTRUCTIONS AVANT L’UTILISATION
GARDEZ L’APPAREIL LOIN DE L’EAU
DANGE R – Comme avec la plupart des appareils électriques, les pièces électriques sont sous
tension même lorsque l’interr upteur est dans la position d’arrêt. Pour réduire le
danger de choc électrique:
1. Ne met tez pas ou ne range z pas l’appareil dans un endroit d’où il peut tomb er ou être tiré
dans une baignoire ou un évier.
2. Toujours retirer cet appareil de la prise de cour ant après usage et avant nettoyage.
3. Ne l’utilisez pas en prenant un b ain.
4. Ne le placez pas ou n e l’échappez pas dans l’eau ou autre liquide.
5. Si l’appareil por tatif tombe dans l’eau, le retirer immédiatement de la prise de courant.
Ne pas le toucher dans l’eau.
ADVERTISEMENT – Pour réduire le risque de brûlures, électrocution, incendie ou blessures
personnelles:
1. Une surveillance at tentive est nécessaire lorsque cet appareil est utilisé par, sur ou proche de
personnes invalides ou malade s. Cet appareil ne doit pas être utilisé par ou sur des enfants.
2. Utilisez-le tel que décrit dans ce livret d’instructions. N’utilisez pas d’accessoires non
recommandés par le fabricant .
3. N’utilisez pas cet appareil si le cordon ou la fiche est endommagé ou s’il ne fonctionne pas
proprement, s’il a été échappé ou e ndommagé d’une façon quelconque ou échappé dans
l’eau. Contact agréé le plus proche de votre Sunb eam® Distributeur d’accueil.
4. Gardez le cordon l oin des surfaces chaudes.
5. Ne bloque z jamais les admissions d’air de cet appareil et ne le placez pas sur une surface
molle, telle qu’un lit ou un sofa, où les admissions d’air peuvent être bloquées. Gardez les
admissions d’air exemptes de charpie, cheveux, etc.
6. Ne l’utilisez jamais lors que vous vous endormez.
7. N’échappez jamais ou n’insérez jamais d ’objet dans les ouverture s.
8. Ne l’utilisez pas à l’extér ieur ni dans un endroit ou des produits en aérosol sont utilisés où
dans un endroit où de l’oxygène est adminis tré.
9. Ne dirigez pas l ’air chaud vers vos yeux ou autres endroits s ensibles à la chaleur.
10. L’appareil peut se chauffer pendant son e mploi. Laissez-le refroidir avant de l’utiliser. Pour
éviter les brûlures faites attention à ce que la peau ne touche pas les surf aces chaudes.
11. Ne pla cez pas l’appareil sur une surf ace quelconque pendant qu’il fonctionne.
12. Prenez soin que vos cheveux n’entrent pas dans les admissions d’air pendant que vous
l’utilisez.
13. Ne pas enrouler la corde autour du séchoir. Une tension continue sur la corde p eut abîmer
l’isolation de la corde et aboutir à un ch oc, un incendie ou risqué de brûlure.
14. Ne pas utiliser cet appareil avec un transfor mateur de voltage.
15. Vous devez toujours faire attention à l’appareil quand il est br anché.
16. Inspecter régulièrem ent l’élément mural pour une ins tallation sécurisée.
CET APPAREIL A ÉTÉ PLACÉ À L’USINE
POUR FONCTIONNER À 125 VOLTS.
Pour réduire le risque d’électrocution cet appareil est muni d’une fiche polarisée
(une lame est plus large que l’autre). Comme mesure de sécurité, cette fiche peut être
insérée dans une prise de courant polarisée dans un sens seulement. Si elle n’entre pas dans
la prise de courant, inversez la fiche et essayez de nouveau. Si elle refuse toujours d’entrer,
communiquez avec un électricien compétent.
N’ESSAYEZ PAS D’OUTREPASSER CETTE MESURE DE SÉCURITÉ.
ATTENTION – Ne jamais permettre à la corde d’être tirée, tordue ou exagérément pliée.
Ne jamais serrer la corde autour du séchoir. Des dégâts se produiront au niveau du point
de flexion élevé d’entrée du séchoir, le faisant se rompre, se courber et raccourcir. Inspecter
fréquemment la corde pour contrôle des dégâts. Stopper immédiatement l’utilisation si les
dégâts sont visibles ou si l’appareil s’arrête ou opère par intermittence.
CONSERVER CES INSTRUCTIONS
STOP
Ce Me s s a g e Co n C e r n e :
les Disjoncteurs-Détecteurs
de
Fuites à la Terre
Si vous utilisez votre sèche-cheveux dans la salle de bain,
installez un DDFT dès maintenant !
Votre électricien peut vous aider à choisir l’installation la mieux adaptée
à vos besoins : un dispositif amovible qui se branche sur une prise
de courant ou un dispositif permanent installé par votre électricien.
Conformément au Code Électrique National, les salles de bain, garages et
prises extérieures des nouvelles constructions doivent impérativement
être équipés de DDFT.
Pourquoi avez-vous besoin d’un DDFT?
L’électricité et l’eau ne font pas bon ménage. Si votre sèche-cheveux
tombe dans l’eau alors qu’il est branché, le choc électrique peut vous
être fatal, même si le sèche -cheveux est en position « arrêt ». Un simple
fusible ou un disjoncteur ordinaire ne vous protègent pas contre ce type
d’accident ; un DDFT vous offre une bien meilleure protection.
Un DDFT peut vous sauver la vie!
Son prix en vaut la peine !
N’attendez plus et installez un
DDFT dès maintenant !
Les DDFT sont des dispositifs sensibles
qui réagissent immédiatement à la
moindre fuite de courant électrique et
interrompent le flux d’électricité.
Page 6

10
11
INSTRUCTIONS DE MONTAGE
Pour utilisation uniquement sur plâtre ou mur de bois.
Le séchoir à cheveux à montage mural de Sunbeam® est
destiné à être utilisé uniquement sur plâtre ou murs de
bois. Pour le montage mural, bien vérifier qu’il n’existe
aucun circuit électrique ou tuyaux à l’endroit du montage.
1. Oter le support murale de l’appareil.
2. Utiliser le support comme gabarit pour marquer
l’emplacement des trous à percer à proximité de la prise
de courant, à distance de la baignoire et du lavabo.
3. Percer des trois d’environ 45 mm.
4. Insérer les trois douilles de fixation en tapant
légèrement avec un marteau jusqu’á ce que la butée
des des douilles repose sur le mur.
5. Positionner le suppor t murale et serrer en premier
les deux écrous du bas, puis serrer la vis du haut (les
douilles de fixation et les vis vous sont fournies).
6. Faire correspondre les trous au dos du socle de
montage avec les crochets sur le support.
7. Presser le support contre les crochets et faire coulisser
pour garantir la sécurité du montage.
8. Brancher l’unité dans la prise de courant à proximité
(125 volt, cycle de 60 c.a. uniquement).
DANGE R – Pour réduire le risque d’électrocution, ne pas installer l’appareil à proximité
d’une baignoire ou un évier.
SUPPORT
Vis
Brosse
Ancré
Remarque : Le modèle
HD3002, HD3003
a été conçu pour être
compatible avec les
supports de sèche-cheveux
1632-040/1632-020
Comment Utiliser Votre Séchoir à Cheveaux
Le séchoir à cheveux ore trois niveaux de chaleur / de vitesse d’air. Pour contrôler les
congurations de chaleur / de vitesse de l’air, faites basculer l’interrupteur à la température
et à la vitesse désirées.
Une fois le bouton de réglage positionné sur « arrêt », brancher le sèche-cheveux sur une
prise de courant standard 220 volts AC. Choisissez la conguration qui convient le mieux à
vos besoins et qui permettra d’obtenir les meilleurs résultats.
Après l’utilisation du sèche-cheveux, positionner le bouton de réglage sur « arrêt » et
débrancher le l de la prise de courant.
Information Additionnelle
AIR FROID BOUTON (Consultez la Figure)
Pour nir style,
utilisez le bouton Cool Shot pour désactiver le ux de chaleur de
la sécheuse.
FILTRE À AIR JETABLE
Le ltre à air jetable doit être remplacé tous les 6 mois. Ouvrez le capuchon arrière, enlevez
et jetez le ltre à air et remplacez-le par un nouveau.
INTERRUPTEUR DOUBLE TENSION
Cet interrupteur permet de modier la puissance du sèche-cheveux de 1 875 watts à 1 500
watts. L’interrupteur est situé sous le capuchon arrière.
VEILLEUSE (Seulement HD3003)
Utilisez le variateur situé sur le petit côté du montant mural an d’allumer et d’éteindre la
veilleuse et d’ajuster l’intensité désirée.
Articulé la
prise d’air
Air Froid
Bouton
Fil Garde
Passage d’Air
Base
murale
Interrupteur
à glissement à
3 vitesses / chaleurs
Veilleuse
(Modèle HD3003
uniquement)
Marche/arrêt
de la veilleuse
Variat eur
(Modèle HD3003
uniquement)
Jetable
Filtre à air
Interrupteur
double tension
Caractéristiques de Cet Séchoir à Cheveaux
Test
Bouton
Réinitialiser
Bouton
Instructions de Fonctionnement
Pour votre sécurité, le séchoir est équipé d’un interrupteur de fonctionnement
en cas de court-circuit (ALCI). Ce système est destiné à rendre l’appareil
électroménager inopérable sous des conditions anormales (telle qu’une immersion
accidentelle dans l’eau).
Après branchement, vous devez vérifier le système de protection de la façon
suivante:
1. Appuyer sur le bouton de restauration « Reset » du dispositif de sécurité ALCI.
2. Appuyer ensuite sur le bouton d’essai « Test ». Le bouton de restauration « Reset
» sortira. Cela confirme que le dispositif de sécurité fonctionne correctement.
3. Appuyer sur le bouton de restauration « Reset » pour rebrancher le dispositif
de sécurité et pour utiliser votre appareil.
RÉPÉTER LE PROCESSUS CI-DESSUS CHAQUE FOIS
QUE VOUS UTILISEZ CET APPAREIL POUR VÉRIFIER
LE BON FONCTIONNEMENT DU DISPOSITIF DE SÉCURITÉ.
Page 7

12
13
Garantie Limitée au secteur
de l’Hospitalité de Deux (2) ans
Sunbeam Amérique Latine LLC garantit que pour une période d’eux (2) ans à partir de la
date d’achat, ce produit n’aura aucun défaut matériel ou de fabrication. JCS, à sa discrétion,
réparera ou remplacera ce produit ou tout composant du produit qui s’avère défectueux
durant la période de garantie. Le remplacement se fera par un nouveau produit ou
composant ou par un produit ou composant réusiné. Si le produit n’est plus disponible, le
remplacement se fera par un nouveau produit semblable de valeur égale ou supérieure. Ceci
est votre garantie exclusive.
Cette garantie n’est valable que pour des clients du secteur hôtelier et à partir de la date
d’achat, ne pouvant être remise à une autre personne quelconque. Les distributeurs,
intermédiaires, centres de service ou n´importe quelle autre magasin qui vend ou offre le
service d´entretien des produits JCS, n´ont pas le droit de altérer, modifier ou changer d´une
manière quelconque les termes de cette garantie.
Cette garantie ne couvre pas l´usure des par ties ou les dommages, dont l´origine est une
mauvaise utilisation du produit, le branchement sur le courant ou le voltage différent de
celui qui est indiqué, l´utilisation différente de celle qui est indiquée dans les instructions
d´opération, le démontage, les réparations ou altérations faites par des personnes non
autorisées par JCS ou un de ses centres de services. La garantie ne couvre non plus des
situations fortuites, telles qu´incendies, inondations, ouragans et tornades.
JCS ne sera pas responsable par les dommages résultants d´incidents, ou à la suite des
violations des garanties expresses ou implicites. Au moins qu´il soit déterminé par les lois en
vigueur, toute garantie commerciale implicite et applicable aura une durée qui sera limitée
par la garantie décrite ci-dessus. JCS ne reconnaît aucune autre garantie, condition o
représentation expresse, implicite ou accordée de n’importe quelle autre manière.
Certains états, provinces et même, juridictions ne permettent pas l´exclusion ou limitation, à
l’égard de la durée de la garantie, des dommages ou limitants qui résultent d´incidents ou à
la suite de violations de ces garanties. C´est pourquoi les limitations ou exclusions décrites ci
dessus peuvent ne pas être applicables dans votre cas. Cette garantie vous offre des droits
légaux spécifiques, en plus d´autres droits qui varient selon l´état ou la province.
Cette garantie est seulement valable pour des produits achetés par des clients du secteur
hôtelier et non pour le consommateur final.
Comment Obtenir le Service de Garantie
Contactez votre revendeur agréé JCS ou contactez JCS International au +1-786-845-2540.
www.sunbeamhospitality.com
Avertissement
Utiliser le sèche-cheveux SUNBEAM® Hospitality avec soin. Diriger une forte chaleur en
continu sur une zone peut surchauer les cheveux et le cuir chevelu. Lorsque le sèchecheveux est réglé en position température élevée, tenir le ventilateur du sèche-cheveux à
quelques centimètres des cheveux, en séchant une zone à la fois. Travailler les épaisseurs de
cheveux par mouvements rapides. Maintenir le sèche-cheveux en mouvement jusqu’à ce que
les cheveux soient entièrement séchés et coiés.
Important Information
1. Si le sèche-cheveux tombe accidentellement dans l’eau, contacter le revendeur agréé
SUNBEAM® Hospitality le plus proche. N’ESSAYER EN AUCUN CAS D’UTILISER LE SÈCHECHEVEUX À NOUVEAU.
2. Si le bouton « réinitialisation » saute lors de l’utilisation du sèche-cheveux et que celui-ci
cesse de fonctionner, il s’agit probablement d’un dysfonctionnement. Laisser le sèche cheveux refroidir avant d’appuyer sur le bouton « réinitialisation », puis essayer à nouveau.
Si le bouton « réinitialisation » saute à nouveau, contacter le revendeur agréé SUNBEAM®
Hospitality le plus proche.
3. Si le sèche-cheveux ne fonctionne pas de la manière décrite dans la procédure d’essai
ci-dessus, contacter le revendeur agréé SUNBEAM® Hospitality le plus proche.
Entretien, précaution et nettoyage
Pour un résultat optimal, le SÈCHE-CHEVEUX DOIT ÊTRE NETTOYÉ. Les entrées d’air bloquées
ou obstruées provoquent une surchauffe de l’appareil.
1. Toujours débrancher le sèche-cheveux de la prise de courant lorsque l’appareil n’est pas
utilisé ou pour le nettoyer.
2. Pour nettoyer la surface extérieure, l’essuyer avec un chiffon légèrement humide.
REMARQ UE : NE JAM AIS PLACER LE SÈCHECHEVEUX DANS L’EAU.
3. Entrée d’air (filtre à air jetable) : à remplacer tous les 6 mois. Ouvrez le capuchon arrière;
enlevez et jetez le filtre à air ; remplacez-le par un nouveau.
4. Manipuler le fil avec précaution afin d’éviter qu’il soit tordu, tiré ou tiré brusquement, ce
qui l’endommagerait.
Le sèche-cheveux ne requiert aucune révision ou entretien particuliers. Aucune lubrification
n’est nécessaire. Si nécessaire, l’appareil doit être réparé par un service de réparation habilité.
Rangement
1. Toujours replacer le sèche-cheveux sur sa base.
2. Ne pas installer ou ranger le sèche-cheveux dans un endroit excessivement chaud ou
humide.
3. Ne pas entourer le fil autour du sèche-cheveux. Laisser le fil pendre de l’appareil.
4. Ne pas suspendre le sèche-cheveux par le fil ou utiliser le fil pour attraper le sèchecheveux.
5. Ranger le sèche-cheveux dans un endroit frais et sec, hors de portée des enfants.
6. Ranger le sèche-cheveux dans un endroit où il ne pourra être endommagé
accidentellement en raison de bosses ou de chutes. Ne rien placer au dessus du
sèche-cheveux.
Page 8

14
15
PRECAUCIONES IMPORTANTES
Cuando use aparatos eléctricos, especialmente en presencia de niños, siempre deben
seguirse pre cauciones básicas de seguridad, incluyendo las siguientes:
LEA TODAS LAS INSTRUCCIONES ANTES DE USAR MANTENGA
ALEJADO DEL AGUA
PELIGRO – Al igual que en la mayoría de aparatos eléctricos, las partes eléc tricas
permanecen eléctricamente vivas aun cuando el interruptor esté apagado.
Para reducir el riesgo de muerte por electrocución:
1. NO instale o almacene el aparato donde pueda caer o pueda ser tirado a la tina al lavatorio.
2. Siempre desenchufe el aparato de la toma de corriente eléctrica inmediatamente después
de usar y antes de limpiarlo.
3. NO utilice mientras se está bañando.
4. NO coloque o deje caer dentro del agua o cualquier otro líquido.
5. Si la unidad manual cae dentro del agua, apague el aparato inmediatamente. NO toque
el agua.
ADVERTENCIA – Para reducir el riesgo de quemaduras, electrocución, incendio o lesiones
a personas:
1. Es necesaria la supervisión cercana cuando el aparato sea usado p or, en o cerca de
inválidos o personas incapacitadas. Este aparato no debe usarse por o en niños.
2. Utilice este aparato solamente para lo que ha sido diseñado como se describe en este
manual. No use aditamentos no recomendados por el fabricante.
3. Nunca opere este aparato si el cordón o el enchufe han sido dañados, si el aparato no
está funcionando correc tamente, si se ha caído o dañado o ha caído dentro del agua.
Comuníquese con su distribuidor autorizado más cercano Sunbeam® Hospitalidad
distribuidor.
4. Mantenga el cordón lejos de superficies calientes.
5. Nunca bloqueé las aberturas de aire del aparato, tampoco coloque sobre una superf icie
suave como una cama o un sofá, donde las aber turas de aire puedan bloquearse.
Mantenga las aberturas para el aire libres de pelusa, cabello, etc.
6. Nunca use el aparato mientras está durmiendo.
7. Nunca deje caer o inserte ningún objeto dentro de ninguna abertura.
8. No use en exteriores o donde se esté usando productos de aerosol (rocío) donde se esté
administrando oxigeno.
9. No dirija el aire caliente hacia los ojos o cualquier otra área sensible al calor.
10. El aparato podría calentarse mientras esté en uso. Permita que se enfríe antes de utilizarlo.
Para evitar el riesgo de quemaduras, no permita que la piel haga contacto con superficies
calientes.
11. No coloque el aparato en ninguna super ficie mientras está en operación.
12. Mientras usa el aparato, mantenga su cabello lejos de la entrada de aire.
13. No enrolle el cordón al rededor de la secadora. La tensión continua en el cordon puede
dañar el aislamiento de éste y resultar en riesgo de una descarga eléctrica, incendio
o quemadura.
14. No opere este aparato con un convertidor de voltaje o una ex tensión.
15. Este aparato nunca debe dejarse desatendido mientras esté conectado.
16. Compruebe periódicamente que la unidad de pared está correctamente fijada.
OPERE ESTE APARATO CON UNA CORRIENTE
DE CON 125 VOLTIOS.
Para reducir el riesgo de elec trocución, este aparato tiene un enchufe polarizado (una
cuchilla es más ancha que la otra). Como una medida de seguridad, este enchufe entrará en
una toma de corriente polarizada de una sola forma. Si el enchufe no entra completamente
en la toma de corriente, voltéelo. Si aún así no entra, contacte a un electricista calificado.
NO INTENTE MODIFICAR ESTE DISPOSOTIVO DE SEGURIDAD.
CUIDADO – Nunca permita que el cordón de alimentación de energía sea jalado, torcido
o severamente doblado. Nunca enrolle fuertemente el cordón alrededor de la secadora
Pueden ocurrir daños en el punto de alta flexión de la entrada a la secadora, causando
ruptura, arco voltaico o corto circuito. Inspeccione el cordón frecuentemente para detector
cualquier daño. Pare de usar inmediatamente si el daño es visible o si la unidad deja
de operar o funciona intermitentemente.
GUARDE ESTAS INSTRUCCIONES
STOP
as u n T o d e l Me n s a j e ::
Los Interruptores con detección de falla a tierra
GFCI
Si tiene que usar el secador en el cuarto de baño, no
tarde en instalar un sistema GFCI.
Su electricista puede ayudarle a decidir qué clase le conviene más (una
unidad portátil que se conecte a la toma eléctrica o una unidad fija
instalada por su electricista). En la actualidad, la normativa británica en
materia de electricidad exige que todas las casas nuevas dispongan de
sistemas GFCI en el cuarto de baño, garaje y tomas de electricidad en
dependencias exteriores.
Para qué necesita un sistema GFCI
La electricidad y el agua no deben entrar en contacto. Si deja caer el
secador en el agua mientras está conectado, la descarga eléctrica podría
matarlo incluso estando el interruptor apagado. Un fusible o un disyuntor
no lo protegerán en estas circunstancias. El sistema GFCI le ofrece una
mayor protección.
El sistema GFCI puede salvarle la vida
Comparado con eso, el precio es bajo.
No espere más. ¡Instálelo ya!
El sistema GFCI es un dispositivo sensible que
reacciona inmediatamente a las pequeñas
fugas de corriente eléctrica interrumpiendo
el flujo de electricidad.
Page 9

16
17
INSTRUCCIONES DE MONTAJE
Solamente para uso sobre paredes de yeso o de
madera.
El Secador de Cabello para Montaje en la Pared de
Sunbeam® esta diseñada para ser instalada sobre paredes
de yeso y de madera únicamente.Antes de montar el
aparato en la pared, asegúrese de que no hay circuitos
eléctricos ni tubos de agua escondidos en el lugar donde
se va a instalar el secador de cabello.
1. Retire el soporte de pared de la unidad.
2. Utilice el soporte como plantilla para marcar la posición
de los agujeros para taladrar cerca de la toma de
electricidad y lejos de la bañera o del lavabo.
3. Perfore tres orificios de 45 mm.
4. Inserte los tres cojinetes de fijación golpeando
ligeramente con un martillo hasta que el borde del
cojinete descanse contra la pared.
5. Coloque el soporte de la pared y apriete los dos
tornillos inferiores primero, después apriete el tornillo
superior. (Los cojinetes de fijación y los tornillos se
incluyen con el secador).
6. Alinée las ranuras en la parte posterior de la base del
soporte con los ganchos en el soporte.
7. Presione el soporte dentro de los ganchos y deslice hacia abajo para asegurar un buen
montaje.
8. Conecte la unidad en la toma de corriente más cercana (sólo 125V, 60 Hz CA).
PELIGRO – Para reducir el riesgo de electrocución, no instale donde la unidad pueda caer
dentro de una tina o lavatorio.
SOPORTE
Tornillo
Cojinetes
de Fijación
Cómo Utilizar Su Secador de Cabello
El secador de pelo tiene tres ajustes de calor / velocidad. Para controlar los ajustes de calor /
velocidad, cambie el interruptor a la temperatura y velocidad deseada.
Con el interruptor de selección de calor en posición de apagado [imagen] “OFF”, conecte el
Secador a una toma eléctrica convencional de 220 voltios AC. Seleccione el ajuste que sea
más adecuado a sus necesidades y que le dará los mejores resultados.
Cuando haya terminado de utilizar el Secador, mueva el interruptor hasta la posición de
apagado “OFF” y desconecte el cable de la toma de corriente.
Información Adicional
BOTÓN DE AIRE FRIO INSTANTANEO (Consulte el Diagrama)
Para terminar el estilo, utiliza el
Cool Shot botón para desactivar el ujo de calor de la
secadora.
FILTRO DE PELUSA DESECHABLE
El ltro de pelusa desechable debe ser reemplazado cada 6 meses. Abra la cubierta trasera,
remueva y deseche
el ltro de pelusa y reemplace con uno nuevo.
INTERRUPTOR DE POTENCIA DUAL
Este interruptor permite que el secador de pelo cambie de 1875 W a 1500 W. El interruptor
está situado debajo de la cubierta trasera.
LUZ DE NOCHE (HD3003 solamente)
Utilice el regulador de luz situado en la parte inferior de la montura de pared para encender/
apagar la luz de noche y para ajustar la intensidad de la luz.
Nota: El modelo HD3002,
HD3003 ha sido concebido
para ser compatible con
los soportes para secador
1632-040/1632-020 ya
existentes.
Instrucciones de Operación
Para su seguridad, este secador está provisto de un interruptor de filtración de
corriente (ALCI). Este dispositivo está diseñado para hacer el aparato inoperable
bajo ciertas condiciones anormales (tales como la inmersión accidental en el agua).
Después de que el aparato está desconectado, usted debe revisar el dispositivo de
protección de la siguiente manera:
1. Presione el botón de reinicio “Reset” en el dispositivo de seguridad ALCI.
2. Presione el botón de prueba “Test.” El botón de reinicio “Reset” saltará.
Esto verifica que el dispositivo de protección está trabajando correctamente.
3. Presione el botón de reinicio “Reset” una vez más para reactivar el dispositivo
de seguridad y use su aparato.
REPITA EL PROCEDIMIENTO ANTERIOR ANTES DE CADA USO
PARA CONFIRMAR QUE EL DISPOSITIVO DE PROTECCIÓN ESTÁ
OPERANDO.
Características de la Secador de Cabello
Bisagras parrilla d e
entrada de aire
Botón de
Aire Frio
Instananeo
Protector del Cab le
Salida de Aire
Unidad fija de
pared
Interruptor de
3 velocidades/calor
Luz de noche
(Modelo HD3303
solamente)
Encender/
Apagar luz de
noche
(Modelo HD3303
solamente)
Filtro de pelusa
desechable
Interruptor de
potencia dual
Prueba
Botón
Reajustar
Botón
Page 10

18
19
Cuidado
Use su Secadora de Cabello Sunbeam® Hospitality con cuidado. El dirigir un volumen alto
de aire continuamente a una misma área puede sobre calentar el cabello y el cuero cabelludo. Cuando lo use en el nivel alto (HIGH) de calor, mantenga la salida de aire de la secadora
alejada a algunos centímetros del cabello, secando una sección a la vez. Seque las capas del
cabello con movimientos rápidos. Mantenga la Secadora en movimiento hasta que el cabello
se seque y estilice complemente.
Información Importante
1. Si el secador de cabello ha sido sumergido en agua accidentalmente, contacte a su
distribuidor autorizado SUNBEAM® más cercano. NO INTENTE VOLVER A UTILIZAR EL
SECADOR DE CABELLO.
2. Si el botón «RESET» se sale mientras se está utilizando y el secador de cabello deja de
funcionar, esto podría indicar un mal funcionamiento. Permita que el secador de cabello
se enfríe antes de presionar el botón «RESET» e intente de nuevo. Si el botón «RESET» se
vuelve a salir, contacte a su distribuidor autorizado SUNBEAM® más cercano.
3. Si el secador de cabello no funciona como ha sido descrito en el procedimiento de prueba
mencionado anteriormente, contacte a su distribuidor autorizado SUNBEAM® más
cercano.
MANTENIMIENTO, CUIDADO Y LIMPIEZA
Para un rendimiento adecuado, el SECADOR DEBE MANTENERSE LIMPIO. Las entradas de aire
bloqueadas o atascadas provocarán un sobrecalentamiento del Secador.
1. Recuerde desconectar siempre el Secador de la toma de corriente cuando no esté en uso
o cuando vaya a limpiarlo.
2. Para limpiar la superficie exterior: frote con un paño ligeramente húmedo.
NOTA: NUNCA SUME RJA EL SECADOR EN AGUA.
3. Entrada del aire (filtro de pelusa desechable): Reemplazar cada 6 meses. Abra la cubierta
trasera, remueva y deseche el filtro de pelusa desechable y reemplace con un filtro nuevo.
4. Manipule el cable con cuidado evitando enrollarlo, estirarlo o desconectarlo bruscamente
para no dañarlo.
El Secador no requiere un servicio de mantenimiento o de reparación especial. No necesita
lubrificación. Las reparaciones, cuando resulten necesarias, deben efectuarse en servicios de
reparación reconocidos.
Almacenamiento
1. Siempre guarde el secador de cabello dentro de la base.
2. No instale ni almacene el secador de cabello en un área con excesivo calor o humedad.
3. No enrolle el cordón alrededor del secador de cabello. Permita que éste cuelgue
holgadamente del secador.
4. No cuelgue el secador del cordón ni use el cordón como asa.
5. Almacene en un lugar fresco, seco y fuera del alcance de los niños.
6. Almacene en un lugar donde el secador no pueda ser dañado accidentalmente como
resultado de un golpe o caída. No ponga nada encima del secador.
Garantie Limité Pendant de dos (2) Años
Sunbeam Latin America LLC garantiza que por un periodo de dos (2) años a partir de la
fecha de compra, este producto estará libre de defectos en materiales y mano de obra.
JCS, a su discreción, reparará o reemplazará este producto o cualquier componente
del producto durante el periodo de garantía si se determina que tienen defectos. Se
reemplazará con un producto o componente nuevo o remanufacturado. Si el producto ya
no está disponible, se reemplazará con un producto similar de valor equivalente o mayor.
Esta es su garantía exclusiva.
Esta garantía es válida para la industria de la hospitalidad comprador a partir de la fecha
de la compra inicial y no es transferible. JCS distribuidores, centros de servicio, o tiendas
de venta de productos JCS no tienen derecho a alterar, modicar o de cualquier manera
cambiar los términos y condiciones de esta garantía.
Esta garantía no cubre el desgaste como resultado del uso normal o daño de las partes
como consecuencia del uso negligente o mal uso del producto, utilización de una tensión
o corriente inadecuadas, uso contrario a las instrucciones de uso, desmontaje, reparación o
alteración por cualesquier agente ajeno a JCS o a sus.
Centros de Servicio Autorizados. Además, la garantía no cubre actos de Dios, tales como
incendios, inundación, huracanes y tornados.
JCS no será responsable por daños incidentales o consecuentes causados por la violación
de cualquier expresar, implícita o legal de garantía o condición. Salvo en la medida
prohibida por la ley aplicable, cualquier garantía de comerciabilidad o idoneidad para un
propósito particular está limitada en duración a la duración de la garantía. JCS renuncia a
todas las demás garantías, condiciones o representaciones, expresas, implícitas, legales o
de otro tipo.
Algunos estados, jurisdicciones o provincias no permiten la exclusión o limitación de los
daños consecuentes o incidentales o limitaciones respecto de la duración de la garantía, de
modo que las antes citadas limitaciones y exclusiones pueden no aplicar a Ud. Esta garantía
le otorga derechos legales especícos, y usted también puede tener otros derechos que
varían de estado a estado o provincia a provincia.
Esta garantía sólo se aplica a los productos adquiridos por los miembros de la industria de
la hospitalidad y no a las ventas al consumidor.
Cómo Obtener Servico de Garantía
Contacte con su Representante Autorizado de Jarden o Llame a +1-786-845-2540
www.sunbeamhospitality.com
 Loading...