

Page 1
Part No. 118721
AM/FM CLOCK RADIO
Model: 89019
OPERATING INSTRUCTIONS
The lightning flash
and arrowhead
within the triangle
is a warning sign
alerting you of
"dangerous voltage"
inside the product.
CAUTION : TO REDUCE THE
RISK OF ELECTRIC SHOCK,
DO NOT REMOVE COVER
(ON BACK). NO USERSERVICEABLE PARTS
INSIDE. REFER SERVICING
TO QUALIFIED SERVICE
PERSONNEL.
The exclamation
point within the
triangle is a warning
sign alerting you of
important instructions accompanying
the product.
WARNING: TO REDUCE THE RISK OF FIRE OR
ELECTRIC SHOCK, DO NOT EXPOSE THIS
APPLIANCE TO RAIN OR MOISTURE.
CAUTION: TO PREVENT ELECTRIC SHOCK DO NOT USE THIS
(POLARIZED) PLUG WITH AN EXTENSION CORD, RECEPTACLE,
OR OTHER OUTLET UNLESS THE BLADES CAN BE FULLY INSERTED
TO PREVENT BLADE EXPOSURE.
Please read this before operating your unit.
Page 2

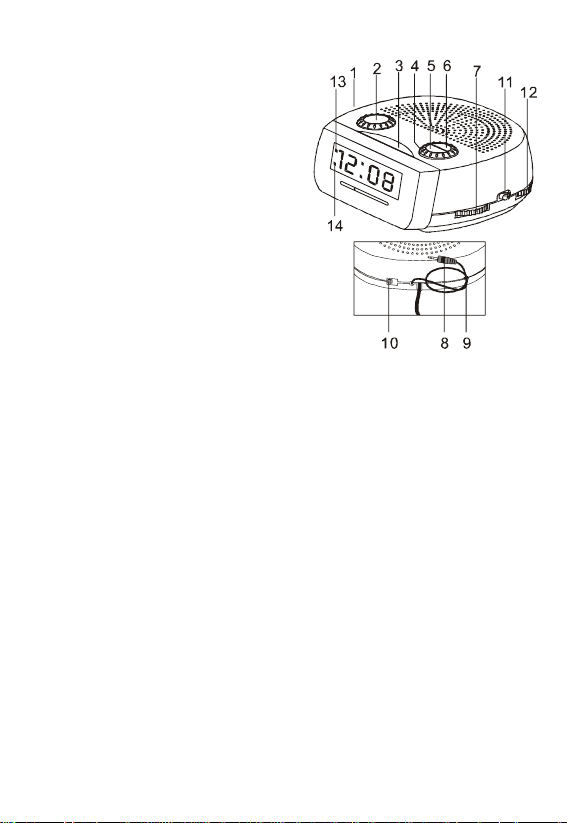
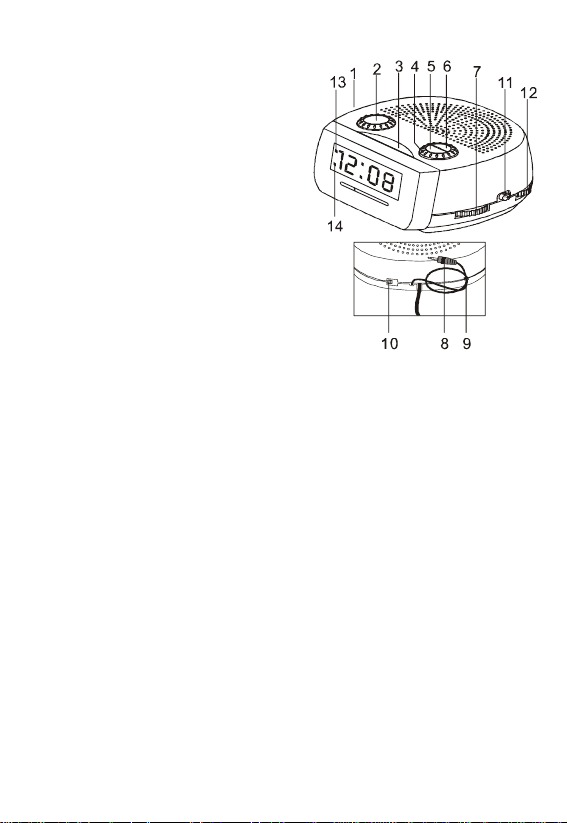
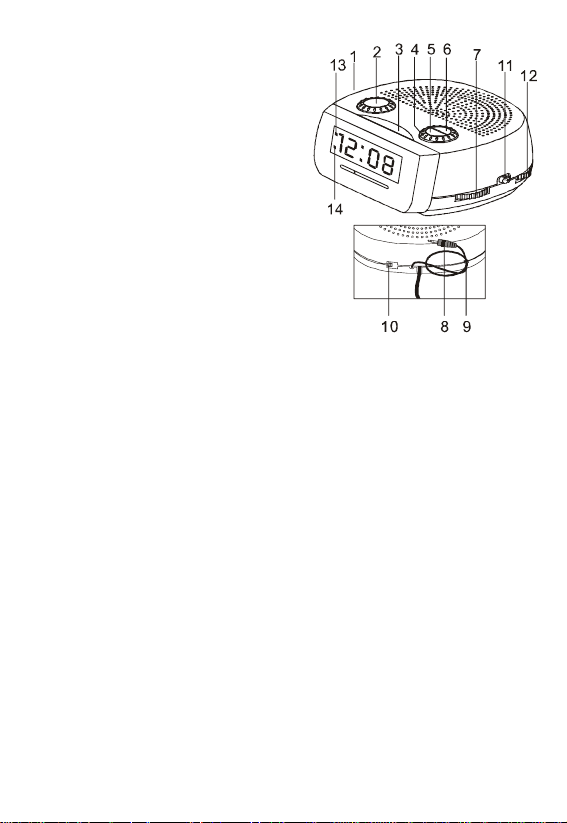
1. On/Off/Auto
2. Sleep
3. Snooze Button
4. Clock/Set Time/Set Alarm switch
5. Minute set button
6. Hour set button
7. Tuning Control
8. Mp3 Input, Wire and Plug
9. Mp3 Wire Retaining Clip
10. Mp3 / Radio Switch
11.AM/FM Band Switch
12. Volume Control and Buzzer switch
13.PM Indicator
14.Alarm ON indicator
BOTTOM OF SET: Battery compartment for 9 volt battery (not included) for tempo-
rary timekeeping in event of power failure.
ANTENNA
For AM reception, this radio incorporates a built-in highly sensitive ferrite core bar
antenna.
For FM reception, this set is specially equipped with an FM antenna built into the
power line cord.
Be sure to untwist it to its fullest length for peak performance.
ELECTRONIC CLOCK OPERATION
1. Plug the AC line cord into 110/120V AC home outlet.
2. Put ON/OFF/AUTO switch (1) into the OFF position. The clock display will flash
to show you it is not set correctly.
3. To set the correct time, turn the dial (4) to "Set Time" position, then depress the
Hour Button (6), release the button when the correct hour is reached. Now
depress the Minute Button (5) to set the display to the correct minute. The PM
indicator (13) will be lighted when the clock is reading PM.Be sure PM is on if
current time is PM.
4. When the correct time is set, turn the dial (4) to "Clock" position. Time cannot
be changed when switch is in this position.
RADIO OPERATION
1. Slide the ON/OFF/AUTO Switch (1) to 'ON' position.
2. Slide the RADIO/MP3 switch (10) to RADIO position.
3. Slide Band Switch (11) to FM or AM position.
4. Turn the Volume Control (12) to desired volume.
5. Turn the Tuning Control (7) to select your favorite station.
Page 3

WAKE TO RADIO
Having selected your station and set the volume at the desired level, proceed as
follows:
1. Slide the ON/OFF/AUTO Switch (1) to 'AUTO' position.
2. Turn the switch (4) to "Set Alarm" position, and then press the Hour Button (6)
until the hour is reached at which you wish to wake.Then press Minute Button (5)
to set alarm minute. After setting the alarm time, turn the dial (4) back to "clock"
position. The wake up time is now entered into the timer memory. To check the
wake up time, simply turn the dial (4) to "Set Alarm" position, and the clock will
show the time the alarm is set for. The wake up time will remain in the timer
memory and the radio will switch on by itself at the same time the next day. To
switch the radio off, simply slide the On/Off/Auto(1) Switch to 'Off' position.
Please note that the Alarm On indicator (14) is illumanated when alarm is set to
operate.
WAKE TO BUZZER
Set the controls as for 'Wake to Radio' but turn the Volume Control (12) back until
it clicks into BUZZER position. The buzzer can be turned OFF or sound switched to
the radio by selecting switch (1) to OFF or ON position.
SLEEP TO MUSIC
The radio can be set to play and to switch off automatically for a length of time from
1 minute to 1 hour 59 minutes by following this procedure. With tuning and volume
controls set,Place ON/OFF/AUTO switch (1) in the AUTO Position. Then depress
the Sleep Button (2) and press the Minute Button (5) to count down to the desired
sleep time. To switch off the radio before the end of the registered sleep time period,
simply press the Snooze Button (3).
SNOOZE CONTROL
Pushing down on the Snooze Button (3) turns the alarm sound off and allows the
user extra sleep time of about 9 minutes.This can be repeated as often as you like
for up to 2 hours.Turn ON/OFF/AUTO switch (1) to OFF to stop Snooze function.
BATTER Y BACK-UP
Connect a 9 volt battery (not included) to the terminals inside the battery compartment on bottom of clock radio. It is recommended that the set be disconnected
from the 110/120V power source while the battery is fitted. The clock display will not
light up, but the clock time will be held in the clock memory by the battery back-up
system. This enables you to move the set from place to place without re-setting the
clock every time. The battery back-up system is only meant to be used from short
temporary power failures. For longer durations the battery may become exhausted
or there may be some deviation in accuracy,due to the battery being exhausted. It
should be removed from the set to prevent leakage. If you do not wish to take
advantage of the battery back-up system, your set will work normally without a
battery. However, if disconnected from the 110/120V source, the clock display will
flash when the power is re-connected and you must re-set the clock as described in
the Electronic Clock Operation paragraph.
Page 4

MP3 WIRE AND PLUG
• To play a MP3 player through this clock radio, a wire with plug (8) has been
provided for connecting.
• Set the MP3 player next to the clock radio and insert the plug into the headphone
jack of the MP3 player.Move RADIO/MP3 switch (10) to MP3 position. Move
ON/OFF/AUTO switch (1) to the ON position.
• T o disconnect, remove plug from headphone jack and slide RADIO/ MP3 switch
to RADIO position. Be sure to push wire into clip (9) to keep it from being
damaged.
GENERAL CARE
The cabinet can be cleaned with a slightly damp cloth (make sure power line is
disconnected).
Avoid leaving the clock radio in direct sunlight or in hot, humid, dusty places.
Keep the set away from heating appliances and appliances that generate noise,
such as fluorescent lamps, or motors.
SPECIFICATIONS
Power Source : 120V ~ 60Hz, 5w
DC Back Up : 9V (1x9V 6F22 NOT INCLUDED)
Radio Frequency : AM 530-1700 kHz
: FM 88-108 MHz
Page 5

1-Year Limited Hospitality Warranty
Sunbeam Products, Inc. d/b/a Jarden Consumer Solutions in US and Sunbeam
Corporation (Canada) Limited doing business as Jarden Consumer Solutions in
Canada warrants that for a period of 1 year from the date of purchase, this product
will be free from defects in material and workmanship. Sunbeam, at its option, will
repair or replace this product or any component of the product found to be defective
during the warranty period. Replacement will be made with a new or remanufactured
product or component. If the product is no longer available, replacement may be
made with a similar product of equal or greater value. This is your exclusive
warranty.
This warranty is valid for the original purchaser from the date of initial purchase and
is not transferable. Sunbeam dealers, service centers, or stores selling Sunbeam
products do not have the right to alter, modify or any way change the terms and
conditions of this warranty.
This warranty does not cover normal wear of parts or damage resulting from any of
the following: negligent use or misuse of the product, use on improper voltage or
current, use contrary to the operating instructions, disassembly, repair or alteration
by anyone other than Sunbeam or an authorized service center. Further, the
warranty does not cover Acts of God, such as fire, flood, hurricanes and tornadoes.
Sunbeam shall not be liable for any incidental or consequential damages caused by
the breach of any express, implied or statutory warranty or condition. Except to the
extent prohibited by applicable law, any implied warranty of merchantability or
fitness for a particular purpose is limited in duration to the duration of the above
warranty. Sunbeam disclaims all other warranties or conditions, express, implied
statutory or otherwise. Some states, provinces or jurisdictions do not allow the
exclusion or limitation of incidental or consequential damages or limitations on how
long an implied warranty lasts, so the above limitations or exclusion may not apply
to you. This warranty gives you specific legal rights, and you may also have other
rights that vary from state to state or province to province.
This warranty is only applicable to products purchased by members of the hospitality
industry and not to consumer sales.
How to Obtain Warranty Service
Contact your Sunbeam authorized dealer.
Page 6

IMPORT ANT SAFETY INSTRUCTIONS
1. READ INSTRUCTIONS - All the safety and operating instructions should be read before
the product is operated.
2. RETAIN INSTRUCTIONS - The safety and operating instructions should be retained for
future reference.
3. HEED WARNINGS - All warnings on the product and in the operating instructions
should be adhered to.
4. FOLLOW INSTRUCTIONS - All operating and use instructions should be followed.
5. CLEANING - Unplug this product from the wall outlet before cleaning, Do not use liquid
cleaners or aerosol cleaners. Use a damp cloth for cleaning.
6. ATTACHMENTS - Do not use attachments not recommended by the product
manufacturer as they may cause hazards.
7. WATER AND MOISTURE - Do not use this product near water - for example, near a bath
tub, wash bowl, kitchen sink , or laundry tub; in a wet basement, or near a swimming
pool, and the like.
8. ACCESSORIES - Do not place this product on an unstable cart, stand tripod, bracket,
or table. The product may fall, causing serious injury to a child or adult, and serious
damage to the product. Use only with a cart, stand, tripod, bracket, or table recommended
by the manufacturer, or sold with the product. Any mounting of the product should follow
the manufacturer’s instructions, and should use a mounting accessory recommended
by the manufacturer.
9. A product and cart combination should be moved with care. Quick stops, excessive
force, and uneven surfaces may cause the appliance and cart
combination to overturn.
10. VENTILATION - Slots and openings in the cabinet are provided for ventilation and to
ensure reliable operation of the product and to protect it from overheating, and these
openings must not be blocked or covered. The openings should never be blocked by
placing the product on a bed, sofa, rug, or other similar surface. This product should not
be placed in a built-in installation such as a bookcase or rack unless proper ventilation
is provided or the manufacturer’s instructions have been adhered to.
11. POWER SOURCES - This product should be operated only from the type of power
source indicated on the marking label. If you are not sure of the type of power supply to
your home, consult your product dealer or local power company. For products intended
to operate from battery power, or other sources, refer to operating instruction.
Page 7
12. GROUNDING OR POLARIZATION - This product may be equipped with a polarized
alternating current line plug (a plug having one blade wider than the other). This plug
will fit into the power outlet only one way. This is a safety feature. If you are unable to
insert the plug fully into the outlet, try reversing the plug. If the plug should still fail to fit,
contact your electrician to replace your obsolete outlet. Do not defeat the safety purpose
of the polarized plug.
ALTERNATE WARNINGS - This product is equipped with a three-wire grounding-type
plug, a plug having a third (grounding) pin. This plug will only fit into a grounding-type
power outlet. This is a safety feature. If you are unable to insert the plug into the outlet,
contact your electrician to replace your obsolete outlet, Do not defeat the safety purpose
of the grounding-type plug.
13. POWER - CORD PROTECTION - Power supply cords should be routed so that they are
not likely to be walked on or pinched by items placed upon or against them, paying
particular attention to cords at plugs, convenience receptacles, and point where they
exit from the product.
14. PROTECTIVE ATTACHMENT PLUG - The product is equipped with an attachment plug
having overload protection. This is a safety feature. See Instruction Manual for
replacement or resetting of protective device. If replacement of the plug is required, be
sure the service technician has used a replacement plug specified by the manufacturer
that has the same overload protection as the original plug.
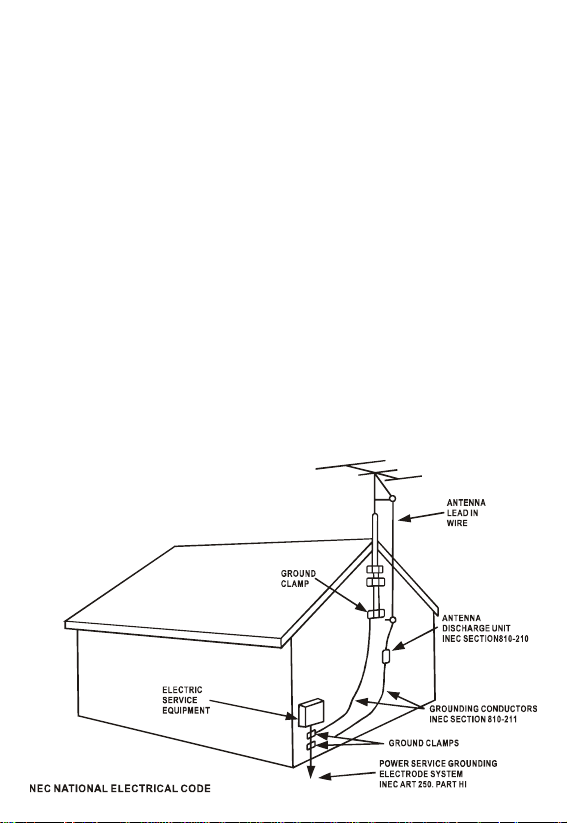
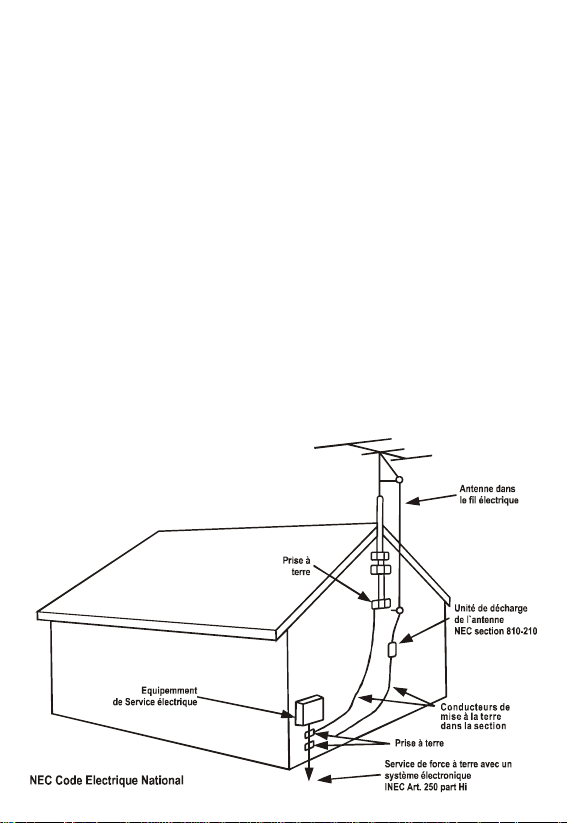
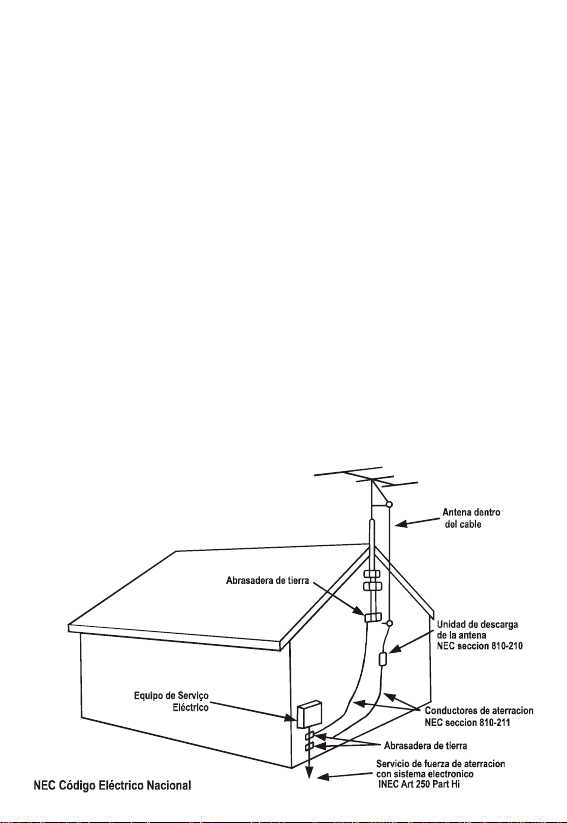
15. OUTDOOR ANTENNA GROUNDING - If an outside antenna is connected to the receiver,
be sure the antenna system is grounded so as to provide some protection against
voltage surges and built-up static charges. Article 810 of the National Electrical Code,
ANSI/NFPA 70, provides information with regard to proper grounding of the mast and
supporting structure, grounding of the lead-in wire to an antenna-discharge unit, size
of grounding conductors, location of antenna-discharge unit, connection to grounding
electrodes, and requirements for the grounding electrode.
See figure:
Page 8

16. LIGHTNING - For added protection for this product during a lightning storm, or when it
is left unattended and unused for long periods of time, unplug it from the wall outlet and
disconnect the antenna or cable system. This will prevent damage to the product due
to lightning and power-line surges.
17. POWER LINES - An outside antenna system should not be located in the vicinity of
overhead power lines or other electric light or power circuits, or where it can fall into
such power lines or circuits. When installing an outside antenna system, extreme care
should be taken to keep from touching such power lines or circuits as contact with them
might be fatal.
18. OVERLOADING - Do not overload wall outlets, extension cords, or integral convenience
receptacles as this can result in a risk of fire or electric shock.
19. OBJECT AND LIQUID ENTRY - Never push objects of any kind into this product through
openings as they may touch dangerous voltage points or short-out parts that could
result in a fire or electric shock. Never spill liquid of any kind on the product.
20. SERVICING - Do not attempt to service this product yourself as opening or removing
covers may expose you to dangerous voltage or other hazards. Refer all servicing to
qualified service personnel.
21. DAMAGE REQUIRING SERVICE - Unplug this product from the wall outlet and refer
servicing to qualified service personnel under the following conditions:
a) When the power-supply cord or plug is damaged.
b) If liquid has been spilled, or objects have fallen into the product.
c) If the product has been exposed to rain or water.
d) If the product does not operate normally by following the operating instructions,
adjust only those controls that are covered by the operating instructions as an
improper adjustment of other controls may result in damage and will often require
extensive work by a qualified technician to restore the product to its normal operation.
e) If the product has been dropped or damaged in any way, and.
f ) When the product exhibits a distinct change in performance - this indicates a need
for service.
22. REPLACEMENT PARTS - When replacement parts are required, be sure the service
technician has used replacement parts specified by the manufacturer or have the same
characteristics as the original part. Unauthorized substitutions may result in fire, electric
shock, or other hazards.
23. SAFETY CHECK - Upon completion of any service or repairs to this product, ask the
service technician to perform safety checks to determine that the product is in proper
operating condition.
24. WALL OR CEILING MOUNTING - The product should be mounted to a wall or ceiling
only as recommended by the manufacturer.
25. HEAT - The product should be situated away from heat sources such as radiators, heat
registers, stoves, or other products (including amplifiers) that produce heat.
Warning: Changes or modifications to this unit not expressly approved by the party
responsible for compliance could void the users' authority to operate the equipment.
Page 9
AM/FM Digital Clock radio
Avec lumière de nuit
Modèle : 89019
MODE D’EMPLOI
AA
TTENTIONTTENTION
A
TTENTION
AA
TTENTIONTTENTION
risque de choc électrique
Ne pas ouvrir
Le triangle avec
la foudre est un
symbole de
danger en raison
du haut voltage
dans l‘appareil.
NOTE : Afin de réduire le risque d‘incendie ou de choc
électrique, ne mettez pas cet appareil en contact avec la
pluie ou l‘humidité.
Attention : pour prévenir des décharges électriques
n’utilisez pas cette prise polarisée avec une rallonge ou
une autre prise qui ne permette pas rentrer complètement
les pattes.
ATTENTION : Afin de réduire le
risque de choc électrique
n‘enlève pas le couvercle (du
derrière). Renseignez vous
auprès de notre service
d‘entretient ou auprès des
professionnels autorisés.
Le symbole
d‘exclamation dans
le triangle vous
indique qu‘il faut lire
la notice jointe au
produit.
Avant de l‘utilisation lisez les instructions du mode d‘emploi.
Page 10
1. ON/OFF.AUTO
2. SLEEP (dormir)
3. SNOOZE
4. Bouton pour régler L’HEURE / L’ALARME
ET L’HORLOGE.
5. Bouton pour régler les minutes
6. Bouton pour régler les heures
7. TUNING CONTROL
(Contrôle de syntonisation de la radio)
8. Mp3 Input, Wire and Plug
9. Mp3 Wire retaining clip
10. Radio/Mp3 switch
11. AM/FM BAND SWITCH
(contrôle de bande de radio AM / FM)
12. VOLUME / BUZZER CONTROL
(Contrôle du volume / buzzer)
13. Indicateur de PM
14. Indicateur d’alarme
BASE DE L’APPAREIL
Couvercle pour une batterie de 9 volt (non inclue) pour préserver de manière
temporaire l’heure, dans le cas d’une coupure d’énergie.
ANTENNE
Pour la réception de la bande AM cet appareil comporte une antenne interne de
grande sensitivité.
Pour la réception de la bande FM ce poste compte avec une antenne FM à l’intérieur
du cordon électrique. Pour une meilleure réception assurez vous de le déplier
complètement.
Fonctionnement de l’horloge électronique
1. Branchez le cordon AC sur une prise de 110/120
2. Placez le bouton ON/OFF/AUTO (1) sur la position OFF. L’écran de l’horloge va
clignoter pour vous indiquer qu’il n’est pas correctement réglé.
3. Pour régler l’heure correcte placez le sélecteur (4) à la position « Set Time »
après appuyez sur le bouton heure (6) pour programmer la bonne heure puis
libérez-le. Ensuite appuyez sur le bouton minutes (5) pour régler les minutes.
L’indicateur PM (13) va s’allumer si l’horloge est en période PM. Assurez-vous
que l’heure affichée corresponde à la période PM si cet indicateur est allumé.
4. Après avoir réglé l’heure correctement, changez le sélecteur à la position « clock ».
l’heure ne pourra pas être changée si le sélecteur est à cette position.
COMMENT FAIRE FONCTIONNER LA RADIO
1. Mettez le bouton ON/OFF/AUTO (1) sur la position «ON».
2. Glissez le Bouton RADIO/MP3 (10) à la position RADIO
3. Choisissez la bande de votre préférence en mettant le bouton BAND SWITCH
(11) sur la position FM ou AM
Page 11

4. Mettez le bouton VOLUME CONTROL (12) au niveau de volume souhaité.
5. Faites tourner le bouton TUNING CONTROL (12) afin de trouver la station
préférée.
POUR VOUS REVEILLEZ AVEC LA RADIO
Après avoir choisi votre station de radio et le niveau de volume, suivez ces étapes :
1. Placez le bouton ON/OFF/AUTO (1) à la position AUTO.
2. Placez le bouton (4) à la position « set alarm » et appuyez sur le bouton heure (6)
pour programmer l’heure à laquelle vous voulez être réveillé. Appuyez ensuite
sur le bouton minute (5) pour programmer les minutes. Après avoir programmé
l’alarme mettez à nouveau le sélecteur (4) à la position « horloge ». Alors l’heure
de l’alarme est déjà dans la mémoire. Pour vérifier l’heure de l’alarme il vous
suffit de placer le sélecteur (4) à la position « set alarm » et l’horloge va vous
montrer l’heure choisie. L’heure de l’alarme va rester dans la mémoire de
l’horloge et la radio va se mettre en marche pour soi même à cette heure le
lendemain. Pour éteindre la radio vous pouvez déplacer le bouton ON/OFF/
AUTO (1) à la position « off ». S’il vous plaît vérifiez que le voyant de l’alarme
(14) est allumé quand l’alarme a été programmée.
POUR VOUS REVEILLER AVEC LE BUZZER
Réglez les contrôles selon la rubrique « pour vous réveiller avec la radio » mais
déplacez le contrôle de volume (12) jusqu’à ce qu’on écoute le click du retour à la
position BUZZER. Le BUZZER peut s’arrêter ou le son peut se changer par la radio
si vous déplacez le bouton (1) à la position OFF ou ON.
VOUS EN DORMIR EN ECOUTANT DE LA MUSIQUE
La radio peut être programmée pour s’éteindre automatiquement après une période
qui peut aller de 1 minute à 1 heure 59 minutes si vous suivez les pas suivants : En
réglant le sélecteur de station et celui du volume déplacez le bouton ON/OFF/AUTO
(1) à la position AUTO. Après appuyez le bouton SLEEP (2) et le bouton Minute (5)
pour programmer le temps désiré. Pour arrêter la radio avant du temps programmé
il faut simplement appuyer sur le bouton Snooze (3).
CONTROLE DU SNOOZE
Il vous suffit de déplacer le bouton SNOOZE (3) pour arrêter l’alarme et vous
permettre d’avoir encore 9 minutes pour dormir. Cette période peut se répéter tout
le temps dont vous aurez besoin jusqu’à un maximum de deux heures. Pour arrêter
la fonction du BUZZER déplacez le bouton ON/OFF/AUTO (1) à la position OFF.
BA TTERIE DE RECUPERA TION
Placez une batterie de 9 volt (non inclue) dans le couvercle correspondant en bas du
radio horloge. Il est conseillé de débrancher l’appareil du secteur 110/120V quand
vous mettez la batterie. L’écran ne va pas s’allumer mais l’heure de l’horloge va se
garder dans la mémoire de l’horloge grâce au système de récupération à batterie.
De cette manière vous pourrez déplacer l’horloge d’un lieu à l’autre sans avoir
besoin de régler l’heure à chaque fois. Le système de récupération à batterie a été
pensé pour des périodes courtes de manque d’énergie. Quand il s’agit de coupures
longues d’énergie la batterie peut s’épuiser et produire des variations dans l’heure.
Page 12

On vous conseille d’enlever la batterie pour éviter des fuites. Si vous ne voulez pas
vous servir du système de récupération à batterie votre poste va fonctionner
normalement sans la batterie. Cependant s’il est débranché sur le secteur 110/120V
l’écran va clignoter quand l’énergie est restaurée et vous devrez programmer à
nouveau l’heure selon la rubrique Fonctionnement de l’horloge électronique.
FIL ET PRISE MP3
- Pour lire un MP3 dans ce radio – horloge vous disposez d’un fil avec une prise
(15) pour les relier. Mettez le lecteur MP3 près du radio - horloge et insérez la
prise dans la connexion des écouteurs du lecteur MP3.
- Déplacez le bouton radio/MP3 (16) à la position MP3. Mettez le bouton ON/OFF/
AUTO (10) à la position ON.
- Pour délier enlevez la prise de la connexion des écouteurs et déplacez le bouton
RADIO/MP3 à la position RADIO. Assurez vous de placer le fil dans le trombone
pour le garder et ainsi éviter de l’endommager.
ENTRETIEN GÉNÉRAL
L’extérieur peut se nettoyer avec un chiffon légèrement humidifié (assurez-vous de
débrancher l’appareil)
Evitez la lumière directe du soleil ainsi que des sources de chaleur et d’humidité ou
poussière. Placez l’appareil loin d’autres appareils produisant du bruit comme des
lampes fluorescentes ou des moteurs.
CARACTERISTIQUES
Source d’énergie: 120V-60Hz, 5w
DC de récupération : 9V (1x9V 6F22 non inclue)
Fréquence de la radio : AM 530-1700KHZ / FM 88-108 MHZ
Page 13

GARANTIE LIMITÉ PENDANT 1 AN
Sunbeam Products, Inc. faire les affaires comme Jarden Consumer Solutions dans
US et Sunbeam Corporation (Canada) Limited faire les affaires comme Jarden
Consumer Solutions dans Canada offre à ses clients une garantie pendant 1 an à
partir de la date d´achat. Elle garantit que ce produit n´aura pas de défauts, soit à
cause de materiaux ou à la main d´oeuvre utilisé. Sunbeam s´engage à réparer ou
remplacer l´apareil ou une composant quelquonque qui ne fonctionne pas, toujours
dans la période couverte par la garantie. Le remplacement sera fait avec un produit
nouveau ou une partie nouvelle. Si le produit n´est plus disponible, le remplacement
sera fait avec un autre produit de caracteristiques de qualité similaires ou superieures,
cela dependra du choix du fabricant. C´est votre garantie exclusive.
Les distributeurs, intermediaires, centres de service ou n´importe quelle autre
magasin qui vend ou offre le service d´entretien des produits Sunbeam, n´ont pas
le droit de altérer, modifier ou changer d´une manière quelquonque les termes de
cette garantie.
Cette garantie ne couvre pas l´usure des parties ou les dommages, dont l´origine
est une mauvaise utilisation du produit, le branchement sur la courant ou le voltage
different de celui qui est indiqué, l´utilisation differente de celle qui est indiquée
dans les instructions d´opération, le démontage, les réparations ou altérations faites
par des personnes non autorisées par Sunbeam ou un de ses centres de services.
La garantie ne couvre non plus des situations fortuites, telles qu´incendies,
inondations, ouragans et tornades.
Sunbeam ne sera pas résponsable par les dommages resultants d´incidents, ou à la
suite des violations des garanties expresses ou implicites. Au moins qu´il soit
déterminé par les lois en vigeur, toute garantie commerciale implicite et aplicable
aura une durée qui sera limitée par la garantie décrite ci-dessus. Certains états,
provinces et même jurisdictions ne permettent pas l´exclusion ou limitation, à la
égard de la duration de la garantie, des dommages ou limitants qui resultent
d´incidents ou à la suite de violations de ces garanties. C´est pourquoi les limitations
ou exclusions décrites ci dessus peuvent ne pas être applicables dans votre cas.
Cette garantie vous offre des droits légaux spécifiques, en plus d´autres droits qui
varient selon l´état.
Comment obtenir le service de garantie
Mettez – vous en contacte avec le distributeur Sunbeam.
Page 14

Informations importantes concernant votre sécurité
1. Lisez les instructions: toutes les instructions concernant les mesures de
sécurité doivent être lues avant d‘utiliser l‘appareil.
2. Conservez la notice: Vous devez conserver la notice pour avoir les mesures
de sécurité comme une référence au futur.
3. Attention: Prenez en compte toutes les informations concernant ce produit et
son utilisation.
4. Mode d‘emploi: toutes les instructions d‘utilisation et d‘opération doivent être
respectées.
5. Nettoyage: Débranchez la prise avant de nettoyer l‘appareil. N‘utilisez ni de
produits liquides ni d‘aérosol, utilisez un chiffon pour nettoyer la poussière.
6. Accessoires – N’utilisez pas d’accessoires non recommandés par le fabricant
de l’appareil qui pourraient causer des dégâts.
7. Eau et humidité: n‘utilisez pas ce produit près de lieux avec de l‘eau comme une
baignoire, un seau d‘eau, un évier, des piscines, du sol mouillé ou d‘autres lieux
avec des caractéristiques similaires.
8. Accessoires: Ne mettez pas cet appareil sur un trépied, étagère ou table non
conseillée par le fabricant. L‘appareil peut tomber par terre et blesser gravement
à des enfants ou des adultes en plus des dégâts de l‘appareil. Mettez -le
seulement sur des trépieds, des tables et des étagères conseillées par le
fabricant ou sur ceux qui sont vendus avec ce produit. Pour le montage de ce
produit vous devez suivre les instructions du fabricant et vous devez utiliser
seulement les accessoires de montage conseillés par le fabricant.
9. Déplacez avec soin les combinaisons appareil et chariot. Des arrêts brutaux, une
force excessive ou des surfaces inégales peuvent causer le renversement de
l’ensemble de chariot et appareil
10.Ventilation: cet appareil doit être utilisé dans des lieux avec une bonne ventila-
tion afin d‘éviter le surchauffe. Les ouvertures des lits, des canapés ou d‘autres
meubles de ce type doivent être bloquées si l‘appareil se trouve près d‘eux. Il
n‘est pas conseillé d‘installer cet appareil dans une bibliothèque ou sur une
étagère, sauf si ceux-ci ont une bonne ventilation et sont bien installés selon
recommandation du fabricant inclus
11.Sources d‘énergie: cet appareil doit être branché exclusivement sur le type de
source d‘énergie indiqué dans la notice. Si vous n’ êtes pas certain du type
d’approvisionnement en courant, consultez votre marchand d’appareil ou votre
compagnie locale d’électricité. Pour les produits conçus pour être utilisé à partir d’une
source de pile ou autres sources, référez-vous aux instructions de fonctionnement
12.Installation à terre et polarisation : cet appareil compte avec une prise
polarisée (une fiche ayant une lame plus large que l’autre). Cette prise doit entrer
d‘une seule manière. C‘est un dispositif de sécurité de l‘appareil. Si vous n‘arrivez
Page 15
pas à faire entrer la prise correctement essayez de renverser la position de la
prise. Si la prise n‘entre toujours pas correctement alors prenez contact avec
votre électricien pour la faire remplacer. N’essayez pas de détruire le dispositif
de sécurité de la fiche polarisée.
Autres avertissements – Ce produit est équipé d’une fiche du type avec mise à
la terre à trois fils. Il s’agit d’une fil ayant un troisième ergot (prise a terre). Cette
fiche s’adaptera seulement sur une prise de courant du type avec prise a terre. Il
s’agit d’un dispositif de sécurité. Si vous êtes incapables d’insérer la fiche dans la
prise de courant, contactez votre électricien pour remplacer votre prise désuète.
N’essayez pas de détruire le dispositif de sécurité de la fiche polarisée.
13.Protection du fil du courant – le fils d’approvisionnement devraient être
acheminés a façon à ce que l’on ne risque pas de marcher dessus ou qu’il ne soit
pas coincés par des articles placés au-dessus d’eux, en faisant particulièrement
attention aux fils à proximité de fiches, prises de courant de service, et au point
où ils sortent de l’appareil.
14.Elément protecteur de la prise: cet appareil compte avec une prise protégée
contre les surcharges. C‘est un dispositif de sécurité. Si vous devez faire remplacer
la prise, assurez-vous que le technicien utilise une prise avec le même dispositif
de protection contre surcharges, comme il est indiqué par le fabricant.
15.MISE À TERRE DE L’ANTENNE EXTÉRIEURE: cet appareil doit être branché
exclusivement sur le type de source d‘énergie indiqué dans la notice. Si vous
doutez du type d‘énergie renseignez vous auprès du vendeur ou avec la compagnie
locale. L‘article 810 du code électrique national ANSI/NFPA 70, comporte
l‘information correspondant à la manière correcte de faire une installation à terre
à travers une colonne ou une structure, ainsi que la manière de faire l‘installation
du câble d‘entrée à l‘antenne pour décharge, et la taille de l‘unité et les dimensions
correctes des conducteurs pour l‘installations à terre, la position de l‘antenne et de
l‘unité.
Page 16

16.Éclair: Afin de protéger cet appareil lors d‘une tempête ou s‘il n‘est pas utilisé
pour longtemps, débranchez-le de la prise et du système d‘antenne ou du câble
d‘énergie. Cette mesure va le protéger des dommages dus aux foudres et aux
variations de voltage.
17.Lignes d‘énergie électrique : l‘antenne ne doit pas être située près des lignes
électriques aériennes ou des circuits électriques ou d‘énergie. Quand vous
installez une antenne externe prenez soin de ne pas toucher les lignes ou les
circuits électriques parce qu‘il peut être fatal.
18.Surcharges : Ne branchez pas trop d‘appareils sur la prise du mur, des rallonges
ou des prises intégrées parce qu‘il peut produire des incendies ou des chocs
électriques.
19.Contact avec d‘autres objets ou avec de l‘eau : ne mettez jamais des objets
dans les trous de l‘appareil parce qu‘ils peuvent se mettre en contact avec des
points de haut voltage ou avec de circuits donnant comme résultat des chocs
électriques ou des incendies. Ne jamais verser des liquides sur l‘appareil.
20.Service d‘entretien : N‘essayez jamais de réparer cet appareil vous même.
N‘enlevez pas les couvercles parce que vous risquez un choc électrique ou
d‘autres dangers. Renseignez vous auprès de votre service d‘entretien ou du
personnel autorisé.
21.Dommages : cet appareil a besoin du service technique autorisé quand :
A)le fil électrique ou la prise sont abîmés,
B) si on a versé du liquide sur l‘appareil ou si on a introduit un objet dans
l‘appareil,
C)si l‘appareil a été exposé à la pluie ou d‘autres liquides,
D)Si cet appareil ne marche pas correctement après avoir suivi les instructions,
réglez seulement les contrôles couverts par les instructions de service parce
qu’un règlement incorrect peut produire des dommages et peut demander une
réparation plus détaillée de la part d’un technicien qualifié afin de mettre
l’appareil à son état original.
E) Si l‘appareil est tombé par terre ou a été abîmé en certaine manière.
F) Si le produit montre un changement dans son fonctionnement, cela peut
indiquer qu’il a besoin d’une vérification d’entretien.
22.Pièces de rechange : si l‘appareil a besoin des pièces de rechange, assurezvous que le technicien utilise les pièces conseillées par le fabricant ou le cas
échéant qu‘elles aient les mêmes caractéristiques des pièces originales. Les
pièces non conseillées peuvent produire des incendies, des chocs électriques ou
autres dangers.
23.Vérification de la sécurité : Tous les travaux de réparation ou de service
technique de cet appareil doivent être faits par un technicien qui assure la
qualité de son travail.
24.Installation sur le mur ou sur le plafond : ce produit doit être installé sur le
mur ou sur le plafond si ceci est conseillé par le fabricant.
25.Chaleur : cet appareil doit rester loin de sources de chaleur comme radiateurs,
fours ou n‘importe quel autre équipe similaire (haut parleurs inclus)
ATTENTION : Les changements ou modifications non autorisés par le fabricant de
cet appareil peuvent entraîner la nullité de la garantie.
Page 17
Radio Relógio Digital com Despertador
Com iluminação noturna
Modelo: 89019
Instruções de operação
PerigoPerigo
Perigo
PerigoPerigo
Risco de choque elétrico
Não abrir.
O símbolo do flash e a
ponta da flecha ao
interior do triangulo
são um sinal de
advertência que
indicam “voltagens
perigosas” neste
produto.
Advertência: Para reduzir o risco de fogo ou de
eletrocussão, não exponha este aparelho à água chuva ou
umidade.
CUIDADO: PARA PREVER UM CHOQUE ELÉTRICO NÃO UTILIZE
ESTE ENCAIXE (POLARIZADO) COM UMA EXTENSÃO, TOMA
CORRENTE, U OUTRA TOMA A MENOS QUE AS PATAS DO
ENCAIXE FIQUEM INSERIDAS POR COMPLETO P ARA EVIT AR A
EXPOSIÇÃO DAS MESMAS.
PERIGO: PARA REDUZIR O RISCO
DE CHOQUE ELÉTRICO, NÃO TIRE
A TAMPA (NA PARTE POSTERIOR).
ESTE APARELHO NÃO CONTÉM
PARTES QUE POSSAM SER
REPARADAS PELO USUÁRIO. SE
REQUER SERVIÇO CONTATE
PESSOAL QUALIFICADO.
O sinal de exclamação
dentro do triangulo é um
sinal que indica a
existência de instruções
importantes incluídas
com este produto.
Leia por favor as instruções antes de usar seu aparelho.
Page 18
1. ON/OFF/AUTO (ligado/desligado/automático)
2. SLEEP (Dormir)
3. SNOOZE
4. Clock Set / ALARM / TIME SET switch
(programador de relógio/alarme/Hora)
5. MINUTE Set Button (seletor de Minutos)
6. HOUR Set Button (Seletor deHora)
7. TUNING CONTROL (Seletor de estação)
8. MP3 Input, Wire and Plug
(Toma para MP3, cabo e encaixe)
9. MP3 Wire Retaining clip
(Clipe sujeitador do MP3)
10. Radio/MP3 Switch (Seletor Radio/MP3)
11. AM/FM Band Switch
(Seletor de Banda AM/FM)
12. VOLUME/BUZZE CONTROL
(Controle de volume/ buzzer)
13. PM Indicador (Indicador de hora PM)
14. ALARM ON Indicador
(Indicador de Alarme acionado)
FUNDO DO APARELHO
Compartimento para bateria de 9V (não incluida) para conservar temporalmente a
hora em caso de uma interrupção de energia.
ANTENA
Para uma melhor recepção de AM, este aparelho vem com uma antena de ferrita de
alta sensibilidade.
Para uma melhor recepção de FM, este aparelho vem especialmente equipado com
uma antena FM incorporada ao cabo alimentador.
Assegure-se de desenrolar a antena por completo para seu bom funcionamento.
USO DO RELÓGIO ELETRÔNICO
1. Conete o fio alimentador a um toma corrente de 110/120V AC, 60 Hz.
2. Coloque o seletor ON/OFF/AUTO (1) na posição OFF. A pantalha do relógio
piscará indicando que a hora não é a correta.
3. Para por a hora correta, gire o dial (4) à posição “Set Time”, logo pressione o
botão HOUR (6) e mantenha pressionado até alcançar a hora desejada. Agora
pressione o botão MINUTE e mantenha assim até alcançar os minutos corretos.
O indicador de PM (13) se iluminará quando a hora marcar PM (horas da tarde).
Assegure-se de que o indicador PM esteja aceso se a hora programada
corresponde ao PM.
4. Quando a hora correta tenha sido programada, gire o dial (4) à posição “Clock”.
A hora não pode ser mudada quando o dial se encontra nesta posição.
UTILIZACION DEL RADIO
1. Deslize o botão ON/OFF/AUTO (1) à posição de “ON”. (ligado)
Page 19

2. Deslize o seletor RADIO/MP3 (10) a posición de RÁDIO.
3. Selecione a banda de sua preferência deslizando o botão BAND SWITCH (11) à
posição de “AM” ou de “FM”.
4. Ajuste o botão do VOLUME CONTROLE (12) a seu gosto.
5. Gire o botão de TUNING CONTROLE (7), para sintonizar sua estação de rádio
favorita.
ACORDE COM MÚSICA
Uma vez selecionada a estação de rádio desejada e ajustado o nível do volume,
proceda da seguinte maneira:
1. Deslize o seletor ON/OFF’AUTO (1) à posição de AUTO.
2. Gire o seletor (4) à posição “Set Alarm” (programar alarme), e logo pressione o
botão HOUR (6) até alcançar a hora na qual deseja acionar o a alarme. Para
ajustar os minutos do alarme, pressione o botão MINUTE (5). Logo após ter
programado o alarme, volte o seletor (4) à posição CLOCK. A hora do alarme já
se encontra guardada na memória do timer. Para revisar a hora do alarme,
simplesmente gire o dial (4) à posição “Set Alarm” e o relógio mostrará a hora na
qual foi programado o alarme. A hora de ativação do alarme permanecerá na
memória do timer e o rádio ligará automaticamente à mesma hora no dia
seguinte. Para desligar o rádio, simplesmente deslize o seletor ON/OFF/AUTO
(1) à posição de OFF. Note que o indicador de “Alarm ON” (14) se ilumina
quando o alarme do relógio se encontra ativado.
ACORDE COM A CAMPAINHA
Ajuste os controles da mesma maneira que para “Acorde com Musica” girando o
volume (12) até que faça um click sobre a posição de BUZZER. O buzzer pode ser
desligado ou a fonte de som trocada a rádio colocando o selecionador (1) na posição
OFF o ON.
DURMA COM MÚSICA
Seguindo estas instruções o rádio pode ser programado para tocar ou desligar
automaticamente após um período de tempo entre 1 minuto a uma hora e 59
minutos. Uma vez selecionada a estação e o volume desejado, coloque o botão
ON/OFF/AUTO (1) na posição AUTO. Pressione o botão SLEEP (dormir -2) e
pressione o botão MINUTE (5) até alcançar o tempo desejado para o desligado
automático. Para desligar o rádio antes de finalizar o tempo programado, pressione
o botão o SNOOZE.
CONTROLE O SNOOZE
Pressionando o botão do Snooze (3) desliga o alarme e lhe permite estender seu
sono por nove minutos. Esta operação pode se repetir tantas vezes como Você
deseje até por um tempo máximo de 2 horas. Coloque o botão ON/OFF/AUTO (1)
na posição OFF para desativar a função de Snooze.
RESPALDO A BATERIA
Conete uma bateria de 9V (não incluída) aos terminais no interior do compartimento
para baterias do rádio relógio. Recomenda-se desligar o aparelho da tomada no
Page 20

momento de ligar as baterias. Embora a pantalha do relógio permaneça desligada,
o relógio mantém a hora na sua memória. Isto lhe permite mexer o rádio de um lado
ao outro sem necessidade de programar a hora uma e outra vez. O sistema de
respaldo da bateria somente deve ser usado durante interrupções de energia de
curta duração. Se utilizar por períodos mais longos, a bateria pode descarregar,
resultando uma menor precisão na hora mostrada. A bateria deve ser tirada do rádio
para evitar derrames. Se não houver necessidade de utilizar o sistema de respaldo
da bateria, seu rádio funcionará normalmente sem bateria. Não ter uma bateria;
com tudo, faz com que a pantalha pisque no momento de reconetar o rádio à
tomada, sendo necessário programar a hora tal como se indica. “USO DO RELÓGIO
ELETRÔNICO”.
FIO ADAPTADOR P ARA MP3
· Para tocar um MP3 com este rádio, este set inclui um cabo adaptador (8).
· Coloque o MP3 ao lado do rádio e insira o encaixe na tomada para audífonos do
MP3. Mexa o seletor RADIO/MP3 (10) à posição de MP3. Mexa o botão ON/
OFF/AUTO (1) à posição ON.
· Para desligar, tire o encaixe da tomada para audífonos e coloque o seletor
RADIO/MP3 à posição de RÁDIO. Assegure-se de pendurar o fio do clip (9) para
evitar danos.
CUIDADOS GERAIS
A parte exterior do rádio pode ser limpado com um pano úmido (assegure-se de que
o aparelho esteja desligado).
Não deixe o rádio sob a luz do sol, ou em lugares úmidos, quentes ou com poeira.
Mantenha o aparelho longe de equipamentos que produzam calor ou barulho, tais
como: lâmpadas fluorescentes ou motores.
ESPECIFICAÇÕES
Corrente: 120V-60Hz, 5w
Bateria de respaldo: 9V (1x9V 6F22 NÃO INCLUSA)
Freqüência de rádio: AM 530-1700 MHz / FM 88-108 MHz
Page 21

GARANTIA LIMIT AD A A 1 ANO
Sunbeam Products, Inc. fazendo negocios como Jarden Consumer Solutions en US
e Sunbeam Corporation (Canada) Limited fazendo negocios como Jarden Consumer
Solutions en Canada garante que durante un ano logo da data de compra este
produto nao apresentara defeitos de materias ou mao de obra. Sunbeam reparara
ou substituira o produto ou cualquer dos seus componentes que fiquem defeituosos
durante o periodo da garantia. A substituiçao sera feita com um produto ou
componente novo. Si o produto ja nao esta disponivel, a substituiçao sera feita com
um produto semelhante de mesmo o superior valor. Ista é sua garantia exclusiva.
Os distribuidores, os negociantes e os centros de serviço Sunbeam ou outras
companhias que vendem ou dão serviço aos produtos Sunbeam nao tem o direito
de alterar, modificar de nenuma forma o conteudo e as condições desta garantia.
Esta garantia nao cobre o gasto normal das peças ou os danos causados pelas
seguintes causas: uso negligente ou inadequado do produto, uso de voltagem ou
corrente inapropriada, uso que contrarie as instruçoes operacionais, ou desmontagem,
reparo ou alteraçao realizada por pessoas que nao pertençam ao quadro de
profissionais dela Sunbeam ou aos centros de assistencia tecnica autorizados.
Mais ainda, a garantia nao cobre Atos de Deus, tais como fogo, inundação, furacões
e tornados.
A Sunbeam nao sera responsavel por qualquer dano incidental que ocorra como
consequencia da violaçao dos termos explicitos ou implicitos da garantia deste
produto ou qualquier parte deste. Salvo que seja proibido pela lei existente, qualquer
garantia comercial subentendida para um propósito particular tem uma duração
limitada pela garantia descrita acima. AIguns estados nao permitem a exclusao ou
limitaçao de danos incidentais ou consequenciais, nem permitem limitaçoes sobre
o tempo de duração duma garantia implicita, portanto as limitaçoes ou exclusoes
citadas acima poderao nao ser pertinentes ao caso do cliente. Esta garantia concede direitos juridicos especificos ao cliente, entretanto este podera ter outros
direitos que poderao variar de acordo com o estado em questao.
Como Obter Serviço de Garantia
Entre em contato com o distribuidor Sunbeam.
Page 22

Dados importantes para sua segurança
1. Leia as instruções: todas as instruções referentes às medidas de segurança
devem ser lidas antes de utilizar o aparelho.
2. Guarde o instrutivo: as medidas de segurança devem guardar para futura
referencia.
3. Advertência: todas as advertências a respeito deste produto e sua utilização
devem ser tomadas em conta.
4. Instruções a seguir: todas as instruções de uso e operação devem ser seguidas.
5. Limpeza: Desligue o aparelho da tomada antes de utilizá-lo. Não use líquido ou
aerossol. Use um pano para poeira para limpá-lo.
6. Aditamentos: Não coloque aditamento algum, já que não se recomendam para
este produto e pode causar danos.
7. Água e Umidade: não utilize este aparelho perto da água – por exemplo: perto
de uma banheira, lavabo, pia, tanque de lavar roupa ou num sótano úmido ou
perto de uma piscina.
8. Acessórios: não coloque este aparelho sobre um tripé, suporte, ou sobre uma
mesa que não seja recomendada pelo fabricante. O aparelho poderia cair,
causando feridas serias a crianças ou adultos, e inclusive danos sérios ao
aparelho. Use somente sobre mesas, tripodes, suportes, recomendados pelo
fabricante, ou vendidos com o produto. Toda a montagem do produto deve
realizar se seguindo as instruções do fabricante, e se devem utilizar somente
aqueles acessórios de montagem recomendados pelo fabricante.
9. Suportes ou bases: O aparelho e o suporte devem ser movidos com cuidado.
A aplicação de força excessiva e as superfícies desiguais podem causar a
queda do aparelho.
10. Ventilação: o aparelho deve ser utilizado em lugares ventilados para evitar o
sobre aquecimento do mesmo. As aberturas de camas, sofás, ou itens similares
devem ser bloqueadas se o aparelho é instalado perto dos mesmos. Este aparelho
não deve ser colocado ou instalado dentro de uma estante a menos que estes
estejam ventilados e corretamente ensamblados segundo as instruções do
fabricante.
11. Fontes de energia: Este produto deve ser operado somente utilizando a fonte
de energia indicada na etiqueta. Se Você não está seguro do tipo de fonte de
alimentação elétrica consulte seu vendedor ou a companhia local. Revisar o
instrutivo para aparelhos que funcionem com bateria ou outras fontes de energia.
12. Terra e polarização: este produto esta equipado com uma tomada polarizada
(tomada com uma pata mais longa que a outra). Esta tomada deve encaixar-se
Page 23
de uma maneira só ao toma corrente. Este é um dispositivo de segurança do
aparelho. Se Você não conseguir encaixar corretamente tente inverter a posição
do mesmo. Se mesmo assim não encaixar corretamente contate seu eletricista
para sua substituição. Não desligue ou desabilite este dispositivo de segurança
do encaixe polarizado.
13. ADVERTÊNCIAS ADICIONAIS: Este aparelho está equipado com uma tomada
com cabo a terra – um encaixe com uma terceira pata (para fazer terra). Este
encaixe somente pode ser conectado com um toma corrente especial para este
tipo de encaixe. Este é um dispositivo de segurança. Se Você não logra inserir
por completo o encaixe no toma corrente, contate a um eletricista qualificado
para trocar seu toma corrente por um mais moderno e adequado. Não desligue
ou desabilite este dispositivo de segurança do encaixe polarizado.
14. Proteção do cabo: o fio de alimentação deve ser distribuído de modo que não
se encontre em meio de lugares transitados. O fio deve ser colocado sobre uma
base ou num lugar afastado.
15. Protetor do encaixe: este aparelho está equipado com um encaixe com proteção
contra sobrecargas. Este é um dispositivo de segurança. Veja o manual de
instruções em caso de ser necessária a troca ou reprogramação do dispositivo.
Se a substituição do encaixe é necessária, assegure-se de que o técnico utilize
um encaixe com o mesmo dispositivo de proteção contra sobrecarga do encaixe
original tal como especifica o fabricante.
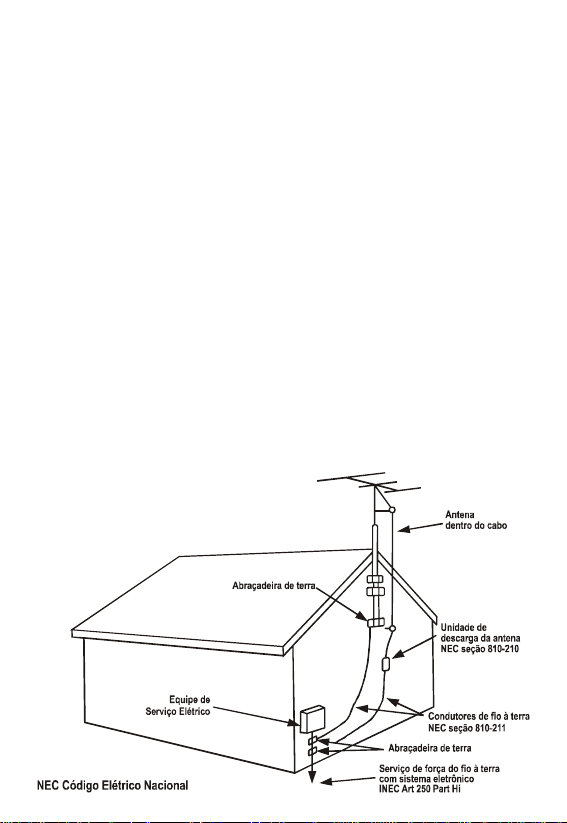
15. Antena ao ar livre ou a terra: se a antena exterior estiver ligada a um receptor,
assegure-se de que o sistema da antena tenha conexão a terra como proteção
contra as variações de carga e as cargas estáticas. O artigo 810 do código
elétrico nacional, ANSI/NFPA 70, prove informação na qual explica respeito de
como aterrar corretamente assim seja a um poste ou estrutura, aterrar o fio de
entrada à antena para descarga, o tamanho da unidade e a dimensão apropriada
dos condutores para aterrá-la, posição da antena e da unidade.
Page 24

16. Relâmpagos: Para a proteção deste aparelho durante uma tormenta elétrica,
ou para quando estiver desligado por um longo período de tempo, desligue-o da
tomada e da mesma maneira desligue-o do sistema da antena ou do fio
alimentador. Isto impedirá danos ao aparelho devido a relâmpagos e variações
de energia.
17.Linhas de energia: Um sistema exterior de antena não deve estar situado
perto de linhas de força aérea ou de outros circuitos de luz elétrica ou de força.
Ao instalar um sistema exterior de antena, devem tomar-se extremas precauções
ao tocar linhas ou circuitos de força, já que tal contato de força pode resultar
fatal.
18. Sobrecargas - Não sobrecarregue as tomadas da parede, cabos de extensão,
ou receptáculos integrados, já que isto pode resultar em fogo ou eletrocussão.
19. Entrada de objetos e líquidos – Nunca introduza objetos de nenhum tipo ao
interior deste aparelho através das ranhuras, já que estes poderiam entrar em
contacto com pontos de alta voltagem ou outras produzindo fogo e choque
elétrico. Nunca derrame nenhum tipo de líquidos sobre este aparelho.
16. Serviços de manutenção: Não tente consertar este aparelho por conta própria.
Não tente abrir ou remover as tampas já que se expõem a uma possível
eletrocussão ou outros perigos. Consulte com serviços de manutenção e pessoal
qualificado.
17.Danos: Desligue este aparelho da tomada e leve-o a um centro de serviço
autorizado se alguma das seguintes condições se apresenta:
a) o fio alimentador ou o encaixe estão danificados.
b) se algum líquido derramou sobre o aparelho ou objeto algum tenha sido
introduzido nele
c) se o aparelho foi exposto à água, chuva ou outros líquidos
d) Se o produto não funciona normalmente embora seguindo as instruções,
ajuste somente aqueles controles detalhados neste manual já que um ajuste
incorreto de outros controles poderia resultar em danos que somente um
técnico qualificado poderia consertar.
e) se o aparelho cair no chão ou for danificado de alguma maneira.
f ) Se o aparelho mostra mudanças em seu modo de funcionamento – isto
indica a necessidade de uma revisão.
20. Peças de reposição: quando se requeiram peças de reposição, assegure-se de
que o técnico tenha utilizado as peças de estipuladas pelo fabricante ou que
estas pelo menos possuam as mesmas características que a peça original
trocada. As substituições não autorizadas podem ocasionar fogo, eletrocussão
ou outros perigos.
23.Verificação de segurança: Todo serviço ou consertos sobre este aparelho,
devem ser realizados por um técnico qualificado para a segurança do produto.
24.Montagem sobre parede ou teto – Este aparelho deve ser montado sobre
uma parede ou um teto somente da maneira em que recomenda o fabricante.
25.Calor – Este produto deve ser colocado longe de fontes de calor tais como:
radiadores, queimadores ou outros produtos (amplificadores incluídos) que
emitam calor.
Advertência: As trocas ou modificações sobre esta unidade não aprovadas pelo
fabricante podem resultar na anulação da garantia do equipamento.
Page 25
RADIO RELOJ AM/FM
Modelo 89019
Instrucciones de operación
PeligroPeligro
Peligro
PeligroPeligro
Riesgo de shock eléctrico
No abrir
El símbolo del flash y
la punta de flecha al
interior del triángulo
son un signo de
advertencia que
indican “voltage
peligroso” en este
producto.
Advertencia: Para reducir el riesgo de fuego o de
electrocución, no exponga este aparato al agua lluvia o
humedad.
CUIDADO: PARA PREVENIR UN SHOCK ELECTRICO NO UTILIZE
ESTE ENCHUFE (POLARIZADO) CON UNA EXTENSION,
TOMACORRIENTES, U OTRA TOMA A MENOS QUE LAS PAT AS
DEL ENCHUFE QUEDEN INSERTADAS POR COMPLETO PARA
EVITAR LA EXPOSICION DE LAS MISMAS.
PELIGRO: PARA REDUCIR EL
RIESGO DE SHOCK ELECTRICO, NO
QUITE LA TAPA (EN LA PARTE
POSTERIOR). ESTE APARATO NO
CONTIENE PARTES QUE PUEDAN
SER REPARADAS POR EL USUARIO.
SI REQUIERE SERVICIO CONTACTE
PERSONAL CALIFICADO.
El signo de exclamación
dentro del triángulo es
una señal que indica la
existencia de
instrucciones
importantes incluídas
con este producto.
Lea por favor las instrucciones antes de usar su aparato.
Page 26
1. ON/OFF/AUTO
(encendido/apagado/automático)
2. SLEEP (Dormir)
3. SNOOZE
4. Clock Set / ALARM / TIME SET switch
(programador de reloj/alarma/Hora)
5. MINUTE Set Button (selector de Minutos)
6. HOUR Set Button (Selector deHora)
7. TUNING CONTROL
(Selector de estación)
8. MP3 Input, Wire and Plug
(Toma para MP3, cable y enchufe)
9. MP3 Wire Retaining clip
(Clip sujetador del cable MP3 )
10. Radio/MP3 Switch (Selector Radio/MP3)
11. AM/FM Band Switch
(Selector de Banda AM/FM)
12. VOLUME/BUZZE CONTROL
(Control de volumen/ buzzer)
13. PM Indicador (Indicador de hora PM)
14. ALARM ON Indicador (Indicador de Alarma encendida)
FONDO DEL AP A RA TO
Compartimento para batería de 9V (no incluída) para conservar temporalmente la
hora en caso de una interrupción de energía.
ANTENA
Para una mejor recepción de AM, este aparato viene con una antena de ferrita de
alta sensibilidad.
Para una mejor recepción de FM, este aparato viene especialmente equipado con
una antena FM incorporada al cable alimentador.
Asegurese de desenrollar la antena por completo para su buen funcionamiento.
USO DEL RELOJ ELECTRONICO
1. Conecte el cable alimentador a un tromacorrientes de 110/120V AC.
2. Coloque el selector ON/OFF/AUTO (1) en la posición OFF. La pantalla del reloj
parpadeará indicando que la hora en la misma no es la correcta.
3. Para poner la hora correcta, gire el dial (4) a la posición “Set Time”, luego
presione el botón HOUR (6) y manténgalo presionado hasta alcanzar la hora
deseada. Ahora presione el botón MINUTE y manténgalo así hasta alcanzar los
minutos correctos. El indicador de PM (13) se iluminará cuando la hora marque
PM (horas de la tarde). Asegurese de que el indicador PM esté encendido si la
hora programada corresponde al PM.
4. Cuando la hora correcta haya sido programada, gire el dial (4) a la posición
“Clock”. La hora no puede ser cambiada cuando el dial se encuentra en esta
posición.
Page 27

UTILIZACION DEL RADIO
1. Deslize el selector ON/OFF/AUTO (1) a la posición “ON” (encendido).
2. Deslize el selector RADIO/MP3 (10) a la posición de RADIO.
3. Deslize el selector de banda (“BAND” - 11) a la posición de AM o FM.
4. Ajuste el Control de Volumen (12) hasta alcanzar el volumen deseado.
5. Ajuste el Selector de Estación (7) para seleccionar su estación favorita.
DESPIERTE CON MUSICA
Una vez seleccionada la estación de radio deseada y ajustado el nivel del volumen,
proceda de la siguiente manera:
1. Deslize el selector ON/OFF’AUTO (1) a la posición de AUTO.
2. Gire el selector (4) a la posición “Set Alarm” (programar alarma), y luego presione
el botón HOUR (6) hasta alcanzar la hora a la cual Ud. desea suene la alarma.
Para ajustar los minutos de la alarma, presione el botón MINUTE (5). Luego de
haber programado la alarma, regrese el selector (4) a la posición CLOCK. La
hora de la alarma ya se encuentra guardada en la memoría del timer. Para
revisar la hora de la alarma, simplemente gire el dial (4) a la posición “Set Alarm”
y el reloj mostrará la hora en la cual ha sido programada la alarma. La hora de
activación de la alarma permanecerá en la memoria del timer y el radio se
encenderá automaticamente a la misma hora al día siguiente. Para apagar el
radio, simplemente deslize el selector ON/OFF/AUTO (1) a la posición de OFF.
Note que el indicador de “Alarm ON” (14) se ilumina cuando la alarma del reloj se
encuentra activada.
DESPIERTE CON EL TIMBRE
Ajuste los controles de la misma manera que para “Despierte con Musica” girando
el volumen (12) hasta que haga un clic sobre la posición de BUZZER. El buzzer
puede ser apagado o la fuente de sonido cambiada a la radio colocando el
seleccionador (1) en la posicion OFF o ON.
DUERMA CON MUSICA
Siguiendo estas instrucciones el radio puede ser programado para tocar u apagarse
automaticamente luego de un periodo de tiempo de entre 1 minuto a una hora y 59
minutos. Una vez seleccionada la estación y el volumen deseados, coloque el
botón ON/OFF/AUTO (1) en la posición AUTO. Luego presione el botón SLEEP
(dormir -2) y presione el botón MINUTE (5) hasta alcanzar el tiempo deseado para
el apagado automático. Para apagar el radio antes de finalizado el tiempo programado,
presione el botón el SNOOZE.
CONTROL EL SNOOZE
Presionando el botón del Snooze (3) apaga la alarma y le permite extender su sueño
por nueve minutos. Esta operación puede repetirse tantas veces como Ud. desee
hasta por un tiempo máximo de 2 horas. Coloque el botón ON/OFF/AUTO (1) en la
posición OFF para desactivar la función de Snooze.
RESPALDO A BATERIA
Conecte una batería de 9V (no incluída) a los terminales al interior del compartimento
para baterías del radio reloj. Se recomienda desconectar el aparato del tomacorrientes
Page 28

al momento de conectar las baterías. Aunque la pantalla del reloj permanecerá
apagada, el reloj mantiene la hora en su memoria. Esto le permite mover el radio de
un lado a otro sin necesidad de programar la hora una y otra vez. El sistema de
respaldo a batería sólo debe ser usado durante interrupciones de energía de corta
duración. De utilizarse por períodos mas largos, la batería puede descargarse dando
como resultado una menor precisión en la hora mostrada. La batería debe ser
sacada del radio para evitar derrames. Si Ud. No tiene necesidad de utilizar el
sistema de respaldo a batería, su radio funcionará normalmente sin una batería. El
no tener una batería; sin embargo, hace que la pantalla parpadée al momento de
reconectar la radio al tomacorriente, siendo necesario programar la hora tal como se
indica en el parrafo “USO DEL RELOJ ELECTRONICO”.
CABLE ADAPT ADOR P ARA MP3
· Para tocar un MP3 con este radio, este set incluye un cable adaptador (8).
· Coloque el MP3 al lado del radio e inserte el enchufe en la toma para audífonos
del MP3. Mueva el selector RADIO/MP3 (10) a la posición de MP3. Mueva el
botón ON/OFF/AUTO (1) a la posición ON.
· Para desconectar, quite el enchufe de la toma para audífonos y coloque el
selector RADIO/MP3 a la posición de RADIO. Asegurese de colgar el cable del
clip (9) para evitar daños.
CUIDADOS GENERALES
La parte exterior del radio puede ser limpiado con un paño húmedo (asegúrese de
que el aparato esté desconecado).
No deje el radio bajo la luz del sol, o en lugares húmedos, calientes o polvorientos.
Mantenga el aparato lejos de equipos que produzcan calor o ruido, tales como:
lamparas fluorescentes o motores.
ESPECIFICACIONES
Corriente: 120V-60Hz, 5w
Batería de respaldo: 9V (1x9V 6F22 NO INCLUIDA)
Frecuencia de radio: AM 530-1700 MHz / FM 88-108 MHz
Page 29

Garantía Limitada de 1 Año
Sunbeam Products, Inc hacienda negocios como Jarden Consumer Solutions en
US y Sunbeam Corporation (Canada) Limited hacienda negocios como Jarden
Consumer Solutions en Canada garantiza que durante un período de 1 año a partir
de la fecha de compra, este producto estará libre de defectos de material y mano
de obra. Sunbeam, a su discreción, reparará o cambiará este producto o cualquier
componente del mismo que se halle defectuoso dentro del período de garantía. El
reemplazo se hará con un producto o componente nuevo o remanufacturado. Si el
producto ya no está disponible, el reemplazo se realizará con un producto similar de
igual o mayor valor. Esta es su garantía exclusiva.
Esta garantía es válida para el comprador original a partir de la fecha de compra y
no es tranferible. Los ditribuidores o Centros de Servicio Sunbeam no tienen el
derecho de alterar, modificar o de manera alguna cambiar los términos y condiciones
de esta garantía.
Esta garantía no cubre el desgaste como resultado del uso normal o daño de las
partes como consecuencia del uso negligente o mal uso del producto, utilización de
un voltaje o corriente indecuados, uso contrario a las instrucciones de uso,
desmomtaje, reparación o alteración por cualesquier agente ajeno a Sunbeam o a
sus Centros de Servicio Autorizados. Mas aún, la garantía no cubre actos de Dios,
tales como incendios, inundación, huracanes y tornados.
Sunbeam no es responsable por daños ocurridos como resultado de la violación de
los términos de la garantía. Excepto hasta donde lo prohiben las leyes aplicables,
cualquier garantía de comercialización o aptitud tiene una duración limitada a los
términos de la garantía antes detallada. Algunos estados, jurisdicciones o provincias
no permiten la exclusión o limitación de los daños consecuentes o incidentales o
limitaciones respecto de la duración de la garantía, de modo que las antes citadas
limitaciones y exclusiones pueden no aplicar a Ud. Esta garantía le brinda derechos
legales específicos, además de otros derechos que Ud. pueda tener según sean las
leyes de su estado o provincia.
Como Obtener Servicio de Garantía
Contacte a su Distribuidor Sunbeam Autorizado.
Page 30

Datos importantes para su seguridad
1. Lea las instrucciones: todas las instrucciones referentes a las medidas de
seguridad deben ser leídas antes de utilizar el aparato.
2. Guarde el instructivo: las medidas de seguridad deben guardarse para futura
referencia.
3. Advertencia: todas las advertencias respecto de este producto y su utilización
deben ser tomadas en cuenta.
4. Instrucciones a seguir: todas las instrucciones de uso y operación deben ser
seguidas.
5. Limpieza: Desconecte el aparato del tomacorrientes antes de utilizarlo. No use
líquidos o aerosoles. Use un paño para polvo para limpiarlo.
6. Aditamentos: No coloque aditamento alguno, ya que no se recomiendan para
este producto y pueden causar daños.
7. Agua y Humedad: no utilize esta aparato cerca de agua – por ejemplo: cerca de
una bañera, lavacara, lavabo, piedra de lavar o en un sótano húmedo o cerca de
una piscina.
8. Acessorios: no coloque este aparato sobre un tripode, soporte, o sobre una
mesa que no sea recomendada por el fabricante. El aparato podría caer, causando
heridas serias a niños o a adultos, e inclusive daños serios al aparato. Use
solamente sobre mesas, tripodes, soportes, recomendados por el fabricante, o
vendidos con el producto. Todo el montaje del produto debe realizarse siguiendo
ls instrucciones del fabricante, y se deben utilizar solo aquellos acessorios de
montaje recomendados por el fabricante.
9. Soportes o bases: El aparato y el soporte deben ser movidos con cuidado. La
aplicación de fuerza excesiva y las superficies desiguales pueden causar la
caída del aparato.
10. Ventilación: el aparato debe ser utilizado en lugares ventilados para evitar el
sobrecalentamiento del mismo. Las aberturas de camas, sofás, o items similares
deben ser bloqueadas si es que el aparato es instalado cerca de los mismos.
Este aparato no debe ser colocado o instalado dentro de un librero o repisa a
menos que estos esten bien ventilados y correctamente ensamblados segun
las instrucciones del fabricante.
11. Fuentes de energía: Este producto debe ser operado solamente utilizando la
fuente de energía indicada en la etiqueta. Si Ud. no esta seguro del tipo de fuente
de alimentación consulte con su vendedor o con la compañía local. Revisar el
instructivo para aparatos que funcionen con batería u otras fuentes de energía.
12. Tierra y polarización: este producto esta equipado con un enchufe polarizado
(enchufe con una pata mas larga que la otra). Este enchufe debe encajarse de
Page 31
una sola manera al tomacorrientes. Este es un dispositivo de seguridad del
aparato. Si Ud. no logra encajar el enchufe correctamente intente invertir la
posición del mismo. Si aun así el enchufe no encaja correctamente contacte a
su electricista para su substitución. No desconecte o desabilite este dispositivo
de seguridad del enchufe polarizado.
ADVERTENCIAS ADICIONALES: Este aparato está equipado con un enchufe
con cable a tierra – un enchufe con una tercera pata (para hacer tierra). Este
enchufe solo puede ser conectado con una tomacorrientes especial para este
tipo de enchufes. Este es un dispositivo de seguridad. Si Ud. no logra insertar
por completo el enchufe en el tomacorrientes, contacte a un electricista calificado
para cambiar su tomacorrientes por uno mas moderno y adecuado. No desconecte
o desabilite este dispositivo de seguridad del enchufe polarizado.
13. Protección del cable: el cable de alimentación debe ser distribuído de modo
que no se encuentre en medio de lugares transitados. El cable debe ser colocado
sobre una base o de lo contrario en un lugar apartado.
14. Protector del enchufe: este aparato esta equipado con un enchufe con
protección contra sobrecargas. Este es un dispositivo de seguridad. Vea el
manual de instrucciones en caso de ser necesario el cambio o reprogramación
del dispositivo. Si la substitución del enchufe es necesaria, asegurese de que el
técnico utilize un enchufe con el mismo dispositivo de protección contra
sobrecarga del enchufe original tal como lo especifíca el fabricante.
15. Antena al aire libre o a tierra: si la antena exterior estuviera conectada a un
receptor, asegurese de que el sistema de la antena tenga conexión a tierra como
protección contra las variaciones de carga y las cargas estáticas. El artículo
810 del código eléctrico nacional, ANSI/NFPA 70, provee información en la cual
explica respecto de como aterrar correctamente ya sea a un poste o estructura,
aterrar el cable de entrada a la antena para descarga, el tamaño de la unidad y
la dimensión apropiada de los conductores para aterrarla, posición de la antena
y de la unidad.
Page 32

16. Relampagos: Para la protección de este aparato durante una tormenta eléctrica,
o para cuando este es dejado desatendido por un largo período de tiempo,
desconectelo del tomacorrientes y de misma manera desconéctelo del sistema
de la antena o del cable alimentador. Esto impedirá daños al aparato debido a
relámpagos y variaciones de energía.
17. Líneas de energía: Un sistema exterior de antena no debe estar situado en la
cercanía de líneas de fuerza aéreas o de otros circuitos de luz eléctrica o de
fuerza. Al instalar un sistema exterior de antena, deben tomarse extremas
precauciones al tocar líneas o circuitos de fuerza , ya que tal contacto de fuerza
puede resultar fatal.
18.Sobrecargas - No sobrecargue los tomacorrientes de la pared, cables de
extensión, o receptáculos integrados, ya que esto puede resultar en fuego o
electrocución.
19. Entrada de objetos y líquidos – Nunca introduzca objetos de ningún tipo al
interior de este aparato a través de las ranuras, ya que estos podrían entrar en
contacto con puntos de alto voltaje u otras produciendo fuego y shock eléctrico.
Nunca derrame ningun tipo de líquidos sobre este aparato.
20.Servicios de mantenimiento: No intente reparar este aparato por cuenta
propia. No intente abrir o remover las tapas ya que se expone a una posible
electrocución u otros peligros. Consulte con servicios de mantenimiento y
personal calificado.
21. Daños: Desconecte este aparato del tomacorrientes y llevelo a un centro de
servicio autorizado si alguno de los siguientes condiciones se presenta:
A) el cable alimentador o el enchufe están dañados
B) si algun líquido ha sido derramado sobre el aparato u objeto alguno ha sido
introducido en el mismo
C) si es que el aparato ha sido expuesto a agua lluvia u otros liquidos
D) si es que al aparato no opera normalmente aún luego de haber seguido las
instrucciones de operación, ajuste solo aquellos controles contemplados en
el instructivo ya que realizar otros ajustes podrían producir daños y por ende
requerir reparación por parte de un técnico calificado.
E) si el aparato cae al piso o es dañado de alguna manera.
F) cuando el aparato exhibe cambios en su funcionamiento - esto indica necesidad
de servicio.
22. Piezas de repuesto: cuando se requieren piezas de repuesto, asegurese de
que el técnico haya usado las piezas de repuesto estipuladas por el fabricante
o que estas por lo menos posean las mismas características que la pieza
original intercambiada. Las substituciones no autorizadas pueden ocasionar
fuego, electrocución u otros peligros.
23. Verificación de seguridad: Todo servicio o reparaciones sobre este aparato,
deben ser realizados por un técnico calificado para asegurarse de la seguridad
del producto.
24. Montaje sobre pared o techo – Esrte aparato debe ser montado sobre una
pared o un techo solo de la manera en que recomienda el fabricante.
25. Calor – Este producto debe colocarse lejos de fuentes de calor tales como:
radiadores, hornillas u otros productos (amplificadores incluídos) que emitan
calor.
Advertencia: Los cambios o modificaciones sobre esta unidad no aprobadas por el
fabricante pueden resultar en la anulación de la garantía del equipo.
 Loading...