

Page 1
AUTOMATIC WRIST
BLOOD PRESSURE
MONITOR
One piece, one step
Model
7689
Important Notes:
Only a physician is qualified to interpret
changes in your blood pressure. This device is
not intended to replace regular medical examinations. It is recommended that your physician
review your procedure for using this monitor.
Never make adjustments to your medication
unless it is the advice of a physician.
Please read this manual carefully before using
this device. This Blood Pressure Monitor is
intended for use by adults only. Children should
not use this monitor unless it is under the
supervision of an adult.
Please read these instructions carefully before
using this Blood Pressure Monitor.
Page 2
Helpful information
What is Blood Pressure?
Blood pressure is the force that blood exerts on
the arteries. This force is constantly changing as
the heart beats. When the heart contracts, blood
pressure reaches its highest value. This is called
systolic blood pressure. When the heart relaxes
between beats, the value of blood pressure is
lower. This is called the diastolic blood pressure.
The unit of measure for blood pressure is the mil-
limeter of mercury, abbreviated
For example, an individual’s blood pressure may
be measured as 120 mmHg (systolic) and 80
mmHg (diastolic). This would be spoken as “120
over 80” and written as “120/80”. Remember
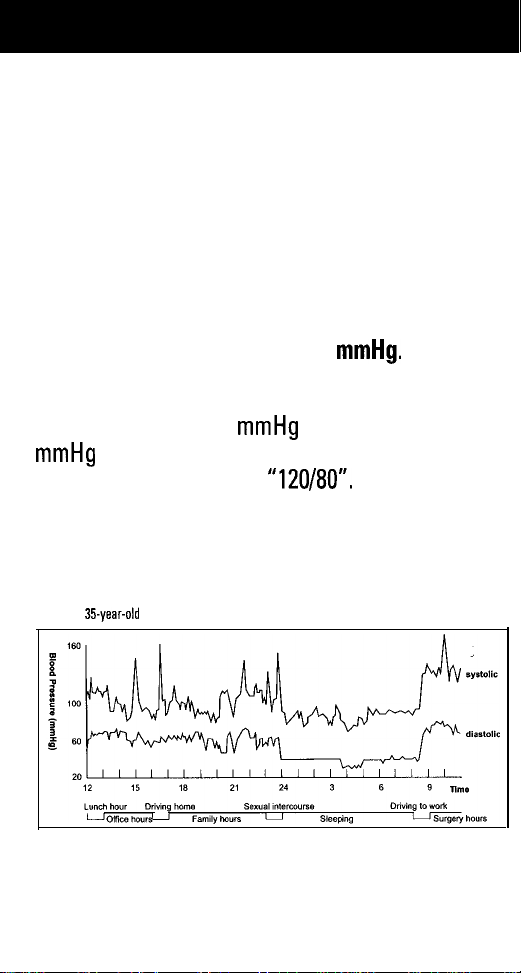
that blood pressure varies throughout the day.
Food intake, smoking, time of day, stress, level
of exercise and many other factors can affect it.
Typical daily blood pressure fluctuations
(Example: 35year-old male)
mmHg.
What is High Blood Pressure?
Hypertension, or high blood pressure, is a condi-
tion where an individual’s blood pressure
Page 3

remains high over a long period of time.
Untreated, hypertension can cause many serious medical problems including strokes and
heart attacks. To control hypertension, the
American Heart Association recommends that
you not smoke, reduce fat and salt intake, main-
tain proper weight, exercise and get regular
physical check-ups.
Why Is It Important to Measure Your Blood
Pressure at Home?
Having your blood pressure taken at the doctor’s
office may cause you to become nervous, thus
artificially raising your reading. Having the ability
to take your blood pressure at home makes it easy
to record a log of your daily readings. This will
help you gain a greater understanding of your
blood pressure reading and the factors that effect
it. Be sure that you share your information with
your physician.
Hints for Accurate Measurement
1) Relax and try to remain still for 5 to 10 minutes before a measurement.
2) Remove shirts or other tight-fitting garments
on the wrist (for example wristwatches) and
upper arm before applying the wrist cuff.
3) Refrain from eating, smoking, and drinking
(especially alcoholic beverages) before a
measurement since these activities can
affect your blood pressure.
4) Remember that blood pressure varies continuously throughout the day. Try to take your
blood pressure at the*same time each day.
Page 4
5) Do not be concerned with the results of one
measurement. Many measurements, recorded over a long period of time, will provide a
better indication of your blood pressure.
6) Please relax for 5 to 10 minutes before taking
another measurement.
7) Many factors can affect your blood pressure
-
such as exercising, eating, talking, moving,
nervousness, environment and temperature
changes. Emotional stress can cause an
increase in blood pressure. Daily fluctuations
of 25 to 50
Using a Wrist Unit
Taking your blood pressure at the wrist may
give different readings than from the upper arm
-
as is done in most doctor offices. Because of
the location of measurement and differences in
arterial diameters, a healthy person may see a
maximum difference oft/- 10
systolic and diastolic measurements, versus
those taken with an arm unit with cuff.
mmHg
are common.
mmHg
in both
Please note: Some individuals with hypertension,
diabetes, kidney disorders, arteriosclerosis or
poor circulation may see a significant difference
in blood pressure readings taken from the wrist
as compared to readings from the upper arm. It
is recommended that you consult with your
physician concerning the use of this monitor.
Page 5
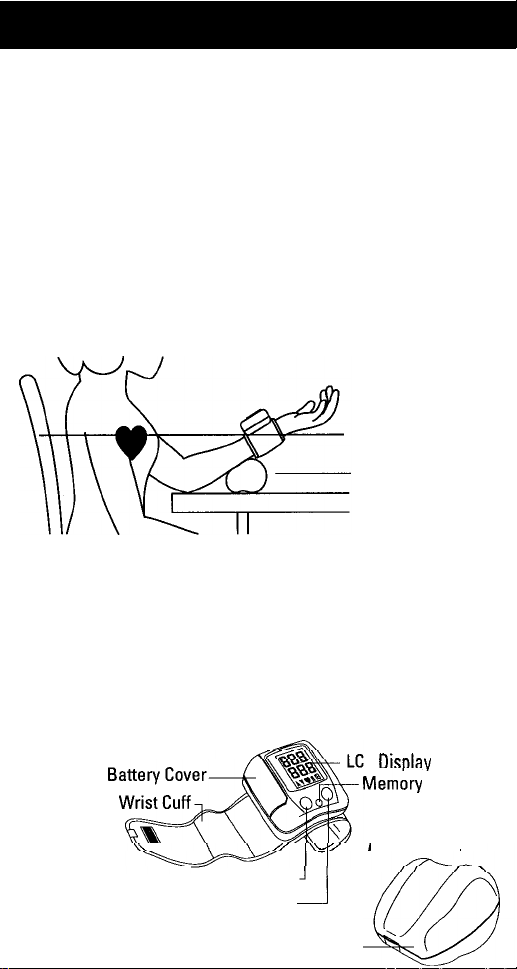
Correct Method of Measurement
To obtain the most accurate blood pressure
measurement, please follow these important,
directions.
l Be seated in a chair with back support.
l Rest your arm on a table so the cuff is at the
same level as your heart.
l Use the storage case or similar item to sup-
port the forearm. (see diagram A)
l Place both feet on the ground.
Storage Case
Diagram A
IMPORTANT: The wrist cuff must be at the
same level as your heart, or accurate measurement will not be possible. (Your heart is located
slightly below your left armpit).
Getting to Know Your Wrist Unit
Model No. 7689
ON/OFF Button]
Start Button
i
Storage Case
A
D Disdav
Men&y
‘Button
Accessories:
Page 6
Preparation Before Taking a Measurement
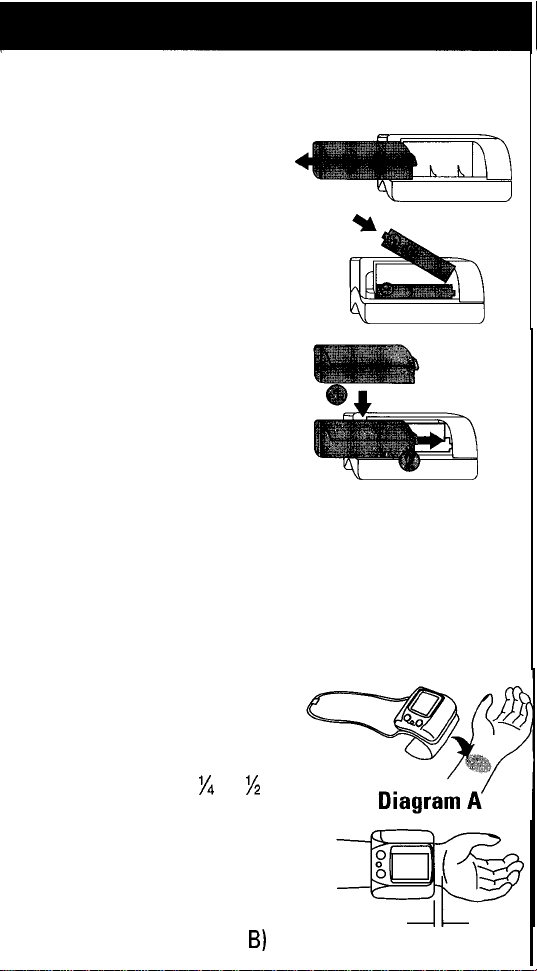
Battery Installation/Replacement
1) Slide the battery cover
off in the direction of
the arrow.
2) Install or replace the
two AA batteries, noting
the proper orientation
of positive (t) and negative (-) terminals of
the batteries in the
battery compartment.
Alkaline batteries are
recommended.
3) Replace the battery
cover.
4) If the Low Battery Symbol appears on the
display, replace both batteries.
5) Remove the batteries if the unit will not be
used for an extended period of time.
How to Apply the Wrist Cuff
(These directions are for either right or left hand
measurements.)
1) With your palm side up,
apply the cuff so that the
cuff’s edge should be
approximately
inch from your palm. You
can use the width of your
forefinger as a simple
way to measure the distance between the cuff
and palm. (diagram
l/4
to
l/2
B)
5
Diagram B
Page 7

Do not apply wrist unit
2)
on top of a shirt sleeve.
Wrap the cuff snugly
3)
around your wrist and
attach using the fastener. The top and bottom edges of the cuff
should be tightened
evenly around your
Diagram C
wrist. (diagram C)
Any gap between the
4)
wrist and cuff will
affect the result of
measurement.
The fabric cuff can be
5)
folded down for ease
of viewing the display.
(diagram
D)
Diagram D
Taking a Measurement
Please review the previous sections on proper
placement of the cuff and proper arm position.
1) After the cuff has been properly placed on
either the right or left wrist, press the ON/OFF
button. All display symbols will appear
momentarily. Note: The low battery symbol
will also appear at this time. This does not
indicate a low battery unless the low battery
symbol remains on continuously.
2) After the display reads
button.
3) The cuff will automatically inflate to an appropri-
ate pressure, and will then begin to slowly deflate
as it takes the measurement The cuff will be quite
“0’:
press the START
6
Page 8

snug for a short while; this is normal. Try to remain
relaxed, refrain from talking, and be as still as possible during the measurement Note: If the unit
determines that the initial inflation pressure was
insufficient, it will re-inflate to a higher pressure.
4) After the measurement cycle is finished, the
unit will release any remaining air in the cuff.
The systolic and diastolic pressure will be dis-
played for 5 seconds and then be replaced by
the pulse rate. The blood pressure reading and
pulse rate will then be displayed alternately.
For any reason you feel a need to end a measurement, just press the ON/OFF button to turn
off the monitor and release the cuff pressure.
If during a measurement the power drops to an
insufficient level, the monitor will end the measurement and display the low battery symbol.
Please replace the batteries and repeat the
measurement.
If the monitor cannot detect your pulse, it will
end the measurement attempt. Wait a few minutes, make sure that the cuff is positioned properly, and try again.
The monitor will automatically shut off 3 minutes
following a reading, or it can be turned off man-
ually by pressing the ON/OFF button.
Page 9

Memory Function
Memory Input
Your Sunbeam Wrist Blood Pressure Monitor has
a memory feature. When a valid measurement is
made, the reading data (systolic, diastolic and
pulse rate) will be stored in the memory auto-
matically as soon as the unit is turned off,
automatically shuts off, or when another
measurement is initiated. The monitor has the
capacity to store 14 readings, and also computes
an average of all memory readings. When more
than 14 readings are taken and recorded to
memory, the oldest ones will be lost.
Memory Recall
To recall your last reading, press the MEMORY
button. A “1” will appear in the lower right hand
corner of the display which represents the
newest memory reading. When the memory button is pressed again, the display will show “2’:
which represents the second newest reading,
and so on. The memory will recall up to 14 previous readings. When the letter “A” appears in
the display, the average value of your systolic,
diastolic and pulse rate based on the memory
readings is shown.
Memory Erase
When the batteries are taken out of the monitor,
all records of readings saved in memory will be
erased. NOTE: When taking a measurement,
the MEMORY button is inactive.
8
Page 10

~~~
E
l-0-
330
Indication:
Cause:
Correction:
Indication: Displays “Err’:
Cause:
Correction: Press Start
Indication: Could not obtain
Cause:
Correction: Reapply cuff and
Batteries are-exhausted.
Replace with new alkaline
AA batteries.
Cuff pressure
reaches 330 mmHg.
Twisted bladder
inside of the cuff.
Make sure that
the bladder
lays flat within
the cuff.
cuff pressure
releases and
“0”
pressure
displays.
Excessive arm
movement or
talking during
measurement.
button to
measure
again while
keepinq still.
pulse rate.
Cuff was loosely
applied, extremely
weak pulse
or arrhythmia.
measure aaain.
Page 11

Troubleshooting
Problem
Nothing appears in
display
No measurement
occurs
Blood pressure
readings are
too high or low
Recommended Action
l Make sure that the
batteries are properly
installed (Battery
polarity matches the
indications in the
battery case.)
l Check that the cuff is
positioned properly.
l
Go over the
measurement
procedure again.
l Check if the wrist
is positioned properly.
l Remain seated during
the entire measurement
period.
l Hold your arm so that
the cuff is level with
your heart during
measurement.
l Refrain from hand and
body movements
during measurement.
Page 12

Troubleshooting (cont.)
Problem Recommended Action
Blood pressure l Your blood pressure
readings can fluctuate
are variable considerably through
out the day.
l All of the following
factors can influence
your blood pressure:
7)
Emotional state
2) Daily activities or
exercise
3) Smoking
4) Drinking alcoholic
beverages
5) Eating
6) Taking certain
medications
Care and Maintenance
Cleanins and storaae
Only clean the monitor with a soft, dry cloth.
Do not use solvents or other petroleum based
liquids.
Keep the unit out of locations with high temperatures, high humidity and direct sunlight.
Keep sharp objects away from the cuff.
Remove the batteries if the monitor will not
be used for extended periods of time.
NOTE: Removing the batteries will erase
all readings in memory.
Do not stretch or twist the wrist cuff.
11
Page 13

Care and Maintenance (cont.)
12
Cleaning and storage
l Do not press the START button without the
cuff around your wrist.
l Do not disassemble or modify the monitor or
the wrist cuff.
l Do not drop or subject the monitor to strong
mechanical shock.
iopd;cifications
Measurement Location
Display
Digit size
Measurement type
Inflate System
Measurement range
Accuracy
Exhaust
cuff
Memory
Operation Environment
Storage Environment
Power Source
Dimension
Weight
Cuff size
Wrist circumference
7689
Wrist
LCD size 40.5 x 33 mm (LxWl
7 x 12 mm (WxH)
Oscillometric
Automatic, with Fuzzy Logic
pressure level determination
Pressure: 0
Pulse: 30
Cuff Pressure: +I- 3 mmHg
Pulse rate:
Performance: Designed
to meet
SP-10 standards
Auto air-release valve
Velcro fastener with
spring support
14 readings with average
calculation.
~10”C-+40”Ct
Less than 85% relative
humidity
-10” C to t60” C
Less than 95% relative
humidity
2 “AA” batteries
81x72x33.5 mm
approx. 250 grams with
batteries.
77x312 mm
to 8.6 inches)
-
300 mmHg
-
190 beatslmin.
tl-
5%
ANSI/AAMI
135 to 220 mm (approx. 5.3
Page 14

1 Year limited Warranty
Sunbeam Products, Inc. “Sunbeam” warrants that
for a period of one year from the date of purchase,
this product will be free from defects in material
and workmanship. Sunbeam, at its option, will
repair or replace this product or any component of
the product found to be defective during the war-
ranty period. Replacement will be made with a
new or remanufactured product or component.
If the product is no longer available, replacement
may be made with a similar product of equal or
greater value. This is your exclusive warranty.
This warranty is valid for the original retail pur-
chaser from the date of initial retail purchase and
is not transferable. Keep the original sales
receipt. Proof of purchase is required to obtain
warranty performance. Sunbeam dealers, service
centers, or retail stores selling Sunbeam products
do not have the right to alter, modify or any way
change the terms and conditions of this warranty.
This warranty does not cover normal wear of
parts or damage resulting from any of the following: negligent use or misuse of the product, use
on improper voltage or current, use contrary to
the operating instructions, disassembly, repair or
alteration by anyone other than Sunbeam or an
authorized service center. Further, the warranty
does not cover Acts of God, such-as fire, flood,
hurricanes and tornadoes.
13
Page 15

Sunbeam shall not be liable for any incidental or
consequential damages caused by the breach
of any express or implied warranty. Except to
the extent prohibited by applicable law, any
implied warranty of merchantability or fitness
for a particular purpose is limited in duration to
the duration of the above warranty. Some
states, provinces or jurisdictions do not allow
the exclusion or limitation of incidental or con-
sequential damages or limitations on how long
an implied warranty lasts, so the.above limitations or exclusion may not apply to you. This
warranty gives you specific legal rights, and you
may also have other rights that vary from state
to state or province to province.
.-
Page 16

How to Obtain Warranty Service
Take the product to an authorized Sunbeam serv-
ice center. You can find the nearest authorized
Sunbeam service center by calling l-800-435-1250.
If a service center is not conveniently located,
attach a tag to the product that includes your
name, address, daytime telephone number and
description of the problem. Include a copy of the
original sales receipt. Carefully package the product and send either by UPS or Parcel Post with
shipping and insurance prepaid to:
For products purchased in the United States:
Sunbeam Products, Inc.
117 Central Industrial Row,
Purvis, MS 39475
Do not return this product to the place of purchase.
If you have any questions regarding this warranty
please call l-800-435-1250 or write to:
Sunbeam Consumer Care Center
P.O. Box 948389
Maitland, FL 32794-8389
01999 Sunbeam Products, Inc., or its affdiated companies, all rights reserved.
SUNBEAM” and HEALTH AT HOME@ ate registered trademarks of Sunbeam Products, Inc.,
or its affiliated companies. Distributed by Sunbeam Products. Inc., Boca Raton. Florida 33431.
Imparted by Sunbeam Products, Inc.
Model # 7689 P.N. 103751 Printed in Taiwan
BZ-S0900SfWE
 Loading...