

Page 1

INSTRUCTION MANUAL
Automatic Digital Blood
Model 7659
Sunbeam-Oster Household Products
Before operating this unit
P.N.99935
please
Pressure
read these instructions completely.
Monitor
Page 2

Do Read instructions carefully before using Monitor
2.
Do
Rest
arm on a
taking
measurements.
flat
surface so that upper arm is at heart level when
3. Do Remain calm, quiet and still when measurements are being taken.
4.
DO make sure that the cuff is in the proper position according to your
instruction manual.
5.
DO Insure that the exhaust velocity is 2-5
mmHg
per second at the systolic
point each time a measurement is taken.
6.
DO Wait at least 10 minutes between taking measurements.
7.
DO Pump unit pressure 30 to 60 mmHg above normal systolic before
beginning measurement.
8.
DO Consult your physician before adjusting your medication based on
readings from this Monitor.
9.
DO Use fresh alkaline batteries.
IO. DO Use a dry, soft cloth to clean the instrument.
DO NOT move arms or hands when measurement is being taken.
DO
2.
3.
4.
5.
NOT talk or chew when measurement is being taken.
NOT take a series of measurements without waiting at least 10 minutes
DO
between measurements.
DO NOT adjust medication based on readings from this Monitor.
DO
NOT make any adjustments to unit, there are no user serviceable parts.
Call l-800-597-5978 for further instructions.
6.
DO NOT smoke during or at least 30 minutes prior to taking blood pressure
measurements.
7.
DO NOT drop or otherwise mechanically shock the Monitor. This is a delicate
precision device.
DO NOT use thinner, alcohol, benzene or wet cloth to clean unit.
8.
9.
DO NOT subject to extremes in temperature, humidity, direct sunlight or dust.
DO NOT fold the Arm Cuff or Rubber Cuff Hose tightly during storage, as
10
such treatment may shorten the life of the components.
Manufactured to meet specifications set by the Association for the
Advancement of Medical Instrumentation (AAMI)
Page 3
What is
Blood pressure is a measurement of the force of blood
arteries. Arterial blood pressure is constantly changing
Blood Pressure?
flowing against
during
the walls of the
the course of the cardiac
cycle. The highest pressure in the cycle is called the SYSTOLIC BLOOD PRESSURE;
the lowest is the DIASTOLIC BLOOD PRESSURE. Both pressure readings, the SYS-
to
TOLIC and DIASTOLIC, are necessary
enable a physician to evaluate the status of a
patient’s blood pressure. Many factors such as physical activity, anxiety, or the time of day,
can influence your blood pressure. Blood pressure is typically low in the morning and
increases from afternoon to evening. It is lower in the summer and higher in the winter.
Why Is It a Good Thing to Measure Blood Pressure at Home?
Having one’s blood pressure measured by a doctor in a hospital or a clinic, and group
health checks, tend to stimulate nervousness in the subject and may even create high blood
pressure. Also blood pressure varies in accordance with a variety of conditions,, and so
judgement is not possible on the basis of a single measurement. (See Fig. 2)
The blood pressure measured first thing in the morning after getting up, before taking any
food, and with the subject still, is known as the fundamental blood pressure. In practice it
is rather difficult to record the fundamental blood pressure, but to come as near as possible
to measuring. the blood pressure in
to take the measurement at home.
aan
environment that is close to this, is why it is
. .
useful
Systolic:
The highest point of blood pressure; level of blood pressure produced
as your heart beats.
Diastolic: The lowest point of blood pressure; level of blood pressure produced
as your heart rests between beats.
Millimeters of
%l~ercury
(mmHg): Blood pressure is measured in terms of the
height of mercury in a column. Measurements are written one over the other.
mmHg
For example, a systolic presssure of 120
mmHg
is expressed as “120 over 80.”
IMPORTANT:
Only a physician is qualified to interpret your blood pressure
and diastolic pressure of 80
measurements, and no device can replace regular medical examinations by
your physician. It is recommended that your physician raview your procedure
for using this blood pressure monitor. Your physician should verify blood
pressure measurements before making adjustments to medication.
Page 4
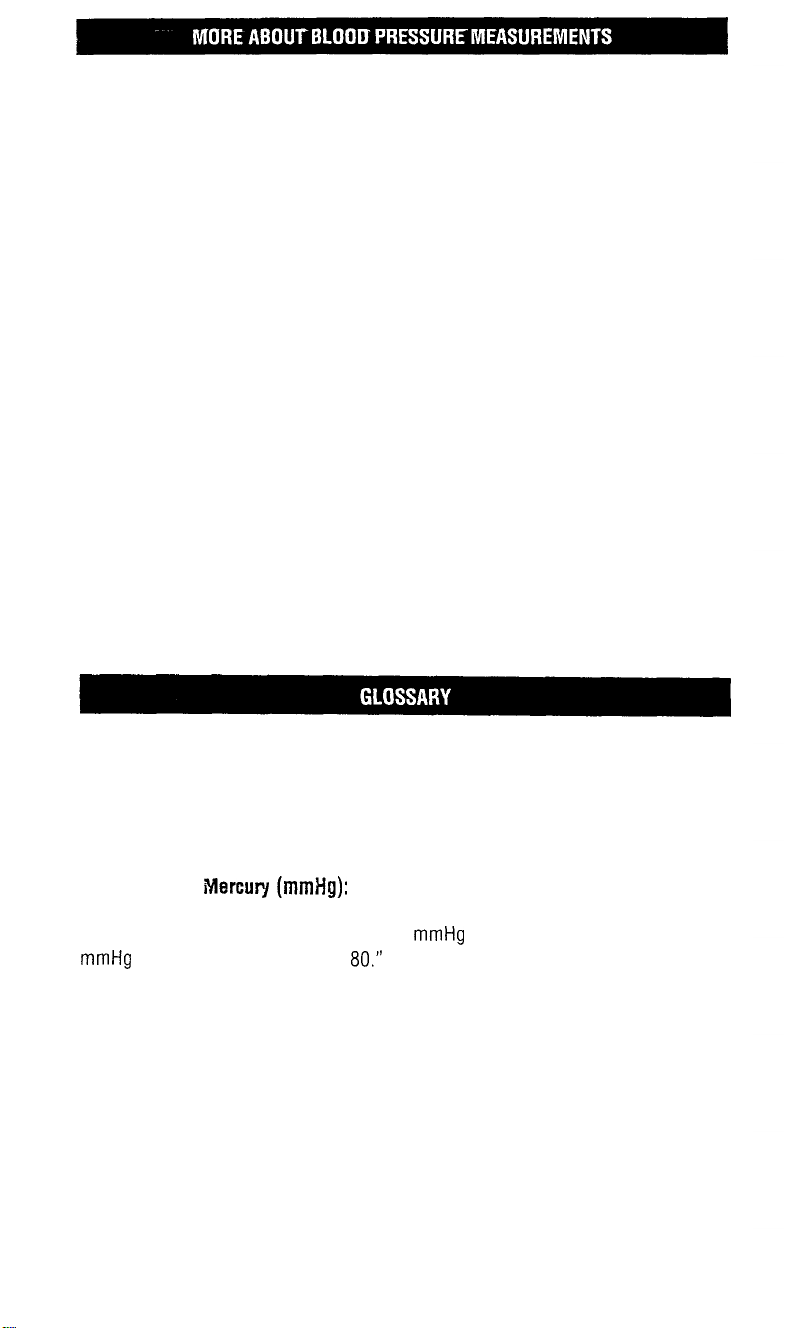
Standards for assessment of high or low blood pressur.$ without regard to age,
have been established by the World Health Orga’nization (WHO), as shown in this
chart.
(Fig. 1)
..‘. (
Hypertense
pressure type
Normal blood
pressure type
140
160 mmHg
Reference Material: Investigation into Adult Diseases Report by the Ministry of Health
and Social Security, 1971.
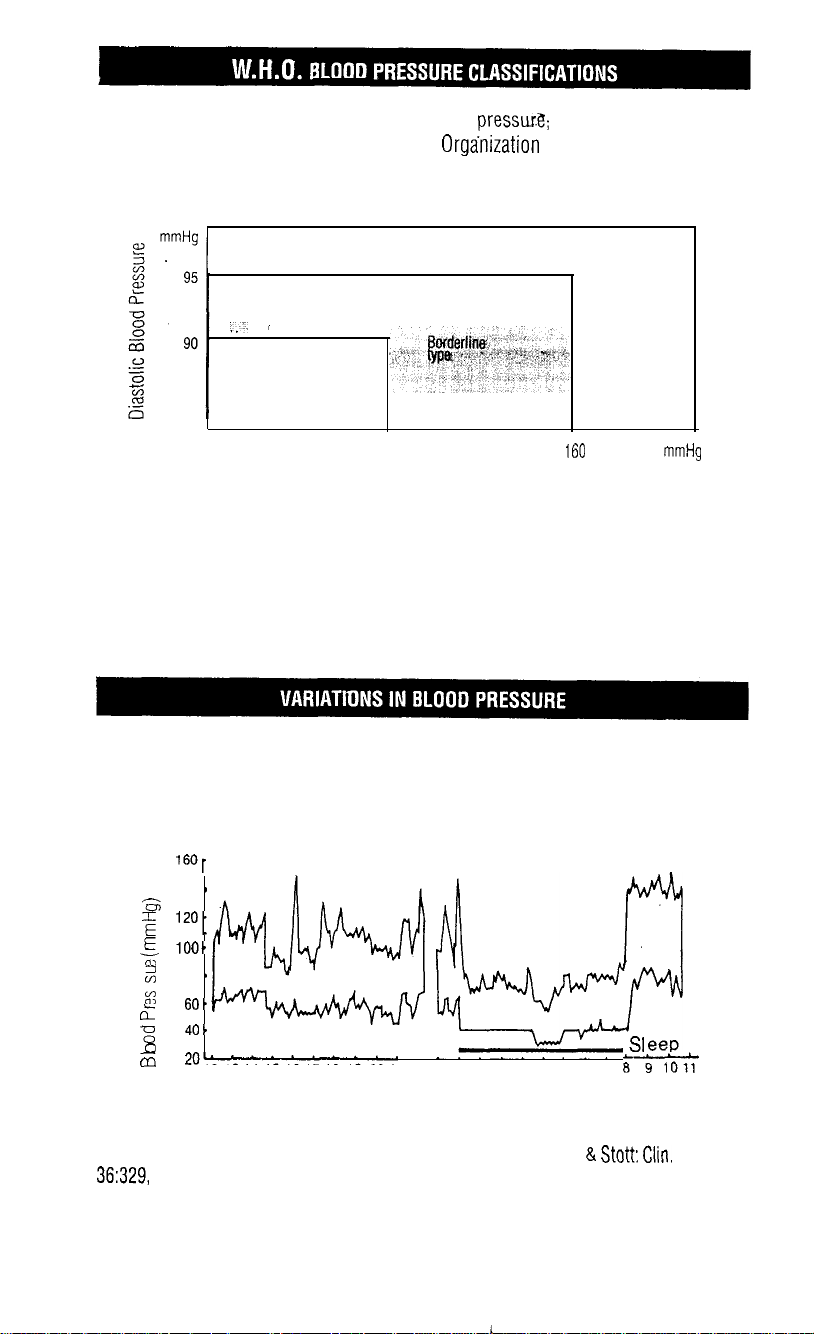
Individual blood pressures vary greatly both on a daily and a seasonal basis.
These variations are even more pronounced in hypertense patients. Normally the
blood pressure rises while at work and is at its lowest during the sleeping
period. The graph below illustrates the variations in blood pressure over a whole
day with measurement taken every five minutes.
69
SI
(Fig. 2)
eep
1601
140
Gi
E
lZO.
E 100,
22
2
80
zCT60.
g 40.
0
m
20d’...““.
A
*
*
12
131415161718192021
PM
B
&
22 23 2412 3 4 5 6 7
Time
AM
Shown is data tor measurements taken every 5 minutes. The thick line represents sleep.
The rise in blood pressure at 4 PM (A in the graph) and 12 PM (B in the graph) correspond to an attack of pain and sexual intercourse. (Beven, Honour & Stott:
36:329,
1969.)
Clin.
Sci.
Page 5

DIAGRAM
A
Systolic blood pressure Diastolic blood pressure,
display section puise display section
Pressure Memory Star[ Power
Hose
connector
-
Main
frame
rltxlult:
setting switch
Hose
Plug
-Cuff
hose
Page 6

Display mark
i
v
Condition/Cause
Mark
ap’pears
in the mea- Measurement in progress -
surement condition and
Corrective action
remain quiet.
Measurement in flashes when pulse is
progress
detected.
I
7
Exhaust
--
A
Insufficient
pressure
+s
Replace
batteries
/-- -
IZ K/f’
fleasurement error
31 I/ /I,T,T
1-1 L I- K /‘\
Pulse error
Mark flashes when power is Automatic exhaust is
applied and there is air formed.
I
remaining in the cuff.
Measurement has begun Raise
but the pressure was
insufficient.
Appears when the battery
voltage is excessively tow.
Appears when the blood
pressure could not be
obtained accurately.
Appears when the pulse
rate could not be obtained
accurately.
pressure 30-40
more and measure once
again.
Replace all four batteries
with new ones.
Exhaust the air from the
cuff, and re-apply the cuff
properly and re-measure.
(Wait 10 minutes before
re-measure)
per-
WcufT
mmHg
Page 7

1.1
Battery Installation
Remove the battery cover and insert oatteries into the battery compartment as shown, taking
+
extreme tare that the polarities
and - are observed. (Fig. 3)
. .
(Fig. 3)
2. Attaching the Arm Cuff
Wind the arm cuff
edge of the cuff is positioned
around
the left
one inch
Upper
arm tightly (for best results) SO that the bottom
above the elbow joint.
(Fig. 4)
*Do not roll up a shirt or jacket.
It may
arm and proper measurement results
Will
3. Measuring Posture
Remain in a seated or reclining position.
Do not move your arm while measuring.
cause
constriction
not be obtained. (Fig. 5)
of the
Upper
(Fig. 5)
Page 8

l
When power is turned
l
When the
"o"
is displayed the unit is ready for measurement
ON,
all display marks appear for approximately 1 second.
ltthk”V”
mark appears, release air
in the arm cuff by squeezing it or removing the hose plug.
Approx. 1 second
2. Attach the arm cuff to the left arm for best results.
3. Pressurize the arm cuff with the inflation bulb.
l
Pressurize the arm cuff to approximately 30-40 mmHg above the estimated systolic blood
pressure to be measured.
1pl
I
I
4. When Pressurization is Completed, the automatic exhaust mechanism will
gradually reduce arm cuff pressure, and the
“v “
mark will appear indicating that
measurement is in progress.
1) Pressure value appears on the
!eft, and exhaust speed on the right side of the display.
*Remain still during measurement.
2) When a pulse is detected, the pressure value moves to the right side of the display. At
this time the
“ v”
mark flashes at the same rate as pulse rate, and the buzzer
sounds when the pulsation is sufficient.
Flashing+
v
]~~fi:~:n’
Pressure
3) When the measurement is completed and buzzer sounds (beep), Systolic pressure is
displayed on the left and Diastolic pressure on the right side of the display.
2-3 seconds later, pressure value and pulse appear alternately on the display.
*When a measurement is made with insufficient pressure the “Err” mark appears. Pressurize to a
valve 30-40 mmHg higher than that previously used and perform the measurement again.
5. Push the air release valve to completely release the air from within the cuff.
6. Turn Power OFF
Press the Power switch to turn power OFF. (See Diagram A)
7. Previous Measurement Display
When the Memory switch is pressed, the previous measurement value is shown for
about 5 seconds.
8. Automatic Power OFF Function
If this unit is left on after measurement an Automatic Power-OFF function turns the
power OFF after approximately 2 min. 30 seconds. To continue measurement press
the power switch turning the unit ON.
Page 9

Name and model number Digital Eood Pressure Meter 7659
DiSplay system DigItal g!solay system/LCD,! di@s
Measuring method
Oscillometric
method
Power source Type AA batteries x 4
Measuring range
20-260 mmHg (Pressure)
40-200 Pllsesimincte (Pulse)
-3
mmH
or 2% whichever greater (Pressure)
-5%
(Pu se)
9
Pressurization
Manual pressurization
Depressurization Constant-Air-Release Valve System
i
Deflation Manual air release valve
Memory
Automatic Power OFF To be automatically cut off after 2 minutes 30 seconds of nonuse to
Built-in memory enabling display of the previously measured value and
currents measurements.
save energy.
Battery life Approx. 12 months with 3 min. usage per day
Operating environment
Storage environment 5
Dimensions
Weight 10.5 oz (including 4 batteries)
50” to
14O”F,
less than 85% RH
14”. to 122”F, less than 85% RH
5”(W).x 3”(D) x
1.6”(H)
.
Page 10

a@
Healtlz#Home
Part# Description
47834-042 Regular Adult Cuff
47834-033
47834-012
47834-036 Exhaust Valve Assembly
47834-044 Replacement Bulb
47834-037 Storage Case 4.50
99935
47834-006 Blood Pressure Record 3.95
47834-038 T Connector 4.95
Above prices include shipping and handling.
Please print your name and address below.
Street Address
City
I
Batterv Cover
Replacement Hose
Instruction Book 1 .oo
.,Sheet (25/pack)
State
Send to: Sunbeam-Oster Household Products
REPLACEMENT PARTS
MODEL 7659
AND ACCESSORIES
Price
12.95
2 00
4.95
4.95
2.95
Order 1
Zip
117 Central Industrial Row Purvis, Mississippi 39475
or call l-800-394-2326
For Mastercard or VISA: ‘Circle one
Card #
Authorization Signature
I
Mastercard VISA
Exp. Date
Page 11

LIMITED ON YEAR WARRANTY
This product is warranted for one year from the date of purchase against defects in
material and workmanship. If the product fails to operate during this period, return
it, prepaid, to Appliance Service Station, 117 Central Industrial Row,
Purvis, MS 39475 for repair or replacement without charge at the manu-
facturers option or call
1-800-597-5978. This warranty gives you specific legal
rights, and you may also have other rights which vary from state to state.
Warrantor: Sunbeam-Oster Household Products.
@Sunbeam TM Health at Home 01992 Sunbeam-Oster Household Products
Distributed by Sunbeam-Oster Household Products, Schaumburg, IL 60173
MODEL7659
REPLACEMENTPARTS
r*
__r_____r-_--------------------------------------------
ome
AND ACCESSORIES
Please print your name and address below.
,,
City
State Zip
Include check or money order made payable to Sunbeam-Oster Household Products
and mail to:
Sunbeam-Oster Household Products
117 Central Industrial Row Purvis, Missrssippi 39475
Page 12

a@
Healtlz#Home
Part# Description
47834-042 Regular Adult Cuff
47834-033
47834-012
47834-036 Exhaust Valve Assembly
47834-044 Replacement Bulb
47834-037 Storage Case 4.50
99935
47834-006 Blood Pressure Record 3.95
47834-038 T Connector 4.95
Above prices include shipping and handling.
Please print your name and address below.
Street Address
City
I
Batterv Cover
Replacement Hose
Instruction Book 1 .oo
.,Sheet (25/pack)
State
Send to: Sunbeam-Oster Household Products
117 Central Industrial Row
Purvis, Mississippi 39475
or call l-800-394-2326
For Mastercard or VISA: ‘Circle one
REPLACEMENT PARTS
MODEL 7659
AND ACCESSORIES
Price
12.95
2 00
4.95
4.95
2.95
Order 1
Zip
I
Mastercard VISA
Card #
Authorization Signature
Exp. Date
 Loading...