

Page 1
Ultrasonic
Humidifier
Instruction Manual
Model No. 696
Read and save these
*Product may vary from picture,
instructions.
Page 2

Important Safeguards
When using electrical
present, basic safety precautions should always be followed,
including the following:
1.
Always
2. Use only clean, cool, tap water to fill tank (softened or distilled
water is recommended, if tap water is hard).
3. To avoid white dust, you may use distilled water, or
a demineralization cartridge.
4. Be sure the filling cap of the tank is firmly tightened.
have water in the water tank when operating unit.
appliances, especially when children are
Always
5.
the unit is operating. Rotate the mist nozzle so it is aimed away
from children, walls and furniture.
6. Use only
and unplug unit with dry hands only. Turn unit
7
Never operate unit with a damaged cord or plug.
8. Always place
Keep cord away from heated surfaces and areas where it could be
walked on or tripped over.
have the mist
110-120V
unit on a flat, level surface away from direct sunlight.
nozzle
AC
and the mist chamber in place while
outlet. As with any
Note:
The
mist will automatically
electric
off
to
device, plug
unplug.
shut off when the tank is empty; however, the fan will
continue to run.
9. Unplug
move the unit.
the unit when not in use and whenever you clean or
10. Do not
tank. Do not cover any openings of the unit or insert objects into
any openings.
11.
The unit
become saturated and leave
Always leave room door partly open.
When cleaning
12.
Exterior may be wiped with a damp cloth (except for electrical
add
medication of any type into the nozzle, base or water
should not be left unattended in closed rooms as
condensation
inside of unit, keep water away from the air outlet.
on walls or furniture.
air could
Page 3
controls) when unit is
off.
Any part may be wiped with a damp
cloth when unit is
13. Do
14.
Do
not
tilt or tip unit or attempt to empty or fill it while
not
use detergent to clean any water containing parts of the unit.
unplugged.
it
is operating.
Detergent film dissolved in the water supply can interfere with the
output of the unit.
15. The nebulizer (ultrasonic transducer) is highly sensitive.
important part clean and treat it gently.
Do not touch the
Keep this
nebulizer while unit is operating, as possible burns could result. Do
not touch the nebulizer with bare fingers. Any residue on the metal will
reduce mist output.
Save These Instructions
This product is intended for household use only.
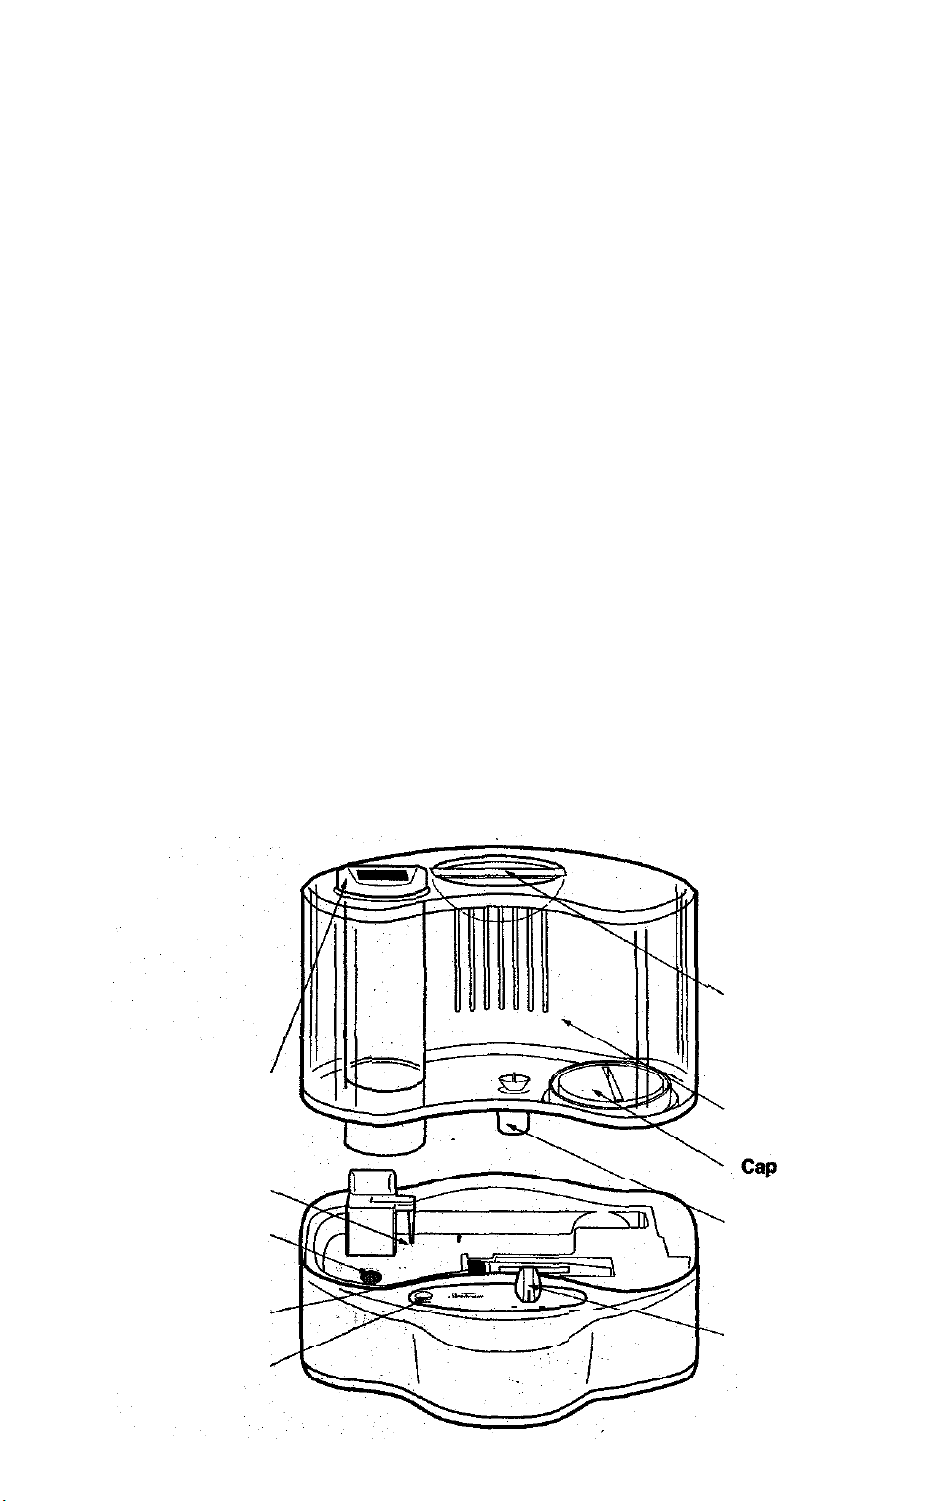
YOUR
1. Carefully remove the Ultrasonic Humidifier from carton and place on level surface.
2. Unit is fully assembled.
(Ultrasonic transducer)
HUMIDIFIER
Output Nozzle
Water Sensor
Nebulizer
Cleaning
Power On Light
Brush
Handle
Water lank
Water Flow Valve
On/Off
Switch
Page 4

This product has a polarized plug (one blade is wider than the other). As a safety feature, this plug
‘will fit in a polarized outlet only one way. If the plug does not fit fully in the outlet, reverse the plug.
If it still does not fit, contact a qualified electrician. Do not attempt to defeat this safety feature.
OPERATION
To Fill:
1.
Remove water tank from base, and turn it upside down. Turn the filling cap counter-clockwise,
2. Fill the tank with
Place the water tank back on the unit and
reservoir.
Note: Water that is too cold may temporarily reduce the mist output. Too hot water can
clean, cool, tap water or distilled water
and fasten the filling cap firmly.
allow a few minutes for the water to fill the
damage the nebulizer (ultrasonic transducer).
3. The fan keeps operating when the water tank is empty. Turn the unit off before refilling
the water tank.
To Use:
1.
Plug power cord into a
120V
AC wall outlet oniy.
2. Switch the unit on by turning the power control. The power indicator will illuminate.
3. Adjust the mist intensity control to desired level.
4. Simply turn mist nozzle until the desired amount of mist is coming out.
5. Adjust mist nozzle away from wails and furniture.
It is important to leave the door of the room open when humidifier is being used
(see note about humidity).
MAINTENANCE/CARE
General
Always unplug the unit before cleaning.
Drain and clean before storing.
Clean after tong periods of storage.
Clean frequently during the heating season. (Every third day is recommended.)
Never immerse unit in water or let water enter the air outlet or any other openings.
Rinse water tank with lukewarm water after each use. To dry for storage, wipe with a soft clean cloth.
lnformation
To Clean Water Tank:
If tank appears dirty, sanitize it by using a mild bleach and water solution, never detergent.
Rinse thoroughly to be sure bleach is
entirely
elimlnated before using.
Caution: If water sits in the tank for more than a day or two,
bacterial growth is possible.
Page 5

To Clean Nebulizer and Water Sensor:
Periodically inspect nebulizer and water sensor and keep them free of mineral deposits. Remove the
tank from the unit and empty the reservoir in the bottom of the unit. Clean nebulizer (located in the
bottom of reservoir) with the brush stored in the unit under the tank. Do not scrape nebulizer or
water sensor or clean them with tools that have metal parts. Clean water sensor with the brush.
If instructions are not followed and hard water is used, mineral build-up on the nebulizer will occur.
If nebulizer has accumulated hard water build-up, drain the reservoir, refill it with a white vinegar
and water solution and let it soak for an hour. Then use the brush to loosen build-up on the
nebulizer. Rinse and drain reservoir and wipe clean.
Caution: Minerals in tap
water
can cause a white dust to
appear on furniture, etc. Distilled water reduces buildup of
mineral scale and white dust. See inside front cover.
To Store Unit:
The original box makes a good storage place for the unit. Make sure tank, reservoir and all parts
are thoroughly dry before storing. If water is left in the unit during storage, water may harden and
leave deposits that can prevent the unit from operating properly. Leave filling door of the tank
loosened to prevent door and gasket from sticking together. This will prolong the life of the gasket.
A NOTE ABOUT
It is best to keep the humidity level at about 30 to 50 percent relative humidity.
The comfort level of humidity will vary from room to room and with changing room conditions.
In cold weather, windows and even some walls may fog or develop frost from excessive indoor
humidity. If this occurs, reduce the mist intensity setting to avoid damage from condensed water
dripping on sills.
HUMIDITY
Too much humidity in the room may allow moisture to accumulate on surfaces where bacteria and
fungi can grow. Collected moisture may also harm furniture and walls, especially wallpaper.
To correct for too much humidity, especially in a small room, leave the room door open and-adjust
the mist intensity control setting.
This equipment generafes and uses RF energy and if not installed properly may cause interference
to radio and television reception. This device has been tested and found to comply with part 18 of
the FCC rules. Should interference occur in a particular installation the user is encouraged to try
to correct the interference by one or more of the following measures:
1. Reorient the receiving antenna of your radio or television.
2. Plug receiver into different outlet so that humidifier and receiver are on different branch circuits.
If necessary, the user should consult an experienced radio/television technician for additional
assistance. The user may find the following booklet prepared by the FCC helpful: “How to
identify and resolve radio-television interference problems”. The booklet is available from
the US government printing office, Washington DC 20402, Stock No.:
004000-00345-4. -
Page 6

DEMINERALIZATION
CARTRIDGE
The demineralization cartridge reduces the amount of minerals that cause white dust to appear
on furniture, etc. if unit is used with tap water. The amount of white dust accumulation depends on
your water supply and its mineral content. You may be able to find out the water hardness in your
area by calling your local water department.
To use: Just place the demineralization cartridge in the cavity in the bottom of the unit. Then replace
the water tank and wait a few minutes for the reservoir to refill. Plug in the unit and turn it on. Mist
will
start when reservoir is full. If white dust accumulation becomes noticeable, or after long
periods of storage, order and insert a new demineralization cartridge.
To order a demineralization cartridge,
cartridge 6588.
VISA
and Mastercard accepted.
call
1-800-394-2326. Order demineralization
Note: The performance of the demineralization cartridge is dependent upon the mineral content
of your water supply: Efficiency will deteriorate with the number of uses.
Page 7
OWNER’S CHECK LIST
CONDITION
No power (and light
indicator is off)
No air or mist (and
light indicator is on
Water tank full but
no mist (fan on)
PROBABLE CAUSE CORRECTION
Unit not plugged in
No power at outlet
Plug unit in
Check circuits,
fuses, test outlet
with lamp
No water in unit
Defective fan
Defective components
Fill water tank
See warranty
See warranty
(non-serviceable)
Mist intensity level
set too
Unit not level
low
Set mist intensity
level higher
Place unit on level
surface
Mineral depositson
Clean nebulizer and
, nebulizer or sensor Sensor and refill
Damaged plug or cord
White dust accumulation
Water tank was washed
with detergent
Nebulizer worn or
defective
Worn insulation
Damaged or exposed
wires
Defective components
(non-serviceable)
Tap water used without
demineralization
cartridge
Demineralization
cartridge needs
replacement
with distilled water
or replace
demineralization
cartridge
Rinse thoroughly
with clean water
See warranty
Do not use product,
see warranty
Do not use product,
see warranty
Do not use product,
see warranty
Use distilled water
Replace dimeralization
cartridge
Page 8

LIMITED WARRANTY
What is Covered and For How long
Congratulations on your recent purchase of a quality Sunbeam product. We are confident that
our product will perform well and, therefore, warrant to you as the original retail purchaser, for
a period of 1 year from the date of original purchase, that your new product will be free of
mechanical and electrical defects in material and workmanship.
What Sunbeam Will Do 81 How to Get Service
If your product is covered during the warranty period, we will repair or replace your new product
(at our option) without cost to you, which will be your exclusive remedy under this warranty.
Please do not return this product to the place of purchase; doing so may delay the processing
of your claim and our repair of your product. Simply send your product postage prepaid, with
proof of purchase and a short description of the problem directly to our factory service center
at the following address:
SUNBEAM HOUSEHOLD PRODUCTS
Service Station
160 Commerce Drive
P.D. Box 506
Bay Springs, MS 39422
California residents may call our toll free number to locate the nearest
authorized service center: l-800-526-2832:
What
18
Not
Covered
Our warranty for your product will not cover normal wear of parts, damage resulting from
negligent use or misuse of the product, use on improper voltage or current, use contrary to
operating instructions, glass breakage (if applicable), or disassembly, repair, or alteration by
any person other than an authorized service station. Any implied warranty of merchantability
or fitness for a particular purpose on your product is limited to the duration of this written
warranty. We shall not be liable for any incidental or consequential damages for breach
of any express or implied warranty on your product.
How Your State’s Law May Apply
Some states do not allow limitations on how long an implied warranty lasts or the exclusion
or limitation of incidental or consequential damages, so the above limitation may not apply to
you. This warranty gives you specific legal rights, and you may also have other rights which
vary from state-to-state.
@I996 Sunbeam Corporation or its affiliated companies, all rights reserved. Sunbeam
is a registered trademark of Sunbeam Corporation or its affiliated companies,
Distributed by: Sunbeam Household Products, Schaumburg, Illinois 60173
Model 696
~ /
,
P.N. 69003
Page 9
Humidificador Ultrasónico
Manual de Instrucciones
Modelo No.
696/696-13
LEA Y GUARDE ESTE INSTRUCTIVO.
*
El producto puede variar de la ilustración.
Page 10

Precauciones Importantes y
Advertencias de uso,
Cuando utilice aparatos eléctricos, especialmente cuando se
encuentren niños alrededor, deberá tomar las siguientes
precauciones de seguridad:
1.
Lea todas las instrucciones antes de usar su humidicador ultrasónico.
2. No desatienda su humidificador ultrasónico mientras esté funcionando.
3. Al hacer funcionar su unidad,
agua.
4. Use
5. Para evitar que se forme polvo blanco, no ponga a funcionar su
6. Asegúrese de que la tapa del depósito de agua cierre firmemente.
siempre agua de la llave
recomienda agua destilada o suave, en el caso de que la de la llave
sea muy dura).
humidificador sin el cartucho de desmineralización, A NO SER QUE,
esté utilizando agua destilada.
siempre
fria
vigile que el depósito tenga
y limpia, para llenar el depósito (se
7. Siempre que esté en funcionamiento su aparato, tenga cuidado de
que la boquilla de salida del vapor y la cámara de vapor estén bien
puestas en su lugar. Nunca dirija la boquilla de salida del vapor hacia
niños, paredes o muebles.
8. Este aparato
120/127 Volts.
desconecte su unidad solamente con las manos secas. Apague la
unidad antes de desconectarla.
sólo se puede conectar a un contacto de pared de
Como con cualquier otro aparato eléctrico, conecte
.
y.
9.
NUNCA haga funcionar su unidad con un cable o una clavija dañados.
10. Siempre coloque su unidad sobre una superficie plana y horizontal,
lejos de la luz directa del sol. Aleje el cable de superficies y óreas
podrja
calientes y de lugares dónde alguien
él.
Nota: En el momento que el depósito de agua se
pisarlo o tropezarse con
encuentre vacío, automóticamente, el aparato dejará
Page 11

de emitir vapor; sin embargo, el ventilador seguirá
funcionando.
11.
Mantenga
limpiarla o cuando la vaya a mover.
12. No debe añadir medicamentos de ning’n tipo dentro de la boquilla,
base o depósito de agua. No tape ningún orificio de la unidad ni
inserte objetos en ellos.
desconectada
la unidad cuando no esté en uso, al
13. Deberá vigilar
cerrados, ya que podda saturarse el aire y producir condensación
de agua en las paredes
un poco abierta.
14.AI
limpiar
salida de aire.
un trapo mojado ( salvo los controles eléctricos). Puede Ud. limpiar
cualquier
la unidad
15.No voltee ni incline la unidad ni intente vaciarla o llenar
la mientras esté funcionando.
16.No use detergente para limpiar las partes de su aparato que
trabajan con agua o tienen contacto con ella. La película de
detergente disuelta en el suministro de agua puede interferir;
con el rendimiento de la unidad.
17. El nebulizador es altamente sensitivo (
su unidad
el interior
Apague
fiarte
del mismo con un trapo mojado, siempre y cuando
cuando ésta se encuentre en cuartos
o’en
los muebles. Siempre deje la puerta
de.su
unidad, no deje que el agua toque la
su aparato antes de limpiarlo. Límpielo con
esté desconectada.
trans\ductor
ultrasónico).
Mantenga limpia esta parte importantisima y trátela con
muchisimo cuidado.
No toque el nebulizador mientras la unidad
esté en funcionamiento, se podda quemar. Protéjase las manos para
tocar el nebulizador. Cualquier residuo en el metal, reducirá la
producción total de vapor.
Guarde este Instructivo
Este producto sólo es para uso doméstico.
10
Page 12

SU HUMIDIFICADOR ULTRASONICO
1.
Quite cuidadosamente el empaque del Humidificador Ultrasónico y colóquelo sobre
una superficie horizontal.
2. La unidad está totalmente ensamblada.
Asa
Boquilla de Salida de Vapor
Sensor de Agua
(Transductor
Cepillo para Limpieza
Nebulizador
Ultrasdnico)
Botón Indicador de
Encendido (On)
Depósito de Agua
Tapa
Wlvula de Descarga de Agua
Interruptor de Encendido/
Apagado
(On/Off)
Este producto cuenta con una clavija polarizada ( una hoja es más ancha que la otra). Como medida precautoria, esta
forma. Si no entra la clavija en el contacto,
claìrija entrará solamente en un contacto de pared polarizado de una sola
volteela.
Si
cqntinúa
sin entrar, solicite el servicio de un
electricista. No intente ir en contra de esta medida de seguridad.
FUNcjON/)MIENTCi _.
Para el
1.
2. Llene el depósito con agua de
3. Aunque el depósito de agua esté vacío, el ventilador seguirá funcionando. Apague
LLenado
del Dipósito de Agua:
Separe el depósito de agua de su base, y voltkelo boca abajo. Gire ia tapa del depósito en la
direccibn
contraria al movimietito de las manecillas del reloj.
Ia llave fría y limpia o con agua destilada i cierre
firmemente la tapa. Enseguida, vuelva a colocar el depósito de. agua en la unidad y dele unos
minutos para que el tanque se llene de agua. Nota: Si Ud. pone agua muy fría, se podrá
reducir, temporalmente, la producción de vapor. Si Ud. pone agua muy caliente, puede dañar el
nebulizador ( transductor
ultrasónicp).
la unidad, antes de llenar de nuevo su depósito de agua.
11
Page 13

Utilización del Humidificador:
12
1. Conecte el cable eléctrico a un contacto de pared de 120/127 Volts.
2. Prenda la
únidad, haciendo girar el botón de control de energía. Se iluminará eI botbn
indicador de encendido.
3. Ajuste el control de intensidad de vapor al nivel deseado.
4. Cuando esté
5. Evite que la boquilla
salie?do la cantidad de vappr deseada, dele vuelta a la boquilla de salida del vapor.
de.salida de vapor esté dirigida hacia paredes o muebles. Es
importante
que deje abierta la puerta del cuarto dónde esté utilizando su humidificador ( Ver:
Información acerca de la Humedad).
MANTENIMIENTO Y CUIDADO:
Información General
l
Siempre desconecte su unidad antes de limpiarla.
l
.Séquela y límpiela antes de guardarla.
l
Si Ud. la ha guardado por mucho tiempo, límpiela antes de usarla.
l
Límpiela frecuentemente durante las estaciones de calor. (Se recomienda que lo haga
cada tercer día).
l
Nunca sumerja la unidad en agua ni deje que el agua entre en la salida de aire ni en ningún otro
orificio o abertura.
l
Siempre que termine de utilizar su humidificador,enjuague el depósito de agua con agua
tibia. Al secarlo para guardarlo, límpielo con un trapo limpio y suave.
Para limpiar el Depósito de Agua
Si su depósito está sucio, desinfkctelo con una solución de agua y un poquito de cloro. Nunca
use detergente. Enjuáguelo perfectamente para asegurarse de que ya eliminó el cloro
en su totalidad, antes de volverlo a usar.
CUIDADO: Si Ud. deja agua en el depósito por más de un
día o dos, podrán aparecer bacterias.
Limpieza del Nebulizador y del Sensor de Agua
Revise peribdicamente el nebulizador y el sensor de agua, verificando que no tengan depósitos
depbsito
minerales. Separe el
Limpie el nebulizador ( localizado en el fondo del tanque) utilizando el cepillo guardado dentro
de la unidad, bajo el depósito. No raspe el nebulizador ni el sensor de agua ni los limpie con
herramientas que contengan partes de metal. Limpie también el sensor de agua con el cepillo.
de agua de la unidad y vacíe el tanque en el fondo de la unidad.
Page 14

Si Ud. no sigue las instrucciones y
nebulizador. Si se han acumulado residuos de agua dura en el nebulizador, seque el tanque,
utilizi
agua dura, se pueden formar
tkiduos
de minerales en
eI
Iknelo
con una solución de agua con vinagre blanco y déjelo remojar durante una hora. A continuación,
use el cepillo para desprender la formación de residuos en el nebulizador y enjuague, seque y
limpie el tanque.
CUIDADO: Los minerales del aiua de Iá llave
pod&
hacer que aparezca un polvo
blanco sobre los muebles y otras partes. Si Ud. utillrá’agua destilada, reducirá la
forinaclbri de capas de mlneraies’y de
polvo~blanoik
Ver la cubierta frolital interna. .
/, :’
._
,‘.
Para Guardar su Unidad
Guarde el humidificador en su caja original. Es el !ugar ideal para guardarlo. Antes,de guardar
su aparato, asegúrese de que todas sus partes esten totalmente secas. Si Ud. deja,agua en la
unidad al guardarla, esta agua se endurecerá y dejará sedimentos que
impidirán
que su
humidificador funcione correctamente. Deje desapretada la tapa por dónde se llena el depósito
de agua, para evitar que la tapa y la junta se peguen. Lo anterior alargará la vida de la junta.
,.,
_,
‘.
<,$
‘.’
‘:
8..
13
Page 15

LISTA DE VERIFICACIÓN DE FALLAS
FALLAS
l No prende (el botbn de
encendido está apagado)
l No sale aire ni
vapor ( y el botón de
l El depósito de agua
está lleno pero el
humidificador no produce
vapor- (el ventilador está
prendido)
CAUSAPROBABLE
l No está conectada la
unidad
l No hay energía en el
.”
contacto de pared
l No tiene agua la unidad
l Ventilado defetuoso
l
Partes defectuosas
l La graduación seleccionada
para el nivel intensidad de
vapor es muy baja
l La unidad no está sobre
una superficie horizontal
l Hay depósitos minerales
en el nebulizador o en
el sensor
l Lavaron el depósito de
agua con detergente
l El nebulizador está
desgastado o defectuoso
SOLUCIÓN
l Conecte la unidad
l Revise circuitos,
fusibles y contacto con
un probador de corriente
l Llene el depósito de agua
l Refierase
* Refi6rase a la garantía
( partes no desgastables )
l Aumente la graduación
de intensidad de vapor
l Coloque la unidad sobre
una superficie horizontal
l Limpie el nebulizador y el
sensor y vuelva a llenar
el depósito con agua
destilada o reemplace
el cartucho de
desmineralización
l Enjuague completamente
con agua limpia
l Refierase a la garantía
a
la garantía
j
I
l Cable o clavija
dañada
l
Acumulacibn
polvo blanco
de
l Desgaste de las
partes aislantes
l Cables dañados o
expuestos al aire libre
l
Partes defectuosas
(partes no desgastables)
l Se está utilizando agua de
la llave sin cartucho de
desmineralizacibn
l Se necesita reemplazar
el cartucho de
desmineralización
l No utilice el producto,
1
refierase a la garantía
*No utilice el producto,
refierase a la garantía
*No utilice el producto,
refiérase a la garantía
l Use agua destilada
l Reemplace el cartucho
de desmineralización
Page 16

INFORMACIÓ‘N
15
Lo ideal es mantener el nivel de humedad a un 30 6 50 % de humedad relativa.
El nivel de confort de humedad variará de cuarto a cuarto y según las condiciones de cada cuarto.
En climas fríos, las paredes o ventanas podrán empañarse o cubrirse de escarcha debido a la
humedad excesiva del interior. De ser así, reduzca la graduación de la intensidad de vapor, para
evitar daños por caída de agua condensada sobre tos antepechos de las ventanas o los umbrales de
las puertas.
El exceso de humedad en el cuarto puede producir bacterias y hongos, debido a la acumulación
de humedad sobre las superficies. Asimismo, puede dañar las paredes, el mobiliario de la casa
especialmente, el papel tapiz de las paredes.
Para evitar que se acumule mucha humedad, tratándose especialmente de un cuarto pequeño,
deje la puerta abierta del cuarto y ajuste la graduación del control de la intensidad de vapor.
Este equipo genera y utiliza energía RF (Frecuencia de Radio) y si no se instala, apropiadamente,
puede causar interferencia con la señal de radio o de televisión. Este aparato ha sido puesto a
prueba, y cumplió con el fragmento No. 18 de las reglas del FCC. En el caso de que hubiera
interferencia con una instalación en particular, le aconsejamos tratar de corregir la
siguiendo los siguientes pasos:
1
Jeorientar
2Conectar
conectados a circuitos eléctricos diferentes.
De ser necesario, consulte a un tecnico especialista en radio y televisión. Existe un folleto elaborado
por la FCC que quizás le sea de utilidad: “Cómo identificar y resolver problemas de interferencia en
radio y televisión”. Para conseguir este folleto, diríjase a la oficina de talleres gráficos del gobierno
de E.U.A., Washington, D.C. 20402, y pregunte por el folleto en existencia No.: 004000-00345-4.
el receptor a un contacto de pared diferente a la del humidificador, para que estén
ACERCA DE LA HUMEDAD
la antena receptora de su radio o televisión.
‘-
y,
falla,
CARTUCHO DE DESMINERALIZACIÓN
El cartucho de desmineralización reduce la cantidad de minerales que provocan la aparición de
polvo blanco sobre los muebles, etc. si se utiliza agua de la llave. La cantidad de acumulación de
polvo blanco depende del tipo de aguay su contenido mineral. Ud. puede investigar si el agua de
su casa es dura llamando al Departamento de Aguas de su localidad.
Utilización: Coloque el cartucho de desmineralización en la cavidad que se encuentra en la parte
inferior de la unidad. Enseguida coloque el depósito de aguay dele algunos minutos para que se
llene el tanque. Conecte la unidad y enciéndala. Empezará a salir vapor cuando el tanque esté lleno
de agua. Si Ud. nota acumulacibn de polvo blanco o ha tenido’guardado su humidificador por
mucho tiempo, ordene e inserte un nuevo cartucho de desmineralización.
NOTA: El desempeílo de su cartucho de desmineralización (modelo 6588) depende
del contenido de minerales en el tipo de agua que se
mismo disminuirá con el uso.
esfe u.sando.
La eficiencia del
Page 17

GARANTIA LIMITADA DE UN AÑO
Qué está cubierto y por cuánto tiempo
Felicidades por su reciente compra de un producto de calidad Oster. Tenemos confianza en que
nuestro producto funcionará bien y por lo tanto le garantizamos a Ud. durante un período de un
año a partir de la fecha original de compra, que el producto está libre de defectos en material y
mano de obra, excepto por las cuchillas y las baterías.
Qué hará Sunbeam y como obtener el servicio
Si su producto está dentro del período de garantía, lo repararemos o lo cambiaremos por un nuevo
producto
Por favor no
de su reclamación y de la reparación o cambio del producto por nuestra parte. Simplemente envíe
J
su producto con porte pagado
del problema directamente a nuestro centro de servicio de fábrica a la siguiente dirección:
(anueuo nuestra elecrión) sin, costo para Ud., lo cual será lo que ampara esta garantía.
regreskeste producto al lugar donde lo compró; el hacer esto demorará el proceso
acompabado del comprobante de compra y una breve descripción
SUNBEAM HOUSEHOLD PRODUCTS
150
Cadillac
McMinnville,TN
Lane
37110-3601
SUNBEAMM@lCANA
Vía
Dr.Gustavo
Tlalnepantla,
Baz 180
Edo.
de Mexico.
México, 54090
Qué es lo que no está cubierto
La garantía de su producto no cubre el uso normal de las partes, los daòos que resulten de un
uso incorrecto o negligente del producto, la utilización de un voltaje o corriente eléctrica mayor, el
uso contrario a las instrucciones de operación, la ruptura de vidrio (si procede) o el desensamblaje,
reparación o alteración por cualquier persona ajena a la estación de servicio autorizada. Cualquier
implicita
garantía
duración de esta garantía ‘escrita. No seremos iesponsables por ning’n daòo incidental o
consecuente debido a la violación de cualquier garantía
expresa o implícita en su producto.
, Algunos estados no permiten limitaciones en cuándo a la duración implícita de la garantía o a la
exclusión o limitación por danos incidentales o consecuentes , así lo antes mencionado puede no
aplicarle a Ud. La garantía le proporciona derechos legales específicos, y
derechos los cuales varían de un, estado a otro.
Sunbeam son marcas registradas de 01996 Sunbeam Corporation o de sus
tienen todos los derechos reservados.
de comercialización para un fin específico de su producto está limitada a la
Como aplica la ley en su Estado
tambi6n puede tener otros
compabías afiliadas y
16
Page 18

Humidificateur
ultrdsonique
Livret d’instructions
Modèle No 696
Lire et conserver ces instructions.
*Le
produit peut s’écarter de la gravure.
Page 19

Mises en garde importantes
L’utilisation des appareils électriques, surtout en présence des enfants,
impose toujours certaines précautions, notamment les suivantes:
1. TOUJOURS
de faire fonctionner l’appareil.
2. Ne remplir le réservoir qu’avec de l’eau du robinet fraîche et propre
(une EAU DISTILLÉE ou adoucie EST RECOMMANDÉE, si l’eau du
robinet est dure).
3. Pour éviter la présence de poussière blanche, ne pas faire fonctionner
l’humidificateur sans cartouche de déminéralisation,
d’utiliser de l’eau distillée.
4. S’assurer que le bouchon du réservoir est serré à bloc.
5. TOUJOURS
vaporisation sont en place en période de fonctionnement. Tourner la
buse de vaporisation de façon à ne pas la diriger vers les enfants, les
murs et les meubles.
6. N’UTILISER QU’UNE PRISE DE COURANT CA DE
Comme l’impose tout appareil électrique, il faut avoir les mains sèches
quand on branche et débranche l’humidificateur. Mettre l’appareil sur
ARRET (OFF)
s’assurer qu’il y a de l’eau dans le réservoir au moment
À
MOINS
s’assurer que la buse de vaporisation et la chambre de
IlO-120V.
pour le débrancher.
7. NE JAMAIS
cordon défectueux.
8. TOUJOURS PLACER
à l’abri des rayons du soleil. Tenir le cordon à distance des surfaces
chauffées et à l’écart du va-et-vient.
arrêtera automatiquement quand le réservoir deviendra
vide; cependant, le ventilateur continuera de fonctionner.
9. DÉBRANCHER
de le nettoyer ou de le déplacer.
10. NE PAS
le socle, ni dans le réservoir à eau. Ne couvrir aucun orifice de
l’appareil et n’introduire aucun objet dans aucun orifice.
faire fonctionner l’appareil avec une fiche ou un
l’appareil sur une surface plane et horizontale,
Nota: La vaporisation
l’appareil quand on ne s’en sert pas et au moment
mettre aucune sorte de médicament dans la buse, dans
Page 20

11 I L’APPAREIL
19
ne doit pas être laissé en marche sans surveillance
dans des pièces fermées, car l’air pourrait devenir satureet produire
de la condensation sur les murs. Toujours laisser la porte de la
piece
entrouverte.
12. AU NETTOYAGE
de l’intérieur de l’appareil, ne pas laisser entrer
d’eau dans l’orifice de sortie d’air. L’extérieur’(à l’exception des
commandes électriques) peut être
quand l’appareil est hors tension (à
l’appareil peut
I’apparejl est
13.NE
PAS
ê!re essuyee,avec
DEBRANCHE.
incliner ou faire basculer l’appareil, ni essayer de le vider
essuye
avec un linge humide
OFF).
Toute partie de
un linge humide quand
ou de le remplir quand il est en marche.
14.NE PAS
utiliser de détergent pour nettoyer les pièces de l’appareil
en contact avec l’eau. Un residu de detergent dissous dans l’eau
d’alimentation pourrait nuire à la performance de l’appareil.
15.Le nebuliseur (transducteur ultrasonique) est très sensible.
TENIR CETTE PIÈCE l,MPORTANTE BIEN PROPRE ET LA
MANIPULER DÉLICATEMENT. Ne pas toucher au nébuliseur,
quand l’appareil est en marche,
car
on risquerait de se brîiler. Ne pas
toucher au nébuliseur avec la main nue. La présence de tout residu
sur le métal réduirait le débit de l’appareil.
”
Conserver ces instructions
Ce produit est destiné à l’usage domestigue seulement.
Page 21

VOTRE HUMIDIFICATEUR
1,
Debaiier soigneusement I’Humidificateur ultrasonique et le placer sur une surface plane.
2. L’appareil est compietement assemble.
Polgn6e
Buse de sortie
RBservoir B
eau
Capteur d’eau
(îransducteur ultrasonique)
Voyant d’alimentation
NBbullseur
Brosse d’entretien
Bouchon
Soupape d%coulement
d’eau
Interrupteur Marche-Arr&
Ce produit est dote d’une fichèpoiarisee (une broche est plus large que l’autre). Cette fiche
securitaire ne va que dans un sens dans une prise de courant polarisée. Si la fiche ne s’enfonce
pas complètement dans la prise, la retourner et essayer de nouveau. Si elle ne s’adapte toujours
pas, contacter un électricien qualifie. Ne pas essayer de déjouer ce dispositif de
securite.
MODE D’EMPLOI
Remplissage:
1.
Enlever du socle le réservoir a eau, puis le tourner
remplissage en le tournant dans le sens anti-horaire.
2. Remplir le reservoir d’eau fraîche et propre du robinet ou d’eau distillée, puis bien serrer le
a
bouchon en place. Replacer le reservoir
eau sur le socle et compter quelques minutes pour que
le bac puisse s’emplir d’eau. Nota: Une eau trop froide pourrait
vaporisation. Une eau trop chaude peutendommager le
3. Le ventilateur continue de marcher quand le reservoir a eau est vide. Arreter l’appareil
avant de remplir le reservoir a eau.
a
l’envers. Deioger le bouchon du trou de
reduire temporairement le debit de
nebuiiseur (transducteur ultrasonique).
20
Page 22

UTILISATION:
.‘.
1. Brancher le cordon électrique sur une prise murale CA de 120 volts seulement.
2. Mettre l’appareil en marche en tournant l’interrupteur. Le voyant s’allumera.
3.
Regler
le
debit
de vaporisation pour l’intensité
4. Tourner tout simplement la buse de vaporisation jusqu’à
desirée.
I’emission du jet voulu.
5. Ajuster la buse de vaporisation pour la détourner des murs et des meubles.
II est important de laisser ouverte la porte de la pièce où l’humidificateur est
(vbir la section au sujet de l’humidité).
utilisé
SOINS ET ENTRETIEN
Renseignements généraux
l
Toujours debrancher l’appareil avant de le nettoyer.
l
Vider, nettoyer et assecher l’appareil avant de l’entreposer.
l
Le nettoyer après de longues périodes d’entreposage.
l
Le nettoyer souvent durant les mois de chauffage. (II est recommandé de le faire tous les trois jours.)
l
Ne jamais plonger l’appareil dans l’eau ni laisser entrer d’eau dans la sortie d’air et tout autre orifice.
l
Rincer le bac à eau a l’eau tiède après chaque usage. Pour bien I’assecher avant l’entreposage,
l’essuyer avec un linge doux et propre.
Pour nettoyer le réservoir à eau
Si le reservoir semble sale, l’assainir avec une faible solution d’eau de Javel et d’eau claire
-
ne
jamais se servir d’un détergent. Bien rincer avant de l’utiliser, pour s’assurer qu’il ne
reste aucune trace d’eau de Javel.
,
MISE.EN GARDE: Si l’eau séjourne dans le réservoir pendant plus d’un
ou deux jours, les bactéries pourraient s’y multiplier.
Nettoyage du nébuliseur et du capteur d’eau
Examiner periodiquement le nébuliseur et le capteur d’eau et les tenir exempts d’entartrage. Enlever
le réservoir de l’appareil et vider le bac à eau du fond de l’appareil. Nettoyer le nébuliseur (situé au
fond du bac) avec la brosse
rangee dans l’appareil, sous le réservoir. Ne pas racler le nébuliseur ni
le capteur d’eau; ne pas les nettoyer avec des outils comportant des pièces de métal. Nettoyer le
capteur d’eau avec la brosse.
Si les instructions ne sont pas observées et qu’une eau dure est utilisée, l’entartrage du
nébuliseur se produira. Si de l’eau dure a entartré le nébuliseur, mettre le bac à sec et le
remplir d’une solution de vinaigre blanc et d’eau; laisser tremper ainsi le nébuliseur pendant
une heure. Le brosser ensuite pour déloger les dépôts. Vider et rincer le bac et bien l’essuyer.
MISE EN GARDE: Les minéraux de l’eau du robinet peuvent causer
la dispersion d’une poussière blanche sur les meubles, etc. L’eau
distillée réduit
I’entartragé et cette poussière blanche. Se reporter
au texte au verso de la couverture.
21
Page 23

i I
“i t ^ ; 2 : i
.
?
.,_I
Entreposage de l’appareil
La boîte d’origine se prête bien a l’entreposage de l’appareil. Bien s’assurer que le réservoir et
à
toutes les pièces sont complètement
entrepose, l’eau sechera en laissant des
bien fonctionner. Ne pas serrer le bouchon du reservoir pour l’empêcher d’adhérer a l’anneau
d’étanchéité; ceci prolongera la
AiJ
SUJET DE L’HUMIDITÉ
II vaut mieux maintenir le
L’État
hygrometrique confortabJe varie d’une pièce a l’autre selon les conditions variables des pieces.
Par temps froid, les fenêtres et même les murs peuvent suinter ou se-givrer si I’humidite ambiante
est excessive. Le cas
dommages que peut causer l’eau de condensation en degouttant sur les tablettes de fenêtres.
Dans une pièce où
provoquer le
peut aussi endommager les meubles et les murs, surtout le papier peint.
Pour corriger un
ouverte et
developpenient des bacteiies
exces
regler
l’humidificateur à un débit de vaporisation plus faible.
degre
echeant, commander un debit de vaporisation plus faible, pour éviter les
I’atmosphere est trop humide; la buee peut s’accumuler sur des surfaces et
d’humidite, surtout dans une petite
sec avant d’entreposer. S’il reste de l’eau dans l’appareil
depots calcaires qui pourraient empêcher l’appareil de
duree
de l’anneau
d’humidite à un taux de 30 à 50
d’étancheite.
et de
la moisissure. Cette vapeur d’eau accumulee
‘S’
pour
cent d’humidite relative.
piece,
laisser la porte de la
piece
i
Cet appareil produit et utilise une
de radio et de
18 des règlements de la FCC. Au cas où des parasites viendraient troubler une installation
particuliore, l’utilisateur pourra essayer de corriger I’interference en adoptant une ou toutes
les mesures suivantes:
1. Réorientez l’antenne de votre radio ou de votre
2. Branchez-le sur une prise de courant différente, afin que l’humidificateur et le recepteur soient
branchés sur des circuits différents.
Si
necessaire,
supplementaire.
“How to identify and resolve radio-television
livret en s’adressant aux presses du gouvernement americain, Washington DC 20402,
Stock No.: 004000-00345-4.
television. Ce dispositif a été mis à l’essai et détermine conforme à la section
consulter un technicien
Cutilisateur
frequence
pourrait trouver d’un grand secours le livret prépare par la FCC:
radioelectrique pouvant parisiter les
televiseur.
competent
en
radio/television
interference
pour obtenir de l’aide
problems”. On peut obtenir ce
recepteurs
Page 24

CARTOUCHE Di DÉ~INÉRALISATION
La cartouche de
les meubles, etc. lorsqu’on utilisé de l’eau du’ robinet dans I’appareil. L’accumulation de poussiere
blanche sera plus ou moins forte en fonction’ de la teneur en mineraux de votre eau de canalisation.
Vous pourrie? être capable de connaître le degre de durete de l’eau de votre
Service municipal de distribution d’eau.
Pour l’utiliser: Placer tout simplement la cartouche dans la
ensuite le
l’appareil et
accumulation de poussiere blanche devient visible, et
l’appareil, commander et installer une cartouche de demineralisation neuve.
Pour commander une çartouche de demineralisation, composer 1-800-394-2326. Commander
la cartouche de demineralisation 6588. Les cartes VISA et Mastercard sont acceptees.
deminéraliation
reservoir a eau et attendre quelques minutes pour que le bac refasse son plein. Brancher
le
mettre en marche. Dès que le bac est plein, la vaporisation commence. Si une
réduit la teneur en mineraux qui cause une poussiere blanche sur
cavite
du fond de l’appareil.
apres une longue periode d’entreposage de
j
localite
en contactant le
Reinstaller
NOTA: La performance de la Cartouche de demineralisation dépendra de. la teneur
en mineraux de votre eau de canalisation. Son efficacité s’altérera
à
la longue.
’
23
Page 25

Tableau de dépannage de l’utilisateur
É
TAT
l
Pas de courant
(e;l;t;oyant est
l
Aucun jet d’air ou
de vaporisation (et
le voyant est allume)
l
Réservoir plein d’eau
mais aucune buee
(ventilateur en
marche)
CAUSEPROBABLE
l
Appareil non branche
. Prise de courant hors tension
l
Pas d’eau dans l’appareil
l
Ventilateur defectueux
l
Pieces defectueuses
(non reparables)
l
Débit de vaporisation regle trop bas
l
Appareil non a l’horizontale
l
Depots mineraux sur le nebuliseur
ou le capteur
l
Le reservoir à eau a et6 lave
avec un detergent
l
Nebuliseur
use
ou defectueux
CORRECTION
l
Brancher l’appareil
l Verifier circuit et
fusibles, faire
l’essai de la prise
avec une lampe
l
Remplir le reservoir
l
Voir la garantie
l
Voir la garantie
l
Augmenter le debit
de vaporisation
l
Le placer sur une
surface horizontale
l
Nettoyer le nebuliseur
et le capteur, refaire le
plein avec de l’eau
distillee
la cartouche de
demineralisation
l
Le rincer a fond
avec de l’eau claire
l
Voir ta garantie
ou remplacer
l
Fiche ou cordon
abîmé
l
Accumulation de
poussiere blanche
l
Isolant use
l
Fils nus ou endommages
l
Pieces defectueuses
(non reparables)
l
Eau du robinet utilisée sans
cartouche de demineralisation
l
La cartouche de deminéralisation
doit être
remplacee
l
Ne pas utiliser le
produit, voir
garanhe
l
Ne pas utiliser le
produit, voir
garanhe
l
Ne pas utiliser le
produi,t,voir
garantre
l
Utiliser de l’eau
distillee
l
Remplacer la cartouche
de demineralisation
Page 26

Garante limitée
Ce qui est couvert et pour combien de temps
Nous vous
que notre produit fonctionnera bien et, à titre de premier
jouir de sa garantie contre tous defauts
la période de un
Si votre appareil est sous le couvert de la garantie, nous le reparerons ou le remplacerons (à notre
discrétion) durant cette
Envoyez tout simplement l’appareil en port paye et assure, accompagne de la preuve d’achat et d’une
breve description du probleme qu’il présente, directement au centre de service apres-vente de l’usine,
a l’adresse suivante:
La garantie de notre produit ne couvre pas l’usure normale des pieces, les dommages imputables a la
négligence, a l’usage abusif, a l’utilisation sur courant ou sous tension non appropries, a l’utilisation
l’encontre des instructions, au bris de verre (s’il y a lieu), ou au demontage, a la reparation ou à la
modification par d’autres qu’un centre de service
loyale et marchande ou I’adaptabilite du produit à une fin particulière se limite à la
presente garantie ecrite. Nous nous dégageons de toute responsabilité en cas de dommages consécutifs ou indirects pour rupture de toute garantie explicite ou implicite du produit.
felicitons
d’avoir recemment fait l’achat d’un produit Sunbeam de qualite. Nous savons
mecaniques
ane, a
partir de la date de l’achat initial.
acquereur au
et
electriques
de
detail
du produit, vous pourrez
materiau
ou de fabrication pour
Ce que fera Sunbeam et comment se prévaloir du service
periode. Ceci constitue votre seul et unique recours en vertu de cette garantie.
SUNBEAM CANADA
Service à la client6le
5975 Falbourne Street
L5R
Mississauga, Ontario
3VB
Ce que la garantie ne couvre pas
a
agree. Toute garantie implicite portant sur la qualite
duree
de la
Législation provinciale applicable
Certaines provinces ne permettent pas la limitation de la durée d’une garantie implicite, l’exclusion ni
la limitation des dommages consécutifs ou indirects; par consequent, la limitation susmentionnée ne
s’applique peut-être pas a votre cas. Cette garantie vous donne des droits legaux spécifiques et vous
pourriez avoir d’autres droits
0
1996 Sunbeam Corporation ou ses filiales. Tous droits reservés.
SunbeamMo
Distribue par: Sunbeam Household Products, Schaumburg, IL 60173.
Sunbeam Corporation (Canada) Ltd, Mississauga, Ontario L5R 3V8.
Pour obtenir les recettes en version française, veuillez contacter notre Service à la clientèle
en composant
est une marque deposee de Sunbeam Corporation ou de ses filiales.
l-&Xl-66-SUNBEAM.
legaux qui varient d’une province à l’autre.
25
Page 27

Notas
notas
Page 28

Notas
notas
 Loading...