

Page 1

INSTRUCTION BOOKLET
I5-MINUTE AUTO-OFF IRON
Page 2

IMPORTANT SAFEGUARDS
When using your iron, basic safety precautions should always be
followed, including the following:
1.
Read all instructions.
2.
Use iron only for its intended use.
3.
To protect against a risk of electric shock, do not immerse the iron in
water or other liquids.
4.
The iron should always be turned to OFF before plugging or unplugging
from outlet. Never yank cord to disconnect from outlet; instead grasp plug
to disconnect.
5.
Do not allow cord to touch hot surfaces. Let iron cool completely
before putting away. Loop cord loosely around iron when storing.
6.
Always disconnect iron from electrical outlet when filling with water or
emptying and when not in use.
7.
Do not operate iron with a damaged cord or if the iron has been dropped
or damaged. To avoid the risk of electric shock, do not disassemble the
iron. Take it to qualified serviceman for examination and repair. Incorrect
reassembly can cause risk of electric shock when the iron is used.
8.
Close supervision is necessary for any appliance being used by or
near children. Do not leave iron unattended while connected.
9.
Burns can occur from touching hot metal parts, hot water or steam. Use
caution when you turn a steam iron upside down - there may be hot
water in the reservoir.
10. If the malfunction indicator goes on, the flatiron is not operating normally.
Disconnect from the power supply and have the flatiron serviced by
qualified service personnel.
SPECIAL INSTRUCTIONS
1.
This is a 1200 watt appliance. To avoid a circuit overload, to not operate
another high wattage appliance on the same circuit.
2.
If an extension cord is absolutely necessary, a I0-ampere cord should be
used. Cords rated for less amperage may overheat. Care should be taken
to arrange the cord so that it cannot be pulled or tripped over,
3.
Your Sunbeam iron is designed to rest on the heel rest. Do not leave
the iron unattended.
Do not set the iron on an unprotected surface, even if it is on its heel rest.
SAVE THESE INSTRUCTIONS
2
Page 3
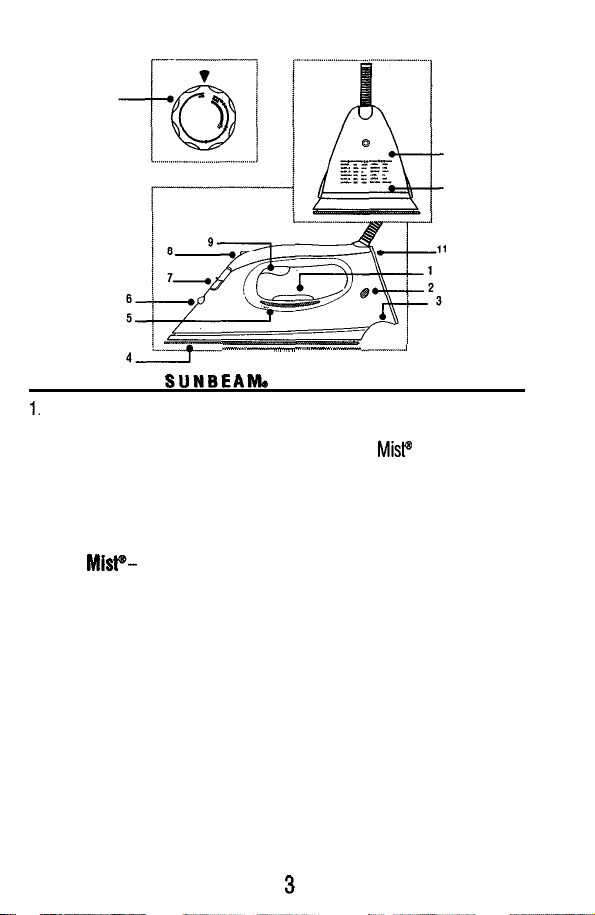
1
10
11
-.~---
KNOW YOUR SUNBEAMa STEAM/SPRAY/DRY
1.
Temperature Control Dial 7. Water Fill Opening
2.
Power Light, Auto-Off Indicator 8. Steam On/Off Control
3. Cord Wrap Groove
4. Non-Stick Sole Plate; 21 Steam Vents
9. Spray
Mist@
Trigger
10. Fabric Temperature Suggestions
IRON
5. Water Window 11. Heel Rest
6. Spray Mist@ Nozzle
FEATURES
l
Spray
MisP-
Provides a fine spray mist for spot dampening. Trigger control.
l
Temperature Dial-Controls heat output of iron. Adjust dial according to
ironing needs, For low temperatures, turn the dial to the first dot. For medium
temperatures turn the dial to second set of dots. For high temperatures turn dial
to third set of dots. (Refer to Ironing Guide for recommended settings).
l
Swivel Cord- Pivots up and down and is supported to prevent dragging
on fabric. Flexible grommet protects the cord from fraying.
l
Soleplate- Has full length grooves for added convenience when ironing shirts
and blouses.
l
Non-Stick Finish-The non-stick coating on the sole plate prevents sticking
of fabrics and starch residue.
l
Sliding Water Reservoir Cover- Prevents dust and foreign matter from
entering the water tank; stops any water spillage during ironing.
l
Cord Wrap- Provides quick, convenient cord storage.
3
Page 4

AUTO-OFF FEATURE
When the iron is plugged into a 120 volt, AC electrical outlet the steady red signal
light signals the iron is on. If the iron is left standing for 15 minutes, the iron will
stop heating. The signal light extinguishes to indicate
aura
shut-off and will stay
out until the iron is either restarted or unplugged.
To
restart iron: To restart the iron after it has shut itself off, unplug the iron,
wait ten seconds and plug the iron back into the outlet.
CAUTION: DO NOT USE THE AUTO SHUT-OFF FEATURE AS A SUBSTITUTE
FOR TURNING OFF AND UNPLUGGING THE IRON WHEN NOT IN USE.
BEFOREFIRSTUSE
To ensure no stain is transferred to the fabric the first time you use the iron,
it is advisable to flush the soleplate steam vents to remove any residue from
the manufacturing process. To do this:
1. Set the steam adjustment control to steam (on).
2. Fill the iron’s water tank to its maximum fill line.
3. Set the temperature selector knob to its highest setting. Heat iron for 2 minutes.
4. Steam for 2 minutes while directing the steam vents away from
the ironing surface.
5. Pass the iron on a damp cloth or a paper towel to clean.
Selecting the Correct Fabric Setting
When ironing, use the temperature and steam settings recommended for the type of
fabric being ironed. Garments requiring low temperatures and steam should be
ironed first. This will help avoid damaging garments with a too hot iron. If you are
sure of the fabric content of the garment, start with a low heat and steam setting and
test the iron on an area of the garment where it will not show, such as a seam or
facing. Gradually increase the heat and steam settings until wrinkles are removed
without damaging the fabric.
When changing the temperature from a high setting to a lower setting
(EXAMPLE: Temperature selector is moved from maximum to minimum)
allow approximately 5 minutes for the lower temperature to be reached.
The following charts are designed to help you select the best setting and method
for the fabric you plan to iron. Check garment labels and follow recommendations
given by the manufacturer. For blended fabrics use the setting for the fabric in the
blend requiring the lowest temperature, for example: 65% polyester, 35%
COttOn
fabric. Iron this fabric at the minimum setting.
4
Page 5

A Word on Water
This iron is specially designed to use tap water. In areas of the country where the water is very hard,
distilled water is recommended for your iron. If you’use distilled water in your iron, you should
periodically use a tank of tap water to keep your iron properly conditioned. DO NOT use water
passed through home water softening systems because such water contains minerals that may be
harmful to the iron.
Using as a Dry Iron
The iron can be used on the dry setting with or without water in the tank. Avoid having the tank
too full of water while dry ironing.
l
Slide the temperature control to Min. before plugging the cord into a 120 volt, AC electrical
outlet.
l
Slide top button to the no steam position and move the temperature control to the appropriate
fabric setting.
l
It you are starting with a cool iron, let iron heat in the upright position on the heel rest. If the iron
is already hot, be sure to cool or heat the iron to a suitable temperature for the fabric you are
about to iron. Try it on an area 01 the garment where it will not show, such as a seam or facing.
5
Page 6

Uslng as a Steam Iron
6
When using as a steam iron be sure the temperature setting is within the STEAM range on the
temperature selector to avoid spotting the garment.
l
Slide the temperature control to MIN. Slide top button to the steam position,
Fill the iron with water. (See TO FILL THE WATER TANK instructions),
l
Plug the cord into a 120 volt, AC electrical outlet.
l
Move the temperature control to the appropriate fabric setting. Allow 2 minutes for the iron
to reach the desired temperature.
l
After iron has reached desired temperature, remove from the heel rest and use. If the unit fails to
steam after depressing the steam slide button, gently tap the soiepiate on the ironing surface.
This will aid in starting the steaming action.
l
‘When steam ironing, if the temperature control setting is accidentally lowered, water may appear
on the soleplate, indicating that iron temperature has dropped below steaming level. If this,
should occur, reset temperature control to desired level. Rest the iron on its heel rest for 1 minute
to allow it to reach temperature. if your iron starts losing its flow of steam and you wish to
continue steam ironing, you may refill without cooling the iron, Unplug the iron, Follow the TO
FILL THE WATER TANK instructions. Add water only to the maximum fill line to prevent overflow.
To Fill the Water Tank
Always unplug the iron before filling. Set iron on its heel rest,
The water fill opening is located underneath the spill-proof cap. Hold the iron
with the cap open and fill to maximum
fill
line. Close the spill-proof cap
on the iron. Be sure the cap is fully seated. Wipe the exterior of the unit
to dry off any spillage.
To Empty the Water Tank
Slide the temperature selector to the
Open the spill-proof cap. Holding the iron over the sink, point the iron handle down and hold in
that position until water stops flowing out of the fill opening. Shake the iron gently to loosen trapped
water drops; the heat of the iron will dry the inside of the iron. Let the iron cool on its heel rest.
IMPORTANT: SUNBEAM DOES NOT RECOMMEND STORING THE IRON WITH WATER IN THE TANK.
MIN
position. Unplug the iron from the electrical outlet.
Caring for Your Sunbeam Iron
l
Avoid ironing over snaps, zippers, rivets on jeans, etc., as they will scratch the soleplate.
l
FOR MODELS WITH A NON-STICK OR CHROME-PLATED SOLEPLATE, clean water marks,
calcium deposits and starch from the soleplate as follows: allow iron to cool and wipe with a soft
cloth using a mild vinegar solution (one tablespoon of vinegar in one cup of water). DO NOT USE
SCOURING PADS, ABRASIVES, OR CHEMICAL CLEANING SOLVENTS as they may mar the
finish. NOTE: Scratches in non-stick soleplates do not affect performance of iron.
Maintenance
Other than recommended care instructions contained in this pamphlet, no further user maintenance
should be necessary.
However, following is a list of frequently asked questions and their resolutions. However, if for any
reason your Sunbeam iron continues to exhibit one of these symptoms, or should require repair for
another reason, do not attempt to fix it yourself. Send it to the Sunbeam Appliance Service Center.
Page 7

Questions and Answers
SYMPTOM POTENTIAL REASONS AND SOLUTIONS
Iron does not heatl The slide control must at least be set at the desired temperature.
Iron does not steam
Iron splits water or
leaks water froml If the iron leaks when turned
steam vents
l
Iron should be plugged into a 120 volt, AC electrical outlet only.
l
The auto shut-off feature may have been activated, unplug iron,
wait 10 seconds & plug in.
l
The water tank may be empty. Add water.
l
Make sure the steam button is depressed. (On variable steam models.
the slide control must be in one of the three steam positions). .
l
Use only temperature settings at or above Polyester,
l
Do not set to steam setting until selected temperature has been
reached. Make sure iron is pre-heated
l
Gently tap the soleplate on the ironing board once or twice to clear
1X-2
minutes.
any blockage of steam valve.
l
Your iron may spit or leak water from the steam vents if you try to get
steam when the temperature setting is too low. Use only
temperature settings in steam range shown on the Temperature
and Steam Guide.
l
Make sure iron has reached selected temperature before ironing.
Pre-heat iron l%-2 minutes.
DFF
or while DRY ironing,
make sure the steam control is set to NO STEAM Position,
l
Iron may have been overfilled. Turn it off. Follow instructions for
emptying the water tank. Remove some of the water. Let iron cool,
then dry it off. Replug iron into electrical outlet and reheat.
After 1% minutes, set to ‘steam”. Follow USING AS A STEAM IRON
instructions.
Note: For additional assistance please call the Iron Hotline
l-800-597-5978
Iron Storage
l
When you’ve finished ironing, turn the temperature guide to the MIN position and push down
or slide the button to the OFF position.
l
Remove the cord from the outlet by grasping the plug rather than pulling the cord.
l
Empty the water tank AFTER EACH USE while the iron is still HOT.
l
Allow the iron to COOL COMPLETELY before putting it away. Wrap the cord loosely around
the heel rest. WRAPPING TOO TIGHTLY CAN DAMAGE THE CORD.
l
Always store the iron ON ITS HEEL REST with the temperature control knob in the MIN position.
DO NOT store In the carton, as any residue of moisture may cause the soleplate to discolor.
Environmental Note
Irons with the automatic shut-off feature may contain a small amount of mercury in the auto-off
switch. The mercury switch should be removed for recycling before the iron is thrown away
Please contact your local recycling center for information regarding proper disposal of the iron.
7
Page 8

~-YEAR
L
IMITED
W
ARRANTY
Sunbeam Products Inc. warrants that, for a period of two years from date of purchase, this product
shall be free of mechanical and electrical defects in material and workmanship. Our obligation
hereunder is limited to repair or replacement, at manufacturer’s option, of this product during
the warranty period, provided that the product(s) purchased in the United States are sent postage
prepaid directly to:
SUNBEAM APPLIANCE SERVICE STATION
117
Central
lndustrial
Row
MS
Purvis,
Answers to questions regarding this warranty or your nearest U.S.A. authorized service location
may be obtained by calling toll free
1-800-597-5978 or by writing to Sunbeam-Consumer Affairsat
PO. Box 948389, Maitland, Florida 332794-8389.
For products purchased in Canada please return them, postage prepaid, directly to:
SUNBEAM APPLIANCE SERVICE STATION (KND)
1351 Matheson Boulevard East, Unit # 5 & # 6
Mississauga, ON L4W 2A1
Answers to questions regarding this warranty
may be obtained by calling toll free in Canada l-800-887-8823.
Forwarranty information or an authorized service location outside of the United States and Canada
please see the warranty service card inserted in the product packaging.
D0 NOT RETURN THIS PRODUCT TO THE
PLACE OF PURCHASE; DOING SO MAY DELAY
THE PROCESSING OF YOUR WARRANTY CLAIM.
This warranty does not cover normal wear of parts or damage resulting from any of the following:
negligent use or misuse of the product, use on improper voltage or current, use contrary to
operating instructions, or disassembly, repair, or alteration by any person other than an authorized
service center. Product repair or replacement as provided under this warranty is your exclusive
remedy. Sunbeam Products Inc. shall not be liable for any Incidental or consequential damages
for breach of any expressed or implied warranty on this product. Except to the extent prohibited
by applicable law, any implied warranty of merchantability or fitness for a particular purpose on
this product is limited in duration to the duration
do not allow the exclusion or llmitation of incidental or consequential damages, or allow limitation
on how long an implied warranty lasts, so the above limitations or exclusion may not apply to you.
This warranty gives you specific legal rights, and you may also have other rights which vary
state to state or province to province.
01997 Sunbeam Corporation or its affiliated companies. All rights reserved.
Sunbeam is a registered trademark of Sunbeam Corporation or its affiliated companies.
Distributed by Sunbeam Products Inc., Delray Beach, Florida 33445.7
39475
or your
nearest Canadian authorized service location
of
the above warranty. Some states and provinces
8
 Loading...