

Page 1

Instruction Manual
CLASSIC IRON
Manuel d'lnstructions
FER h REPASSER
Manual de lnstrucciones
PLANCUA CthlCA
Manual de
FERRO
*
v
CLASSIQUE
*
v
*
v
Instrug6es
CtihSlCO
Page 2

When using your flatiron, basic safety precautions should always be followed,
including the following:
READ ALL INSTRUCTIONS BEFORE USING
1. Use iron only for its intended use.
2. To protect against risk of electric shock, do not immerse the iron in water
or other iiquids.
3. The iron should always be turned to “OFF” before plugging or unplugging from outlet.
Never yank cord to disconnect from outlet; instead, grasp plug and pull to disconnect.
4. Do not allow cord to touch hot surfaces. Let iron cool completely before putting away.
Loop cord loosely around iron when storing.
5. Always disconnect iron from electrical outlet when filling with water or emptying
and when not in use.
6. Do not operate iron with a damaged cord or if the iron has been dropped or damaged.
To avoid the risk of electric shock, do not disassemble the iron. Take it to a qualified
serviceman for examination and repair. Incorrect reassembly can cause a risk of
electric shock when the iron is used.
7. Close supervision is necessary for any appliance being used by or near children.
Do not leave iron unattended while connected or on an ironing board.
8. Burns can occur from touching hot metal parts, hot water or steam. Use caution
when you turn a steam iron upside down -there may be hot water in the reservoir.
9. If the flatiron is not operating normally, disconnect from the power supply
and have the flatiron serviced by qualified service personnel.
10. Your Sunbeam@ Iron is designed to rest on the heel rest. Do not leave the iron unattended.
Do not set the iron on an unprotected surface, even if it is on its heel rest.
SPECIAL INSTRUCTIONS
1. This is a 1200 Watt appliance? To avoid a circuit overload, do not operate another high
wattage appliance on the same circuit.
2. If an extension cord is absolutely necessary, a lo-ampere” cord should be used.
Cords rated for less amperage may overheat. Care should be taken to arrange
the cord so that it cannot be pulled or tripped over.
FOR
PRODUCTS PURCHASED IN THE U.S. AND CANADA ONLY:
To reduce the risk of electrical shock, this appliance has a polarized plug (one blade
is wider than the other). This plug fits a polarized outlet only one way; if the plug does not
fit fully into the outlet, reverse the plug. If it still does not fit, contact a qualified electrician.
Do not attempt to defeat this safety feature.
*In Mexico, the iron runs at 127 Volts, 1340 Watts. If an extension cord is necessary,
a 13 ampere cord should be used
Page 3

SPRAY
MIST@
MODELS ONLY
10
1. Centered
FLEXcordTM
2. Fabric and Steam Setting Guide
3. Heel Rest
4. Auto-Off Signal Light
(Some Models On/y)
5. Off and Temperature Selector
6. Non-Stick Soleplate
(Some Models Only)
9
7. Dry/Fill Steam Button or Variable Steam
Adjustment Guide
8. Water Window
9. 29 Steam Vents
10. Full Length Button Groove
11. Water Fill Opening
12. Thumb Rest
Page 4

DRY
FILL
Steam & Dry Feature
When using as a steam iron, press down or slide the button (depending on the model of your iron)
to the STEAM position. If using the iron as a dry iron, or filling the iron with water for steam
ironing, press down or slide the button to the DRY/FILL position.
Spray Mist Feature (Some Mode/s
On/y)
Press spray button to spray water in a fine mist to dampen fabric for removal of tough wrinkles.
Variable Steam Feature (Some Models
Only)
When steam ironing, move the variable steam slide to one of the steam areas:
C$
&&
J v
&~~($
Safety
Smart” Auto-Off Feature
GENTLE steam for lightweight and delicate fabrics such as polyester and silk,
at low temperatures.
FULL steam for medium weight fabrics such as wools and cotton blends.
ULTRA steam for heavy fabrics such as cotton and linen at high temperatures.
(Some Models Only)
When the iron is plugged into a 120 volt, AC electrical outlet, the steady red signal light signals
the iron is on or is ready to be turned on. If the iron is left standing on the heel rest for 15 minutes,
the iron will stop heating. The signal light flashes to indicate auto shut-off and will continue
flashing until the iron is either restarted or unplugged.
If the iron is left in the ironing position, the iron switches to the Auto-Off mode in 30 seconds.
Again, the signal light flashes to indicate auto shut-off and will continue flashing until the iron
is either restarted or unplugged.
TO RESTART IRON: To restart the iron after it has shut itself off, select DRY/FILL; then move the
iron back and forth in the ironing position until the signal light changes from flashing to steady.
Make sure the slide control is set at the desired temperature and allow 3 minutes for the soleplate
to get to the selected temperature before selecting steam level.
CAUTION: 00 NOT USE THE AUTO SHUT-OFF FEATURE AS A SUBSTITUTE FOR TURNING OFF
AND UNPLUGGING THE IRON WHEN NOT IN USE.
Page 5

Self Cleaning Feature
(Some Models On/y)
THIS PROCEDURE CLEANSES THE IRON'S STEAM VENTS AND STEAM CHAMBER OF MANY MINERALS
THAT CAN
l Set variable steam slide to OFF position.
l Fill the iron’s water tank to its maximum level.
l Set the temperature se!ector knob to i!s highest setting.
l Allow the iron to heat for l-1/2 minutes.
l Turn off the iron and unplug.
l Hold the iron over the sink and activate the self-cleaning feature by sliding the variable steam
l Slowly rock the iron from side to side and front to back for 30 seconds. When rocking from front
CLOG YOUR IRON, REDUCING
ITS STEAMING AND HEATING CAPABILITIES.
to the self-cleaning position. (Be careful not to
touch hot
surfaces.)
to back, the nose of the iron should dip slightly below the rear of the iron to make certain water
is circulated completely through the iron.
l Return the variable steam knob to the OFF position.
l Empty the remaining water through the fill opening.
l Dry the soleplate with a towel.
l Plug in the iron, set the temperature selector to the highest setting and let the iron heat for
2 minutes to dry any water remaining inside the steam chamber.
l Cool the iron and store as per the instructions
Page 6

To ensure no stain is transferred to the fabric the first time you use your iron, it is advisable to
flush the soleplate steam vents to remove any residue from the manufacturing process. To do this:
l
Set the steam adjustment control to “DRY/FILL"
l
Fill the iron’s water tank to its maximum fill line.
l
Set the temperature selector knob to its highest setting. Heat iron for 2 minutes.
l
Set the steam adjustment control to its highest setting.
l
Steam for 2 minutes while directing the steam vents away from the ironing surface.
l
Pass the iron on a damp cloth or a paper towel to clean.
When ironing, use the fabric temperature and steam settings recommended for the type of fabric
being ironed. Garments requiring low temperature and steam should be ironed first. This will help
avoid damaging garments with an iron that is too hot. If you are not sure of the fabric content of the
garment, start with a low heat and steam setting and test the iron on an area of the garment where
it will not show, such as a seam or facing. Gradually increase the heat and steam settings until
wrinkles are removed without damaging the fabric.
When changing the temperature from a high setting to a lower setting (EXAMPLE: Temperature
selector is moved from “LINEN” to “POLYESTER” and the variable steam slide is moved from
ULTRA steam to GENTLE steam) allow approximately 5 minutes for the lower temperature
to be reached.
The following charts are designed to help you select the best setting andmethod for the fabric you
plan to iron. Check garment labels and follow recommendations given by the fabric manufacturer.
For blended fabrics use the setting for the fabric in the blend requiring the lowest temperature.
For example: 65% polyester 35% cotton fabric. Iron this fabric at the “POLYESTER” setting
(and GENTLE steam on models with variable steam).
Page 7

I
Acetate-Nylon Dry Steam
Acrylic-Silks Dry Steam
Polyester
Wools
Cottons
Linens
Fabric
Acetate-Nylon
Acrylic-Silks Dry iron on wrong side while damp.
Polyester 1
Dry Steam
Drv
Steam
Dry Steam
Dry Steam
Steam
Guide
DRY
GENTLE
4b
Wools
Cottons
Linens
FULL
+e
ULTRA
444kJ
Dry iron on wrong side while damp.
Dry iron on wrong side while damp. Acrylic fabrics may be steam
ironed at steam settings if fabric manufacturer directs.
Dry iron while fabric is damp or use spray as you iron.
Iron rayon fabrics on the wrong side. Steam iron as fabric
manufacturer directs,
Steam iron on wrona side or use bressina cloth on riaht side.
Steam iron while damp or use spray as you iron. Iron dark fabrics
on wrong side to avoid shine.
Steam iron while damp or use spray as you iron. Iron each section
until entirely dry. Iron dark fabrics on the wrong side and
table linens on right side.
Ironing
Recommendations
Dry iron on wrong side while damp.
Steam iron while fabric is damp or use
I
spray as you iron. Iron rayon fabrics inside out.
Steam iron as manufacturer directs.
Steam iron inside out or use
pressing cloth on right side.
Steam iron while damp or use spray as you iron.
Iron dark fabrics inside out to avoid shine.
Steam iron while damp or use spray as you iron.
Iron each section until entirely dry. Iron dark fabrics
inside out and table linens on right side.
Page 8

A WORD ON WATER
This iron is specially designed to use tap water. In areas of the country where the water is
very hard, distilled water is recommended for your iron. If you use distilled water in your iron,
you should periodically use a tank of tap water to keep your iron properly conditioned.
DO NOT use water passed through home water softening systems because such water contains
minerals that may be harmful to the iron.
U
SING
As
The iron can be used on the dry setting with or without water in the tank. Avoid having the tank
too full of water while dry ironing.
l Slide the temperature control to OFF before plugging the cord into a 120 volt,
AC electrical outlet.
l Push down or slide button to the DRY/FILL position. Move the temperature control
to the appropriate fabric setting.
l If you are starting with a cool iron, let iron heat in the upright position on the heel rest. If the iron
is already hot, be sure to cool or heat the iron to a suitable temperature for the fabric you are
about to iron. Try it on an area of the garment where it will not show, such as a seam or facing.
U
SING
AS
When using as a steam iron, be sure the temperature setting is within the STEAM range on the
temperature selector to avoid water spotting on garment.
l Slide the temperature control to OFF. Push down or slide button to the DRY/FILL position.
Fill the iron with water. (See TO FILL THE WATER TANK instructions.)
l Plug the cord into a 120 volt, AC electrical outlet.
l Move the temperature control to the appropriate fabric setting. Allow 2 minutes for the iron to
reach the desired temperature.
l After iron has reached desired temperature, push down or slide button to the STEAM position.
If the unit fails to steam after depressing the steam slide button, gently tap the soleplate on the
ironing surface. This will aid in starting the steaming action.
l When steam ironing, if the temperature control setting is accidentally lowered, water may
appear on the soleplate, indicating that iron temperature has dropped below steaming level.
If this should occur, select DRY/FILL setting. Then, reset temperature control to desired level.
Rest the iron on its heel rest for 1 minute to allow it to reach temperature.
If your iron starts losing its flow of steam and you wish to continue steam ironing, you may refill
without cooling the iron, Turn the iron off. Follow the TO FILL THE WATER TANK instructions.
Add water only to the maximum fill line to prevent overflow.
A
DRY
A STEAM
I
IRON
RON
Page 9

To
FILL
THE
WATER TANK
Always unplug the iron before filling. Push down or slide the button to
the DRY/FILL position. The water fill opening is located underneath the
spill-proof cap. Hold the iron with the cap open and fill to maximum fill line.
Replace the spill-proof cap on the iron. Be sure the cap is fully seated by
applying slight downward pressure. Wipe the exterior of the unit to dry off
any spillage.
Models with Spray Mist@
To Empty THE WATER TANK
Push down or slide button to the DRY/FILL position. Slide the temperature selector to
the OFF position. Unplug the iron from the electrical outlet. Open the spill-proof cap.
Holding the iron over the sink, point the iron handle down and hold in that position until
water stops flowing out of the fill opening. Shake the iron gently to loosen trapped water drops
The heat of the iron will dry the inside of the iron. Let the iron cool on its heel rest.
IMPORTANT: SUNBEAM DOES NOT RECOMMEND STORING THE IRON
WITH WATER IN THE TANK.
CARING
1. Avoid ironing over snaps, zippers, rivets on jeans etc., as they will scratch the soleplate
2. If starch or other material clings to the ALUMINUM SOLEPLATE of the iron,
cool the iron and then clean as follows:
A. Make a thin paste of nonabrasive household cleaner and water on a soft cloth.
Gently rub surface to remove starch or residue build-up.
B. Fill iron, set temperature control to linen. Allow iron to heat up (approximately 2 minutes).
Push button down or slide switch to high steam setting. Allow to steam for a few minutes.
C. Iron over old cotton towel to remove paste from iron bottom and steam vents.
D. Should soleplate become scratched, most minor scratches can be removed using fine
steel wool. After buffing, follow steps B and C before ironing garments.
E. A hot iron cleaner may be used according to manufacturers instructions.
3. IF YOU HAVE A MODEL WITH A NON-STICK SOLEPLATE, clean water marks, calcium deposits
and starch from the soleplate as follows: allow iron to cool and wipe with a soft cloth using a
mild vinegar solution (one tablespoon of vinegar in one cup of water). DO NOT USE SCOURING
PADS, ABRASIVES, OR CHEMICAL CLEANING SOLVENTS as they may mar the finish.
N
OTE
:
Scratches in non-stick soleplates do not affect performance of iron.
FOR YOUR
SUNBEAMS@ IRON
Page 10

M
AIN
TEN
ANCE
Other than the recommended care instructions contained in this pamphlet, no further user
maintenance should be necessary. However, following is a list of frequently asked questions
and their resolutions. However, if for any reason your Sunbeam’ Iron continues to exhibit one
of these symptoms, or should require repair for another reason, do not attempt to fix it yourself.
Send it to the Sunbeam Appliance Service Station.
QUESTIONS AND ANSWERS
SYMPTOM POTENTIAL REASONS AND SOLUTIONS
l
Iron does not heat
Iron does not steam
Iron spits water or
leaks water from
steam vents
Iron should be plugged into a 120 volt, AC electrical outlet only.
l
The slide control must be set at the desired temperature.
l
The auto shut-off feature may have been activated
(some models only). See “Safety Smart@” section.
l
The water tank may be empty. Add water.
l
Make sure the steam button is fully depressed.
(On variable steam models, the slide control must be in one of the
three steam positions.)
l
Only use temperature settings at or above Polyester.
l
Do not set to steam setting until selected temperature has
1X-2
been reached. Make sure iron is pre-heated
l
Gently tap the soleplate on the ironing board once or twice to clear
minutes.
any blockage of steam valve.
l
Your iron may spit or leak water from the steam vents if you
try to get steam when the temperature setting is too low. Use only
temperature settings in steam range shown on the Temperature
and Steam Guide.
l
Make sure iron has reached selected temperature before ironing.
Pre-heat iron l-112 to 2 minutes.
l
If the iron leaks when turned OFF or while DRY ironing,
make sure the DRY/FILL button (or slide control on some models)
is set to DRY/FILL position.
l
Iron may have been overfilled. Turn iron off. Follow instructions for
emptying the water tank. Remove some of the water. Let iron cool,
then dry it off.
Replug
iron into electrical outlet and reheat.
After l-112 minutes, set to “Steam”. Follow “Using As a Steam Iron”
instructions.
NOTE: Always set steam control to NO STEAM position unless unit
is ready for steam ironing.
NOTE: For additional assistance please call the Iron Hotline:
l-800-597-5978
Page 11

IRON
STORAGE
l When you’ve finished ironing, turn the temperature guide to the OFF position and push down
or slide the button to the DRY/FILL position.
l Remove the cord from the outlet by grasping the plug rather than pulling the cord.
l Empty the water tank AFTER EACH USE while the iron is still HOT.
l Allow the iron to COOL COMPLETELY before putting it away. Wrap the cord loosely
around the handle and use the molded cord lock on the plug to fasten the cord in place.
WRAPPING TOO TIGHTLY CAN DAMAGE THE CORD.
l Always store the iron ON ITS HEEL REST with the temperature control knob in the OFF position.
DO NOT store in the carton, as any small residue of moisture may cause the soleplate to discolor.
ENVIRONMENTAL NOTE
Irons with the automatic shut-off feature may contain a small amount of mercury in the auto-off
switch. The mercury switch should be removed for recycling before the iron is thrown away.
Please contact your local recycling center for information regarding proper disposal of the iron.
8-~~~.-~~~=~~~‘~~~.j?:~~~~~;~~~~~~~~~~
2-YEAR
Sunbeam Products Inc. warrants to the original purchaser, subject to the limitations and exclusions set forth below, that this
product shall be free, in all material respects, of mechanical and electrical defects in material and workmanship from the
date of purchase for two years. This warranty does not cover normal wear of parts or damage resulting from any of the
following: negligent use or misuse ot the product, use on improper voltage or current, use contrary to operating instructions
or disassembly, repair or alteration by any person other than an authorized service center.
Our obligation hereunder is limited to repair or replacement, at manufacturer’s option, of the product during the warranty
period, provided that the product, along with the model number and original dated proof of purchase, is sent postage
prepaid, directly to the following address:
For products purchased in the United States:
SUNBEAM APPLIANCE SERVICE STATION
117 Central Industrial Row
For products purchased in Canada:
SUNBEAM APPLIANCE SERVICE STATION (KND)
Do not return this product to the place of purchase or to the manufacturer; doing so may delay the processing of your
warranty claim.
Answers to questions regarding this warranty for for your nearest authorized service location may be obtained by calling
toll-free l-800-597-5978 or by writing to Sunbeam
Answers to questions regarding this warranty or for your nearest Canadian authorized service location may be obtained by
calling toll-free in Canada l-800-667-8623. For warranty information or for an authorized service location outside of the
United States and Canada, please see the warranty service card inserted in the product packaging.
Product repair or replacement as provided under this warranty is your exclusive remedy. SUNBEAM PRODUCTS, INC.
SHALL NOT BE LIABLE FOR ANY INCIDENTAL OR CONSEQUENTIAL OAMAGES FOR BREACH OF ANY
EXPRESS OR IMPLIED WARRANTY ON THIS PRODUCT OR ANY PART THEREOF. EXCEPT TO THE EXTENT
PROHIBITED BY APPLICABLE LAW, SUNBEAM PRODUCTS, INC. DISCLAIMS ANY IMPLIED WARRANTY OF
MERCHANTABILITY OR FITNESS FOR A PARTICULAR PURPOSE OF THIS PRODUCT OR ANY PART THEREOF.
Some states and provinces do not allow the exclusion or limitation of incidental or consequential damages, or allow
limitations on how long an implied warranty lasts, so the above limitations or exclusions may not apply to you. This warranty
gives you specific legal rights, and you may also have other rights, which vary from State to State or Province to Province.
L
IMITED
W
ARRANTY
Attention: Service Department
Purvis, MS 39475
Attention: Service Department
5975 Falbourne Street
Mississauga, ON
-
Consumer Affairs, at P.O. Box 948389, Maitland, FL 32794-8389.
DISCLAIMER
L5R 3V8
Page 12

Lors de l’utilisation du fer à repasser, veiller à toujours respecter des mesures de précaution
élémentaires, notamment:
LIRE TOUTES LES INSTRUCTIONS AVANT D’UTILISER
1. Utiliser ce fer uniquement à des tâches pour lesquelles il est conçu.
2. Pour écarter les risques d’électrocution, ne pas immerger le fer dans l’eau ni dans
aucun autre liquide.
3. Veiller à toujours mettre le fer en position ARRÊT (OFF) avant de le brancher ou
de le débrancher. Ne jamais tirer sur le fil pour débrancher le cordon; saisir la fiche et
l’extraire de la prise.
4. Ne pas laisser le cordon d’alimentation venir au contact des surfaces chaudes. Laisser le fer
refroidir complètement avant de le ranger. Pour le rangement, enrouler le cordon autour du
fer sans serrer.
5. Veiller à toujours débrancher le fer de la prise de courant avant de remplir ou vider le réservoir
d’eau ou lorsque le fer n’est pas utilise.
6. Ne pas utiliser un fer dont le cordon d’alimentation est endommagé ou qui a subi une chute
ou a été endommagé. Pour écarter les risques d’électrocution, ne pas démonter le fer.
Confier les contrôles et réparations à un réparateur qualifié. Un fer mal remonté présente
un danger d’électrocution durant son utilisation.
7. Faites particulièrement attention lorsque le fer est utilisé par, ou en présence d’enfants.
Ne pas laisser sans surveillance un fer branché ou posé sur la table à repasser.
8. Le contact avec les pièces en métal chaudes ou avec la vapeur s’échappant des orifices de
diffusion présente des risques de brûlure. Attention avant de tourner un fer
à l’envers: le réservoir peut contenir de l’eau bouillante.
9. Si le fer plat ne fonctionne pas convenablement, débranchez-le de la source d’alimentation
et apportez le fer plat à un centre de service agréé pour le faire vérifier,
10. Le fer à repasser
sans surveillance. Ne pas poser le fer sur une surface not protegee, même pour le placer sur
son talon d’appui.
Sunbeam@ est conçu pour reposer sur son talon d’appui. Ne pas laisser le fer
à
repasser vapeur
INSTRUCTIONS PARTICULIÈRES
1. Ceci est un appareil 1200 W.* Pour éviter toute surcharge du réseau électrique, ne pas utiliser
un autre appareil
2. S’il est absolument necessaire de se servir dune rallonge électrique, utiliser un cordon de 10 A:
Les cordons de capacité moindre présentent des risques d’échauffement. Veiller a placer
le cordon de manière à ce qu’il ne risque pas d’être arraché ou de provoquer de trébuchement.
deforte
puissance sur le même circuit.
PRODUITS
Pour réduire le risque de choc électriquecet appareil est doté d’une fiche polarisée
(une broche est plus large
sur une prise de courant polarisée. Si la fiche ne s’enfonce pas complètement dans la prise,
la retourne et essayer de nouveau. Si elle ne s’adapte toujours pas à fond, consulter
un électricien qualifié. Veillez à respecter les mesures de securite de la prise polarisée.
*Au Mexique, le fer fonctionne à une tension de 127 Volts, 1340 Watts. S’il est necessaire de
se servir d’une rallonge électrique, utiliser un cordon de 13 A.
ACHETÉS AUX
que
hutre), cette fiche ne va que dans un sens seulement
ÉTATS-UN~S
ET AU
CANADA UNIQUEMENT:
Page 13

MODELES SPRAY
Bouton de Vaporisation
Buse de Vaporisation
Couvercle Antirenversement
MET@
SEULEMENT
/
10
‘9
CARACTERISTIQUES
1.
Cordon
2. Guide de Réglage Vapeur-Tissu
3. Talon d’Appui
4. Indicateur de Mise à I’Arrêt Automatique
5. Commutateur de Mise Hors Tension
^_
b.
modèles seulement)
FLEXcordTM
Centré
(s’applique à certains modèles seulement)
et de
Reglage de Température
. .
Semelle Antradhérente (s’applique à certains
6
7. Bouton de Relâchement de Vapeur à
Sec-Remplissage ou Guide de Réglage
de Vapeur Variable
8. Fenêtre de Niveau d’Eau
9. 29 Orifices à Vapeur
10. Rainure de Bouton Pleine Longueur
11. Goulot de Remplissage d’Eau
12. Repose-Pouce
Page 14

Fonction Vapeur-à Sec
Pour repasser à la vapeur, enfoncez ou glissez le bouton (selon le Modèle de fer) à la position
STEAM. Pour repasser à sec, ou pour remplir le réservoir d’eau aux fins de repassage vapeur,
enfoncez ou glissez le bouton à la position SEC/REMPLIR.
Mist@
Fonction Spray
(Certains Modèles Seulement)
Appuyez sur le bouton de vaporisation pour pulvériser une fine bruine d’eau et humecter
le vêtement afin d’éliminer les plis et froissements rebelles.
Fonction de Vapeur Variable (Certains Modèles Seulement)
Pour repasser à la vapeur, déplacez la glissière de vapeur variable à l’un des réglages de vapeur:
($3
VAPEUR DOUCE (aGENTLE)>) pour les tissus legers et/ou fragiles comme
le polyester et la soie à basse température.
PLEINE VAPEUR
(«FlJLL») pour les tissus de densité moyenne commes
les laines et les mélanges de coton.
c”3&&
VAPEUR MAXIMALE («ULTRA~~) pour les tissus tels que le coton et la literie
à haute température.
Fonction de Mise à I’Arrêt Automatique Safety Smart”
(Certains Modèles Seulement)
Lorsqu’on branche la fiche du fer dans une prise électrique de 120 V c.a., l’indicateur rouge allumé
continuellement signale que le fer est sous tension ou prêt à mettre sous tension. Si le fer est
inutilisé pendant 15 minutes, il s’éteint automatiquement.
Cindicateur
clignote pour signaler
la mise à l’arrêt automatique et continuera de clignoter jusqu’à ce qu’on redémarre ou débranche
le fer.
Si on laisse le fer en position de repassage, il commute au mode de mise à l’arrêt automatique au
bout de 30 secondes. Encore ici, l’indicateur clignote pour signaler la mise à l’arrêt automatique
et continuera de clignoter jusqu’à ce qu’on redémarre ou débranche le fer.
POUR REDÉMARRER LE FER: Pour redemarrer le fer après qu’il s’est mis à l’arrêt,
selectionnez
DRY/FILL, puis déplacez le fer en va-et-vient en position de repassage jusqu’à ce que l’indicateur
de signal ne clignote plus et reste plutôt allumé continuellement. Assurez-vous de régler
la glissière à la température désirée et de laisser à la plaque d’appui un délai de 3 minutes pour
atteindre la température choisie avant de sélectionner le réglage de vapeur.
ATTENTION: LA FONCTION D’ARRÊT AUTOMATIQUE N’ÉLIMINE PAS LA NÉCESSITÉ
DE DÉBRANCHER LE FER POUR L’ÉTEINDRE APRÈS UTILISATION.
Page 15

Fonction d’Autonettoyage
(Certains Modèles Seulement)
C~EPROCÉDURENETTOIELESVOLETSDERELACHEMENTDEVAPEURETLACHAMBRE
A VAPEURDE
.NOMBREUXMINÉRAUXQUIPEUVENTBOUCHERVOTREFERETAINSIRÉDUIRESESCAPACITÉSDE
CHAUFFAGE ET DE VAPEUR.
l Mettez la glissiere de vapeur variable hors tension («OFF»).
l Remplissez le reservoir jusqu’au niveau maximal d’eau.
l Laissez le fer chauffer
l Mettez le fer hors tension et debranchez-le.
l Tenez le fer au-dessus de I’evier et actionnez la fonction d’autonettoyage en deplaçant la glissiere
l-1/2
minute.
a la position d’autonettoyage. (Évitez de loucher les surfaces chaudes.)
l Balancez lentement le fer d’un
côté
a l’autre et avant-arriere durant 30 secondes. Lorsque vous
le balancez avant-arrière, le nez du fer doit se pencher legerement plus bas que son arrière pour
que l’eau circule d’un
l Remettez le bouton de vapeur variable hors tension (<<OFF>>).
bouta l’autre du fer.
Q Videz l’eau restante par le goulot de remplissage.
l Assechez la plaque d’appui à l’aide d’une serviette.
l ’ Branchez le fer, reglez le selecteur de temperature a sa plus haute valeur et laissez chauffer le fer
2 minutes afin d’evaporer toute eau qu’il peut encore rester dans la chambre a vapeur.
l Laissez refroidir le fer et entreposez-le selon les directives.
Page 16

AVANT LA
Pour écarter le risque de transfert de taches sur le tissu lors du premier repassage, il est
conseillé de rincer les orifices à vapeur de la semelle pour éliminer tout résidu issu du processus
de fabrication. Pour cela:
l
Placer le bouton de commande en position SEC/REMPLIR.
l
Remplir le réservoir d’eau jusqu’à son niveau maximum.
l
Mettre le bouton de commande de la température sur son réglage maximum. Laisser chauffer
le fer pendant 2 minutes.
l
Mettez le réglage de vapeur à sa plus haute valeur.
l
Laisser la vapeur s’échapper pendant deux minutes en écartant le fer de la surface de repassage.
l
Passer le fer sur un chiffon ou une serviette en papier humide pour le nettoyer.
(WOIX
Pour repasser, respecter les réglages de vapeur et de température conseilles pour le type de tissu
repassé. Repasser en premier les vêtements nécessitant de basses températures et peu de vapeur.
Ceci permet d’éviter d’endommager les vêtements avec un fer trop chaud. En cas d’incertitude sur
la composition du tissu, commencer avec un réglage minimum de la température et de la vapeur
et effectuer un essai sur une zone
Augmenter progressivement les réglages de température et de vapeur jusqu’à faire disparaître
les plis sans endommager le tissu.
cachee du vêtement, du type couture ou revers,
PRLMI~RE
UTILISATION
DU TYPE DE TISSU
Lorsque vous baissez la température (p. ex., lorsque vous déplacez le sélecteur de température de
-LINEN,> à
d’environ 5 minutes pour que le fer atteigne la nouvelle température.
Lorsque la température est abaissée (bouton de réglage amené du maximum au minimum, par ex.),
attendre cinq minutes environ que le fer soit descendu jusqu’à la température
de la page suivante permettent de choisir le réglage et la méthode les mieux adaptés au tissu
à repasser. Consulter les étiquettes des vêtements et suivre les recommandations du fabricant du
vêtement. Pour les tissus mixtes, utiliser le réglage correspondant au tissu du mélange nécessitant
la température la plus basse. Exemple : 6.5 % polyester, 35 % cotton. Repassez ce tissu au réglage
-POLYESTER- (et au réglage de vapeur GENTLE sur les modèles à vapeur variable).
<<POLYESTER,,
et la glissière de vapeur (I’ULTRA à GENTLE), prévoyez un délai
desirée. Les tableaux
Page 17

Polyester
1 ~
Va$
Sèche
I
Lainages Vapeur
Cotons Vapeur Sèche
Lins
Seche
Vapeur Sèche
MAXIMALE
w!MJ
Conseils de repassage
Repasser a sec sur l’envers humide.
Repasser à sec sur l’envers humide. Les tissus acryliques peuvent être
repassés
a
la vapeur suivant les instructions du fabricant.
Repasser à sec le tissu humide ou utiliser le.vaporisateur au fur et
1
mesure du repassage Repasser la rayonne sur l’envers.
Repasser à la vapeur suivant tes instructions du fabricant.
Repasser à la vapeur sur l’envers ou utiliser un tissu protecteur
sur l’endroit.
Repasser à la vapeur le tissu humide ou utiliser le vaporisateur au fur et à
mesure du repassage. Repasser les tissus sombres sur l’envers pour
éviter le lustrage.
Repasser à la vapeur le tissu humide ou utiliser le vaporisateur au fur et à
mesure du repassage. Repasser chaque portion jusqu’au séchage complet
Repasser tes tissus sombres sur l’envers et le linge de table sur l’endroit,
a
l
Conseils de repassage
Repasser à sec sur l’envers humide.
Repasser à sec sur l’envers humide. Les tissus akyliques peuvent être
repassés à la vaoeur suivant les instructions du fabricant.
Repasser à la vapeur le tissu humide ou utiliser le vaporisateur au fur et à
mesure du
les repasser. Repasser à la vapeur suivant les instructions du fabricant.
Retourner l’intérieur des vêtements pour les repasser ou utiliser un tissu
protecteur sur l’endroit.
Repassez à la vapeur pendant que le vêtement est encore humecte et
utilisez la vaporisation tout en repassant. Repassez les tissus foncés à
l’intérieur pour éviter les marques de brillance.
Repasser à la vapeur le tissu humide ou utiliser le vaporisateur au fur et
mesure du repassage. Repasser chaque portion jusqu’au séchage complet.
Repasser les tissus sombres sur l’envers et le linge de table sur l’endroit.
reoassaae. Retourner l’intérieur des vêtements en ravonne pour
I
I
a
Page 18

Ce fer est conçu spécialement pour utiliser de l’eau du robinet. Dans les regions disposant
d’une eau particulièrement dure, il est conseillé d’utiliser de l’eau distillée. En cas d’utilisation
d’eau distillée, il est conseille de remplir périodiquement le reservoir avec de l’eau du robinet pour
État
garder le fer en bon
de fonctionnement. NE PAS utiliser d’eau ayant passe par un dispositif
adoucisseur domestique car une telle eau contient des minéraux susceptibles d’endommager le fer.
U
TILISATION DU
fER
Àkc
Le fer peut être utilise sur le réglage <SEC=, avec ou sans eau dans le reservoir. Éviter d’avoir
un réservoir trop plein lors d’un repassage
l Mettre la commande de température sur
à
sec.
-OFF~~
avant de brancher le cordon d’alimentation
sur une prise électrique 120 V c.a.
l Enfoncez ou glissez le bouton à la position DRY/FILL. Déplacez le réglage de température
à l’identificationde tissu appropriee.
l Si le fer est froid à l’origine, le laisser chauffer en position verticale sur son talon d’appui.
Si le fer est déjà chaud, veiller à le laisser chauffer ou refroidir jusqu’à la température adaptée
au tissu à repasser. Faire un essai sur une zone du vêtement qui ne sera pas visible,
du type couture ou revers.
U
TILISATION DU
AVECVAPEUR
Lorsque le fer est utilisé avec la vapeur, veiller à ce que le réglage de temperature soit dans
l’intervalle STEAM du bouton de température afin d’éviter les tâches d’eau sur le vêtement.
l Glissez le réglage de température hors tension (-OFF-). Enfoncez ou glissez le bouton à
la position DRY/FILL. Remplissez le réservoir d’eau. (Consultez les directives REMPLISSAGE DU
RÉSERVOIR D’EAU.)
l Brancher le cordon d’alimentation sur une prise électrique 120 V c.a.
l Placer le bouton de température sur le réglage correspondant au tissu à repasser.
Attendre deux minutes que le fer ait atteint la température choisie.
l Une fois que le fer a atteint la temperature désiree, l’enlever de son talon d’appui et l’utiliser. Si le
,
fer ne dégage pas de vapeur une fois que le bouton de vapeur coulissant a été enfoncé, tapoter
légèrement de la semelle sur la surface de repassage. Ceci facilitera le début de la production de
vapeur.
l Si le réglage de température est baissé accidentellement durant le repassage à la vapeur, il est
possible que de l’eau apparaisse sur la semelle, signalant que la température du fer est passée
en dessous du seuil de production de vapeur. Si cela se produit, sélectionnez la position
DRY/FILL, puis remettez le réglage de température à la valeur désirée. Laisser le fer reposer sur
son talon d’appui pendant 1 minute jusqu’à ce que la température choisie soit atteinte.
Si le fer commence à perdre son débit de vapeur, il est possible de continuer à l’utiliser sans le
faire refroidir. Débrancher le fer. Suivre les instructions de REMPLISSAGE DU RÉSERVOIR D’EAU.
Pour éviter les débordements d’eau, remplir jusqu’au
repere de niveau maximal.
Page 19

REMPLISSAGE DU RESERVOIR D’EAU
Veiller à toujours débrancher le avant le remplissage. Enfoncez ou glissez
le bouton
sous le capuchon anti-déversement. Tenir le fer avec le capuchon ouvert et
le remplir jusqu’à la ligne de niveau maximum. Refermer le capuchon du fer.
Vérifier qu’il est correctement en place. Essuyer l’extérieur de l’appareil pour
eliminer
a
la position DRY/FILL. Corifice de remplissage de l’eau se situe
les éclaboussures.
VIDANGE DU
Enfoncez ou glissez le bouton à la position DRY/FILL. Glissez le réglage de température hors
(<<OFF>>).
tension
Au-dessus de l’évier, pointer la poignée du fer vers le bas et maintenir dans cette position jusqu’à
ce que l’eau ait cessé de s’écouler de l’orifice de remplissage. Remuer doucement le fer pour libérer
les gouttes d’eau piégées à
Laisser le fer refroidir sur son talon d’appui.
1. Pour éviter de rayer la surface de la semelle, ne pas repasser sur des boutons-pression,
fermetures-éclair, rivet de jeans, etc.
2. Si de l’empois ou autre substance colle ou s’accroche à la PLAQUE D’APPUI D’ALUMINIUM
du fer, laissez refroidir le fer et nettoyez-le comme suit:
A. Confectionnez une mince pâte de nettoyeur menager non abrasif et d’eau sur un chiffon doux.
Frottez doucement la surface pour enlever l’accumulation d’empois ou d’autres résidus.
B.
Remplissez le fer d’eau, rkglez la température à
(environ 2 minutes). Enfoncez ou glissez le bouton au plus haut réglage de vapeur.
Laissez relâcher la vapeur quelques minutes.
C. Repassez une vieille serviette de coton pour enlever la pâte du dessous du fer et des volets
de-relâchement de vapeur.
D. Si la plaque d’appui s’égratigne, on peut enlever la plupart des égratignures mineures à l’aide
d’une laine d’acier fine. Une fois la plaque d’appui polie, reprenez les
de repasser les vêtements.
E. On peut utiliser un nettoyeur à fer chaud d’après les directives du fabricant.
3. SUR LES MODÈLES
de calcium et d’amidon sur la semelle de la manière suivante: laisser le fer refroidir et l’essuyer
avec un chiffon doux et une solution légèrement vinaigrée (une
pour 250 ml ou une tasse d’eau). NE PAS UTILISER DE TAMPONS A RÉCURER,
PRODUITS ABRASIFS OU SOLVANTS NETTOYANTS CHIMIQUES, qui risqueraient
d’endommager le revêtement.
n’ont pas d’effet sur l’efficacité du fer.
Débrancher le fer de la prise de courant. Ouvrir le capuchon du réservoir.
I’int&ieur ;
IMPORTANT:
LE FER AVEC DE L’EAU DANS LE RÉSERVOIR.
la chaleur du fer finira de sécher l’intérieur.
SUNBEAi’l DÉCONSEILLE DE RANGER
SOINS DU FER
À
SEMELLE ANTIADHÉRENTE, nettoyer les marques d’eau, les dépôts
REMARQUE:
RESERVOIR
À
REPASSER
Les rayures sur une semelle antiadhérente
SUNBEAM@
<<LINENa>.
Laissez chauffer le fer
cuil[erée à soupe de vinaigre
ModÈk avec Spray Mis?
etapes B et C avant
Page 20

Aucune opération d’entretien autre que les soins recommandés plus haut dans ce document
n’est nécessaire. Toutefois, ce qui suit est une liste des problèmes les plus frequents avec
leur solution. Si, pour quelle que raison que ce soit, le fer à repasser Sunbeam continuait à
présenter l’un de ces problèmes ou nécessitait toute autre réparation, ne pas tenter de le réparer
soi-même. Le renvoyer au Centre de Réparation Electroménager de Sunbeam.
SYMPTÔME
Le fer ne chauffe pas
Le fer ne produit
pas de vapeur
QUESTIONS ET
CAUSES POSSIBLES ET SOLUTIONS
l Le fer doit être branche exclusivement sur une prise secteur 120 V.
l Le bouton coulissant doit être place sur le reglage de temperature desire.
l II est possible qu’on ait actionné la fonction de mise
(sur certains modèles seulement). Consultez la section Safety
l Le réservoir d’eau est vide. Remplir d’eau.
l Verifier que le bouton de vapeur est totalement enfoncé (sur les modèles
REPONSES
a
l’arrêt automatique
Smart?
à vapeur réglable, ce bouton coulissant doit se trouver dans l’une des
trois positions de vapeur).
l Utiliser uniquement des reglages de temperature de niveau polyester
et au-dessus.
l Ne pas régler sur -vapeur= avant que la temperature choisie ait eté
atteinte. Permettre au fer de préchauffer pendant 1 min 30 à 2 min.
l Taper doucement une ou deux fois avec la semelle sur la planche à
repasser pour éliminer tout blocage éventuel de la soupape
l Lorsqu’on cherche à obtenir de la vapeur avec un réglage de température
trop bas, il est possible que de l’eau s’écoule ou soit
a
vapeur.
projetee hors du fer.
Utiliser exclusivement un réglage de temperature compris dans la
gamme de vapeur
s’ecoule ou est l Verifier que le fer ait bien atteint la temperaturechoisie avant de repasser.
De l’eau
indiquee dans le Guide de température et vapeur.
projetée hors des orifices Lui permettre de préchauffer pendant 1 min 30 à 2 min.
a
vapeur du fer.
l Si le fer fuit lorsqu’il est hors tension
(&F~~)
ou pendant le repassage à
sec (DRY), assurez-vous que le bouton DRY/FILL (ou la glissière sur
certains
l Il est possible que le fer soit trop plein d’eau. L’éteindre. Suivre les
modeles)
est a la position
DRY/FILL.
instructions de vidange du réservoir d’eau. Vider une partie de l’eau.
Laisser le fer refroidir, puis l’essuyer. Le rebrancher puis le laisser
rechauffer. Au bout de 1 min 30, le mettre en mode
«
vapeur =. Suivre
les instructions du paragraphe UTILISATION DU FER AVEC VAPEUR.
REMARQUE: Toujours garder la commande de vapeur en position
NO STEAM
a
moins que l’appareil soit prêt pour le repassage à la vapeur.
REMARQUE: Pour tout besoin d’assistance supplémentaire, appeler le numéro d’assistance:
l-800-597-5978
Page 21

RANGEMENT DU FER
l Une fois le repassage terminé, mettez le cadran de température hors tension (à la position
<<OFF>>),
puis enfoncez ou glissez le bouton à la position
l Débrancher le cordon d’alimentation de la prise de courant en saisissant la fiche plutôt que de
DRY/FILL.
tirer sur le fil.
l Vider l’eau du réservoir APRÈS CHAQUE UTILISATION pendant que le fer est encore CHAUD.
l Permettre au fer de REFROIDIR COMPLÈTEMENT avant de le ranger. Enrouler le cordon autour du
talon d’appui sans serrer. UN ENROULEMENT TROP SERRÉ PEUT ENDOMMAGER LE CORDON.
l Veiller à toujours entreposer le fer SUR SON TALON D’APPUI avec la commande de température
en position MIN. NE PAS l’entreposer dans son emballage carton car tout reste d’humidité peut
provoquer des taches sur la semelle.
REMARQUE ENVIRONNEMENTALE
Les fers à dispositif d’arrêt automatique peuvent contenir une petite quantité de mercure dans le
commutateur d’arrêt automatique. Le commutateur au mercure devra être démonté pour être recyclé
avant de jeter le fer. Veuillez contacter votre centre de recyclage local pour plus de renseignements
concernant la procédure d’élimination du fer.
; ‘:“y‘
f
i
v,r .v.-#, “S&Bb” “i ~: ,& *--““-:-?, -
i. si
“xx-
CI_ >.“.3 :rz
,
~>m&- L “Mmz&&
LT*;&
i;,=; < -p
Sunbeam Products Inc. garantit à l’acheteur initial, sous couvert des limitations et exclusions stipulees ci-après, que ce produit
GARANTIE~IMIT~I
est exempt, sous tous les aspects matériels, de tout defaut mecanique et electrique de matériel ou de fabrication pendant deux ans
à compter de la date d’achat. Cette garantit ne couvre pas l’usure normale des pièces ni les dommages résultant des situations
suivantes: usage négligent ou abusif du produit, courant ou tension d’alimentation madaptes, utilisation en contradiction avec
le mode d’emploi ou demontage, roparation ou modification par ioute personne autre que le personnel d’un centre de réparation agrée.
Nos obligations dans le cadre de cette garantie se limitent à la réparation et au remplacement, au choix du fabricant, du produit
pendant la durée de la garantie, à condition que le produit soit renvoye en port paye, accompagne de son numero de modèle
et de l’original du justificatif d’achat date, à l’adresse suivante:
Produits achetés aux États-Unis:
Produits achetés au Canada:
Ne pas renvoyer l’appareil au revendeur ou au fabricant ; ceci aurait pour effet de retarder le traitement de la demande de garantie.
Pour toute question relative à cette garantie ou pour obtenir l’adresse du centre de réparation agree le plus proche, appeler sans frais
le 1-800-597-5978 ou écrire au Sunbeam - Consumer Affairs, PO. Box 948389, Maitland, FL 32794-8389.
Au Canada, pour toute question relative a cette garantie ou pour obtenir l’adresse du centre de réparation
proche, appeler sans frais le l-800-667-8623 Pour toute question relative à cette garantie ou pour obtenir l’adresse du centre de
réparation agréé le plus proche en-dehors des Etats-Unis et du Canada, consulter la carte de service de la garantie jointe à
l’emballage du produit.
La réparation ou le remplacement du produit suivant les termes de cette garantie constituent votre unique recours. SUNBEAM
PRDDUCTS, INC. NE POURRA ÊTRE TENUE RESPONSABLE DE DOMMAGES ACCESSOIRES OU INDIRECTS POUR
RUPTURE D’UNE
DE CE PRODUIT. DANS LES LIMITES DE LA RÉGLEMENTATION EN VIGUEUR, SUNBEAM PRODUCTS, INC. N’OFFRE
AUCUNE GARANTIE IMPLICITE OUANT À
USAGE PARTICULIER OU À LA COMMERCIALISATION. Certains états ou provinces n’autorisant pas l’exclusion ou la
limitation des dommages accessoires ou indirects ou autorisant uniquement des limitations sur la durée de validité d’une garantie
implicite, les limitations et exclusions ci-dessus peuvent ne pas s’appliquer à votre situation. Cette garantie vous accorde des droits
juridiques particuliers et il est possible que vous ayez d’autres droits, differents d’un état ou dune province a l’autre.
GUELCONQUE
SUNGEAM
APPLIANCE SERVICE STATION
Attention: Service Department
117 Central
SUNBEAM APPLIANCE SERVICE STATION (KND)
Attention: Service Department
GARANTIE EKPRESSE OU IMPUCITE CONCERNANT CE PROOUIT OU UNE PARTIE
L’ADÉGUATION
Industrial Row
Purvis,
MS 39475
5975 Falbourne Street
Mississauga, ON
AVERTISSEMENT
DE CE PRODUIT OU D’UNE PARTIE DE CE PRODUIT À UN
L5R
3V8
2 A
NS
agreé
canadien le plus
Page 22

PARA MEXICANA SOLAMENTE
UN AÑO DE GARANTÍA UN AÑO DE GARANTÍA
Póliza de Garantía,
SUNBEAM MEXICANA S.A. de C.V.
Sunbeam Mexicana S.A. de C.V. garantiza por el término de un año este aparato en todas
sus partes y mano de obra contra cualquier defecto de fabricación y funcionamiento, en
uso doméstico normal a partir de la fecha de entrega.
Incluye la reparación o reposición gratuita de cualquier parte o componente que
eventualmente fallará y la mano de obra necesaria para su diagnóstico y reparación, así
como los gastos de transportación del producto a partir de la recepción en los Talleres de
Servicio Autorizados derivados del cumplimiento de este certificado.
CONDICIONES
1. Para hacer efectiva esta garantía no podrán exigirse mayores requisitos que la presentatción
de esta póliza debidamente llenada, sellada y fechada por la casa vendedora junto con el
aparato en el lugar donde fue adquirido o en cualquiera de los Centros de Servicio Autorizados
que se indican en el reverso.
2. Esta póliza quedará sin efecto en los siguientes casos:
a) Cuando el aparato haya sido utilizado en condiciones anormales y los daños que presentara
manifestaran un maltrato, descuido o mal uso.
b) Cuando el aparato haya sido operado en forma diferente a las condiciones normales que
marca el instructivo, mismo que señala los valores nominales y tolerancias de tensiones
(voltajes) y frecuencias (ciclajes de la alimentación eléctrica.
c) Cuando el aparato haya sido intervenido por personal no autorizado provocando
alteraciones inadecuadas.
3. Los Talleres de Servicio Autorizados por Sunbeam Mexicana. S.A. de C.V., repararán y
devolverán el aparato en un plazo no mayor a 30 días contados a partir de la fecha de habar
ingresado éste a uno de los talleres. Excepto en caso de demoras en el ser vicio originado por
causas de fuerza mayor o cualquier otro motivo fuera del control de los Talleras de Servicio
Autorizados tales como huelga en las fábricas proveedoras, etc., situación que será comunicada
a usted a través de los Talleres respectivos.
4. La garantía de esta Póliza cubre cualquier daño o desperfecto que llegara a ocurrir en el
interior de los Talleres de Servicio Autorizados o en el transpor te de sus vehículos, pero sin
asumir la responsabilidad por daños robos, extravíos o destrucción del aparato durante los
almacenamientos o transportes efectuados por terceros no autorizados.
5. En caso de extravío de la Póliza de Garantía, usted podrá recurrir al lugar donde adquirió su
aparato, donde le expedirán otra Póliza de Garantía previa presentación de la Nota de
Compra, Remisión o Factura respectiva.
Al término de su Póliza de Garantía, los Talleres de Ser vicio Autorizados, seguirán a sus órdenes
para
brindarle el servicio que usted se merece, siempre con la confianza Sunbeam®, Oster
®
y Osterizer®.
Aparato _____________________________
Marca ______________________________
Modelo _____________________________
Sello de la Casa Vendedora
Sello de la Casa Vendedora
SUNBEAM MEXICANA,
S.A. de C.V.
Vía Dr. Gustavo Baz No. 180
Tlalnepantla, Edo. de México,
C.P. 54090
Tel. 729-21-00
TIMBRE
PARA USO DEL PROPIETARIO DEL APARATO
La presente garantía contará a partir de la fecha de entrega.
Año Mes Día
Page 23

SUNBEAM MEXICANA S.A. DE C.V.
Vía Dr. Gustavo Baz No. 180, Tlalnepantla, Edo. de México
C.P. 54090
Tel 729-21-00 Fax 397-03-99
OFICINAS DE VENTA EN LA REPÚBLICA MEXICANA:
SUCURSAL TLALNEPANTLA EDO. DE MÉXICO
Vía Dr. Gustavo Baz No. 180. . . . . . . . . . . . . . . . . . . . . . . . . . . . . Tel: 729-21-00
SUCURSAL GUADALAJARA, JALISCO
Juan Kepler #4536-4, Col. Residencial Arboledas, Zapopan,
C.P. 45070 . . . . . . . . . . . . . . . . . . . . . . Tels: 19-64-05, 19-65-08 Fax: 19-15-46
SUCURSAL MONTERREY, NUEVO LEON
Plaza Puerta del Sol Local 19, Blvd. Puerta del Sol 350 Colinas de San Jerónimo,
C.P. 064640 . . . . . . . . . . . . . Tel: 46-94-70, 46-94-78, 46-94-79 Fax: 46-94-70
CARACTERÍSTICAS ELÉCTRICAS:
60Hz 127 +/-10% V 1070W
© Osterizer, Sunbeam y Oster son marcas registradas de Sunbeam Corporation
© Sunbeam Products, Inc. o sus compañías afiliadas, todos los derechos reservados Sunbeam,
es una marca registrada de Sunbeam Products, Inc. o de sus compañías afiliadas.
Distribuido por: Sunbeam Products, Delray Beach, FL 33445.
Use sólo refacciones originales
“UNA RESPUESTA PARA
CADA PREGUNTA”
¿Tiene Ud. alguna pregunta
o comentario?
Llámenos sin costo al: 91-800-506-17
del D.F. al: 729-21-00
De lunes a viernes de las 8:30 hrs. a las 17:00 hrs.
NOM-004-
ANCE
Page 24

PARA SERVICIO DE GARANTÍA Y VENTA DE PARTES Y REFACCIONES
SUNBEAM MEXICANA, S.A. de C.V.
Via Dr. Gustavo Baz No. 180, Tlalnepantla, Edo. de México
TALLERES DE SERVICIO AUTORIZADOS
ESTADO Y CIUDAD NOMBRE Y DIRECCIÓN . . . . . . . . . . . . . . . . . . . . . . . . . . . . . . . . . . . . . . . . . TELEFONO
AGUASCALIENTES AGUASCALIENTES - DISTRIB. AGUASCALIENTES - Madero No. 203 . . . . . . . . . . . . . . . . . . . . . . . . . . . . . . . . . . . . . . . 15-1346
AGUASCALIENTES - RYSE DE AGUASCALIENTES, S.A.- Atiende Poniente YVictoria No.118 . . . . . . . . . . . . . . . . . . . . 15-5782
AGUASCALIENTES - SAMUEL RODRIGUEZ D., - Abedul No. 1006. . . . . . . . . . . . . . . . . . . . . . . . . . . . . . . . . . . . . . . . . . 14-8222
BAJA CALIFORNIA NORTE TIJUANA - CASA ELECTRICA ROTHENHAUSLER - 5A. E. Zapata No. 1637. . . . . . . . . . . . . . . . . . . . . . . . . . . 85-F149 y 85-3025
TIJUANA - PLOMERIA LAS DOS EMES - Defensores oe Baja California No. 200, Col. Ruiz Cortines. . . . . . . . . . . . . . . . . 82-3189
CAMPECHE CAMPECHE - REFA HOGAR DE CAMPECHE - Av. Fco. I. Medero. C. Com. Villa del Río. Depto 1. . . . . . . . . . . . . . . . . . . . 1-4206
CIUDAD DEL CARMEN - REFA HOGAR DE CARMEN - Calle No. 24. No.73-C. . . . . . . . . . . . . . . . . . . . . . . . . . . . . . . . . . 2-3619
CHIAPAS COMITAN- CENTRO SINGER DE COMITAN - 3A Calle Norte Poniente No. 59, Col. Centro. . . . . . . . . . . . . . . . . . . . . . . . . 2-0290
OCOSINGO - ELECTRONICA DEL ISTMO - 2A Av. Sur Oriente No. 14. Col. Centro. . . . . . . . . . . . . . . . . . . . . . . . . . . . . . . . . . . . .
SAN CRISTOBAL DE LAS CASAS - REFAC. ELECTRI-HOGAR - 20 deNoviemore No. 17-B Col. Centro. . . . . . . . . . . . . 8-1137
TAPACHULA- REFRIGERACION Y SISTEMAS - 5A Calle Poniente No. 16-8 Col. Centro. . . . . . . . . . . . . . . . . . . . . . . . . . 8-7070
TUXTLA GUTIERREZ - COMPRESORES Y PARTES DE REFRIGERACION - 2A Poniente Sur No. 500, Col. Centro . . . . . . 3-7325
TUXTLA GUTIERREZ - SERVICIO Y REFAC. DE TUXTLA - 2A OrienteNorteNo. 354 Int.. . . . . . . . . . . . . . . . . . . . . . . . . . 2-2737
CHIHUAHUA CHIHUAHUA - REFAC. Y SERVUCOS DE CHIHUAHUA - Av. Juárez No. 514. . . . . . . . . . . . . . . . . . . . . . . . . . . . . . . . . . . 10-5540
CHIHUAHUA - TALLER DE REFRIG. Y SERVICIOS ELECTRCOS - Ojinaga No. 507 . . . . . . . . . . . . . . . . . . . . . . . . . . . . . . 10-5963
CIUDAD DELICIAS - MUEBLERIA PORTILLO - Calle 1a. Norte No. 104, Col. Centro. . . . . . . . . . . . . . . . . . . . . . Z-1457 y 2-8333
CIUDAD JUAREZ - DIST. TURMIX Paseo Triunfo de la Republica No. 5298, Local 2-A Col. San Lorenzo. . . . . . . . . . . . . 17-8030
CIUDAD JUAREZ - REFAC. DEL HOGAR DE CHIHUAHUA, S.A. DE C.V. - Av. Insurgentes No.1669 . . . . . . . . . . 2-2321 y 2-7575
HIDALGO DEL PARRAL- CASA ELECTRICA DEL PARRAL - Calle Colegio No. 35 . . . . . . . . . . . . . . . . . . . . . . . . . . . . . . 2-0320
HIDALGO DEL PARRAL- CASA MAYKA - Maclovio Herrera No. 67 Local 12. . . . . . . . . . . . . . . . . . . . . . . . . . . Z-7845 y 2-4140
COAHUILA SALTILLO- ELECTRICIDAD Y NOVEDADES DE SALTILLO - Calle Moreios No. 211-A Sur Centro . . . . . . . . . . . . . . . . . . 12-5525
TORREON - COMERCIAL GARCIA DE TORREON. S.A. - Av. Juárez No. 99 Poniente. . . . . . . . . . . . . . . . . . . . . . . . . . . . . . 6-3010
TORREON - JOSE C. DE JESUS LOPEZ. S.A. - Calle Acuna No. 259 Sur. . . . . . . . . . . . . . . . . . . . . . . . . . . . . . . . . . . . . . 12-9822
TORREON - REFAC. Y SERV. P/APAR DOMESTICOS - Presidente Carranza No. 655 . . . . . . . . . . . . . . . . . . . . 19-5189 y 16-3165
COLIMA COLIMA - JABA HERMANOS - Av. Pino Suárez No. 230. . . . . . . . . . . . . . . . . . . . . . . . . . . . . . . . . . . . . . . . . . . . . . . . . . . . 3-0930
COLIMA - TODO PARA GAS - Ignacio Sandoval No. 15 . . . . . . . . . . . . . . . . . . . . . . . . . . . . . . . . . . . . . . . . . . . . . . . . . . . . 2-7776
DISTRITO FEDERAL MÉXICO - ART ELECTRICOS PARA EL HOGAR, S.A. DE C.V. - Av. Revolución 154-C Col. Tacubaya. . . . . . . . . . . . . . . . 516-0292
MÉXICO - BULBOS Y REFAC. ELECTRONICAS. - Plutarco Elias No.1494-A Col. Zacahuizco. . . . . . . . . . . . . . . . . . . . . . 672-0808
MÉXICO - CASA HUERTA - Calzada I. Zaragoza No. 3254 L. 13-8 Col. Sta. Martha . . . . . . . . . . . . . . . . . . . . . . . . . . . . . 738-1972
MÉXICO - CORP. ELECTRODOMESTICA CASA GARCIA, S.A. DE C.V. - Av. Patriotismo No. 875-B Col. Mixcoac . . . . . . 563-8723
MÉXICO - DOMESTICA NORTE - Camino a Santiaquito No. 131-C Deleg. Gustavo A. Madero. . . . . . . . . . . . . . . . . . . . . . . . . . . .
MÉXICO - DOMESTICA ORIENTE - Calle 7 Mz. 6 Lote 16. . . . . . . . . . . . . . . . . . . . . . . . . . . . . . . . . . . . . . . . . . . . . . . . . 845-3328
MÉXICO - DOMESTICOS ELECTRO S.A. DE C.V. - Tonaiá No. 124 Col. Rome . . . . . . . . . . . . . . . . . . . . . . . 584-0939 y 584-0950
MÉXICO - ECONOHOGAR - López No. 31-A. Col. Centro . . . . . . . . . . . . . . . . . . . . . . . . . . . . . . . . . . . . . . . . . . . . . . . . . 512-8006
MÉXICO - REPARADORA DEL HOGAR TLAHUAC - FF.CC. Rafael Atlixco No. 1 Tlahuac. . . . . . . . . . . . . . . . . . . . . . . . . . 842-4489
MÉXICO - SERVICIO DOMESTICO DEL SUR - Blvd. La Virgen Manz, 1 Lota 6 Col. Carmen Sentan . . . . . . . . . . . . . . . . 608-2313
DURANGO DURANGO - REFACCIONARIA EASY - Patoni No. 506 Sur. . . . . . . . . . . . . . . . . . . . . . . . . . . . . . . . . . . . . . . . . . . . . . . . . 11-0251
DURANGO - REFACCIONARIA EASY - Pino Suarez No. 423 Poniente. . . . . . . . . . . . . . . . . . . . . . . . . . . . . . . . . . . . . . . . . . . . . . .
DURANGO - SERVICIO ESPARZA - 20 de Noviembre No. 507 con Porras . . . . . . . . . . . . . . . . . . . . . . . . . . . . . . . . . . . . . 17-4736
GOMEZ PALACIOS- REFAC. Y SERV. P/APAR. DOMESTICOS STA. LUCIA - Hidalgo y Escobedo. . . . . . . . . . . . . . . . . . 14-0225
GOMEZ PALACIOS- REFAC. Y SERV. P/APAR. DOMESTICOS STA. LUCIA - Victoria No. 326-A Norte. . . . . . . . . . . . . . 14-6031
EDO. DE MÉXICO COACALCO - ELECTRODOMESTICOS MARSOL - C. Comercial Coacalco, Local 33 . . . . . . . . . . . . . . . . . . . . . . . . . . . . 875-7030
ECATEPEC- SERVICIO DOMESTICO HERGAR - Vía Morelos No. 103 (antes 30), Col. Jajalpa . . . . . . . . . . . . . . . . . . . . 787-2622
ECATEPEC- SERVICIO HEGAR - Via Morelos No. 26 Manz, 1 Col. Nuevo Laredo. . . . . . . . . . . . . . . . . . . . . . . . . . . . . . 787-7536
IXTLAHUACA - POUREPUESTOS ORIGINALES - Plaza Suárez No. 1 - J . . . . . . . . . . . . . . . . . . . . . . . . . . . . . . . . . . . . . . . . . . . . .
NETZAHUALCOYOTL - CASA HUERTA - Av. Aldolfo López Matleos No. 150 . . . . . . . . . . . . . . . . . . . . . . . . . . . . . . . . . 797-8131
NETZAHUALCOYOTL - CASA HUERTA - Av. Pantitlán No.407 Col. Vicente Villada. . . . . . . . . . . . . . . . . . . . . . . . . . . . . 765-3371
NETZAHUALCOYOTL - CASA HUERTA - Plaza Neza, Local E-27, Col. Benito Juárez . . . . . . . . . . . . . . . . . . . . . . . . . . . 731-9345
TLALNEPANTLA- CASA MONTOYA - Av. Rio Lerma No. 111 . . . . . . . . . . . . . . . . . . . . . . . . . . . . . . . . . . . . . . . . . . . . . 565-8942
TOLUCA - SERVICIO Y REFAC. TAUN - Ignacio López Rayón Norte No. 211-A. Col. Centro . . . . . . . . . . . . . . . . . . . . . . . . . . . . . .
GUAMAJUATO ACAMBARO - PRELAGAS DE ACAMBARO - Vicente Guerrero No. 23-C . . . . . . . . . . . . . . . . . . . . . . . . . . . . . . . . . . . . . . . 2-1445
CELAYA- ELECTRODOMESTICOS DEL BAJIO - Bejuca No. 103. Col. los Pinos . . . . . . . . . . . . . . . . . . . . . . . . . . . . . . . . . 5-5157
IRAPUATO- MECAN HOGAR Y/O RYSE DE IRAPUATO - Av. 5 de Mayo No. 518, Col. Independencia. . . . . . . . . 6-4446 y 7-6767
LEON - ELECTRONICA DIGITAL - Rio Lerma No. 1124. Col. Prados Verdes. . . . . . . . . . . . . . . . . . . . . . . . . . . . . . . . . . . . 11-7381
LEON - SERVI HOGAR - Pino Suárez No. 314 Col. Centro. . . . . . . . . . . . . . . . . . . . . . . . . . . . . . . . . . . . . . . . . . . . . . . . . . 16-8006
MOROLEON - REFACCIONARIA DEL HOGAR - Guadalupe Victoria No. 25 Col. Centro. . . . . . . . . . . . . . . . . . . . . . . . . . . . . . . . . .
PENJAMO - ELECTRONICA DEL CENTRO - Hidalgo No. 44-B. Zone Centro . . . . . . . . . . . . . . . . . . . . . . . . . . . . . . . . . . . . 2-0774
SALAMANCA - REFRIGERACION FONSECA - Calaya No. 107. Col. Guanajuato . . . . . . . . . . . . . . . . . . . . . . . . . . . . . . . . . 7-3475
GUERRERO ACAPULCO- TELEVICENTRO - Av. Cuauhtámoc No. 135. Col. Centro . . . . . . . . . . . . . . . . . . . . . . . . . . . . . . . . . . . . . . . . . . . . . .
ACAPULCO - TELEVICENTRO - Velázquez de León No. 52. Col. Centro. . . . . . . . . . . . . . . . . . . . . . . . . . . . . . . . . . . . . . . 82-0349
IGUALA - ELECTRO SURIANA - Av. Bandera Nacional No.1-A . . . . . . . . . . . . . . . . . . . . . . . . . . . . . . . . . . . . . . . . . . . . . . . 2-1099
HIDALGO CIUDAD SAHAGUN- SERVICIO ELIZALDE - Av. Huichapán No. 17. Col. Rojo Gómez . . . . . . . . . . . . . . . . . . . . . . . . . . . . 3-3930
PACHUCA- REFAC. Y SERVICIO DE HIDALGO - Fernando Soto No. 102-B. . . . . . . . . . . . . . . . . . . . . . . . . . . . . . . . . . . . . 5-1837
JALISCO CIUDAD GUZMAN - NUEVO RADIO SERVICIO - S.A. DE C.V. - 5 Mayo No. 26. . . . . . . . . . . . . . . . . . . . . . . . . . 2-3374 y 2-0484
CIUDAD TUXPAN- SERVO ELECTRICA - Foa. I. Madero No. 27-A. . . . . . . . . . . . . . . . . . . . . . . . . . . . . . . . . . . . . . . . . . . 7-2914
GUADALAJARA - IMPLEMENTOS Y REFAC. DOMESTICAS S.A. DE C.V. - Manuel Avila Camacho No. 1280. . . . . . . . . . 23-1927
GUADALAJARA - PROESA TECNOGAS S.A. DE C.V. - Independencia No. 11. . . . . . . . . . . . . . . . . . . . . . . . . . . . . . . . . . 14-6825
GUADALAJARA - REFAC. ECONOMICAS DE OCCIDENTE. S.A. DE C.V. - Garibaldi No. 1450. . . . . . . . . . . . . 25-5819 y 25-3460
GUADALAJARA - SERVICO MAYO - Av. Colón No. 783, Sector Juárez . . . . . . . . . . . . . . . . . . . . . . . . . . . . . . 13-0325 y 14-9088
LAGOS DE MORENO - TECNO-HOGAR - Hidalgo No. 614-A . . . . . . . . . . . . . . . . . . . . . . . . . . . . . . . . . . . . . . . . . . . . . . . 2-0664
PUERTO VALLARTA - PROESA TECOGAS DE OCCIDENTE. - Perú No. 1279 Esq. Nicaragua . . . . . . . . . . . . . . . 2-5455 y 2-4989
TEPATITLAN- TECNO GAS DE LOS ALTOS - Colón No.151 . . . . . . . . . . . . . . . . . . . . . . . . . . . . . . . . . . . . . . . . . . . . . . . . 1-0558
Page 25

MICHOACAN APATZINGAN- REFRIG. Y CLIMAS ARTIF. DE MEXICO - Cart. Apatzingán Cuatro Caminos No. 202. Col. La Nueva 4-5030 y 4-5082
LA PIEDAD - REFRIGERACION CALDERON - Vicente Guerrero No. 109. Zona Centro . . . . . . . . . . . . . . . . . . . . . . . . . . . . . . . 2-1504
MORELIA - CASA MARY - Alvaro Obregón No. 22. Zona Centro. . . . . . . . . . . . . . . . . . . . . . . . . . . . . . . . . . . . . . . . . . . . . . . . 2-5415
MORELIA - CENTRAL DOMESTICA DE MORELIA - Av. Morelia Sur No. 618 . . . . . . . . . . . . . . . . . . . . . . . . . . . . . . . . . . . . . . 2-1796
PURUANDIRO - REFACCIONARIA SAN FRANCISCO - Fagoaga No. 72-A. Centro. . . . . . . . . . . . . . . . . . . . . . . . . . . . . . . . . 83-1405
SAHUAYO- REFRI-LAV. - Matamoros No. 4 Esq. Morelos. . . . . . . . . . . . . . . . . . . . . . . . . . . . . . . . . . . . . . . . . . . . . . 2-3873 y 23895
URUAPAN- EL SURTIDOR DEL HOGAR - Madero No. 12-A. . . . . . . . . . . . . . . . . . . . . . . . . . . . . . . . . . . . . . . . . . . . . . . . . . . 4-2926
ZAMORA - MULT. SERV. PROF. DE ZAMORA - Virrey de Mendoza No. 283-C. . . . . . . . . . . . . . . . . . . . . . . . . . . . . . . . . . . . . . 5-1108
ZAMORA - RYSE DE IRAPUATO S.A. DE C.V. - Av. 5 de Mayo Esq. Colón. . . . . . . . . . . . . . . . . . . . . . . . . . . . . . . . . 2-3304 y 2-5368
ZITACUARO- DEL CENTRO - Av. Hidalgo Poniente No. 2. . . . . . . . . . . . . . . . . . . . . . . . . . . . . . . . . . . . . . . . . . . . . . . . . . . . . 3-2191
MORELOS CUAUTLA - SERVICIO DEL HOGAR - 2 de Mayo No, 104-A . . . . . . . . . . . . . . . . . . . . . . . . . . . . . . . . . . . . . . . . . . . . . . . . . . . 2-2856
CUERNAVACA- MECANICA DOMESTICA INDUSTRIAL - Matamoros No. 410-A Zona Centro . . . . . . . . . . . . . . . . . . . . . . . 12-4512
CUERNAVACA- SERVICIO Y REFAC., S.A. - Plan de Ayala y Av. Central, Local 6. . . . . . . . . . . . . . . . . . . . . . . . . . . . . . . . . . 15-7041
MAYARIT TEPIC - TECNO HOGAR - Av. México No. 37 Sur. . . . . . . . . . . . . . . . . . . . . . . . . . . . . . . . . . . . . . . . . . . . . . . . . . . . . . . . . . . . 2-1936
NUEVO LEON CERDADO - CERRAJERIAS REGIA. - Carretera Nacional No. 211. Fracc. Las Hadas. . . . . . . . . . . . . . . . . . . . . . . . . . . . . . . . . 5-0383
GUADALUPE - CERRAJERIAS REGIA. - Av. Miguel Alemán No.243 Oriente, Col. Lindavista . . . . . . . . . . . . . . . . . . . . . . . . . 79-0794
GUADALUPE - CERRAJERIAS REGIA. - Hacienda No. 1234-A Oriente, Fracc. Hda. de Guadalupe . . . . . . . . . . . . 37-3494 y 37-8510
MONTERREY - CERRAJERIA DEL VALLE - Orinoco No. 207 Norte. . . . . . . . . . . . . . . . . . . . . . . . . . . . . . . . . . . . . . . . . . . . . 78-3655
MONTERREY - ELECTRODOMESTICA DE REFACCIONES - Fidel Velázquez No. 1513 Poniente L-4F. Col. La Central . . . . . . . . . . . .
MONTERREY - JOSE F. SEPULVEDA - Ruperto Martinez No. 238 Oriente, Col. Centro . . . . . . . . . . . . . . . . . . . . . 43-6700 y 43-1815
MONTERREY - REFAC. DOMESTICAS MONTERREY - Av. Gonzalitos No. 3501 Loc. 44 Col. Mitras Norte. . . . . . . . . . . . . . 73-1621
MONTERREY - SERVICIO Y REFAC. HECTOR SEPULVEDA S.A. DE C.V. - Zaragoza No. 203 Sur. . . . . . . . . . . . . 43-8909 y 42-3970
SAN NICOLAS DE LAS GARZAS - CERRAJERIAS REGIA - Av. Parque Anahuac No. 105 Oriente. Col. Anahuac. . . . . . . . . 76-9024
OAXACA OAXACA - SERVICIO ELECTRODOM. APARICIO - Av. Pariférico No. 111, Col. Postal. . . . . . . . . . . . . . . . . . . . . . . . . . . . . . . . 3-6277
TUXTEPEC - SERVICIO ESPECIALIZADO WHIRLPOOL - José Mania Morelos No. 1234 . . . . . . . . . . . . . . . . . . . . . . . . . . . . . 5-4616
PUEBLA ATLIXCO - REFAC. DEL HOGAR - Calle Sur No. 503-B . . . . . . . . . . . . . . . . . . . . . . . . . . . . . . . . . . . . . . . . . . . . . . . . . . . . . . . 5-2465
PUEBLA - MATERIAL ELECTRICO LA CASA - 10 Oriente No. 15-B. . . . . . . . . . . . . . . . . . . . . . . . . . . . . . . . . . . . . . . . . . . . . 46-5504
PUEBLA - REPRESENTACION DE PUEBLA - 3 Poniente No. 523-B. . . . . . . . . . . . . . . . . . . . . . . . . . . . . . . . . . . . . . . . . . . . . 42-4955
TEHUACAN - C. DE SERVICIO ALM. PATJANE - Av. Independencia Poniente No. 407, Col. Centro . . . . . . . . . . . . . . . . . . . . . 2-3835
TEZIUTLAN - ALMACENES 5-10-15 - Prol. Av. Juárez No. 2 . . . . . . . . . . . . . . . . . . . . . . . . . . . . . . . . . . . . . . . . . . . . . . . . . . 2-0720
QUERÉTARO QUERÉTARO- ELECTRONICA “J.M.V.” - Calle Peña de Bernal No. 7-B. Col. Las Américas. . . . . . . . . . . . . . . . . . . . . . . . . . 17-1592
QUERÉTARO- ELECTRODOM ANTONIO - 16 de Septiembre No. 6-C Poniente. . . . . . . . . . . . . . . . . . . . . . . . . . . . . . . . . . . 12-2149
QUINTANA ROO CANCUN - AGUILAR REFACCIONES - Av. López Portillo SM 70 Manz. 1 Local, 2 Col. Centro. . . . . . . . . . . . . . . . . . . . . . . . 84-0727
COZUMEL - REFACCIONARIA DEL HOGAR - Adolfo Rosado Salas No. 33, Depto. 1, Col. Centro . . . . . . . . . . . . . . . . . . . . . . 2-1690
CHETUMAL - TALLER DE REP. DE APARATOS ELECTRICOS ALVARADO - Hidalgo No. 89 . . . . . . . . . . . . . . . . . . . . . . . . . . . 2-3841
SAN LUIS POTOSI CIUDAD VALLES- REFACCIONARIA DEL HOGAR DE VALLES S.A. - Calle Aguilas No. 500. . . . . . . . . . . . . . . . . . . . . . . . . . 2-1148
S.L.P. - ELECTRO HOGAR - Julián de los Reyes No. 328 . . . . . . . . . . . . . . . . . . . . . . . . . . . . . . . . . . . . . . . . . . . . . . . . . . . . 12-2116
S.L.P. - PROV. TECNO HOGAR GIVI - Himno Nacional No. 1410, Col. Las Aguilas. . . . . . . . . . . . . . . . . . . . . . . . . . . . . . . . . 12-5808
S.L.P. - SERVICIO ELECTRODOM. ITURBIDE - Damián Carmona No. 685 . . . . . . . . . . . . . . . . . . . . . . . . . . . . . . . . . . . . . . . . 2-0487
SIMALOA CULIACAN - SERVICIO DEL HOGAR GOMEZ - Av. Morelos No.183 Norte . . . . . . . . . . . . . . . . . . . . . . . . . . . . . . . . . . . . . . . . 3-6995
GUAMUCHIL - ELEC. DOMESTICA E INDUSTRIAL - Zaragoza No. 157 Norte, Col. Juárez. . . . . . . . . . . . . . . . . . . . . . . . . . . . 2-1088
LOS MOCHIS - NUEVO JAPON DE LOS MOCHIS - Benito Juárez No. 430 Poniente . . . . . . . . . . . . . . . . . . . . . . . . . . . . . . . . 2-5850
LOS MOCHIS - TECOGAS DE OCCIDENTE, S.A. DE C.V. - Av. Hidalgo No. 545. . . . . . . . . . . . . . . . . . . . . . . . . . . . 5-5860 y 5-5247
MAZATLAN- CAMACHO DE MAZATLAN, S.A. DE C.V. - Zaragoza No. 1211. . . . . . . . . . . . . . . . . . . . . . . . . . . . . . . 1-6110 y 2-8420
MAZATLAN- REFAC. DEL HOGAR, S.A. DE C.V. - German Evers No. 1708 Norte . . . . . . . . . . . . . . . . . . . . . . . . . 85-1325 y 85-0794
SONORA CIUDAD OBREGON - TECNI-SERVICIOS GALICIA S.A. DE C.V. - Veracruz No. 435 Sur . . . . . . . . . . . . . . . . . . . . . 3-8033 y 3-3315
GUAYMAS- CENTRAL DE REFACCIONES SERVICIOS - Av. Miguel Alemán No. 75 Sur. . . . . . . . . . . . . . . . . . . . . . . . . . . . . . 2-3244
HERMOSILLO - SERVICIO ELECTRO HOGAR - Guerrero No. 80 Esq. Dr. Noriega. . . . . . . . . . . . . . . . . . . . . . . . . . . . . . . . . . 2-1244
TABASCO COMALCALCO - ELECTROHOGAR 2 HERMANOS - Juárez No. 1102 Esq. Rayon. . . . . . . . . . . . . . . . . . . . . . . . . . . . . . . . . . . 4-2073
H. CARDEMAS - COMERCIAL LA ESTRELLA - Mader No. 805, Col. Centro . . . . . . . . . . . . . . . . . . . . . . . . . . . . . . . . . . . . . . 2-0548
VILLAHERMOSA - SERVICIO Y REFAC. FRIAS - Sánchez Megallanes No. 918. . . . . . . . . . . . . . . . . . . . . . . . . . . . . . . . . . . . 2-7002
TAMAULIPAS CIUDAD VICTORIA- CARLOS A. CARRIZALES PAZ - Adolfo López Mateos No. Local 6. . . . . . . . . . . . . . . . . . . . . . . . . . . . . 6-1335
MATAMOROS- MUEBLERIA REAL DEL NORTE. S.A. DE C.V.- Juárez y Panamá No. 3-B . . . . . . . . . . . . . . . . . . . . . . . . . . . 13-2122
TAMPICO- COM. ELECTRICA BRICEÑO - H. del Cañonero No. 206 Oriente. . . . . . . . . . . . . . . . . . . . . . . . . . . . . 12-3175 y 12-1775
TAMPICO- HOSPITAL DE ELECTRODOM - Díaz Mirón No. 909 Oriente. . . . . . . . . . . . . . . . . . . . . . . . . . . . . . . . . . . . . . . . . 12-6940
TAMPICO- SERVICIO ALLENDE - Olmos No. 602 Norte. . . . . . . . . . . . . . . . . . . . . . . . . . . . . . . . . . . . . . . . . . . . . . . . . . . . . 12-1999
REYNOSA - PROV. DE RESTAURANTES DE REYNOSA - Calle Bravo No. 500, Centro . . . . . . . . . . . . . . . . . . . . . . . . . . . . . . 22-5679
VERACRUZ COATZACOALCOS- ACC. Y REFRIG. DEL SURESTE, S.A. DE C.V. - Maipica No. 312. . . . . . . . . . . . . . . . . . . . . . . . . . . . . . . 2-1976
CORDOBA - VIC-MAR - Av. 2 No. 921. . . . . . . . . . . . . . . . . . . . . . . . . . . . . . . . . . . . . . . . . . . . . . . . . . . . . . . . . . . . . . . . . . . . 2-8393
MINATITLÁN- ELECTROREFRIG. CUPIL S.A. DE C.V. - Calle Amelia Riverol No. 10 Col. Playón Sur . . . . . . . . . . . . . . . . . . . 3-5714
ORIZABA - SIST. Y EQUIPOS COMPUTACIONALES S.A. DE C.V. - Poniente 2 No. 38 . . . . . . . . . . . . . . . . . . . . . . . . . . . . . . . 5-0311
POZA RICA - REFAC. INTERNACIONAL DEL HOGAR - Mariano Artista, Esq. 16 de Sept., Col.Tajin . . . . . . . . . . . . . . . . . . . . 3-5119
SAN ANDRÉS TUXTLA - TELE SERVICIO - Dr. Argudin No. 2. . . . . . . . . . . . . . . . . . . . . . . . . . . . . . . . . . . . . . . . . . . . . . . . . 2-0570
TUXPAN- REFAC. INTERNACIONAL DEL HOGAR - Garizurietz No. 52. . . . . . . . . . . . . . . . . . . . . . . . . . . . . . . . . . . . . . . . . . . 4-2016
TUXPAN- REFAC. LINEA BLANCA DE TUXPAN, S.A. DE C.V. - Arteaga No. 1 . . . . . . . . . . . . . . . . . . . . . . . . . . . . . . . . . . . . . 4-5953
VERACRUZ - ELECTRODOMESTICA DEL PUERTO - Zamora No.1479. . . . . . . . . . . . . . . . . . . . . . . . . . . . . . . . . . . . . . . . . . 38-2154
VERACRUZ - SERVIREFAC. RODRIGUEZ - Carlos Cruz No. 55 Local 4. . . . . . . . . . . . . . . . . . . . . . . . . . . . . . . . . . . . . . . . . . 32-5351
XALAPA- DOMESTICA TAPIA - Av. Rafael Murillo Vidal No. 3-F,. Fraco. Ensueño . . . . . . . . . . . . . . . . . . . . . . . . . . . . . . . . . 18-8759
YUCATAN MÉRIDA - ELECTRODOMÉSTICOS REFORMA - Calle 72 No. 433-C . . . . . . . . . . . . . . . . . . . . . . . . . . . . . . . . . . . . . . . . . . . 28-2137
MÉRIDA - REFACCIONARIA DEL HOGAR - Calle 67 No. 511 . . . . . . . . . . . . . . . . . . . . . . . . . . . . . . . . . . . . . . . . . . . . . . . . . 23-5652
ZACATECAS FRESNILLO - DOMÉSTICA MUNOZ - Calle 1858 No. 4, Fracc. González Ortegá . . . . . . . . . . . . . . . . . . . . . . . . . . . . . . . . . . . 2-5727
JUCHIPILA - TELE SERVICIO LUNA - Nicolás Bravo No. 3, Col. Centro. . . . . . . . . . . . . . . . . . . . . . . . . . . . . . . . . . . . . . . . . . 2-0599
ZACATECAS- REFAC. DOMESTICAS ROMO - Rayón No. 220. . . . . . . . . . . . . . . . . . . . . . . . . . . . . . . . . . . . . . . . . . . . . . . . . 2-3664
COMPRADOR:
Nombre__________________________________________________
Dirección ________________________________________________
Ciudad __________________________________________________
Estado __________________________________________________
CASA VENDEDORA:
Nombre _________________________________________________
Dirección ________________________________________________
Ciudad__________________________________________________
Estado __________________________________________________
Aparato _________________________________ Marca _______________________________ Modelo _________________________________
La presente garantía contará a partir de la fecha de entrega Año _____________________ Mes _________________ Día ________________
ESTADO Y CIUDAD NOMBRE Y DIRECCIÓN. . . . . . . . . . . . . . . . . . . . . . . . . . . . . . . . . . . . . . . . . . . TELEFONO
Page 26
Cuando utilice su plancha, siempre debe de seguir algunas medidas básicas de seguridad,
incluyendo las siguientes:
LEA TODAS LAS INSTRUCCIONES ANTES DE USAR
1. Utilice la plancha sólo para lo que fue diseñada.
2. Para protegerse contra el riesgo de descargas eléctricas, no sumerja la plancha en agua
o en cualquier otro líquido.
3. La plancha siempre deberá ser “APAGADA” antes de conectar o desconectar de la toma
de corriente eléctrica. Nunca jale el cable eléctrico para desconectar de la toma de corriente
eléctrica; por el contrario, tome la clavija y desconecte.
4. Evite que el cable eléctrico toque superficies calientes. Permita que la plancha se enfríe
completamente antes de guardarla. Enrolle el cable eléctrico alrededor de la plancha
para almacenarla.
5. Siempre desconecte la plancha de la toma de corriente eléctrica cuando la llene con agua
o cuando la vacíe y cuando no esté en uso.
6. No opere la plancha con un cable eléctrico dañado o después de que la plancha se ha caído
o dañado. Para evitar el riesgo de descarga eléctrica, no desensamble la plancha. Llévela con
una persona calificada para su examinación y reparación. Si la plancha ha sido ensamblada
de nuevo incorrectamente, puede existir el peligro de descargas eléctricas cuando se utilice.
7. Supervisión cercana es necesaria cuando cualquier electrodomésticos sea usado por o cerca
de niños. No deje sin atender la plancha cuando
de planchado.
8. Pueden ocurrir quemaduras al tocar partes metálicas o el vapor que sale de las ventilas.
Tenga cuidado cuando invierta la posición de una plancha de vapor
caliente en el tanque de agua.
9. Si la plancha no está operando adecuadamente, desconecte de la toma de corriente y haga
que personal calificado de servicio revise el aparato.
10. Su plancha
vigilar la plancha. No coloque la plancha en una superficie sin protección, incluso si es sobre
la base de apoyo.
Sunbeam@ está diseñada para descansar sobre su base de apoyo. No deje de
este
conectada o cuando esté sobre la tabla
-
puede haber agua
INSTRUCCIONES ESPECIALES
1.
Este es un aparato electrodoméstico de 1200
cargue, no opere otro aparato de alta potencia en el mismo circuito.
2. Si un cable de extensión es absolutamente necesario, un cable de 10 amperios* debe de usarse.
Cables con un amperaje menor pueden sobre calentarse. Tenga cuidado cuando coloque el
cable de extensión ya que no debe de dejar que cuelgue, jale o se pueda poder tropezar con él.
W.*
Para evitar que el circuito eléctrico se sobre
PARA PRODUCTOS COMPRADOS EN ESTADOS UNIDOS Y CANADÁ ÚNICAMENTE:
Para reducir el riesgo de descargas eléctricas, este aparato cuenta con una clavija polarizada
(una cuchilla es más ancha que otra). Como medida de seguridad, esta clavija entra sólo de
una manera en un enchufe polarizado. Si la clavija no encaja en el enchufe simplemente colóquela
al revés. Si aún así no encaja llame a un electricista calificado. De ninguna manera intente
modificar esta medida de seguridad.
* En México, la plancha funciona a 127 Voltios, 1340 Watts. Si un cable de extensión es necesario,
un cable de extensión es necesario, un cable de 13 amperios debe de usarse.
Page 27

MODELOS CON LA SPRAY
Tapa a Prueba de Derrames
MIS+
ÚNICAMENTE
1
12
CARACTERíSTICAS
1.
Cordón Centrado
2. Guía de Temperatura y Vapor Para Telas
3. Base de Descanso 8. Ventana Para Visibilidad
4. Luz Indicadora de Apagado Automático
(algunos modelos únicamente)
5. Interruptor Para Seleccionar la Temperatura y
Apagar
6. Suela Con Superficie Antiadherente
(algunos modelos únicamente)
FLEXcordTM
7. Botón Para Vapor Variable Seca/Llena
Guía Para el Ajuste Variable del Vapor
9. 29 Ventilas de Vapor
10. Ranura Para Planchar
Debajo de los Botones
ll. Orificio Para Llenar con Agua
12. Descanso Para el Dedo Pulgar
2
3
4
o
Page 28
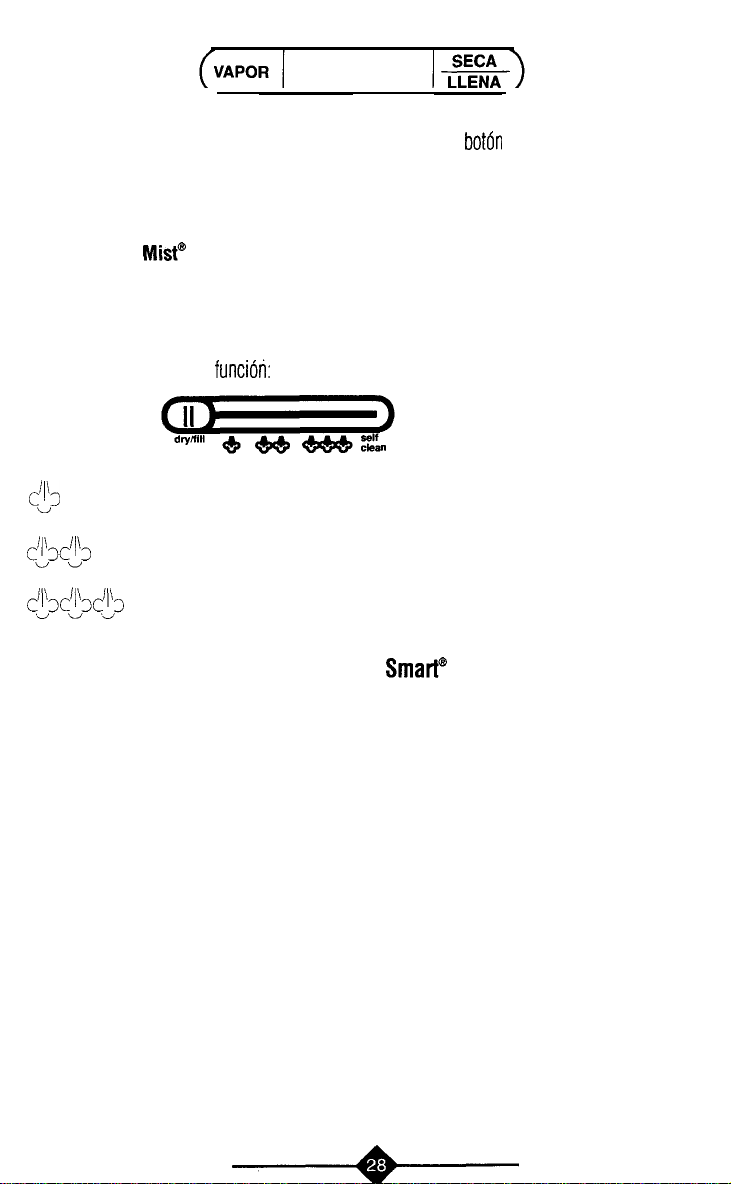
Función con Vapor y Seca
Cuando use la plancha como una plancha de vapor, presione el botbn o deslice el interruptor
(dependiendo del modelo de su plancha) a la posición
una plancha seca, o llena la plancha con agua para planchar al vapor, presione el botón o deslice
el interruptor a la posición
SECA/LLENA - DRY/FILL.
VAPOR/STEAM.
Si usa la plancha como
Función Spray
Presione el botón y obtenga un fino rocío para humedecer la tela y remover las arrugas difíciles,
Mi&
(Algunos Modelos únicamente)
Función de Vapor Variable (Algunos Modelos Únicamente)
Cuando planche al vapor, deslice el interruptor para vapor ligeramente hacia una de las marcas
que indican el uso de esta
C$
c$c’i’s
&C:“3$3
Función de Apagado Automático Safety
(Algunos Modelos Únicamente)
Cuando la plancha está conectada en una toma de corriente alterna de 120 voltios, la luz
indicadora roja señala que la plancha está encendida. Si la plancha se deja en posición vertical,
sobre su base de descanso durante 15 minutos, la plancha dejará de calentar. La señal de luz
parpadeará para indicar que se está apagando automáticamente y continuará parpadeando hasta
que la plancha sea desconectada o encendida nuevamente.
Si la plancha se deja en la posición de planchado, la función de apagado automático se activará
en 30 segundos. Una vez más, la señal de luz parpadeará para indicar que se está apagando
automáticamente y continuará parpadeando hasta que la plancha sea desconectada
o encendida nuevamente.
PARA ENCENDER LA PLANCHA NUEVAMENTE: Para encender la plancha después de que se ha
apagado automáticamente, seleccione la función
hacia adelante y hacia atrás en la posición de planchado hasta que la señal de luz se encienda y
deje de parpadear. Asegúrese de que el control deslizable esté en la posición deseada y permita
3 minutos para que la suela alcance la temperatura requerida antes de seleccionar el nivel de vapor
funcióti:
VAPOR LIGERO para telas delicadas y ligeras como el poliester y la seda,
use con temperaturas bajas.
VAPOR ABUNDANTE para telas como algodón y lana.
VAPOR ULTRA para telas pesadas y gruesas como algodón y lino,
use con temperaturas altas.
Smart”
SECA/LLENA - DRY/FILL;
después la plancha
PRECAUCIÓN: NO USE LA FUNCIÓN DE APAGADO AUTOMÁTICO COMO UN SUBSTITUTO
DE APAGAR Y DESCONECTAR LA PLANCHA CUANDO ESTÉ EN USO.
Page 29

Función de Limpieza Automática
(Algunos Modelos únicamente)
ESTE PROCEDIMIENTO LIMPIA LAS VENTILAS DE LA PLANCHA Y LA CÁMARA DE VAPOR
ELIMINANDO LOS MINERALES QUE PUEDEN OBSTRUIR SU PLANCHA. ESTOS PUEDEN
OCASIONAR QUE SU PLANCHA REDUZCA SUS CAPACIDADES DE CALOR Y VAPOR.
l Deslice el interruptor de vapor variable a la posición de APAGADO/OFF.
l Llene el tanque de agua de la plancha a su nivel máximo.
l Coloque la perilla para seleccionar temperatura en su posición más alta.
l Permita que la plancha se caliente por 1 minuto y medio.
l Apague la plancha y desconecte.
l Mantenga la plancha sobre el lavabo y active la función de limpieza automática deslizando el
interruptor de vapor variable a la posición de limpieza automática. (Tenga cuidado de no tocar
las superficies calientes).
l Mueva la plancha ligeramente de un lado a otro y de adelante hacia atrás por 30 segundos.
Cuando mueva la plancha de adelante hacia atrás, verifique que la plancha derrame un poco de
agua por la boquilla y por la parte trasera para asegurarse de que el agua circula completamente
por todo el aparato.
l Regrese el interruptor de vapor variable a la posición de
l Vacíe por el orificio del tanque, el agua que haya sobrado
l Seque con una toalla la suela de la plancha.
l Conecte la plancha, coloque el selector de temperatura en su posición más alta y permita que
APAGADO/OFF
la plancha se caliente por 2 minutos para que se seque el agua que haya quedado dentro de
la cámara de vapor.
l Enfríe la plancha y almacene como se indica en este manual.
Page 30

ANTES DE USAR POR PRIMERA VEZ
Para asegurar que no se transferirán ningunas manchas a la tela la primera vez que use la plancha,
es aconsejable que limpie con un chorro de vapor las ventilas que están en la suela de la plancha.
Esto ayudará a remover cualquier residuo que se haya acumulado durante el proceso de manufactura.
Para hacer esto:
l Coloque el control del ajuste de vapor en vapor en la posición “SECA /LLENA
l Llene el tanque de agua de la plancha a su nivel máximo.
l Coloque la perilla del selector de temperatura en su posición más alta. Caliente la plancha
-
DRY/
FILL”.
por 2 minutos.
l Coloque el control de ajuste de vapor en su posición más alta.
l Genere vapor por 2 minutos mientras dirige las ventilas de vapor lejos de la superficie
de planchado.
l Pase la plancha sobre una tela húmeda o sobre una toalla de papel limpia.
SELLECIONANDO LA TEMPERATURA CORRECTA PARA (ADA TELA
Cuando planche, use el nivel de temperatura y la cantidad de vapor recomendados para el tipo
de tela que se va a planchar. Las prendas que requieren bajas temperaturas y poco vapor,
deben ser planchadas primero. Esto le ayudará a evitar dañar las prendas con una plancha que está
demasiado caliente. Si usted no está seguro de los materiales contenidos en una prenda,
inicie con una temperatura baja y poco vapor. Pruebe la plancha en un área de la prenda escondida
tales
o que no se note,
la cantidad de vapor hasta que las arrugas desaparezcan sin dañar la tela.
como las costuras o el revés. Gradualmente incremente la temperatura y
Cuando cambie la temperatura de una alta a una baja (EJEMPLO: Mover el selector de temperatura
del nivel “LINO” a “POLIESTER” y el interruptor de vapor variable se mueve de la posición de
VAPOR ULTRA a la posición VAPOR LIGERO), permita aproximadamente 5 minutos para que
la temperatura en la plancha baje.
Los siguientes cuadros son diseñados para ayudarle a seleccionar la temperatura y el método
más adecuado para la tela que planea planchar. Revise las etiquetas en las prendas y siga
las recomendaciones que le dé el fabricante de la tela. Para planchar telas que tengan una mezcla
de diferentes materiales mezclados, use la temperatura que se indica para el material que requiera
el nivel más bajo. Por ejemplo: 65% poliester, 35% algodón. Planche esta tela en usando el nivel
de “POLIESTER” (y VAPOR LIGERO en modelos que tengan vapor variable).
Page 31

Guía
Tela
Acetato - Nilón
Acrílicos - Sedas Vapor Seco Planchas seca en el lado contrario mientras esté húmeda. Las telas de
Poliester Vapor Seco
Lanas Vapor Seco Planche con vapor en el lado contrario o planche el lado derecho,
Algodones Vapor Seco
Lino/Blancos Vapor Seco Plancha seca mientras
de Vapor
Vaoor Seco
Recomendaciones de Planchado
Plancha seca en el lado contrario mientras esté húmeda.
acrílico pueden ser planchadas con vapor si así lo indica el fabricante
Planchas seca en el lado contrario mientras esté húmeda. Las telas de
acrílico pueden ser planchadas con vapor si así lo indica el fabricante,
colocando una tela entre la plancha y la prenda.
Plancha seca mientras esté húmeda o use el rocío mientras plancha.
Planche cada sección hasta que esté completamente seca. Planche las telas
obscuras en el lado contrario para evitar que la tela brille y los blancos de
mesa oor el derecho.
Planche cada sección hasta que
obscuras en el lado contrario para evitar que la tela brille y los blancos de
mesa por el derecho.
este húmeda o use el rocío mientras plancha.
este completamente seca. Planche las telas
Tela de Vapor Recomendaciones de Planchado
Acetato - Nilón
Acrílicos
-
Sedas Plancha seca en el lado contrario mientras esté húmeda.
Poliester
Lanas
Algodones
Lino/ Blancos
Guía
SECO
LIGERO
Q
ABUNDANTE
ae
ULTRA
M
a
*
Plancha seca en el lado contrario mientras esté húmeda
Planche con vapor mientras esté húmeda o use el rocío mientras plancha.
Planche las telas de rayón en el lado contrario. Planche con vapor si así lo
indica el fabricante.
Planche con vapor en el lado contrario o planche el lado derecho,
colocando una tela entre la plancha y la prenda.
Planche con vapor mientras este húmeda o use el rocío mientras plancha.
Planche telas obscuras en el lado contrario para evitar que la tela brille.
Planche con vapor mientras esté húmeda o use el rocío mientras plancha.
Planche cada sección hasta que
obscuras en el lado contrario y los blancos de mesa por el derecho.
este completamente seca. Planche las telas
Page 32

ACERCA DEL AGUA
Esta plancha está especialmente diseñada para u>ar agua del grifo. En áreas del país donde el agua
sea muy “dura” se recomienda usar agua destilada en su plancha. Si usted usa agua destilada en
su plancha, debe llenar periódicamente el tanque de agua con agua del grifo, para mantener su
plancha acondicionada. NO USE agua que ha sido tratado por un sistema casero para suavizarla,
ya que este tipo de agua contiene minerales que pueden ser dañinos para la plancha.
USANDO LA PLANCHA
La plancha puede planchar en seco con o sin agua en el tanque. Evite tener el tanque muy lleno
de agua mientras está planchando en seco.
l Deslice en control de temperatura la posición APAGADO/OFF antes de conectar el cable
en una toma de corriente alterna de 120 voltios.
l Presione el botón o deslice el interruptor a la posición
Mueva el control de temperatura al nivel que sea el adecuado para la tela que planchará.
l Si usted empieza a planchar con una plancha fría, permita que esta se caliente colocándola en
posición vertical sobre su base de descanso o talón. Si la plancha ya está caliente, asegúrese
de bajar o subir su temperatura, dependiendo del nivel de calor que requiera el tipo de tela
que planchará. Empiece a planchar en un área de la prenda donde no se note, como en
las costuras internas o en el revés o parte contraria de la prenda.
USANDO LA
Cuando use la plancha como una plancha de vapor, asegúrese de que el selector de temperatura
este colocado en el rango de VAPOR/STEAM para evitar que el agua se derrame sobre la prenda
y la manche.
l Deslice en control de temperatura la posición APAGADO/OFF. Presione el botón o deslice
el interruptor a la posición SECA/LLENA
(Vea las instrucciones de PARA LLENAR EL TANQUE DE AGUA).
l Conecte el cable eléctrico en una toma de corriente alterna de 120 voltios.
l Mueva el control de temperatura al nivel que sea el adecuado para la tela que planchará.
Permita que la plancha se caliente por 2 minutos para que alcance la temperatura deseada.
l Después de que la plancha ha alcanzado la temperatura deseada, presione o deslice el botón a
la posición VAPOR/STEAM. Si la unidad no genera vapor cuando presiona el botón para vapor,
dé un ligero golpe con la suela en la superficie de planchado. Esto ayudará para iniciar la acción
que genera el vapor.
l Cuando planche con vapor, si el control de temperatura accidentalmente se coloca en una
posición más baja, puede aparecer agua en la suela, indicando que la temperatura en la plancha
está por debajo del nivel de vapor. Si esto ocurre, seleccione la posición de SECA/LLENA
DRY/FILL. Después coloque el control de temperatura en el nivel deseado. Coloque la plancha
sobre el talón por 1 minuto para permitir que se alcance la temperatura que se requiere.
Si su plancha empieza a perder el flujo de vapor y usted desea continuar planchando con vapor,
usted debe rellenar el tanque de agua, sin enfriarla. Apague la plancha. Siga las instrucciones que
se indican en PARA LLENAR EL TANQUE DE AGUA. Agregue agua sólo hasta donde la línea indica
el nivel máximo para prevenir derrames.
PLANCHA COMO
COMO
UNA
PLANCMA
SECA/LLENA - DRY/FILL.
SECA
UNA PLANCHA DE VAPOR
-
DRY/FILL. Llene la plancha con agua.
elktrico
-
Page 33

PARA LLENAR EL TANQUE DE AGUA
Siempre desconecte la plancha antes de llenarla. Presione el botón o deslice
el interruptor a la posición
con agua está localizado debajo de la tapa a prueba de derrames.
Mantenga la plancha con la tapa abierta y llene hasta donde la línea indica
el nivel máximo. Cierre la tapa a prueba de derrames. Asegúrese de que
la tapa esté correctamente colocada y cierre bien el orifico. Limpie el exterior
de la unidad para secar cualquier derrame.
SECA/LLENA - DRY/FILL.
El orificio para llenar
PARA VACIAR EL TANQUE DE AGUA
Presione el botón o deslice el interruptor a la posición SECA/LLENA - DRY/FILL.la
Deslice el selector de temperatura a la posición APAGADO/OFF.
Desconecte la plancha de la toma de corriente eléctrica. Abra la tapa a prueba de derrames.
Mantenga la plancha sobre el lavabo, apunte el mango de la plancha hacia abajo y manténgala
en esta posición hasta que deje de salir agua del orificio. Agite ligeramente la plancha para salgan
las gotas que se hayan quedado acumuladas; el calor de la plancha secará el interior de la plancha.
Permita que la plancha
1. Evite planchar sobre cierres de contacto, cierres de metal, ribetes en los pantalones de mezclilla
o jeans, etc., ya que puede rayar la suela de la plancha.
2. Si almidón o cualquier otro material se adhiere a la SUELA DE ALUMINIO de la plancha,
enfríe y después limpie como sigue:
A. Haga una pasta suave de limpiador casero no abrasivo y agua sobre un paño suave.
Frote suavemente para remover el almidón o los residuos acumulados.
B. Llene la plancha con agua, coloque el control de temperatura en la posición de lino.
Permita que la plancha se caliente (aproximadamente 2 minutos). Presione el botón
o deslice el interruptor a la posición más alta de vapor. Permita que la plancha genere vapor
por unos minutos.
C. Planche sobre una toalla de algodón vieja para remover los residuos de la suela
y de las ventilas de vapor.
D. Si la suela de la plancha se raya, la mayoría de rayones o raspaduras (ligeras) pueden
removerse usando una fibra metálica fina. Después de limar, siga los pasos B y C antes de
planchar cualquier prenda.
E. Un limpiador para planchas calientes puede usarse de acuerdo a las instrucciones
del fabricante.
3. SI USTED TIENE UNA PLANCHA CON UNA SUELA ANTIADHERENTE, limpie las marcas
del agua, depósitos de calcio y almidón de la suela como se indica a continuación:
permita que la plancha se seque y limpie con un paño usando una solución suave de vinagre
(una cucharada de vinagre en
ABRASIVOS 0 SOLVENTES QUIMICOS, ya que pueden dañar el acabado de la suela.
N
OTA
:
Cualquier raspadura o rayón en la suela de la plancha, no afectará su desempeño.
este colocada sobre su talón de descanso.
IMPORTANTE: SUNBEAM NO RECOMIENDA
ALMACENAR LA PLANCHA CON AGUA EN EL TANQUE.
CUIDADOS PARA Su PLANCHA
una
taza de agua). NO USE FIBRAS 0 ESPONJAS, LIMPIADORES
SUNBEAM’
Modelos con
Función de
Spray
Mi&
Page 34

La plancha no necesita ningún otro mantenimiento que no sea el recomendado en las instrucciones
de este manual. Sin embargo, en seguida encontrará una lista de preguntas que se hacen con
mayor frecuencia acompañadas de sus repuestas. Si por cualquier razón su plancha
Sunbeam@
continúa presentando uno de estos síntomas, o requiere reparación por cualquier otro motivo,
no intente hacerlo usted. Envíe el producto al Centro de Servicio de Aparatos Sunbeam.
P
PROBLEMA
La plancha no calienta
REGUNTAS Y
POSIBLESCAUSASYSOLUCIONES
l La plancha solamente debe conectarse en una toma de corriente eléctrica
R
ESPUESTAS
alterna de 120 voltios.
l El control deslizable debe de colocarse en la temperatura deseada.
l La función de apagado automático puede estar activada (algunos modelos
La plancha
no genera vapor
únicamente).
l El tanque de agua puede estar vacío. Agregue agua.
l Asegúrese de que el botón para vapor
Consulte la sección “Funcibn
Safety Smar?‘.
este
completamente presionado.
(En modelos de vapor variable, el control deslizable debe estar en una de
las tres posiciones de vapor).
l Use sólo el nivel del temperatura que se necesita para Poliester
0 una temperatura aún más alta.
l Fije la función de vapor hasta que la temperatura ha sido alcanzada.
Asegúrese de que la plancha
(l-1/2
a 2 minutos).
l
De
uno o dos ligeros golpecitos con la suela en la superficie de planchado
para remover cualquier obstrucción que
l Las ventilas de vapor en su plancha pueden escurrir o salpicar agua si usted
este
en el periodo de calentamiento
est6
bloqueando la válvula de vapor.
trata de tener vapor cuando la temperatura de la plancha es demasiado baja.
sblo los niveles de temperatura en el rangcyde vapor que se muestra en
Use
la Guía de Temperatura y Cantidad de Vapor.
Las ventilas de.vapor
en la plancha salpican
0 escurren agua
l Asegúrese de que la plancha ha alcanzado la temperatura seleccionada
antes de planchar. Caliente la plancha previamente por un tiempo de
l-1/2
a 2 minutos.
l Si la plancha escurre cuando se APAGA o mientras se está planchando
botbn
en SECO, asegúrese de que el
SECA/LLENA -
DRY/FILL
(o el control deslizable en algunos modelos) esté colocado en la posición
SECA/LLENA -
l La plancha puede estar demasiado llena. Apáguela. Siga las instrucciones
DRY/FILL.
para vaciar el agua del tanque. Saque un poco de agua. Permita que
la plancha se enfríe, luego seque. Conecte la plancha en la toma de corriente
eléctrica y caliente nuevamente. Después de l-112 minutos, coloque en
“vapor/steam: Siga las instrucciones en “Usando la Plancha como una
Plancha de Vapor:’
NOTA: Siempre coloque el control del vapor en la
posición de SIN VAPOR/NO STEAM a menos de que la unidad esté lista para
planchar al vapor.
NOTA: Para mayor asistencia por favor llame al siguiente número sin costo:
l-800-597-5978
Page 35

A LMACENAMIENTO DE LA PLANCHA
l Cuando ha terminado de planchar, coloque la guía de temperaturas en la posición
y presione el botón o deslice el interruptor a la posición de
l Saque el cordón de la toma de corriente, no lo jale, agarre la clavija y saque del contacto.
l Vacíe el tanque de agua DESPUÉS DE CADA USO mientras la plancha aún esté CALIENTE.
l Permita que la plancha ESTÉ COMPLETAMENTE FRíA antes de guardarla. No enrolle
SECA/LLENA -
el cordón muy apretado en el talón de descanso. ENROLLAR EL CORDÓN MUY APRETADO
PUEDE DAÑARLO.
l Siempre guarde la plancha sobre su BASE DE DESCANSO con la perrilla del control
de temperatura en la posición APAGADO/OFF. NO guarde la plancha en su empaque,
ya que cualquier residuo de humedad puede causar que la suela se manche.
APAGADO/OFF
DRY/FILL
NOTA EN FAVOR DEL MEDIO AMBIENTE
Las planchas con la función de apagado automático pueden contener una pequeña cantidad de
mercurio en el interruptor de apagado automático. El interruptor de mercurio debe ser removido
antes de que la plancha se tire a la basura para reciclaje. Por favor llame a su centro de reciclaje
local para obtener más información sobre la forma correcta de desechar su plancha.
GARANTíA
Sunbeam Products Inc. garantiza al comprador original, sujeto a limitaciones y exclusiones que se estipulan en seguida, que este
producto estará libre de defectos mecánicos y eléctricos en el material y en la mano de obra durante dos años a partir de la fecha
de compra. Esta garantía no cubre el desgaste de partes o daños resultantes de cualquiera de lo siguiente: uso negligente o mala
utilizacio'n del producto, uso con un voltaje o corriente no adecuado, uso contrario a las instrucciones de operación, desensamble,
reparaciones o alteraciones hechas por cualquier persona que no sea de un centro de servicio autorizado.
Nuestra obligacibn esta limitada a la reparacion o a la reposición, bajo la opinibn del fabricante, de este producto durante el período
de la garantía, si el producto se envía gastos previamente pagados, con el numero de modelo y la fecha original de compra ,
directamente a la siguiente direccibn:
Para productos comprados en Estados Unidos:
Para productos comprados en Canadá:
No regrese este producto al lugar de compra o al fabricante; al hacer esto retrasará el proceso del reclamo de su garantía.
Respuestas a sus preguntas sobre esta garantía o sobre la estación de servicio autorizado más cercano se pueden obtener llamando
sin costo al l-800-597-5978 o escriba a Sunbeam - Consumer Affairs, al P>O> Box 948389, Maitland. FL 32794-8389.
Respuestas a preguntas sobre esta o sobre la estación de servicio autorizado canadiense
sin costo al l-800-667-8623. Para información sobre la garantía o sobre la localización de un centro de servicio autorizado fuera
de los Estados Unidos y Canadá, por favor revise la tarjeta garantía del servicio que se incluye en el empaque del producto.
Reparación de productos o reposiciones como se ofrecen en esta garantía es su único remedio. SUNBEAM PRDDUCTS, INC.
NOSE HACERESPONSABLEPORCUALDUIERDAÑOINCIDENTALDCONSECUENTEDUEOCURRAPORLAVIOLACIóN
DE LOS TÉRMINOS EXPLICITOS 0 IMPLICITOS DE LA
ESTE. A EXCEPCIO'N DEL ALCANCE PROHIBIDO POR LA LEY APLICABLE, SUNBEAM PRODUCTS, INC. RECHAZA
TODA RESPONSABILIDAD DE
PROPOSITO EN PARTICULAR SOBRE ESTE PRODUCTO 0 CUALQUIER PARTE DE ESTE. Algunos estados y provincias
no permiten la exclusión o limitación de daños imprevistos o consecuentes, o permiten limitación en la duración de una garantía
implícita, así que las limitaciones o exclusiones arriba mencionadas pueden no ser aplicables para usted. Esta garantía le da a usted
derechos legales específicos, y puede también tener otros derechos que pueden variar de estado a estado o de provincia a provincia.
SUNBEAM APPLIANCE SERVICE STATION
Attention: Service Oeparlment
117 Central Industrial Row
Purvis,
SUNBEAM APPLIANCE SERVICE
Attention: Service Department
Mississauga, ON
RECHAZO DE RESPONSABILIDADES
CUALQUIER GARANTíA
DE
2 AÑOS
MS 39475
STATION(KND)
5975 Falbourne Street
L5R
3VB
mis
cercano se pueden obtener llamando
GAFtANTíA
IMPLíCITA 0 COMERCIAL, 0 AJUSTES HECHOS PARA UN
DE ESTE PRODUCTO 0 DE CUALQUIER PARTE DE
Page 36

Sempre que utilizar o
como as que seguem:
1. Utilize o ferro elétrico somente para o que ele
2. Para evitar risco de choque elétrico, não submerja o fio. ou a tomada ou o aparelho em água
ou em qualquer outro líquido.
3. 0 ferro elétrico
da tomada. Nunca puxe o fio elétrico para desconectá-lo da tomada; pelo contrário.
segure
o plugue e desconecte-o.
4. Náo permita que o fio elétrico toque superficies quentes. Deixe que o ferro elétrico se
completamente antes de guardá-lo. Enrole o fio ao redor do ferro elétrico para guardá-lo.
5. Sempre desconecte o ferro elétrico da tomada quando estiver enchendo-o de água ou
esvariando-o
6. Nâo use o ferro elétrico com o fio danificado ou após
ter caído no chão. Para evitar o risco de curto circuito, não abra ou desmonte o ferro elétrico.
Leve-o
à urna
ou desmontado incorretamente. pode
7. E necessário manter
ou
perto
de criancas. Não deixe o ferro elétrico sorinho quando estiver ligado ou na tábua
de
passar.
8. Podem oconer queimaduras ao tocar partes metálicas ou entrar em contato
que sai dos orificios. Tome cuidado ao virar um ferro de
haver
água quente no reservatório de água.
9. Quando o ferro não está funcionando bem, desligue o ferro da tomada
em local de assistência técnica qualificada.
10. Seu ferro Sunbeam” está desenhado para descansar-se sobre a sua base de apoio. Não coloque
o ferro em
seu
ferro elétrico, você deve tomar algumas medidas básicas de seguranca,
LEIA
TODAS AS INSTRU~ÓES ATENTAMENTE
foi
designado.
deverá
sempre ser
e
também quando este náo estiver em uso.
pessoa qualificada para consertos e/ou reparos. Se o ferro elétrico for aberto
urna
supervisão muito próxima quando este aparelho for usado por, em
urna
superficie sem
DESLIGADO/OFF
haver
risco de descargas
protecáo,
embora este esteja sobre a sua base de apoio.
antes de conectá-lo ou desconectá-lo
ter
apresentado algum defeito ou após
elétricas
passar
para baixo poderá ainda
esfrie
quando for utilisá-lo.
direto
com o vapor
e
leve-o para conserto
INSTRU~ÓES ESPECIAIS
1. Este é um aparelho eletrodoméstico de 1200 W*. Para evitar que o circuito elétrico
se
sobrecarregue,
2. Se um fio de extensão for absolutamente necessário, um fio de 10 ampares* deve ser usado.
Fios com amperagem menor podem esquentar-se muito. Tenha cuidado quando colocar o fio
de extensáo para que ninguém chute, pise ou
não use
outro
aparelho de alta
tropece
potência
nele.
no mesmo
CirCUitO.
PARA PRODUTOS COMPRADOS SOMENTE NOS ESTADOS UNIDOS E CANADÁ:
Este aparelho conta com um plug polarizado (um dos contatos é mais /argo do que outro). Para
evitar risco de choque elétrico, este plug encaixa-se somente em um plug unidirecional polarizado.
Seo plug não se encaixar totalmente dentro da tomada,
encaixar,
*No México, o ferro funciona a 127 volts, 1340 Watts. Se um fio de extensáo for necessário,
um fio de 13 ampares deve ser usado.
contate
um
eletricista
competente. Náo tente
inverta
desativar
o mesmo. Se ainda assim náo
este recurso de segurany
Page 37

CARACTERíSTICAS
1. FLEXcordTM Centralizado
2. Seletor de
de Tecido
3. Base de Descanso
4. Luz sinalizadora de Desligamento
Automático (Somente em Alguns Modelos)
5. Seletor de Desligamento e de Temperatura
6. Base Com Superficie
(Somente em
Regulagem
e
Vapor
Anti-Aderente
Alguns Modelos)
Ab
7. Botão de Seco/ Cheio do Vapor
Seletor de Ajuste da
ou
8.
Janela
Para Visibilidade
9. 29 Orificios de Vapor
10. Rebaixo do Botão em Todo o Comprimento
11. Entrada para
12. Descanso para 0 Polegar
Abastecimento
Varia@o
de Água
do Vapor
Page 38

VAPOR
SECO
CHE10
Característica de Vapor e Seco
Ao usar o ferro com vapor, aperte ou escorregue o botáo (dependendo do modelo do ferro) até a
posi@o de VAPOR. Se estiver usando o ferro seco, ou estiver enchendo o reservatório de água
aperte
para obter vapor,
ou escorregue o botão até a posicão de SECOICHEIO.
Característica de Spray Mista
Aperte o botáo de borrifar para obter
e
remova o amassado.
Característica de Variacáo do Vapo?
Quando passar com vapor coloque a variacáo do vapor em
;,\,,
,,
DELICADO -vapor a baixa temperatura para tecidos leves
poliéster
;
:,
irn :~>:4::
:~
iil,
,I
-.,t, ~,,,
TOTAL-vapor para tecidos de peso médio como lá e algodão.
J ULTRA vapora alta temperatura para tecidos pesados como algodáo
Característica de Desligamento Automático Safety
(Somente em
Quando o ferro está ligado em tomada
Alguns
Modelos)
(Somente em Alguns
urna
e
seda.
elétrica
Modelos)
névoa delicada de borrifo que umedeca o tecido
(Somente em Alguns
Modelos)
urna
das áreas de vapor:
e
delicados como
SmarP
de 120 volts CA, a luz sinalizadora vermelha quando
e
firme indica que o ferro está ligado ou que está pronto para ser ligado. Se o ferro elétrico ficar
parado sobre a sua base de descanso durante 15 minutos, o ferro elétrico deixará de esquentar.
e
A luz sinalizadora piscará para indicar desligamento automático
continuará pistando até que
o ferro seja reiniciado ou seu fio retirado da tomada.
linho,
Se o ferro ficar na posi@o de passar, ele passa parao modo de desligamento automático em
e
30 segundos
pistando até que o ferro seja reiniciado ou
PARA REINICIAR 0 FERRO: Para reiniciar o ferro após estar desligado, selecione
e em seguida movimenfe o ferro para frente e para
sinalizadora deixe de piscar e fique firme. Verifique se o controle de deslizar está regulado
a luz sinalizadora pista novamente indicando desligamento automático e continua
seu
fio retirado da tomada.
SECO/CHEIO
trás
na posi@o de passar alé que a luz
na
temperatura desejada e antes de ajustar o nivel do vapor, aguarde 3 minutos até que a chapa do
à
ferro chegue
PRECAUCiiO:
APAGAR E DESCONECTAR 0 FERRO
temperatura seiecionada.
NÁO USE A
FUN@iO DE
DESLIGA AUTOMÁTICO COMO UM SUBSTITUTO PARA
ELÉTRICO
QUANDO ESTIVER EM USO.
Page 39

Característica de
Limpeza
Automática (Somente em Nguns Modelos)
ESTE PROCEDIMETO ELIMINA DOS RESPIRADOUROS DO VAPOR E DA CAMARA DE VAPOR DO FERRO
OS
RESíDLlOS
MINERAIS QUE PODERÁO ENTUPIR 0 FERRO E
REDIJZIR SUA
CAPACIDADE DE VAPOR
E DE AQUECIMETO.
l Regule a varia@0 do vapor na posi@o DESLIGADO,
l
Encha o
tanque de água até o nivel máximo,
l Regule
l
l Desligue o ferro
l Leve
o
botão
seletor
de temperatura até o ponto mais alto.
Deixe o
ferro esquentar durante l-1/2 minuto.
e
retire 0 fio da tomada.
o
ferro até a pia e ative a característica de Iimpeza automática escorregando a
variacáo de vapor até a posi@o de limpeza automática. (Tome cuidado para náo tocar
superficies
nas
l Balance ligeiramente
30 segundos. Ao
quentes.)
o
ferro de um lado para o
balancar
da frente para trás, o
outro e
da frente para trás durante
bico
do ferro
deverá
uns
ficar ligeiramente mais
baixo que a parte traseira do ferro para que a água circule completamente por todo o ferro.
l Coloque o botáo de varia@0 de vapor novamente na posi@o de DESLIGADO
l Esvazie a água restante pela abertura de abastecimento.
l Seque a chapa do ferro com uma toalha.
l Coloque o fio
na
tomada, regule o seletor de temperatura no ponto máximo e espere que o ferro
esquente durante 2 minutos para secar toda a água que reste na câmara de vapor.
l Esfrie
o
ferro e guarde-o de
acordo
com as
instru@es.
Page 40

ANTES DE USAR PELA PRIMERA VEZ
Para assegurar que não foram transferidas nenhumas manchas ao tecido na primeira vez que
usado o ferro elétrico, é aconselhável que limpe com um jato de vapor os orifícios que estão na
parte inferior do ferro elétrico. Isto ajudará a remover qualquer resíduo que se tenha acumulado
durante o processo de manufatura. Para fazer ìsto:
l Coloque o controle de ajuste de vapor em
l Encha o tanque de água do ferro elétrico ao seu nível máximo.
l Coloque o botão do seletor de temperatura na sua posi@o mais alta. Esquente o ferro elétrico
por 2 minutos.
l Regule
l FaCa a pulveriza@o por 2 minutos, longe da roupa que será passada.’
l Passe o ferro elétrico sobre um pano úmido ou sobre
o
controle do vapor no ponto de ajuste mais alto.
SEWIONANDO A TEMPERATURA
Ao passar, use o nível de temperatura e a quantidade de vapor recomendados para o tipo de tecido
vai
que se
primeiro. lsto ihe ajudará a evitar danos aos tecidos com o ferro elétrico demasiadamente quente.
Se você náo tem certeza dos materiais presentes no tecido, comece com
pouco vapor. Verifique o calor do ferro elétrico numa área escondida do tecido ou que náo se note,
tais como as costuras ou ao revés. Gradualmente aumente a temperatura e a quantidade de vapor
até que as rugas
usar. Os tecidos que requerem baixas temperaturas e pouco vapor, devem ser passados
desaparecam sem danificar o tecido.
SECOKHEIO.
CORRETA
urna
toalha de papel limpa.
PARA
CADA
TIPO DE
urna
temperatura baixa e
foi
TECIDO
Ao passar a temperatura de
de temperatura é levado de “LINHO” para “POLIÉSTER” e a
para DELICADO), aguarde cerca de 5 minutos para que a temperatura mais baixa seja
Os seguintes quadros são desenhados para ajudar a selecionar a temperatura e o método mais
adequado para o tecido que planeja passar. Verifique as etiquetas das roupas e siga as
recomendacões do fabricante. Para passar roupas que tenham
use a temperatura indicada para o material que requer o nível mais baixo. Por exemplo:
65% poliester, 35% algodão. Passe este tecido na regulagem de
nos modelos que possuam
urna
regulagem alta para
variacáo de vapor).
urna
mais baixa (EXEMPLO: quando o sefetor
yariacão de vapor é levada de ULTRA
alcayada.
urna
mistura de diferentes materiais,
“POLIÉSTER”
(e vapor DELICADO
Page 41

Tela
Acetato-Nylon
Acrílicos-Sedas
Poliester
Lãs
Algodão
Linho
Guia
de Vapor
Vapor a Seco
Vapora Seco
Vapor a Seco
Vapor a Seco
Vapora Seco
Vapor a Seco
Recomendaqóes de Como Passar
Passe a seco do lado contrário quando estiver úmida.
Passa a seco no lado contrário quando estiver úmida. Os tecidos de acrílico
podem ser passados a vapor se assim for indicado pelo fabricante.
Passe a seco quando estiver úmida ou use o spray enquanto passa. Passe a
vapor se assim for indicado pelo fabricante.
Passe a vapor do lado contrário ou passe do lado direito, colocando um pan
entre 0 ferro ektrico e a roupa.
Passe a seco enquanto estiver úmida ou use 0 spray enquanto passa. Passe
roupas escuras do lado contrário para evitar que o tecido fique brilhando.
Passe a seco enquanto estiver úmida ou use o spray enquanto passa.
Passe cada se#o até que
escuras do lado contrário para evitar que o tecido brilhe e o linho de mesa
pelo lado direito.
esteja
completamente seca. Passe as roupas
Tela
Acetato-Nylon
Acrílicos-Sedas Passa a seco no lado contrario quando estiver tímida. Os tecidos de acrílico
t-i
1
Poliester 1
de Vapor Recomendacóes de Como Passar
SECO Passe a seco do lado contrário quando estiver úmida
Dodem ser oassados a vapor se assim for indicado Delo fabricante.
Passe a seco enquanto a roupa estiver úmida ou use o spray enquanto
/
passa. Passe as roupas de raiom do lado contrário. Passe a vapor se’assim
for indicado Delo fabricante.
Passe a vapor se assim for indicado pelo fabricante
Passe usando vapor enquanto úmido ou borrife ao
Passe tecidos escuros no avesso para que evitar que adquiram brilho.
Passe a seco enquanto estiver úmida ou use o spray enquanto passa.
Passe cada se$áo até que
escuras do lado
pelo lado direito.
contrario
esteja
completamente seca. Passe as roupas
para evitar que o tecido brilhe e o linho de mesa
4x+&
DETO
ULTRA
passar.
Guia
Page 42

SOBRE A ÁGUA
Este ferro elétrico
é
muito consistente, recomenda-se usar água destilada em seu ferro elétrico. Se
destilada em seu ferro elétrico,
manter
seu
caseiro
sistema
daninhos para
foi
feito especialmente para usar água de torneira. Em áreas do país ondea água
deverá
encher periodicamente o tanque de água de torneira, para
ferro elétrico em suas devidas condicões. Nâo use água que tenha sido tratada por um
para suavizá-la,
o
ferro elétrico.
urna
vez que este tipo de água contenha minerais que podem ser
VO&
usar água
USANDO-O
0 ferro elétrico pode ser usado a seco com ou sem água no tanque. Evite deixar o tanque muito
cheio de água enquanto estiver em uso.
l Selecione o controle de temperatura na posi@o
e
tomada alternada
l Empurre para baixo ou escorregue o botáo até a posi@o de SECO/ CHEIO. Mude o controle de
temperatura para a regulagem de tecido apropiada.
l Se você comecar a passar com
posicäo vertical sobre sua base de descanso. Se o ferro já estiver quente, certifique-se de
abaixar ou aumentar sua temperatura. Comece a passar numa área da roupa onde não se note,
nas
como
costuras internas ou ao revés ou na parte
120 volt
USANDO-O
Quando usar o ferro elétrico como um ferro elétrico a vapor, certifique-se se o
temperatura está colocado
e
a manche.
roupa
l Escorregue
ou escorregue
(Consulte as
l Conecte
l Mova
Deixe que o ferro elétrico se esquente por 2 minutos para que alcance a temperatura desejada.
l Depois que o ferro elétrico alcancar a temperatura desejada para a roupa que será passada,
pegue-o
dê um ligeiro golpe na superficie da planta do ferro elétrico. Isto ajudará para iniciar a
gera
l Quando passar a vapor, se
mais baixa, poderá aparecer água na base suporte, indicando que a temperatura no ferro elétrico
está abaixo do nivel de vapor. Se isto
reajuste o controle de temperatura até
1 minuto para permitir que se alcance a temperatura desejada.
Se
o seu
a vapor,
ferro elétrico. Siga as instrucôes que indicam PARA ENCHER 0 TANQUE DE AGUA. Adicione água
somente até ondea linha indica o nivel máximo para prevenir derrames.
o
controle de temperatura até a posicáo de DESLIGADO. Empurre para baixo
o
Instrt@es sobre ABASTECIMENTO DO TANQUE DE AGUA.)
o
fio elétrico numa tomada alternada de 120 volt.
o
controle de temperatura ao nivel que seja adequado para a roupa que será passada.
e
use-o. Sea unidade náo
0 vapor.
ferro elétrico comecar a perder o fluxo de vapor e você ainda quiser continuar a passar
VO@
deverá
na
posicäo
botäo até a posi@o de SECO/ CHEIO. Encha o ferro de Agua.
o
controle de temperatura acidentalmente se coloca em
encher o tanque de água
(OMO
o
ferro elétrico
COMO
UM
VAPOR/STEAM
gera
ocorrer,
o
UM
fmo
A
SECO
MIN
antes de conectar o cabo elétrico numa
frio,
deixe que este esquente colocando-o
contrária
fmo
para evitar que a água derrame sobre a
vapor quando se presiona o botão para pulverizar,
selecione a regulagem de SECO/ CHEIO. A seguir,
nivel desejado. Coloque o ferro sobre a base por
outra
vez, sem esfriá-lo. Desconecte o
da roupa.
ELÉTRICO
A VAPOR
seletor
de
urna
seu
acáo que
posi@o
na
A
Page 43
P ARA
ENCHER
Sempre desconecte o ferro elétrico antes de enchê-lo. Empurre para baixo ou
escorregue o botão até a
água está localizado debaixo da tampa a
elétrico com a tampa
máximo, Feche a tampa a
correlamente colocada e feche o orificio. Limpe o exterior da unidade para
secar qualquer derrame.
posicáo de SECO/ CHEIO. 0 orificio para encher com
aberta e
encha-o até ondea Iinha indicar o nivel
prova
de derrames. Certifique-se sea tampa está
P ARA ESVAZIAR o TANQUE DE
Empurre para baixo ou escorregue o botáo até a pos@o de SECO/ CHEIO.
seletor
Escorregue o
Desconecte o ferro elétrico da tomada. Abra a tampa a
Mantenha o ferro elétrico sobre a pia, vire o cabo do ferro elétrico para baixo
nesta
posicáo até que a água deixe de sair do orificio. Agite o ferro elétrico ligeiramente para
que saiam as gotas que ainda estejam dentro; o calor do ferro elétrico secara-o interiormente.
Certifique-se de que o ferro elétrico seja colocado sobre sua base de descanso.
de temperatura até a posi@o de DESLIGADO.
IMPORTANTE: SUNBEAM NÁO RECOMENOA
GUARDAR 0 FERRO
o TANQUE DE
prova
de derrames. Mantenha o ferro
prova
de derrames.
ELÉTRICO
COM AGUA NO TANOUE.
ÁGUA
ÁGUA
Outros Modelos
_~
LL
Modelos com
Spray
e
mantenha-o
\-;.\.J
rur.,
;g
MisP
(UIDADOS
1. Evite passar sobre colchetes, zippers,
2. Caso
3. PARA MODELOS COM UMA
grude
goma de passar ou
DE POLIÉSTER do ferro, espere que o ferro
A. Faca
urna
pasta de produto de limpeza doméstica não abrasivo e água e usando
um pana macio passe na chapa do ferro, esfregando suavemente a superficie
para remover o acúmulo de goma ou de outros residuos.
B. Encha o ferro, regule o controle de temperatura para linho. Deixe
(cerca de 2 minutos). Empurre o
alta de vapor. Deixe o vapor sair durante alguns minutos.
C. Passe o ferro em cima de urna toalha de
e
dos respiradouros do vapor.
D. Caso a chapa fique arranhada, poderá remover os pequenos arranhóes com
aso. Após passar a esponja siga as etapas B e C antes de passar a roupa.
de
E. Poderá usar um produto de limpeza
do fabricante.
depósitos de cálcio
deixe que o ferro elétrico seque
(urna colher de chá de vinagre em um copo de água). NÁO USE FIBRAS OU ESPONJAS,
LIMPADORES ABRASIVOS
OTA: Qualquer arranhadura na superficie do ferro elétrico náo afetará o seu desempenho.
N
PARA
SEU FERRO ELÉTRICO hNBEAM@
rebites
and etc.
outro
material na CHAPA DE
esfrie e,
bota6 para baixo ou escorregue a chave até a regulagem
algodáo para remover a pasta do fundo do ferro
para
ferro quente de acordo com as instrucóes
SUPERFíCIE
e
goma da superficie do ferro elétrico como se indica a continua@o:
OU
SOLVENTES
ANTIADERENTE, limpe as marcas de água,
e limpe-o
com um pano usando
QUíMICOS,
urna
vez que possa arranhar a base
ALUMíNIO
então, limpe da seguinte maneira:
urna
porque podem danificar a superficie.
COM REVESTIMENTO
o
ferro esquentar
solu@o suave de vinagre
urna
suporte
esponja
Page 44
MANUTEN~AO
0 ferro elétrico
nas
instru@es deste manual. Portanto. em seguida encontrará uma lista de perguntas que se fazem
com maior frequência, acompanhadas de
Sunbeam continuar apresentando
motivo, náo tente
não
necessita de
fazê-lo
VO@ mesmo. Envie o produto ao Centro de ServiGo Autorizado Sunbeam.
nenhum
outro tipo de
suas
respostas. Se por qualquer razão seu ferro elétrico
um
destes sintomas, ou requerer repara@0 por qualquer outro
manuten@
que
näo
seja o recomendado
PERGUNTAS
E
RESPOSTAS
PROBLEMA POSSíVEISCAUSASESOLUl$ES
0
ferro elétrico
náo esquenta 120
0
fello
não
gera
vapor
Os orificios de vapor
no term elétrico salpicam selacionada antes de passar. Esquente o ferro eletrico previamente por
ou escorrem água um
l 0 ferro elétrico deve ser conectado am uma tomada alternada de
volt.
l 0 controle deslizavel deve ser colocado na temperatura desajada.
l Pode ser que a característica de desligamento automático tenha sido ativada
(somente em alguns modelos). Siga as
l 0 tanque de agua pode
l Certifique-se de que o botão de vapor
(Em modelos variáveis
tres posi&%s
l Use somente o nivel de temperatura que se necessita para Poliester ou uma
temperatura
l Mantenha-se a fun@o
l Certifique-se de que o ferro elétrico esteja no período de aquecimenlo
(l-lE a
l Dê um ou dois leves golpes na superficie da planta do ferro elétrico para
a vapor).
a
um nivel mais alto.
2 minutos).
estar
vazio, Adicione água.
a
vapor, o controle deslizável deve estar em uma das
a
vapor ate que a temperatura saja alcancada.
instrucões em Safety
esteja
comp!etamente pressionado.
Smart”;.
remover qualquer obstn@o que esteja bloqueando a valvula de vapor.
l Nos orificios de vapor am seu ferro elétrico podem escorrer ou salpicar água
quando
se você tentar pulverizar
Use
somente
no
Guia
l Certifique-se de que o ferro elétrico tenha alcanCado
tempo
l Se o ferro derramar água ao ser DESLIGADO ou durante
niveis de temperatura na amplitude a vapor que se mostra
de Temperatura e Qualidade de Vapor.
de l-112 a 2
a SECO, verifique se o botáo de SECO/ CHEi0 (ou
em alguns modelos) está
l 0 ferro elétrico pode estar demasiado chelo. Apague-o.
a
para esvaziar
se esfrie
água do tanque. Remova um pouco de agua. Espere que o ferro
e
loga seque-o. Conecte o ferro eletrico na tomada e esquente-o
a temperatura do ferro elétrico
minutos.
regulado
na posicáo de SECO/
o
controle de deslizar
a
estiver
temperatura
o
passamento
CHElO,
Siga
as instru~ões
novamente. Depois de l-112 minutos coloque am “Vapor/Steam" Siga as
lnstru@es em USANDO 0 FERRO
OTA: Sempre coloque o controle do vapor na posi@o de SIN
N
ELETRICO
COMO UM FERRO A VAPOR.
VAPOR/NO
STEAM a manos que a unidade esteja pronta para passar a vapor.
baixa.
Nota: Para maior assistência, por favor ligue gratuitamente para o seguinte número:
l-800-597-5978
v
Page 45
Ao
GUARDAR o FERRO ELÉTRICO
l
Quando terminar de passar, gire o seletor de temperatura até a posi@o de DESLIGADO
e emparre para baixo ou escorregue o botäo até a posi@o de SECOICHEIO.
l
Desconecte o fin da tomada, não puxe-o, segure-o pelo plugue e retire-o da tomada.
l
Esvarie o tanque de água DEPOIS DE CADA USO enquanto o ferro elétrico ainda
estiver OLIENTE.
l
Espere que o ferro elétrico FIQUE COMPLETAMENTE FRIO antes de guardá-lo. Não enrole o
fio muilo aperiado ao redor da base de descanso. ENROLAR 0 FIO MUITO APERTADO PODE
DANIFICÁ-LO.
l
Sempre guarde o ferro elélrico sobre sua BASE DE DESCANSO com o botáo de controle de
temperatura na posi@o MIN. NÁO guarde o ferro elétrico na sua embalagem, urna vez que
qualquer residuo de umidade possa manchá-lo.
NOTA A FAVOR DO
Os ferros elétricos com a funcáo para apagar automaticamente podem conter urna pequena
quantidade de mercúrio no interruptor de apagar automático. 0 interruptor de mercúrio deve ser
removido antes do ferro elétrico ser atirado ao lixo para reciclagem. Por favor ligue parao seu
centro local de reciclagem para obter mais informacóes sobre a forma correta de jogar fora o seu
ferro elétrico.
MEIO
AMBIENTE
GARANTíA LIMITADA DE 2 ANOS
Page 46

NOTES/NOTAS
Page 47

NOTES/NOTAS
Page 48

01998 Sunbeam Corporation or its affiliated companies. All rights reserved.
Sunbeam? Spray Mist? Safety Smart@ and FLEXCordTM
Distributed by Sunbeam Products Inc., Delray Beach, Florida 33445, oran affiliated company.
Distribué par Sunbeam Products Inc., Delray Beach, Florida 33445, ou un sociéte afWe
01998 Sunbeam korporation o sus corporaciones afiliadas. Todos los derechos reservados.
Distribuido por Sunbeam Products Inc., Delray Beach, Florida 33445, o alguna compañia afiliada.
01998 Sunbeam Corporation ou suas empresas afiliadas. Todos os direitos reservados.
Distribuído pela Sunbeam Products Inc., Delray Beach, Florida 33445, ou empresa coligada.
are trademarks of Sunbeam Corporation or its affiliated companies.
01998 Sunbeam Corporation ou sessociétés affiliées. Tous droits réservés.
sont marques de commerce de Sunbeam Corporation ou de ses sociétés affiliées.
son marcas comerciales de Sunbeam Corporation o de sus compañias afiliadas.
sáo marcas comercia& da Sunbeam Corporation ou de suas empresas coligadas.
Sunbeam’? Spray MistP Safety Smart” et FLEXCordTM
SunbeamF) Spray Mist? Safety Smart” y FLEXCord”
A
v
Sunbeam? Spray Mist? Safety Smart” e FLEXCordTM
l? N. 99449-098
 Loading...