

Page 1

Smart-Set™
Smart-Set
© 2008 Sunbeam Products, Inc. doing business as Jarden Consumer Solutions.All rights reserved.
Distributed by Sunbeam Products, Inc. doing business as Jarden Consumer Solutions, Boca
Raton, Florida 33431.
TM
Cookbook and Owner’s Manual
Printed in China 124381-08/9100050002431
6 QT Smart-Set 08EM1
6 QT Smart-Set 08EM1.indd 1-26 QT Smart-Set 08EM1.indd 1-2 4/17/08 6:21:16 PM4/17/08 6:21:16 PM
Read and Keep These Instructions
www.crockpot.com
Page 2

Table of Contents
Important Safeguards .................................... 2
Save These Instructions
Smart-Set™ Slow Cooker Components
Before You Use Your Smart-Set
Slow Cooker ..................................................... 5
Assembly ..........................................................5
How to Use Your Smart-Set
Slow Cooker ....................................................6
Auto Cook Mode .................................................................. 7
Digital Timer Mode ............................................................. 9
Dual-Cycle Mode ................................................................10
Manual Mode .....................................................................11
Usage Notes........................................................................12
Care and Cleaning ........................................13
Troubleshooting ............................................14
Cooking Hints and Tips ................................15
Smart-Set™ Slow Cooker Recipes ...............17
Brunch and Beverages ......................................................17
Appetizers and Side Dishes .............................................27
Main Courses ...................................................................... 29
Poultry .....................................................................29
Pork and Sausage ................................................. 40
Beef .......................................................................... 49
Vegetarian ..............................................................58
Soups and Chowders ........................................................61
Holidays and Special Occasions ..................................... 67
Holiday and Special Occasion category .......................68
Desserts ............................................................................... 76
Service Instructions .....................................81
Warranty ........................................................81
.................................. 3
........... 4
™
™
IMPORTANT SAFEGUARDS
When using electrical appliances, basic safety precautions should always
be followed, including the following:
1. READ ALL INSTRUCTIONS BEFORE USING.
2. Do not touch hot surfaces. Use handles or knobs.
3. To protect against electrical shock, do not immerse cord, plug, or
heating base in water or other liquid.
4. Close supervision is necessary when any appliance is used by or near
children.
5. Unplug from outlet when not in use and before cleaning. Use oven
mitts or allow to cool before putting on or taking off parts.
6. Do not operate any appliance with a damaged cord or plug or after the
appliance malfunctions or has been damaged in any manner. Return
appliance to the manufacturer (see warranty) for examination, repair,
or adjustment.
7. Do not use outdoors.
8. Do not let cord hang over edge of table or counter or touch heated
surfaces.
9. Do not place on or near a hot gas or electric burner or in a heated oven.
10. Extreme caution must be used when moving an appliance containing
hot oil or other hot liquids. Always use oven mitts when moving your
heated slow cooker.
11. Do not use appliance for other than intended use.
12. Avoid sudden temperature changes, such as adding refrigerated foods
or cold liquids into a heated pot.
13. To disconnect, press/switch OFF then remove plug from wall outlet.
14. The use of accessory attachments not recommended by the
manufacturer may cause injuries.
15. Keep 6 inches clear from the wall and 6 inches clear on all sides.
16. CAUTION: To prevent damage or shock hazard, do not cook directly in
the heating base. Cook only in the stoneware provided.
1 2
6 QT Smart-Set 08EM1.indd Sec1:1-Sec1:26 QT Smart-Set 08EM1.indd Sec1:1-Sec1:2 4/17/08 6:21:20 PM4/17/08 6:21:20 PM
Page 3
HOUSEHOLD USE ONLY.
IMPORTANT NOTE:
NOTE:
NOTE:
POLARIZED PLUG
SAVE THESE INSTRUCTIONS
This appliance is for
There are no user-serviceable parts inside. Do not attempt to service this
product.
A short power-supply cord is provided to reduce the hazards resulting from
entanglement or tripping over a longer cord. AN EXTENSION CORD MAY BE
USED WITH CARE; HOWEVER, THE MARKED ELECTRICAL RATING SHOULD BE
AT LEAST AS GREAT AS THE ELECTRICAL RATING OF THE SLOW COOKER. The
extension cord should not be allowed to drape over the counter or tabletop
where it can be pulled on by children or tripped over unintentionally.
contact a qualified electrician. Do not attempt to modify the plug in
any way. If the plug fits loosely into the AC outlet or if the AC outlet
feels warm do not use that outlet.
IMPORTANT NOTE: Some countertop and table surfaces are not designed
to withstand the prolonged heat generated by certain appliances. Do not
set the heated unit on a finished wood table. We recommend placing a hot
pad under your slow cooker to prevent possible damage to the surface.
NOTE: During initial use of this appliance, some slight smoke and/or odor
may be detected. This is normal with many heating appliances and will not
recur after a few uses.
NOTE: Please use caution when placing your stoneware on a ceramic or
smooth glass cook top stove, countertop, table, or other surface. Due to
the nature of the stoneware, the rough bottom surface may scratch some
surfaces if caution is not used. Always place protective padding under
stoneware before setting on table or countertop.
HOUSEHOLD USE ONLY.
POLARIZED PLUG
This appliance has a polarized plug (one blade is
wider than the other). To reduce the risk of electric
shock, this plug is intended to fit into a polarized
outlet only one way. If the plug does not fit fully into
the outlet, reverse the plug. If it still does not fit,
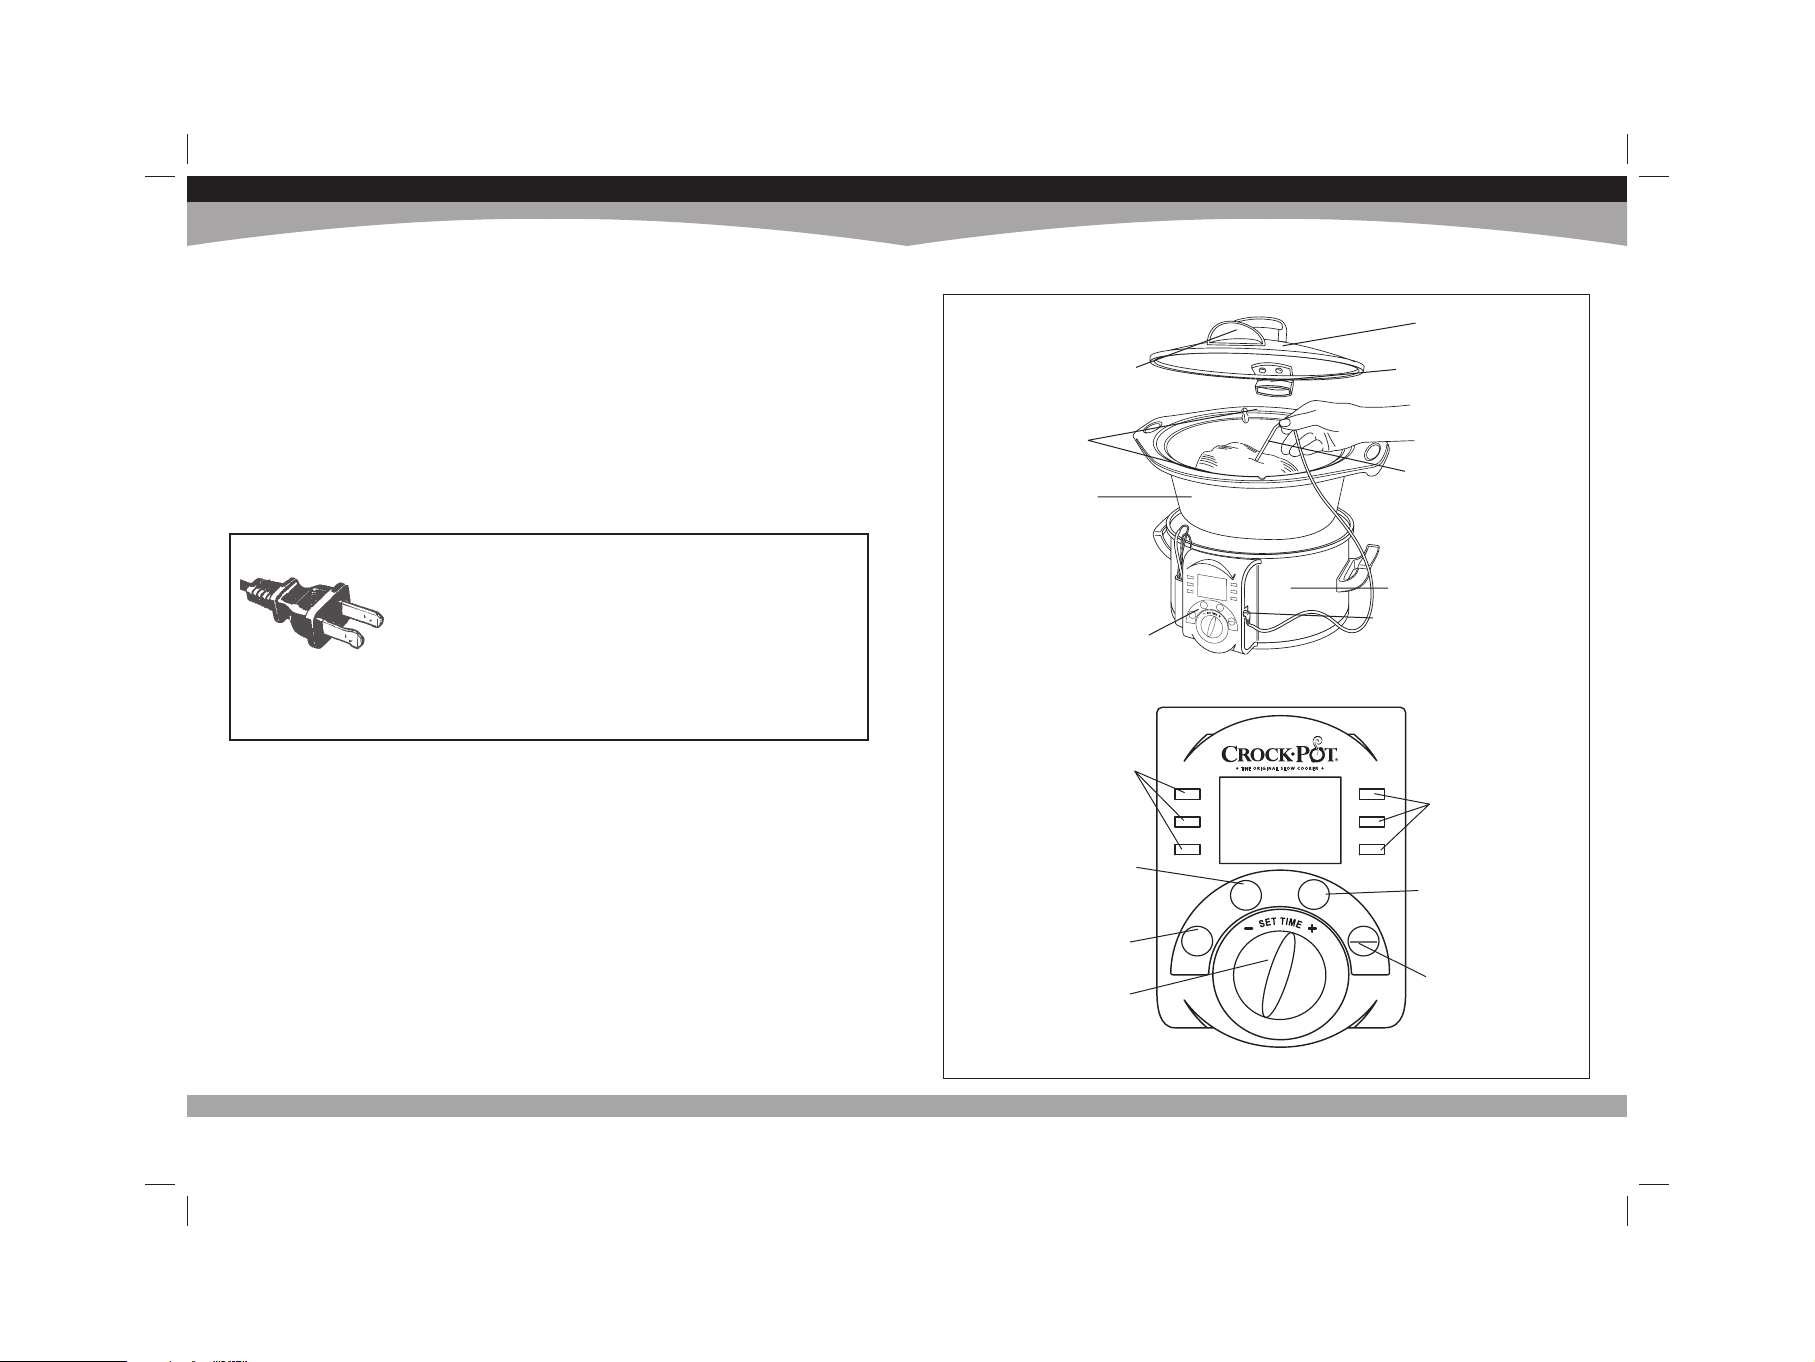
SMART-SET™ SLOW COOKER COMPONENTS
Figure 1
Lid Lifting
Handle
Notches for
Temperature
Probe Cord
Stoneware
Control Panel
Figure 2 - Control Panel
Cooking Mode
Indicator
Cooking
Temperature
Selection
Auto Cook Mode
Selection
Set Time Dial
CYCLE 1
CYCLE 2
AUTO
C
YC
C
YC
A
AUTO
LE
1
LE 2
U
T
O
TEMP
A
U
T
O
LO
W
H
I
G
H
WA
R
M
C
YC
LE
ST
A
R
T
ST
O
P
TEMP CYCLE
START
STOP
Lid
Lid Hinge
Temperature Probe
Heating Base
Temperature Probe Jack
LOW
HIGH
WARM
Cooking
Temperature
Indicator
Dual Cycle Mode
Selection
Start/Stop and
On/Off
3 4
6 QT Smart-Set 08EM1.indd Sec1:3-Sec1:46 QT Smart-Set 08EM1.indd Sec1:3-Sec1:4 4/17/08 6:21:20 PM4/17/08 6:21:20 PM
Page 4

Note:
BEFORE YOU USE YOUR SMART-SET™
Caution:
Note:
SLOW COOKER
HOW TO USE YOUR SMART-SET™
SLOW COOKER
Before you use your slow cooker, wash the lid, stoneware, temperature
probe, and temperature probe housing in WARM, soapy water and dry
thoroughly.
NEVER immerse the heating base in water or any other liquid.
ASSEMBLY
1. Place stoneware into the heating base.
2. Lower the lid horizontally down onto the stoneware. Be sure to align
the lid hinge so that it slides down onto the base hinge.
(See Figure 3a and 3b)
3. When raising and lowering the lid, use the lid lifting handle.
Caution: When disassembling, always remove the lid first, and then remove
the stoneware.
Note: When removing the lid, use both hands to gently lift up and remove.
( See Figure 3c)
Figure 3
3a 3c3b
1. Prepare your ingredients according to the recipe and place them into
the stoneware.
2. Plug the heating base into a standard outlet.
Note: Display will blink until you program your cooking mode. If more
than 10 seconds pass between button presses, the display will clear and
you must start again.
3. Select the cooking mode you wish to use from the 4 options below.
Note: Plug the temperature probe into the temperature probe jack
ONLY if using Auto Cook Mode.
4 Cooking Modes
Cooking Mode Ideal For How it Works
AUTO COOK
MODE
DIGITAL TIMER
MODE
DUAL CYCLE
MODE
MANUAL MODE Supervised
Ultimate
taste and
convenience
One cooking
time and
temperature
Two cooking
time and
temperatures
cooking
•Automatically times and cooks your meal
using a temperature probe.
•After reaching ideal internal temperature,
automatically switches to simmer (SIMR),
then WARM when cooking is complete.
•Select LOW or HIGH, and set a time for cooking
your meal, from 30 minutes to 20 hours.
Digital display counts down remaining time.
•Automatically switches to WARM when
cooking is complete.
•Same as Digital Timer Mode, but allows you
to set two cooking times and temperatures.
•Cooks for a specified time and temperature
(LOW or HIGH), then cycles to a second
time and temperature before automatically
switching to WARM.
•Cooks at the temperature you set (LOW
or HIGH), until you manually switch it to
another temperature (LOW, HIGH or WARM)
or turn it off.
5 6
6 QT Smart-Set 08EM1.indd Sec1:5-Sec1:66 QT Smart-Set 08EM1.indd Sec1:5-Sec1:6 4/17/08 6:21:20 PM4/17/08 6:21:20 PM
Page 5

Auto Cook Mode
The Auto Cook Mode automatically times and cooks your meal using a
temperature probe. The pre-set meat options and digital thermometer
ensure perfect results, regardless of variables that can effect cook time such
as unit starting temperature, fresh or frozen food, food size or ingredients.
Smart-Set™ slow cooker automatically switches to the WARM setting when
cooking is done so that your meal stays
WARM
until it is served. Use this
mode when taste is your top concern, as it was designed to produce optimal
results every time.
CAUTION:
The Auto Cook Mode automatically times and cooks your meal using a
temperature probe. The pre-set meat options and digital thermometer
ensure perfect results, regardless of variables that can effect cook time such
as unit starting temperature, fresh or frozen food, food size or ingredients.
Smart-Set™ slow cooker automatically switches to the WARM setting when
cooking is done so that your meal stays
mode when taste is your top concern, as it was designed to produce optimal
results every time.
1. Plug the temperature probe cord into the temperature probe jack on
the heating base.
2. Insert the temperature probe into the thickest piece of meat or center
of dish without touching any bone or fat.
• The notch in the stoneware allows the lid to close when temperature
probe is plugged in.
NOTE: If the probe is removed from the temperature probe jack during
programming or cooking, the Auto Cook Mode must be reset. The slow
cooker will beep and display PROB OUT until the temperature probe
cord is plugged back into the temperature probe jack.
3. Press the AUTO button to cycle through and select pre-set meat
options from BEEF, POUL (poultry), PRK1 (bone-in pork), PRK2 (boneless
pork), CHIL (chili), or STEW.
4. Press the TEMP button to select LOW or HIGH.
• WARM is ONLY for keeping already cooked food at the perfect serving
temperature . DO NOT cook on the WARM setting.
5. Press the START/STOP button to start cooking.
• The upper display shows the pre-set meat selection, the lower
display shows the internal temperature of the food, and the
corresponding temperature selection illuminates.
• When the internal temperature of the meat reaches the safe
temperature, the slow cooker beeps once, the upper display shows
“SIMR,” and the lower display counts down additional cooking time
until the food reaches its optimal taste.
• When the cook time expires, the slow cooker beeps twice, and the
temperature shifts to WARM. The upper display shows WARM and
the lower display is off.
WARM
until it is served. Use this
Auto Cook Mode (cont.)
• To change any settings after you have already pressed START/STOP,
you must make your new selections and press START/STOP again so
the slow cooker recognizes the new settings.
6. To turn the slow cooker off, press the START/STOP button, then unplug
it from the outlet.
Important Information About the Temperature Probe
• Temperature probe is ONLY for use with Auto Cook Mode. Make sure
it is inserted fully into the probe jack or Auto Cook Mode will not
function correctly.
• Remove probe before cooking with other modes (they will not work
with probe plugged in).
• Do not remove probe from temperature probe jack while cooking or
Auto Cook Mode will not function properly. Leave the temperature
probe in the food throughout the cooking cycle.
CAUTION: Use oven mitts to remove the temperature probe from the
•
food as it is HOT!
7 8
6 QT Smart-Set 08EM1.indd Sec1:7-Sec1:86 QT Smart-Set 08EM1.indd Sec1:7-Sec1:8 4/17/08 6:21:20 PM4/17/08 6:21:20 PM
Page 6

Digital Timer Mode
The Digital Timer Mode allows you to set a time and temperature at which
your meal will cook, anytime from 30 minutes to 20 hours (in half-hour
increments). The digital display counts down the remaining cook time and
when cooking is complete, automatically switches to the WARM setting so
that your meal stays
WARM
until it is served.
Note
The Dual-Cycle Mode operates the same way as the Digital Timer Mode,
but it takes things one step further! This mode allows you to set your
slow cooker to cook at one temperature for a specified time and then
automatically switch over to another temperature for additional time before
switching to the WARM setting.
Note
The Digital Timer Mode allows you to set a time and temperature at which
your meal will cook, anytime from 30 minutes to 20 hours (in half-hour
increments). The digital display counts down the remaining cook time and
when cooking is complete, automatically switches to the WARM setting so
that your meal stays
WARM
until it is served.
Dual-Cycle Mode
The Dual-Cycle Mode operates the same way as the Digital Timer Mode,
but it takes things one step further! This mode allows you to set your
slow cooker to cook at one temperature for a specified time and then
automatically switch over to another temperature for additional time before
switching to the WARM setting.
1. Press the TEMP button until either LOW or HIGH illuminates.
• WARM is ONLY for keeping already cooked food at the perfect serving
temperature. DO NOT cook on the WARM setting.
2. Turn the SET TIME dial to select the amount of time you want to cook
at the selected temperature.
• Each rotation increases time in increments of 30 minutes. You may
also hold the dial to the right or left to rapidly increase or decrease
the time setting.
3. Press the START/STOP button to start cooking.
• The amount of time that you dialed shows in the upper display and
starts counting down and the corresponding temperature light
remains illuminated.
• When the selected time expires, the slow cooker beeps twice and
switches to the WARM setting. WARM shows in the upper display
and the WARM light illuminates.
4. To turn off the slow cooker, press the START/STOP button, then unplug
it from the outlet.
Note: Temperature Probe can not be used in Digital Timer Mode.
1. Press the TEMP button until either LOW or HIGH illuminates.
• WARM is ONLY for keeping already cooked food at the perfect serving
temperature. DO NOT cook on the WARM setting.
2. Rotate the SET TIME dial to select the amount of time you want to cook
at the 1st selected temperature.
• Each rotation increases time in increments of 30 minutes. You may
also hold the dial to the right or left to rapidly increase or decrease
the time setting.
3. Press the CYCLE button.
4. Rotate the SET TIME dial to select the amount of time you want to cook
at the 2
nd
temperature.
5. Press the START/STOP button to start cooking.
• When slow cooker has run for the selected time on CYCLE 1, the slow
cooker beeps once and switches to the CYCLE 2 program for the
selected time.
• Once CYCLE 2 has run for the selected time, the slow cooker beeps
twice and switches to the WARM setting. The slow cooker remains on
WARM until you turn it off.
• To change any settings after you have already pressed the START/
STOP button, you must make your new selections and press the
START/STOP button so that the slow cooker recognizes the new
settings.
6. To turn off the slow cooker, press the START/STOP button, then unplug
it from the outlet.
Note: Temperature Probe can not be used in Dual-Cycle Mode.
9 10
6 QT Smart-Set 08EM1.indd Sec1:9-Sec1:106 QT Smart-Set 08EM1.indd Sec1:9-Sec1:10 4/17/08 6:21:20 PM4/17/08 6:21:20 PM
Page 7

Manual Mode
Using the Manual Mode, you simply set a temperature and the slow cooker
cooks at that temperature until you either switch it to another temperature
or turn it off.
Note:
Using the Manual Mode, you simply set a temperature and the slow cooker
cooks at that temperature until you either switch it to another temperature
or turn it off.
1. Press the TEMP button until either LOW or HIGH button illuminates.
• WARM is ONLY for keeping already cooked food at the perfect serving
temperature. DO NOT cook on the WARM setting.
2. Press the START/STOP button to start cooking.
• The temperature setting selected (low or high)will be shown in the
upper display.
• To change any settings after you have already pressed the START/
STOP button, you must make your new selections and press the
START/STOP button so that the slow cooker recognizes the new
settings.
3. To turn off the slow cooker, press the START/STOP button and then
unplug it from the outlet.
Note: Temperature Probe can not be used in Manual Mode.
Usage Notes
• If there is a power outage, when the power is restored the display and
lights blink. All slow cooker settings have been cleared and must be
reset. As a result the food may be unsafe to eat. If you are unsure how
long the power was out, discard the food inside.
• While selecting your slow cooker settings, if more than 10 seconds
pass between button presses, the display will clear and you must start
again.
• For recipes that require a range of times, select the time in the middle
of the range. For instance, to cook a recipe calling for a cooking time of
7 to 9 hours on LOW, set your slow cooker to 8 hours.
1
3
2
• To avoid over- or under-cooking, always fill the stoneware
and conform to recommended cook time. To prevent spillover do not
3
fill stoneware higher than
4
/
full.
• Always cook with the lid on for the recommended time. Do not remove
the lid during the first two hours of cooking.
• Always wear oven mitts when handling the lid , stoneware or
temperature probe.
• Unplug when cooking is done and before cleaning.
• Removable stoneware is ovenproof and microwave safe. Do not use
removable stoneware on gas or electric burner or under broiler. Refer
to chart below.
4
/
to
/
full
PART
DISHWASHER
SAFE
OVEN SAFE
MICROWAVE
SAFE
STOVETOP
SAFE
Heating Base No No No No
Stoneware Yes Yes Yes No
Lid Yes No No No
Temperature
Probe
No No No No
Temperature
Probe
Ye s No N o N o
Housing
11 12
6 QT Smart-Set 08EM1.indd Sec1:11-Sec1:126 QT Smart-Set 08EM1.indd Sec1:11-Sec1:12 4/17/08 6:21:20 PM4/17/08 6:21:20 PM
Page 8

CARE AND CLEANING
CAUTION:
TROUBLESHOOTING
• ALWAYS turn your slow cooker off, unplug it from the electrical outlet,
and allow it to cool before cleaning.
• The lid and stoneware can be washed in the dishwasher or with hot,
soapy water. Do not use abrasive cleaning compounds or scouring
pads. A cloth, sponge, or rubber spatula will usually remove the residue.
To remove water spots and other stains, use a non-abrasive cleaner or
vinegar.
• As with any fine ceramic, the stoneware will not withstand sudden
temperature changes. Do not wash the stoneware with cold water
when it is hot.
• The outside of the heating base may be cleaned with a soft cloth and
WARM, soapy water. Wipe dry. Do not use abrasive cleaners.
• The temperature probe can be washed in WARM, soapy water and
wiped dry.
• The temperature probe housing is removable for cleaning. Simply slide
housing up to remove.
• The housing is dishwasher safe (top rack only), or can be washed in
WARM, soapy water and wiped dry.
CAUTION: Never immerse the heating base in water or other liquid.
• No other servicing should be performed.
Situation Solution
Slow cooker not
operating
Display is blinking • Display will blink until you program your cooking mode.
Display reads “PROB
OUT”
Note: the
temperature probe is
only for use with Auto
Cook Mode
When selecting
temperature (LOW
or HIGH), CYCLE light
illuminates
Changing settings or
cooking modes during
programming
Display clears when
trying to program the
slow cooker
In Auto Cook Mode,
display immediately
reads a HIGH
temperature and
suddenly switches to
SIMR
Slight smoke or odor
during initial use
Food under- or
overcooked
Slow cooker exterior
is hot
Slow cooker runs
indefinitely
• Make sure appliance is properly plugged into a wall outlet and the
outlet is energized (check fuses or circuit breaker).
• If a power outage has occurred, re-enter cooking settings.
• Probe cord is not fully inserted into probe jack.
• If you remove the probe cord from the probe jack while the slow
cooker is on, PROB OUT will display until you plug it back into the
temperature probe jack.
• After making sure probe cord is fully inserted into the probe jack,
press Start/Stop and reset the Auto Cook Mode.
• Press TEMP button again to select either LOW or HIGH
• To change any settings or cooking modes after you have already
pressed START/STOP, make your new selections and press START/
STOP again to activate the new settings.
• If using Auto Cook Mode, you must remove the probe cord from
the probe jack before selecting another cooking mode.
• If more than 10 seconds elapse between button presses, display
clears (goes blank) and you must start again.
• Make sure temperature probe cord is fully inserted into
temperature probe jack.
• If you remove probe cord from probe jack during programming or
cooking, you must reset the Auto Cook Mode.
• This is normal with many new heating appliances and will
subside after the first few uses.
• See COOKING TIPS.
• If using Auto Cook Mode, make sure probe cord is fully inserted
into probe jack, and probe TIP is fully inserted into the center of
the meat or dish.
• This is normal with many heating appliances.
• Always use oven mitts or hot pads when handling, and place a hot
pad under your slow cooker.
• Timer will automatically switch to WARM or SIMR after set time
elapses and until you manually shut it off.
13 14
6 QT Smart-Set 08EM1.indd Sec1:13-Sec1:146 QT Smart-Set 08EM1.indd Sec1:13-Sec1:14 4/17/08 6:21:20 PM4/17/08 6:21:20 PM
Page 9

COOKING HINTS AND TIPS
PASTA AND RICE
• For best rice results, use long grain converted rice or a specialty rice
as the recipe suggests. If the rice is not cooked completely after the
suggested time, add an extra 1 to 1
rice and continue cooking for 20 to 30 minutes.
• For best pasta results, first partially cook the pasta in a pot of boiling
water until just tender. Add the pasta to the Smart-Set™ slow cooker
during the last 30 minutes of cook time.
BEANS
• Beans must be softened completely before combining with sugar and/
or acidic foods. Sugar and acid have a hardening effect on beans and
will prevent softening.
• Dried beans, especially red kidney beans, should be boiled before
adding to a recipe.
• Fully cooked canned beans may be used as a substitute for dried beans.
VEGETABLES
• Many vegetables benefit from slow cooking and are able to develop
their full flavor. They tend not to overcook in your slow cooker as they
might in your oven or on your stovetop.
• When cooking recipes with vegetables and meat, place vegetables in
slow cooker before meat. Vegetables usually cook slower than meat in
the slow cooker.
• Place vegetables near the sides or bottom of the stoneware to facilitate
cooking.
HERBS AND SPICES
• Fresh herbs add flavor and color, but should be added at the end of the
cooking cycle as the flavor will dissipate over long cook times.
• Ground and/or dried herbs and spices work well in slow cooking and
may be added at the beginning.
• The flavor power of all herbs and spices can vary greatly depending on
their particular strength and shelf life. Use herbs sparingly, taste at
end of cook cycle and adjust seasonings just before serving.
MILK
• Milk, cream, and sour cream break down during extended cooking.
When possible, add during the last 15 to 30 minutes of cooking.
• Condensed soups may be substituted for milk and can cook for extended times.
1
2
/
cups of liquid per cup of cooked
SOUPS
• Some soup recipes call for large amounts of water. Add other soup
ingredients to the slow cooker first then add water only to cover. If
thinner soup is desired, add more liquid at serving time.
MEATS
• Trim fat, rinse well, and pat meat dry with paper towels.
• Browning meat in a separate skillet or broiler allows fat to be drained
off before slow cooking and also adds greater depth of flavor.
• Meat should be positioned so that it rests in the stoneware without
touching the lid.
• For smaller or larger cuts of meat, alter the amount of vegetables or
potatoes so that the stoneware is always
1
3
2
4
/
to
/
full.
• The size of the meat and the recommended cook times are just
estimates and can vary depending upon the specific cut, type, and
bone structure. Lean meats such as chicken or pork tenderloin tend to
cook faster than meats with more connective tissue and fat such as
beef chuck or pork shoulder. Cooking meat on the bone versus boneless
will increase required cook times.
• Cut meat into smaller pieces when cooking with precooked foods such
as beans or fruit, or light vegetables such as mushrooms, diced onion,
eggplant, or finely minced vegetables. This enables all food to cook at
the same rate.
• When cooking frozen meats, at least 1 cup of warm liquid must first be
added. The liquid will act as a “cushion” to prevent sudden temperature
changes. An additional 4 hours on LOW or 2 hours on HIGH is typically
required. For larger cuts of frozen meat, it may take much longer to
defrost and tenderize.
FISH
• Fish cooks quickly and should be added at the end of the cooking cycle
during last fifteen minutes to hour of cooking.
LIQUID
• For best results and to prevent food from drying or burning, always
ensure an adequate amount of liquid is used in the recipe.
1
2
/
• Ensure the stoneware is always filled a minimum of
maximum of
3
4
/
full, and conform to recommended cook times.
full and a
Visit the Crock-Pot® slow cooker website at www.crockpot.com
for additional hints, tips and recipes.
15 16
6 QT Smart-Set 08EM1.indd Sec1:15-Sec1:166 QT Smart-Set 08EM1.indd Sec1:15-Sec1:16 4/17/08 6:21:21 PM4/17/08 6:21:21 PM
Page 10

SMART-SET™ SLOW COOKER RECIPES
Brunch and Beverages
Breakfast Berry Bread Pudding
1 tablespoon butter
8 cups 1-inch cubed bread, preferably dense loaf of Italian, sourdough,
or peasant loaf
3 cups sliced, fresh strawberries*
2 cups fresh blueberries*
7 large eggs, beaten
5-7 cups milk (1% or greater) - use 5 cups if cooking on LOW
2 tablespoons vanilla extract
1
2
1
/
cups brown sugar (increase to 2 cups if making bread pudding for dessert)
1
2
2
/
tablespoons cinnamon
*If you are making this dish during a season when fresh berries are not
available, a combination of mixed unsweetened frozen berries can be
substituted (strawberries, raspberries, blackberries and blueberries). Thaw
berries before using or extend the cooking time slightly if using berries
directly from the freezer.
1. Butter the inside of the stoneware.
2. Place the bread and berries into the stoneware and toss to combine.
3. Combine the remainder of the ingredients in a separate bowl and whisk
to blend.
4. Pour over bread and berries, and toss to blend.
5. Cover; cook on LOW for 5-6 hours or on HIGH for 3 hours, until the bread
has set in the middle.
6. Remove from heat. Allow to cool and set prior to serving (this will allow
the bread to reabsorb to liquid from the berries, etc.).
Brunch and Beverages
Bacon and Eggs Primavera
Non-stick cooking spray
3-4 cups diced crusty bread (
1
2
/
pound bacon, cut into
2 cups sliced fresh mushrooms (about 6-ounces of whole mushrooms), such
as Crimini or Baby Bellas
2 cups sliced fresh spinach, stems removed
8 eggs
1
2
/
cup milk
3
4
/
cup roasted red peppers, drained and chopped
1 cup shredded cheese, such as Cheddar or Monterey Jack
Salt and pepper
1. Spray the stoneware with non-stick spray.
2. Pour bread into bottom of stoneware.
3. Heat a sauté pan on medium heat and cook bacon until crispy. Remove
all but 1 tablespoon of renderings. Add mushrooms and spinach and toss
to coat. Cook for 1-2 minutes, until spinach wilts.
4. In a separate bowl, beat eggs and milk. Add remaining ingredients and
blend. Pour into stoneware.
5. Cover; cook on LOW for 3
are firm in center but still moist.
6. Season with salt and pepper, and serve.
Serves 6-8
3
4-
/
1 inch dices)
1
2
/
-inch dices
1
2
/
-4 hours or on HIGH for 2
1
2
/
hours, until eggs
Serves 10-12
17 18
6 QT Smart-Set 08EM1.indd Sec1:17-Sec1:186 QT Smart-Set 08EM1.indd Sec1:17-Sec1:18 4/17/08 6:21:21 PM4/17/08 6:21:21 PM
Page 11

Brunch and Beverages
Brunch and Beverages
Fruity Granola Oatmeal
Nonstick cooking spray or butter for coating stoneware
1
4
1
/
cup old fashioned oats (not quick cooking)
1 cup plain, cinnamon, or apple granola
2 cups milk, plus more if desired for serving
1 cup water
1
4
/
teaspoon salt
1 teaspoon cinnamon
1
4
/
cup apples, peeled, cored, and chopped into 1-inch cubes
1
4
/
cup pears, peeled, cored, and chopped into 1-inch cubes
1
4
/
cup walnuts, toasted
1
4
/
cup maple syrup or brown sugar (optional)
1. Grease stoneware with cooking spray or butter.
2. Add oats, granola, milk, water, salt, cinnamon, and fruit to stoneware.
Gently stir ingredients.
3. Cover; cook on HIGH for 2 hours and then on LOW for 1-2 hours.
4. On a large baking sheet, toast walnuts on the top rack of the broiler for
about 4 minutes. Turn frequently.
5. Mix walnuts into stoneware.
6. Spoon oatmeal into individual bowls and serve hot. Add additional milk,
maple syrup and brown sugar if desired.
Serves 6-8
Fruit Medley Compote
1 cup water
1 cup sugar or to desired sweetness
1
2
/
cup brown sugar
2 pounds fresh rhubarb stalks, washed and cut into 2-inch cubes
1 quart fresh strawberries, rinsed, hulled, and halved
2 cups fresh raspberries
2 cups fresh blueberries
2 teaspoons vanilla
1
2
1
/
teaspoons ground cinnamon
1
4
/
teaspoon ground nutmeg
1. Combine water, sugars, and rhubarb in stoneware.
2. Cover; cook on HIGH for 30 minutes.
3. Add strawberries, raspberries, and blueberries to stoneware.
4. Add vanilla, cinnamon, and nutmeg to fruit. Gently stir fruit once or
twice to evenly distribute and return cover to stoneware.
5. Remove stoneware from heating base, and allow mixture to cool
without stirring. Compote can be served WARM, at room temperature,
or refrigerated. If not using immediately, place in storage bowl, cover,
and refrigerate. Compote can remain in refrigerator for up to four days.
Serving suggestions: serve on top of French toast, waffles, yogurt, ice cream,
pound cake, or Fruity Granola Oatmeal. (see recipe)
Serves 8-10
This recipe is ideal for
using the Auto Cook Mode.
6 QT Smart-Set 08EM1.indd Sec1:19-Sec1:206 QT Smart-Set 08EM1.indd Sec1:19-Sec1:20 4/17/08 6:21:21 PM4/17/08 6:21:21 PM
19
This recipe is ideal for using
the Dual Cycle Mode.
This recipe is ideal for
using the Auto Cook Mode.
This recipe is ideal for using
20
the Dual Cycle Mode.
Page 12

Brunch and Beverages
Spiced Chai Tea
2 quarts water
8 bags black tea
1
3
2
4
/
-
/
cup sugar
16 whole cloves
16 whole cardamom seeds, pods removed
5 whole cinnamon sticks
8 slices fresh ginger
1 cup milk
Appetizers and Side Dishes
Asian-Style Ribs
2 full racks baby back pork ribs
6 ounces Hoisin sauce
1 ounce fresh ginger
4 ounces of maraschino cherries
4 ounces of rice wine vinegar
Water to cover
Chopped scallions
1. Combine water, tea, sugar, cloves, cardamom, cinnamon, and ginger in
1
the stoneware. Cover; cook on LOW for 3-5 hours or on HIGH for 2-2
2
/
hours.
2. Strain mixture; discard solids. (May be covered and refrigerated for up to
3 days.)
3. Stir in milk just before serving. Serve WARM or chilled.
Serves 16
Mulled Cider
1 gallon apple cider
1
3
/
cup brown sugar
15 whole cloves
10 whole allspice berries
5 whole cinnamon sticks
1. Combine all ingredients in the stoneware.
2. Cover; cook on HIGH for 30 minutes and then on LOW for up to 5 hours.
The longer the spices are left in, the stronger the “mulling.”
Serves 16
This recipe is ideal for
using the Auto Cook Mode.
21
This recipe is ideal for using
the Dual Cycle Mode.
1. Split each rack of ribs into three sections.
2. Combine all ingredients in stoneware.
3. Cover; cook on LOW for 8 to 10 hours or on HIGH for 6 to 8 hours.
4. Garnish with scallions.
Serves 6-8
This recipe is ideal for
using the Auto Cook Mode.
22
This recipe is ideal for using
the Dual Cycle Mode.
6 QT Smart-Set 08EM1.indd Sec1:21-Sec1:226 QT Smart-Set 08EM1.indd Sec1:21-Sec1:22 4/17/08 6:21:21 PM4/17/08 6:21:21 PM
Page 13

Appetizers and Side Dishes
Appetizers and Side Dishes
Stuffed Mushrooms
15-20 large mushrooms, preferably Baby Bellas, cleaned, stems removed and
finely chopped
2 tablespoons olive oil
1
2
/
medium red onion, very finely diced
2 cloves garlic, minced
1
2
/
pound sausage patties
1 teaspoon salt
1
2
/
teaspoon ground black pepper
1
4
/
teaspoon paprika
1
4
/
cup fresh parsley, finely chopped
4 ounces Gruyere cheese, shredded
1. In a skillet over medium heat, add the oil, onion, garlic, and mushroom
stems. Cook for 2-3 minutes, until onion begins to soften.
2. Add the sausage patties and crumble with a wooden spoon. Season with
salt, pepper, and paprika, and cook until lightly browned through.
3. Transfer the sausage to a heavy mixing bowl along with the parsley and
Gruyere cheese. Stir to combine ingredients and stuff 1 tablespoon of
mixture into each cap. Place into the stoneware, cover and cook on HIGH
for 2 hours.
Serves 6-10
Teriyaki Chicken Wings
3-4 pounds chicken wings
1
4
/
cup soy sauce
1
4
/
cup sherry
1
4
/
cup honey
1 tablespoon Hoisin sauce
1 tablespoon orange juice
2 cloves garlic, minced
1 red chili pepper, minced (optional)
1. Place the wings in the stoneware. Combine remaining ingredients in a
bowl and pour over the wings.
2. Cover; cook on LOW for 3-3
Serves 6-8
1
2
/
hours or on HIGH for 1
1
2
/
-2 hours.
This recipe is ideal for
using the Auto Cook Mode.
6 QT Smart-Set 08EM1.indd Sec1:23-Sec1:246 QT Smart-Set 08EM1.indd Sec1:23-Sec1:24 4/17/08 6:21:21 PM4/17/08 6:21:21 PM
23
This recipe is ideal for using
the Dual Cycle Mode.
This recipe is ideal for
using the Auto Cook Mode.
This recipe is ideal for using
24
the Dual Cycle Mode.
Page 14

Appetizers and Side Dishes
Appetizers and Side Dishes
Wild Rice with Fruit and Nuts
2 cups wild rice, rinsed*
5-6 cups chicken broth
1 cup orange juice
2 tablespoons butter, melted
1
2
/
cup dried cranberries
1
2
/
cup raisins, chopped
1
2
/
cup chopped dried apricots
1
2
/
cup almond slivers, toasted
1 teaspoon cumin
2 scallions, thinly sliced
2-3 tablespoons chopped fresh parsley
Salt and pepper
*If using a wild rice blended with other types of rice, cooking time may be
shortened.
1. Combine wild rice, cranberries, raisins, apricots and almonds in the
stoneware.
2. Combine broth, orange juice, butter and cumin in medium bowl. Pour
mixture over rice, and stir to mix.
1
3. Cover; cook on LOW for 7 hours or on HIGH for 2
adding more hot broth if necessary.
4. When rice is soft to the bite, add scallions and parsley. Adjust
seasonings. Cook for 10 additional minutes and serve.
2
/
-3 hours. Stir once,
Butternut Squash Risotto
4 tablespoons extra virgin olive oil
4 tablespoons unsalted butter
1
3
1
/
cups Vidalia onion, chopped
1
2
2
/
cups risotto rice such as superfino Arborio
3 cups butternut squash, peeled, seeded, and cut into 1-inch cubes
6 cups chicken broth
2 tablespoons fresh basil, chopped
1
4
/
cup Pecorino Romano cheese plus extra for sprinkling on top
Salt and pepper
1. In skillet, over medium heat, add oil and butter, and sauté until tender,
approximately 6-8 minutes.
2. Pour rice on top of onions and, with a wooden spoon, coat grains with
butter and oil mixture. Cook and occasionally stir for about 4 minutes.
3. Transfer rice to stoneware. Add squash and broth and gently stir
ingredients. Cover; cook on HIGH for 2-3 hours.
4. When serving, top with basil and additional cheese if desired. Season to
taste with salt and freshly cracked black pepper.
Serves 10-12
Serves 6-8
This recipe is ideal for
using the Auto Cook Mode.
6 QT Smart-Set 08EM1.indd Sec1:25-Sec1:266 QT Smart-Set 08EM1.indd Sec1:25-Sec1:26 4/17/08 6:21:21 PM4/17/08 6:21:21 PM
25
This recipe is ideal for using
the Dual Cycle Mode.
This recipe is ideal for
using the Auto Cook Mode.
This recipe is ideal for using
26
the Dual Cycle Mode.
Page 15

Appetizers and Side Dishes
Appetizers and Side Dishes
Asparagus in Parchment Paper Package
Parchment paper
1 bunch asparagus, bottom ends trimmed
Salt and pepper
Pinch sugar
Lemon zest
Drizzle of extra virgin olive oil
1. Cut parchment paper into large heart shape. Place asparagus in center
of one side. Season with salt and pepper. Sprinkle with sugar and
lemon zest, and drizzle with olive oil.
2. Turn heart half over asparagus, folding along center. Turn, crimp, and
fold edges to seal.
3. Place in stoneware. Cover; cook on HIGH for 1 hour, checking doneness
Serves 4
1
2
after
/
hour, until asparagus spears are bright green and just tender.
Open pouch and serve immediately.
Garlic Mashed Potatoes
4 pounds potatoes, cut
4-6 cloves garlic, peeled
3 cups chicken broth, vegetable broth or water
1 stick butter, cut in small pieces
1
2
/
cup heavy cream
Salt and pepper to taste
1. Place potatoes and garlic in stoneware. Pour enough broth in stoneware
to cover potatoes. Cover; cook on HIGH for 4-5 hours or until potatoes
are tender.
2. Drain broth and add butter and cream and mash with a potato masher
until desired consistency.
3. Season with salt and pepper and serve WARM.
Serves 8-10
Creamy Parmesan Polenta
9 cups chicken broth or water
4 tablespoons butter
1 bay leaf
3 cups instant polenta
3 cups grated parmesan
1. In a pot on the stovetop, bring the chicken broth or water to a boil with
the butter and bay leaf.
2. Whisk in the polenta in a steady stream to prevent lumps. Whisk in the
grated cheese to fully combine.
3. Turn the polenta out into the stoneware, cover, and cook on LOW for 2530 minutes.
Serves 6-8
This recipe is ideal for
using the Auto Cook Mode.
6 QT Smart-Set 08EM1.indd Sec1:27-Sec1:286 QT Smart-Set 08EM1.indd Sec1:27-Sec1:28 4/17/08 6:21:21 PM4/17/08 6:21:21 PM
27
This recipe is ideal for using
the Dual Cycle Mode.
This recipe is ideal for
using the Auto Cook Mode.
This recipe is ideal for using
28
the Dual Cycle Mode.
Page 16

Main Courses
Main Courses
Poultry:
Mediterranean Memories
Non-stick cooking spray
1 bulb fennel (about 1-1
reserve
some ‘fennel fronds’ for garnish, if desired
1 large onion, chopped
2 carrots, finely chopped
2 garlic cloves, minced
1 teaspoon salt - divided usage
1 teaspoon coarsely ground black pepper - divided usage
8 boneless, skinless chicken thighs, all visible fat removed (about 1
2 14-ounce cans chicken broth
1 cup orzo
1 6-ounce bag of baby spinach (about 4 cups)
1
3
/
cup coarsely shredded Asiago cheese
1. Lightly spray stoneware with cooking spray. Place fennel, onion, carrot,
and garlic in stoneware; stir in about half of the salt and pepper; spread
mixture evenly over bottom of stoneware.
2. With kitchen shears or knife, cut each chicken thigh into 4-6 pieces.
Season chicken chunks with remaining salt and pepper. Place chicken
atop fennel/onion mixture. Pour chicken broth over top.
3. Cover; cook on HIGH for 1 hour and then on LOW for 2 hours.
4. Stir in orzo; cover and cook on LOW for 1
orzo and chicken are tender; if necessary cook about 30 minutes longer.
5. Place spinach atop chicken/orzo mixture; do not stir. Cover and continue
to cook on LOW for 10 to 15 minutes. Turn off heat. Stir spinach into
chicken/orzo mixture. If desired, garnish with some of the reserved
feathery fennel fronds. Top each serving with Asiago cheese.
1
4
/
pounds), trimmed, quartered, and sliced;
1
2
/
hours more. Check to see if
1
3
/
pounds)
Poultry:
Three Bean Turkey Chili
Olive oil
1 pound ground turkey
1 small onion, chopped
1 28-ounce can diced tomatoes, undrained
1 15-ounce can garbanzo beans, rinsed and drained
1 15-ounce can kidney beans, rinsed and drained
1 15-ounce can black beans, rinsed and drained
1 8-ounce can tomato sauce
1 4-ounce can chopped mild green chilies
1-2 tablespoons chili powder
1. Cook turkey and onion in medium skillet coated with olive oil over
medium- heat, stirring to break up meat, until turkey is no longer pink.
2. Drain; place turkey mixture into the stoneware.
3. Add tomatoes with juice, beans, tomato sauce, chilies, and chili powder;
mix well.
4. Cover; cook on LOW for 6-8 hours or on HIGH for 5-7 hours.
Serves 6-8
Serves 6-8
This recipe is ideal for
using the Auto Cook Mode.
6 QT Smart-Set 08EM1.indd Sec1:29-Sec1:306 QT Smart-Set 08EM1.indd Sec1:29-Sec1:30 4/17/08 6:21:21 PM4/17/08 6:21:21 PM
29
This recipe is ideal for using
the Dual Cycle Mode.
This recipe is ideal for
using the Auto Cook Mode.
This recipe is ideal for using
30
the Dual Cycle Mode.
Page 17

Main Courses
Main Courses
Poultry:
Chicken Pot Au Feu
1 16-ounce bag baby carrots
1 large onion, cut in quarters
4 medium celery stalks, cut into 1-inch pieces
4 new potatoes, quartered
2 3-pound whole chickens or one 1 6-pound chicken
1 10-ounce box of mushrooms, cleaned
1
2
1
/
teaspoons salt
1 teaspoon freshly ground black pepper
1
2
/
cup water, white wine or chicken broth
3 sprigs fresh thyme
1. Place the carrots, onion, celery, and potatoes in the bottom of the
stoneware.
2. Add the whole chicken(s) and top with the remaining ingredients.
1
1
2
3. Cover; cook on LOW for 8-10 hours or on HIGH for 4
4. Remove the chicken and vegetables, and arrange attractively on a
platter before serving.
Serves 6-8
/
-6
2
/
hours.
Poultry:
Creamy Roasted Chicken and Prosciutto
1
2
2
/
pounds whole chicken, seasoned with salt and pepper
1 small onion, finely chopped
5 ounces prosciutto or bacon, diced
1
2
/
cup dry white wine
1 10-ounce package frozen peas
1
2
/
cup heavy cream
1
2
1
/
tablespoons cornstarch
2 tablespoons water
4 cups bowtie pasta, cooked al dente
1. Combine the chicken, onion, prosciutto, and wine in the stoneware.
Cover; cook on LOW for 7-9 hours or on HIGH for 4
2. In the last 30 minutes of cooking, add the frozen peas and the heavy
cream to the liquid in the stoneware.
3. After cooking, remove the chicken from the stoneware and carve the
meat in slices.
4. Combine the cornstarch and water and add to the liquid in the slow
cooker to thicken the sauce.
5. To serve, spoon the pasta onto individual plates, place the chicken over
the pasta, and top each portion with sauce.
Serves 6
1
/
2
- 6
1
2
/
hours.
This recipe is ideal for
using the Auto Cook Mode.
6 QT Smart-Set 08EM1.indd Sec1:31-Sec1:326 QT Smart-Set 08EM1.indd Sec1:31-Sec1:32 4/17/08 6:21:22 PM4/17/08 6:21:22 PM
31
This recipe is ideal for using
the Dual Cycle Mode.
This recipe is ideal for
using the Auto Cook Mode.
This recipe is ideal for using
32
the Dual Cycle Mode.
Page 18

Main Courses
Main Courses
Poultry:
Burgundy Braised Chicken
2 whole chickens, 3 pounds each
5 cups red wine
8 strips bacon, cut into
8 sprigs thyme
6 garlic cloves, peeled and sliced thin
4 cups quartered button mushrooms
4 cups thinly sliced onions
2 tablespoons butter
1
3
/
cup flour
2 cups chicken broth
1 bunch Italian flat leaf parsley, washed, stemmed, and coarsely chopped
Salt and pepper
Creamy Parmesan Polenta (see recipe)
1. The day before cooking the dish: Quarter the chicken, leaving the breasts
on the bone. Separate each leg into thigh and drumstick portions, and
cut each breast in half.
2. Add the chicken to a shallow container large enough to accommodate
all of the pieces in a single layer. Pour the wine over the chicken and
add the thyme and sliced garlic.
3. Cover and marinate in refrigerator overnight.
4. Cook the bacon in a sauté pan until crispy. Remove bacon with a slotted
spoon to a plate lined with paper towels, leaving all of the rendered fat
in the pan.
5. Add the mushrooms to the pan and sauté until lightly golden brown.
Toss the onions into the mushrooms and continue to sauté until they
are well caramelized.
6. Reduce the heat to LOW and melt in the butter and then incorporate the
flour. Continue to cook for 5 minutes, then season with salt and pepper
and remove from the heat.
1
2
/
-inch strips
Poultry:
Burgundy Braised Chicken (cont.)
7. Remove the chicken from the marinade, season with salt and
pepper, and dust the skin sides lightly with flour.
8. Sauté the pieces of chicken, skin side down, until golden brown
and then add to the slow cooker stoneware.
9. Add the red wine marinade to a sauce pot and slowly bring to a simmer.
Simmer for a few minutes, skimming away impurities that rise to the
top.
10. Add the chicken broth, caramelized onion, and mushroom mixture to
the wine and heat through. Adjust seasoning and then pour over the
chicken.
11. Cover the slow cooker and cook on HIGH for 30 minutes.
12. Reduce the temperature setting to LOW and cook for 2 more hours.
13. Serve the chicken over Creamy Parmesan Polenta (see recipe), spooning
sauce over.
14. Garnish with the crisp bacon and parsley.
Serves 4-6
Recipe continued on next page.
This recipe is ideal for
using the Auto Cook Mode.
6 QT Smart-Set 08EM1.indd Sec1:33-Sec1:346 QT Smart-Set 08EM1.indd Sec1:33-Sec1:34 4/17/08 6:21:22 PM4/17/08 6:21:22 PM
33
This recipe is ideal for using
the Dual Cycle Mode.
This recipe is ideal for
using the Auto Cook Mode.
This recipe is ideal for using
34
the Dual Cycle Mode.
Page 19

Main Courses
Main Courses
Poultry:
Spinach and Feta Stuffed Chicken Breasts
6 boneless, skinless chicken breasts
8 ounces Feta cheese (drained and dried if necessary)
3 cups chopped fresh spinach (heavy stems removed)
1
3
/
cup sun-dried tomatoes, drained from oil and chopped (if using dry sun
dried tomatoes, soak in warm water for 10-15 minutes, dry and chop)
1
2
/
cup oil cured olives, pit in*
1 teaspoon minced lemon zest
1 teaspoon dried basil, oregano or mint
1
2
/
teaspoon garlic powder
1 15-ounce can of diced tomatoes, undrained
Freshly ground black pepper
*If using pitted olives, add to stoneware in the final hour of cooking.
1. Place 1 chicken breast between plastic wrap and, using the back of a
skillet or meat tenderizer, pound until about
each.
2. In a separate bowl, combine Feta, spinach, sun dried tomatoes, lemon
zest, basil (or oregano or mint), garlic powder, and pepper to taste. Mix
to combine.
3. Lay “skin” side down on work surface and place approximately 2
tablespoons of feta mixture onto the wide end of the breast. Roll snugly
and repeat with each.
4. Place rolled chicken in stoneware, seam down, and top with diced
tomatoes and olives.
1
2
/
5. Cover; cook on LOW for 3
-4 hours or on HIGH for 2
portion topped with a spoonful of tomatoes and olives.
1
4
/
-inch thin. Repeat with
1
2
/
hours. Serve each
Poultry:
Chicken and Artichokes
3 pounds boneless, skinless chicken thighs
16 ounces fresh mushrooms, sliced
2 12-ounce jars marinated artichoke hearts, drained
8 cloves garlic, peeled and coarsely chopped
1
2
/
cup white wine (or chicken broth)
Black pepper
1-2 pounds spaghetti, cooked
1. Place chicken, mushrooms, artichokes, garlic, wine and black pepper into
stoneware.
1
1
2
2
/
-6
/
2. Cover; cook on LOW for 6-8 hours or on HIGH for 5
3. Serve over pasta.
Serves 6-8
hours.
Serves 6
This recipe is ideal for
using the Auto Cook Mode.
6 QT Smart-Set 08EM1.indd Sec1:35-Sec1:366 QT Smart-Set 08EM1.indd Sec1:35-Sec1:36 4/17/08 6:21:22 PM4/17/08 6:21:22 PM
35
This recipe is ideal for using
the Dual Cycle Mode.
This recipe is ideal for
using the Auto Cook Mode.
This recipe is ideal for using
36
the Dual Cycle Mode.
Page 20

Main Courses
Main Courses
Poultry:
Chicken with Shallots and White Wine
8-10 boneless, skinless chicken thighs, rinsed, dried and seasoned with salt
and pepper
4 large Yukon Gold potatoes, cut into
10 ounces Spanish green olives (pit in), drained and rinsed*
12 shallots, skinned and sliced in
8 sprigs of fresh tarragon or 2 tablespoons dried tarragon
8 cloves of garlic, crushed
3
4
/
cup white wine
3
4
/
cup chicken stock
1
2
1
/
tablespoons Dijon mustard
Salt and pepper
*If using pitted olives, add to stoneware in the final hour of cooking.
1. Add chicken, shallots, olives, and tarragon to stoneware.
2. Combine all remaining ingredients except Dijon mustard. Whisk to
blend and pour into stoneware.
3. Cover; cook on LOW for 6 hours or on HIGH for 4 hours, turning once or
twice if possible to ensure even cooking.
4. Once shallots have softened, transfer chicken, shallots, olives, and
potatoes to a serving dish and cover to keep WARM.
5. Set slow cooker to HIGH, whisk in the Dijon mustard and continue to
cook for 15 minutes, allowing the broth to simmer.
6. Adjust seasoning, pour broth over chicken, shallots, olives, and potatoes
and serve.
Serves 4
3
4
/
- 1 inch cubes
1
2
/
(across the shallot)
Poultry:
Curry Chicken with Peaches and Raisins*
8-10 boneless, skinless chicken thighs, rinsed, dried and seasoned with salt
and pepper
4 peaches, skinned and sliced into
(or 2 cups frozen sliced unsweetened peaches, with 6 slices reserved
for garnish)**
2
3
/
cup raisins, chopped, OR
2
2 shallots, thinly sliced
2 tablespoons olive oil
2 tablespoons fresh ginger root, grated
4 cloves of garlic, crushed
1 teaspoon curry
2 teaspoons cumin
1 teaspoon whole cloves
1
2
/
cup chicken stock
2 tablespoons cider vinegar
1
2
/
teaspoon cayenne pepper (optional)
Salt and pepper
Lemon juice
*If making this dish during a season that fresh peaches are not available,
unsweetened frozen peeled sliced peaches can also be used. Thaw peaches
before using or extend the cooking time if using peaches straight from the
freezer.
** To skin a peach, use a peeler OR make an “x” at the bottom of the peach
with a knife, submerge the peach into simmering water for 10-20 seconds.
Cool under running water or in an ice water bath. When cool enough to
handle, use paring knife to peel away skin.
1
4
/
-inch slices, reserving 6 slices for garnish
3
/
cup currants, whole
Recipe continued on next page.
This recipe is ideal for
using the Auto Cook Mode.
6 QT Smart-Set 08EM1.indd Sec1:37-Sec1:386 QT Smart-Set 08EM1.indd Sec1:37-Sec1:38 4/17/08 6:21:22 PM4/17/08 6:21:22 PM
37
This recipe is ideal for using
the Dual Cycle Mode.
This recipe is ideal for
using the Auto Cook Mode.
This recipe is ideal for using
38
the Dual Cycle Mode.
Page 21

Main Courses
Main Courses
Poultry:
Curry Chicken with Peaches and Raisins (cont.)
1. Rinse, dry and season the chicken with salt and pepper.
2. Heat the olive oil in a skillet and add the chicken to lightly brown, about
3 minutes per side.
3. Transfer chicken to stoneware and top with peaches, raisins, (or whole
currants) and shallots.
4. Reserve the remaining 8 slices of peaches tossed with lemon juice to
coat and refrigerate.
5. Combine remaining ingredients in a bowl, whisk to combine and pour
over chicken.
6. Cook on LOW for 5-7 hours or on HIGH for 3-5 hours.
7. Remove chicken to serving dish. Using a slotted spoon, spoon the
peaches, raisins (or currants), and some of the juice onto the chicken and
serve. Garnish with the reserved peaches.
Serves 4-5
Pork and Sausage:
Pulled Pork Sandwiches
Sauce:
5 cloves chopped garlic
2 cups orange juice
2 cups coffee
2 cups brown sugar
16 ounces ketchup
3 cups balsamic vinegar
1 cup molasses
2 teaspoons ground cinnamon
1
2
/
teaspoon ground cloves
2 cans beer
6 pounds pork butt or pork shoulder
10 cloves garlic
Salt and freshly ground pepper
8 Rolls
1. Combine all ingredients for the sauce in a large saucepan and bring to
a simmer. Continue to cook for 45 minutes at a LOW simmer, stirring
occasionally to keep the sugars from scorching on the bottom of the
pan.
2. Preheat oven to 425ºF.
3. Using a small paring knife, cut deep slits into the pork and insert the
garlic cloves all around. Rub the pork with oil and season liberally with
salt and freshly ground pepper. Place the pork on a rack and put in the
oven for 25 minutes. The HIGH heat will sear the pork all around and
give a nice crust.
4. Place the pork in the stoneware and cover with the sauce. Cover; cook
on LOW for 10-12 hours or on HIGH for 7 to 9 hours.
5. Stuff rolls with pulled pork.
Serves 8
This recipe is ideal for
using the Auto Cook Mode.
6 QT Smart-Set 08EM1.indd Sec1:39-Sec1:406 QT Smart-Set 08EM1.indd Sec1:39-Sec1:40 4/17/08 6:21:22 PM4/17/08 6:21:22 PM
39
This recipe is ideal for using
the Dual Cycle Mode.
This recipe is ideal for
using the Auto Cook Mode.
This recipe is ideal for using
40
the Dual Cycle Mode.
Page 22

Main Courses
Main Courses
Pork and Sausage:
Easy Pork Burritos
1 6-pound pork butt or pork shoulder, trimmed of fat
1-2 bottles of your favorite BBQ sauce
1 package (8) burrito wrappers
2 ripe avocados, peeled and sliced
1 bunch cilantro, stemmed (optional)
1-2 cups shredded Monterey Jack or Cheddar cheese
Sour cream and salsa to garnish
1. Place pork in stoneware. Cover; cook on LOW for 10-12 hours or on HIGH
for 8-10 hours (can be done overnight).
2. Set oven to 400ºF. Separate meat from fat and drippings, and place in
a separate bowl. Stir in enough BBQ sauce to thoroughly moisten and
flavor meat.
3. Roll burritos with BBQ pork, avocado, and cilantro, and place in a 9x13
inch glass baking dish.
4. Top with cheese and place in oven. Cook for 5-10 minutes or until heat
through and cheese is melted. Garnish with sour cream and salsa.
Serves 6-8
Pork and Sausage:
Sweet and Spicy Pork Picadillo
2 pound boneless pork country-style ribs, trimmed of excess fat and cut into
1-inch cubes*
2 tablespoons olive oil
2 yellow onions, cut into
4 cloves of garlic, minced
2 15-ounce can diced tomatoes, undrained
6 tablespoons cider vinegar
4 chipotle peppers (canned, in Adobo sauce), chopped**
1 cup raisins, chopped
1 teaspoon cumin
1 teaspoon cinnamon
Salt and freshly ground pepper
Prepared white rice
*Other cuts of boneless pork can also be used, such as trimmed pork shoulder.
**If using dried chipotles, soak in warm water to soften before
chopping - about 20 minutes.
1. Heat olive oil in sauté pan, add onions and garlic, and sauté over
medium-LOW heat until softened, about 4 minutes.
2. Add pork and brown. Transfer to stoneware.
3. In a separate bowl, combine tomatoes, cider vinegar, chipotle peppers,
raisins, cumin, and cinnamon. Blend well and pour over pork.
4. Cover; cook on LOW for 6-8 hours or on HIGH for 3-5 hours or until pork
is very tender. Using the tines of two forks, shred the pork. Put the lid
back on the stoneware and cook for
5. Season with salt and pepper and serve over rice.
1
4
/
-inch dices
1
2
/
hour more on HIGH.
Serves 8
This recipe is ideal for
using the Auto Cook Mode.
6 QT Smart-Set 08EM1.indd Sec1:41-Sec1:426 QT Smart-Set 08EM1.indd Sec1:41-Sec1:42 4/17/08 6:21:22 PM4/17/08 6:21:22 PM
41
This recipe is ideal for using
the Dual Cycle Mode.
This recipe is ideal for
using the Auto Cook Mode.
This recipe is ideal for using
42
the Dual Cycle Mode.
Page 23

Main Courses
Main Courses
Pork and Sausage:
Pork Tenderloin with Figs, Apricots, and Shitake
Mushrooms
3 pounds pork tenderloin, rinsed, dried, and trimmed of excess fat
or
silver skin
2 tablespoons olive oil
3 large Vidalia onions, sliced into
2 cups sliced shitake mushrooms (4 or 5 stemmed mushrooms)
20 dried figs
1 cup dried apricots, chopped
3 tablespoons balsamic vinegar
1
2
/
cup chicken stock
2 tablespoons chopped fresh sage
Salt and freshly ground pepper
1. Heat olive oil in sauté pan. Season pork tenderloin with salt and pepper,
sear all sides in sauté pan, and remove from heat.
2. Layer onions in bottom of stoneware, place tenderloin on top, and add
mushrooms, figs, and apricots.
3. In a separate bowl, combine balsamic, stock, and sage; pour over other
ingredients.
4. Cover; cook on LOW for 6-8 hours or on HIGH for 3-5 hours, tossing
ingredients several times to ensure even cooking, until meat is tender
and onions have softened
5. Remove tenderloin, let rest for 5 minutes. Adjust seasoning to taste
3
and cut into
4
/
-inch slices. To serve top pork with the figs, apricots and
mushrooms and broth.
1
4
/
-inch slices
Pork and Sausage:
Smothered Autumn Pork Roast
2 boneless pork loins, about 2-3 pounds each
4 apples, peeled, cored and sliced
2 large onions, peeled and sliced
Salt and freshly ground pepper to taste
1. Season the pork loins well with salt and freshly ground pepper.
2. Place pork in bottom of stoneware and place apples and onions on top.
3. Cover; cook on LOW for 10-12 hours or on HIGH for 6-8 hours, until meat
pulls apart easily. Transfer pork to cutting surface and let rest for 10
minutes before slicing into
4. Top pork slices with apples and onions.
Serves 10-12
1
3
2
4
/
-
/
inch pieces.
Serves 4-6
This recipe is ideal for
using the Auto Cook Mode.
6 QT Smart-Set 08EM1.indd Sec1:43-Sec1:446 QT Smart-Set 08EM1.indd Sec1:43-Sec1:44 4/17/08 6:21:22 PM4/17/08 6:21:22 PM
43
This recipe is ideal for using
the Dual Cycle Mode.
This recipe is ideal for
using the Auto Cook Mode.
This recipe is ideal for using
44
the Dual Cycle Mode.
Page 24

Main Courses
Main Courses
Pork and Sausage:
Boneless Pork Roast with Garlic
and Rosemary
2 boneless pork loins, about 2 pounds each, rinsed and patted dry
6 tablespoons olive oil
8 cloves of garlic, minced
1 bunch chopped fresh rosemary
1 lemon, cut into
1
4
/
cup white wine
1
2
/
cup chicken stock
Kosher salt and pepper
Butcher’s twine
1. Place pork loins on your work surface and heavily season with salt and
freshly ground pepper.
2. In a separate bowl, combine 2 tablespoons of olive oil, the garlic and the
rosemary. Rub this all over the pork.
3. Roll and tie the pork snugly using butcher’s twine. Tuck the slices of the
lemon under the twine and into the ends of the roast.
4. Heat the remaining 1 tablespoon of olive oil in a sauté pan over medium
heat. Sear the pork loins on all sides until just brown. Transfer to the
stoneware.
5. Return the sauté pan to the heat and deglaze the pan with the white
wine and the stock, using a wooden spoon to remove any caramelized
bits. Pour over the pork.
6. Cover; cook on LOW for 8-10 hours or on HIGH for 5-7 hours. Remove
from stoneware; allow roast to rest for 10 minutes before removing
twine and slicing.
7. Adjust the seasoning to taste and pour juices over the sliced pork.
1
1
8
4
/
-
/
inch slices
Pork and Sausage:
Country-Style Pork Ribs
3 pounds boneless country-style pork ribs, rinsed and patted dry
6 firm, crisp apples (such as Granny Smith, Macouns, Galas,
Braeburns), peeled, cored and cut into
6 leeks, trimmed of roots and green tops, sliced (across into
and rinsed to remove any grit (about 6 cups)
1
4
/
cup white wine
1
4
/
cup chicken stock
4 cloves of garlic, smashed
2 tablespoons chopped fresh sage
Salt and pepper
1. Trim pork of any excess fat. Season well with salt and pepper, and
transfer to the stoneware.
2. Put leeks and apples on top of pork. In a separate bowl, add wine, stock,
garlic, sage, salt, and pepper. Blend and pour into stoneware.
3. Cover; cook on LOW for 7-9 hours or on HIGH for 5-7 hours, until pork
is tender and apples and leeks have softened, turning once or twice to
ensure even cooking. Adjust seasoning to taste.
4. Spoon leeks and apples onto a serving dish and top with pork.
Serves 4-6
1
4
/
-inch slices
1
4
/
-inch slices)
Serves 8-10
This recipe is ideal for
using the Auto Cook Mode.
6 QT Smart-Set 08EM1.indd Sec1:45-Sec1:466 QT Smart-Set 08EM1.indd Sec1:45-Sec1:46 4/17/08 6:21:23 PM4/17/08 6:21:23 PM
45
This recipe is ideal for using
the Dual Cycle Mode.
This recipe is ideal for
using the Auto Cook Mode.
This recipe is ideal for using
46
the Dual Cycle Mode.
Page 25

Main Courses
Main Courses
Pork and Sausage:
Baby Back Ribs
2 tablespoons ground cumin
2 tablespoons chili powder
2 tablespoons brown sugar
4 teaspoons ground coriander
1
2
/
teaspoon ground cinnamon
2 teaspoon salt
1 teaspoon ground black pepper
4-6 pounds baby back pork ribs
2
3
/
cup bourbon
1
2
/
cup brown sugar, packed
1
2
/
cup chili sauce
1. In a small bowl, combine the cumin, chili powder, 2 tablespoon of sugar,
coriander, cinnamon, salt, and pepper. Stir to thoroughly combine, and
rub all over the ribs.
2. Place the ribs into the stoneware. In a small bowl, stir together the
bourbon,
3. Cover; cook on LOW for 8-10 hours or on HIGH for 4-6 hours.
Occasionally brush sauce onto the ribs.
Serves 8
1
2
/
cup sugar, and chili sauce and pour all over the ribs.
Pork and Sausage:
Sausage and Pepper Submarine Sandwiches
6 red bell peppers, sliced thin
4 yellow onions, sliced thin
1
1
4
2
/
-
/
cup extra virgin olive oil, divided
1 tablespoon dried oregano
2 teaspoons dried parsley flakes
2 teaspoon salt
1 teaspoon ground black pepper
2 teaspoon red pepper flakes (optional)
4 pounds hot or sweet Italian sausage
Submarine rolls
1. Place the sliced peppers and onions in the stoneware. Drizzle with 2
tablespoon of oil and add the seasonings. Stir to thoroughly combine.
1
2. In a skillet over MEDIUM-HIGH heat, add
the sausage in two batches, adding more olive oil if necessary.
3. Place sausage over the vegetables in the stoneware, cover, and cook
on LOW for 4-6 hours or on HIGH for 2-4 hours. Remove sausage to a
submarine roll and cover with the peppers and onions. Repeat with
remaining sausages and vegetables.
Serves 10-12
2
/
the remaining oil and brown
This recipe is ideal for
using the Auto Cook Mode.
6 QT Smart-Set 08EM1.indd Sec1:47-Sec1:486 QT Smart-Set 08EM1.indd Sec1:47-Sec1:48 4/17/08 6:21:23 PM4/17/08 6:21:23 PM
47
This recipe is ideal for using
the Dual Cycle Mode.
This recipe is ideal for
using the Auto Cook Mode.
This recipe is ideal for using
48
the Dual Cycle Mode.
Page 26

Main Courses
Main Courses
Beef:
Maple Whiskey Glazed Beef Brisket
1
2 beef briskets, about 2-2
both sides
1
4
/
cup olive oil
1 cup real maple syrup
1
2
/
cup whiskey
1
4
/
cup brown sugar
2 tablespoons tomato paste
2 oranges, zested and then juiced
4 cloves of garlic, smashed
8 thin slices fresh ginger (
2 teaspoons cayenne pepper
2 tablespoons coarse salt
1 teaspoon freshly ground black pepper
1. Combine cayenne pepper, salt, and ground black pepper. Rub all over
brisket and place in a plastic zipper bag, bowl or other container.
2. Combine remaining ingredients in a separate bowl and blend to mix.
Pour over brisket and marinate for 2 hours or overnight.
3. Transfer brisket and marinade to stoneware, cover, and cook on LOW
for 9-12 hours or on HIGH for 4-6 hours, turning once or twice. Adjust
seasoning to taste. Thinly slice across the grain and serve with liquid
spooned over brisket.
2
/
pounds each, scored with a knife on
1
16
/
-inch thick)
Beef:
Carne Relleno
2 pieces of flank steak, about 2 pounds each, scored on one side
2 4-ounce can whole green chilies (jalapeños)
8 ounces cream cheese
2 12-ounce jars prepared salsa verde
String to tie roll
1. Divide cream cheese among the chilies, stuffing each chili.
2. Lay the chilies into the steak, unscored side. Roll the steak and tie with
string.
3. Place into stoneware; pour the salsa verde over meat.
4. Cover; cook on LOW for 6-9 hours or 3-5 hours on HIGH.
5. Remove from stoneware, cut string and cut into 6 pieces. To serve,
spoon sauce over meat.
Serves 10-12
Serves 8-10
This recipe is ideal for
using the Auto Cook Mode.
6 QT Smart-Set 08EM1.indd Sec1:49-Sec1:506 QT Smart-Set 08EM1.indd Sec1:49-Sec1:50 4/17/08 6:21:23 PM4/17/08 6:21:23 PM
49
This recipe is ideal for using
the Dual Cycle Mode.
This recipe is ideal for
using the Auto Cook Mode.
This recipe is ideal for using
50
the Dual Cycle Mode.
Page 27

Main Courses
Main Courses
Beef:
Hearty Beef Short Ribs
8 bone-in beef short ribs, about 6 pounds (or 8-12 boneless beef
short ribs, about 4 pounds)
2 tablespoons coarse salt
2 tablespoons freshly ground black pepper
2 tablespoons olive oil
4 carrots, cut into
4 celery stalks, cut into
2 large yellow onion, cut into
6 cloves of garlic, minced
2
3
/
cup red wine
2
3
/
cup crushed tomatoes
2
3
/
cup balsamic vinegar
3 bay leaves
1. Season each short rib with coarse salt and freshly ground black
pepper and coat with olive oil.
2. Heat 2 tablespoons olive oil in a large sauté pan. Sear short ribs until
just browned, in batches if necessary, about 2-3 minutes per side.
Transfer to stoneware.
3. Top meat with celery, carrots, onions, garlic, and bay leaves.
4. In a separate bowl, combine wine, crushed tomato, vinegar, salt, and
pepper. Stir to blend. Pour into stoneware.
5. Cover; cook on LOW for 8-10 hours or on HIGH for 5 7 hours, turning
once or twice, until meat is tender and easily falling from bone (or
fork-tender if using boneless).
6. Remove ribs from stoneware. Using an immersion blender (or
traditional blender), puree the sauce, leaving some chunkiness.
7. Pour sauce over ribs and serve.
Serves 6-8
1
4
/
-inch dices
1
4
/
-inch dices
1
4
/
-inch dices
Beef:
Beef Ale Stew with Caramelized Onions and
Fennel
2 tablespoons unsalted butter
2 teaspoons dried Italian seasoning
1 teaspoon dried tarragon
1 pound thin-sliced yellow onion
2 cups fresh chopped fennel
2 pounds beef top round steak, sliced thin
1 pound white button mushrooms, halved
1 14-ounce can beef broth
1 14.5-ounce can diced roasted garlic tomatoes, undrained
1 teaspoon paprika
1 12-ounce bottle amber ale beer
1 tablespoon dark brown sugar
2 teaspoons beef & pork seasoning or rub
1 bay leaf
6 cups prepared white rice
1
4
/
cup fresh chopped Italian parsley
1. Place butter in stoneware and set to HIGH until butter melts. Add
Italian seasoning, tarragon, onions, and fennel. Cover and cook on HIGH
for 15 to 20 minutes, until caramelized.
2. Add the beef slices, mushrooms, beef broth, tomatoes, paprika, amber
ale beer, brown sugar, seasoning or rub, and bay leaf. Cover; cook on
HIGH for 1 hour and then on LOW for 5 to 6 hours.
3. Remove bay leaf. On a large platter, make a ring of white rice and fill the
center with beef stew. Top with fresh chopped Italian parsley.
Serves 6-8
This recipe is ideal for
using the Auto Cook Mode.
6 QT Smart-Set 08EM1.indd Sec1:51-Sec1:526 QT Smart-Set 08EM1.indd Sec1:51-Sec1:52 4/17/08 6:21:23 PM4/17/08 6:21:23 PM
51
This recipe is ideal for using
the Dual Cycle Mode.
This recipe is ideal for
using the Auto Cook Mode.
This recipe is ideal for using
52
the Dual Cycle Mode.
Page 28

Main Courses
Main Courses
Beef:
Winter Comfort Pot Roast
2 carrots, peeled and halved
1 medium onion, peeled, roots removed, and cut into 4 wedges
4 cloves garlic, peeled and minced
2 tablespoons fresh thyme
1 bay leaf
3 whole cloves
1 cup chicken broth
1 cup dry white wine
3 tablespoons tomato paste
2 tablespoons extra-virgin olive oil
1
4
/
pound pancetta, thickly sliced, diced
1 4-pound boneless beef chuck pot roast
Salt and pepper
2 tablespoons brandy
1
2
/
teaspoon prepared horseradish
1
2
/
teaspoon Dijon mustard
2 tablespoons sour cream
1 teaspoon flour
2 tablespoons Italian flat-leaf parsley, minced
1. Place the carrots, onion, garlic, herbs, and cloves into the stoneware.
2. Combine broth, wine, and tomato paste in a separate bowl; set aside.
3. Add olive oil and pancetta to a large, heavy skillet set to MEDIUM-HIGH
heat and cook pancetta until lightly browned. Remove pancetta and
add to stoneware.
Beef:
Winter Comfort Pot Roast (cont.)
4. Pat roast dry with paper towels and season generously with
salt and pepper. Sear on all sides in skillet set to MEDIUM-HIGH heat,
about 4 minutes per side.
5. Remove roast and place in stoneware over vegetables. In skillet set to
medium heat, deglaze the pan with the broth mixture, scraping up all
browned bits of pancetta and pot roast stuck to pan.
6. Pour the liquid over the roast, cover, and cook on LOW for 8-10 hours or
on HIGH for 5-7 hours.
7. Remove roast, carrots and onions and strain and reserve liquids.
Using a skimmer or defatter, remove and discard fat from liquid. Place
in saucepan, and boil and reduce liquids by half, about 10 minutes. Stir
in the brandy, horseradish and mustard.
8. In a small bowl, stir together the sour cream and the flour. Stir in 2
tablespoons of the brandy sauce to the sour cream and flour mixture
and add back to the pan. Cook gently over medium heat for about 4-5
minutes.
9. Slice thinly, and serve with sauce and parsley to garnish.
Serves 6-8
Recipe continued on next page.
This recipe is ideal for
using the Auto Cook Mode.
6 QT Smart-Set 08EM1.indd Sec1:53-Sec1:546 QT Smart-Set 08EM1.indd Sec1:53-Sec1:54 4/17/08 6:21:23 PM4/17/08 6:21:23 PM
53
This recipe is ideal for using
the Dual Cycle Mode.
This recipe is ideal for
using the Auto Cook Mode.
This recipe is ideal for using
54
the Dual Cycle Mode.
Page 29

Main Courses
Main Courses
Beef:
Six Pepper Chili
3 pounds hamburger
1 12-ounce can beef broth
1 teaspoon oregano
3 teaspoons chili powder
1 teaspoon cumin
5 cloves garlic
2 12-ounce cans pinto beans, drained and rinsed
2 12-ounce cans of red kidney beans, drained and rinsed
5 dashes hot sauce
2 28-ounce cans crushed Italian tomatoes
1 12-ounce can of tomato paste
1 teaspoon salt
1 teaspoon black pepper
1 teaspoon cayenne pepper
1 red pepper, seeded and diced
1 green pepper, seeded and diced
2 Serrano chili peppers, minced
1 long red pepper, diced
1. In a large skillet, brown meat.
2. Add meat and other ingredients to stoneware.
3. Cover and cook on LOW for 6-8 hours or on HIGH for 5-7 hours,
stirring occasionally.
4. Mix well before serving.
Beef:
Beef, Bacon, and Mushroom Stew
3-4 pounds beef chuck, cut into 1-inch pieces
1 onion, chopped
2 carrots, chopped coarsely
6 cloves garlic, chopped coarsely
4 bay leaves
4 sprigs fresh thyme
10 black peppercorns
2 tablespoons olive or vegetable oil
1
2
/
pounds bacon or pancetta, diced
2 onions, chopped
2 carrots, diced
1
4
/
cup flour
2 cups red wine
2 cups beef broth
1 tablespoon tomato paste
1 pound mushrooms
2 cloves fresh garlic, coarsely chopped
Salt and pepper
Freshly chopped Italian flat-leaf parsley
1. Combine first seven ingredients in a bowl. Place in refrigerator to
marinate for 12 hours. Remove meat from marinade, pat meat dry, and
discard marinade.
Serves 6-8
Recipe continued on next page.
This recipe is ideal for
using the Auto Cook Mode.
6 QT Smart-Set 08EM1.indd Sec1:55-Sec1:566 QT Smart-Set 08EM1.indd Sec1:55-Sec1:56 4/17/08 6:21:23 PM4/17/08 6:21:23 PM
55
This recipe is ideal for using
the Dual Cycle Mode.
This recipe is ideal for
using the Auto Cook Mode.
This recipe is ideal for using
56
the Dual Cycle Mode.
Page 30

Main Courses
Main Courses
Beef:
Beef, Bacon, and Mushroom Stew (cont.)
2. In a large heavy skillet, pour 1 tablespoon of oil and set to medium
heat. Add bacon and cook until it just starts to brown. Remove bacon,
reserving bacon fat, and place bacon in the stoneware.
3. Salt and pepper the beef, and brown the meat, in batches if necessary,
until browned on all sides. Place meat in the stoneware.
4. Briefly sauté onions, carrots and mushrooms in reserved bacon fat until
lightly browned.
5. Add flour and sauté for 5 minutes on medium heat. Add vegetables to
the stoneware.
6. Stir in red wine, beef broth, and tomato paste. Cover; cook on LOW for
5-7 hours or on HIGH for 4-6 hours.
7. Cool and place in refrigerator overnight.
8. Set oven to 300ºF. Skim fat off top of dish and add fresh garlic and salt
and pepper to taste.
9. Place stoneware in the oven and cook until dish begins to simmer. Stir
and simmer for 5 minutes.
10. Garnish with parsley.
Serves 8
Vegetarian:
Chunky Vegetarian Chili
1 tablespoon olive oil
1
2
1
/
cups Vidalia onion, chopped (or other large, sweet yellow onion)
3 cloves garlic, minced
3
4
/
cup red bell pepper, chopped
1
2
/
cup green bell pepper, chopped
1 cups celery, chopped
1 28-ounce can whole tomatoes, undrained and chopped
1 16-ounce can stewed tomatoes, undrained
1 15-ounce can diced tomatoes, drained
1 15-ounce cans black beans, rinsed and drained
1 15-ounce can pinto beans, rinsed and drained
1
2
1
/
tablespoons chili powder
1 teaspoon ground cumin
1 teaspoon dried oregano
1 bay leaf
1
2
/
teaspoon salt
1
2
/
teaspoon black pepper
1 cup zucchini, chopped chunky
1 cup mushrooms, chopped chunky
1 package frozen corn kernels
1
4
/
cup sour cream for garnish (optional)
1
4
/
cup shredded Cheddar cheese for garnish (optional)
Prepared rice
1. Heat the oil in a Dutch oven or large sauté pan over medium heat.
2. Add onion, garlic, bell peppers, and celery.
3. Sauté 5 minutes or until tender and transfer to stoneware.
4. Add remaining ingredients, cover, and cook on LOW for 6-8 hours or
on HIGH for 5-7 hours.
5. Serve over white or brown rice and garnish with a dollop of sour
cream
and/or sprinkled with shredded cheese.
Serves 6-8
This recipe is ideal for
using the Auto Cook Mode.
6 QT Smart-Set 08EM1.indd Sec1:57-Sec1:586 QT Smart-Set 08EM1.indd Sec1:57-Sec1:58 4/17/08 6:21:24 PM4/17/08 6:21:24 PM
57
This recipe is ideal for using
the Dual Cycle Mode.
This recipe is ideal for
using the Auto Cook Mode.
This recipe is ideal for using
58
the Dual Cycle Mode.
Page 31

Main Courses
Main Courses
Vegetarian:
Mushroom Barley Stew
1
2
/
pound of pearl barley, rinsed and checked over
1 10-ounce package of fresh mushrooms, such as Crimini, rinsed
and thinly sliced
1 cup dried mushrooms, Porcini if possible, soaked to cover in warm water to
soften, liquid reserved
2 carrots, peeled and cut into
2 celery stalks, cut into
1 yellow onion, cut into
8-10 cups chicken (or mushroom) stock
1 tablespoon fresh thyme
2 bay leaves
1 tablespoon tomato paste
Salt and pepper
2 tablespoons Italian flat-leaf parsley
1. Add all ingredients, starting with 8 cups of stock and including reserved
liquid from dried mushrooms (be careful to discard any sediment) to
stoneware. Stir to blend.
2. Cover; cook on LOW for 5-6 hours or on HIGH for 3-5 hours, until barley
and vegetables have softened. If more liquid is needed, add more stock
(this will require more cooking time after adding).
3. Adjust seasoning and serve with a sprinkling of parsley.
1
1
4
/
-inch dices
1
4
/
-inch dices
4
/
-inch dices
Vegetarian:
Easy Pizza / Pasta Sauce
2 whole bulbs garlic, peeled and coarsely chopped
3 tablespoons olive oil
3 28-ounce cans peeled plum (Roma) tomatoes
2-3 tablespoons sugar
Salt and pepper
2 bunches fresh basil, cut into ribbons or torn
1. In a frying pan set to medium heat, heat olive oil. Add garlic to the
pan and cook until fragrant and softened, stirring constantly and being
careful not to burn, about 2 minutes. Remove from heat, and add garlic
and oil to stoneware.
2. Add tomatoes, sugar, and salt and pepper to taste. Cover; cook on LOW
for 6-7 hours or on HIGH for 3-4 hours.
3. Stir in basil; toss with pasta or spread on pizza round as desired and pass
the cheese.
Serves 8-10
Serves 8-10
This recipe is ideal for
using the Auto Cook Mode.
6 QT Smart-Set 08EM1.indd Sec1:59-Sec1:606 QT Smart-Set 08EM1.indd Sec1:59-Sec1:60 4/17/08 6:21:24 PM4/17/08 6:21:24 PM
59
This recipe is ideal for using
the Dual Cycle Mode.
This recipe is ideal for
using the Auto Cook Mode.
This recipe is ideal for using
60
the Dual Cycle Mode.
Page 32

Soups and Chowders
Black Bean Chipotle Soup *
Soups and Chowders
Black Bean Chipotle Soup (cont.)
1 pound dry black beans, rinsed, drained and checked for foreign
objects
1
4
/
2 stalks celery, cut into
2 carrots, peeled and cut into
1 yellow onion, peeled and cut into
-inch dices
1
4
/
-inch dices
1
4
/
-inch dices
2 chipotle peppers (canned in adobo sauce), chopped**
1 cup crushed tomatoes
1 4-ounce can chopped green chilies, drained (hot or mild, depending on
preference)
6 cups chicken (or vegetable) stock
2 teaspoons cumin
Salt and pepper
Toppings
Sour cream
Salsa
Fresh cilantro, chopped
*For an even heartier soup, add 1 cup of diced, cooked spicy sausage, such as
andouille, chorizo, or linguica. Add to soup after soup has been pureed and
cook for 30 minutes more.
**If using dried chipotle peppers, soak in warm water to soften before
chopping about 20 minutes.
1. Place beans in a medium pan, cover with cool water, bring to a boil, boil
for 2 minutes, remove from heat, and let stand for 1 hour and rinse. Add
to stoneware and top with celery, carrots, and onions.
2. In a separate bowl, combine chipotles, crushed tomatoes, green
chilies, stock, cumin, and salt and pepper to taste. Mix to blend and pour
into stoneware.
3. Cover; cook on HIGH for 1 hour and then on LOW for 6 hours, until beans
are tender to bite. Adjust seasoning to taste.
4. Puree with an immersion blender (or traditional blender) to a slightly
chunky consistency. If using, add additional sausage and cook for 30
minutes more.
5. Serve topped with a dollop of sour cream, spoon of salsa and sprinkling
of chopped cilantro.
Serves 4-6
Recipe continued on next page.
This recipe is ideal for
using the Auto Cook Mode.
6 QT Smart-Set 08EM1.indd Sec1:61-Sec1:626 QT Smart-Set 08EM1.indd Sec1:61-Sec1:62 4/17/08 6:21:24 PM4/17/08 6:21:24 PM
61
This recipe is ideal for using
the Dual Cycle Mode.
This recipe is ideal for
using the Auto Cook Mode.
This recipe is ideal for using
62
the Dual Cycle Mode.
Page 33

Soups and Chowders
Soups and Chowders
Chicken Tortilla Soup
8 boneless, skinless chicken thighs, rinsed, dried, and seasoned with salt
and pepper
2 4-ounce can chopped green chilies, drained (hot or mild, depending on
preference)
4 cloves garlic, minced
2 yellow onions, diced
2 28-ounce cans of diced tomatoes, undrained
4 - 5 cups chicken broth
2 teaspoons cumin
Salt and pepper
Toppings
1
8 corn tortillas, sliced into
1
4
/
cup chopped cilantro
1 cup shredded Monterey Jack cheese
2 avocados, diced and tossed with lime juice to prevent browning
2 limes
1. Place chicken in stoneware.
2. In a separate bowl, combine chilies, garlic, onion, tomatoes, 3 cups
chicken broth and cumin. Blend and pour over chicken.
3. Cook on LOW for 7-9 hours or on HIGH for 3-5 hours. When chicken
is very tender, use the tines of two forks to shred the chicken. Adjust
seasoning, and add additional chicken broth if soup is too thick, noting
that the soup will also be thickened with the addition of the sliced
tortillas.
4. Just before serving, add sliced tortillas and chopped cilantro to
stoneware. Stir to incorporate and to soften tortillas. Adjust seasoning
to taste.
5. Serve in soup bowls, topping each with shredded cheese, diced avocado,
and a squeeze of lime.
Serves 8-10
4
/
-inch strips
Beggar’s Chowder
1
4
/
cup unsalted butter at room temperature
1
4
/
cup all-purpose flour
1 tablespoon garlic salt
1 tablespoon thyme
1 tablespoon sweet Hungarian paprika
1
2
/
teaspoon coarsely ground black pepper
4 skinless, bone-in turkey thighs, trimmed of visible fat
Non-stick cooking spray
2 14.75-ounce cans cream style sweet corn
1 10.5-ounce can condensed chicken broth, undiluted
1 cup diced red bell pepper
1 cup diced green bell pepper
1
2
1
/
cups diced yellow onion
1 pound cleaned, stemmed white mushrooms, halved or quartered if large
1 14.5-ounce can petite diced tomatoes, drained
1
2
1
/
cups heavy whipping cream
1
2
/
cup cilantro or parsley
Salt and pepper
1. Combine butter, flour, garlic salt, pepper, thyme, and paprika in small
(1-quart) mixing bowl. Using the back of a wooden spoon, work the
mixture to form a smooth paste. Rub the paste into all sides of the
turkey thighs
2. Spray the stoneware with non-stick cooking spray. Place the turkey
thighs in the bottom of the stoneware and cover with red and green
peppers, onion, corn, and chicken broth.
3. Cover; cook on HIGH for 3 hours or until turkey is fork tender. Remove
turkey thighs from stoneware and set aside until cool enough to handle.
4. While turkey cools, add mushrooms and tomatoes to liquid in
stoneware. Cover and continue to cook on HIGH for
5. While mushrooms are cooking, remove the turkey meat from the bones
in bite size pieces. When mushrooms are tender, return the turkey
to the chowder. Add the heavy cream and cilantro or parsley and
cook, covered, until heated through, about 15 minutes more. Taste for
seasoning, adding salt and pepper to taste.
Serves 8
1
2
/
hour more.
This recipe is ideal for
using the Auto Cook Mode.
6 QT Smart-Set 08EM1.indd Sec1:63-Sec1:646 QT Smart-Set 08EM1.indd Sec1:63-Sec1:64 4/17/08 6:21:24 PM4/17/08 6:21:24 PM
63
This recipe is ideal for using
the Dual Cycle Mode.
This recipe is ideal for
using the Auto Cook Mode.
This recipe is ideal for using
64
the Dual Cycle Mode.
Page 34

Soups and Chowders
Soups and Chowders
Shrimp Thai Soup with Lime and Chilies
3
4
/
pound uncooked large shrimp, peeled and deveined, shells reserved
1
2
2
/
quarts low salt chicken broth
1 cup diced carrots
3 stalks lemongrass, thinly sliced
2 inches gingerroot, peeled and grated
2 tablespoons garlic, minced
1
2
1
/
tablespoons fresh Thai basil (or basil)
1
2
1
/
tablespoons fresh mint
1
2
1
/
tablespoons finely chopped cilantro
1 serrano chili, stemmed, thinly sliced
1
2
/
teaspoon fresh lime juice
1
6 thin lime slices
1. Halve shrimp lengthwise. Place in refrigerator.
2. Add shrimp shells, broth, carrot, lemongrass, gingerroot, and garlic into
stoneware. Cover; cook on LOW for 3
hours.
3. Strain and reserve broth, discard solids. Pour broth into stoneware.
4. Add shrimp, herbs, chili, and lime juices. Cover, and cook on HIGH until
shrimp are cooked, about 15 minutes. Garnish with lime slices.
Serves 6
1
1
2
2
/
-4
/
hours or on HIGH for 2-3
New England Clam Chowder
1 pound sliced bacon
4 onions, chopped
2 16-ounce containers of clams in juice
4 large cloves garlic, minced
12 new potatoes, cubed
6 cups chicken broth, clam broth or fish fumet
1 tablespoon salt
2 teaspoons pepper
1 stick butter
8 tablespoons flour
1 13-ounce cans evaporated milk
1-2 cups heavy cream
1. Sauté bacon and onion in a skillet.
2. Add bacon, onion, clams and juice, garlic, potatoes, broth, salt and
pepper.
3. Cover; cook on LOW for 6-8 hours or on HIGH for 2-4 hours.
4. Melt butter in saucepan on stovetop set to medium heat. Add flour and
cook for about 3-4 minutes, stirring constantly. Reduce heat and whisk
in evaporated milk. With a ladle, scoop out broth from stoneware and
stirring constantly, whisk thickened mixture until smooth. Continue
adding broth until mixture is pourable. Pour back into stoneware and
stir until chowder is smooth. Stir in heavy cream and heat through. Do
not simmer.
Serves 8-10
This recipe is ideal for
using the Auto Cook Mode.
6 QT Smart-Set 08EM1.indd Sec1:65-Sec1:666 QT Smart-Set 08EM1.indd Sec1:65-Sec1:66 4/17/08 6:21:24 PM4/17/08 6:21:24 PM
65
This recipe is ideal for using
the Dual Cycle Mode.
This recipe is ideal for
using the Auto Cook Mode.
This recipe is ideal for using
66
the Dual Cycle Mode.
Page 35

Holidays and Special Occasions
holiday and special occasion category
Stuffed Artichokes
1 lemon, sliced in quarters
6-8 artichokes, washed, tops sliced off and stems trimmed
2 cups bread crumbs
2 cups grated Pecorino Romano cheese
1 large bunch flat leaf parsley, chopped
2 teaspoons salt
1 teaspoon freshly ground pepper
2 tablespoons extra virgin olive oil
1
2
/
1. Fill stoneware with lemon slices and about 1
2. Combine bread crumbs, cheese, parsley, salt, and pepper in a bowl.
Spread artichoke leaves and fill pockets generously with bread crumb
mixture until you reach the soft leaves near the center.
3. Place artichokes in stoneware standing up. Drizzle olive oil on top of
each artichoke. Cover, and cook on LOW for 3-5 hours or on HIGH for 1
1
2
/
hours. Check for doneness after 3 hours on LOW or 1 hour on HIGH.
Cook until leaves are tender and pull away from heart easily.
Serves 4
inches of water.
Duck with Port, Mushroom,
and Tart Cherry Glaze
1
4 bone-in, skin-on duck legs, about 1
patted dry
1 tablespoon olive oil
1
4
/
cup dried Porcini mushrooms, soaked in warm water to cover until softened
softened and roughly chopped, reserving liquid (or
1
2
/
cup dried cherries
4 cloves of garlic
3 tablespoons apricot preserves
1
4
/
cup port wine
1 shallot, thinly sliced
16 sprigs fresh thyme, 8 whole, 8 chopped (about 1
2 bay leaves
Coarse salt and freshly ground pepper
1
2
/
-2
Butcher’s twine
1. Season duck legs with coarse salt and freshly ground pepper.
2. Lay a duck leg on your work surface, skin side down and “open”.
3. Place 1 teaspoon of mushrooms, 3-4 dried cherries, 2 sprigs of thyme, and
1 clove of garlic on leg. Fold skin over filling and, using butcher’s twine,
firmly tie the duck leg closed. Repeat with each leg.
4. Heat olive oil in a sauté pan over medium heat. Sear duck legs until
browned, 2-3 minutes per side. Transfer to stoneware.
5. In a separate bowl, combine remaining mushrooms, 2 tablespoons
reserved mushroom liquid (avoiding sediment), remaining cherries, 3
tablespoons apricot preserves, port, shallot, chopped thyme, and bay
leaves. Season and whisk to combine.
6. Pour port liquid over duck.
7. Cover; cook on LOW for 6 hours, turning once or twice.
8. Remove duck from stoneware. Remove twine from legs with kitchen
sheers (be careful to remove all of twine).
9. Pour port liquid over a sieve, reserving cherries, etc. Allow remaining
liquid to settle and skim off fat. Add cherries, etc., back to skimmed
liquid, adjust seasoning, and pour over duck legs.
Serves 4
2
/
-2 pounds total, rinsed and
1
2
/
cup sliced fresh Shitakes)
1
2
/
tablespoons)
This recipe is ideal for
using the Auto Cook Mode.
6 QT Smart-Set 08EM1.indd Sec1:67-Sec1:686 QT Smart-Set 08EM1.indd Sec1:67-Sec1:68 4/17/08 6:21:24 PM4/17/08 6:21:24 PM
67
This recipe is ideal for using
the Dual Cycle Mode.
This recipe is ideal for
using the Auto Cook Mode.
This recipe is ideal for using
68
the Dual Cycle Mode.
Page 36

holiday and special occasion category
holiday and special occasion category
Home-Style Corn Bread
Non-stick cooking spray
1
4
/
cups all-purpose flour
1
3
4
/
cup yellow cornmeal
1
4
/
cup granulated sugar
1 tablespoon plus 1 teaspoon baking powder
1
2
1
/
teaspoons salt
1
4
/
teaspoon ground black pepper
1
1
4
2
/
-
/
teaspoon cayenne pepper
1 egg
1 cup evaporated milk
6 tablespoons melted butter
1. In a medium mixing bowl, combine the flour, cornmeal, sugar, baking
powder, and seasonings.
2. In a small bowl, mix the egg, milk, and butter. Pour the wet into the dry
ingredients and stir until just incorporated. Do not over-stir.
3. Place the batter into well greased stoneware, cover, and cook on LOW
Serves 6-8
1
for 4-4
2
/
hours or HIGH for 1-2 hours, until a toothpick inserted in center
comes out clean.
Corned Beef and Cabbage
12 new potatoes, quartered
4 carrots, sliced
4 pounds corned beef brisket
2 onions, sliced
3 bay leaves
8 black peppercorns
1 head cabbage, wedged
1. Place potatoes and carrots in bottom of stoneware. Add brisket, onion,
bay leaves and peppercorns.
2. Add enough water to cover.
3. Cover; cook on LOW for 8-10 hours or on HIGH for 4-5 hours.
4. Add cabbage halfway through cooking.
Serves 6-8
This recipe is ideal for
using the Auto Cook Mode.
6 QT Smart-Set 08EM1.indd Sec1:69-Sec1:706 QT Smart-Set 08EM1.indd Sec1:69-Sec1:70 4/17/08 6:21:25 PM4/17/08 6:21:25 PM
69
This recipe is ideal for using
the Dual Cycle Mode.
This recipe is ideal for
using the Auto Cook Mode.
This recipe is ideal for using
70
the Dual Cycle Mode.
Page 37

holiday and special occasion category
holiday and special occasion category
Stuffi ng with Apples, Canadian Bacon, and
Toasted Pecans
8 cups bread stuffing or unseasoned croutons (about 1-inch cubes)*
1
2
/
pound Canadian bacon, cut into
1 cup pecans, toasted and roughly chopped
1/2 cup dried cherries (or dried cranberries)
2 cups whole mushrooms, chopped (about 1 cup when chopped)
1
4 stalks of celery, cut into
4
/
-inch dices
2 crisp apples (such as Granny Smith, Macoun, Gala, Braeburn), peeled, cored
1
and cut into
2
/
-inch dices
2 tablespoons olive oil
5 cups chicken stock
2 shallots, peeled and minced
2 cloves garlic, minced
1 tablespoon fresh sage, minced
Salt and pepper
*To make your own bread stuffing using fresh or day-old bread, dice the
bread into 1-inch cubes and heat in a LOW oven (225ºF) until dried, about
15-20 minutes.
1. Add bread stuffing, apple, cherries, pecans, and sage to stoneware. Toss
to combine.
2. In a large sauté pan, heat olive oil over medium-LOW heat. Add celery,
shallot, garlic, mushrooms, and bacon. Sauté until softened and lightly
browned, about 4-5 minutes.
3. Deglaze the pan with the chicken stock, using a wooden spoon to lift
any bits from the bottom of the pan.
4. Pour this mixture into the stoneware. Add salt and pepper to taste, and
stir to blend.
5. Cover; cook on HIGH for 3-5 hours, stirring periodically, until bread
softens and stuffing begins to bind.
1
4
/
-inch dices
Citrus Spark Salmon Steaks
Non-stick cooking spray
4 6-ounce salmon steaks or fillets, rinsed and blotted dry
1
2
/
cup water
1
2
/
cup orange juice
1 jalapeño pepper, seeded and minced
1 2-inch piece fresh ginger root, grated
1 large lime, thinly sliced
1 large lemon, thinly sliced
1 tablespoon extra virgin olive oil
Sea salt and pepper
Springs of fresh cilantro and lemon wedges, to garnish
1. Coat stoneware with non-stick cooking spray. Arrange the salmon
tightly in the bottom, tucking end of fillets under themselves to even
out thickness of the fish.
2. In a small saucepan, combine water, orange juice, jalapeño pepper, and
ginger; heat to boil over MEDIUM-HIGH heat. Pour evenly around fish.
3. Arrange sliced lime and lemon evenly over fish. Drizzle with olive oil.
Salt and pepper to taste.
4. Cover; cook on HIGH until the salmon is opaque and firm to the touch
(about 1
5. Turn off heat, and carefully lift fish out of stoneware and place on
serving platter. Garnish with cilantro sprigs and lemon wedges. Serve
immediately.
Serves 4
1
2
/
to 2 hours).
Serves 10-12
This recipe is ideal for
using the Auto Cook Mode.
6 QT Smart-Set 08EM1.indd Sec1:71-Sec1:726 QT Smart-Set 08EM1.indd Sec1:71-Sec1:72 4/17/08 6:21:25 PM4/17/08 6:21:25 PM
71
This recipe is ideal for using
the Dual Cycle Mode.
This recipe is ideal for
using the Auto Cook Mode.
This recipe is ideal for using
72
the Dual Cycle Mode.
Page 38

holiday and special occasion category
holiday and special occasion category
Holiday Ham with Ginger and Bourbon
1 fully cooked ham, 5-6 pounds, outer skin and fat removed and scored in a
diamond pattern
1 4-inch piece of fresh ginger root, peeled with a spoon, finely grated
1
2
/
cup bourbon
1
2
/
cup brown sugar, packed
1. Place ham in stoneware. Combine ginger, bourbon and brown sugar and
pour over ham.
2. Cover; cook on LOW for 7-8 hours or on HIGH for 4-5 hours, basting often,
or until internal temperature is over 160ºF.
Serves 6-8
1
4
/
-inch around top and sides
Sweet Potato Casserole with
Gingersnap Topping
8 large sweet potatoes
1 tablespoon salt
Butter, as needed to grease the stoneware
1
2
1
/
cups gingersnaps, finely ground in food processor
1
2
/
cup brown sugar, packed
1
4
/
cup butter, melted
Dash nutmeg
1. Bake or boil the sweet potatoes until tender, and mash well with 2
teaspoons of salt.
2. Grease the bottom and sides of the stoneware with butter and add the
mashed potatoes.
3. Combine the remaining ingredients in a bowl and spread over the top.
Cover; cook on LOW for 4-5 hours or on HIGH for 2-2
1
2
/
hours.
Lamb Stew with Sherry and Thyme
1
2
/
cup flour, seasoned with salt and pepper
3 pounds lamb stew meat, cubed to 1-inch and trimmed of fat
1
2
/
cup olive oil
2 tablespoons butter
4 celery stalks, cut into
4 carrots, peeled and cut into
6-8 Yukon gold potatoes, cut into
6 cloves garlic, peeled and chopped
1
4
/
cup fresh thyme
1
2
1
/
cups stock
3
4
/
cup sherry
Salt and pepper
2 tablespoons minced fresh parsley
1. Place seasoned flour in a bowl. Dredge lamb in flour and shake off
excess.
2. Heat olive oil and butter in a large sauté pan. Add lamb and sauté until
just browned, about 4 minutes. Transfer to stoneware and top with
celery, carrots, potatoes, garlic, and thyme.
3. Place sauté pan back on heat and pour in the stock and
to deglaze the pan, using a wooden spoon to remove any caramelized
bits from the pan. Pour into the stoneware.
4. Cover; cook on HIGH for 3-5 hours or on LOW 7-9 hours, until lamb is
tender.
1
2
5.
/
hour before completion, add remaining sherry. Adjust seasonings, and
serve with a sprinkling of parsley.
Serves 8
1
2
/
-inch dices
1
/
2
-inch dices
1
2
/
-inch dices (about 2 cups)
1
2
/
cup of sherry
Serves 8-10
This recipe is ideal for
using the Auto Cook Mode.
6 QT Smart-Set 08EM1.indd Sec1:73-Sec1:746 QT Smart-Set 08EM1.indd Sec1:73-Sec1:74 4/17/08 6:21:25 PM4/17/08 6:21:25 PM
73
This recipe is ideal for using
the Dual Cycle Mode.
This recipe is ideal for
using the Auto Cook Mode.
This recipe is ideal for using
74
the Dual Cycle Mode.
Page 39

holiday and special occasion category:
Scalloped Potatoes and Ham
Desserts
Crème Brûlée
Non-stick cooking spray
1
6 large russet potatoes scrubbed clean and sliced in
4
/
-inch rounds
1 can cream of mushroom condensed soup
1 soup can water
1
1 ham steak, about 1
2
/
pounds, cubed
4 ounces shredded Cheddar cheese
Grill seasoning to taste
1. Layer potatoes and ham in a slow cooker sprayed with nonstick spray.
2. Mix the soup, water, cheese, and seasoning together and pour mixture
1
over ham and potatoes. Cover; cook on HIGH for 3
2
/
hours and then on
LOW for 1 hour.
Serves 5
5 egg yolks
2 cups heavy cream
1 vanilla bean, split down the center
1
2
/
cup sugar
1
4
/
cup raw sugar
1. Place 5
2
3
/
-cup ramekins or custard cups (2
3
4
/
inches wide by 1
3
4
/
inches
HIGH) inside stoneware. Pour water around ramekins so that water
comes halfway up the sides of the ramekins. Remove ramekins and
prepare custard.
2. Whisk the egg yolks briefly, set aside. Place the cream, vanilla bean and
sugar in a small saucepan set over medium heat. Stir until mixture
begins to boil. Remove from heat and let cool, allowing vanilla bean to
steep in the cream. When cool, remove bean, scraping out the seeds into
the mixture. Very slowly, pour into the egg yolks, whisking well. Strain
the mixture through a fine sieve.
3. Pour the mixture into the ramekins and place in stoneware. Cover; cook
on HIGH for 1-2 hours, or until custard is set but centers are still soft
and jiggly. Carefully remove ramekins from stoneware, let cool, and
refrigerate until ready to serve.
4. Spread tops of each custard generously with raw sugar and brûlée with
a torch, gradually melting and browning the sugar in quick small, circles.
Serves 5
This recipe is ideal for
using the Auto Cook Mode.
6 QT Smart-Set 08EM1.indd Sec1:75-Sec1:766 QT Smart-Set 08EM1.indd Sec1:75-Sec1:76 4/17/08 6:21:25 PM4/17/08 6:21:25 PM
75
This recipe is ideal for using
the Dual Cycle Mode.
This recipe is ideal for
using the Auto Cook Mode.
This recipe is ideal for using
76
the Dual Cycle Mode.
Page 40

Desserts
Desserts
Chocolate Hazelnut Polenta Cake
Butter, as needed to grease the stoneware
4 ounces semi-sweet chocolate, melted
2 ounces semi-sweet chocolate, chopped into
4 tablespoons butter, melted
3
4
/
cup sugar
2 eggs
1/3 cup milk
1 teaspoon vanilla
3
4
/
cup cornmeal
1
4
/
cup flour
1 teaspoon baking powder
1
2
/
teaspoon baking soda
1 teaspoon cinnamon
1
2
/
teaspoon orange peel, finely minced
1
4
/
cup hazelnuts, finely chopped
Dash of salt
1. Butter and flour bottom and 3 lowest side inches of stoneware, shaking
out any excess flour.
2. In a small sauce pan, melt together 4 ounces of chocolate and butter.
Transfer to mixing bowl.
3. Combine sugar, eggs, and vanilla; beat until fluffy. Add to chocolate and
blend.
4. In a separate bowl, combine cornmeal, flour, baking powder, baking
soda, cinnamon, orange peel, hazelnuts and salt. Mix to blend.
5. Add milk and cornmeal mixture alternately to chocolate until fully
incorporated.
6. Fold in chocolate chunks.
7. Pour into stoneware, cover, and cook on HIGH for 2
sets but is still moist in the center.
8. Let cool and serve with ice cream or whipped cream.
Serves 6-8
1
4
/
-inch pieces
1
2
/
hours, until cake
Apple Butter
4 quarts peeled, thin-sliced McIntosh apples
4 cups granulated white sugar
1 teaspoon ground cinnamon
1
4
/
teaspoon ground cloves
1
4
/
teaspoon salt
1. Stir all ingredients in stoneware. Cover; cook on HIGH for 1 hour and
then on LOW for 7 hours, or until the apple butter is thick and brown.
Stir occasionally throughout the day.
2. Apple butter will thicken as it cools. Spoon into sterilized pint jars and
seal. If sealed, will keep for up to 1 year.
This recipe is ideal for
using the Auto Cook Mode.
6 QT Smart-Set 08EM1.indd Sec1:77-Sec1:786 QT Smart-Set 08EM1.indd Sec1:77-Sec1:78 4/17/08 6:21:25 PM4/17/08 6:21:25 PM
77
This recipe is ideal for using
the Dual Cycle Mode.
This recipe is ideal for
using the Auto Cook Mode.
This recipe is ideal for using
78
the Dual Cycle Mode.
Page 41

Desserts
Desserts
Orange Souffl é
1 tablespoon butter to coat stoneware
2
3
/
cup superfine sugar plus extra sugar to coat stoneware and sprinkle on top
of soufflé (regular sugar may be used if superfine is unavailable)
1 orange, zest only
6 tablespoons flour
1
2
/
cup milk
8 egg yolks
4 tablespoons unsalted butter, room temperature
6 tablespoons orange liqueur
1 tablespoons vanilla extract
10 egg whites
1 teaspoon salt
4 tablespoons sugar
Chocolate sauce or sweetened whipped cream (optional)
1. Rub the interior of stoneware with unsalted butter, and sprinkle with
superfine sugar. Turn out and reserve any excess sugar.
2
2. Mix
3. Whisk the flour and milk in a saucepan to blend. Beat in the orange
4. Add butter, orange liqueur and vanilla extract to the mixture and let
5. In a clean bowl, beat egg whites until foamy. Add salt and beat to soft
6. Add in
7. If desired, sprinkle the top of the soufflé with sugar and brûlée with a
8. Spoon out and serve with chocolate sauce or sweetened whipped cream.
Serves 10
3
/
cup sugar and orange zest in a food processor.
scented sugar. Stir over medium heat until sauce thickens, then whisk
as sauce comes to a boil. Continue whisking for 30 seconds and then
remove from the heat. Let cool for a moment before beating in the egg
yolks one at a time.
stand at room temperature for 20 minutes to cool.
peaks. Sprinkle in 4 tablespoons sugar and beat to stiff peaks.
1
4
/
of whipped egg whites to base and fold in. Fold in remaining
whites and then scrape the mixture into the sugar-coated stoneware.
Cover, cook on HIGH for 1 hour.
torch, gradually melting and browning the sugar in quick small, circles.
Cinnamon Ginger Poached Pears
6 cups water
2 cups granulated sugar
20 slices ginger
4 cinnamon sticks
12 pears, peeled and cored
2 tablespoons candied ginger
1. Combine all ingredients in stoneware. Cover; cook on LOW for 4-6 hours
or on HIGH for 1
2. Remove pears and cook uncovered for 30 minutes to let syrup thicken.
Serve with ice cream or pound cake, spooning syrup over pears.
Serves 12
1
2
/
-2 hours.
This recipe is ideal for
using the Auto Cook Mode.
6 QT Smart-Set 08EM1.indd Sec1:79-Sec1:806 QT Smart-Set 08EM1.indd Sec1:79-Sec1:80 4/17/08 6:21:26 PM4/17/08 6:21:26 PM
79
This recipe is ideal for using
the Dual Cycle Mode.
This recipe is ideal for
using the Auto Cook Mode.
This recipe is ideal for using
80
the Dual Cycle Mode.
Page 42

What are the limits on JCS’s Liability?
How to Obtain Warranty Service
To register your product, please visit us online at www.crockpot.com.
SERVICE INSTRUCTIONS
1.Do NOT attempt to repair or adjust any electrical or mechanical functions on this unit. Doing so will void the
Warranty.
2.If you need to exchange the unit, please return it in its original carton, with a sales receipt, to the store where
you purchased it. If you are returning the unit more than 30 days after the date of purchase, please see the
enclosed Warranty.
3.If you have any questions or comments regarding this unit’s operation or believe any repair is necessary, please
call our Consumer Service Department at 1-800-323-9519 or visit our website at www.crockpot.com.
Sunbeam Products, Inc. doing business as Jarden Consumer Solutions or if in Canada, Sunbeam Corporation
(Canada) Limited doing business as Jarden Consumer Solutions (collectively “JCS”) warrants that for a period of
one year from the date of purchase, this product will be free from defects in material and workmanship. JCS, at
its option, will repair or replace this product or any component of the product found to be defective during the
warranty period. Replacement will be made with a new or remanufactured product or component. If the product is no longer available, replacement may be made with a similar product of equal or greater value. This is your
exclusive warranty. Do NOT attempt to repair or adjust any electrical or mechanical functions on this product.
Doing so will void this warranty.
This warranty is valid for the original retail purchaser from the date of initial retail purchase and is not transferable. Keep the original sales receipt. Proof of purchase is required to obtain warranty performance. JCS dealers,
service centers, or retail stores selling JCS products do not have the right to alter, modify or any way change the
terms and conditions of this warranty.
This warranty does not cover normal wear of parts or damage resulting from any of the following: negligent use
or misuse of the product, use on improper voltage or current, use contrary to the operating instructions, disassembly, repair or alteration by anyone other than JCS or an authorized JCS service center. Further, the warranty
does not cover: Acts of God, such as fi re, fl ood, hurricanes and tornadoes.
What are the limits on JCS’s Liability?
JCS shall not be liable for any incidental or consequential damages caused by the breach of any express, implied
or statutory warranty or condition.
Except to the extent prohibited by applicable law, any implied warranty or condition of merchantability or fi tness
for a particular purpose is limited in duration to the duration of the above warranty.
JCS disclaims all other warranties, conditions or representations, express, implied, statutory or otherwise.
JCS shall not be liable for any damages of any kind resulting from the purchase, use or misuse of, or inability
to use the product including incidental, special, consequential or similar damages or loss of profi ts, or for any
breach of contract, fundamental or otherwise, or for any claim brought against purchaser by any other party.
Some provinces, states or jurisdictions do not allow the exclusion or limitation of incidental or consequential
damages or limitations on how long an implied warranty lasts, so the above limitations or exclusion may not
apply to you.
This warranty gives you specifi c legal rights, and you may also have other rights that vary from province to prov-
ince, state to state or jurisdiction to jurisdiction.
How to Obtain Warranty Service
In the U.S.A.
If you have any questions regarding this warranty or would like to obtain warranty service, please call
1-800-323-9519 and a convenient service center address will be provided to you.
In Canada
If you have any questions regarding this warranty or would like to obtain warranty service, please call
1-800-323-9519 and a convenient service center address will be provided to you.
In the U.S.A., this warranty is offered by Sunbeam Products, Inc. doing business Jarden Consumer Solutions located in Boca Raton, Florida 33431. In Canada, this warranty is offered by Sunbeam Corporation (Canada) Limited
doing business as Jarden Consumer Solutions, located at 20 B Hereford Street, Brampton, Ontario L6Y 0M1. If
you have any other problem or claim in connection with this product, please write our Consumer Service Department. PLEASE DO NOT RETURN THIS PRODUCT TO ANY OF THESE ADDRESSES OR TO THE PLACE OF PURCHASE.
To register your product, please visit us online at www.crockpot.com.
© 2008 Sunbeam Products, Inc. doing business as Jarden Consumer Solutions. All rights reserved. Distributed by
Sunbeam Products, Inc. doing business as Jarden Consumer Solutions, Boca Raton, Florida 33431.
Website: www.crockpot.com.
1 YEAR LIMITED WARRANTY
81
6 QT Smart-Set 08EM1.indd Sec1:816 QT Smart-Set 08EM1.indd Sec1:81 4/17/08 6:21:26 PM4/17/08 6:21:26 PM
 Loading...