


Sunbather SunSwitch
Operating Instructions
RCM 5209
240VAC/50Hz/10A
SET
TEMP
ON
OFF
MAN AUTO
To Switch ON:
Push the ON/OFF button once to switch the unit
ON (pool temperature reading will then display).
For Automatic Operation:
Press the AUTO button once for fully automatic
operation (status light will then display).
In this mode the controller automatically
switches the solar pump to heat the pool when
weather conditions are favourable.
The status light pulses when the pump is on
standby and remains on when the pump is
running.
SECONDARY FUNCTIONS:
Manual:
Press the MAN button to run the solar pump at anytime
(flashing status light indicates Manual mode).
Press AUTO button to exit Manual mode or wait 30 minutes
for unit to revert back to Auto mode.
For continuous Manual operation, hold the MAN button down for
10 seconds. CO will appear in the display. Press AUTO to revert
back to the Auto mode.
Winter Mode:
Hold ON/OFF button for 5 seconds (W will appear in the display).
The solar pump will run for a 10 minutes period each day
beginning from the time of setting.
Press the ON/OFF button again to exit winter mode.
To Read Roof Temperature:
Hold the Up Arrow button for 3 seconds.
This displays the roof sensor temperature for 5 seconds.
Heat and Cool Mode:
Hold the AUTO button for 10 seconds (display pulses
continuously when in Heat and Cool mode).
Push AUTO button again to revert to normal operation.
SERVICE FUNCTIONS:
Start-up Diagnostic:
All lights, displays and non-volatile memory are checked on
start-up. “EE” will flash in the display if a fault is found.
Sensor Fault Diagnosis:
A flashing “Er” display indicates a faulty roof sensor.
A non-flashing “Er” display indicates a faulty pool sensor.
Both sensors are non-polar 4.7K Ohm at 25°C thermistors with
these temp/resistance ohm readings: 10°C - 9535, 20°C - 5902,
30°C - 3770, 40°C - 2480, 50°C - 1673, 60°C - 1156.
Electrical Specifications:
T on 6°C. T off at 2°C. Maximum relay overload 230V - 10A.
Readout Calibration:
To fine tune the temperature readings hold TEMP SET
button down for 10 seconds until the display flashes.
Pressing the up or down arrow buttons will change the
units base settings one degree each press.
While in standby, the display reads the last recorded temperature.
Service Lock-Out Mode:
Hold AUTO & MAN buttons down for 10 seconds (LO appears in
display). Controller will remain in Lock-Out for 2 hours before
reverting to normal
automatic operation.
SUNBATHER POOL TECHNOLOGIES
P. O. BOX 107 HASTINGS, VICTORIA AUSTRALIA 3915
Ph: 03 5979 5777 Fx: 03 5979 3577
www.sunbather.com.au
PRIMARY FUNCTIONS
SET
TEMP
ON
OFF
MAN AUTO
Display Status
Sunbather SunSwitch
Operating Instructions
RCM 5209
240VAC/50Hz/10A
SET
TEMP
ON
OFF
MAN AUTO
SECONDARY FUNCTIONS:
Manual:
Press the MAN button to run the solar pump at anytime
(flashing status light indicates Manual mode).
Press AUTO button to exit Manual mode or wait 30 minutes
for unit to revert back to Auto mode.
For continuous Manual operation, hold the MAN button down for
10 seconds. CO will appear in the display. Press AUTO to revert
back to the Auto mode.
Winter Mode:
Hold ON/OFF button for 5 seconds (W will appear in the display).
The solar pump will run for a 10 minutes period each day
beginning from the time of setting.
Press the ON/OFF button again to exit winter mode.
To Read Roof Temperature:
Hold the Up Arrow button for 3 seconds.
This displays the roof sensor temperature for 5 seconds.
Heat and Cool Mode:
Hold the AUTO button for 10 seconds (display pulses
continuously when in Heat and Cool mode).
Push AUTO button again to revert to normal operation.
SERVICE FUNCTIONS:
Start-up Diagnostic:
All lights, displays and non-volatile memory are checked on
start-up. “EE” will flash in the display if a fault is found.
Sensor Fault Diagnosis:
A flashing “Er” display indicates a faulty roof sensor.
A non-flashing “Er” display indicates a faulty pool sensor.
Both sensors are non-polar 4.7K Ohm at 25°C thermistors with
these temp/resistance ohm readings: 10°C - 9535, 20°C - 5902,
30°C - 3770, 40°C - 2480, 50°C - 1673, 60°C - 1156.
Electrical Specifications:
T on 6°C. T off at 2°C. Maximum relay overload 230V - 10A.
Readout Calibration:
To fine tune the temperature readings hold TEMP SET
button down for 10 seconds until the display flashes.
Pressing the up or down arrow buttons will change the
units base settings one degree each press.
While in standby, the display reads the last recorded temperature.
Service Lock-Out Mode:
Hold AUTO & MAN buttons down for 10 seconds (LO appears in
display). Controller will remain in Lock-Out for 2 hours before
reverting to normal
automatic operation.
SUNBATHER POOL TECHNOLOGIES
P. O. BOX 107 HASTINGS, VICTORIA AUSTRALIA 3915
Ph: 03 5979 5777 Fx: 03 5979 3577
www.sunbather.com.au
Sunbather SunSwitch
Operating Instructions
RCM 5209
240VAC/50Hz/10A
SET
TEMP
ON
OFF
MAN AUTO
Select The Desired Temperature:
Press the SET TEMP button down and scroll up or
down with the arrow buttons until the desired pool
temperature is displayed.
The display reverts back to reading the pool water
temperature after 5 seconds.
The pool set temperature can be read anytime by
pressing the SET TEMP button.
SETTING THE TEMPERATURE
SET
TEMP
ON
OFF
MAN AUTO
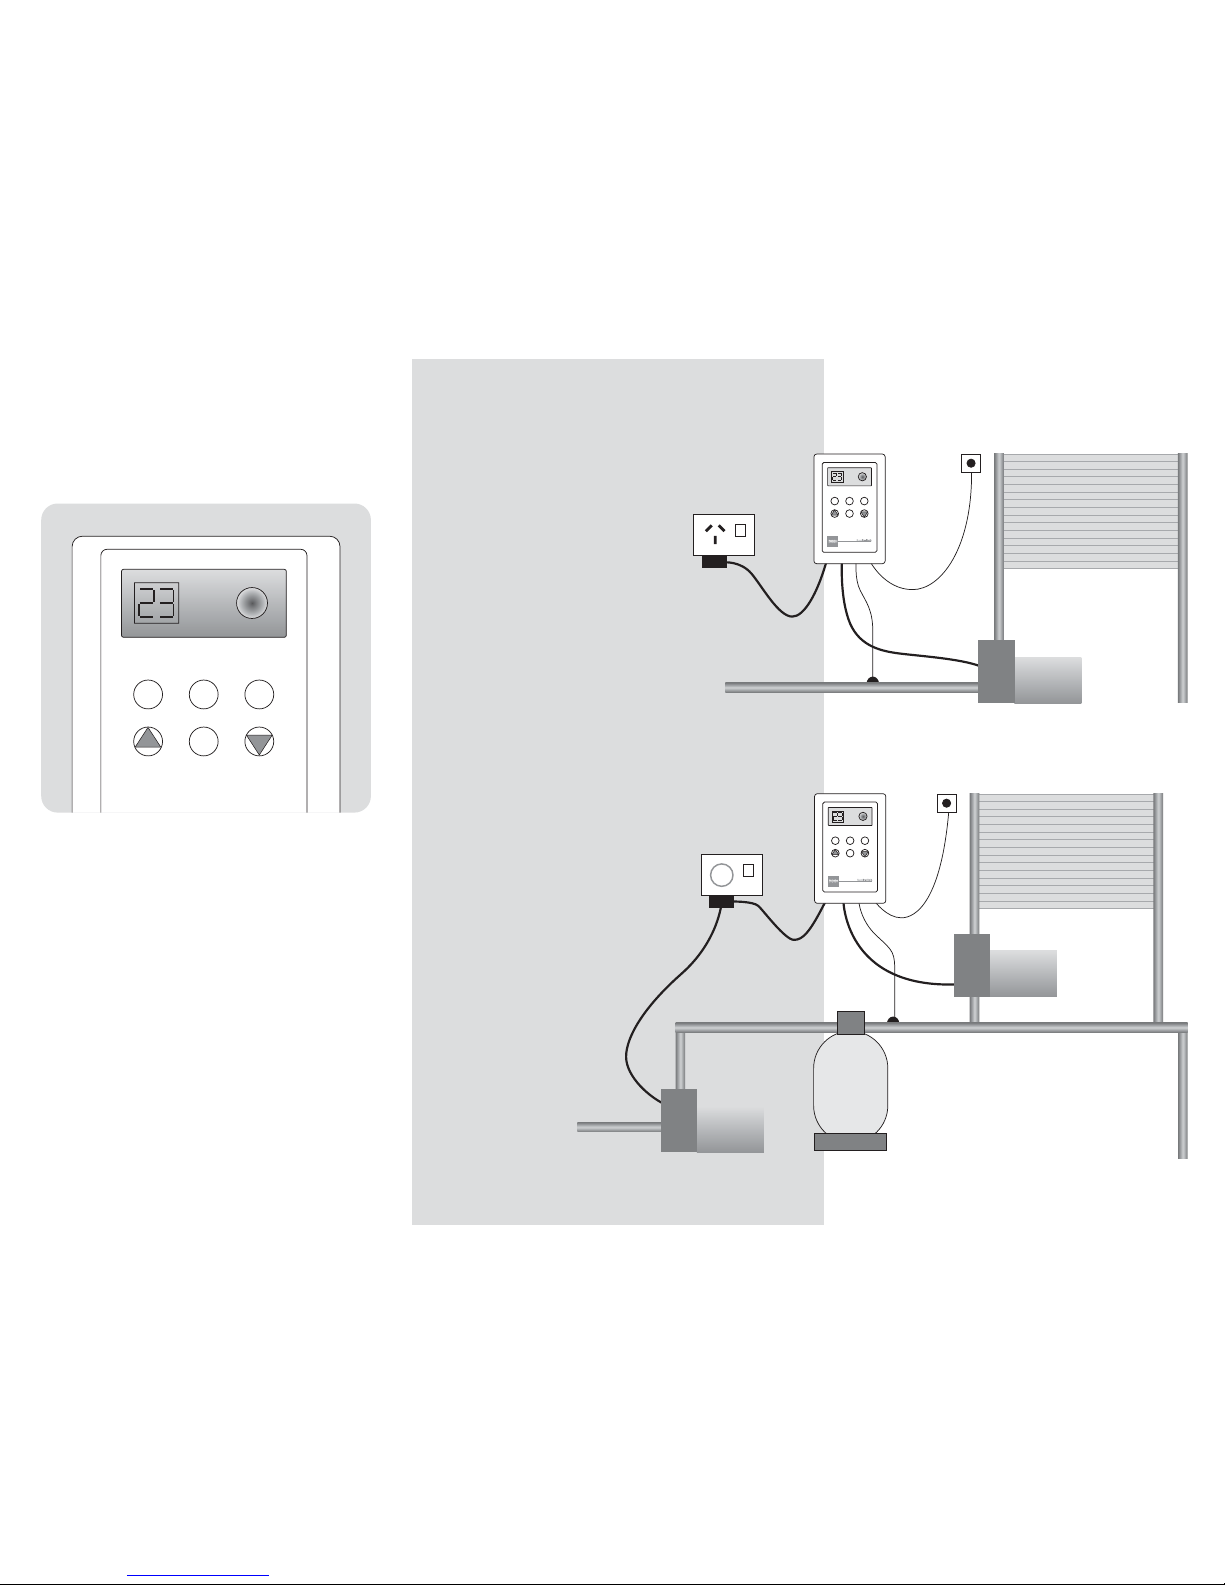
OPTION 1: MOST NEW POOLS
SEPARATE SOL AR PIPE SYSTEM
OPTION 2: EXISTING POOLS
TAPPED INTO FILTRATION SYSTEM
Roof
Sensor
From Pool
Return
to Pool
Pool
Sensor
230 V
SOLAR
PUMP
Solar
Collector
SET
TEMP
ON
OFF
MAN AUTO
Roof
Sensor
Time Clock
From Pool
Return
to Pool
Pool
Sensor
230 V
SOLAR
PUMP
Solar
Collector
POOL
PUMP
POOL
FILTER
SET
TEMP
ON
OFF
MAN AUTO
INSTALLATION INSTRUCTIONS
Step 1
Fix wall mounting bracket on
a vertical wall protected from
direct rain and sun.
Step 2
Locate Roof Sensor (15.0m) on
separate solar pad fixed adjacent
to the solar collector.
This pad must receive similar
sun to the solar collector but
not be in contact with it.
Step 3
Install the threaded pocket well into
a section of pipework before the
solar collector take-off and insert
the Pool Sensor (1.8m) into the well.
Step 4
Connect both Roof (red) and
Pool (blue) sensors to the
colour-matching connections
on the controller.
Slide unit into
mounting bracket.
Step 5
Plug in solar circulation
pump and switch ON.
Notes:
1. Joins in sensor cables must be soldered and waterproofed.
2. Option 2 requires the Time Clock to be set for daylight hours.
3. For any repairs, return to the supplier.
 Loading...