

Page 1
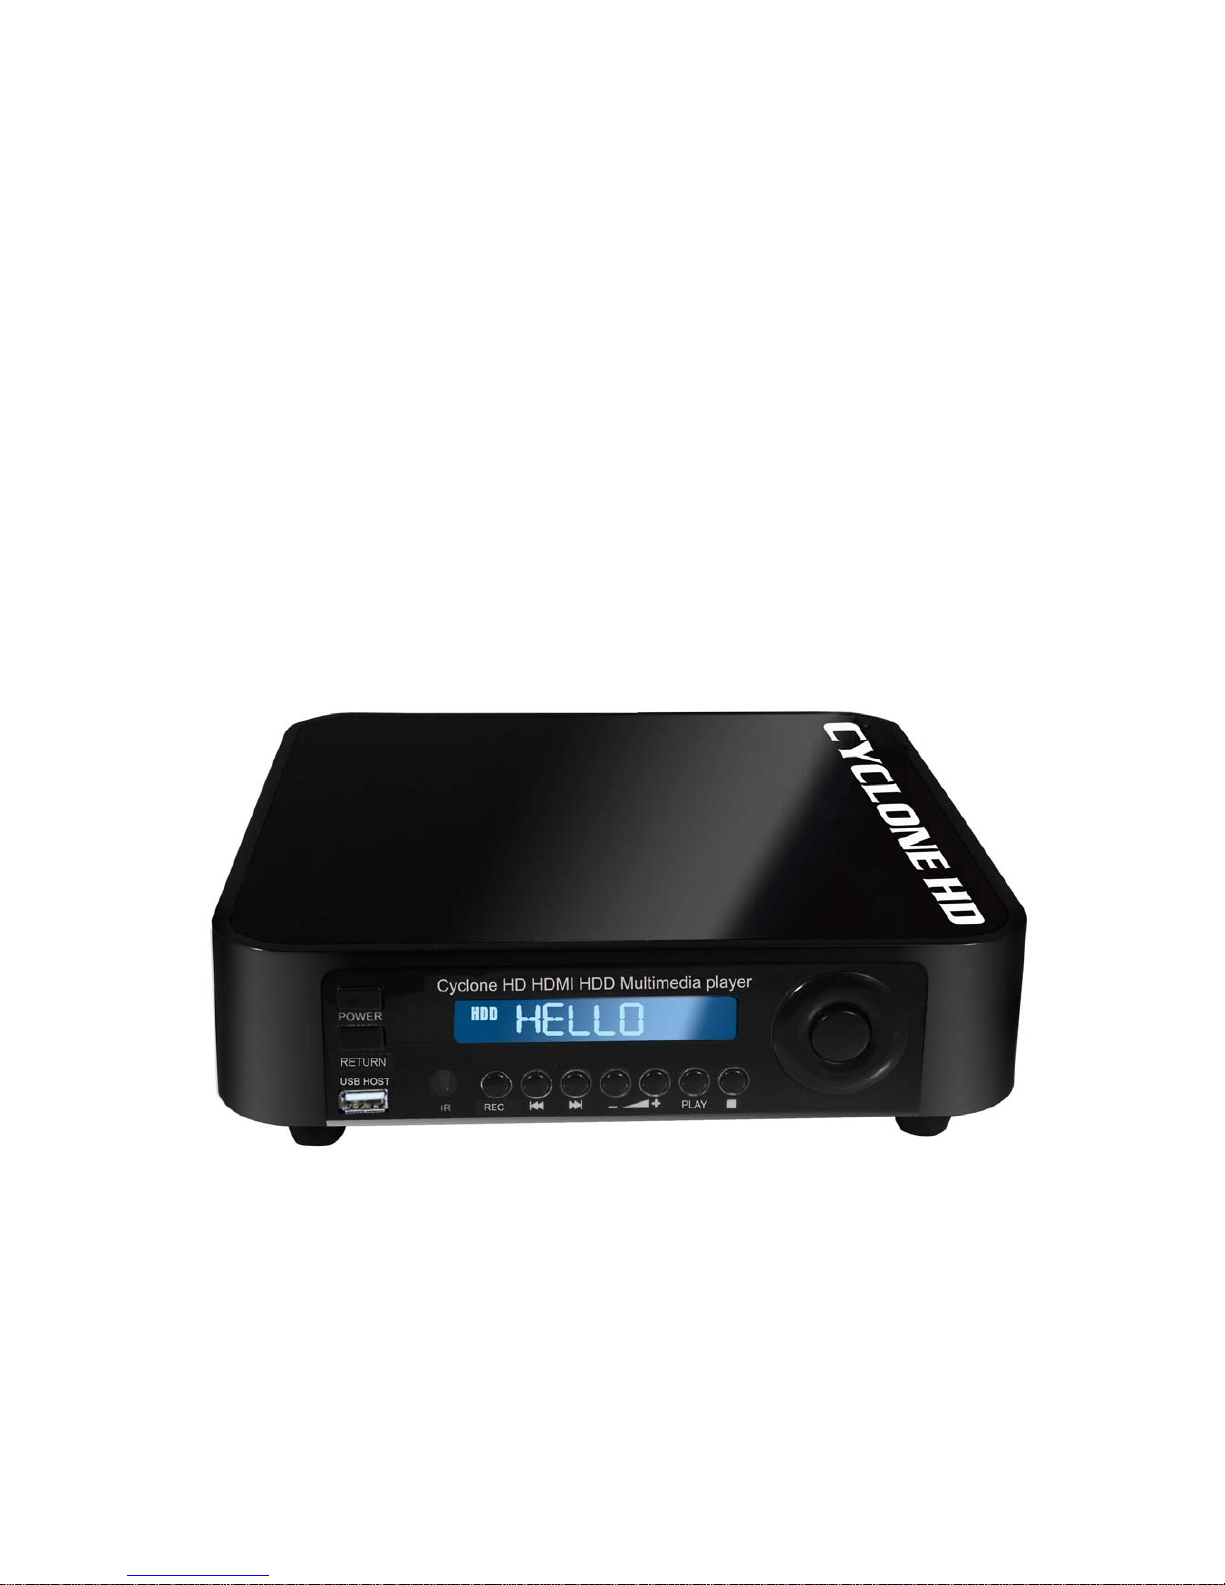
CYCLONE
HD
USER’S MANUAL
Default package: Harddrive Is Not I ncluded
REV1.1
Page 2

Table of Content
Warning and introduction………………………………… 4
Warning and caution………………………………………………………… 4
Limited liability……………………………………………………………… 4
Introduction…………………………………………………………………… 5
Powerful Multilingual Subtitle Languages………………………………… 6
Home Theater & Car Theater……………………………………………… 6
Digital Photo Album………………………………………………………… 6
Firmware Update…………………………………………………………… 6
Powerful Media Processor………………………………………………… 6
External decode software…………………………………………………… 7
Package contents…………………………………………………………… 7
Getting started…………………………………………… 8
Front panel view…………………………………………………………… 8
Rear panel view…………………………………………………………… 9
The Remote contronl……………………………………………………… 10
Selectin video in…………………………………………………………… 15
Selection file copy………………………………………………………… 15
Selection browser………………………………………………………… 15
Selection setup…………………………………………………………… 15
Selecting time REC……………………………………………………… 16
Format hard disc………………………………………… 17
The first step……………………………………………………………… 17
The second step…………………………………………………………… 17
Congratulation page……………………………………………………… 18
The REC list
REC list Menu……………………………………………………………… 19
Timer Record Menu…………………………………………20
Creating a New Schedule…………………………………………………… 20
Editing schedeles…………………………………………………………… 21
Deleting schedules…………………………………………………………… 21
Viewing schedule status viewing schedule status………………………… 21
Viewing recording history……………………………………………………… 22
Setup memu………………………………………………… 23
Changing system setings………………………………………………………23
Changing video setings…………………………………………………………26
Changing audio setings…………………………………………………………28
Page 3

Changing record setings……………………………………………………… 29
Changing photos setings……………………………………………………… 31
Changing network setings………………………………………………………33
Browser menu…………………………………………………35
Browser music……………………………………………………………………36
Browser photos………………………………………………………………… 37
Browser movies………………………………………………………………… 37
Browser all……………………………………………………………………… 38
File edit menu…………………………………………………………………… 38
File copy menu………………………………………………40
Step 1.select source device……………………………………………… 40
Step 2.select Destination Device………………………………………… 40
Step 3.select copy files or folders………………………………………… 41
Step 4.select the folders of Destination…………………………………… 41
Step 5. Copy Status………………………………………………………… 41
Specifications…………………………………………… 43
Page 4

Warnings and introduction
Warnings and Cautions
It is normal that the surface becomes hot when using it as a player but do not
cover anything over the device.
The product may generate heat when used for long period of time.
Do not attempt to disassemble this product. Doing so may cause fire, electric
shock or electrical leakage, and defectiveness in the product itself.
In the event of unusually abnormal sounds, strange odor or smoke, stop using this
product immediately. Please shut down your computer, TV set and peripheral
devices promptly.
Do not handle, shake or try to remove this product while hard drive is writing and
reading data.
Do not expose this product to the following conditions;
1.Strong vibration or shock
2. Direct sunshine or dusty, hot or humid conditions
3. Extreme temperature fluctuations or near magnetic fields
Regular backup is recommended to preserve and store your valuable data.
Before unplugging power please stop the player and power down.” using ON/OFF
button
Do not power off player during file transfer, it may cause data loss and harm the
hard disk.
The hard disk must be set as master. When the device is used as a player, make
sure that all partitions are primary (not extended). The file system is recommend
to use FAT32
When used as USB storage device extended partitions, FAT32 is supported.
The hard disk can be fragmented after using for a period of time. This can affect
playing movie files from your hard disk. It is recommended that you assign a
partition for file storage while another partition is for movies
Limited Liability
The manufacturer, importer, and dealer can not be held responsible for accidental
damage, including personal injury or any other damage, due to inappropriate
usage of the product. Information in the user manual is written for the current
specification of the product. The manufacturer continues to provide additional
functions and apply new technology to it. All specifications may be changed
without prior notice to individual user. Manufacturer should not be liable for any
special, incidental or consequential damages. Even if informed of possibility there
of in advance.
Furthermore, warranty does not apply to:
Damages or problems resulting from misuse, abuse, accident, alteration or
incorrect electrical current or voltage. Any product tampered-with or damaged
warranty seal or serial number barcode or serial number label. Any product
without a warranty or serial number barcode or serial number label. AC adapter
and any consumable items delivered with or in the equipment.
Page 5

CYCLONE HD Media player is not designed or intended to, and may not be used
to violate any copyrights or other IP (Intellectual Property) rights.
Every user of player may only use it in connection with materials legally owned by
or licensed to the user and only extend such ownership or license rights that will
permit such use.
Checking Package Contents
Select the check boxes to confirm that all items are included in the package. In
case you find any missing item, please contact local dealer.
Introduction
CYCLONE HD Media player, a new fashionable substitute for the traditional video
recorders, is a multifunctional device that can serve as a PC storage device.
The CYCLONE HD Media player provides robust video & audio playback
functions, including movie playback, photo slideshow and music play back. The
player is designed with brand new HD GUI (Graphic User Interface) which
provides user-friendly operation for user.
Thanks to the big storage capacity and easy set up, you can connect it to the PC
via network or USB, and transfer you multimedia files to the player smooth and
simple.
The CYCLONE HD Media player works standalone (without computer) and
supports all popular file formats like
AVI, MPG, MP4, ASF, VOB, DAT, MP2/3, AC3, WMA, WAV, OGG, JPG,
JPEG, BMP.
With the support High definition (720p/1080i) you can provide an advance digital
media to your room. “Please note HD is only support on HD TV system”
Powerful Recorder Player
Recording you favorite digital media can be never been simpler with the
CYCLONE HD Media player. You can record many hours of your favorite media
to cyclone HD player.
Multiple schedule record programs can be setup to automatic record when you
away.
Pause, rewind and fast forward TV program with Time-shifting function. Catch up
with your program when you away from your seat.
Page 6

Powerful Multilingual Subtitle Languages
Support multiple subtitle languages for movie playback. And CYCLONE HD
Media player has been designed for entire globe. With sophisticated Unicode
character handling, it supports Six (6) kinds of subtitle languages, including
English, Spanish, French, German, Italian, and Dutch.
This function depends on sold model.
Powerful Multilingual OSD Languages Support six kinds of multiple OSD (On
Screen Display) languages for media playback or system operation, including
English, Spanish, French, German, Italian, Dutch. This function depends on sold
model .
Home Theater
Store your video files to you CYCLONE HD Media player, and playback on TV to
provide full digital Entertainment to you. Using HDMI it can provide high definition
playback format to your eyes. You can also steam media though the Ethernet
network or by the USB2.0 host.
MP3 Music Player
Save your music sound files on DVR media player and enjoy music through TV
speaker or existing audio device. It can store and play back MP3, WAV, AC3
music files about maximum 200,000 songs if installed a 250 GB HDD.
Digital Photo Album
Use to share thousands of your digital photos which are high resolution
image with your family or friends. You can also enjoy a HD photo slideshow in a
big TV screen at home or demo some photos for commercial purpose. Support
photo files with, JPG, JPEG, motion JPG (15fps/30fps).
Data Storage Box
Backup all files on and use it as a portable external disk drive and storage device.
This could be done through USB 2.0 interface at high speed 480Mbps or by
network transfer. Data can be transfer by MAC or PC
Firmware Update
You can download latest updated features via firmware upgrade.
Please contact with you local dealer or importer for latest firmware.
Powerful Media Processor
The heart of device is a powerful media processor supporting the demanding
Recording and decoding media files.
Page 7

1.4 External decode software
Transcode server software is decode for format rm&rmvb of movie
Notice:
If you want to play for format “rm / rmvb “of movie via LAN you need to setup
“transcode server” software to your PC.
“Note there is no official support for this software”
1.5 Package Contents
Package contents
1.DVR media player (no hard driver include)
2. AV cable (composite + stereo cable)
3. USB cable (for connecting to PC)
4. Power adapte
5. AC cable
6. CD Driver (For Windows 98 and user manual)
7. Remote control
8. Screw bag for hard drive (with screws 4pcs)
-1pcs
-1pcs
-1pcs
-1pcs
-1pcs
-1pcs
-1pcs
-4pcs
Keep the box and packing materials/ca bles in a safe place and use them when
transporting the product for the p ur po se of repair or other service.
Page 8
Getting Started
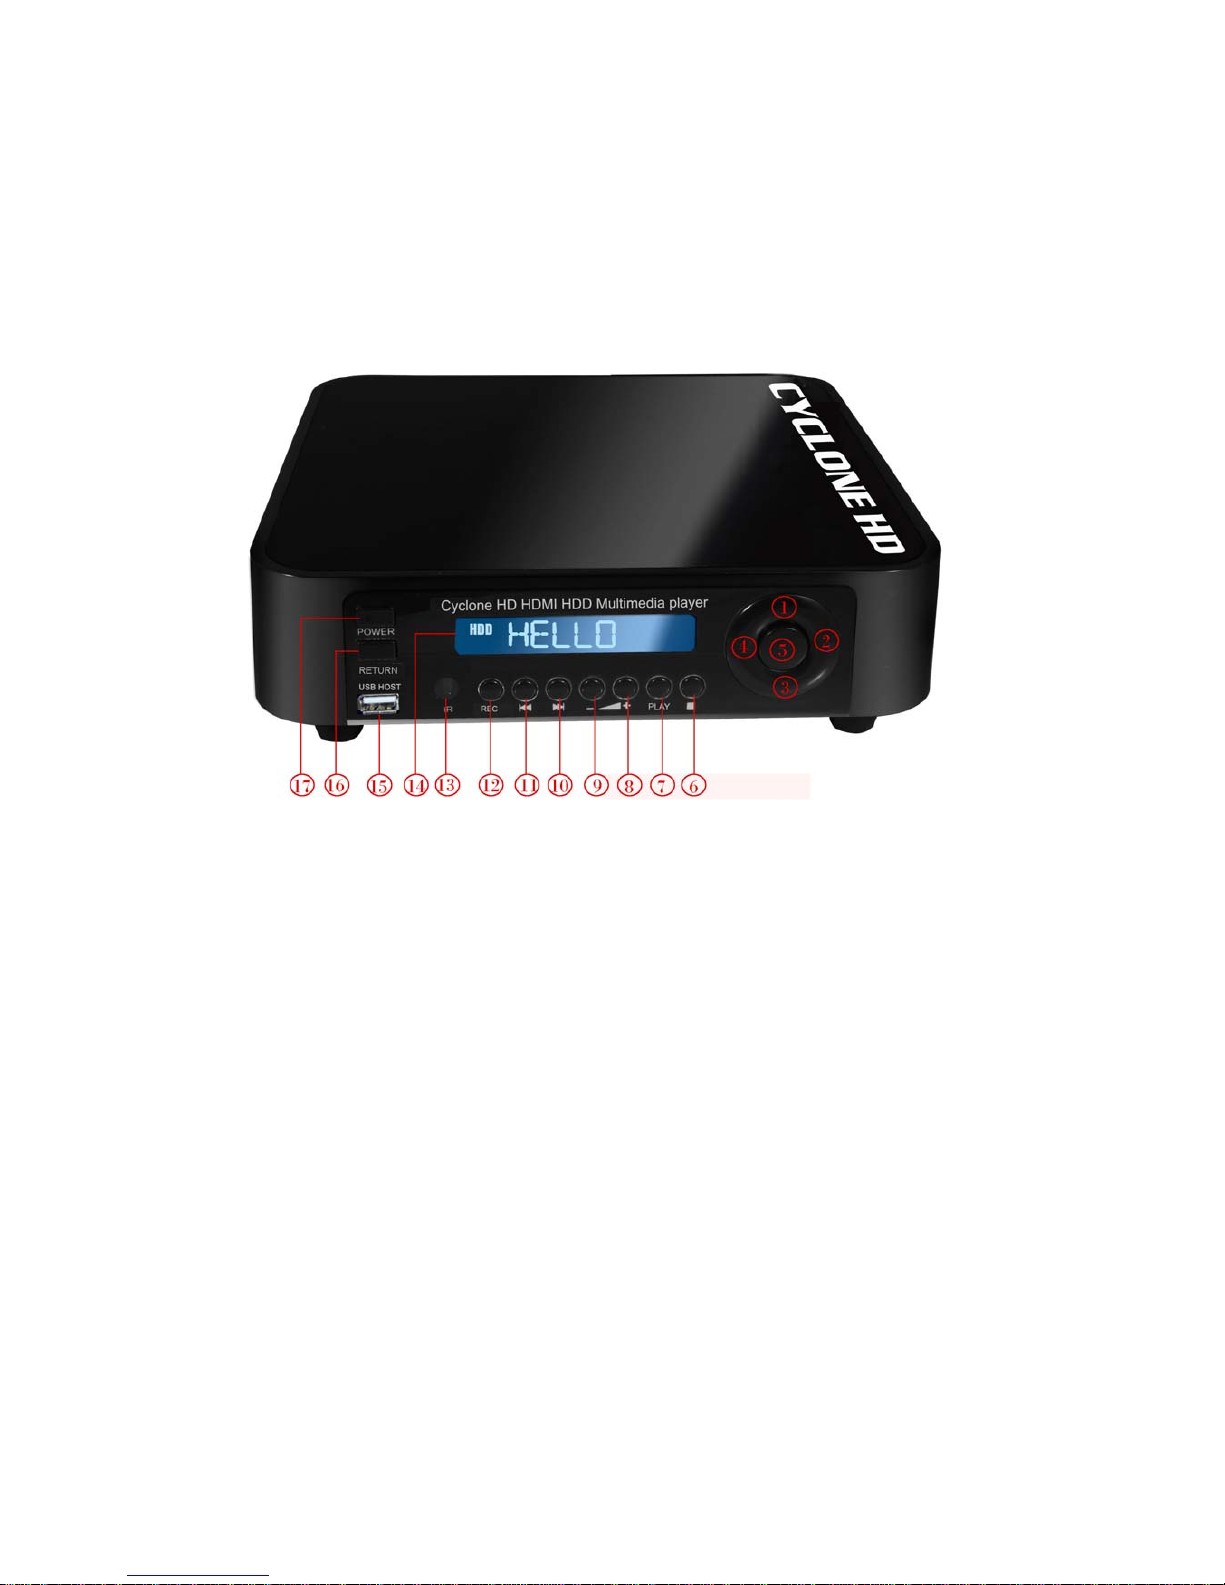
Front Panel View:
(1) Up - press the button to up
(2) Right- press the button to right
(3) down- press the button to down
(4) Left- press the button to left
(5) Enter- press the button to confirm your choose
(6) Stop- press the button to stop playing files
(7) Play- Press to begin playback of a DVD or HDD title.
(8) Voice increase-press the button to increase the volume
(9) Voice decrease- press the button to decrease the volume
(10)Next- press the button to next the files
(11)Previous- press the button to previous the files
(12)Recorder-press the button to begin recording movie
(13) Infrared receiving interface - aiming the port with remote control while using
(14) POWER LED- Power ON LED, Green color at power-on mode
(15) Usb host- with Plug & Play function for MP3, U disk and other USB products.
(16)Return –press the button to return to main menu
(17)Power- press the button to power on or off the multimedia player recorder.
Page 9
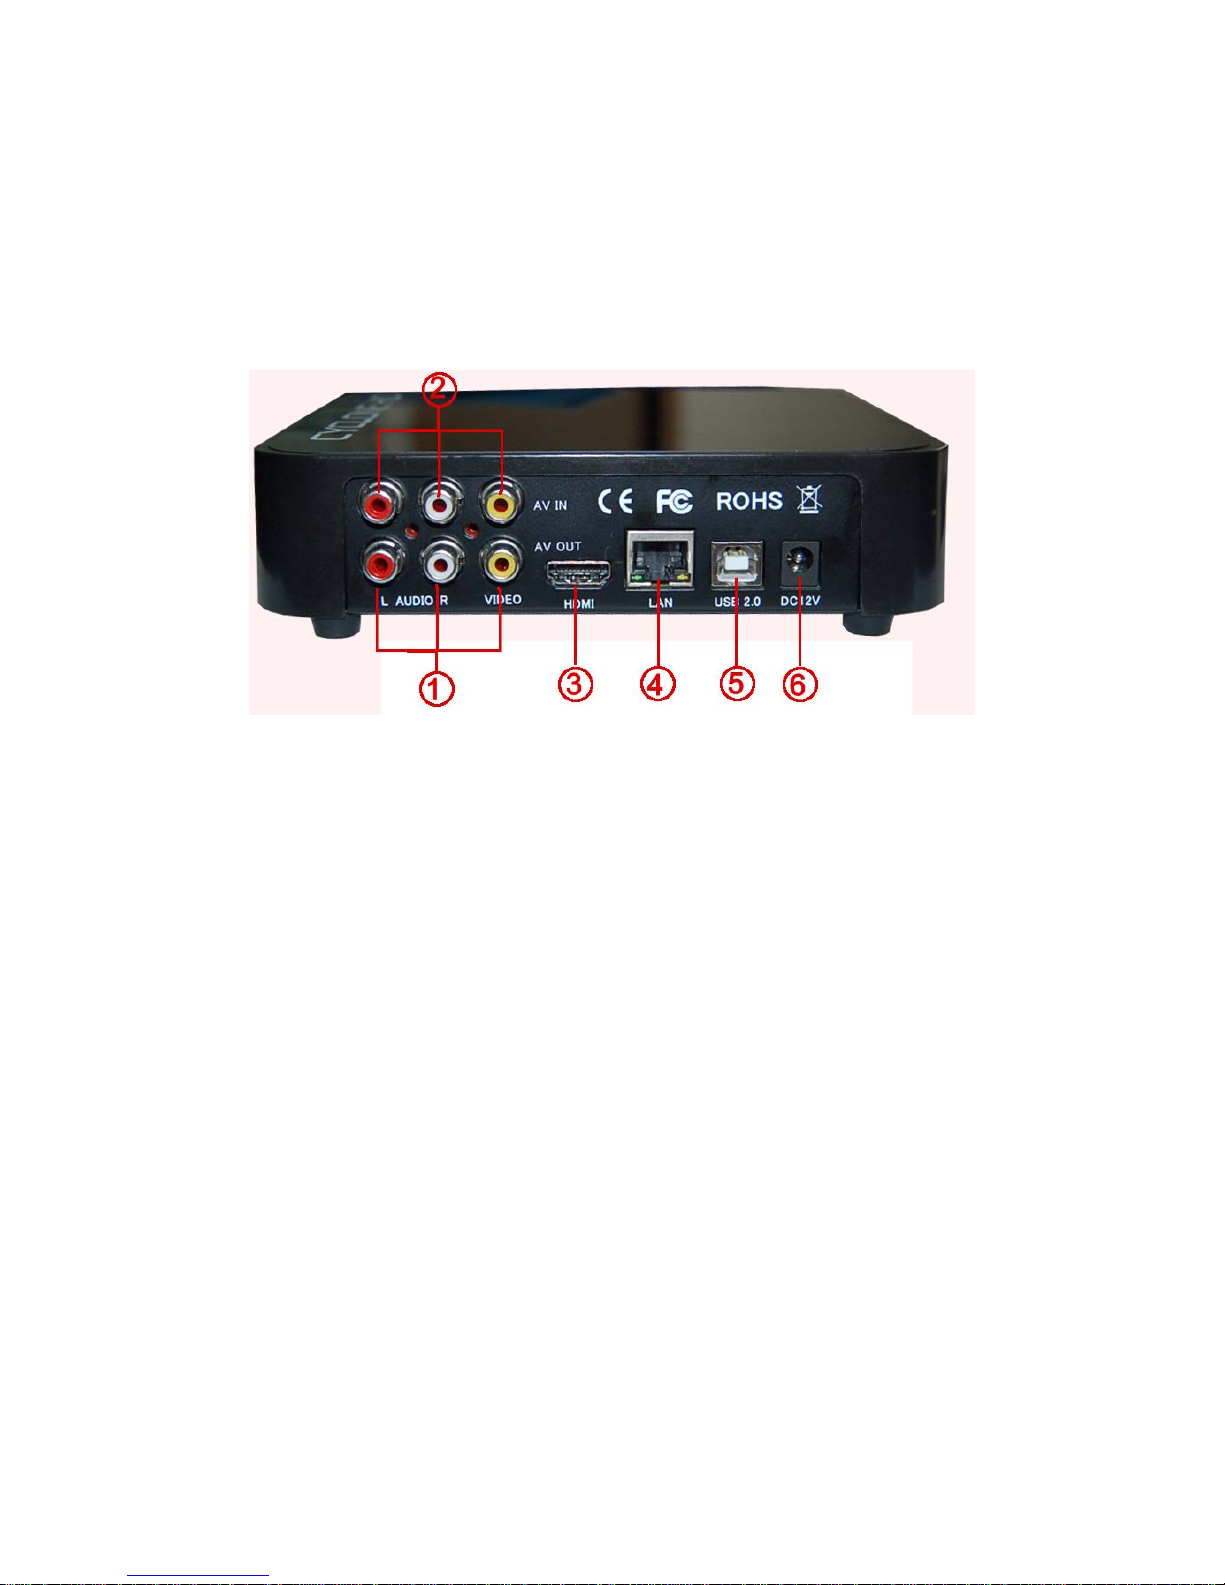
Rear Pa n el View:
(1) AV OUT-Composite video output to TV set
(2)AV IN- Composite video input to Multimedia player
(3) HDMI out- HDMI video output (720P/1080i) to TV set.
(4) LAN Port-Used to connect Lan and play the shared files.
(5) USB 2.0- connect to PC USB 2.0 port providing power and transferring data
(6) POWER in-DC input, provide 12V/3A power adapter for TV Play mode or PC
mode.
Page 10
The Remote Control
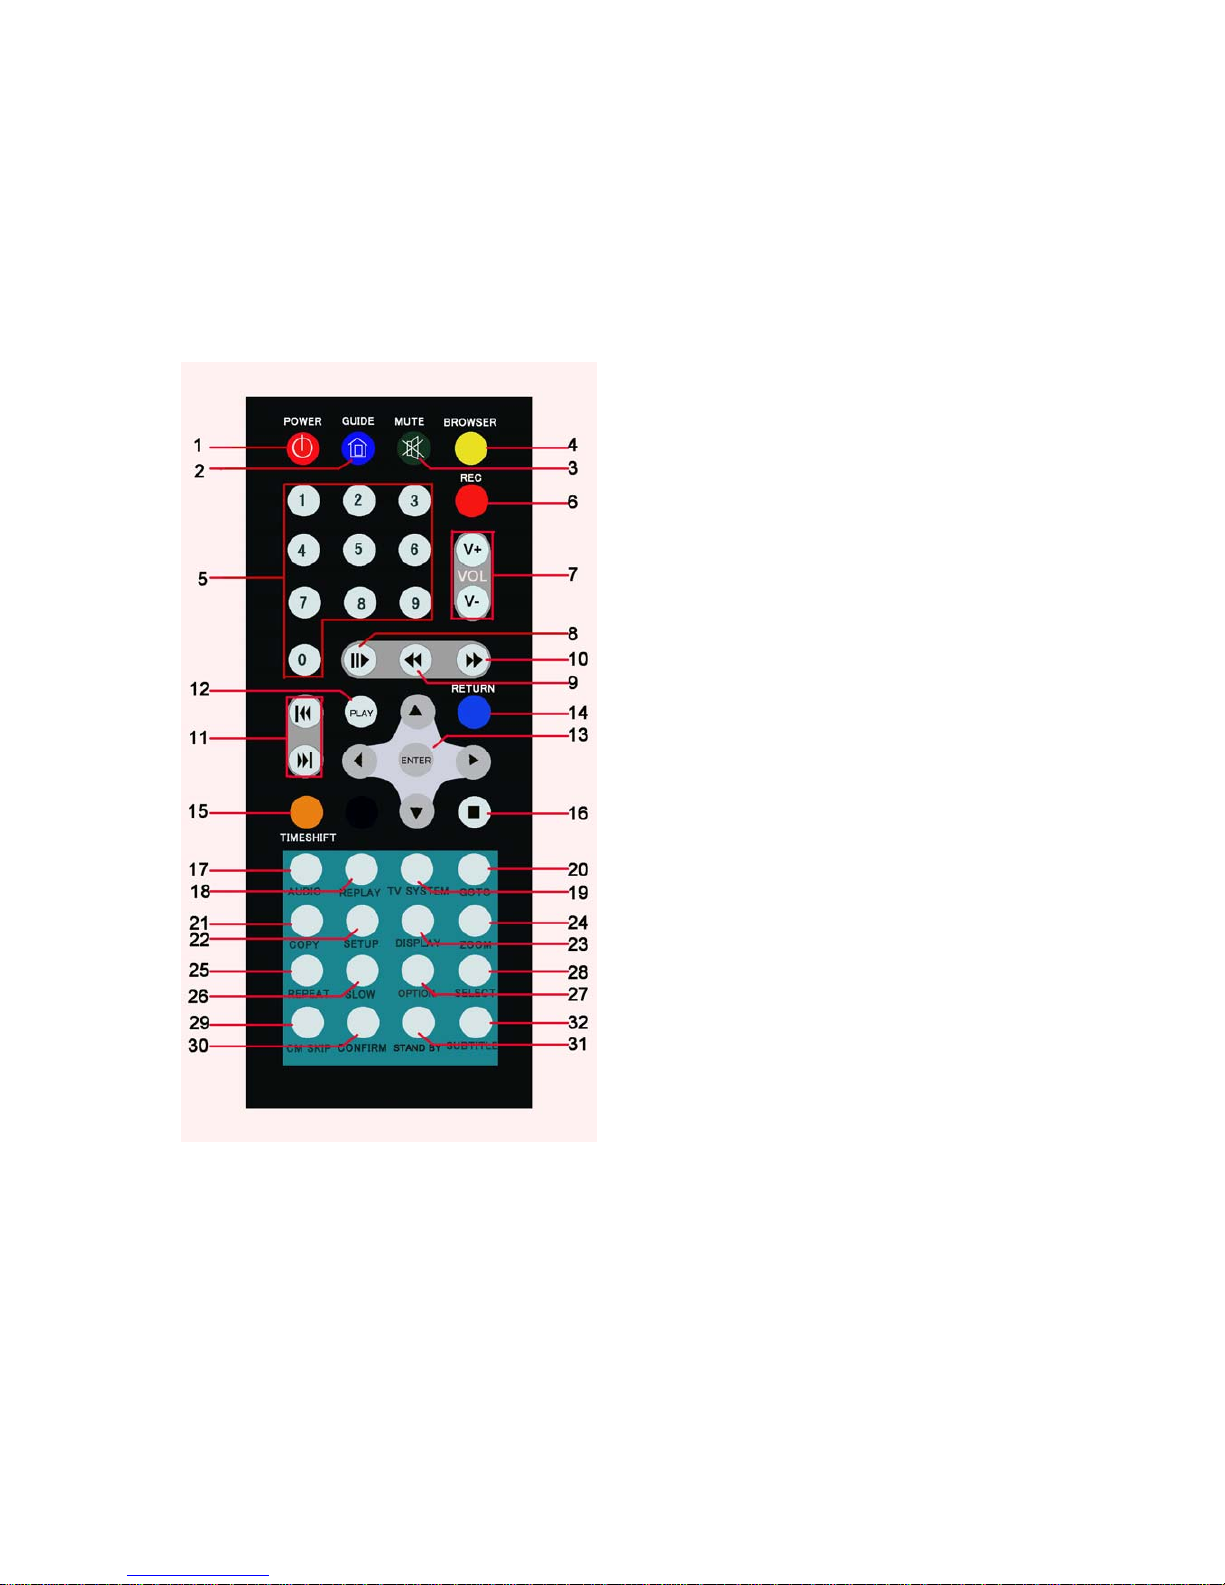
All procedures in this manual can be carried out using the remote control buttons. Certain functions
can also be carried out using the front panel at the front of the DVD recorder.
See the following for details on each button and its function:
1. POWER 2.GUIDE
3.MUTE 4. BROWSER
5. Number buttons 6. REC
7.VOL +/- 8. SETP/PAUSE
9. FAST REWIND 10. FAST
FORWARD
11. PREV/NEXT 12. PLAY
13. Navigation
/enter buttons
14. RETURN
15. TIMESHIFT 16. STOP
17. AUDIO 18. REPLA Y
19. TV SYSTEM 20. GOTO
21. COPY 22. SETUP
23. DISPLAY 24. ZOOM
25. REPEAT 26. SLOW
27.OPTION 28. SELECT
29. CM SKIP 30. ICONFIRM
31. STAND BY 32. SUBTITLE
Page 11
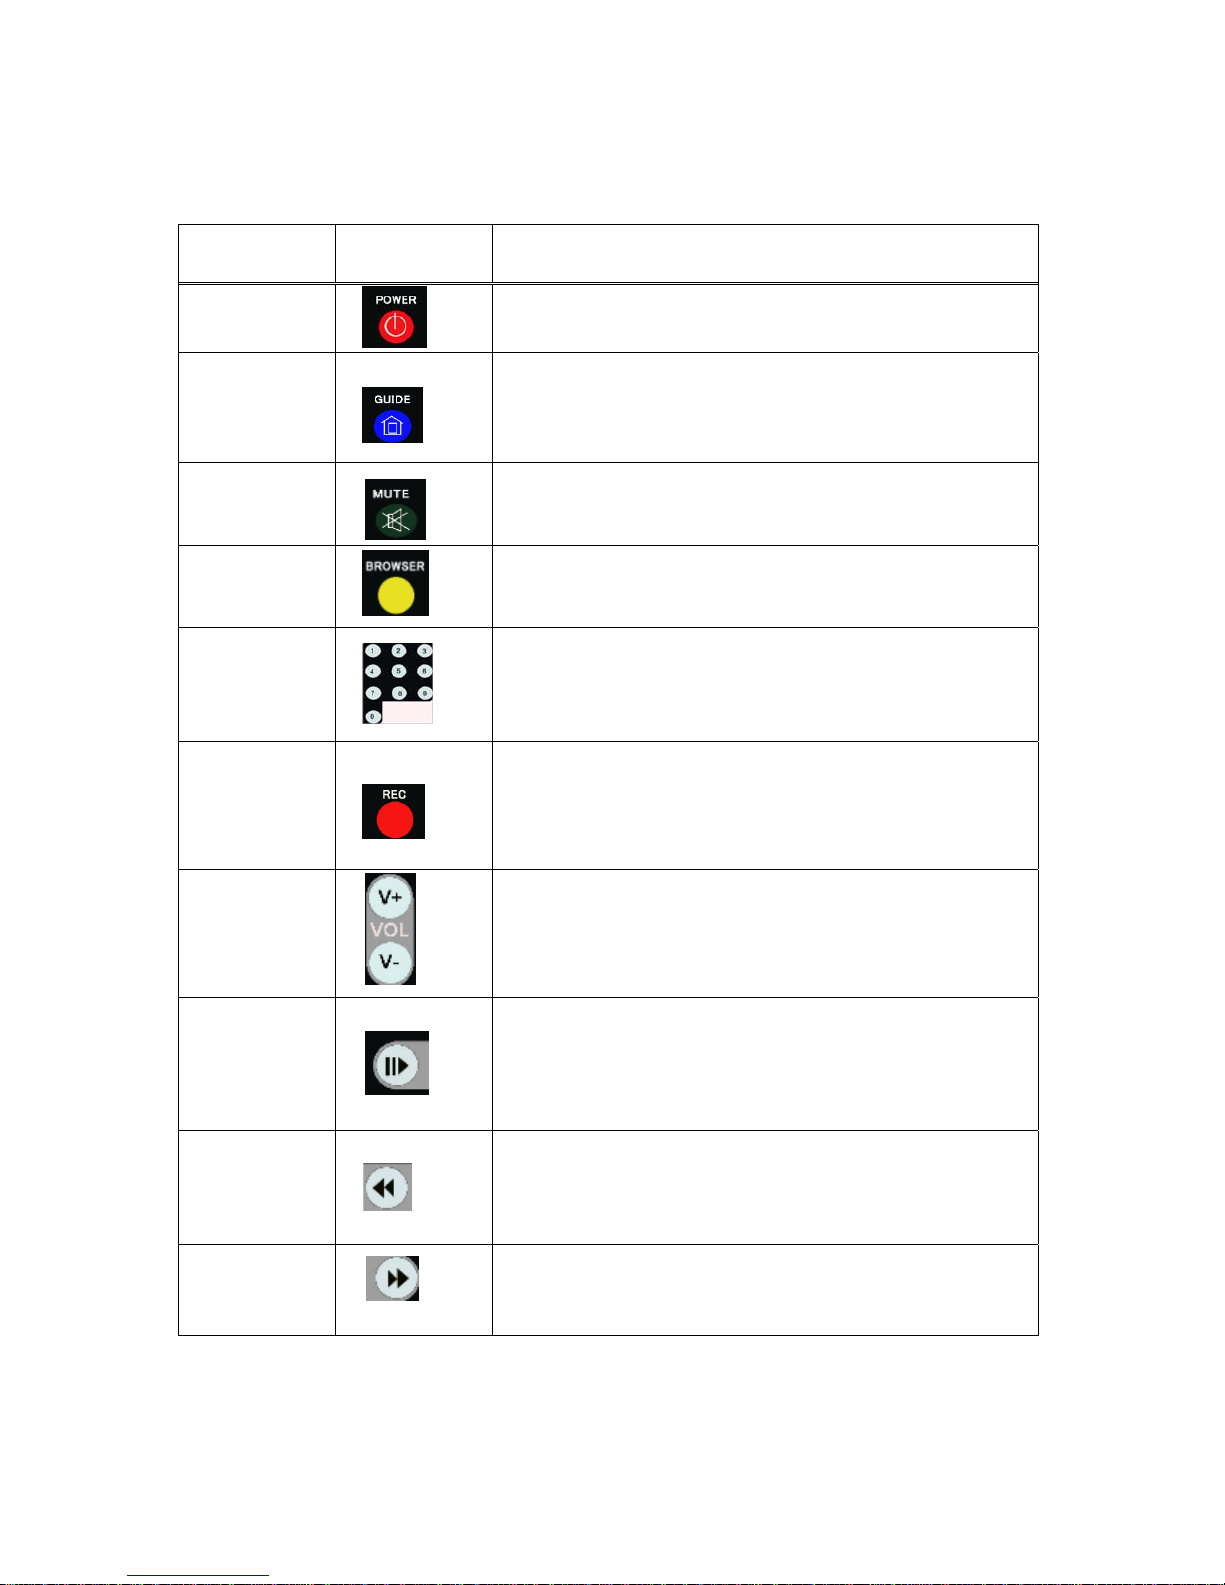
No. Button Function
1
POWER button:
Press to POWER on or off the AVHDD recorder.
2
GUIDE button:
Press to view the Guide menu. See
“The Guide Menu” on page 6 for
more details.
3
MUTE button:
Press to mute audio output, and press again to resume.
4
BROWSER button:
Press to browse the music , photo, movie, all files on USB,HDD.
5
Numeric buttons:
Press to enter channel numbers or numeric input when changing settings.
6
RECORD button:
Press to begin recording or to resume when recording has been paused.
Press repeatedly to set OTR length (30 mins / 60 mins / 90 mins / 120
mins / 180 mins /240 mins/Off).
7
VOL + / - buttons:
Press to increase or decrease the volume.
8
PAUSE / STEP button:
Press to pause current playback.
Press again to step to the next frame.
Press to resume playback.
9
FAST REWIND / button:
Press to fast rewind the current playback.
Press repeatedly to select faster rewind speeds
10
FAST FORWARD button:
Press to fast forward the current playback.
Press repeatedly to select faster forward speeds
Page 12
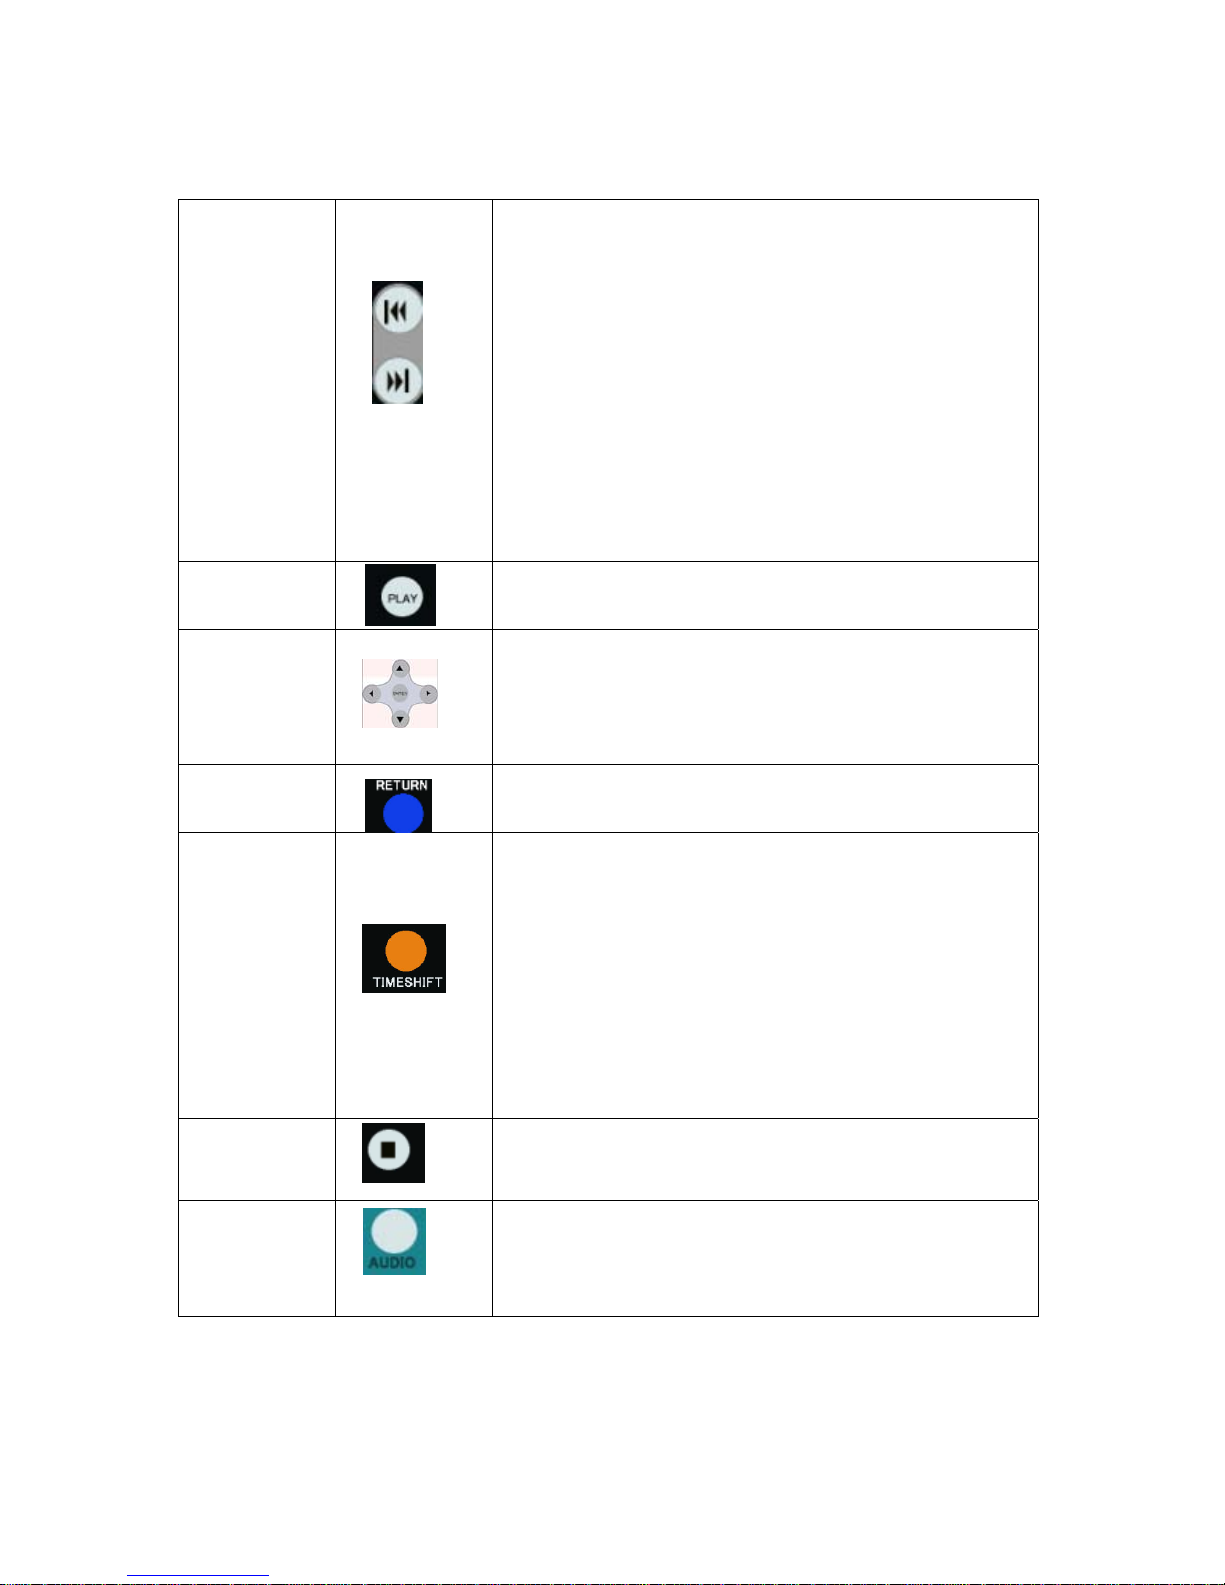
11
PREVIOUS buttons:
z Press to go the prev. on a HDD or USB file when playing music.
z Press to page up the file list at Browser.
z
When play photo ,the button is enable; play Movie and Mp3 file,
the button is disable.
NEXT
buttons:
z Press to go the next on a HDD or USB file when playing music.
z Press to page down the file list at Browser.
z
When play photo ,the button is enable; play Movie and Mp3 file,
the button is disable.
12
PLAY button:
Press to begin playback of a DVD or HDD title.
13
Navigational buttons:
Press the arrow buttons to navigate the menus.
ENTER button:
Press to select confirm in menus.
14
RETURN button:
Press to return to the previous screen when navigating the menus.
15
TIME SHIFT button:
Press to activate the timeshift function, which allows you to pause live TV
and resume the program from the point you left it. While paused, the
program is recorded to the HDD, as long as space is available.
Press to activate TIME SHIFT function and wait for the
PLAY arrow to appear on the screen.
Press the” step/pause”button and the program is paused.
Press the”play”button to resume viewing the program.
Timeshift mode remains active until you press the “stop”button.
16
STOP button:
Press to stop playback.
17
AUDIO button:
Press to select an audio track on a HDD or USB file.
Page 13
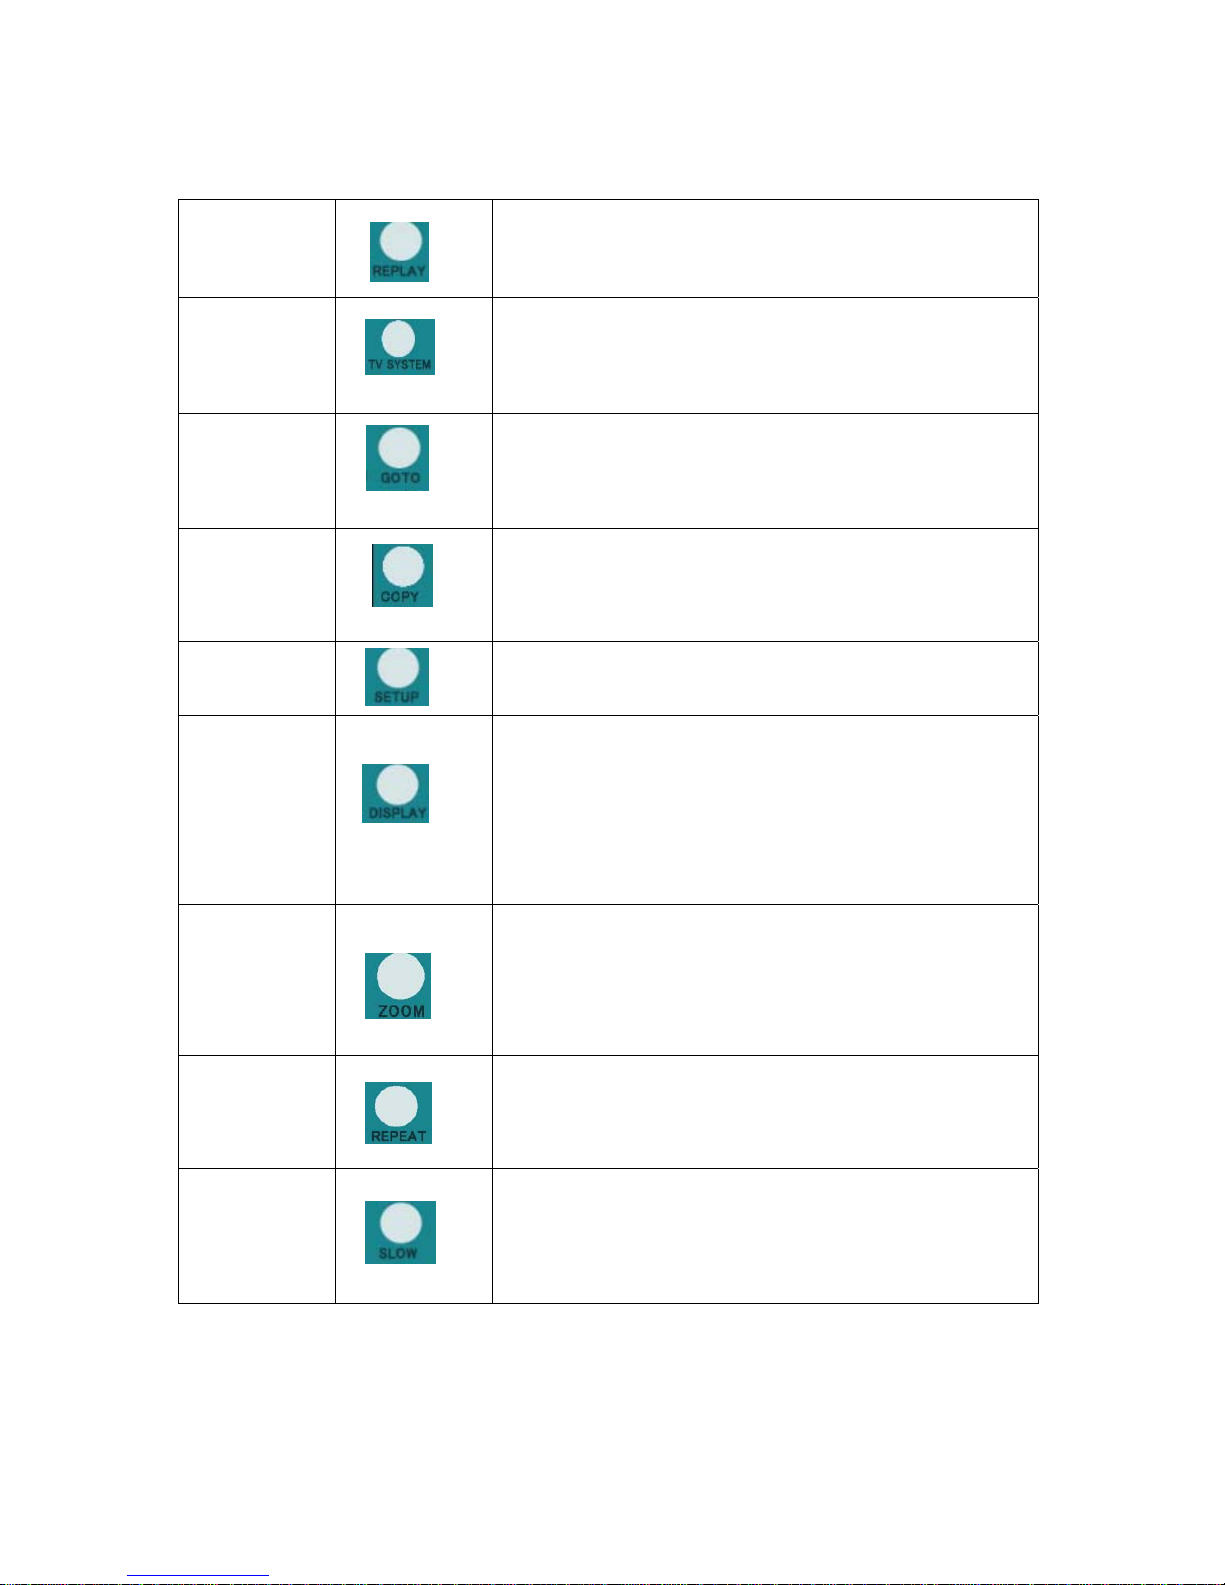
18
REPLAY button.
Press to backward 10 seconds of the current playback, which suitable for
sport program.
19
TV SYSTEM button:
Press to switch between NTSC Interlaced, NTSC Progressive,
PAL Interlaced, and PAL Progressive.
20
GOTO button:
Press to jump to a specific point on the disc or title. Specify the point using
Title, Chapter and Time.
21
COPY button:
Press to copy file from one device to other.
See
“FILE COPY MENU” on page 30 for more details.
22
SETUP button:
Press to access the Setup Menu directly to change system settings.
23
DISPLAY button:
Press to display current status.
z Press during playback and an onscreen display appears,
showing track number and time elapsed/remaining.
z Press during recording and an onscreen display appears,
showing the recording quality setting and time elapsed.
24
ZOOM button:
Press to zoom in/out when playing back photos or Video programs.
Photo zoom levels:2X,4X,8X,16X;
Video zoom levels:2X,3X,4X,8X.
25
REPEAT buttons:
Press REPEAT 1 / ALL to set repeat option - Chapter, Title or Off.
26
SLOW MOTION button:
Press to play back in slow motion. Three motion settings are available.
Five slow motion levels(3/4,1/2,1/4,1/8,1/16x) are available.
Press
the “play” button to resume regular playback.
Page 14
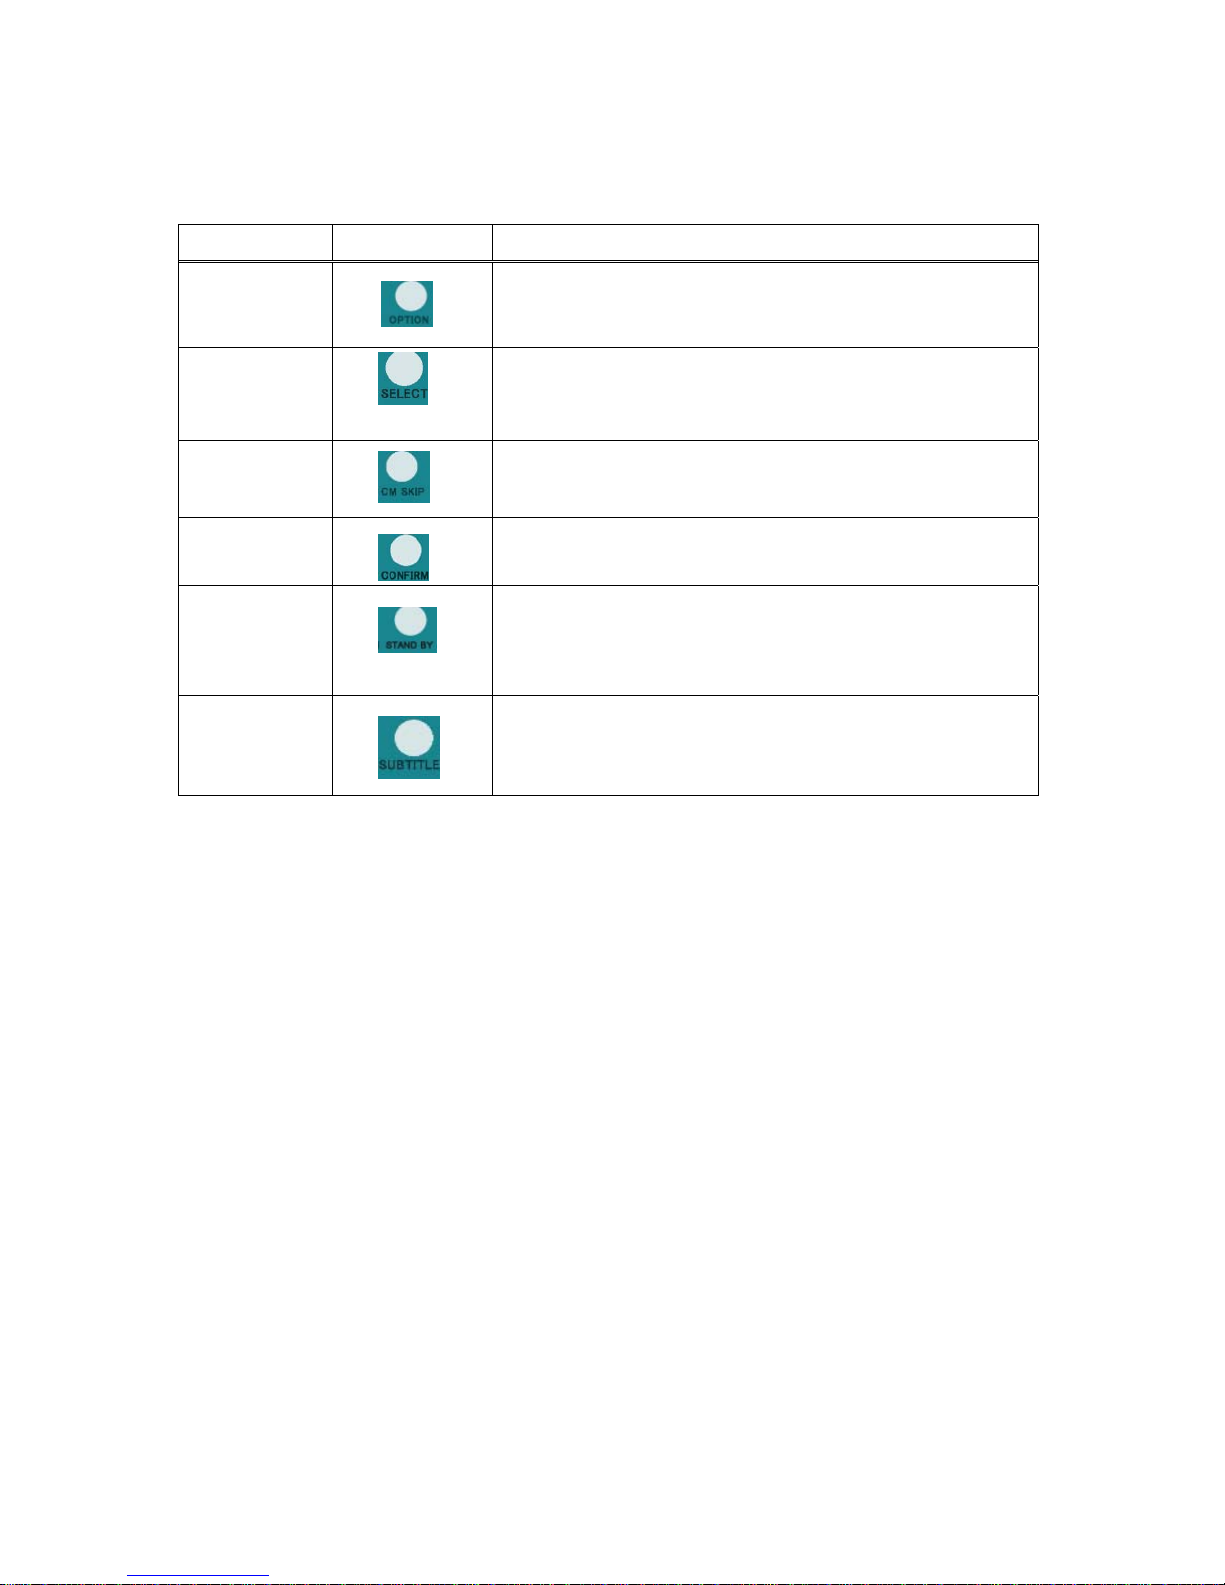
No. Button Function
27
OPTION button:
Press to select option bar.
28
SELECT buttons:
Press to select file or folder to rename or delete.
29
CM SKIP button:
Press to advance 30 seconds when in playback or record mode.
30
CONFIRM button:
Press to select confirm.
31
STAND BY
Press to stand by mode or power off waiting 5 seconds as correctly
32
SUBTITLE button:
Press to activate available subtitles when play the DIVX file.
DivX subtitle supported: SRT,SMI,SUB,SSA format file.
Page 15
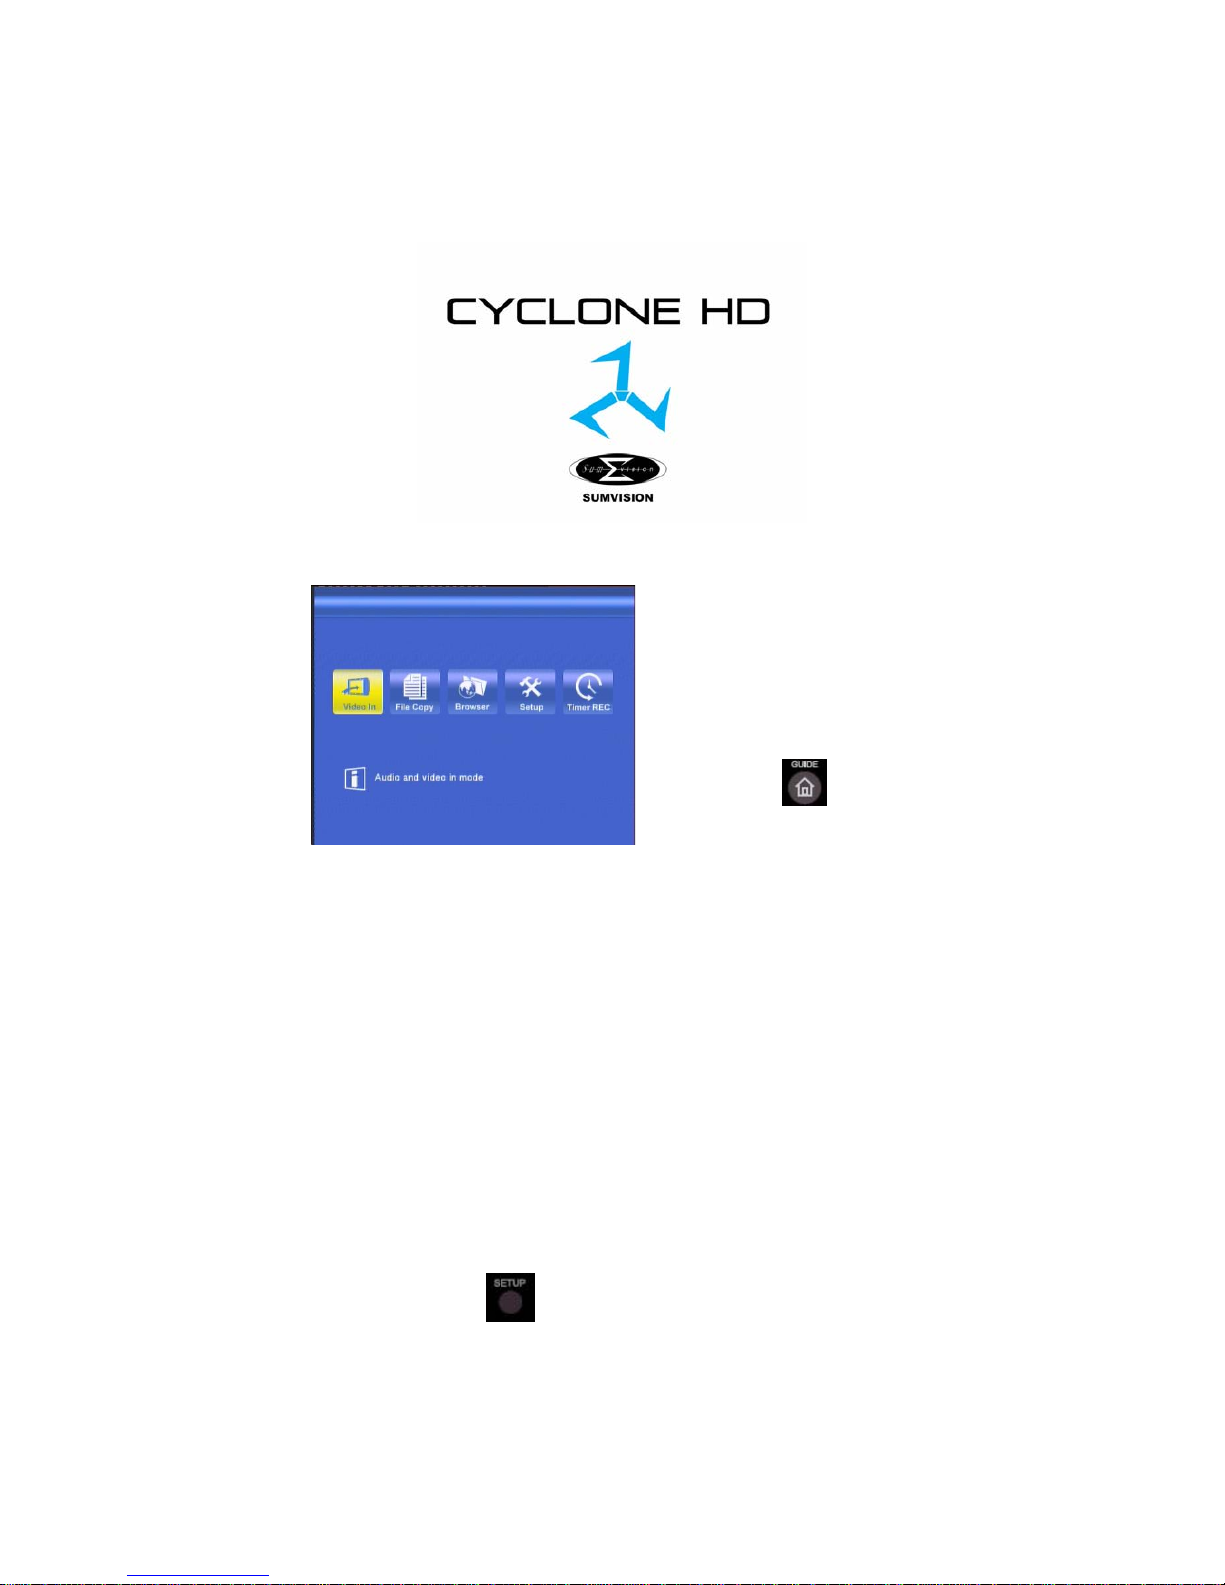
Power on the MK-AVHDD system, you can see the star up page.
After a few second, the system will enter a guide menu. To enter this menu, press on the remote control too.
Selecting Video In
To select the a input source, select Video In button on the guide menu page.
Selecting file Copy
A clip recorded in HDD or USB disc is called a Title.
Select Browser button on the guide menu page to browser the file which under the “My Recording”
folder.
Selecting Browser
Select Browser button on the guide menu page to browser movie, photo, music files stored either on
a HDD, USB, Card Reader, NET or a USB device.
Selecting Setup
To enter the setup menu, select
on the remote control or select Setup button on the guide
menu page.
Page 16

Selecting Time REC
To enter the Time REC setup page, select on the remote control or select Timer REC button
on the guide menu page.
Page 17
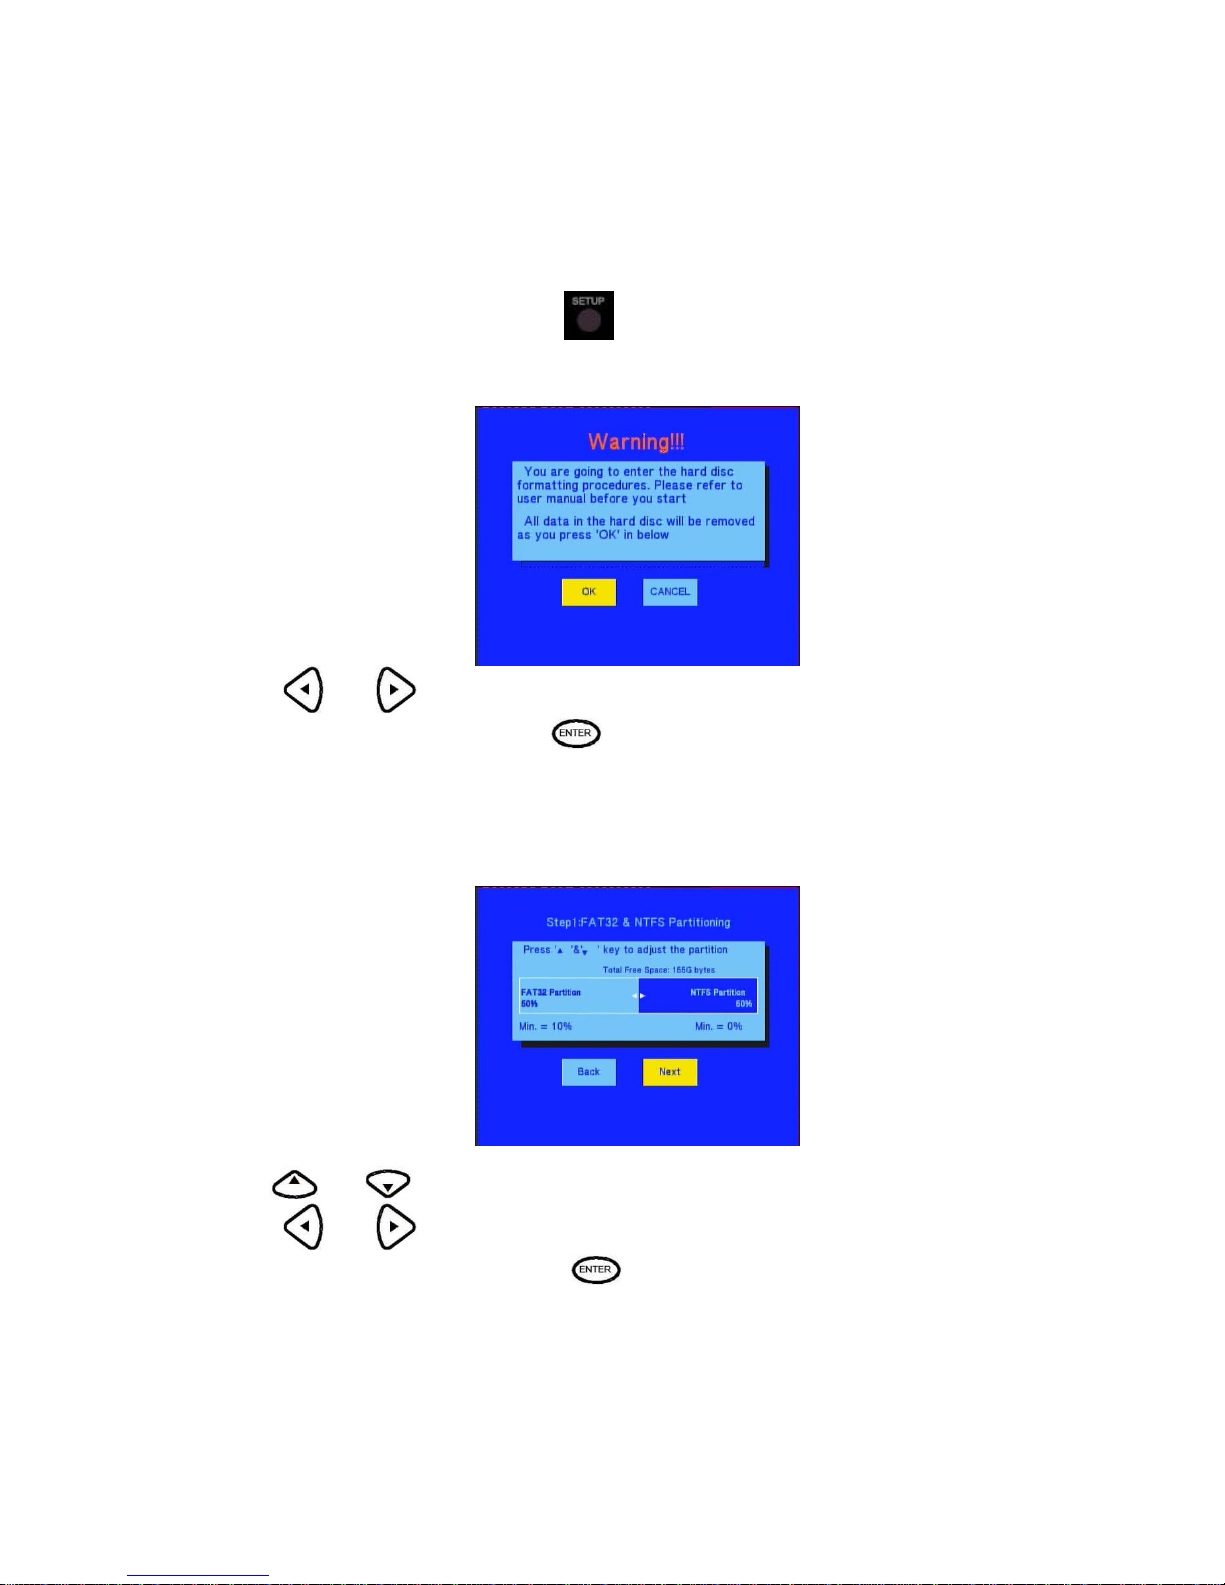
Format Hard disc
When you insert a Hard disc on the system at the first time, System will remain you to enter the Hard
disc format interface. You can also press
into Setup menu and select HDD Format to Format
HDD.
First, the system will jump a warning page.
Press and on the remote control to select you wish.
When highlight move the OK button, Press to enter the next step. Otherwise, select cancel to return.
The first step
Step 1: FAT32 & NTFS Partitioning
Please according the screen remain to adjust the capacity.
Use and to adjust the Fat32 and NTFS partition.
Press
and on the remote control to select back or next.
When highlight move t he Next button, Press
to enter the next step. Otherwise, select back button to
return.
Page 18
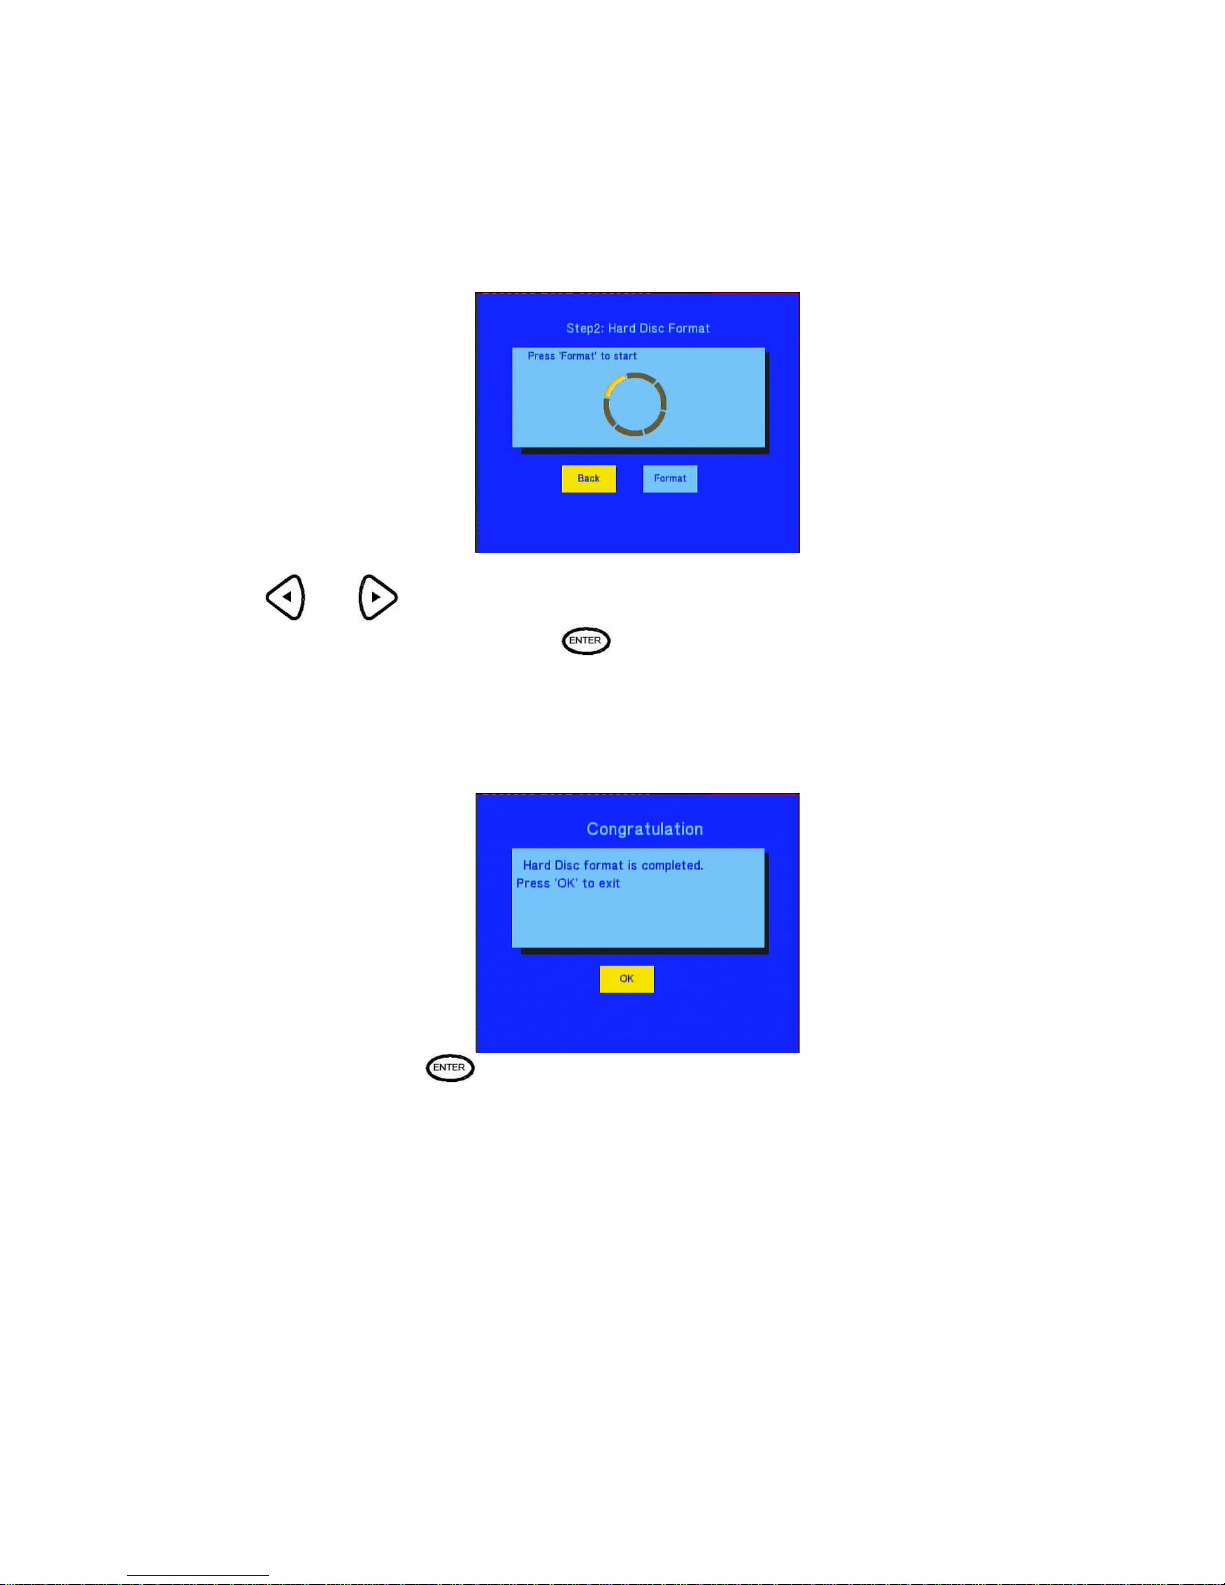
The second step
Step 2: Hard disk format
Press and on the remote control to select back or format.
When highlight move the Format button, Press
to start. Otherwise, select back button to back.
Congratulation page
When complete the format, the system will display the congratulation page.
Select OK button a nd Press to exit.
When you preparing to format hard drive please consider the file format you planning to used.
FAT 32 is READ and WRITE partition. Data recorded and transfer by network can only be store on
the fat32 partition. ”Please note you can transfer data on the FAT32 by USB too”.
NTFS is READ only partition .Cannot record or transfer data by network ont o N TFS partitio n. “Pleas e
note to transfer data on to NTFS partition is done only by USB and NTFS can support media file over 4GB
which FAT32 cannot”.
Page 19
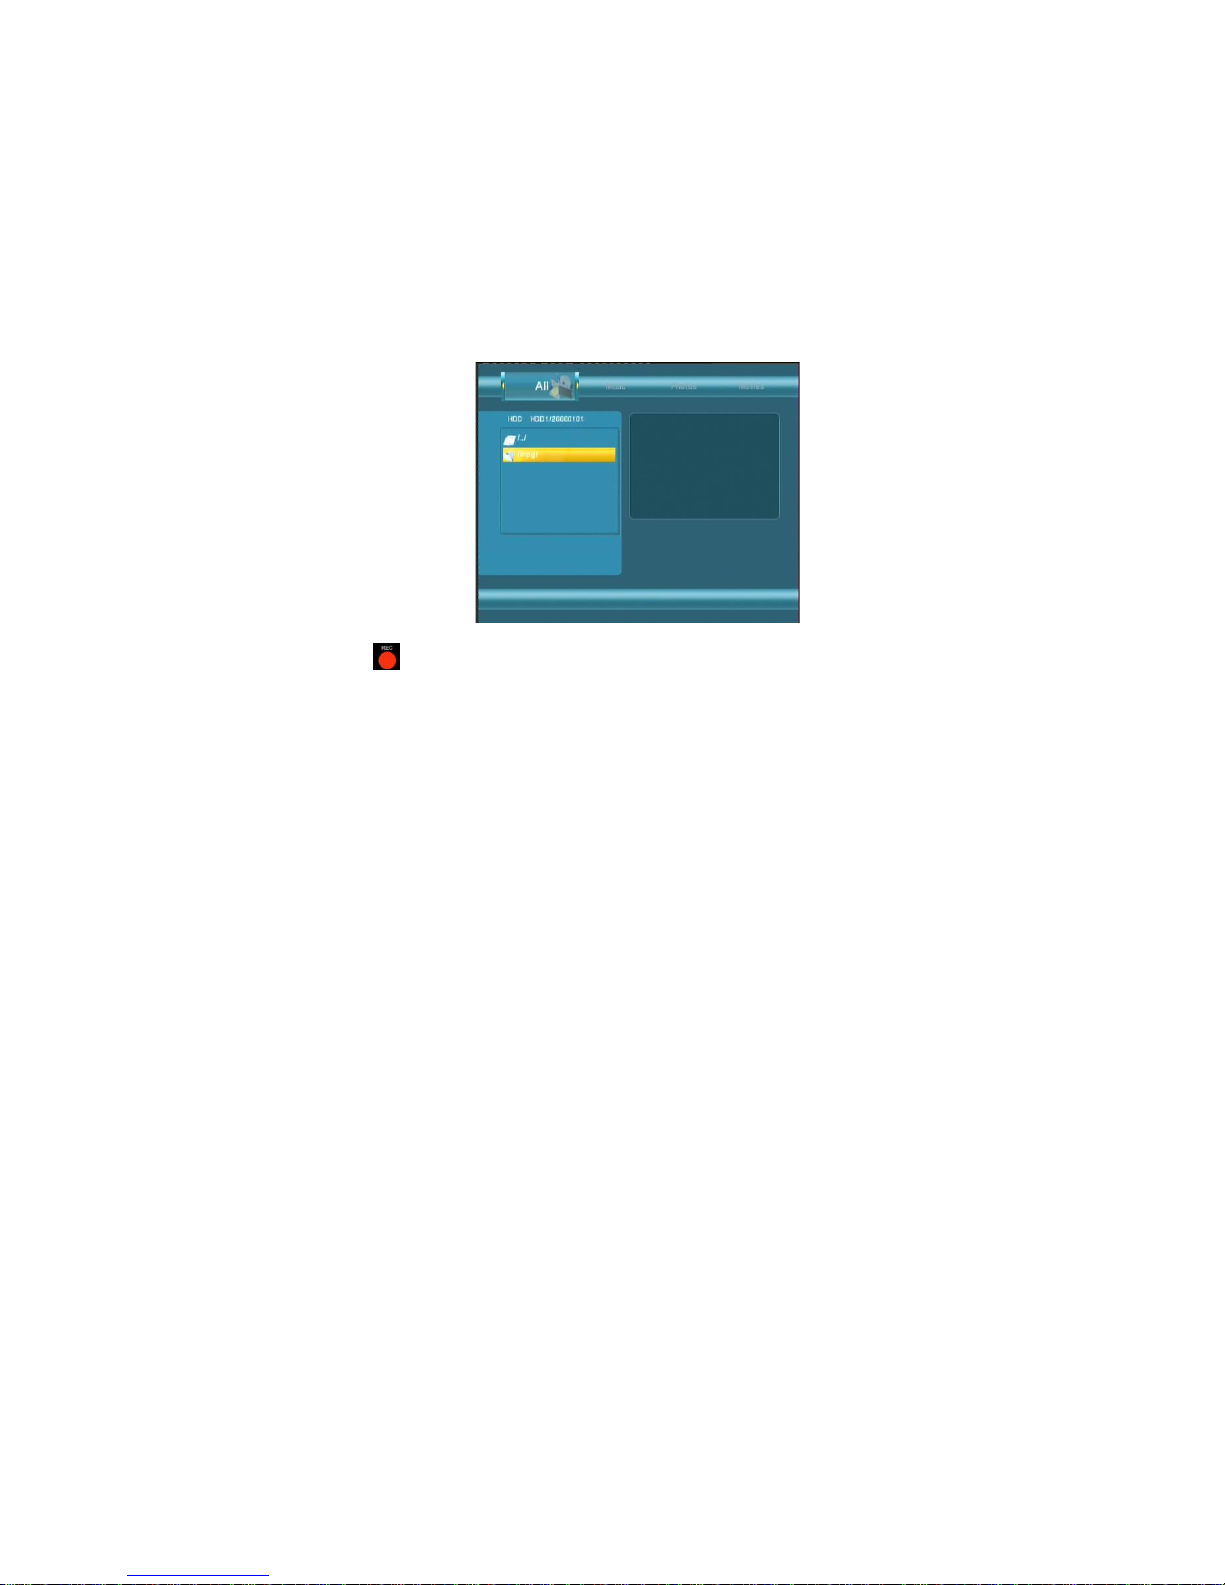
The REC List
The REC List menu allows you to play all saved titles.
REC List Menu
When you press
to begin recode. System will make a “My Recordings” folder at “HDD1” or USB
device automatically for the first time. And your recode movie file will be saved at this folder. The file
name will be rename according system time. The format of recording file is .mpg .
Page 20
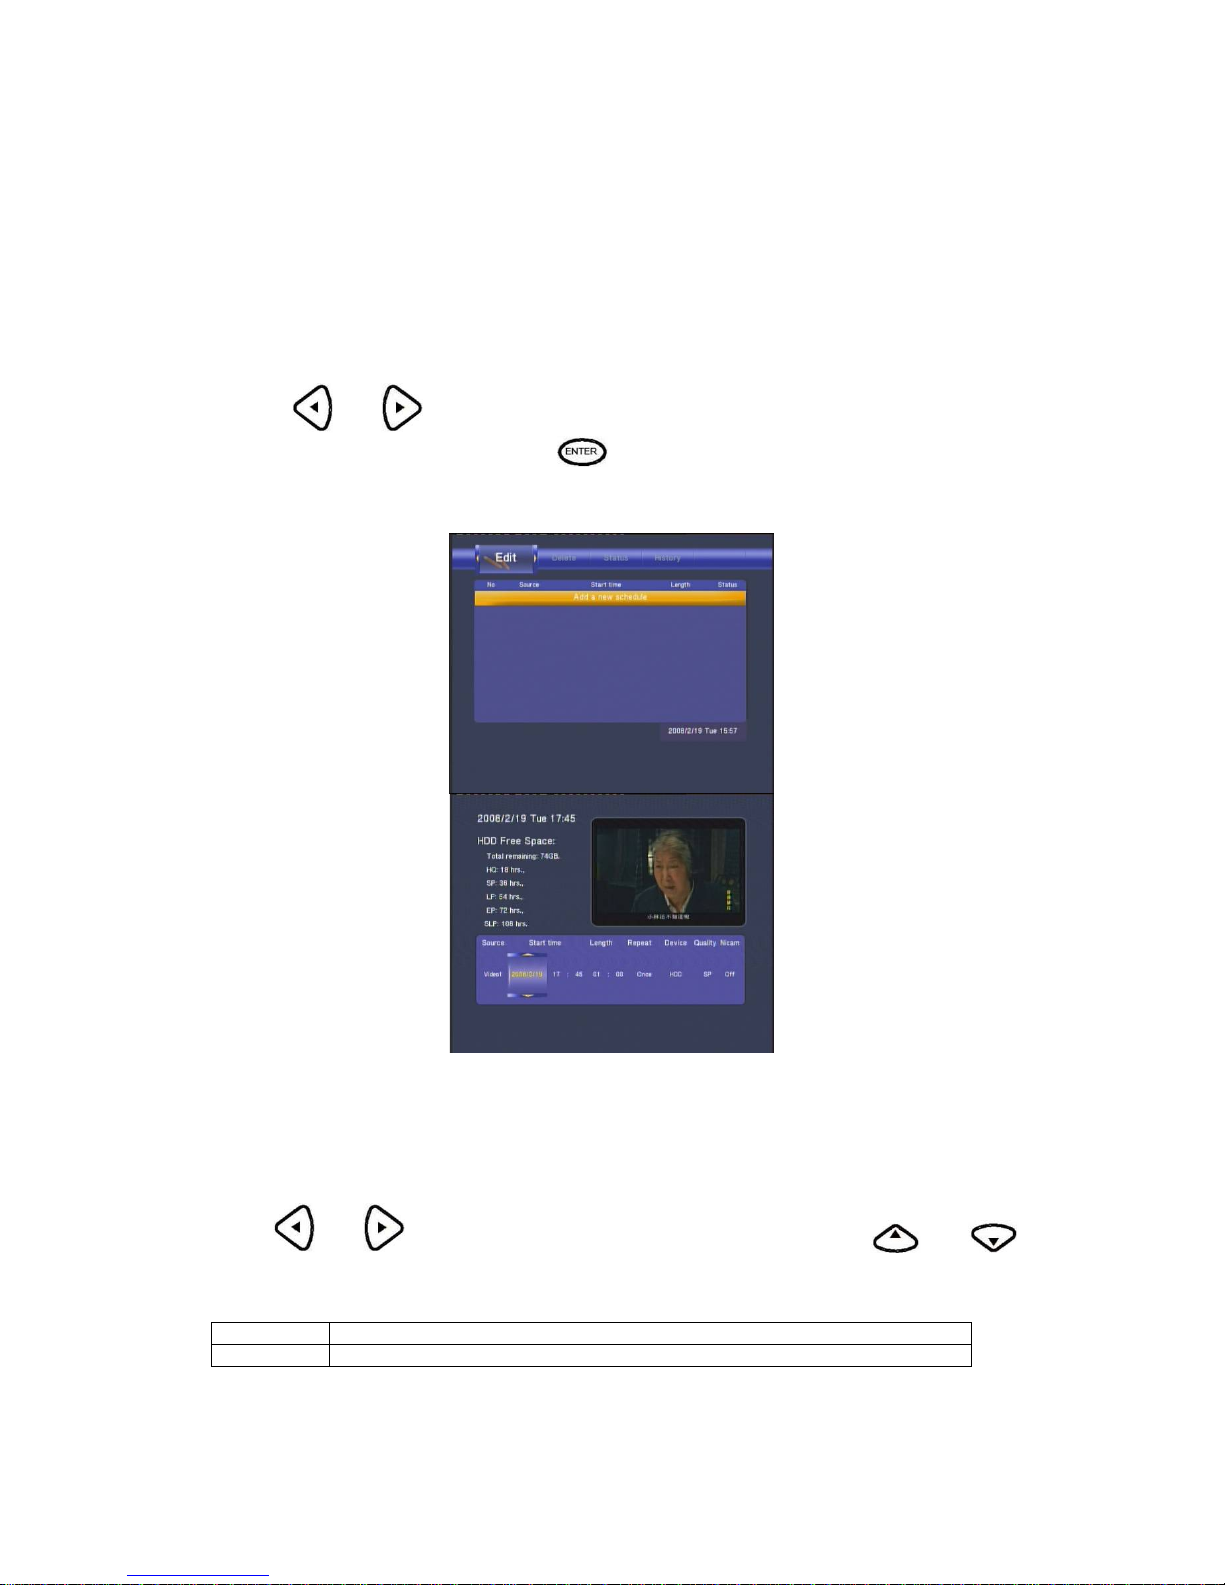
Timer Record Menu
The Timer Record menu allows you to create, edit and delete recording schedules and view all
schedule status and history. To enter the menu, select Timer Record from the Guide menu .
Creating a New Schedule
Press
and on the remote control to select the Edit tab from the menu bar.
Select Add a New Schedule and press
. The schedule setting screen appears.
Use and on the remote control to move betw een fields and Pr ess and to
adjust each setting.
Start Time
Enter the date and time of the recording.
Length
Enter the length of the recording
Page 21
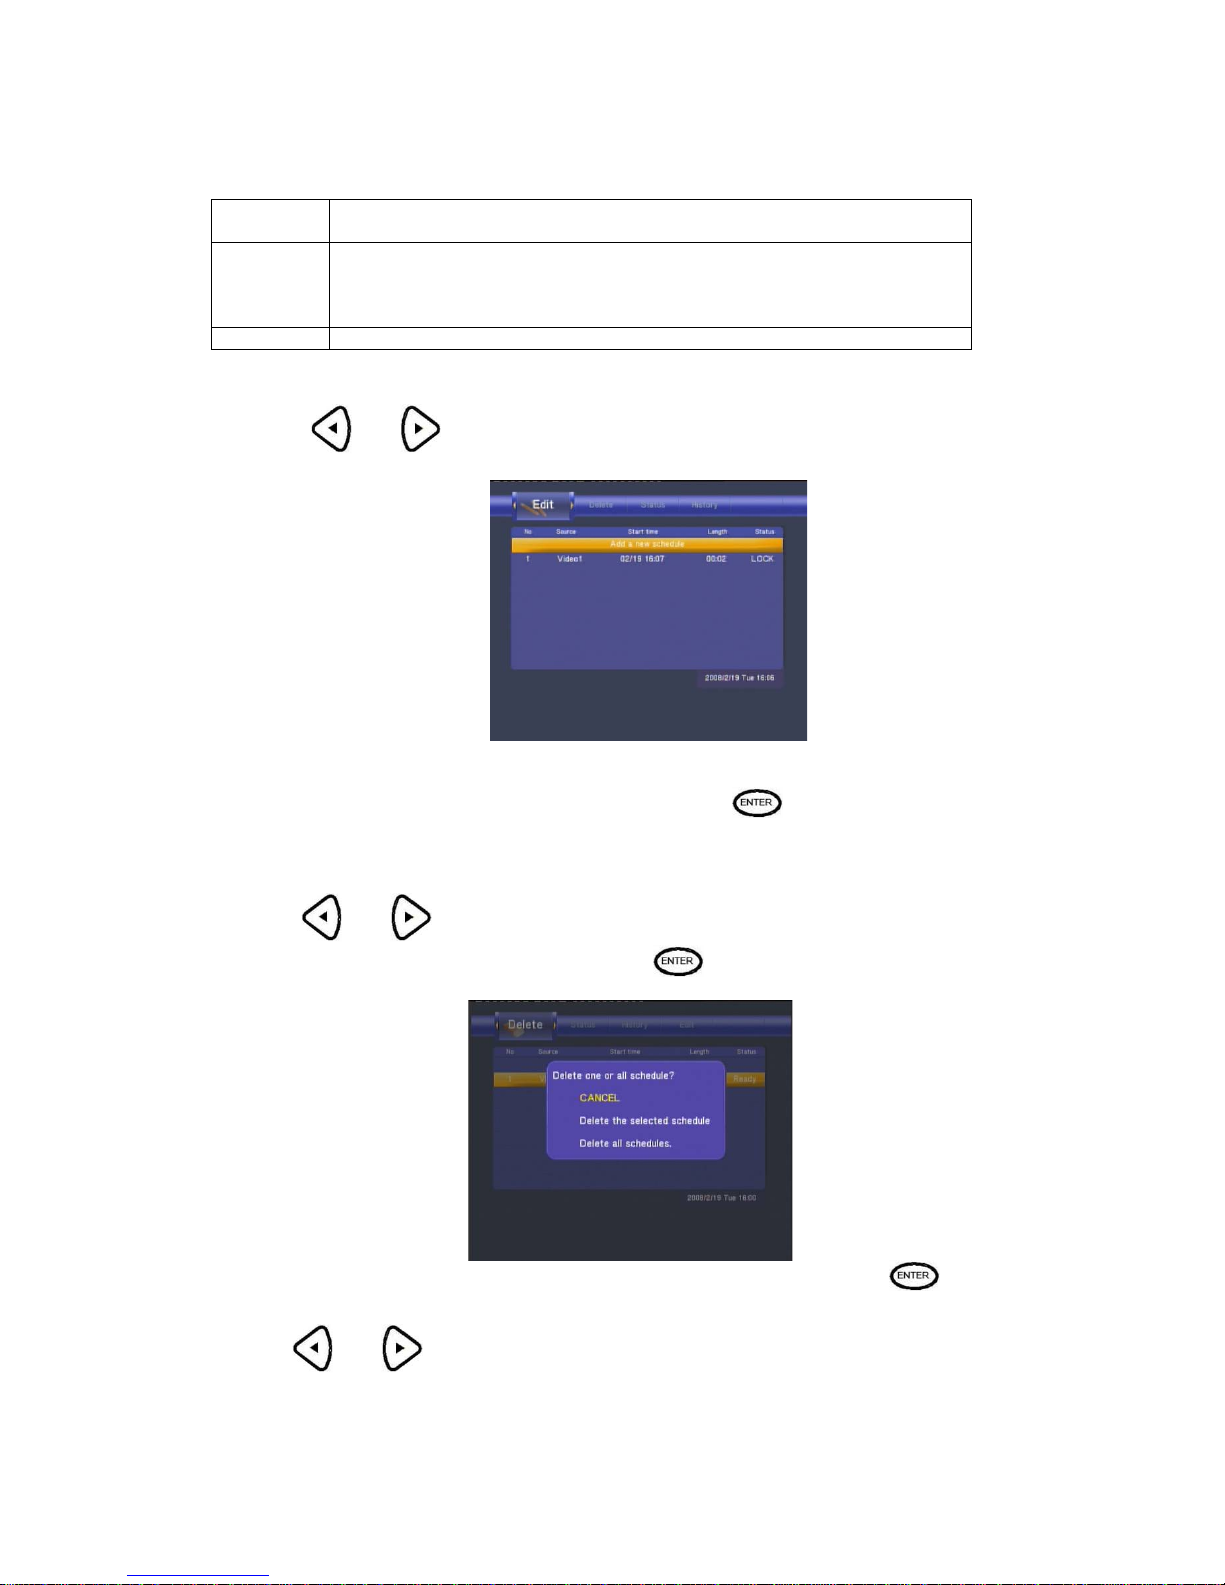
Repeat
Select how often you want the schedule to record. Choose from
Once, Everyday, Mon-Fri, Mon-Sat or for an individual day of the week.
Quality
Select the recording quality. Choose from HQ, SLP, EP, LP and SP.
The higher the quality, the more space required on the hard drive. See
HDD/USB Free Space on the left of the screen for details of how long you can
record for using each setting.
Preview
This small preview window will show the current program of the select channel.
Editing Schedules
Press and on the remote control to select the Edit tab from the menu bar.
Select the schedule you want to edit from the list and press
. The schedule setting screen
appears. Modify the schedule as described in “Creating a New Schedule” on page 10.
Deleting Schedules
Press and on the remote control to select the Delete tab from the menu bar.
Select the schedule you want to delete and press
. A confirmation message appears.
Select CANCEL, Delete the selected schedule or Delete all schedules. Press
to confirm.
Viewing Schedule Status Viewing Schedule Status
Press and on the remote control to select the Schedule tab from the menu bar.
Page 22
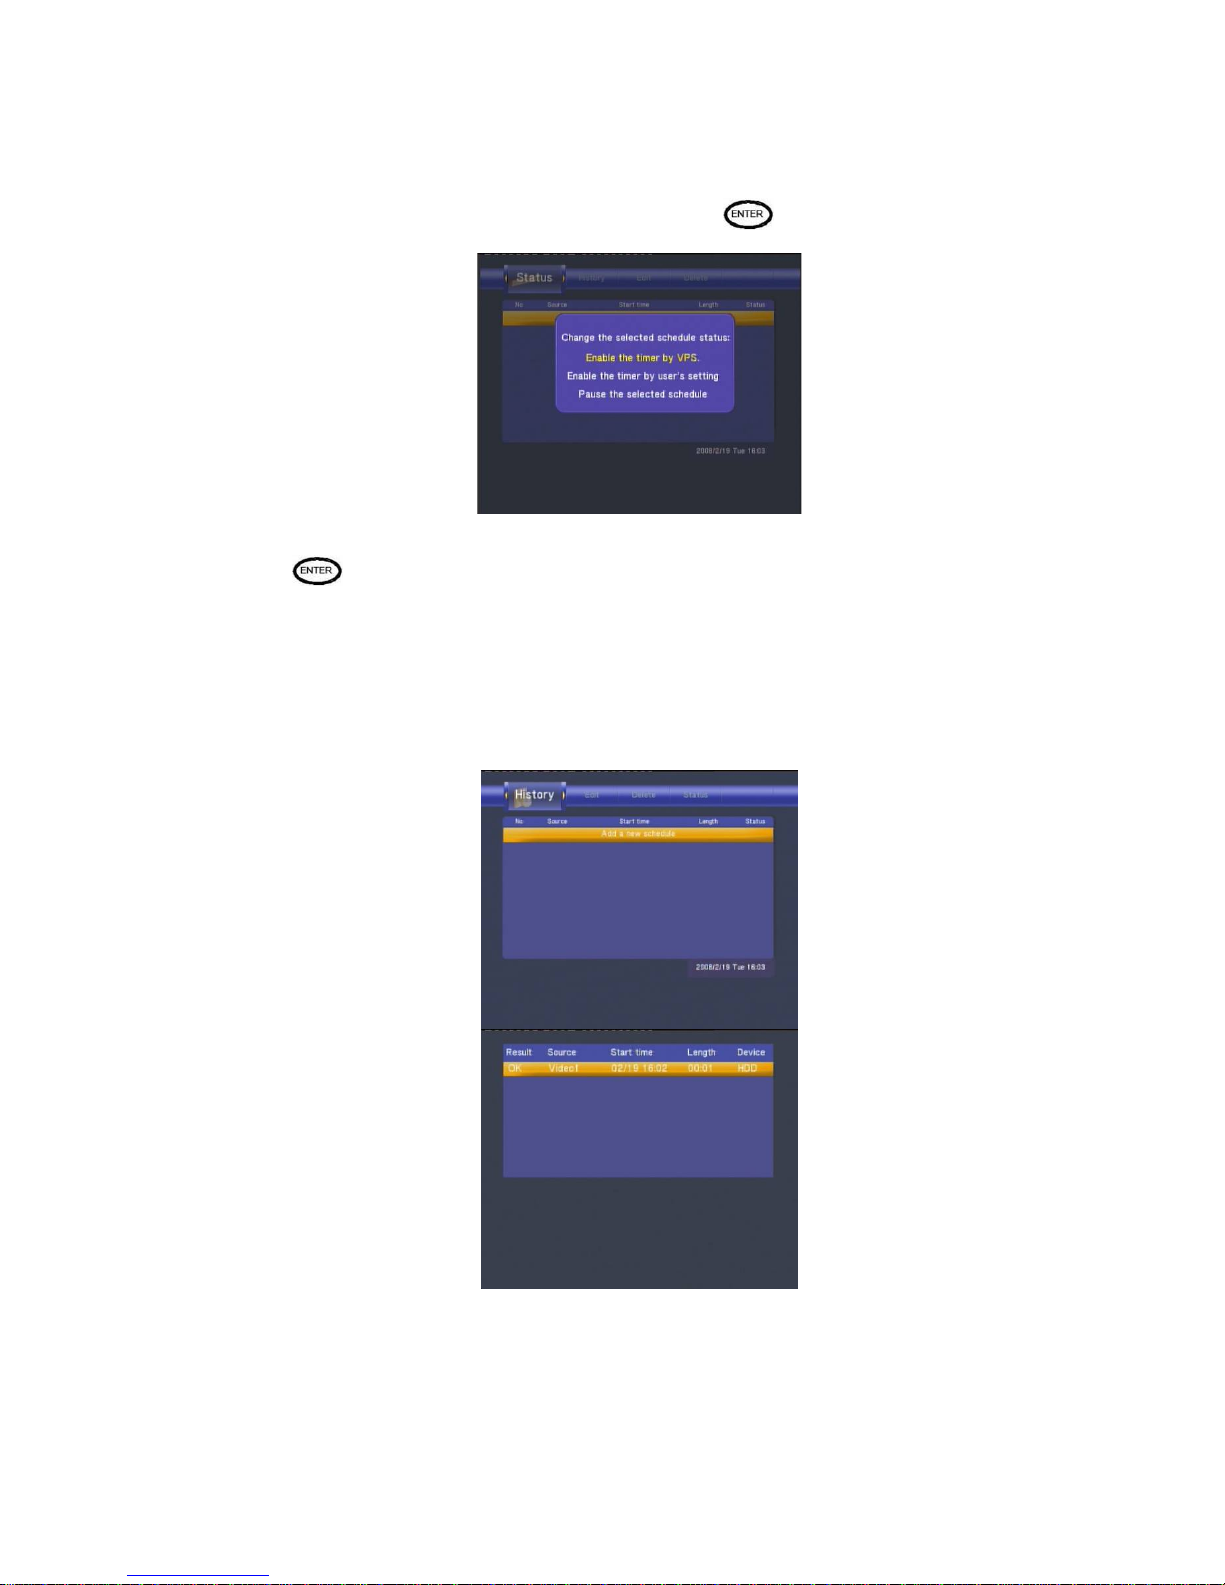
The schedule list is displayed. Select a schedule and press .
Select Enable VPS, Disable VPS or Pause the selected schedule.
Press
to confirm.
Viewing Recording History
Press the left and right navigation arrows on the remote control to select the History tab from the
menu bar.
Here you can view a complete history of all recordings that were set.
Page 23
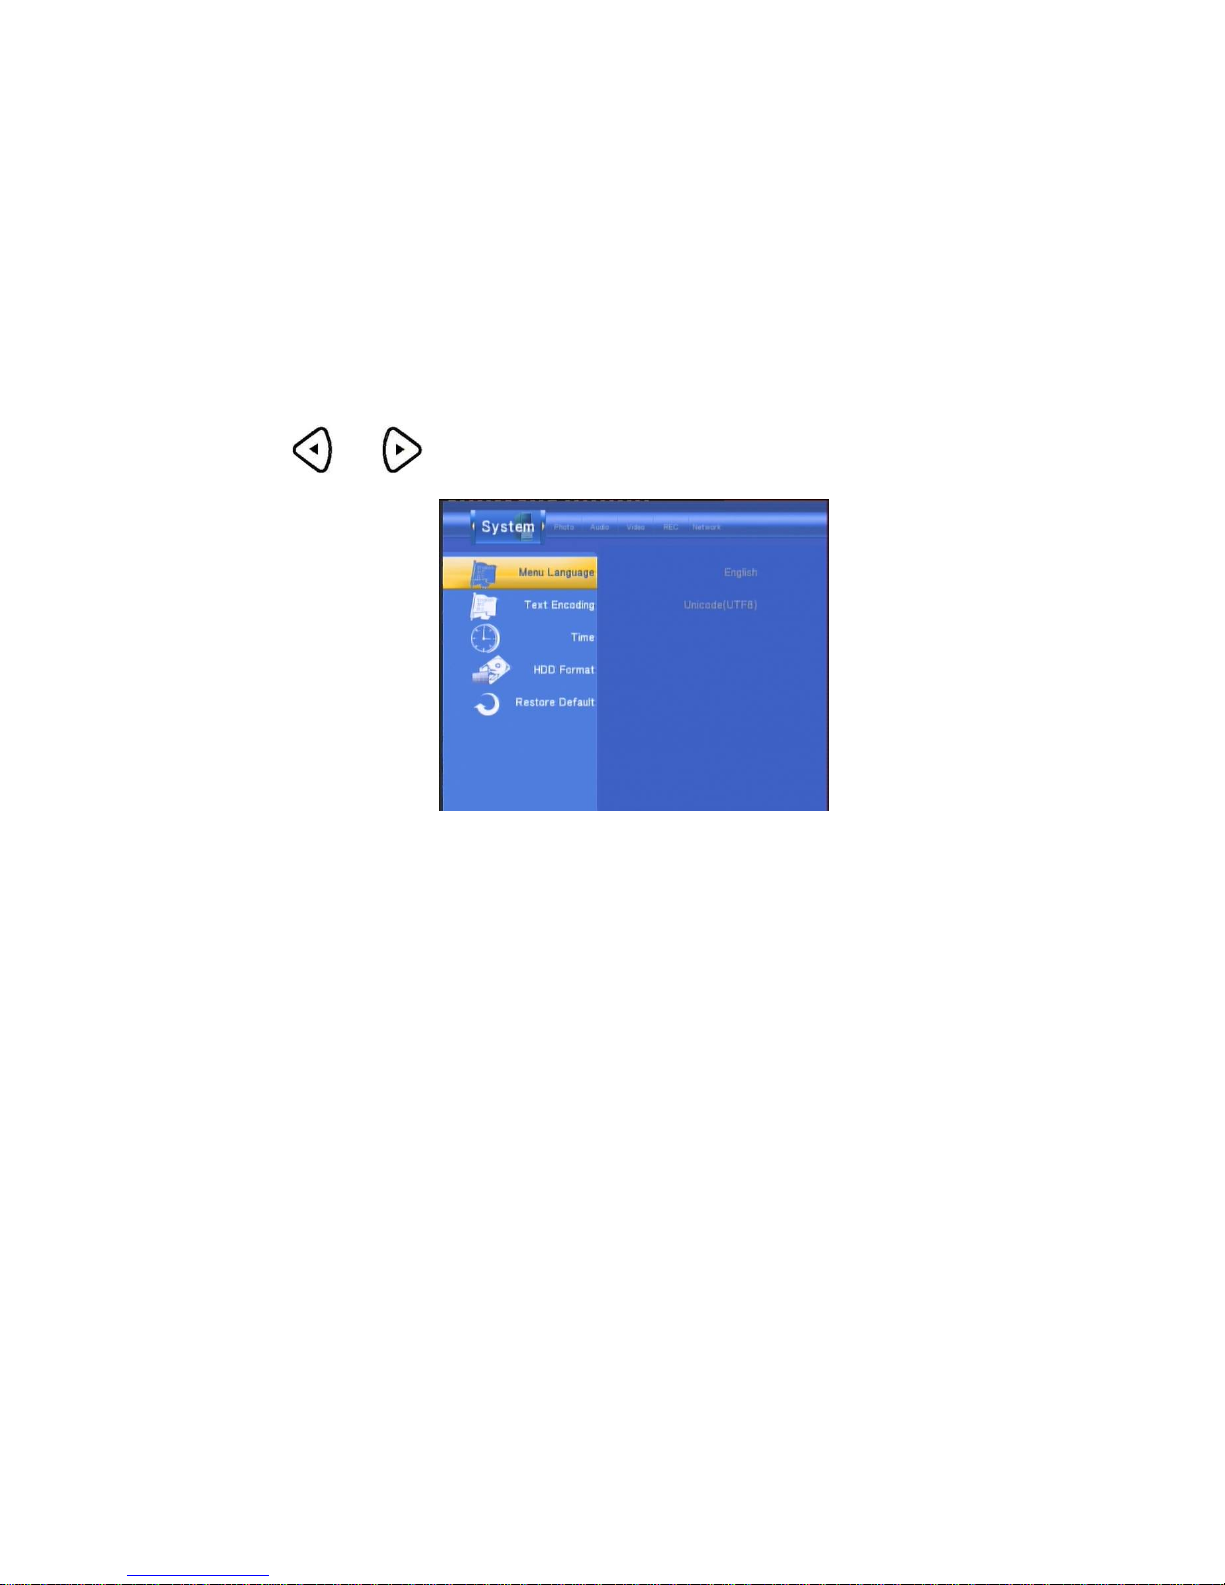
Setup Menu
The Setup Menu allows you to configure video, record and system settings.
To enter the menu, select Setup from the Guide menu.
Changing System Settings
Press and on the remote control to select the System tab from the menu.
Page 24
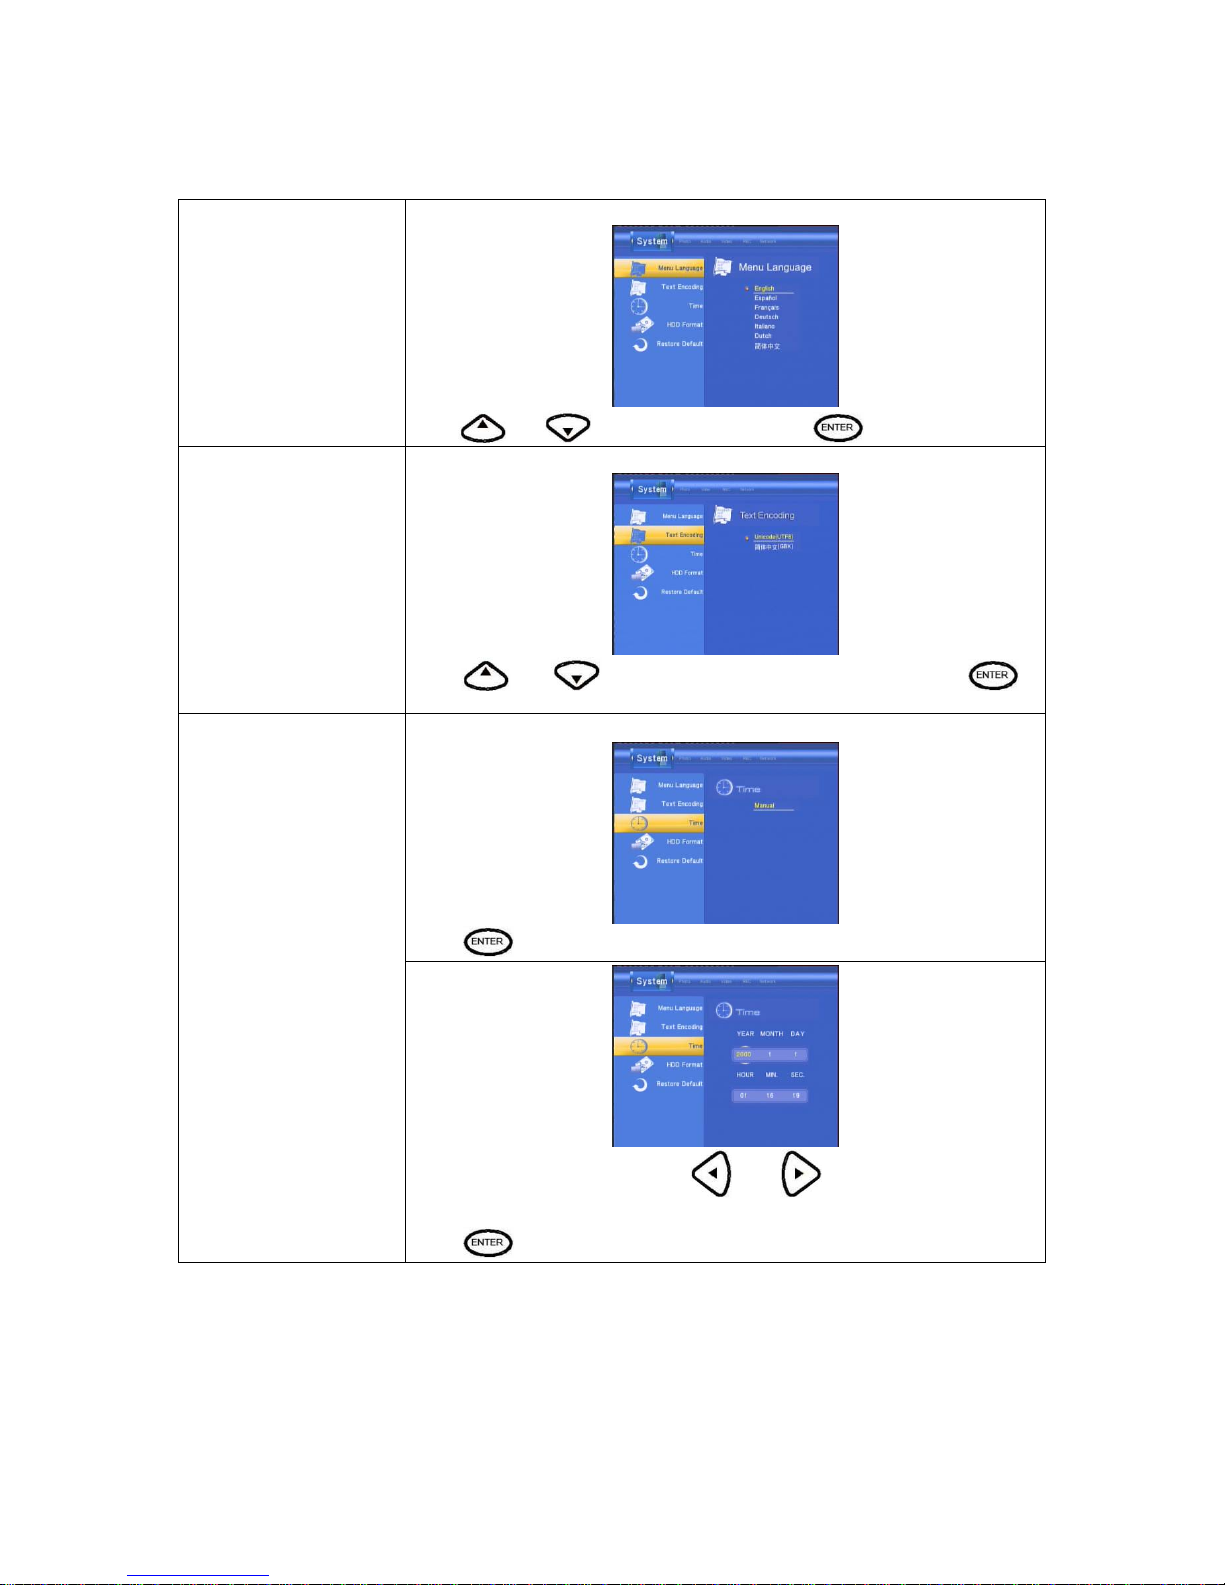
Menu Language
Select to choose the OSD (On Screen Display) language.
Press
and to select the language. Press to confirm.
Text Encoding
Select to choose the text encoding language.
Press
and to select the text encoding language. Press to
confirm.
Select to set the system time.
Press
and enter Manual setup.
Time
Enter the system menu and press
and to select each field and
the up and down navigation arrows to adjust each setting.
Press
to confirm.
Page 25
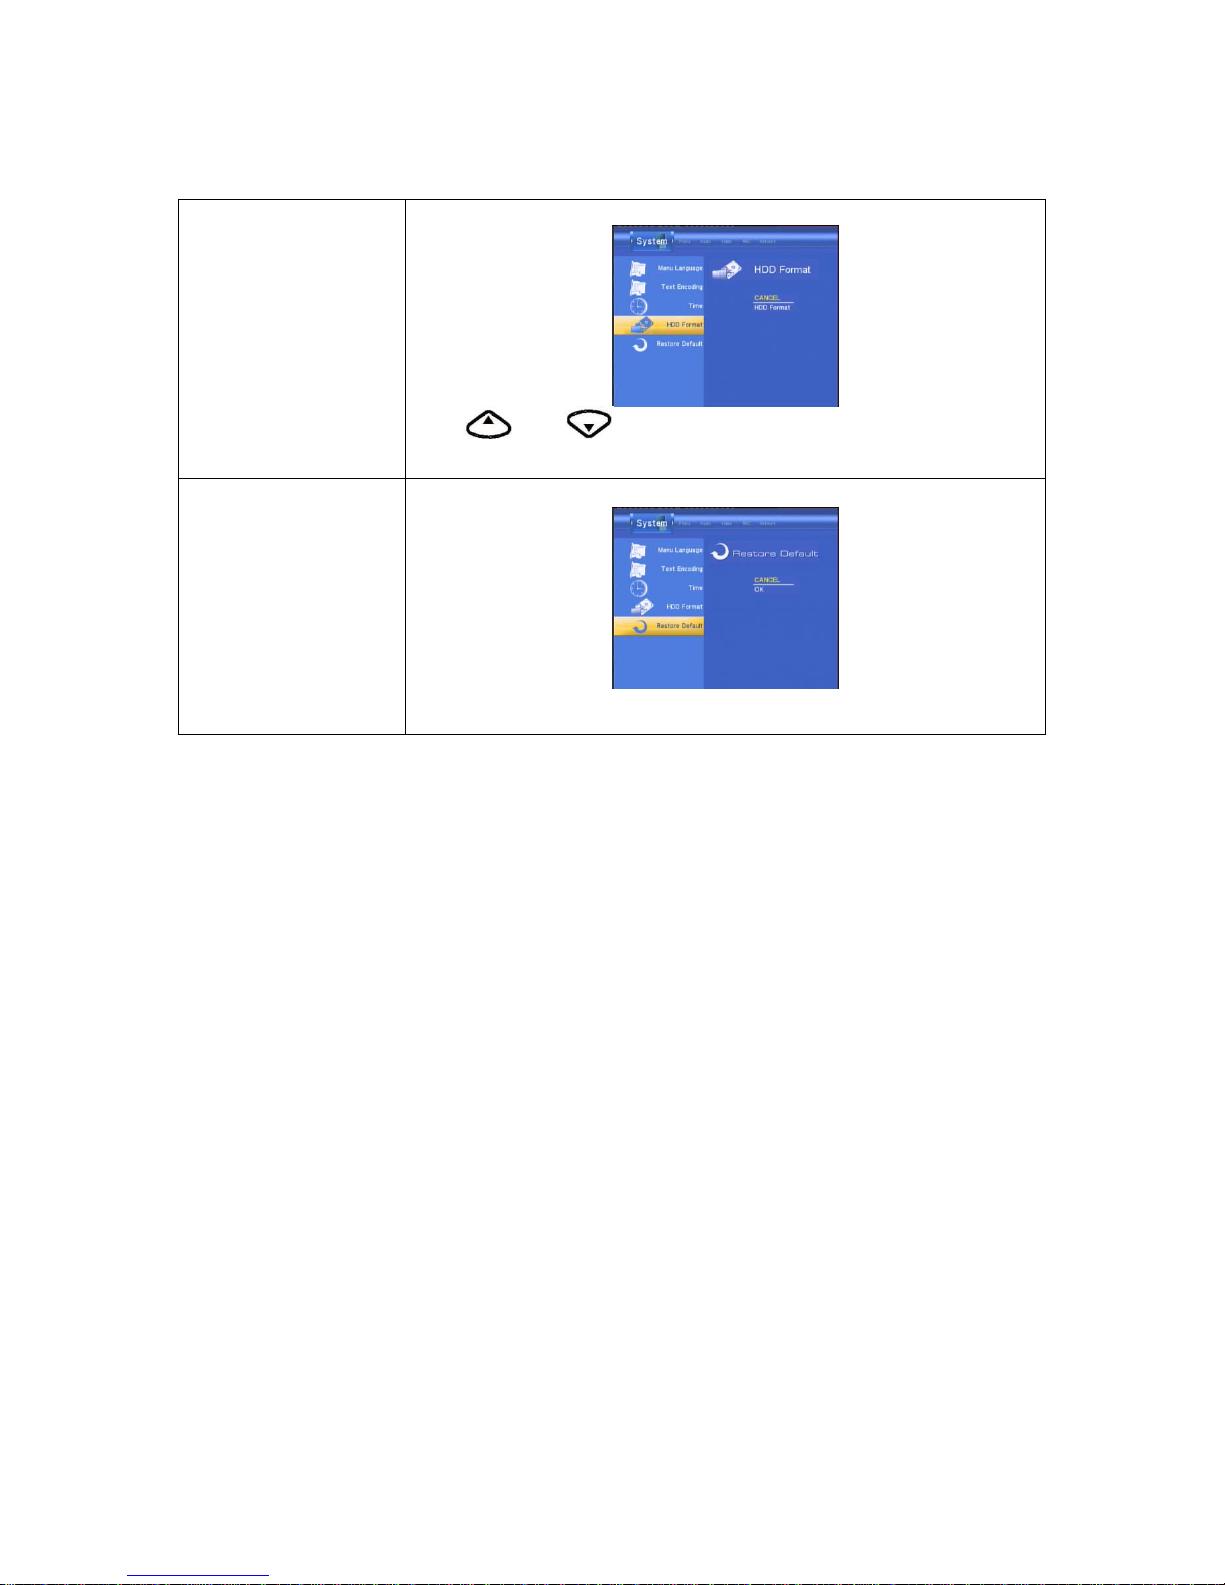
HDD Format
Select to HDD Format.
Press and button on the remote control to select Cancel or
CONFIRM from the menu.
Restore Default
Select to restore factory defaults.
A confirmation message appears. Select CONFIRM and press RETURN to
restore all settings to defaults.
Note:
If you open “system” menu of setup is not operation, please you open the TIMER REC from
main menu and you need not any setup, then close it and return to setup menu.
Page 26
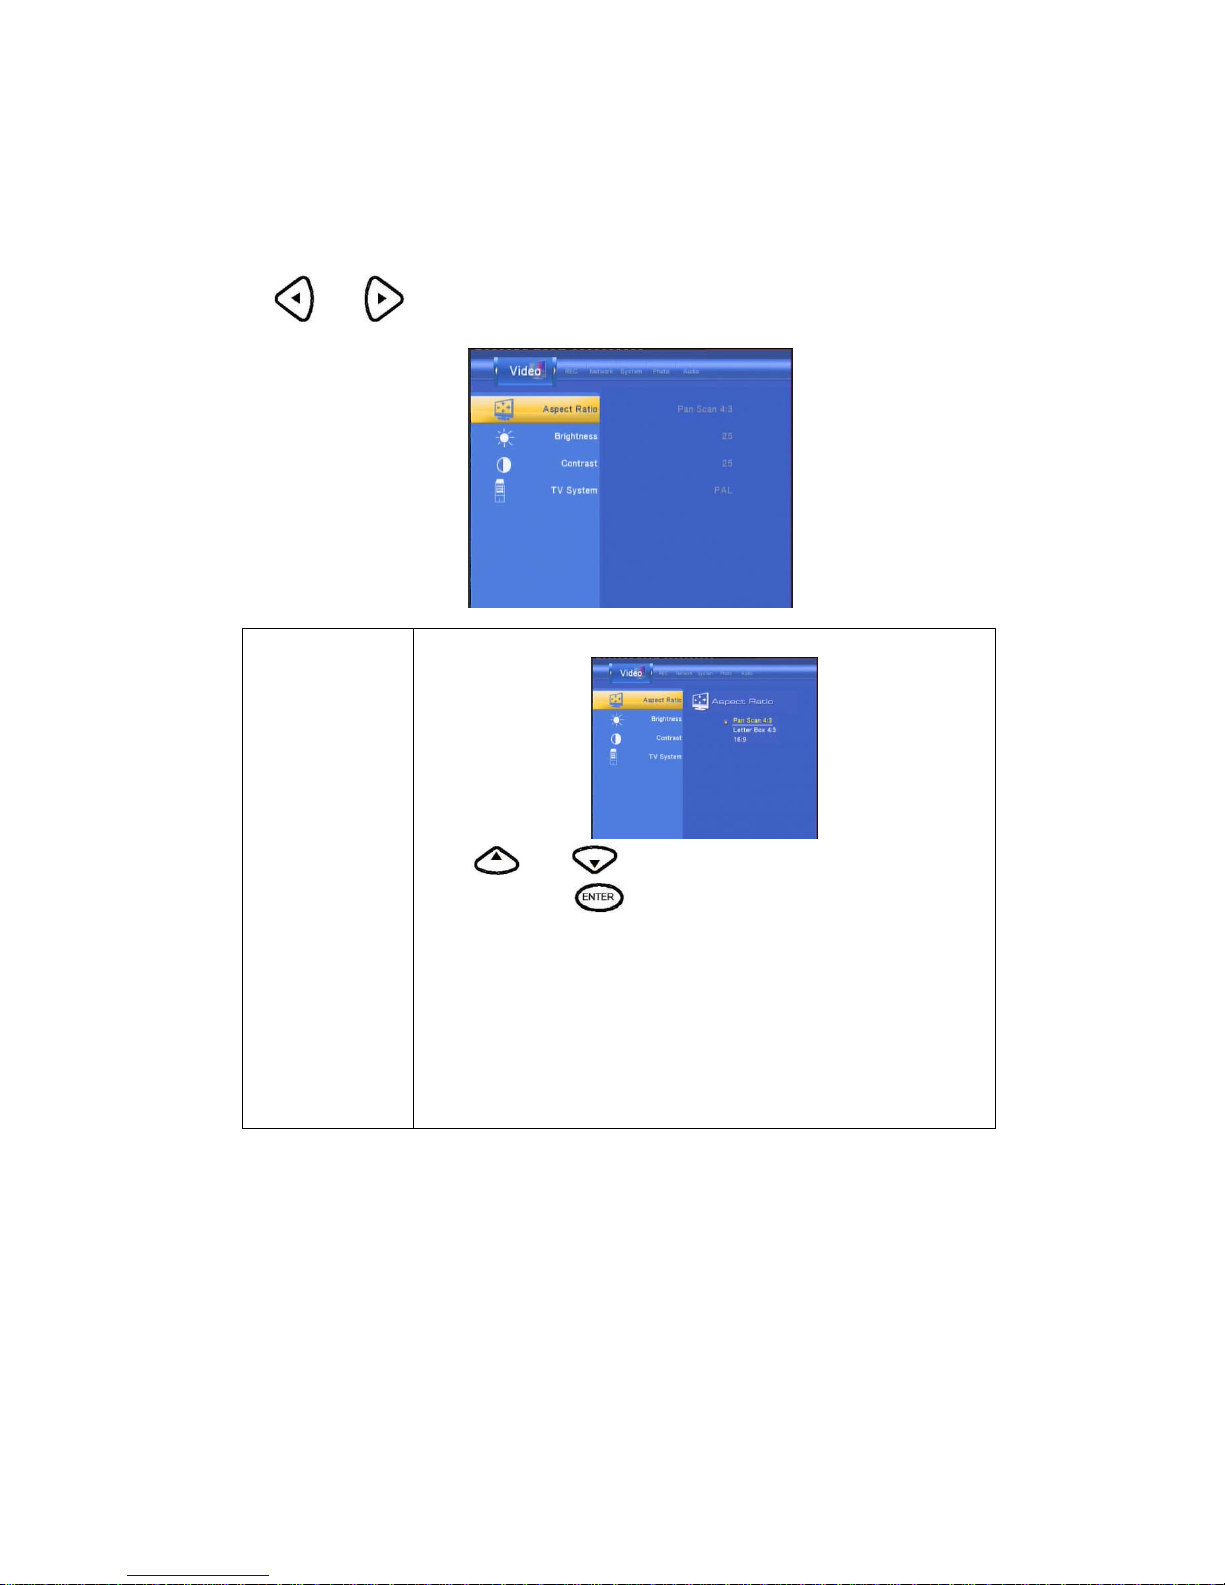
Changing Video Settings
Press and on the remote control to select the Video tab from the menu bar.
Aspect Ratio
Select to set aspect ratio.
Press
and to select from Pan Scan 4:3, Letter Box
4:3, or 16:9. Press
to confirm.
Pan Scan 4:3: Display a wide picture on the entire screen and cuts off
the redundant portions. Select whe n a standa rd 4:3 T V is conn ec ted.
Letter Box 4:3: Display a wide picture with two bla ck borders on the t op
and bottom of 4:3 screen Select when a standard 4:3 TV is connected.
16:9: Compress the image to convert the whole image. Select when a
16:9 TV is connected.
Page 27
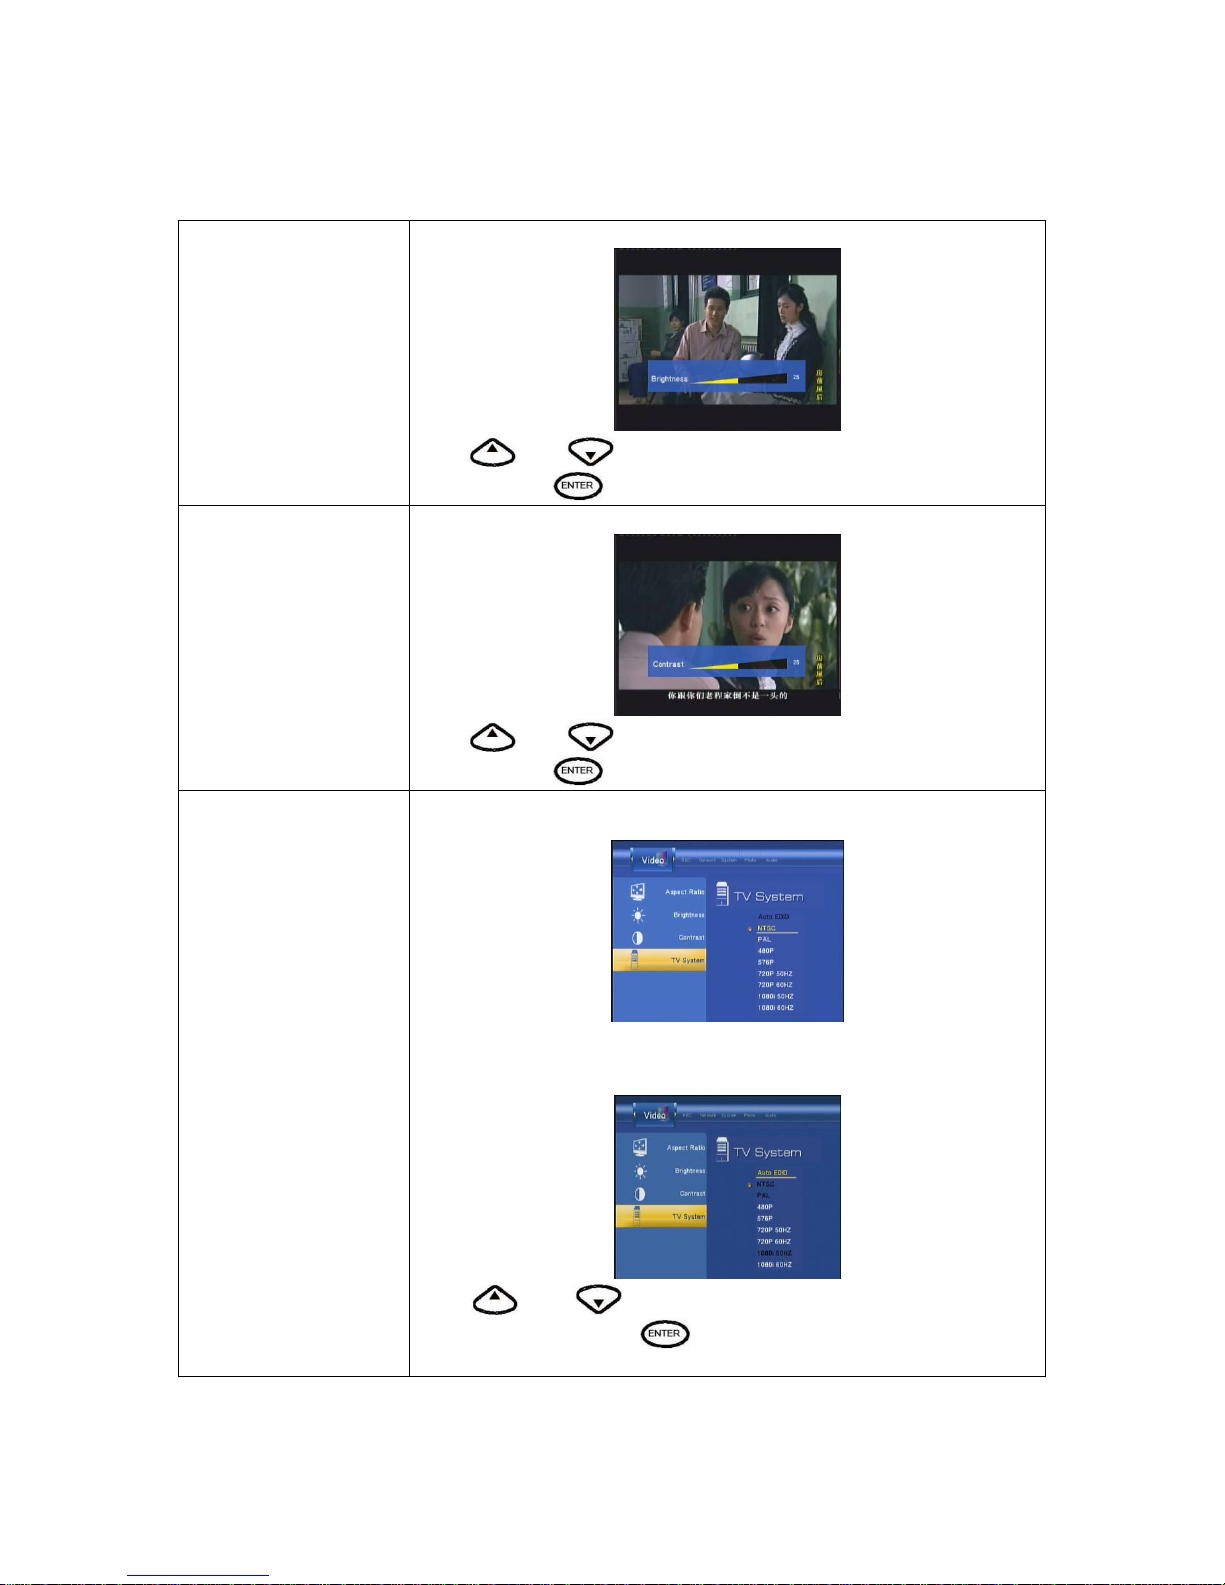
Brightness
Select to set brightness levels.
Press
and to adjust brightness. The new setting is previewed
onscreen. Press
to confirm.
Contrast
Select to set contrast levels.
Press
and to adjust contrast. The new setting is previewed
onscreen. Press
to confirm.
TV System
Select to adjust TV system.
When insert HDMI TV, TV System only choose Auto EDID,480P,576P,720P
50HZ,720P 60HZ,1080i 60HZ.
Press
and to set the HD Resolution, depending on your
viewing preferences. Press
to confirm.
Page 28
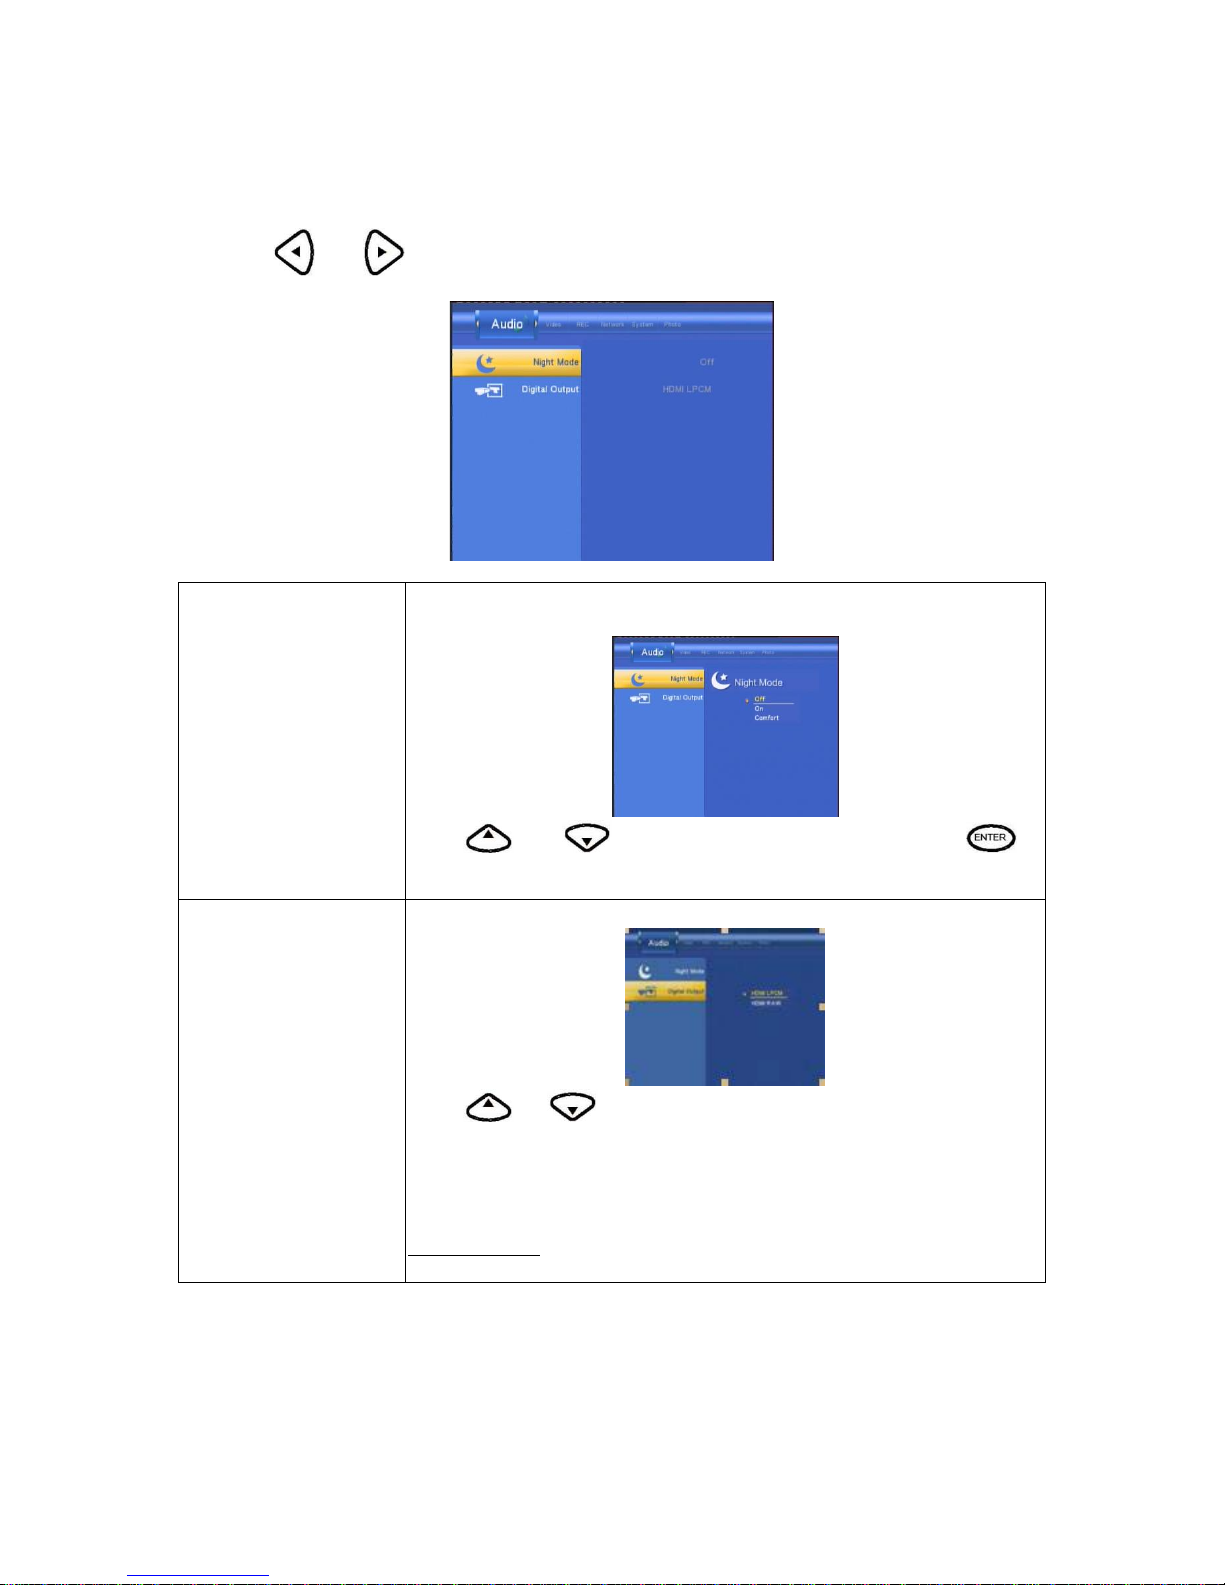
Changing Audio Settings
Press
and on the remote control to select the Audio tab from the menu bar.
Night Mode
Select to toggle Night Mode on and off.
This function reduces the maximum dynamic audio rang e.
Press
and to to enable or disable the function. Press to
confirm.
Digital Output
Select to set Digital output type.
Press
or to select from HDMI (Sony/Phillips Digital Interface
Format) carries digital audio signals between the DVD recorder and other
component devices, such as a home theater setup with surround sound.
The HDMI(High Definition Multimedia Interface) is a compact
audio/video connector interface for transmitting uncompressed digital streams.
It represents a digital alternative to consumer analog standards such as
composite video
,
Page 29
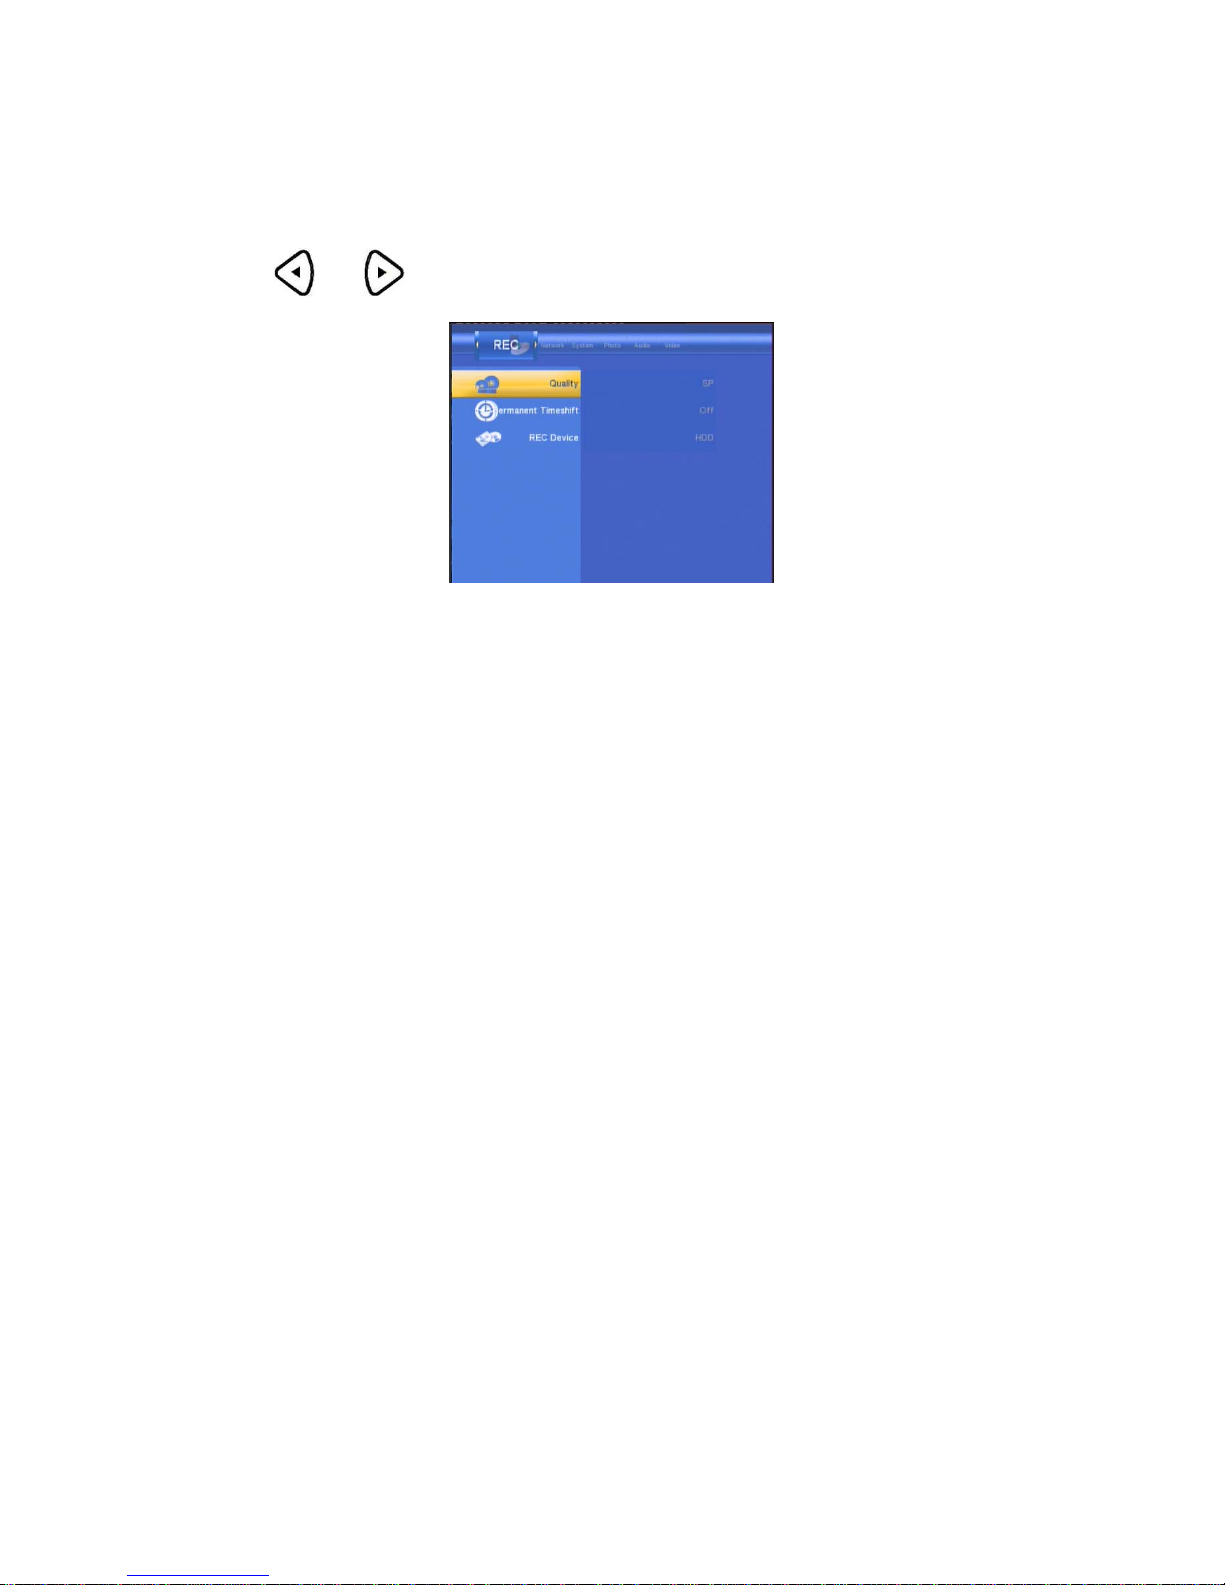
Changing Record Settings
Press
and on the remote control to select the Record tab from the menu bar.
Page 30
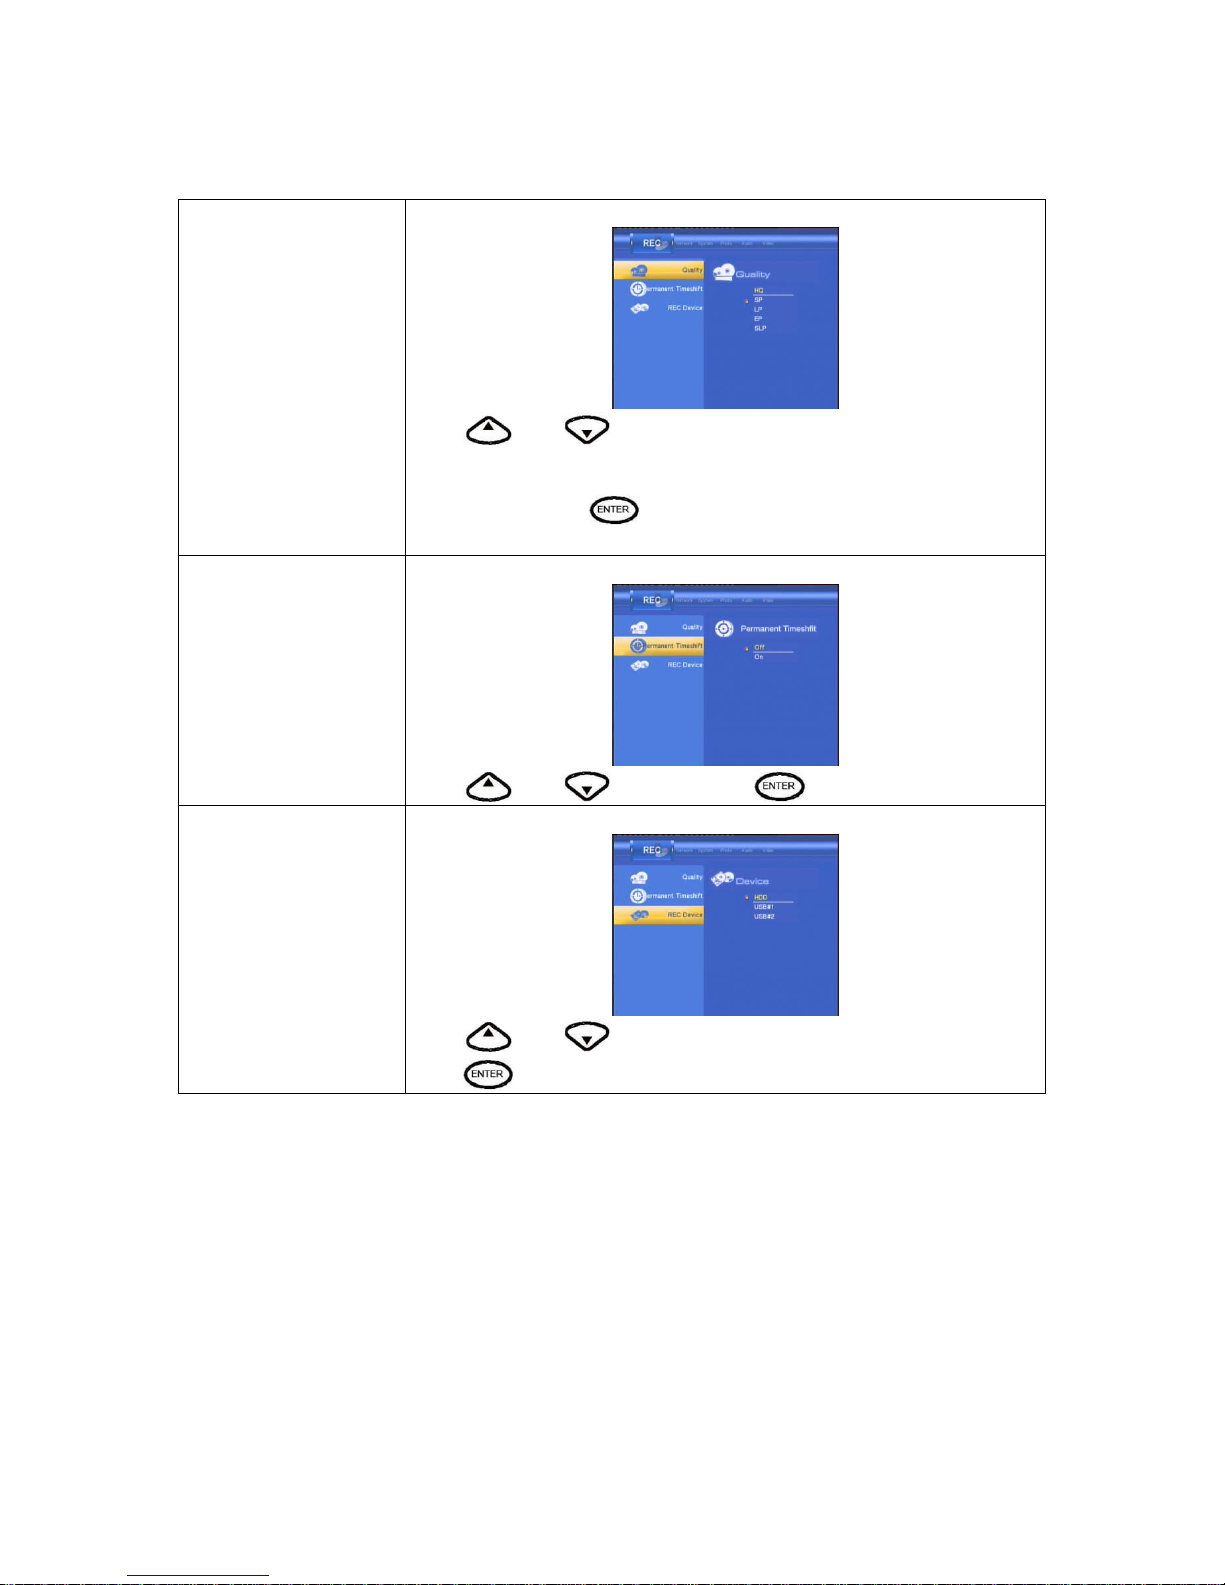
Quality
Select to set the default recording quality setting.
Press
and to select the quality setting you require.
The highest quality setting is HQ which requires the most storage space. The
other settings reduce recording quality sequentially but also require less
storage space. Press
to confirm.
Permanent timeshift
Select to set the Permanent timeshift on or off.
Press
and to select. Press to confirm.
Record Device
Select to choose the device to which to record .
Press
and to select to record on either HDD or USB.
Press
to confirm.
Page 31
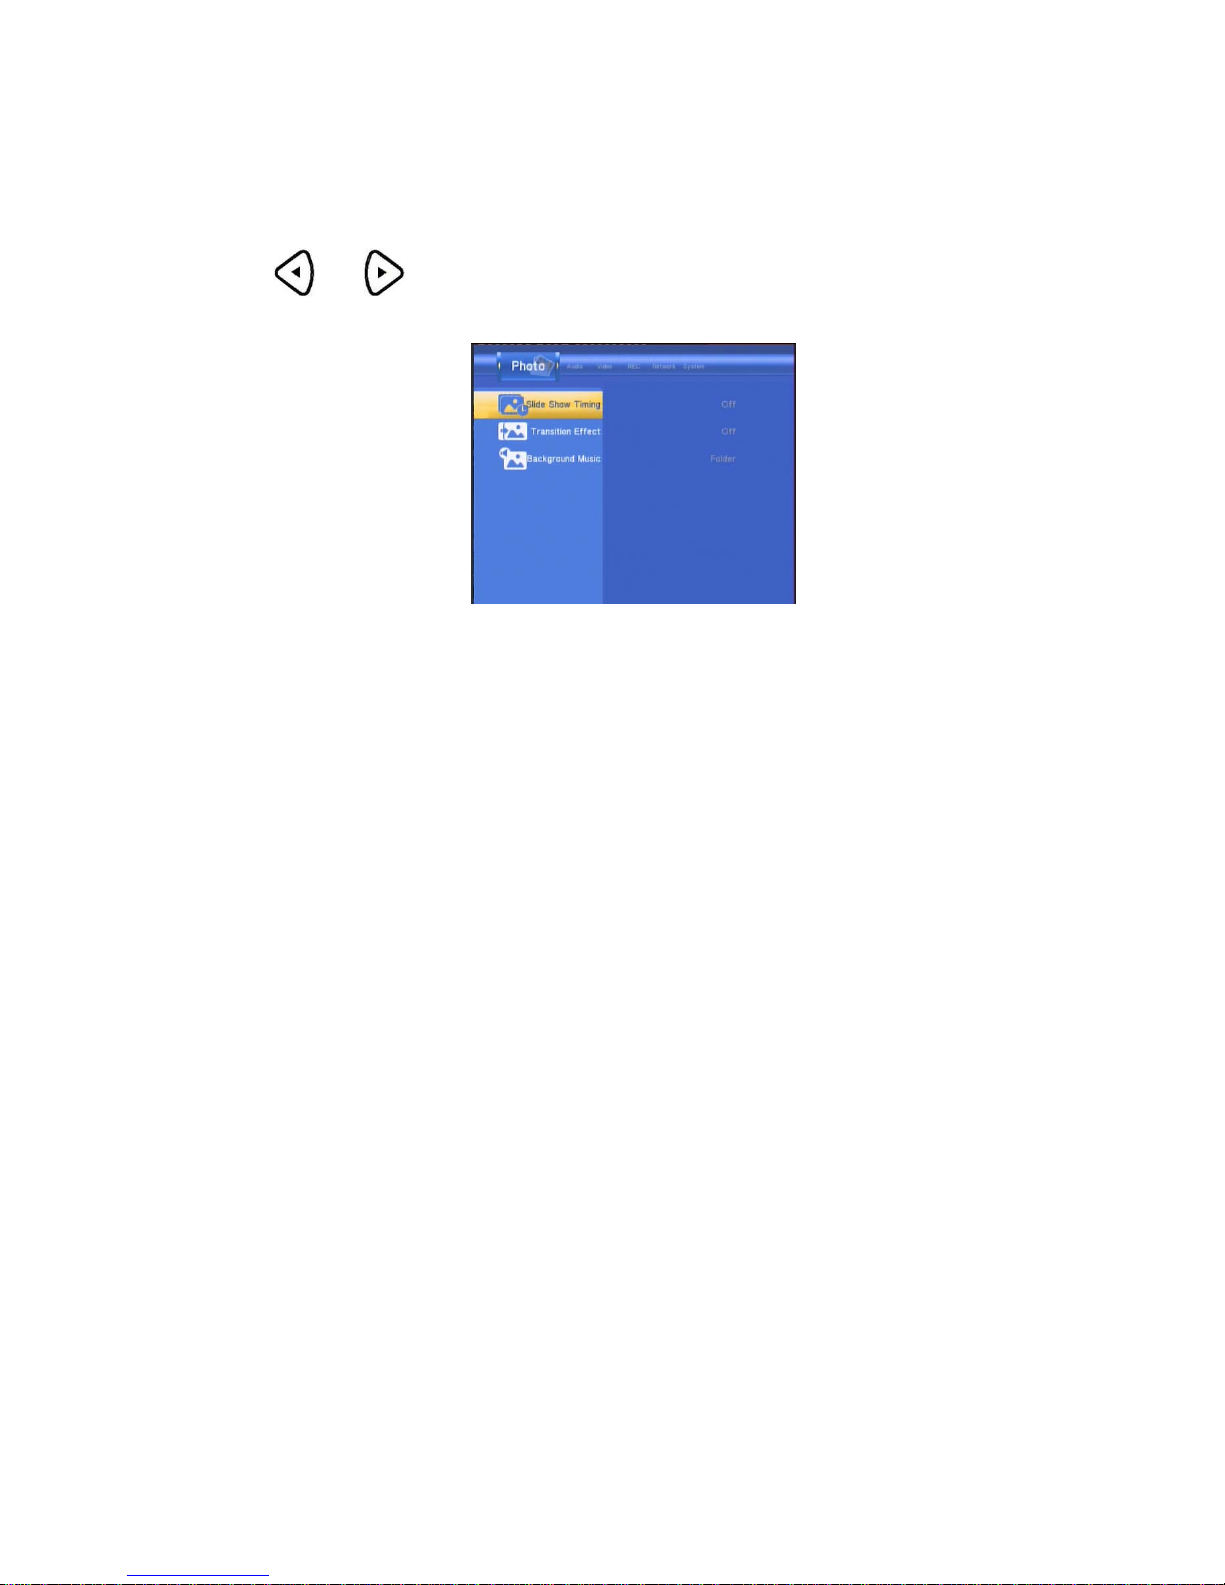
Changing Photos Settings
Press
and on the remote control to select the Photos tab from the menu.
Page 32
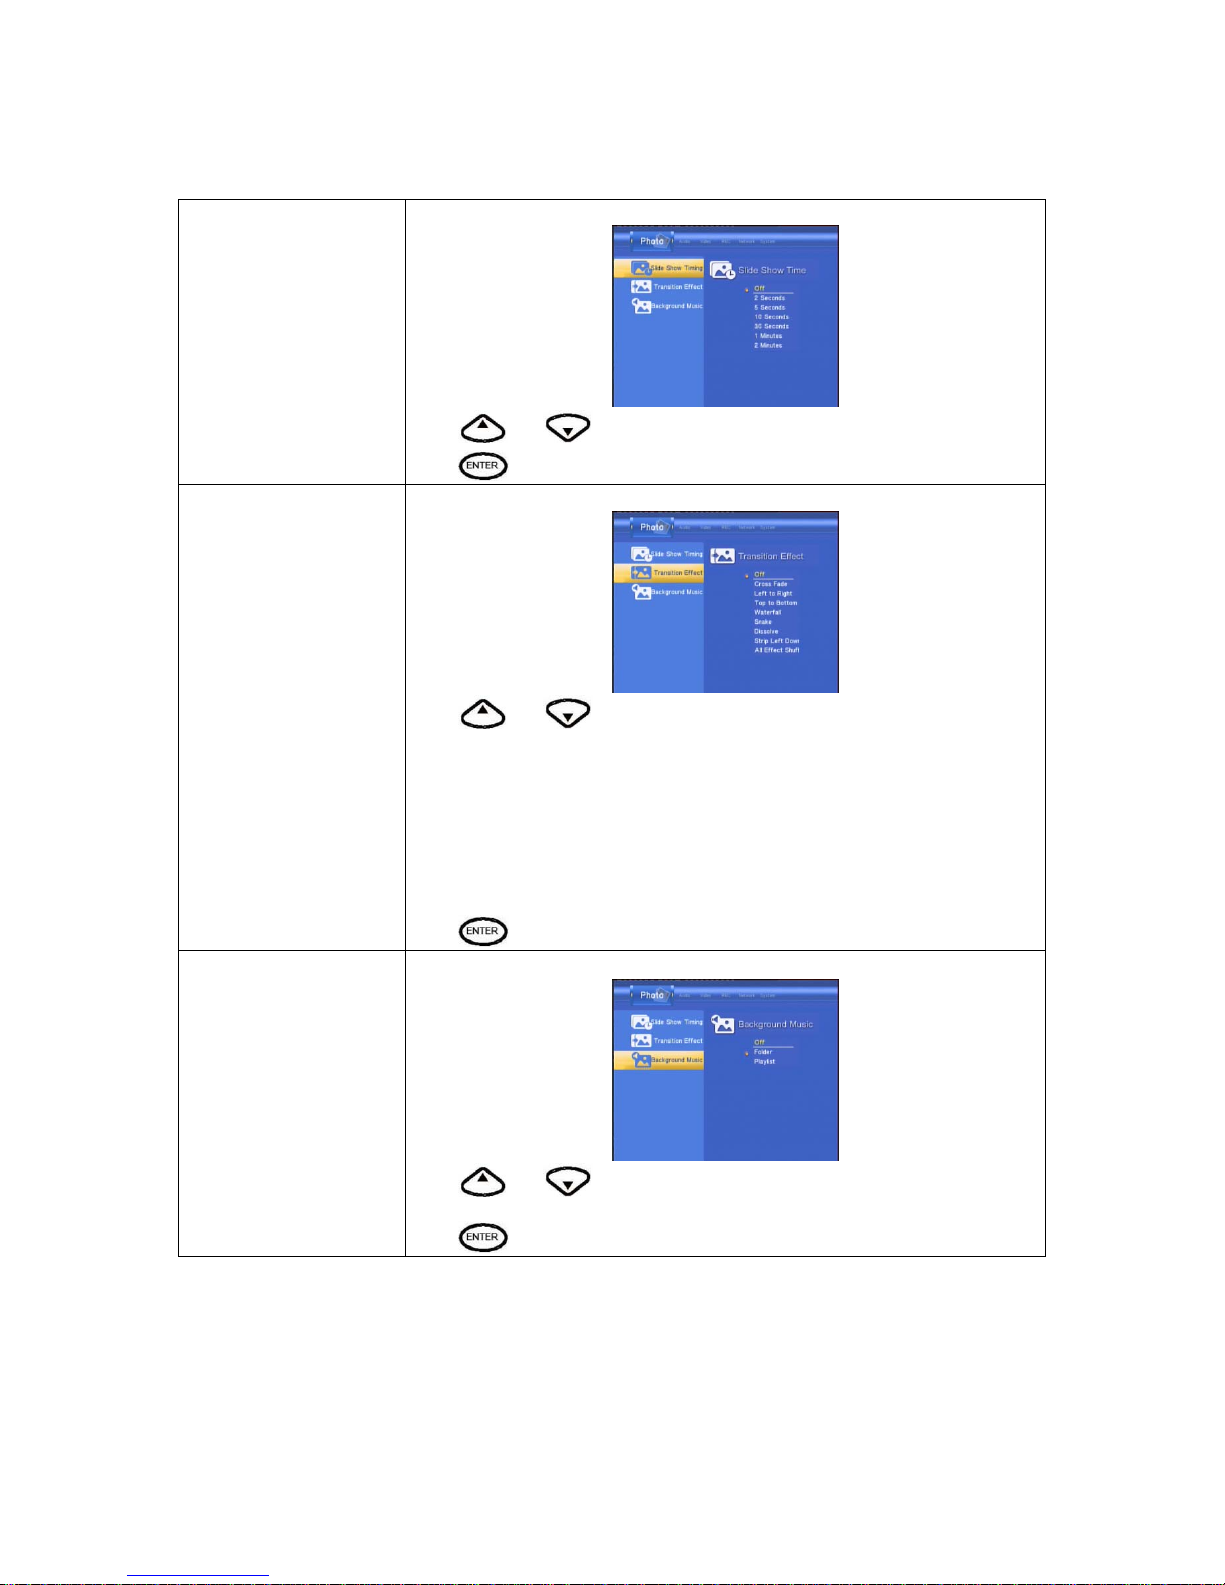
Slide Show Time
Select to set slide show time.
Press
and to select the interval you require.
Press
to confirm.
Transition Effect
Select to set the transition effect of photos.
Press
and to select the transform of photo you require:
1) Cross Fade – fade in and fade out
2) Left to Right- from left to right
3) Top to Bottom- from top to bottom
4) Waterfal l- like a steep descent of water from a height
5) Snake – like snake motion
6) Dissolve – like water dissolve
7) Strip Left Down – like strip cover from top of left to bottom of right
8) All Effect Shuffle – shuffle in and out
Press
to confirm.
Background Music Select to play the music file under the same folder.
Press and to select the position of the background music. Select “off” to
close the function.
Press
to confirm.
Page 33
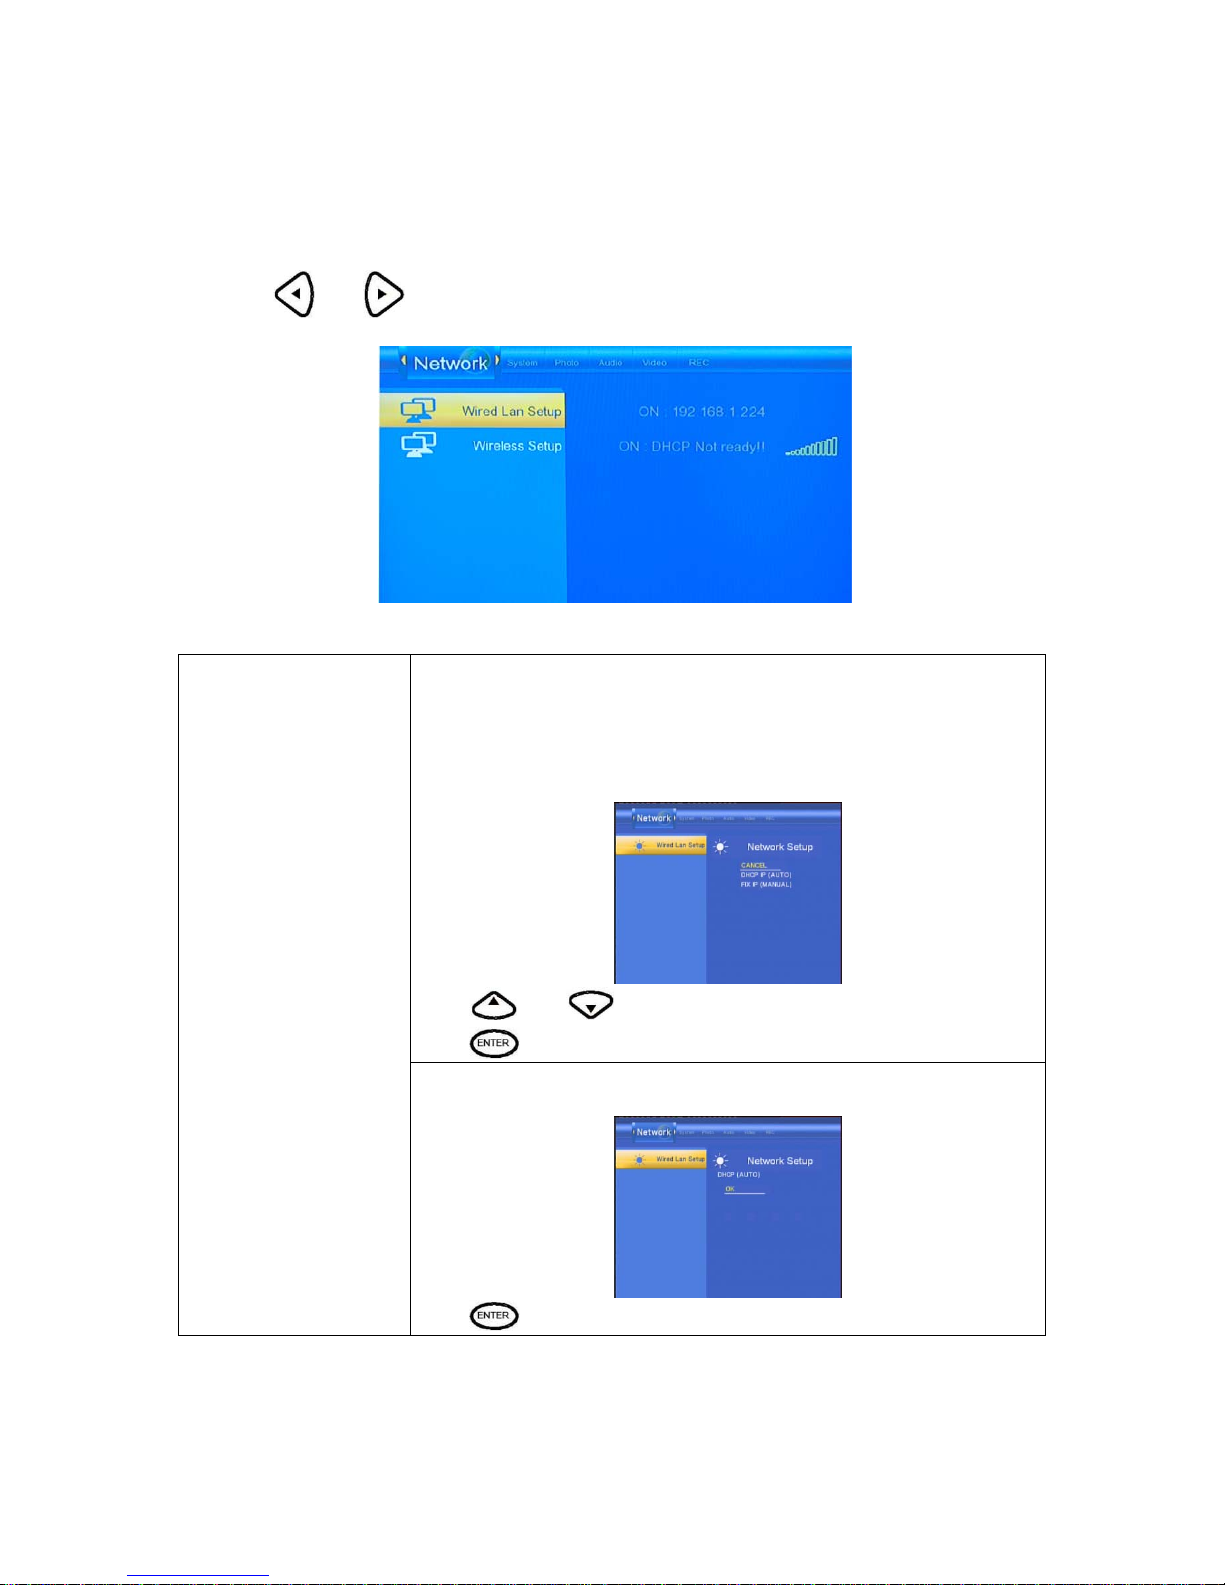
Changing Network Settings
Press and on the remote control to select the Network tab from the menu.
Select to set the Network Setting. Before use the Network functions, please
check following items:
1) Connect the MKAVHDD to Network first.
2) Please enable NetBIOS of TCP/IP on computer.
3) Please turn off your PC’s firewall.
4) Please share the folders which you wish to browse in your PC.
Press
and to select DHCP(AUTO) or FIXED IP(MANUAL).
Press
to confirm.
Wired Lan Setup
DHCP DNS(AUTO)
Set the DNS server IP address by auto.
Press
to confirm.
Page 34
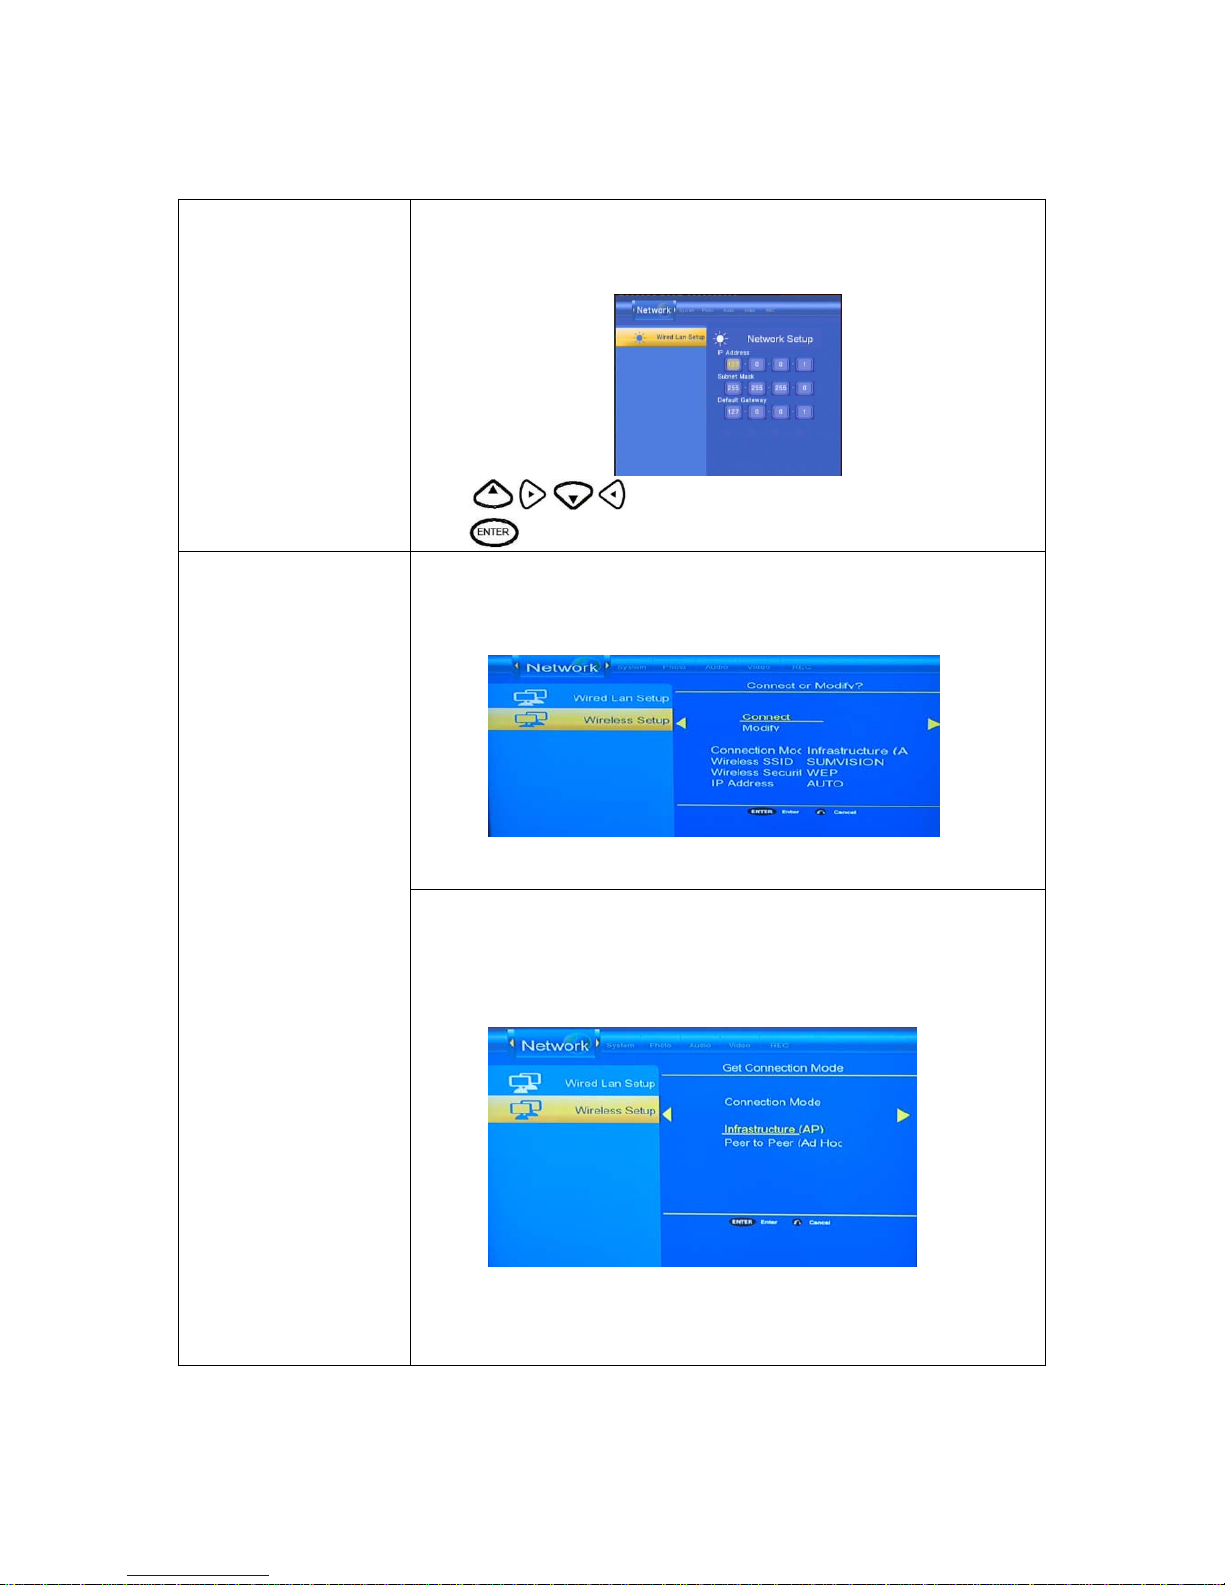
FIX IP (MANUAL)
Using Fixed IP, it is required to enter followings. IP address, Subnet Mask,
Default Gateway. For further assistant to above settings, please contact to the
network administra to r.
Press to enter the IP address.
Press
to confirm.
wireless setup
1、select “connect ”to confirm then it can connect to network by auto
2、Select “modify” to others setup
Wireless setup
Modify
Select “Infrastructure(AP)”to confirm and enter menu ,then select
“Auto”to connect to network and will get the IP add ress by auto, you
also select others to setup
Note:
wireless only support to Realtek ch ip se t solution (RTD8187 chipset)
Cyclone HD cannot support any other manufactu rer network dongle.
Page 35
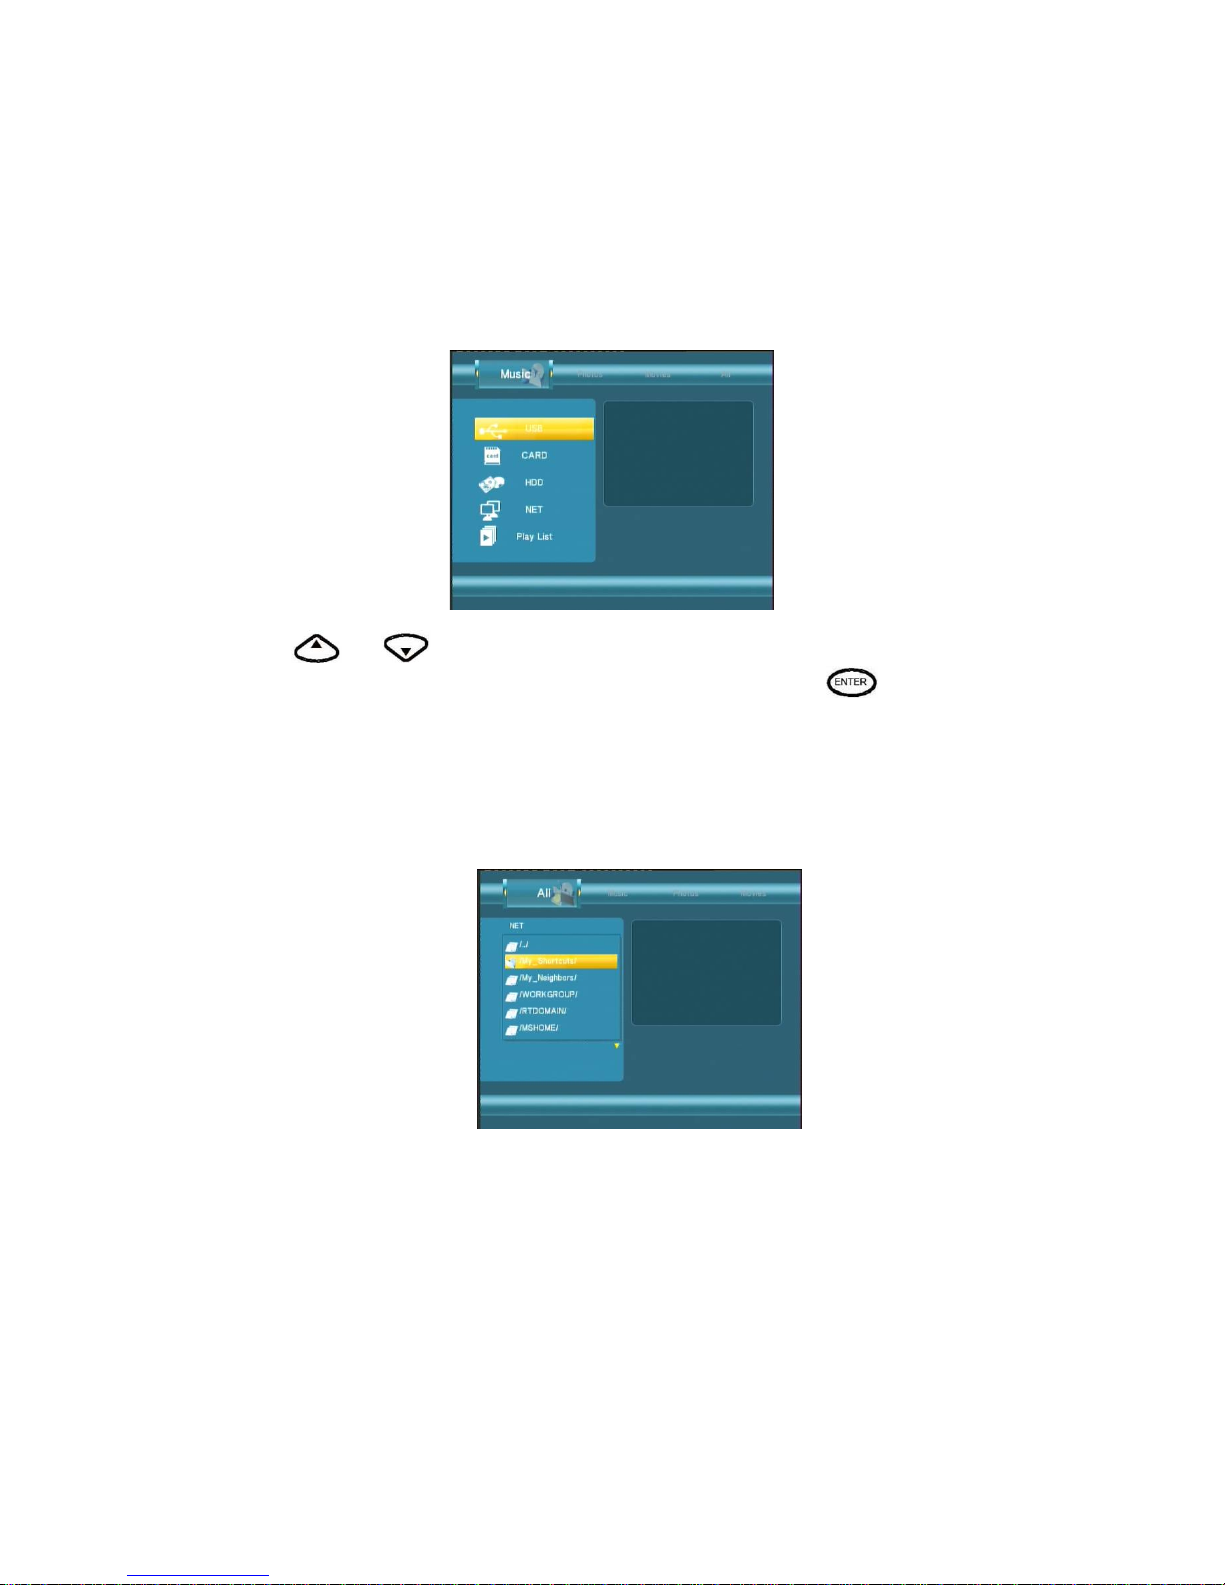
Browser Menu
The Browser menu allows you browse and play music, photo and movie files stored on a HDD or an
external USB device and Card reader, Network. To enter the menu, select Browser from the Guide
menu.
Press
and to select the device on which the media is stored. Choose from HDD, USB
(for media stored on an external flash disk),Card reader, NET and press
.
When data on HDD,USB device or Card reader is connected the system to Network, you can also
browse photos, listen to MP3 files, and watch videos.
My Short Cut
When you are browsing NET, you can choose the PC name from the menu or you can set “Specific
File Server IP” and access it from “My Short Cut” in the menu.
My Neighbors
When you are browsing NET, When you install “Transcode Server” in your PC. you can choose the
PC name from the menu or you can select “My Neighbors” to access .
Page 36
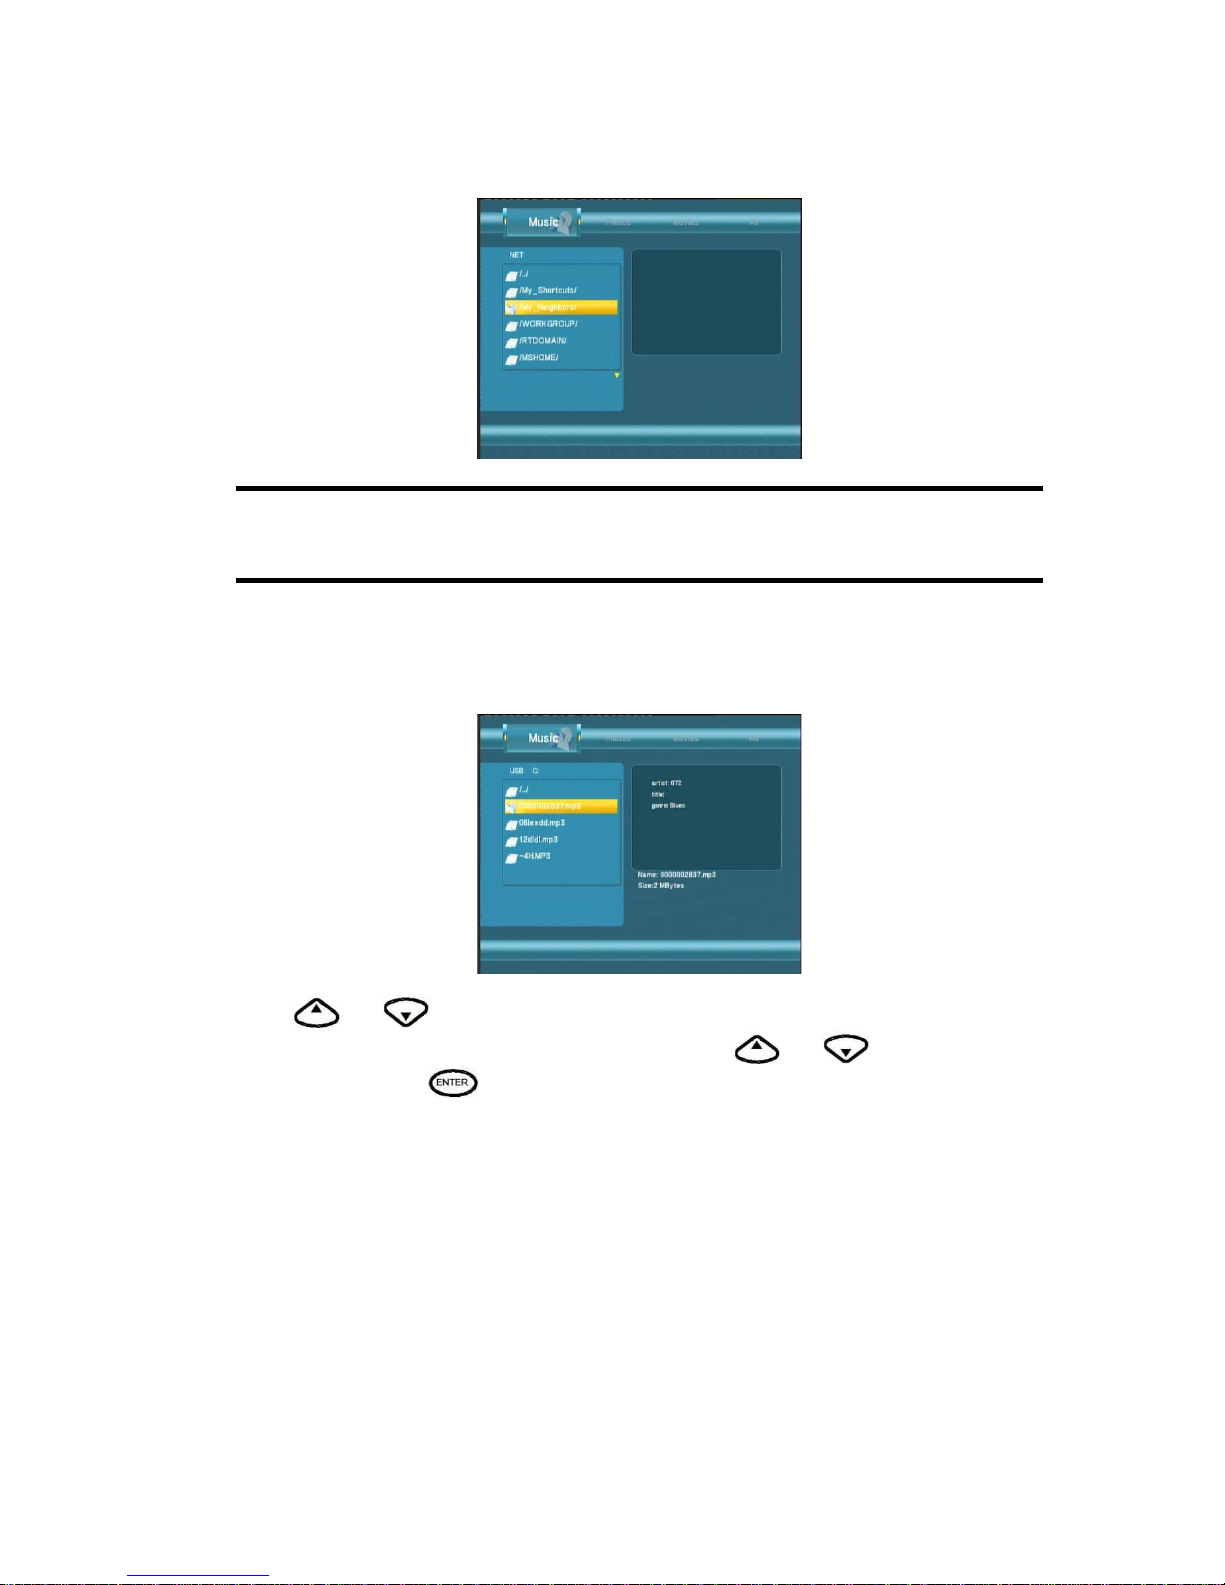
Note:
If you install the “Transcode Server” in your PC, the system will support ,RMVB
WMV,RM… format playback through the NET.
Browsing Music
Use the left and right navigation arrows to select the Music tab.
Press
and to select the folder containing your audio files. A thumbnail strip appears at
the bottom of the screen, along with song information. Press
and to select the file you
want to play and press
.
This browsing music function supports Mp3,WMA,AAC,OGG format Playback.
Browsing Photos
Use the left and right navigation arrows to select the Photos tab.
Page 37
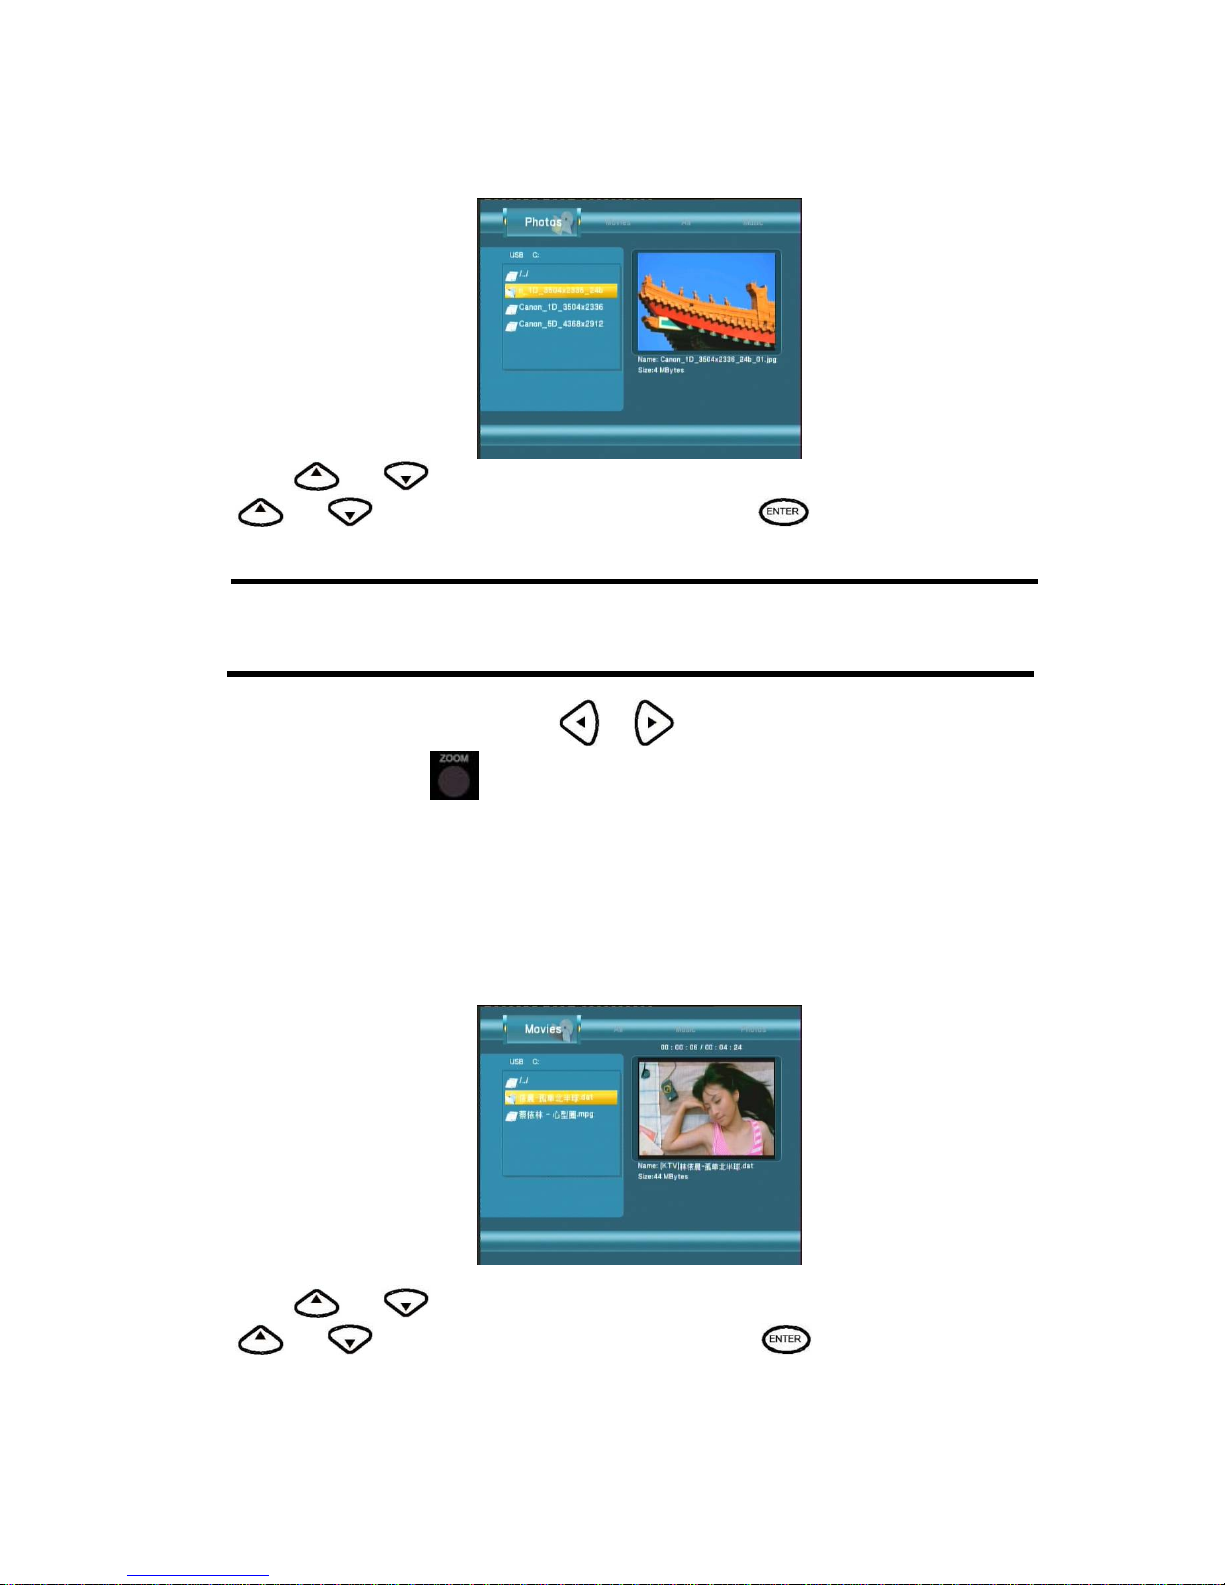
Press
and to select the folder containing your photo files. Enter the folder press
and to select the photo you want to view and press The photo is displayed full
screen.
Note:
1. When the photo is displayed in full screen mode, the slide show starts automatically.
2. While listening to MP3 files, you can browse the photos at the same time.
While browsing a photo, you can press
or to rotate a photo in any angle. Beside rotating
a photo, you can press
to zoom in/out that photo, three zoom levels are available.
This browsing photos function supports High Definition Photo (JPG,JPEG,BMP)Playback.
Browsing Movies
Use the left and right navigation arrows to select the Movies tab.
Press
and to select the folder(s) containing your movie files. Enter the folder press
and to select the movie you want to view and press . The movie is played full
screen.
Page 38
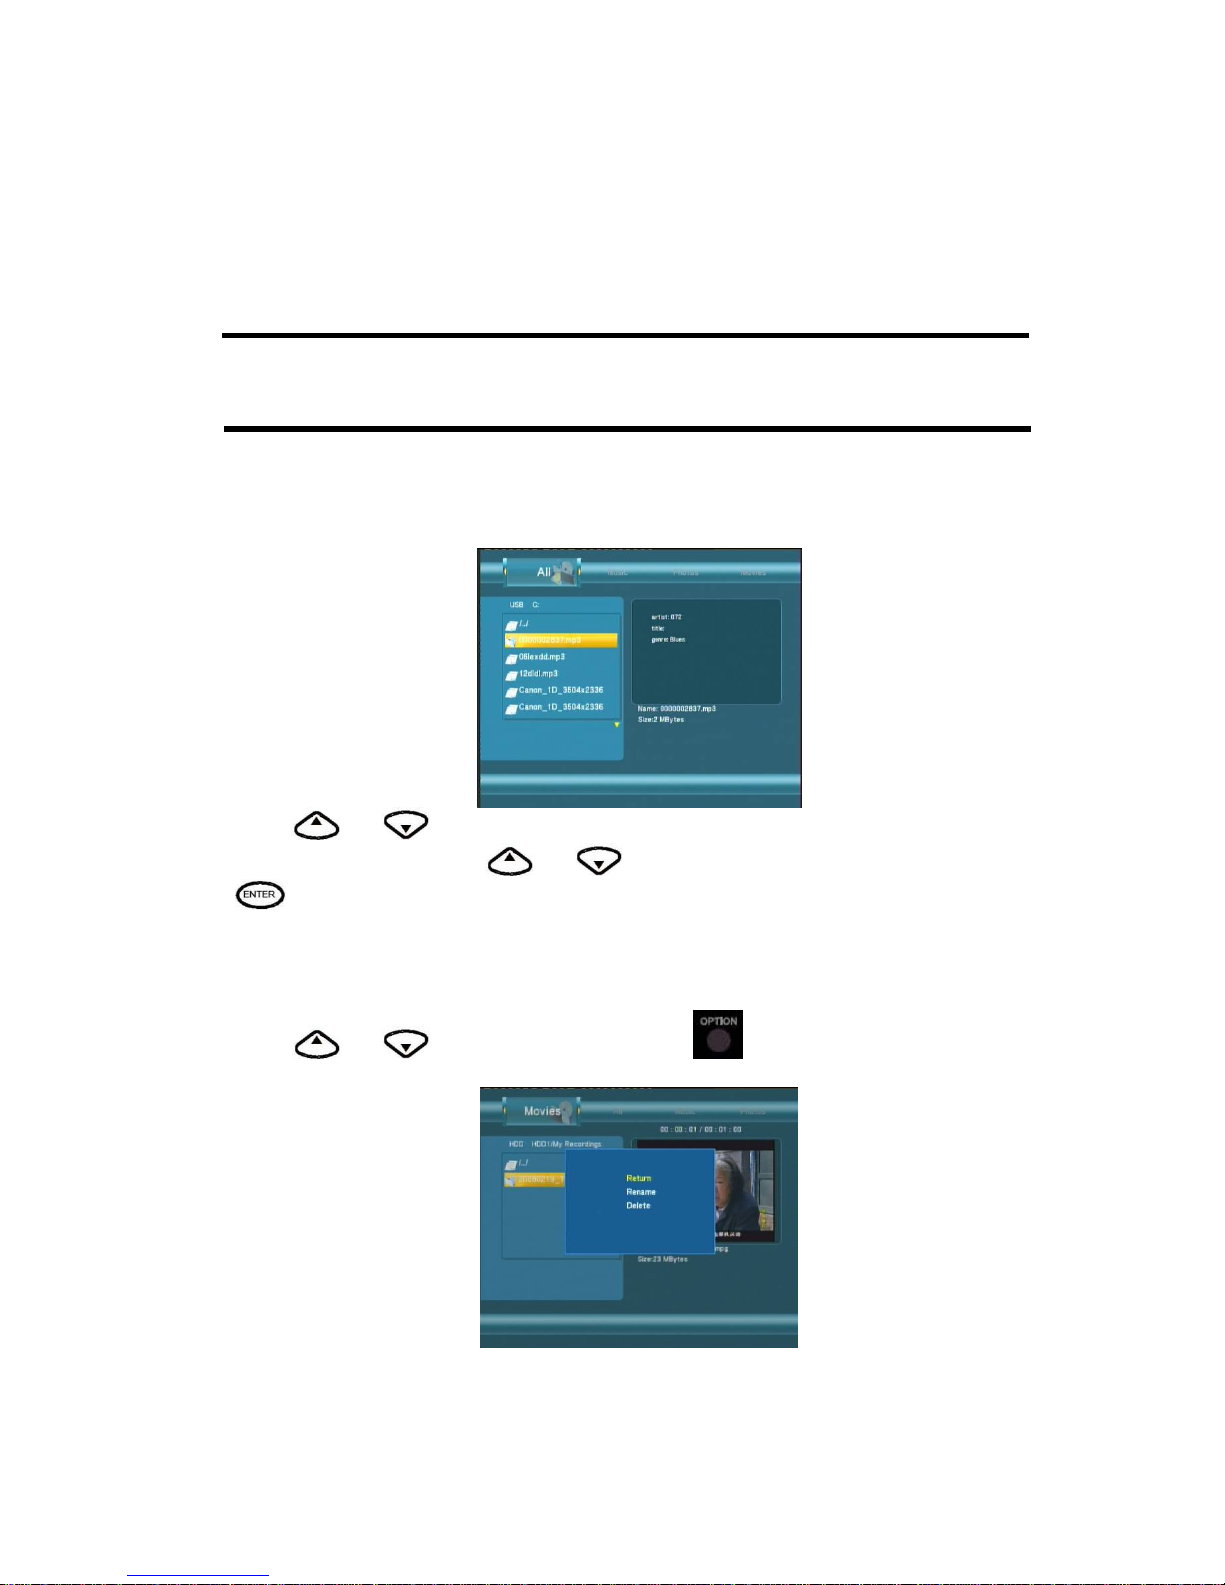
This browsing movies function supports High Definition Video(720P,1080i) Playback. For example:
1. MPEG1(DAT ,MPG)
2. MPEG2(VOB, MPG, TS)
3. MPEG4(AVI,DIVX,XVID)
Note:
When play the HD Video, you can according the movie resolution to adjust HD Video output. See
“ HD Output of SETUP menu” on page 18 for more details.
Browsing All
Use the left and right navigation arrows to select the All tab.
Press
and to select the folder(s) containing your all files(Beside Music ,Photo and
Movie). Enter the folder press
and to select the file you want to view and press
to play.
File Edit Menu
Press and to select the file or folder, press to display the Edit tab.
Page 39
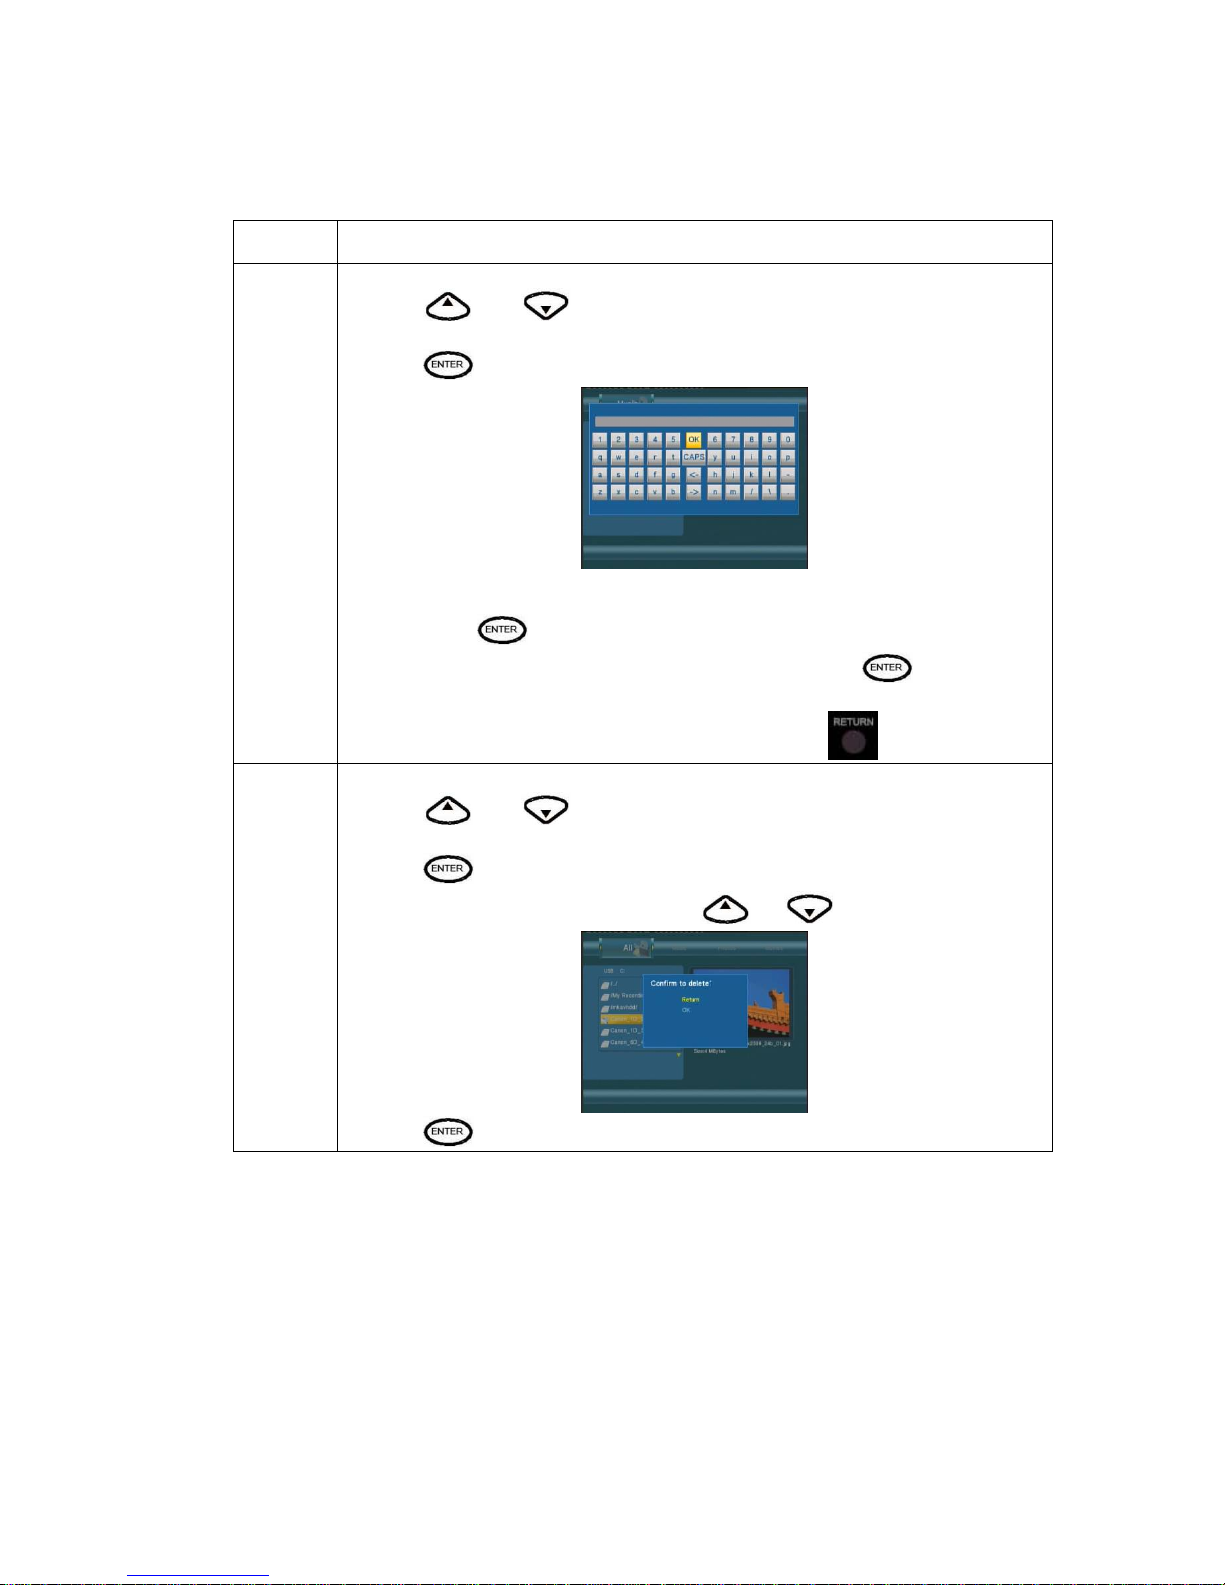
Return
Select to return to the main screen.
Rename To rename a file, do the following:
1. Press
and on the remote control to select the Rename tab from the
menu bar.
2. Press
on the remote control. The name en try screen appears.
3. Use the navigation arrows to select letters and numbers. Select CAPS to toggle
between uppercase and lowercase letters. Press <- to delete a letter. Press -> to insert
a space. Press
to input each letter or number.
4. Once you have entered the new name, select OK and press
to confirm all
changes.
If you want to cancel the naming during the process, press
Delete
To delete a title, do the following:
1. Press
and on the remote control to select the Delete tab from the
menu bar.
2. Press
to confirm and delete the file.
3. A confirmation message appears. Press
or and select OK.
4. Press
to delete the selected file. To cancel delete, select Return.
Page 40
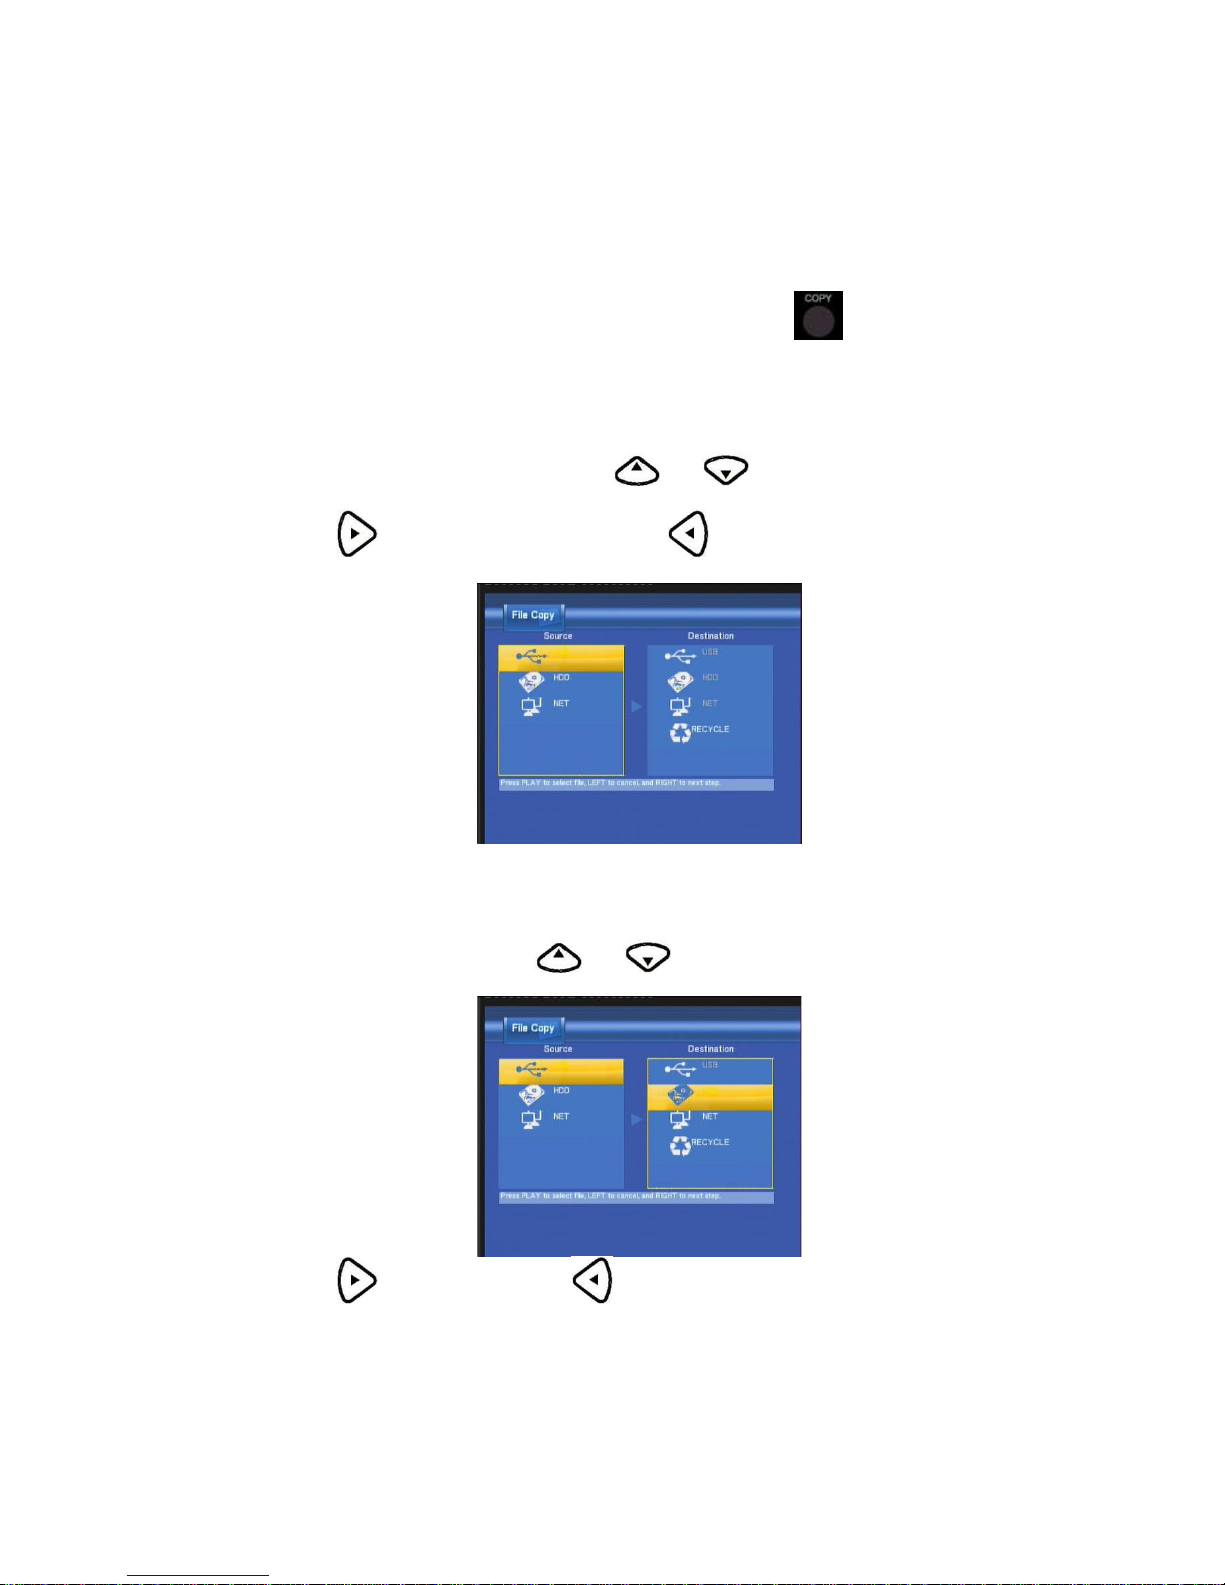
File Copy Menu
The Setup Menu allows you to copy files at NET,USB,HDD each other.
To enter the menu, select File Copy from the Guide menu or select
on the remote control.
Step 1. Select Source Device
When you enter the File copy int erface, press and to select the device which your want
to copy first.
Then press
to select Destination Device, press to return.
Step 2. Select Destination Device
When into Destination sector, press and to select the device of the Destination.
Then press
to next step, and press to return.
Page 41
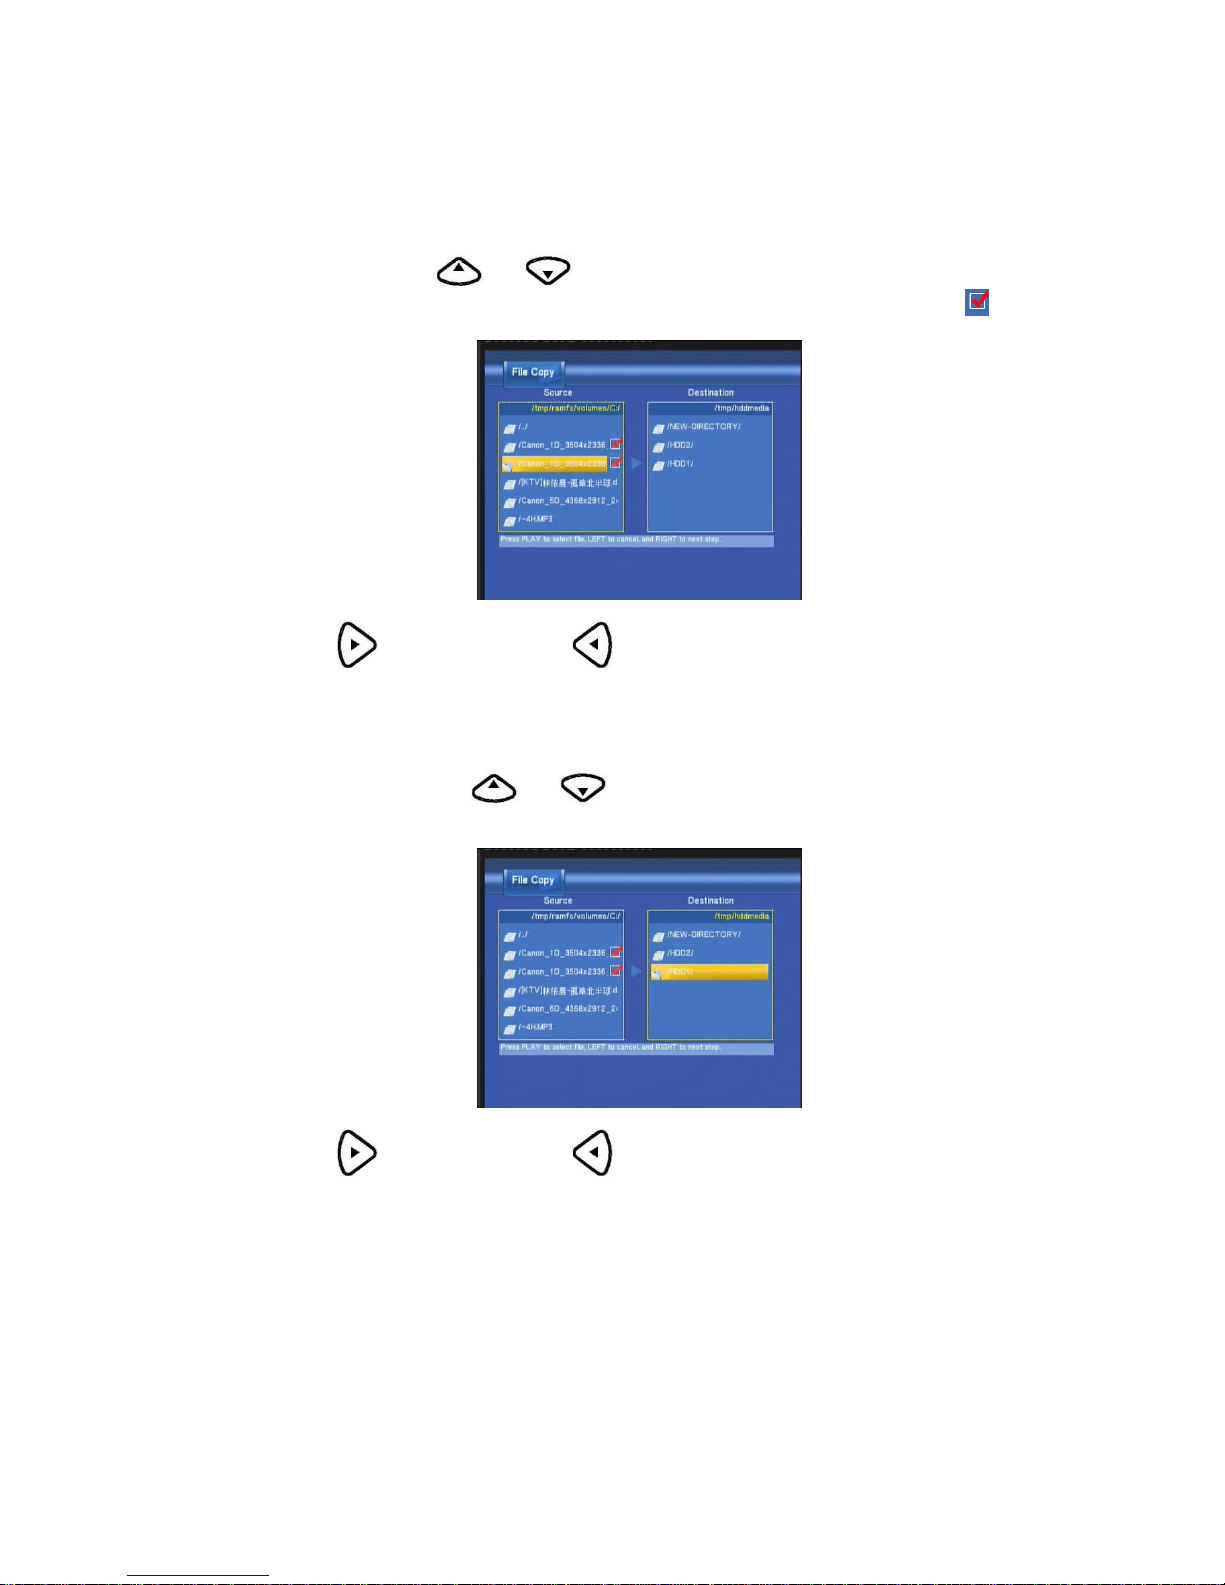
Step 3. Select copy files or folders
At Source sector, press and to select and press Enter to select file or folders which you
want to copy. When you succeed to select, at the file or folder name right side will display
.
Then press
to next step, and press to return.
Step 4. Select the folders of Destination
At Destination sector, press and to select the folders of destination.
Then press
to next step, and press to return.
Step 5. Copy Status
At Pop menu, select OK to copy, select No to cancel.
Page 42
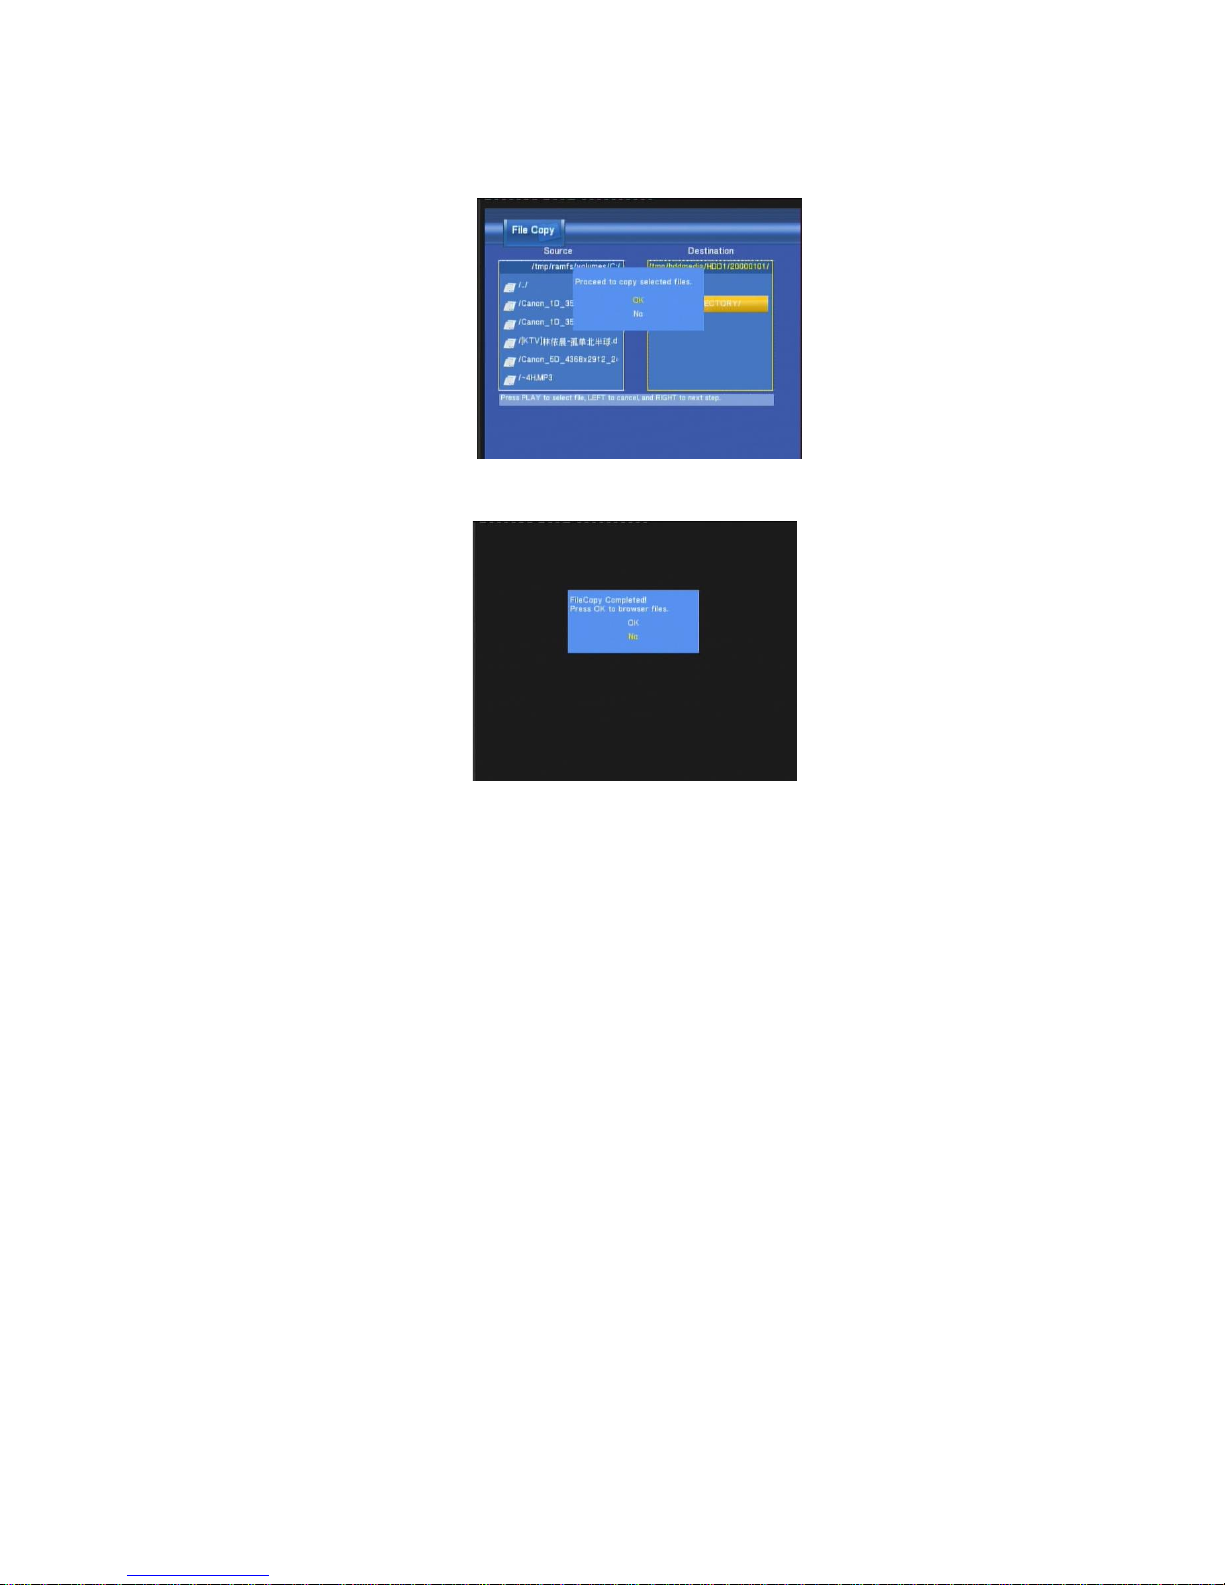
When copy succeed, the system will display “File Copy Completed!”; if failed, the syst em wi ll display
“File Copy failed!”
When the File Copy completed! You can select “OK” to browser files, or select “No” return Video1.
Page 43
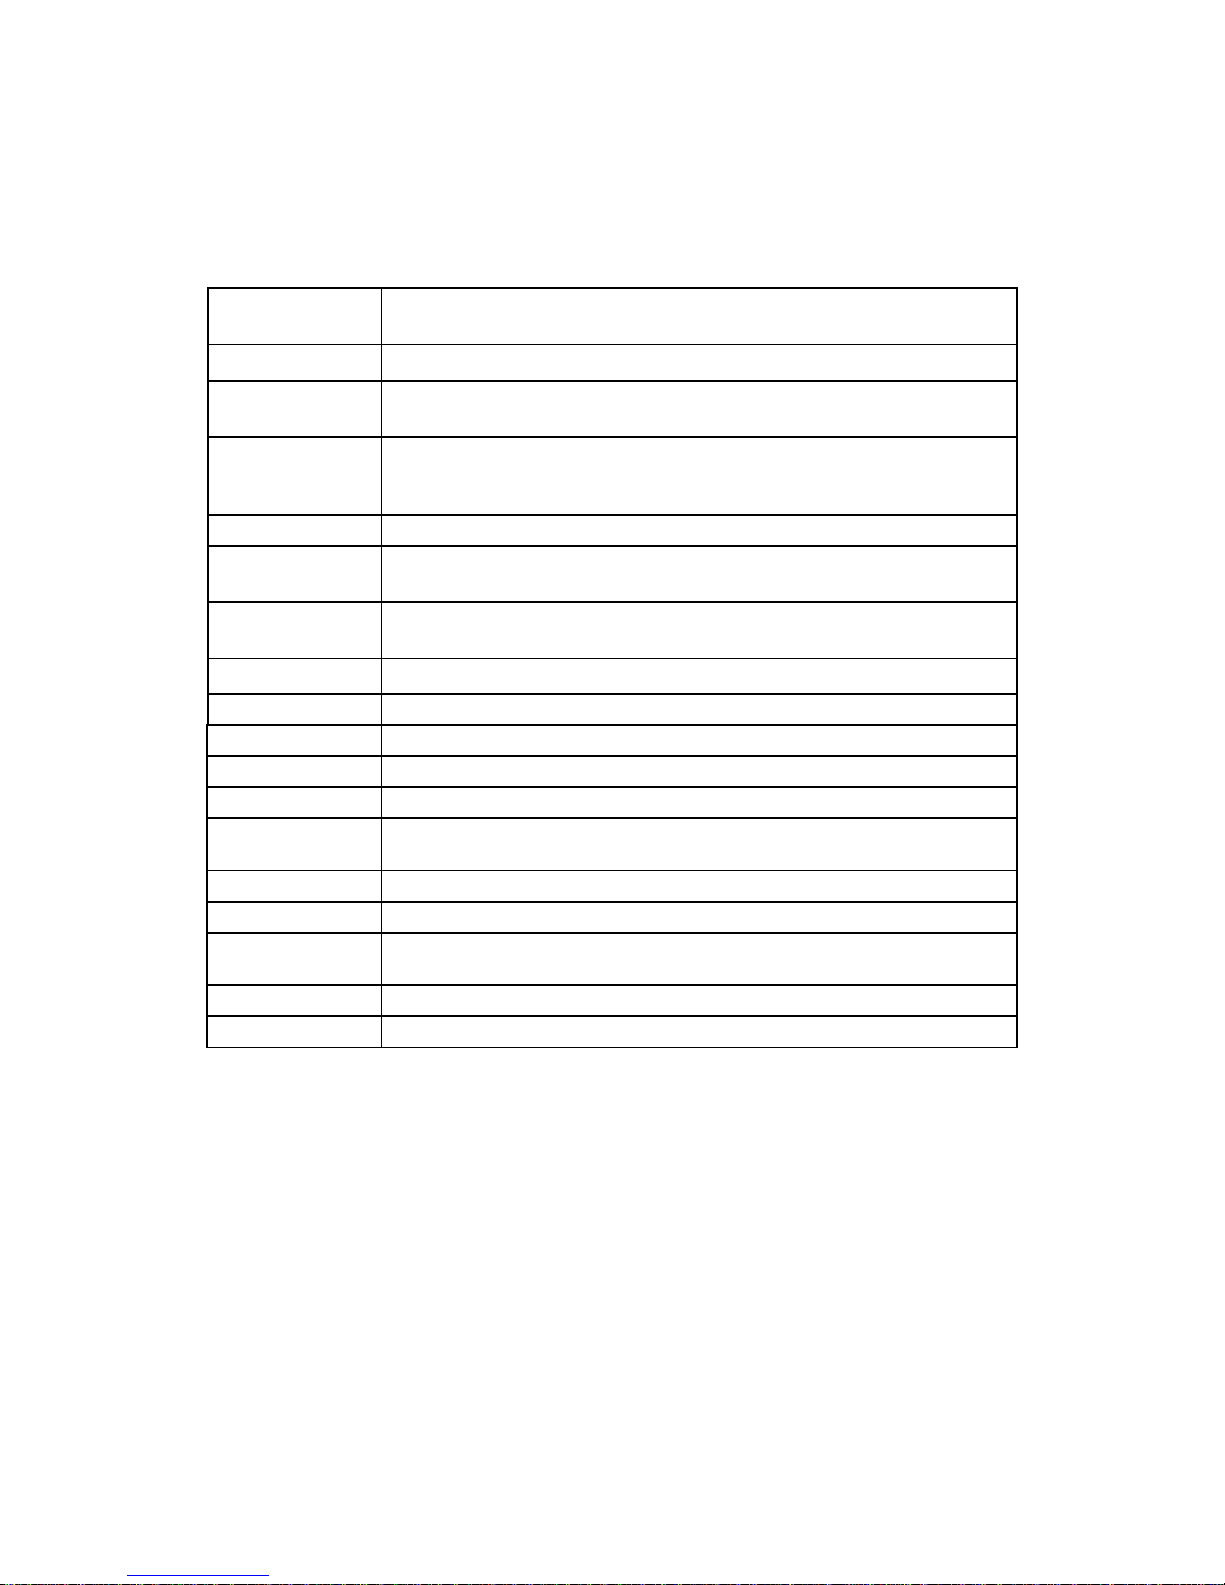
Specifications
Product Name CYCLONE HD Media player
Available OS USB Device Compatible: Windows 98SE/ME/2000/XP/VISTA,
USB Device Device Port x 1, 480Mbps USB 2.0 (USB 1.1 compatible)
USB Host Host Port x 1, 480Mbps USB 2.0 (USB 1.1 compatible)
Supporting to read USB devices like External USB HDD, Flash
Drive,
HDD Type SATA HDD “default package HDD is not included”
Wired LAN Wired : 10/100 Mbps LAN (RJ-45) x 1ea, 100BaseTx:UTP/STP
Category 5 LAN cable compatible
HDD File
System
NTFS / FAT32, Up to 1TB
Video Record Video REC
TV Type NTSC / PAL,4:3 / 16:9
Video Format Format : AVI, MPG, MP4, ASF, VOB,DAT,
Codec : MPEG 1/2/4, AVI, XVID,DVIX3/4/5,
Resolutions up to 1080I
Attach Video
Format
RMVB/RM (Must install the corresponding software in computer
and access it with network )
Audio Format MP2/3, AC3, WMA,WAV,
Photo Format JPG/JPEG/BMP
Subtitle Text
Subtitle
SMI,SUB,SRT,TXT
OSD Language English, Spanish, French, German, Italian, Dutch
Video input Composite
Page 44
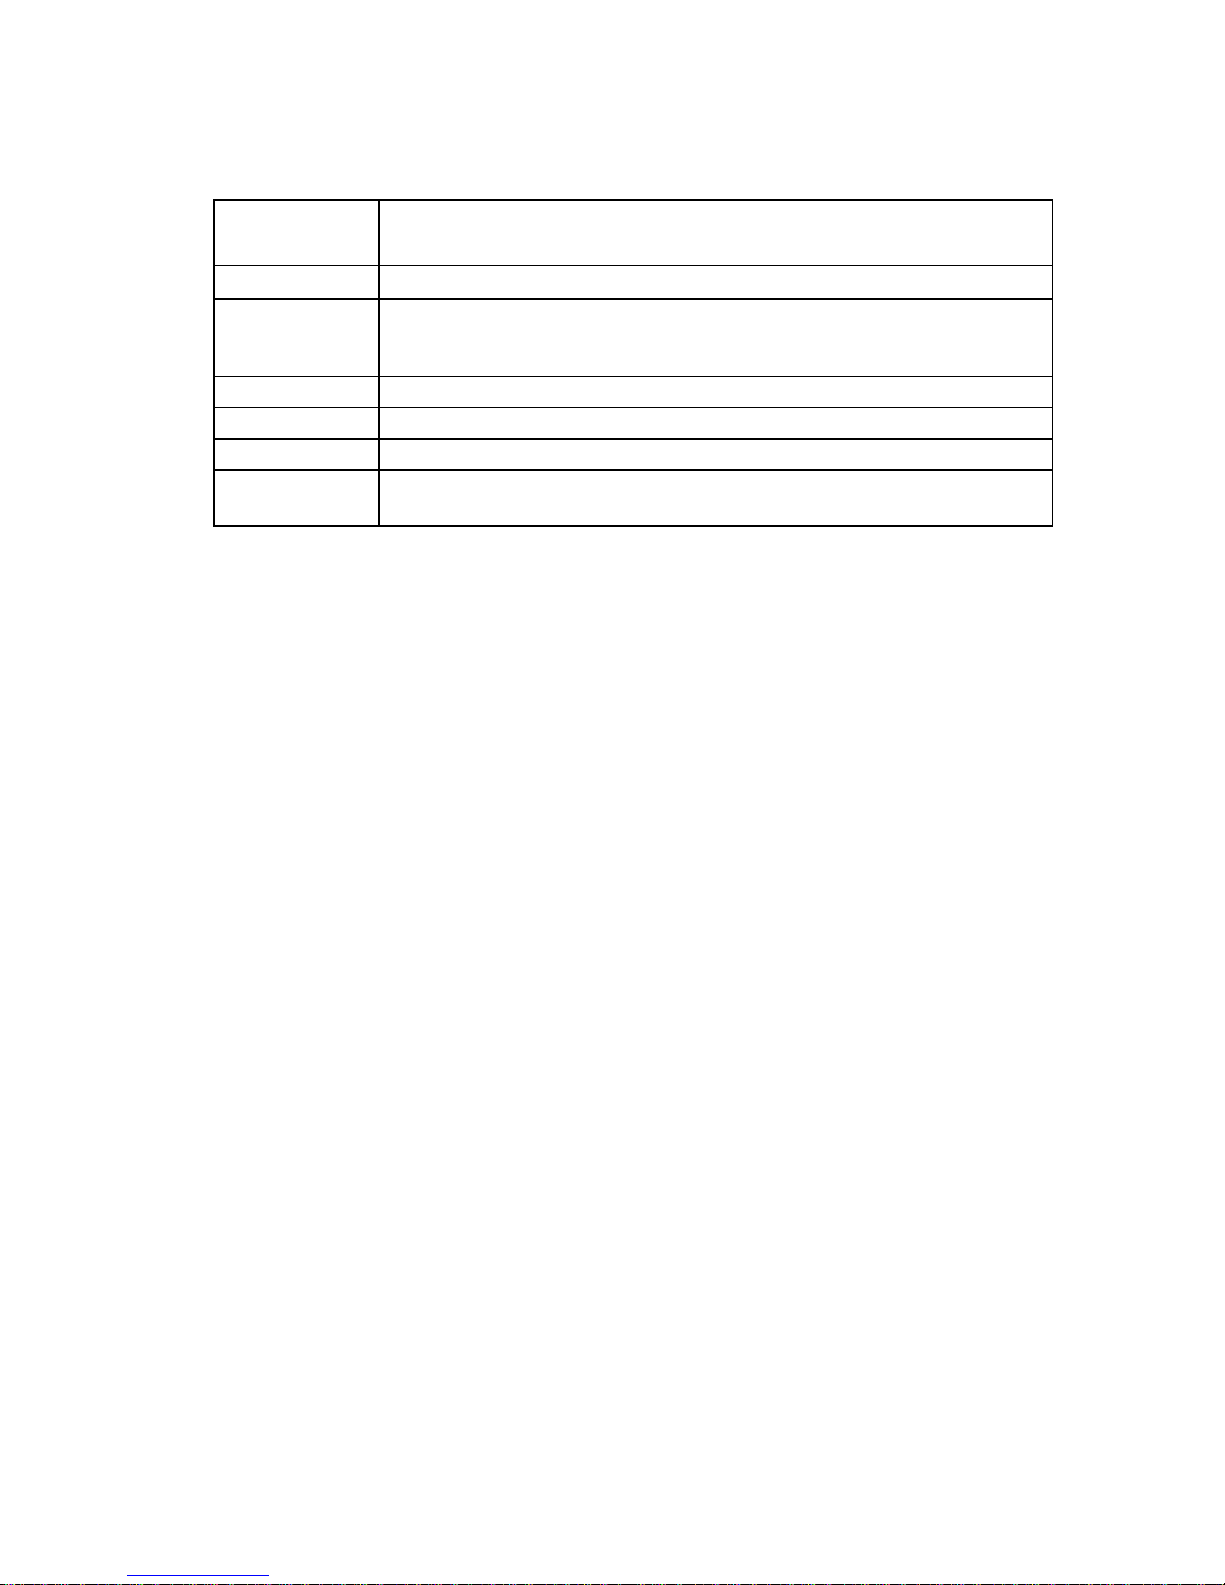
Video Output HDMI (Auto EDID,480P,576P,720P 50HZ,720P 60HZ,1080i 60HZ.)
COMPOSITE
Audio Output Stereo L-R
FAN &
Working
Temperature
40mm Brushless FAN ; 0°C ~ 60°C
Dimension
(L x W x H) : 170 x 165 x 40mm
Weight 500g (without HDD)
Power 12V/3A 35W; 110~240V Free Voltage
Working
Humidity
10% ~ 50%
Note: The specifications and design of this product are subject to change without notice
 Loading...