

Page 1

Setting Guide to Access Point
Version 2.0 – August 2001
1
Page 2

Copyright Statement
No part of this publication may be reproduced, stored in a retrieval system, or
transmitted in any form or by any means, whether electronic, mechanical,
photocopying, recording or otherwise without the prior writing of the publisher.
Windows 95/98 and Windows 2000 are trademarks of Microsoft Corp.
Pentium is trademark of Intel.
All copyright reserved.
2
Page 3

Table of Contents
Table of Contents 3
Regulatory information 4
1. Welcome 5
1.1 Advantages for Using Wireless Network 5
1.2 About Access Point 6
1.3 Verifying kit contents 6
1.4 Wireless Adapter 6
1.5 System Interoperatability 6
2. Step by Step Setting Guide 7
2.1 Setting up Access Point
3
Page 4

Regulatory Information
USA – Federal Communications Commission (FCC)
* This equipment has been tested and found to comply with the limits for a
Class B digital device, pursuant to Part 15 of the FCC Rules. These limits
are designed to provide reasonable protection against harmful interference in a
residential installation. This equipment generates, uses and can radiate radio
frequency energy and, if not installed and used in accordance with the
instructions, may cause harmful interference to radio communications.
However, there is no guarantee that interference will not occur in a particular
installation. If this equipment does cause harmful interference to radio or
television reception, which can be determined by turning the equipment off
and on, the user is encouraged to try to correct the interference by one of the
following measures:
- Reorient or relocate the receiving antenna.
- Increase the separation between the equipment and receiver.
- Connect the equipment into an outlet on a circuit different from that
to which the receiver is connected.
- Consult the dealer or an experienced radio/TV technician for help.
FCC Caution: To assure continued compliance, (example - use only shielded
interface cables when connecting to computer or peripheral devices). Any
changes or modifications not expressly approved by the party responsible for
compliance could void the user's authority to operate this equipment.
- This equipment complies with FCC RF radiation exposure limits set forth
for an uncontrolled environment. This equipment should be installed and
operated with a minimum distance of 20 centimeters between the radiator and
your body.
4
Page 5

-
Canada – Industry Canada (IC)
This class B digital apparatus meets all requirements of the Canadian Interference
Causing Equipment Regulations.
EU Declaration of Conformity (Europe)
Access Point conforms to the specifications listed below, following the
provisions of the Low Voltage Directive 73/23/EEC and the EMC Directive
89/336/EEC
Safety EN60950/IEC950
EMC EN55022/CISPR22 Class B EN50082-1
The manufacturer is not responsible for any radio or television interference caused by
unauthorized modification of this device or the substitution or attachment of connecting
cables and equipment other than specified. The correction of interference caused by such
unauthorized modification, substitution or attachment will be the responsibility of the
user. Built-in antennas, whether installed indoors or out, should be installed only by
experienced antenna installation professionals who are familiar with local building and
safety codes and, wherever applicable, are licensed by the appropriate government
regulatory authorities.
5
Page 6

1. Welcome
This guide will lead you through the installation process in detail. It describes
most common configurations and a quick start set-up.
The product supports any O.S include Web Browser Function Windows
95/98/2000, CE, Unix, Linux, MAC…...etc.
1.1 Advantages for Using Wireless Network
Advantages for Using a Wireless Network:
- Hard to wire areas: Access Point provides access to network services in areas
otherwise hard or expensive to wire, such as historic buildings with asbestos and
classrooms.
- Flexible workgroups: Lower total cost of ownership for workspaces that are
frequently reconfigured.
- Networked conference rooms: user can access the network as they move from
meeting to meeting, getting up to date access to information and the ability to
communicate decision while ‘on the go’
- Ad hoc networking: on site consultants and small workgroups increase
productivity with quick network setup and collaboration software
- Branch office networking: provides an easy to install, use and maintain network
for a remote or sales office
Campus-wide network mobility: roaming capabilities allow enterprise to set up
-
easy to use wireless networks that cover the entire campus transparently.
6
Page 7

1.2 About Access Point
The Access Point is a modular unit with an integrated Ethernet interface that
enables you to use your Access Point with your adaptors. The Antennas create
further wireless atmosphere and a cleaner look. The Access Point is a wired to
wireless bridge that you can use to connect wireless cells1 to one another or to a
wired (Ethernet) Local Area Network. The Access Point can serve mobile wireless
clients roaming between various locations within network premises.
1.3 Verifying Kit Contents
The kit you have received should contain the following items:
- ‘Setting Guide to Access Point’
- Access Point
- EU/USA Spec. Adaptor
- Setting Stand
If anything is missing, please contact your vendor.
1.4 Wireless Adaptor
Adaptor comes in separate packages. It is a wireless network adapter, that allows
sharing of internet access and peripherals through access point. Adaptor comes
in two types: PC Card and USB Adapter. PC Card is for the use of notebook
only; on the other hand USB is compatible for both computer and notebook.
1.5 System Interoperatability
Access Point is able to integrate with other brand’s wireless network
communication systems. E.g. Access Point is compatible with all other brands
wireless adapter.
Notification:
cable. It connects to PC (Server) with a cross network cable. And the console port
connects with RS232 cable in 25 pin female connector.
Access Point connects to Hub/Switch with a non-cross network
1
Please Refer Section 5 - Glossary
7
Page 8
2. Step by Step Setting Guide
This section will lead you through the installation of Access Point in thorough
detail. You may wish to skip to Quick Start to Wireless Networking.
2.1 Setting up Access Point
Please follow the instructions on how to set up your Access Point:
A. Connecting to AP
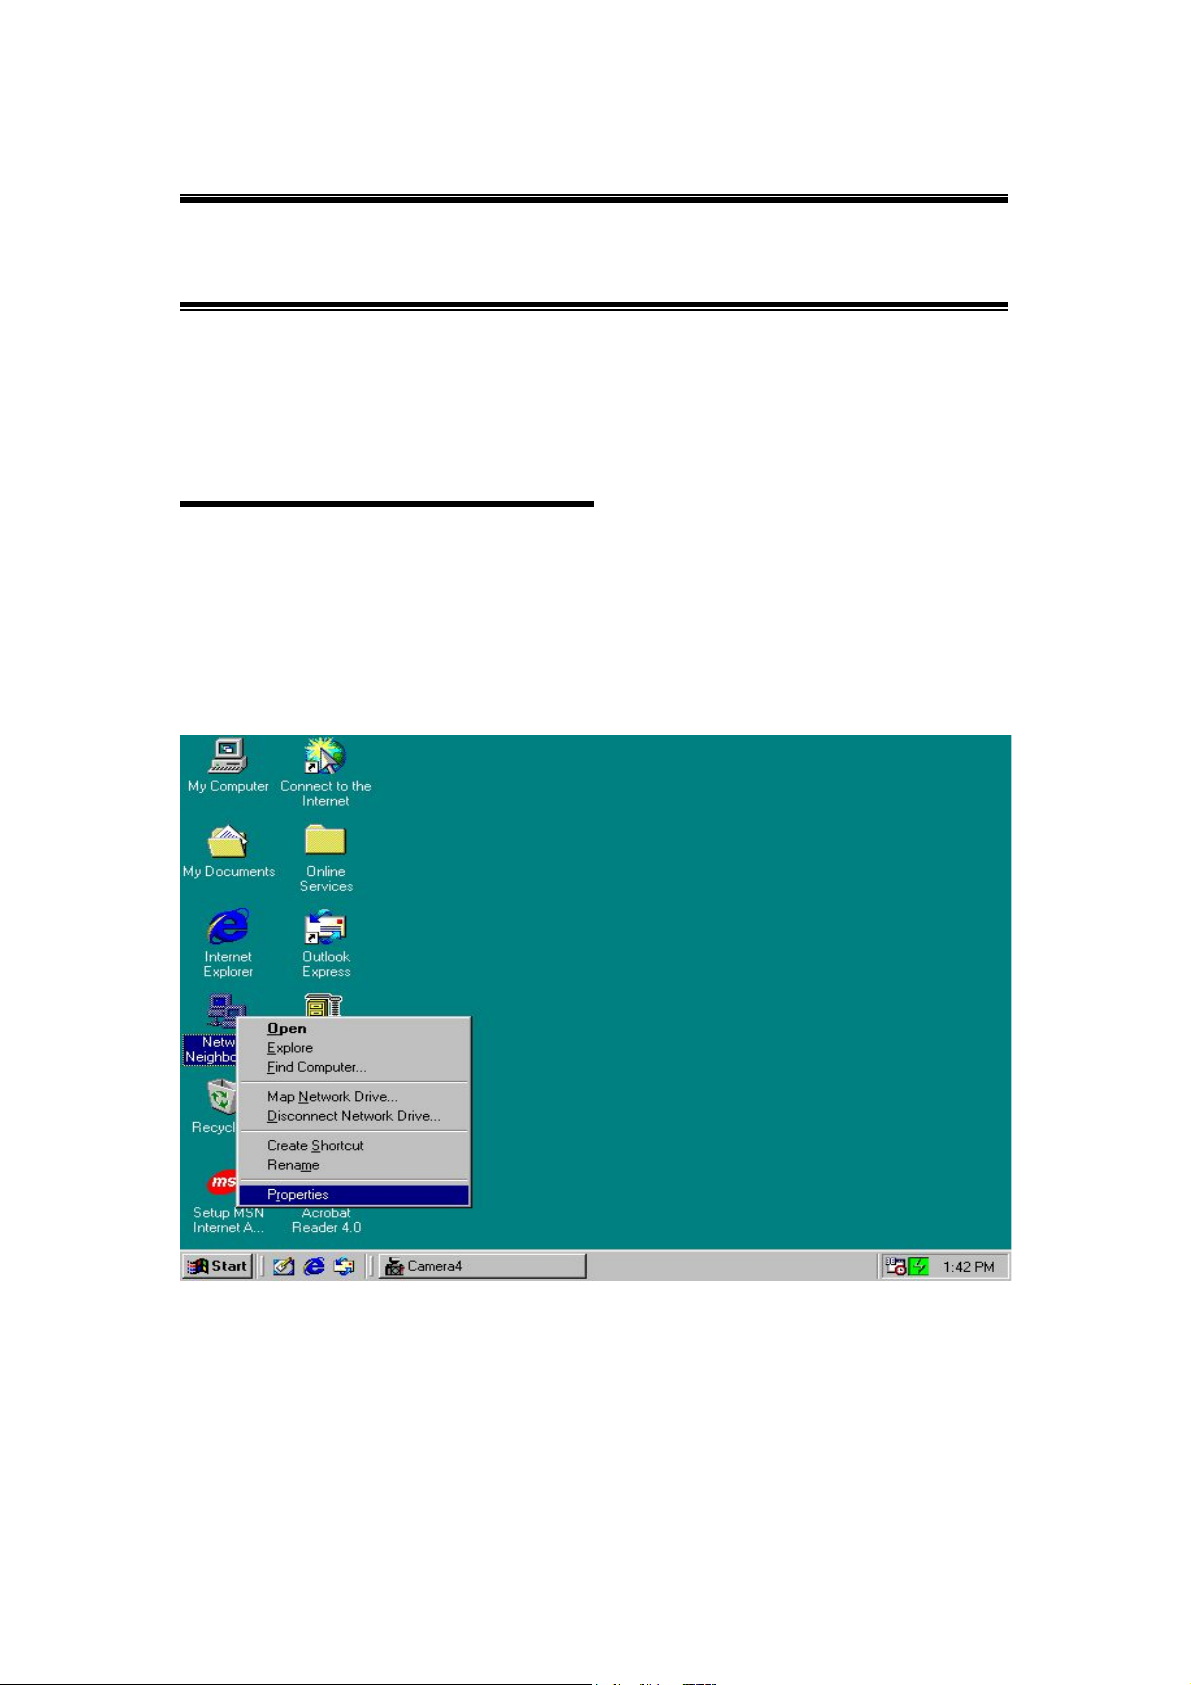
1. Firstly, connect USB wireless adapter to your computer.
Start the computer, then right click “Network Neighborhood” and
Select “Property”.
8
Page 9
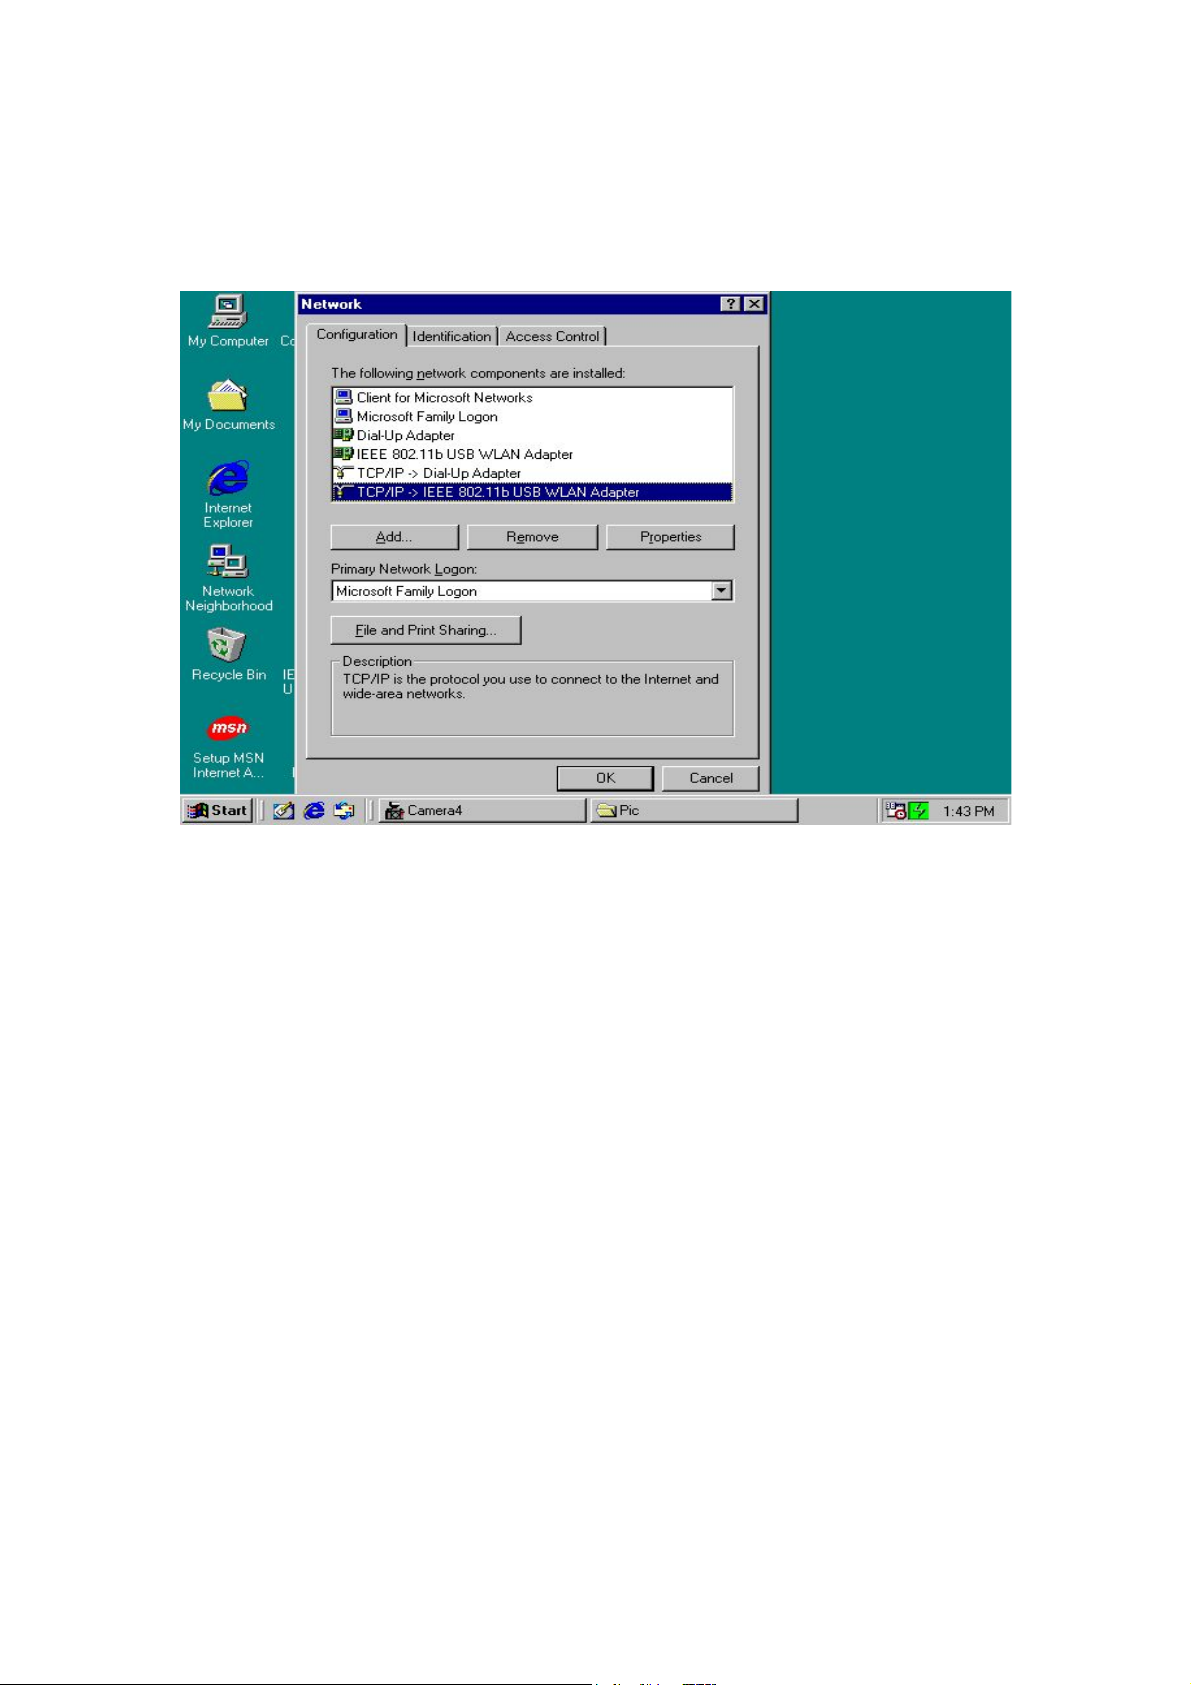
2. Double click “TCP/IP IEEE802.11Busb WLAN Adapter”, in the
“Configuration” toolbar.
9
Page 10
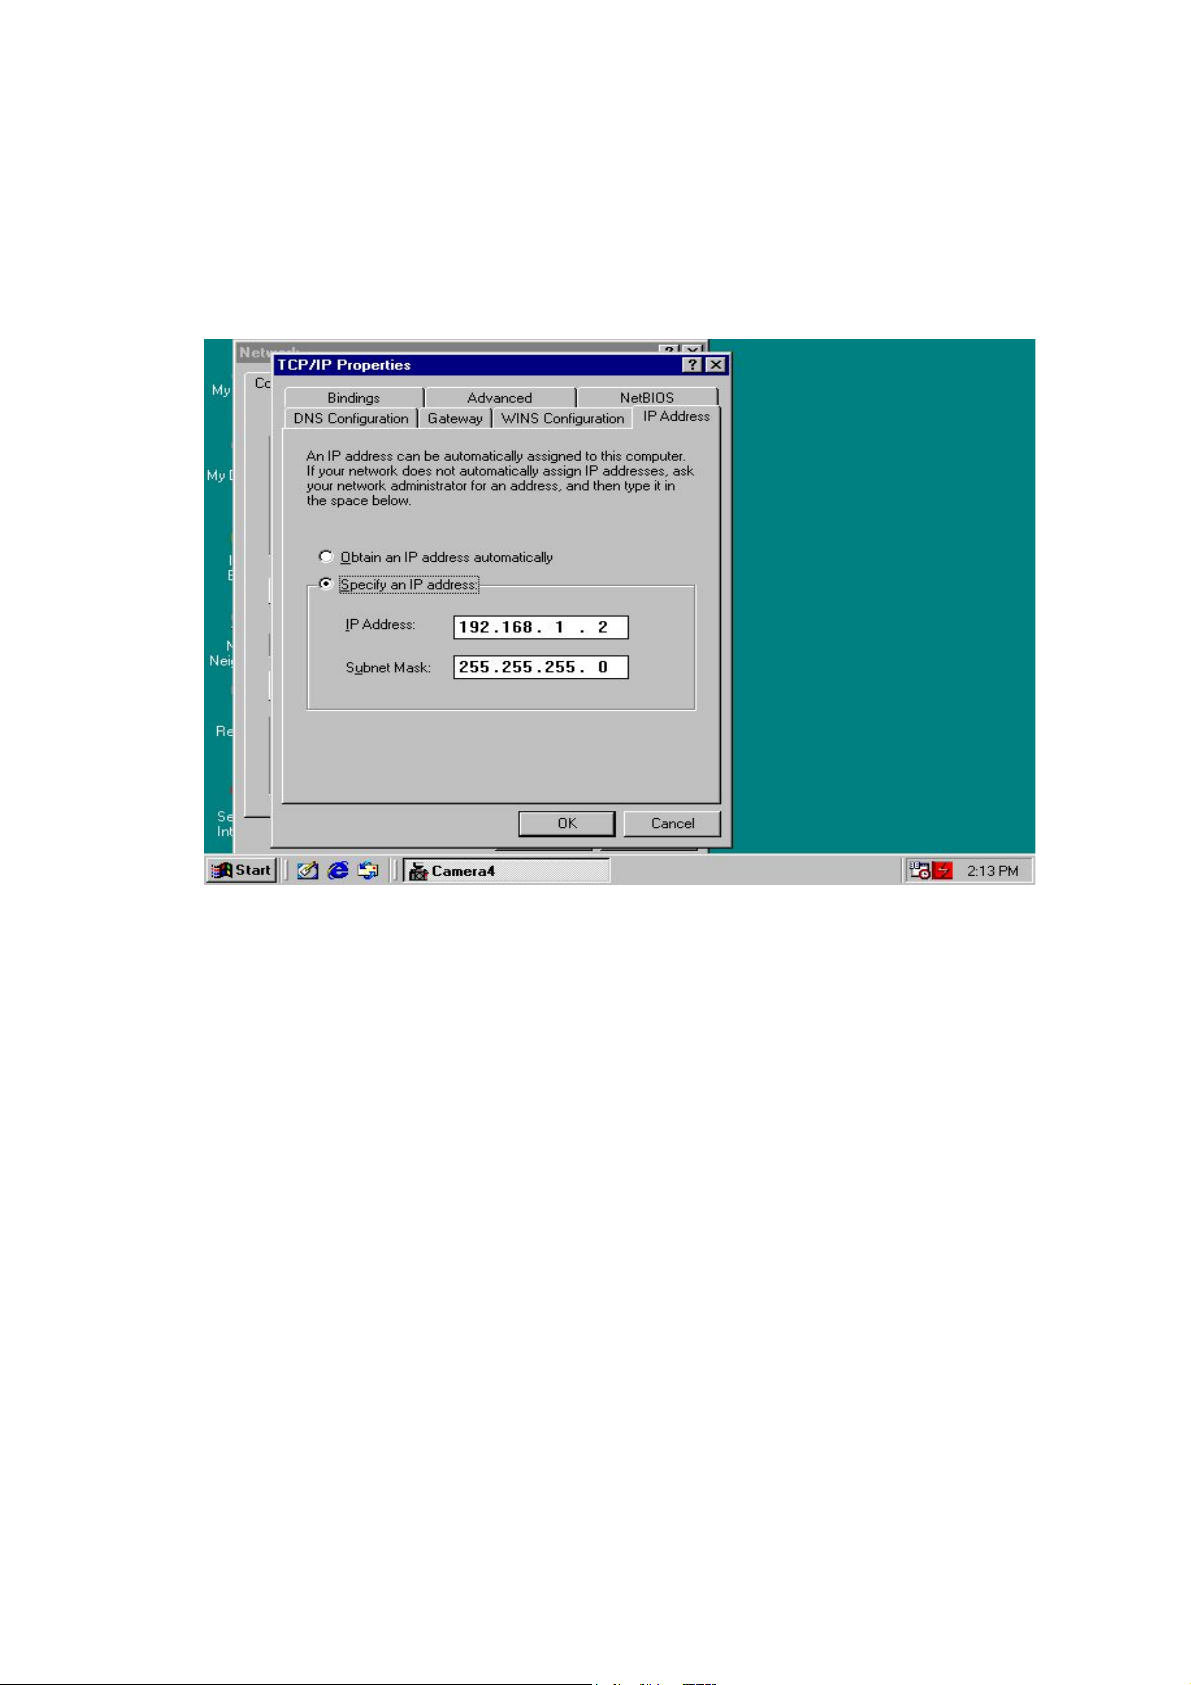
3. Select the second choice “Assign IP Address”. Then you’ll need to input an
unused network IP address (Please also refer to your Network Neighborhood
Property sheet). The default IP address of AP is (192.168.1.1) Furthermore,
insert (255.255.255.0) for your Network Mask.
4. Then click ‘O.K’ , and ’O.K’ and restart the computer.
10
Page 11
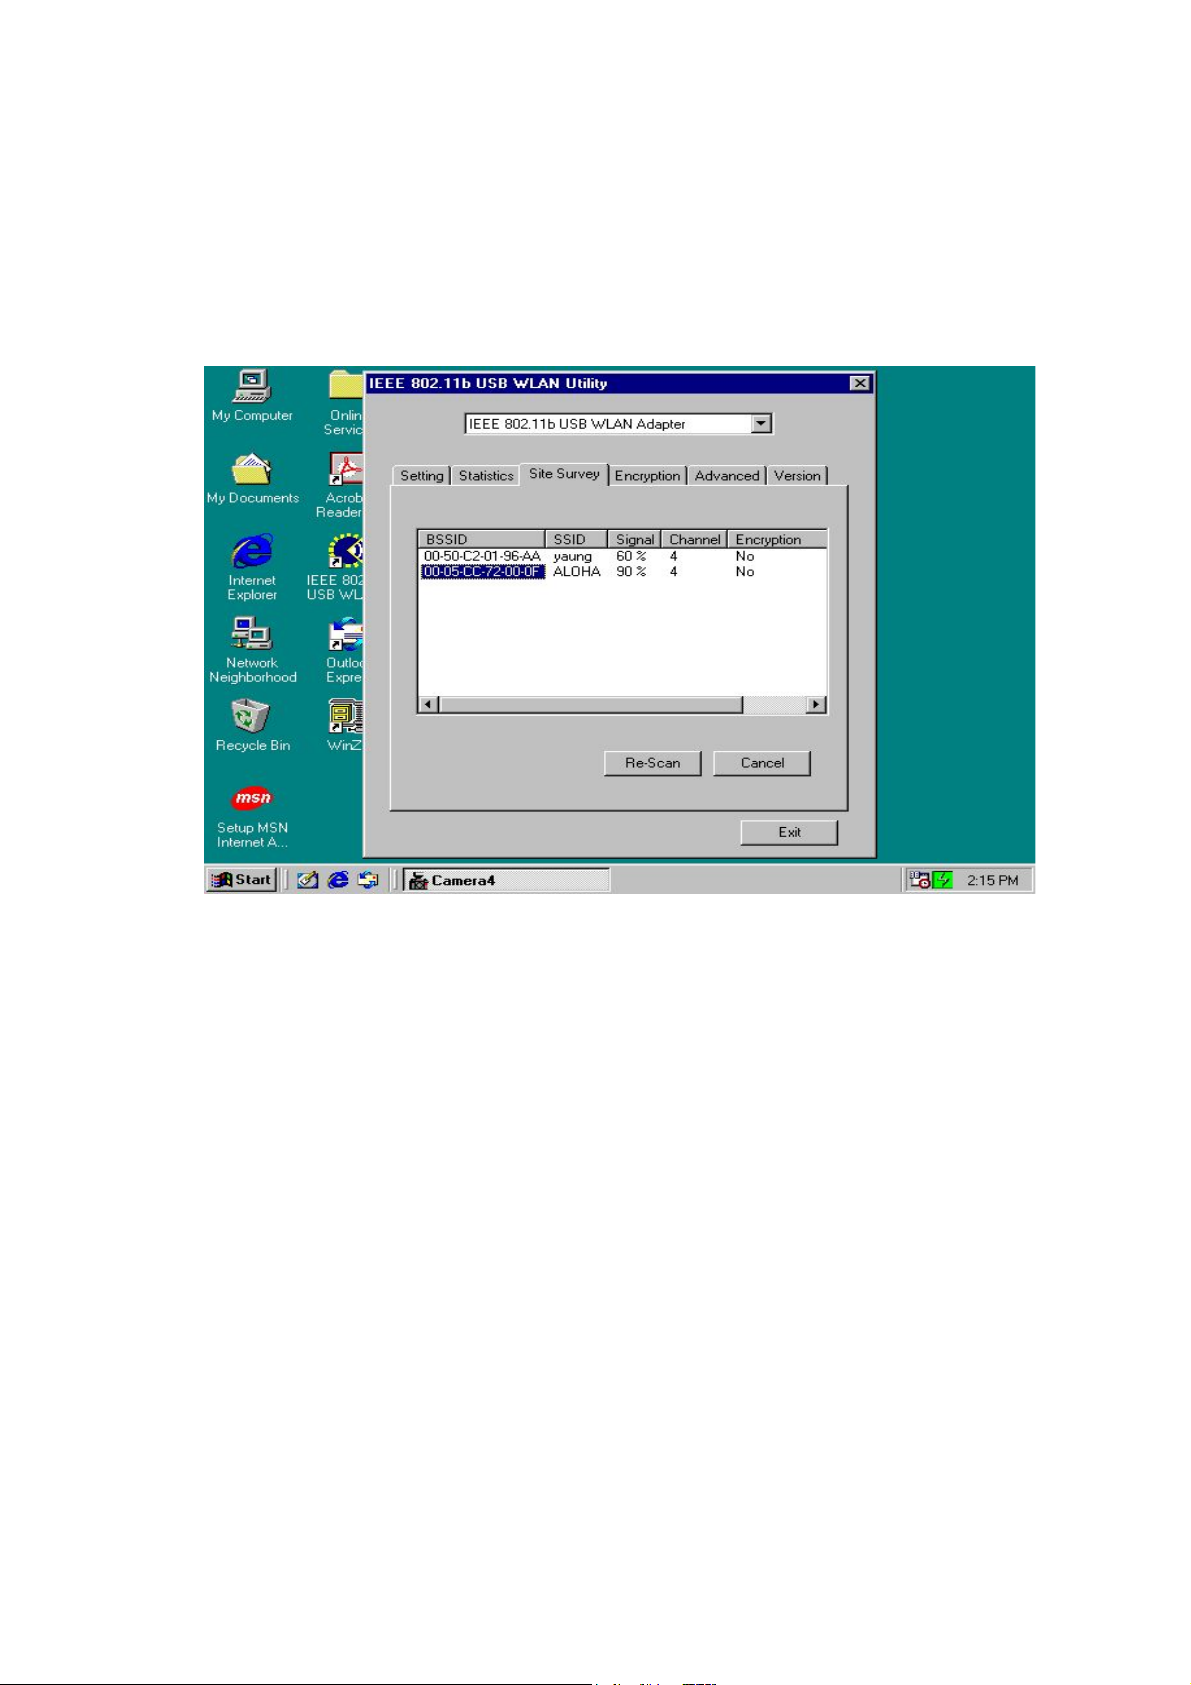
5. Click the red icon on the right hand side of the main window. (If the icon shows
green, it is connecting now, the icon shows red, it isn’t connecting now). And
select “Site Survey”, click “rescan” it shows how many APs are searched in the
receiving range. Select and double click the AP in which you are connecting. It’ll
show the setting situation. Then exit the window.
11
Page 12
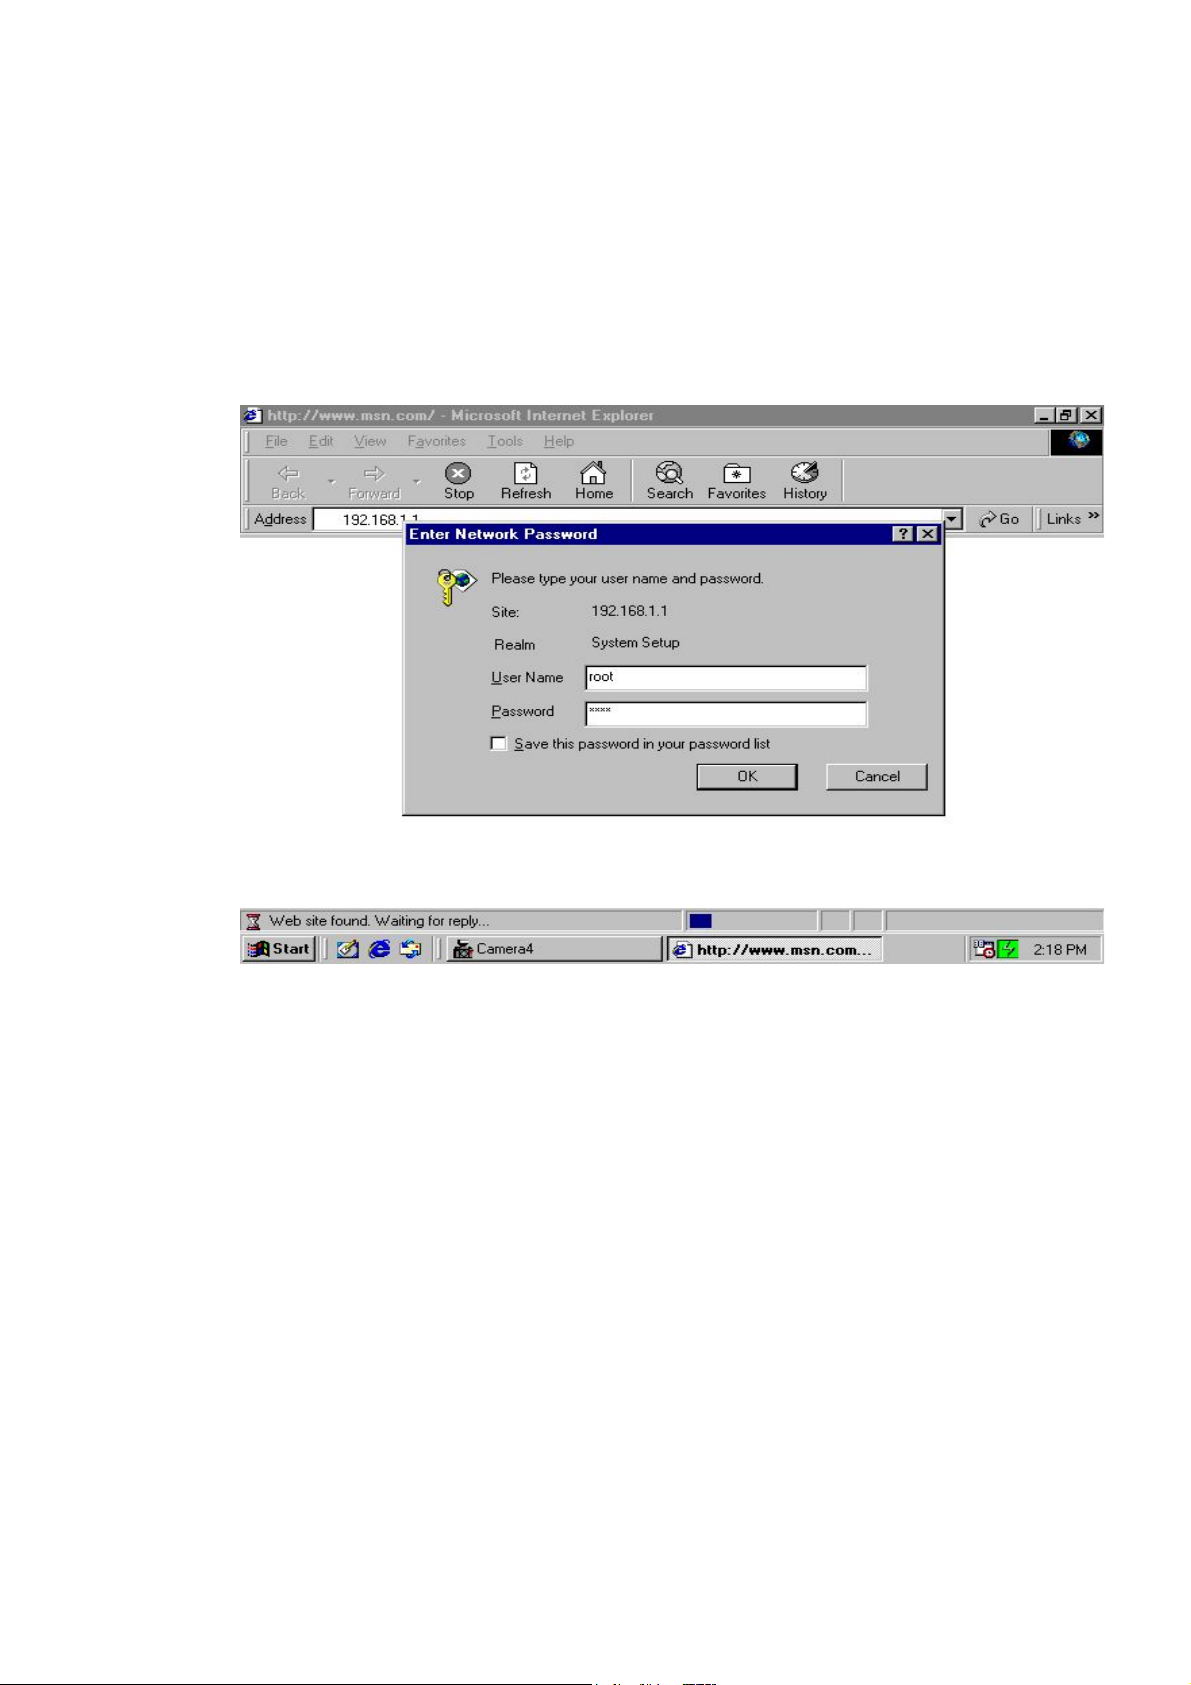
B. AP Configuration
Login:
6. Open your internet browser, and enter the IP address of the AP in which you are
using. It will show a configuration window, please enter the word “root” in the
“User Name” blank, and the word “root” in the “password” blank as the default
value.
12
Page 13
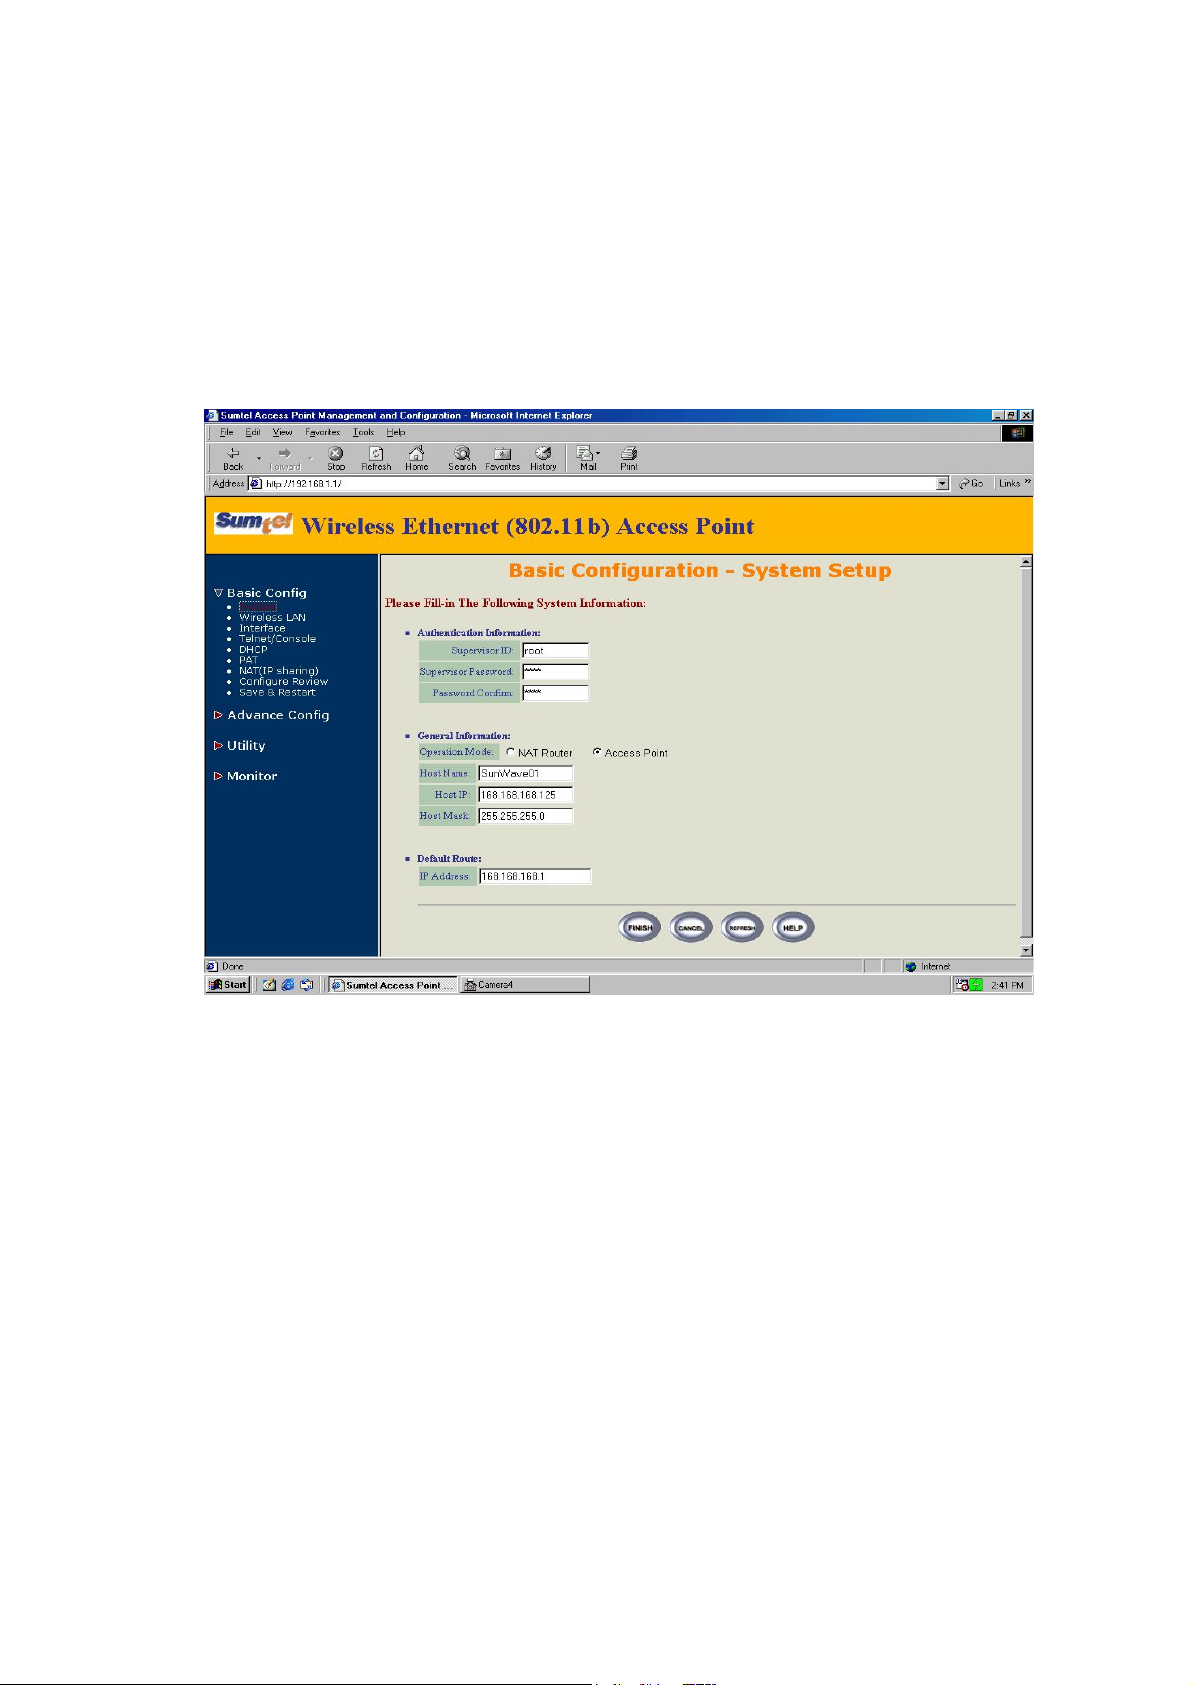
7.
Basic Configuration:
8. Click “System” under the “Basic Configuration”, then select the “Access
Point” and fill up the “Host Name” and “Host IP”(IP Address of AP), insert
(255.255.255.0) for your Network Mask. In the “Default Rout” insert the
Gateway IP as its IP Address. Click “Finish”.
13
Page 14
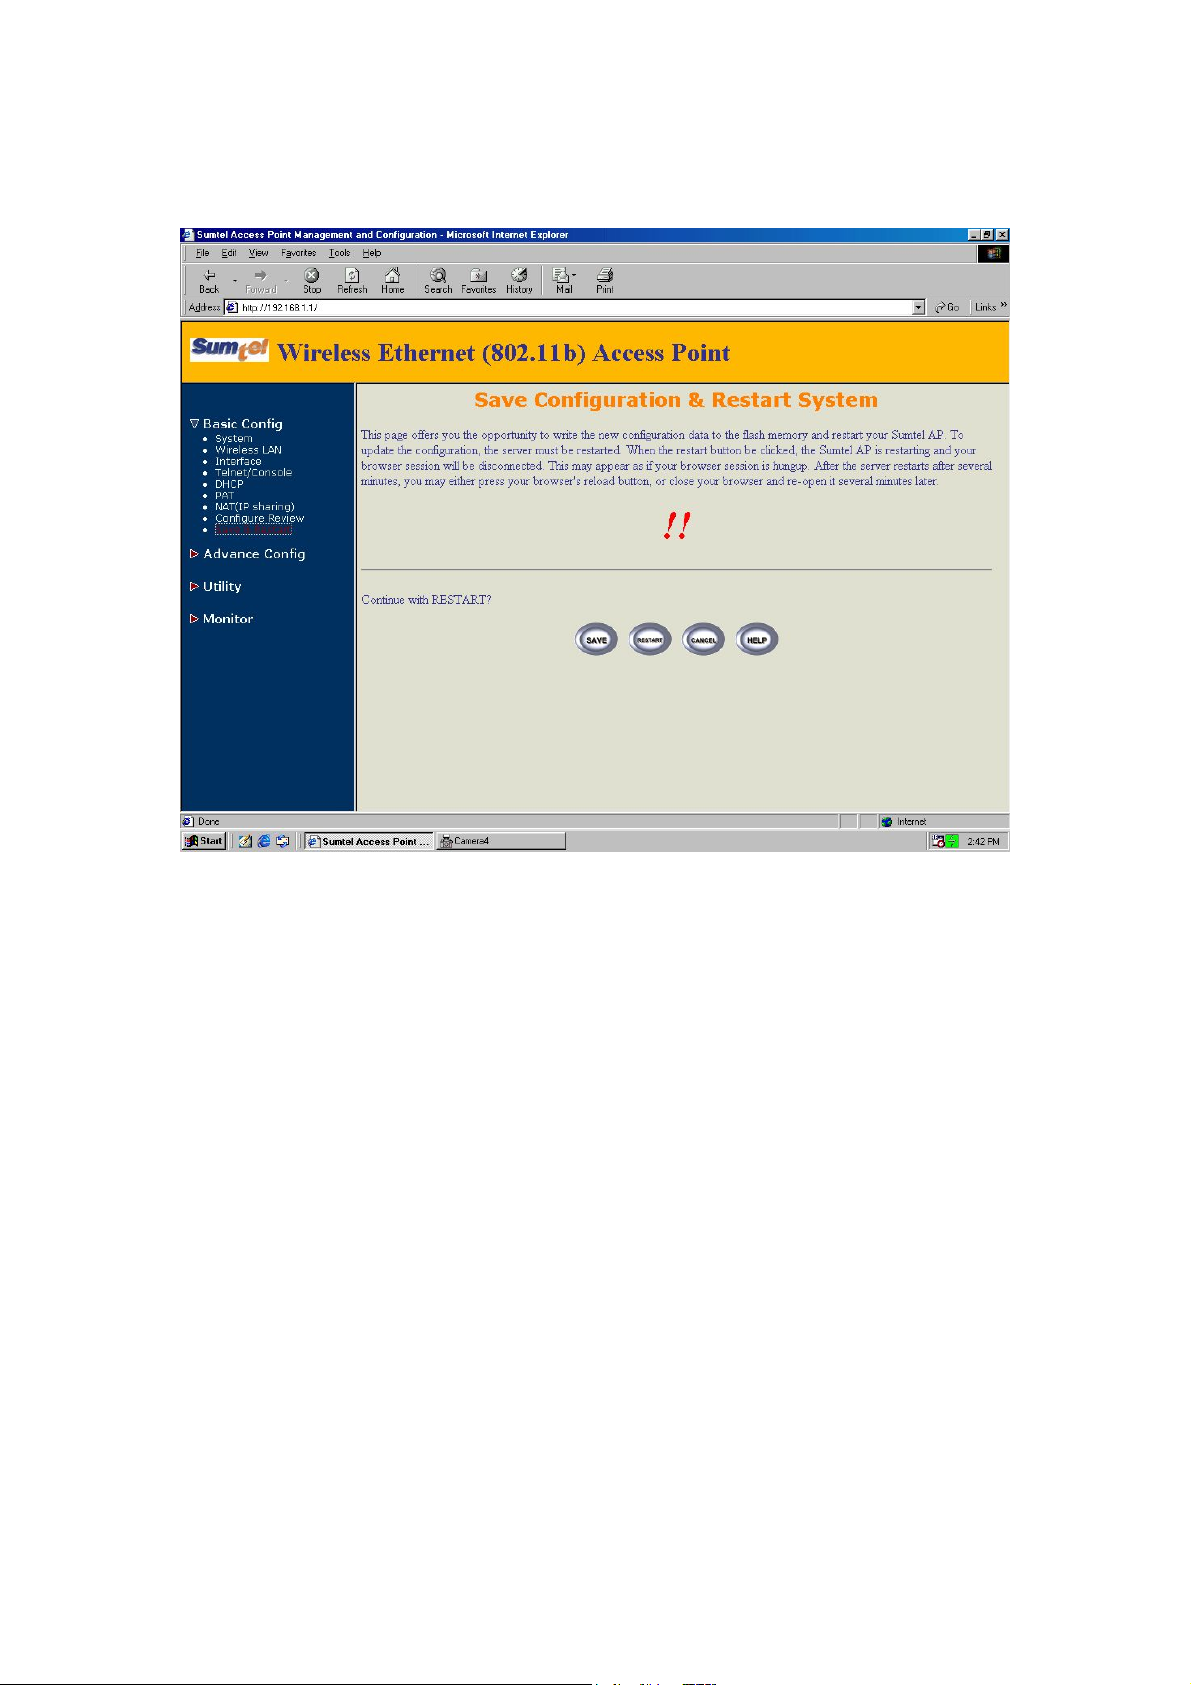
8. Go to “Save & Restart”, click “save”. The AP will be rebooted.
14
Page 15
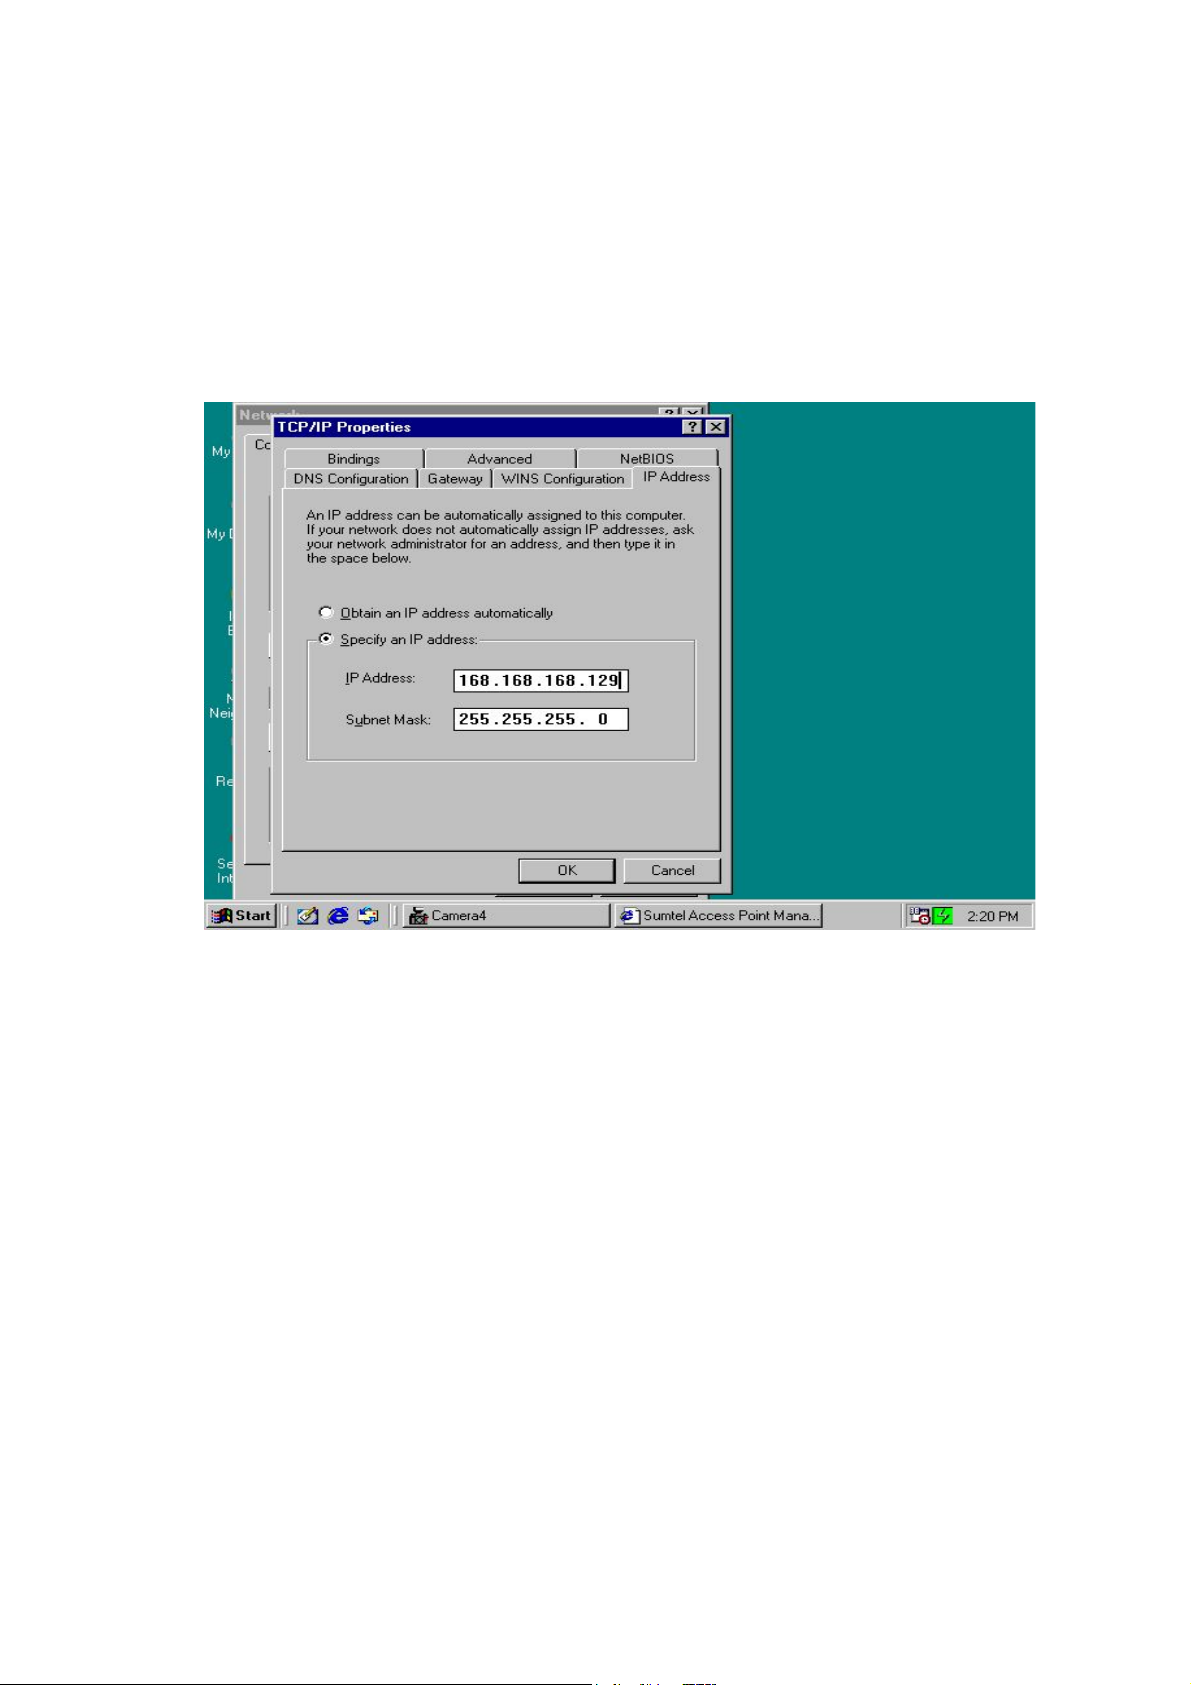
C. Connecting to WAN
9.Right click “Network Neighborhood” select “Property” and in the
“Configuration” toolbar, then double click “TCP/IP IEEE802.11Busb WLAN
Adapter”.
Select the second choice “Assign IP Address”. Then you’ll need to change an
assigned IP address that can connect to Gateway IP)
Up to now, we set up the Wireless LAN Networking.
Is your Installation Successful?
If the installation is successful, the middle light (wireless) is green and the highest
light (power) and lowest light (Ethernet.) The lowest light will flash whenever
there is traffic on the respective network.
How to Select Wired Network?
The Access Point automatically selects the medium attached. When the cable
network is detected, the network light will turn on.
How to Start your Wired Network?
Now, you can try your wireless internet access. Just type-in your desired web
address, and it will be accessed wirelessly.
Factory Settings
You can reset the Access Point’s Settings to factory defaults by pushing a
paperclip in the little hole next to the power switch when Access Point is turned
off. Hold until the lights at the front of the Access Point lights are off.
15
 Loading...