

Page 1
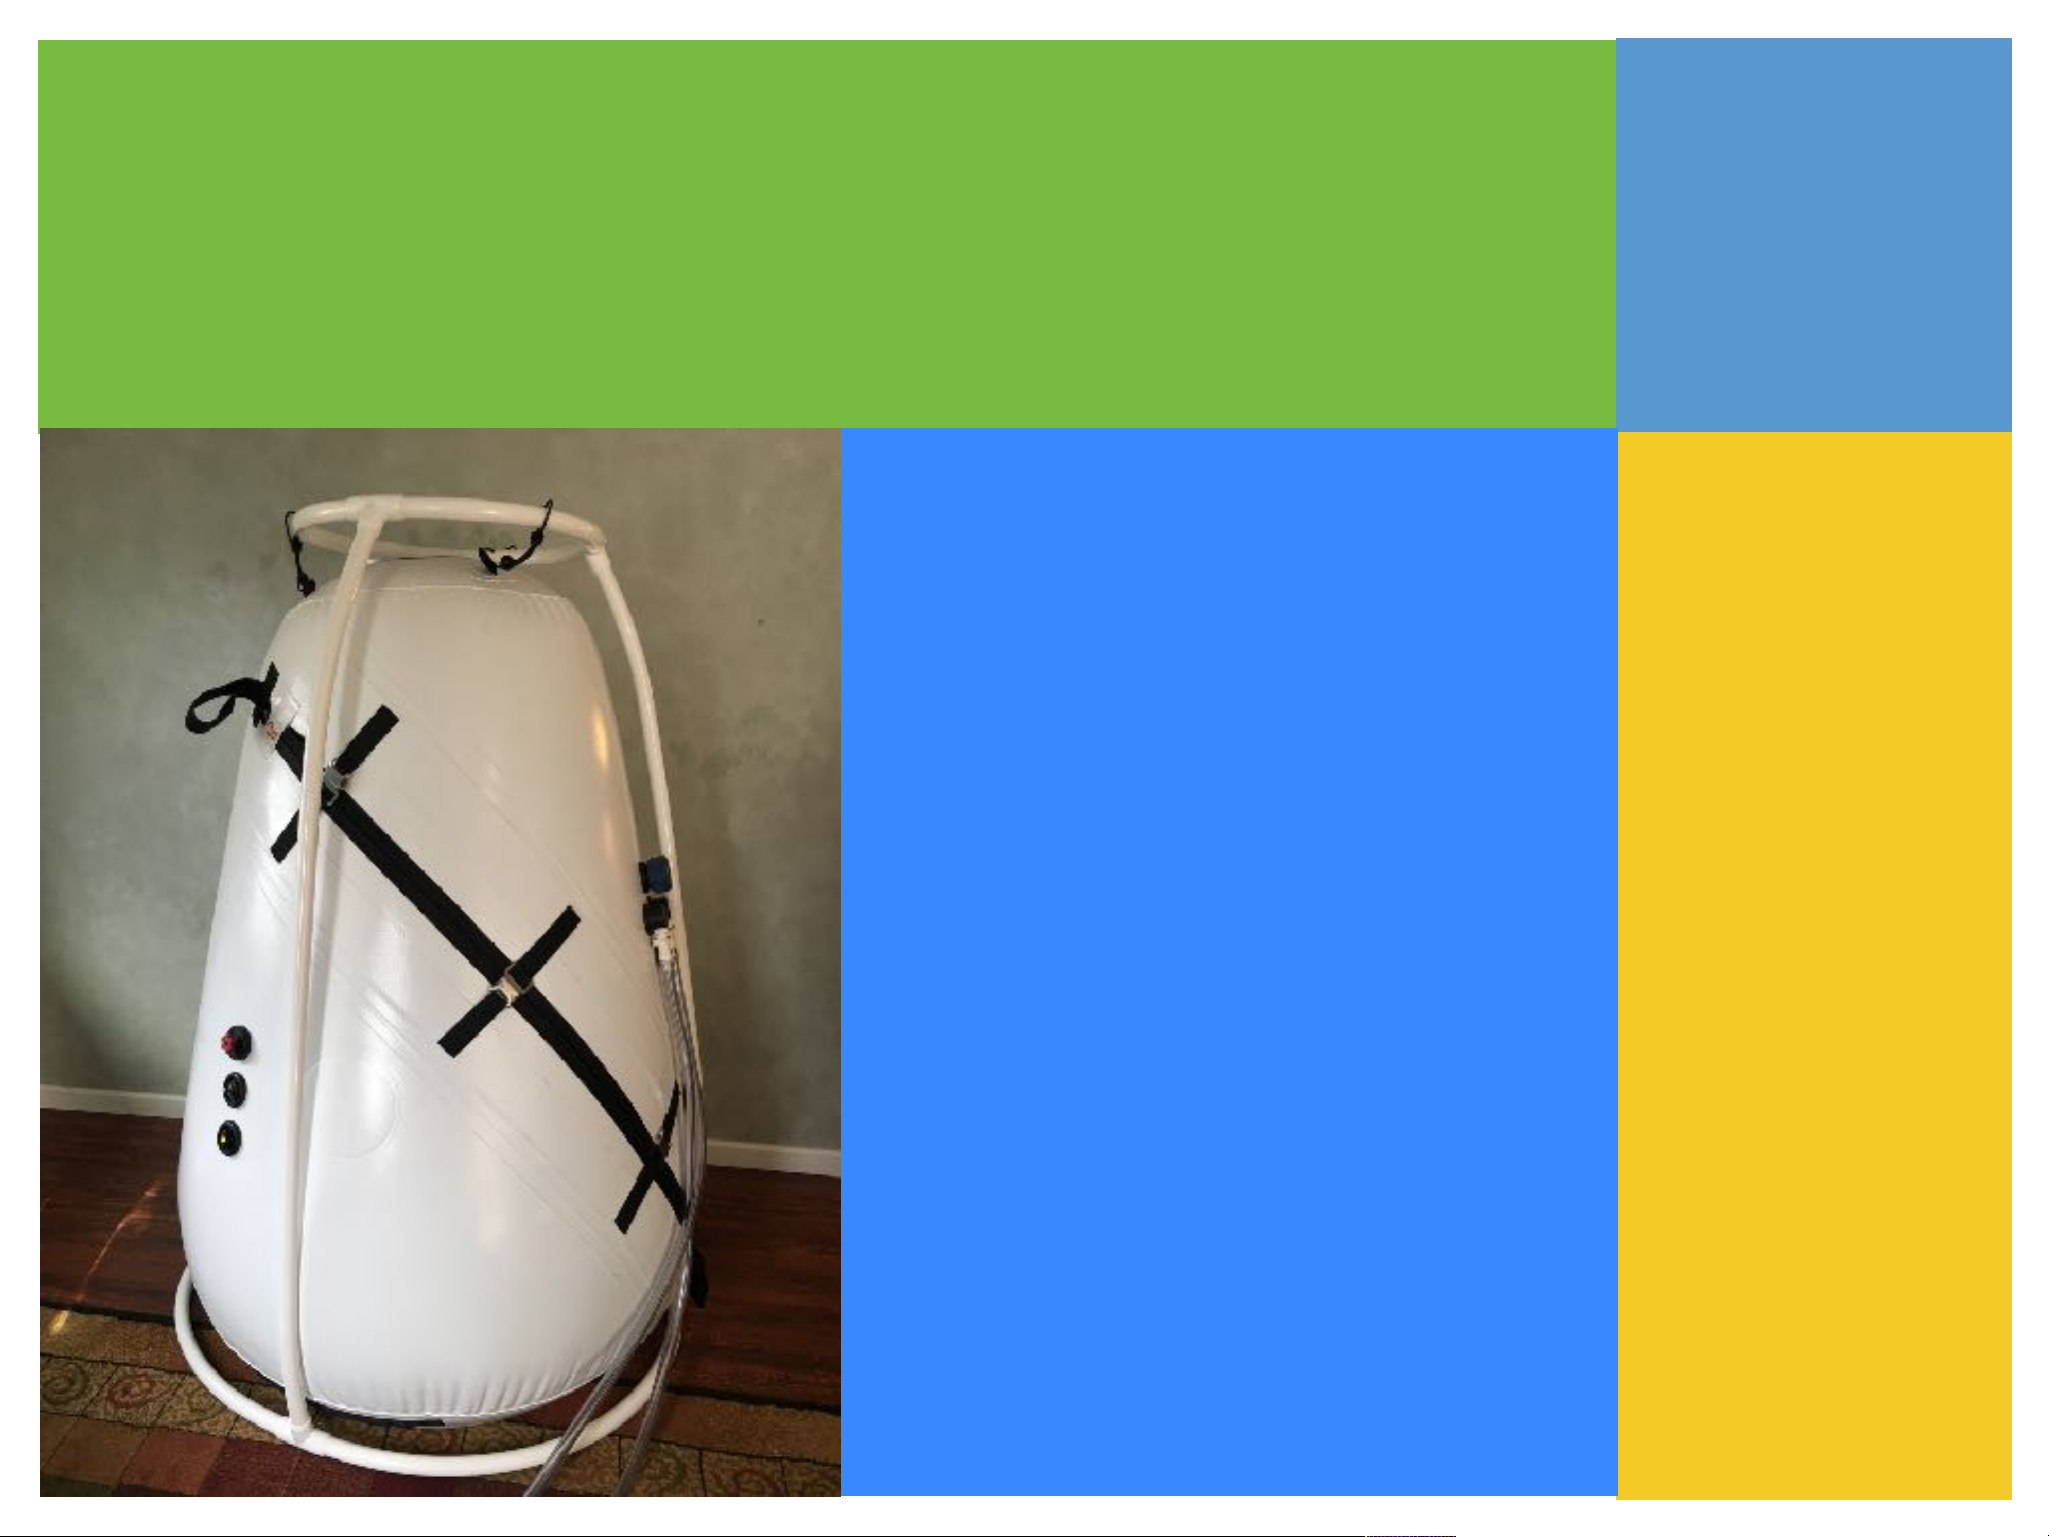
DIVE VERTICAL
Page 2

SAFETY FIRST
Summit to Sea has made every effort for your hyperbaric experience to
be safe, comfortable and beneficial.
We have implemented 3 safety features that are unique to
Summit to Sea chambers.
Belts
•
Two compressors
•
Failed Circuit Alarm
•
Page 3

SAFETY FIRST
Belts
It is very important that when operating the chamber both zippers
are completely closed and all belts are buckled.
The belts reduce stress on the zipper extending the life of the zipper.
Page 4
SAFETY FIRST
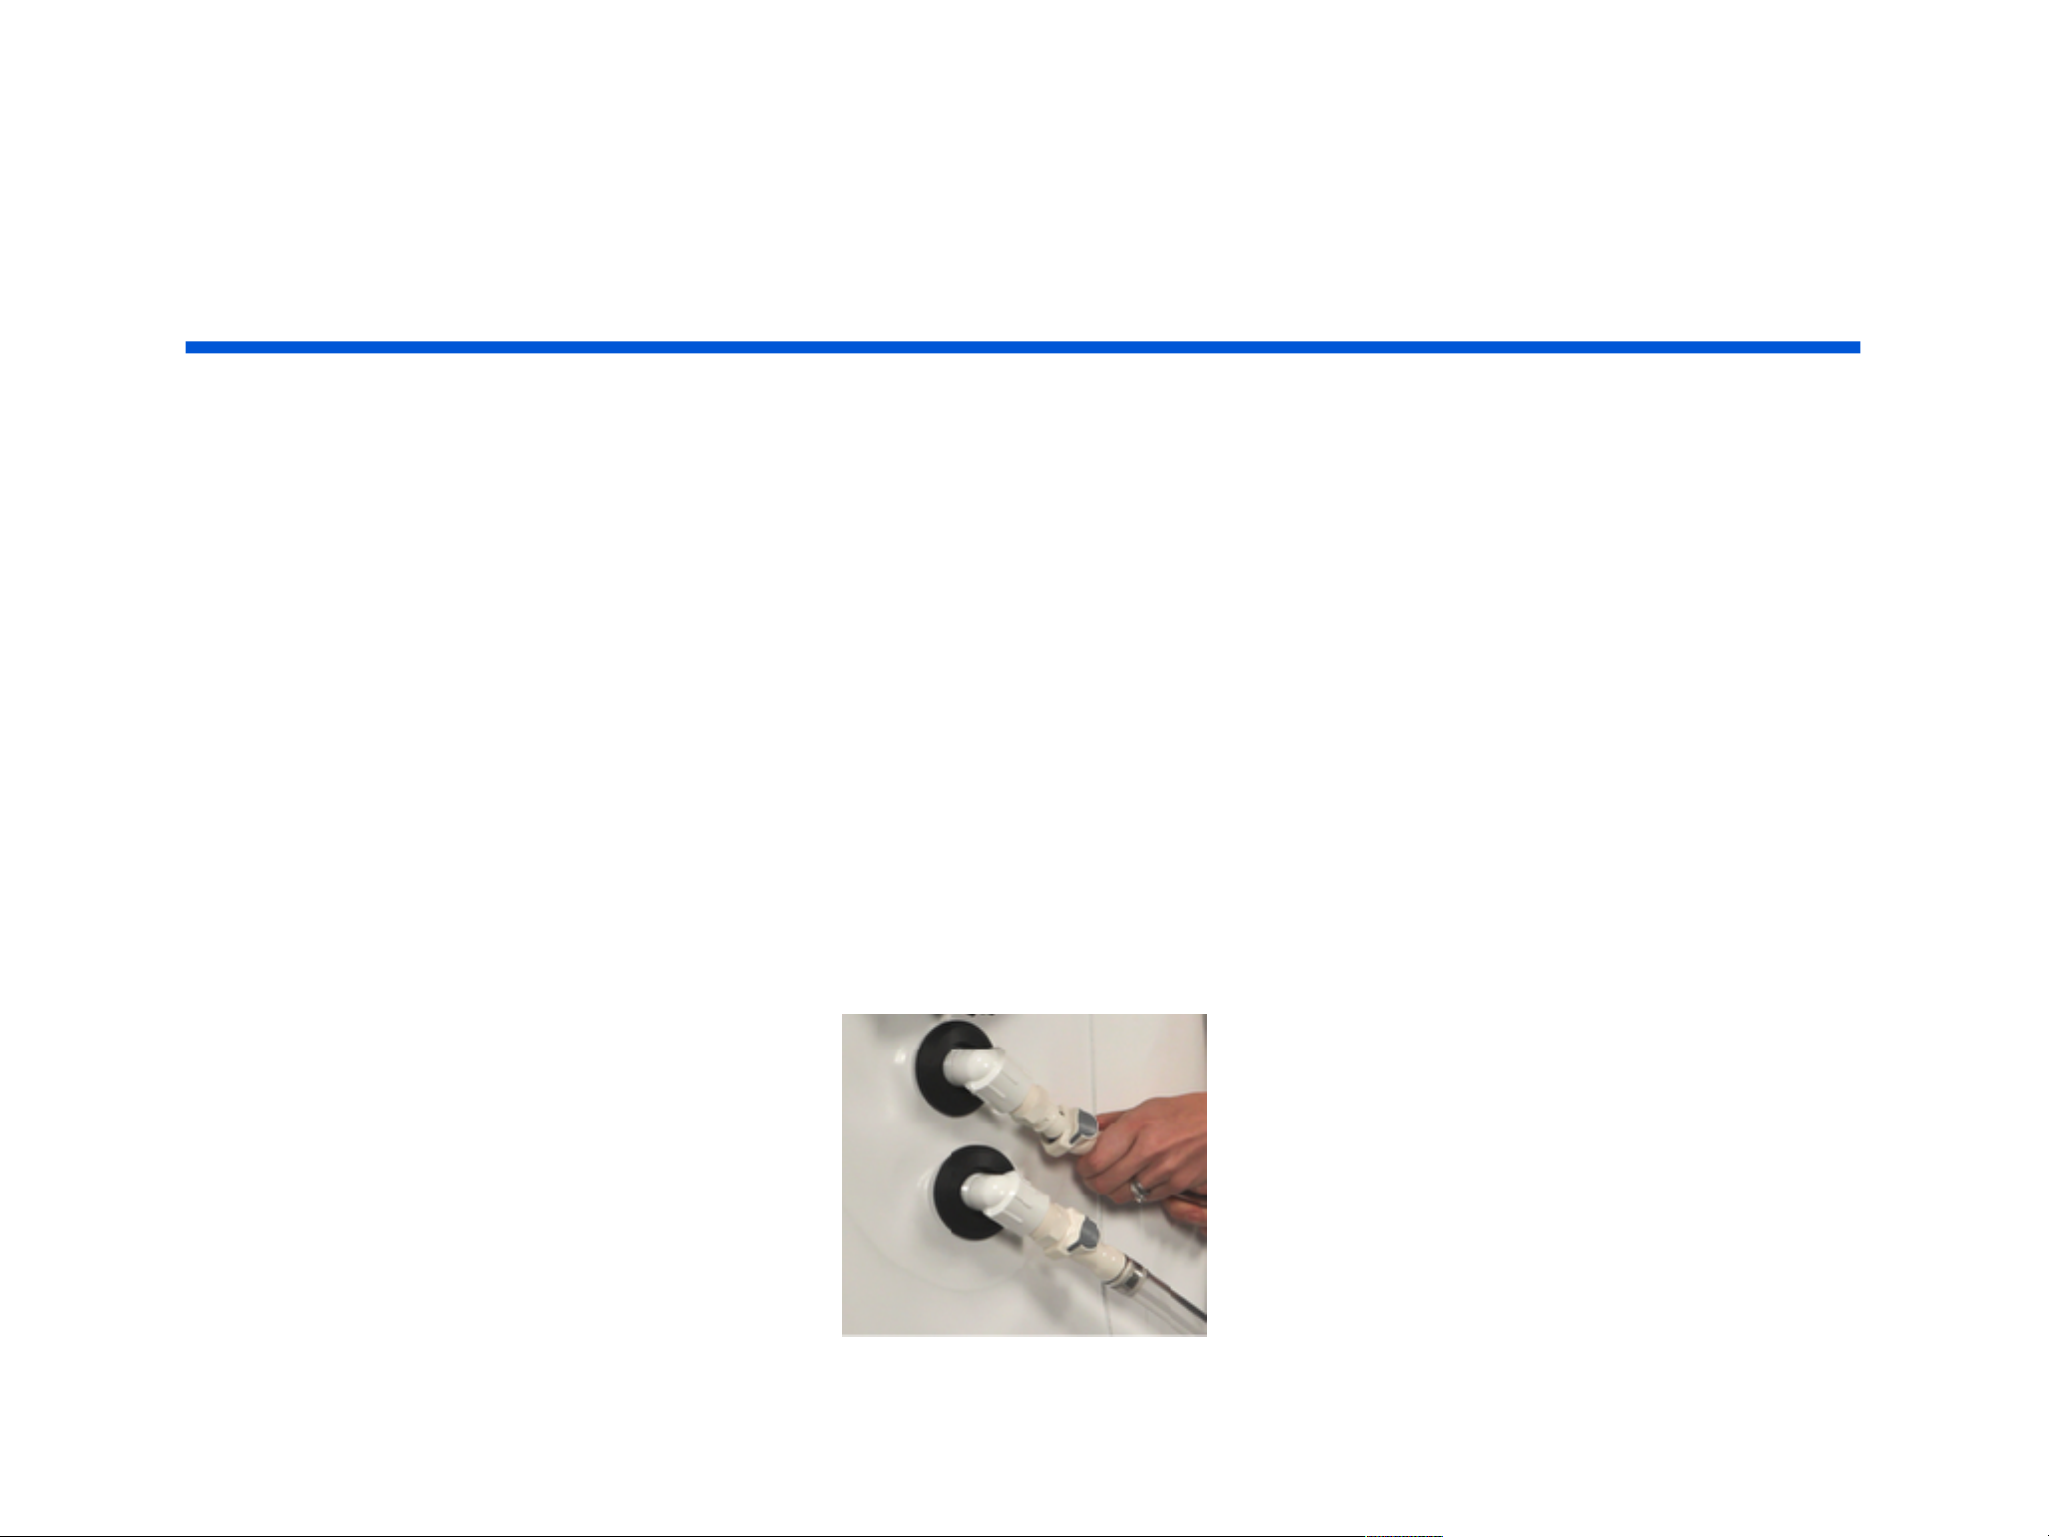
Two compressors
For safety Summit to Sea has multiple redundant systems and components.
One of these is the compressor system.
In the event if one of the compressors failed you would still receive fresh air
into the chamber allowing you to deflate safely.
Summit to Sea uses two independent compressors offering
safety and comfort.
VERY IMPORTANT: Both compressors need to be running during treatment.
Page 5

SAFETY FIRST
Failed Circuit Alarm
Summit to Sea supplies a failed circuit alarm with every chamber.
In the event that there is a power outage which would prevent the
compressors from supplying fresh air into the chamber the user
would be alerted with a loud sound.
Page 6
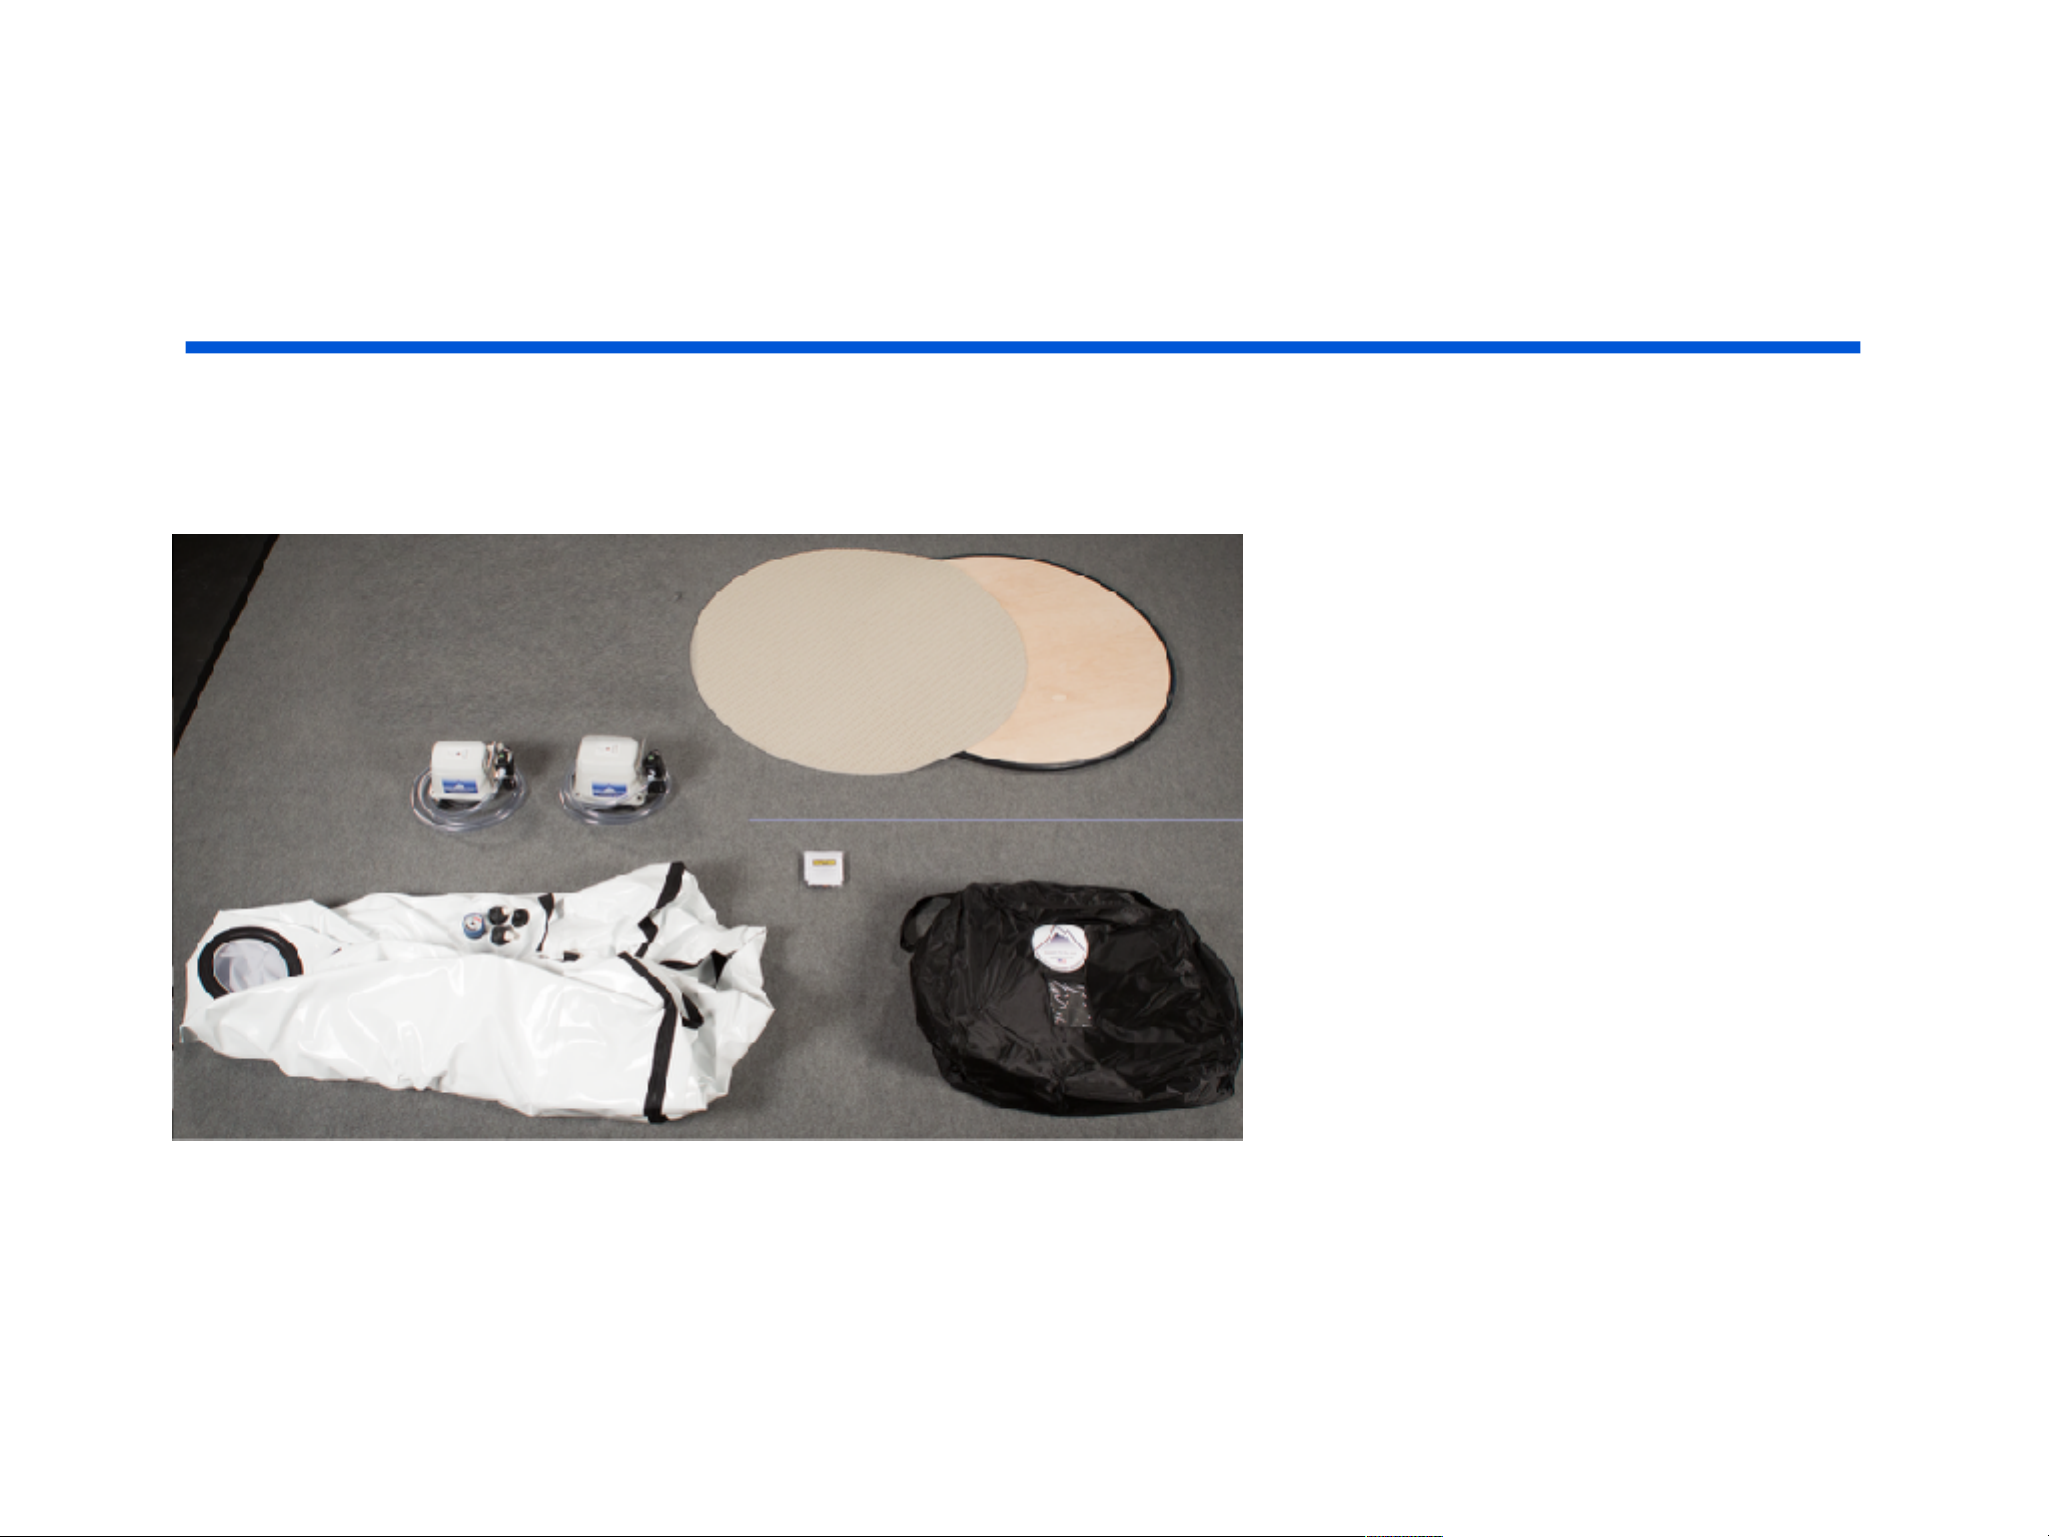
WHAT IS INCLUDED
Chamber
Carry Bag
Carpet
Floor
Frame
Bungees/Hooks
2 Compressors
Zipper lubricant & cleaner
Auxiliary Valve
Failed Circuit Alarm
Page 7
SET UP
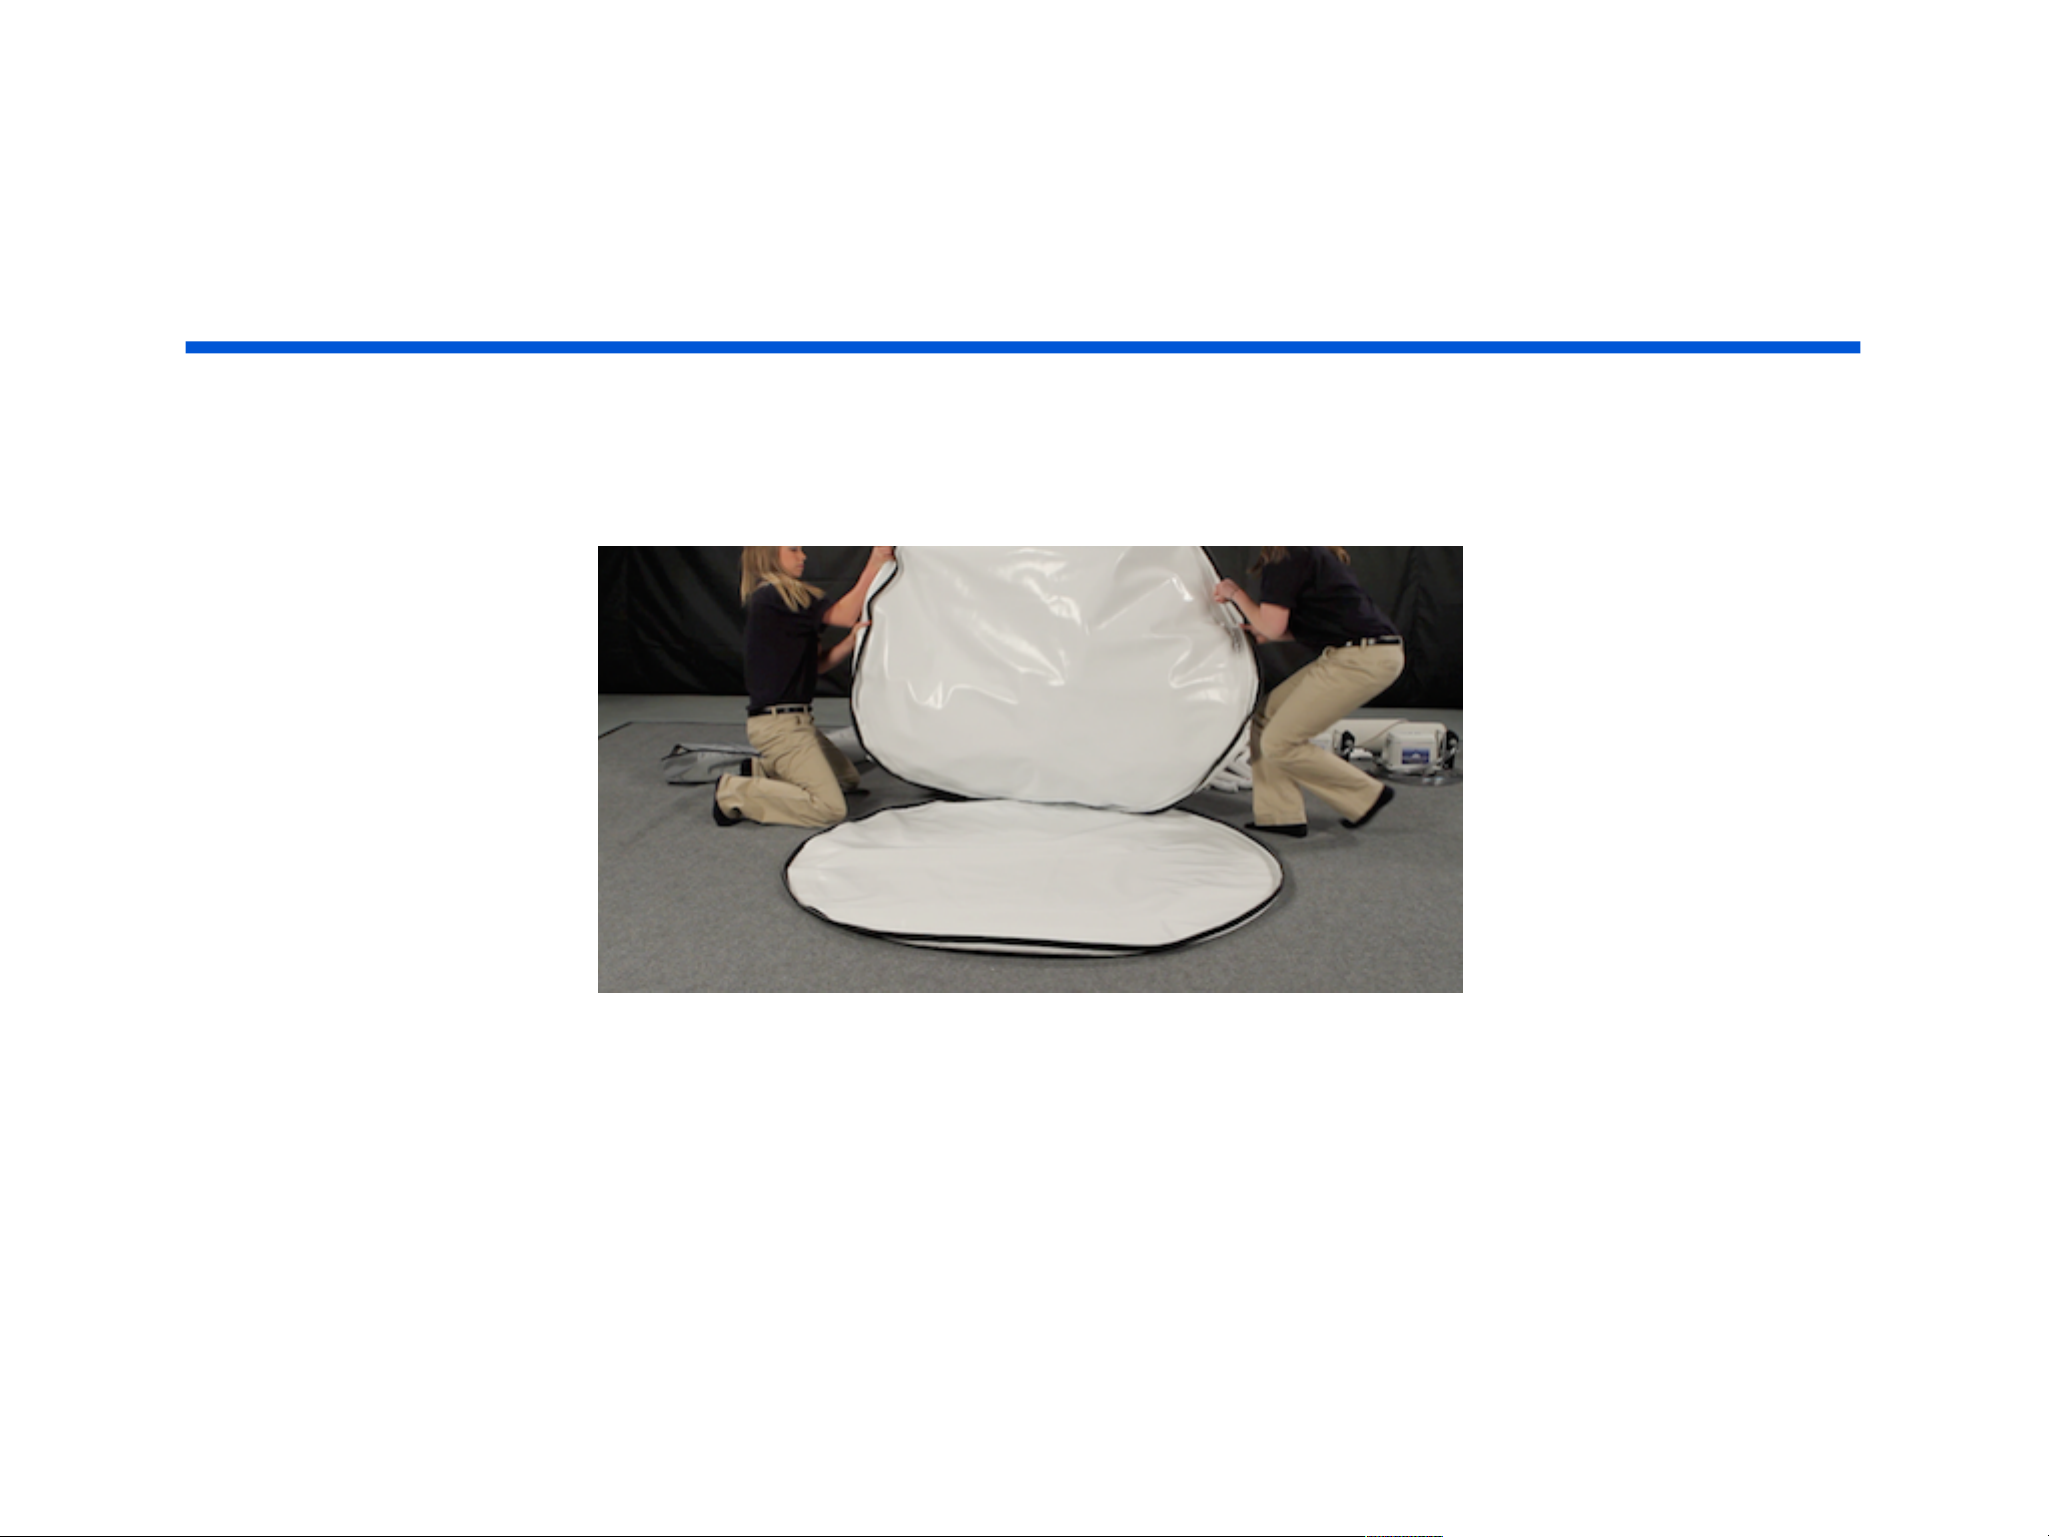
The first step is to fold back the chamber to expose the bottom pocket for the floor.
You will need to unzip this pocket so that you can place
your floor in the center of this circle.
Page 8
SET UP
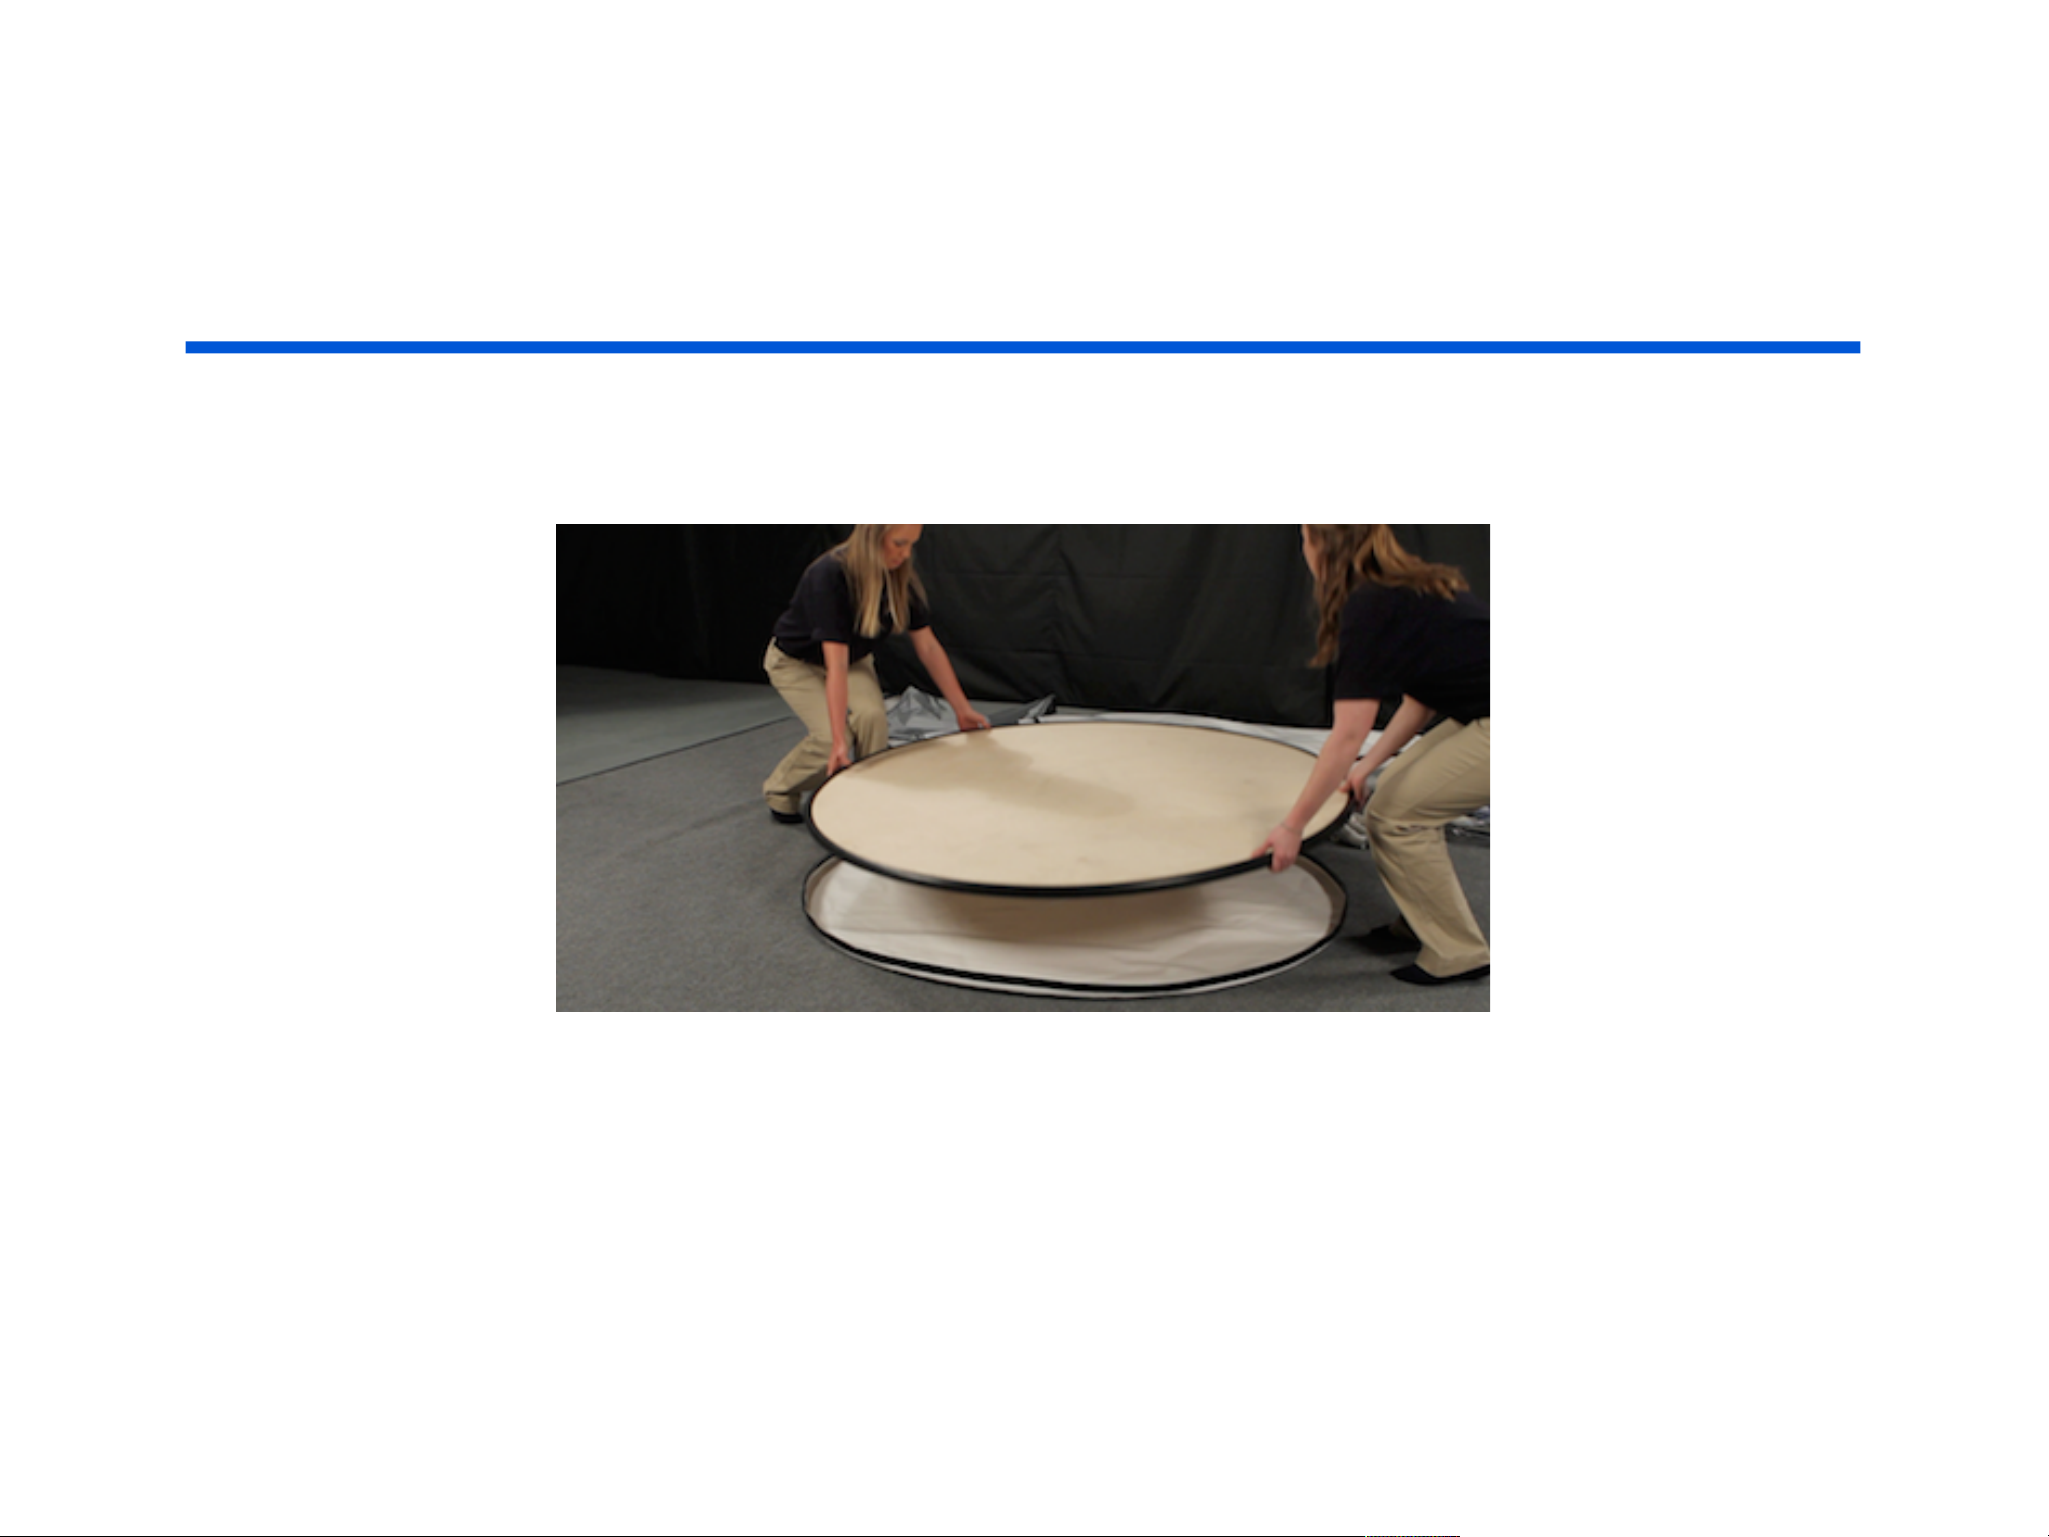
Carefully place the wooden floor in the center of this pocket opening.
The floor will be a little smaller than the bottom circle.
It is very important that you center the wood floor.
When you inflate your chamber and it does not seem
to be balanced, you may need to readjust the floor to make
sure it is in the center of the circle.
Page 9
BUILDING THE FRAME
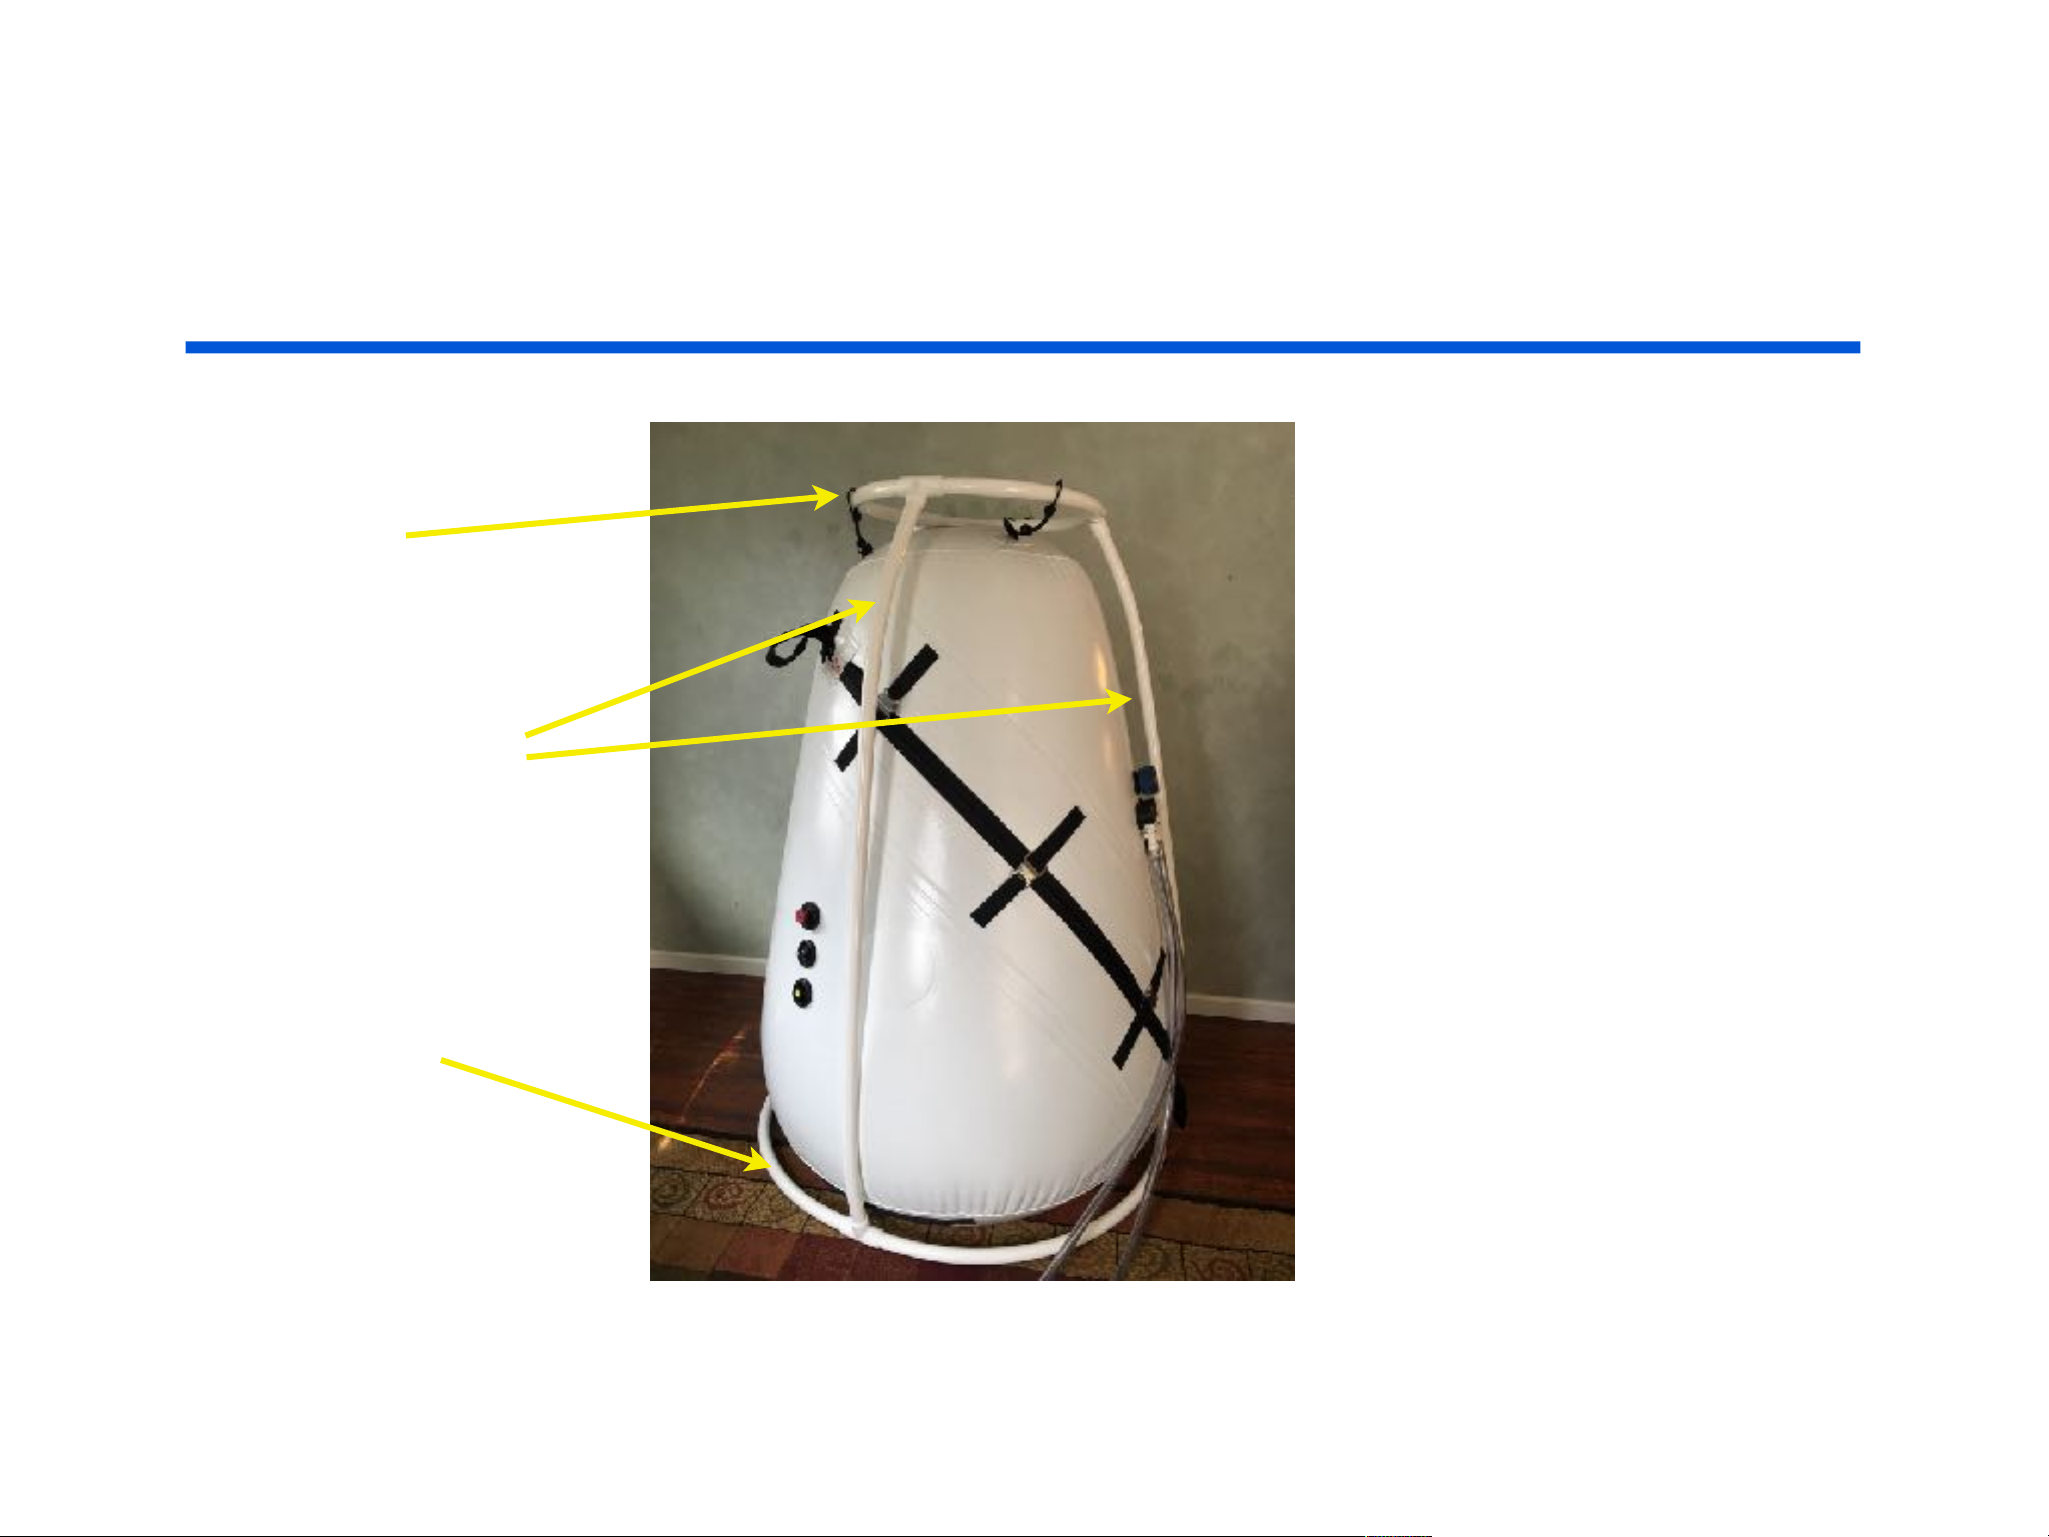
This easy-to-build
frame comes with
Top ring
3 Poles with dot on
one end to indicate
top of pole
Bottom ring
5 pieces.
There is a small ring
for the top and a
large ring for the
bottom. Each one
has 3 tee fittings
attached.
Simply place the 3
poles in each tee
FRAME
fitting. There is a
dot on one end to
indicate that it goes
into the small ring
on top.
Page 10
BUILDING THE FRAME
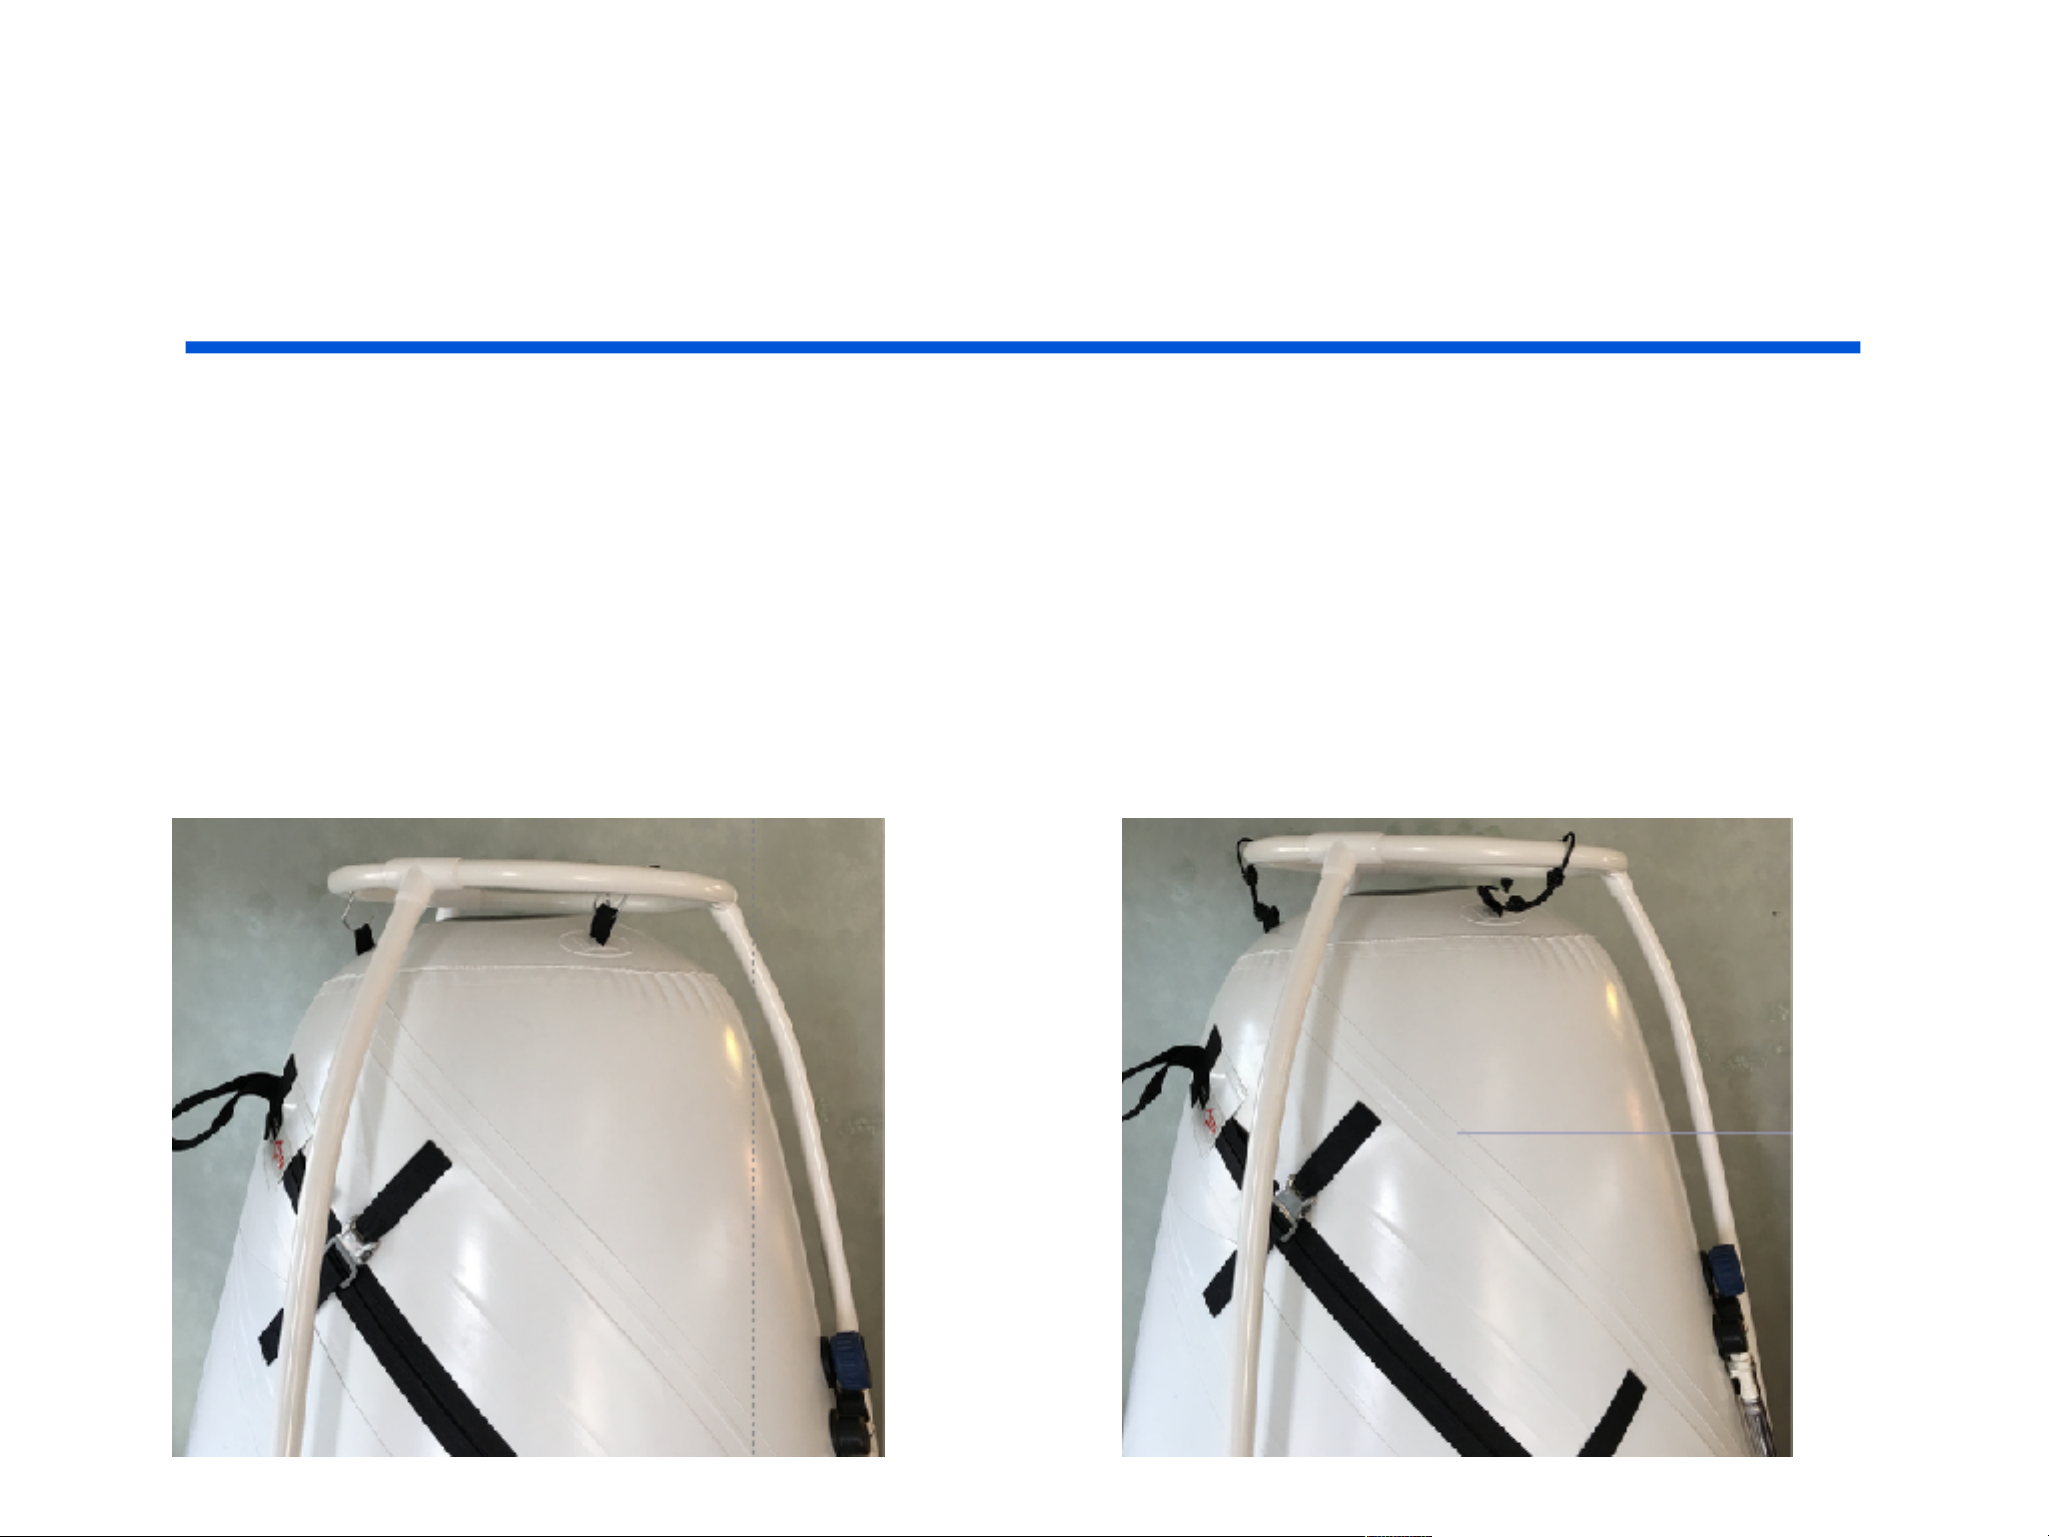
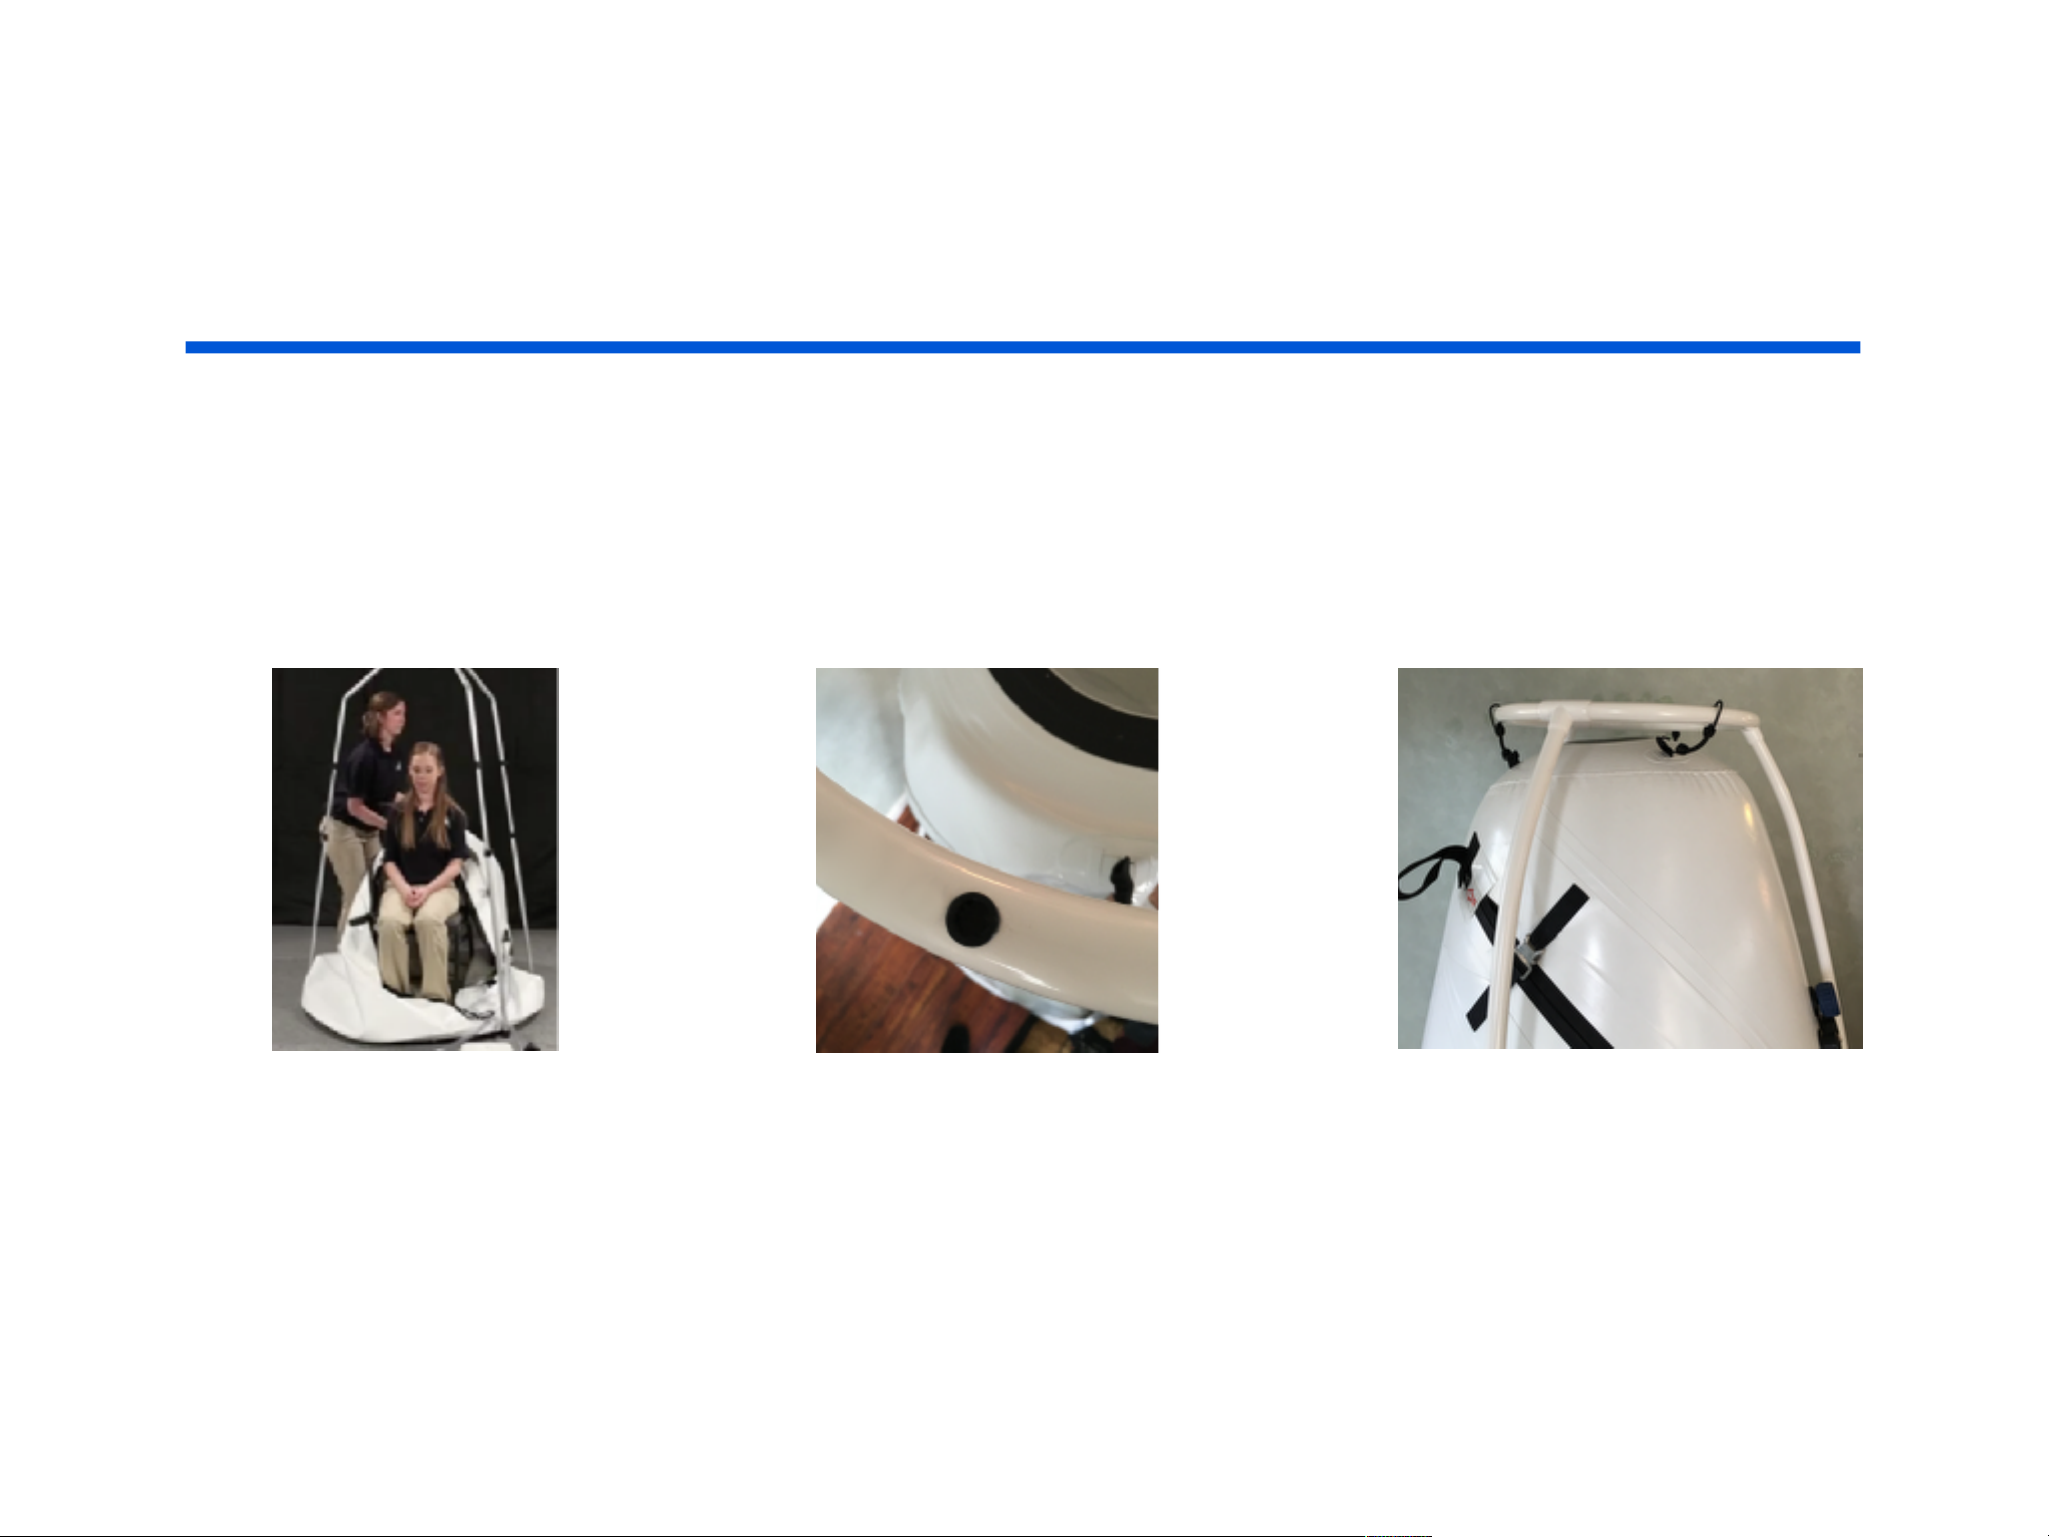
There are TWO options for attaching the chamber to the frame.
Both the metal hooks and the bungee cords are included
in your instructional packet
Option 1: Metal hooks Option 2: Bungee cords
Page 11
BUILDING THE FRAME
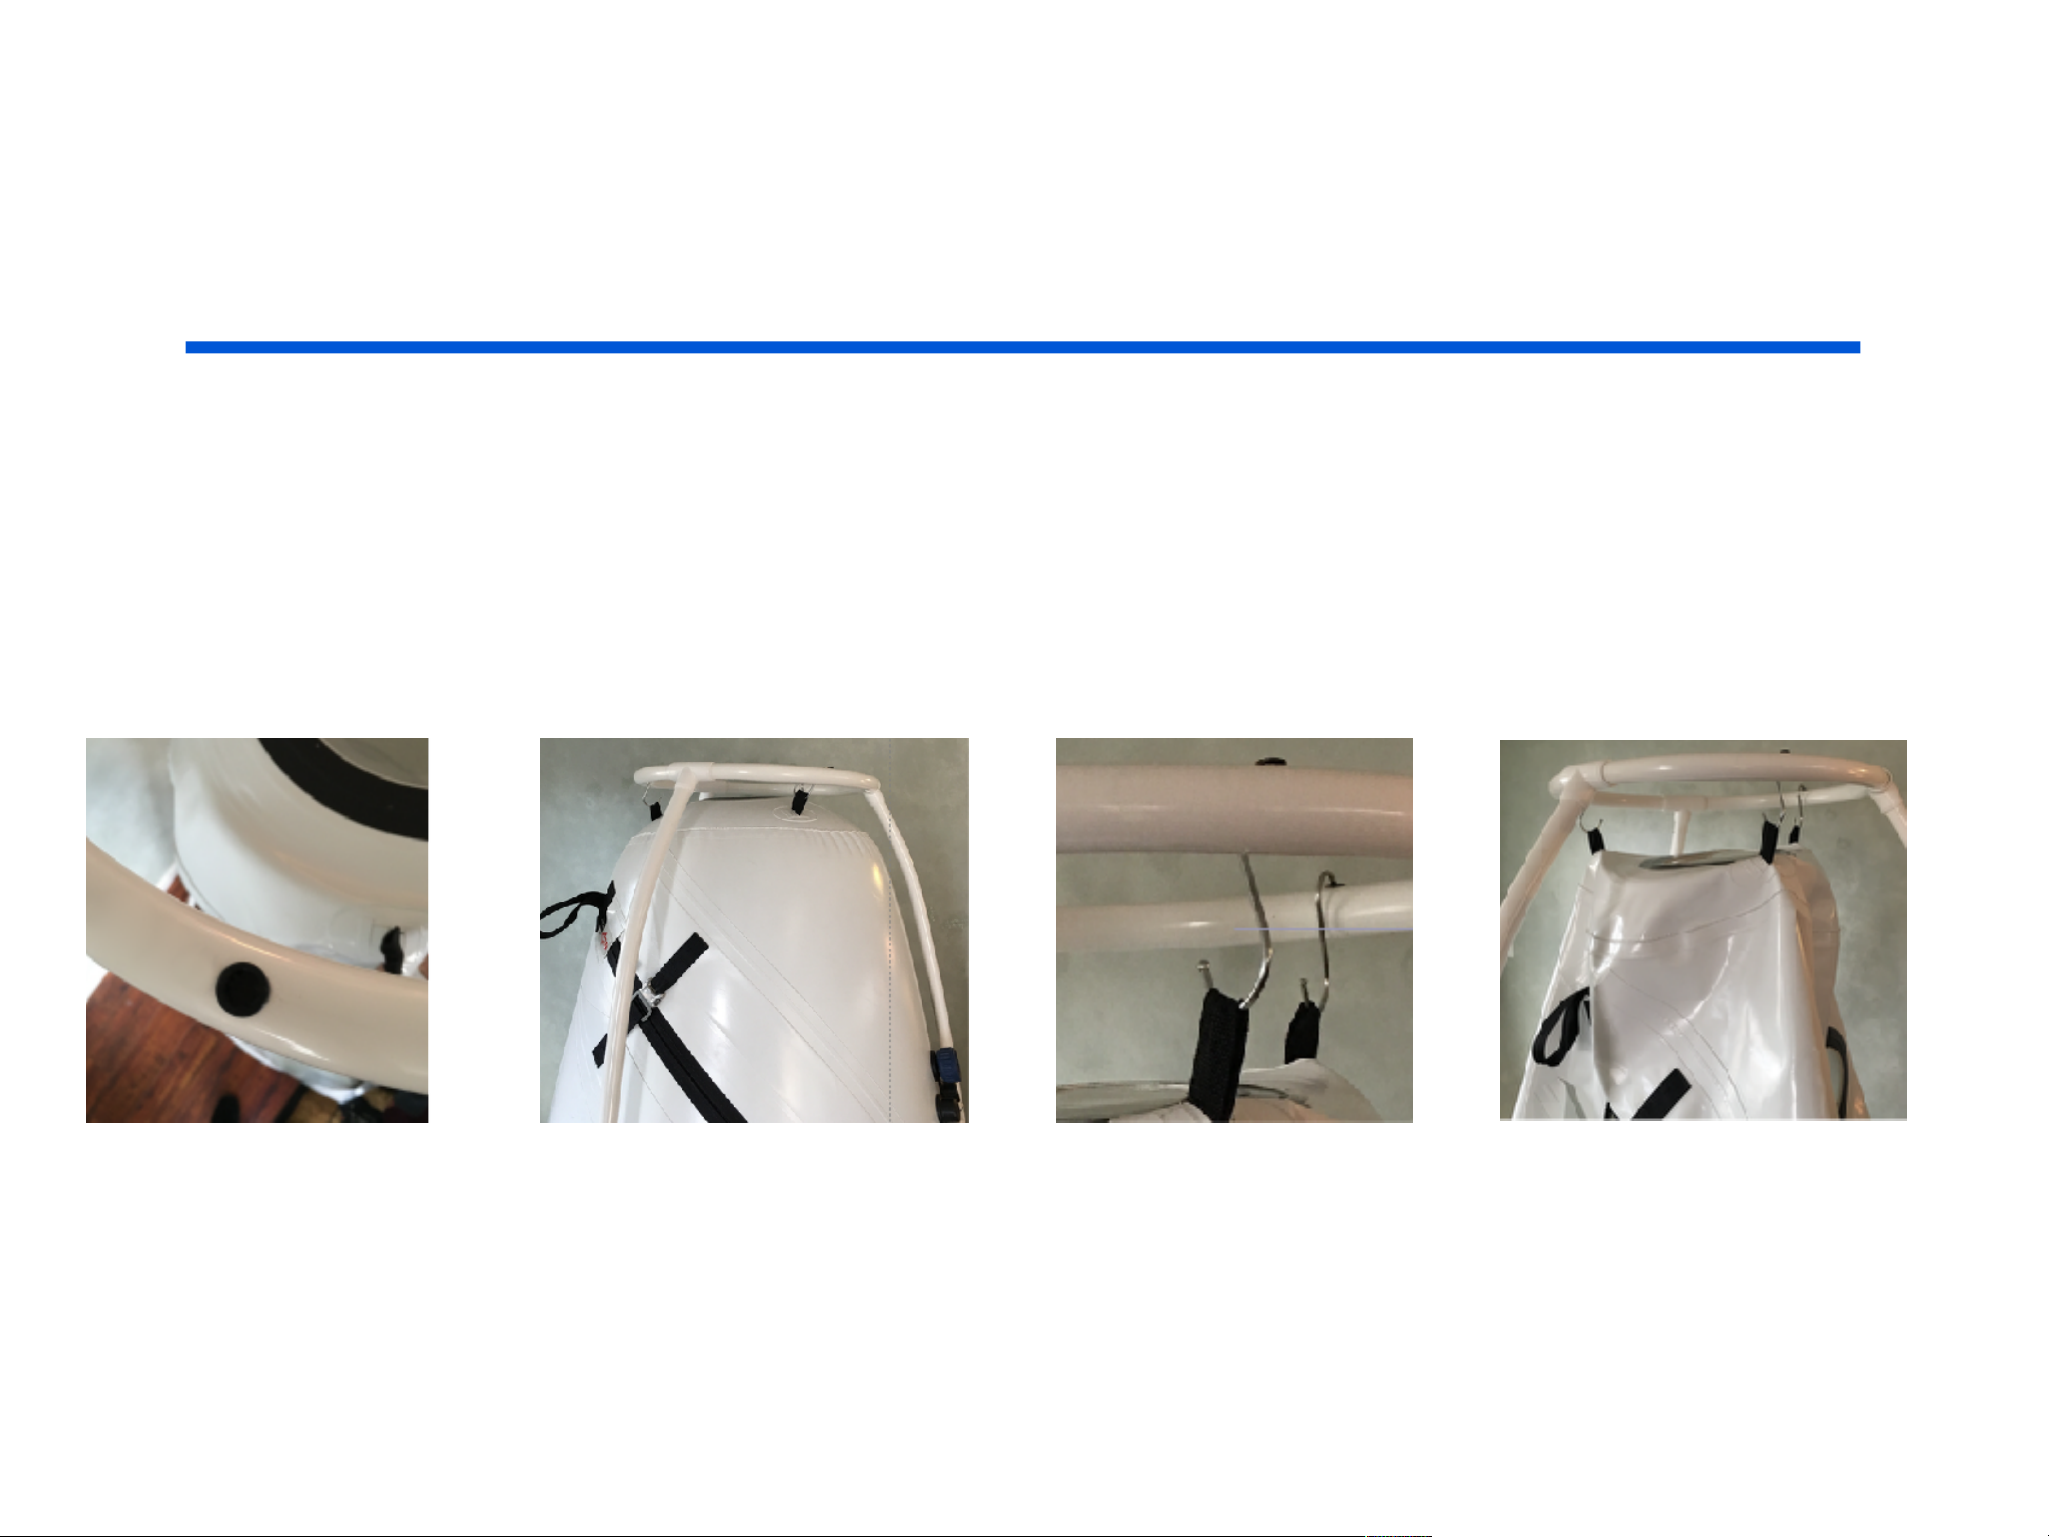
Option 1: Metal hooks
This option is usually used if the chamber will be permanently connected to the frame
and you will not be dropping the chamber to the floor.
There are 3
grommets on the
top of the small
ring where you will
place the metal
hooks.
Inflate the chamber
first and then
connect the hook
into the grommet
and the loop
on the chamber.
When installing the
hooks the small
end goes into the
grommet and the
large end into the
chamber loop.
This will allow you
to easily step inside
the chamber
through the open
zipper.
Page 12
BUILDING THE FRAME
Option 2: Bungee Cords
This option is used if the chamber will be dropped to the floor.
Place the person
sitting inside the
chamber. Attach the
bungees to the loops
on the chamber.
Lift the chamber over
the person and attach
the bungees to the
grommets on the frame.
Now you are ready to
inflate the chamber.
When you are ready to
deflate the chamber first
unhook the bungees from the
frame and lower the chamber
down around the person.
Page 13

SET UP
By now you should have the floor zipped into the bottom pocket.
You should have the frame built.
Next you will place the carpet inside the deflated chamber.
Page 14
STEREO
BLUETOOTH
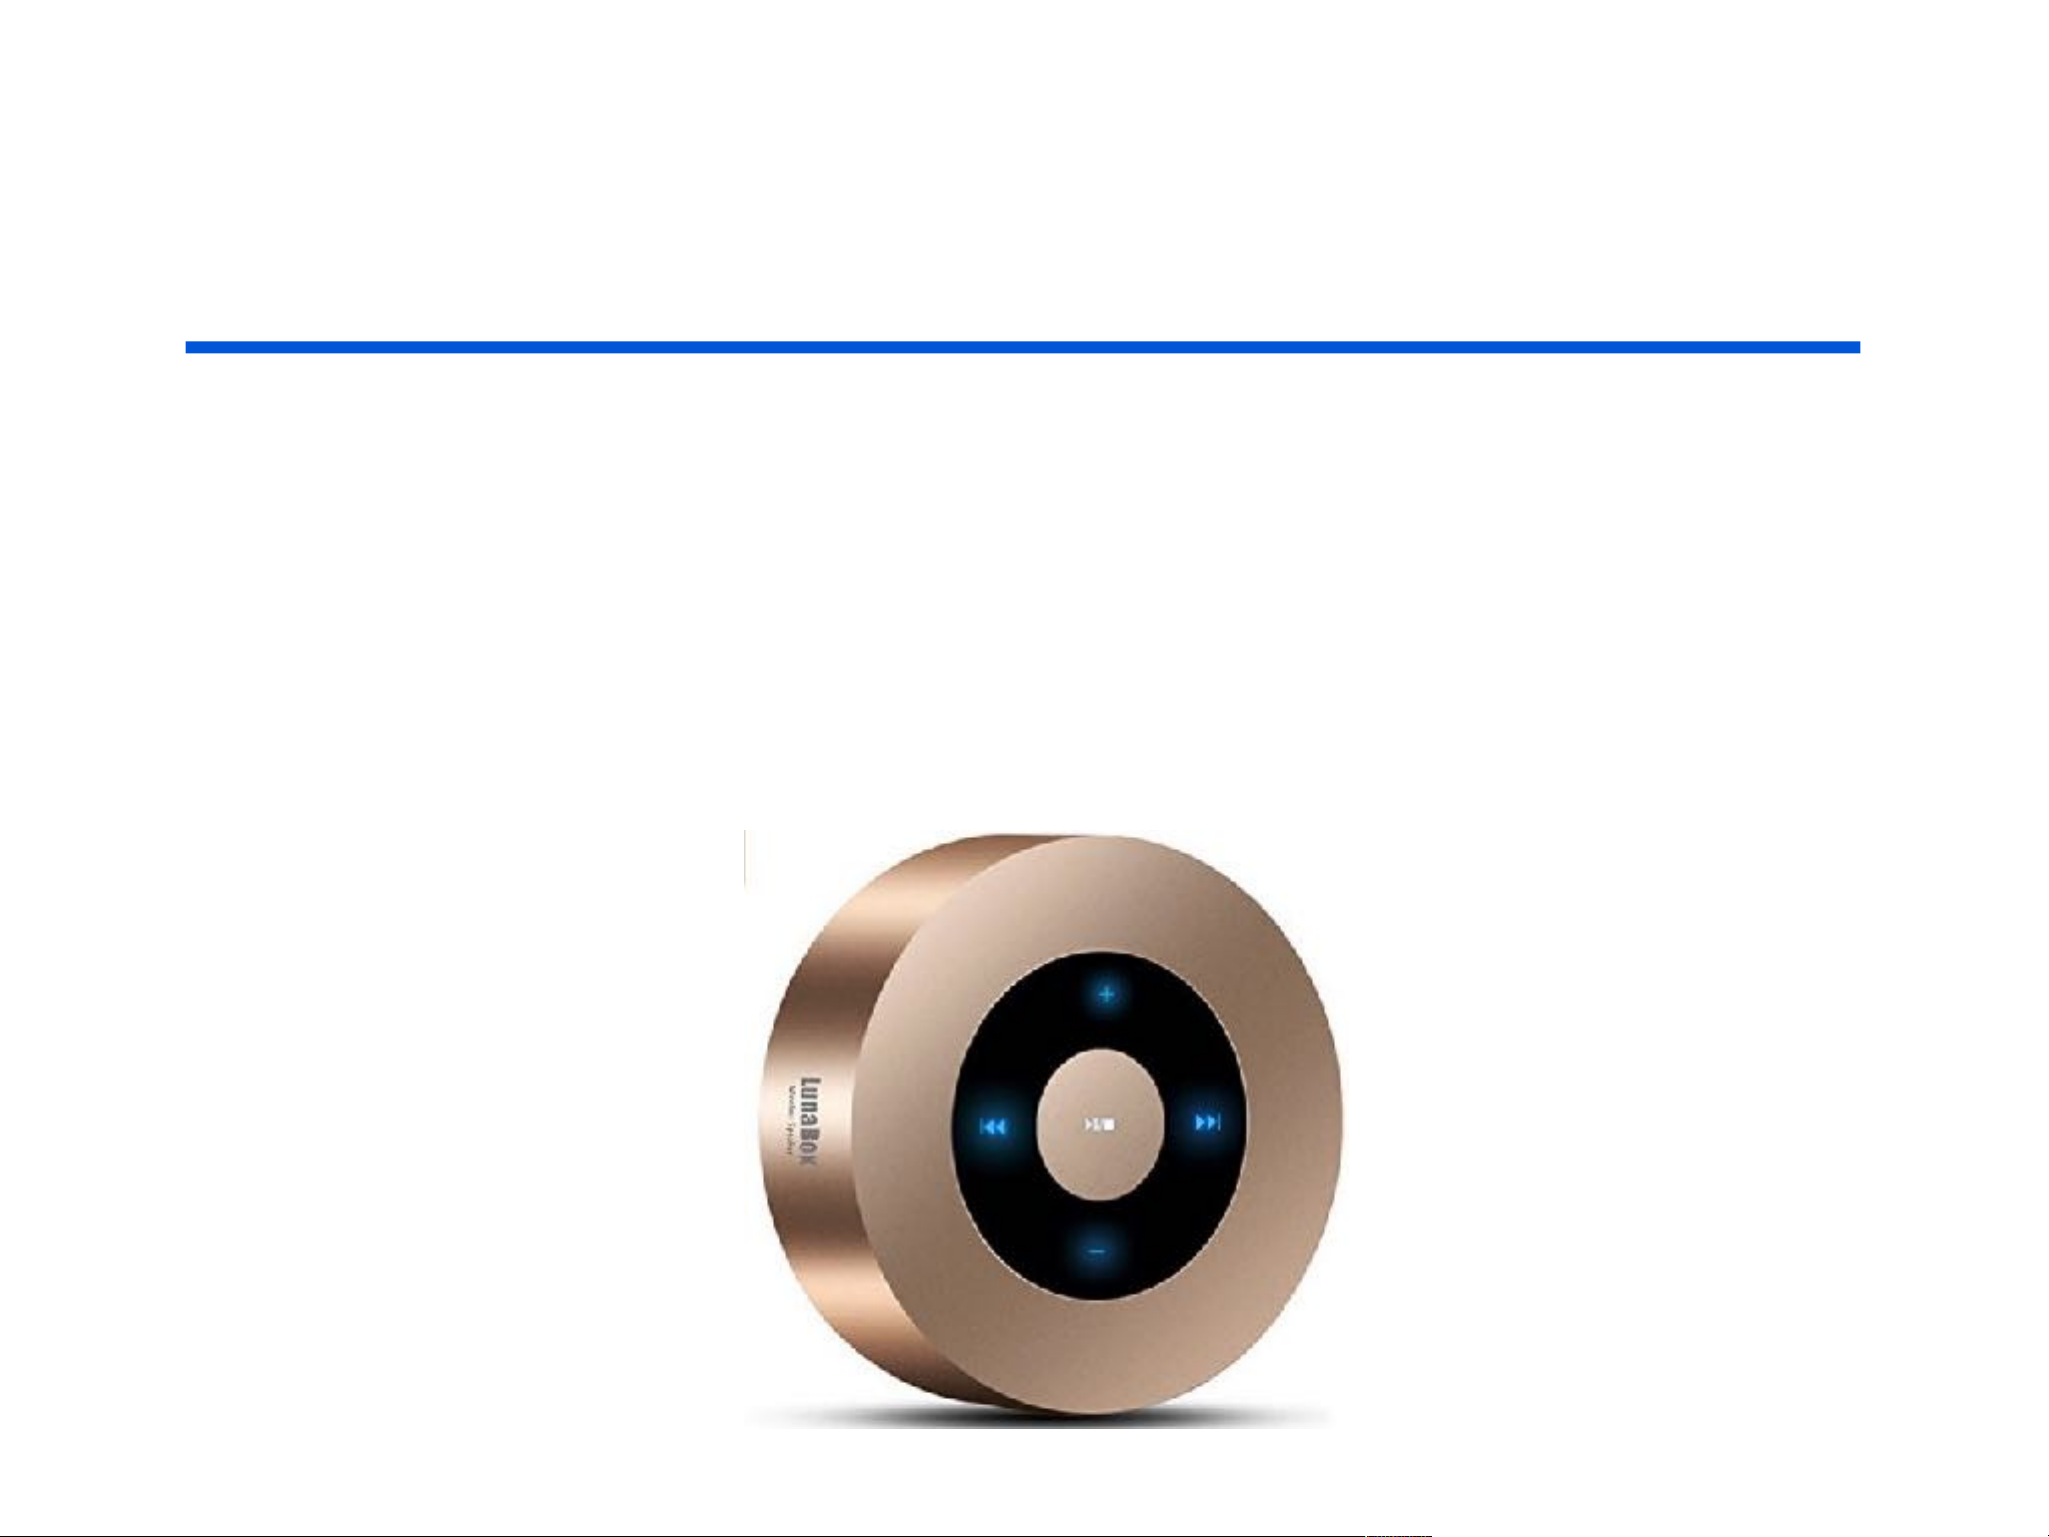
To enhance your hyperbaric experience we have included a
bluetooth stereo speaker.
You will just need to turn it on and pair with your device.
Instructions are inside the stereo box.
Page 15

INFLATING
At first, follow these instructions to inflate and deflate the
chamber without any person inside the chamber.
WARNING
Never take a treatment alone.
Always have someone outside the chamber to assist you.
Page 16
INFLATING
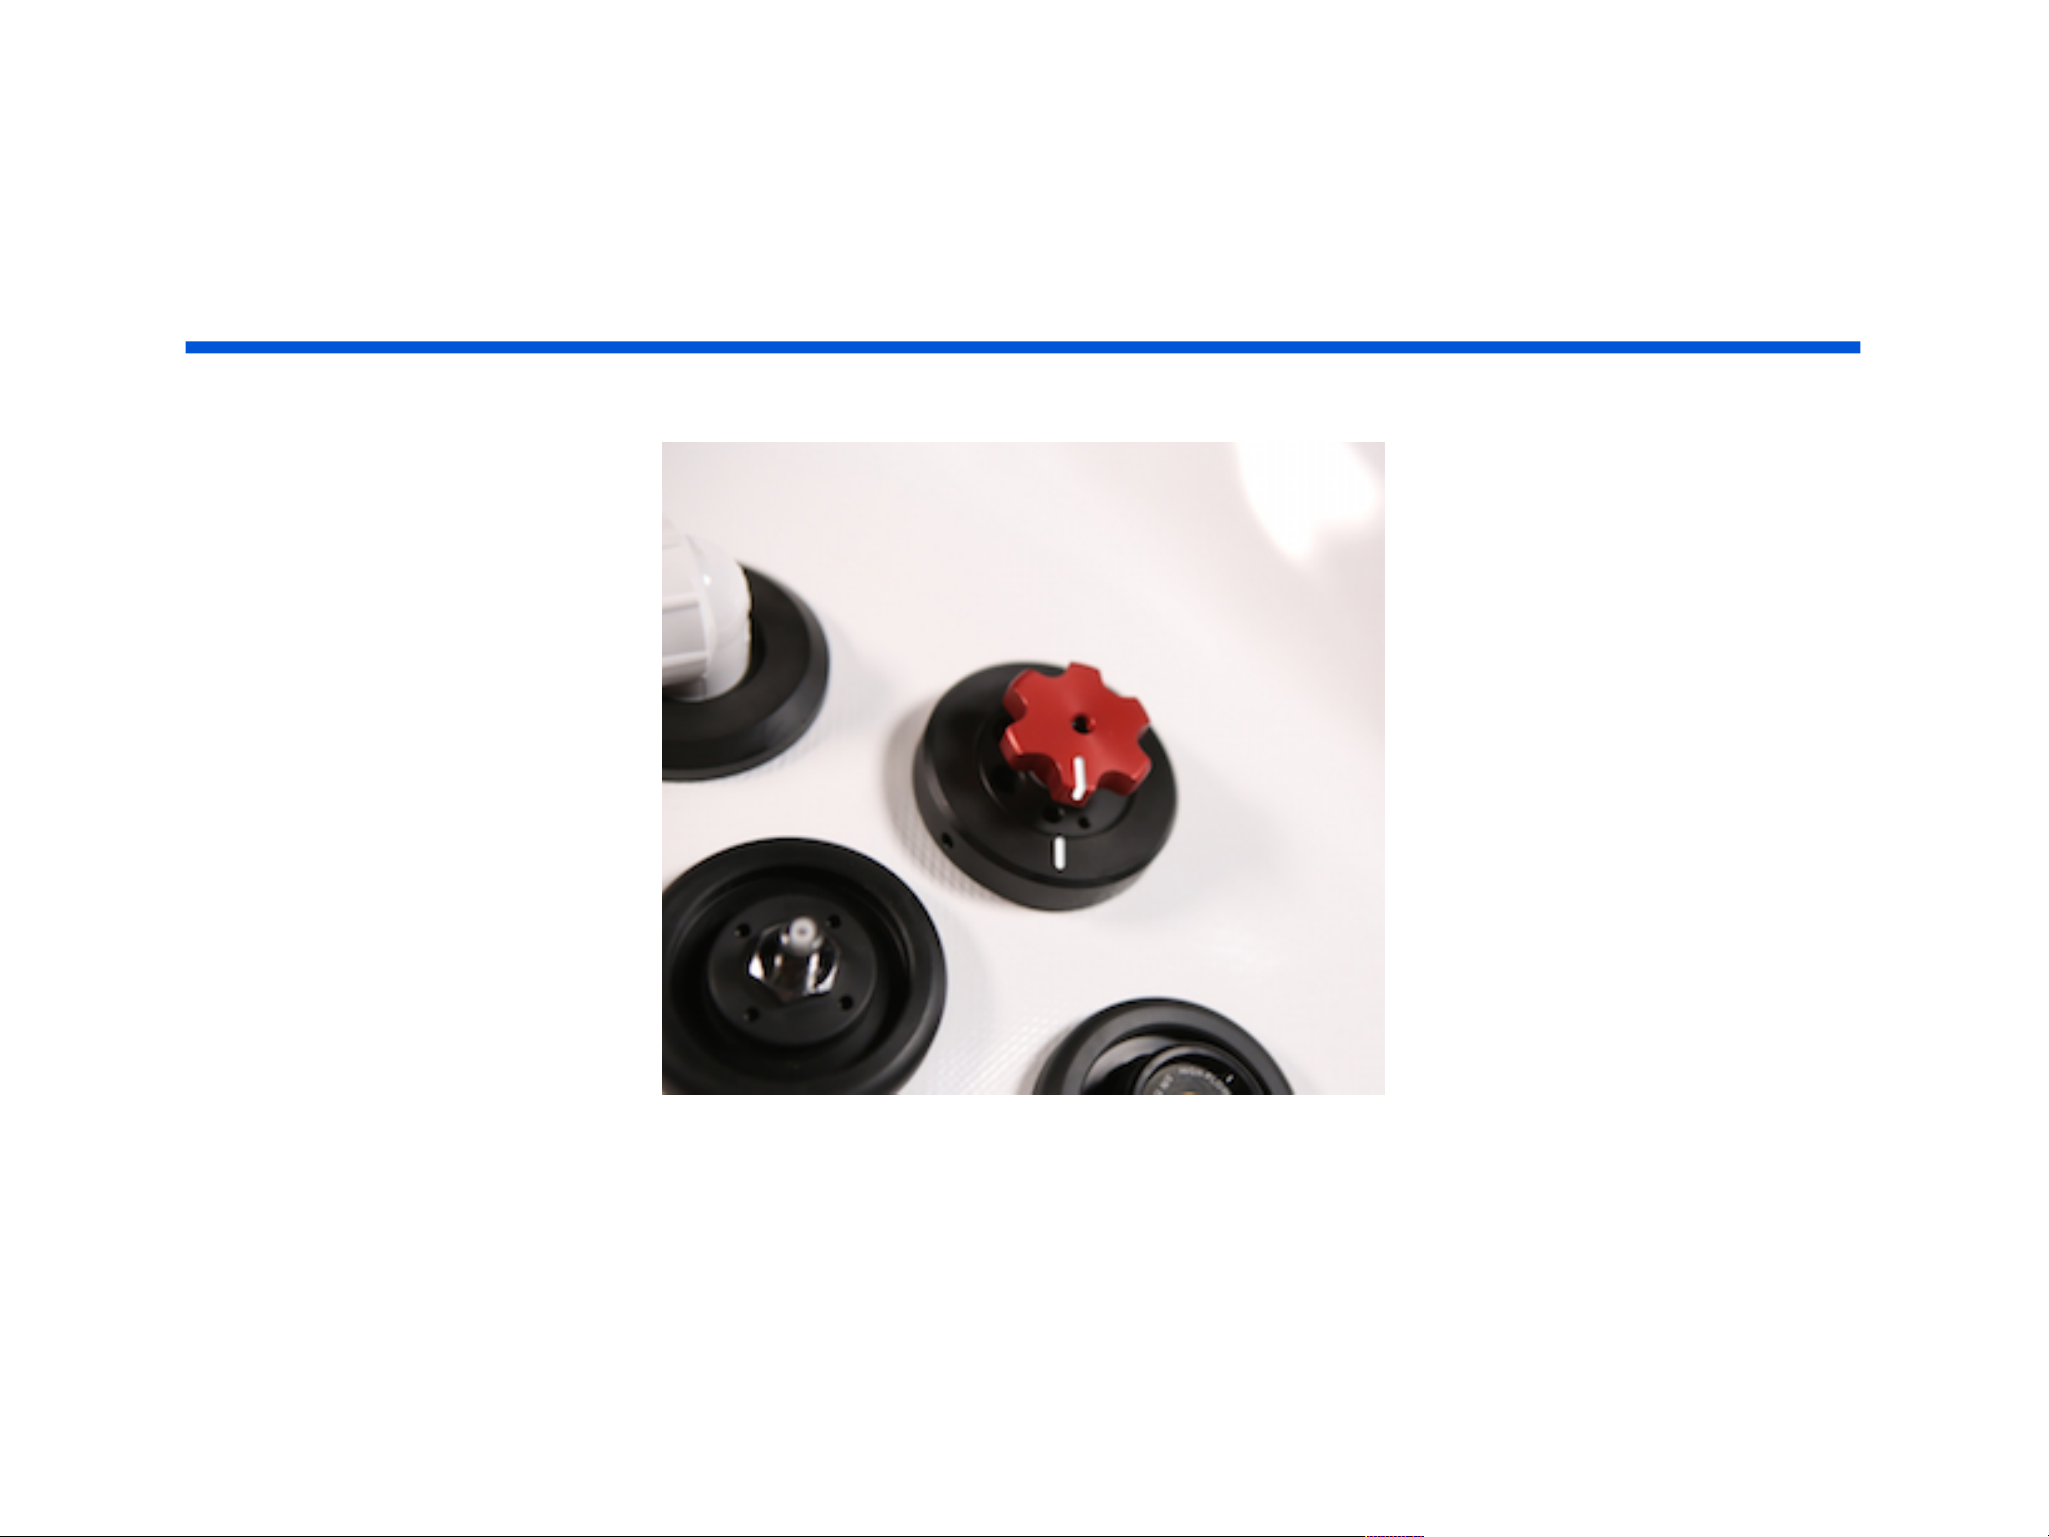
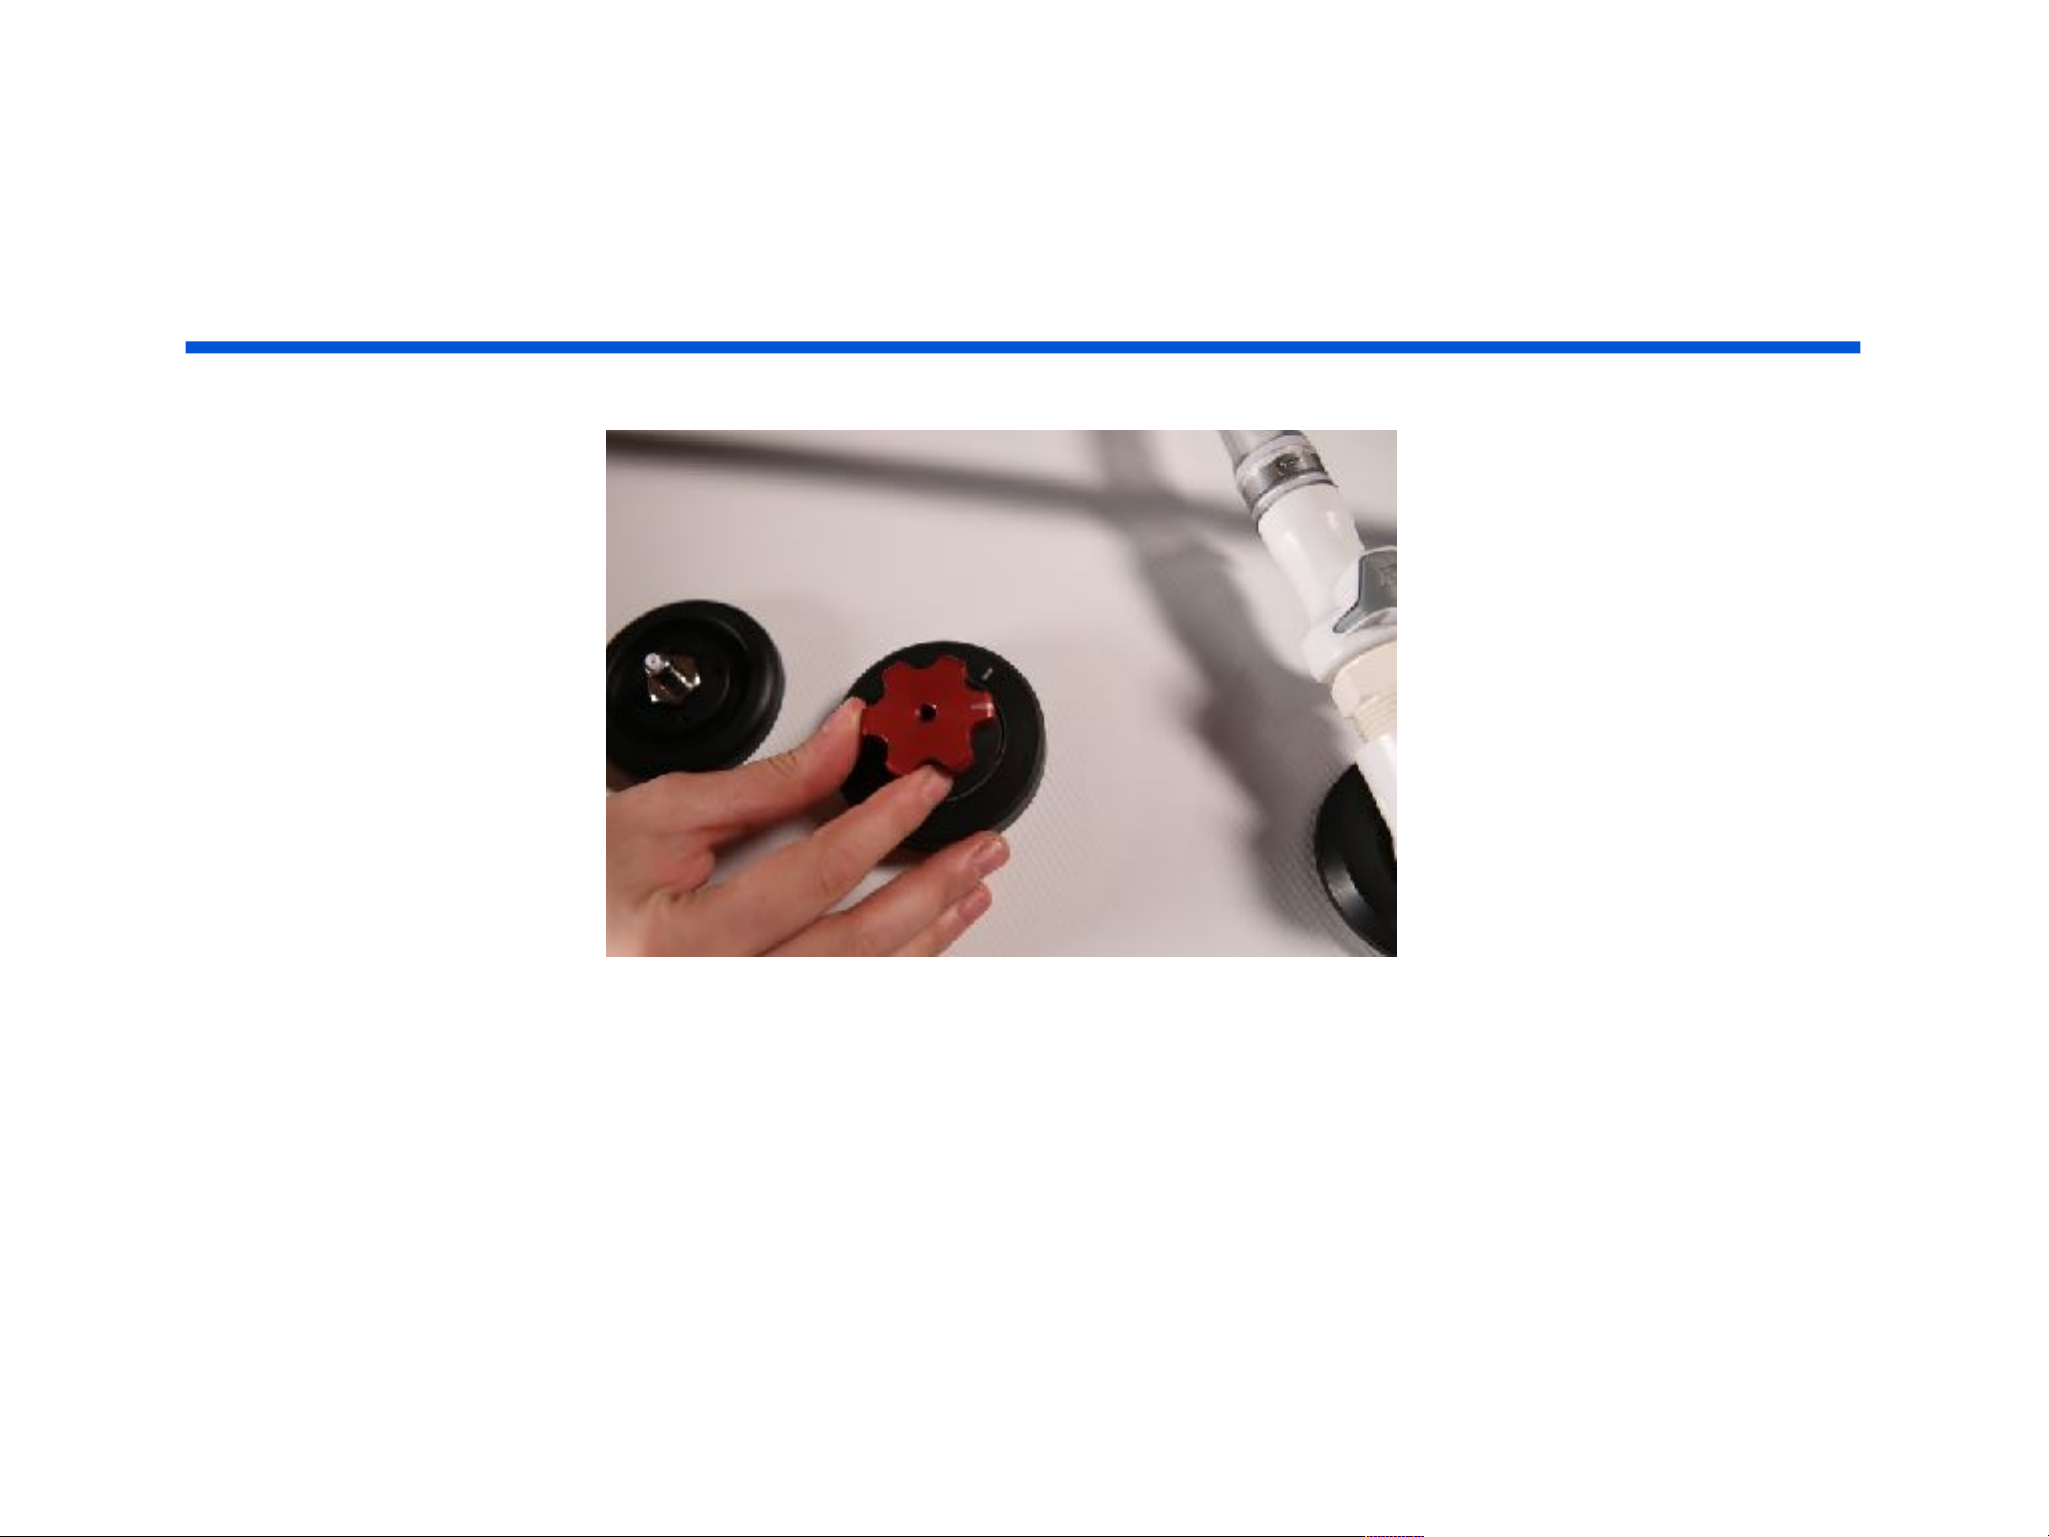
First, turn the red knob so that the marks line up together.
This will prevent air escaping.
Page 17
INFLATING
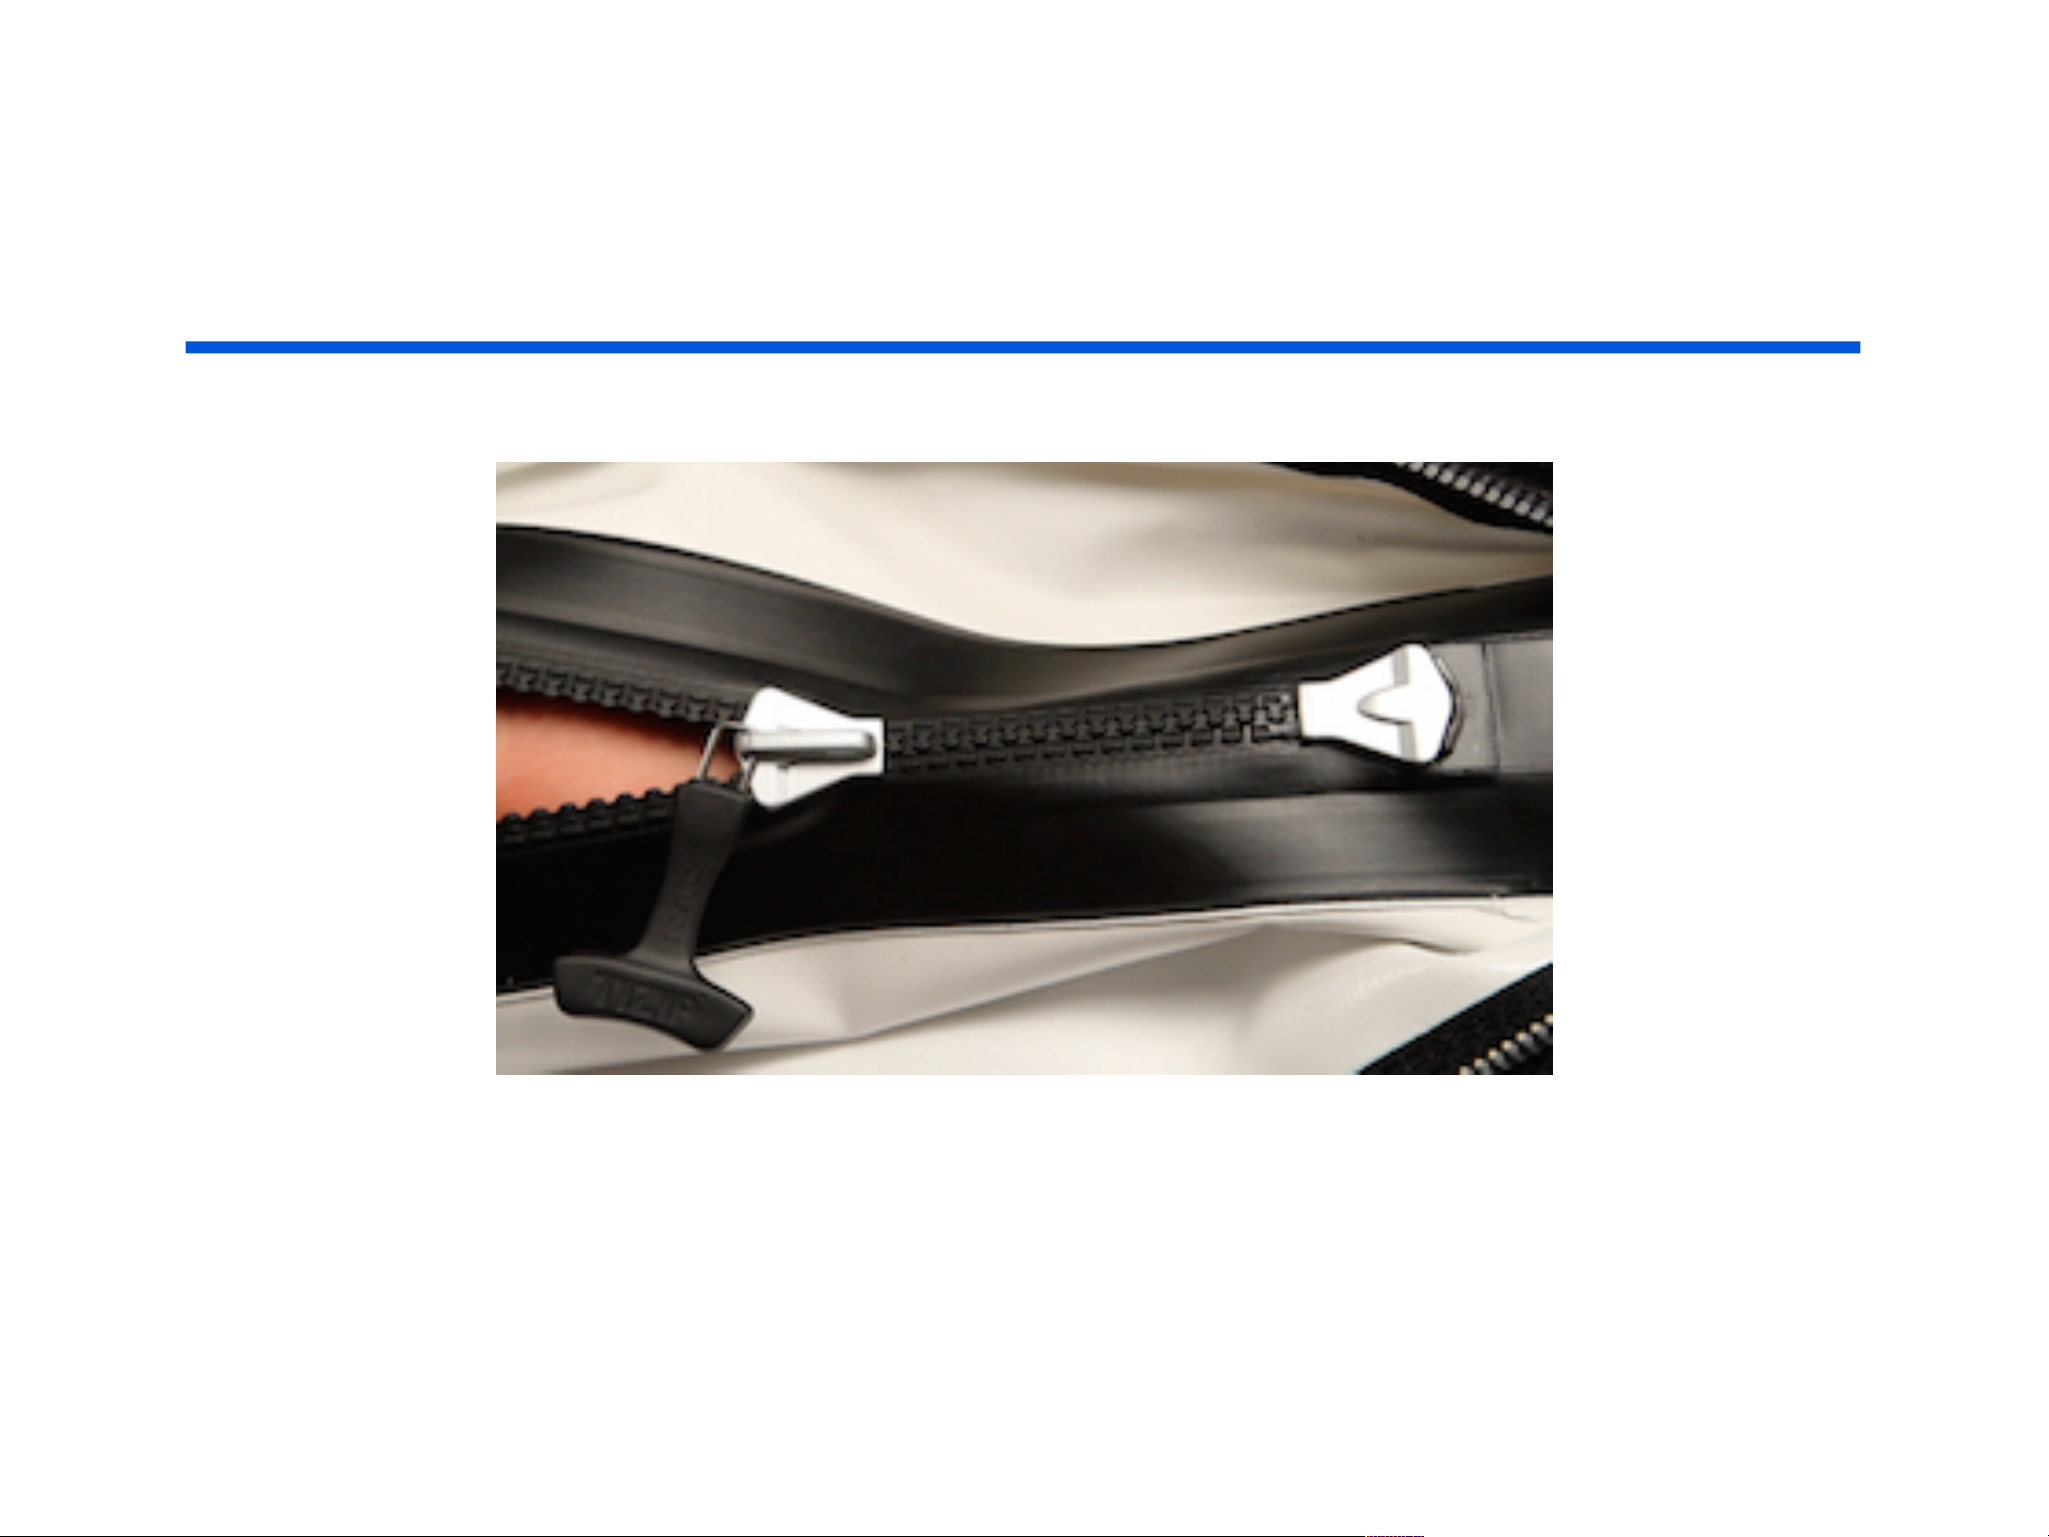
Next it is time to close the zippers.
There are two zippers that stretch nearly the length of the
chamber. These zippers are dual-triggered and can be
opened and closed from inside or outside the chamber.
Page 18
INFLATING
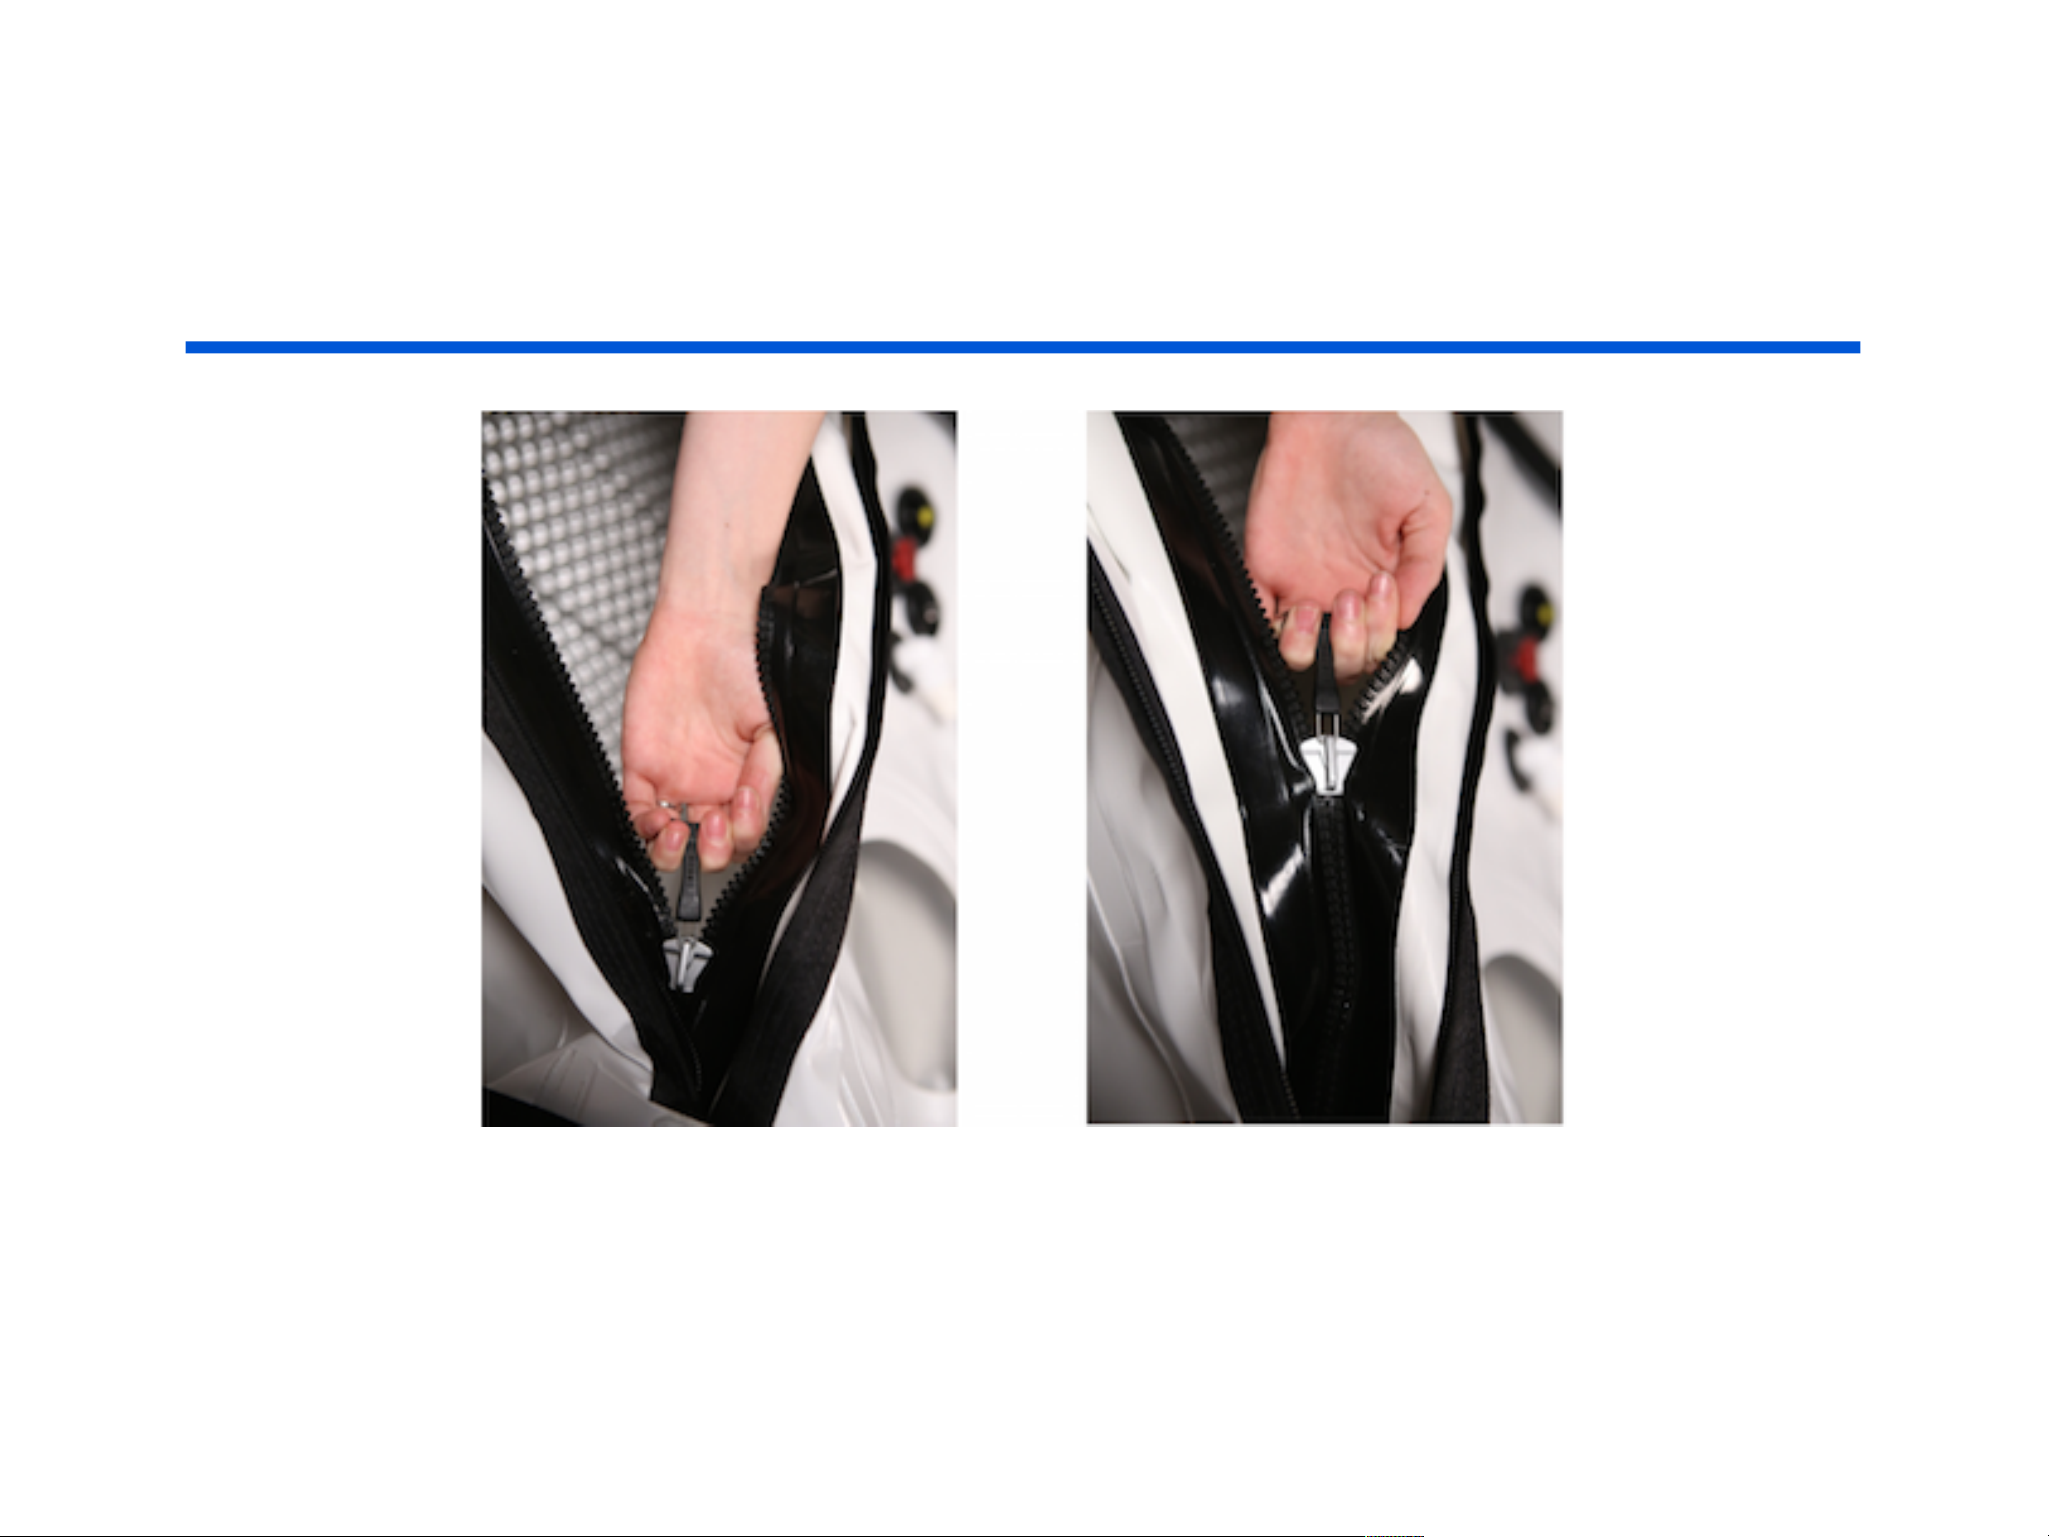
If you are closing from the outside, pull the black T connected to the inside zipper
Page 19
INFLATING
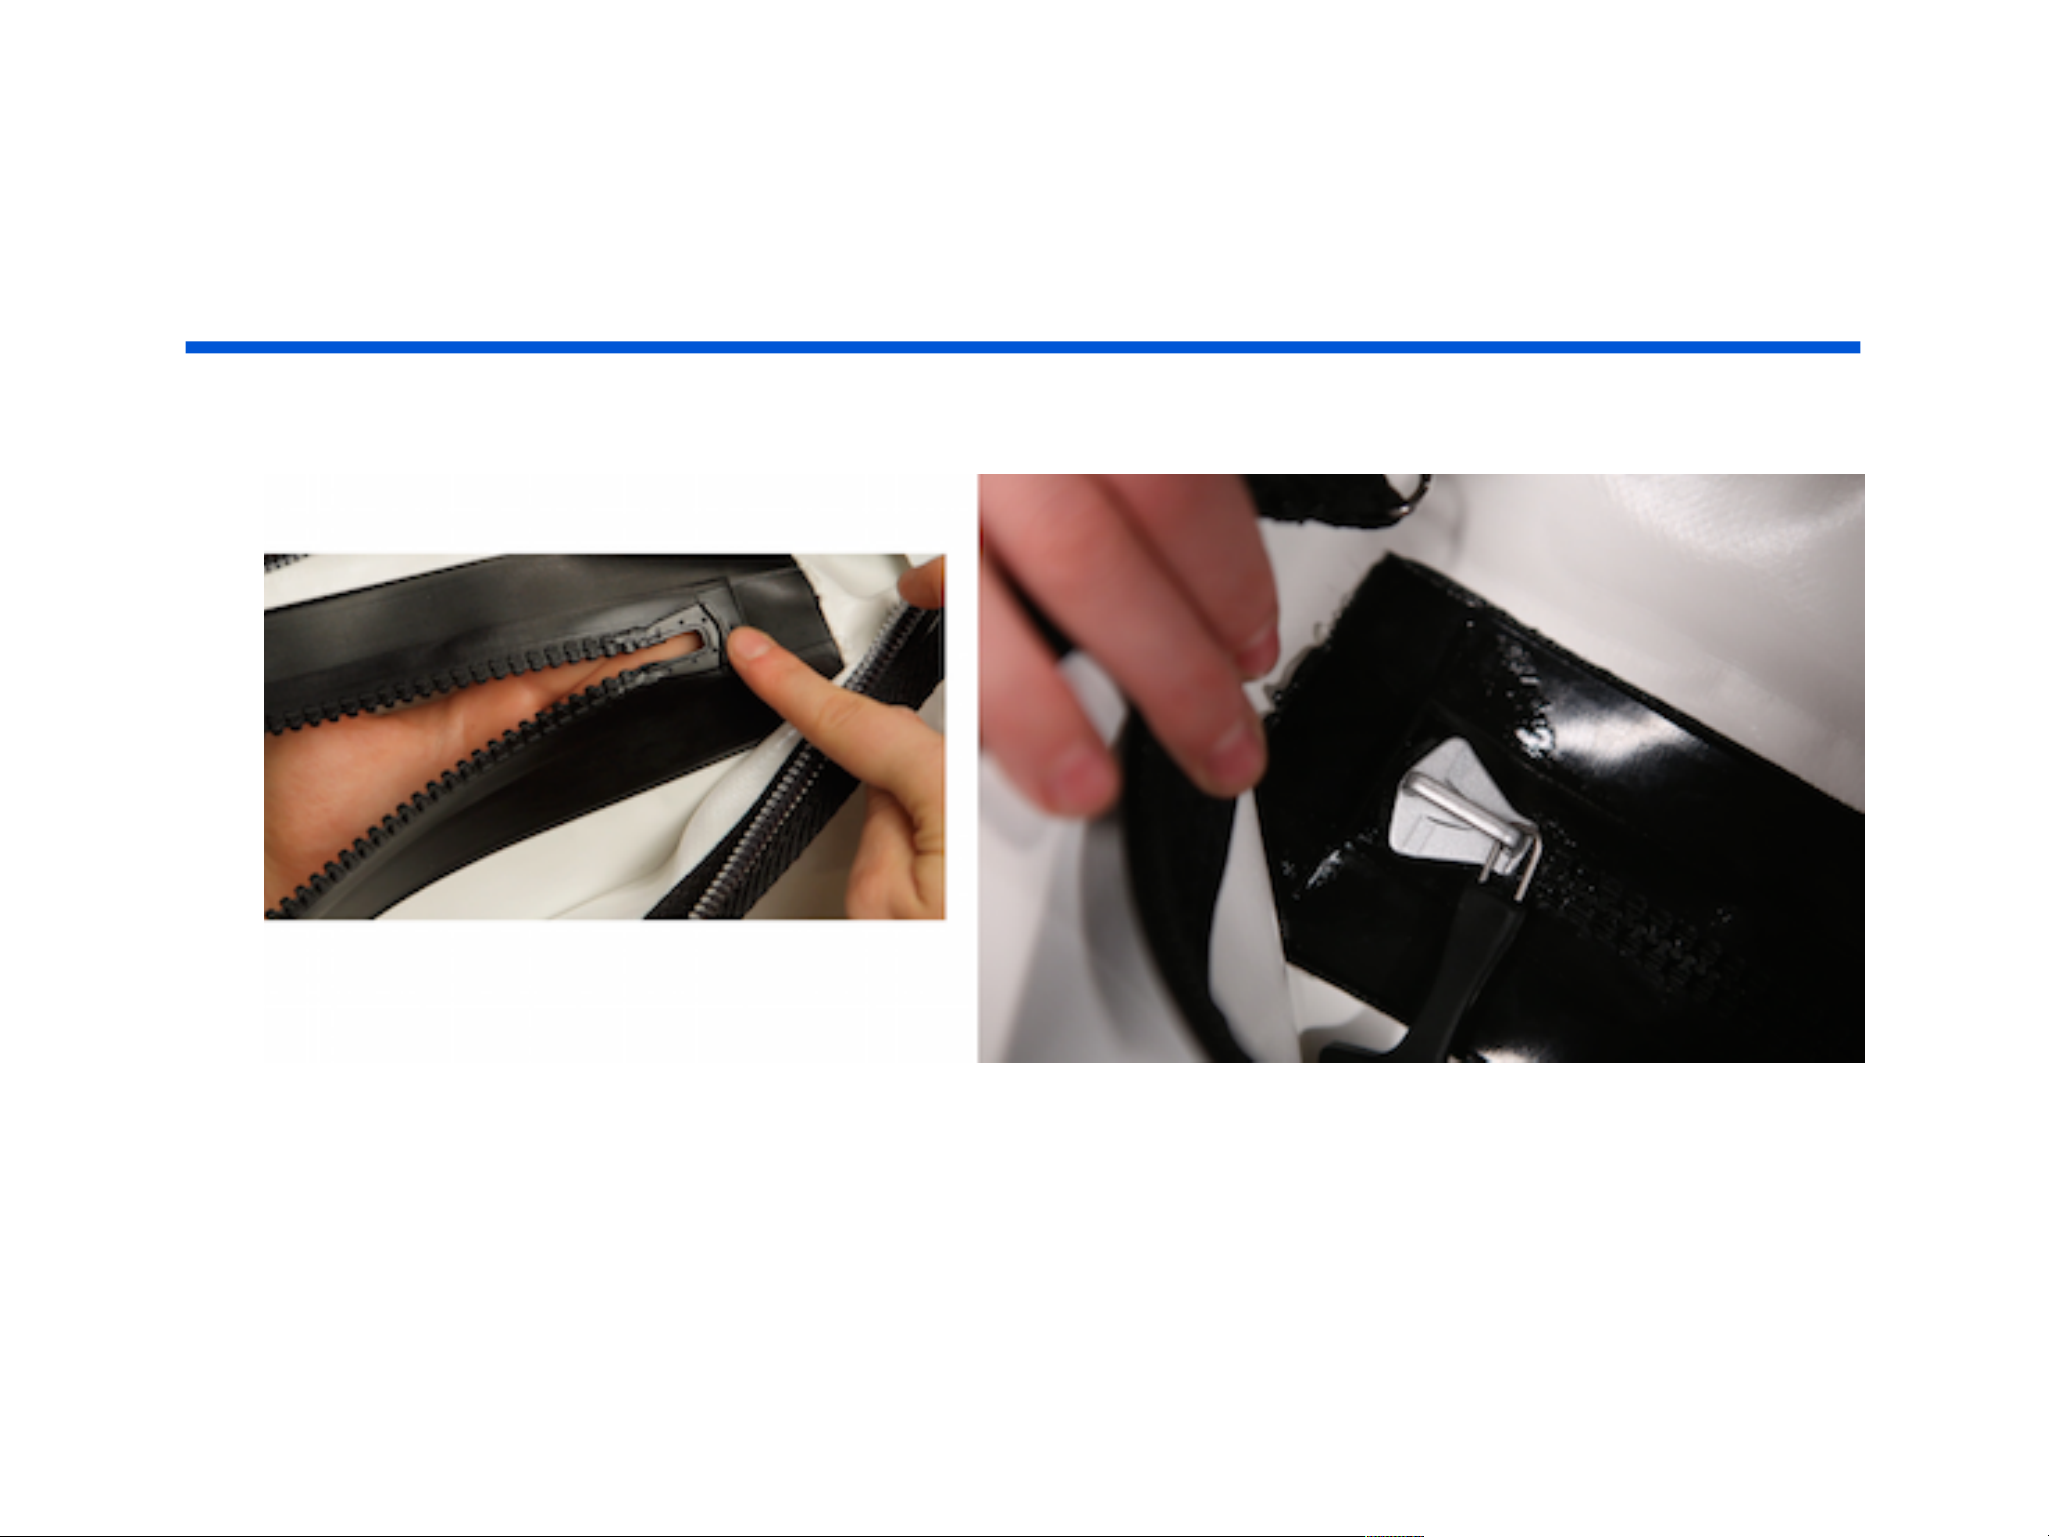
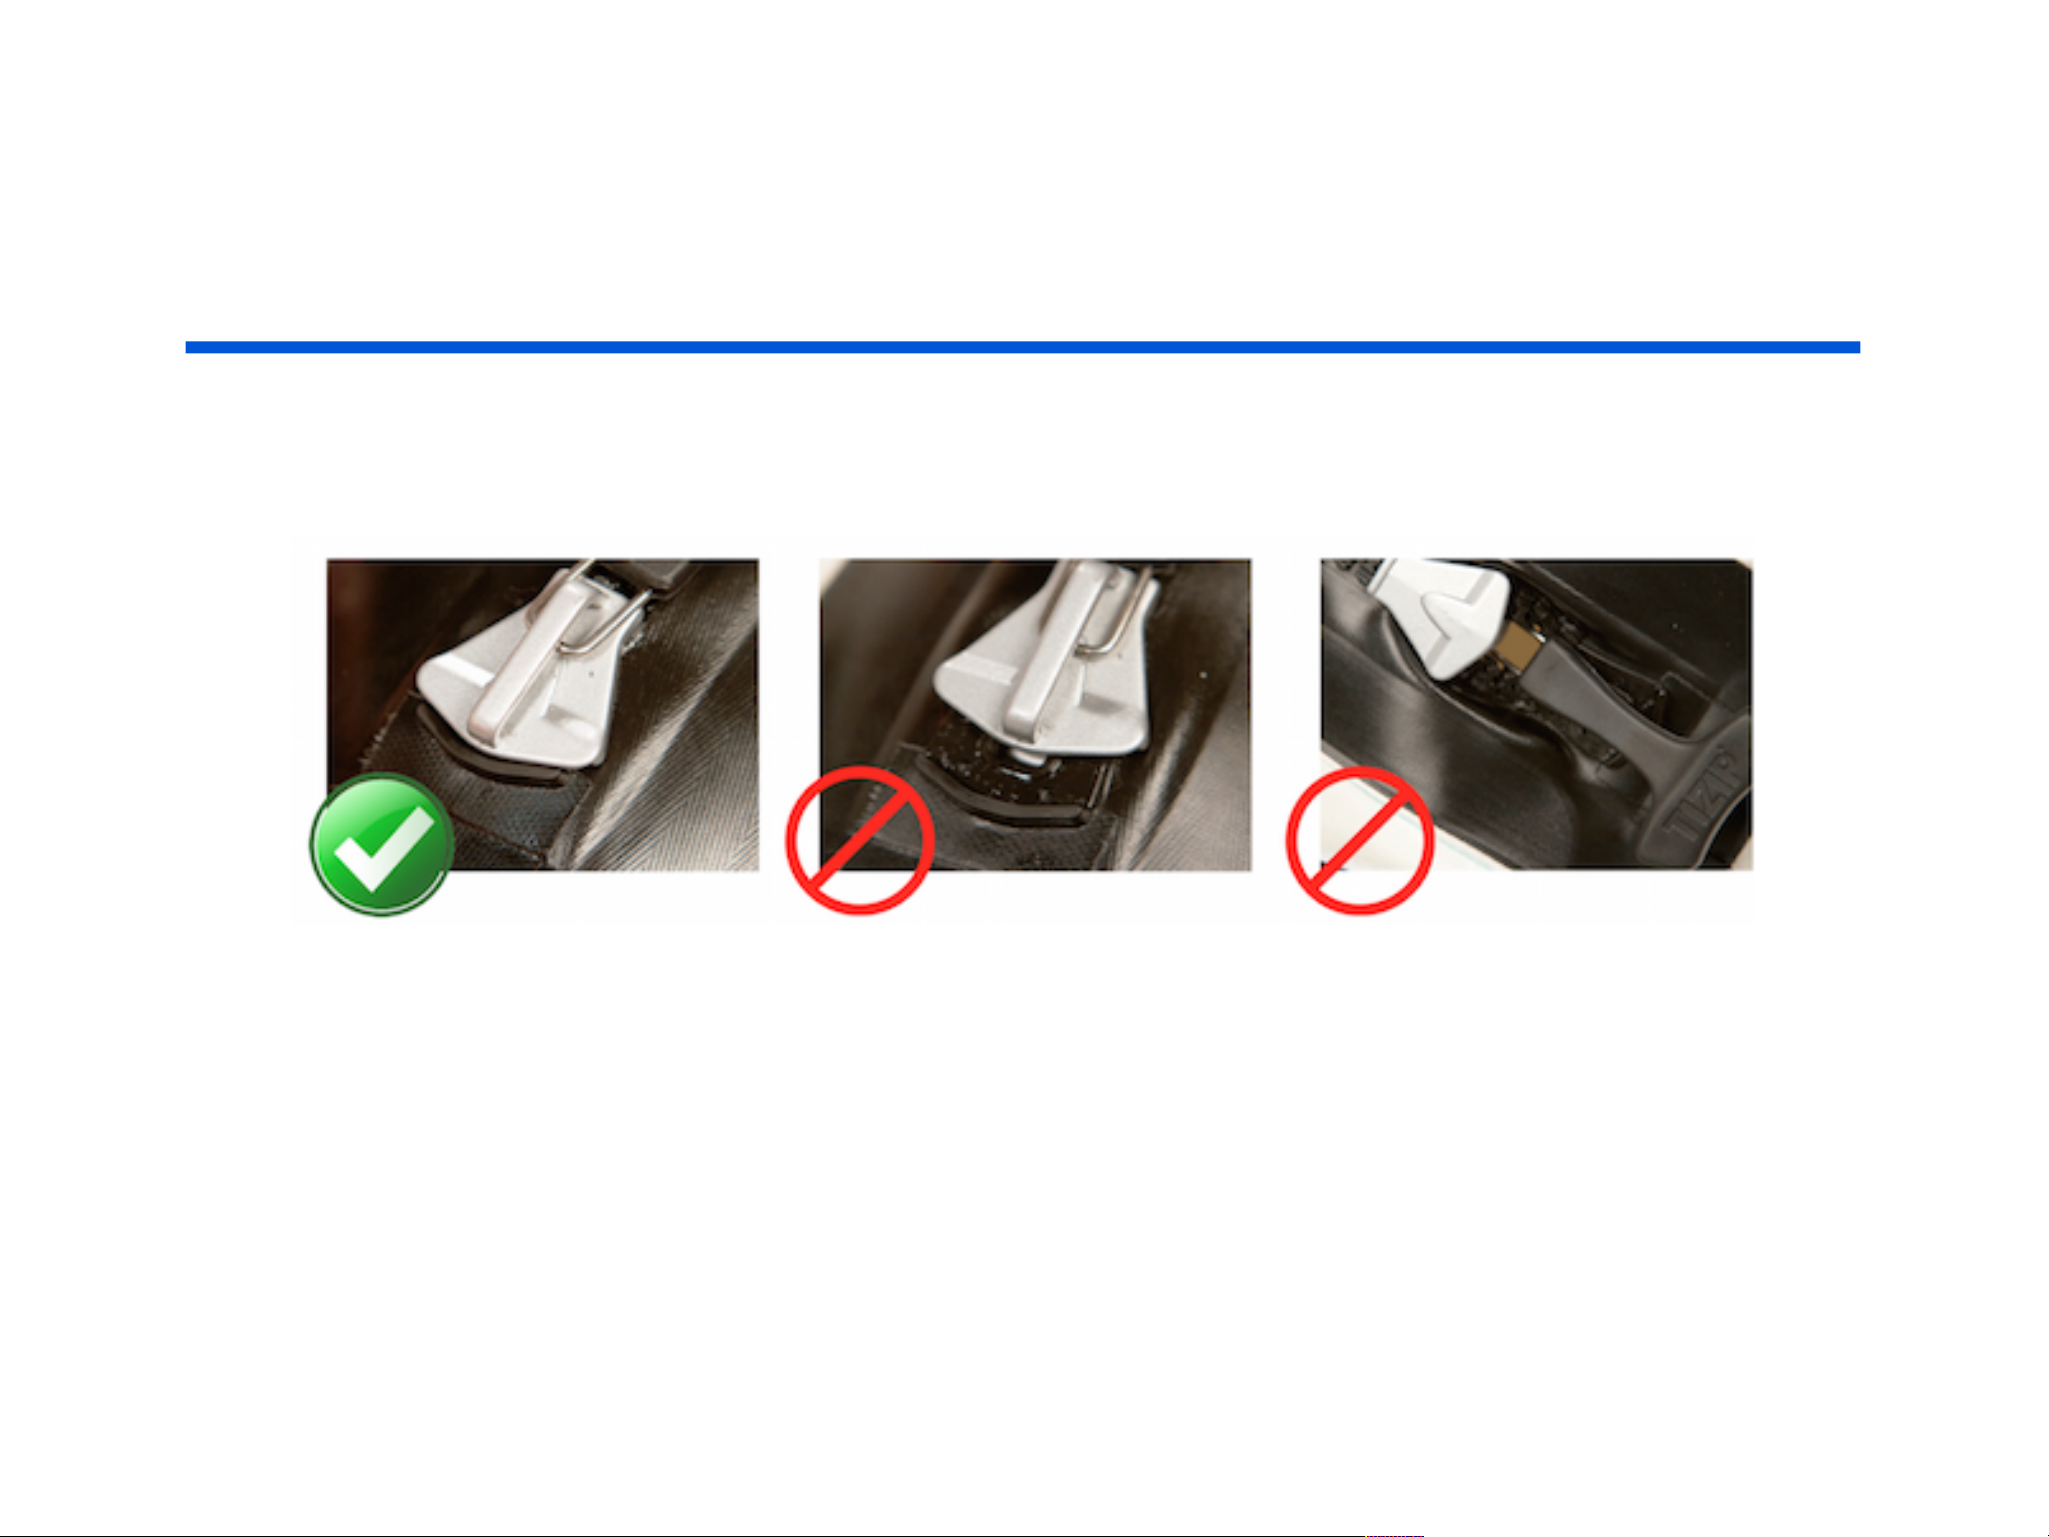
It is important that the inside zipper is totally closed into the dock.
Page 20
INFLATING
Pictured is the right and wrong way to close the inside zipper.
Page 21
INFLATING
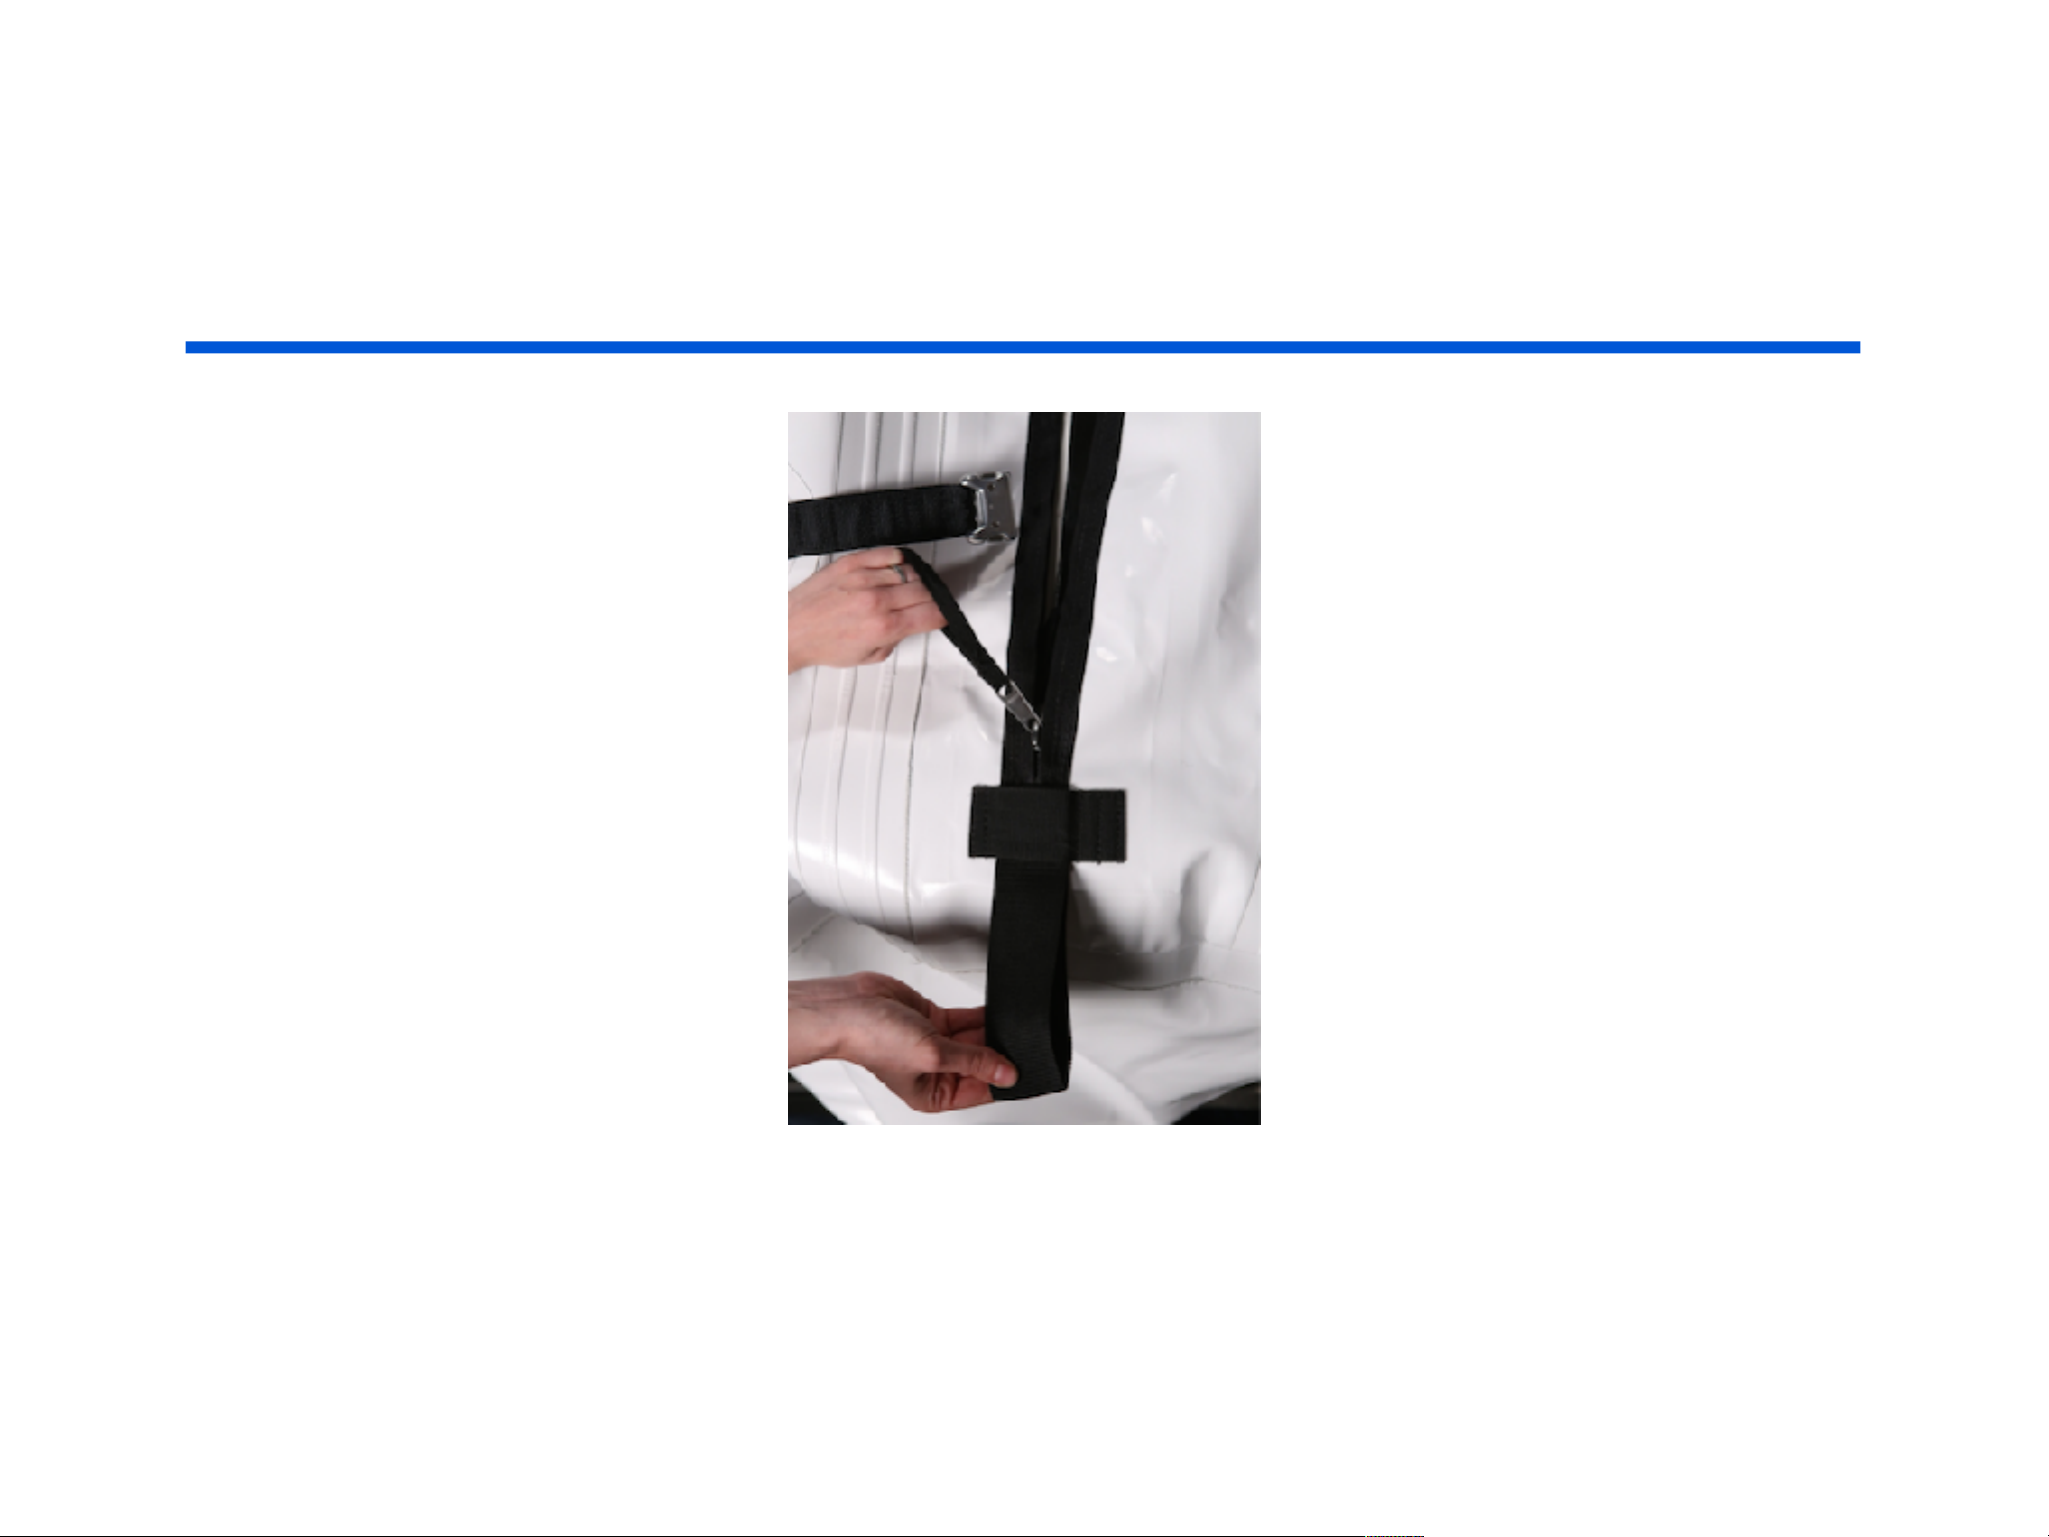
Next close the outside zipper. Hold the loop to start pulling the zipper.
Page 22
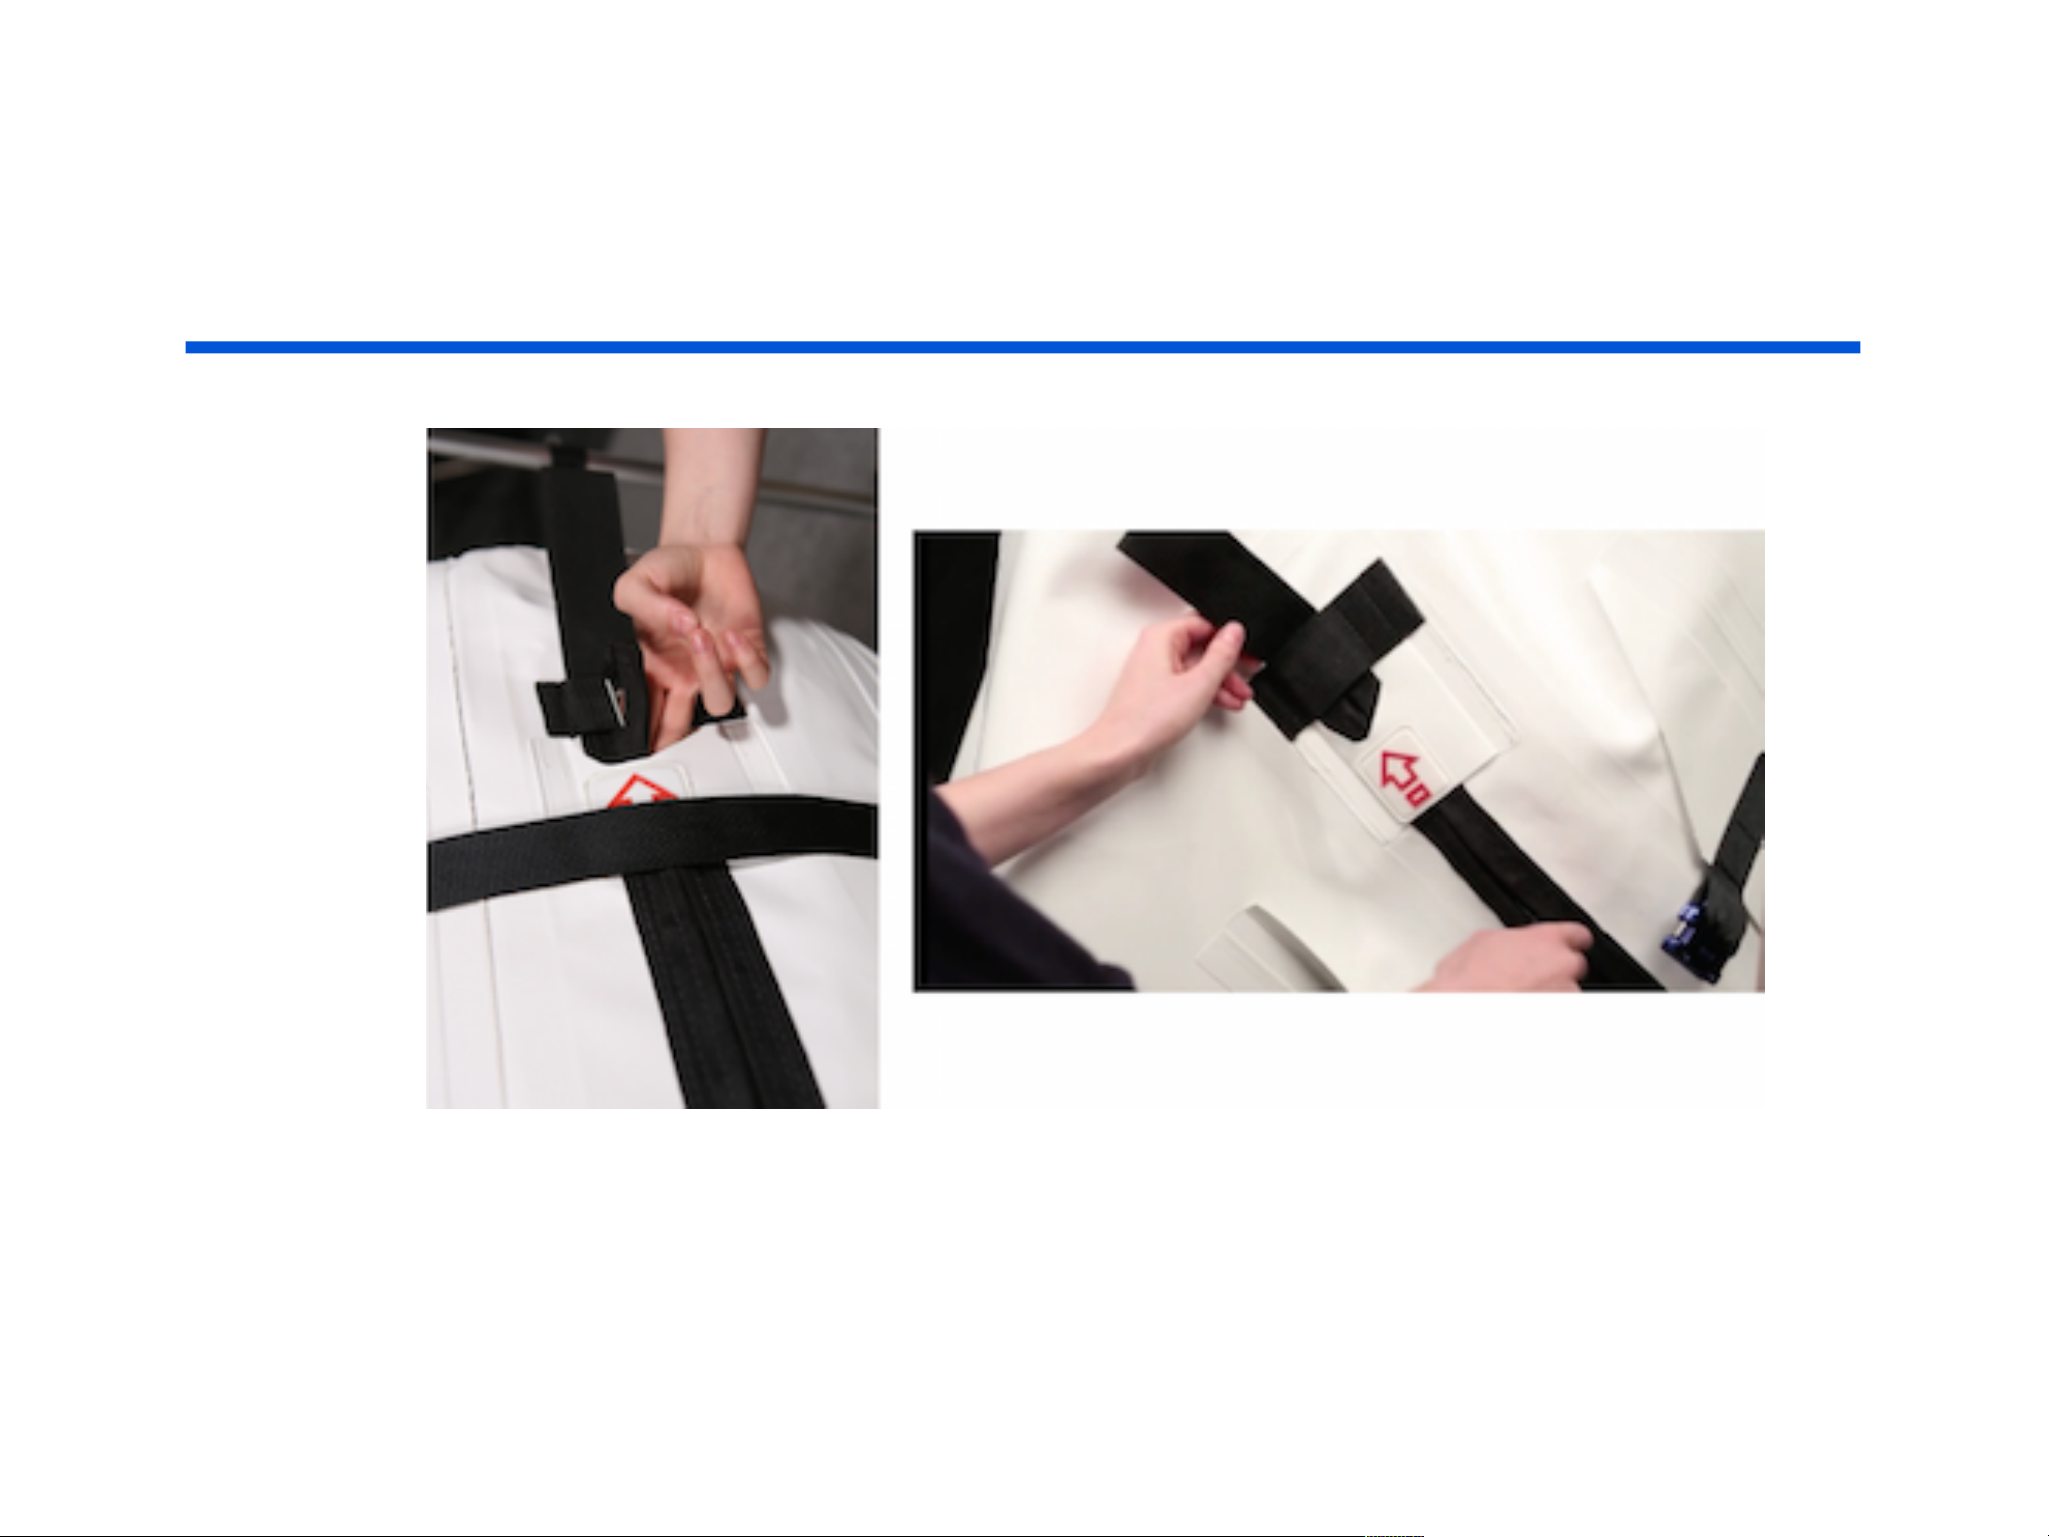
INFLATING
Be sure that the zipper pull is tucked under the
red arrow and is all the way closed.
Page 23

INFLATING
Make sure both the inside and the outside zippers are
completely closed each time the chamber is in use.
Failure to do this may result in damage to the chamber.
Page 24
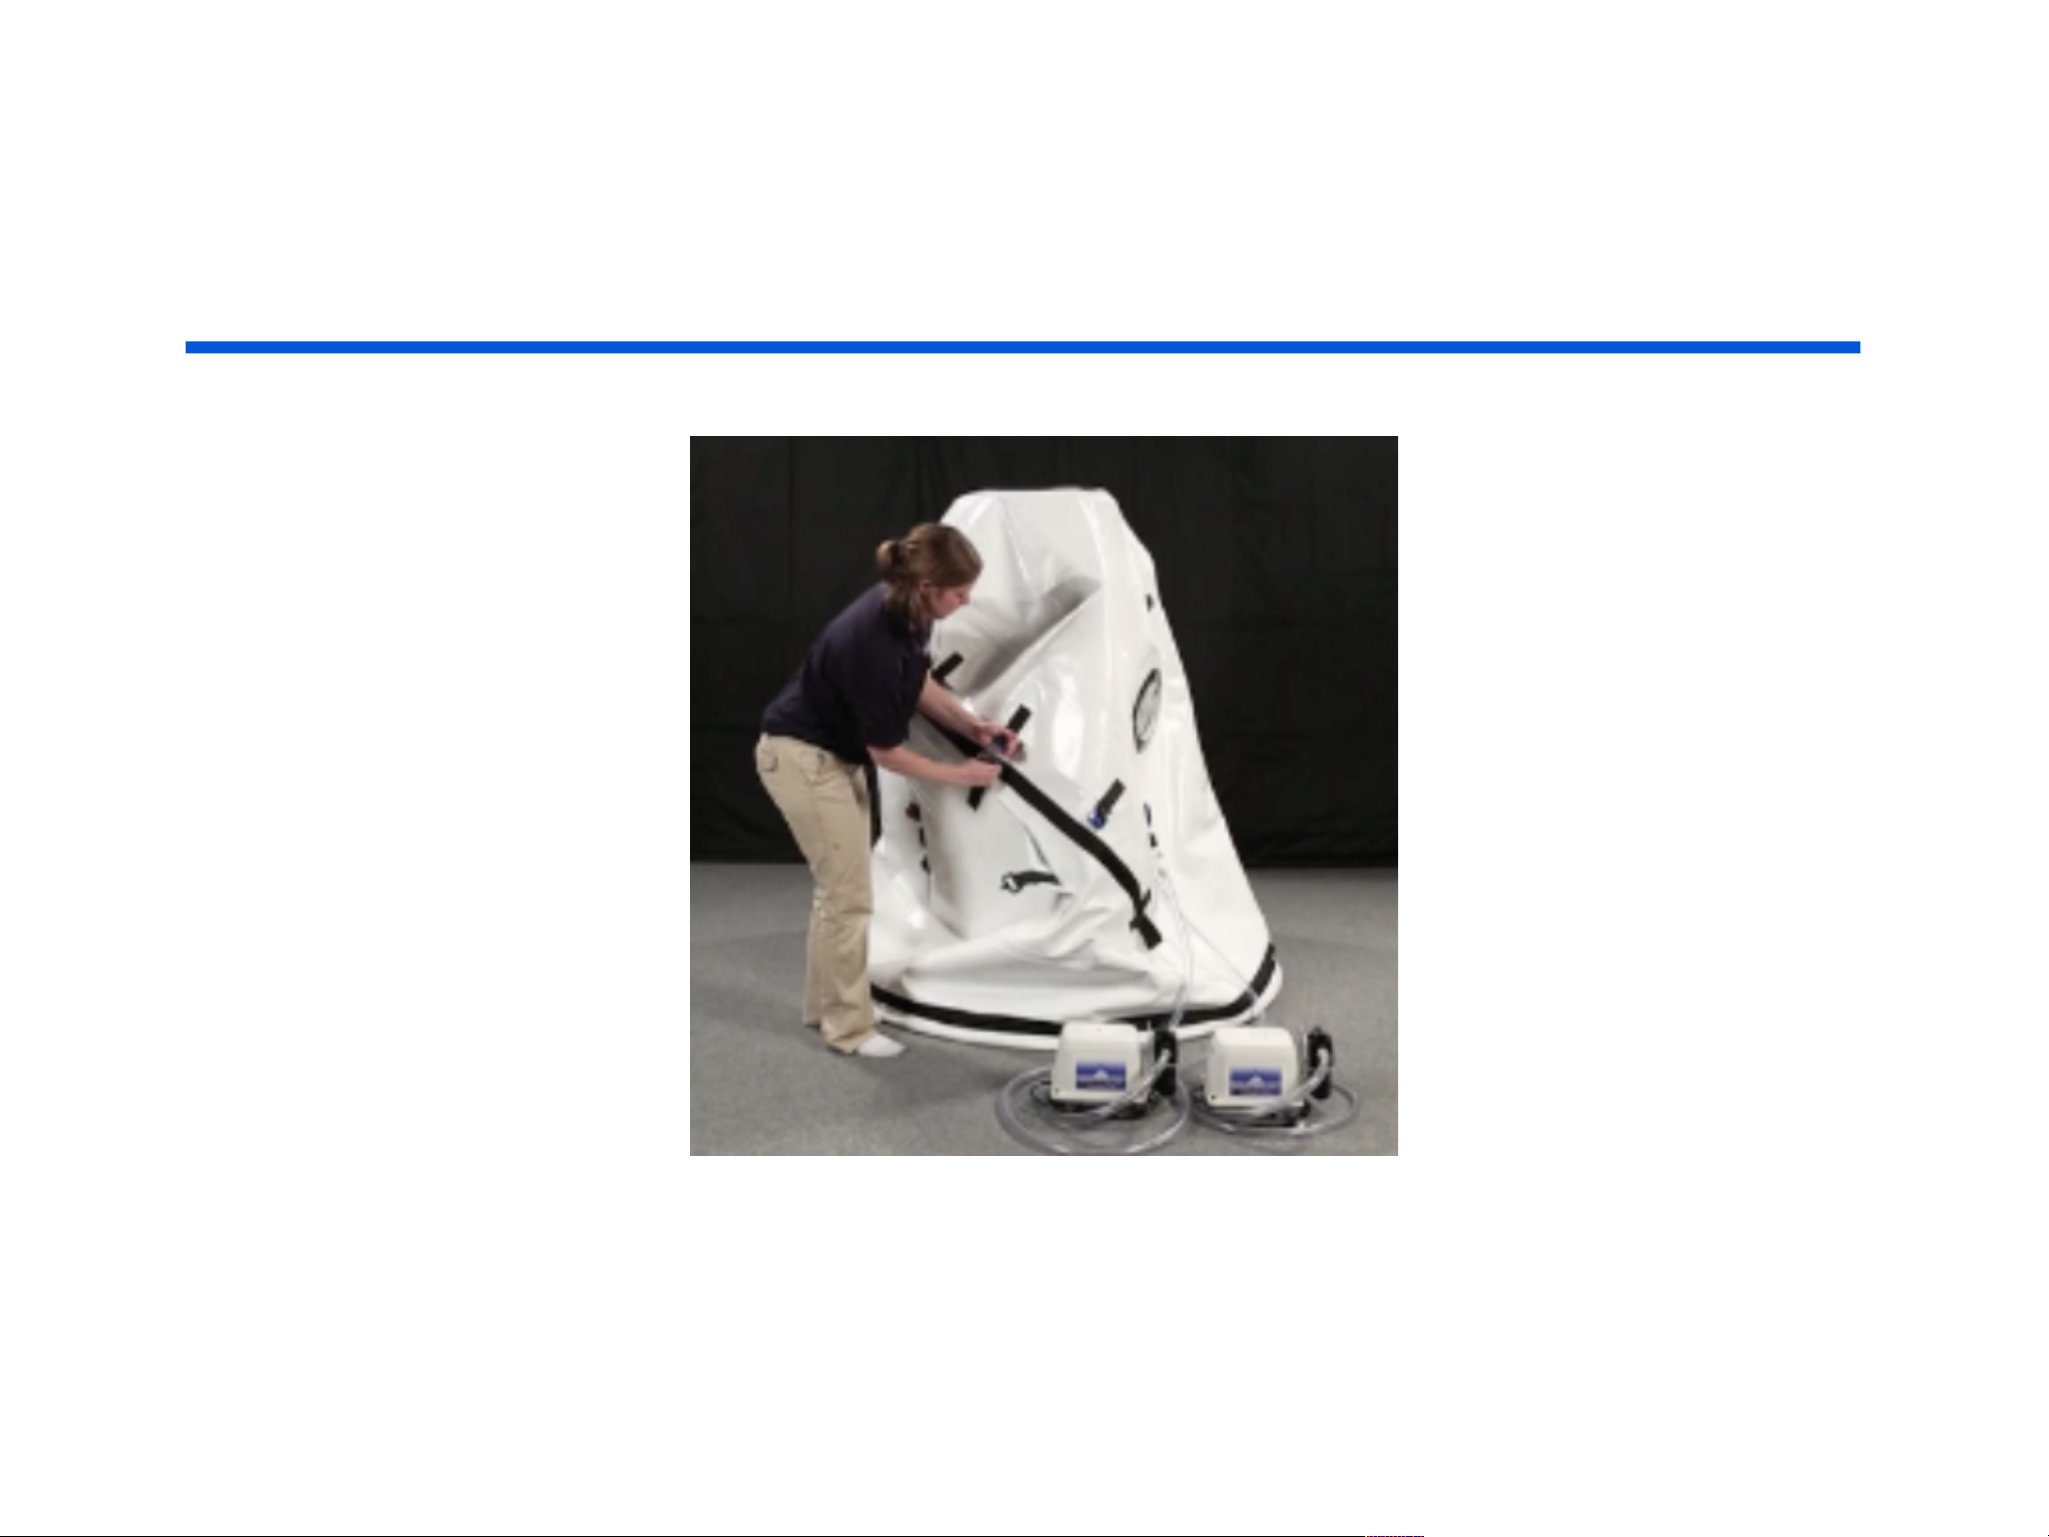
INFLATING
Next buckle the belts.
Page 25
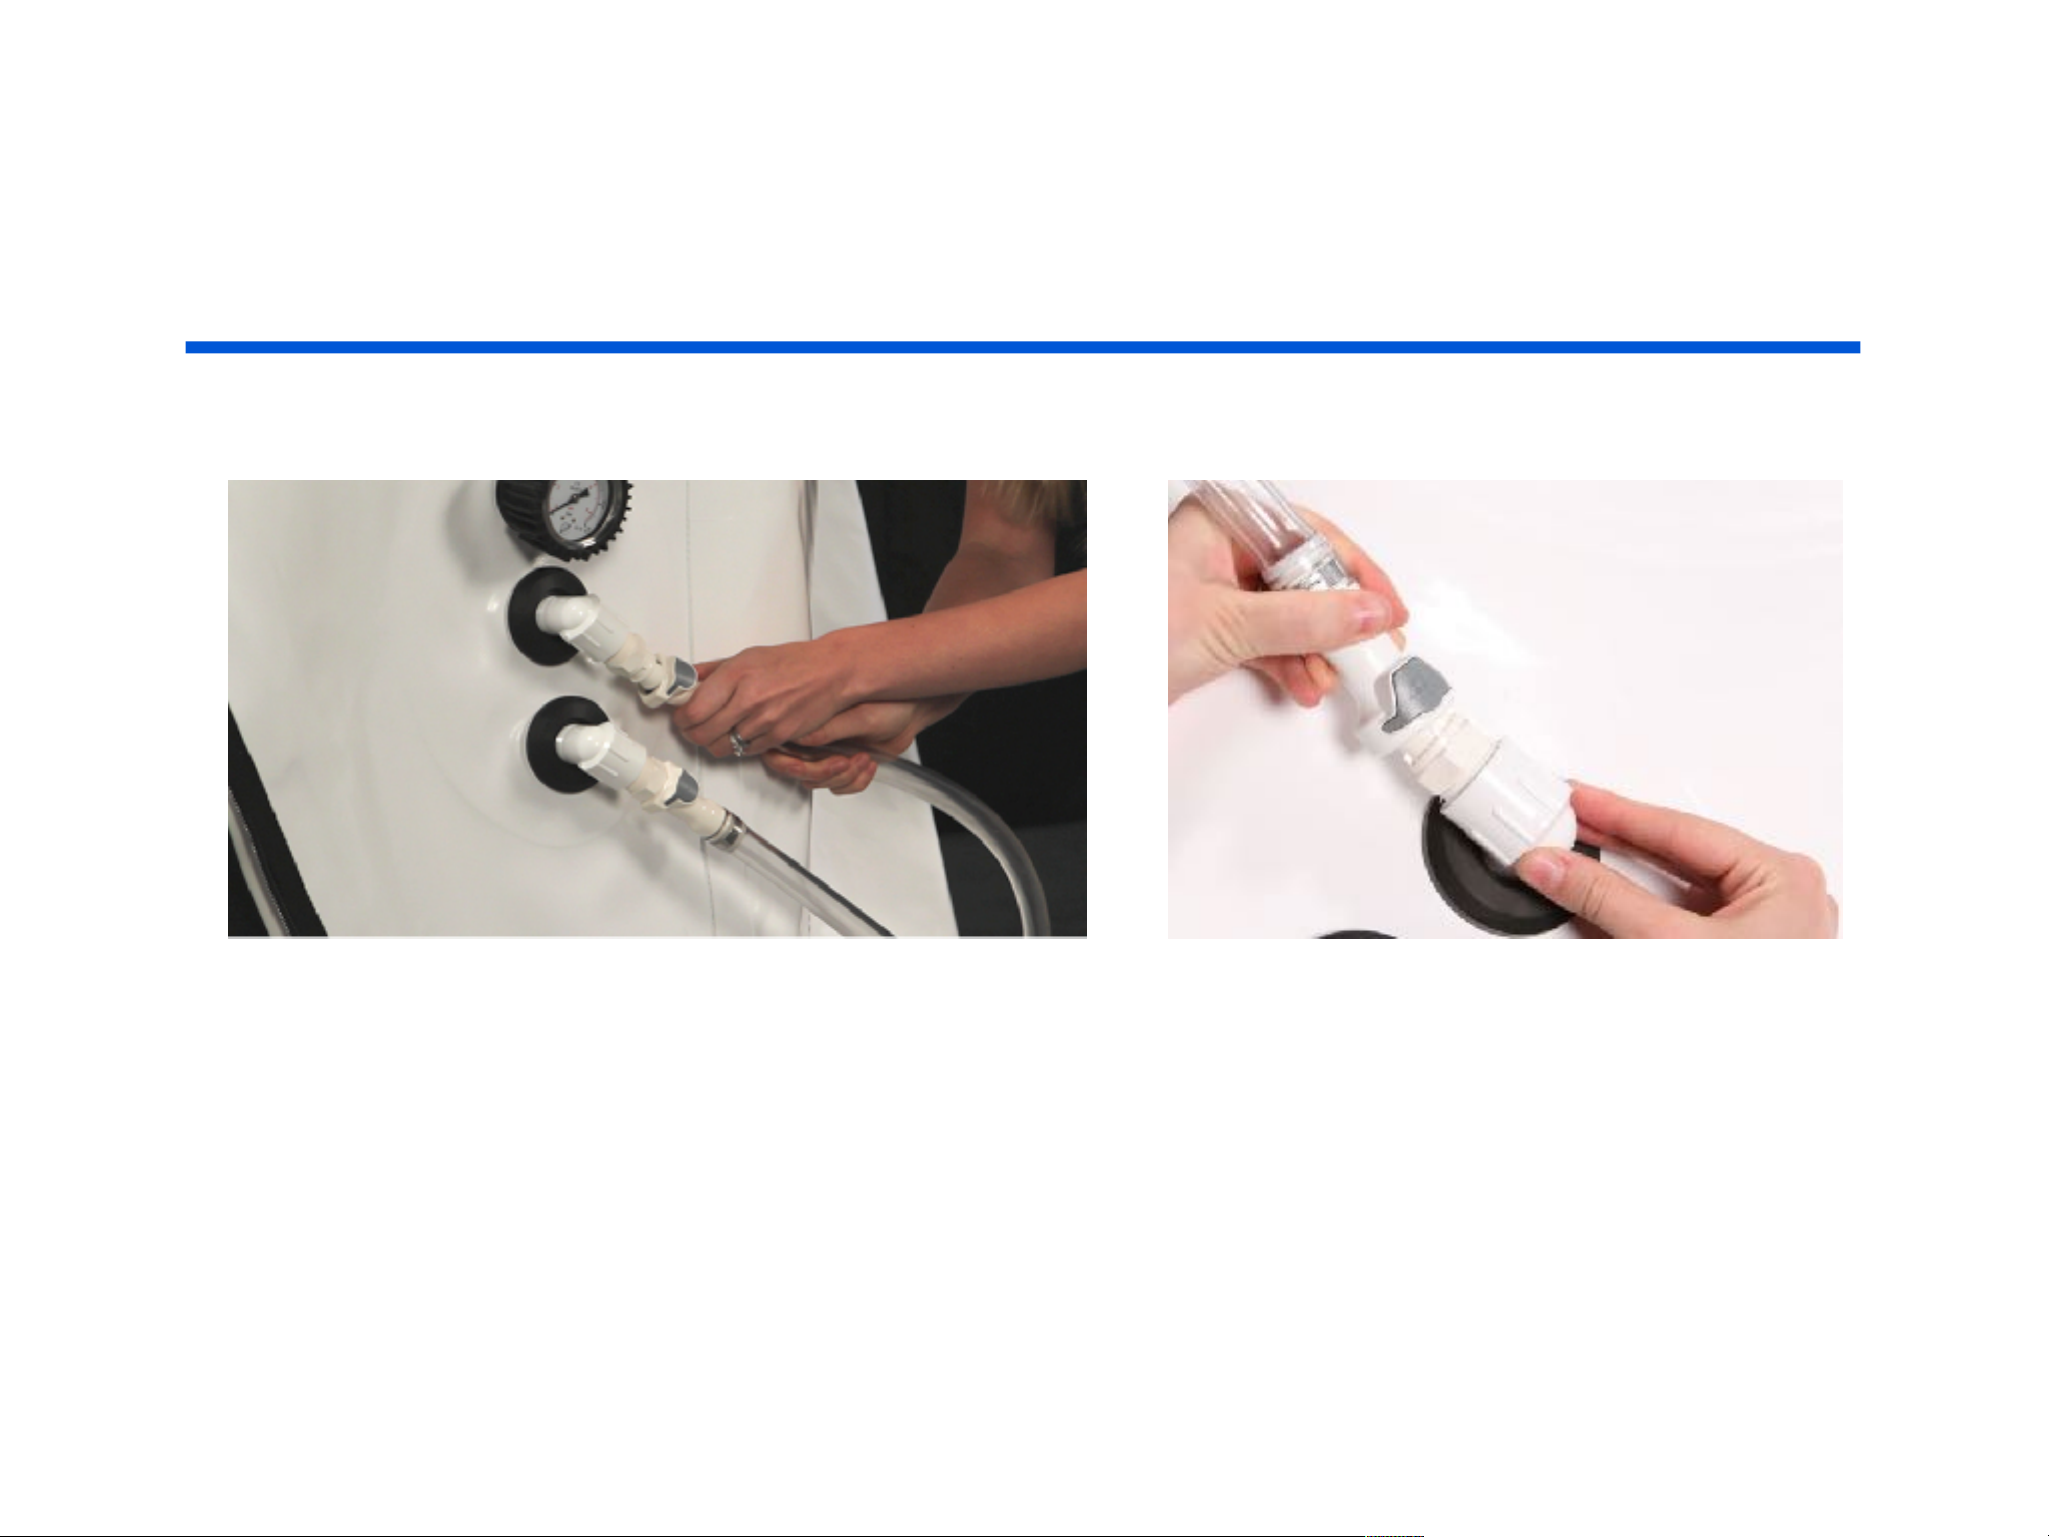
INFLATING
Now it is time to connect the compressor hoses to the chamber.
Simply snap the hoses to the fill valve until you hear a click.
Next plug the compressors into an electric outlet.
Page 26
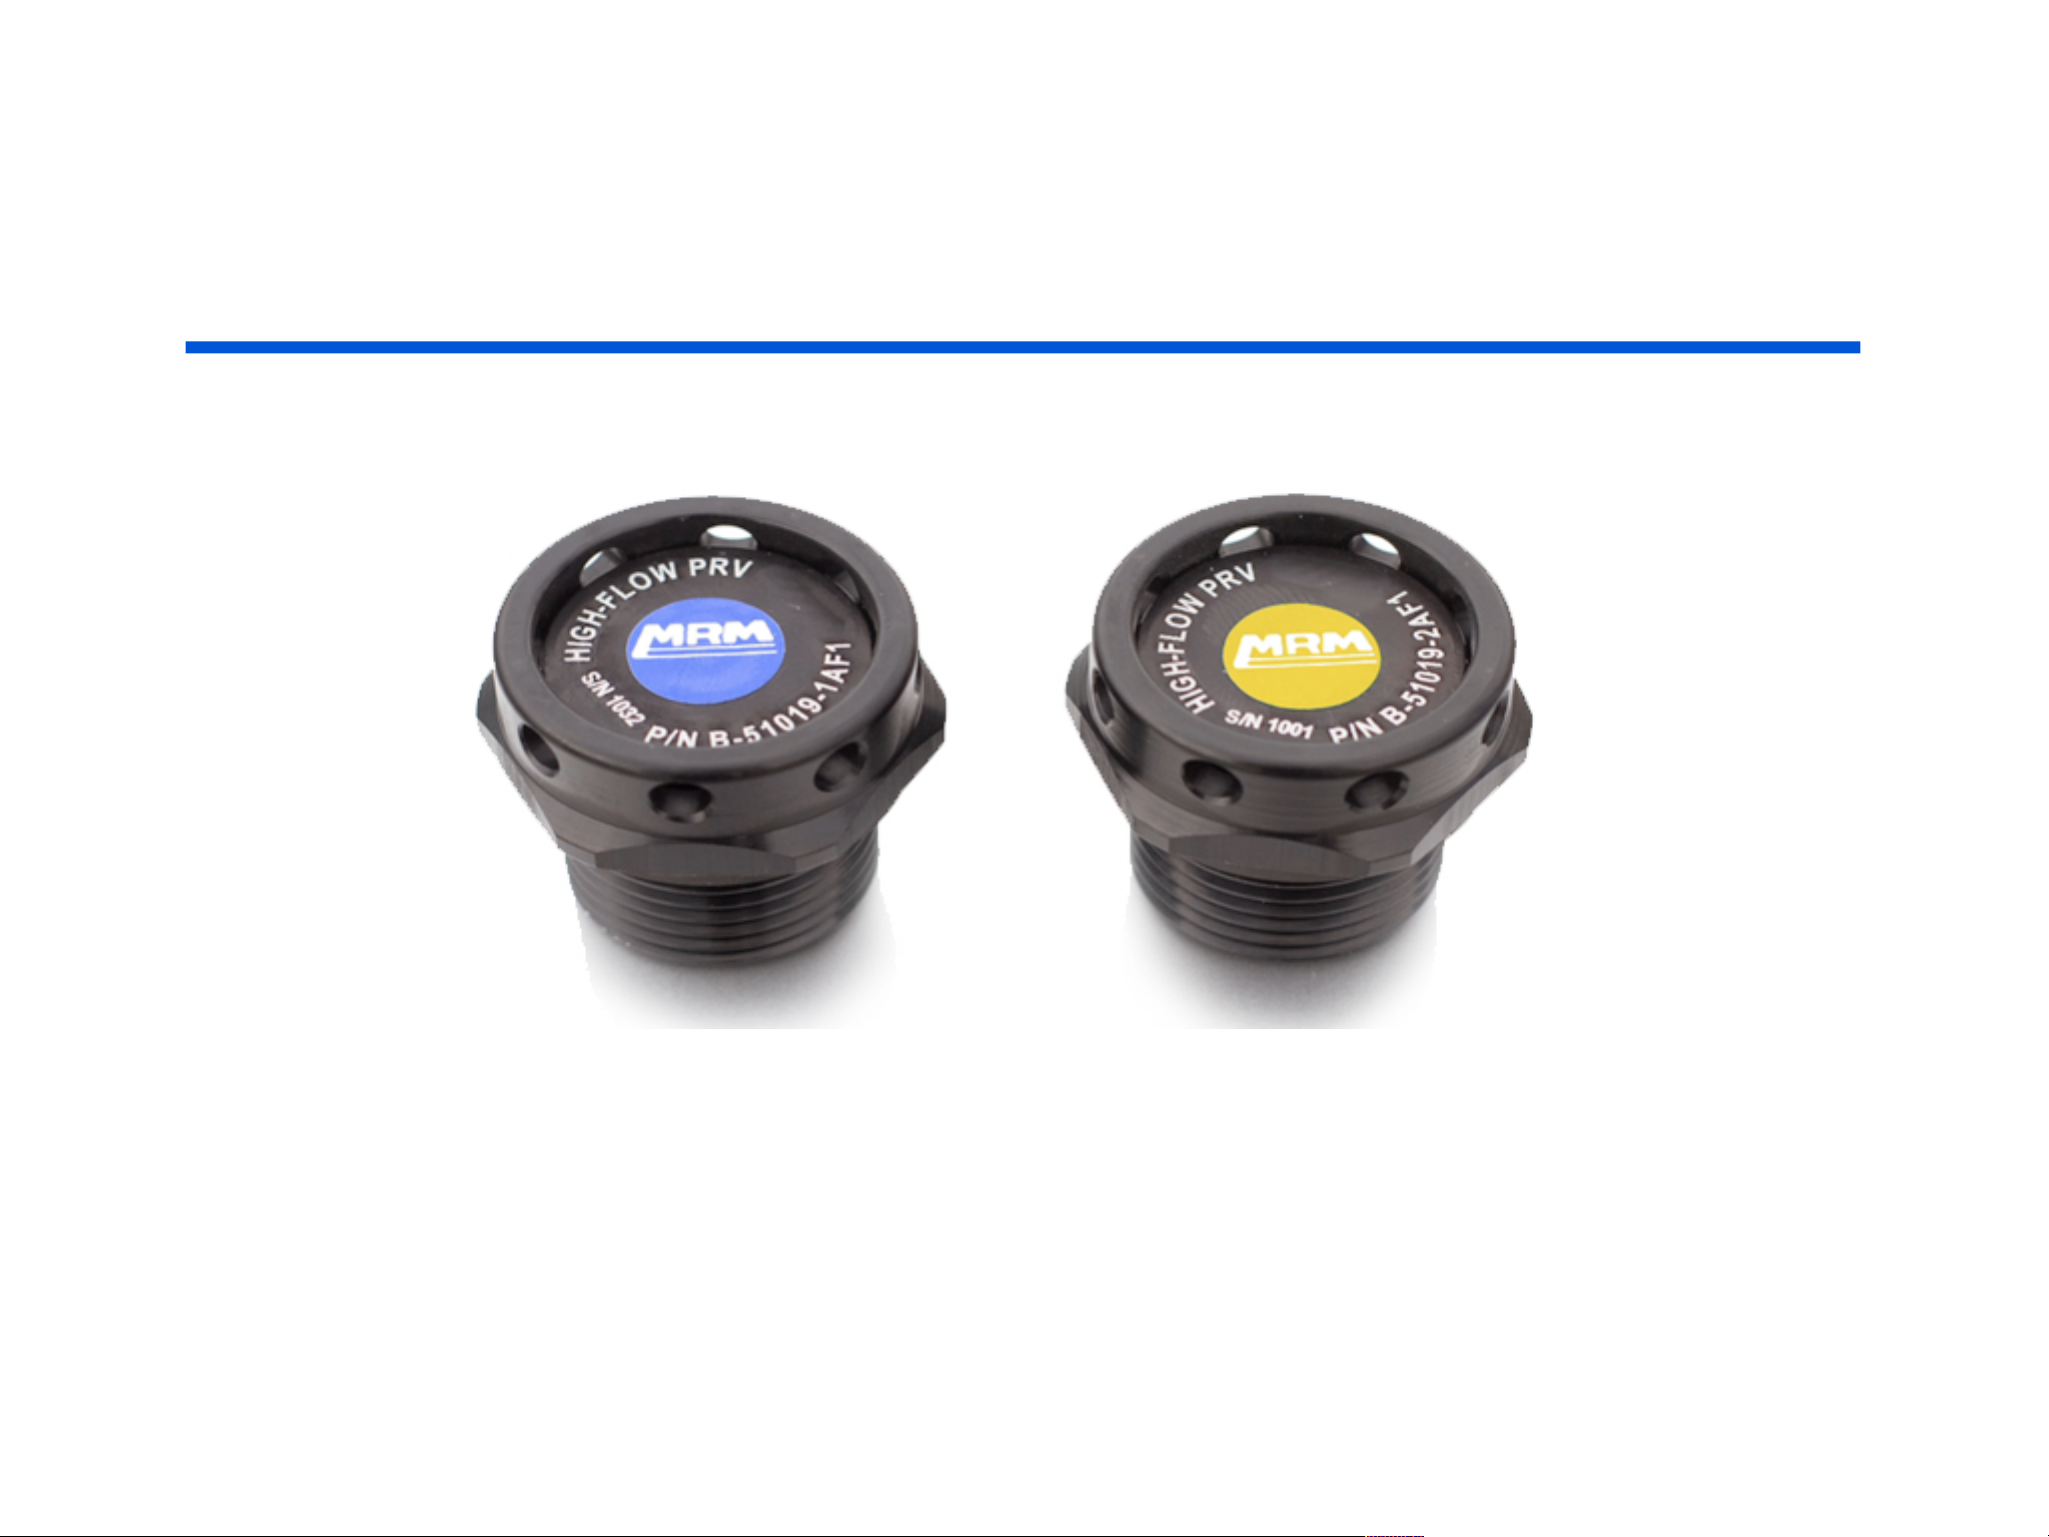
INFLATING
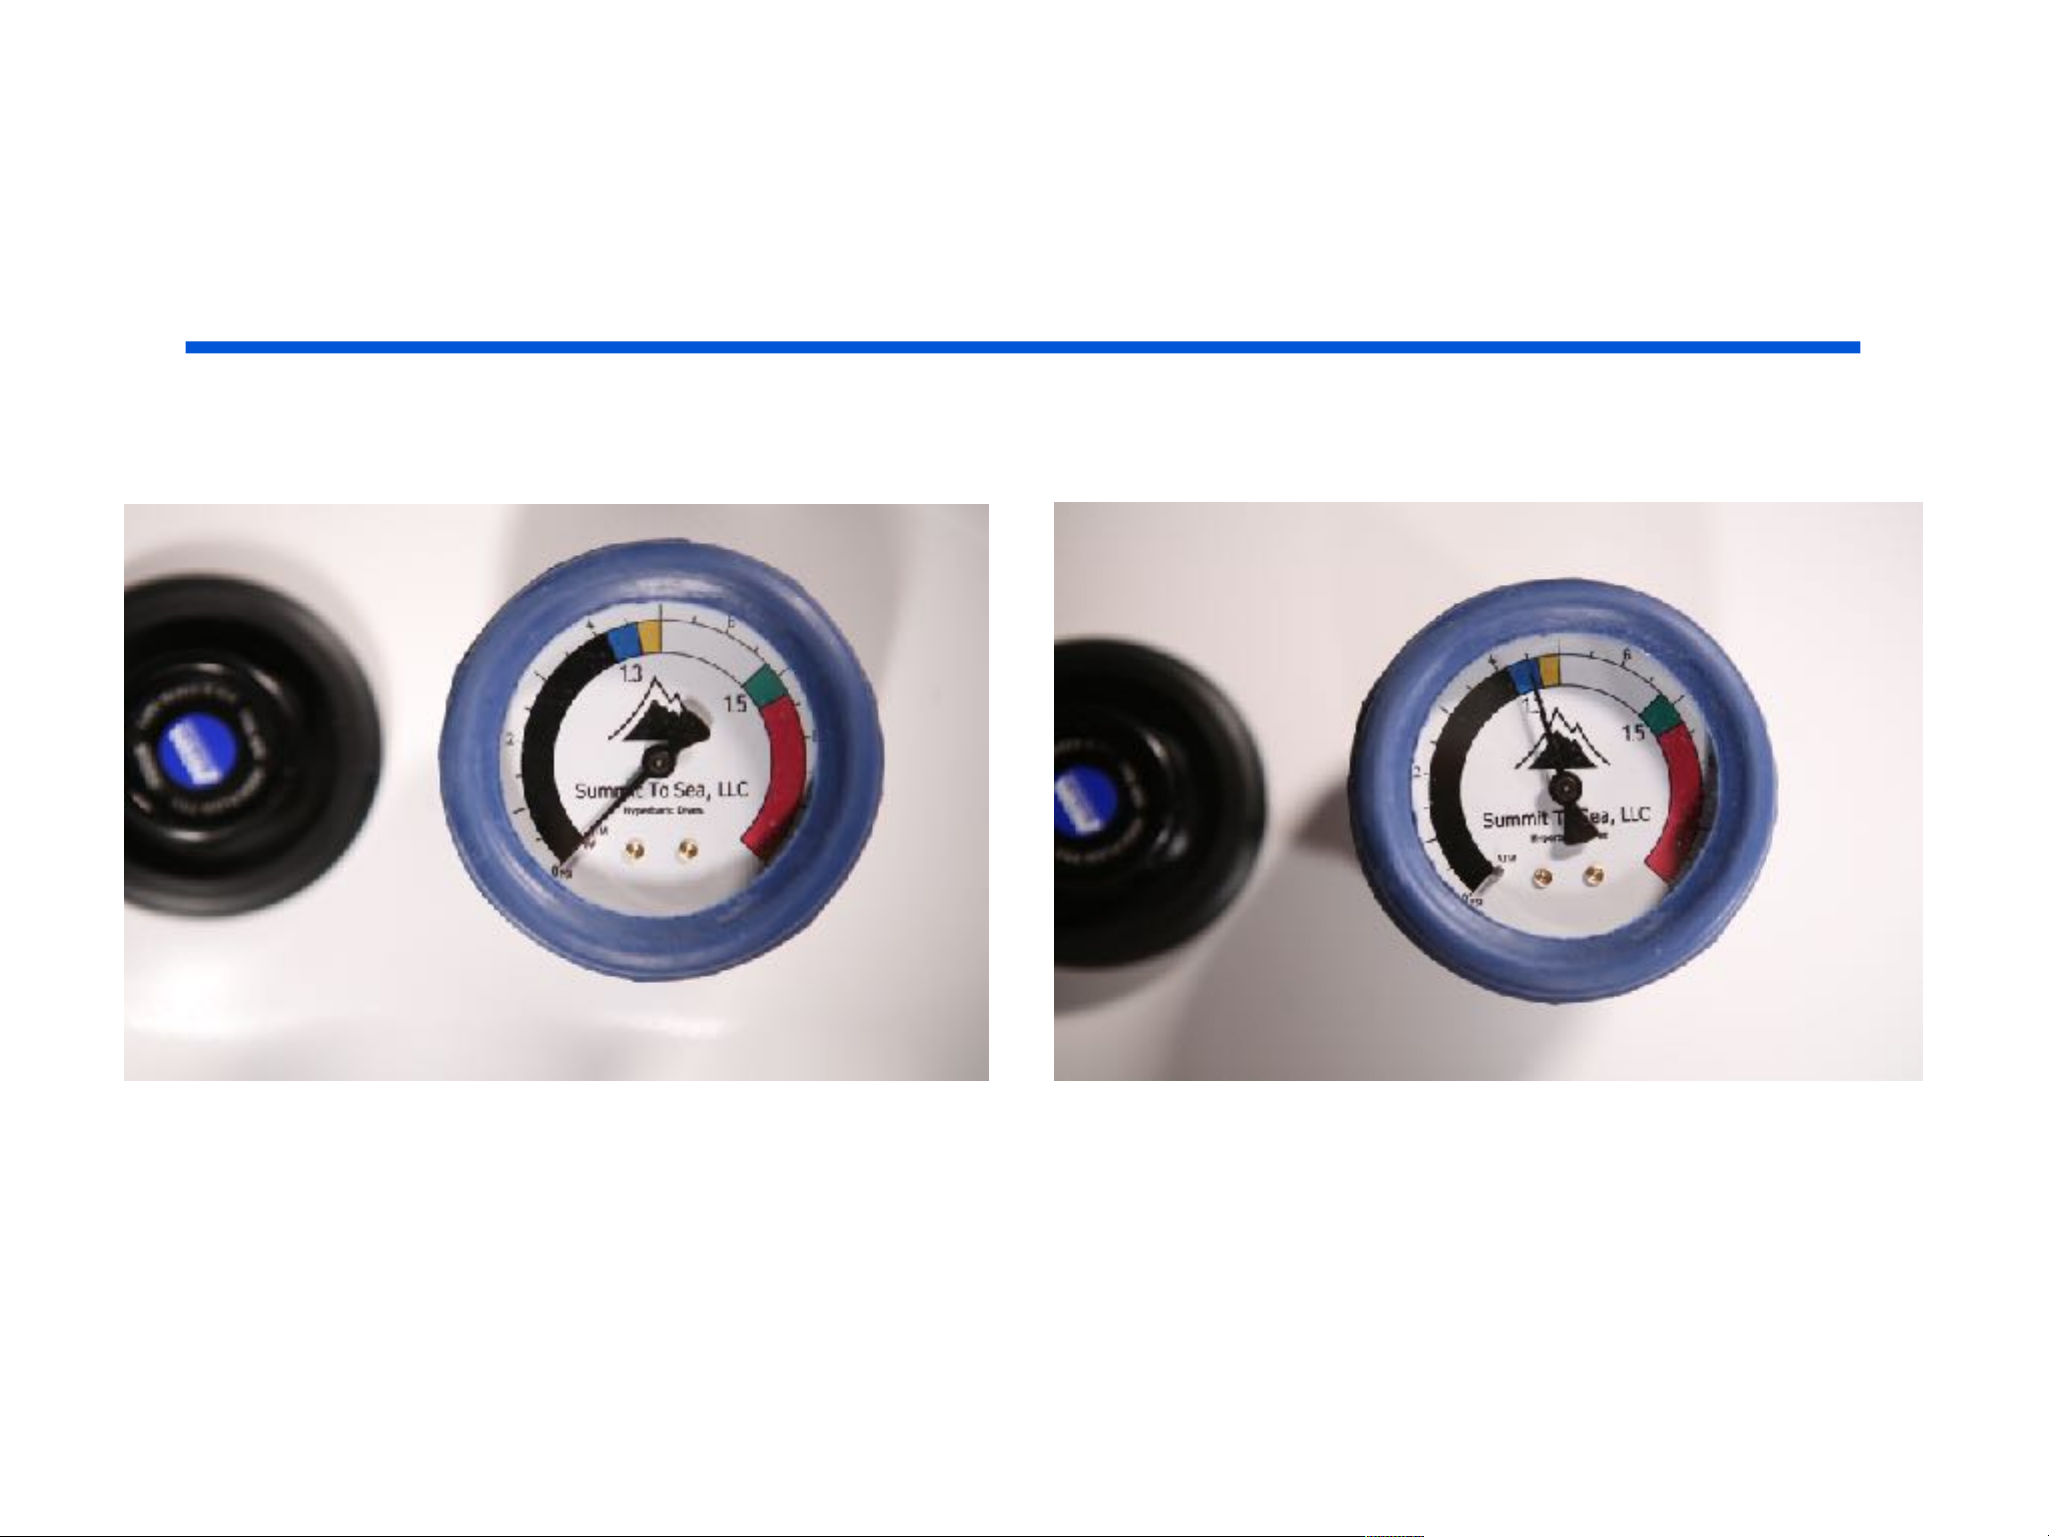
You will notice that there are two relief valves on your chamber.
The blue valve is factory set to release air when the chamber reaches 1.3 ATA.
The yellow valve is set at a slightly higher pressure for redundancy and safety.
Page 27

INFLATING
If the relief valve does not release air when it is at full pressure,
stop your treatment and call your distributor.
The compressor must remain on for the entire treatment session to ensure the
circulation and exchange of fresh air, which provides a safe and comfortable treatment.
Page 28
INFLATING
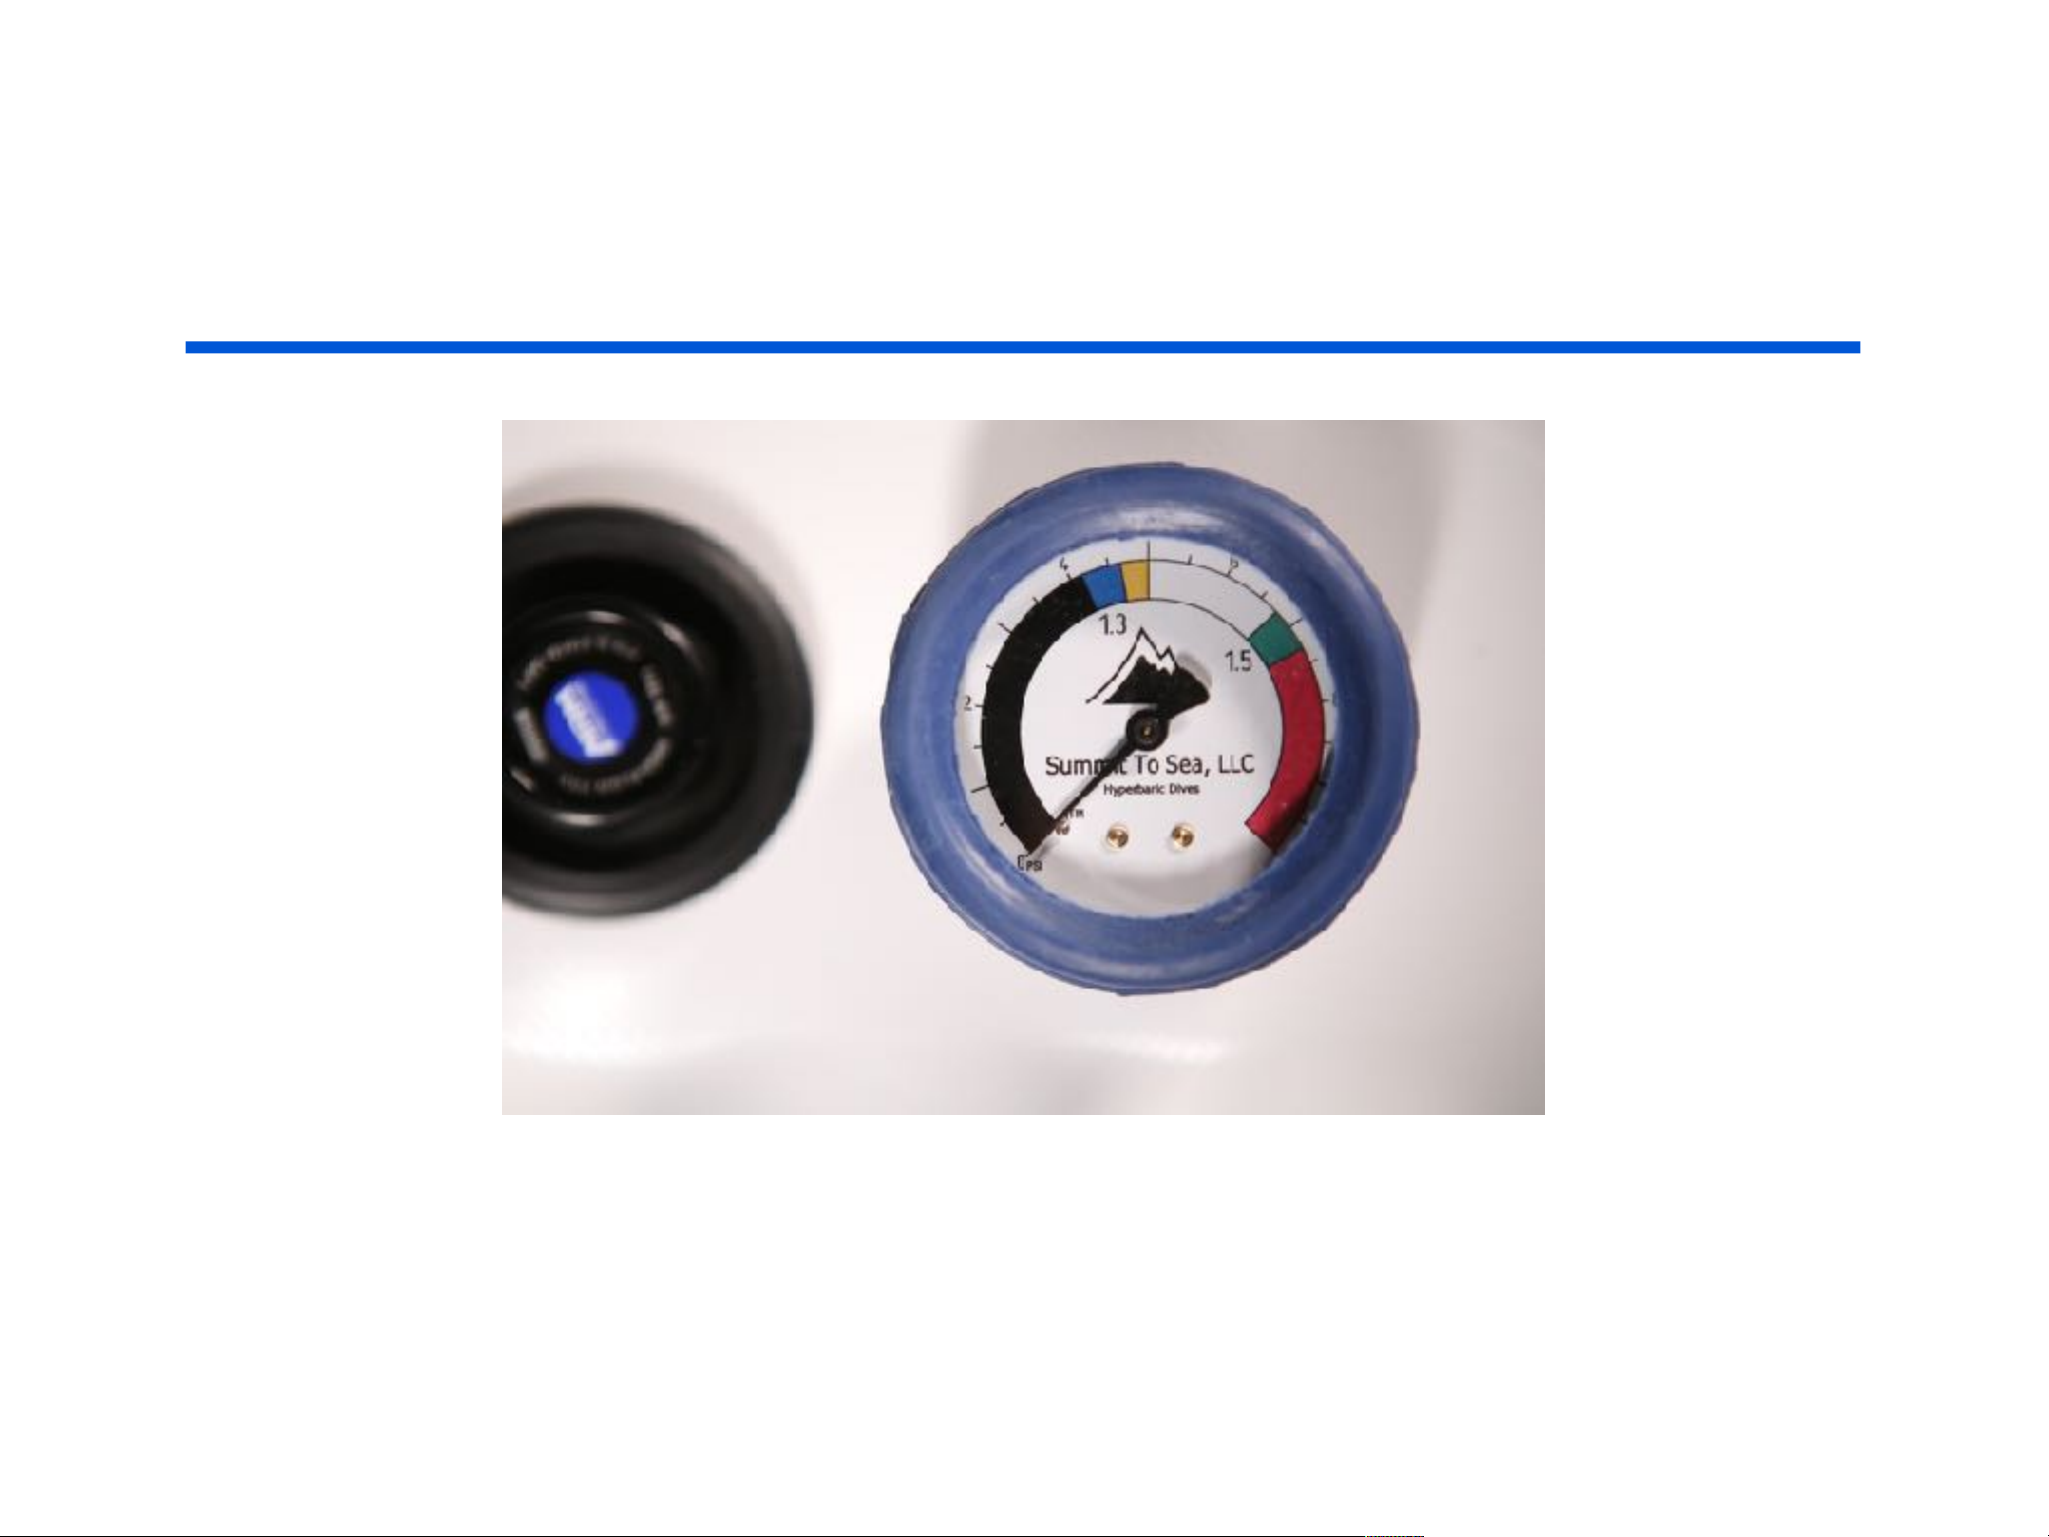
Notice that the gauge is reading zero when you begin.
It will then reach the blue section on the gauge which is 1.3 ATA.
You will hear air being released from the blue valve.
Page 29
INFLATING
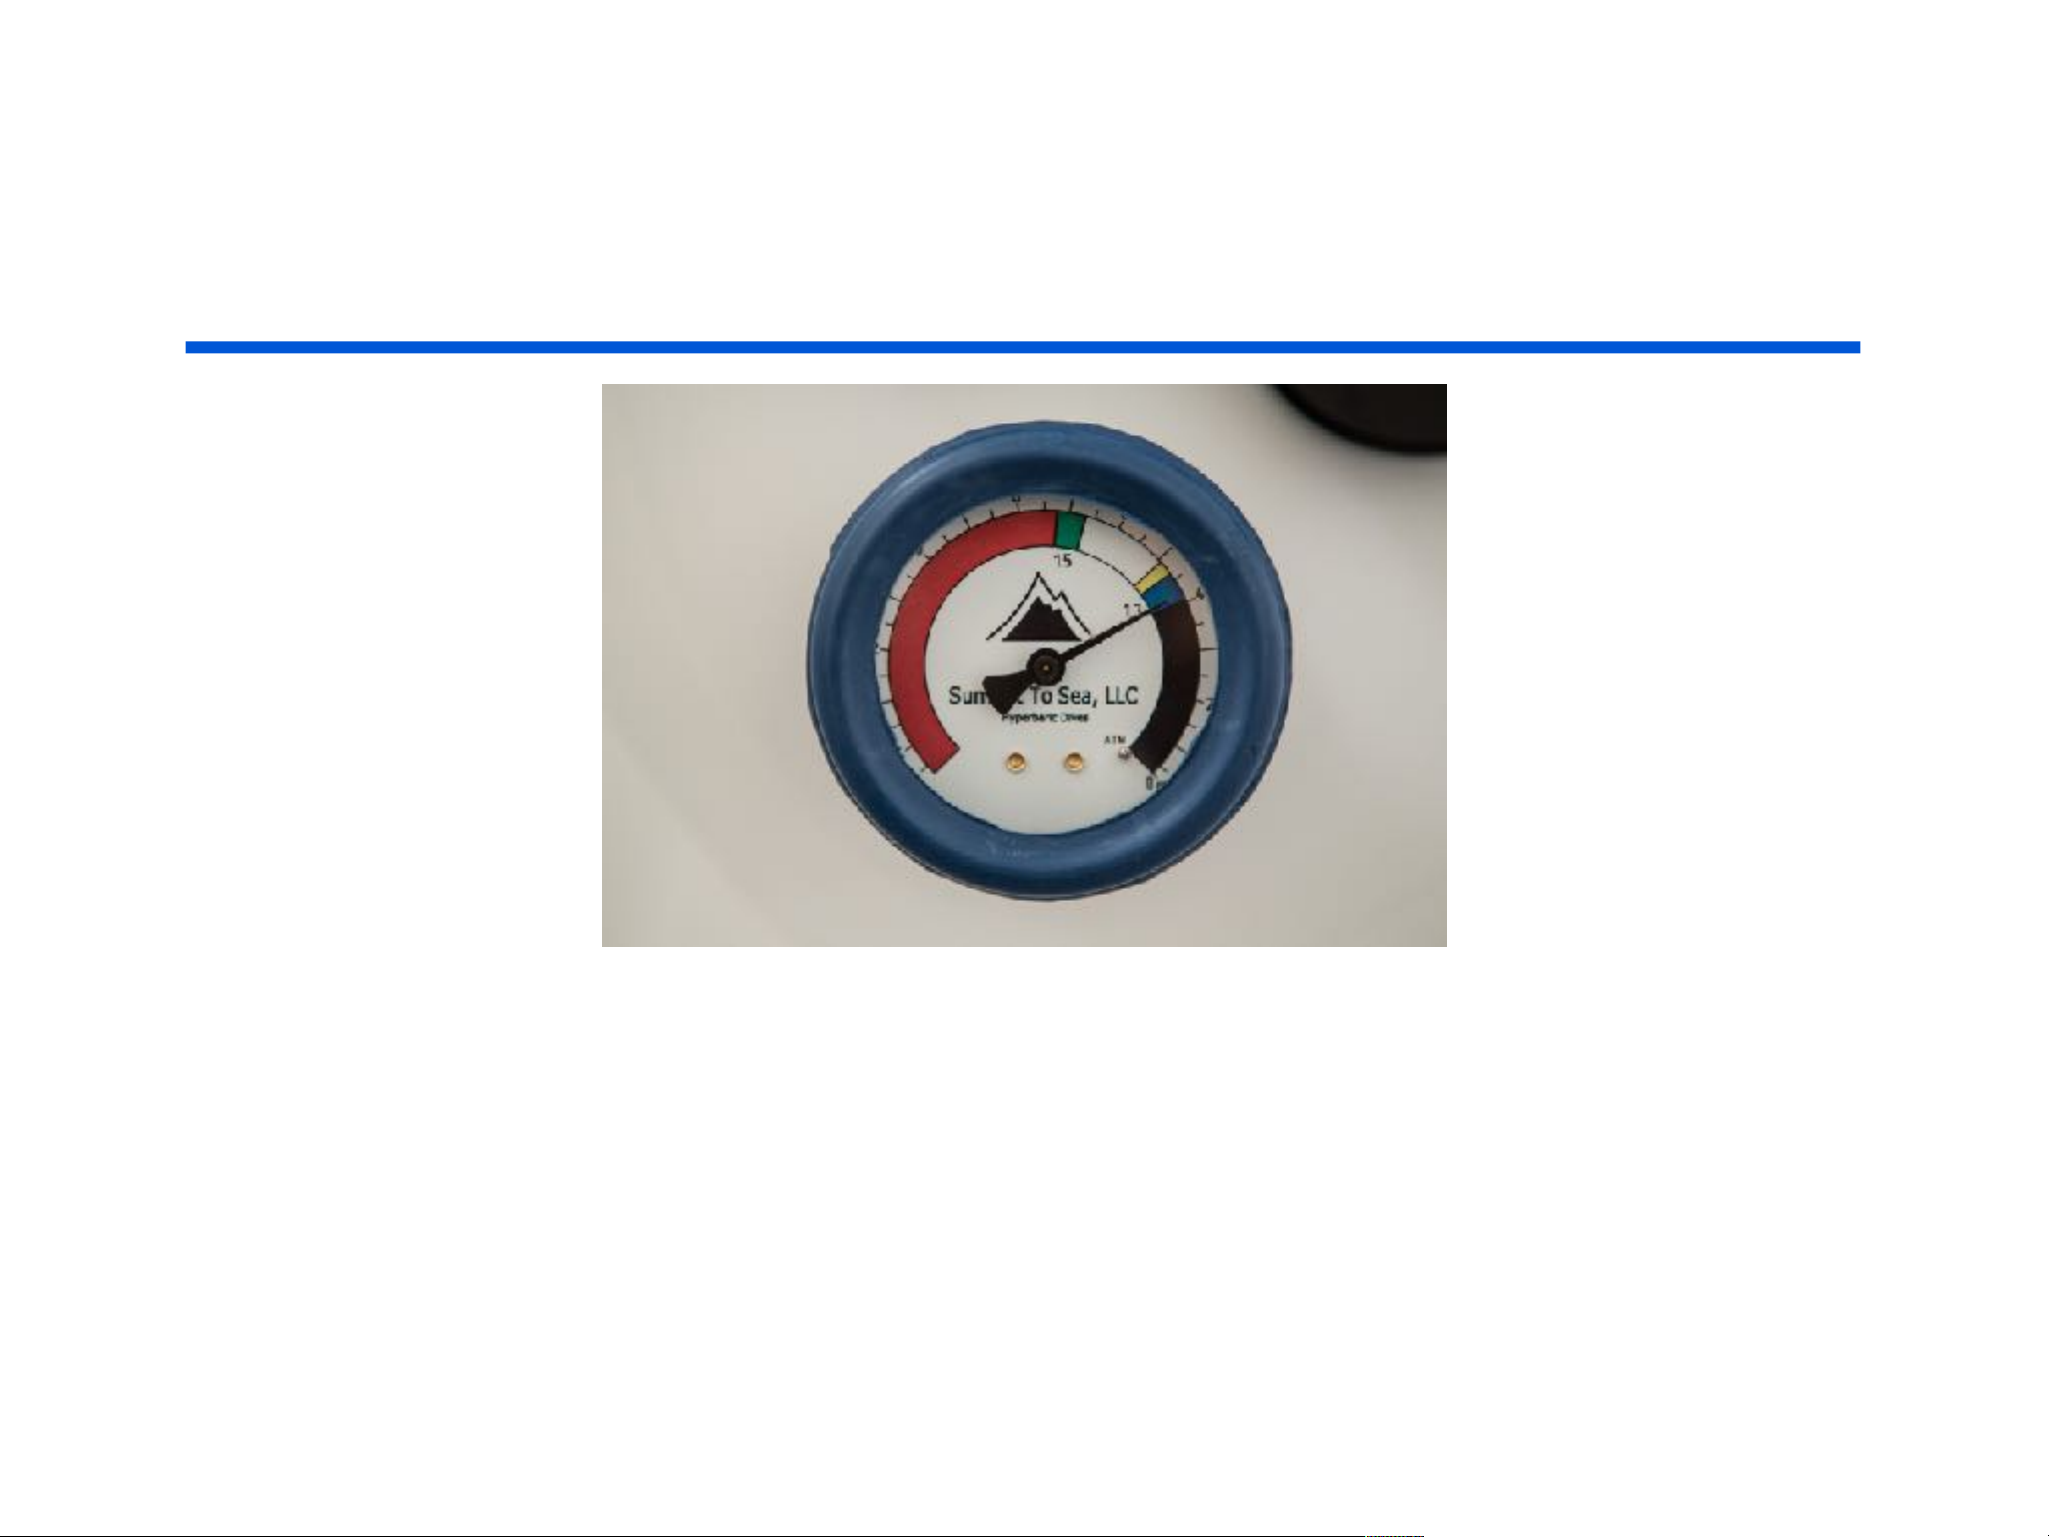
The Dive Vertical chamber is unique in that it also has an internal gauge that can be read
from inside the chamber. You will notice that the gauge needle moves counter clockwise
while inflating the chamber. The inside gauge allows you to monitor the pressurization to
determine when you have reached 1.3 ATA. During depressurization this allows you to
determine when it is time to open the zipper.
Page 30

INFLATING
INFLATING THE CHAMBER WHEN INSIDE
If you will be inflating the chamber from the inside of the chamber
please follow these instructions:
Plug the compressor into an electric outlet and ensure it is running
Make sure the red knob is closed
Step into the chamber
Buckle the belts
Close the outside zipper
Close the inside zipper
Page 31
INFLATING
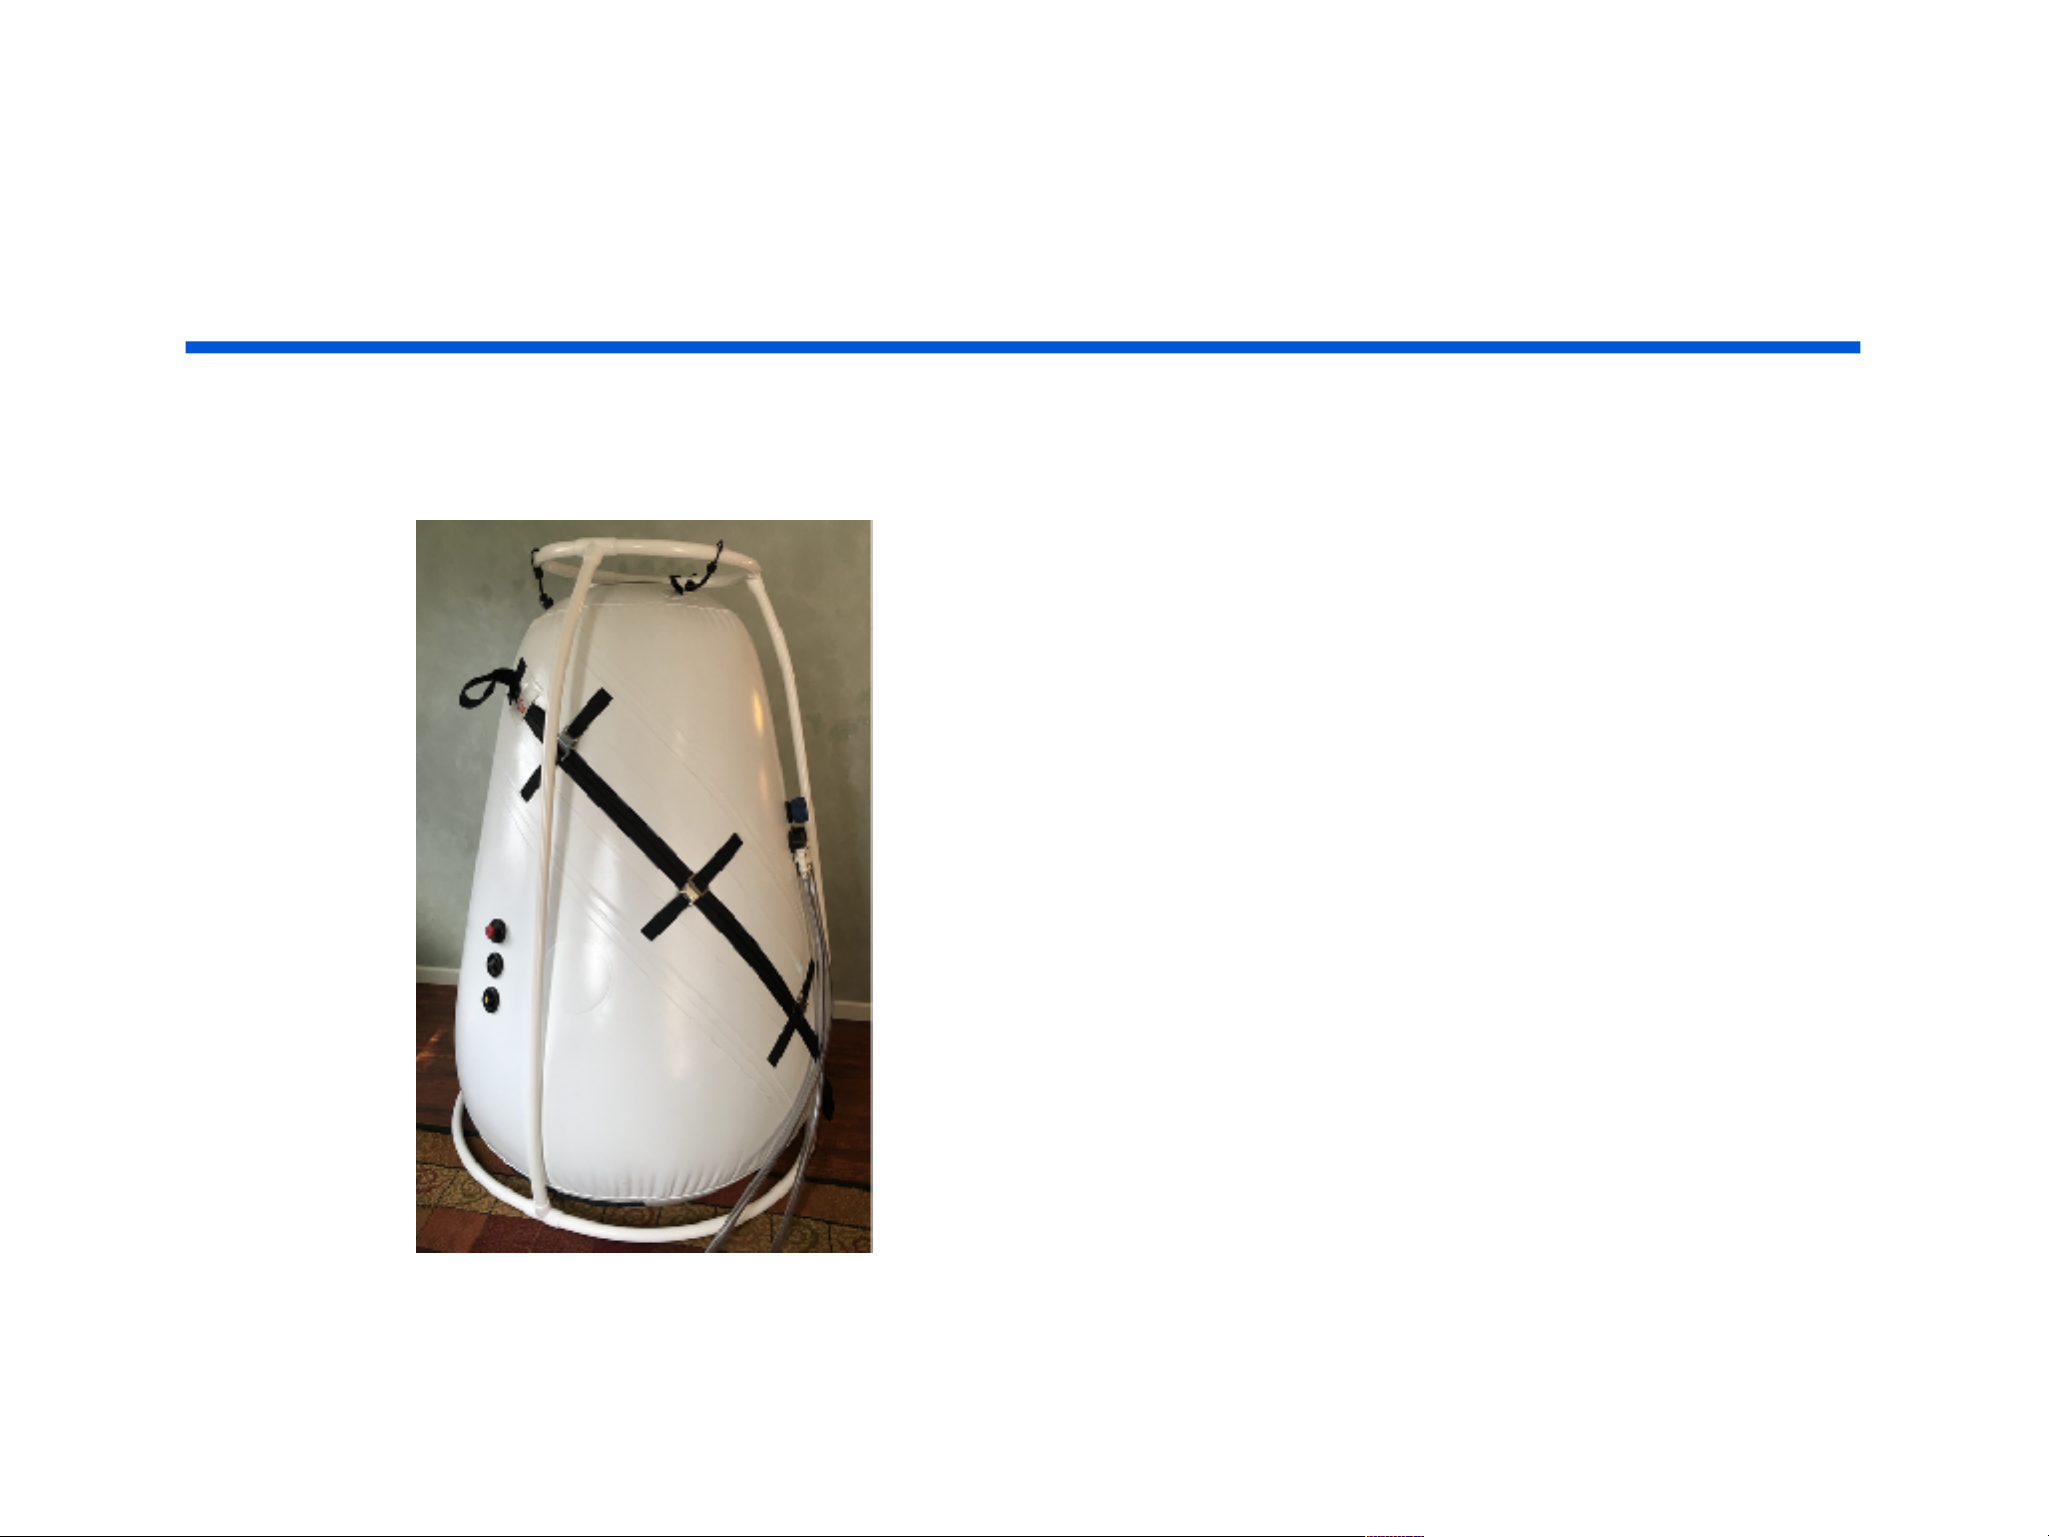
Place the deflated chamber inside the
frame. Once it is inflated you can
attach the chamber to the frame by
using either the metal hooks or the
bungee cords.
Page 32
DURING TREATMENT
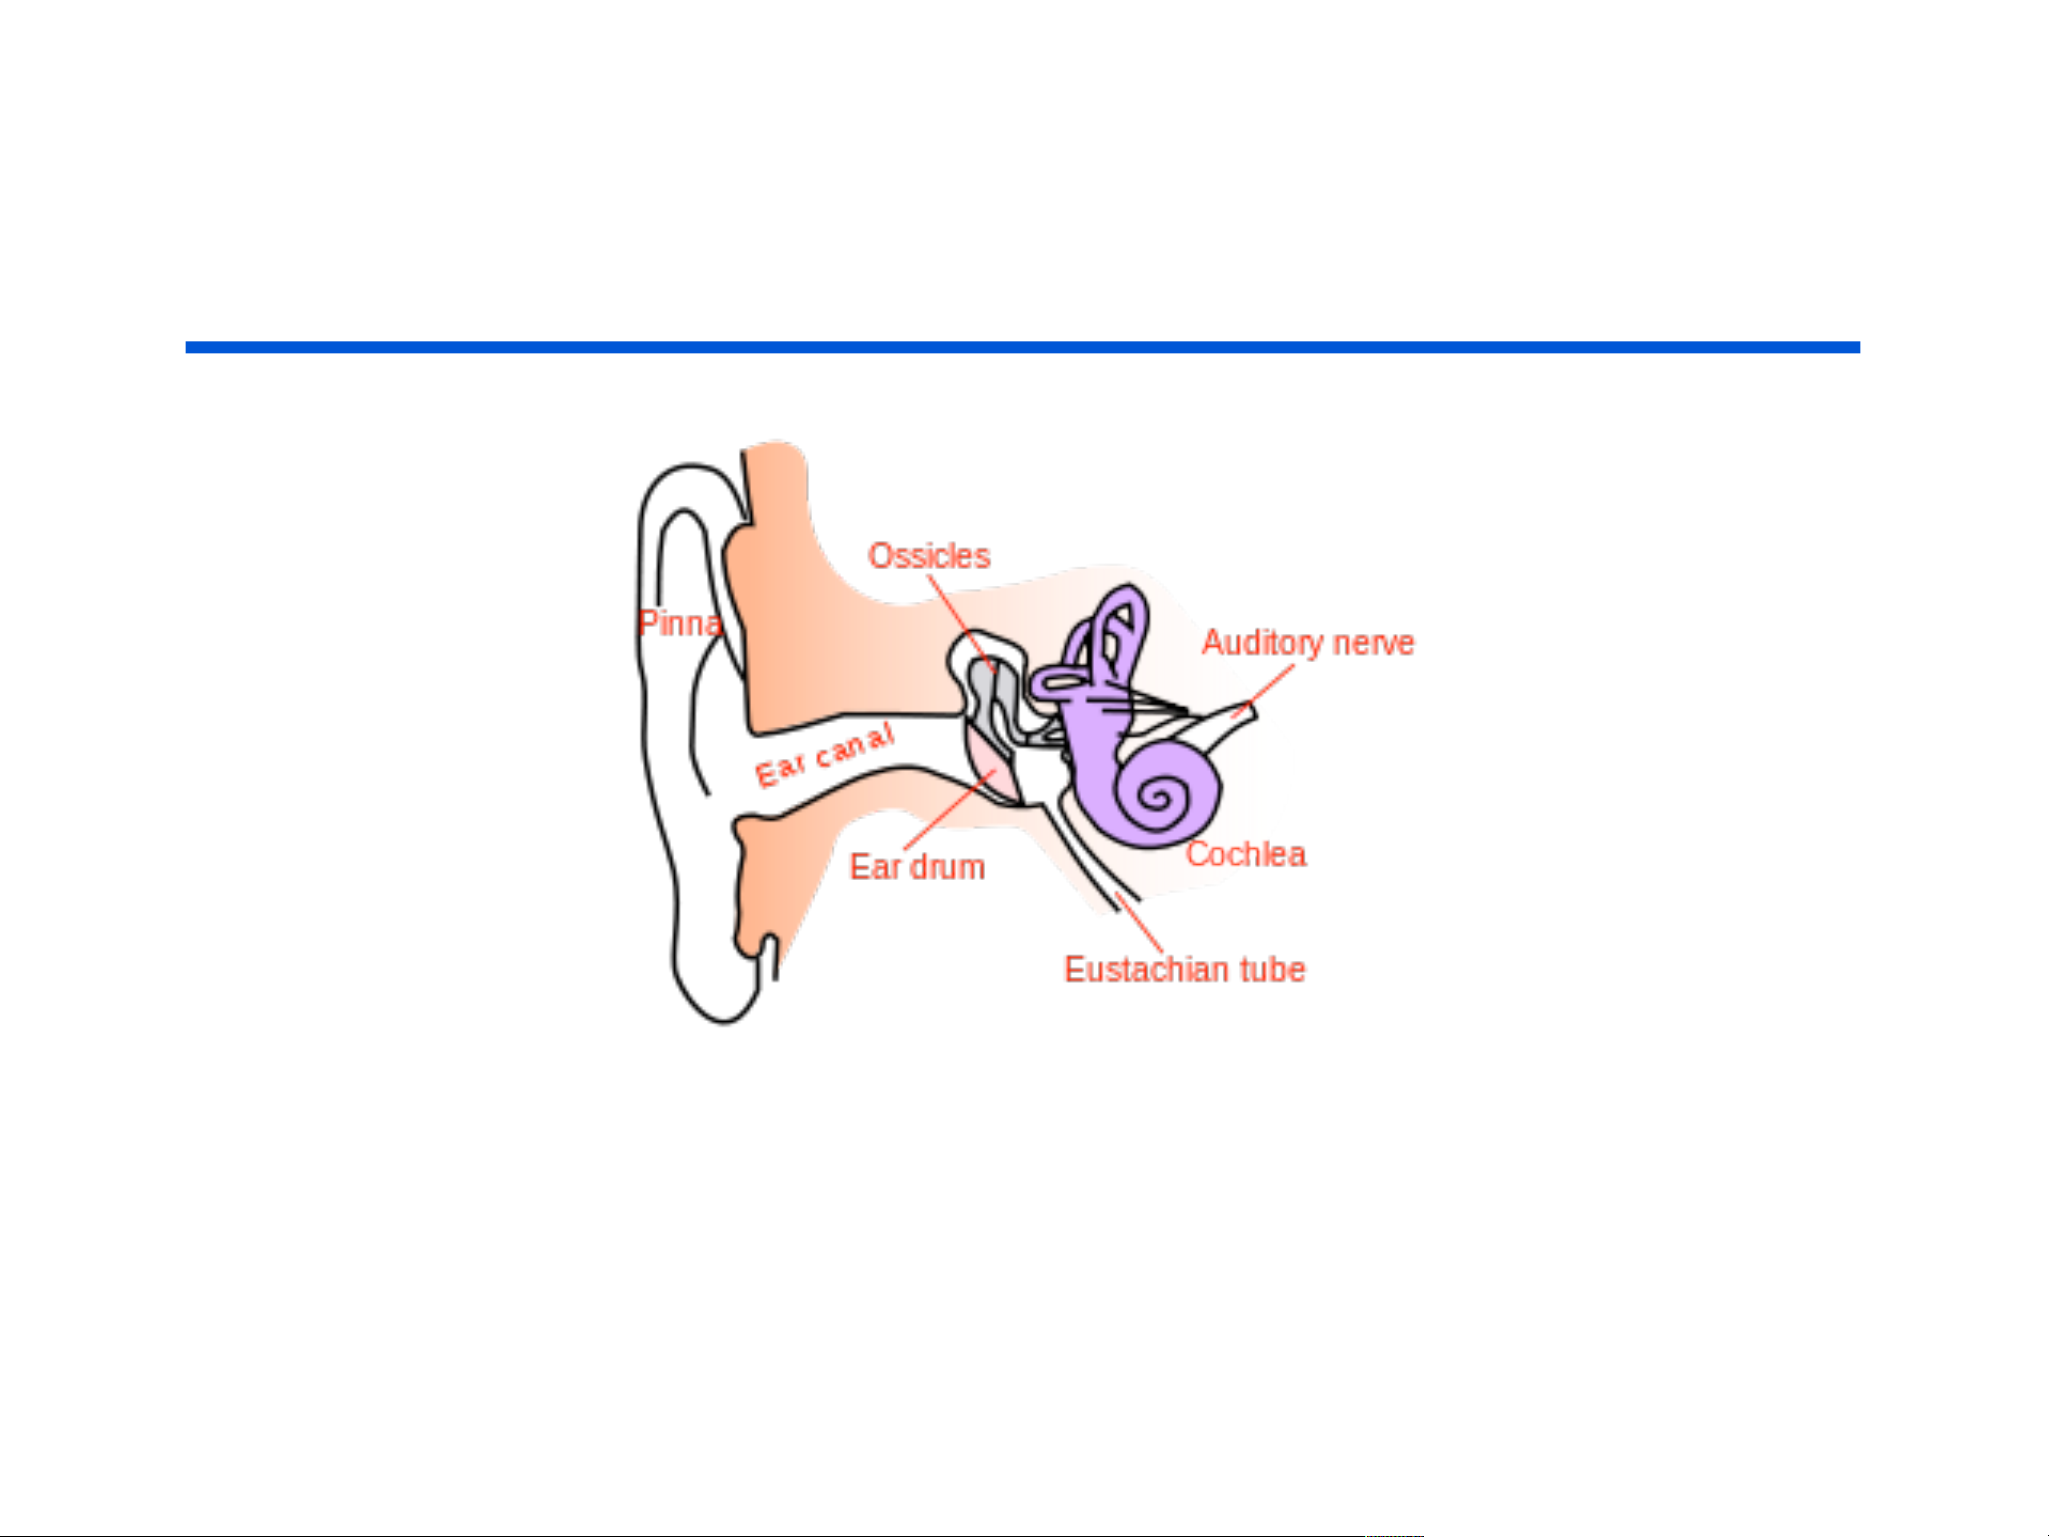
As the chamber begins to inflate, you may notice added pressure on the ears.
This feeling indicates the need to equalize the pressure.
The pressure feeling is similar to that of landing in an airplane.
This pressure is relieved through the Eustachian tube.
There are several methods for relieving this pressure.
Page 33
DURING TREATMENT
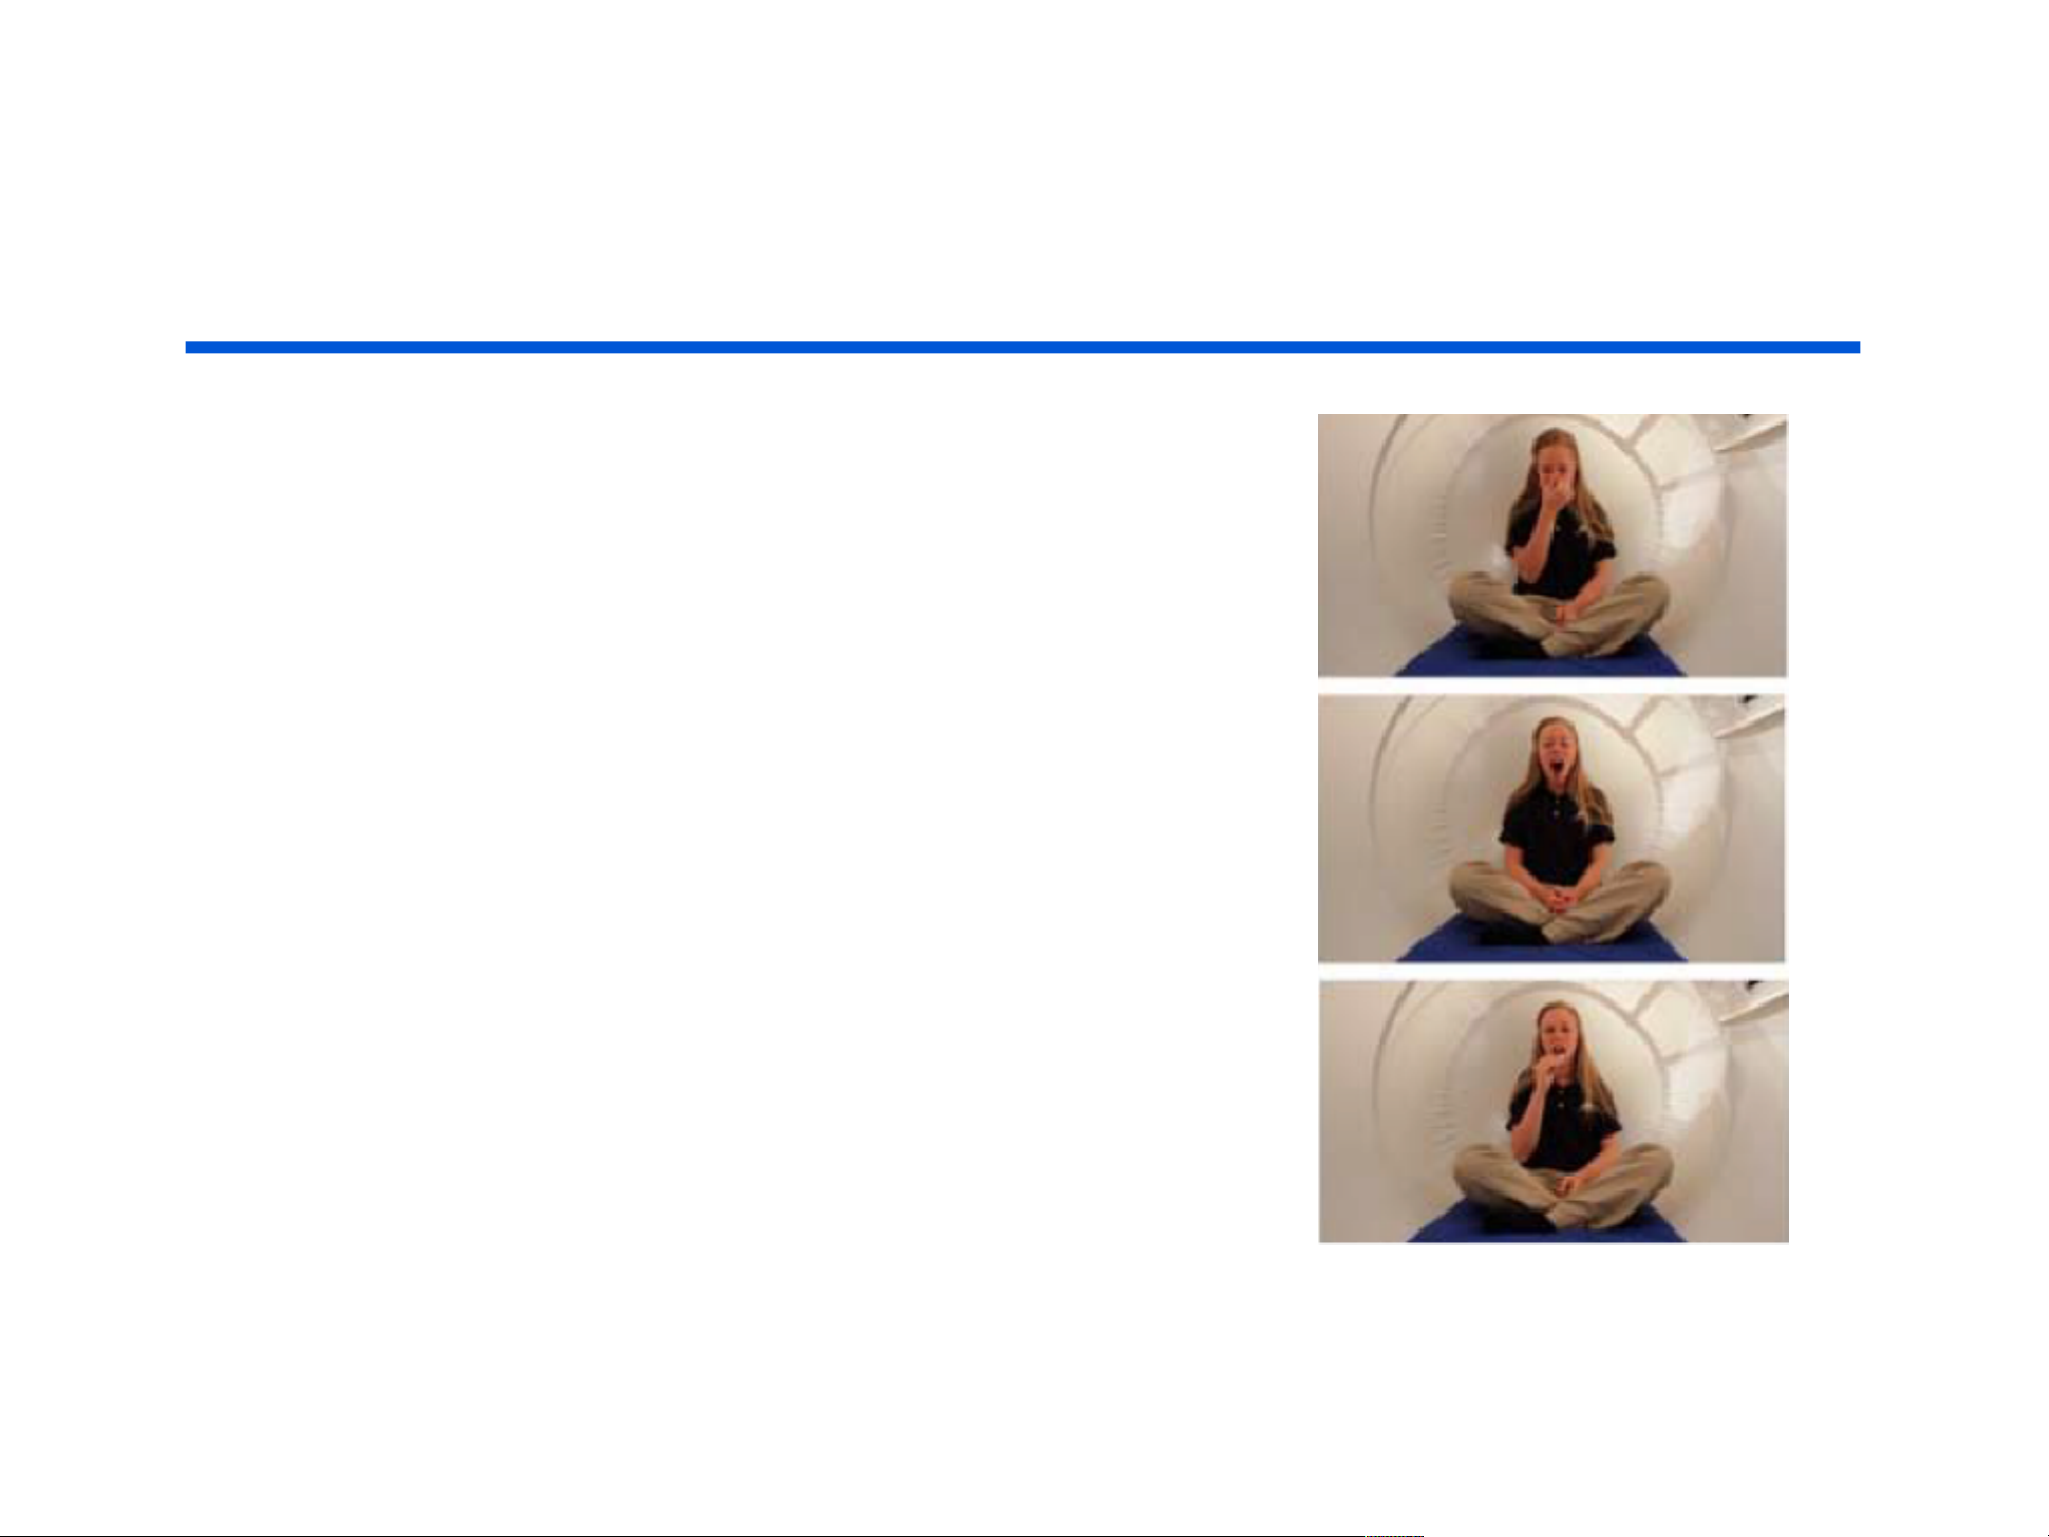
The first, is the Valsavla maneuver. Pinch your
nose, close your mouth and try gently blowing out
your nose. Repeat every time you begin to feel that
pressure
Yawning or opening your mouth wide will also help.
Lastly, chewing gum may help relieve this pressure.
If the above suggestions do not resolve the ear pressure, open the red relief knob
until the feeling of pressure is gone. Then close the red knob to continue to
pressurize the chamber. The red relief knob will allow you to control the speed of
pressurization to aid in equalizing the pressure on your ears.
Page 34

DURING TREATMENT
WHAT TO WEAR
You may wear any type of clothing in the chamber;
however, comfortable and soft clothing is typically used.
Do not wear shoes inside the chamber.
Page 35

DURING TREATMENT
WHAT TO BRING INTO THE CHAMBER
Feel free to bring food, drinks, books and personal computers,
DVD players or any other form of entertainment into the chamber.
It may also be helpful to have your cell phone with you.
We ask that you refrain from bringing in sharp objects such as forks or knives.
Page 36
DEFLATING
When it is time to deflate the chamber you will turn the red knob to release the air.
The red knob has three settings depending on how quickly you would like to release
the air. There is a slow, medium and fast setting to release air.
If you are deflating the chamber from the outside you can unplug the compressors to
deflate the chamber faster.
Page 37
DEFLATING
It is very important that your gauge reads zero before you
unbuckle the belts and open the zippers.
Page 38
DEFLATING
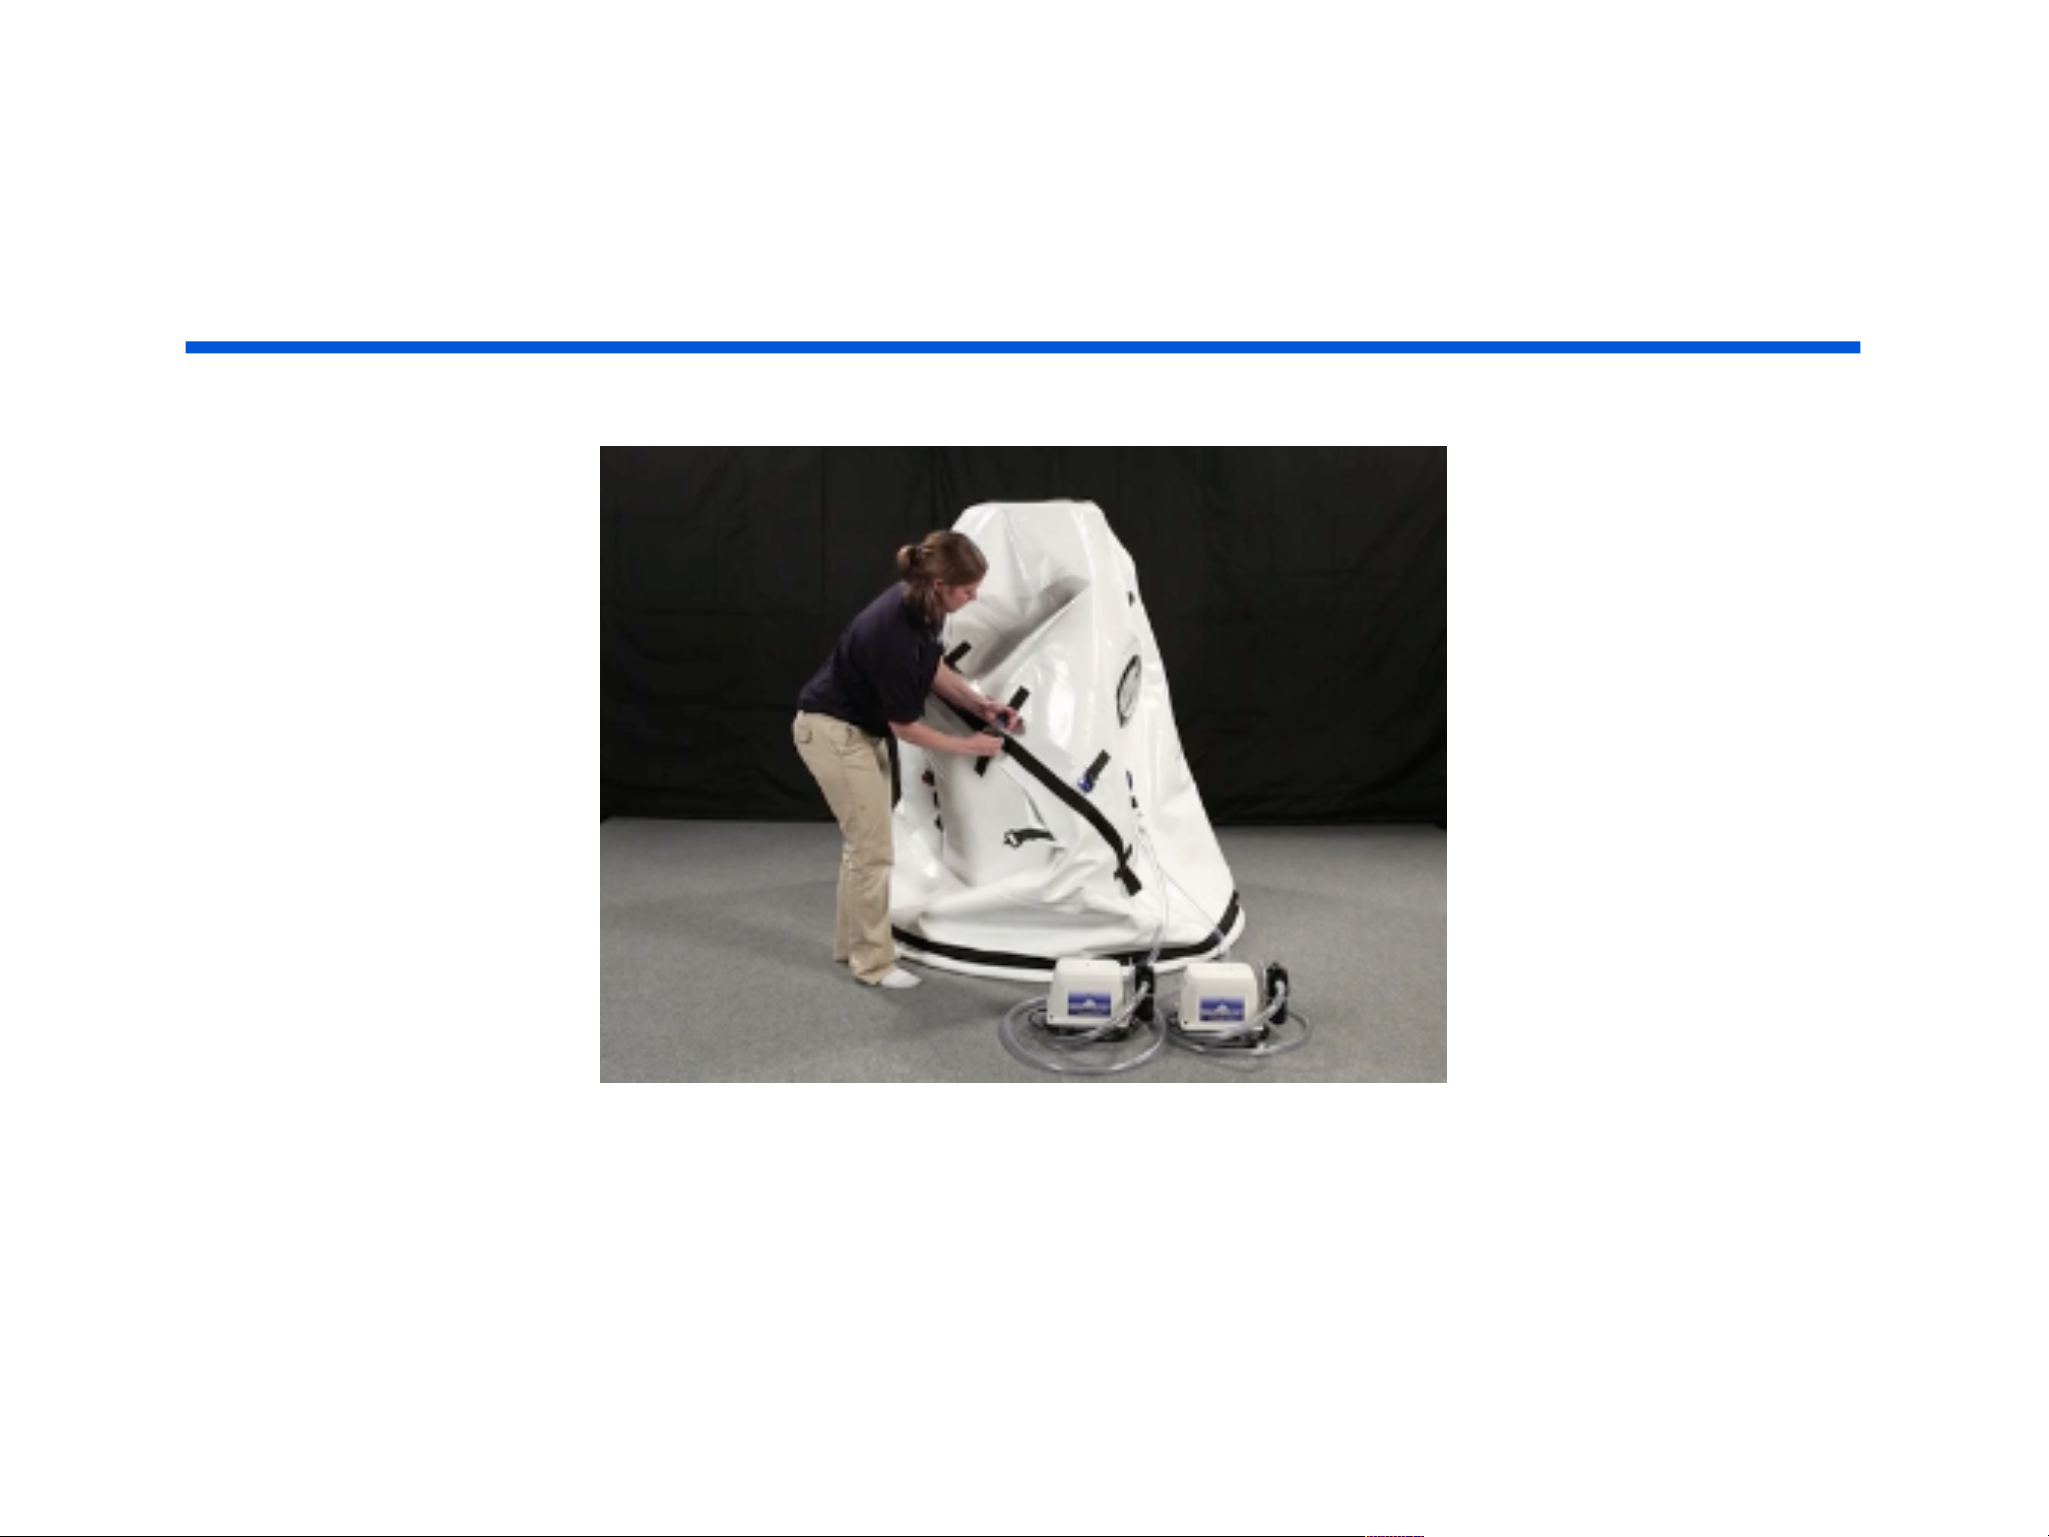
Next, unbuckle the belts.
Page 39
DEFLATING
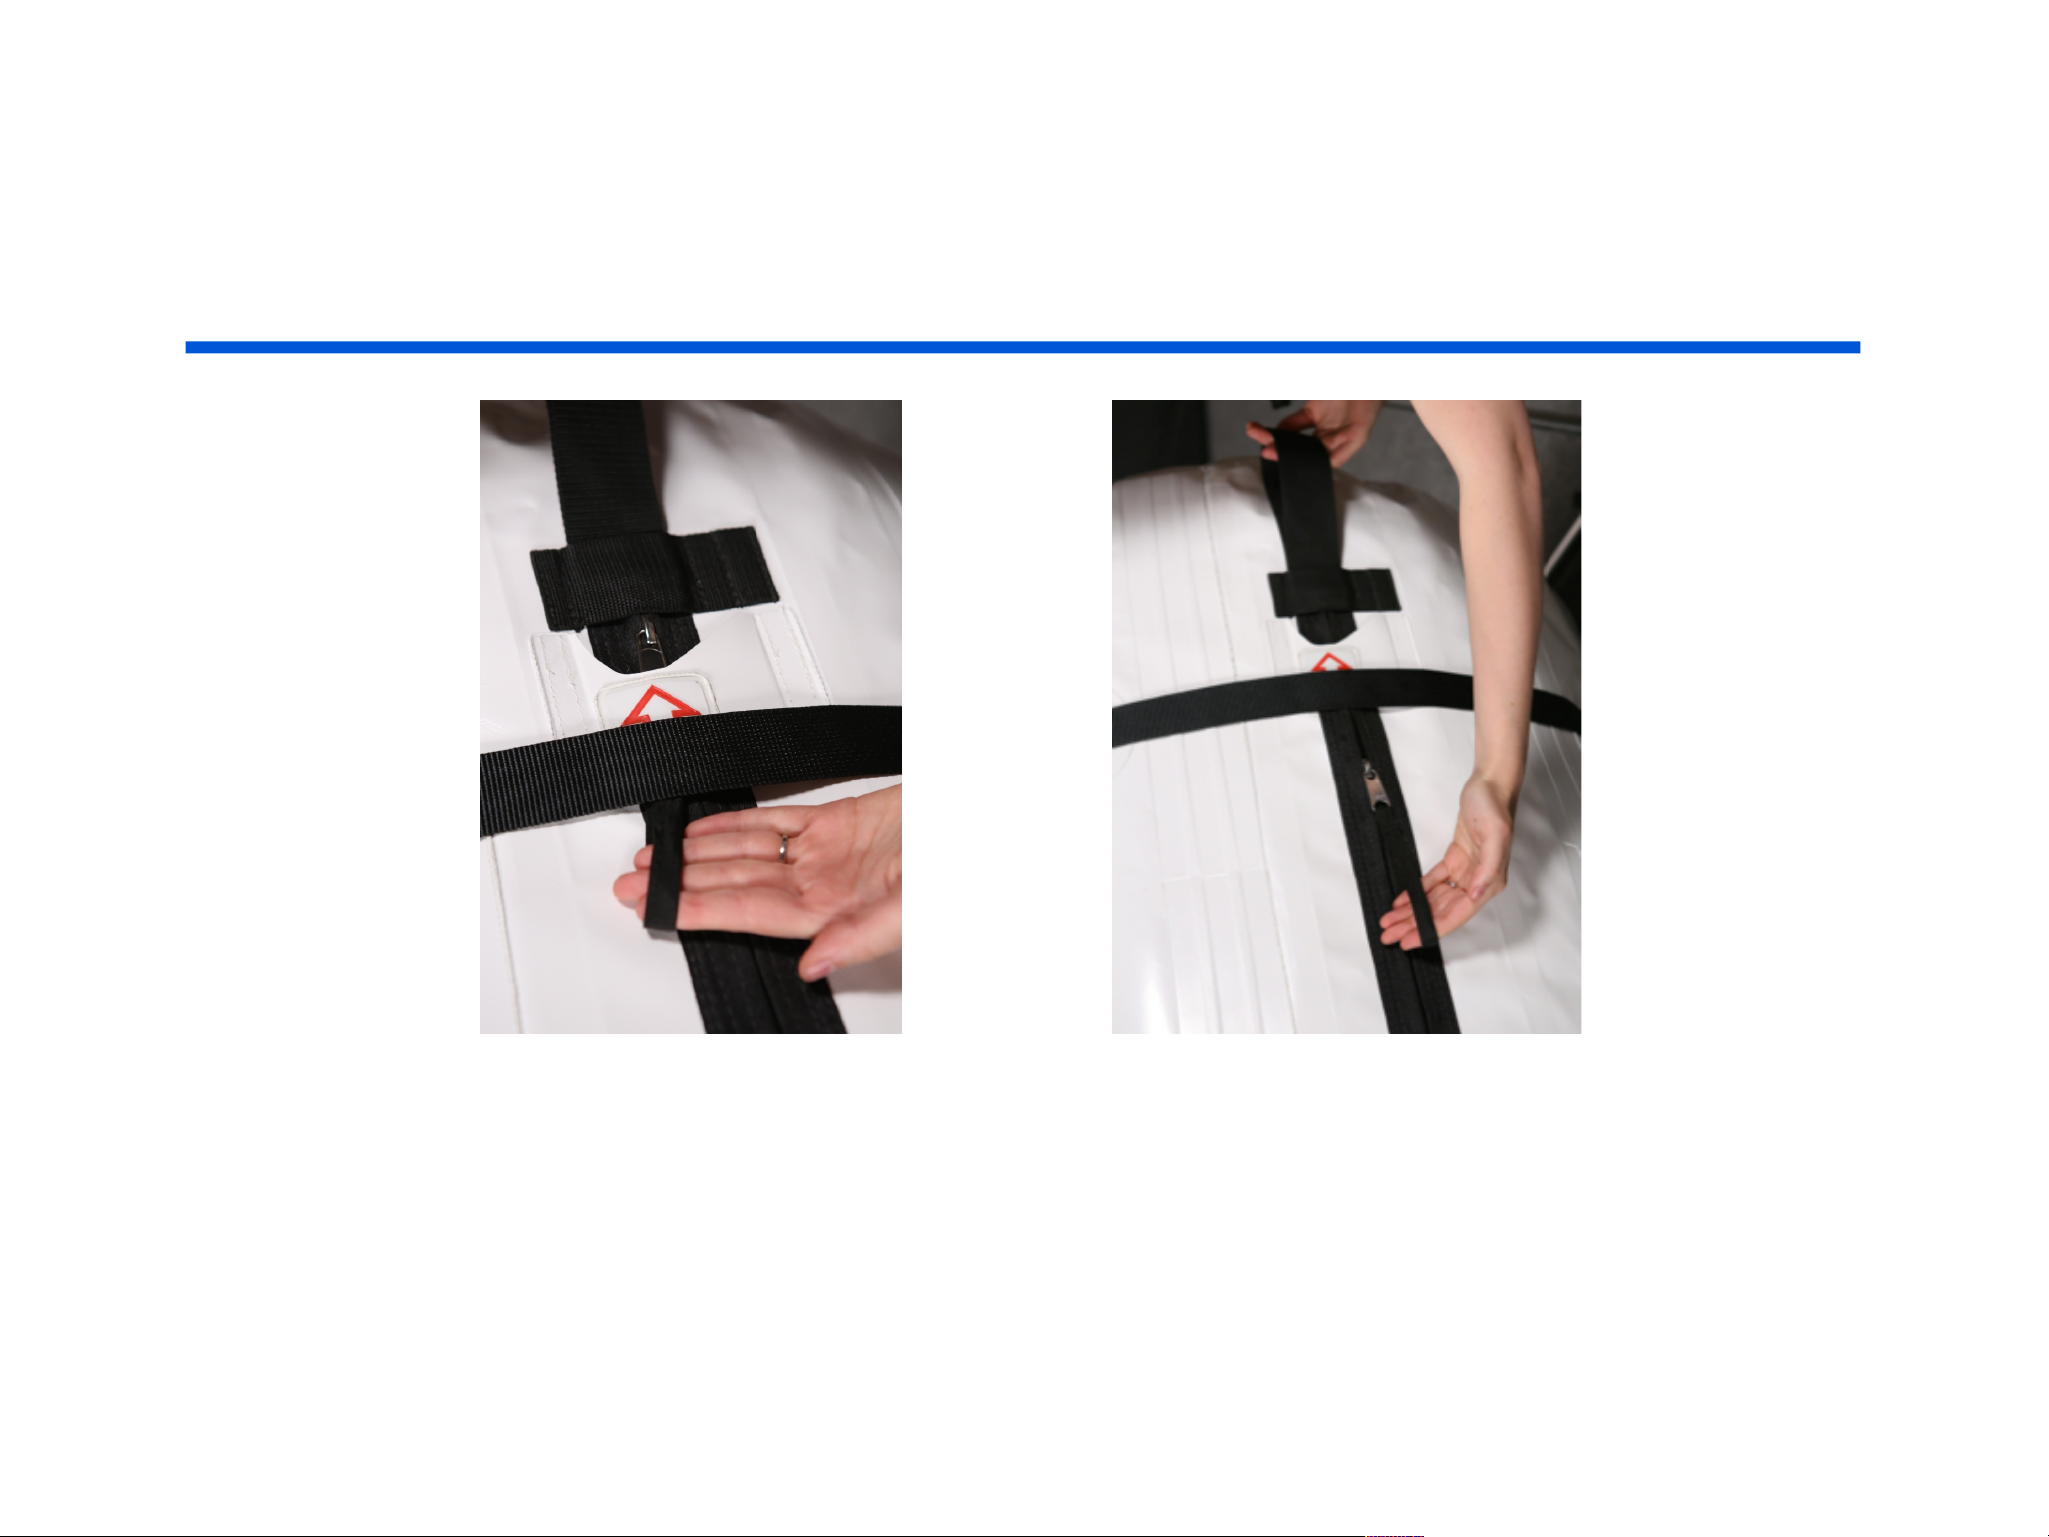
Now it is time to unzip the outside zipper.
Thread the pull tab under the safety strap.
Hold the black loop and pull the zipper pull.
Open the zipper all the way.
Page 40
DEFLATING
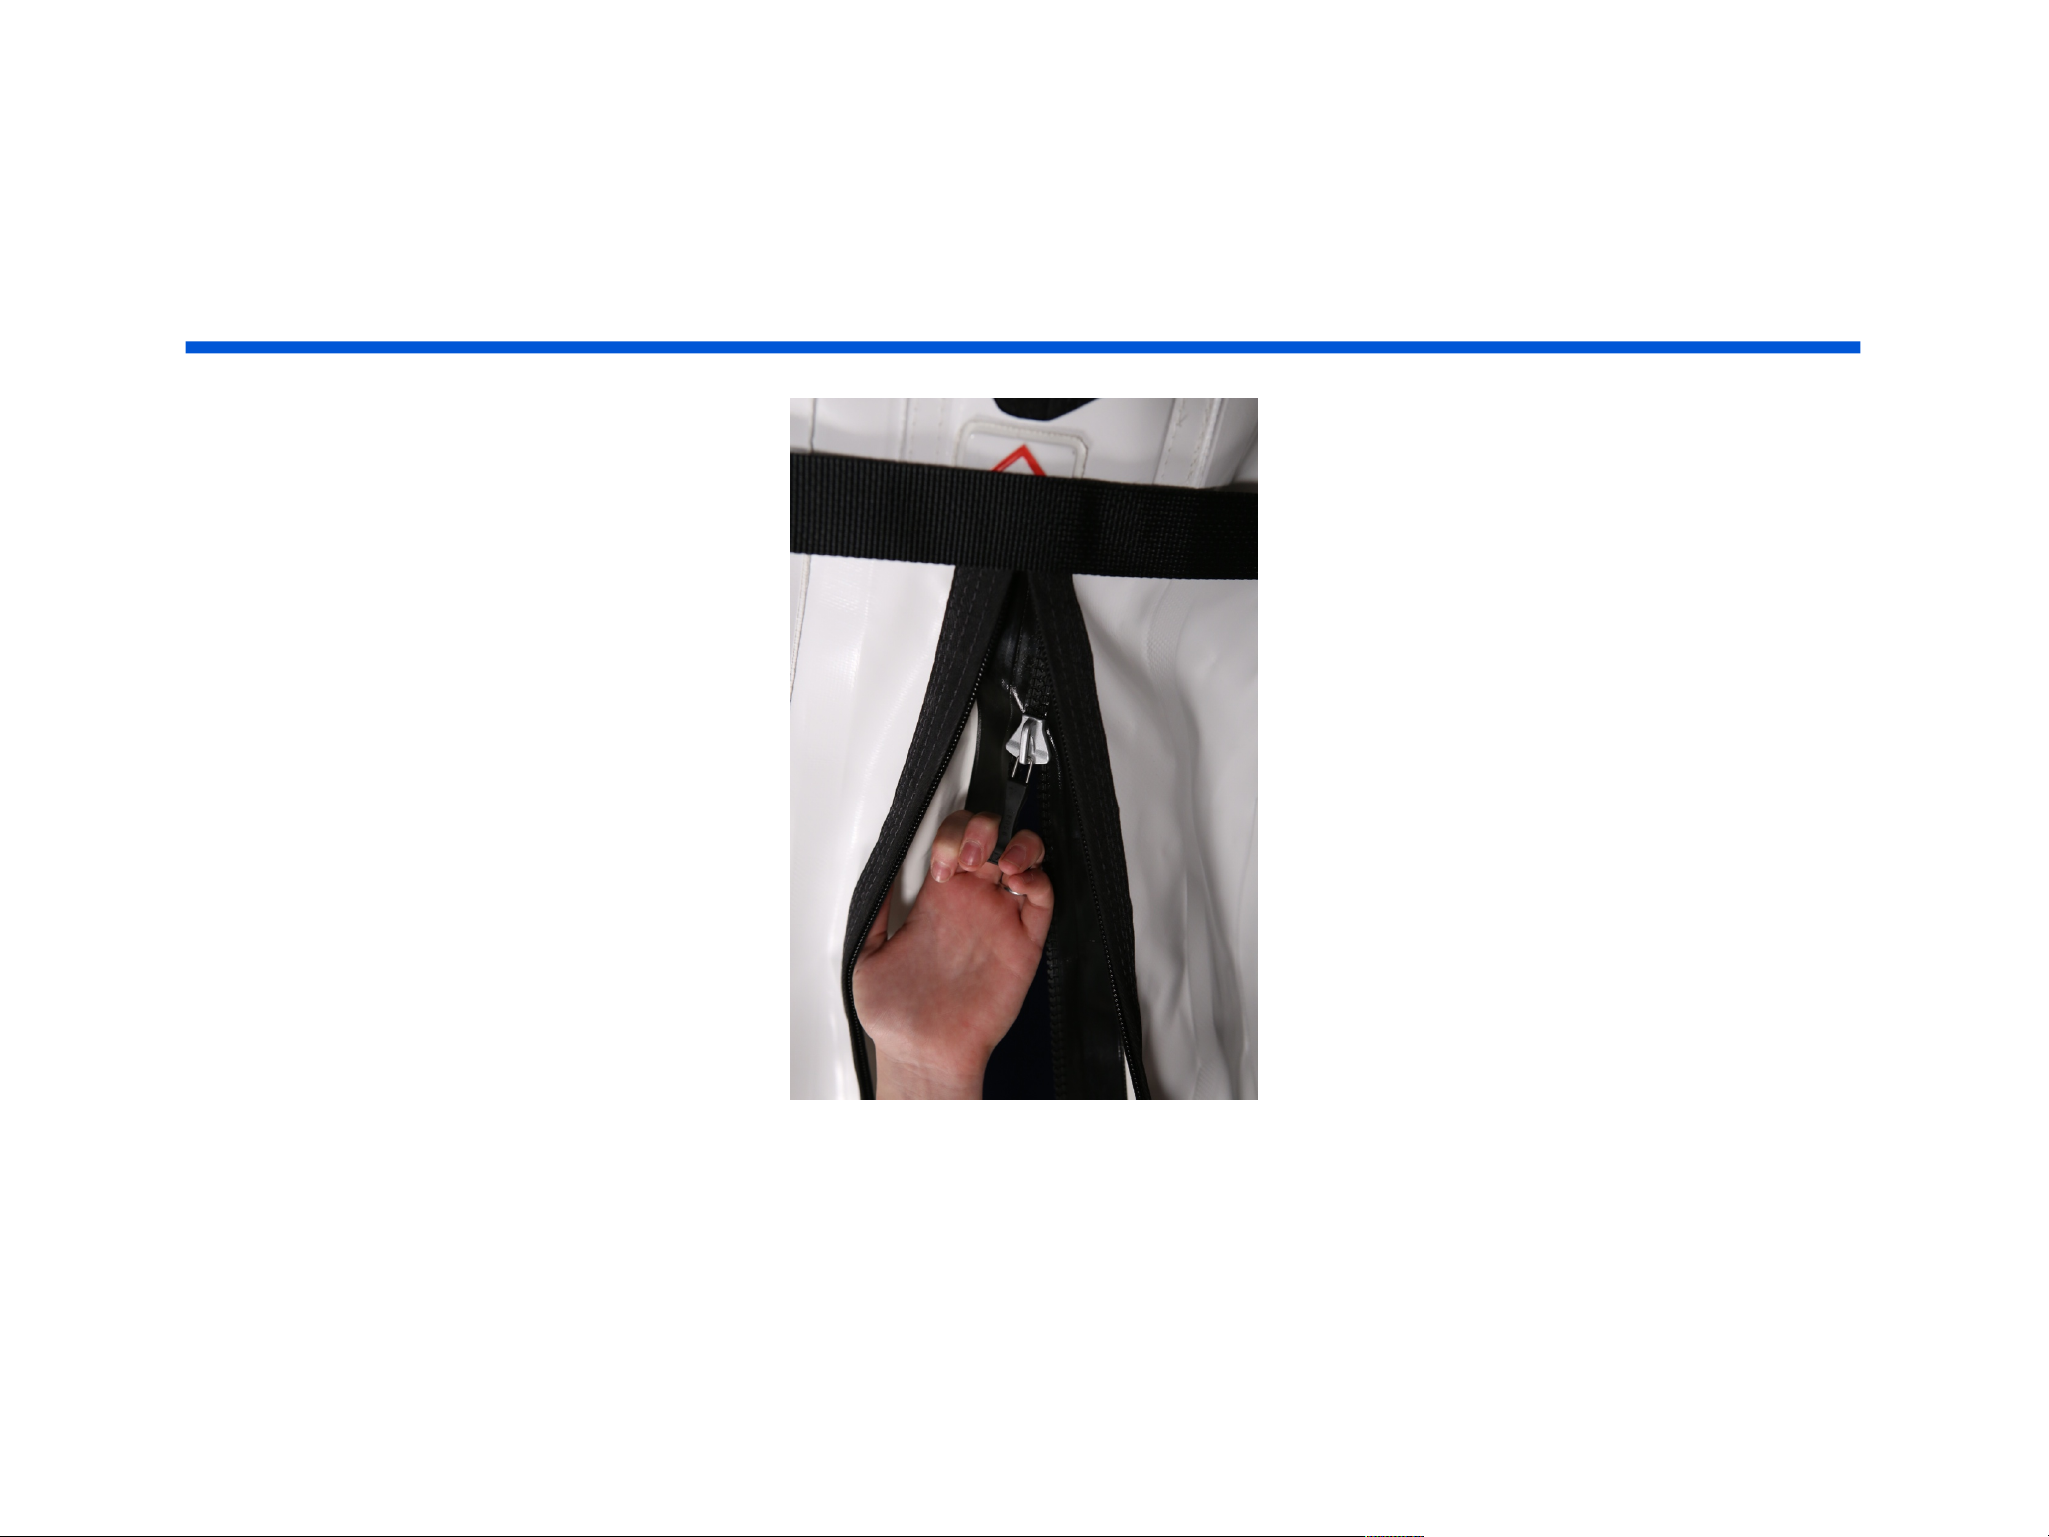
Next you will open the inside zipper.
Pull the zipper T on the inside zipper.
Open the zipper all the way.
Page 41

DEFLATING
DEFLATING THE CHAMBER FROM INSIDE
If you will be deflating the chamber from the inside please follow these instructions:
Turn the red knob to release the air.
Before opening the zipper, press on the chamber walls to make sure they feel soft.
Open the inside zipper.
Open the outside zipper.
Unbuckle the belts.
Step out of the chamber.
Page 42
DEFLATING
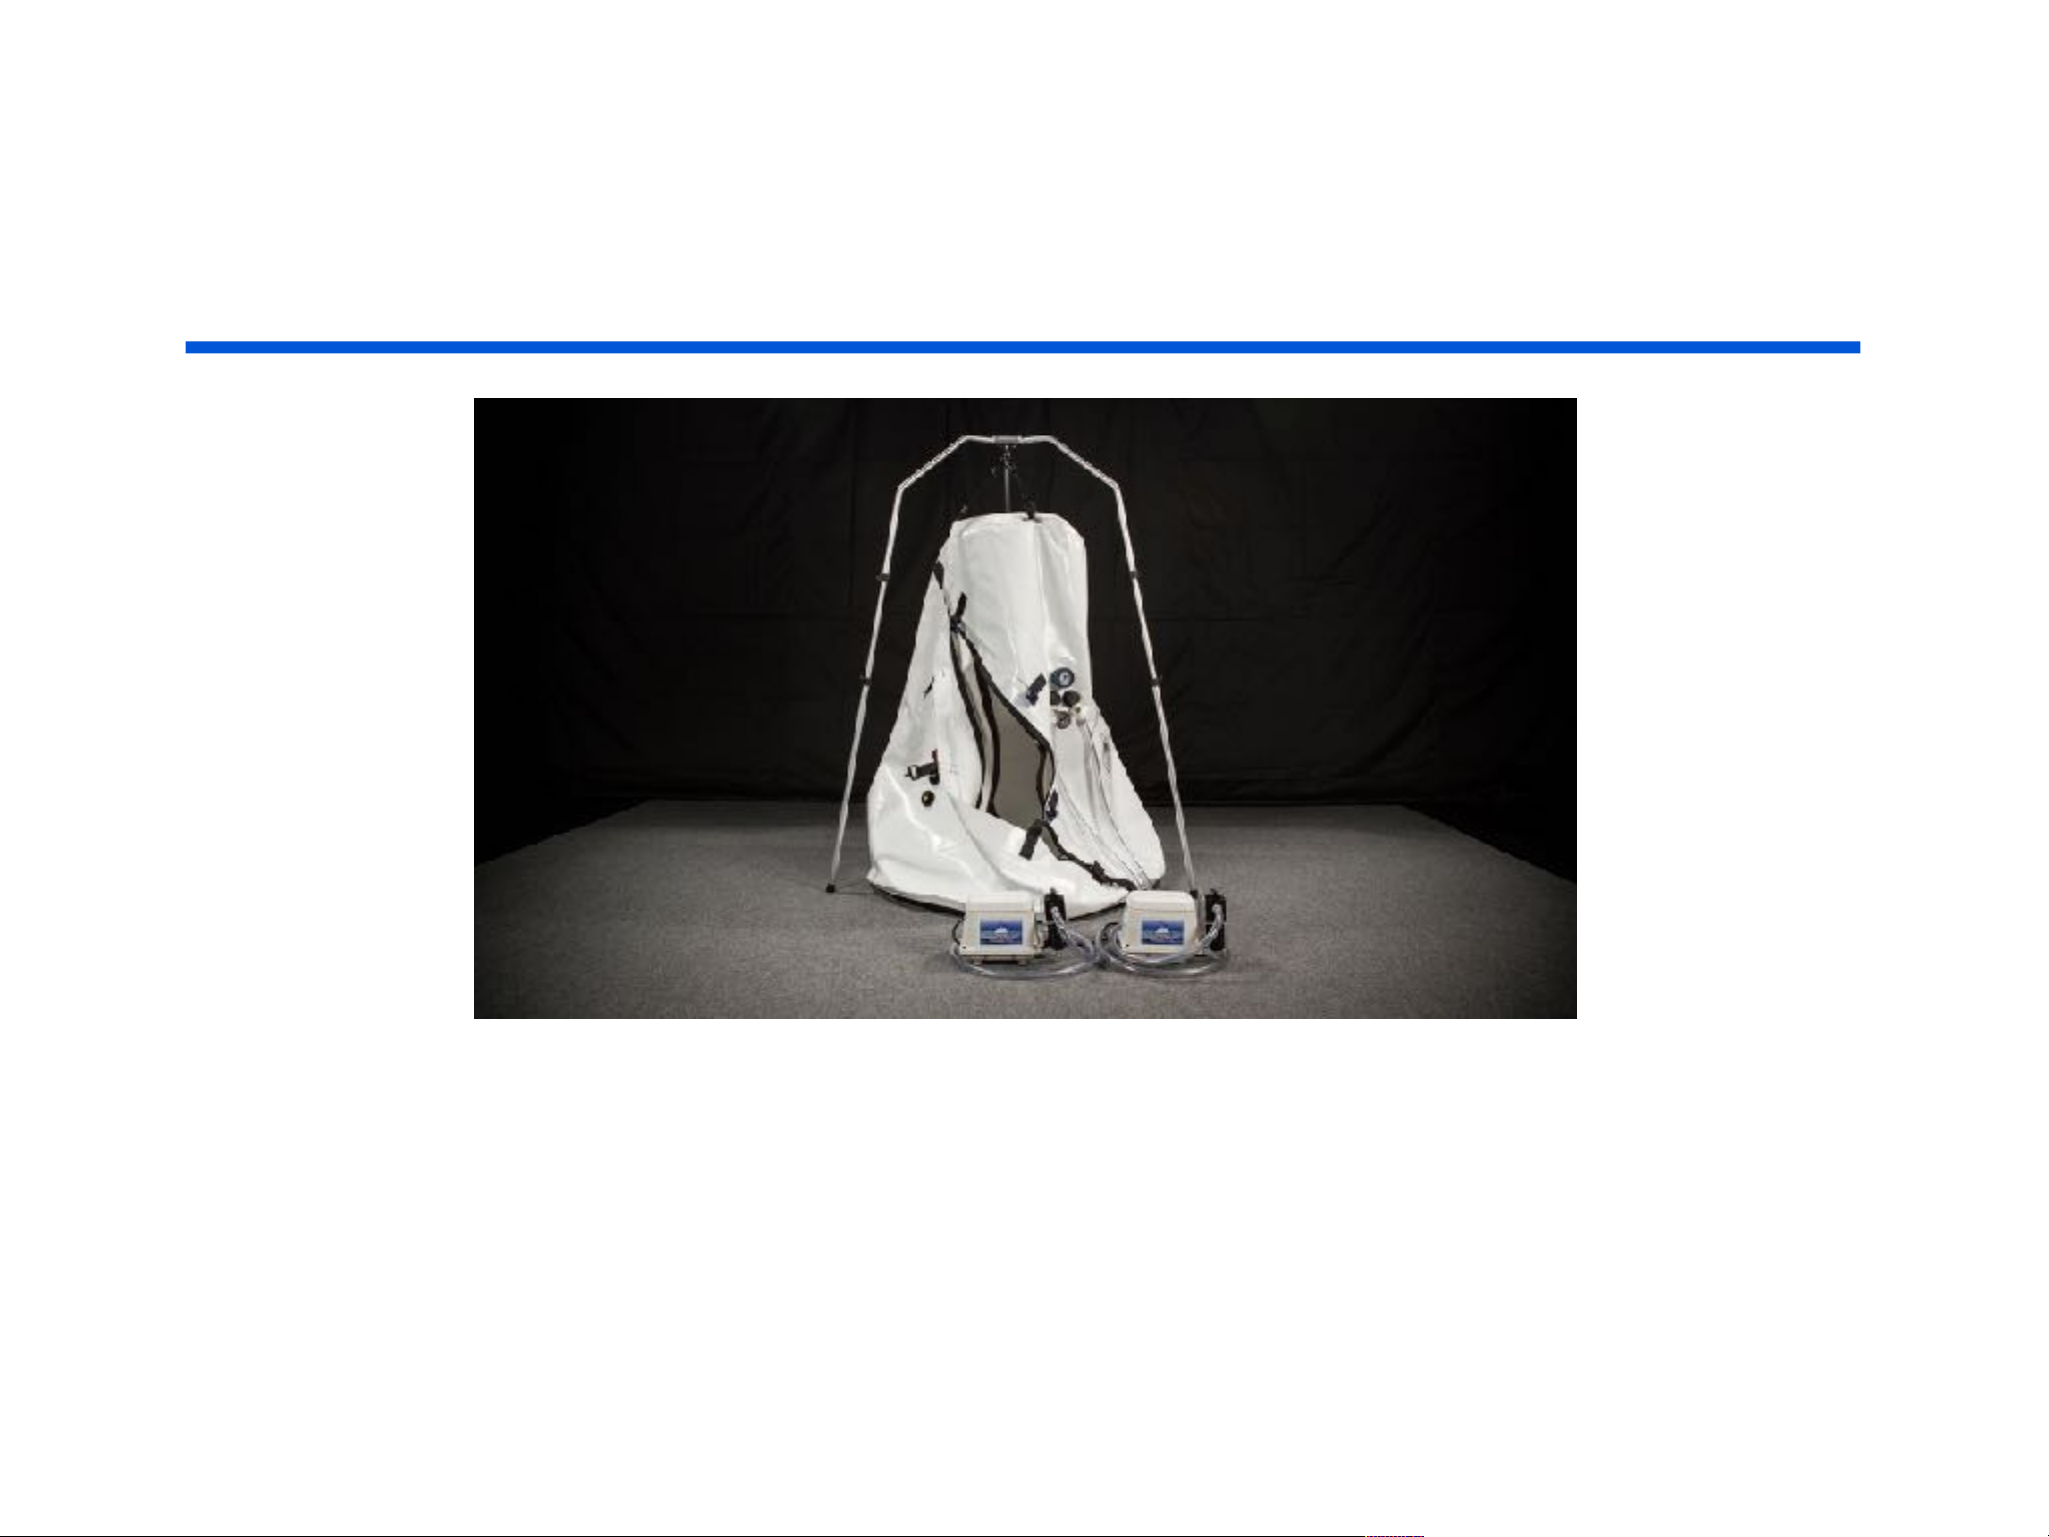
The deflated chamber will look like this. You may place
a chair, cushions, or bean bag into the chamber.
Page 43

REMINDERS
REMEMBER THESE IMPORTANT STEPS
Be sure both zippers are completely closed.
Do not open the zipper until the gauge reads zero.
Each belt must be fastened from the start of inflation to full deflation.
The compressor must be running during the whole time of treatment.
The blue relief valve must be releasing air when the chamber is at full pressure.
Page 44

CONGRATULATIONS
Congratulations on the purchase your Dive Vertical Chamber.
Summit to Sea believes that you have purchased one of the best
chambers on the market and will be totally pleased with the ease of
use and the quality of craftsmanship.
Summit to Sea also believes that we have the best customer service of
any hyperbaric chamber company on the market. We will always try
our best to be available and give you prompt service.
If you have any questions regarding your chamber
please contact your distributor first.
If you have additional questions please call us at
1-877-PSI-DIVE
(1-877-774-3483)
Page 45

CHAMBER CARE
ZIPPERS
The outside zipper requires no maintenance.
Periodically, wipe the outside open zipper with a damp cloth.
Page 46
CHAMBER CARE
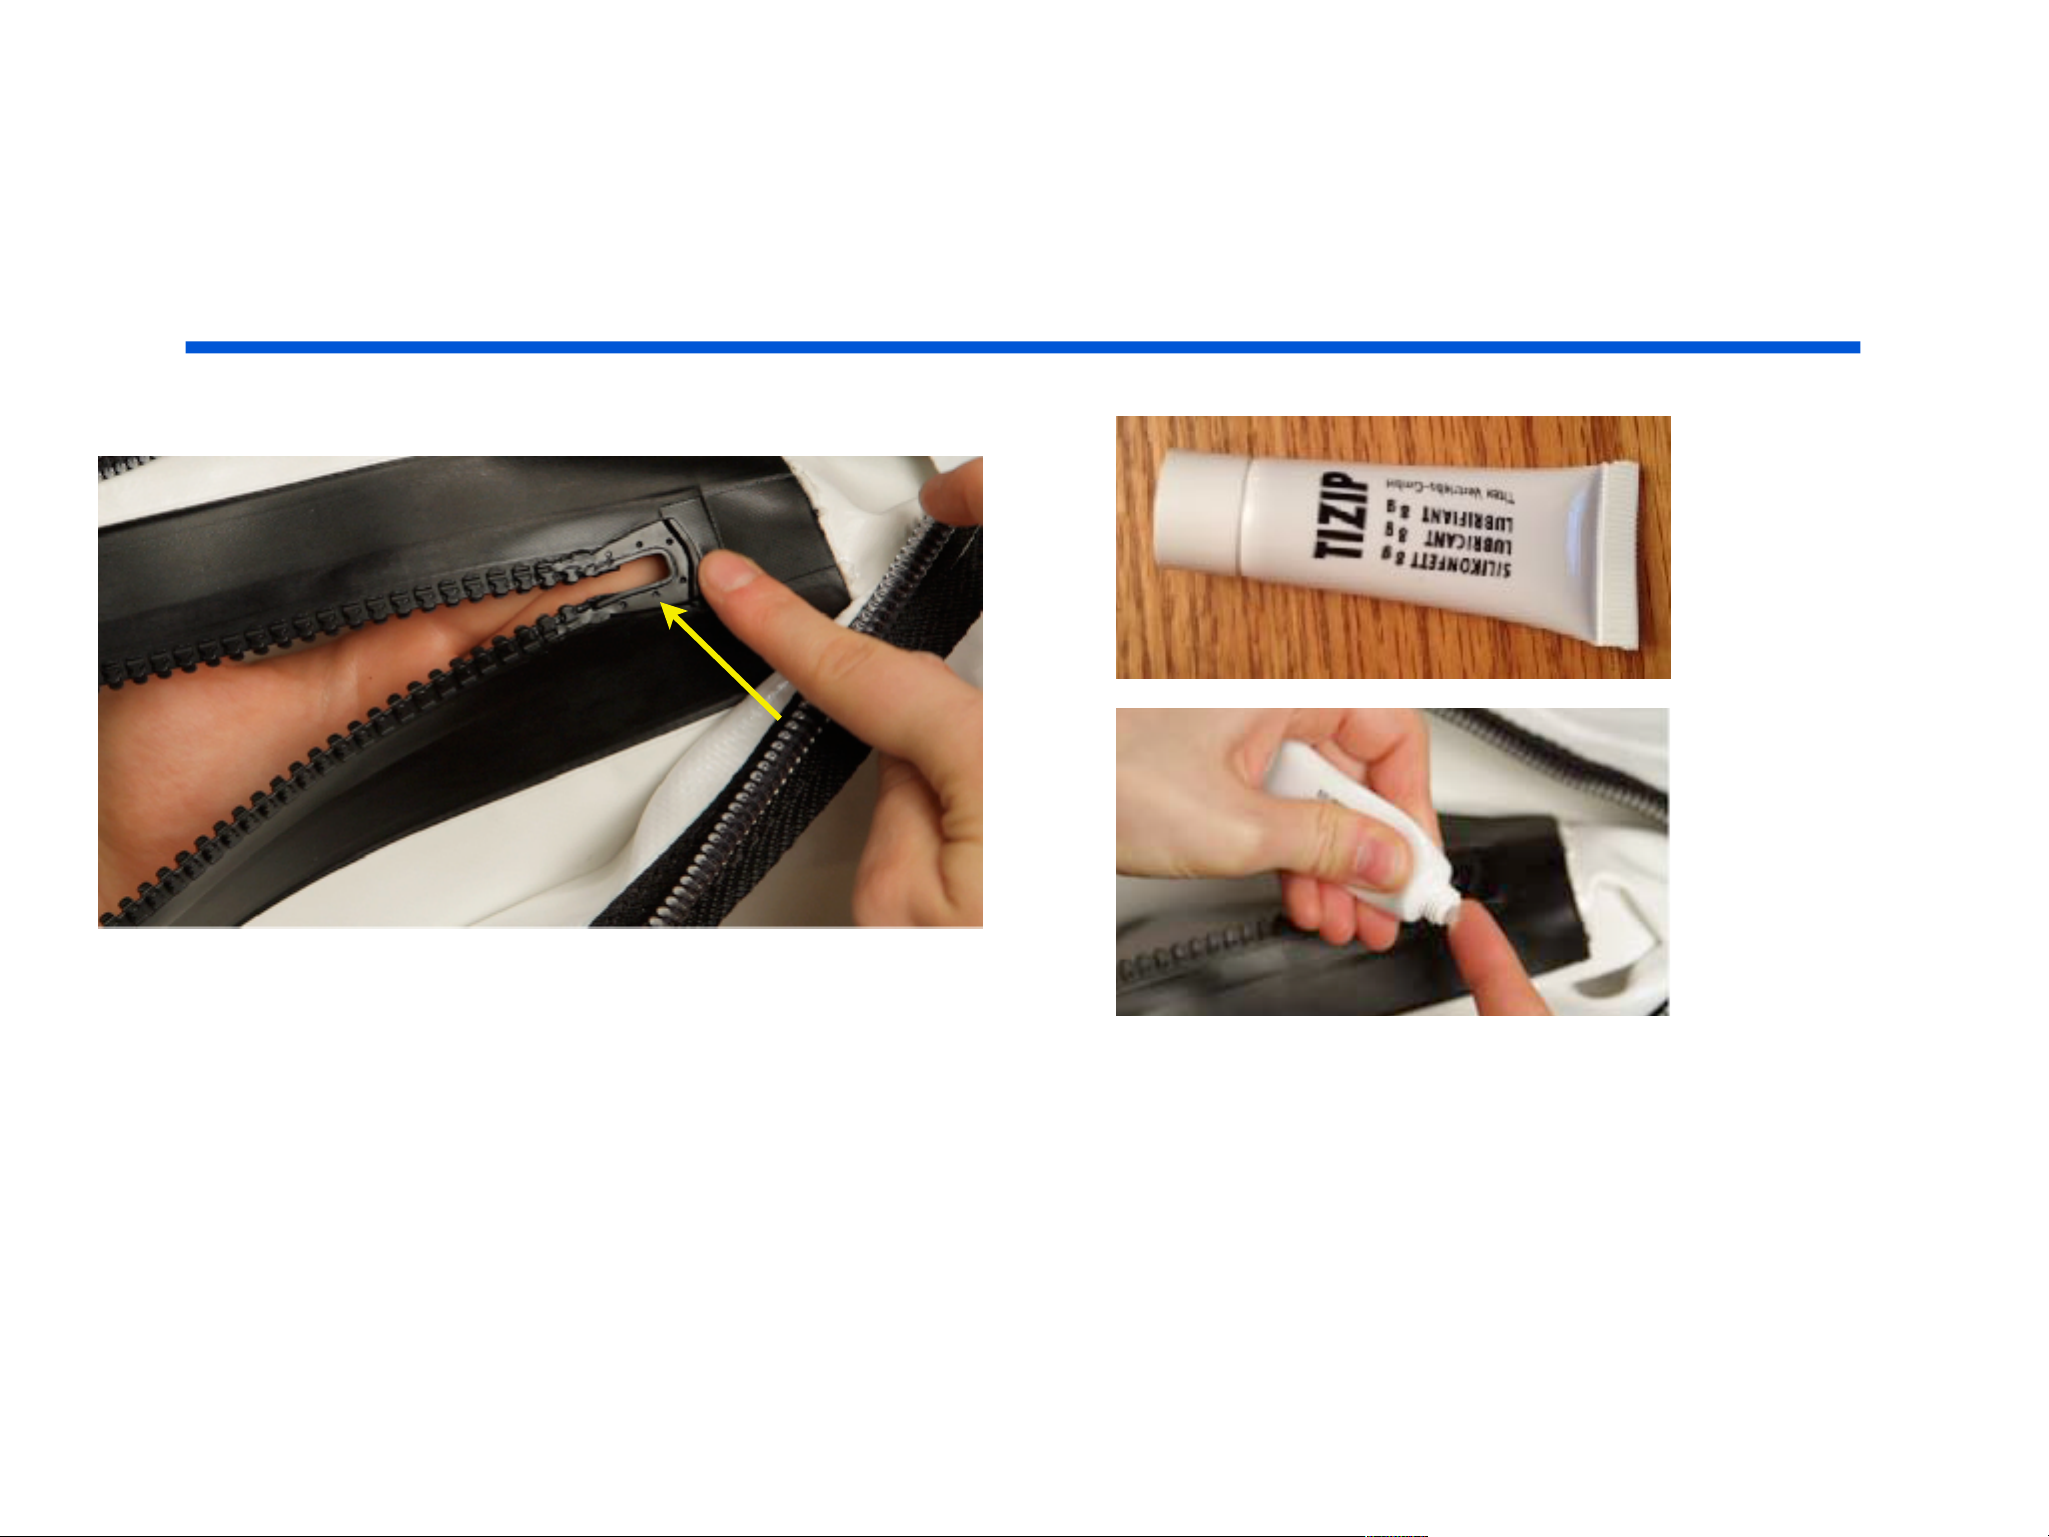
On occasion the inside airtight zipper requires Tzip silicone lubricant.The chamber
comes with this Tzip silicone to lubricate the docks where the zipper triggers are
secured. It is necessary to keep this dock lubricated. Squeeze a small amount of the
silicone onto your finger and spread it out on the dock. You will need to do this when it
becomes difficult to seat the zipper into the dock. It is not necessary to put this silicone
on the zipper itself. Periodically, wipe the open inside zipper with a damp cloth.
Page 47

CHAMBER CARE
CLEANING THE CHAMBER
There is no maintenance needed other than cleaning with a non-petroleum
based household cleaner.
FITTINGS & HOSES
Regularly check the fittings and hoses for cracks or damage. If you see any
damage, call your distributor for a replacement part.
Page 48

CHAMBER CARE
COMPRESSOR & FILTER
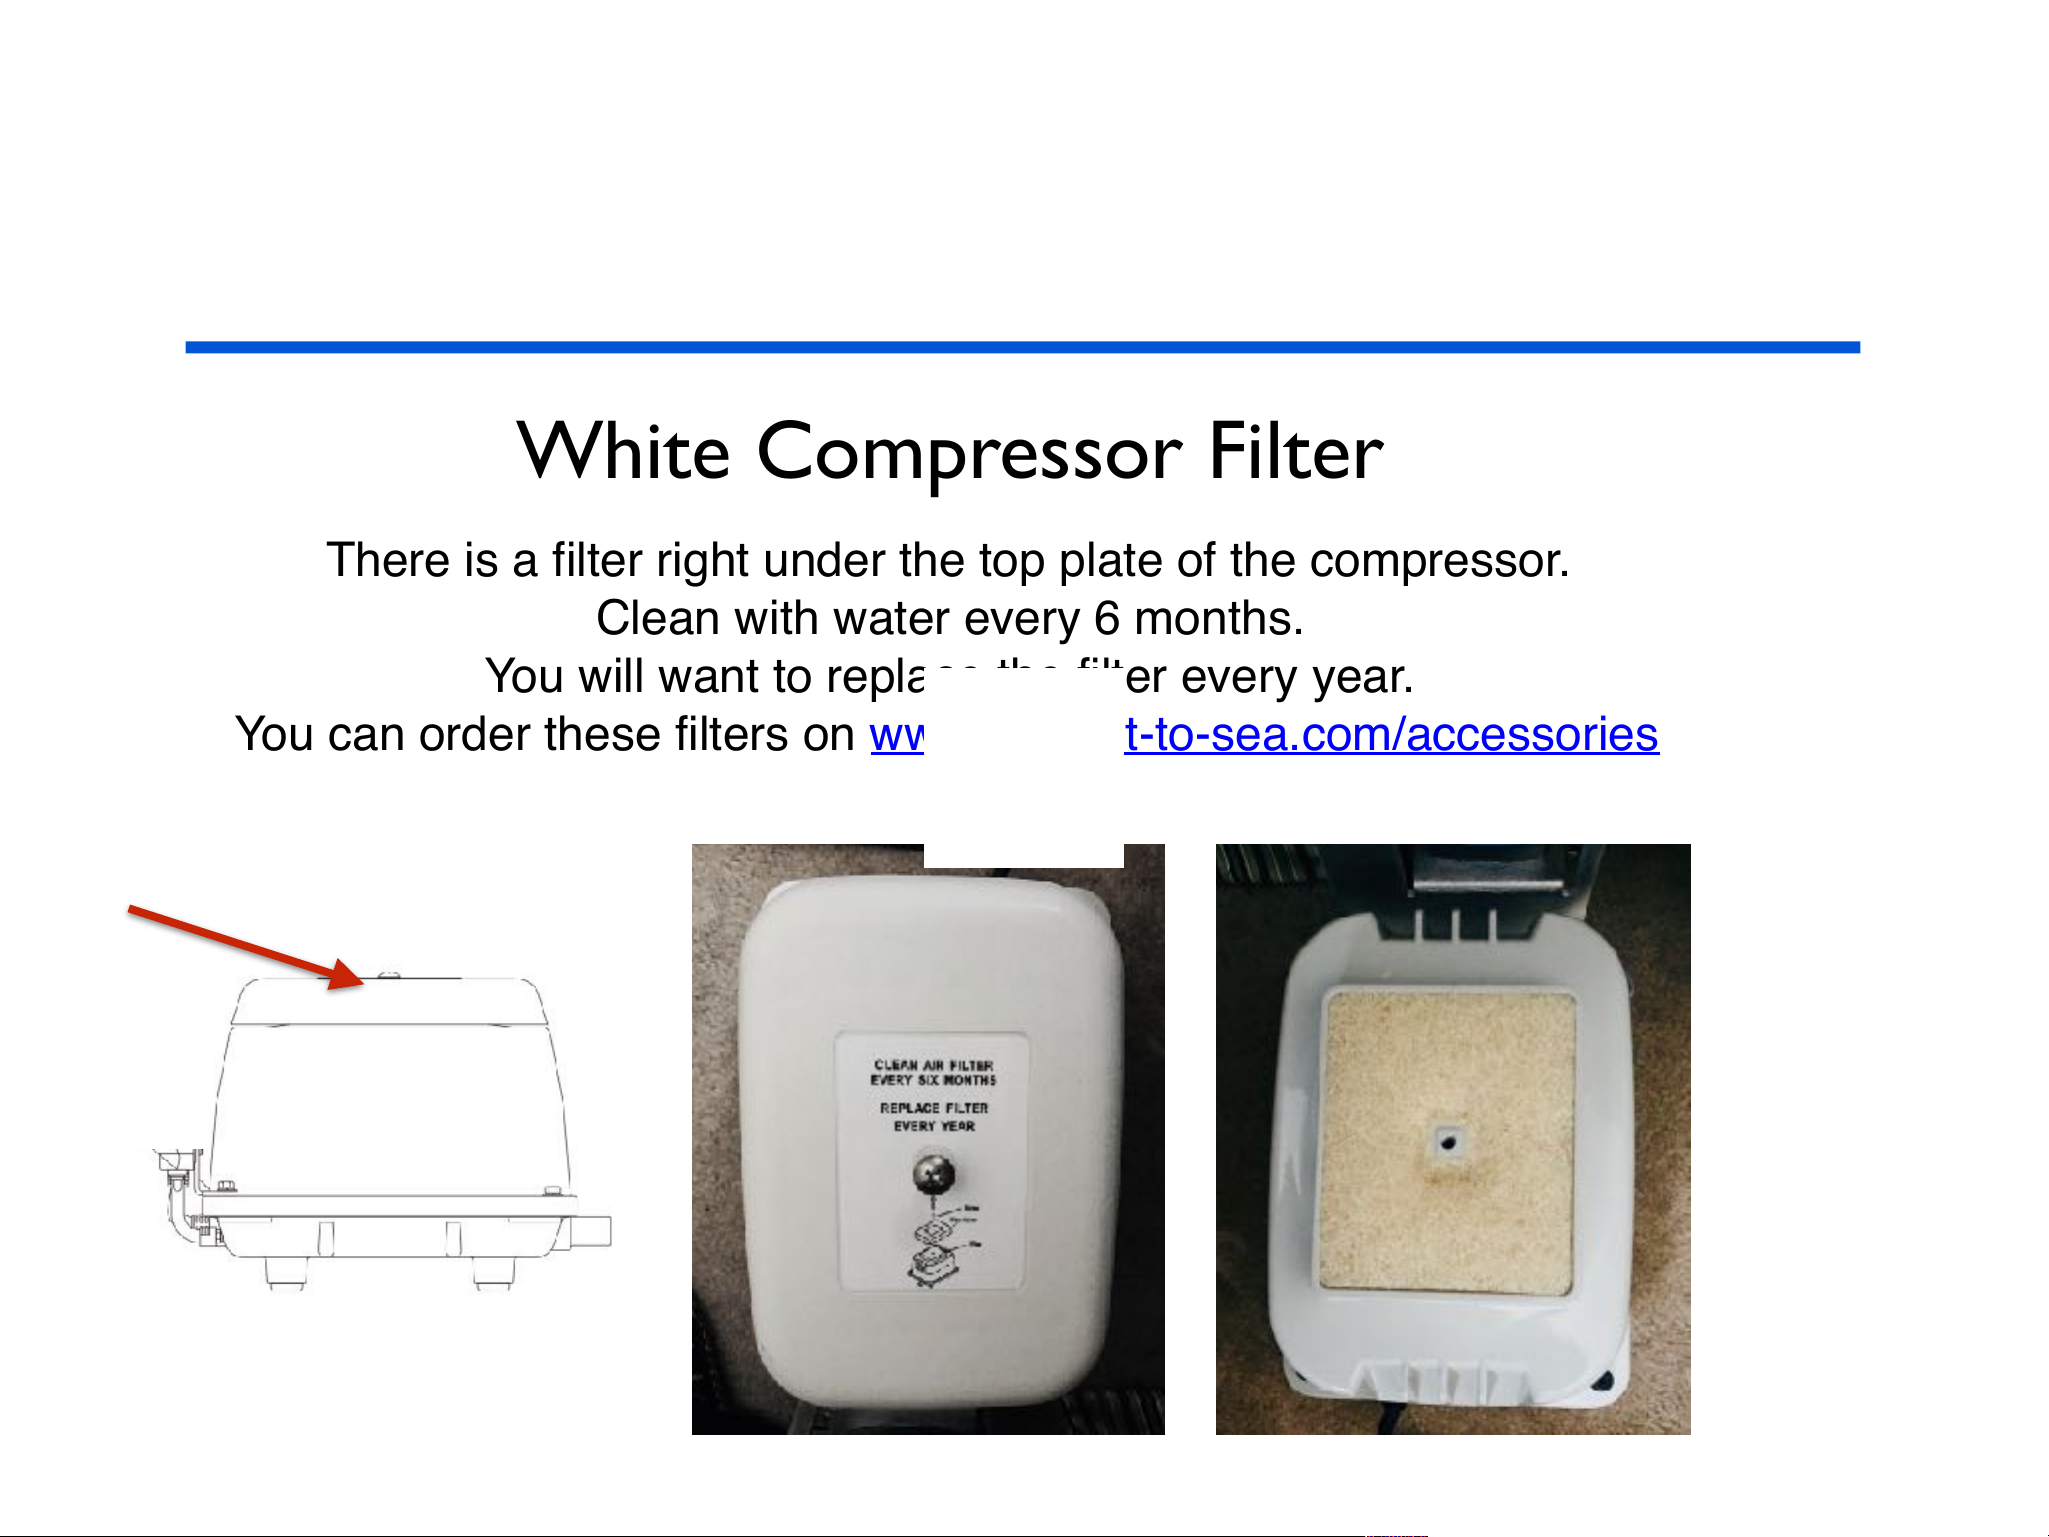
There is an intake fabric filter on the compressor that has the curved plastic cover.
Instructions for cleaning the filter are on the cover.
The recommendation on the compressor cover is to replace the filter once per
year based on 24 hour per day usage. Since average usage will be much less,
the filter life is expected to be five years.
The output filter (black) requires no maintenance. There is a green ball visible
from the top of the filter. When this ball turns red, it is time to change the filter.
Contact your distributor to reorder.
Page 49

CHAMBER CARE
STORAGE
Prior to storing the chamber, ensure that it has been cleaned inside and out by
using a non-petroleum based household cleaner.
Carefully fold the chamber ensuring all gauges and fittings are protected with
bubble wrap or a similar material.
Place the chamber in the carry case and store in a dry area between 40 and 80
degrees.
Upon first reuse, run the chamber for several hours to purge the chamber from
any odors that may have collected during storage.
Page 50
CHAMBER CARE
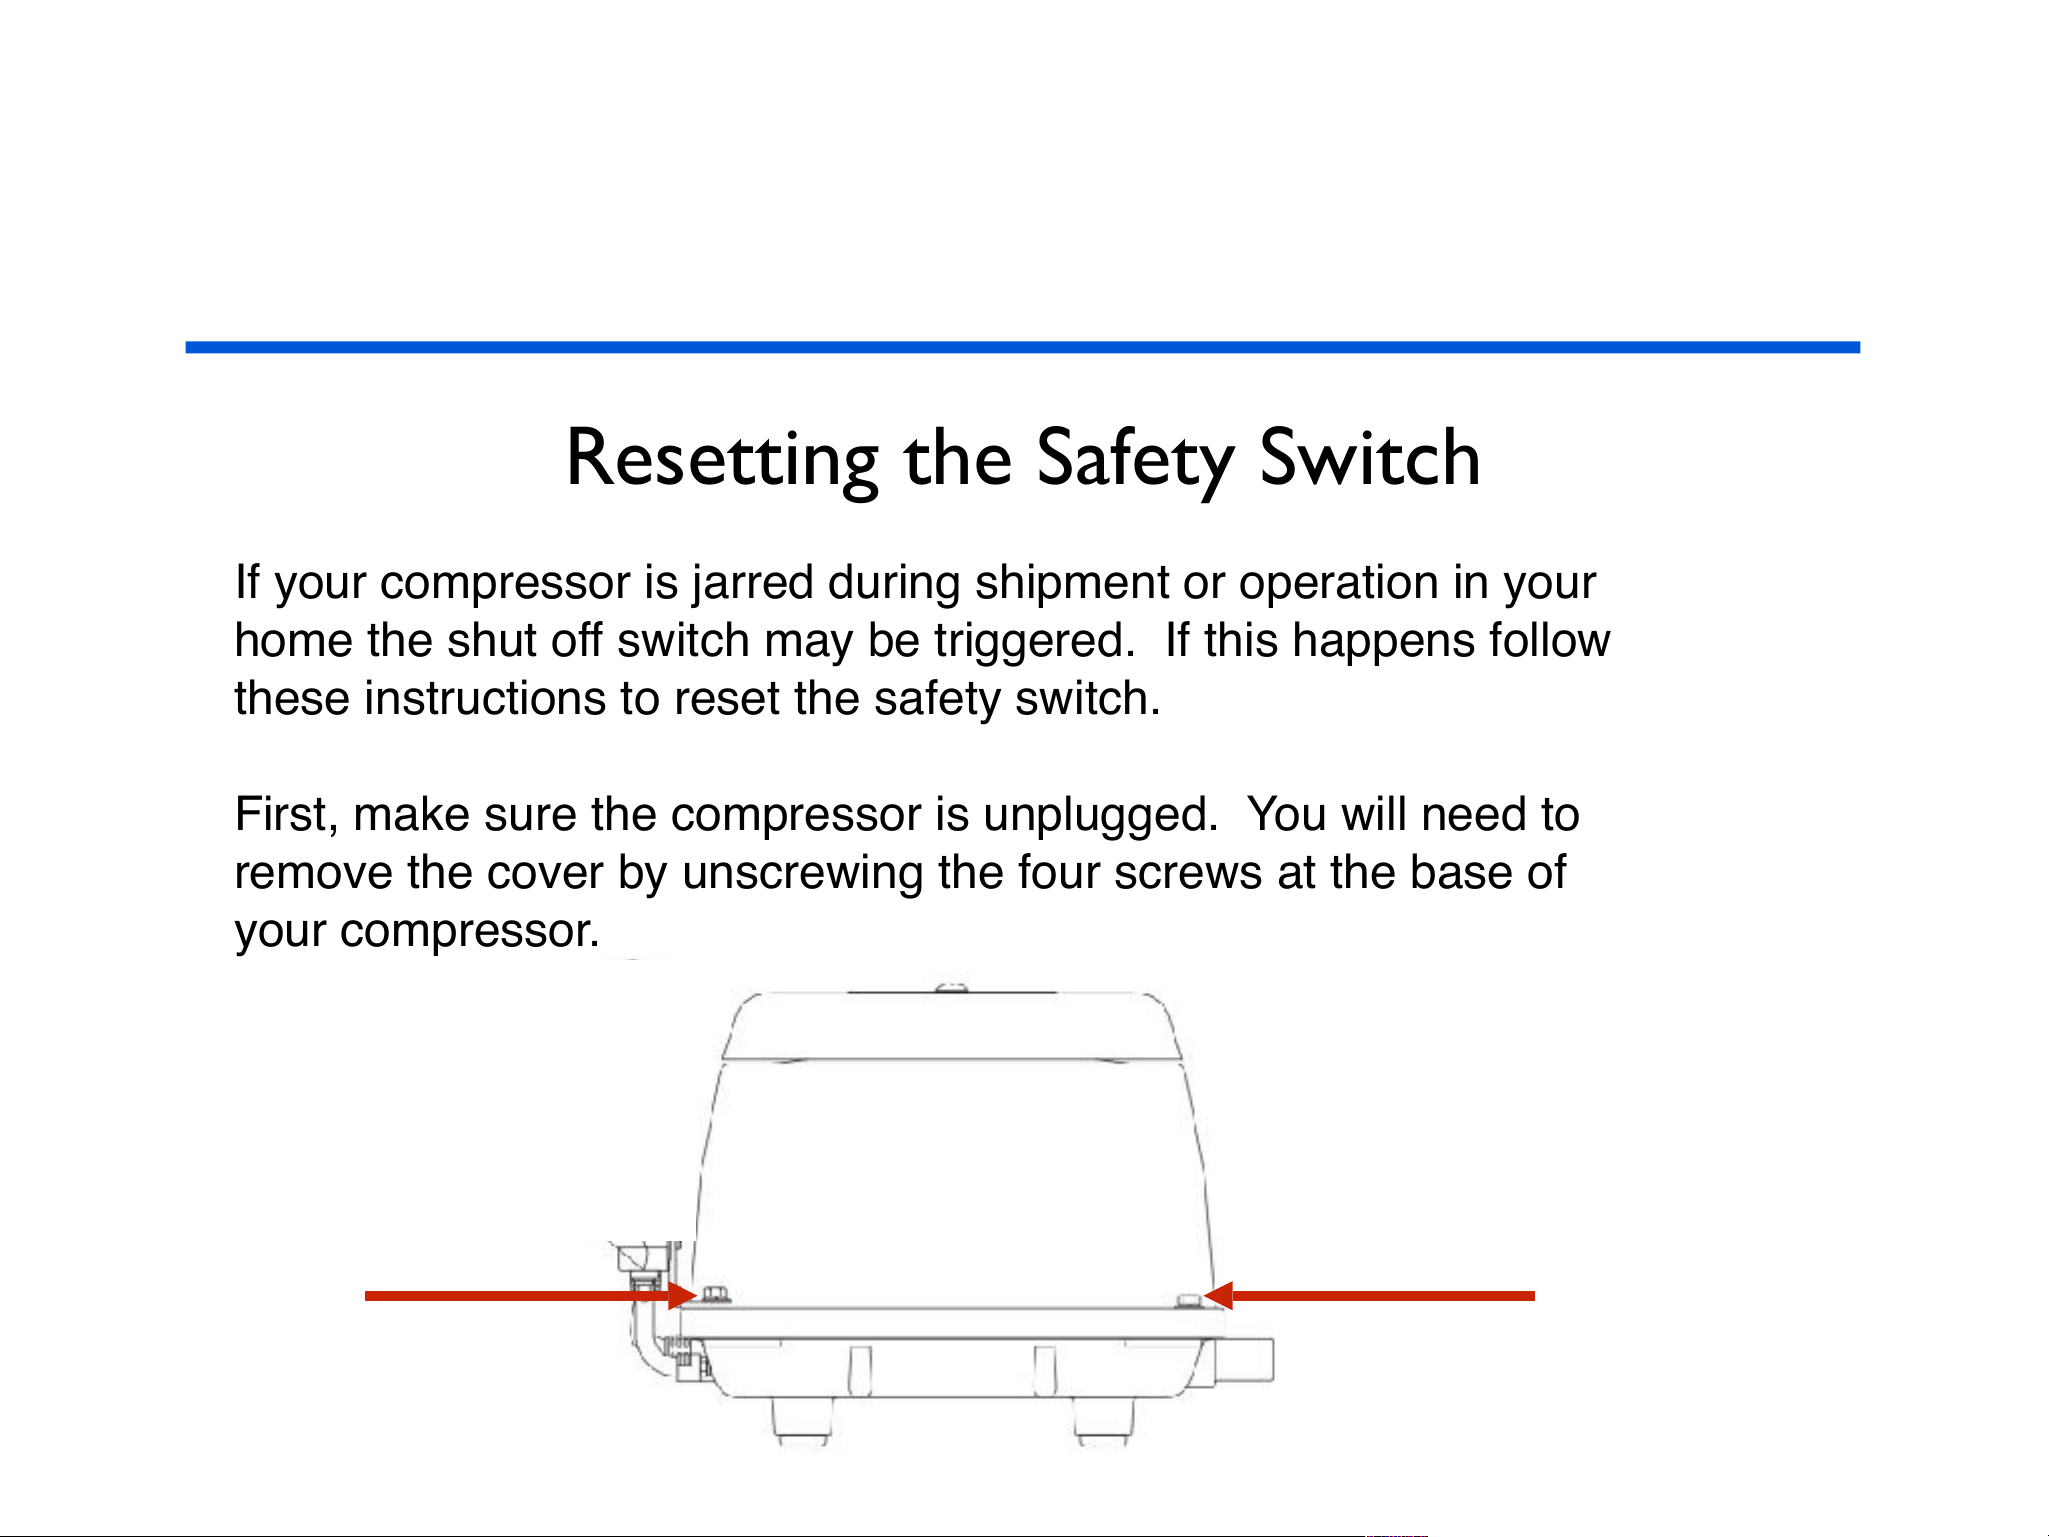
Resetting the Safety Switch
If your compressor is jarred during shipment or operation in your
home the shut off switch may be triggered. If this happens follow
these instructions to reset the safety switch.
First, make sure the compressor is unplugged. You will need to
remove the cover by unscrewing the four screws at the base of
your compressor.
Page 51
CHAMBER CARE
Resetting the Safety Switch
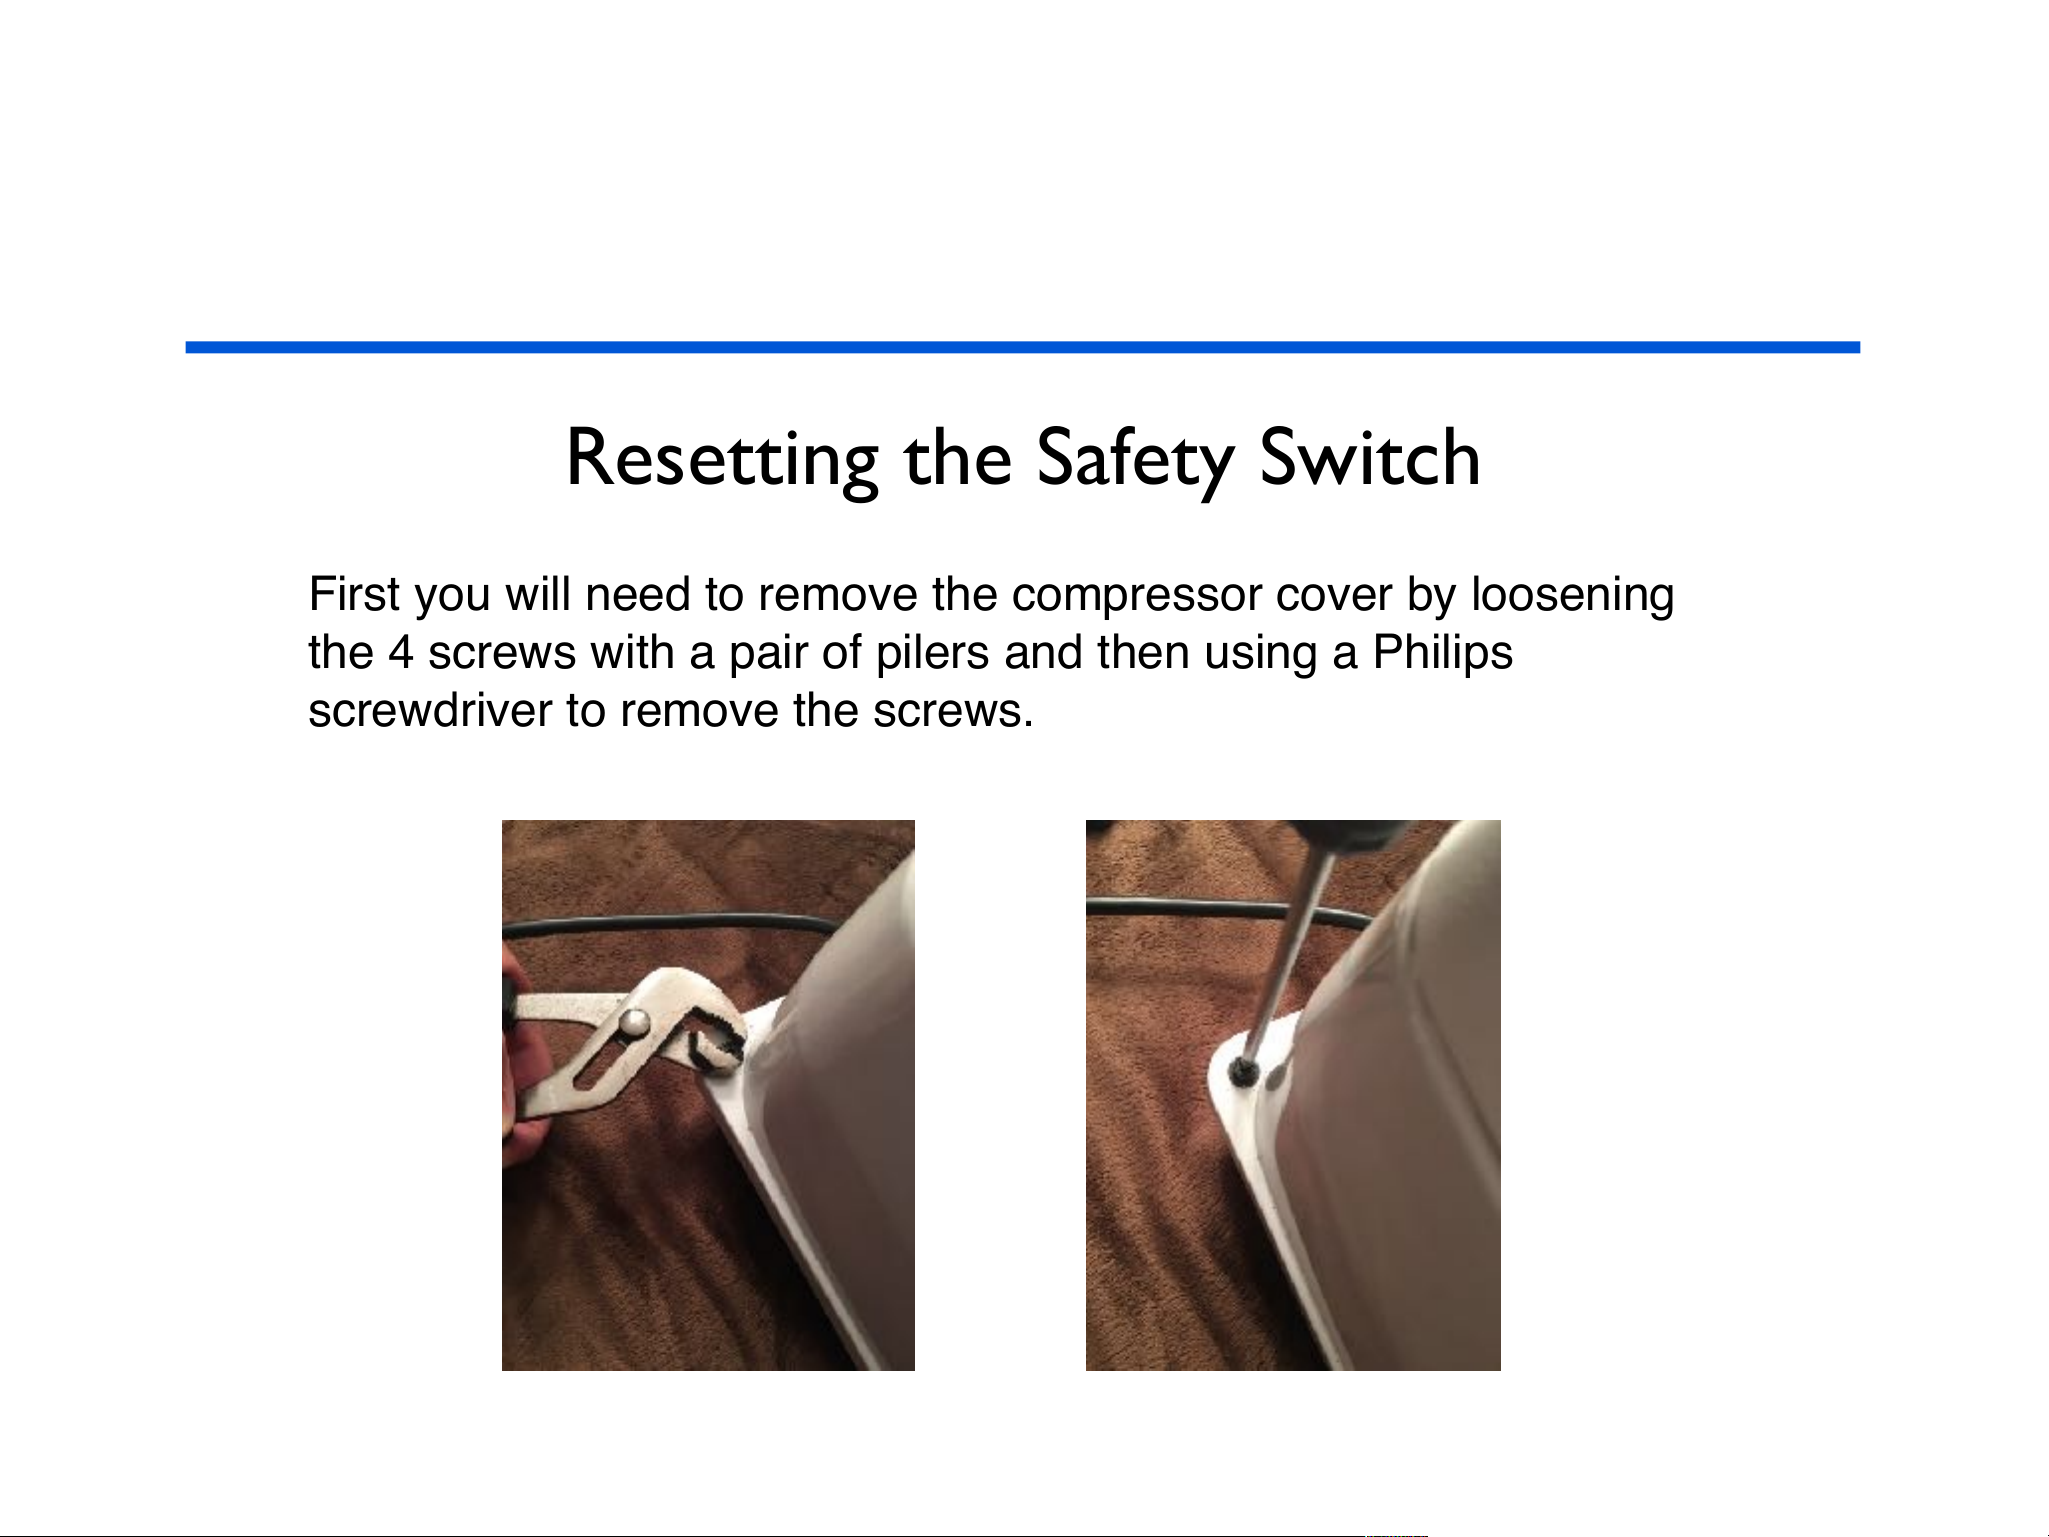
First you will need to remove the compressor cover by loosening
the 4 screws with a pair of pilers and then using a Philips
screwdriver to remove the screws.
Page 52
CHAMBER CARE
Resetting the Safety Switch
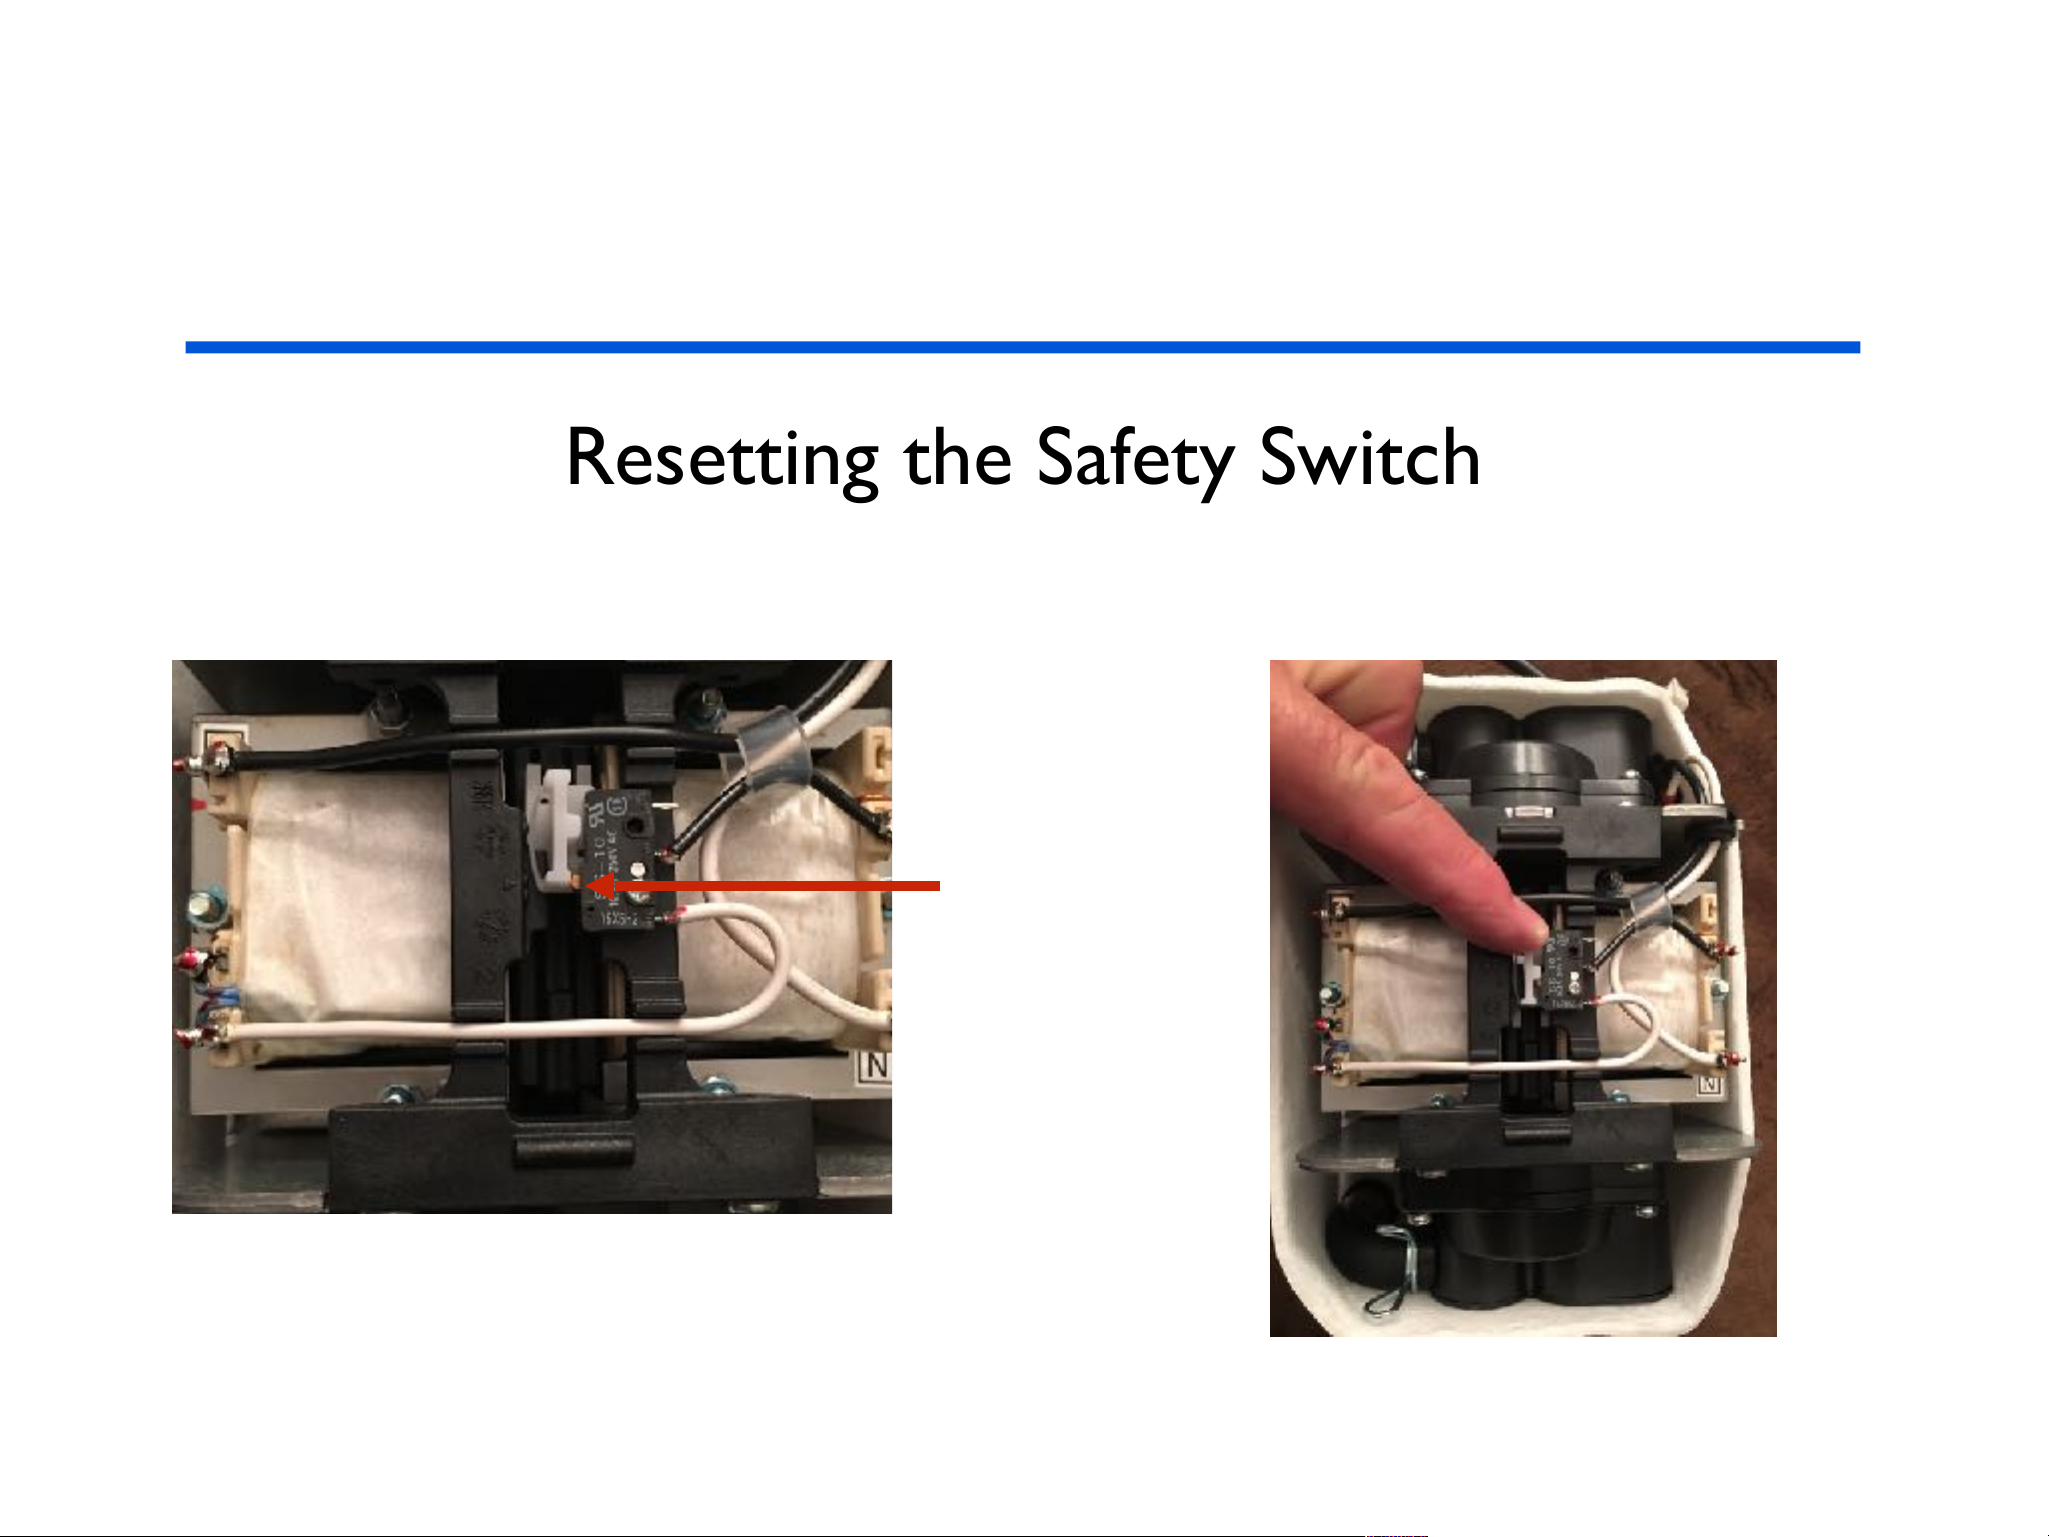
If the safety
switch has
been tripped
you will see
this little red
button.
Move the
white switch
to the center
of the
compartment.
Page 53
CHAMBER CARE
Resetting the Safety Switch
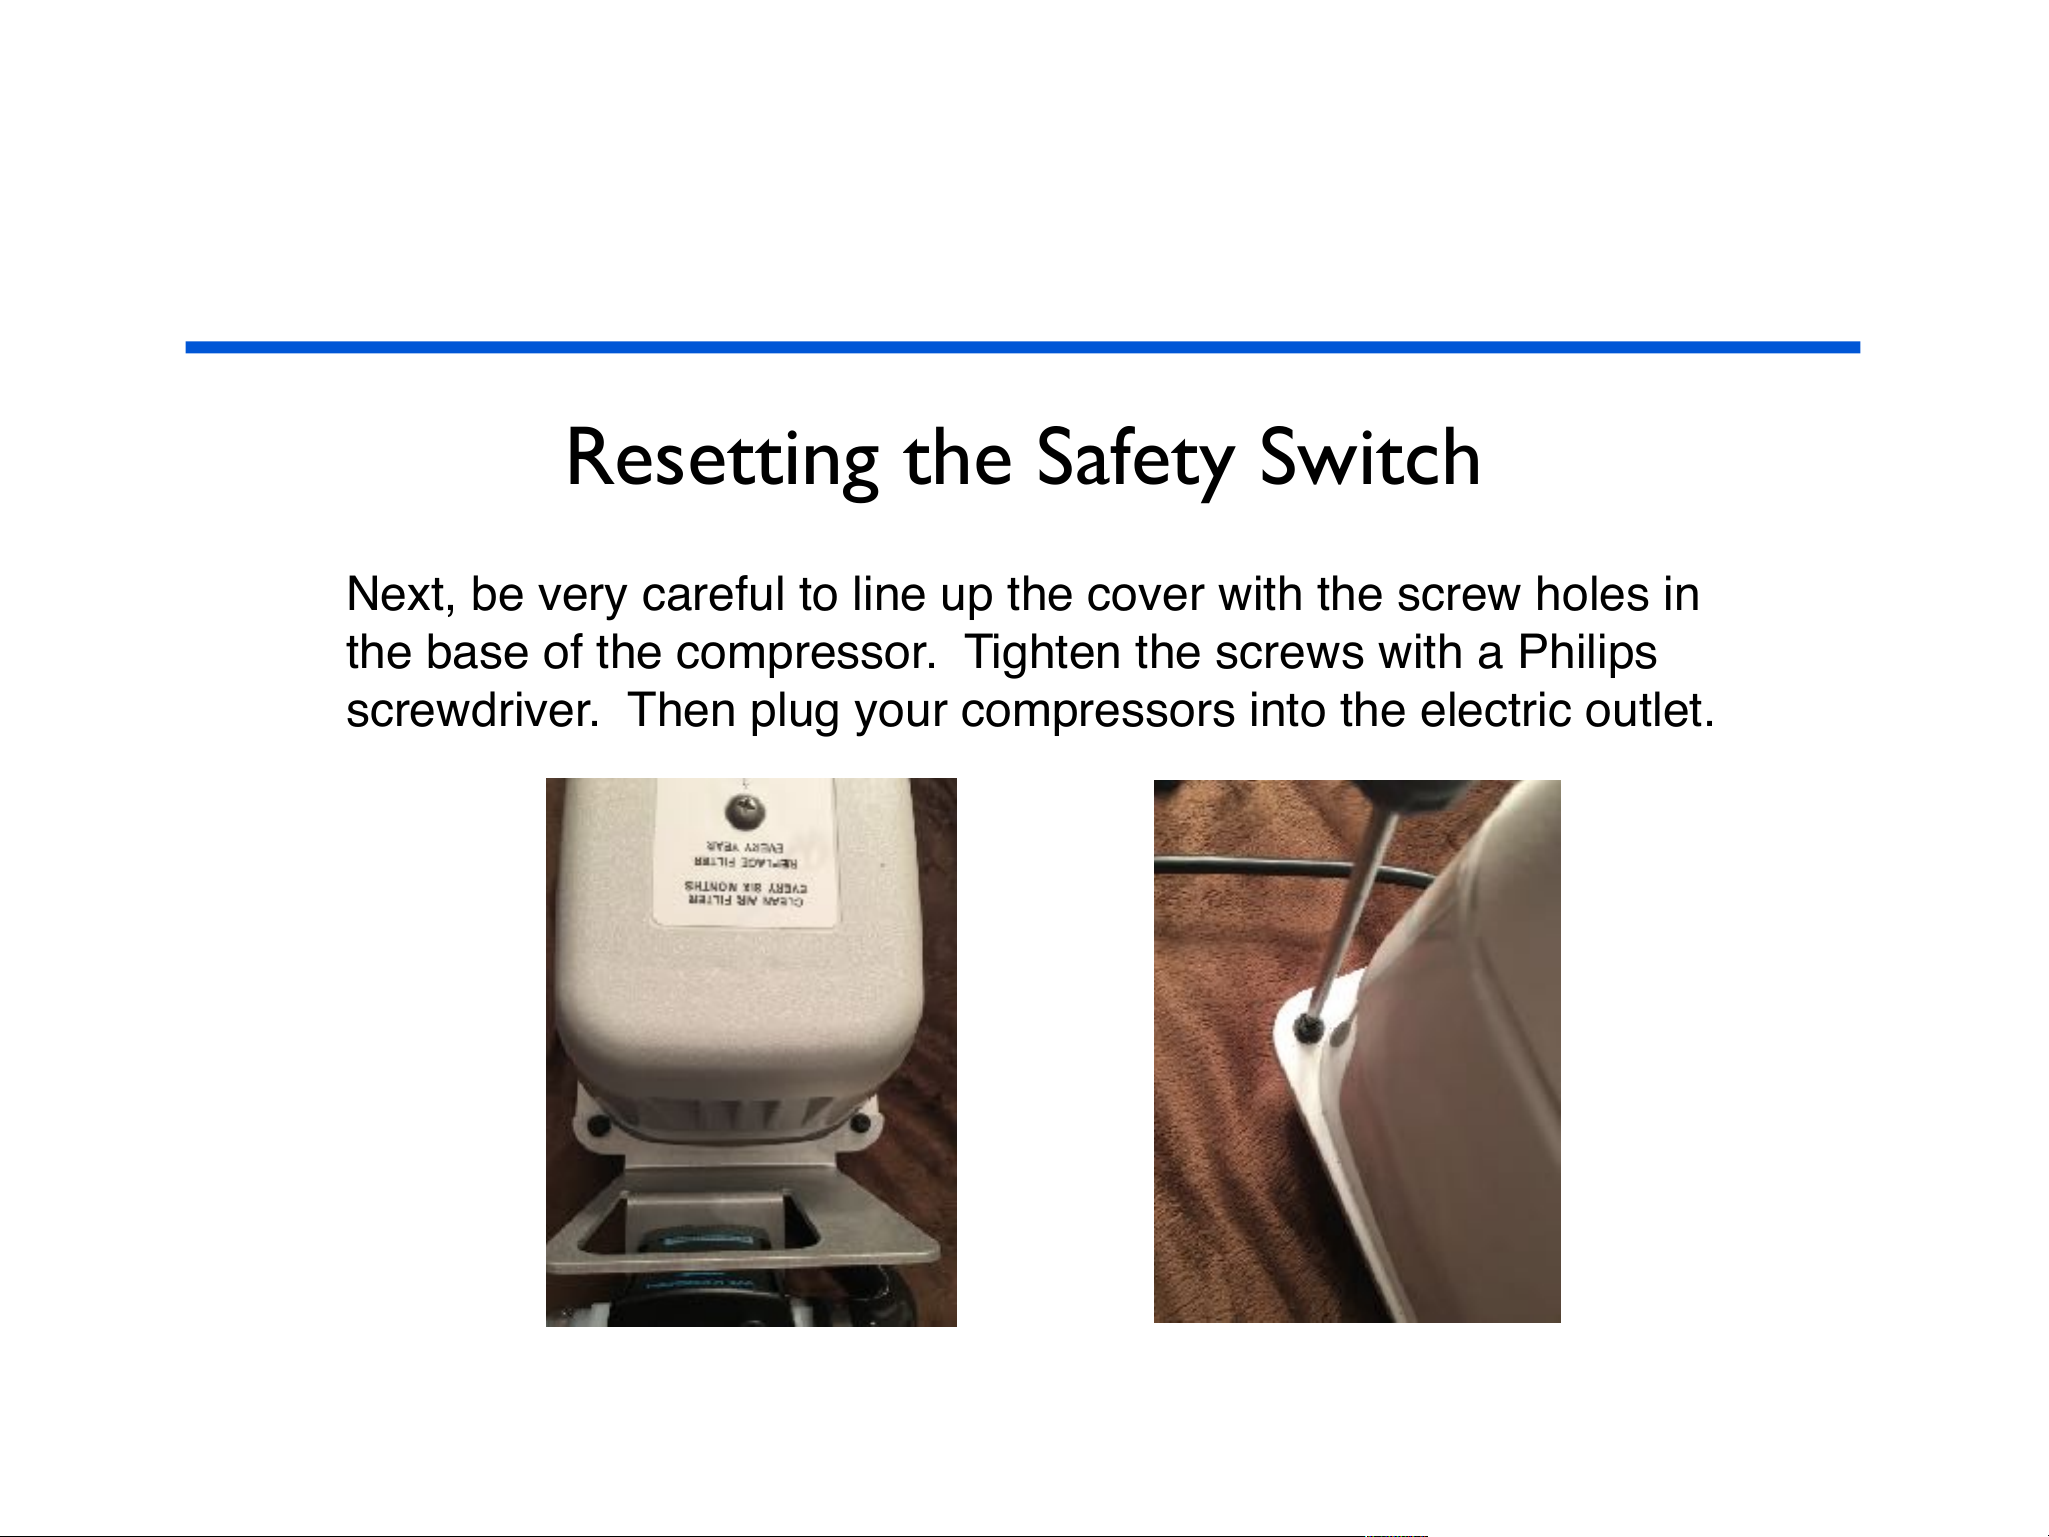
Next, be very careful to line up the cover with the screw holes in
the base of the compressor. Tighten the screws with a Philips
screwdriver. Then plug your compressors into the electric outlet.
Page 54
CHAMBER CARE
White Compressor Filter
There is a filter right under the top plate of the compressor.
Clean with water every 6 months.
You will want to replace the filter every year.
You can order these filters on www.summit-to-sea.com/accessories
Page 55
CHAMBER CARE
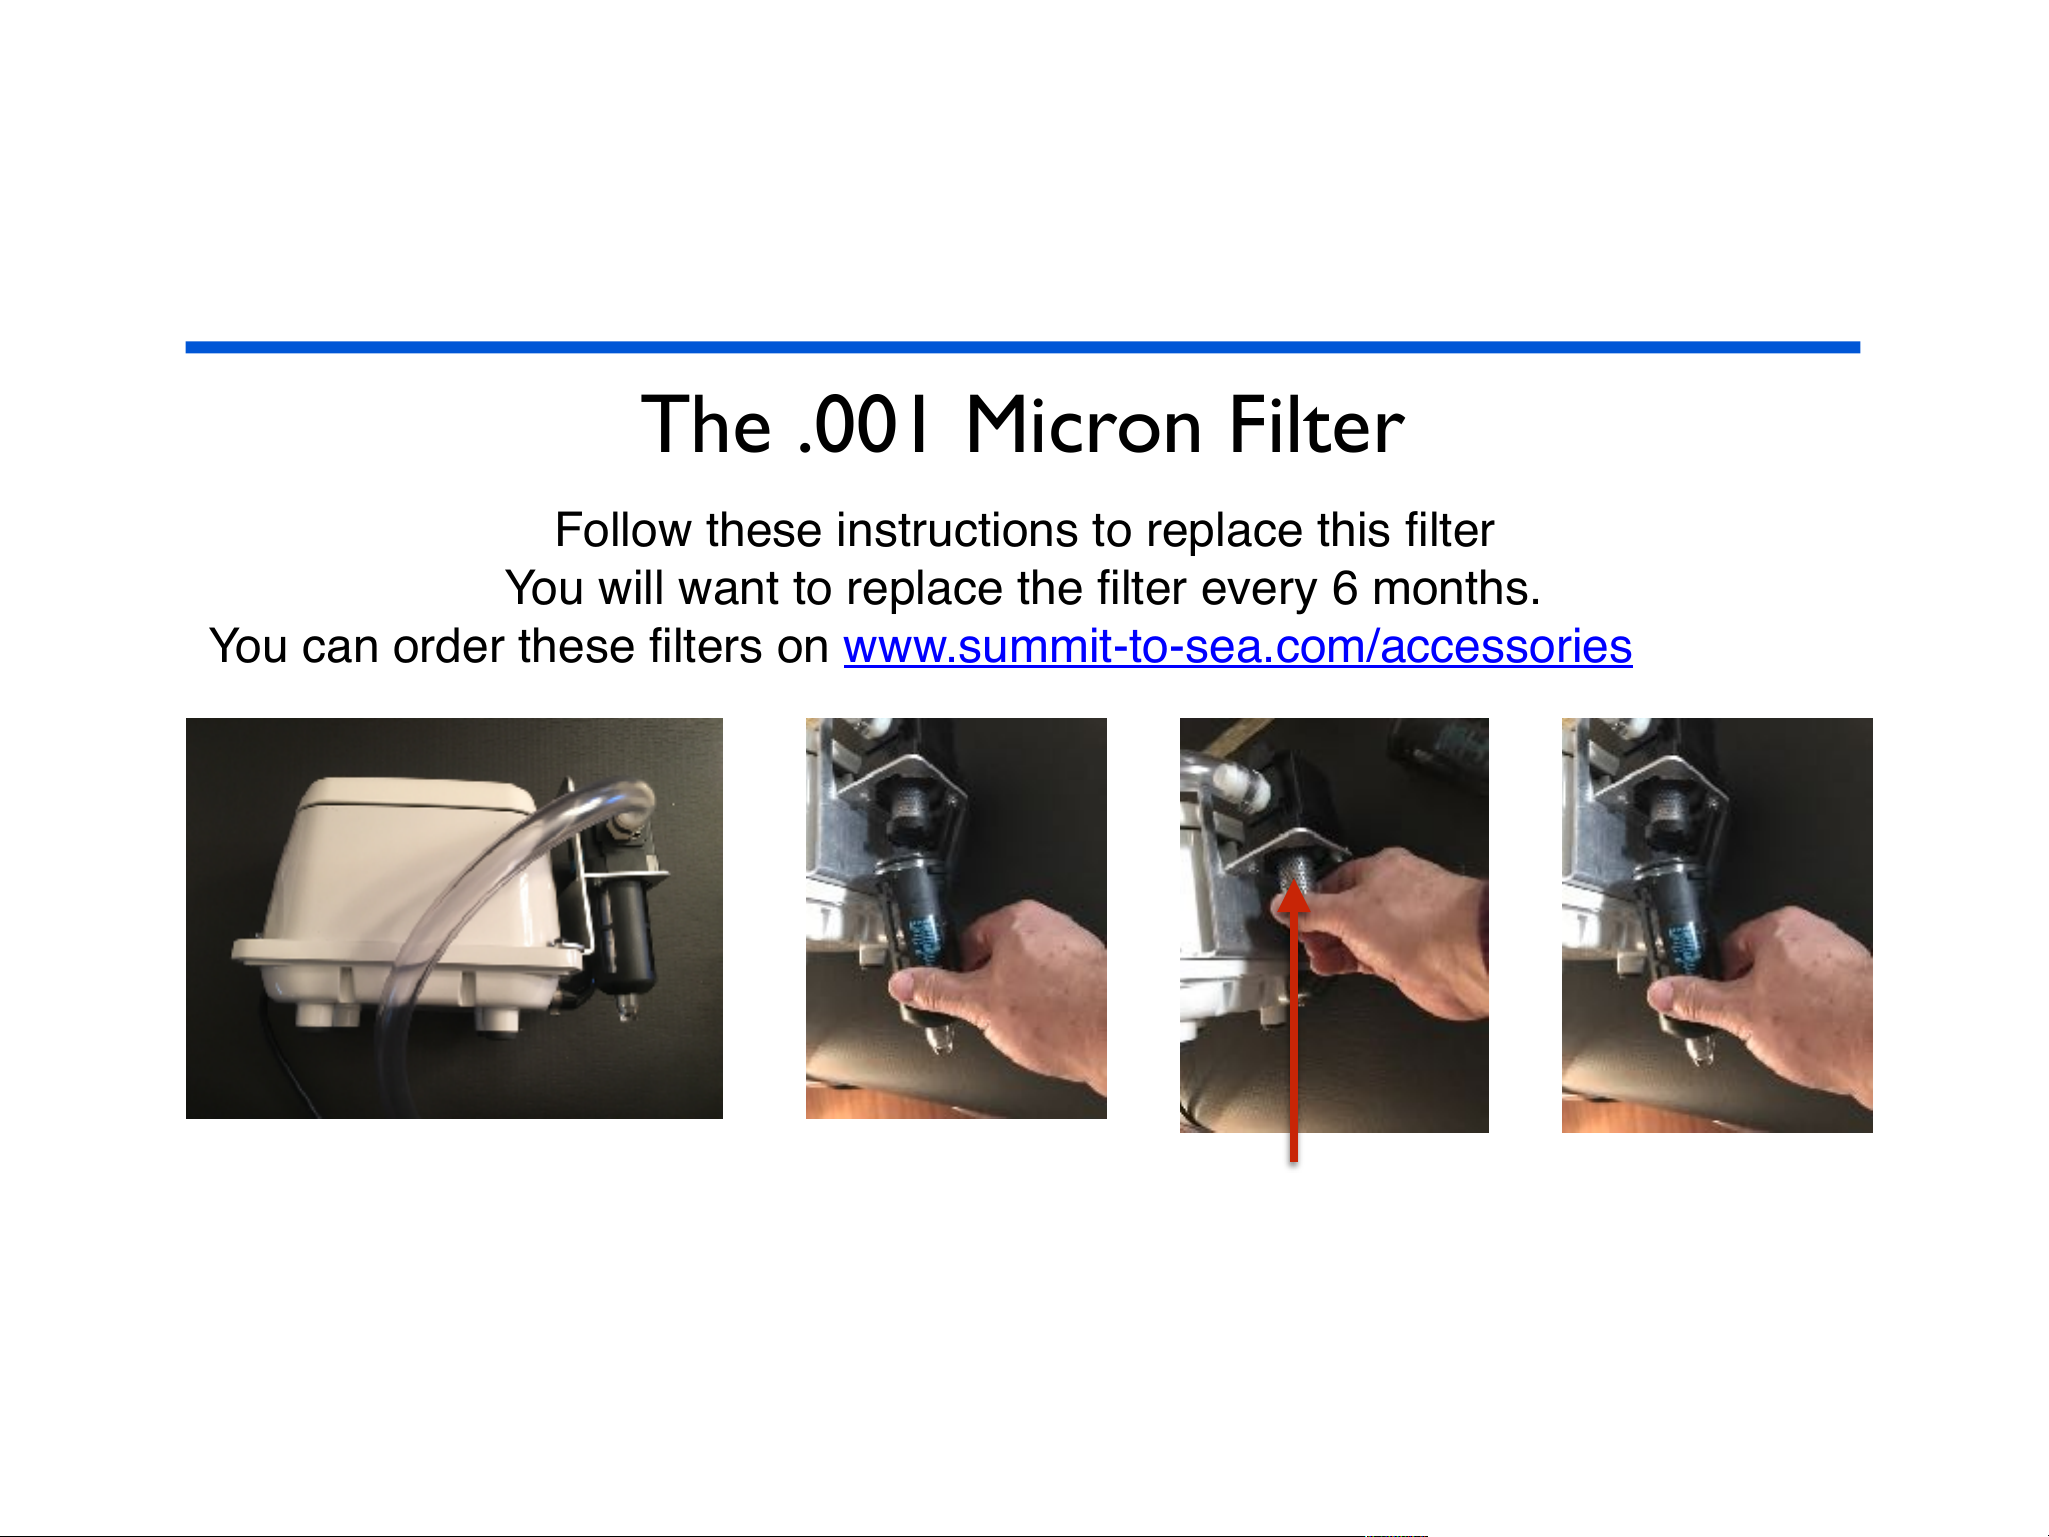
The .001 Micron Filter
Follow these instructions to replace this filter
You will want to replace the filter every 6 months.
You can order these filters on www.summit-to-sea.com/accessories
Lay the compressor on its side
Push the black bulb up
and give it a quarter
turn to unlatch then
pull down
Unscrew the silver
filter piece.
Screw on the new
silver filter
Put the black bulb
back on pushing up
and giving it a quarter
turn to make sure it is
securely connected.
Page 56

WARRANTY
Summit to Sea warrants our products and accessories against defect
for two years from purchase. The warranty covers parts and labor to
repair the Summit to Sea system. Summit to Sea, at our option and
sole discretion, will repair or replace the warranty item. The warranty
does not cover damage as a result of misuse or modification.
Shipping to and from Summit to Sea is the customer's
responsibility.
Summit to Sea has always and will continue to cover all components on
our chambers — including zipper, windows, seams, valves, hoses... in
other words, if it came from Summit to Sea we will stand behind our
product.
Page 57

EXTENDED WARRANTY
Extended warranties are available for purchase anytime within the two
year warranty period. The extended warranties also cover all
components on the chamber — including zipper, windows, seams,
valves, hoses, etc. Contact your distributor.
1 Year Extended warranty $850
2 Year Extended warranty $950
3 Year Extended warranty $1,050
Page 58

IMPORTANT TO READ
Important Safety Considerations
You should NOT use this chamber without guidance and instruction from your
health care provider.
Do NOT use the chamber if you have the following conditions:
Common colds or flu-like symptoms
Recent alcohol consumption
Blocked ear canals
Blocked sinuses
Otic barotraumas
Excessive CO2 exposure
Page 59

IMPORTANT TO READ
CAUTIONS
CAUTION: Federal law requires this device for sale by or on the order of a physician.
CAUTION: Do not inflate the chamber with only pure oxygen; use the compressor
provided. It is designed to work safely with the chamber.
CAUTION: Inspect all seams and fittings prior to use to ensure they are secure.
Failure to do so could cause leaks reducing the performance of the chamber.
CAUTION: If any unusual noise or odor is detected, immediately discontinue use and
contact the manufacturer. This may be an indication of a problem with the normal
operation of the unit that needs to be addressed. In most situations, a simple call can
resolve the issue.
Page 60

IMPORTANT TO READ
WARNING: In the unlikely event that there is a rapid decompression, the individual inside
the chamber must EXHALE. Please make sure that each individual receiving treatment
understands this precaution.
WARNING: Do not replace the compressor with any other model. The chamber is designed
to work specifically with the compressor provided. For added safety, the compressor will not
exceed the test pressure for the chamber.
WARNING: Do not tamper with the pressure regulation valves. These are factory set and
there are no user adjustments. Any sign of tampering with these valves will void the
warranty.
WARNING: Do not use the chamber in a manner where the chamber could roll off the
surface causing a fall. Always use on a surface large enough to prevent rolling off and
causing a fall.
WARNING: Never take a treatment alone. Always have someone outside the chamber to
assist you.
WARNING: Do not use the electric compressor in the rain or around running water as this
could cause electric shock.
WARNING: Wear comfortable clothing and lay on a mat, towel or blanket while in the
chamber to limit contact with the chamber surface and to improve comfort and safety.
Page 61

IMPORTANT TO READ
Pressure Regulation Valves (Relief Valves)
Summit to Sea Chambers utilizes redundant pressure regulation valves. These are factory
programmed to ensure a steady, constant pressure. During treatment, there will be a steady
flow of fresh air through the chamber. For proper operation, the air compressor is to be
running throughout the entire treatment. This is important to ensure that CO2 build up does
not occur.
These valves exhaust the old air while maintaining the factory operating pressure. This
pressure is set to 1.3 ATA (4.4 PSI).
WARNING: Do not tamper with the pressure regulation valves. These are factory
programmed and have no user adjustments. Any sign of tampering with these valves will
void the warranty.
Page 62

IMPORTANT TO READ
Buckles- We have selected one of the most secure buckles on the market to ensure
your safety and comfort.
Bolsters- All chambers come with fitted bolsters that are an integrated part of the
chamber.
Compressor- Ultra quiet compressors provide patented sound suppression which
permits a restful and relaxing dive experience. These highly compact compressors are
designed for continuous operation providing you with a longlasting solution to hyperbaric
pressurization needs. This compressor is small and compact making it easy to transport.
With its small carbon footprint, this compressor will easily integrate into your
environment.
Oil-less 80/120 with a flow rate of 80 to 160 liters per minute and a max operating
pressure of 6 PSI. See compressor manual included in the compressor box.
CAUTION: Using any other compressor with the Hyperbaric Dive units will void the
warranty and may cause injury to the occupant and/or the attendant.
Frame- We have designed this lightweight, highly durable frame. It is easily assembled
and disassembled so that your chamber can be as mobile as your lifestyle.
Page 63

IMPORTANT TO READ
Valves-The Grand Dive has three pressure release valves to ensure a safe and comfortable
operation. This redundancy assures your safety. The Shallow and the Dive have two release
valves.
Windows-The window has a five layer, one firm acrylic layer between four vinyl layers to
ensure a long lasting, permanent seal.
Zipper- An airtight zipper securely seals the air pressure inside the chamber without the
need to massage or manipulate the seal, along with a heavyduty zipper to ensure the
integrity of the chamber.
With over thirty years of manufacturing experience of hyperbaric chambers, our group of
experts have gained the experience and knowledge of hyperbaric chambers and have
produced a high quality product that will meet your needs today, tomorrow, and additional
products for your future.
Page 64

IMPORTANT TO READ
USE CARE to avoid the use of any sharp objects that may penetrate the walls of the
chamber.
WARNING: Never take a treatment alone. Always have someone outside the chamber to
assist you.
CLEAN the inside of the chamber with a soft, damp cloth after each use.
INSPECT all hoses for leaks.
HUMIDITY - In humid climates, the chamber will create condensation. Simply dry with a soft
towel.
EARS - Be sure to chew gum or swallow often during the pressurization.
ENJOY a beverage, read a book, or enjoy any other form of entertainment.
UNZIP the chamber and inspect for foreign objects.
ENSURE that all connections are tightly secured.
ENSURE the chamber is on a stable platform or on the floor.
ATTACH the compressor hose and any accessory hoses.
DURING TREATMENT - After entering the chamber, lie on the mat and get comfortable with
your book, computer, etc.
INDIVIDUAL HELPER zips up the chamber and buckles all the straps.
FILL TIME - using the frame allows for the fill time to be greatly reduced.
AIR - Once the chamber is zipped tight, you will hear the air entering the chamber and see it
start to inflate.
Page 65

IMPORTANT TO READ
Be sure to swallow often during the pressurization process. If you cannot clear your ears,
have the individual helping you temporarily stop the compressor until the pressure in your
ears releases.
Once the chamber is at full pressure, you will hear the “hissing” of the exhaust valves. This
is important as it will prevent CO2 build up.
It is important to relax. Sit back and let the chamber operate. Hyperbaric treatments usually
last from 30-60 minutes or longer. Check with your medical provider for recommended
duration.
Allow 510 minutes for the chamber to return to normal pressure.
As air is released, check with the occupant to ensure they are equalizing the pressure at the
same speed it is being reduced. Once the sides are soft, unzip the chamber.
When the chamber is clean and dry, it can be rolled up and stored or left for your next
hyperbaric treatment (Be careful not to fold the window section).
CAUTION: Do NOT inflate the chamber with only pure oxygen. Use the compressor
provided. It is designed to work safely with the chamber.
WARNING: If, in the highly unlikely event that there is a rapid decompression, the person
inside must EXHALE.
Please make sure that each person receiving a hyperbaric treatment understands this
precaution.
Page 66

IMPORTANT TO READ
FDA 510K CLEARANCE
Portable Mild Hyperbaric Chambers are Class II Medical Devices.
They meet the FDA 510(k) Specifications.
The chamber has been cleared by the FDA for the treatment of Acute High Altitude
Sickness.
FDA WARNING
Increasing the percentages of oxygen content in the air delivery is considered the
same as administering a drug under FDA regulations.
This device is intended for use with ambient air and is not to be inflated with enriched
oxygen.
Page 67

SUMMIT TO SEA
To order additional:
filters
zipper lubricant
zipper cleaner
www.summit-to-sea.com/accessories
Page 68

SUMMIT TO SEA
PO Box 339
Mound, MN 55364
Phone 1.877.PSI.DIVE
(1.877.774.3483)
Fax 1.877.420.7622
www.summit-to-sea.com
© 2011 Summit to Sea, LLC
 Loading...