

Page 1

FELIX STORCH, INC.
GAS RANGE
Model PRO24G
Write Serial No. from rating label here:
_______________________________
er's Manual
Us
770 Garrison Avenue
Bronx, New York 10474
www.summitappliance.com
Page 2
1
Page 3
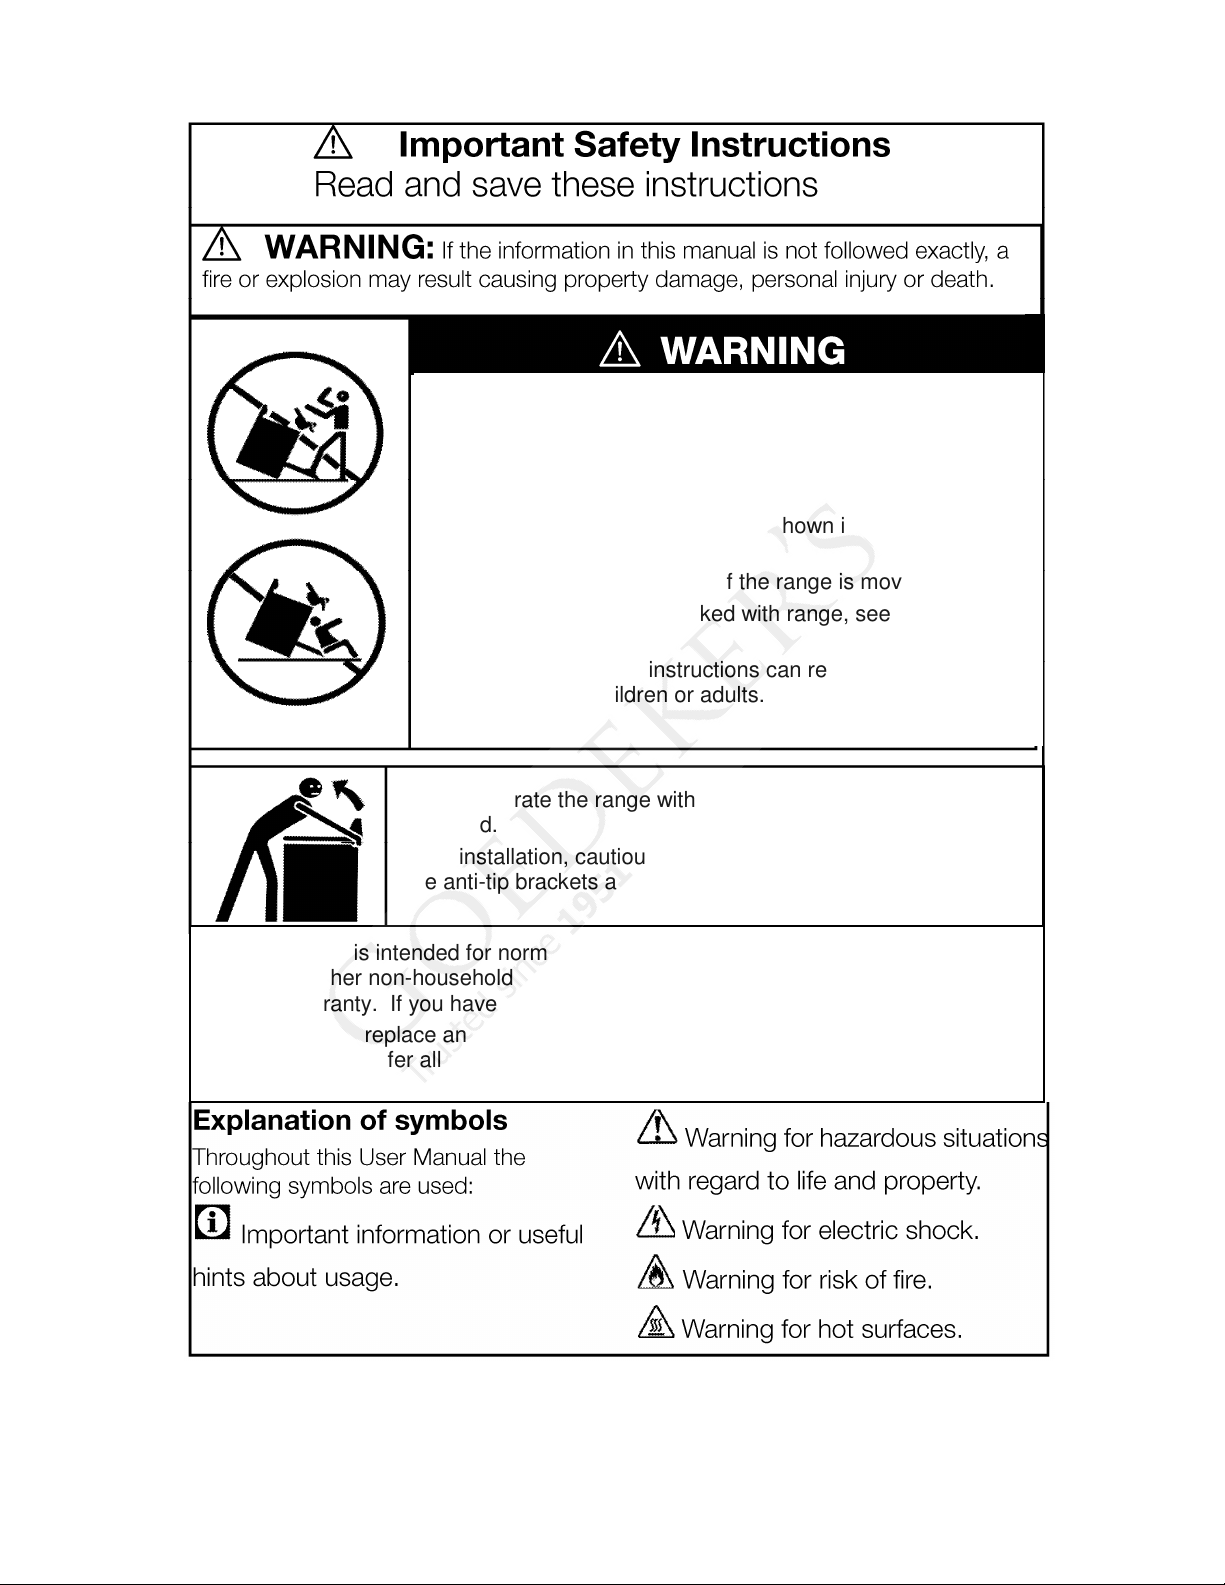
A child or adult can tip the range and be killed.
Install the anti-tip device to the structure and/or the range.
Connect the range to the anti-tip device by the anti-tip
brackets included with the oven as shown in Figs. 2 and 3 on
page 13.
Re-engage the anti-tip device if the range is moved.
To install anti-tip device packed with range, see Installation
instructions.
Failure to follow these instructions can result in death or
serious burns to children or adults.
Tip-Over Hazard
Do not operate the range without anti-tip device in place and
engaged.
After installation, cautiously grip the rear of the range to ensure
the anti-tip brackets are engaging the rear of the range.
This appliance is intended for normal household use only. It is not approved for
outdoor or other non-household uses (including sea- or air-going vessels). See
Limited Warranty. If you have any questions, contact the manufacturer.
Do not repair or replace any part of the appliance unless specifically recommended
in this manual. Refer all servicing to a factory-authorized service center.
2
Page 4
Please read these instructions before
installing or using your appliance!
Dear Customer,
We would like you to obtain the best performance from your product, which has been
nufactured in modern facilities and has passed through strict quality control
ma
procedures.
Therefore, we advise you to read through this User's Manual carefully before using your
product and keep it for future reference. If you hand over the product to someone else,
deliver the User's Manual as well.
The User's Manual will help you use the product in a safe and efficient way.
IMPORTANT:
Save these instructions for the local electrical inspector's use.
The instructions will help you to operate the appliance quickly and
safely.
• Upon delivery, please check that the appliance is not damaged. If you note any
transport damage, please contact your point of sale immediately and do not connect
or operate the appliance!
• Before you connect and start using the appliance, please read this manual and all
closed documents. Please note in particular the safety instructions.
en
• Keep all documents so that you can refer to the information again later on. Please
keep your receipt for any repairs which may be required under warranty.
• When you pass on the appliance to another person, please provide all documents
including original date of purchase. Warranty is not valid if the product is sold second
hand.
• If you should decide not to use this appliance any longer (or decide to substitute
another model), before disposing of it, you should make it inoperative in an
appropriate manner in accordance with health and environmental protection
regulations, ensuring in particular that all potentially hazardous parts be made
harmless, especially in relation to children who could play with old appliances.
Remove the door and the warming drawer before disposal to prevent entrapment.
3
Page 5
Table of Contents
Introductory Material 1
1 Safety Instructions 5
Basic safety instructions ...................... 5
Safety for children ............................... 6
Safety when working with electricity .... 7
Safety when working with gas ............. 7
Intended use ....................................... 8
Disposal: Packaging material .............. 8
Future transportation ........................... 8
2 Installation 10
Room ventilation ............................... 10
Installation and connection ................ 10
Clearances & Dimensions ................. 12
Important notes to the installer .......... 12
Anti-Tip stability device installation
instructions ................................... 13
Connection to the gas supply ............ 14
Connection to the power supply ........ 20
2
23
3 Preparation 2
Tips for saving energy ....................... 22
Initial operation .................................. 22
Gas oven ........................................... 22
Broiler ................................................ 22
4 How to use gas burners
5 How to operate the oven 25
General information on baking,
roasting and broiling ..................... 25
Tips for baking ................................... 25
Tips for roasting ................................ 25
Tips for broiling .................................. 25
How to use the gas oven ................... 26
How to operate the broiler ................. 27
Table of broiling times ....................... 28
6 Care and Maintenance 28
General information ........................... 28
How to clean the cooktop area .......... 28
Cleaning the oven ............................. 29
Replacing the oven lamp ................... 29
Cleaning the oven door ..................... 30
7 General Information 32
Location of Parts ............................... 32
Technical Data .................................. 33
Accessories supplied with unit .......... 33
Gas pressure table ............................ 34
8 Troubleshooting 35
9 Limited Warranty 36
4
Page 6
1 Safety Instructions
Basic safety instructions
• This appliance is not intended for use
by persons (including children) with
reduced physical, sensory or mental
capabilities, or lack of experience and
knowledge, unless they have been
given supervision or instruction
concerning use of the appliance by a
person responsible for their safety.
Children should be supervised to
ensure that they do not play with the
appliance.
• Never use when judgment or
ordination is impaired by the use of
co
alcohol and/or drugs.
• Do not operate the appliance if it is
defective or shows any visible
damage.
• Do not carry out any repairs or
modifications on the appliance.
However, you may remedy some
malfunctions. (See Troubleshooting,
page 35.)
• Only authorized replacement parts
y be used in performing service on
ma
the range. Replacement parts are
available from factory-authorized
parts distributors. Contact the
nearest parts distributor in your area.
• Be careful when using ingredients
containing alcohol in preparing your
dishes. Alcohol evaporates at high
temperatures and may cause fire
since it will ignite when it comes in
contact with hot surfaces.
• Do not heat closed food containers
and glass jars. Pressure that may
build up in the container can cause it
to burst.
• Keep appliance area clear and free
om combustible materials such as
fr
gasoline and other flammable fluids.
• Ensure that no flammable materials
ar
e adjacent to the appliance as the
sides become hot during use.
• Fire risk! Do not store flammable
aterials in the oven or warming
m
drawer.
• Do not use water on grease fires.
Smother flames or use a dry chemical
or foam type extinguisher.
• Do not leave empty pots or pans on
burners that are switched on. They
might get damaged.
• Since it may be hot, do not leave
plastic or aluminum dishes on the
surface of the appliance.
surface of the appliance.
IMPORTANT: Never cover any
slots, holes or passages in the oven
or cover an entire rack with aluminum
foil. Doing so blocks airflow through
the oven and may cause carbon
monoxide poisoning. Aluminum foil
linings may also trap heat, creating a
fire hazard.
• Do not use aluminum foil to line
rface unit drip bowls or oven
su
bottom, except as suggested in the
manual. Improper installation of
these liners may result in a risk of
electric shock and/or fire.
• The manufacturer declines all liability
for injury to persons or damage to
property caused by incorrect or
improper use of the appliance.
• Always use only dry potholders or
heat-resistant gloves when inserting
or removing the dishes into/from your
oven. Do not let potholder touch hot
heating elements. Do not use a towel
or other bulky cloth.
5
Page 7
• Do not use the oven with door glass
removed or broken.
• Rear surface of the oven gets hot
when it is in use. Electric connection
should not touch the rear surface,
otherwise the main cable may be
damaged. Do not trap the power
cable between the hot oven door and
the frame. Do not route the power
cable over the hot cooking area.
Otherwise, cable insulation may melt
and cause fire as a result of short
circuiting.
• Never wear loose-fitting or hanging
rments while using the appliance.
ga
Be careful when reaching for items
stored in cabinets over the oven.
Flammable material could be ignited
if brought into contact with hot
surfaces or heating elements and
may cause severe burns.
• Flame in the oven can be smothered
completely by closing the oven door
and turning the oven off or by using a
multi-purpose dry chemical or foam-
type fire extinguisher.
• Place the oven rack in the desired
sition while the oven is cool. If
po
racks must be handled when hot, do
not let pot holder contact the heating
elements.
• Pulling out the rack to the stop-lock is
a convenience in lifting heavy foods.
It is also a precaution against burns
from touching hot surfaces of the
door or oven walls.
• Do not use the oven to dry
newspapers. If overheated, they can
catch on fire.
CAUTION: Do not use the oven or
warming drawer (if equipped) for
storage.
• After broiling, always take any broiler
n out of the oven and clean it.
pa
Leftover grease in a broiler can catch
fire the next time you use the pan.
• Check that all controls on the
ap
pliance are switched off after use.
IMPORTANT: Call an authorized
service center for installation of the
appliance. The warranty period will
begin after this procedure.
fety for children
Sa
WARNING: Stepping, leaning or
sitting on the door or drawers of this
range can results in serious injuries
and also cause damage to the range.
Do not allow children to climb or play
around the range. The weight of a
child on an open door may cause the
range to tip, resulting in serious burns
or other injury.
• Accessible parts may be hot when
the broiler is in use. Young children
should be kept away.
• Surface units may be hot even
though they are dark in color. Areas
near surface units may become hot
enough to cause burns. During and
after use, do not touch or let clothing
or other flammable materials contact
surface units until they have had
sufficient time to cool. Among these
areas are the cooktop and surfaces
facing the cooktop.
WARNING: Do not store items of
terest to children in the cabinets
in
above the range or on the backguard
of a range. Children climbing on the
range to reach items could be
seriously injured.
• The packaging materials may be
dangerous for children. Keep these
materials away from children.
Dispose of all parts of the packaging
material according to environmental
standards.
6
Page 8
Safety when working
with electricity
WARNING: Before installing,
turn power OFF at the service panel.
Lock service panel to prevent power
from being turned ON accidentally.
WARNING: Personal injury or
ath from electrical shock may occur
de
if the range is not installed by a
qualified installer or electrician.
Any additions, changes or conversions
required in order for this appliance to
meet the application needs satisfactorily
must be made by a qualified technician.
• In case of any damage, switch off the
appliance and disconnect it from the
power supply by removing the fuse or
switching off the circuit breaker.
• Ensure that the fuse rating is correct.
• Do not operate the appliance
barefooted.
• Never touch the appliance with wet
hands or feet.
Safety when working with gas
WARNING: To reduce the risk of
rsonal injury in the event of a
pe
grease fire, observe the following:
• Smother flames with a close-fitting lid,
cookie sheet or metal tray, then turn
off the burner. Exercise caution to
prevent burns. If the flames do not
go out immediately, evacuate and call
the fire department.
• Never pick up a flaming pan – you
may be burned.
Do not use water, including wet rags or
towels – a violent steam explosion will
result.
Use an extinguisher only if:
1) You know you have a Class ABC
ex
tinguisher and you already know
how to operate it.
2) The fire is small and contained in the
area where it started.
3) The fire department is being called.
4) You can fight the fire with your back
an exit.
to
WARNING: If the information in this
manual is not followed exactly, a fire or
explosion may result causing property
damage, personal injury or death.
• Any work on gas equipment and
systems may only be carried out by
authorized and qualified persons who
are Gas Safe registered.
• Prior to the installation, ensure that
the local distribution conditions
(nature of the gas and gas pressure)
and the adjustment of the appliance
are compatible.
• This appliance is not connected to a
combustion products evacuation
device. It should be installed and
connected in accordance with current
installation regulations. Particular
attention should be given to the
relevant requirements regarding
ventilation. (See page 10.)
• CAUTION:
appliance results in the production of
heat and moisture in the room in
which it is installed. Ensure that the
kitchen is well ventilated: keep natural
ventilation holes open or install a
mechanical ventilation device
(mechanical extractor hood).
Prolonged intensive use of the
appliance may call for additional
ventilation, for example, increasing
the level of the mechanical ventilation
where present.
The use of a gas cooking
7
Page 9
• Gas appliances and systems must be
regularly checked for proper
functioning. Please arrange for
annual maintenance.
• Clean the gas burners regularly. The
flames should be blue and burn
evenly.
• Good combustion is required in gas
pliances. In case of incomplete
ap
combustion, carbon monoxide (CO)
might develop. Carbon monoxide is a
colorless, odorless and very toxic
gas, which has a lethal effect even in
very small doses.
• Request information from your local
gas provider about gas emergency
telephone numbers and safety
measures in case a gas odor is
noticed.
Intended Use
WARNING: Use this appliance
only for its intended purpose as
described in this manual. NEVER
use it as a space heater to heat or
warm a room. Doing so may result
in carbon monoxide poisoning and
overheating of the appliance.
Never use the appliance for
storage.
This appliance should not be used for
warming plates under the broiler,
hanging towels and dish cloths on the
handles, or for drying or space heating
purposes.
All openings in the wall behind the
appliance and in the floor under the
appliance should be sealed.
The appliance is not intended for use
in mobile homes and recreational
vehicles.
Do not obstruct the flow of ventilation
air.
The manufacturer shall not be held
liable for any damage caused by
improper use or handling errors.
The appliance can be used for
defrosting, baking, roasting and broiling
food.
Disposal – Packaging material
DANGER: Risk of suffocation
by the packaging materials!
Packing elements (i.e., plastic
bags, polystyrene foam, nails,
packing straps, etc.) should not be
left around within easy reach of
children, as these may cause
serious injuries.
The packaging material and transport
locks are made from materials that are
not harmful to the environment. Please
dispose of all parts of the packaging
according to environmental standards.
Future Transportation
Do not carry out cleaning or
intenance operations on the
ma
appliance without having previously
disconnected it from the electric power
supply.
NOTICE: Do not place other items
on top of the appliance. The
appliance must be transported
upright.
When possible, store the appliance's
original box and transport the appliance
in its original carton. Follow the
guidance marks printed on the carton.
IMPORTANT: Verify the general
appearance of your equipment by
identifying possible damage during
transportation.
8
Page 10

To prevent the wire shelf and tray inside
the oven from damaging the oven door,
place a strip of cardboard onto the
inside of the oven door that lines up with
the position of the trays. Tape the oven
door to the side walls.
If you do not have the original carton
Pack the appliance in bubble wrap or
thick cardboard and tape it securely in
order to prevent damage during
transportation.
9
Page 11
2 Installation
To ensure that critical air gaps are
maintained under the appliance, we
recommend that this appliance be
mounted on a solid base and that the
feet do not sink into any carpeting or
soft flooring.
The kitchen floor must be able to carry
the weight of the appliance plus the
additional weight of the cookware,
bakeware and food.
• If an appliance hood is to be fitted,
fer to the manufacturer's
re
instructions regarding fixing height.
• The appliance corresponds to device
class 1, i.e., it may be placed with the
rear and one side to kitchen walls,
kitchen furniture or equipment of any
size. The kitchen furniture or
equipment on the other side may
only be of the same size or smaller.
• Any kitchen furniture next to the
appliance must be heat-resistant
(212°F minimum).
Room ventilation
The air for combustion is taken from the
om air and the exhaust gases are
ro
emitted directly into the room.
Good room ventilation is essential for
safe operation of your appliance. If
there is no window or door available
for room ventilation, extra ventilation
must be installed.
Do not install this appliance in a room
below ground level unless it is open
to ground level on at least one side.
Failure to install correctly is
dangerous and could result in
prosecution.
Prolonged intensive use of the
appliance may call for additional
ventilation, for example, the opening
of a window or the use of a
permanent fixed mechanical
ventilation system such as an
extractor fan or range hood that
ventilates to the outside.
Room size Ventilation opening
Smaller than 180 ft3 Min 15½ in2
180 ft3 to 350 ft3 Min 8 in2
Greater than 350 ft3 Not required
In cellar or basement
Min 10 in2
Be sure your appliance is properly
installed and grounded by a qualified
technician in accordance with the
National Fuel Gas Code ANSI Z223. latest edition, or in Canada, CAN/CGA
B149.1 and CAN/CGA B149.2, and
National Electrical Code ANSI/NFPA
No.70 - latest edition, or in Canada,
CSA Standard C22.1, Canadian
Electrical Code, Part 1 and local code
requirements.
Installation and Connection
IMPORTANT: Do not install the
pliance next to refrigerators or
ap
freezers. The heat emitted by the
appliance will lead to an increased
energy consumption of cooling
appliances.
• For installation, the appliance must
be connected in accordance with all
local electrical and/or gas regulations.
CAUTION: Unit is heavy and
requires at least two persons or
proper equipment to move.
10
Page 12
25"
11
Page 13
NOTICE:
Material damage!
Th
e door and/or handle must not be
used for lifting or moving the appliance.
• The appliance must be placed directly
on the floor. It must not be placed
onto a base or pedestal.
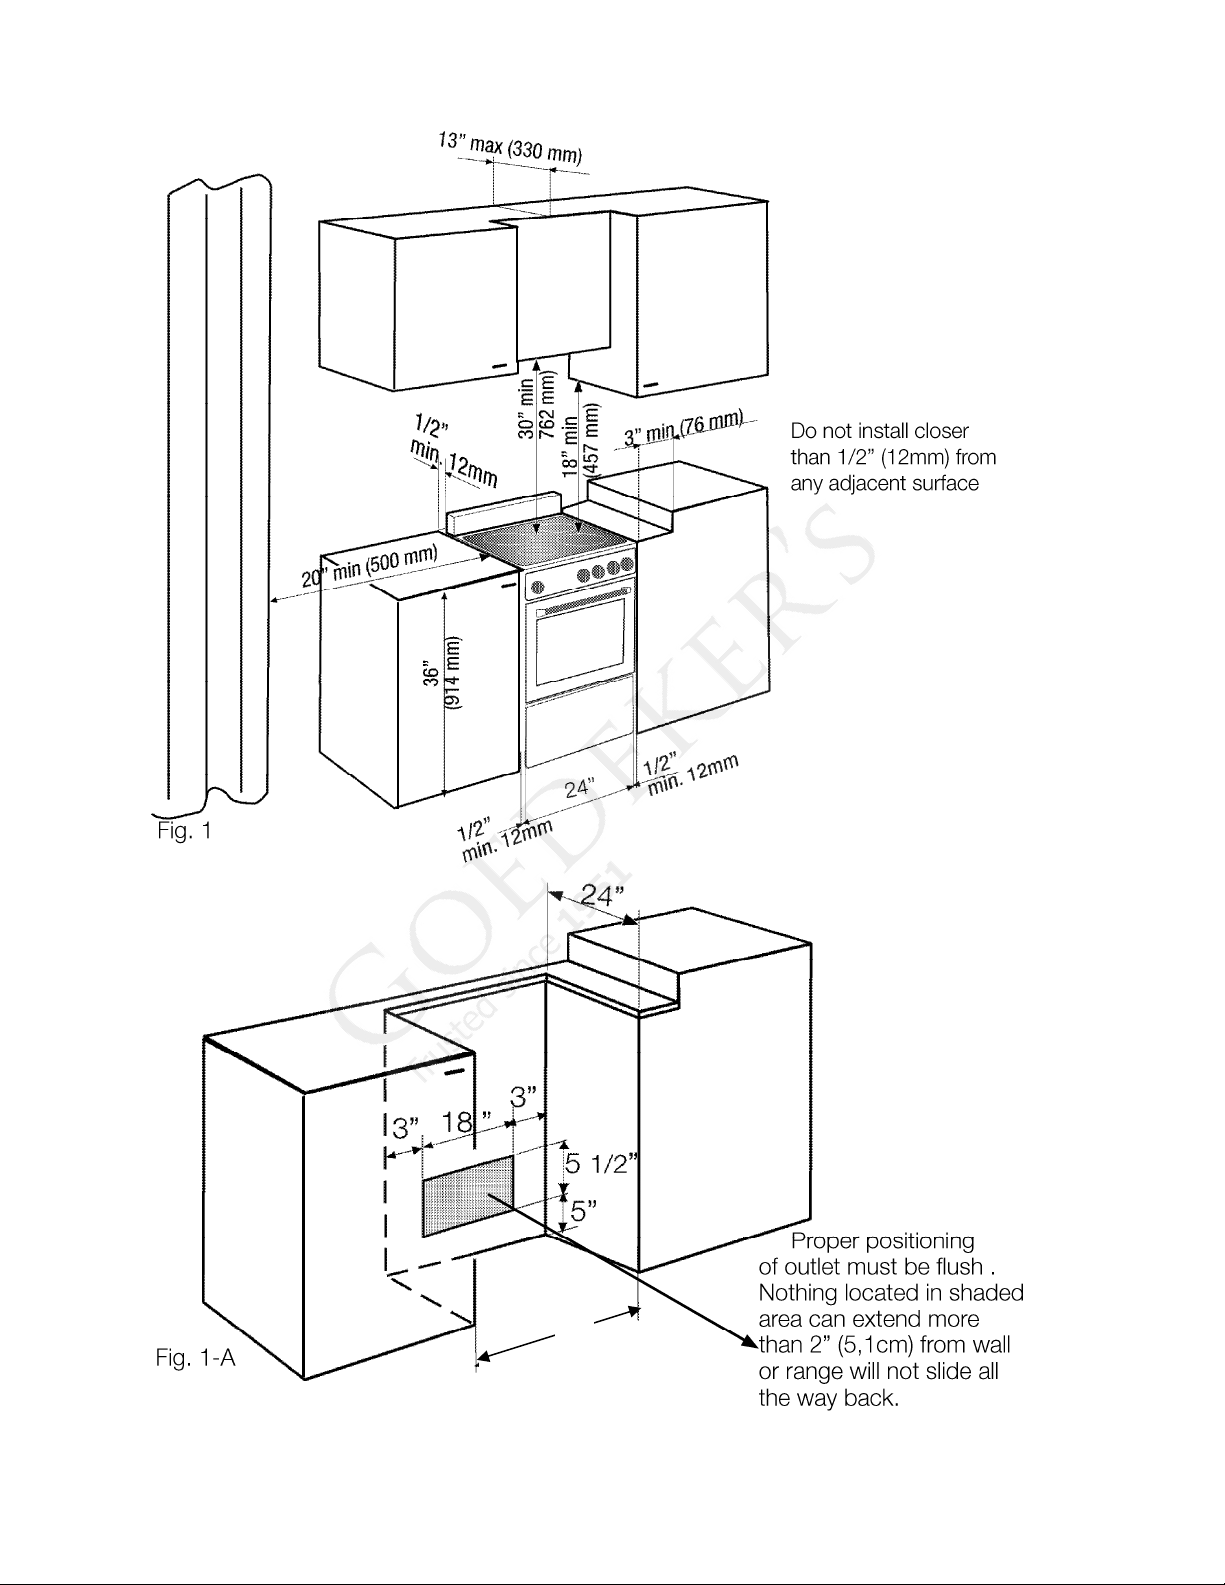
Clearances & Dimensions
Dimensions that are shown in figures 1
d 1a must be used. Given
an
dimensions provide minimum clearance.
There needs to be a 30-inch minimum
clearance between the top of the
cooking surface and the bottom of
unprotected wood or metal cabinets or a
24-inch minimum when bottom of wood
or metal cabinets is protected by not
less than a 1/4-inch flame retardant
millboard covered with not less than no.
29 MSG sheet steel, 0.015-inch
stainless steel, 0.024-inch aluminum or
0.020-inch copper.
To eliminate the risk of burns or fire by
reaching over heated surface units,
cabinet storage space located above the
surface units should be avoided. If
cabinet storage is to be provided, the
risk can be reduced by installing a range
hood that projects horizontally a
minimum of 5 inches beyond the bottom
of the cabinets.
This appliance is not intended for use in
mobile homes or recreational vehicles.
Be sure your range is installed and
grounded properly by a qualified
installer or service technician.
Important notes to the installer:
Read manual before installing the
range.
Observe all governing codes and
ordinances.
Be sure to leave these instructions with
the consumer.
IMPORTANT: Before installing the
range in an area covered with
linoleum or any synthetic floor
covering, make sure the floor
covering can withstand temperatures
at least 90°F above room
temperature without shrinking,
warping or discoloring.
Do not install the range over carpeting
unless you place an insulating pad or
sheet of 1/4-inch (0.64 cm) thick
plywood between the unit and carpeting.
WARNING
All ranges can tip, and injury to persons
could result.
• Install the Anti-Tip Device packed
with the appliance.
• A risk of tip-over may exist if the
pliance is not installed in
ap
accordance with these instructions.
• If the range is pulled away from the
wall for cleaning, service or any other
reason, ensure that the Anti-Tip
Device is properly re-engaged when
the range is pushed back against the
wall. In the event of abnormal usage
(such as a person standing, sitting or
leaning on an open door), failure to
take this precaution can result in
tipping of the range. Personal injury
might result from spilled hot liquids or
from the range itself.
12
Page 14
Anti-Tip stability device installation
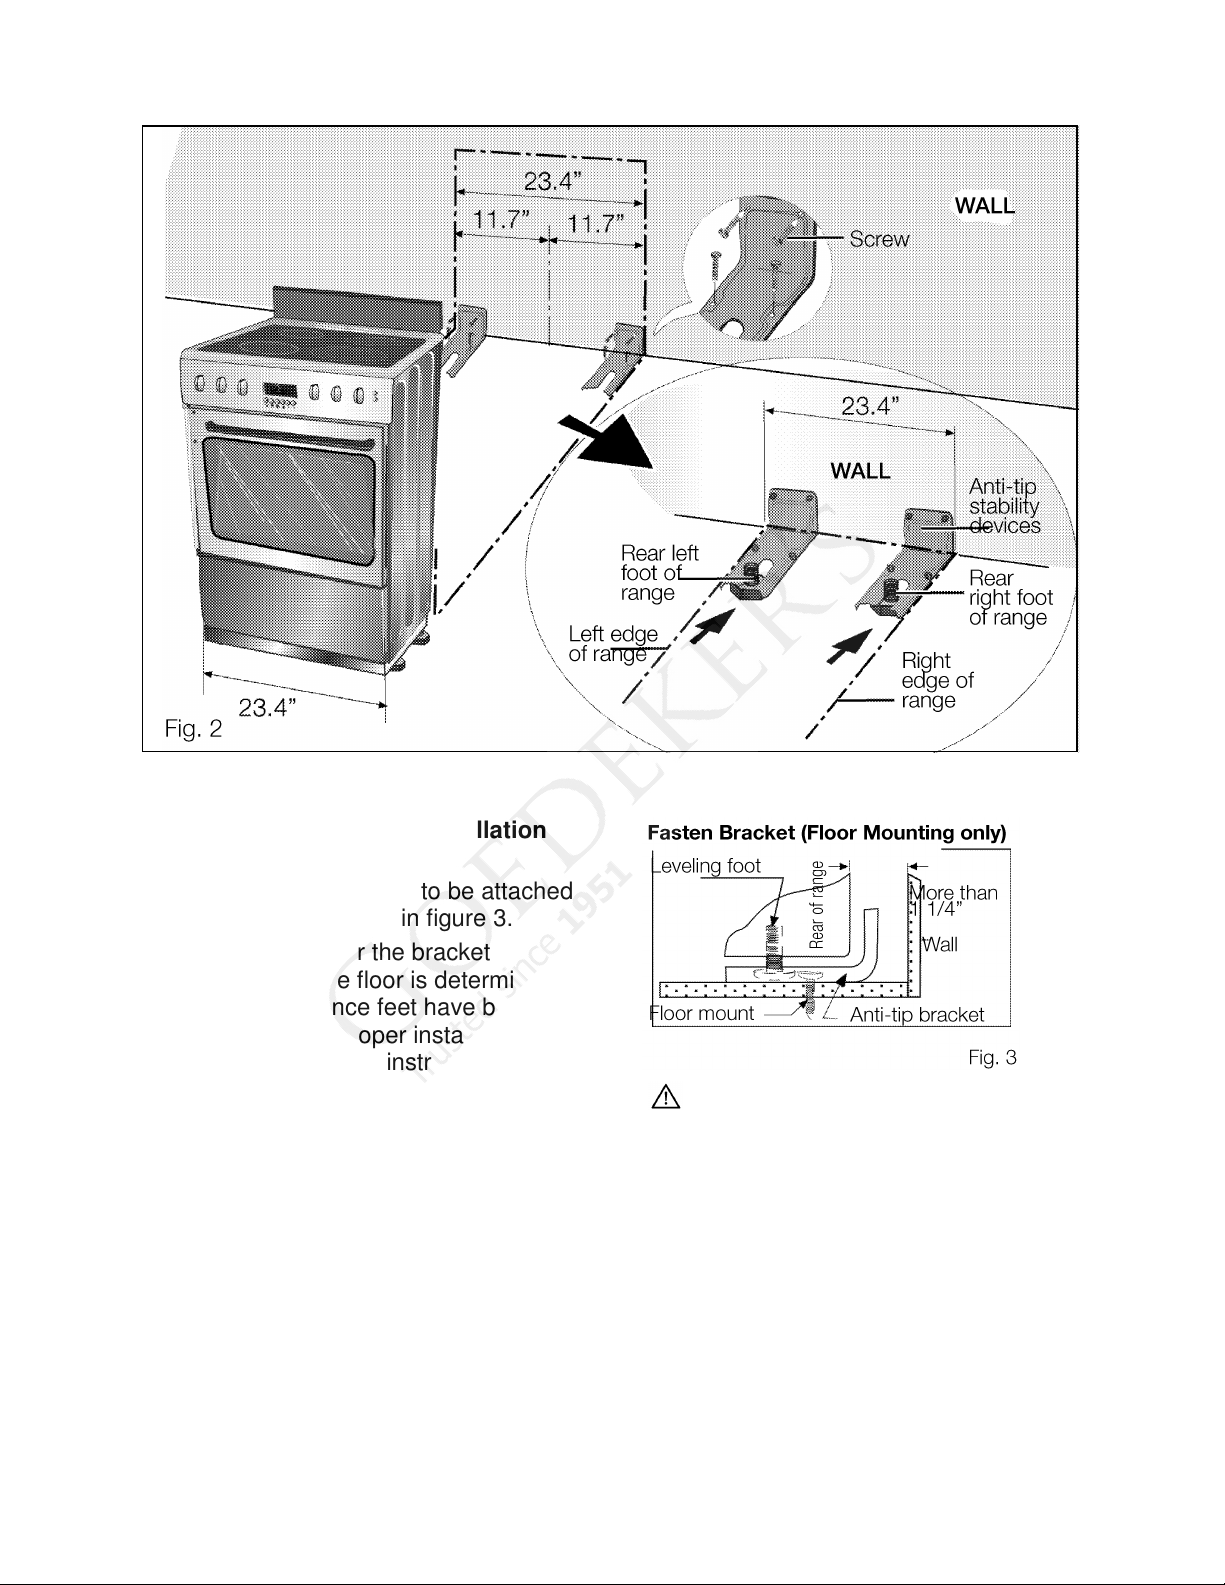
instructions
1. The anti-tip device has to be attached
to the floor as shown in figure 3.
The dimension for the bracket
location from the floor is determined
after the appliance feet have been
adjusted to the proper installation
height shown in the instructions and
the appliance has been leveled.
2. Locate the anti-tip device on the wall
at the measured dimension from
where the left side of the appliance
(facing range) is to be located.
3. Slide range into place making sure
the anti-tip device is facing the anti-tip
hole on the cooktop and is screwed
into place.
Tip-Over Hazard
A child or adult can tip the range and be
killed. Connect anti-tip bracket to rear
range foot. Reconnect the anti-tip
bracket if the range is moved. Failure to
follow these instructions can result in
death or serious injury to children and
adults.
13
Page 15

DANGER: Electrical shock hazard!
• Use extreme caution when drilling
ho
les into the wall or floor. There
may be concealed electrical wires
located behind the wall or under the
floor.
• Identify the electrical circuits that
uld be affected by the installation of
co
the Anti-Tip Device, then turn off
power to these circuits.
Failure to follow these instructions
may result in electrical shock or
other personal injury.
Connection to the Gas Supply
This appliance has been tested in
accordance with the following
standards:
• ANSI Z21.1 Standard for Household
Cooking Appliances (USA).
• CAN 1.1 M81 Interim Reqt no. 58
Domestic Cooktops (CANADA).
• CAN/CSA-C 22.2 No. 61-M89
Household Cooking Ranges.
In Canada, installation must be in
accordance with CAN 1-B149.1 and 2
Installation Codes for Gas Burning
Appliances and/or local codes.
For Massachusetts Installations:
1. Installation must be performed by a
contractor, plumber or gas fitter
qualified or licensed by the state,
province or region where this
appliance is being installed.
2. Shut-off valve must be a "T" handle
gas cock.
3. Flexible gas connector must not be
longer than 36 inches.
High Altitude Installation note:
This gas range is ETL-certified for safe
operation up to an altitude of 10,000 ft.
without any modifications.
Exception: For use with LP, the range
must first be converted using the LP
conversion instructions included in
this literature package.
Connecting to the gas supply:
Important note for LP users
The range is shipped from the factory
for use with natural gas. For use with
propane (LP) gas, your range must first
be converted using the LP conversion
kit.
The gas connection is located below the
back panel of the range (see figure 4).
It is accessible through the warming
drawer access panel or from the back of
the range. To reach the access panel,
remove the warming drawer.
Shut off the main gas supply valve
before disconnecting the old range and
leave it off until the new hook-up has
been completed.
The gas range can be installed using
rigid pipe or a CSA, cCSAus, ULInternational certified metal appliance
connector. If using a flexible connector,
always use a new connector.
Apply pipe joint compound or Teflon
tape appropriate for use with LP gas
and natural gas around all male pipe
threads to prevent leaks.
14
Page 16
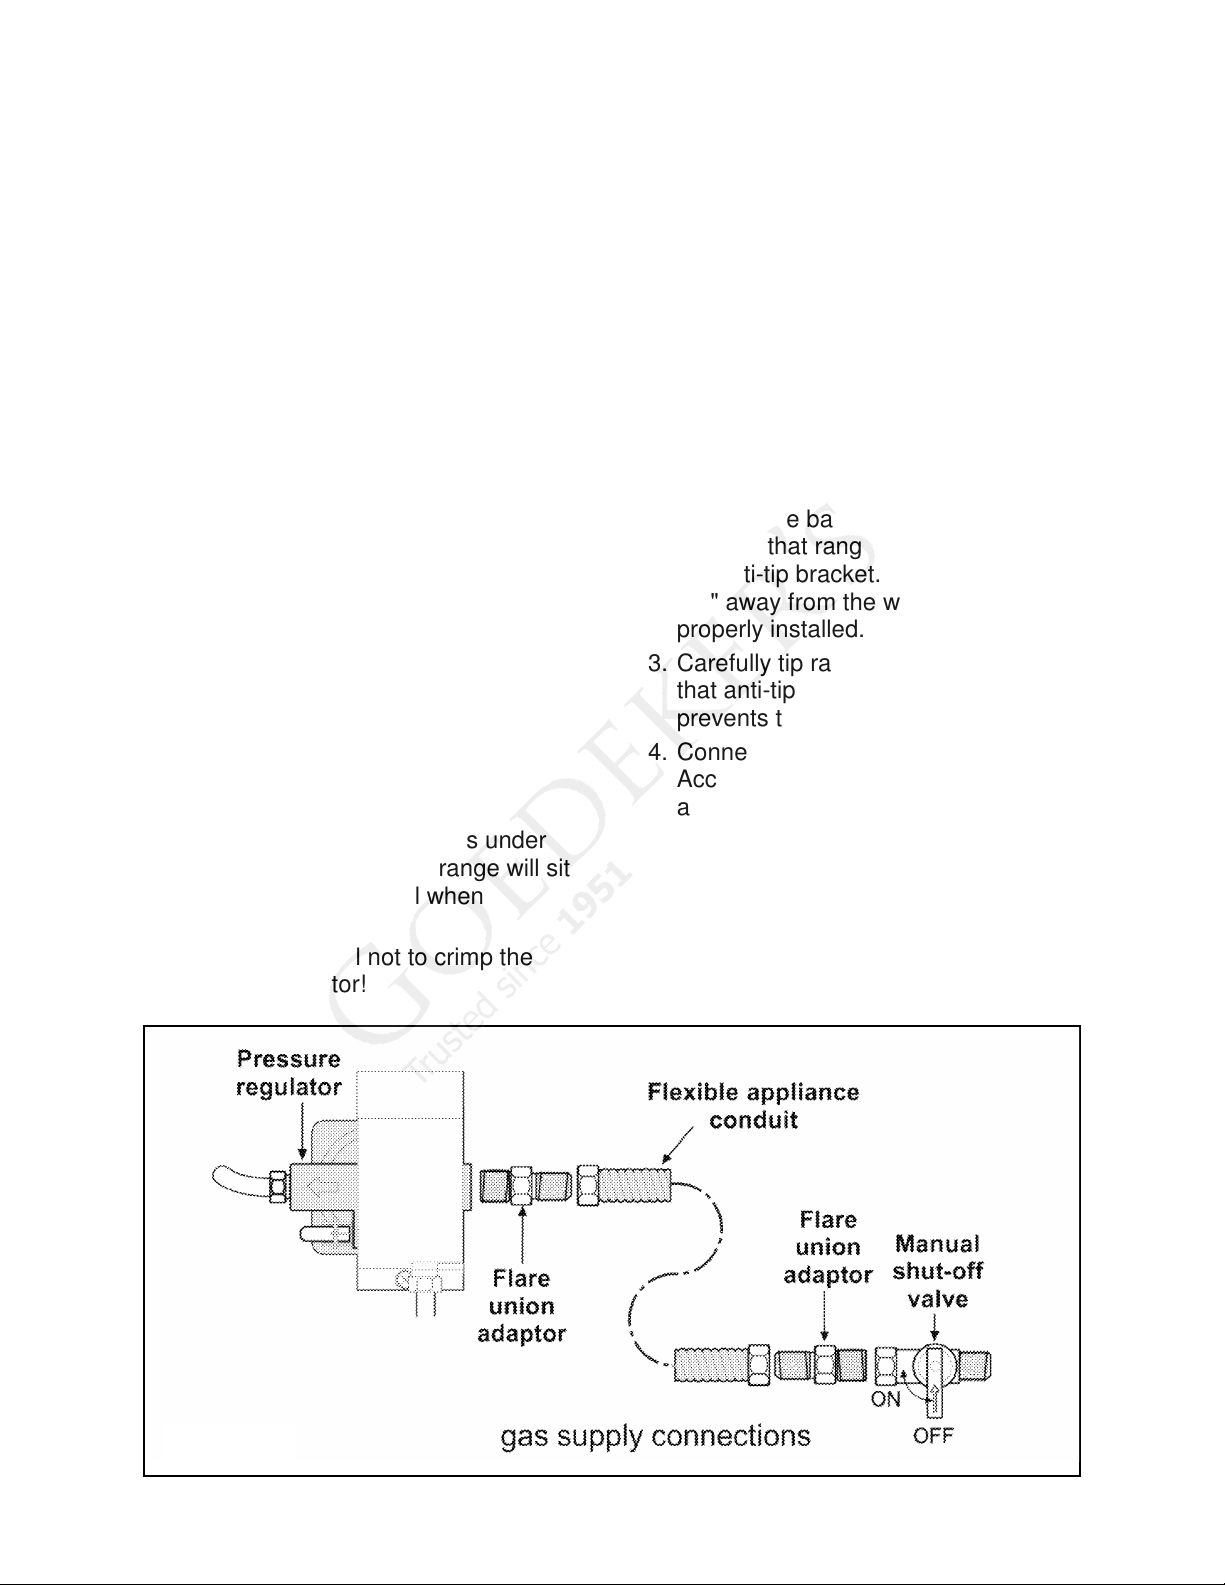
If not already present, install a gas shutoff valve in an easily accessible location.
Make sure all users know where and
how to shut off the gas supply to the
range.
NOTE: The installer should inform the
consumer of the location of the gas
shut-off valve.
Flexible Connector Method (see fig. 4)
1. Install a male 1/2" flare adaptor at the
1/2" NPT internal thread of the range
inlet. Use a backup wrench on the
elbow fitting to avoid damage.
2. Install a male 1/2" or 3/4" flare union
adaptor on the NPT internal thread of
the manual shut-off valve.
3. Connect the flexible metal appliance
connector.
4. Make sure circuit breaker is off and
then plug range cord into electrical
outlet.
5. Push range back into position
insuring that range leg slides under
the anti-tip bracket. The range will sit
3/4" away from the wall when
properly installed.
NOTE: Be careful not to crimp the
flexible connector!
Fig. 4
6. Carefully tip range forward to insure
that anti-tip bracket engages and
prevents tip-over.
Rigid Pipe Method (see fig. 4)
The configuration of the rigid pipe
connection will vary depending on the
location of the gas pipe stub. Refer to
fig. 4 for details.
1. Make sure circuit breaker is off and
then plug range cord into electrical
outlet.
2. Push range back into position
insuring that range leg slides under
the anti-tip bracket. The range will sit
3/4" away from the wall when
properly installed.
3. Carefully tip range forward to insure
that anti-tip bracket engages and
prevents tip-over.
4. Connect pipe to range at union.
Access the connection through the
access panel behind the warming
drawer.
NOTE: Be careful not to apply
pressure to warming drawer element
during rigid pipe installation.
15
Page 17
Test for Gas Leaks
Leak testing is to be conducted by the
installer according to the instructions
given in this section.
Turn on gas. Apply a non-corrosive
leak detection fluid to all joints and
fittings in the gas connection between
the shut-off valve and the range.
Include gas fittings and joints in the
range if connections may have been
disturbed during installation.
Bubbles appearing around fittings
and connections indicate a leak:
If a leak appears, turn off the supply line
gas shut-off valve and tighten
connections. Retest for leaks by turning
on the supply line gas shut-off valve.
When leak check is complete (no
bubbles appear), test is complete. Wipe
off all detection fluid residue.
CAUTION
Never check for leaks with a flame. Do
not continue to the next step until all
leaks are eliminated.
CAUTION
Before you plug in an electrical cord, be
sure all controls are in the OFF position.
Test Burner Function
1. Turn on power at breaker
If
your model has a display screen and it
flashes and beeps continuously, the
wiring is incorrectly installed. Verify that
wiring in house is correctly installed. If
not, call Service.
2. Test rangetop burners
Test Burner Ignition
burner knob. Push down and turn to the
flame symbol. The igniter/spark module
will produce a clicking sound. Once the
. Select a rangetop
air has been purged from the supply
lines, the burner should light within four
(4) seconds.
Test Flame: High Setting
. Turn burner
on to HI. See next page for appropriate
flame characteristics. If any of the
burners continue to burn mostly or
completely yellow, call Service.
Test Flame: Low Setting
. Turn burner
on to LO. Verify that the flame
completely surrounds the burner. There
should be a flame at each burner port
and there should be no air gap between
the flame and the burner. If any of the
burners do not carry over, call Service.
Test the ignition and flame of each
rangetop burner as described above.
When flame is properly adjusted:
There should be a flame at each range
top burner port.
There should be no air gap between the
flame and the burner port.
3. Test oven burners
Remove the oven bottom cover by
removing the two rear thumb screws
and sliding the cover forward and out.
Test Bake Burner Ignition
. Set the oven
to bake at 350°F. After 30-75 seconds,
the burner will ignite. The burner will
stay lit until the temperature reaches
350°F and will then shut off. From this
point forward, the burner will cycle on
and off to maintain the temperature.
Test Bake Burner Flame. While the
burner is lit, inspect the flame. See
proper flame characteristics on next
page. If the flame burns completely or
mostly yellow, adjust the bake burner air
shutter.
Test Broil Burner Ignition
. Set cooking
mode to Hi Broil. The burner will ignite
after 30-75 seconds.
16
Page 18
Test Broil Burner Flame. While the
burner is lit, inspect the flame. See
flame figures below for proper flame
characteristics. If the flame burns
completely or mostly yellow, adjust the
broil burner air shutter.
Replace oven bottom cover
. Slide cover
into place and replace two rear thumb
screws.
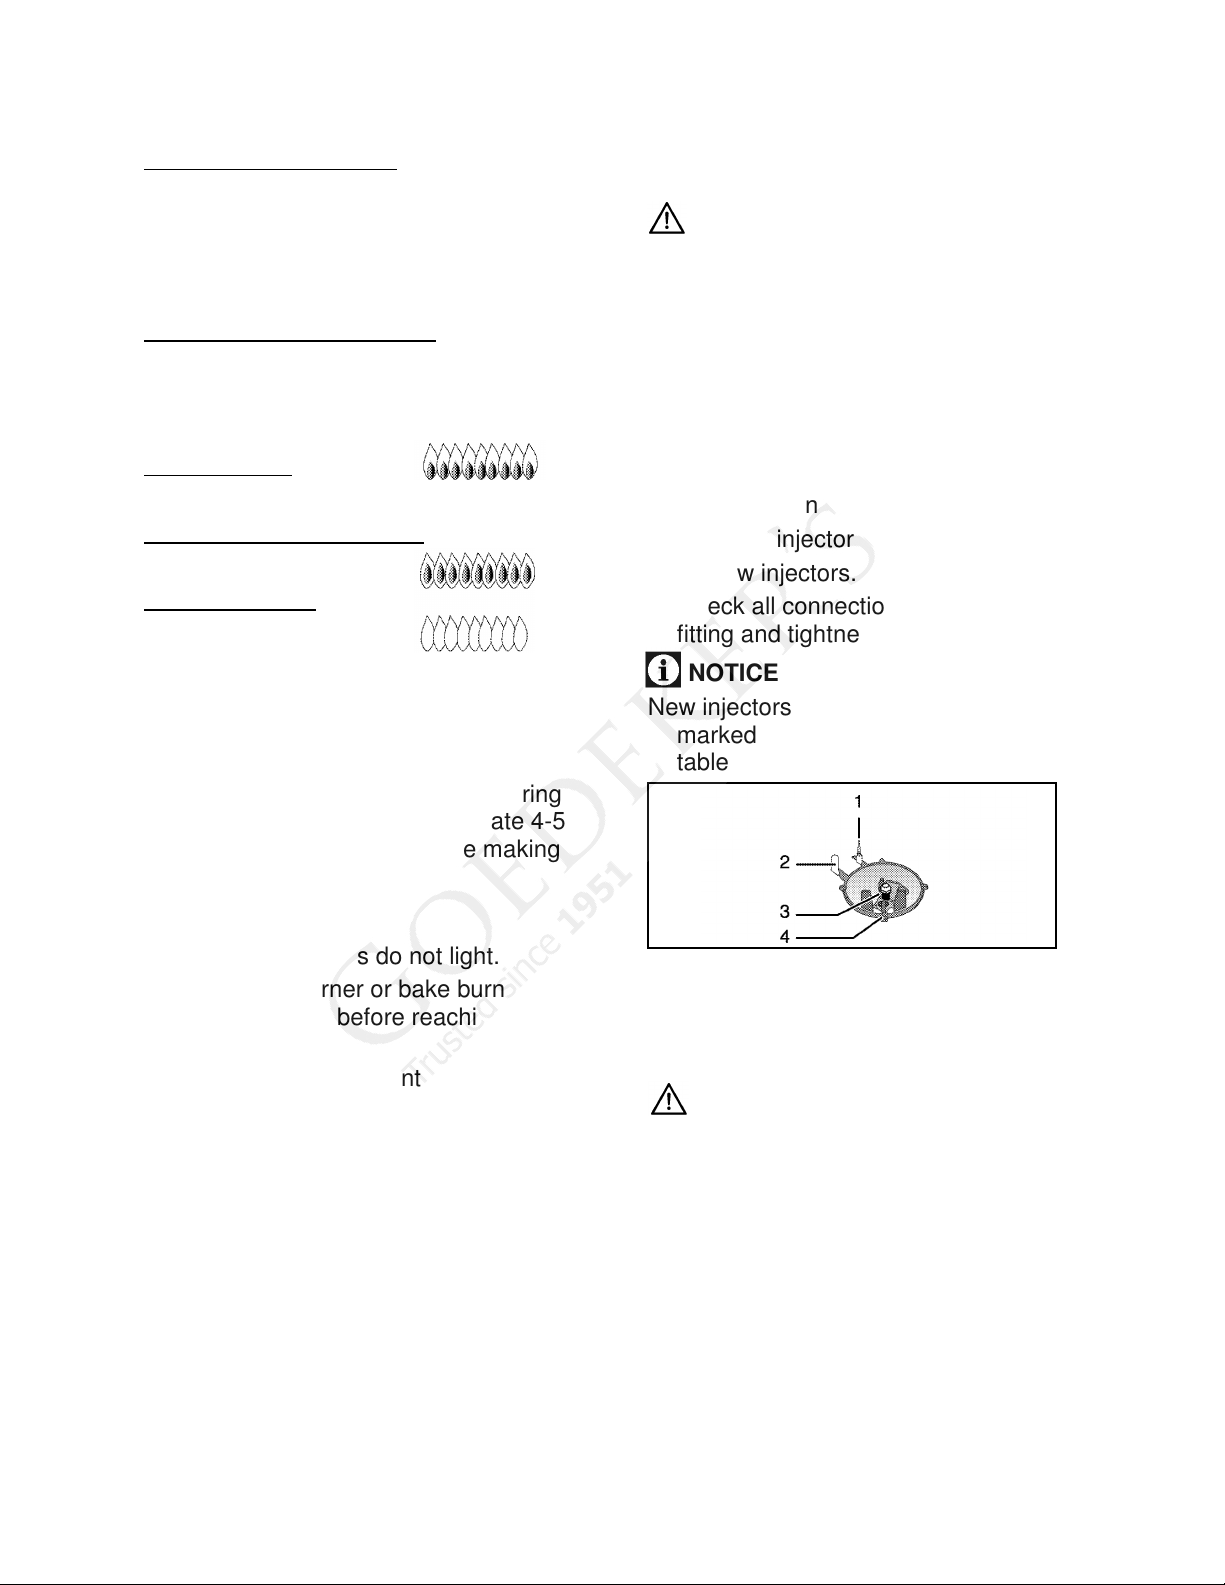
Flame Characteristics
Yellow flames:
Further adjustment is required.
Yellow tips on outer cones:
Normal for LP gas.
Soft blue flames:
Normal for natural gas.
packed with the orifices for gas
conversion.
CAUTION: Risk of explosion!
Be
fore starting any work on the gas
installation, please shut off the gas
supply.
In order to change your appliance's gas
type, change all injectors and make
flame adjustment for all valves at
reduced flow rate position.
Exchange injector for the burners
1. Take off burner cap and burner body.
2. Unscrew injectors.
3. Fit new injectors.
4. Check all connections for secure
fitting and tightness.
If the flame is completely or mostly
yellow, verify that the regulator is set for
the correct fuel. After adjustment,
retest.
Some yellow streaking is normal during
initial start-up. Allow unit to operate 4-5
minutes and re-evaluate before making
adjustments.
Call Service if:
1. Any of the burners do not light.
2. The broiler burner or bake burner
flame goes out before reaching
350°F.
3. Any of the burners continues to burn
yellow.
If flame adjustment is necessary,
continue to next page. Otherwise,
installation is complete at this point.
Gas Conversion
This appliance can be used with LP gas
d natural gas. It is shipped from the
an
factory adjusted for use with natural gas.
Conversion orifices are located in the
conversion kit. Follow the instructions
NOTICE
New injectors have their position
marked on their packing, or pressure
table on page 34 can be referred to.
1 Flame failure device
2 Spark plug
3 Injector
4 Burner
CAUTION:
Unless there is an abnormal condition,
do not attempt to remove the gas
burner taps. You must call an
authorized service agent if it is
necessary to change the taps.
Reduced gas flow rate setting for
range taps
1. Ignite the burner that is to be adjusted
and turn the knob to the reduced
position.
17
Page 19
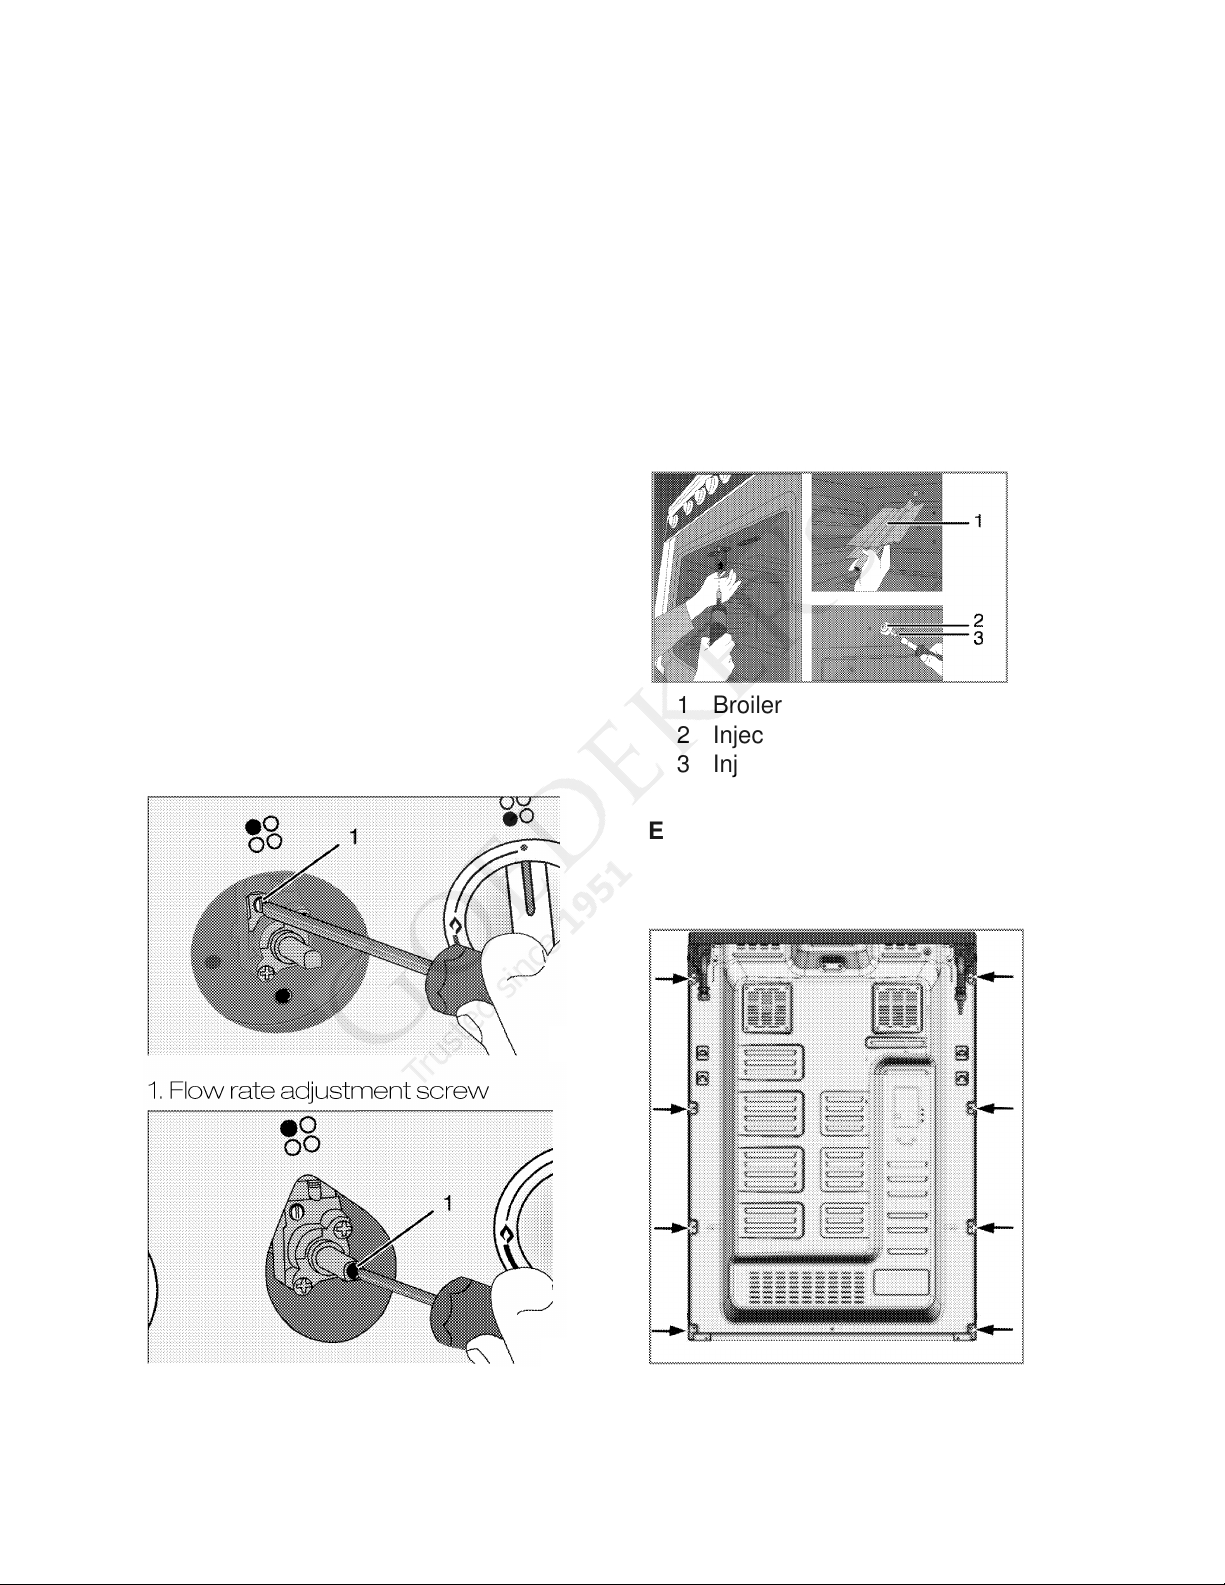
2. Remove the knob from the gas tap.
3. Use an appropriately sized
screwdriver to adjust the flow rate
adjustment screw.
For LPG (butane – propane), turn the
scr
ew clockwise.
For natural gas, turn the screw counterclockwise once.
NOTE: The normal height of a straight
flame in the reduced position is about
1/4 inch.
4. If the flame is higher than the desired
position, turn the screw clockwise. If
it is smaller, turn counter-clockwise.
5. For the last control, bring the burner
both to high-flame and reduced
positions and check whether the
flame is on or off.
Depending on the type of gas tap used
in your appliance, the adjustment screw
position may vary.
Exchange injector for the broiler
1. Open broiler door.
2. Unscrew fastening screw of the
burner.
3. Slightly pull the broiler burner (1) to
lift it free with its link(s) on the rear
side connected.
4. Unscrew injector by turning in
counter-clockwise direction (3).
5. Fit new injector.
1 Broiler burner
2 Injector holder
3 Injector
Exchange injector for the oven
1. Unscrew fastening screws on the
back wall.
18
Page 20
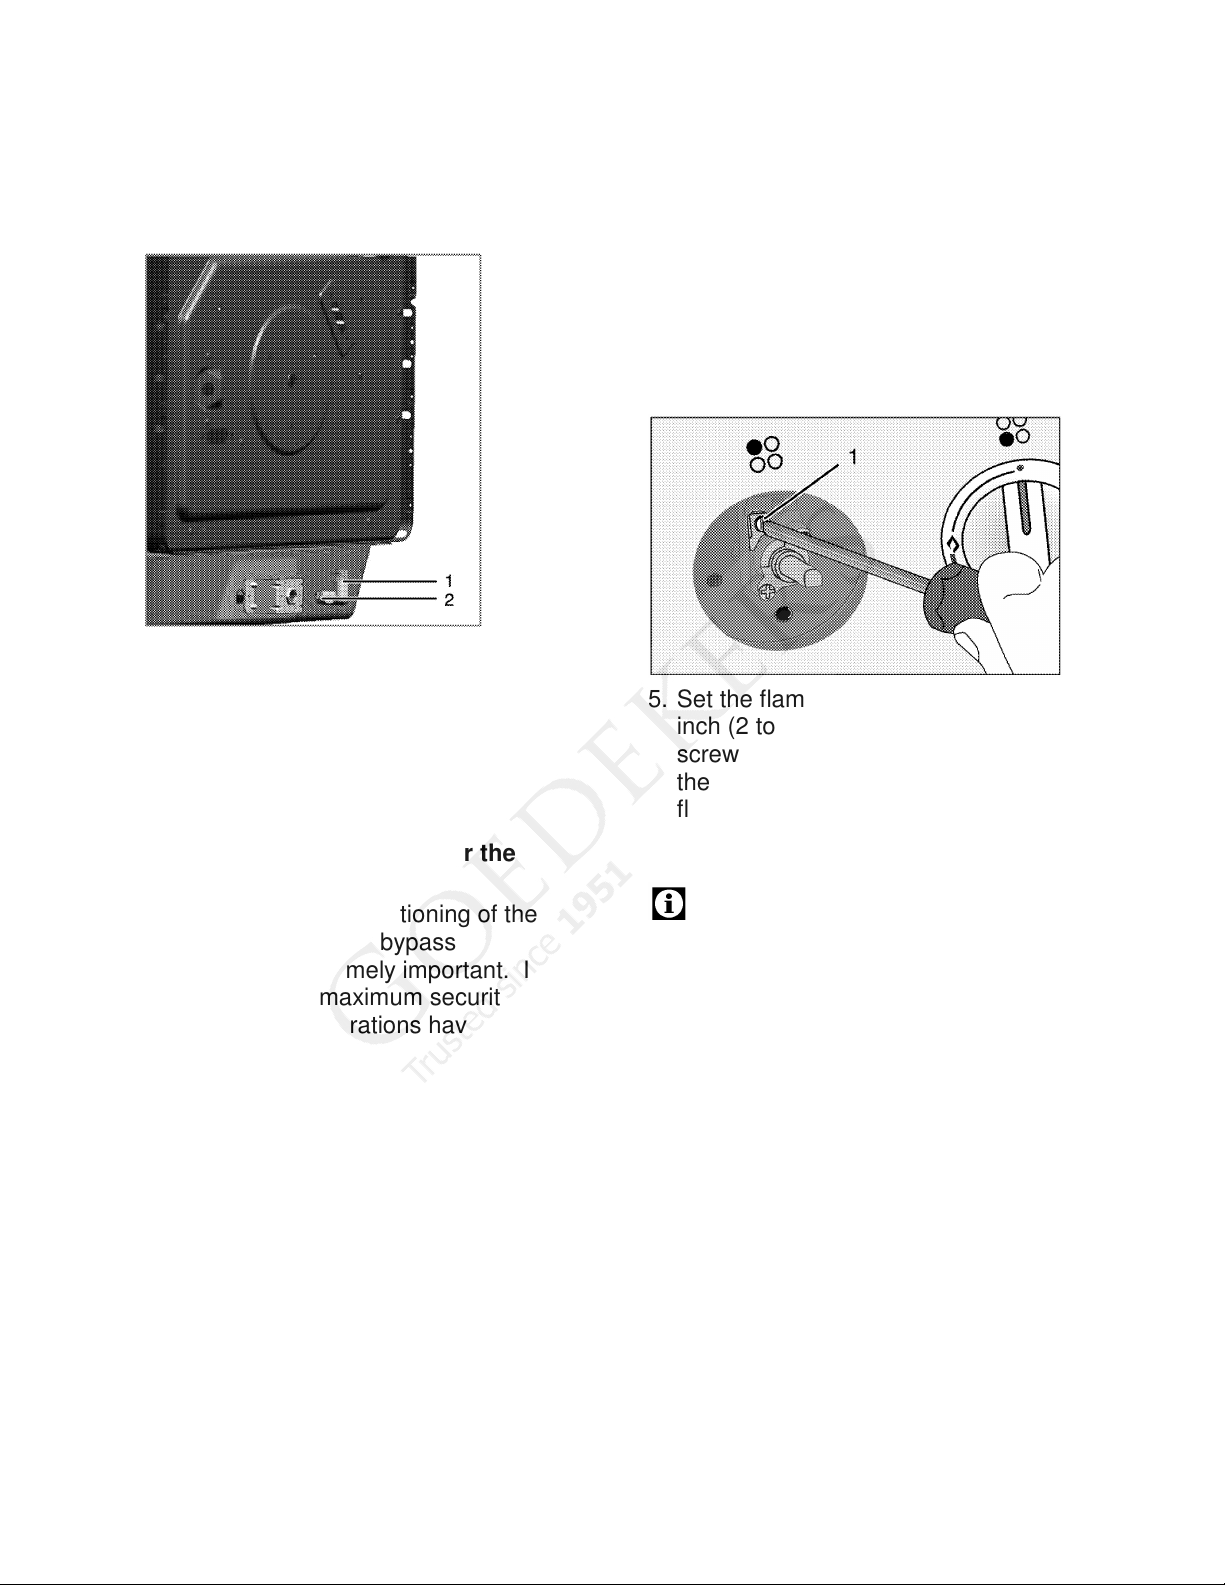
2. Unscrew the 2 screws (2) of the
injector holder (1).
3. Pull out the injector holder.
1 Injector holder
2 Screw
4. Unscrew injector by turning in
counter-clockwise direction.
5. Fit new injector.
Reduced flow adjustment for the
gas oven
For the appropriate functioning of the
oven, re-checking the bypass
adjustment is extremely important. In
order to provide maximum security to
the user, these operations have to be
performed with care.
1. Ignite the burner that is to be adjusted
and turn the knob to the high flame
position.
2. Close the oven door and wait for 10
to 15 minutes until the oven becomes
ready for adjustment.
3. Take out the knob.
4. After 15 minutes, adjust the oven to
the lowest flame position.
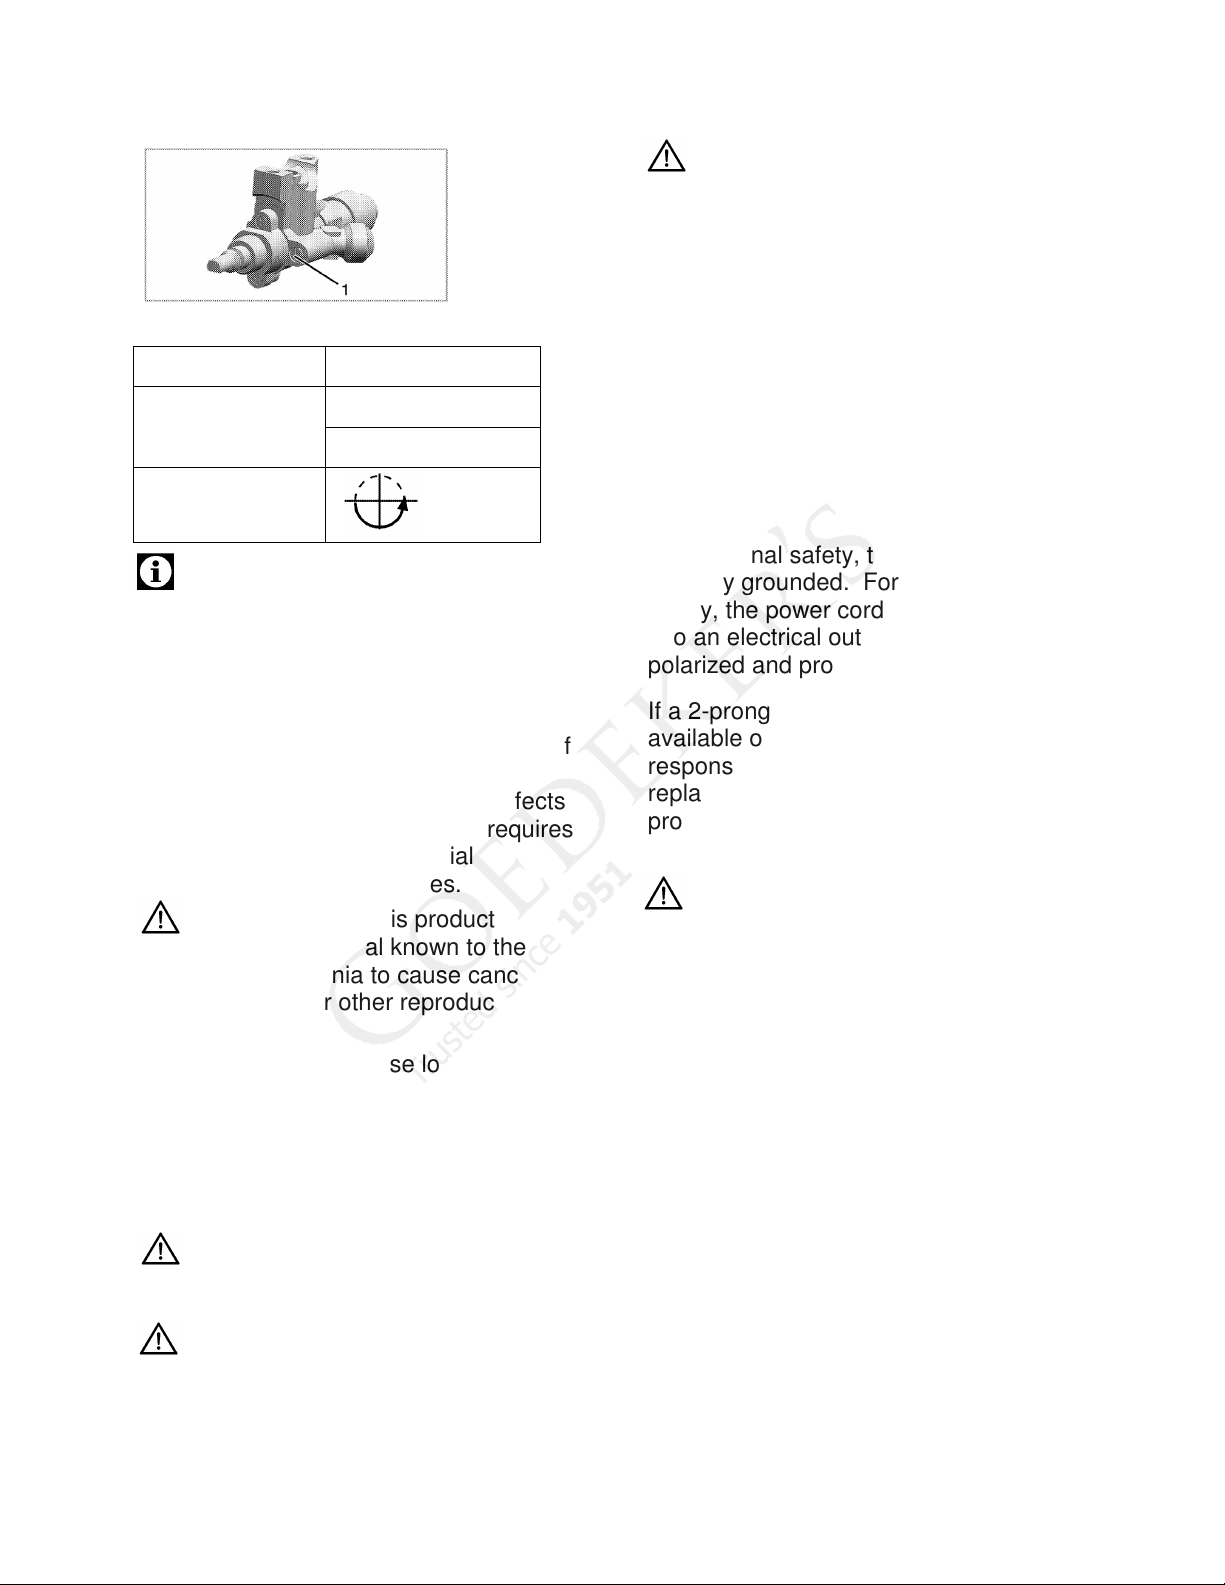
5. Set the flame length to about 1/10
inch (2 to 3 mm) by means of the
screw (1) on the oven tap. Turning
the screw clockwise reduces the
flame, while turning it counterclockwise increases the flame.
CAUTION:
If the temperature of the oven
increases more than intended, turn
off the oven and call the authorized
service center to have the oven
thermostat repaired.
19
Page 21
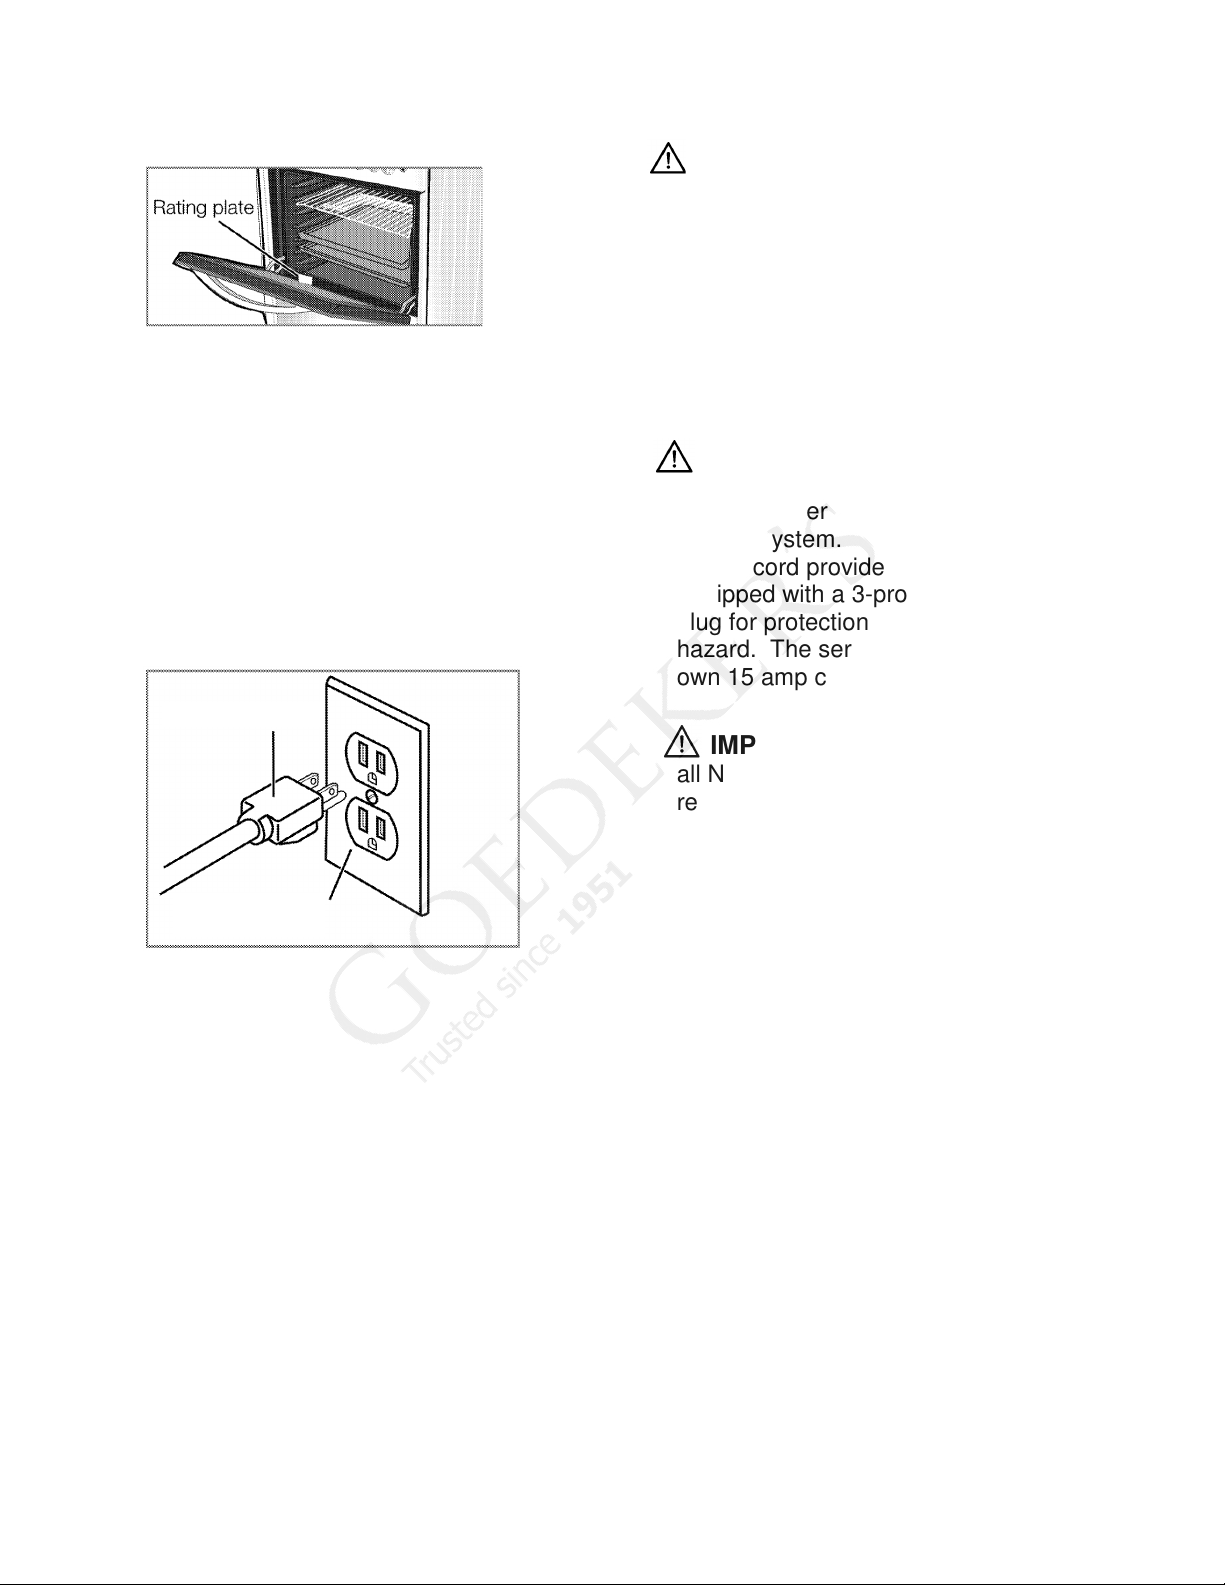
Butane/propane
screw
CAUTION:
If the gas type of the unit is changed,
then the rating plate showing the gas
type must also be changed.
The California Safe Drinking Water and
Toxic Enforcement Act requires the
Governor of California to publish a list of
substances known to the State of
California to cause cancer, birth defects
or other reproductive harm, and requires
businesses to warn of potential
exposure to such substances.
IMPORTANT: This product
ntains a chemical known to the
co
State of California to cause cancer,
birth defects or other reproductive
harm.
This appliance can cause low-level
exposure to some of the substances
listed, including benzene, formaldehyde,
carbon monoxide and toluene.
Natural gas
Loosen the screw Tighten the
1/2 round
Connection to the Power Supply
IMPORTANT: Electrical installation
should comply with national and local
codes.
WARNING: Avoid fire hazard or
el
ectrical shock. Do not use an adaptor
plug, an extension cord, or remove
grounding prong from electrical power
cord. Failure to follow this warning can
cause serious injury, fire or death.
This appliance is equipped with a 3prong grounding plug for your protection
against shock hazard and should be
plugged directly into a properly
grounded receptacle. DO NOT cut or
remove the grounding prong from this
plug.
For personal safety, the range must be
properly grounded. For maximum
safety, the power cord must be plugged
into an electrical outlet that is correctly
polarized and properly grounded.
If a 2-prong wall receptacle is the only
available outlet, it is the personal
responsibility of the consumer to have it
replaced with a properly grounded 3prong wall receptacle installed by a
qualified electrician.
WARNING: Do not ground to a
s pipe.
ga
Our company shall not be held
responsible for any damage caused by
using the appliance without a grounded
receptacle.
The wiring diagram covering the control
circuit is located inside the lower panel,
below the oven door panels.
The power supply data must correspond
to the data specified on the rating plate
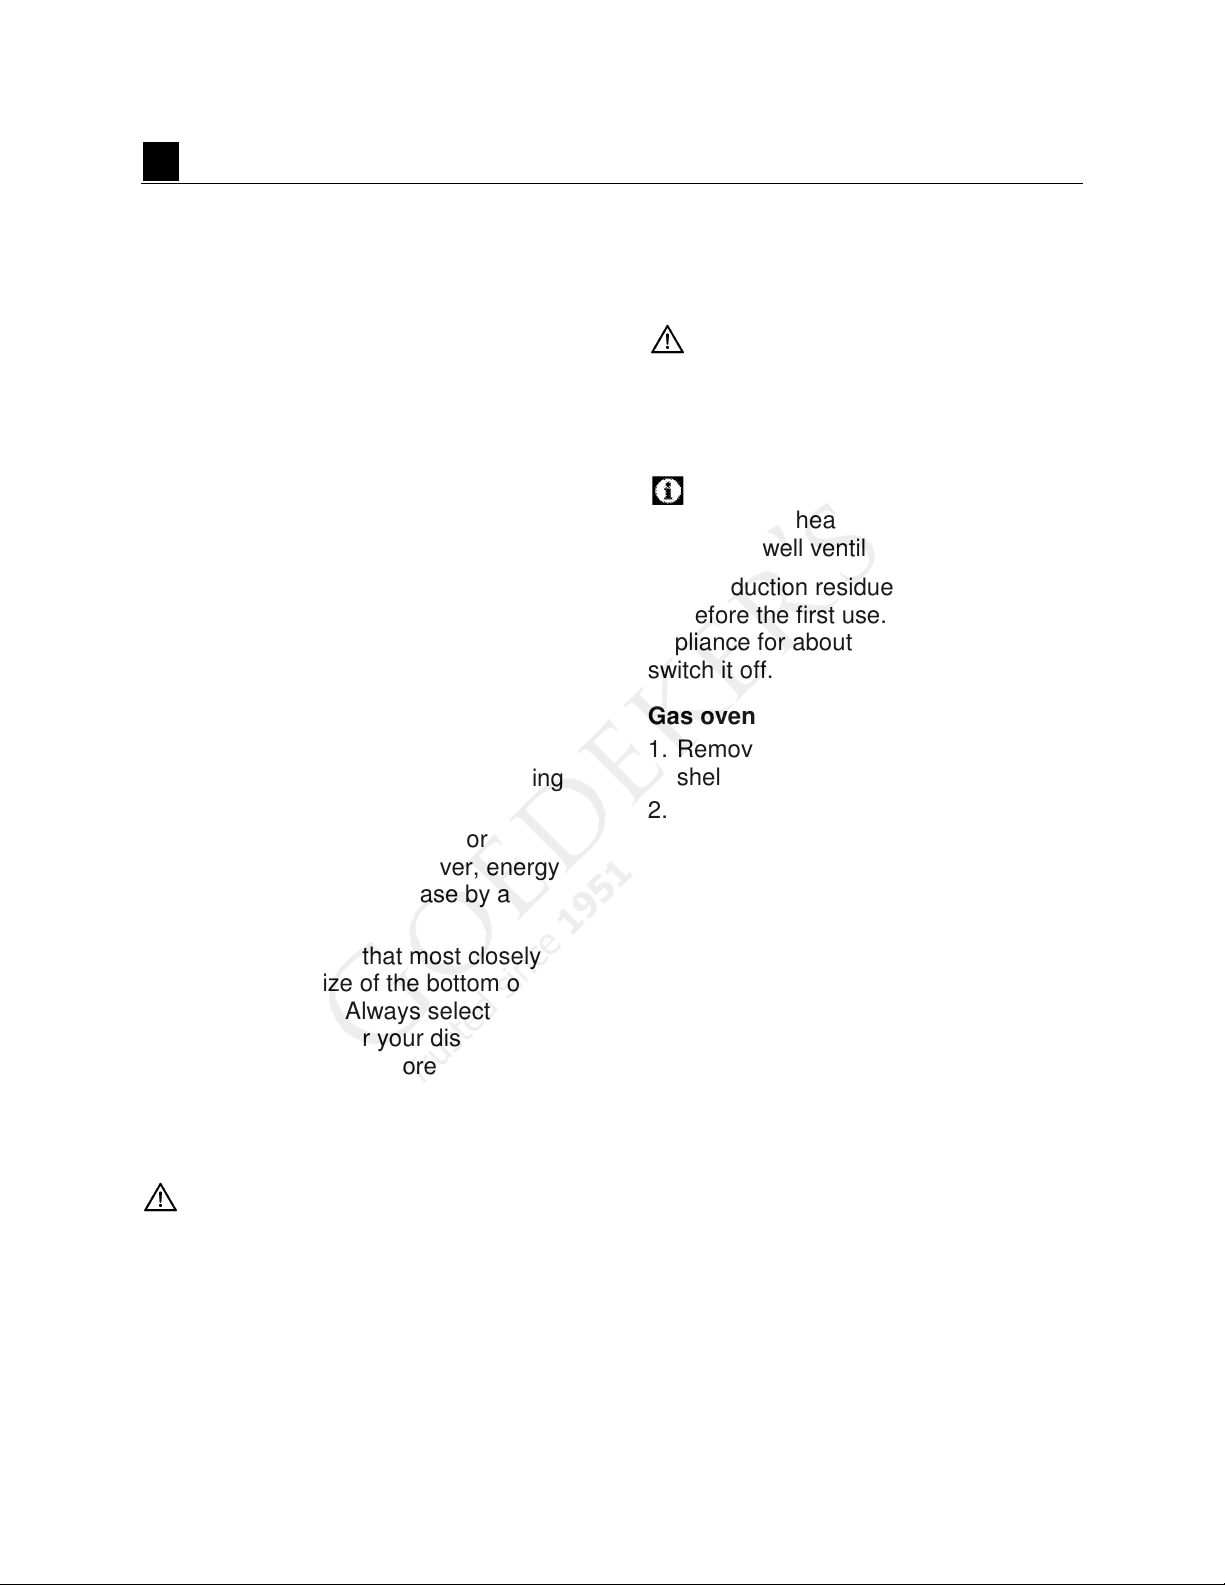
of the appliance. The rating plate is
seen when either the door or the lower
cover is opened.
IMPORTANT: This appliance must
grounded!
be
20
Page 22
Grounding
-
type
The range is equipped with a 3-prong
ground plug. To minimize possible
shock hazard, the cord must be plugged
into a mating 3-prong ground-type
outlet, grounded to conform with the
National Electrical Code, ANSI/NFPA 70
latest edition, or Canadian Electrical
Code (CSA) and all local codes and
ordinances. Refer to the illustration
below.
Grounding plug
electrical outlet
DANGER: Risk of electric shock,
shor
t circuit or fire by damage to the
main power supply!
The main power supply lead must not
be clamped, bent or trapped or come
into contact with hot parts of the
appliance.
If the main power supply is damaged, it
must be replaced by a qualified
electrician.
IMPORTANT: This gas range
quires a 110/120VAC electrical
re
supply to operate the electronic
ignition system. The 6' (1.8 m) power
supply cord provided with the range is
equipped with a 3-prong, grounded
plug for protection against shock
hazard. The service should have its
own 15 amp circuit breaker.
IMPORTANT: You must follow
all National Electrical Code and gas
regulations.
In addition, be aware of local codes
and ordinances when installing your
services.
• To align the appliance with the
rktop, adjust the feet by turning
wo
right or left as required.
21
Page 23
3 Preparation
Tips for Saving Energy
The following information will help you to
use your appliance in an ecological
way and to save energy:
• Use dark-colored or enamel-coated
okware in the oven since the heat
co
transmission will be better.
• Before cooking, preheat the oven if it
is advised in the recipe.
• Do not open the door of the oven
frequently during cooking.
• Try to cook more than one dish in the
oven at the same time whenever
possible. You can cook by placing
two cooking vessels onto the wire
grill.
• Cook more than one dish one after
another. The oven will already be
hot.
• Defrost frozen dishes before cooking
them.
• Use pots/pans with covers for
oking. If there is no cover, energy
co
consumption may increase by a
factor of 4.
• Select the burner that most closely
matches the size of the bottom of the
pot to be used. Always select the
correct pot size for your dishes.
Larger pots require more energy.
Initial Operation
First cleaning of the appliance
IMPORTANT: The surface may be
damaged by some detergents and
cleaning materials.
Remove all packaging materials.
Wipe the surfaces of the appliance with
a damp cloth or sponge and then with a
clean, dry cloth.
Initial Heating
WA
RNING: Hot surfaces may
use burns!
ca
Do not touch the hot surfaces of the
appliance. Use oven gloves. Keep
children away from the appliance.
Smoke and odors may be emitted
during first heating. Ensure that the
room is well ventilated.
Any production residue must be burnt
off before the first use. Heat up the
appliance for about 30 minutes and then
switch it off.
Gas oven
1. Remove baking trays and wire
shelves from the oven.
2. Close the oven door.
3. Select the highest setting of the gas
oven. See How to Use the Gas
Oven, page 26.
Heat for approximately 30 minutes.
4.
5. Switch off the oven. See How to Use
the Gas Oven, page 26.
Broiler
1. Remove baking trays and wire
shelves from the oven.
2. Close the oven door.
3. Select the highest setting of the
broiler. See How to Operate the
Broiler, page 27.
4. Heat for approximately 30 minutes.
5. Switch off the broiler. See How to
Operate the Broiler, page 27.
22
Page 24
4 How to use the gas burners
General Information about Cooking
WARNING: Risk of fire from
overheated oil!
When you are heating oil, do not leave it
unattended.
Never try to extinguish the fire with
water! When oil has caught fire,
immediately cover the pot or pan with
a lid. Switch off the burner if safe to
do so and phone the Fire
Department.
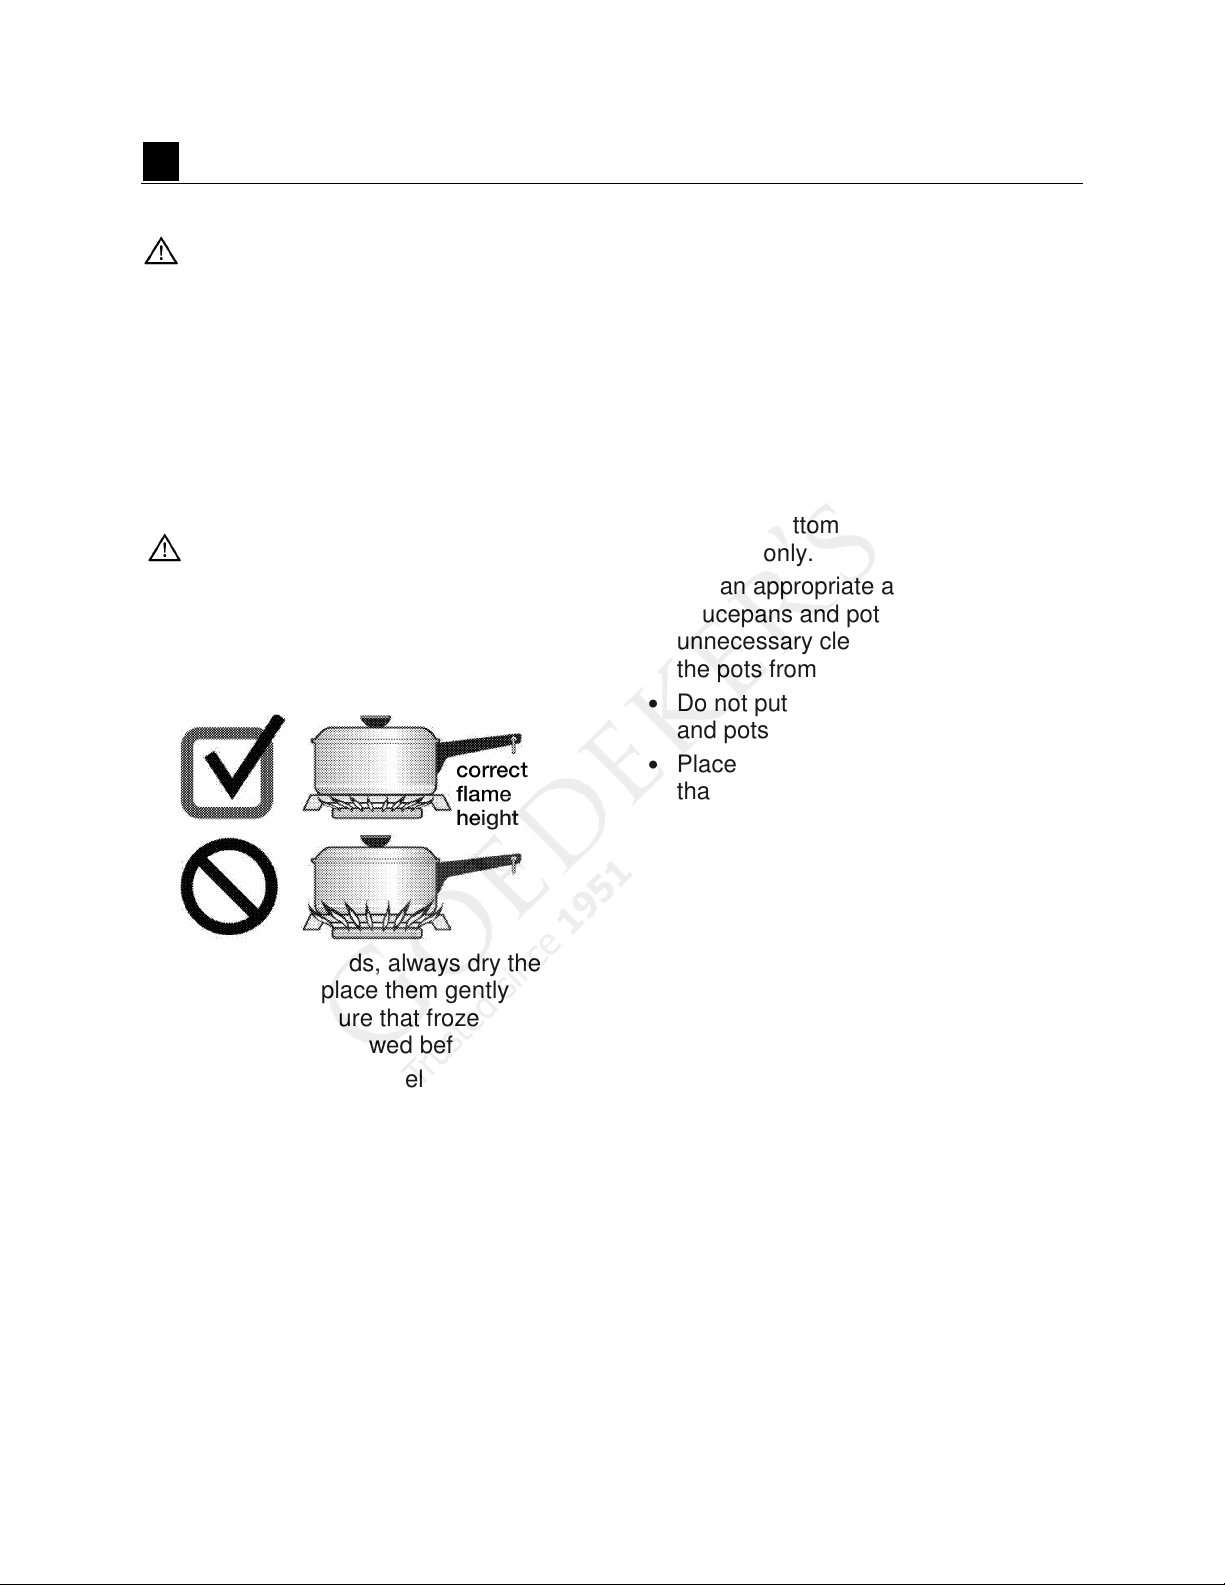
CAUTION: Never allow the flame
extend beyond the outer edge of
to
the cooking utensil. A higher flame
wastes energy and increases your
risk of being burned by the flame.
• Before frying foods, always dry them
ll and then place them gently into
we
the hot oil. Ensure that frozen foods
are completely thawed before frying.
• Do not cover the vessel you are using
to heat oil.
• Do not place empty vessels and
sa
ucepans on burners that are
switched on. They could become
damaged.
• Operating a burner without a vessel
or saucepan on it will cause damage
to the appliance. Turn off the burners
after cooking is complete.
• As the surface of the appliance can
hot, do not put plastic or aluminum
be
vessels on it.
• Use flat-bottomed saucepans or
vessels only.
• Put an appropriate amount of food in
saucepans and pots. This will avoid
unnecessary cleaning by preventing
the pots from overflowing.
• Do not put the covers of saucepans
and pots onto cooking surfaces.
• Place the saucepan in a manner so
that it is centered on the burner.
When you want to move the
saucepan onto another burner, lift
and place it onto the burner you want
instead of sliding it.
Gas Cooking
The size of the vessel and the flame
st match each other. Adjust the gas
mu
flame so that it will not extend beyond
the bottom of the vessel and center the
vessel over the burner.
23
Page 25
Using the burners
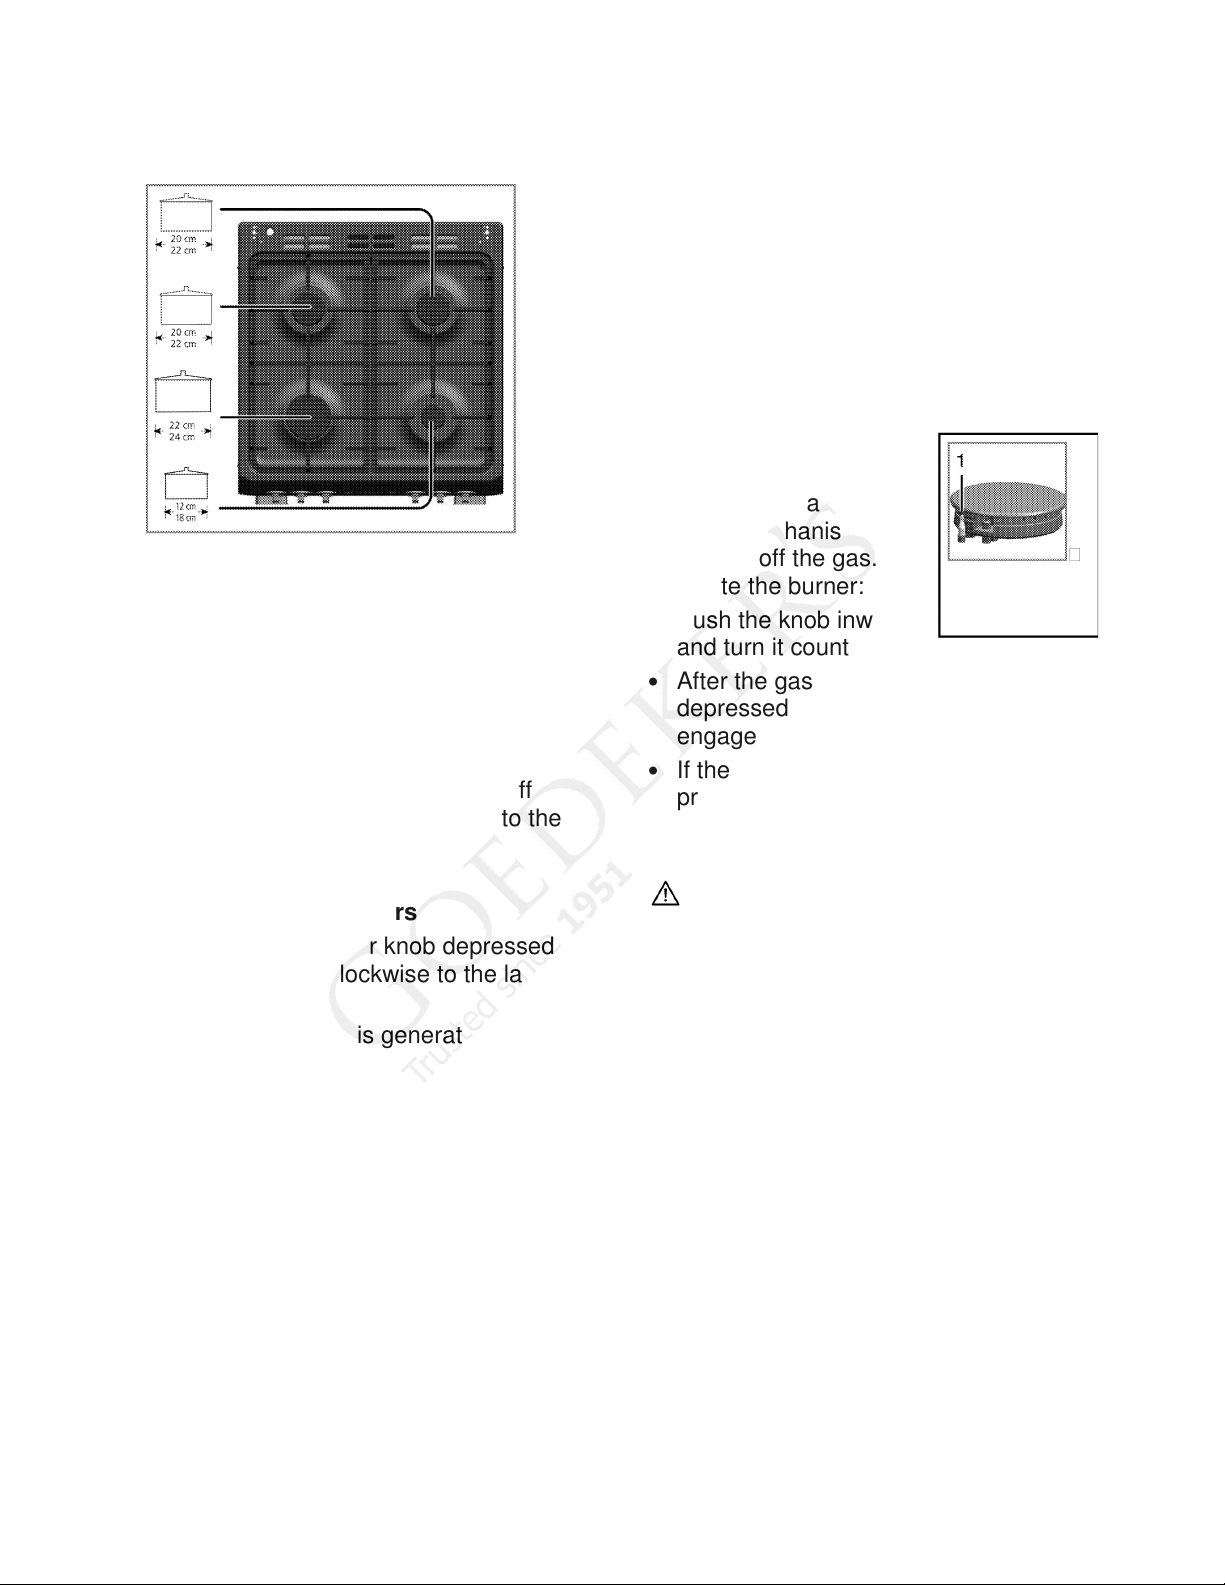
List of advised pot diameters to be used
on related burners:
Normal burner: 18-20 cm (7 - 8")
Rapid burner: 22-24 cm (8½ - 9½")
Auxiliary burner: 12-18 cm (4¾ - 7")
Normal burner: 18-20 cm (7 - 8")
The large flame symbol indicates the
highest cooking power. In turned-off
position (top), gas is not supplied to the
burners.
Igniting the gas burners
1. Keeping the burner knob depressed,
turn it counter-clockwise to the large
flame symbol.
2. An ignition spark is generated and the
gas is ignited.
3. Adjust the flame to the desired
cooking power.
4. If there is no electricity, ignite the gas
with the gas lighter.
Turning off a gas burner
Turn the knob to Off (top) position.
Gas shut-off safety system
As a counter-measure
against blow-out due to
fluid overflows at burners,
a safety mechanism trips
and shuts off the gas. To
re-ignite the burner:
• Push the knob inward
d turn it counter-clockwise to ignite.
an
• After the gas ignites, keep the knob
1 Gas shut-off
safety device
depressed for 3-5 seconds more to
engage the safety system.
• If the gas does not ignite after you
press and release the knob, repeat
the procedure but keep the knob
depressed for 15 seconds.
CAUTION! Risk of explosion in the
esence of unburned gas!
pr
• Do not press the knob for longer than
15 seconds if there was no ignition.
• Wait for one minute and then repeat
the ignition process.
24
Page 26
5 How to operate the oven
General Information on Baking,
Roasting and Broiling
DANGER: Risk of scalding by hot
steam!
Stand away from the oven when
opening the oven door. Hot air or steam
which escapes can cause burns to
hands, face and/or eyes.
Let hot air or steam escape before
removing or replacing food.
Tips for baking
• Use appropriate non-stick coated
tal sheets or aluminum containers
me
or heat-resistant silicone molds.
• Make the best use of the space on
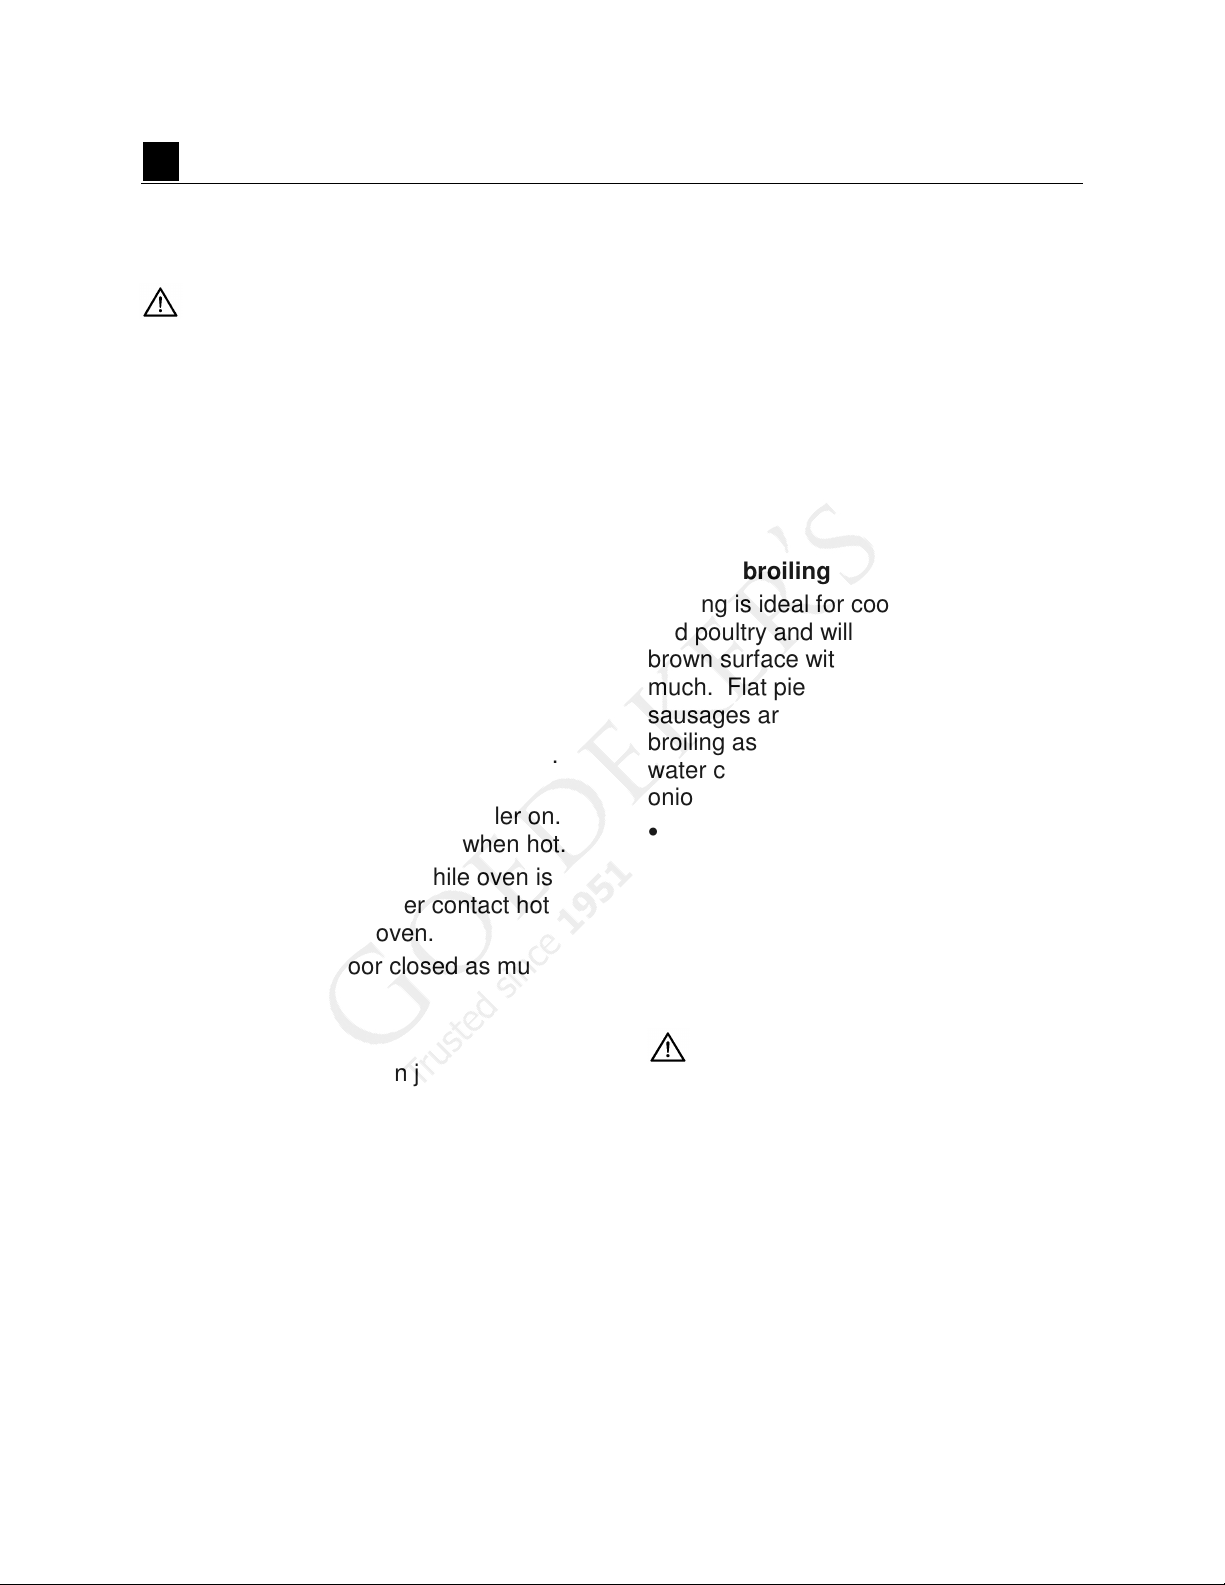
the rack. We recommend placing the
baking pan in the middle of the rack.
• Select the correct shelf position
before turning the oven or broiler on.
Do not move oven shelves when hot.
• If rack must be moved while oven is
t, do not let potholder contact hot
ho
heating element in oven.
• Keep the oven door closed as much
as possible.
Tips for roasting
• Seasoning with lemon juice and black
pepper will improve the cooking
performance when roasting a whole
chicken, turkey or any large piece of
meat.
• Meat with bones takes about 15 to 30
minutes longer before it is cooked
than a roast of the same size without
bones.
• You should calculate about 10 to 12
mi
nutes cooking time per inch
thickness of meat.
• Let meat rest in the oven for about 10
nutes after the cooking time. The
mi
juice is better distributed all over the
roast and does not run out when the
meat is cut.
• Fish in a heat-resistant dish should
be placed on the middle or lower
rack.
Tips for broiling
Broiling is ideal for cooking meat, fish
and poultry and will achieve a nice
brown surface without it drying out too
much. Flat pieces, meat skewers and
sausages are particularly suited for
broiling as are vegetables with a high
water content such as tomatoes and
onions.
• Distribute the pieces to be broiled on
e wire rack.
th
• If the broiling is done on the wire
rack, place a drip pan under it to
collect the fat.
• Add some water to the drip pan for
easier cleaning.
DANGER: Danger of fire due to
food that is unsuitable for broiling!
Only broil food that is suitable for the
intensive heat of broiling.
Do not place the food too far back in the
broiler. This is the hottest area and fatty
food may catch fire.
25
Page 27
How to Use the Gas Oven
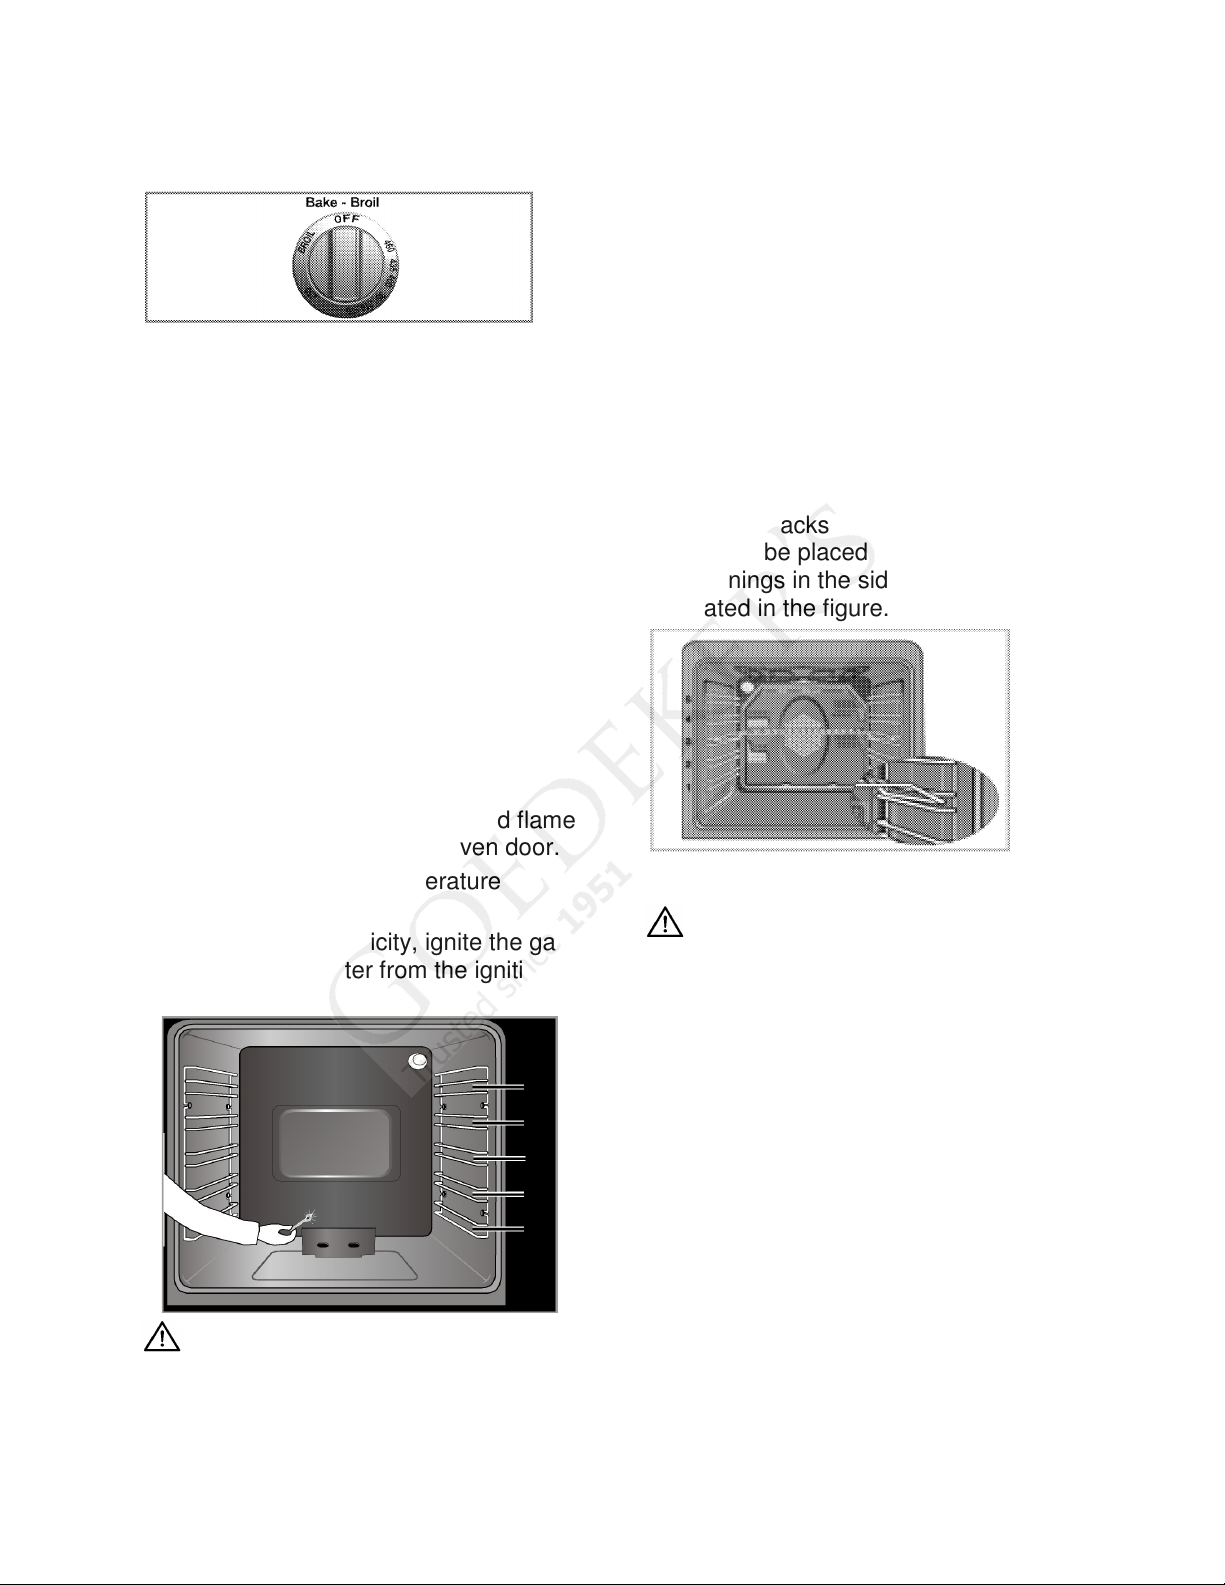
The gas oven is operated by the oven
control knob. In the Off position (top),
the gas supply is locked.
Switch on the gas oven
The gas oven is automatically ignited by
means of the gas oven control knob.
1. Open oven door.
2. Keeping the oven control knob
pressed, turn it counter-clockwise.
An ignition spark is generated and the
gas is ignited.
3. Keep the oven control knob
depressed for another 3 to 5
seconds.
4. Be sure the gas has ignited and flame
is present, then close the oven door.
5. Select the desired temperature
setting.
6. If there is no electricity, ignite the gas
with the gas lighter from the ignition
control hole.
DANGER: Risk of explosion by
that is not ignited!
gas
The control knob should not be operated
for more that 15 seconds. If after 15
Oven
control
knob
seconds, the oven has not lit, stop
operating the device and open the
compartment door. Wait at least 1
minute before attempting a further
ignition of the burner.
Switch the gas oven off
At the end of cooking time, turn the oven
control knob to the Off position (top).
Shelf positions
It is important to position the wire shelf
on the side racks correctly. The wire
shelf must be placed so that it will fit into
the openings in the side racks as
illustrated in the figure.
Baking and Roasting
IMPORTANT: Ma
oven tray is 8.8 lbs (4 kg).
Tips for baking cakes
1. If the cake is too dry: next time,
increase the temperature by 50F° and
reduce the cooking time.
2. If the cake falls: next time, use less
liquid or lower the temperature by
50F°.
3. If the cake is too dark on top: next
time, place it on a lower rack, lower
the temperature and increase the
cooking time.
4. If the cake is done on the inside but
sticky on the outside: next time, use
less liquid, lower the temperature and
increase the cooking time.
ximum load for the
26
Page 28
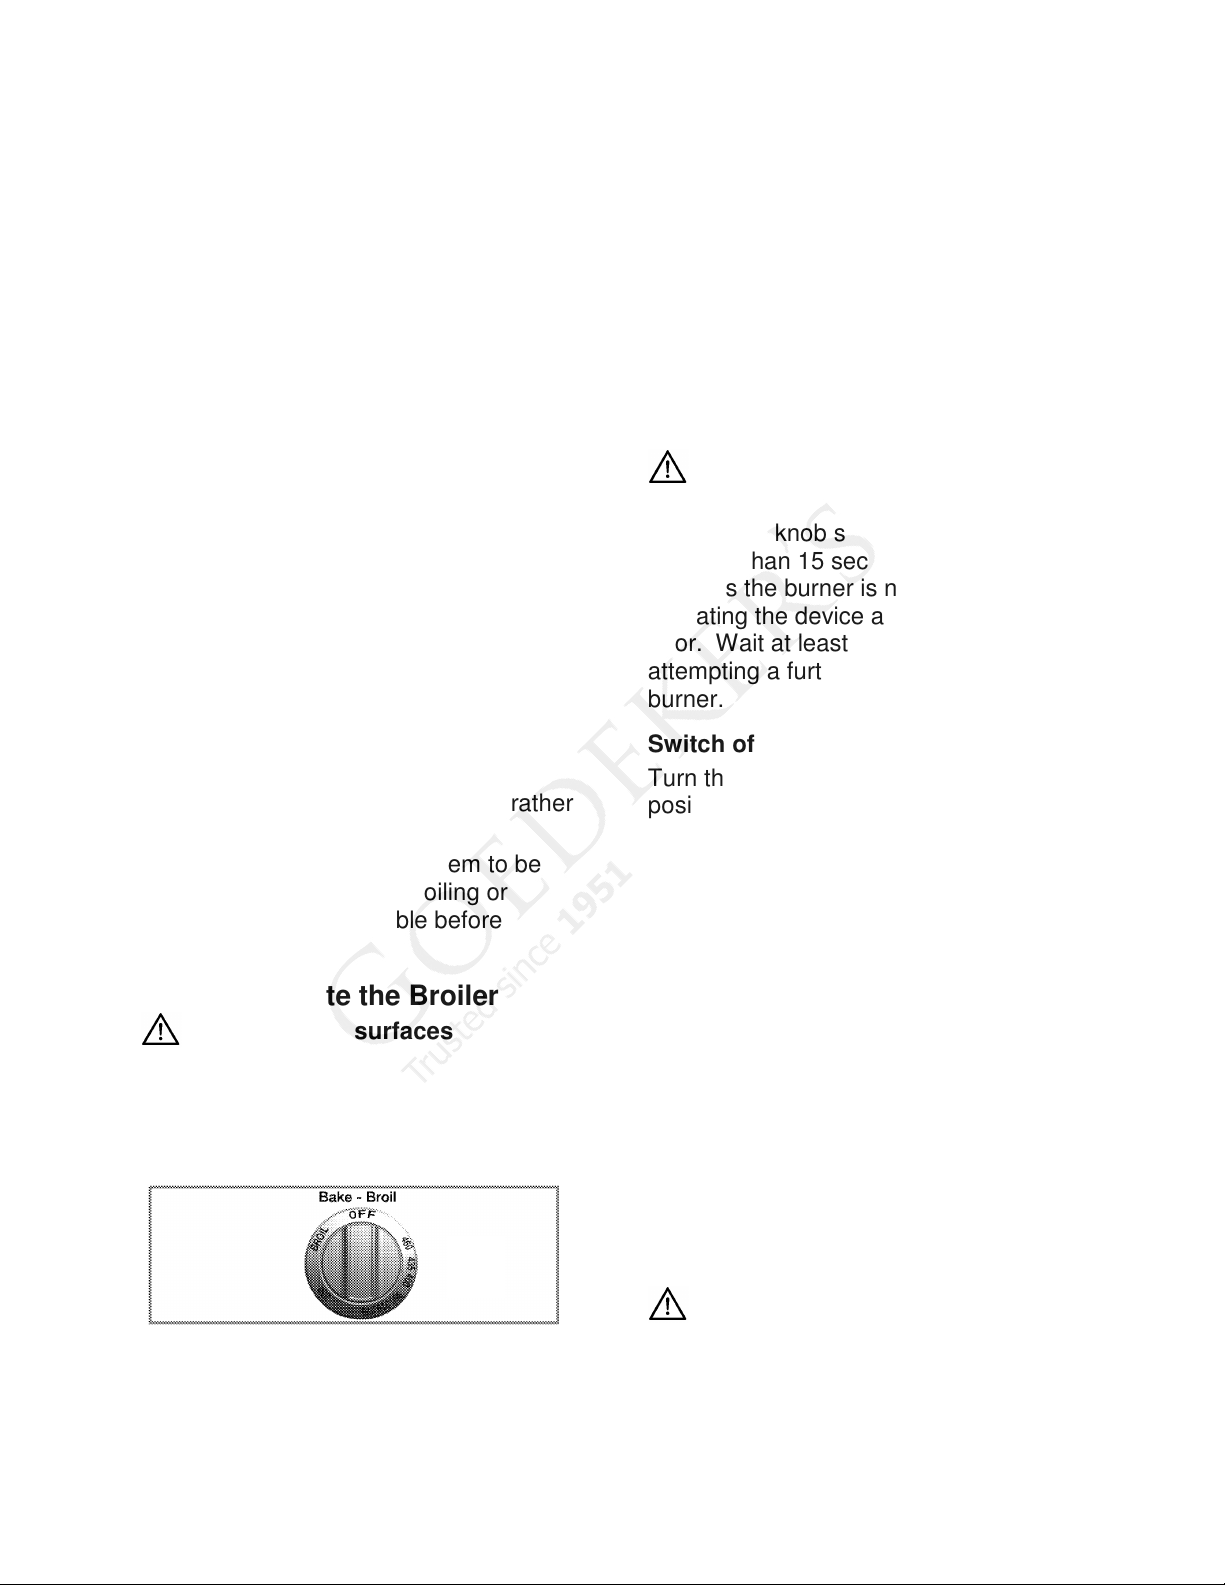
Tips for baking pastry
1. If the pastry is too dry: next time,
a. Increase temperature some 50F°
and decrease the cooking time;
b. Dampen the layers of dough with a
mixture made of milk, oil, egg and
yogurt.
2. If the pastry takes too long to bake,
make sure the thickness of the pastry
you have prepared does not exceed
the depth of the baking tray.
3. If the upper side of the pastry gets
browned but the lower part is not
cooked,
a. Make sure you have not used too
much moistening liquid at the
bottom of the pastry;
b. Try placing the pastry on a lower
shelf next time.
Switch on broiler
1. Open the oven door.
2. Keeping the oven control knob
depressed, turn it clockwise to the
Broil symbol. An ignition spark is
generated and the gas is ignited.
3. Keep the knob depressed for 3-5
seconds more.
4. Be sure ignition has occurred and
flame is present.
DANGER: Risk of explosion by
ga
s that is not ignited!
The control knob should not be operated
for more than 15 seconds. If after 15
seconds the burner is not lit, stop
operating the device and open the oven
door. Wait at least 1 minute before
attempting a further ignition of the
burner.
Tips for cooking vegetables
1. If the vegetables get too dry, try
cooking them in a covered dish rather
than a tray.
2. If a vegetable does not seem to be
getting cooked, try parboiling or
steaming that vegetable before
baking.
How to Operate the Broiler
CAUTION: Hot
cause burns!
The broiler is operated by the oven
control knob. When it is in the Off
position (top), the gas supply is locked.
During broiling, the oven door should
remain partly open.
surfaces can
Oven
control
knob
Switch off the broiler
Turn the oven control knob to the Off
position (top).
Shelf positions
For optimum broiler coverage, position
the wire shelf toward the front of the
oven, just out of contact with the glass
door. Placing the wire shelf fully to the
rear of the oven will reduce broiler
coverage.
• Put small or medium-sized portions in
e correct shelf position under the
th
broiler heater for broiling.
Do not use upper level for broiling.
For models with a cooling fan
The cooling fan cools the front of the
oven.
NOTICE: The cooling fan continues
to operate for 20 to 30 minutes after the
oven is switched off.
27
Page 29
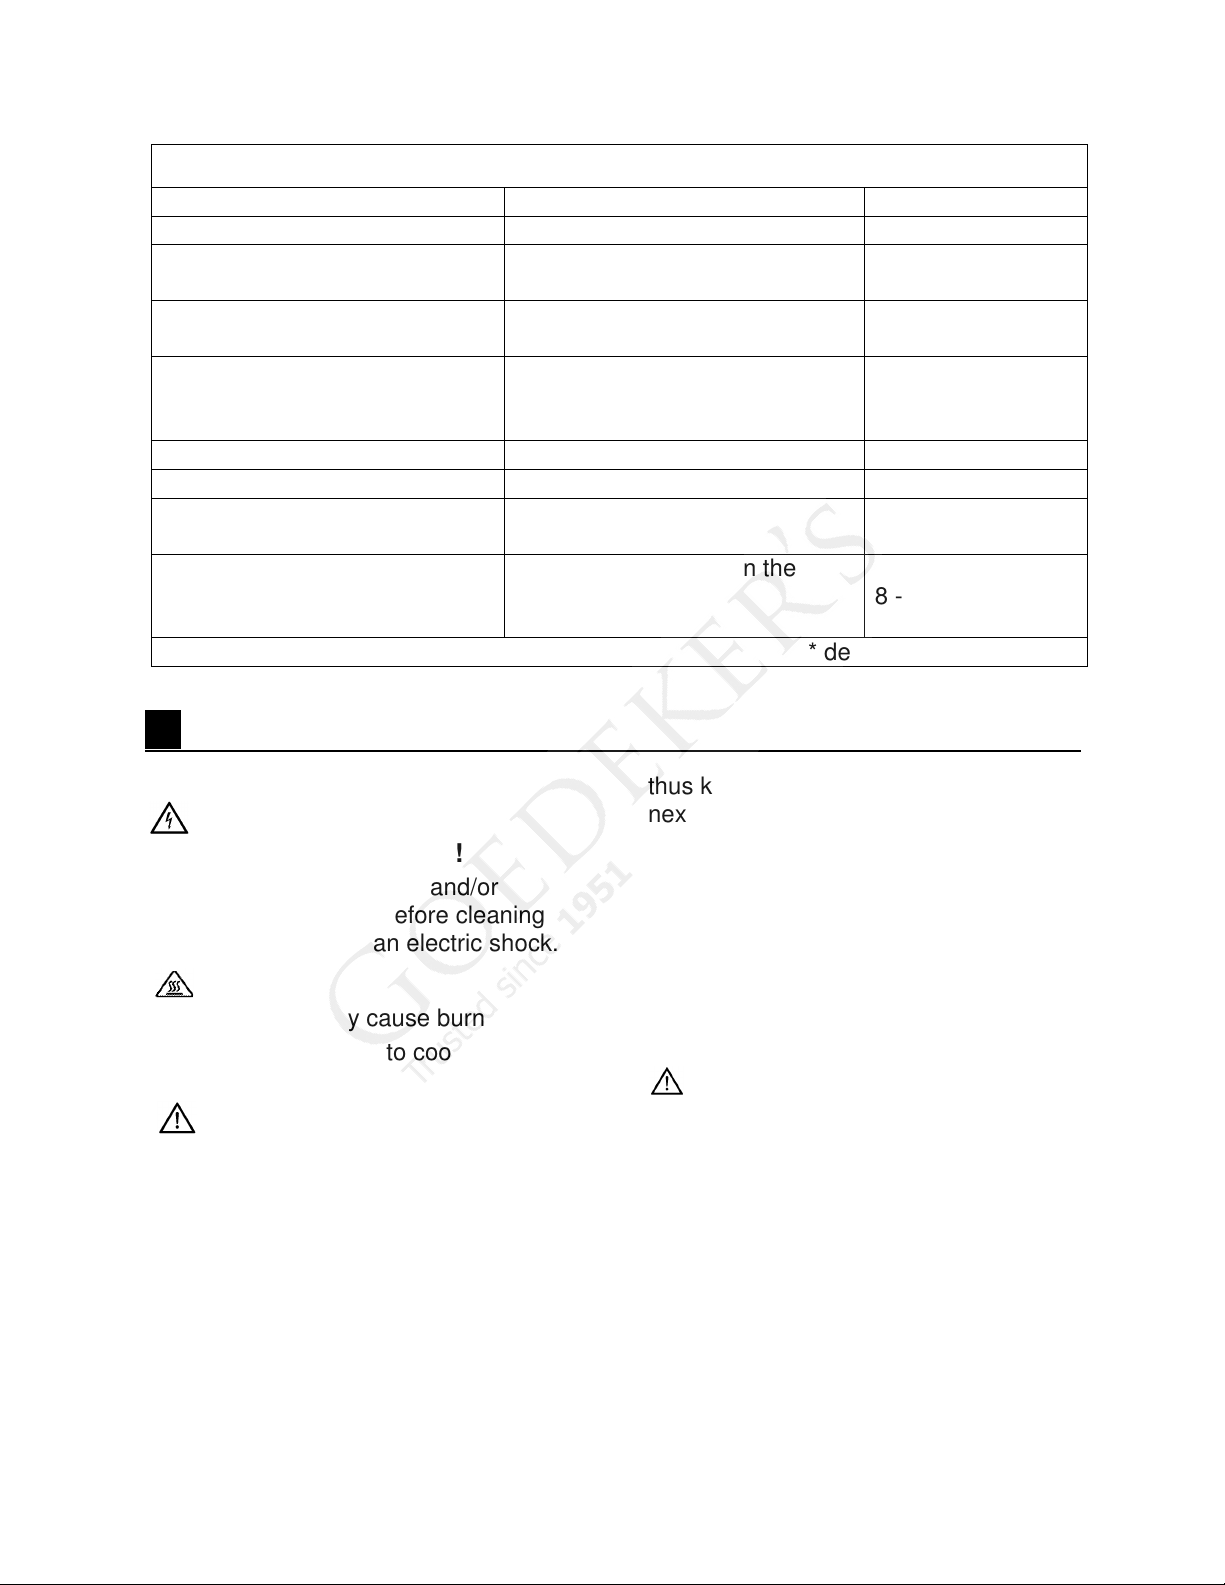
on thickness
Food Preparation/setting Broiling time*
Toasting of bread products ----- 3 - 10 min.
Small cuts of meat,
sausages, bacon, etc.
Chops, ham steaks, chicken
pieces, etc.
Whole fish, fish fillets, fish
fingers
Fish in breadcrumbs ----- 15 - 20 min.
Pre-cooked potato products ----- 15 - 20 min.
Pizza
Grilling/browning of food
Table of Broiling Times
----- 15 - 20 min.
Chicken with wire rack in
upturned position
Whole fish and fish fillets
placed in the base of the
broiling pan.
Placed in the base of the
broiling pan
Dish placed directly on the
base of the broiling
compartment
6 Care and Maintenance
* depending
20 - 25 min.
10 - 20 min.
12 - 15 min.
8 - 10 min.
General Information
DANGER:
Ris
Clean the appliance thoroughly after
each use. In this way it will be possible
to remove cooking residues more easily,
k of electric shock!
Switch off the electricity and/or
plug supply cord before cleaning
un
appliance to avoid an electric shock.
DANGER:
Hot surfaces may cause burns!
Allow the appliance to cool down
before you clean it.
NOTICE:
The surface might get damaged by
some detergents and cleaning
materials.
Do not use harsh detergents,
scouring powder or any sharp
objects.
thus keeping these from burning the
next time the appliance is used.
No special cleaning agents are required
for cleaning the appliance. It is
recommended to use warm water with
dishwashing liquid. Apply with a soft
cloth or sponge and use a clean, dry
cloth for drying.
Do not use any abrasive cleaning
materials!
IMPORTANT:
Do not use steam cleaners for
cleaning.
How to Clean the Cooktop Area
Gas burners
1. Remove pan supports and burner
caps and clean them.
2. Clean the burners.
3. Refit burner caps and check that they
are securely positioned.
28
Page 30
4. While placing pan supports, take care
that burners are centered on pan
supports.
The lenses are made of glass. Handle
carefully to avoid breakage. Broken
glass could cause an injury.
Cleaning the control panel
Damage to the control panel!
Do not remove the control knobs for
control panel cleaning.
Clean control panel and control knobs.
Cleaning the oven
No oven cleaner or any other special
eaning agent is required for cleaning
cl
the oven. It is recommended to wipe
the oven with a damp cloth while it is still
warm.
Do not allow fat or oils to build up on the
oven base or oven accessories.
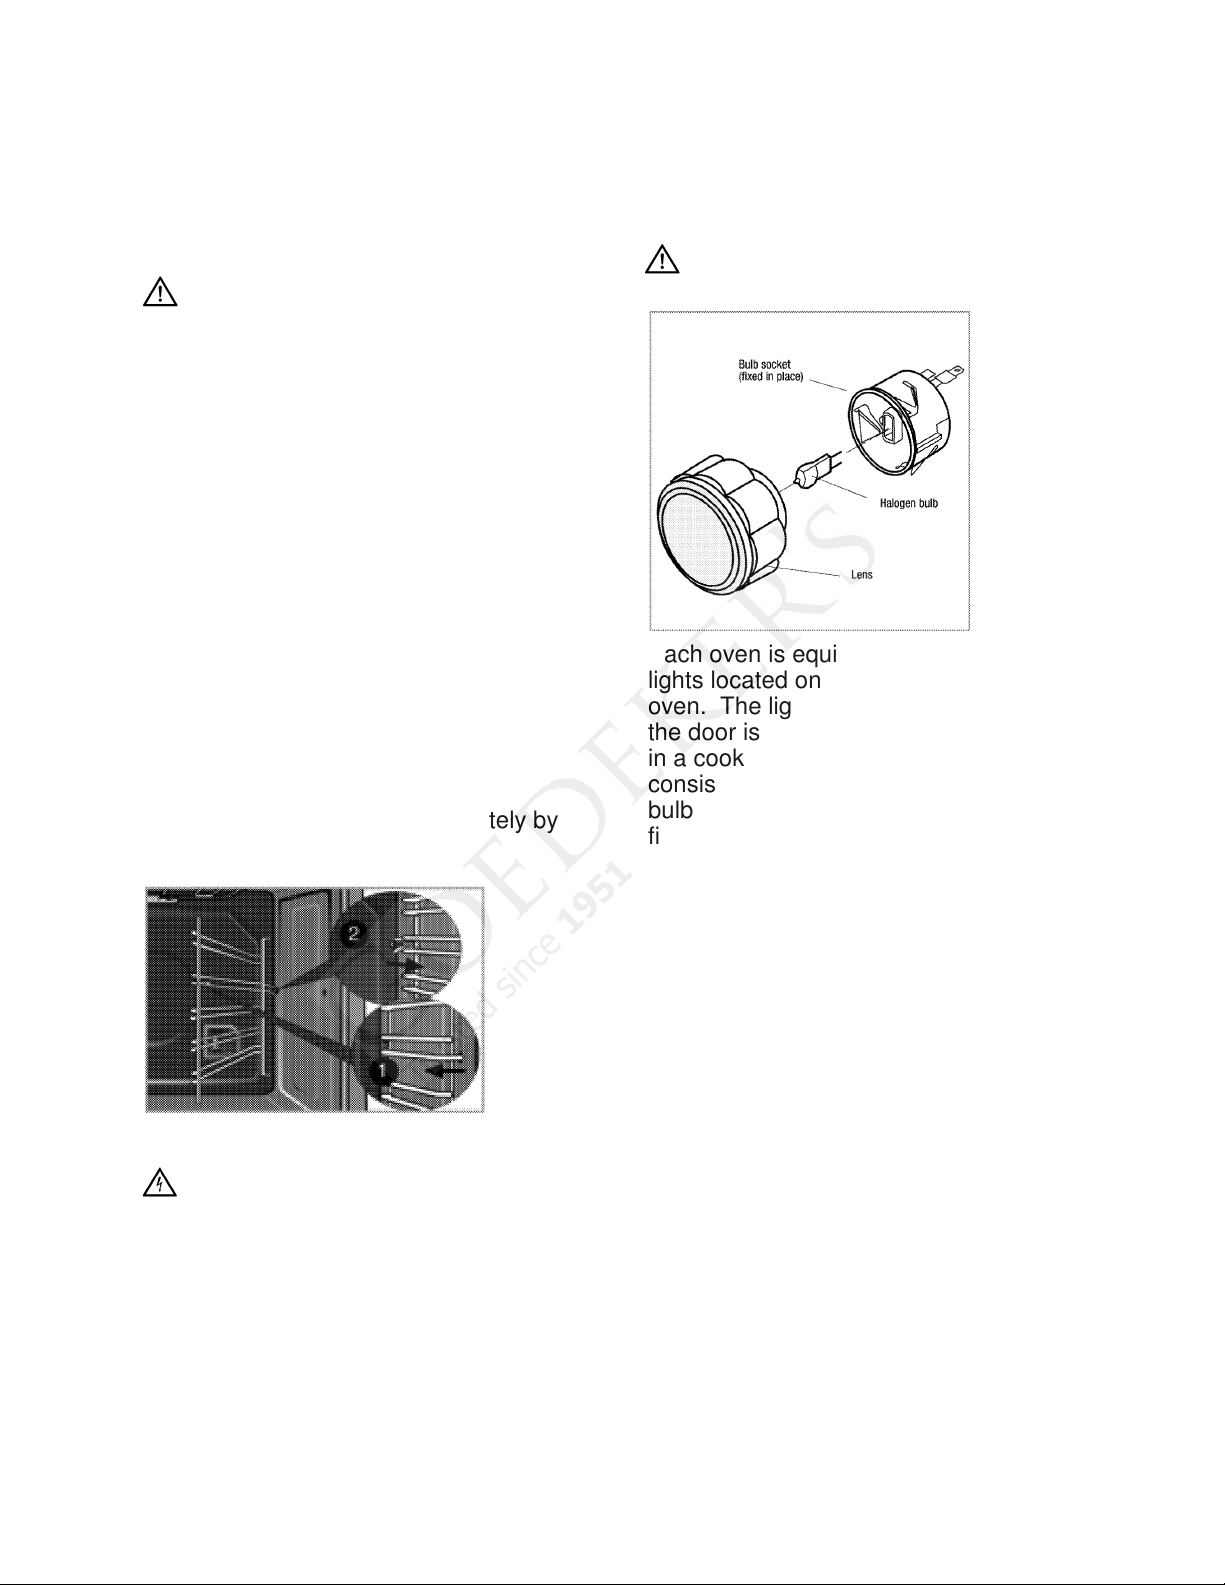
To clean the side walls,
1. Remove the front section of the side
rack by pulling it away from the side
wall.
2. Remove the side rack completely by
pulling it toward you.
Replacing the oven lamp
DANGER:
surfaces may cause burns!
Hot
Make sure the appliance is switched off
and cooled down in order to avoid the
risk of an electrical shock.
The lenses must be in place when using
the oven. They protect the light bulbs
from breaking.
NOTICE: Position of lamp might
vary from diagram.
Each oven is equipped with two halogen
lights located on the back wall of the
oven. The lights are switched on when
the door is opened or when the oven is
in a cooking cycle. Each light assembly
consists of a removable lens, a light
bulb and a light socket housing that is
fixed in place. Light bulb replacement is
considered to be a routine maintenance
item.
To replace a light bulb:
1. Read warning above. Be sure oven
interior is cool.
2. Turn off power at main power supply
(your fuse or circuit breaker box).
3. Remove lens, carefully pull out old
bulb and replace with a fresh one.
4. Replace lens and reconnect power.
29
Page 31
Cleaning the oven door
Don't use harsh abrasive cleaners or
sh
arp metal scrapers for cleaning the
oven door. They could scratch the
surface and damage the glass.
Removing the oven door
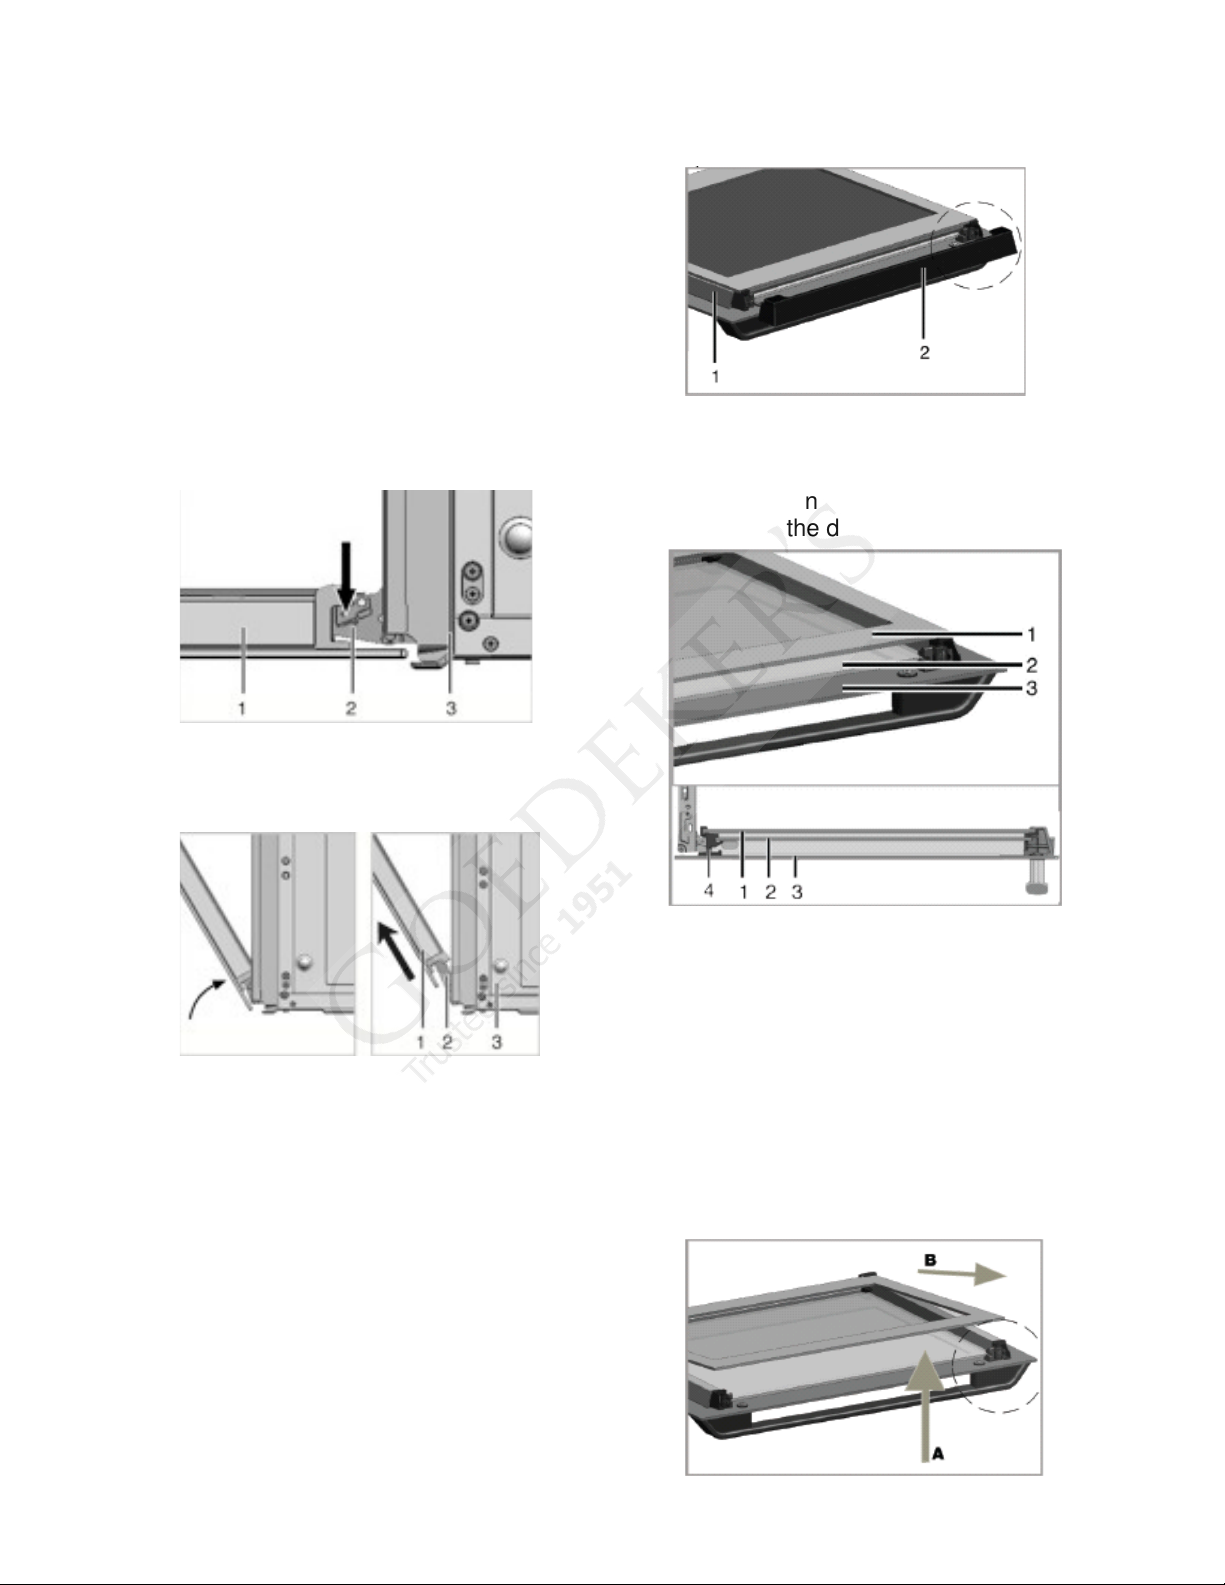
1. Open the oven door.
2. Open the clips at the hinge housing
on the right and left sides of the door
by pressing them down as illustrated
in the figure.
1 Door
2 Hinge
3 Oven
3. Move the door to the half-way
position.
4. Remove the door by pulling it upward
to release it from the right and left
hinges.
Removing the inner glass panels
from the oven door
The inner glass panels of the oven door
can be removed for cleaning.
1. Open the oven door.
1 Frame
2 Plastic part
2. Pull towards yourself and remove the
plastic part installed on the upper
section of the door.
1 Innermost glass panel
2 Middle glass panel
3 Outer glass panel
4 Plastic glass panel slot -
lower
3. As illustrated in the figure below,
raise the innermost glass panel (1)
slightly in direction A and pull it out in
direction B.
Repeat this procedure to remove the
middle glass panel (2).
30
Page 32
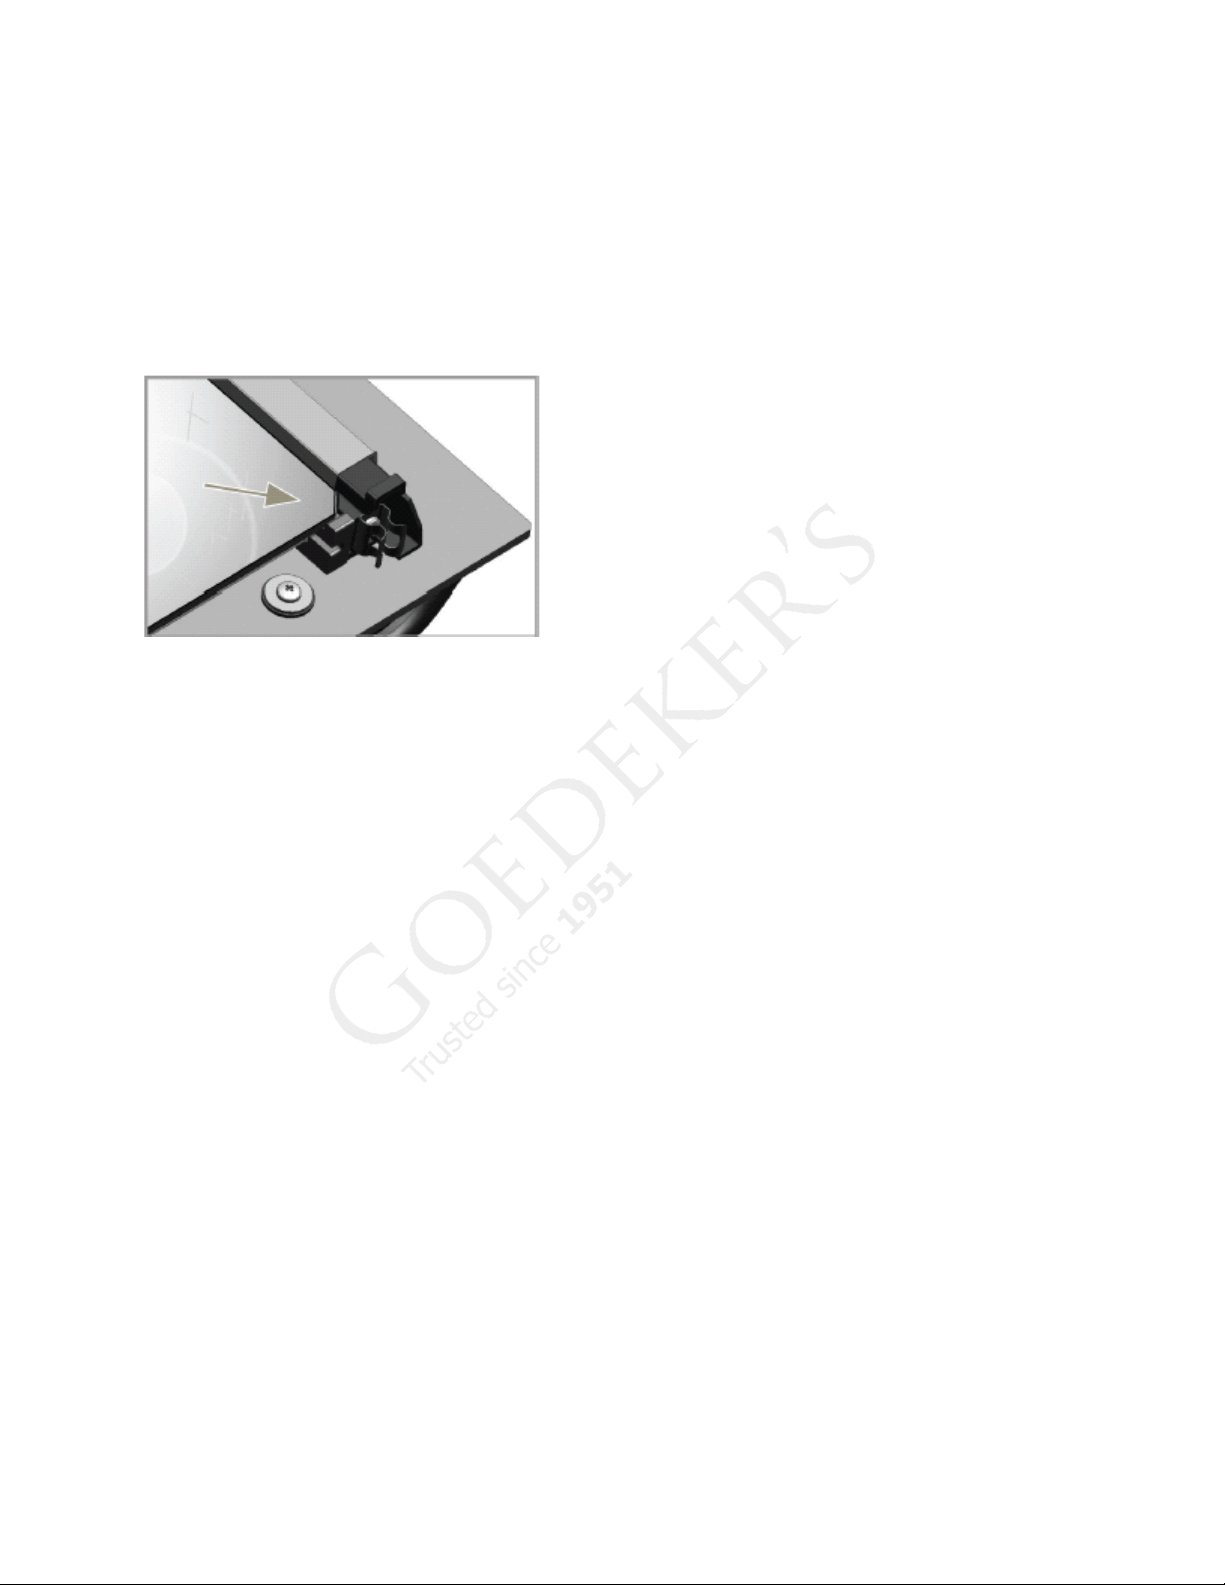
Reassembling the oven door
The first step in reassembling the door
is to reinstall the middle glass panel (2).
As illustrated in the figure below, place
the beveled corner of the glass panel so
that it rests in the beveled corner of the
plastic slot.
It is important to seat the lower corner of
the middle glass panel into the lower
plastic slot.
When installing the innermost glass
panel (1), make sure that the printed
side of the panel faces toward the
middle panel.
Push the plastic part toward the frame
until you hear a click.
31
Page 33
7 General Information
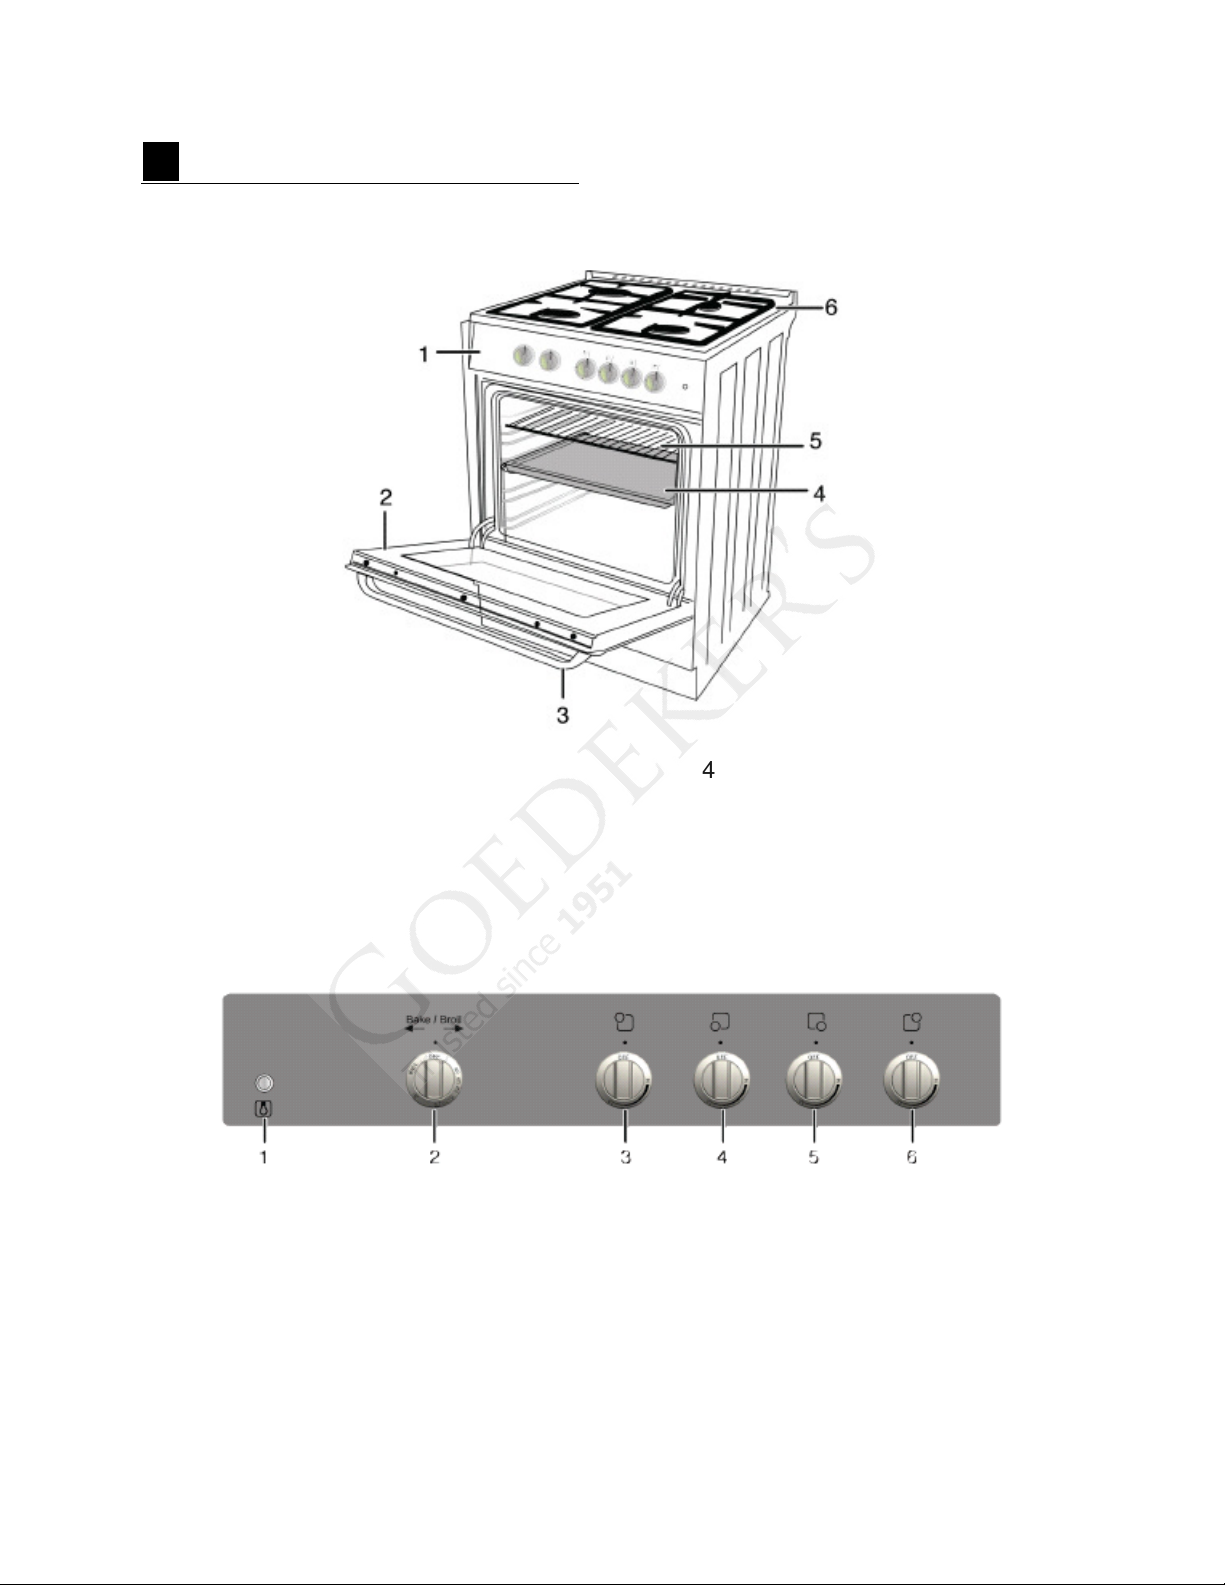
Location of Parts
Control panel
1 Lamp button 4 Front left – Rapid burner
2 Bake/Broil knob 5 Front right – Auxiliary burner
3 Rear left – Normal burner 6 Rear right – Normal burner
1 Control panel 4 Broiler/drip pan
2 Oven door 5 Wire shelf
3 Handle 6 Cooktop
32
Page 34
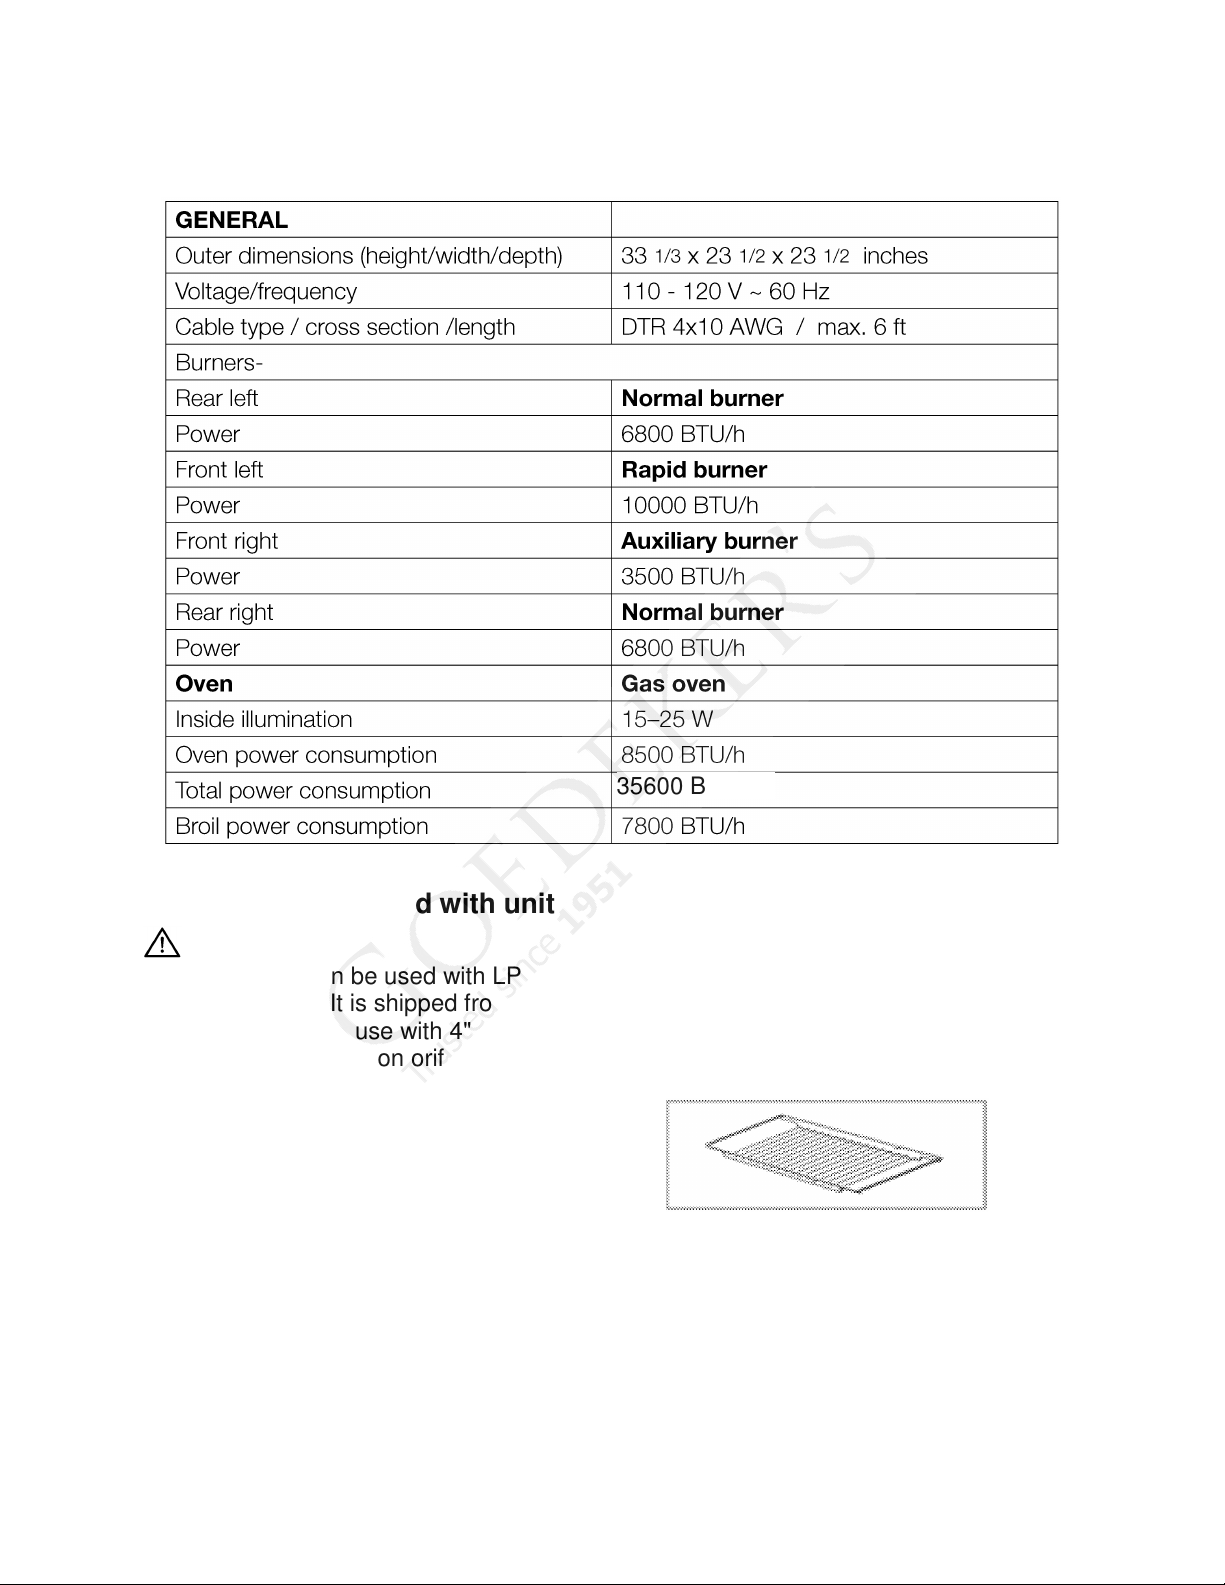
Technical Data
35600 BTU/h
Accessories supplied with unit
Important:
This appliance can be used with LP gas
d natural gas. It is shipped from the
an
factory adjusted for use with 4" w.c.
natural gas. Conversion orifices are
located in the conversion kit. Follow the
instructions packaged with the orifices
for gas conversion.
Accessories supplied can vary
depending on the product model. All the
accessories described in the user
manual may not exist on your product.
Wire shelf and drip tray
The wire shelf can be used for roasting
and as a support for baking, roasting
and casserole dishes. The drip tray can
be used for broiling.
33
Page 35
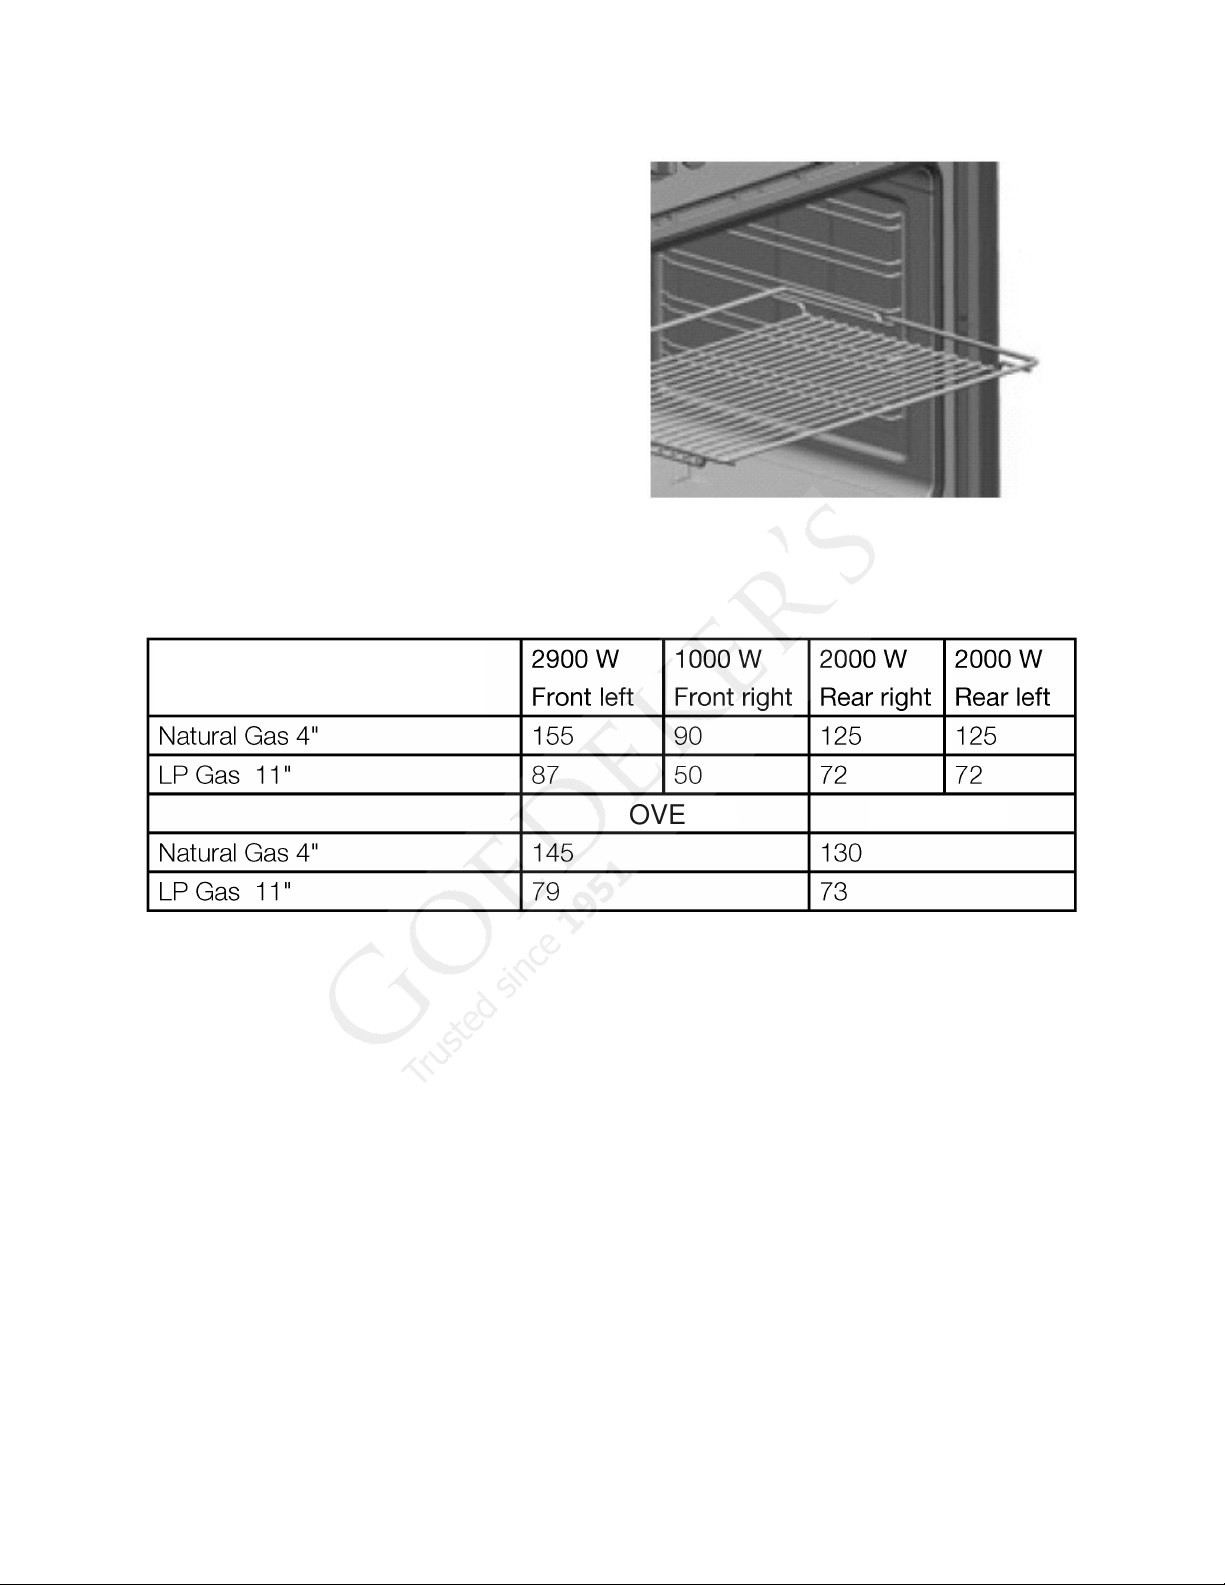
Proper positioning of shelves on
Please see
BROILER
OVEN
wall racks
It is important to position the broiler
and/or drip pan on the wall racks
correctly. Slide the broiler or drip pan
completely between the 2 rails on
each side and make sure it is stable
before putting a dish on it.
the following figure.
Gas Pressure Table
Burner wattage/ position
Gas type/ Gas pressure, psi
34
Page 36
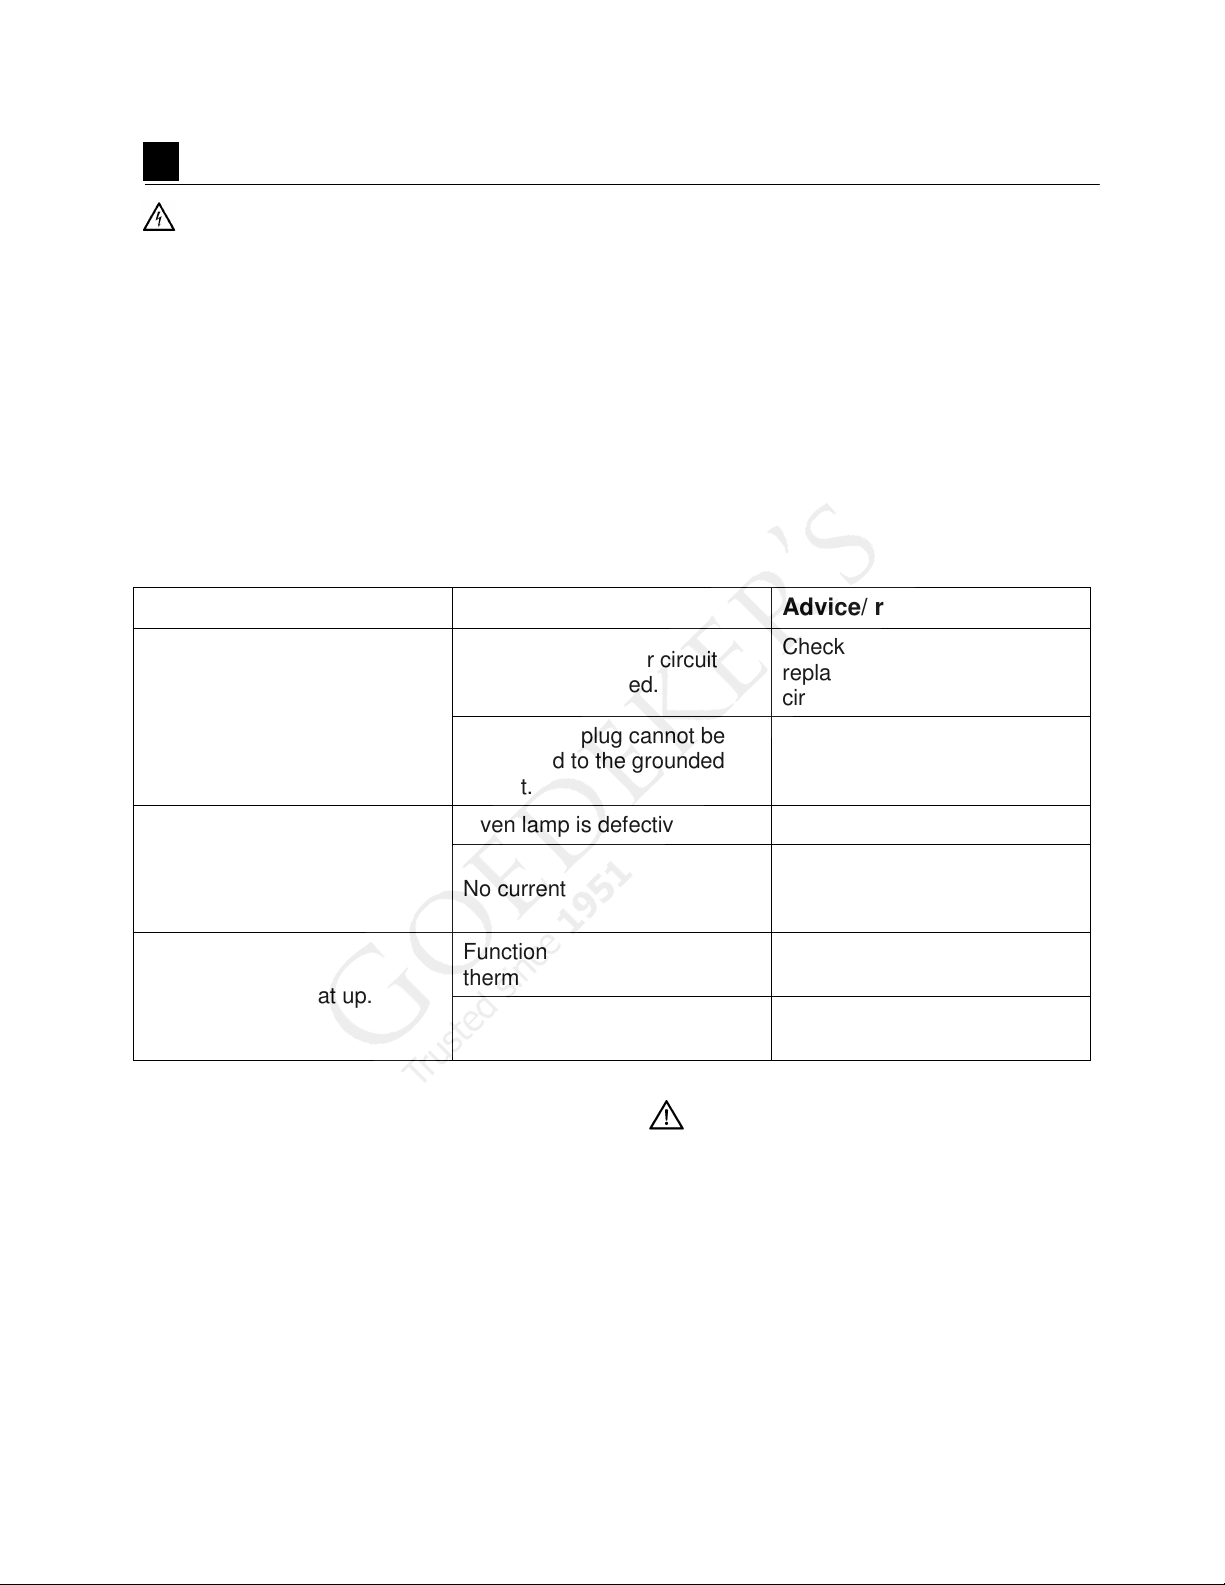
8 Troubleshooting
DANGER:
Risk of electric shock, short circuit
or fire from unprofessional repairs!
Repairs on the appliance must be
carried out by an approved service
center.
Normal operating conditions
• Smoke and odors may be emitted for
a couple of hours during first
operation of the oven.
• It is normal that steam escapes
ring operation.
du
• When metal parts are heated they
may expand and cause a noise.
Before calling for service, please
check the following points:
Troubleshooting Guide
Malfunction/ problem Possible cause Advice/ remedy
Fuse is defective or circuit
breaker has tripped.
The appliance does not work.
Appliance's plug cannot be
connected to the grounded
socket.
Check fuse in fuse box and
replace if necessary, or reset
circuit breaker.
Check the plug connection.
Oven lamp is defective. Replace oven lamp.
Oven light does not work.
No current
Function knob and/or
thermostat knob are not set.
Oven does not heat up.
No power
If the problem has not been solved:
1. Separate the unit from the power
supply (deactivate or unscrew fuse).
2. Call our Service Department.
Check fuse in fuse box and
replace if necessary, or reset
circuit breaker.
Set function knob and
thermostat knob.
Check main power supply and
fuse box or circuit breaker.
IMPORTANT:
Do not attempt to repair the appliance
yourself. There are no customerserviceable items inside the appliance.
35
Page 37
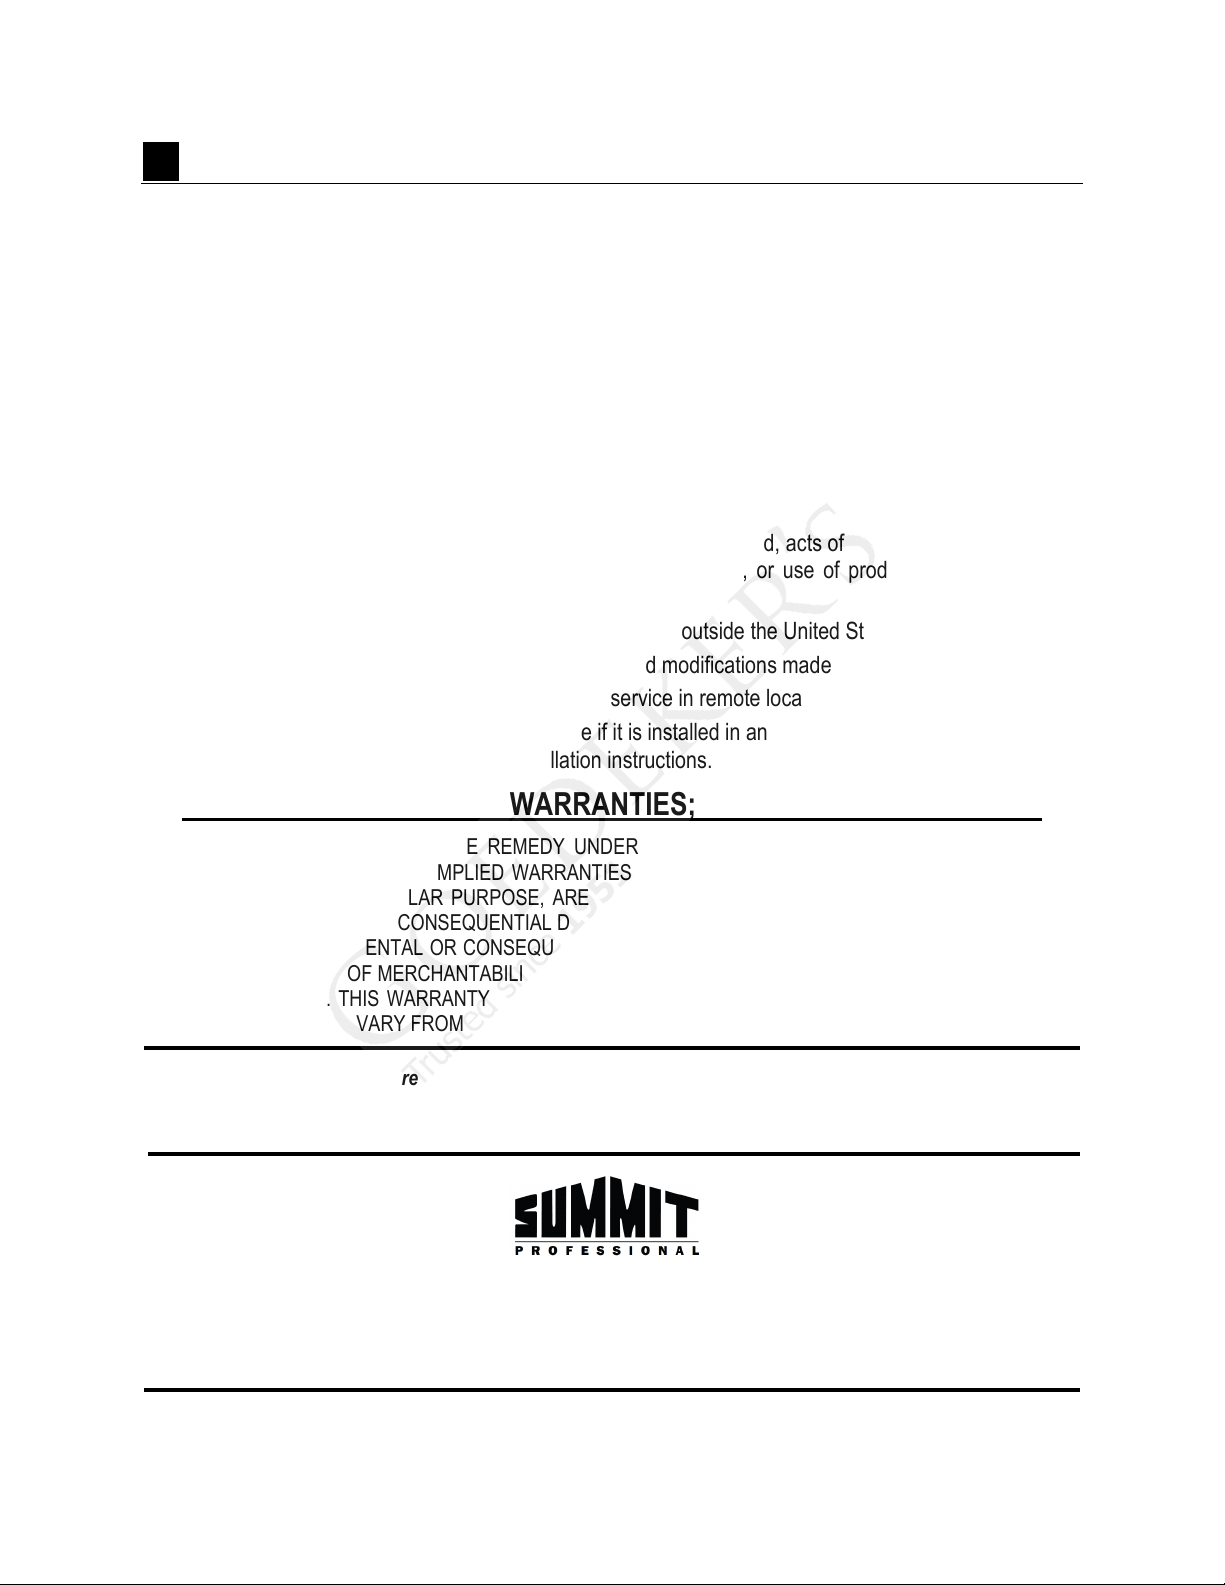
9 Limited Warranty
www.summitappliance.com
Within the 48 contiguous United States, for one year from the date of purchase, when this appliance is
operated and maintained according to instructions attached to or furnished with the product, warrantor will
pay for factory-specified parts and repair labor to correct defects in materials or workmanship. Service must
be provided by a designated service company. Outside the 48 states, all parts are warranted for one year
from manufacturing defects. Plastic parts, shelves and cabinets are warranted to be manufactured to
commercially acceptable standards, and are not covered from damage during handling or breakage.
ITEMS WARRANTOR WILL NOT PAY FOR:
• Service calls to correct the installation of your appliance, to instruct you how to use your appliance, to
replace or repair fuses or to correct wiring or plumbing.
• Service calls to repair or replace appliance light bulbs or broken glass shelves. Consumable parts (such
as filters) are excluded from warranty coverage.
• Damage resulting from accident, alteration, misuse, abuse, fire, flood, acts of God, improper installation,
installation not in accordance with electrical or plumbing codes, or use of products not approved by
warrantor.
• Replacement parts or repair labor costs for units operated outside the United States.
• Repairs to parts or systems resulting from unauthorized modifications made to the appliance.
• Expenses for travel and transportation for product service in remote locations.
• The removal and reinstallation of your appliance if it is installed in an inaccessible location or is not
installed in accordance with published installation instructions.
DISCLAIMER OF IMPLIED WARRANTIES; LIMITATION OF REMEDIES
CUSTOMER’S SOLE AND EXCLUSIVE REMEDY UNDER THIS LIMITED WARRANTY SHALL BE PRODUCT
PAIR AS PROVIDED HEREIN. IMPLIED WARRANTIES, INCLUDING WARRANTIES OF MERCHANTABILITY
RE
OR FITNESS FOR A PARTICULAR PURPOSE, ARE LIMITED TO ONE YEAR. WARRANTOR SHALL NOT BE
LIABLE FOR INCIDENTAL OR CONSEQUENTIAL DAMAGES. SOME STATES DO NOT ALLOW THE EXCLUSION
OR LIMITATION OF INCIDENTAL OR CONSEQUENTIAL DAMAGES, OR LIMITATIONS ON THE DURATION OF
IMPLIED WARRANTIES OF MERCHANTABILITY OR FITNESS, SO THESE EXCLUSIONS OR LIMITATIONS MAY
NOT APPLY TO YOU. THIS WARRANTY GIVES YOU SPECIFIC LEGAL RIGHTS AND YOU MAY ALSO HAVE
OTHER RIGHTS, WHICH VARY FROM STATE TO STATE.
Call customer service toll free in the U.S.A. @ 1-800-932-4267, Monday to Friday 9:00 am. - 5:00 p.m. (ET).
Order parts online at www.summitappliance.com/support
Felix Storch, Inc.
Summit Appliance Division
770 Garrison Avenue
Bronx, NY 10474
Phone: (718) 893-3900
Fax: (718 )842-3093
Web Site:
36
 Loading...