

Page 1
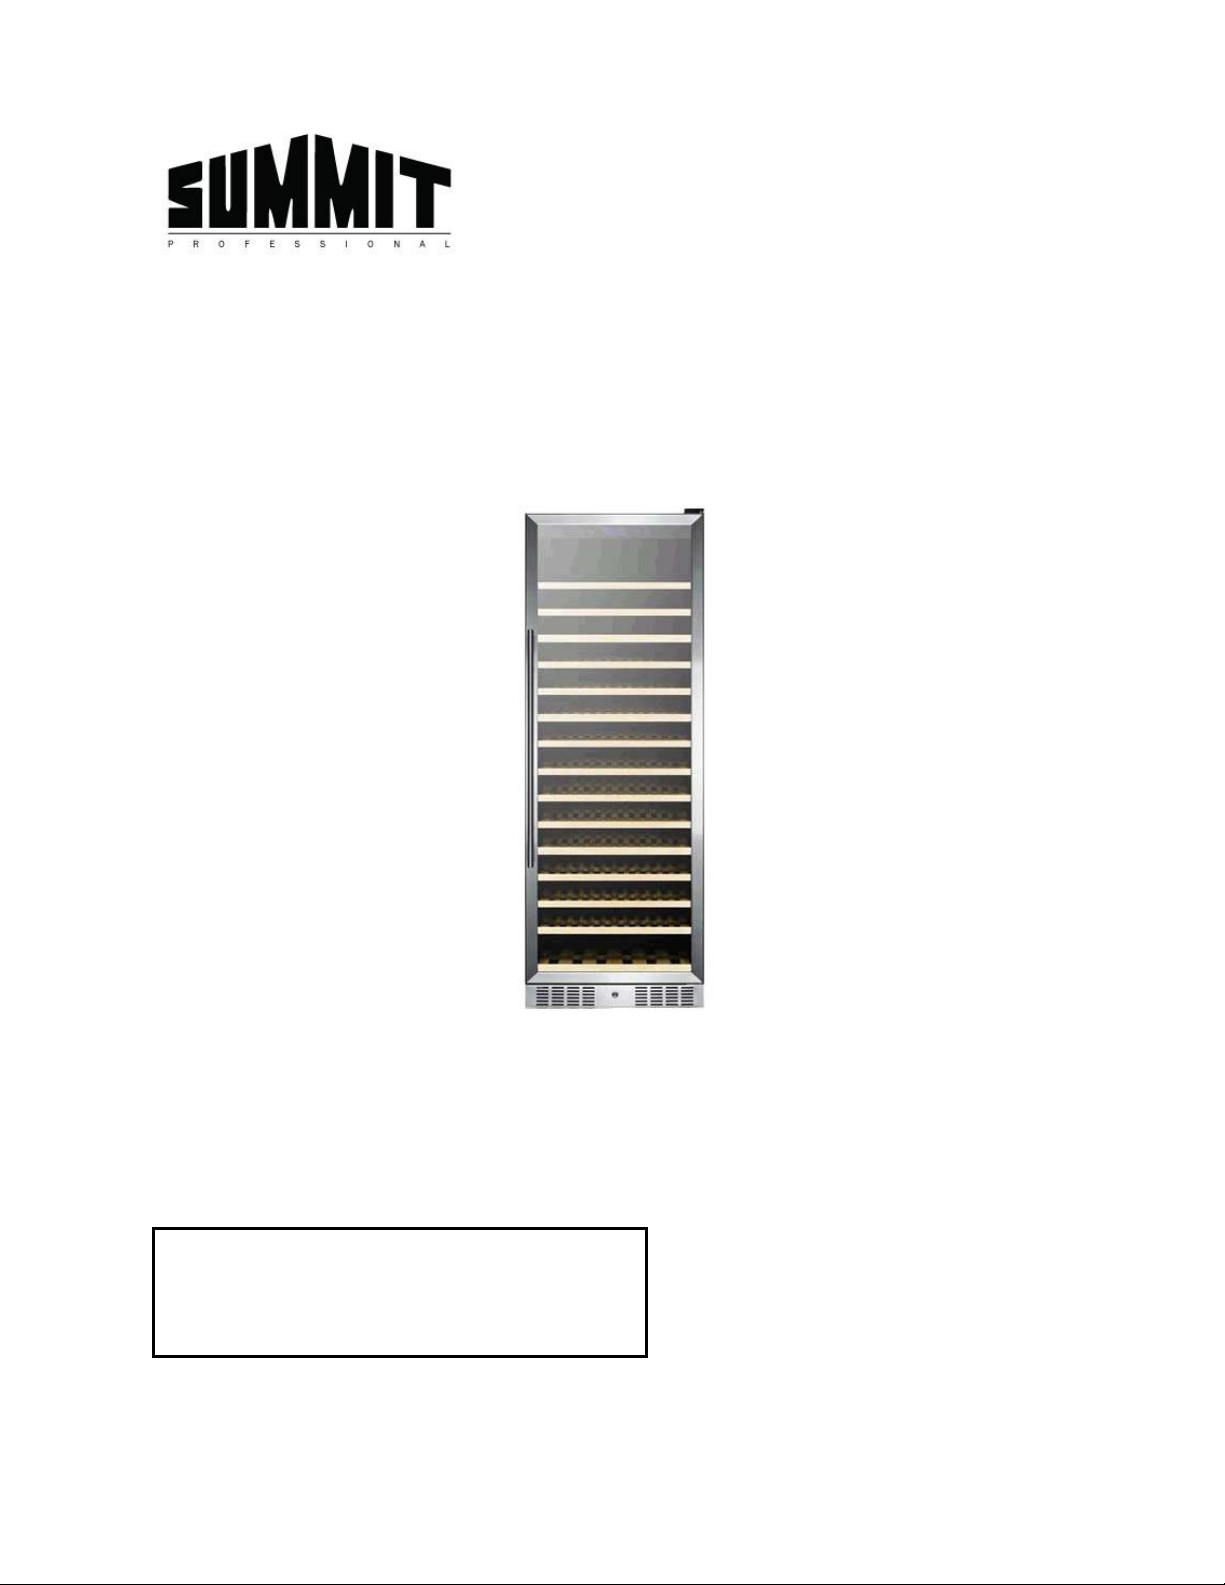
168-BOTTLE WINE CELLAR
Model SWC1925
Instruction Manual
Please read carefully and follow all safety rules and operating instructions.
FELIX STORCH, INC.
Write the Serial Number for your unit here:
_________________________________
Summit Appliance Division
770 Garrison A v enue
Bronx, New York 10474
www.summitappliance.com
Page 2
IMPORTANT SAFEGUARDS
Your safety and the safety of others are very important.
We have provided many im portant safety messages in this manual and on your app liance. Always read
and obey all safety messages.
This is the Safety Alert Symbol. The symbol alerts you to potential hazards that
can kill or injure you and others. All safety messages will follow the Safety
Alert Symbol and either the words "DANGER" or "WARNING".
Danger means that failure to heed this safety
statement may result in severe personal injury or
death.
Warning means that failure to heed this safety
statement may result in extensive product
damage, serious personal injury, or death.
All safety messages will a lert you about the potential ha zard, t ell you how to r educe the chanc e of injury,
and let you know what can happen if the instructions are not followed.
Before the appliance is used, it must be properly positioned and installed as
described in this manual, so read the manual carefully. To reduce the risk of fire,
electrical shock or injury when using the appliance, follow basic precautions,
including the following:
• Plug into a grounded 3-prong outlet, do not remove grounding prong, do not use an adapter, and do
not use an extension cord.
• Replace all panels before oper ati ng.
• It is recommended that a separate circuit serving only your appliance be provided. Use receptacles
that cannot be turned off by a switch or pull chain.
• Never clean appliance parts with flammable fluids. These fumes can create a fire hazard or explosion.
And do not store or use gasoline or other flammable vapors and liquids in the vicinity of this or any
other appliance. The fumes can create a fire hazard or explosion.
• Before proceeding with cleaning and maintenance operations, make sure the power line of the unit is
disconnected.
• Do not connect or disconnect the electric plug when your hands are wet.
• Unplug the appliance or disconnect power before cleaning or servicing. Failure to do so can result in
electrical shock or death.
• Do not attempt to repair or replace any part of your appliance unless it is specifically recommended in
this manual. All other servicing should be referred to a qualified technician.
• SHOCK HAZARD - Electrical Grounding required.
- 2 -
Page 3
FREE-STANDING INSTALLATION ONLY!
FOLLOW WARNING CALLOUTS BELOW ONLY WHEN APPLICABLE TO YOUR MODEL.
• Use two or more people to move and install appliance. Failure to do so can result in back or other
injury.
• To ensure proper ventilation for your appliance, the front, back, sides and top of the unit must be
completely unobstructed . Choos e a well-ventilated area with temperatures above 60°F (16°C) and
below 90°F (32°C). This unit must be installed in an area protected from the elements, such as wind,
rain, water spray or drips.
• The appliance should not be located next to ovens, grills or other sources of high heat.
• The appliance must be installed with all electrical, water and drain connections in accordance with
state and local codes. A standard electrical supply (115 V AC only, 60 Hz), properly grounded in
accordance with the National Electrical Code and local codes and ordinances, is required.
• Do not kink or pinch the power supply cord of the appliance.
• The size of the fuse (or circuit breaker) should be 15 amperes.
• It is important that the appliance be leveled in order to work properly. You may need to make several
adjustments to level it.
• All installations must be in accordance with local plumbing code requirements.
• Make certain that the pipes are not pinched, kinked or damaged during installation.
• Check for leaks after connection.
• Never allow children to operate, play with or crawl inside the appliance.
• Do not use solvent-based cleaning agents or abrasives on the interior. These cleaners may damage or
discolor the interior.
• Use this appliance only for its intended purpose as described in this Instruction Manual.
• Keep fingers out of the “pinch point” areas. Clearances between the doors and between the doors and
cabinet are necessarily small. Be careful closing doors when children are in the area.
Risk of child entrapment!
Child entrapment and suffocation are not problems of the past. Junked or abandoned appliances are
still dangerous, even if they will “just sit in the garage a few days”.
Before discarding your old refrigerator:
• Take off the doors
• Leave the shelves in place so that children may not easily climb inside.
- SAVE THESE INSTRUCTIONS -
- 3 -
Page 4

Table of Contents
Important Safeguards ....................................................................... 2 - 3
Location of Parts ....................................................................................5
Technical Data ........................................................................................6
Installation Instructions .........................................................................6
To Install the Door Handle
Reversing the Door Swing
Operating Your Wine Cellar ...................................................................7
The Control Panel
The Display Screen
Care and Maintenance ............................................................................8
Cleaning Your Wine Cellar
Moving Your Wine Cellar
Important Precautions
Electrical Circuit Diagram ......................................................................9
Troubleshooting ................................................................................... 10
Limited Warranty ................................................................................... 12
- 4 -
Page 5

Location of Parts
1. Light switch
2. Temperature setting
3. C/F switch
4. Temperature display
5. Light
6. Temperature probe
7. Fan
8. Exhaust window
Not shown: Plastic humidifier tray
Compressor (rear of unit)
Condenser coils (at bottom of unit)
- 5 -
9. Shelf
10. Body
11. Exhaust window
12. Foot
13. Glass
14. Door seal
15. Handle
16. Lower hinge
Page 6

Technical Data
Model Number SWC1925
Type Glass door wine cellar
Capacity 168 bottles (15.9 ft3)
Electrical Rating 1 10V AC, 60 Hz
Rated Current 1.5A
Input Power 230W
Power Consumption 438 kWh/yr
Temperature Control Range 40° to 64°F
Net Weight 221.8 lbs
Gross Weight 251.3 lbs
Unit Size (W×D×H) 23.4" x 26.8" x 70"
Installation Instructions
Your SWC1925 wine cellar must not be recessed or built into an enclosure. It must be installed
free-standing, allowing plenty of clearance at the b ac k, sid es a nd top. Be particularly careful to keep
the front of the unit clear of obstruct ions, especially the vents at t he bot tom.
Before using your wine cellar:
• Remove the exterior and int er ior packing.
• Never lift the unit by the door handle.
• Never install or operate th e unit behind closed cabinet doors.
• Before connecting the app liance t o the pow er source, let it stand upright for approximately 2 hours .
This will reduce the possibility of a malfunction in the cooling system from handling during
transportation.
• Clean the interior surface with lukewarm water using a soft cloth.
• Place your appliance on a floor that is strong enough to support the appliance when it is fully
loaded.
• To level your appliance, adjust the front le gs at t he bot t om of t he appliance.
To Install the Door Handle:
For shipment, the door handle has been stored at the back of the unit. To install the handle, the door
gasket should be gently pulled back where it covers the screw holes for the handle, then the handle
should be attached by screwing it into place with the two screws which are packed in the plastic bag
with this Instruction Manual.
Reversing the Door Swing:
As you received your wine ce llar, the door swings open at the left. I f y ou wish to reverse the swing so
that the door opens from the right, it is most important to have at least one other person to help.
It is very dangerous to try to reverse the door swing by yourself. Now, unscrew the upper door
hinge while the second person supports the door. Remove the upper hinge and carefully lift the door
off the bottom hinge. Unscrew the bottom hinge and install it on the left side of the unit. Flip the door
around so that the handle is on the right side and slip the door over the bottom hinge. Reattach the
door by screwing the top hinge into the holes provided on the upper left surface of the unit. Make
adjustments as necessary to be sure the door is aligned pro per ly.
- 6 -
Page 7

Operating Your Wine Cellar
NOTE: Allow unit temperature to stabilize for 24 hours before u se.
The Control Panel:
• To control the interior temperature, press the UP and DOWN buttons on either side of the
display screen. Each press will adjust the temperature by 1C° between 5° and 18°C, or 1F°
between 40° and 64°F.
• To turn the internal LED lighting on or off, pr ess the LIGHT button on the right side.
• To switch the temperature display from Celsius to Fahrenheit or vice versa, press the C/F
button on the left side.
The Display Screen:
On the display screen in the middle of the control panel, you can read the following
information and adjust the temperature setting according to the amb i ent conditions:
1. Indicator of the unit's working status
2. On or Off status of the interior lighting
3. Your set temperature
4. Celsius or Fahrenheit degrees
5. The actual interior temperature
6. Celsius or Fahrenheit degrees
7. Whether t he unit is cooling or maintaining the current temperature
※ : Cooling
○ : Maintaining the current temperature
- 7 -
Page 8

Care And Maintenance
Cleaning your wine cellar
• Unplug the wine cellar and remove the bot t les.
• Wash the inside with a warm water and baking soda solution. The solution should be about 2
tablespoons of baking sod a to a quart of water.
• The outside of the wine cellar should be cleane d w it h m ild detergent in warm wat er.
• Pull out the water collection tray at the bottom and wash it.
Moving your wine cellar
• Remove all the bottles.
• Securely tape down all loose items (shelves) inside the wine cellar.
• Turn the lev el ing legs up to the base to avoid dama ge.
• Tape the door shut.
• Be sure the wine cellar stays in the upright positio n dur ing transportation.
Important Precautions
• Be sure front grille is free of obstruction. Obstructing free airflow can cause the unit to
malfunction and will void the warranty.
• Failure to clean the condenser every six months can cause the unit to malfunction.
• Do not block any internal fans.
• Use only genuine supplier's replacement parts. Unapproved parts can damage the unit, affect
its operation or performance and may void the warranty.
- 8 -
Page 9

Electrical Circuit Diagram
- 9 -
Page 10

PROBLEM
POSSIBLE CAUSE
Troubleshooting
You can solve many common wine cellar problems easily, savi ng you the cost of a possible service
call. T r y the suggestions below to see if you can solve the proble m be fore calling the service center.
Wine cellar does not operate. Not plugged in.
Incorrect voltage supply.
Circuit brea ker tr ipped or fuse blown.
The wine cellar does not get cold
enough.
The light does not work. Contact the Service Cent er .
Vibrations Check to be sure the wine cellar is level.
The wine cellar seems to make too
much noise.
The door does not close pr oper ly. The wine cellar is not level.
LED does not display. Main control board does not work.
LED display error Temperature probe is not working properly.
Buttons are not functional. Temperature controller panel is damaged.
If you still have a problem with your wine cellar, call our SUMMIT Service Center
toll-free at 1-800-932-4267.
Check the temperature co nt r ol set t ing.
External environment may require a higher setting.
The door is opened t oo often.
The door is not closed completely.
The door gasket does not seal pr operly.
The wine cellar is not level.
Check the fan.
The door gasket is out of position.
The shelves are out of position.
PCB problem
There is a problem with the plug.
- 10 -
Page 11

Notes
- 11 -
Page 12

FELIX STORCH, INC.
WARNING! This product may contain chemicals known to the state o f California
Limited Warranty
ONE-YEAR LIMIT ED WARRANTY
Within the 48 contig uous United States, for on e year from the date of purchase, when this appliance is
operated and maintained a c c ording to ins truc ti ons atta c hed to or f ur nishe d with the product, warr antor w ill
pay for factory-spec ified parts and repair la bor to correct defect s in materials or workm anship. Service
must be provided by a des ignated service company. Out side the 48 states, all parts are warr anted for
one year from manufacturing defects. Plastic parts, shelves and cabinets are warranted to be
manufactured to commercially acceptable standards, and are not covered from damage during handling or
breakage.
5-YEAR COMPRESSOR WARRANTY
1. The compressor is covered for 5 years.
2. Replacement does not include labor.
ITEMS WA RRA NTOR WILL NOT PAY F OR:
1. Service calls to correct the installation of your appliance, to instruct you how to use your appliance, to
replace or repair fuses or to correct wiring or plumbing.
2. Service calls to repair or replace appliance light bulbs or broken shelves. Consumable parts (such as
filters) are excluded from warranty coverage.
3. Damage resulting from accident, alteration, misuse, abuse, fire, flood, acts of God, improper installation,
installation not in accordance with electrical or plumbing codes, or use of products not approved by
warrantor.
4. Replacement parts or repair labor costs for units operated outside the United States.
5. Repairs to parts or systems resulting from unauthorized modifications made to the appliance.
6. Expenses for travel and transportation for product service in remote locations.
7. The removal and reinst al lat ion of your appliance if it is installed in an inaccessible location or is not
installed in accordance with published installation instructions.
DISCLAIMER OF IMPLIED WARRANTIES; LIMITATION OF REMEDIES
CUSTOMER'S SOLE AND EXCLUSIVE REMEDY UNDER THIS LIMITED WARRANTY SHALL BE
PRODUCT REPAIR AS PROVID ED HEREIN. IM PLIED WARRANTIES, INCLUDING WARRAN TIES OF
MERCHANTABILITY OR FITNESS FOR A PARTICULAR PURPOSE, ARE LIMITED TO ONE YEAR.
WARRANTOR SHALL NOT BE LIABLE FOR INCIDENTAL OR CONSEQUENTIAL DAMAGES. SOME
STATES DO NOT ALLOW THE EXCLUSION OR LIMITATION OF INCIDENTAL O R CONSEQUENTIAL
DAMAGES, OR LIMITATIONS ON THE DURATION OF IMPLIED WARRANTIES OF MERCHANTABILITY
OR FITNESS, SO THESE EXCLUSIONS OR LIMITATIONS MAY NOT APPLY TO YOU. THIS
WARRANTY GIVES YOU SPECIFIC LEGAL RIGHTS AND YOU MAY ALSO HAVE OTHER RIGHTS,
WHICH VARY FROM STATE TO ST ATE.
to cause cancer or birth defects or other reproductive harm. For more information,
visit: www.summitappliance.com/prop65
Chemicals kno wn b y the man ufac ture r to be p re sent in t his pro duc t in co nce ntra tion s
higher than threshold limits: N ONE.
770 Garrison Avenue
Bronx, NY 10474
Phone: (718) 893-3900
Fax: (718) 842-3093
www.summitappliance.com
For parts and accessory ordering,
troubleshooting and helpful hints, visit:
www.summitappliance.com/suppor
Printed in China
- 12 -
 Loading...