

Summit ingenious, ff1525plx, prismatic, glass Use And Care Manual

1
Use and Care
Manual
Refrigerator
225D6783P011 REV. 0

2
index
Welcome
Quick Installation Guide
Parts and Features Ingenious Model
Quick Reference Guide Ingenious
Where to Start
Know Your Product
Temperature Control
Air Regulator
Exterior Display
Smart Station
SmartFillIceFactory
Compartments
Take&Go Egg Box
ExpressChillZone
Safety Glass Spill Guard Shelf
Shelves
Air Flow
How to Get the Most from Your Refrigerator
Choosing a location
Positioning
Installation
Levelling
Minimum requirements for correct electrical installation
General Temperature Control
Express Chill Zone Function
Exterior Temperature Control
Power Cool Function
Holidays Function
Alarm Function
Lock Function
EnergySaver
Fruits & Veggies Crisper
Deli Fresh Compartment
Meat Keeper
Humidity Control
Medium Shelf
Wide Shelf
Double Capacity Shelf
Jumbo Drinks Shelf
Dairy Shelf
7
7
6
5
4
3
3
ingenious model
6
6
8
9
9
10
10
12
16
16
12
16
16
17
17
18
19
22
23
22
22
22
23
24
24
25
25
25
25
25
25
26
27
Cleaning and Servicing Your Refrigerator
Increased Temperatures of Areas Close to Freezer
General Precautions
Holidays and Absences
Moving
Power Outages
Normal Operating Sounds
Changing the Bulb
Frequently Asked Questions and Operating Guide
29
29
29
30
30
30
31
31
32

3
welcome
O
ur aim is to make your life better every day; that’s why we create appliances
which adapt to your lifestyle and through their technology allow you to enjoy
each moment.
Today we invite you to join this world, so you can discover the ingenuity
and versatility that our line of refrigerators offers you.
You will nd all of the information you need for running your refrigerator
inside this booklet. We invite you to read it and to enjoy your new product.
Thank you for choosing us.
Before beginning, we’ve included a quick guide and a brief description of
the most important parts of your new refrigerator.
quick installation guide
choosing a
location
installation
positioning
cleaning
packaging
connection
Select a large, clean,
and dry space.
Let the refrigerator
stand for 6 to 8 hours.
THIS IS VERY
IMPORTANT SO THAT
THE GAS CAN SETTLE.
Allow for a 5 cm space
on each side, 10 cm at
the back, and between
5 and 10 cm at the top.
Before connecting the
plug, clean the
refrigerator with a cloth
or soft sponge and a
neutral soap.
Remove all packaging
including tape,
cardboard, plastic,
and Styrofoam.
Connect the plug to
the correct outlet.
Leave it empty and
closed for 4 hours
before usage.
2
3
4
5
6

4
Exterior
Handles
Wheels - Levellers
Display
Access to Smart Station
Inside Freezer
Shelves
Air Regulator
Express Chill Zone
Smart Fill Ice Factory
Medium Shelf
Wide Shelf
Inside Cooler
Shelves
Multiple Use Compartment
Fruits and vegetables compartment
Air Flow Outlets
Take & Go Egg Box
Internal Temperature Control
Refrigerator Light
Cold Meats Comparment
Medium Shelf
Smart Station
Double Capacity Shelf
Jumbo Drinks Shelf
a
b
c
d
e
f
g
h
i
j
k
l
m
o
p
q
r
s
t
u
v
w
Ingenious Model

5
quick reference guide for the ingenious model
For
more details on the use and the specications of the benets described
below, we recommend you consult the rest of the manual.
express chill zone
Inside the freezer you’ll find
this separate compartment
designed to rapidly cool
your favourite foods and
drinks. You can control it
from the exterior display
and it will let you know
when your foods and drinks
are ready.
)
exterior display
take & go egg box
smart fill ice factory
power cool
smart station
Specially designed to allow
easy organisation of your
favourite foods. Furthermore,
thanks to its external
access you will always have
these on hand. Not having to
open the refrigerator door,
thanks to this special access,
will help save energy.
)
Practically designed to allow you to operate certain additional
functions like the Express Chill Zone, as well as the refrigerator
temperature.
)
You can take this
multipurpose egg box
wherever you want.
In addition, it’s designed to
hold loose eggs or a carton.
You can also put
the Take&Go in the
“Double Capacity” shelf at
the door.
)
This no-spill ice-maker has a
removable cylinder which
can be easily filled and when
in place, automatically fills
the ice-trays. It also comes
with a storage box that can
be used as an ice-bucket.
)
The Power Cool function
is great for rapidly cooling
a large amount of room
temperature food once it’s
placed in the refrigerator.
As soon as you get back
from the supermarket,
simply activate it and it
will rapidly cool the
refrigerator interior.
)
2
3
(pg.
(pg.
19
18
(pg. 23
(pg.
16
(pg.
12
4
5
6
(pg.
12

6
where to start?
choosing a location
Choose a place for your refrigerator. We recommend a large space that
can be kept clean and dry to prevent oxidation.
positioning
T
o ensure that the refrigerator works correctly, it’s important that air can
circulate. We recommend the following minimum surrounding distances:
•
10 cm on both sides, 10 cm at the back,
between 5 and 10 cm on top.
•
Don’t position it near heat-generating appliances
such as hobs, heaters, or in areas exposed to
sunlight. This could overwork the refrigerator,
making it less efcient and increasing energy
consumption.
•
Don’t lean it against a wall.
Observing these distances and recommendations
will guarantee you a fully-functioning product, as
it will prevent the components from direct contact
with walls and furniture, thus avoiding unpleasant
sounds.
installation
Y
ou must remove all packaging including:
tape, cardboard, plastic, and/or Styrofoam (EPS).
The refrigerator must not be connected to an
energy source before installation.
important
Let the refrigerator stand for 6 to 8 hours before
connecting it to allow the cooling gas and the
compressor oil to settle.
Top
Base
Corner
packaging
working width
door opening direction
working depth
model
ingenious ingenious prismatic prismatic glass glass
Capacity
Total Dimensions
(closed doors)
cm cm cm cm cm cm
Depth
Width
Total Dimensions
(open doors)
Depth
Width
working width
door opening direction
working depth

7
levelling
To level the refrigerator use
the two levelling screws
found on the base at the
front. Make sure that the
refrigerator is placed on level
ground. Adjust the levelling
screws to ensure that the
refrigerator doesn’t move
during day-to-day use.
Turn the screws anticlockwise to lift the front of
the refrigerator and clockwise
to lower it.
The front part of the
refrigerator should be a little
higher than the back causing
it to tilt backwards slightly.
Levelling requires two people;
one to tilt the unit backwards
and the other to turn the screws.
To level it, lift the front by turning the screws until there is a 48 mm (1.9
in) gap between the oor and the base of the refrigerator, as indicated in
the gure on the right.
observe the following when installing:
important –
after leaving the refrigerator to stand 6 to 8 hours
and before plugging it in:
1. Clean
the interior of your refrigerator with a cloth or soft sponge, and
a neutral soap or a soda bicarbonate solution.
2.
Plug it in to the correct outlet.
3. Leave
it on, empty and closed, for 4 hours before putting food inside.
4. Avoid opening the door before optimum temperature has been
reached.
5.
If you want to move your refrigerator to another location, disconnect
it. When it has been repositioned repeat steps 3 and 4.
caution
I
n the case of physical, mental or sensorial difculties (including
children), or if you don’t have sufcient experience or knowledge to
handle this product, you will need the assistance of a capable adult
to ensure safety.
Children should always be supervised. This product is not a toy.
Levelling
screws
Front
wheels
Back
wheels
mm84
Front
Front
Front
Levelling
screws
Front
wheels
Back
wheels

8
minimum electrical requirements:
Check the voltage
and frequency
characteristics in
accordance with
your country of
residence.
electrical installation:
1. Install your refrigerator to
the closest outlet. The use of
an extension cord is not recommended
2.
Where
possible, avoid connecting other electrical
appliances to the same outlet as your refrigerator while
it’s in use. This will prevent uctuations in voltage and
overheating of the refrigerator.
3. To connect and disconnect your refrigerator, take the
cord by the plug and remove it. Never pull on the cable.
4. Your refrigerator comes equipped with a type “Y”
polarised power cord, which includes a grounding cable.
Do not remove the ground prong by using a two-prong
adaptor, or cut the cable to replace the original plug for
a two-prong plug.
5.
If you live in a region where there are voltage and
frequency variations, don’t connect your refrigerator
into the outlet. You must install an automatic voltage
regulator with a minimum power of 500 Watts for 1000
Watts. Make sure the regulator can handle your region’s
variations in tension.
6.
If
the supply cord is damaged, it must be replaced
by the manufacter, its service agent or similarly
qualied persons in order to avoid a hazard.
important:
Ignoring the above-mentioned advice places the
responsibility for any personal or material risk
entirely with the customer.
CountryNominal Characteristics
115 V ~ 60 Hz
Brasil 127 V ~ 60 Hz / 220 V ~ 60 Hz
Europa 220 V - 240 V ~ 50 Hz
Medio Oriente 220 V - 50 Hz / 110 V ~ 60 Hz
Peru 220 V ~ 60 Hz
Ecuador115 V ~ 60 Hz
Venezuela115 V ~ 60 Hz
Colombia 115 V ~ 60 Hz
Chile220 V ~ 50 Hz
El Salvador115 V ~ 60 Hz
Argentina 220 V ~ 50 Hz
Canada115 V ~ 60 Hz
Mexico
9
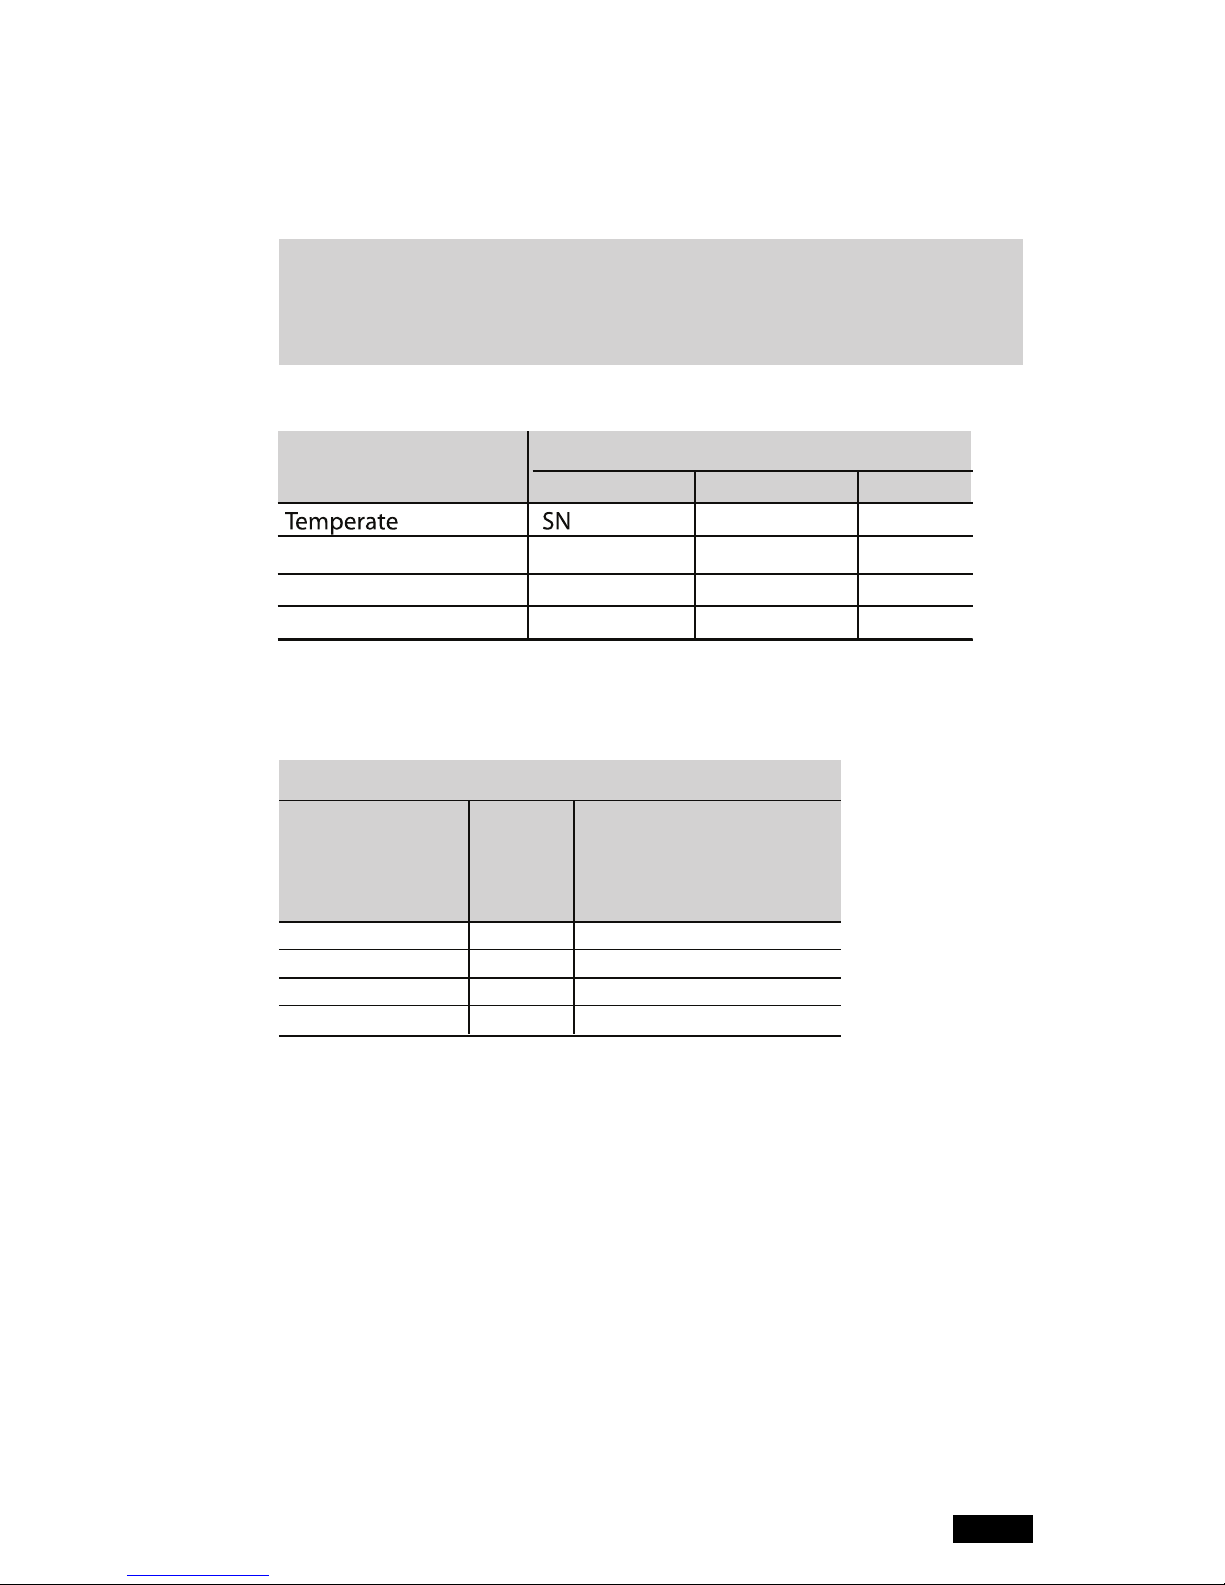
32°C 10°C
N 32°C 16°C
Subtropical ST 38°C 16°C
Tropical
T 43°C 16°C
Temperatura ambiente
Temperature Range
Class Symbol
Room Temperate Range
within which our products are
designed for use.
(Storage temperatures should
comply with these.)
Temperate SN
+10 to + 32
Mild Temperate
N
+16 to + 32
Subtropical
ST
+18 to + 38
Tropical T +16 to + 43
Symbol Maximum Minimum
Mild Temperate
Values in Celsius Degrees
know your product
The
refrigerator is designed to work within the room temperatures specied
in the table below.
note: The internal temperature can be affected by factors such as the
location of the refrigerator , the room temperature, and how often the doors
are opened. Adjust the temperature controls accordingly to compensate
for these factors.
For Chile and Europe:
For Brazil, Ecuador, Colombia, and Argentina:
temperature control
The internal temperatures of the freezer compartments and the cooler can
be regulated to allow them to be adjusted for suitable conservation of food.
When using your refrigerator for the rst time, we recommend maintaining
the original factory positions (in mid-position). Let it stand for 4 to 6 hours to
allow the temperature to stabilise.
If you need to change the temperature after this period you can adjust it with
the controls.

10
general temperature control
The refrigerator control has temperature graduations for both compartments
that vary from minimum (least cold) to maximum (coldest). If needs be, adjust
the control and monitor the food for a couple of hours. You can readjust it
until you obtain the desired refrigeration level. Y ou will have to wait between
4 and 6 hours until the refrigerator reaches the selected temperature.
air regulator
Your refrigerator has an additional
control that regulates the air ow
between the freezer and the cooler.
It’s calibrated in the factory to ensure
optimum function, so we recommend
you don’t alter its position.
If you wish to adjust it, put a coin into
the central slot. By turning it to the right
you’ll generate greater air ow to the
freezer, accelerating the freezing process. However, you’ll notice that the
cooler will take longer to reach the correct temperature.
By turning the control to the left, the air ow to the cooler will increase,
delaying the freezing process according to the following guide:
note: For some models the temperature control is located on the exterior
control or display. If your model has an external control or display,
see page 72 to understand how it works.
important
Changing the position of the air regulator will alter the time it takes the
cooler to reach the correct temperature but not the temperature itself.
note: Do not overll the refrigerator
. Leave space between food and
use the shelves provided to hold everything. This will facilitate the
necessary air circulation and prevent it from lower performance.
Cold days
Few foods stored
Infrequent door opening
Hot Days
Many foods storedMaximum
Mínimum
Medium Recommended for normal use
regulator position
position when to use
Minimum
Maximum
Turn the knob towards Minimum
for less chill or towards Maximum
for greater chill.
Freezer Temperature
Cooler Temperature No variation
Least cold Suggested Coldest
Frequent door opening
Cold days
Few foods stored
Infrequent door opening
Hot Days
Many foods storedMaximum
Mínimum
Medium Recommended for normal use
position when to use
Minimum
Maximum
Turn the knob towards Minimum
for less chill or towards Maximum
for greater chill.
Frequent door opening

11
cautions
1. The room temperature inuences the performance of your
refrigerator. The higher the external temperature, the colder the
selected temperature in the cooler should be.
2. We recommend selecting a lower temperature if you frequently open
the cooler door.
3.
When placing your food inside the refrigerator
, try not to block the
airways. This will allow adequate circulation and keep the inside
temperature stable and uniform, thus only freezing the items in the
freezer.
4.
Use the top compartment to freeze food, conserving it for longer
.
Use the lower compartment to refrigerate food. if your refrigerator
has a rapid cooling compartment, you should take into account that
some fresh fruit and vegetables are cold-sensitive and it is not a
good idea to keep them in this compartment.
 Loading...