

Page 1
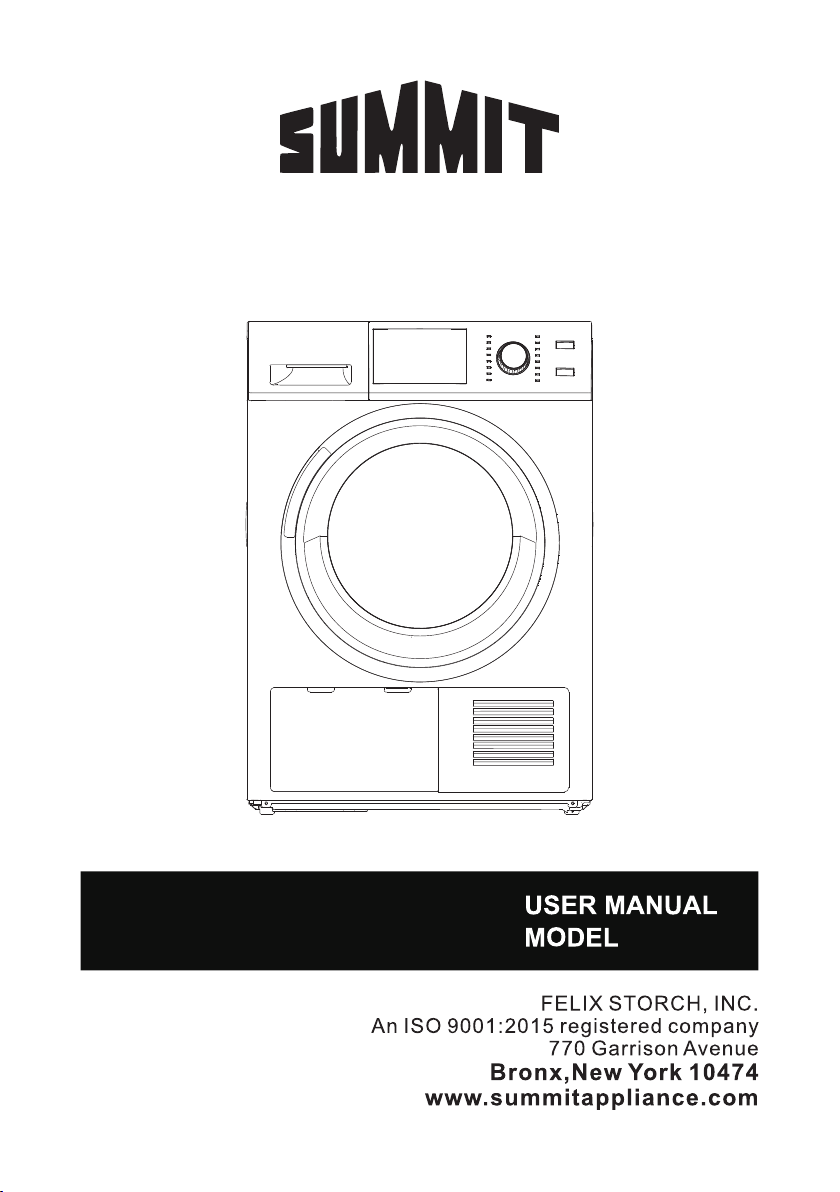
4. 4 C U. FT. HEAT PUMP DRYE R
LD2444
Page 2

CONTENTS
SAFETY AND PRECAUTIONS.................................................................2
WHAT YOU NEED TO KNOW ABOUT SAFETY INSTRUCTIONS................................2
IMPORTANT SAFETY SYMBOLS AND PRECAUTIONS............................................2
IMPORTANT SAFETY INSTRUCTIONS.................................................................2
INSTALLATION REQUIREMENTS.........................................................6
IMPORTANT TO INSTALLER...............................................................................6
BASIC REQUIREMENTS.....................................................................................6
LOCATION REQUIREMENTS..............................................................................6
STACK KIT INSTALLATION INSTRUCTION..........................................................10
DRAIN SYSTEM...............................................................................................12
ELECTRIC REQUIREMENTS...............................................................................12
GROUNDING..................................................................................................14
REPLACEMENT PARTS AND ACCESSORIES.........................................................14
INSTALLATION INSTRUCTION............................................................14
REMOVING FROM THE PACKAGE.....................................................................15
PARTS IDENTIFICATION...................................................................................15
TOOLS NEEDED IN INSTALLATION....................................................................16
INSTALLATION STEPS......................................................................................16
OPERATING INSTRUCTION..................................................................20
CONTROL PANEL............................................................................................20
DRYING A LOAD OF LAUNDRY........................................................................ .22
FILTER CLEAN.................................................................................................25
SPECIAL LAUNDRY TIPS...................................................................................27
MAINTENANCE........................................................................................28
CARE AND MAINTENANCE.............................................................................28
TROUBLESHOOTING INSTRUCTIONS..............................................29
CHECK THESE SOLUTIONS IF YOUR DRYER…...................................................29
ERROR CODES...............................................................................................31
APPENDIX.....................................................................................................32
1
Page 3
SAFETY AND PRECAUTIONS
Introduction
Congratulations on the purchase of your new Insignia dryer. Insignia dryers feature
the latest in design and capabilities and will provide reliable and trouble-free
performance.
SAFETY AND PRECAUTIONS
WHAT YOU NEED TO KNOW ABOUT SAFETY INSTRUCTIONS
This manual contains important information on the installation, use, and care of
your appliance. Please read this manual carefully before installation and operation
of this machine to prevent injury and property damage.
Warnings and Important Safety Instructions in this manual DO NOT cover all
possible conditions and situations that may occur. It is your responsibility to use.
IMPORTANT SAFETY SYMBOLS AND PRECAUTIONS
This indicates that hazards or unsafe practices may cause
serious personal injury or death.
WARNING
To reduce the risk of fire, explosion, electric shock, or
personal injury when using your dryer, these basic safety
precautions SHOULD be followed.
CAUTION
This indicates that hazards or unsafe practices may
cause minor personal injury or property damage.
For your safety the information in this manual
must be followed to minimize the risk of fire or
WARNING
explosion, or to prevent property damage,
personal injury or death.
– Do not store or use gasoline or other flammable vapors and liquids
in the vicinity of this or any other appliance.
– Installation and service must be performed by a qualified installer,
service agency, or the gas supplier.
IMPORTANT SAFETY INSTRUCTIONS
WARNING-To reduce the risk of fire, electric shock, or injury to persons when
using your appliance, follow basic precautions, including the following:
1. Read all instructions before using the appliance.
2. Use this appliance only for its intended purpose as described in this Owner’s Manual.
3. Before use, the dryer must be properly installed as described in this manual.
2
Page 4

SAFETY AND PRECAUTIONS
4. ALWAYS follow the fabric care instructions supplied by the garment manufacturer.
5. Do not dry articles that have been previously cleaned in, washed in, soaked in,
or spotted with gasoline, dry-cleaning solvents, other flammable or explosive
substances as they give off vapors that could ignite or explode.
6. Do not use the dryer to dry clothes which have traces of any flammable substance,
such as vegetable oil, cooking oil, machine oil, flammable chemicals, thinner, etc.,
or anything containing wax or chemicals, such as mops and cleaning clothes.
Flammable substances may cause the fabric to catch fire by itself.
7. Do not store or use gasoline or other flammable vapors and liquids near this or
any other appliance.
8. Do not allow children to play on or in the appliance. Close supervision of children
is necessary when the appliance is used near children.
9. Before the appliance is removed from service or discarded, remove the lid of the
washing or door of the drying compartment.
10.Do not reach into the appliance if the drum is moving.
11.Do not install or store this appliance where it will be exposed to the weather or
freezing temperatures.
12.Do not tamper with the controls.
13.Do not repair or replace any part of the appliance or attempt any servicing unless
it is specifically recommended in the user-maintenance instructions or in published
user-repair instructions that you understand and have the skills to carry out.
14.Keep the area underneath and around your appliances free of combustible materials
(lint, paper, rags, etc.), gasoline, chemicals and other flammable vapors and liquids.
15.Do not place items exposed to cooking oils in your dryer. Items contaminated with
cooking oils may contribute to a chemical reaction that could cause a load to catch
fire. o reduce the risk of fire due to contaminated loads, the final part of a tumble
dryer cycle occurs without heat (cool down period). Avoid stopping a tumble dryer
before the end of the drying cycle unless all items are quickly removed and spread
out so that the heat is dissipated.
16.Turn off the water faucets and unplug the washer if the machine is to be left for an
extended period of time, such as during vacations.
17.Packaging material can be dangerous for children. There is a risk of suffocation!
Keep all packaging from children.
18.Always check the inside of the dryer for foreign objects before loading laundry.
Keep the door closed when not in use.
19.Do not use fabric softeners or products to eliminate static unless recommended
by the manufacturer of the fabric softener or product.
20.Clean the lint screen before or after each load.
T
3
Page 5
SAFETY AND PRECAUTIONS
21.Keep the area around the exhaust opening and surrounding areas free from lint,
dust, and dirt.
22.The interior of the dryer and exhaust duct should be cleaned periodically by
qualified service personnel.
23.Do not place items exposed to cooking oils in your dryer. Items contaminated with
cooking oils may contribute to a chemical reaction that could cause a load to catch
fire.
24.This appliance must be grounded. See “Electric requirements” and
“Grounding” in the “ ” section.
25.This appliance must be properly grounded. Never plug the power cord into a
receptacle that is not grounded adequately and in accordance with local and
national codes. Refer to installation instructions for grounding this appliance.
26.Ensure pockets are free from small irregularly shaped hard objects and foreign
material, i.e. coins, knives, pins, etc. These objects could damage your dryer.
27.Do not use heat to dry articles containing foam rubber or similarly textured
rubber- like materials.
SAVE THESE INSTRUCTIONS.
WARNING-To reduce the risk of fire or explosion
Do not dry items that have been previously cleaned, washed, soaked, or spotted
with gasoline, dry cleaning solvents, or other flammable or explosive substances.
They emit vapors that could ignite or explode. Any material that has been in
contact with a cleaning solvent or flammable liquids or solids should not be
placed in the dryer until all traces of these flammable liquids or solids and their
fumes have been removed.
There are many highly flammable items used in homes, such as acetone,
denatured alcohol, gasoline, kerosene, some liquid household cleaners, some
spot removers, turpentine, waxes, and wax removers.
Do not dry items containing foam rubber (may be labeled latex foam) or similarly
textured rubber-like materials on a heat setting. Heated foam rubber materials
can under certain circumstances, produce fire by spontaneous combustion.
INSTALLATION REQUIREMENTS
4
Page 6
SAFETY AND PRECAUTIONS
CAUTION
1. Do not sit on top of the dryer.
2. Because of continuing product improvements, we reserves the right
of change specifications without notice. For complete details, see the
Installation Instructions packed with your product before selecting cabinetry,
making cutouts, or beginning installation.
3. Do not dry clothing with large buckles, buttons, or other heavy metal or solid things.
4. Install and use in accordance with the manufacturer’s instructions.
5. Do not place items in your dryer that have been spotted or soaked with vegetable oil
or cooking oil. Even after being washed, these items may contain significant
amounts of these oils.
6. Residual oil on clothing can ignite spontaneously. The potential for spontaneous
combustion increases when items containing vegetable oil or cooking oil are
exposed to heat. Heat source such as your dryer can warm these items, allowing an
oxidation reaction in the oil to occur.
7. Oxidation creates heat. If this heat cannot escape, the items can become hot enough
to catch fire. Piling, stacking, or storing these kinds of items may prevent heat from
escaping and can create a fire hazard.
8. Take care that children’s fingers are not caught in door when closing it.
This may result in injury.
WARNIG- Risk of Fire
Clothes dryer installation must be performed by a qualified installer.
Install the clothes dryer according to the manufacturer’s instructions and local
codes.
To reduce the risk of severe injury or death, follow all installation instructions.
Save these instructions.
5
Page 7
INSTALLATION REQUIREMENTS
INSTALLATION REQUIREMENTS
IMPORTANT TO INSTALLER
Please read the following instructions carefully before installing the dryer.
These instructions should be kept for future reference.
The dryer is not suitable for installation in a mobile home.
CAUT ION
BASIC REQUIREMENTS
Make sure you have everything necessary for the proper installation.
- A GROUNDED ELECTRICAL OUTLET is required. Refer to the “Electrical
requirements” section.
- A POWER CORD electric dryer (except for Canada).
LOCATION REQUIREMENTS
1. The dryer should be located where there is enough space at the front for loading
the dryer, and enough space behind for the exhaust system.
2. Make sure the room in which the dryer is located has enough fresh air. The dryer
must be located where there are no air-flow obstructions.
3. The dryer must not be installed or stored in an area where it will be exposed to
water and/or weather. The dryer area must be kept clear of combustible materials,
gasoline, and other flammable vapors and liquids. A dryer produces combustible
lint. The area around the dryer should be kept lint-free.
Remove the door from all discarded appliances to avoid the danger of a
child being trapped and suffocating, after unplugging cut off Power Cord.
6
Page 8
INSTALLATION REQUIREMENTS
Sides
1 in. (25.4mm)
Rear
2 in.(50.8mm)
Top
2 in. (50.8mm)
Closet front
2 in. (50.8mm)
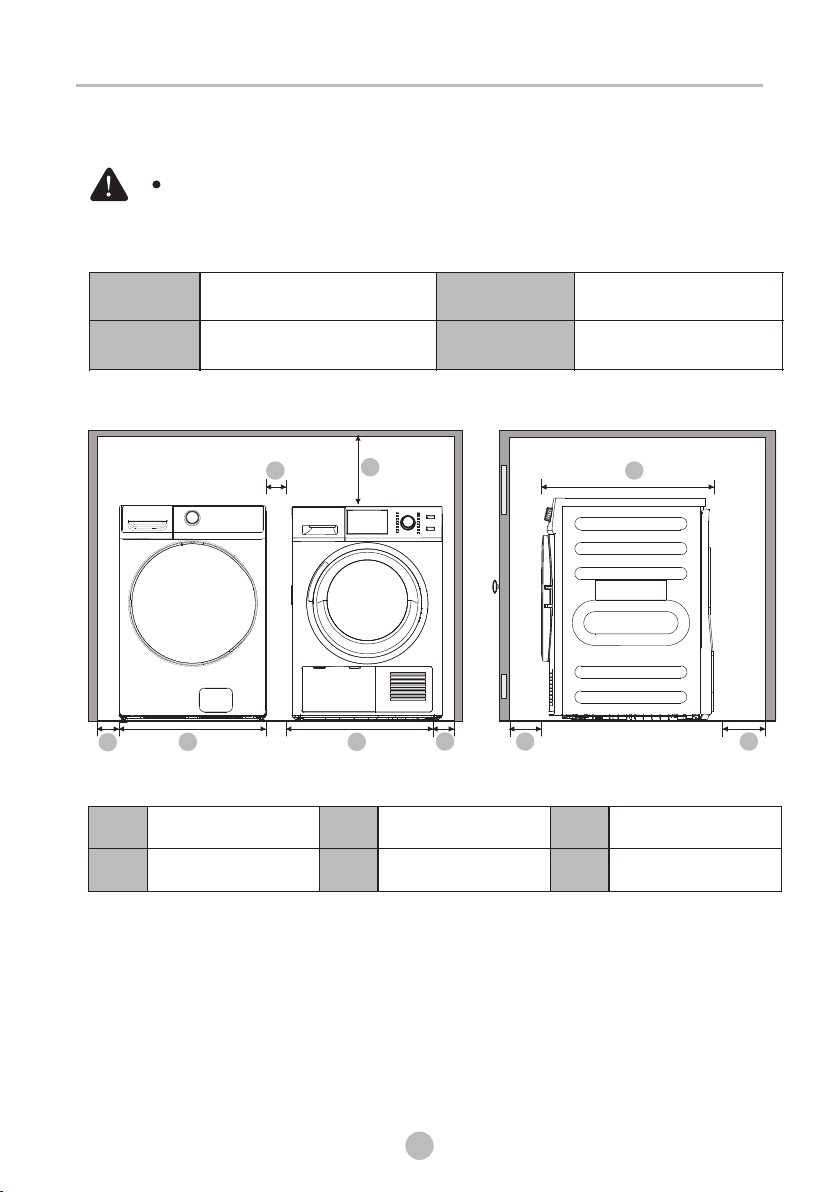
Alcove or closet installationsor wall insert/recessed
No other fuel-burning appliance should b e in st al led in the same closet as the dryer.
WAR NING
Minimum clearances between the dryer and adjacent walls or other surfaces :
A
1 in. (25.4mm)
A
B
23.4 in. (595mm)
A
B B
C
D
C
A
2 in. (50.8mm)
2 in. (51mm)
E
D F
25.7 in. (653mm)
E
2 in. (50.8mm)
F
7
Page 9
INSTALLATION REQUIREMENTS
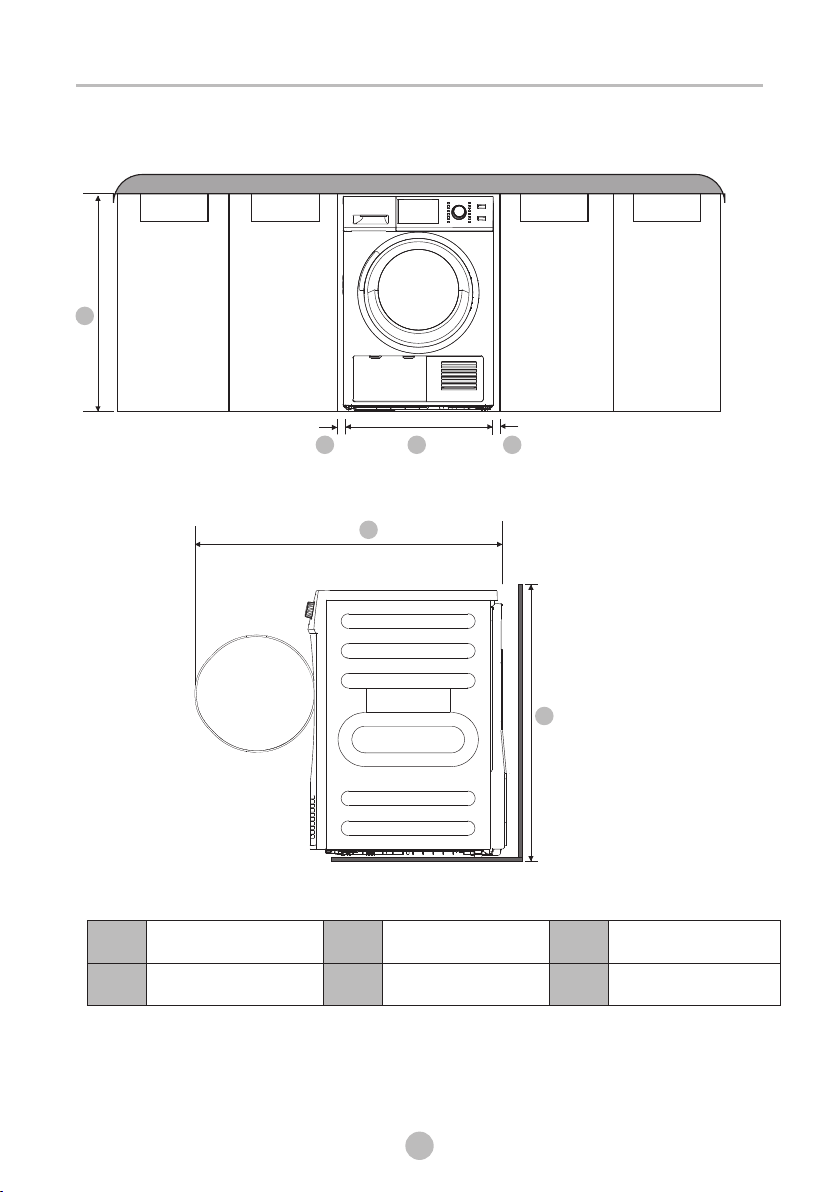
Undercounter installation
A
CB D
E
≥35.5in.( ≥901mm)
A
B
1 in. (25mm)
23.4 in. (595mm)
C
D
1 in. (25mm)
8
F
42.2in.(1072mm)
E
33.5in.(850mm)
F
Page 10
INSTALLATION REQUIREMENTS
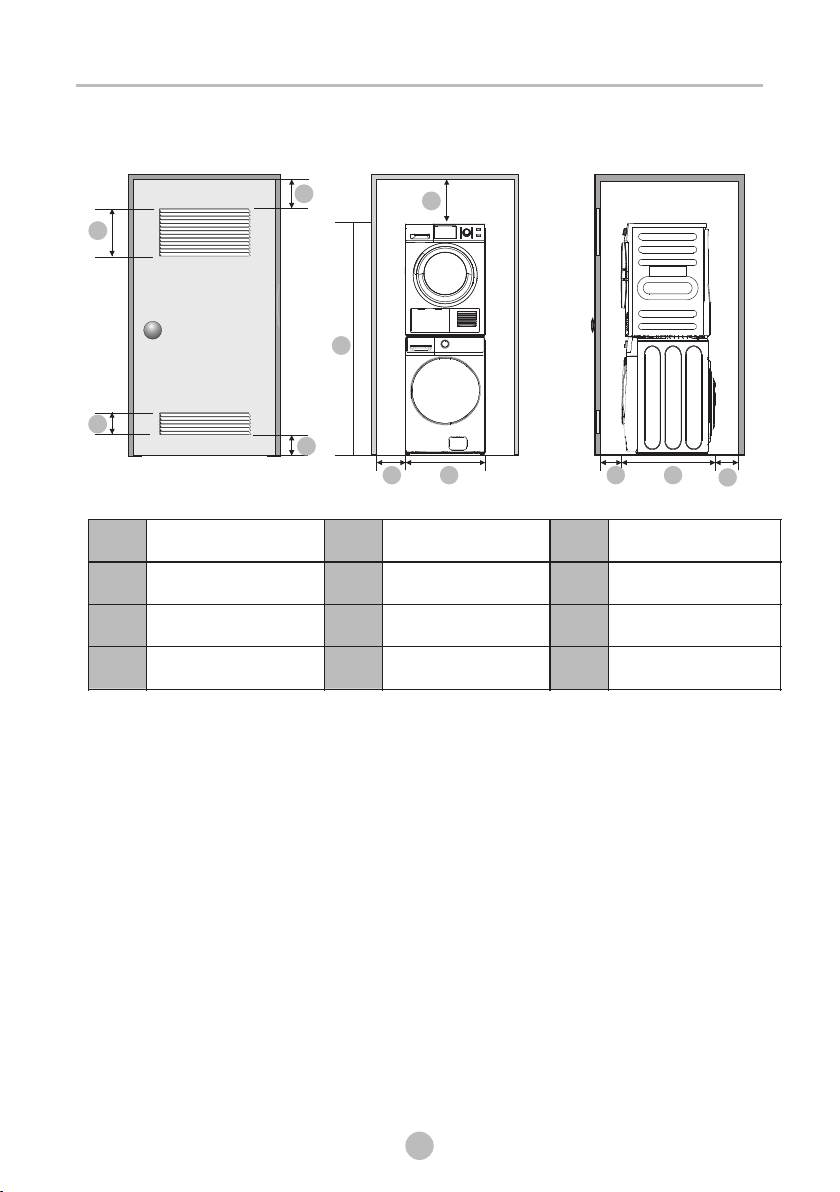
Installation with stacked washing machine and dryer
A
B
F
C
D
3in.(76mm)
A
B
48in.² (3100mm²)
24in.²(1550mm²)
C
D
3in.(76mm)
NOTE
The front of the closet must have two unobstructed air openings for a combined
minimum total area of 72 sq.in. (465 sq.cm) with a minimum clearance of 3 in. (76mm)
at the top and bottom. A slatted door with equivalent space clearance is acceptable.
E
F
G
H
E
G H I J
2in.(50.8mm)
/
1in.(25.4mm)
23.4 in. (595mm)
3in.(76mm)
I
25.7 in.(653mm)
J
2 in.(50.8mm)
K
K
9
Page 11
INSTALLATION REQUIREMENTS
Stack Kit Installation Instruction
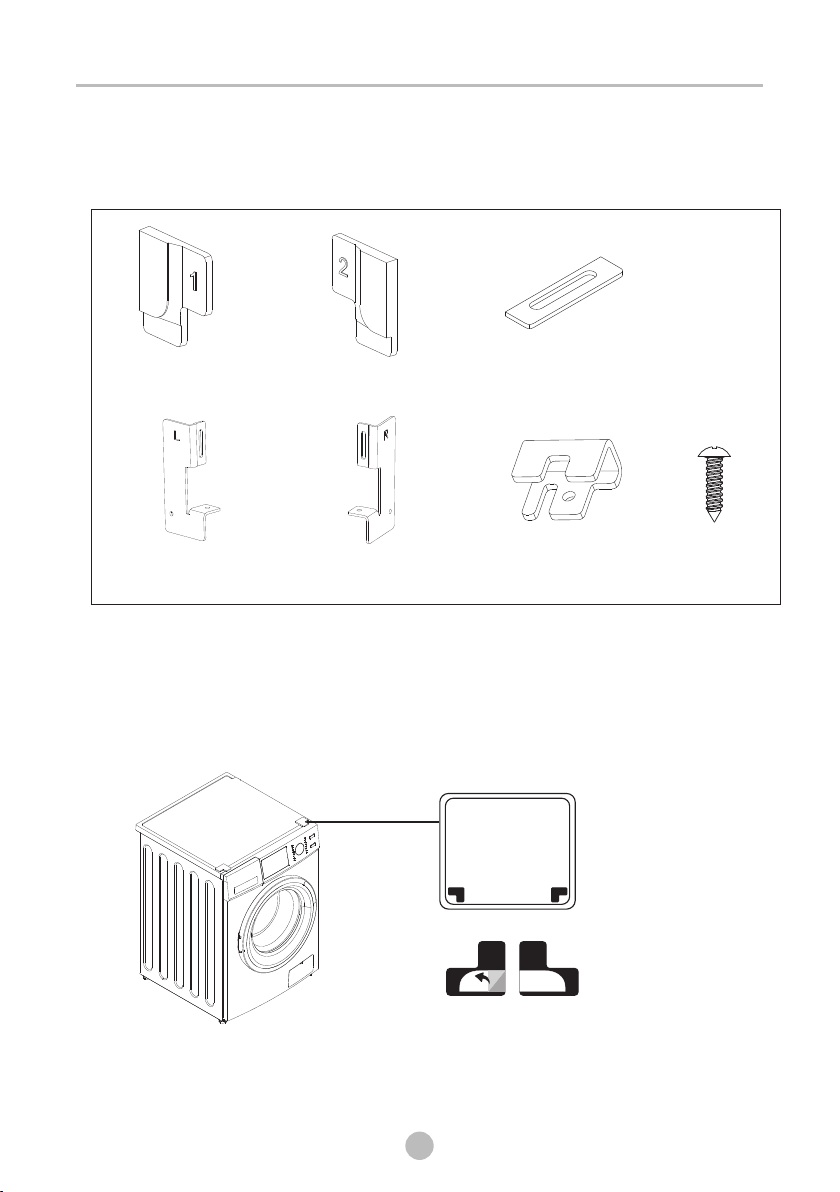
1.The stacking kit includes the following parts:
Rubber pad x1
Connecting bracket L x1
Rubber pad x1
Connecting bracket R x1
Rubber sheet x2
Support piece x4
2. Rubber pad attaching position
Attach the rubber pad to the top cover of the front loader, as shown in the
figure below:
1
2
Screw x10
10
Page 12
INSTALLATION REQUIREMENTS
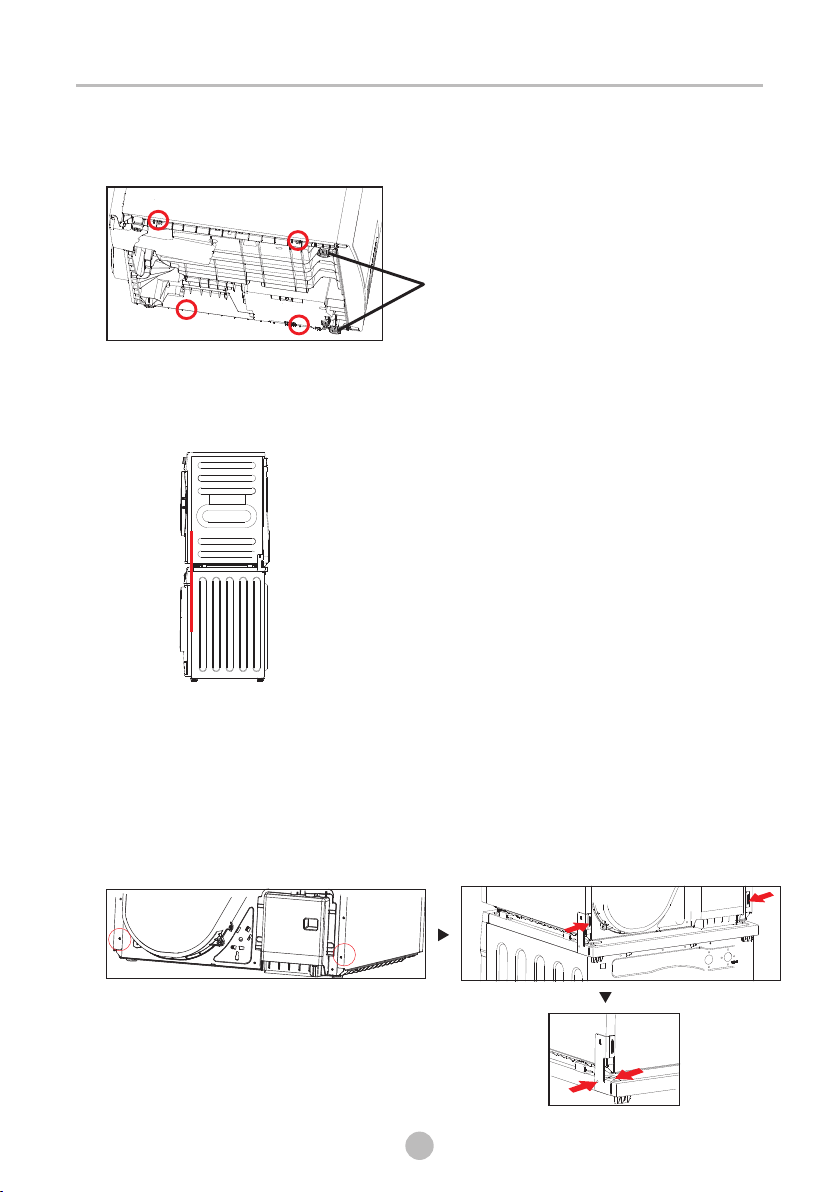
3. Support piece installation
Install the support at the bottom of the dryer, as shown in the figure below:
Screw the two feet on the front of
the dryer to the minimum distance
(clockwise rotation)
4. Method for stacking clothes dryer and washing machine
Lift the dryer to the top of the washing machine. Adjust the position of the dryer
to align both sides, as shown in the picture:
5.Connecting bracket installation
1.Remove the screws at the back of the dryer, first fix the connecting bracket
and the rubber sheet to the back of the dryer and align the U-shaped holes
of the rubber sheet and the connecting bracket.
2.Use a 3mm diameter drill bit to drill the remaining two screw holes.
Then use a torque not exceeding 5Nm to fix the screws.
11
Page 13
INSTALLATION REQUIREMENTS
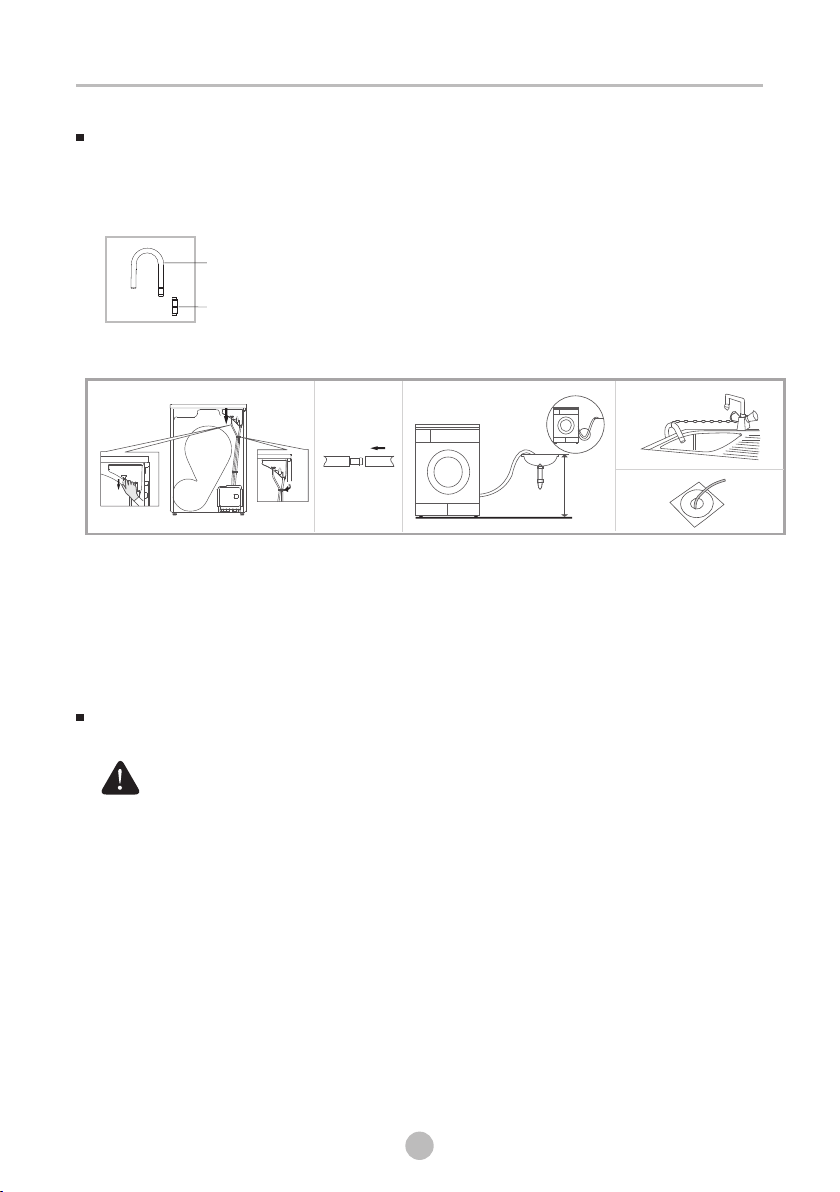
DRAIN SYSTEM
The following parts are optional for specific models.
If your dryer has following parts, please wear gloves and install them as per the
instruction below.
Condensing drain hose
Connector
Installation
x
Max .78c m
1. Take the hose out of the holder.
2.Disconnect the hose from the water container inflow.(To as sur e wat er ti ght nes s,
there is tension between the hose and the inflow and therefore an increased
force is required for disassembly.)
3. Insert the drain hose and the external drainage hose into the connector.
4. Put the hose on the washing basin or floor drain. To assure the smooth drainage, ensure
the pipe is not folded.
ELECTRIC REQUIREMENTS
The wiring diagram is located on the back board of the unit.
- The improper connection of the equipment grounding conductor can result
in the risk of electric shock. Check with a qualified electrician or serviceman
WARN ING
if you are in doubt as to whether your dryer is properly grounded. Do not
modify the plug provided with your dryer - if it doesn’t fit the outlet, have a
proper outlet installed by a qualified electrician.
- To prevent unnecessary risk of fire, electrical shock, or personal injury, all
wiring and grounding must be done in accordance with local codes, or in
the absence of local codes, with the National Electrical Code, ANSI/NFPA
No. 70 - Latest Revision (for the U.S.) or the Canadian Electrical Code CSA
C22.1 - Latest Revisions and local codes and ordinances. It is your
responsibility to provide adequate electrical services for your dryer.
- All gas installations must be done in accordance with the National Fuel
Code ANSI/Z2231 - Latest Revision (for the U.S.) or CAN/CGA - B149
Installation Codes - Latest Revision (for Canada) and local codes and
ordinances.
12
Page 14

INSTALLATION REQUIREMENTS
Electrical connections
An individual branch (or separate) circuit serving only your dryer is recommended.
DO NOT USE AN EXTENSION CORD.
Elec tric models - U.S. only
The dryers require a 120/240 volt, 60Hz AC approved electrical service.
The electric service requirements can be found on the data label located on the back.
A 30-amperefuse or circuit breaker on both sides of the line is required.
- If a power cord is used, the cord should be plugged into a 30-ampere receptacle.
- The power cord is NOT provided with U.S. electric model dryers.
RISK OF ELECTRIC SHOCK:
When local codes allow, the electrical supply of the dryer may be connected by
WAR NING
means of a new power supply cord kit, marked for use with a dryer, that is UL
listed and rated at a minimum of 120/240 volts, 30-ampere with three No. 10
copper wire conductors terminated with closed loop terminals, open-end spade
lugs with turned up ends, or with tinned leads.
- Do not reuse a power supply cord from an old dryer. The power cord electric
supply wiring must be retained at the dryer cabinet with a suitable UL-listed
strain relief.
- Grounding through the neutral conductor is prohibited for (1) new branch circuit installations, (2) mobile homes, (3) recreational vehicles, and (4) areas
where local codes prohibit grounding through the neutral conductor. (Use a
4-prong plug for 4 wire receptacles, NEMA type 14-30R.)
Elec tric models - Canada only
- A 120/240 volt, 60Hz AC approved electrical service fused through a 30-ampere
fuse or circuit breaker on both sides of the line is required.
- All Canadian models are shipped with the power cord attached. The power cord
should be plugged into a 30-ampere receptacle.
Note: A power cord is NOT provided with U.S. electric model dryers
13
Page 15

INSTALLATION INSTRUCTION
Install the clothes dry according to manufacture’s instructions and local
codes.
GROUNDING
- For products sold in the U.S., your dryer has an optional cord with an equipment grounding conductor and a grounding plug, which is sold separately.
For products sold in Canada, your dryer is equipped with a cord having an
equipment-grounding conductor and a grounding plug.
- The plug must be plugged into an appropriate outlet that is properly installed and
grounded in accordance with all local codes and ordinances.
- Do not modify the plug provided with the appliance: if it will not fit the outlet,
have a proper outlet installed by a qualified electrician.
- If a power cord is not used and the electric dryer is to be permanently wired,
This appliance must be connected to a grounded metal, permanent wiring system,
or an equipment-grounding conductor must be run with the circuit conductors
and connected to the equipment-grounding terminal or lead on the appliance.
- Improper connection of the equipment-grounding conductor can result in
WARN ING
a risk of electric shock. Check with a qualified electrician or service
representative or personnel, if you are in doubt as to whether the appliance
is properly grounded.
-
electric shock only during servicing.
service personnel-do not contact the following parts while the appliance is
energized: Main Motor; Cooling Fan.
Certain internal parts are intentionally not grounded and may present a risk
of
14
Page 16
INSTALLATION INSTRUCTION
INSTALLATION INSTRUCTION
REMOVING FROM THE PACKAGE
1. Unpack your dryer and inspect it for shipping damage. Make sure you have
received all the items shown below.
2. To prevent personal injury or strain, wear protective gloves whenever lifting or
carrying the unit.
Packaging materials can be dangerous to children;
WAR NING
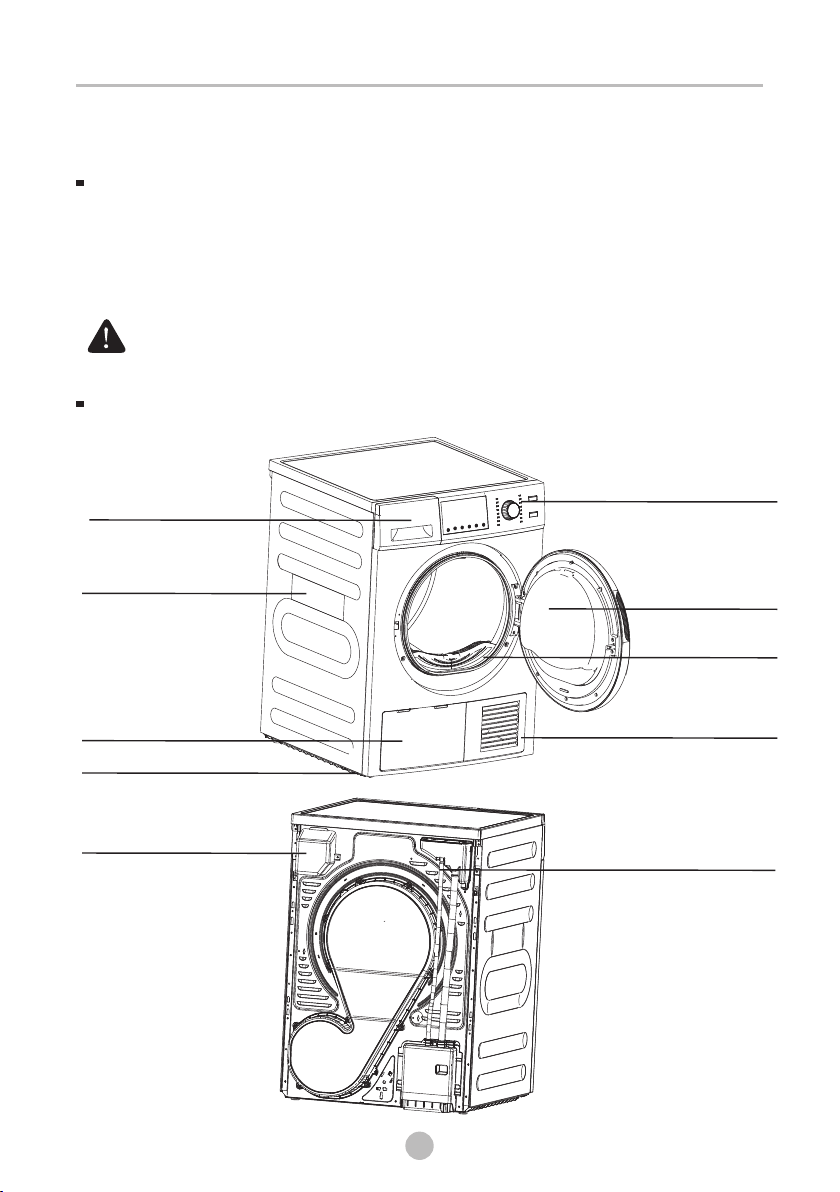
PARTS IDENTIFICATION
Keep all packaging material (plastic bags, polystyrene, etc.) well out of
children’s reach.
wat er t an k
Side Plate
Maintenance Cover
Adjustable leg(Two legs)
Wiring Box
Control Panel
Door
Filter
Fan Cover
Drain Hose
15
Page 17
INSTALLATION INSTRUCTION
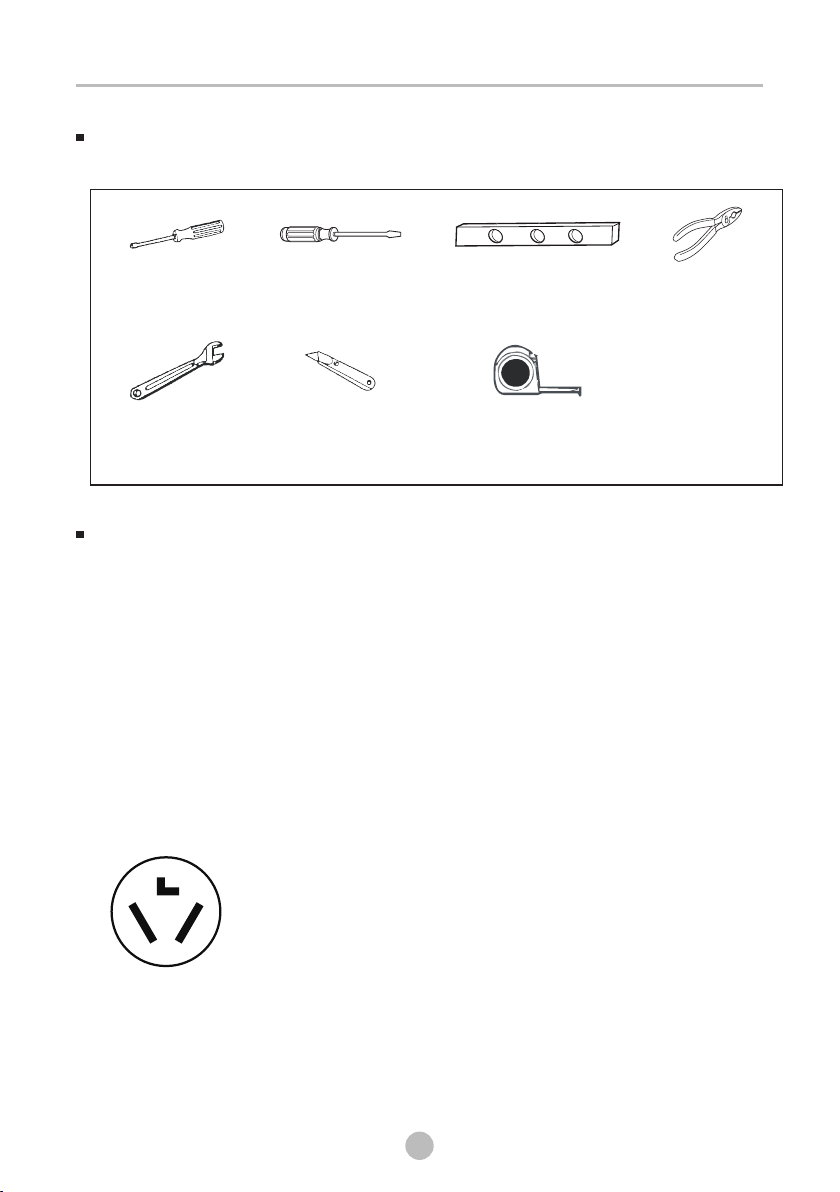
TOOLS NEEDED IN INSTALLATION
Tools needed:
Phillips screwdriver
Adjustable wrench
that opens to 1"
(25 mm)
Flat screwdriver
Cutting knife
Level
Tape measure
Pliers
INSTALLATION STEPS
For the proper installation, we recommend that you hire a qualified installer.
STEP 1 Choose the proper location
1. Move your dryer to an appropriate location for the installation. Consider
installing the dryer and washer side-by-side, to allow access to the gas, electrical,
and exhaust connections. Place two of the carton cushion-tops on the floor. Tip
your dryer on its side so it lies across both cushion-tops.
2. Set your dryer back in an upright position.
STEP 2 Connect the electrical wiring
Three wire outlet
3-Wire
receptacle
(10-30R)
Then choose a 3-wire power supply cord with ring terminals and
UL listed strain relief. The 3-wire power supply cord, at least
4.92 ft. (1.5 m) long, must have 3 10-gauge solid copper wires
and match a 3-wire receptacle of NEMA Type 10-30R, rated
120/240V, min 10A.
16
Page 18
INSTALLATION INSTRUCTION
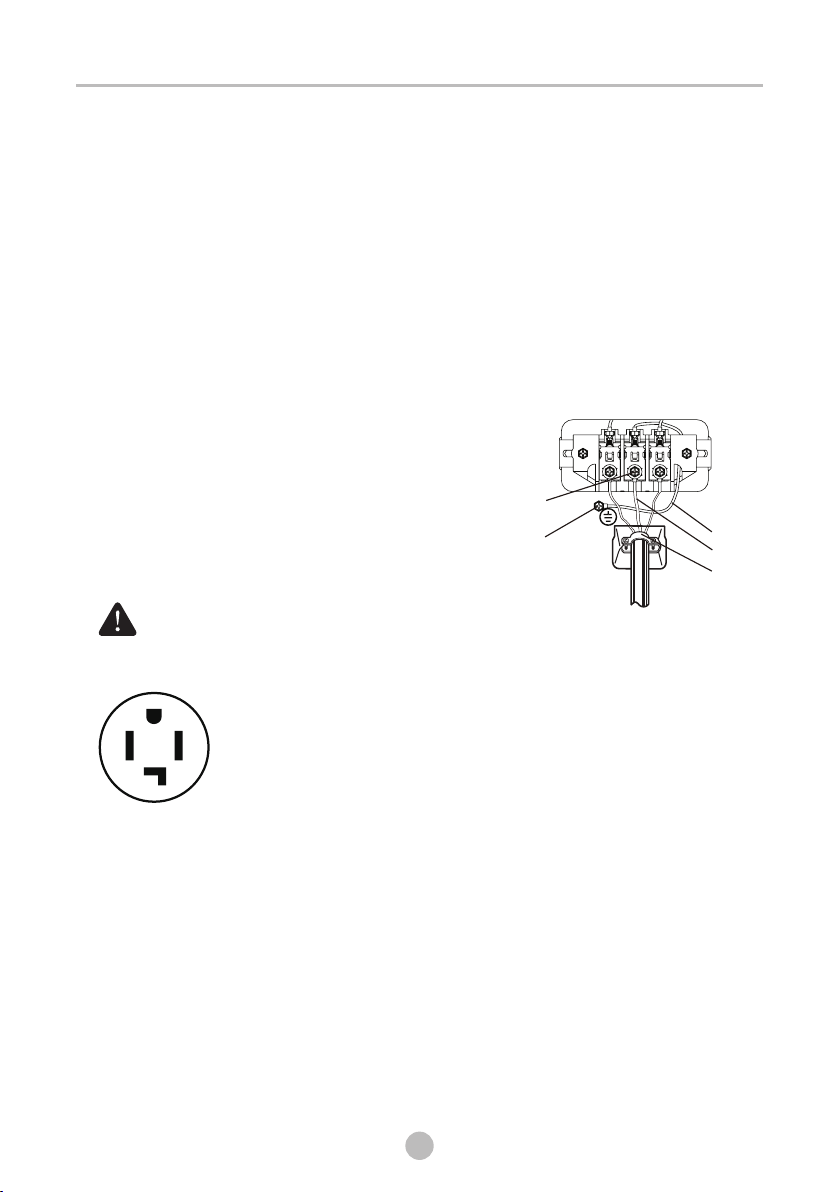
3-Wire system connections
1. Connect the grounding wire of the power cord to the external
screw. If there is no the power cord
grounding wire from center terminal block screw of the dryer, then connect it to
the external ground conductor screw and connect the neutral wire to the center
terminal block screw.
2. Remove the two side terminal block screw and connect the other wires to the
outer terminal screws. Be sure to cross the screw through the terminal ring and
tighten the screw.
3. Tighten the strain relief screws.
4. Insert the tab of the terminal block cover into your dryer's rear panel slot. Secure
the cover with a screw.
3-Wire system instructions:
grounding wire of , please remove the Neutral
A Center terminal block screw
B External ground connector
C Neutral grounding wire (White)
D Neutral wire (white or center wire)
A
B
E 3/4" (1.9cm) UL-listed strain relief
- Ring-type terminals are recommended. If using strap
terminals, make sure they are tightened.
WAR NING
Four wire outlet
ground conductor
C
D
E
Then choose a 4-wire power supply cord with ring terminals and
UL listed strain relief. The 4-wire power supply cord, at least
4.92 ft. (1.5 m) long, must have 4 10-gauge solid copper wires and
match a 4-wire receptacle of NEMA Type 14-30 R, rated 120/240V,
4-Wire
receptacle
(14-30R)
4-Wire system connections
Remove the center terminal block screw.
1.
Connect the ground wire (green or unwrapped) of the power cord to the external
2.
ground conductor screw.
Connect the neutral wire (white or center wire) of the power cord and the appliance
3.
ground wire (white) under the center screw of the terminal block. Be sure to cross the
screw through the ring of the power cord terminal and tighten the screw.
Connect the other wires to the outer terminal block screws. Be sure to cross the
4.
screw through the terminal ring and tighten the screw.
min 10A. The ground wire (ground conductor) may be either green
or bare.The neutral conductor must be identified by a white color.
17
Page 19
INSTALLATION INSTRUCTION
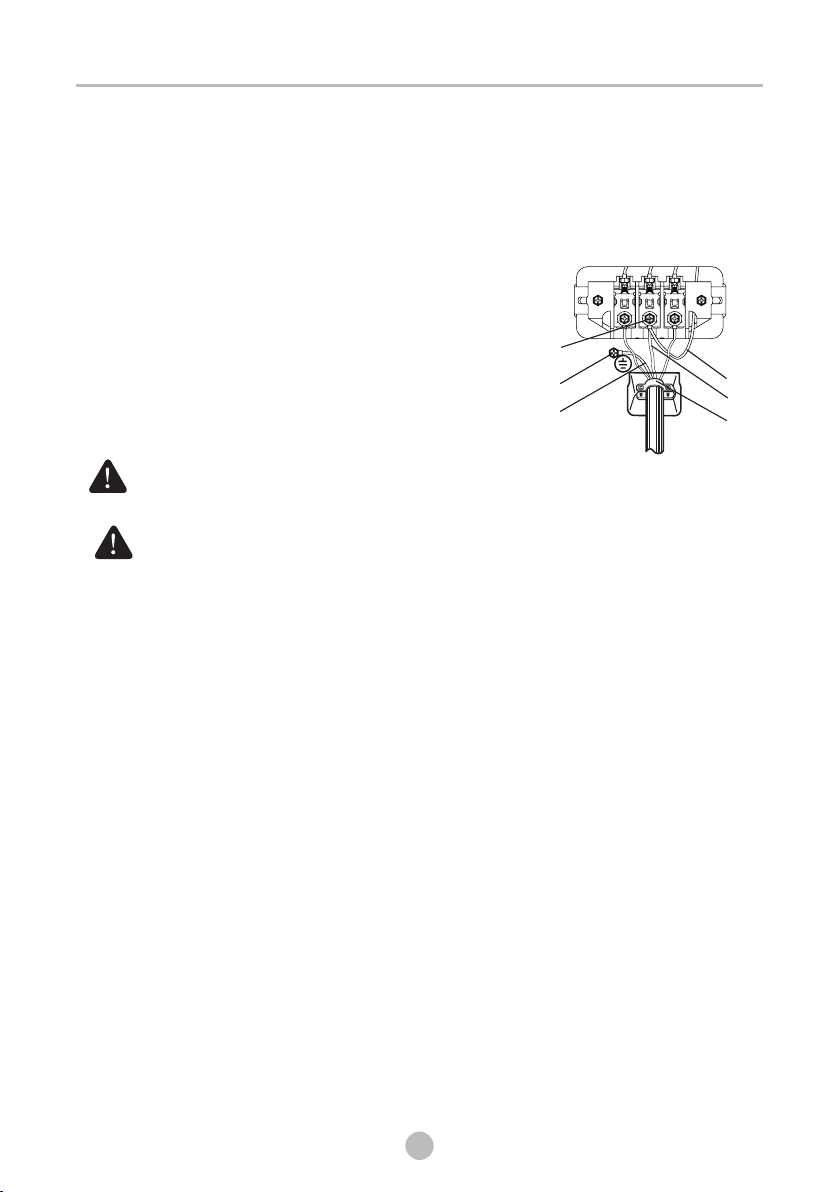
5.
Tighten the strain relief screws.
6.
Insert the tab of the terminal block cover into your dryer’s rear panel slot. Secure
the cover with a screw.
4-Wire system instructions:
IMPORTANT: Ring-type terminals are recommended. If using strap terminals, make sure they are tightened.
A Center terminal block screw
B External ground connector
C Green or bare copper wire of the
power cord
D Neutral grounding wire (White)
E Neutral wire (white or center wire)
F 3/4" (1.9cm) UL-listed strain relief
Ring-type terminals are recommended. If using strap terminals, make sure
they are tightened.
WAR NING
U.S. Models:
Risk Of Electric Shock - All U.S. models are produced for a 3-WIRE
WAR NING
SYSTEM CONNECTION.
The dryer frame is grounded to the neutral conductor at the terminal block.
A 4-WIRE SYSTEM CONNECTION is required for new or remodeled
construction,mobile homes, or if local codes do not permit grounding through
neutral conductor.
If the 4-wire system is used, the dryer frame cannot be grounded to the neutral
conductor at the terminal block. Refer to the “Electric requirements”
section on page 14 for 3-WIRE or 4-WIRE SYSTEM CONNECTIONS.
Remove the terminal block cover plate.
Insert the power cord with a UL-listed strain relief through the hose provided
in the cabinet near the terminal block.
- A strain relief must be used.
Do not loosen the nuts already installed on the terminal block. Be sure they
are tight.
Use a 3/8" (1cm) deep well socket.
A
B
C
Black
White
Red
Green
D
E
F
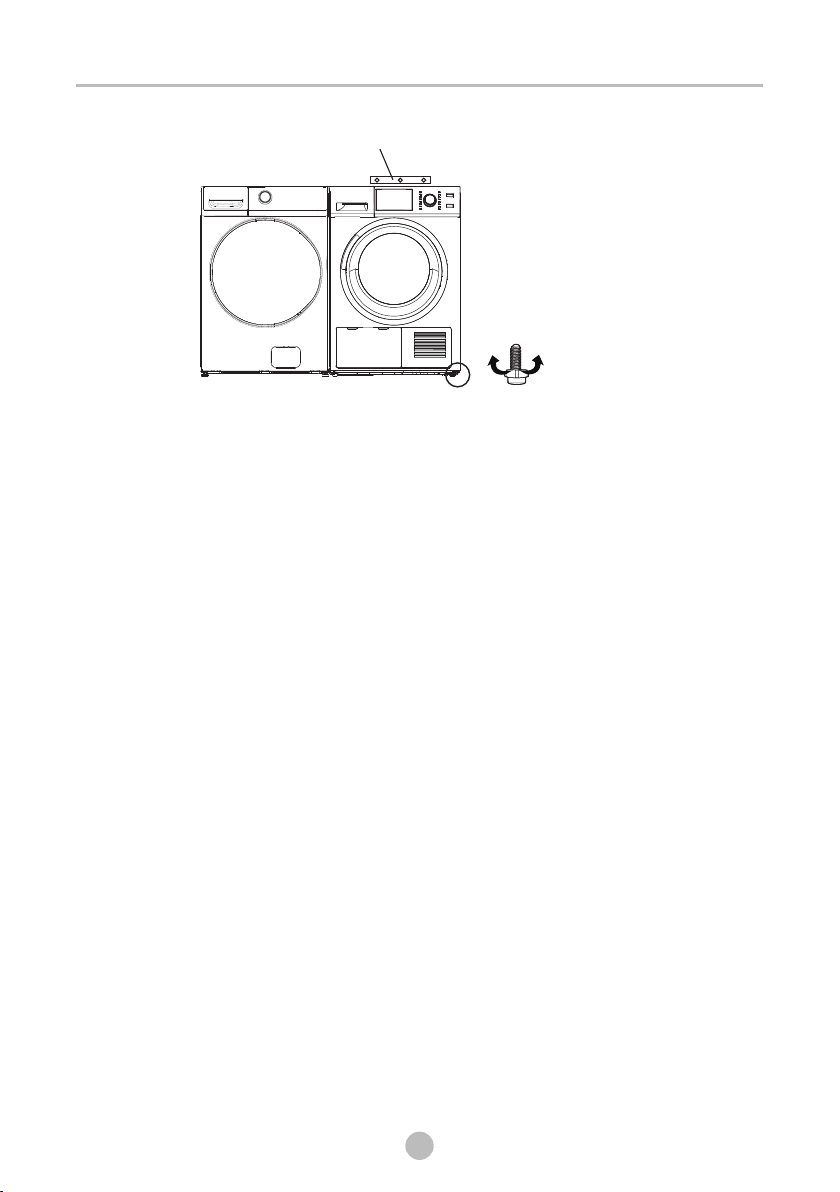
STEP 3 Level the dryer
To ensure that the dryer provides the optimal drying performance, it must be leveled.
To minimize vibration, noise, and unwanted movement, the floor must be a perfectly
level, solid surface.
- Adjust the leveling feet only as much as necessary to level the dryer. Extending the
leveling feet more than necessary can cause the dryer to vibrate.
18
Page 20
INSTALLATION INSTRUCTION
level
loosen lock
Adjustable legs
STEP 4 Power on
Make sure all electrical connections are complete. Plug in your dryer.
STEP 5 Final check
- Make sure the dryer is plugged into an electrical outlet and is properly grounded.
- The dryer is leveled and is sitting firmly on the floor.
- Start your dryer to confirm that it runs, heats, and shuts off.
19
Page 21
OPERATING INSTRUCTION
OPERATING INSTRUCTION
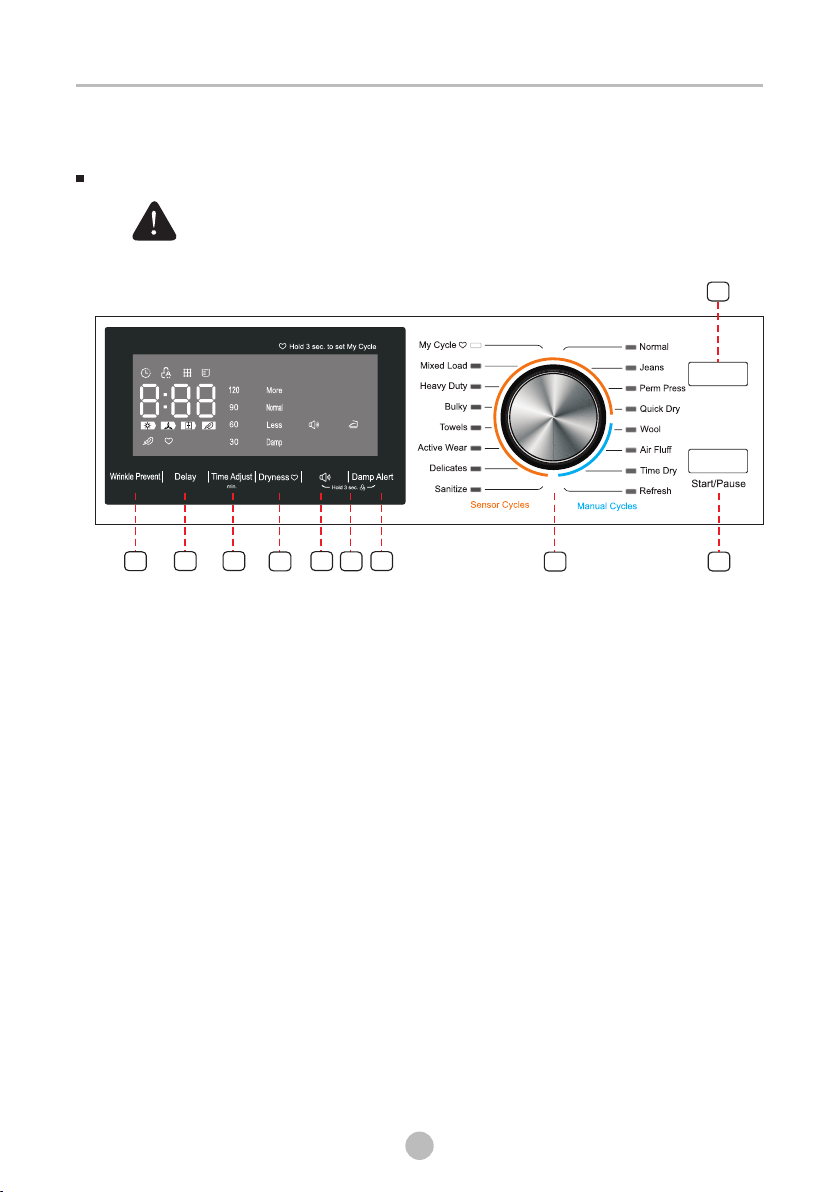
CONTROL PANEL
To reduce the risk of fire, electric shock, or injury to persons, read the
WARNING
4
1-Power button
Press to turn your dryer on or into stand-by situation. If your dryer is on for more
than 10 minutes without any buttons being pressed, it automatically turns into
stand-by situation.
IMPORTANT SAFETY INSTRUCTIONS before operating the appliance.
5
6
7
8 9
10
3
1
Power
2
2-Start/Pause button
Press to start or pause the program. You can't change any setting except add a garment.
3-Cycle selector
Select your desired cycle for the type of load.
The cycle you select determines the heat control for the cycle.
The Normal, Jeans, Perm Press, Quick Dry, My Cycle, Mixed Load, Heavy Duty, Bulky,
Towels, Active Ware, Delicates, Sanitize are Sensor cycles.
Wool, Air Fluff, Time Dry, Refresh are Manual cycles.
4-Wrinkle Prevent
Press once to add the wrinkle care step into the operating program. Press again to
cancel selection.
If wrinkle prevent was active, it provides approximately 90 minutes of intermittent
tumbling in unheated air at the end of the cycle to reduce wrinkling.
The load is already dry, and can be removed at any time during the wrinkle care cycle.
20
Page 22
OPERATING INSTRUCTION
5-Delay
This function is used for delaying clothes drying time within 24 hours. The delay time
means the programme will start after x hours. When the delay programme starts, the
time starts to countdown on the display and the delay icon blinks.
6-Time Adjust
These buttons are effective only for Manual cycles. Press these buttons to change the
drying time you prefer. Push repeatedly to get your desired drying time, including
120minutes,90minutes, 60minutes, 30minutes.
7-Dryness
Press the button to select the dry level, including More, Normal, Less, Damp. Different
dry level will result in different drying time. For clothes to be ironed manually, a lower
dry level should be selected.
Press and hold for 3 seconds to remember your favorite drying cycle, this cycle will be
“My Cycle”.
8-signal
Press once to stop the buzzer sound. Press again to activate the sound. Your selection
will be kept until next pressing.
9-Damp Alert
This function is useful when you want to take some garments out for ironing. The unit
will beep 10s when the moisture in the clothes is good for ironing. At this
time, you can take those garments out and continue drying the other by pressing the
"START/PAUSE" button once.
Note: The unit will not stop operating if you don't take those garments out for ironing.
10-Control Lock
Press the " " and "Damp Alert" together to activate the control lock function.
Press again for another 3 seconds to deactivate the function. All buttons except the
"Power" will be out of function when control lock activated.
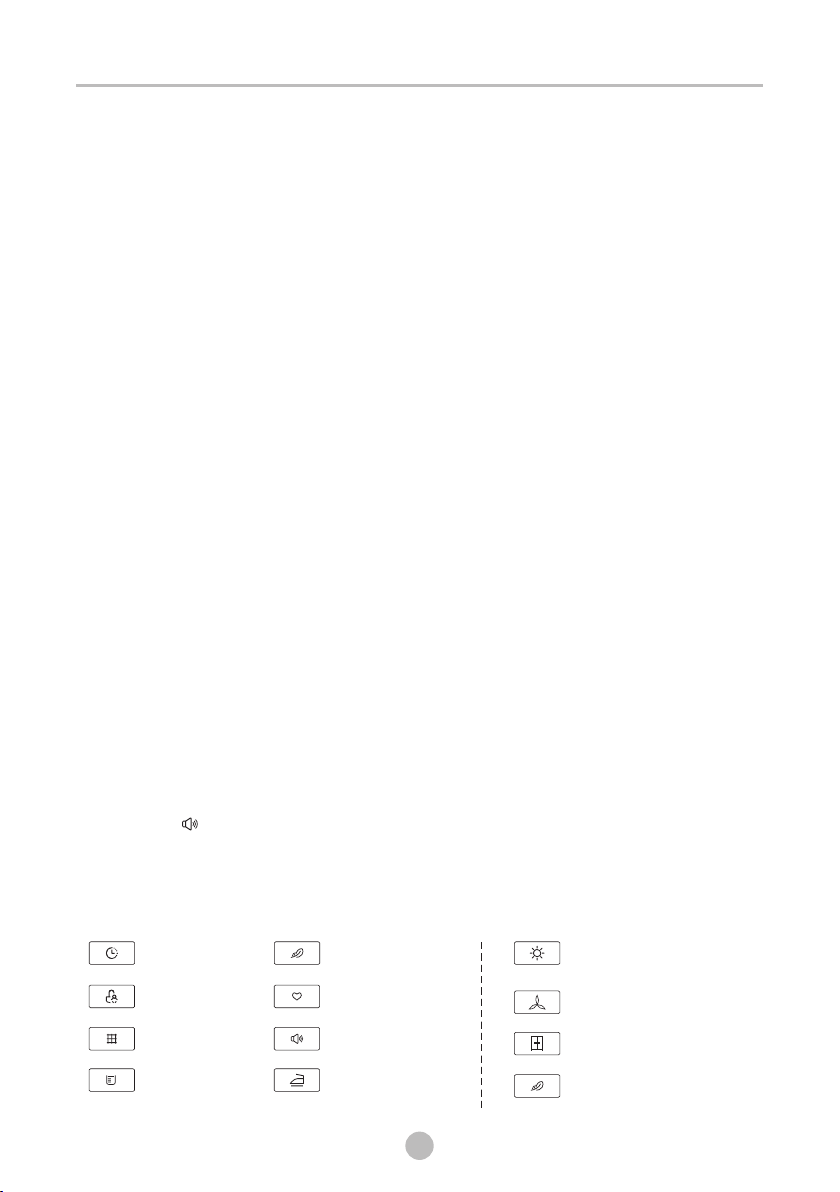
Symbols
Delay start
Control lock
Clean filter
Water tank full
(yo u shoul d empty
wat er ta nk)
Wrinkle Prevent
My Cycle
Buzzer sound open
Damp alert open
21
Cycle phase status
Means machine was drying
with heating air
Means machine was working
with cooling air
Means it is time to open the door
Means machine was making
wrinkle care
Page 23

OPERATING INSTRUCTION
DRYING A LOAD OF LAUNDRY
STEP 1: Power on your dryer
- Press this Power button to power your dryer on.
STEP 2: Load your dryer
- Place only one wash load in your dryer at a time.
- Mixed loads of heavy and light weight fabrics will dry differently,which may result
in lightweight fabrics being dry while heavy fabrics remain damp at the end of a
drying cycle.
- Add one or more similar items to your dryer when only one or two articles of clothing
need drying. This improves the tumbling action and drying efficiency.
- Overloading restricts tumbling action, resulting in uneven drying as well as excessive
wrinkling of some fabrics.
STEP 3: Select the appropriate cycle and options for the load
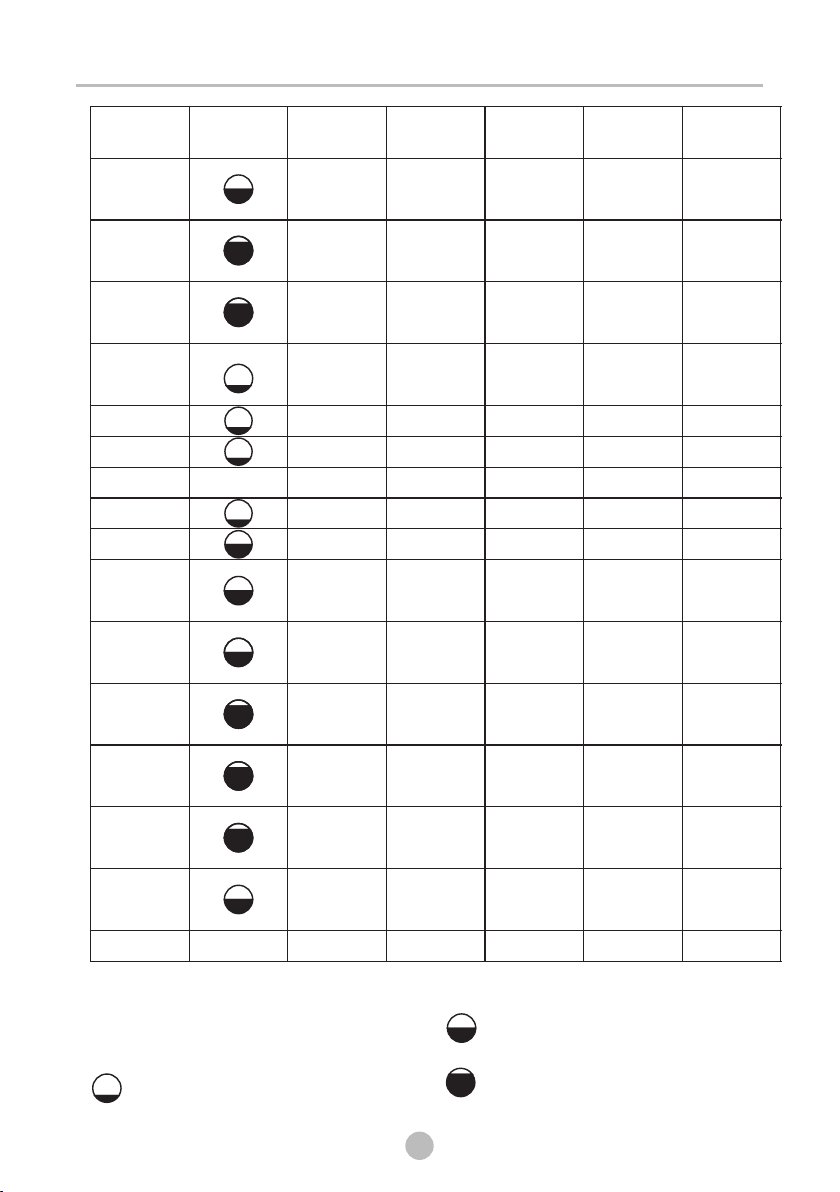
- Select the appropriate cycle by Cycle Selector according to the cycle chart on page 18-19.
- Select the appropriate optional function by buttons according to the chart on page 19.
-My cycle
Once you have set the cycle selector and option function, you can push and hold the
“Dryness” button for 3 seconds to memory this setting as your favorite cycle before
start the unit.
The light beside the knob will flash to confirm the memory with beeps.
- You can finish this Step by just select the “My cycle” once to use your favorite.
STEP 4: Start your dryer
Pressing Start/Pause button will start the selected cycle. To PAUSE cycle press
Start/Pause button then open the door. To resume operation after closing the door
always presses Start/Pause.
Opening the door during the operation will instantly stop operation and will require
pressing Start/Pause button to resume operation.
22
Page 24
OPERATING INSTRUCTION
Cycle
Maxim-um
Amount
Normal
Jeans
Perm
Press
Quick
Dry
Wool
Air Fluff
Time Dry
/
Refresh
Sanitize
Delicates
Active
Ware
Towel
Bulky
Heavy
Duty
Mixed
Load
My Cycle
* Table in bold is a n in itial set ti ng. “Y”are all o pt ional fun ct ions you ca n se lect.
* For even bet ter drying ef fect, pleas e se lect high er d ry level.
Load Siz e Re commendat ions:
For best results, fo ll ow the wet load size
recommendations noted for each cycle.
Small lo ad : Fill the dryer drum with
3-4 items, not more than 1/4 fu ll .
/
Dryness
Level
Damp
Less
Norma l
More
Damp
Less
Norma l
More
Damp
Less
Norma l
More
Damp
Less
Norma l
More
/
/
/
/
More
Damp
Less
Norma l
More
Damp
Less
Norma l
More
Damp
Less
Norma l
More
Damp
Less
Norma l
More
Damp
Less
Norma l
More
Damp
Less
Norma l
More
/
Delay
Y
Y
Y
Y
Y
Y
Y
Y
Y
Y
Y
Y
Y
Y
Y
/ /
23
Time
Adjust
N
N
N
N
N
Y
Y
Y
N
N
N
N
N
N
N
Medium l oa d: Fill the dryer dru m up
to about 1/2 full.
Large load : Fill the dryer drum up to
about 3/4 full. Do not overload. Items
need to tumble freely.
Damp
Alert
Y
Y
Y
Y
N
N
N
N
N
Y
Y
Y
Y
Y
Y
/
Wrinke
Prevent
Y
Y
Y
Y
Y
Y
Y
Y
Y
Y
Y
Y
Y
Y
Y
/
Page 25
OPERATING INSTRUCTION
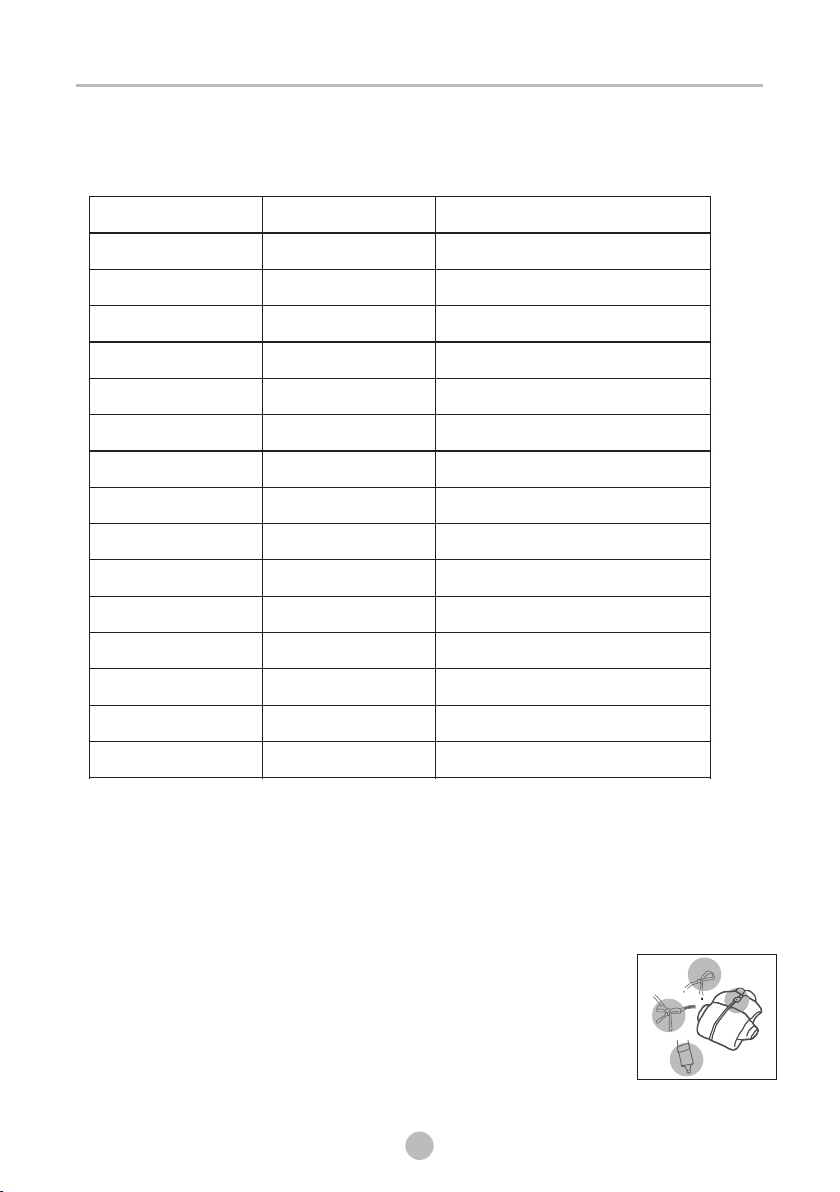
For best results, follow the wet load size recommendations noted for each cycle.
For the best performance, the load for each cycle should be recommended as follows:
Cycle
Normal
Jeans
Perm Press
Quick Dry
Wool
Air Fluff
Time Dry
Refresh
Sanitize
Delicates
Active Ware
Towel
Bulky
Heavy Duty
Mixed Load
Items Weight
81b
81b
7.5b
21b
31b
21b
81b
31b
51b
31b
51b
81b
41b
81b
81b
Recommend load
Cotton
Jeans
Chemical fiber(easy care)
small accounts of clothing
Wool
/
/
/
Cotton
Delicates
sports clothes, Chemical fiber
Towels
bedsheet
Jeans, sports clothes, skirts
Chemical fiber
STEP 5: Unloading your laundry
- The “Clean filter” will flash 10 sec. when your laundry load is powered on.
- The dryer will beep 3 times after the cycles done.
- You should clean the filter after every load once the laundry is unloaded.
Note:
1.Clothes that are easy to be tangled or worn and small pieces,
please put them in the laundry bag to dry.
2.Clothes with long belts or ropes, please make a knot to dry.
3.Clothes with slender buttons, please button up to dry.
4.Clothes with zippers, please zip up and flip to the inside to dry.
24
Page 26
OPERATING INSTRUCTION
Control Lock
This function is useful to prevent children from playing with the unit.
- Press and hold the “ ”and “Damp Alert” buttons simultaneously for 3 seconds to
activate this function. The blue “Control Lock” light will turn ON.
- Press and hold the “ ” and “Damp Alert” buttons simultaneously again for 3
seconds to deactivate this function. The “Control Lock” light will turn OFF.
- When this function is activated, all functions will be out of function except the
POWER button and DEACTIVATE function above.
- You can Power ON your unit and set this function then Power OFF. When you do so,
even if the unit is powered on, you still cannot start it before the Control Lock
function is deactivated.
- This function will be cancelled automatically if your unit is out of power, such as
unplug the unit, power supply out of service, etc.
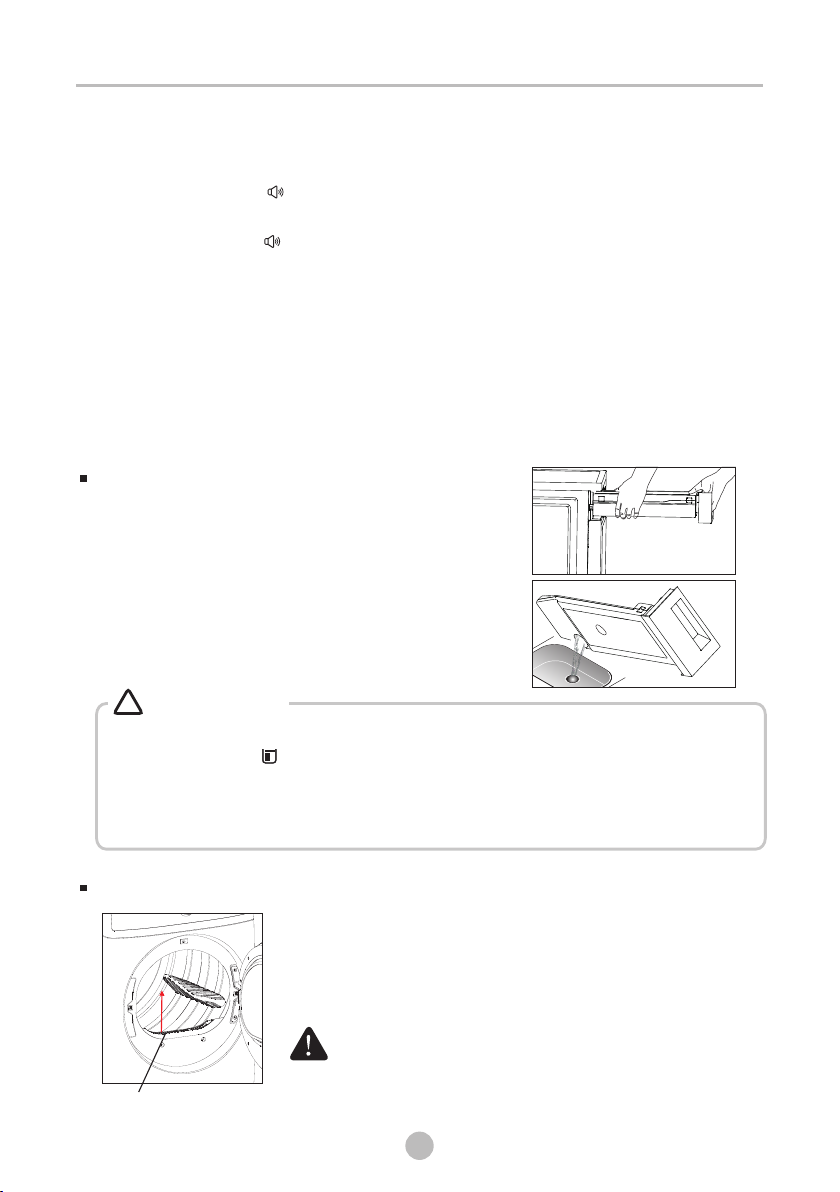
Empty the water tank
1. Pull out and hold the water tank
with two hands.
2.Transfer the water tank flatly in case
of water overflow.
3. Tilt the water tank, pour out the
condensate water into the basin.
4. Install the
!
• Empty the water tank after each use.Otherwise,the programme will be
paused and the” ” icon will light. After the tank is emptied, the dryer
can be restarted by pressing 【Start/Pause】 button.
• Do not drink the condensate water.
• Do not use the dryer without the water tank.
water tank.
Warning!
Filter clean
Lint filter
To prevent a risk of fire, make sure to clean the lint filter
before or after every load.
- To shorten drying time.
- To operate more energy efficiently.
Do not operate your dryer without the lint filter in
place.
CAUT ION
- Do not use a damage or broken lint filter. This may
reduce performance and/or cause fire.
25
Page 27
OPERATING INSTRUCTION
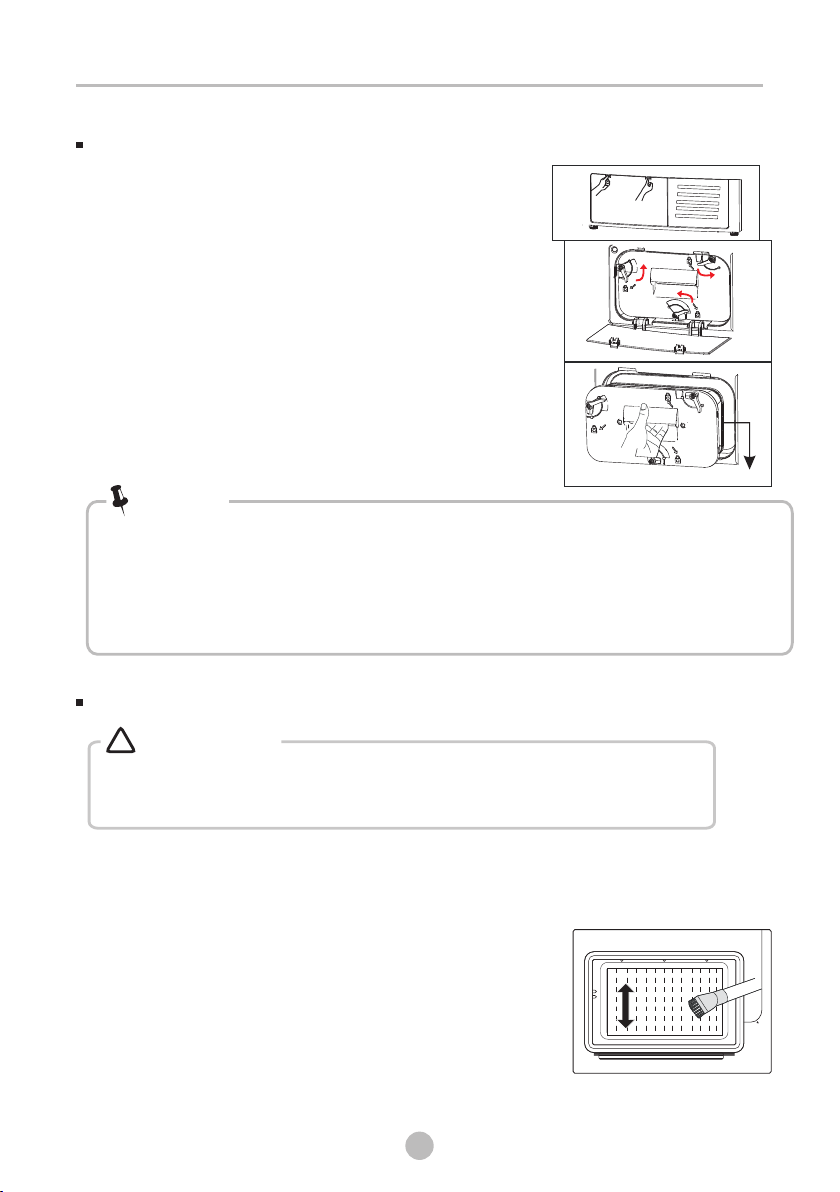
Clean the base filter
1. Open the cover.
2. Unlock three locking levers and grasp the
filter handle.
3. Remove the base filter and clean it.
If there is too much lint on the filter, clean it in
water. Dry the filter thoroughly before installing
it back.
4. Clean the rubber sealing, both at the filter and handle.
5. Re-insert the filter.
6. Lock three locking levers and make sure that the
levers are in correct lock position.
7. Close the cover until there is a click sound.
Note!
• The fluff accumulated on the filter will block the air circulation. Not cleaning the filter
regularly will increase drying time and energy consumption.
• Disconnect the power cord before cleaning!
• Do not operate the dryer without the filter!
• Clean the base filter after each fifth cycle to prevent fluff accumulation inside the dryer.
Filt er Base
Clean the heat exchanger
!
Warning!
Do not touch the heat exchanger with your hand,
which may cause an injury.
As necessary, approx. once every 2 months, remove the fluff from the heat
•
exchanger using a vacuum cleaner with a dusting brush attached.
Clean the heat exchanger without applying any pressure. Otherwise the heat
•
exchanger could be damaged. The dryer will not dry
if the cooling fins are damaged or bent.
26
Page 28
OPERATING INSTRUCTION
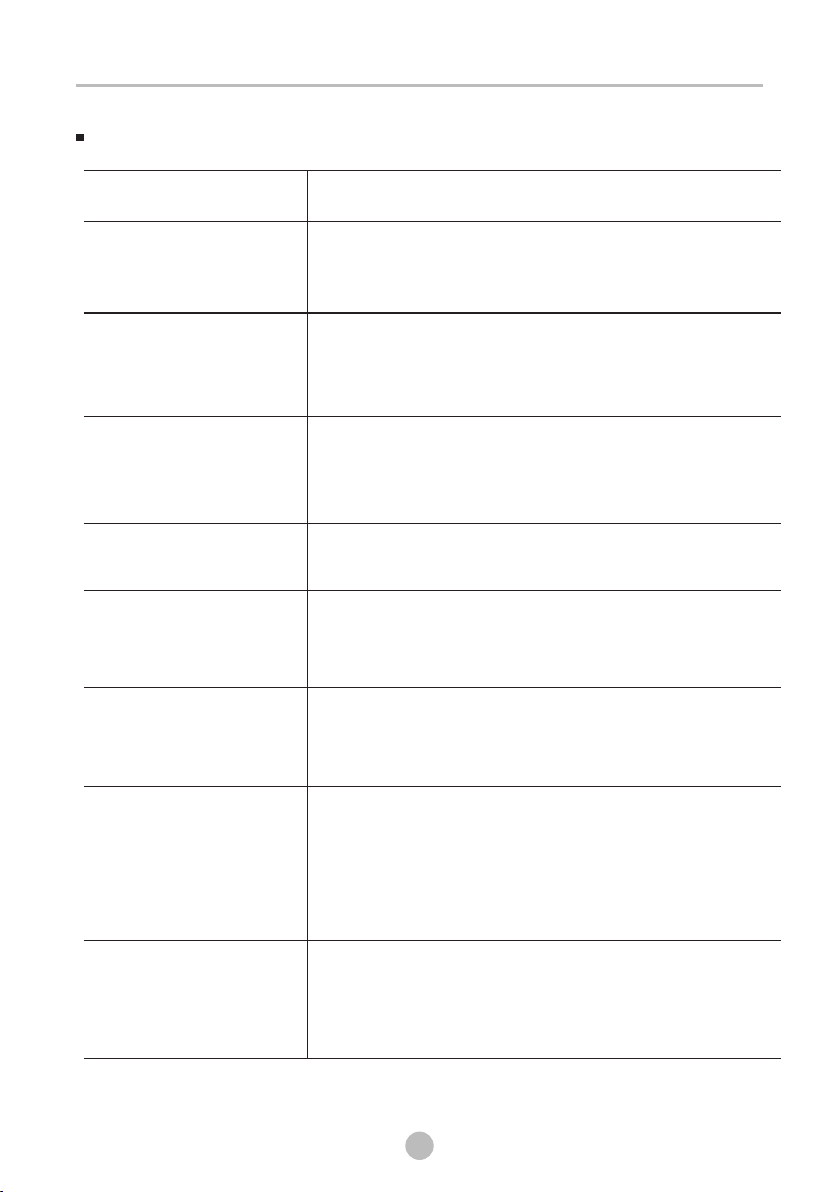
SPECIAL LAUNDRY TIPS
Items
Bedspreads &
Comforters
Blankets
Curtains &
Draperies
Cloth Diapers
Down Filled Items
(jackets,sleeping bags,
comforters, etc.)
Foam Rubber
(rug backs,stuffed toys,
shoulder pads,etc.)
Drying guide
- Follow the care label instructions or dry in Bulky cycle.
- Make sure the item is thoroughly dry before using or storing.
- May require repositioning to ensure even drying.
- Use the Normal cycle and dry only one blanket at a time for
best tumbling action.
- Make sure the item is thoroughly dry before using or storing.
- May require repositioning to ensure even drying.
- Use the Casual cycle and less dry to help minimize wrinkling.
- Dry these in small loads for best results and remove as soon
as possible.
- Use the Normal cycle.
- Use the Normal cycle.
- Add a couple of dry towels to shorten drying time and absorb
moisture.
- DO NOT dry on a seat setting. Use the Air Fluff cycle (no heat).
WARNING: Drying a rubber item with heat may damage
it or create a fire hazard.
Pillows
Plastics (shower
curtains, outdoor
furniture covers,
etc.)
- Use the Normal cycle.
- Add a couple of dry towels and a pair of clean sneakers
to help the tumbling action and to fluff the item.
DO NOT dry kapok or foam pillows in the dryer. You can
dry these items in the dryer as long as you use the air fluff
cycle.
- Use the Air fluff cycle (no heat).
27
Page 29
MAINTENANCE
Certain internal parts are intentionally not grounded and may
present a risk of electric shock only during servicing. Service
WARNING
CARE AND MAINTENANCE
Control panel
- Clean with a soft, damp cloth. Do not use abrasive substances.
- Do not spray cleaners directly on the panel.
- The control panel finish may be damaged by some laundry pre-treatment soil and
stain remover products. Apply such products away from your dryer and wipe up
any spills or overspray immediately.
Stainless steel or anonized drum
- To clean the stainless steel or anonized drum, use a damp cloth with a mild,
non-abrasive cleaner suitable for stainless steel and anonized surfaces.
- Remove the cleaner residue and dry with a clean cloth.
Dryer exterior
- Clean with a soft, damp cloth. Do not use abrasive substances.
- Protect the surface from sharp objects.
- Do not place any heavy or sharp objects or a detergent box on the dryer. Keep
them on the purchased pedestal or in a separate storage box. This may scratch or
damage the top cover of the dryer.
- Since the entire dryer has a high-gloss finish, the surface can be scratched or
damaged.
- Avoid scratching or damaging the surface when using the dryer.
Personnel – Do not contact the following parts while the appliance
is energized: Main Motor , Cooling Fan.
28
Page 30
TROUBLESHOOTING INSTRUCTIONS
CHECK THESE SOLUTIONS IF YOUR DRYER
If your dryer has any problems as followings, you can check as the solutions listed
below before making a service call. This will help you save time and money.
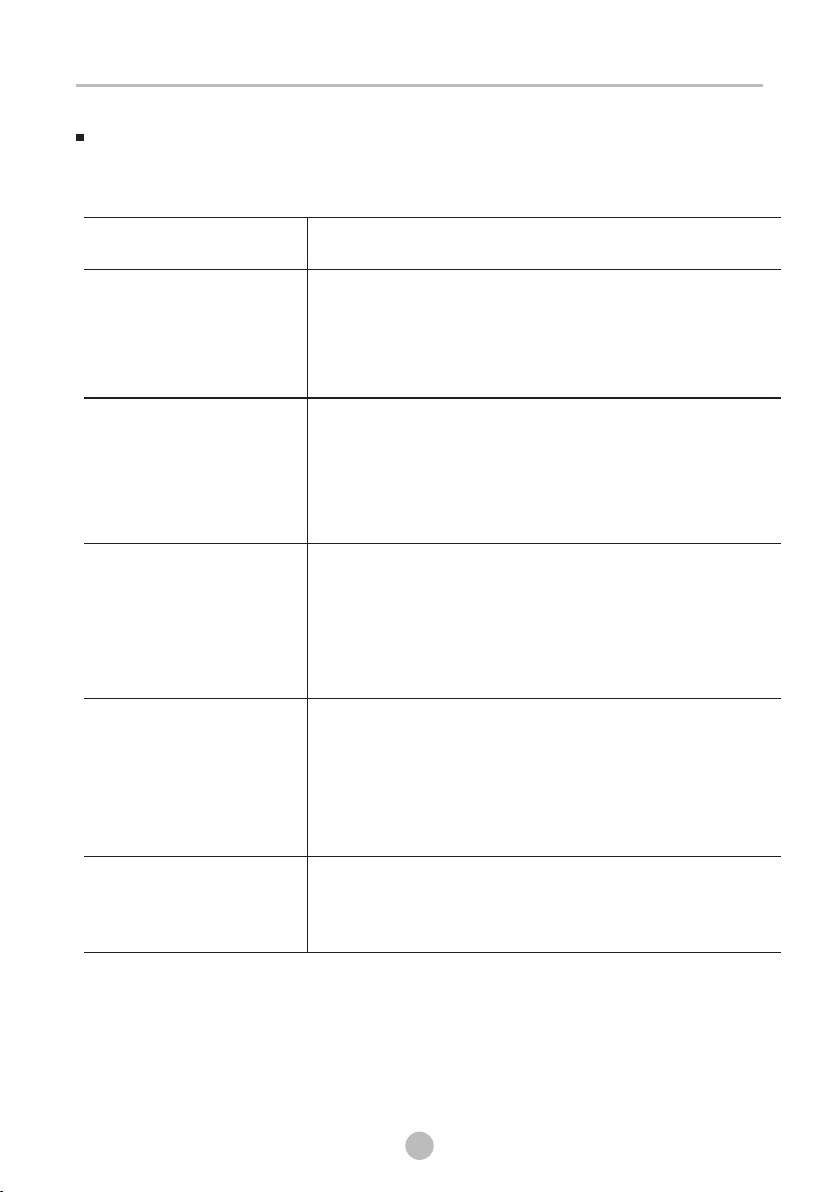
Problem
The unit doesn't start
The unit doesn't heat
Doesn't dry
The unit is noisy
Solution
- Make sure the door is latched shut.
- Be sure the power cord is plugged into a live electrical outlet.
- Check the home's circuit breaker and fuses.
- Press the Start/Pause button again if the door is opened
during the cycle.
- Check the home's circuit breaker and fuses.
- Select a heat setting other than Air fluff .
- Clean the lint filter .
- Dryer may have moved into the cool-down process of the
cycle.
- Check the entire above, plus...
- Do not overload. 1 wash load = 1 dry load.
- Sort heavy items from lightweight items.
- Large, bulky items like blankets or comforters may require
repositioning to ensure even drying.
- Load may be too small to tumble properly. Add a few towels.
- Check the load for objects such as coins, loose buttons, nails,
broken zips, etc. Remove promptly.
- It is normal to hear the dryer gas valve or heating element
cycle on and off during the drying cycle.
- Be sure the dryer is leveled properly as outlined in the
installation instruction.
The remaining time
changes abnormally
-The sensor cycle will estimate dampness of clothes automatically.
Due to amount and material of clothes, to assure the expected
dampness,the dryer will adjust remaining time, this is normal .
29
Page 31
TROUBLESHOOTING INSTRUCTIONS
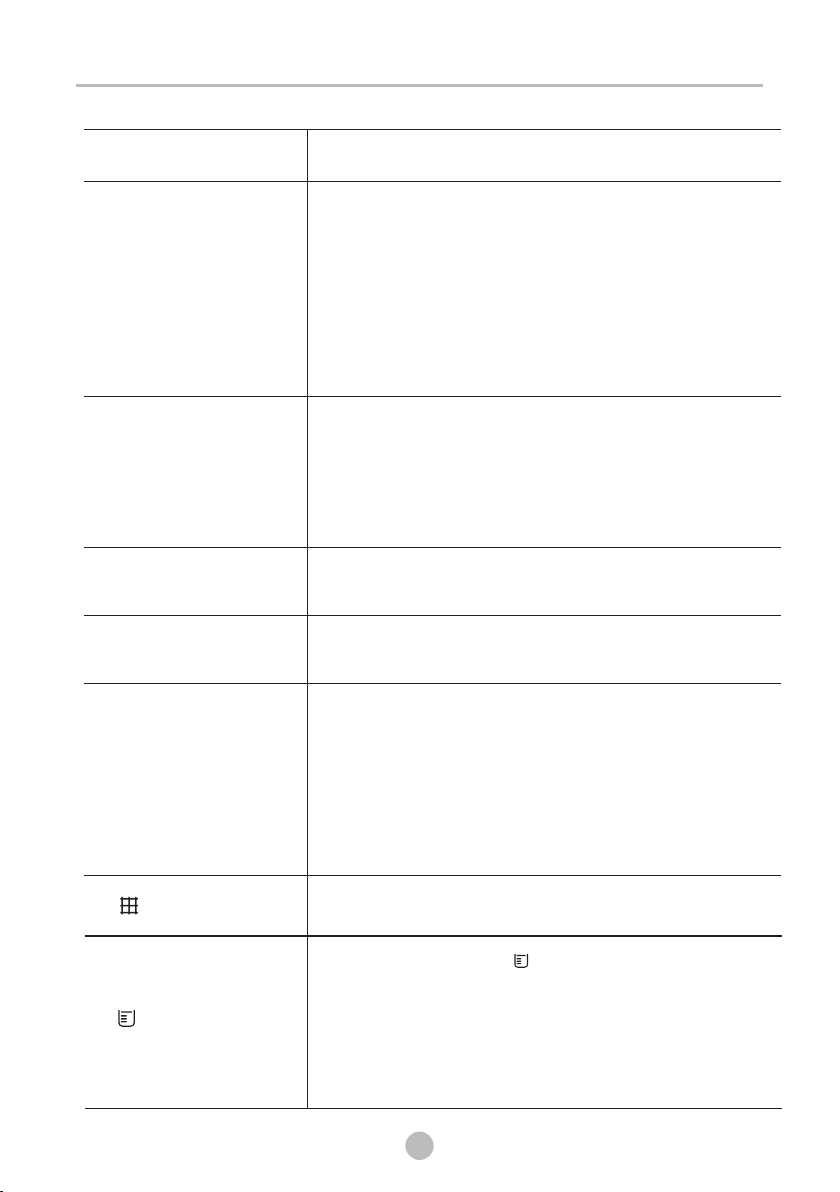
Problem
Clothes are unevenly
dried
Shuts off before
load is dry
Odors remain in clothing
after refresh
Garments still wrinkled
after Wrinkle-prevent
Lint on clothes
Solution
- Seams, pockets, and other similarly heavy areas may not be
completely dry when the rest of the load has reached the
selected dryness level. This is normal. Select the Time Dry
setting if desired.
- If one heavy item is dried with a lightweight load, such as
one towel with sheets, it is possible that the heavy item will
not be completely dry when the rest of the load has reached
the selected dryness level. Sort heavy items from lightweight
items for best drying results.
- Household odors from painting, varnishing, strong cleaners,
etc. may enter the dryer with surrounding room air. This is
normal as the dryer draws the air from surrounding air space
of the dryer locations.
- When these odors linger in the air, ventilate the room
completely before using the dryer.
- Fabrics containing strong odors should be washed utilizing
desired wash cycle.
- Small loads of 1 to 4 items work best.
- Load fewer garments. Load similar-type garments.
- Lint filter be cleaned before every cycle. With some loads that
produce high amounts of lint, it is necessary to clean the filter
after the cycle.
- Some fabrics are lint producers (for example, a fuzzy white
cotton towel) and they should be dried separately from clothes
that are lint trappers (for example, a pair of lack linen pants).
- Divide larger loads into smaller loads for drying.
- Check pockets thoroughly before washing and drying clothes.
“ ”is lighting
“ ”is ingflash
Clear lint filter.-
- When the cycle is end, “ ”will flash and dryer will beep 5
seconds.
- Check the water container. If it's full, please pour out the
condensate water and restart the dryer.
- If the container is not full, please restart the dryer directly.
- If the “water full“ icon is still flashing after you have
finished the first two steps, please call the service.
30
Page 32
TROUBLESHOOTING INSTRUCTIONS
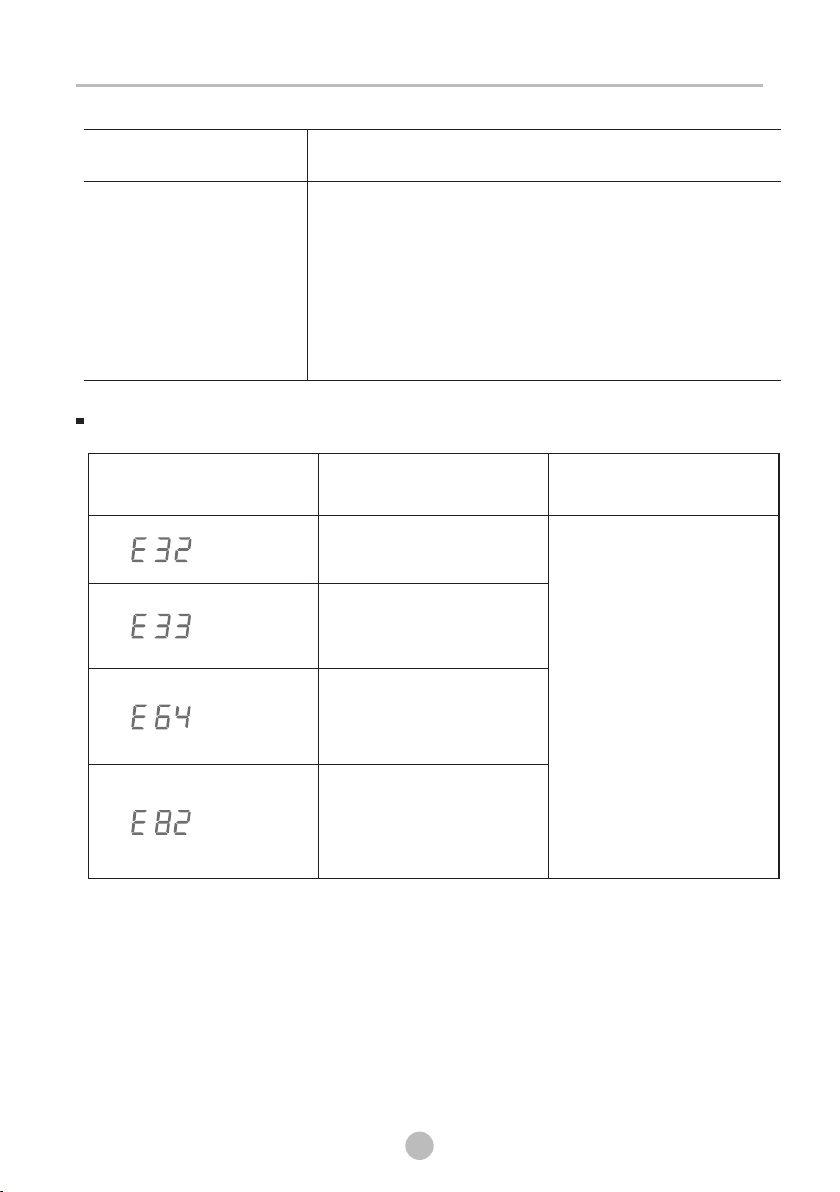
Problem
Degree of dryness was
not reached or drying
time too long
Solution
Clean lint filter.
-
- Empty container.
- Check drain hose.
- Dryer installation place is too restricted.
- Clean the moisture sensors.
- Keep the Air inlet clean.
- Use higher drying intensity level programme or
time programme.
ERROR CODES
Error Code Possible Cause
Humidity
Temperature sensor
error
Motor communication
error
Solutions
Please contact your
local service center
if the problem occurs.
PCB communication
error
31
Page 33
TROUBLESHOOTING INSTRUCTIONS
APPENDIX
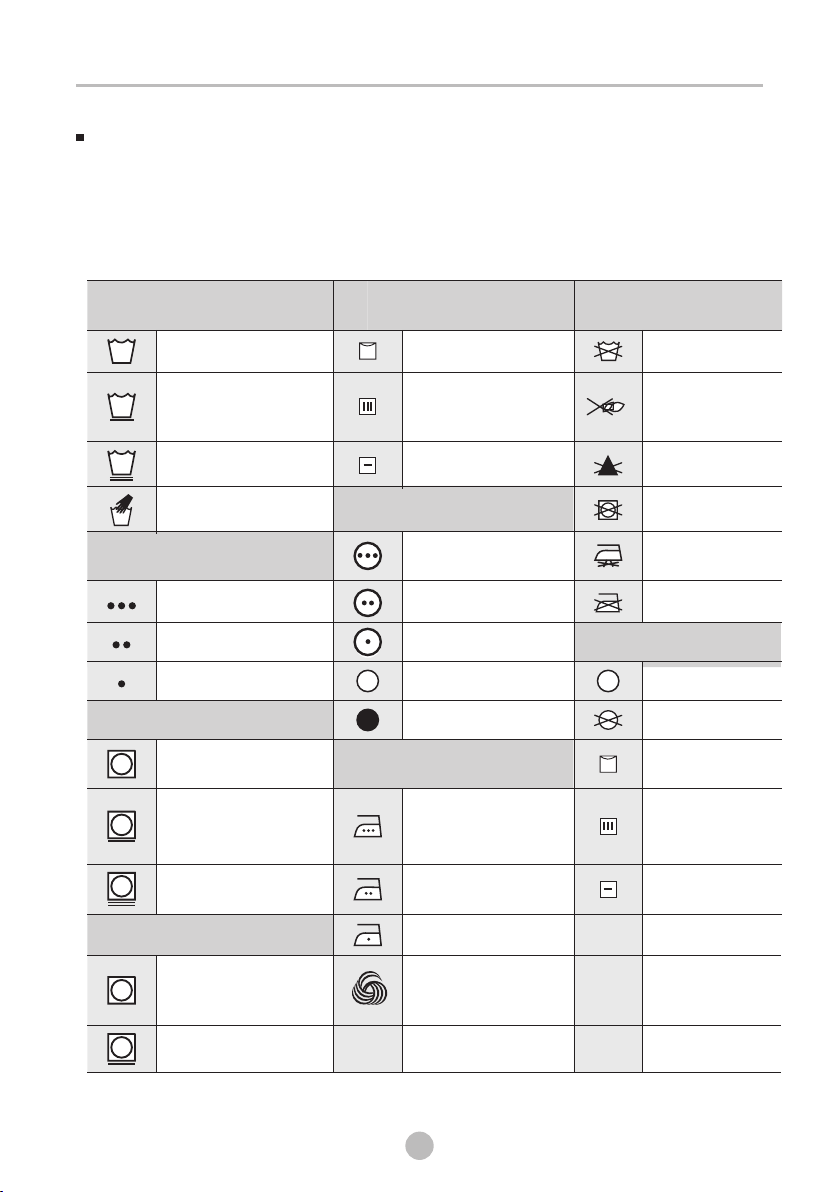
Fabric Care Chart
The following symbols provide garment care direction. The Clothing care labels include
symbols for washing, bleaching, drying and ironing, or dry cleaning when necessary. The use
of symbols ensures consistency among garment manufacturers of domestic and imported
items. Follow care label directions to maximize garment life and reduce laundering problems.
Wash Cycle Special Instructions
Normal Line Dry/ Hang to Dry
Permanent Press /
Wrinkle Resistant /
Wrinkle Control
Gentle/Delicates Dry Flat
Hand Wash Heat Setting
Water Temperature**
Hot Medium
Warm Low
Cold Any Heat
Bleach
Any Bleach (when
needed)
Only Non-Chlorine
(color-safe)
Bleach (when needed)
Iron-Dry or Steam
Temperatures
Drip Dry
High
No Heat/Air
High
Warning Symbols for
laundering
Do Not Wash
Do Not Wring
Do Not Bleach
Do Not Tumble Dry
No Steam (added
to iron)
Do Not Iron
Dryclean
Dry Clean
Do Not Dry Clean
Line Dry/ Hang to
Dry
Drip Dry
Tumble Dr y Cycle Medium
Normal Low
Permanent Press/
Wrinkle Resistant/
Wrinkle Control
Gentle/ Delicates
** The numbe r of d ots repre se nt appropri ate was h water tem pe ratures f or variou s items.
The temp er ature range f or Hot is 105°-12 5°F/41° -52°C , for Warm 85°-105°F/29°-4 1°C an d for Cold 60° -85°F/1 6°-2 9°C.
For machine-washable
wool. Loads should be
under 8 pounds.
32
Dry Flat
Page 34
33
Page 35
 Loading...