

Page 1
FELIX STORCH, INC.
HOTEL BOX
Model HBOX168
Instruction Manual
770 Garrison Avenue
Bronx, New York 10474
www.summitappiance.com
0
Page 2

Introduction
Warning
have it replaced by an aut hor iz ed ser vice center.
The SUMMIT® Hotel Box HBOX168 is designed to cut down the
noise of the refrigerator in your room by turning off the
refrigerator while you are sleeping, or at other times that you can
select yourself. If you choose the 16 8 So un d & Slee p Saver
mode, the refrigerator’s compressor will turn off every night at
11:00 PM and turn on again at 7:00 AM.
WARNING: If you choose the 16 8 mode, it is not safe to keep
perishable food and medicine in the refrigerator overnight.
Installation
The HBOX168 should be placed on top of the refrigerator. Leave
at least 2” of space around it to allow for proper ventilation, and
do not place anything on top of the unit.
1. Plug the HBOX168 into a convenient wall socket.
NOTE: The minimum amperage to the box has to be at least
as large as the amperage to the refrigerator.
2. Plug the refrigerator into the HBOX 168.
3. Set the time and mode (see Operation section).
Electrical Connection:
Improper use of a grounded plug can result in the risk
of electrical shock. If the pow er cor d is damaged,
Operation
• The HBOX168 box should be properly grounded for your
safety. Its power cord is equipped with a three-pin plu g which
mates with standard three prong wall outle ts to minimize the
possibility of electrical shock.
• Do not under any circumstances cut or remove the third
ground prong from the power cord supplied.
• The HBOX168 requires a standard 115Volt AC ~ 60Hz
electrical outlet with three-prong grounded receptacle.
1
Page 3

• To prevent accidental injury, the cord should be secured
behind the refrigerator and not left exposed or dangling.
• Never unplug the box b y pulling the pow er cord. Alwa ys grip
the plug firmly and pull straight out from the receptacle.
• Do not use an extension co rd with t he H BO X 168 . If the po wer
cord is too short, have a qualified electrician or service
technician install an outlet near the appliance.
Operation
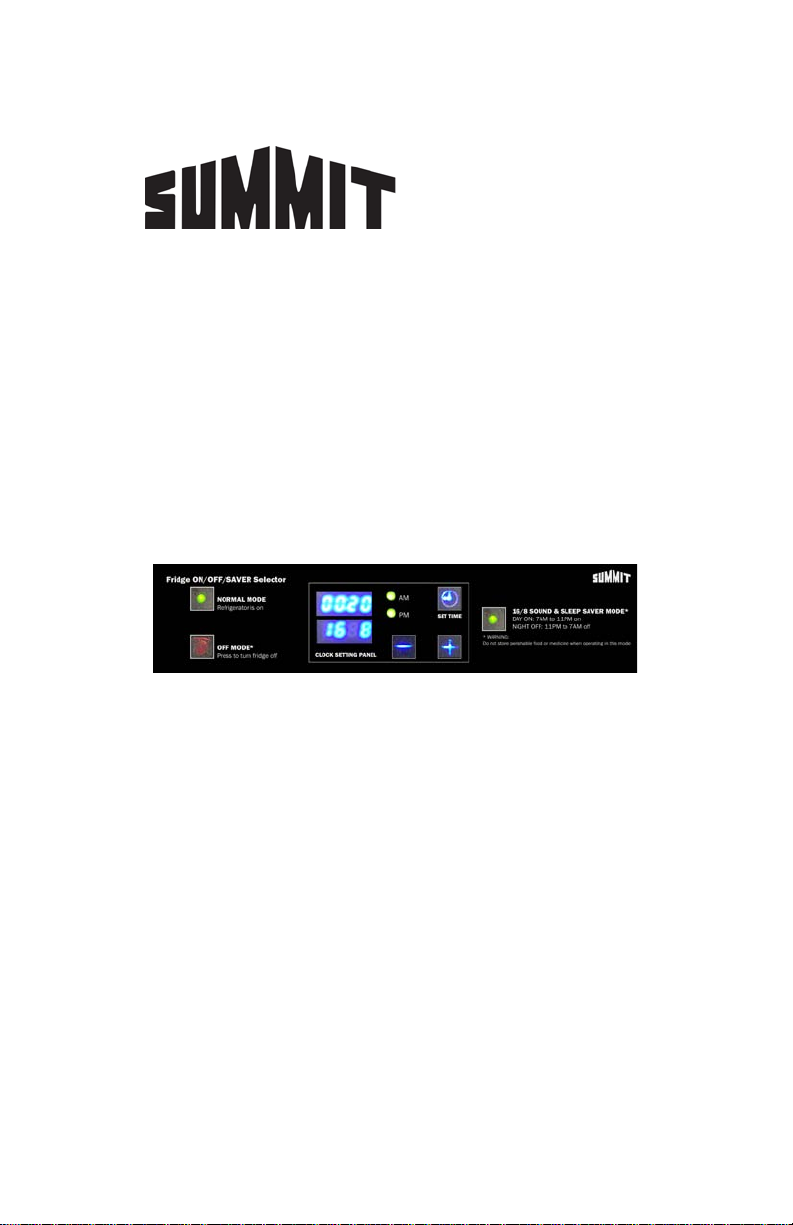
Setting the time:
1. Press SET TIME once. By default the clock is set to AM. To
change to PM, press – (negative sign).
2. Press SET TIME to confirm the setting. This activates the HH
(hour) on the clock, and you can press either + or – to adjust
accordingly.
3. Press SET TIME to confirm. This activates MM (minutes) and
you can adjust accordingly using the +/– buttons.
4. Finally, press SET TIME once more to confirm all settings.
Modes:
By default, the HBOX168 operates in NORMAL mode. You will
see the word On in the window below the time display. (On
means the refrigerator will be operating around the clock, and
you can switch to full-time operation by pressing the NORMAL
button at any time.)
By pressing the 16 8 Energ y & Sleep Saver button, you put the
unit into 16 8 mode. This means the refrigerator will shut off at
11:00 PM every night and will start up again at 7:00 AM. This not
only saves energy, but eliminates the noise of an operating
refrigerator during the night.
If you want to turn the refrigerator off completely, press the OFF
button. The word Off will appear in the mode window.
IMPORTANT: Perishable food or medicine should not be left in
the refrigerator overnight when in the 16 8 mode, or at all if in
the Off mode.
2
Page 4

Limited Warranty
For parts and accessory ordering,
Printed in China
ONE YEAR LIMITED WARRANTY FOR HBOX168
Within the 48 cont iguous United St ates, for one year from the d ate of purchase, when this
appliance is oper ated a nd maintai ned acco rding t o instr uctions attach ed to or furnished with
the product, warranto r will pa y fo r facto r y-specified parts and repair labor to correct defects in
materials or workmanship. Service must be provided by a designated service company.
Outside the 48 state s, all parts are warra nted for one year from m anufacturin g defects. The
cabinet is warra nted to be manufact ured to commerciall y acceptable standar ds, and is not
covered from damage during handling or breakage.
Mail-In Service
it or send back a ne w unit. Mail to Warranty Repair Dept. at address below.
ITEMS WARRANTOR WILL NOT PAY FOR:
1. Service calls to corre ct the in stall atio n of your ap plian ce, to inst ruct you how t o use your
appliance, to replace or repair fuses or to correct wiring or plumbing.
2. Service calls to repair or replace appliance light bulbs or broken glass shelves.
Consumable parts (such as fil te rs) ar e e xclu de d from wa rra nt y cov er ag e.
3. Damage resulting from accident, alteration, misuse, abuse, fire, flood, acts of God,
improper installat ion, ins tallatio n not in accordanc e with elect rical or plum bing codes, or
use of products not approve d by wa rr a nto r.
4. Replacement parts or repair labor costs for units operated outside the United States.
5. Repairs to parts or systems resulting from unauthorized modifications made to the
appliance.
6. Expenses for travel and transportation for product service in remote locations.
7. The removal and reinstallation of your appliance if it is installed in an inaccessible
location or is not installed in accordance with published installation instructions.
DISCLAIMER OF IMPLIED WARRANTIES –
CUSTOMER’S SOLE AND EXCLUSIVE REMEDY UNDER THIS LIMITED WARRANTY
SHALL BE PRODUCT REPAIR AS PROVIDED HEREIN. IMPLIED WARRANTIES,
INCLUDING WARRANTIES OF MERCHANTABILITY OR FITNESS FOR A PARTICULAR
PURPOSE, ARE LIMITED TO ONE YEAR. WARRANTOR SHALL NOT BE LIABLE FOR
INCIDENTAL OR CONSEQUENTIAL DAMAGES. SOME STATES DO NOT ALLOW THE
EXCLUSION OR LIMITATION OF INCIDENTAL OR CONSEQUENTIAL DAMAGES, OR
LIMITATIONS ON THE DURATION OF IMPLIED WARRANTIES OF MERCHANTABILITY
OR FITNESS, SO THESE EXCLUSIONS OR LIMITATIONS MAY NOT APPLY TO YOU.
THIS WARRANTY GIVES YOU SPECIFIC LEGAL RIGHTS AND YOU MAY ALSO HAVE
OTHER RIGHTS, WHICH VARY FROM STATE TO STATE.
: If you r unit ne eds rep air, you can mail it back to us and we will either repair
LIMITATION OF REMEDIES
FELIX STORCH, INC.
770 Garrison Avenue
Bronx, NY 10474
Phone: (718)-893-3900
Fax: (844)-478-8799
www.summitappliance.com
troubleshooting and helpful hints, visit:
www.summitappliance.com/support
3
 Loading...