

Page 1

Felix Storch, Inc.
DISHWASHER
Models DW2432 and DW2432SS
Use & Care Manual
Write Serial Number (on inner door of unit) here:
_______________________________________
Summit Appliance Division
770 Garrison Avenue
Bronx, New York 10474
www.summitappliance.com
0
Page 2

To prevent accidents which could cause serious injury or death, as well as
machine damage, read these instructions before installation and / or use:
Contents
1. IMPORTANT SAFETY INSTRUCTIONS 1
2. INSTALLATION 3
3. GETTING TO KNOW YOUR DISHWASHER 4
4. LOADING THE DISHWASHER 5
4.1 UPPER RACK 6
4.2 LOWER RACK 7
4.3 PROPER AND IMPROPER LOADING OF DISHWARE 10
5. WHAT SHOULD NOT BE WASHED IN YOUR DISHWASHER 11
6. OPERATING THE DISHWASHER 12
7. DETERGENT & RINSE AID DISPENSER 14
7.1 FILLING THE DETERGENT DISPENSER 14
7.2 FILLING RINSE AID DISPENSER 15
8. SETTING THE WATER SOFTENER 17
9. FILLING THE DISHWASHER SALT DISPENSER 18
10. CARE AND MAINTENANCE 19
10.1 CARING FOR YOUR DISHWASHER EXTERIOR 19
10.2 CARING FOR YOUR DISHWASHER INTERIOR 19
11. TROUBLESHOOTING 21
12. TECHNICAL FEATURES 27
13. LIMITED WARRANTY 28
1
Page 3
INTRODUCTION
Please read this user manual and particularly
the safety instructions completely and carefully.
They will save you time and effort and help to
ensure optimum dishwasher performance.
Be sure to observe all listed warnings and
cautions. Look particularly for the icons with
exclamation marks inside. The information icon
will also provide important references.
WARNING:
Indicates a potentially hazardous situation
which, if not avoided, could result in death or
serious injury.
CAUTION:
Indicates a potentially hazardous situation
which, if not avoided, may result in injury. It may
also be used to alert against unsafe practices.
Notice:
Indicates a potentially hazardous situation
which, if not avoided, may result in damage to
the dishwasher, the tableware, the equipment or
the environment.
1. IMPORTANT SAFETY
INSTRUCTIONS
WARNING
When using the dishwasher, follow basic
precautions, including the following:
Read all instructions before using the
dishwasher! Save these operating
instructions and pass them on to any future
user.
• Use the dishwasher only for its intended
purpose as described in this user manual.
This appliance is intended for normal
household use only.
• The manufacturer disclaims responsibility
for damage or injury caused by improper
use of this appliance.
• The information in this user manual must be
followed to minimize the risk of fire or
explosion and to prevent property damage,
personal injury or loss of life.
• Do not operate your dishwasher unless all the
enclosure panels are properly in place.
• Do not tamper with the controls.
• Do not abuse, sit on, stand in or on the door
or dish rack of the dishwasher.
• The cup racks are designed to support cups,
glasses and kitchen utensils. When the cup
racks are in the dishwasher, do not lean on or
use the cup racks to support your body
weight.
• To reduce the risk of injury, do not allow
children to play in, on or near the dishwasher.
• Use only detergents or rinse aids
recommended for use in a household
dishwasher and keep them in a dry place out
of the reach of children. Check that the
detergent dispenser is empty after the
completion of each wash program.
• Dishwasher detergents are alkaline. They can
be dangerous if inhaled or swallowed. Avoid
contact with skin and eyes and keep children
and infirm persons away from the dishwasher
when the door is opened. Consult a doctor
immediately if detergent has been swallowed
or inhaled.
1
Page 4

• Do not drink water from the dishwasher!
Harmful residues could be present.
• Under certain conditions, hydrogen gas may
be produced in a hot water heater system that
has not been used for two weeks or more.
Hydrogen gas is explosive. If the hot water
system has not been used for such a period,
before using the dishwasher, turn on all hot
water taps and let the water flow from each for
several minutes. This will release any
accumulated hydrogen gas. As gas is
flammable, do not smoke or use an open
flame during this time.
• Do not store or use flammable liquids or
vapors in the area of the dishwasher.
• When loading items to be washed, position
sharp items so that they are not likely to
damage the door seal and load sharp knives
with the handles up to reduce the risk of cuttype injuries.
• Do not wash plastic items unless they are
marked “dishwasher safe” or the equivalent.
For plastic items not so marked, check the
manufacturer’s recommendations.
• If a malfunction occurs, switch off the
appliance and turn off the water supply to the
dishwasher.
• Before cleaning or carrying out maintenance,
switch off the appliance, disconnect the power
plug and turn off the water supply.
• Repairs and technical modifications must be
carried out exclusively by a qualified
technician.
• If the dishwasher is not in use for an extended
period of time (e.g., in a vacation home), we
recommend you check that the baskets are
empty, leave the inside of the dishwasher
clean, leave the door cracked open to allow
air to circulate and turn off both the power and
water supply to the dishwasher.
SAVE THESE INSTRUCTIONS
2
Page 5

2. INSTALLATION
WARNING
When installing the dishwasher, follow basic
precautions, including the following:
• The dishwasher installation must be
performed in accordance with the Installation
manual. If you did not receive an installation
manual, order it by calling 1-800-932-4267, or
you may also download it from our website at
www.summitappliance.com
• Installation, maintenance and repair should be
performed by a qualified installer. Work by
unqualified persons could be dangerous and
may void the warranty.
• Do not operate the appliance if damaged,
malfunctioning, partially disassembled or if it
has missing or broken parts.
• Before installation or service, disconnect the
power supply to the work area by unplugging
the unit, “tripping” the circuit breaker or
removing the fuse.
• Only connect the dishwasher to the power
supply when all installation and plumbing work
is complete.
• Do not install or store the dishwasher where it
can be exposed to below freezing
temperatures or exposed to weather.
• The dishwasher must be secured to adjacent
cabinetry using the brackets provided. Failure
to do this may cause damage to property or
bodily injury.
• Connect to a properly rated, protected and
sized power supply circuit to avoid electrical
overload. The dishwasher is designed for an
electrical supply of 120V (volts), 60 Hz (hertz),
AC, connected to a dishwasher-dedicated,
properly grounded electrical circuit with a fuse
or breakers rated for 15 amperes. Electrical
supply conductors shall be a minimum of #14
AWG copper wire rated at 75ºC (167ºF) or
higher. These requirements must be met to
prevent injury and machine damage. Consult
a qualified electrician if in doubt.
• Do not use any extension cord or portable
outlet device to connect the dishwasher to a
power supply.
WARNING
Danger of suffocation!
Ensure that any plastic wrappings, bags,
small pieces, etc., are disposed of safely and
kept out of the reach of children.
• Remove the door to the washing compartment
when removing an old dishwasher from
service or discarding it. Ensure that the
appliance presents no danger to children
while being stored for disposal.
• Old appliances may contain materials that can
be recycled. Please contact your local
recycling authority about the possibility of
recycling these materials.
3
Page 6
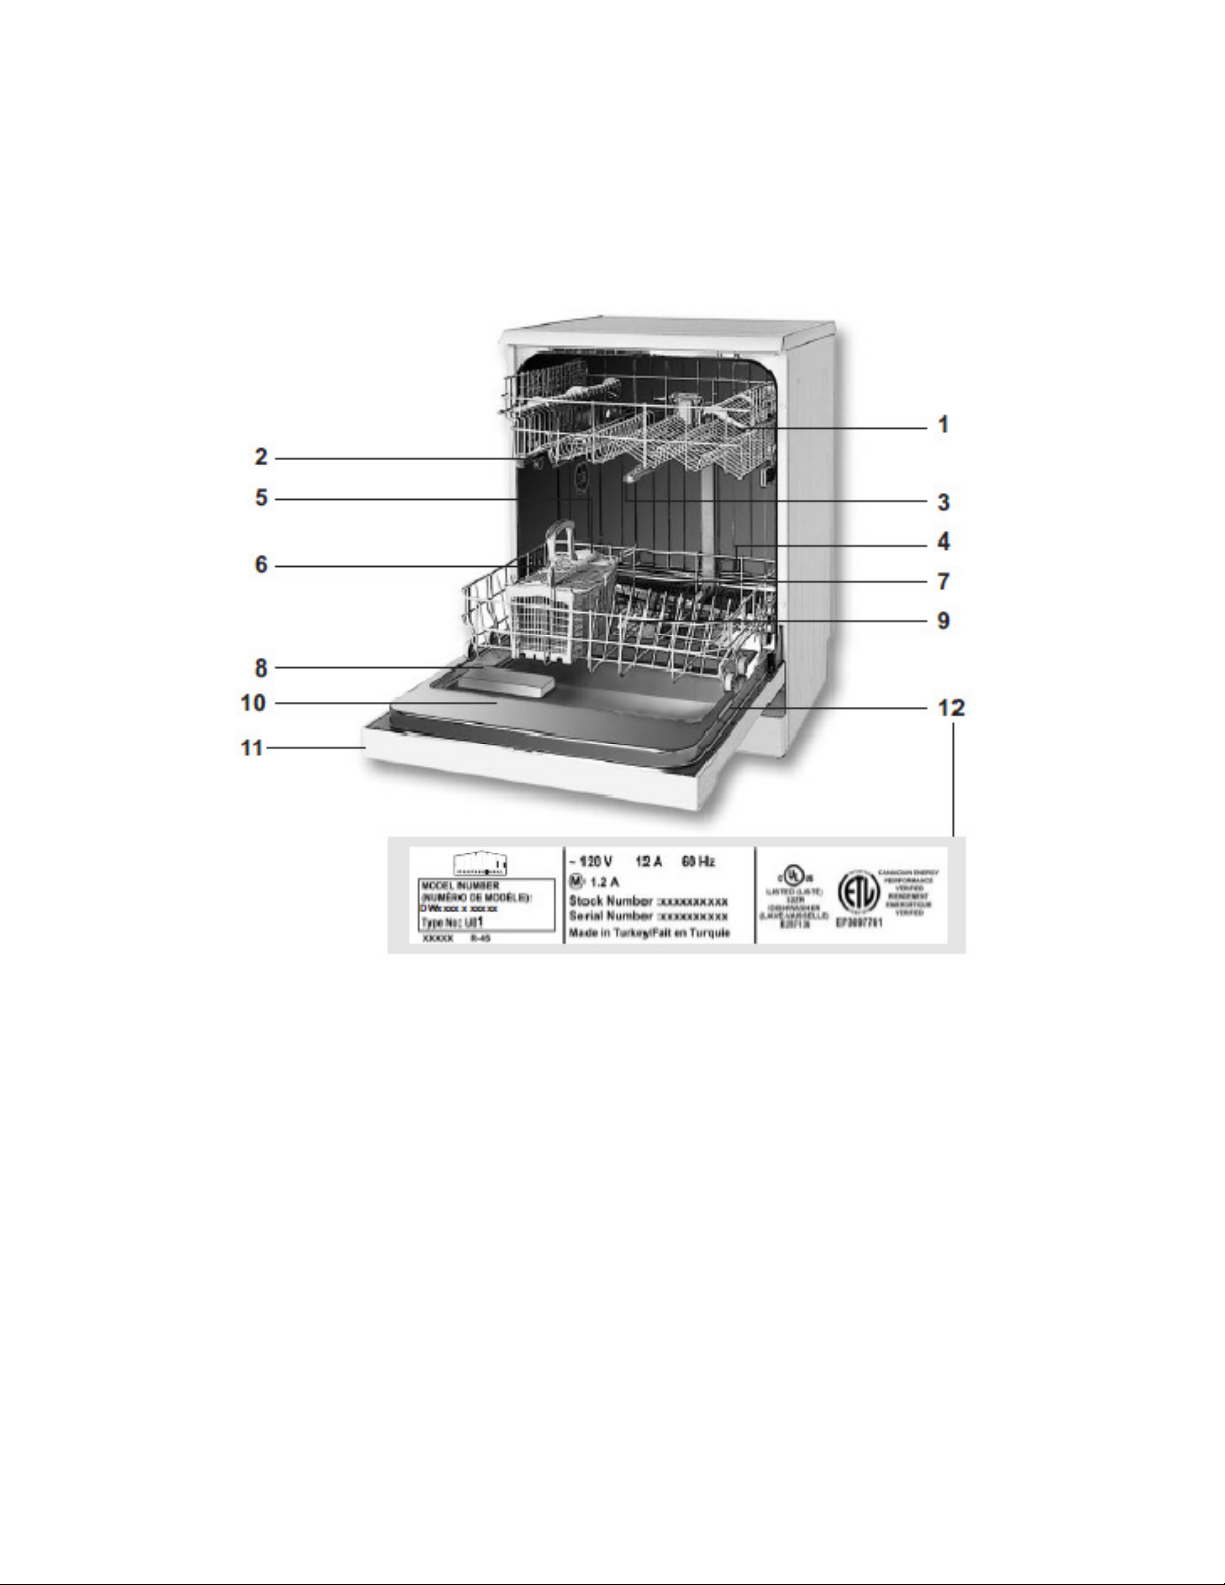
3. GETTING TO KNOW YOUR DISHWASHER
1.
7.
2.
8.
3.
9.
4.
10.
5.
11.
6.
12.
FOR MODELS
DW2432
DW2432SS
Upper rack
Guiding track for the upper rack
Upper spray arm
Lower rack
Salt container (depending on model)
Cutlery basket
Lower spray arm
Detergent dispenser
Filters
Door
Control panel
Model and Serial Tag
4
Page 7
4. LOADING THE DISHWASHER
1. Pull the handle to open the door. If the door is
opened during operation, the dishwasher will
stop running. Once the door is closed, the
program will continue.
CAUTION
Hot steam can escape! Danger of serious
burns or other injury.
2. Remove coarse food leftovers from tableware.
3. Now you can load the dishwasher
CAUTION
• Large knives and other utensils with sharp
tips and edges must be placed horizontally
into the upper rack due to risk of injury.
Other smaller knives and sharp utensils
should be placed with sharp side down in
the cutlery basket.
• Use extreme caution when removing
knives and other sharp utensils from the
dishwasher. These items may have shifted
position during the wash program, and
may be wet or slippery.
• The cup racks are designed to support
cups, glasses and kitchen utensils. When
the cup racks are in the dishwasher, do
not lean on or use the cup racks to
support your body weight.
Notice:
• Your dishwasher holds a maximum of 12
place settings.
• Place all containers such as cups, glasses
and pots into the dishwasher with the opening
facing downwards (so that no water can
collect).
• Small and light items can go into the upper
rack.
• Long and narrow items are placed in the
middle of the racks.
• Place all large and very dirty items in the
lower rack.
• Dishes and cutlery should not be placed
above each other.
• Glasses should not touch.
• The movement of the spray arms must not be
hindered.
• Do not overload your dishwasher and pay
attention to manufacturer instructions
regarding dishes which are appropriate for
use in a dishwasher. Only with suitable dishes
(mentioned in section 5) will you obtain
optimal washing results with a sensible use of
energy.
5
Page 8
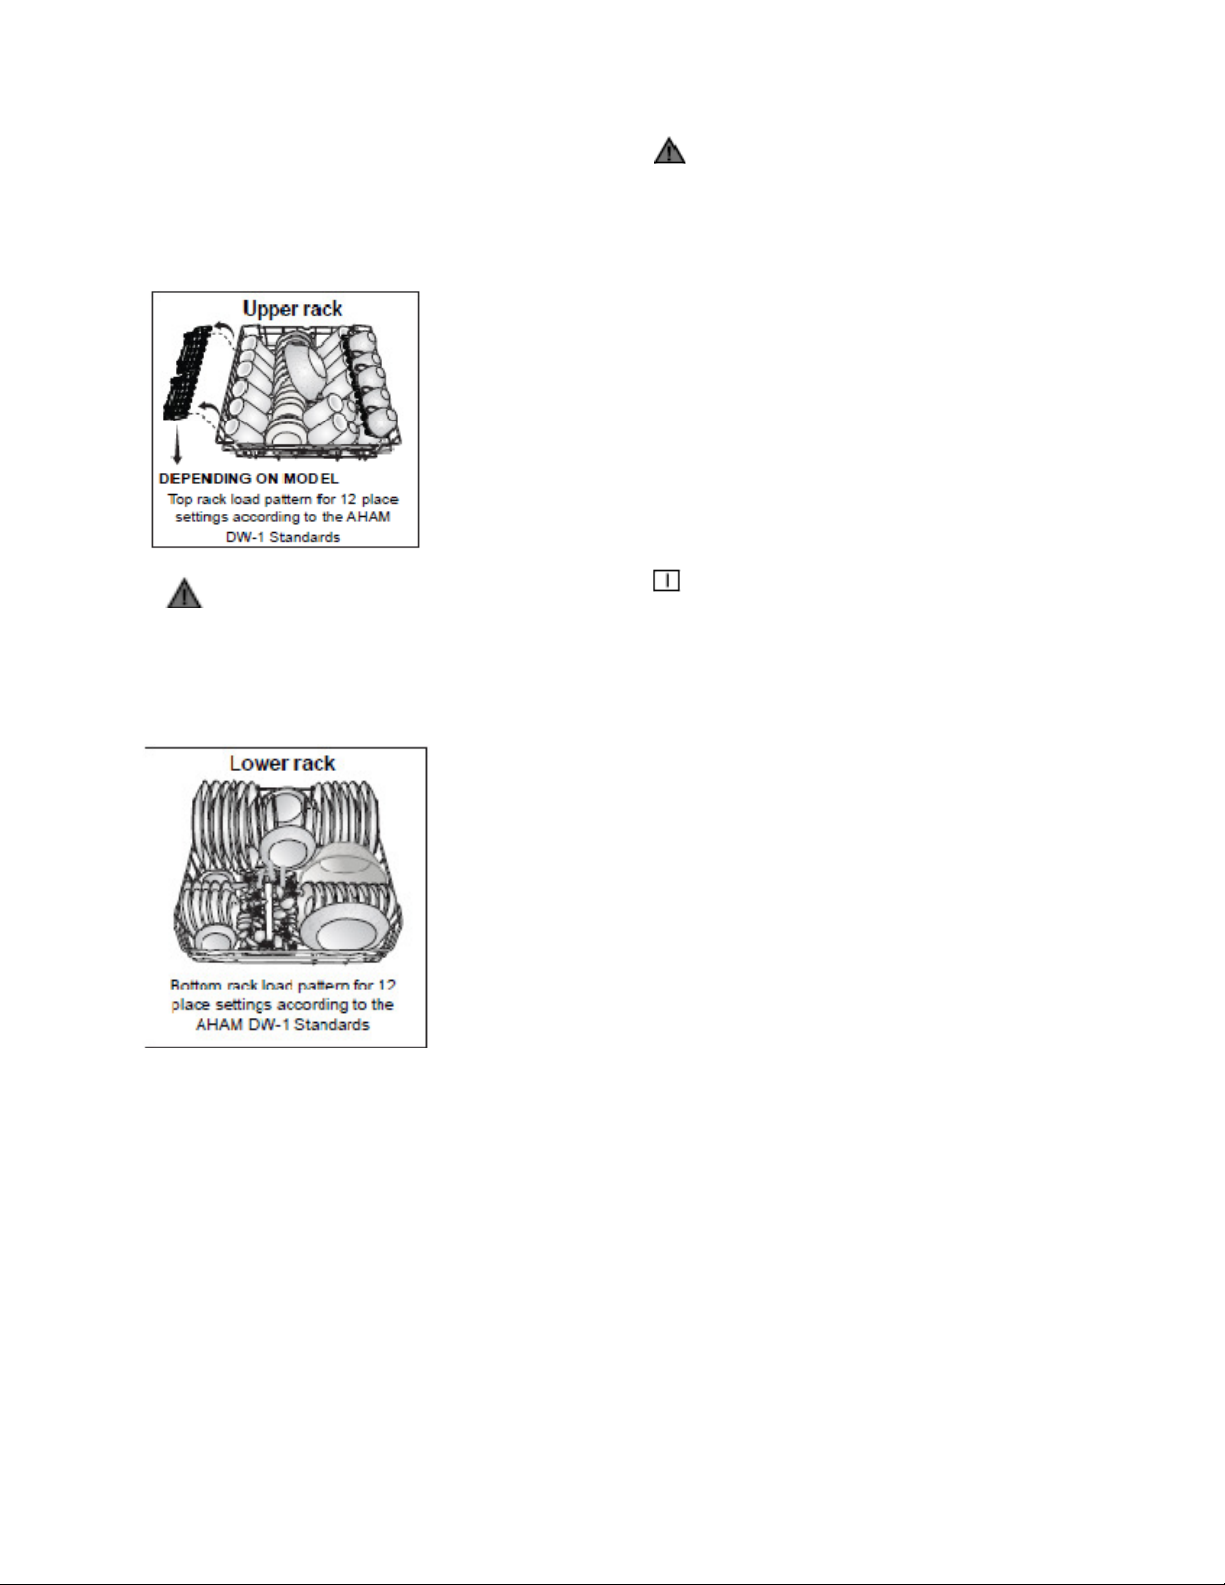
4.1 UPPER RACK
Load the upper rack with dessert plates, cups,
glasses, etc.
4.1.1 HEIGHT SETTING
(DEPENDING ON MODEL)
In certain models, the height setting of the upper
rack may be changed using the wheels which
are present at two height levels.
CAUTION
Make sure that the rack is empty. Changing
the height setting while the rack contains
tableware could cause the contents to
dislodge, causing personal injury or damage
to the tableware.
1. Release the latches on both the right and left
tracks of the upper rack by turning them to the
outside (A).
2. Pull out the rack completely (B).
3. Place the rack into the tracks again at the
desired height (C).
4. Push the latches back into the correct
position.
4.1.2 VARIABLE HEIGHT SETTING
(DEPENDING ON MODEL)
The upper rack is equipped with a lifting
mechanism that enables you to change the
height of the rack even if it is fully loaded,
and without having to remove it from the
dishwasher.
LIFT UPPER RACK
1. To lift the upper rack to a higher position, hold
it on one side and carefully pull it upwards (A).
2. To lift the opposite side of the rack, hold it and
pull it upwards in the same manner.
6
Page 9
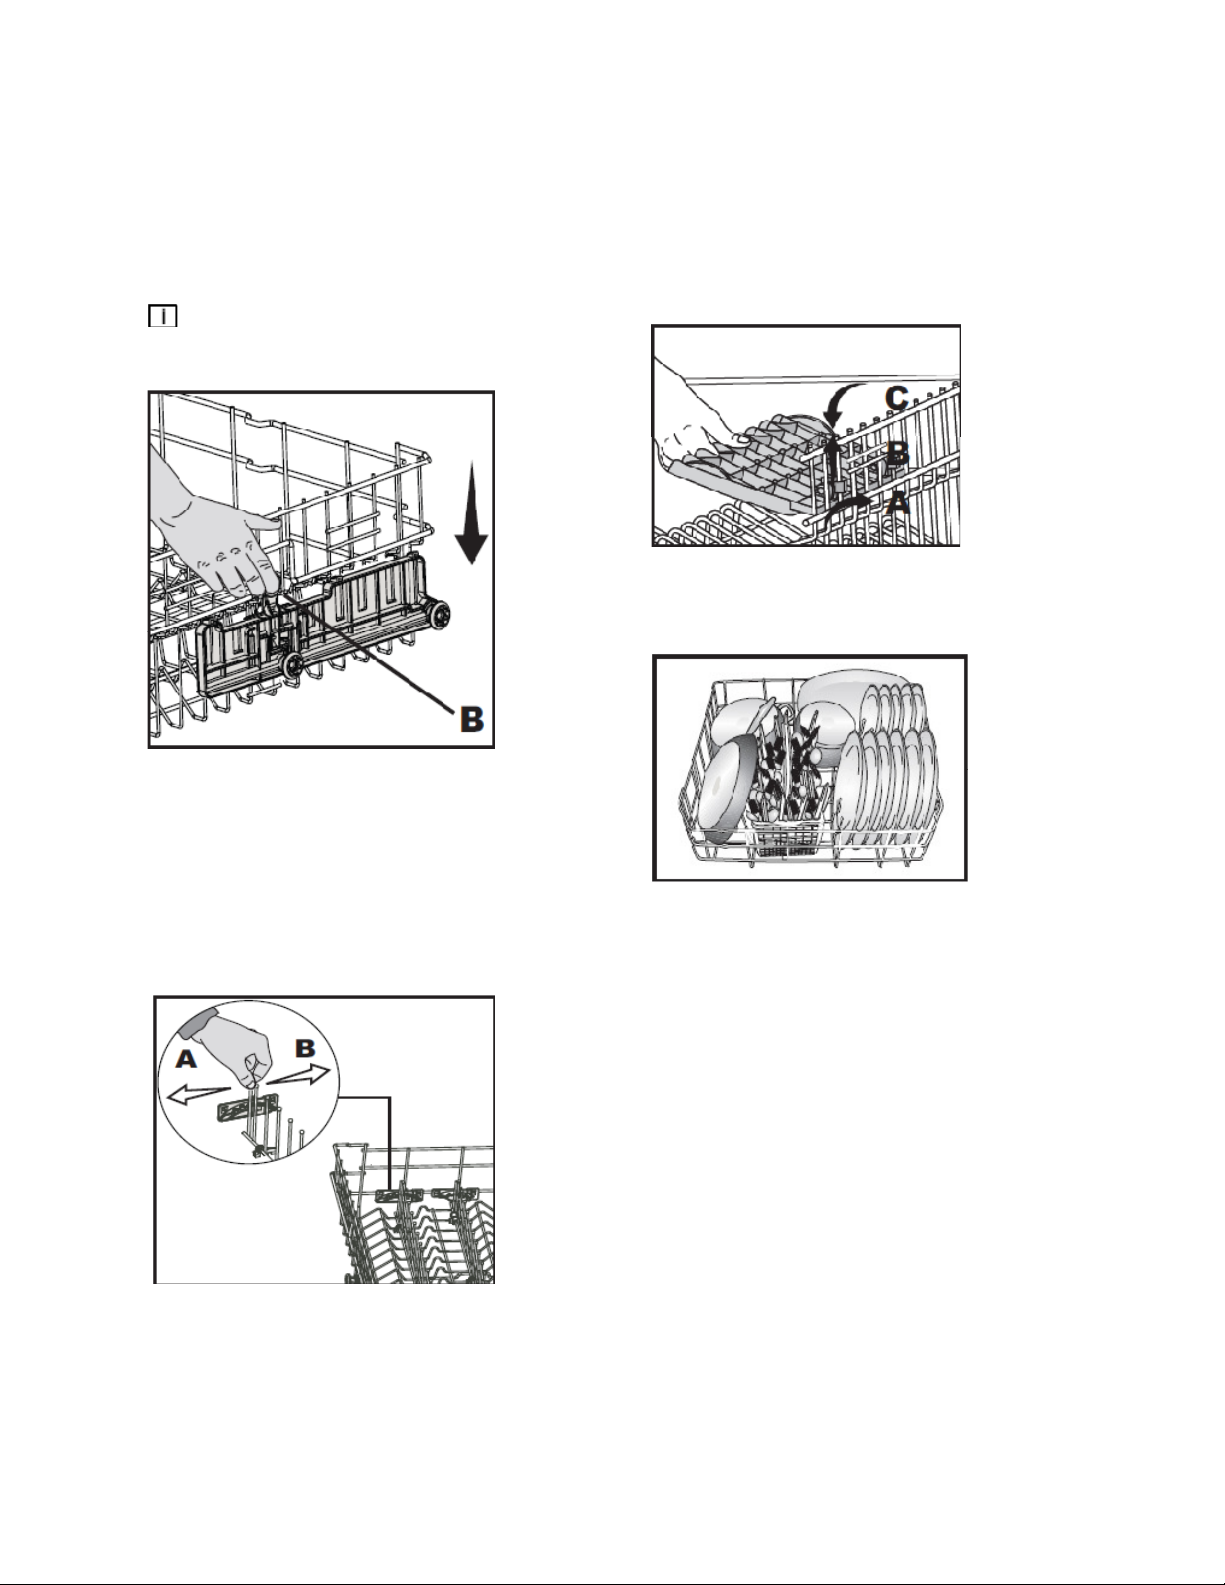
LOWER UPPER RACK
1. To lower the upper rack, hold and press in the
rack lever on one side and carefully lower the
rack without releasing the lever (B).
2. Repeat the procedure with the lever on the
opposite side of the rack.
NOTICE:
Make sure that both levers catch in the same
height position.
4.1.3 FOLDING TINES
(DEPENDING ON MODEL)
There are “folding tines” in the upper rack to
allow you more space to accommodate glasses
or cups.
Simply pull in the first front folding tine, move it
to left (A) or right (B) to place in another position.
When you need, take the tines down until the
tines fall down.
4.1.4 ADJUSTABLE SHELVES
(DEPENDING ON MODEL)
Depending on the size of the glasses and cups,
the shelf height setting may be adjusted.
1. Fold the shelf upwards (A).
2. Position at the desired height (B).
3. Fold the shelf again downwards (C).
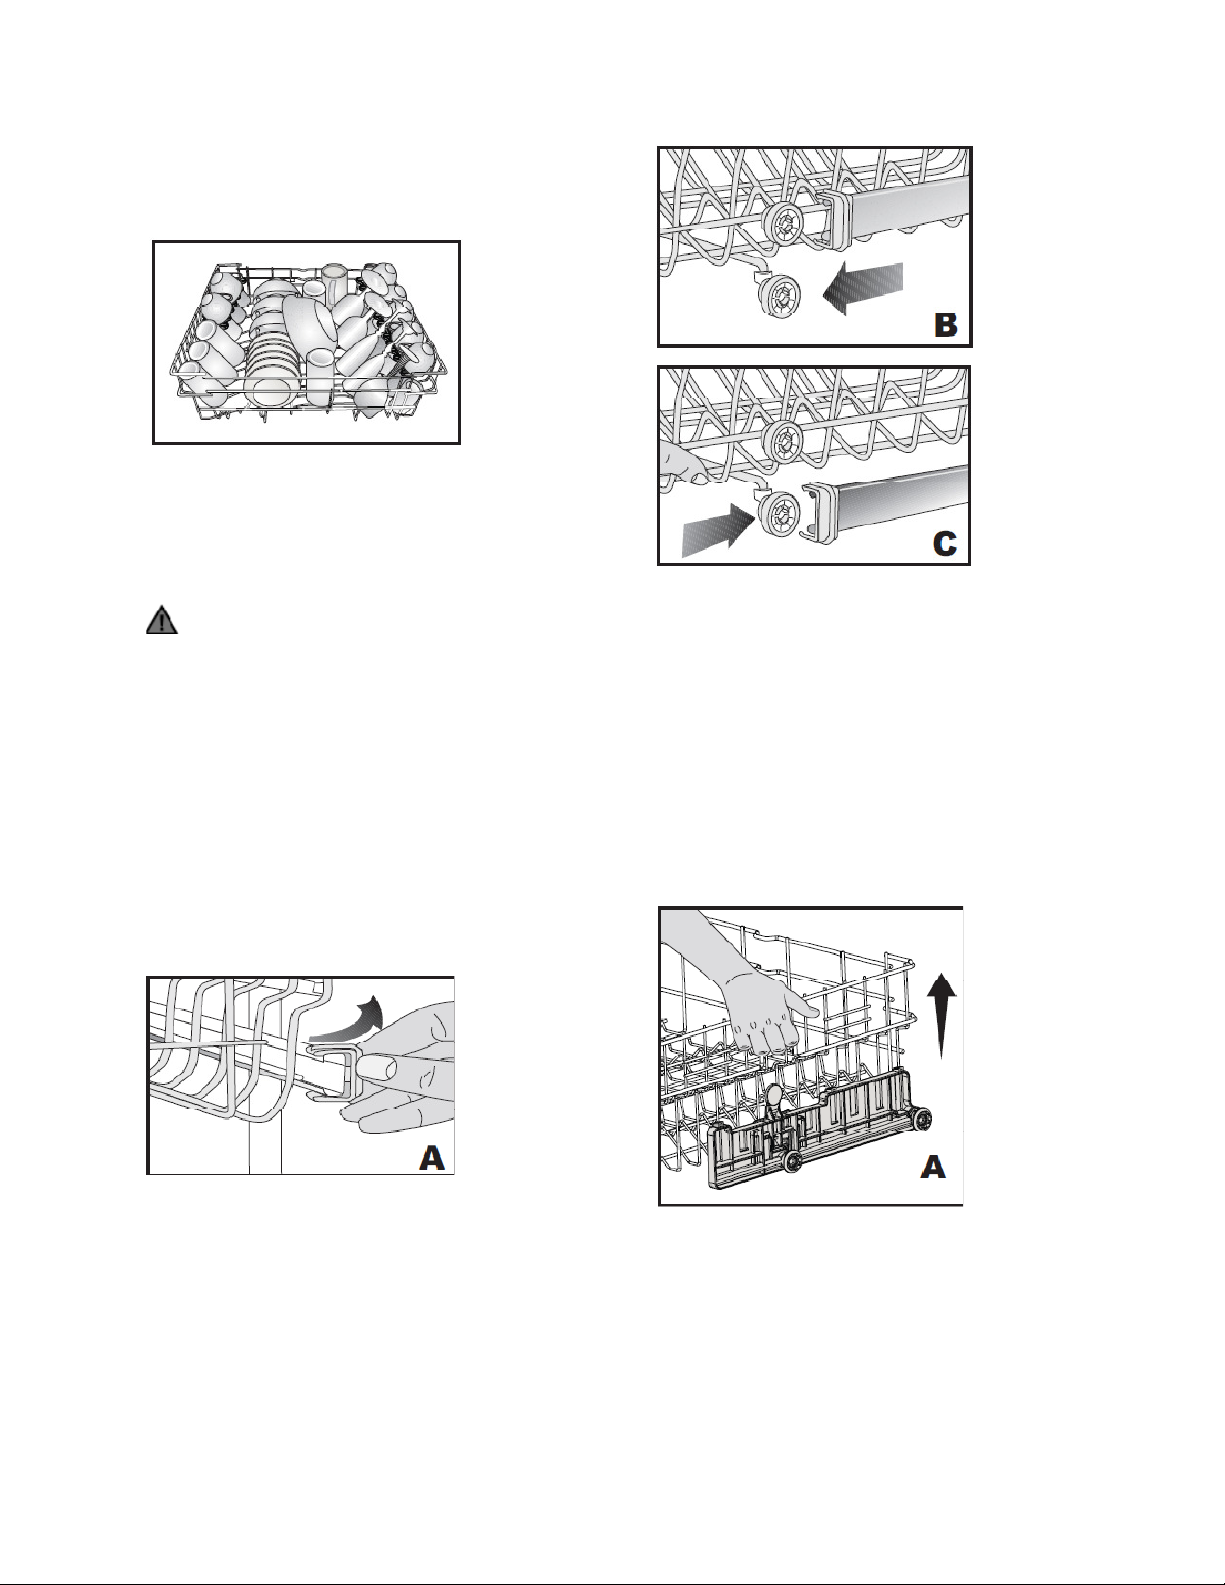
4.2 LOWER RACK
Use the lower rack for plates, bowls, pots, etc.
4.2.1 FOUR FOLDING PLACESUPPORT
TINES (DEPENDING ON MODEL)
There are 4 separate “folding plate support
tines” in the lower rack of your dishwasher
designed to allow you more space to
accommodate saucepans, pots and large bowls
in the lower rack. You can either fold each
section (1, 2, 3, 4) individually or all at once to
create a large empty space.
7
Page 10

Simply press the handgrips A and fold them
down. Pull tines up to fold them up again.
4.2.2 INSET SHELF WITH VARIABLE-
HEIGHT SETTING TINES
(DEPENDING ON MODEL)
You can use this inset in the lower rack for
glasses and long-handled cutlery/utensils.
If you do not need the inset:
1. Fold the shelf upwards at the angle (A).
2. Push the entire inset upwards (B).
3. Place the inset in the upright position (C).
4. Push the inset down and lock it with the
holder (D).
If you would like to use the shelf again, proceed
in the opposite direction.
For the height setting:
1. Push the shelf upwards (E).
2. Push the entire inset upwards (F).
3. Fold it open in position (G).
Notice:
When finished, test to ensure that the spray arm
can still move freely.
8
Page 11

4.2.3 MOVABLE CUTLERY BASKET
(DEPENDING ON MODEL)
Designed to allow free placement of the dishes
according to their size, the movable cutlery
basket can slide over the tines to the left (A)
and right (B) side.
Use the basket inset (C) for your cutlery so that
all items in the basket are surrounded by a
sufficient water flow.
For larger items (e.g., wire whisks) the basket
inset may be removed (C). Simply raise.
To make loading easier, the cutlery basket can
be removed. Simply take out basket upward.
Place long items such as ladles, cooking
spoons, etc., on the shelf in the upper rack.
Notice:
When finished, test to ensure that the spray arm
can still move freely.
4.2.4 CUTLERY BASKET
(DEPENDING ON MODEL)
A Use inset.
CAUTION
B Position sharp items so that they are not
likely to damage the door seal and load
sharp knives with the handles up to
reduce the risk of cut-type injuries.
C Adjust spoons around differently.
Notice:
D Pay attention to any parts that come out of
the basket. The movement of the spray arms
must not be hindered.
9
Page 12

4.3 PROPER AND IMPROPER LOADING OF DISHWARE
• Do not overload your dishwasher. Dishes and cutlery should not be placed above each other.
Glasses should not touch.
• Only with suitable dishes (mentioned in section 5) will you obtain optimal washing results with a
sensible use of energy.
Notice:
• Place all large and very dirty
items in the lower rack.
• Place all containers such as
cups, glasses and pots into
the dishwasher with the
opening facing downwards
(so that no water can
collect).
• The movement of the spray
arms must not be hindered.
10
Page 13

5. WHAT SHOULD NOT
BE WASHED IN YOUR
DISHWASHER
Notice:
• Rust-sensitive steel parts like iron and cast
iron that can rust and stain other utensils and
damage the interior stainless steel liner of the
dishwasher and void the warranty. Do not
wash copper, brass, pewter, bronze or tin.
• Cutlery with wooden or horn handles and
cutlery with mother-of-pearl or porcelain
handles will deteriorate over time if put in the
dishwasher.
• Plastics may lose their shape or color with hot
water. Please follow the instructions of plastic
manufacturers. Be sure that plastic items are
marked “dishwasher safe”.
• Glued dishes or cutlery are not suitable for
machine washing since certain adhesives
may get soft or dissolve with hot water.
• Aluminum may fade over time. Minerals in
water and detergent may cause the aluminum
to darken or spot.
• Sterling silver articles should not be washed in
the dishwasher because they tend to discolor
and become dull by the action of dishwasher
detergent.
• Silverware and stainless steel items should
not be in contact with each other. Mixing
these items can cause staining. Remove and
hand dry these items immediately when the
program ends.
• Decorated glasses, porcelain, fine china and
china with gold rims are sensitive to machine
washing. They may lose their patterns and
colors over time.
• Crystal and very fine glassware may become
opaque (etch), losing their shine over time.
You may prefer to wash them by hand.
• Do not wash sponges or dish cloths in the
dishwasher.
• Do not wash arts and crafts articles in the
dishwasher.
• Disposable plastics and disposable aluminum
cannot withstand high temperatures; do not
wash them in the dishwasher.
CAUTION
• If in doubt, wash by hand or follow the
instructions from the manufacturer of
utensils, dishes, glasses or pots and pans.
• Do not wash items soiled with cigarette
ash, candle wax, varnish, paints or
chemicals since they can damage your
dishwasher.
Notice:
We recommend when buying new dishware, try
to choose ones that are suitable for machine
washing (marked as dishwasher safe).
CARING FOR YOUR TABLEWARE
The combination of high temperatures and
dishwasher detergent may cause damage to
some items if they are washed in the
dishwasher. Remember, if there is any doubt
about any aspect concerning items to be
washed in the dishwasher, follow the
instructions from the manufacturer of the items,
or wash the items by hand.
11
Page 14

6. OPERATING THE DISHWASHER
HOW TO USE YOUR DISHWASHER:
1. Open the door by pulling the door handle 7.
2. Load the dishwasher.
3. Check that both upper and lower spray arms
4. Fill enough detergent into the detergent
5. Use the On/Off button 8 to turn the
6. Check the rinse aid level indicator light 2. If
7. Check the salt level indicator light 3. If
8. Use the Cycle Select button 5 to choose your
9. Start the program with the Start/Pause button
10. When the progress indicator light “End” 4
11. Allow your dishes to cool for 20 minutes, with
12. Unload the dishes. Begin with the lower rack.
1. Program lights 6. Start/Pause button
2. Rinse aid level indicator light * 7. Door handle
3. Salt level indicator light * 8. On/Off button
4. Program follow-up lights
5. Cycle Select button (* Depending on model)
move freely.
dispenser and close the lid.
dishwasher on.
necessary, refill rinse aid (depending on
model).
necessary, refill salt (depending on model).
washing program.
6.
lights up, the wash cycle is completed. Use
the On/Off button 8 to turn the dishwasher off.
the door open.
CAUTION
Avoid opening the door during the washing
process. This interrupts the washing
process, and hot steam will escape. Hot
steam can cause burns and other serious
injuries. When the door is closed, the
program will continue.
FUNCTION BUTTONS
On/Off button
Turn your dishwasher on
with the On/Off button. When
turning on, the icon on the
display module of the last used
program will light up.
Start/Pause button
Use this button to start the
selected program; the light on
the button lights up. Stop the
program with the Start/Pause
button if you would like to open the door
once the dishwasher’s washing program is
running.
Cycle Select button
Use the Cycle Select button
to select the desired program.
The diode of the corresponding
program will light up.
12
Page 15

Cancellation of a program
To cancel a program while the dishwasher is
running:
1. Press the Start/Pause button for 5 seconds.
The indicator light will start flashing.
2. The dishwasher will drain the water inside the
machine for 45 seconds.
3. The program is cancelled when indicator light
goes off.
4. Then, you can choose and start a new
program.
WARNING
Depending on the stage of the program you
have cancelled, there may be detergent
residue or rinse aid inside the machine and
on the dishes. Make sure the items in the
dishwasher are not used before washing
properly. Ingestion or inhalation of detergent
or rinse aid may cause serious injury. Avoid
contact with skin and eyes and keep children
and infirm persons away from these
materials.
Program change
To change a running program:
1. Press the Start/Pause button. The indicator
light on the button will turn off.
2. Select a new program and start it with the
Start/Pause button. The respective program
diode lights up.
CAUTION
The new program will NOT start right from
the beginning. It will start from the stage last
carried out by the previous program
selection.
WARNING
Depending on the length of the terminated
program, detergent and rinse aid may still be
in the dispensers. Ingestion or inhalation of
detergent or rinse aid may cause serious
injury. Avoid contact with skin and eyes, and
keep children and infirm persons away from
these materials.
CONTROL INDICATOR LIGHTS
Program selection via diode
lights.
Number and order of the
programs may vary depending
on model.
Rinse aid level indicator light
(depending on model)
If this indicator light comes on, you have to refill
rinse aid.
You can also tell whether rinse aid must be
refilled by looking at the rinse air dispenser.
When the visual fill indicator is dark, there is
enough rinse aid in the dispenser.
When the color is light, open the dispenser and
refill rinse aid.
Salt level indicator light
(depending on model)
When this indicator light comes on, you must
refill special salt. Only use special dishwasher
salt in your machine to soften the water.
When the visual indicator is dark, there is
enough salt in the container.
When the color is light, open the container and
add dishwasher salt.
13
Page 16

Program follow-up lights
During the washing process, the individual
active program segments are shown by the
program follow-up lights.
Notice:
• When using the 30-minute quick wash
program, the program follow-up light for drying
does not light up.
• The washing process is only complete when
the program follow-up light “End” lights up.
7. DETERGENT & RINSE AID
DISPENSER
7.1 FILLING THE DETERGENT
DISPENSER
WARNING
• Always store your detergent in locations
which are cool, dry and out of the reach
of children.
• Check that the detergent dispenser is
empty after the completion of each wash
program.
• Dishwasher detergents can be dangerous
if inhaled or swallowed. Avoid contact
with skin and eyes, keep children and
infirm persons away from the dishwasher
when the door is opened. Consult a
doctor immediately if detergent has been
swallowed or inhaled.
Notice:
• Only use detergents suitable for dishwashers.
• Do not use detergent in Rinse & Hold cycle.
• Don’t forget to pour/put the detergent into the
dispenser before turning on the machine.
• Too much detergent may mean that the
detergent does not dissolve properly and
dishes could get scratched.
• Too much detergent in soft water may cause
glass corrosion. Do not use too much
detergent if your water supply is soft.
14
Page 17

If you do not know the hardness of your water
supply, use 15 ml / 3 tsp detergent. Increase
the amount of detergent if you see white water
marks especially on the surface of the
glassware.
Find out the hardness of your water supply by
asking your local water department, water
softener company, or county extension agent.
1. Open the detergent container by pushing the
lock to the right (A).
2. Pout/put the detergent into the dispenser.
3. Close the lid until it clicks into place.
• The detergent container holds a total of 40 ml
/ 8 tsp of detergent (1).
• Marking lines on the inside of the detergent
container aids in providing the correct amount
of detergent. When the dishwasher is fully
loaded and the dishes are very dirty, we
recommend filling the detergent container up
to the 25 ml / 8 tsp mark. When the dishes are
less dirty, it is generally sufficient to fill the
detergent up to the 15 ml / 3 tsp mark.
• The detergent amounts for the individual
cleaning programs are shown in the “Quick
Reference Guide – Program Table”.
• Fill amounts given are for standard powder
detergent. Amounts may vary if you use liquid
or concentrated powder detergent. Tablet
detergents should be placed in detergent
container 1. Close the cover.
• Follow instructions on the package of the
detergent when using liquid dishwasher
detergent, concentrated powder detergent or
tablet detergent.
• Deviations are possible depending on how
dirty the dishes are and how hard the water is
in your location.
• If your dishes have been in the dishwasher for
some time without being washed, also fill the
smaller container 2 up to the top.
7.2 FILLING RINSE AID DISPENSER
WARNING
Keep your rinse aids out of the reach of
children. Ingestion or inhalation of rinse aid
may cause serious injury. Avoid contact with
skin and eyes, and keep children and inform
persons away from rinse aids.
15
Page 18

Notice:
• Only use rinse aids suited for use in
dishwashers (e.g., Jet-Dry). Rinse aids allow
washing water to rinse off more cleanly and
prevent watermarks or streaks on the dishes.
• If you use “2 in 1” or “3 in 1”
detergents/tabs, you do not need
additional rinse aid.
1. Open the rinse aid dispenser by pressing the
lock B.
2. Carefully pour in rinse aid to the MAX mark.
3. Close the lid until it clicks in 3.
4. Carefully wipe off spilled rinse aid. Excessive
rinse aid causes excessive foam formation,
which may hinder cleaning.
SET THE DOSE OF RINSE AID
The dose of rinse aid to be used can be set by
means of the dispenser regulator 4 between
levels 1 and 6.
Change the setting only if the following apply
after washing:
• Watermarks are visible on the dishes: Set
dosage higher.
• Streaks are visible on the dishes: Set dosage
lower.
16
Page 19

8. SETTING THE WATER SOFTENER (DEPENDING ON MODEL)
1. Press the Cycle Select button before you switch the appliance on and keep this button pressed down.
2. Switch the appliance on using the On/Off button; then release the switch.
3. Hold the Cycle Select button down for 10 seconds until the control indicator on the Start/Pause button
begins to flash.
4. Water hardness can be set to the desired level by pressing the Cycle Select button (compare the test
strip with the degrees of Hardness Table). The appropriate program follows and lights up.
5. Once you have set the hardness level, press the Start/Pause button to save the value. The control
indicator on the Start/Pause button now lights up permanently.
6. Switch the appliance off again using the On/Off button.
HARDNESS TABLE
Notice:
• If the water hardness level is less than 7 American degree of hardness, you do not need any special
softening salt. In this case, the “salt” control indicator lights up continually (depending on model).
• If your local hardness level exceeds 47 American degree of hardness, you should consider getting a
water softening device for your dishwasher. If you use stream water or rainwater, you are advised to
install filters.
• If you move, do not forget to adjust the water hardness level to suit your new neighborhood.
17
Page 20

9. FILLING THE DISHWASHER
SALT DISPENSER
(DEPENDING ON MODEL)
CAUTION
Never use culinary or table salt. These types
of salt do not dissolve in water easily and
will damage the function of the softening
device.
Notice:
• Only use special dishwasher salt in your
machine to soften the water.
• Do not use coarse-grained salt. Small grains
or powdered salt is more easily soluble.
• The manufacturer is not liable for damages
resulting from the use of the wrong type of
salt.
1. Remove the lower rack from the machine.
2. Open the screw-in cap of the salt container
by turning it counter-clockwise (Figs. A, B).
3. When operating for the first time: Pour 1 liter
of water into the salt container (Fig. C).
4. Pour the salt into the container with the aid of
the supplied salt funnel (Fig. D). Pour in
enough salt to fill the container. The container
holds approximately 2 kg / 4.4 pounds.
5. Close the cap tightly.
CAUTION
Begin any wash program immediately after
filling the salt container. The washing
program prevents damage to the machine
which may be caused by any spilled salt
solution.
After the first washing cycle, the salt level
indicator light will go out (depending on model).
18
Page 21

10. CARE AND MAINTENANCE
WARNING
• Before cleaning or carrying out
maintenance, switch off the appliance,
disconnect the power plug and turn off the
water tap.
• Do not repair or replace any part of the
dishwasher or attempt any servicing
unless specifically recommended in this
manual. We recommend that the
dishwasher only be repaired by an
authorized service agent.
CAUTION
• To avoid the possibility of slipping, keep
the floor around the dishwasher clean and
dry.
• Keep your appliance free from the
accumulation of combustible materials
such as lint, rags and chemicals.
• If the dishwasher is not in use for an
extended period of time, we recommend
you check that the baskets are empty,
leave the inside of the dishwasher clean,
the door cracked open to allow air to
circulate, and turn off both the power and
water supply to the dishwasher.
10.1 CARING FOR YOUR DISHWASHER
EXTERIOR
CAUTION
Possible dishwasher damage: Abrasive
cleaners, scouring pads, abrasive cloths (paper
towels) can damage the dishwasher’s decorative
door.
Cleaning the control panel: Use only soft cloth
that is lightly dampened with a mild detergent
solution. Clean the control panel only with a
moist cloth and clear water.
Cleaning the colored doors: Use only soft
cloth that is lightly dampened with a mild
detergent solution.
Cleaning the stainless steel doors: Use a soft
cloth with a cleaner made for cleaning stainless
steel. For best results, apply the stainless steel
cleaner to a soft cloth and wipe the surface in
the direction of the grain.
Cleaning the door gasket: Regularly clean the
door gasket with a damp cloth to remove food
particles and other debris. Use a gentle
household cleaner for the outside and the door
seals, and rinse thoroughly.
10.2 CARING FOR YOUR DISHWASHER
INTERIOR
Notice:
Cleaning your dishwasher at regular intervals
ensures longer product life and reduces the risk
of recurring problems. Always disconnect the
power to the machine before cleaning.
CAUTION:
When cleaning the underside of the main
filter, care must be taken on the sharp outer
edge to avoid the risk of cut-type injuries.
10.2.1 CLEANING THE FILTERS
Clean the filters and the spray arms regularly. A
dirty dishwasher will have a negative effect on
the cleaning results.
The following filters are to be cleaned:
1. Main filter
2. Coarse filter
3. Micro filter
19
Page 22

1. Remove the lower rack from the machine.
2. Turn the coarse filter counter-clockwise to the
left and pull it out in an upward direction (A).
3. Pull out the main filter (B).
4. Press on the two tabs of the coarse filter and
remove the micro filter (C).
5. Clean the filters thoroughly under running
water. Use a brush if necessary.
6. Replace main filter.
7. Replace the micro filter and the coarse filter
into the main filter.
8. Twist it clockwise until it clicks into place.
CAUTION
Do not operate your dishwasher without a
filter. You will damage your machine. Ensure
that your filters are correctly installed.
10.2.2 CLEANING THE SPRAY ARMS
Notice:
Dirt and/or calcium residue may block the
nozzles on the spray arms. For this reason,
regularly check the spray nozzles.
1. Lower spray arm
2. Upper spray arm
1. Remove the lower rack from the machine.
2. Pull off the lower spray arm with an upward
direction (A).
3. Loosen the fastening screw of the upper spray
arm and pull off the spray arm (B) with a
downward motion.
4. Clean the spray arms under running water.
5. Replace the lower spray arm with a downward
motion.
6. Replace the upper spray arm and tighten the
fastening screw by turning it around to the left.
7. Insert the lower rack.
CAUTION
Ensure that the fastening screw is tight on
the upper spray arm.
20
Page 23

11. TROUBLESHOOTING
What if the dishwasher will not run:
• Is the machine plugged in?
• Are all the fuses operative?
• Is the water supply fully turned on?
• Is the dishwasher door closed securely?
• Have you pressed the On/Off button?
What if the dishwasher starts but fails to circulate water within 5 seconds:
• Cancel the program by pressing the Start/Pause button for 5 seconds. See section 6 or Quick
Reference Guide.
What if the dishwasher produces poor cleaning results:
Follow instructions given on this and the following pages
Possible causes:
• Improper loading
• Too little detergent
• Dishes are removed too soon
• Wrong program selection
• Washing cutlery with worn surfaces
The dishes are not dry
Suggestions on how to fix this problem:
• Load the dishwasher as described in this manual.
• Increase the dosage amount of rinse aid and/or refill
the rinse aid dispenser.
• Do not empty your dishwasher immediately after
washing. Open the door slightly so that the steam
can escape. Begin unloading the dishwasher when
the dishes are only hand warm. Empty the lower
rack first. This cuts down on drips from dishes in the
upper rack.
• In short period programs, the wash temperature and
therefore the cleaning performance are lower.
Choose a program with a longer washing time.
• Evaporation of water is more difficult with certain
items. Cutlery and dishes of this type are not suited
for dishwashers.
21
Page 24

Possible causes:
• Improper loading
• Wrong program selection
• Spray arms are not turning.
• Clogged filters
• Filters are not placed in their proper
positions.
• Spray arm nozzles are clogged.
• Overloaded racks
• Detergent is moist or clumping in box.
• Too little detergent
• Too little rinse aid
• The lid of the detergent dispenser
remained open.
• Washing cutlery with worn surface quality
Possible causes:
• Wrong program selection
• Detergent is moist or clumping in box.
• Using cutlery with a low surface quality
The dishes are not clean
Suggestions on how to fix this problem:
• Load the dishwasher as described in this manual.
• Select a program that washes at a higher
temperature or takes a longer amount of time.
• Check if the spray arms are blocked from moving
freely.
• Clean all filters as described in this manual.
• Check if all filters are placed in their proper
positions.
• Clean the spray arms as described in this manual.
• Do not overload the racks.
• Store detergents in a dry location. Close the lid of
the container securely.
• Increase the amount of the detergent as per the
program table.
• Increase the amount of rinse aid and/or refill the
rinse aid dispenser.
• Always ensure that you close the detergent
dispenser lid after pouring in the detergent.
• Cutlery of this type is not suited to dishwashers.
Tea, coffee or other stains
Suggestions on how to fix this problem:
• Select a program that washes at a higher
temperature or takes a longer amount of time.
• Bleaches in cleaners lose their efficiency when
stored under unfavorable conditions. Store
detergents in a dry location. Close the lid of the
container securely.
• Cleaning of these items is made difficult by their
poor surface structure. Cutlery or dishes of this type
are not for dishwashers.
22
Page 25

Possible Causes:
• Insufficient rinse aid supply
• The hardness is not selected properly;
too little salt is being used.
• Salt loss (models with salt container)
Possible causes:
• Smell of new machine
• Filters are dirty.
• Dirty dishes standing in the machine
for a few days without being washed
• Dirty door gasket
Calcium streaks, misty appearance
Suggestions on how to fix this problem:
• Increase the dosage amount of rinse aid and/or refill
the rinse aid dispenser.
• Call water supplier and ask for local hardness in
grains per gallon or ppm. Use a higher phosphate
content detergent for hard water.
• Check whether the lid of the salt container is firmly
closed. Use the funnel to pour in special salt. Begin
Rinse and Hold program right after filling with salt.
After the program is complete, check whether the lid
may have loosened.
Smell
Suggestions on how to fix this problem:
• The smell of a new machine disappears after a few
wash cycles with detergent.
• Clean all filters as described in this manual.
• Remove coarse dirt under running water and run
the Rinse and Hold program every 2 days without
detergent.
• Regularly clean the door gasket with a damp cloth
to remove food particles and other debris. Use a
gentle household cleaner for the outside and the
door seals, then rinse thoroughly.
23
Page 26

Possible causes:
• Excessive use of detergent when
water hardness is low.
Possible causes:
• The lid of the salt container is
not closed securely. Salt loss
(models with salt container).
• Food leftovers are staying on the
dishes for too long.
• The machine is not grounded properly.
• Cutlery parts from low-grade rust-free
steel.
• Dish items with rust stains.
Milky appearance or rainbow on
glasses (glass corrosion)
Suggestions on how to fix this problem:
• Add a smaller amount of detergent.
• Compare the water hardness level setting on the
dishwasher against the stated values from the local
water supplier.
• When water hardness is low (below 7 American
degree of hardness or 106 parts per million), do not
use salt even if your dishwasher has a water
softener.
• Use a lower phosphate content detergent.
Rust stains, destruction of the surface
Suggestions on how to fix these problems:
• Salt can destroy metal surfaces and cause rust
damage.
• Check whether the lid of the salt container is firmly
closed. Use the funnel to pour in special salt. Begin
the Rinse and Hold program right after filling with
salt. After the program is complete, check whether
the lid may have loosened.
• Remove coarse dirt under running water and carry
out the Rinse and Hold program every 2 days
without detergent.
• Check the grounding of the system. Static electricity
may eat holes into metal and cause irreparable
damage to surfaces.
• Rust on such items cannot be avoided. Cutlery or
dishes of this type are not suited for the dishwasher.
• Rusty dishes may “infect” other items. Cutlery or
dishes of this type are not suited for the dishwasher.
24
Page 27

Possible causes
• Fading of decoration on glasses
and porcelain.
Possible causes
• Moisture in the detergent
dispenser.
• Detergent stays in the dispenser
of the dishwasher for too long.
• The lid of the detergent
dispenser does not open.
• Detergent is moist or clumping
in the box.
• Spray arm nozzles are clogged.
• Spray arms are blocked by dishware.
• Was the cycle terminated early?
Fading of glasses, china, porcelain
pattern
Suggestions on how to fix this problem:
• Glasses, porcelain and cutlery of this type are not
suited for the dishwasher.
Detergent residue remains in the
dispenser
Suggestions on how to fix this problem:
• Ensure that the detergent dispenser is dry before
filling it.
• Pour the detergent in just before washing.
• When loading the dishwasher, take care to ensure
that you do not accidentally block detergent cup
with large dishware or utensils.
• Store detergents in a dry location. Close the lid of
the container carefully.
• Clean the spray arms as described in this manual.
• Make sure spray arms rotate freely.
• Terminating the cycle early can leave detergent
residue in the dispenser.
25
Page 28

Possible causes
• Improper loading
• Overloaded racks
Possible causes
• Dish items/parts made from
aluminum
• The lid of the salt container is not
closed securely. Salt loss (models
with salt container).
• The hardness is not selected
properly; too little salt is being
used.
• Detergents are being stored under
unfavorable conditions.
• Overloaded racks
Dishes break
Suggestions on how to fix this problem:
• Load the dishwasher as suggested in this
manual.
• Do not overload the dish rack. Dishes may hit
against each other and break.
Scratched dishes
Suggestions on how to fix this problem:
• Dishes and cutlery of this type are not suited for the
dishwasher.
• Check whether the lid of the salt container is firmly
closed. Use the funnel to pour in special salt. Begin
the Rinse and Hold program right after filling with
salt. After the program is complete, check whether
the lid may have loosened.
• Call water supplier and ask for local hardness in
grains per gallon or ppm. Adjust the water hardness
level setting accordingly.
• Detergents should not be stored longer than 2
months in open packages. Store detergents in a dry
location. Close the lid of the container carefully.
• Take care to ensure that individual glasses and
dishes do not touch. They may hit against each
other during the washing process, causing
scratches.
26
Page 29

Possible causes
• The dishes are pre-washed by
hand with a large amount of dish
detergent.
• Rinse aid has accidentally leaked
into the machine.
• The cover of the rinse aid
dispenser is not closed securely.
Possible causes
• Clogged filters
• Drain hose kinked or clogged
12. TECHNICAL FEATURES
Foam
Suggestions on how to fix this problem:
• Dishes do not need to be pre-washed. Coarse dirt
may be removed with a dishcloth, or you may hold
the dishes under running water.
• If rinse aid has been spilled during refilling, remove
the aid using a paper cloth or sponge.
• Always take care to ensure that the lid is closed
after refilling the rinse aid dispenser.
Water remains inside the machine
after the rinse cycle
Suggestions on how to fix this problem:
• Clean all filters as described in this manual.
• Ensure that the drain hose is properly placed and
open.
Notice:
Because we continually strive to improve our products, we may change our specifications and design
without prior notice.
This devise corresponds to the following directives:
UL 749 Household Dishwasher directive
27
Page 30

13. LIMITED WARRANTY
FELIX STORCH, INC.
ONE YEAR LIMITED WARRANTY
Within the 48 contiguous United States, for one year from the date of purchase, when this appliance is
operated and maintained according to instructions attached to or furnished with the product, warrantor
will pay for factory-specified parts and repair labor to correct defects in materials or workmanship.
Service must be provided by a designated service company. Outside the 48 states, all parts are
warranted for one year from manufacturing defects. Plastic parts, shelves and cabinets are warranted to
be manufactured to commercially acceptable standards, and are not covered from damage during
handling or breakage.
ITEMS WARRANTOR WILL NOT PAY FOR:
1.
Service calls to correct the installation of your appliance, to instruct you how to use your appliance, to
replace or repair fuses or to correct wiring or plumbing.
2.
Service calls to repair or replace appliance light bulbs or broken shelves. Consumable parts (such as
filters) are excluded from warranty coverage.
3.
Damage resulting from accident, alteration, misuse, abuse, fire, flood, acts of God, improper
installation, installation not in accordance with electrical or plumbing codes, or use of products not
approved by warrantor.
4.
Replacement parts or repair labor costs for units operated outside the United States.
5.
Repairs to parts or systems resulting from unauthorized modifications made to the appliance.
6.
Expenses for travel and transportation for product service in remote locations.
7.
The removal and reinstallation of your appliance if it is installed in an inaccessible location or is not
installed in accordance with published installation instructions.
DISCLAIMER OF IMPLIED WARRANTIES – LIMITATION OF REMEDIES
CUSTOMER'S SOLE AND EXCLUSIVE REMEDY UNDER THIS LIMITED WARRANTY SHALL BE
PRODUCT REPAIR AS PROVIDED HEREIN. IMPLIED WARRANTIES, INCLUDING WARRANTIES OF
MERCHANTABILITY OR FITNESS FOR A PARTICULAR PURPOSE, ARE LIMITED TO ONE YEAR.
WARRANTOR SHALL NOT BE LIABLE FOR INCIDENTAL OR CONSEQUENTIAL DAMAGES. SOME
STATES DO NOT ALLOW THE EXCLUSION OR LIMITATION OF INCIDENTAL OR CONSEQUENTIAL
DAMAGES, OR LIMITATIONS ON THE DURATION OF IMPLIED WARRANTIES OF
MERCHANTABILITY OR FITNESS, SO THESE EXCLUSIONS OR LIMITATIONS MAY NOT APPLY TO
YOU. THIS WARRANTY GIVES YOU SPECIFIC LEGAL RIGHTS AND YOU MAY ALSO HAVE OTHER
RIGHTS, WHICH VARY FROM STATE TO STATE.
770 Garrison Avenue
Bronx, NY 10474
Phone: (718) 893-3900
Fax: (718) 842-3093
www.summitappliance.com
For parts and accessory ordering,
troubleshooting and helpful hints, visit:
www.summitappliance.com/support
28
 Loading...