

Page 1
BEFORE USE, PLEASE READ AND FOLLOW ALL SAFETY RULES
Write down the serial number here. You'll find
FELIX STORCH, INC.
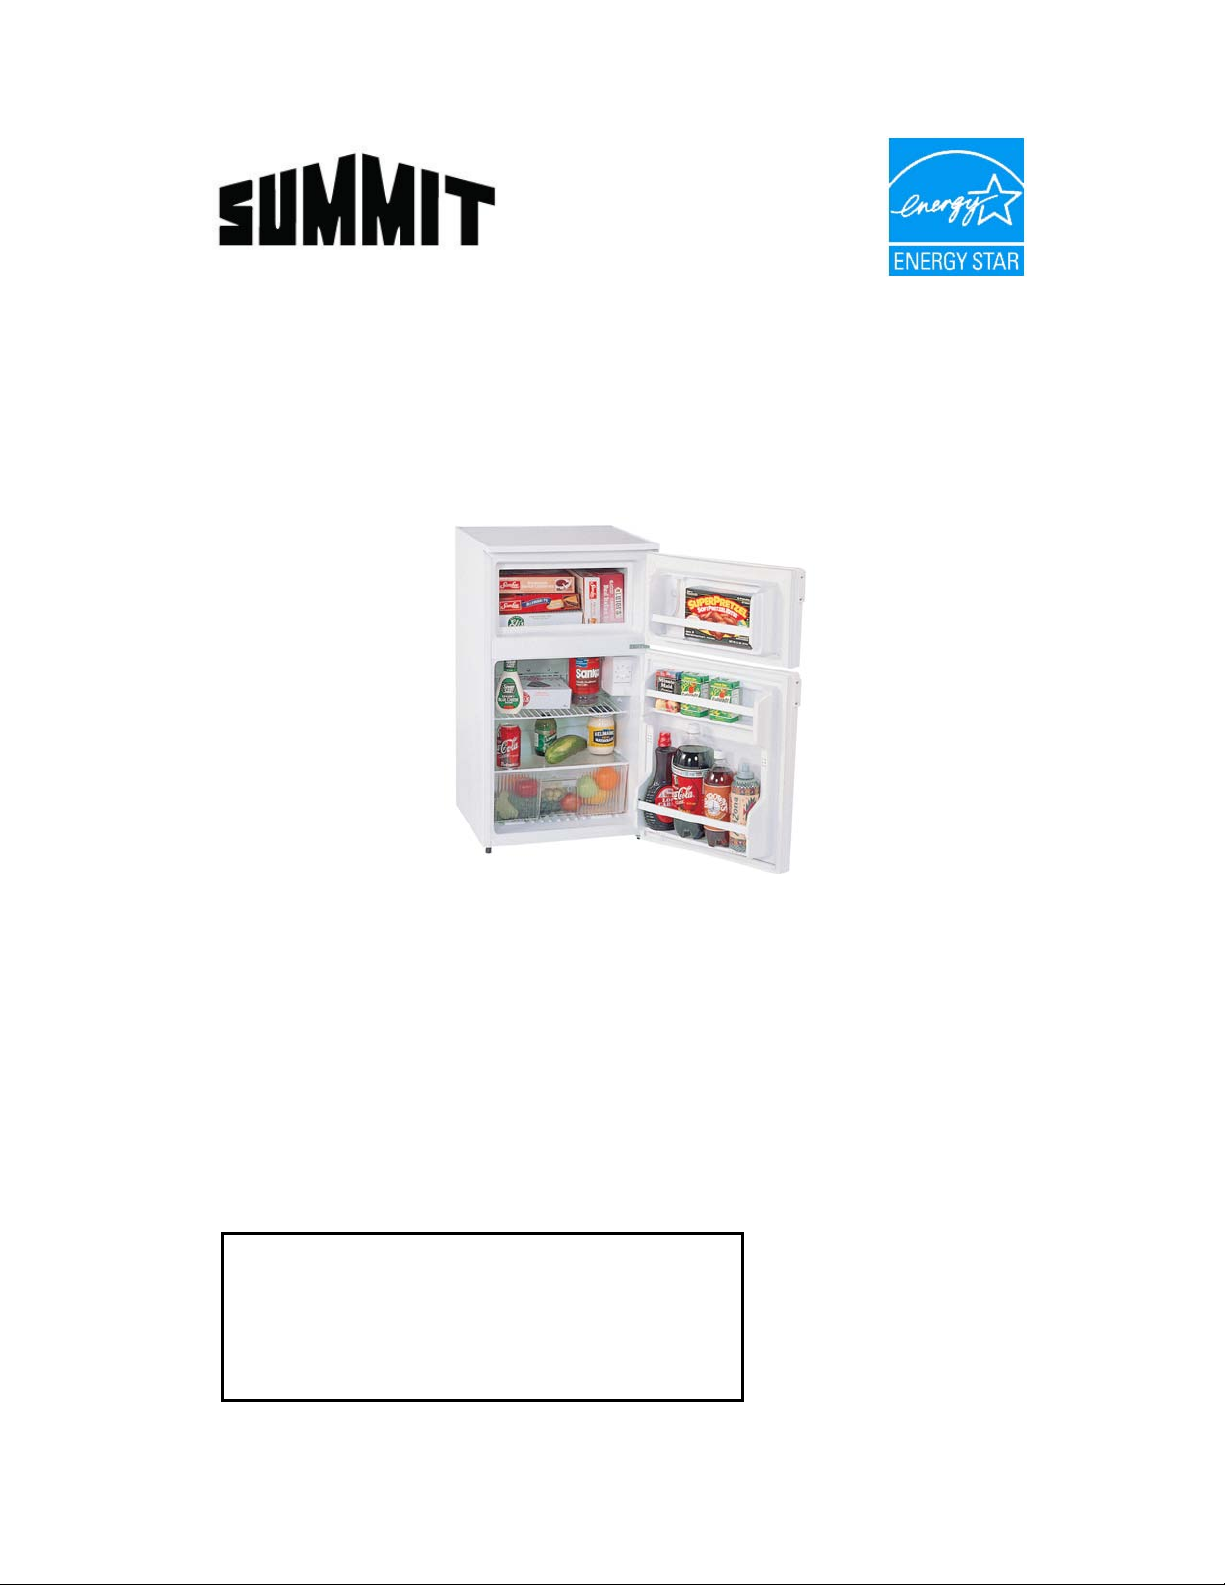
REFRIGERATOR-FREEZER
Model CP351W
Instruction Manual
AND OPERATING INSTRUCTIONS.
Keep proof of original sales date (such as your sales slip) with this
manual to establish the warranty period.
it on a plate located either on the back of the
appliance or on an interior wall.
____________________________________
770 Garrison Avenue
Bronx, New York 10474
www.summitappliance.com
Page 2

Table of Contents
Important Safeguards ................................................................... 2 – 3
Introduction .......................................................................................... 4
Installation ...................................................................................... 4 – 7
Before using your appliance ....................................................... 4
Installing your applia nce ....................................................... 4 – 5
Electrical connection ................................................................... 5
Test run ................................................................................. 5 – 6
Reversing the door swing ..................................................... 6 – 7
Operation ........................................................................................ 8 – 9
Temperature control .................................................................... 8
Storing fresh foods ................................................................ 8 – 9
Storing food in the freezer compartment ..................................... 9
Defrosting ................................................................................... 9
Care and Maintenance .............................................................. 10 – 11
Cleaning the appliance ............................................................. 10
Switching off the appliance when not in use ............................. 10
Disposing of a worn-out appliance ............................................ 10
Energy-saving tips ............................................................ 10 – 11
Technical Information ....................................................................... 11
Troubleshooting ........................................................................ 12 – 13
Limited Warranty ............................................................................... 15
1
Page 3
IMPORTANT SAFEGUARDS
Before the refrigerator/freezer is used, it must be properly positioned and
installed as described in this manual, so read the manual carefully. To
reduce the risk of fire, electrical shock or injury when using this appliance,
follow basic precautions, including the following:
• Plug into a grounded 3-prong outlet, do not remove grounding prong, do not
use an adaptor and do not use an extension co r d.
• It is recommended that a separate circuit, serving only your refrigerator, be
provided. Use receptacles that cannot be turned off by a switch or pull chain.
• Never clean refrigerator parts with flammable fluids. These fumes can create
a fire hazard or explosion. Also, do not store or use gasoline or other
flammable vapors and liquids in the vicinity of this or any other appliance.
The fumes can create a fire hazard or explosion.
• Before proceeding with cleaning and maintenance operations, unplug the
appliance or disconnect power. Failure to do so can result in electrical shock
or death.
• Do not connect or disconnect the electric plug when your hands are wet.
• Do not attempt to repair or replace any part of your appliance unless it is
specifically recommended in this manual. All other servicing should be
referred to a qualified technician.
• DANGER: Risk of child entrapment!
Child entrapment and suffocation are not problems of the past. Junked or
abandoned appliances are still dangerous, even if they will "just sit in the
garage a few days."
√ Before you throw away your old refrigerator or freezer, take off the doors.
Leave the shelves in place so that children may not easily climb inside.
√ Never allow children to operate, play with or crawl inside the refrigerator.
2
Page 4

• This unit is not designed to operate in enclosed spaces. When placing
your unit, make sure you allow at least 4” of clearance on all sides.
• Use two or more people to move and install the appliance. Failure to do so
can result in back or other injury. When moving the appliance, do not tilt it
beyond 45° from the uprig ht positi on .
• To ensure proper ventilation for your refrigerator-freezer, the front of the unit
must be completely unobstructed. Choose a well-ventilated area with
temperatures above 60°F (16°C) and below 90°F (32°C). This unit must be
installed in an area protected from the elements such as wind, rain, water
spray or drips.
• The appliance should not be located next to ovens, grills or other sources of
high heat.
• The appliance must be installed with an electrical connection in accordance
with state and local codes. A standard electrical supply (115-120V AC only ,
60 Hz), properly grounded in accordance with the National Electrical Code
and local codes and ordinances is required.
• Do not kink or pinch the power supply cord of the appliance.
• The fuse (or circuit breaker) size should be 15 amps.
• It is important for the refrigerator-freezer to be leveled in order to work
properly. You may need to make several adjustments to level it.
• Do not use solvent-based cleaning agents or abrasives on the interior
surfaces. These cleaners may damage or discolor the interior.
• This appliance is not intended for use by young children or infirm persons
without supervision.
• Do not use this apparatus for other than its intended purpose.
CAUTION : THIS APPLIANCE IS NOT DESIGNED FOR THE STORAGE OF
MEDICINE OR OTHER MEDICAL PRODUCTS.
SAVE THESE INSTRUCTIONS
3
Page 5

Introduction
The CP351W is a unique two-door refrigerator with a zero degree freezer. The
fresh food section is automatically defrosted; the freezer is manually defrosted.
The refrigerator compar tment sto r es fresh foods at temperatures of 34°F (1°C)
and higher while the freezer maintains a temperature of 0°F (-17°C).
This product is not designed to operate in enclosed spaces. When placing
your unit, make sure you allow at least 4” of clearance on all sides.
Installation
Before Using Your Appliance
1. Remove the exterior and interior packing. To remove any remaining tape or
glue, rub the area briskly with your thumb. Tape or glue residue can al so be
easily removed by rubbing a small amount of liquid dish soap over the
adhesive with your fingers. Wipe with warm water and dry.
Do not use sharp instruments, rubbing alcohol, flammable fluid or abrasive
cleaners to remove tape or glue. These products can damage the surface of
your refrigerator.
2. When moving the appliance, do not tilt it more than 45° from the upright
position.
3. Before connecting the appliance to the power source, let it stand upright for
approximately 2 hours. This will reduce the possibility of a malfunction in the
cooling system from handling during transportation.
4. Clean the interior surfaces with lukewarm water using a soft cloth.
Installing Your Appliance
WARNING: Keep flammable materials and vapors such as gasoline away from
the refrigerator.
• Place your appliance on a floor that is strong enough to support it when fully
loaded. To level your appliance, adjust the leg at the front of the appliance.
• To ensure proper ventilation for your refrigerator-freezer, leave at least 4" of
space on each side, 4" at the back and 4" above the unit.
• If you are installing the appliance next to a fixed wall, leave sufficient space
on the hinge side to allow for the door to swing open.
• Locate the appliance away from direct sunlight and sources of heat (stove,
heater, radiator, etc.). Direct sunlight can affect the refrigerator's coating and
heat sources can increase electrical consumption. Extremely cold ambient
temperatures may also cause the appliance to perform improperly.
4
Page 6

• Avoid locating the appliance in moist areas. Too much moisture in the air will
Warning
cause frost to form quickly on the evaporator, requiring more frequent
defrosting of the appliance.
Electrical Connection
Improper use of the grounded plug can result in the r isk of electrical
shock. If the power cord is damaged, have it replaced by an authorized
service technician.
• This appliance should be properly grounded for your safety. The power cord
of this appliance is equipped with a three-prong plug which mates with standard three-prong wal l outlets to minimize the possibility of electri ca l sh ock.
• Do not under any circumstances cut or remove the third ground prong from
the power cord supplied.
• Plug the appliance into an exclusive, properly installed grounded wall outlet.
Any questions regarding power and/or grounding should be directed toward a
certified electrician or an authorized Summit service center.
• It is recommended that a separate circuit serving only this appliance be
provided. Use a receptacle that cannot be turned off with a switch or pull
chain.
• Do not use an extension cord.
• This appliance requires a standard 115/120-volt, 60 Hz electrical outlet with
three-prong ground and a 15-amp fuse. To prevent accidental injury, the
power cord should be secured behind the appliance and not left exposed or
dangling.
NOTE: Before performing any type of installation, cleaning or removing a light
bulb, turn the temperature control to OFF and then disconnect the unit from
the electrical power source. When you are finished, reconnect the refrigerator
to the power source and reset the temperature control to the desired setting.
Test Run
Before using your appliance, make a test run to be sure it is in working order. If
not, check the electrical supply. When the cause of trouble cannot be located,
contact Summit Customer Service at 1-800-932-4267.
1. Set the temperature control knob to OFF and then plug the AC cord into an
electrical outlet of 115 volts, 60Hz. The motor should not run.
2. Set the knob to MAX and let the refrigerator operate for 20 minutes. Th e
freezer compartment should get slightly frosted and the motor should run
smoothly with a soft hum .
3. Then rotate the knob counter-clockwise toward MIN. Before the pointer of the
knob reaches MIN, the motor should turn off.
5
Page 7

Reversing the Door Swing
This appliance has the capabi li ty of the doors opening from either the left or the
right side. The unit is delivered to you with the doors opening from the left side.
Should you desire to reverse the opening direction, follow the directions and
diagram below. The numbers in the diagram indicate the procedure order in the
instructions. If you have a problem, call Customer Service at 1-800-932-4267.
1. Remove the hinge cap by twisting it off.
2. Remove the upper hexagonal head screws. The top hinge and the freezer
door can now be removed.
3. Remove the middle hexagonal head screws. The middle hinge and the
refrigerator door can now be removed.
4. Remove th e cov er for middl e hing e hol es an d re-attach it symmetrically to
the holes on the other side.
5. Tilt the refrigerator back or lay it on its back for steps 6, 7, and 8. Use a pad
or blanket to protect the floor and to avoid scratching the painted finish.
6. Remove the leveling legs by turning them counterclockwise. Remove the
lower hexagonal head screws, two on the hinge side and one near the front
corner of the other side.
7. Attach the bottom hinge symmetrically to the other side of the cabinet with
the screws removed in procedure 6. (Do not tighten the screws completely.)
8. Attach the left side leg and the leg spacer to the other side hole which was
positioned symmetrically.
9. Remove the upper hinge plastic pins and insert them in the holes from which
the screws were removed in step 2.
10. Take off the hinge collar caps from both the Freezer and the Refrigerator
doors using a screwdriver and insert them in the hinge collars on the
opposite side.
11. Attach the shaft to the hinge bottom. Attach the refrigerator door to the shaft.
12. Rotate the middle hinge 180°. Attach it to the refrigerator door and secure it
with screws. (Do not tighten the screws completely.)
13. Attach the upper hinge to the freezer door. Attach the freezer door to the
middle hinge and use the screws to attach the upper hinge. (Do not tight en
the screws completely.)
14. The direction in which the door opens has now been changed; however, the
following points should be checked:
a. The door is on straight.
b. There is no space between the door gasket and the refrigerator unit itself
when the door is closed.
c. The gasket on the hinge side is not caught between the door and the unit
when the door is opened or closed. (If the door is forced closed when the
gasket is caught, the gasket may be damaged.)
6
Page 8

When checking the above points, if you discover that the door is not installed
properly (this is apt to happen on the first try), loosen the screws holding the
upper hinge, straighten the door and tighten the screws slowly with the
socket wrench. After making sure that the door is installed correctly, tighten
all the screws holding the hinge. If they are not tightened, the door may slip
out of position or there may be an opening between the door and the unit.
15. Stand the unit back in the upright position.
7
Page 9

Operation
Temperature Control
The temperature inside the refrigerator compartment
is controlled by turning the thermostat dial. Higher
numbers mean greater cooling power; lower
numbers mean less cooling power.
Set the temperature control dial to 3 for optimum
refrigeration/freezing conditions under normal
circumstances. Set the dial to MAX only when rapid
refrigeration/freezing in your appliance is necessary.
Be sure to set the dial back to 3 later on.
IMPORTANT:
• Do not operate your refrigerator for more than six hours with the
temperature control dial set to 5 or MAX. At these settings, the
compressor will run continuously. Consequently, foodstuffs stored in the
refrigerator compartment will be frozen and frost will form on the cooling
unit (evaporator).
• When the room temperature is below 60°F, set the temperature control
dial to 2.
• At the control dial setting of 1, the temperature in the freezer compartment
will not remain sufficiently low for ice cream and frozen foods.
• If the unit is turned off or unplugged, YOU MUST ALLOW THREE (3)
MINUTES BEFORE RESTARTING OR REPLUGGING THE UNIT. The
unit will not start if you attempt to restart it in less than three (3) minutes.
Storing Fresh Foods
• Foods to be stored in the refrigerator should be properly packed to prevent
loss of moisture and mixing of odors Use plastic bags or wrap, aluminum foil,
wax paper, covered containers or bottles.
• Never store any inflammable, volatile or explosive substances.
• Beverages with a high percentage of alcohol should be stored in tightly
sealed bottles in a vertical position.
• Stored items should not touch the rear wall of the refrigerator.
• Some organic substances like the volatile oils in lemon and orange peel, the
acid in butter, etc., can cause damage when in contact with plastic surfaces
or gaskets for a long period of time.
• An unpleasant odor inside the refrigerator is a sign that something is wrong
with the food or that your refrigerator needs cleaning. Odors may be
eliminated or reduced by washing the interior of the refrigerator with a mild
solution of water and vinegar.
8
Page 10

• If you plan on taking a long trip, make sure you remove all perishable food
before you leave to prevent any odors.
Storing Food in the Freezer Compartment
• Only freeze fresh, high-quality products. Meat, poultry, fish, vegetables, fruit,
dairy products and ready-made meals are suitable for freezing. Items with a
high water content, e.g. lettuce, radishes, grapes, ap ples, pears and
cucumbers, are not suitable f or fre ez i ng .
• Pack items to be frozen in airtight containers, freezer bags or the like. Freeze
items in suitable portions. Do not freeze vegetables in portions larger than 5½
lbs. Do not freeze meat in portions larger than 5½ lbs. Keep packages dry to
prevent them from freezing together. To ensure rapid freezing, make sure, as
far as possible, that items placed in the freezer are not touching. Ensure that
there is as little air in the packages as possible to prevent the surfaces of the
items from drying out.
• Always remember to write the date, content and quantity on the packages
before placing them in the freezer.
Defrosting
Refrigerator compartment
:
The cooling unit (evaporator) in the refrigerator compartment is automatically
defrosted whenever the compressor motor stops running. No manual
defrosting is required. Frost may grow thick temporarily if the room
temperature is high or the door is opened frequently. Under normal
conditions, however, it will disappear after a period of operation.
Freezer compartment
:
The freezer compartment should be kept free of frost for good freezing and
economical operation at low power consumption. Frost should not be allowed
to grow thicker than 1/8” to 1/4”.
• Scrape frost off the fr e ezer
compartment walls with the scraper
supplied with your refrigerator. This
can be done without stopping
operation.
• After a long period of operation,
frost in the freezer compartment may become too hard to be removed
with the scraper. In this case, set the temperature control dial to OFF,
leave the freezer compartment door open for several minutes, and
wipe the freezer compartment walls clean of frost with a hot towel.
Afterwards, wipe the walls dry and reset the control dial.
9
Page 11

Care and Maintenance
Cleaning the Appliance
Disconnect the power supply before cleaning the appliance. To avoid
damaging the surfaces, do not use coarse or abrasive cleaning agents.
• Clean the exterior with water and detergent. Varnished surfaces can be
cleaned with a soft cloth and an alcohol-based cleaning agent (for example,
glass cleaners). You may also use alcohol (ethanol or isopropyl alcohol). The
application of harsh and abrasive products such as stainless steel cleaners is
not appropriate for the cleani ng of plast i c and co ate d par t s.
• Remove the detachable accessories in the interior of the appliance and clean
it with a solution of water and liquid detergent. Plastic parts cannot be
washed in a dishwasher.
• Wash the interior of the appliance with lukewarm water to which you have
added one or two spoonfuls of vinegar.
• Every now and then wipe the condenser on the rear wall with a soft non-metal
brush, or use a vacuum cleaner.
• Do not forget to clean the defrost water receptacle above the refrigerator’s
compressor (do not remove the receptacle).
• After cleaning, connect the appliance to the power supply and reload the
packages.
Switching Off the Appliance When Not in Use
If you do not intend to use the appliance for an extensive period of time, set the
thermostat knob to the OFF position and disconnect the power supply. Then take
out the foods and clean the appliance. Leave the door slightly open.
Disposing of a Worn Out Appliance
When your appliance finally wears out, dispose of it. If the appliance has a lock,
break it to prevent possible accidents (danger of children getting locked inside
the appliance).
Energy-Saving Tips
• Try not to open the door too often, especially when the weather is hot and
humid. Once you open the door, close it as soon as possible.
• Every now and then check if the appliance is sufficiently ventilated (adequate
air circulation behind the appliance).
• Set thermostat from higher to lower settings as soon as possible (depending
on how loaded the appliance is, the ambient temperature, etc.).
• The coils on the rear of the refrigerator should be cleaned and free of dust or
any other impurities.
10
Page 12

• An ice or frost layer increases energy consumption, so re move the frost as
soon as the layer is 1/8” thick. See Defrosting on page 9.
• Be sure there is adequate clearance all around the unit, as described in
Installing Your Appliance on page 4.
Technical Information
Models: CP351W
Color: White
Capacity: 3.0 cubi c f eet
Electrical Input: 115V AC / 60Hz
Rated Current: 1.4A
Energy Consumption: 319 kWh/yr
Energy Star approved: Yes
Defrost Type: Cycle
Refrigerant: R134a, 2.6 oz
Installation: Free-standing
Shipping Weight: 102.0 lbs
Unit Dimensions: 18.75"W x 20.25"D x 33.5"H
11
Page 13

Troubleshooting
While using your appliance, you may come across some problems that in most
cases result from improper handling. Many of these can easily be eliminated by
following the suggestions listed here.
The appliance fails to operate after connecting to the power supply.
• Check that there is power in the electrical socket.
• Make sure the appliance is switched on (thermostat is in the operating
position).
The refrigeration system is operating continuously.
• The door was frequently opened or it was left open too long.
• The door is not properly closed (the door may sag; the gasket may be dirty
or damaged).
• The appliance may be overloaded w it h fresh foods.
• There may be inadequate ventilation of the compressor and condenser.
(Be sure there is sufficient air circulation. Wipe off the condenser.)
Ice is forming on the inner rear wall.
As long as the defrost water runs to the channel and through the opening to
the drain pan on the compressor , aut o matic d e frost i ng of the refrigerator
compartment is assured. If the ice for m ation on the inner back wall increases
to 1/8” or more, the ice should be manually defrosted as follows:
Set the thermostat knob to OFF and leave the door open. Never use electric
devices for defrosting and do not scrape the ice or frost layer with sharp
objects. When defrosting is completed, turn the knob to the desired position
and close the refrigerator door.
Increased ice formation may be caused by one of the following:
- The door does not seal well (clean the gasket if it is contaminated, or
replace it if it is damaged).
- The door was frequently opened or it was left open for too long.
- Food was warm when placed in the refrigerator.
- The food or a container is touching the inner back wall.
Water is leaking from the refrigerator.
In case the discharge water outlet is clogged or the defrost water drips over
the channel resulting in water leaking from the refrigerator, just clean the
clogged opening with a plastic straw. Manually defrost the increased ice layer.
See Ice is forming on the inner rear wall above.
12
Page 14

Noise
Cooling in refrigerating-freezing appliances is enabled by the refrigerating system
including the compressor, which produces noise. How noisy the appliance is
depends on where it is placed, how it is used and how old the appliance is.
• During the operation of the compressor, a liquid sound is heard and when
the compressor is not operating, a refrigerant flow is heard. This is a
normal condition and it has no influence whatsoever on the lifetime of the
appliance.
• After starting the appliance, the operation of the compressor and the
refrigerant flow may be louder and this does not mean something is wrong
with the appliance. The noise will reduce gradually. This will not affect the
lifetime of the applianc e.
• Sometimes strong noises occur which are unusual for the appliance. This
noise is often a consequence of inappropriate place ment . To avoid the
noise make sure the appliance is placed and leveled firmly on a solid
base. Make sure the appliance is not touching the wall or kitchen units
standing next to it. And always make sure you check the accessories in
the interior of the appliance; they should be placed correctly in their
positions. Check the bottles, cans and other vessels that might touch each
other and rattle.
Before Calling for Service
Check the plug and fuse.
Test the outlet with a lamp.
Be sure the temperature control dial is not set to OFF.
Read the manual, especially the items under the Installation, Operation
and Care and Maintenance sections. You may find the answers to your
questions.
If you don’t find the answers to your questions in this manual, find the
unit model number (on the upper back of the refrigerator) and contact
Summit Customer Service at (800) 932-4267.
13
Page 15

Notes
14
Page 16

Limited Warranty
Felix Storch, Inc.
www.summitappliance.com
For parts and accessory ordering,
WARNING! This product may contain chemicals known to the state
ONE-YEAR LIMITED WARRANTY
Within the 48 contiguous United States, for one year from the date of purchase, when this appliance is operated and
maintained according to instructions attached to or furnished with the product, warrantor will pay for factory-specified
parts and repair labor to correct defects in materials or workmanship. Service must be provided by a designated
service company. Outside the 48 states, all parts are warranted for one year from manufacturing defects. Plastic parts,
shelves and cabinets are warranted to be manufactured to commercially acceptable standards, and are not covered
from damage during handling or breakage.
5-YEAR COMPRESSOR WARRANTY
The compressor is covered for 5 years.
Replacement does not include labor.
ITEMS WARRANTOR WILL NOT PAY FOR:
• Service calls to correct the installation of your appliance, to instruct you how to use your appliance, to replace or
repair fuses or to correct wiring or plumbing.
• Service calls to repair or replace appliance light bulbs or broken glass shelves. Consumable parts (such as filters)
are excluded from warranty coverage.
• Damage resulting from accident, alteration, misuse, abuse, fire, flood, acts of God, improper installation, installation
not in accordance with electrical or plumbing codes, or use of products not approved by warrantor.
• Replacement parts or repair labor costs for units operated outside the United States.
• Repairs to parts or systems resulting from unauthorized modifications made to the appliance.
• Expenses for travel and transportation for product service in remote locations.
• The removal and reinstallation of your appliance if it is installed in an inaccessible location or is not installed in
accordance with published installation instructions.
DISCLAIMER OF IMPLIED WARRANTIES;
CUSTOMER’S SOLE AND EXCLUSIVE REMEDY UNDER THIS LIMITED WARRANTY SHALL BE PRODUCT REPAIR AS
PROVIDED HEREIN. IMPLIED WARRANTIES, INCLUDING WARRANTIES OF MERCHANTABILITY OR FITNESS FOR A
PARTICULAR PURPOSE, ARE LIMITED TO ONE YEAR. WARRANTOR SHALL NOT BE LIABLE FOR INCIDENTAL OR
CONSEQUENTIAL DAMAGES. SOME STATES DO NOT ALLOW THE EXCLUSION OR LIMITATION OF INCIDENTAL OR
CONSEQUENTIAL DAMA GES, OR LIMITAT IONS ON THE DURATION OF IMPLI ED WARRANTIE S OF MERCHA NTABILI TY OR
FITNESS, SO THESE EXCLUSIONS OR LIMITATIONS MAY NOT APPLY TO YOU. THIS WARRANTY GIVES YOU SPECIFIC
LEGAL RIGHTS AND YOU MAY ALSO HAVE OTHER RIGHTS, WHICH VARY FROM STATE TO STATE.
LIMITATION OF REMEDIES
of California to cause cancer or birth defects or other reproductive
harm. For more information, visit: www.summitappliance.com/prop65
Chemicals known by the manufacturer to be present in this product in
concentrations higher than threshold limits: NONE.
Summit Appliance Division
770 Garrison Avenue
Bronx, NY 10474
Phone: (718) 893-3900
Fax: (844) 478-8799
troubleshooting and helpful hints, visit:
www.summitappliance.com/support
15
 Loading...