

Page 1
IMPORTANT SAFETY INSTRUCTIONS
WARNING
Please read all instructions before using this
refrigerator.
For your Safety
• DO NOT store or use gasoline, or other
ammable liquids in the vicinity of this or
any other appliance. Read product labels
for warnings regarding ammability and
other hazards.
• DO NOT operate the refrigerator in the
presence of explosive fumes.
• Avoid contact with any moving parts of
automatic ice maker.
• Remove all staples from the carton. Staples
can cause severe cuts, and also destroy
nishes if they come in contact with other
appliances or furniture.
Denitions
This is the safety alert symbol. It is used to
alert you to potential personal injury hazards.
Obey all safety messages that follow this
symbol to avoid possible injury or death.
DANGER
DANGER indicates an imminently hazardous
situation which, if not avoided, will result in
death or serious injury.
WARNING
WARNING indicates a potentially hazardous
situation which, if not avoided, could result
in death or serious injury.
CAUTION
CAUTION indicates a potentially hazardous
situation which, if not avoided, may result in
minor or moderate injury.
IMPORTANT
IMPORTANT indicates installation, operation
or maintenance information which is
important but not hazard-related.
Installation Checklist
Doors
Handles are secure and tight
Door seals completely to cabinet on all
sides
Freezer door is level across the top
Leveling
Refrigerator is level, side-to-side and
tilted ¼” (6mm) front-to-back
Toe grille is properly attached to
refrigerator
Cabinet is setting solid on all corners
Electrical Power
House power turned on
Refrigerator plugged in
Ice Maker
House water supply connected to
refrigerator
No water leaks present at all connections
- recheck in 24 hours
Ice maker is turned ON
Ice & water dispenser operates correctly
Front lter must be ush with lter
housing (select models)
Final Checks
Shipping material removed
Fresh food and freezer temperatures set
Crisper humidity controls set
Registration card sent in
Child Safety
Destroy or recycle the carton, plastic bags, and
any exterior wrapping material immediately
after the refrigerator is unpacked. Children
should never use these items to play. Cartons
covered with rugs, bedspreads, plastic sheets
or stretch wrap may become airtight chambers,
and can quickly cause suffocation.
Proper Disposal of your
Refrigerator or Freezer
Risk of child entrapment
Child entrapment and suffocation are not
problems of the past. Junked or abandoned
refrigerators or freezers are still dangerous –
even if they will sit for “just a few days”. If you
are getting rid of your old refrigerator or freezer,
please follow the instructions below to help
prevent accidents.
3
Page 2
IMPORTANT SAFETY INSTRUCTIONS
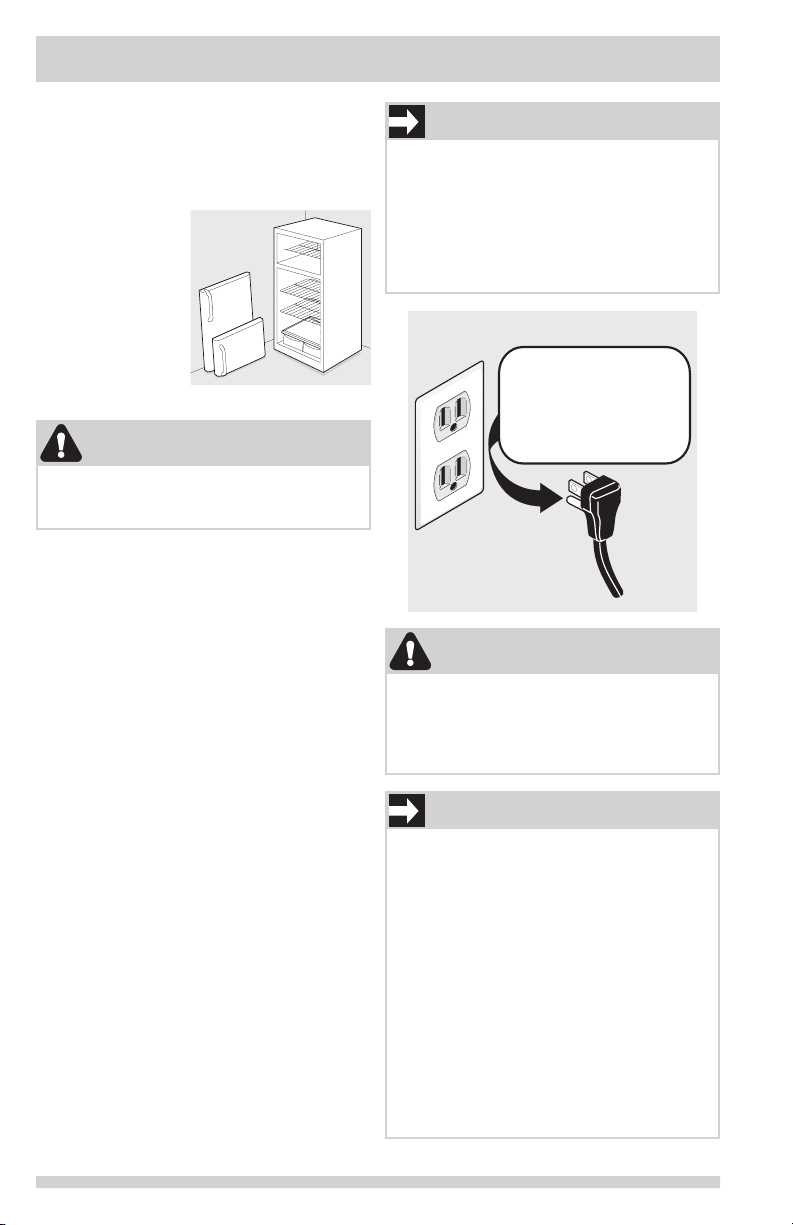
Grounding type wall receptacle
Power cord with
3-prong grounded plug
Do not, under
any circumstances,
cut, remove,
or bypass the
grounding prong.
Proper Disposal of Refrigerators/Freezers
We strongly encourage responsible appliance
recycling/disposal methods. Check with your utility
company or visit www.energystar.gov/recycle for
more information on recycling your old refrigerator.
Before you throw
away your old
refrigerator/
freezer:
• Remove doors.
• Leave shelves in
place so children
may not easily
climb inside.
• Have refrigerant
removed by a
qualied service
technician.
WARNING
These guidelines must be followed to ensure
that safety mechanisms in this refrigerator
will operate properly.
Electrical information
• The refrigerator must be plugged into its own
dedicated 115 Volt, 60 Hz., 15 Amp, AC only
electrical outlet. The power cord of the appliance
is equipped with a three-prong grounding
plug for your protection against electrical
shock hazards. It must be plugged directly into
a properly grounded three prong receptacle. The
receptacle must be installed in accordance with
local codes and ordinances. Consult a qualied
electrician. Avoid connecting refrigerator to a
Ground Fault Interrupter (GFI) circuit. Do not
use an extension cord or adapter plug.
• If the power cord is damaged, it should
be replaced by an authorized service
technician to prevent any risk.
• Never unplug the refrigerator by pulling on
the power cord. Always grip the plug rmly,
and pull straight out from the receptacle to
prevent damaging the power cord.
• Unplug the refrigerator before cleaning
and before replacing a light bulb to avoid
electrical shock.
• Performance may be affected if the voltage
• Do not plug the unit into an electrical outlet
4
varies by 10% or more. Operating the
refrigerator with insufcient power can
damage the compressor. Such damage is
not covered under your warranty.
controlled by a wall switch or pull cord to
prevent the refrigerator from being turned
off accidentally.
IMPORTANT
Turning the Freezer and Fresh Food
controls to “0” (Mechanical controls) or
“OFF” (Electronic controls) will disable your
refrigerator’s cooling system, but does not
disconnect the power to the light bulb and
other electrical components. To turn off
power to your refrigerator you must unplug
the power cord from the electrical outlet.
CAUTION
To avoid personal injury or property
damage, handle tempered glass shelves
carefully. Shelves may break suddenly if
nicked, scratched, or exposed to sudden
temperature change.
IMPORTANT
CFC/HCFC Disposal
Your old refrigerator may have
a cooling system that used CFCs
or HCFCs (chlorouorocarbons or
hydrochlorouorocarbons). CFCs and
HCFCs are believed to harm stratospheric
ozone if released to the atmosphere. Other
refrigerants may also cause harm to the
environment if released to the atmosphere.
If you are throwing away your old
refrigerator, make sure the refrigerant is
removed for proper disposal by a qualied
technician. If you intentionally release
refrigerant, you may be subject to nes
and imprisonment under provisions of
environmental legislation.
Page 3
INSTALLATION
This Use & Care Guide provides general
operating instructions for your model. Use the
refrigerator only as instructed in this Use &
Care Guide. Before starting the refrigerator,
follow these important rst steps.
Location
• Choose a place that is near a grounded
electrical outlet. Do Not use an extension
cord or an adapter plug.
• If possible, place the refrigerator out of
direct sunlight and away from the range,
dishwasher or other heat sources.
• The refrigerator must be installed on a oor
that is level and strong enough to support
a fully loaded refrigerator.
• Consider water supply availability for
models equipped with an automatic ice
maker. If you do not hook up water to
the refrigerator, remember to turn the ice
maker off.
CAUTION
Do Not install the refrigerator where the
temperature will drop below 55°F (13°C) or
rise above 110°F (43°C). The compressor
will not be able to maintain proper
temperatures inside the refrigerator.
Do Not block the toe grille on the lower front
of your refrigerator. Sufcient air circulation
is essential for the proper operation of your
refrigerator.
• The cabinet should be level at the front
and rear.
• The sides should tilt ¼-inch (6 mm) from
front-to-back (to ensure that doors close
and seal properly).
• Doors should align with each other and be
level.
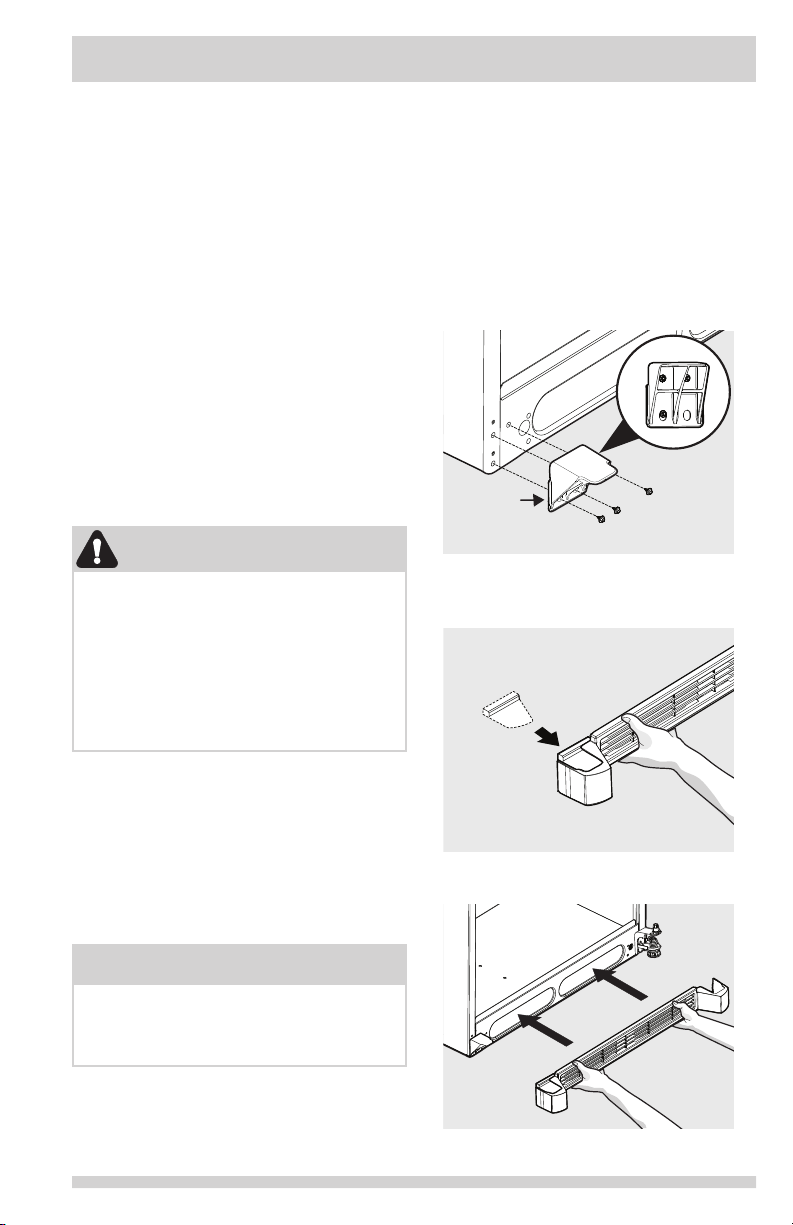
To install the toe grille:
1. Attach toe grille support bracket to cabinet
using 3 bolts supplied.
2. Install left toe grille cover onto slot on
left side of toe grille.
Installation
Installation clearances
• Allow the following clearances for ease
of installation, proper air circulation, and
plumbing and electrical connections:
Sides & Top ⅜ inch
Back 1 inch
NOTE
If your refrigerator is placed with the door
hinge side against a wall, you may have to
allow additional space so the door can be
opened wider.
Guidelines for nal positioning of your
refrigerator:
• All four corners of the cabinet must rest
rmly on the oor.
3. Attach toe grille to cabinet.
or
5
Page 4
INSTALLATION
Raise
some models
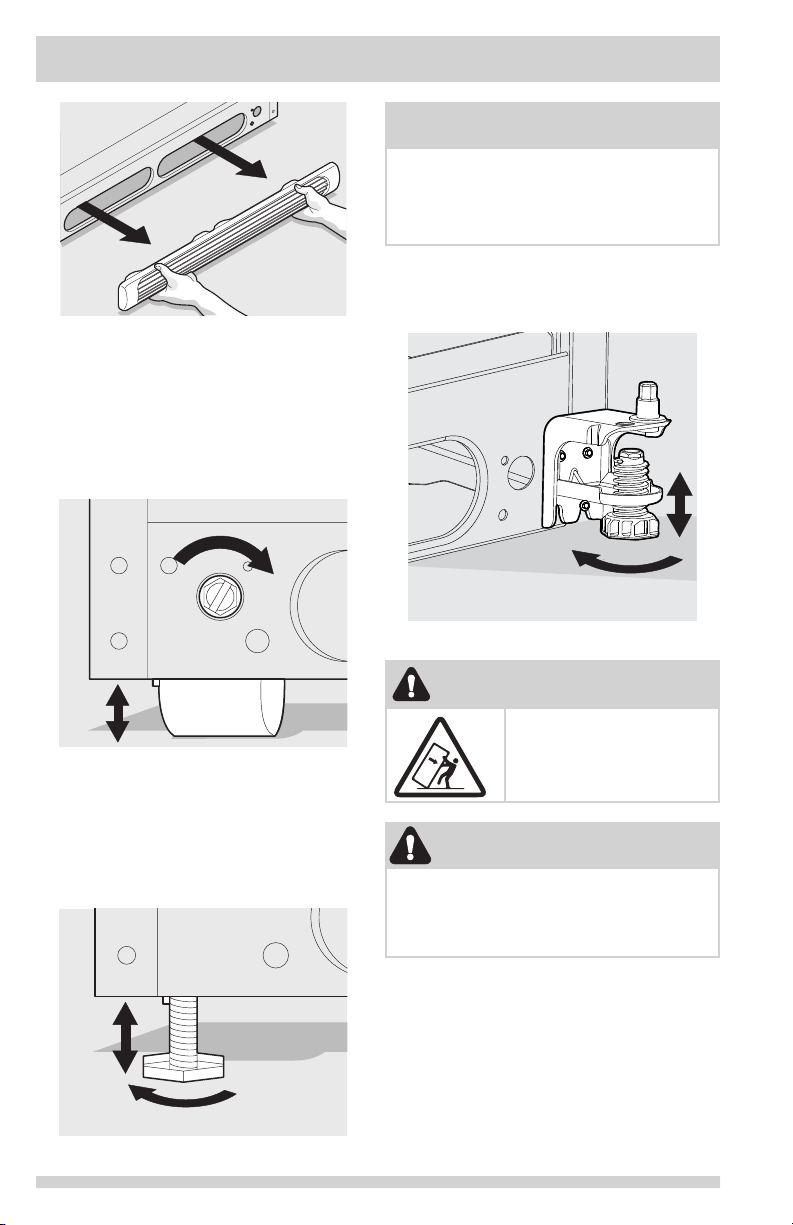
To level the cabinet using the front
rollers:
1 Remove the toe grille.
2 Use a at-blade screwdriver or ⅜ inch
socket wrench to raise or lower the front
rollers (Figure 2).
NOTE
Raise the front of the refrigerator enough so
the doors close freely when opened halfway.
The refrigerator should slope ¼ inch to
½ inch from front-to-back. Then level the
refrigerator from side-to-side.
4 Some models are equipped with an anti-
tip bracket (Figure 4). Lower it clockwise
until it contacts the oor.
Lower
Anti-tip
Bracket
Figure 4 (some models)
Figure 2
or
3 Use adjustable wrench to adjust leveling
screws. Lower the leveling screws on each
side clockwise until they contact the oor
(Figure 3).
Raise
Figure 3
6
WARNING
The anti-tip device must be
installed according to the
instructions in your Use &
Care Manual. Failure to do
so will result in injury.
WARNING
When reversing the door swing:
You MUST move the anti-tip bracket to align
with the hinges of the door. Failure to do so
will result in injury.
Page 5
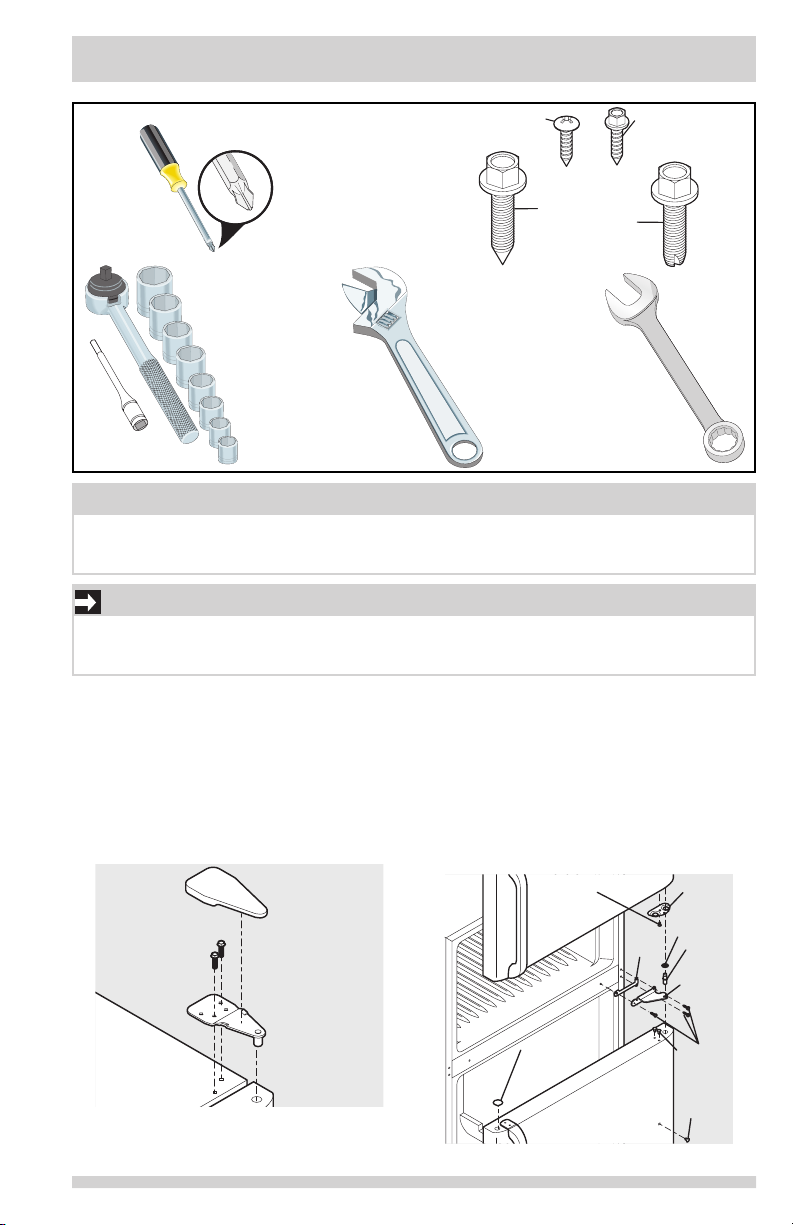
DOOR REMOVAL INSTRUCTIONS
Top Hinge
Cover Front
Screw
Top Hinge
Cover Rear
Screw
Bottom
Hinge
Screw
Top
Hinge
Screw
Adjustable
Wrench Set
Wrench
Tools Necessary:
Phillips
Head
Door
Door
TM
Wrench
oror
The direction in which your refrigerator doors open (door swing) can be reversed, from left
to right or right to left, by moving the door hinges from one side to the other. Reversing the
door swing should be performed by a qualied person.
Before you begin, turn the refrigerator temperature control to “0” (Mechanical controls) or
“OFF” (Electronic controls) and remove the electrical power cord from the wall outlet. Remove
any food from door shelves.
Door removal and reversal
instructions:
1. Remove toe grille.
2. Remove top hinge cover. Trace around the
hinge with a soft lead pencil. This makes
reinstallation easier. Remove top hinge
and lift door off center hinge pin. Set door
aside.
3. Unscrew center hinge pin using adjustable
wrench and save for reassembly. Ensure
plastic washer stays on hinge pin.
Socket
NOTE
IMPORTANT
Top
Hinge
Cover
Top
Hinge
3/8" Fixed
4. Lift refrigerator door off of bottom hinge
and set aside.
5. Remove center hinge and shim by
removing inside screw and loosening two
outside screws enough to allow hinge and
shim to slide out. Tighten screws.
6. Loosen two outside screws on opposite
side of refrigerator, remove inside screw
and install center hinge.
Stop
Screw
Stop
Washer
Hinge
Hole
Plug
Shim
Hinge
Pin
Center
Hinge
Screws
Handle
Hole
Plug
7
Page 6
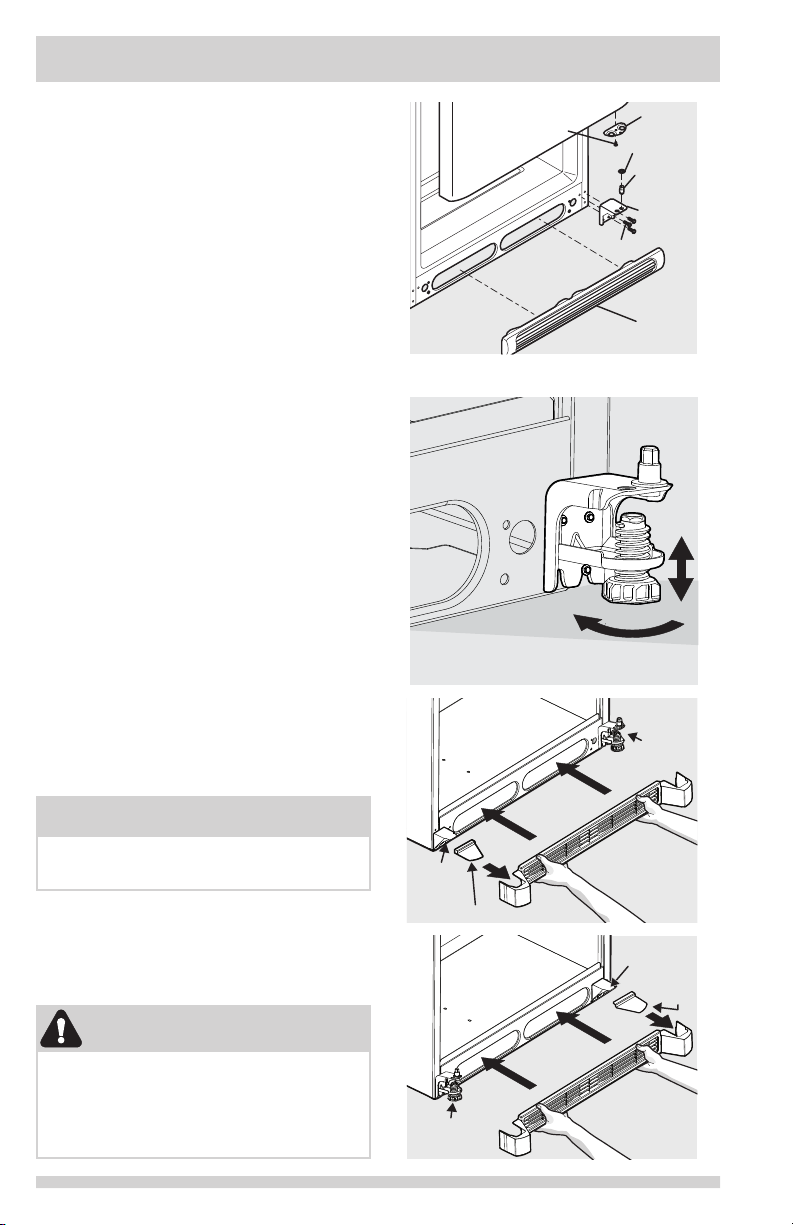
DOOR REMOVAL INSTRUCTIONS
Door Stop
Door
Toe Grille Cover
Toe Grille
7. Remove three screws on bottom hinge
and anti-tip bracket (if equipped) with ⅜”
socket wrench.
8. Install bottom hinge and anti-tip bracket
(if equipped) on opposite side with the
three screws removed from step 7.
9. Unscrew bottom hinge pin using
adjustable wrench. Move hinge pin to
other hole in hinge and tighten with
adjustable wrench.
10. Reverse door handles (see Handle
Installation section).
11. Move freezer and refrigerator door stops
to opposite side. Before starting screws,
use an awl to puncture the foam.
12. Position refrigerator door onto bottom
hinge pin and screw center hinge pin
through center hinge into top of door. Close
refrigerator door to help align hinge hole.
13. Tighten center hinge pin with adjustable
wrench.
14. Remove cabinet and hinge hole plugs and
move to opposite side.
15. Lower freezer door onto center hinge pin.
16. Close freezer door. Have an assistant
lift up on opposite side of door while
tightening screws to install top hinge.
17. There are two toe grille covers provided
in your literature packet; one for the right
side and one for the left side. Install the
appropriate cover over the opening on the
side opposite the anti-tip bracket, (see
Figures A & B).
Screw
OR
Anti-tip
Bracket
Screws
Lower
Stop
Washer
Hinge
Pin
Bottom
Hinge
Toe
Grille
Anti-tip
Bracket
NOTE
In case of future door reversals, save the
toe grille cover not being used.
18. Flip toe grille and reinstall (some models).
19. Plug in electrical power cord and turn
refrigerator temperature control to center
position. Adjust setting as necessary.
WARNING
When reversing the door swing:
You MUST move the anti-tip bracket to align
with the hinges of the door and install the
toe grille support for proper blance. Failure
to do so will result in injury.
8
Toe
Grille
Support
Anti-tip
Bracket
Support
Toe Grille
Cover
A
B
Page 7
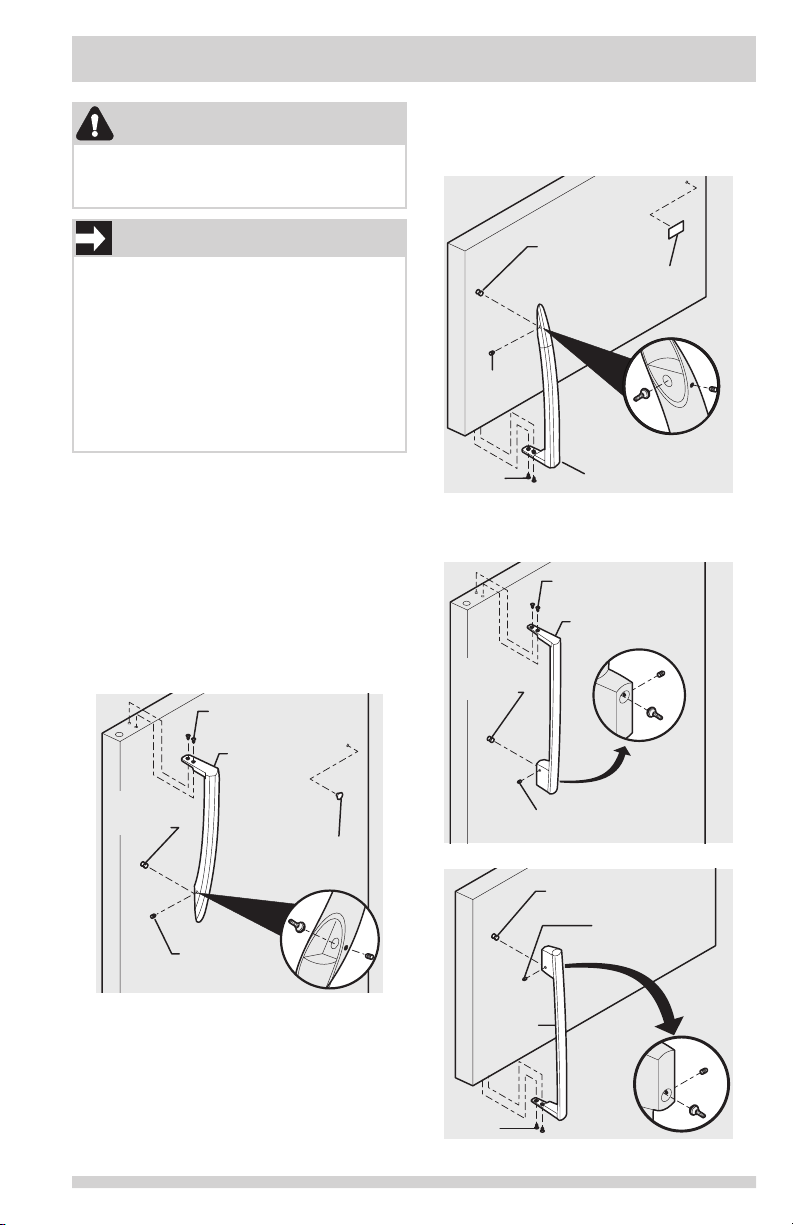
HANDLE INSTALLATION
CAUTION
Wear gloves and use extreme CAUTION
when installing these handles. The rounded
end of the handles may be sharp.
IMPORTANT
To ensure proper installation of handles,
please review these instructions and
illustrations thoroughly prior to installing the
handles.
Additionally, before installing the door
handles, make sure the door swing is
correct. Your model will have either a
right hand or left hand door swing. Follow
instructions in the Use & Care Guide to
reverse the doors, if necessary.
To attach metal refrigerator handle:
1. Place rounded part of handle onto
shoulder screw on face of door and align
the two holes in top of handle with the
two holes in top of door. Do not tighten
the set screw yet.
2. Install the two screws into the top of the
handle.
3. Tighten the set screw on the rounded part
of the handle until the handle is ush with
the door, then tighten another ½ turn.
Screw
3. Tighten the set screw on the rounded part
of the handle until the handle is ush with
the door, then tighten another ½ turn.
Shoulder
Screw
Nameplate
Set
Screw
Screw
Handle
Stainless Steel Models
Screw
Handle
Shoulder
Screw
Handle
Shoulder
Screw
Button
Plug
Set
Screw
To attach metal freezer handle:
1. Place rounded part of handle onto
shoulder screw on face of door and align
the two holes in bottom of handle with
the two holes in bottom of door. Do not
tighten the set screw yet.
2. Install the two screws into the bottom of
the handle.
Set
Screw
Shoulder
Screw
Set
Screw
Handle
Screw
9
Page 8
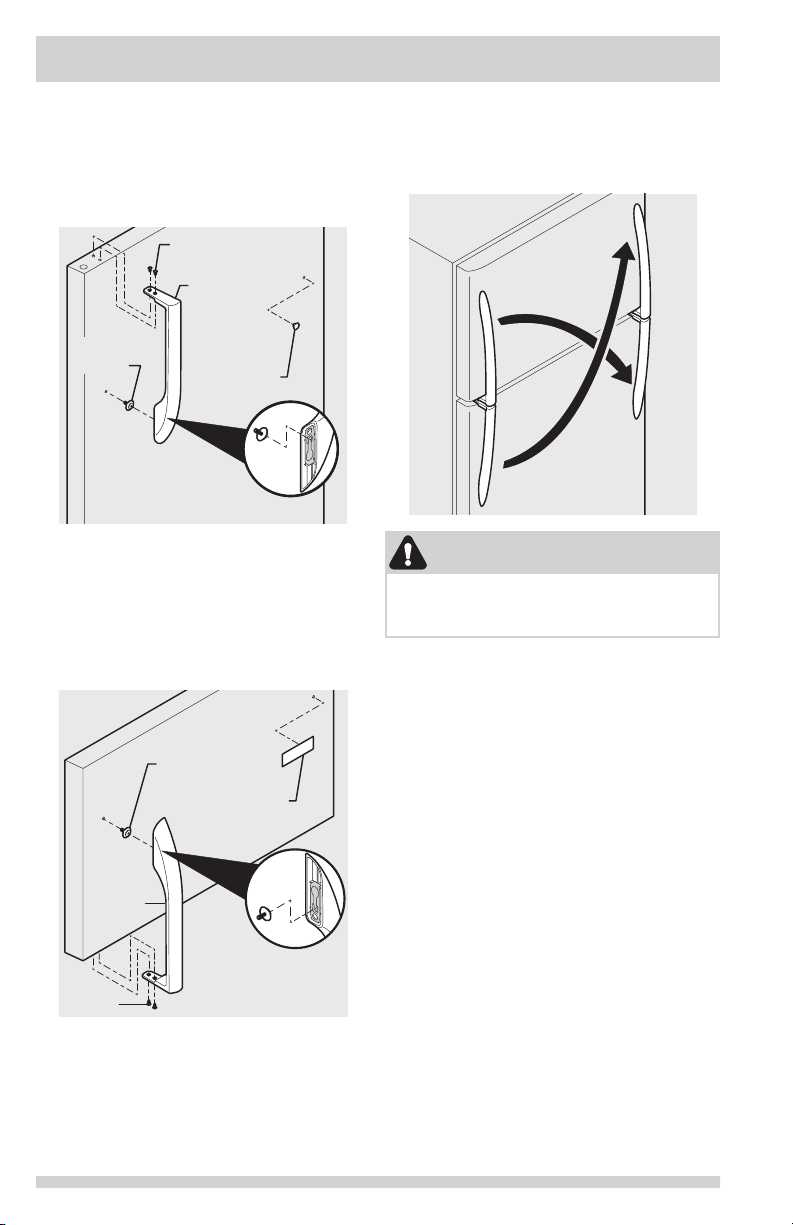
HANDLE INSTALLATION
To attach plastic refrigerator handle:
1. Place top of handle over dovetail screw,
pull handle straight down until handle is
aligned with screw holes on top of door.
2. Secure top of handle with two screws.
Screw
Screw
Handle
Dovetail
Screw
Lock Handle
Dovetail Screw
To attach plastic freezer handle:
1. Place top of handle over dovetail screw,
pull handle straight up until handle is
aligned with screw holes on bottom of
door.
2. Secure bottom of handle with two screws.
over
Button
Plug
To reverse refrigerator/freezer handles:
Handles may be easier to reverse while doors
are off. Reverse freezer and refrigerator
handles as shown.
CAUTION
Be sure doors are set aside in a secure
position where they cannot fall and cause
personal injury.
10
Handle
Screw
Dovetail
Screw
Nameplate
Lock Handle
over
Dovetail Screw
Page 9
CONNECTING THE WATER SUPPLY
WARNING
To avoid electric shock, which can cause
death or severe personal injury, disconnect
the refrigerator from electrical power before
connecting a water supply line to the
refrigerator.
CAUTION
To Avoid Property Damage:
• Copper or Stainless Steel braided tubing
is recommended for the water supply
line. Water supply tubing made of ¼
inch plastic is not recommended to be
used. Plastic tubing greatly increases
the potential for water leaks, and the
manufacturer will not be responsible for
any damage if plastic tubing is used for
the supply line.
• DO NOT install water supply tubing in
areas where temperatures fall below
freezing.
• Chemicals from a malfunctioning softener
can damage the ice maker. If the ice
maker is connected to soft water, ensure
that the softener is maintained and
working properly.
IMPORTANT
Ensure that your water supply line
connections comply with all local plumbing
codes.
Before Installing The Water Supply Line,
You Will Need:
• Basic Tools: adjustable wrench, at-blade
screwdriver, and PhillipsTM screwdriver
• Access to a household cold water line with
water pressure between 30 and 100 psi.
• A water supply line made of ¼ inch (6.4
mm) OD, copper or stainless steel tubing.
To determine the length of tubing needed,
measure the distance from the ice maker
inlet valve at the back of the refrigerator
to your cold water pipe. Then add
approximately 7 feet (2.1 meters), so the
refrigerator can be moved out for cleaning
(as shown).
• A shutoff valve to connect the water supply
line to your household water system. DO
NOT use a self-piercing type shutoff valve.
• Do not re-use compression tting or use
thread seal tape.
• A compression nut and ferrule (sleeve) for
connecting a copper water supply line to
the ice maker inlet valve.
To Connect Water Supply Line To Ice
Maker Inlet Valve
1. Disconnect refrigerator from electric power
source.
2. Place end of water supply line into sink or
bucket. Turn ON water supply and ush
supply line until water is clear. Turn OFF
water supply at shutoff valve.
3. Remove plastic cap from water valve inlet
and discard cap.
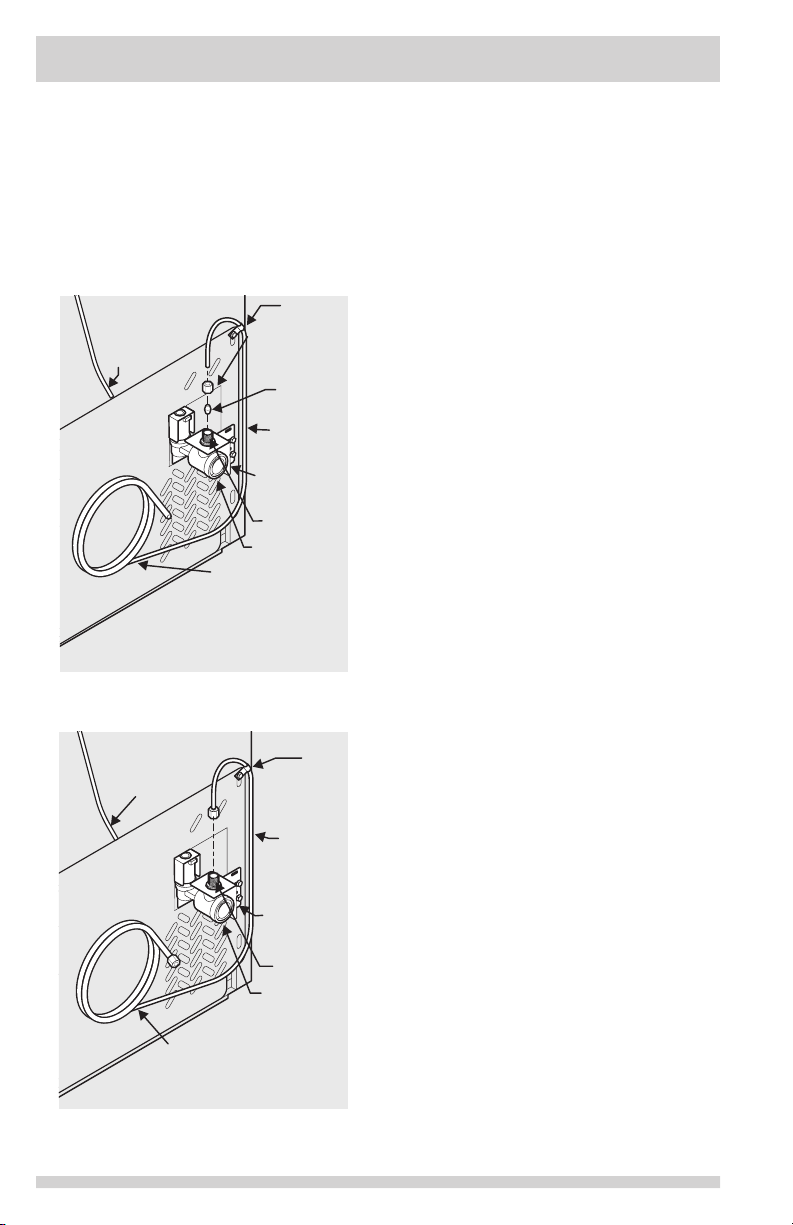
4. If you use copper tubing - Slide brass
compression nut, then ferrule (sleeve)
onto water supply line. Push water supply
line into water valve inlet as far as it
will go (¼ inch / 6.4 mm). Slide ferrule
(sleeve) into valve inlet and nger tighten
compression nut onto valve. Tighten
another half turn with a wrench; DO NOT
over tighten. See Figure 1.
If you use stainless steel tubing - The
nut and ferrule are already assembled on
the tubing. Slide compression nut onto
valve inlet and nger tighten compression
nut onto valve. Tighten another half turn
with a wrench; DO NOT over tighten. See
Figure 2.
5. With steel clamp and screw, secure water
supply line (copper tubing only) to rear
panel of refrigerator as shown.
6. Coil excess water supply line (copper
tubing only), about 2½ turns, behind
refrigerator as shown and arrange coils so
they do not vibrate or wear against any
other surface.
11
Page 10
Steel
Water Valve
CONNECTING THE WATER SUPPLY
7. Turn ON water supply at shutoff valve and
tighten any connections that leak.
8. Reconnect refrigerator to electrical power
source.
9. To turn ice maker on, lower wire signal
arm (side mounted) or set the ice maker’s
On/Off power switch to the “I” position
(rear mounted).
Plastic Water
Tubing to Ice
Maker Fill
Tube
(Include enough tubing in loop
to allow moving refrigerator out
Plastic Water Tubing
for cleaning.)
Figure 1
to Ice Maker
Fill Tube
Brass
Compression
Nut
Bracket
Valve Inlet
Water Valve
Copper water line
from household
water supply
Clamp
Ferrule
(Sleeve)
Copper
water line
Steel
Clamp
Stainless
Steel
water Line
12
Water Valve
Bracket
Valve Inlet
Water Valve
6 ft. Stainless Steel water line
from household water supply
Figure 2
Page 11
ICE SERVICE
If your refrigerator has an automatic ice maker,
minimal ice will be produced during the rst 24
hours of operation. Air in new plumbing lines
may cause the ice maker to cycle two or three
times before making a full tray of ice. With no
usage, it will take approximately one to two
days to ll the ice container.
New plumbing connections may cause the rst
production of ice cubes to be discolored or
have an odd avor. Discard ice made during
the rst 24 hours.
NOTE
Automatic ice makers are also optional
accessories that may be installed in most
models at any time. Call your local dealer for
information.
Turning your Ice Maker On
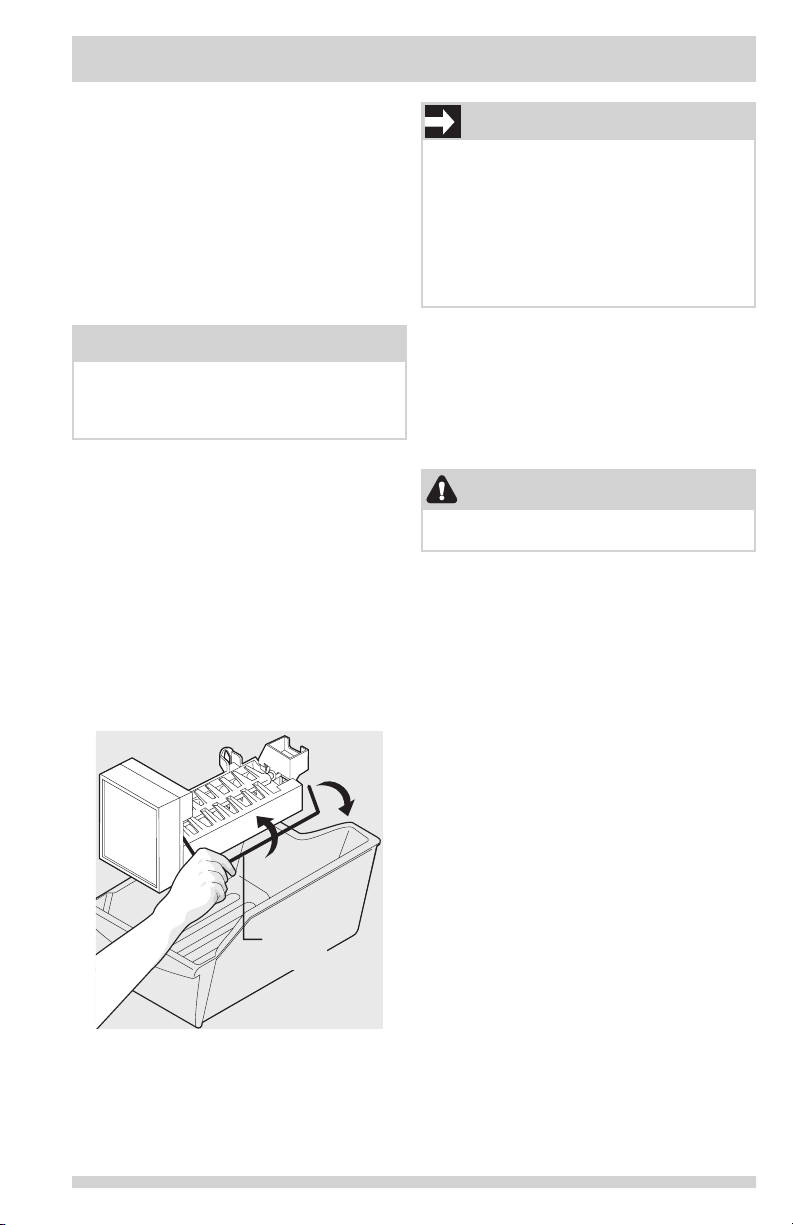
After the plumbing connections have been
completed, the water supply valve must be
opened. Place the ice container under the
ice maker, pushing it as far back as possible.
Lower the wire signal arm to its “down” or ON
position.
Turning your Ice Maker Off
To stop the ice maker, lift the wire signal
arm until it clicks and locks in the “up” or
OFF position. The ice maker also turns off
automatically when the ice container is full.
IMPORTANT
Your ice maker is shipped from the factory
with the wire signal arm in the ON position.
To ensure proper function for your ice maker,
hook up water supply immediately or turn ice
maker OFF by lifting the wire signal arm until
it clicks and locks in the UP position. If the
ice maker is on and the water supply is not
connected, the water valve will make a loud
chattering noise.
ICE PRODUCTION: WHAT
TO EXPECT
The ice maker will produce 2.5 to 3 pounds
of ice every 24 hours depending on usage
conditions. Ice is produced at a rate of 8 cubes
every 80 to 160 minutes.
CAUTION
Do Not place the ice container in your
dishwasher.
OFF
Wire
Signal Arm
ON
13
Page 12
CONTROLS
Cool Down Period
To ensure safe food storage, allow the
refrigerator to operate with the doors closed
for at least 8 hours before loading it with food.
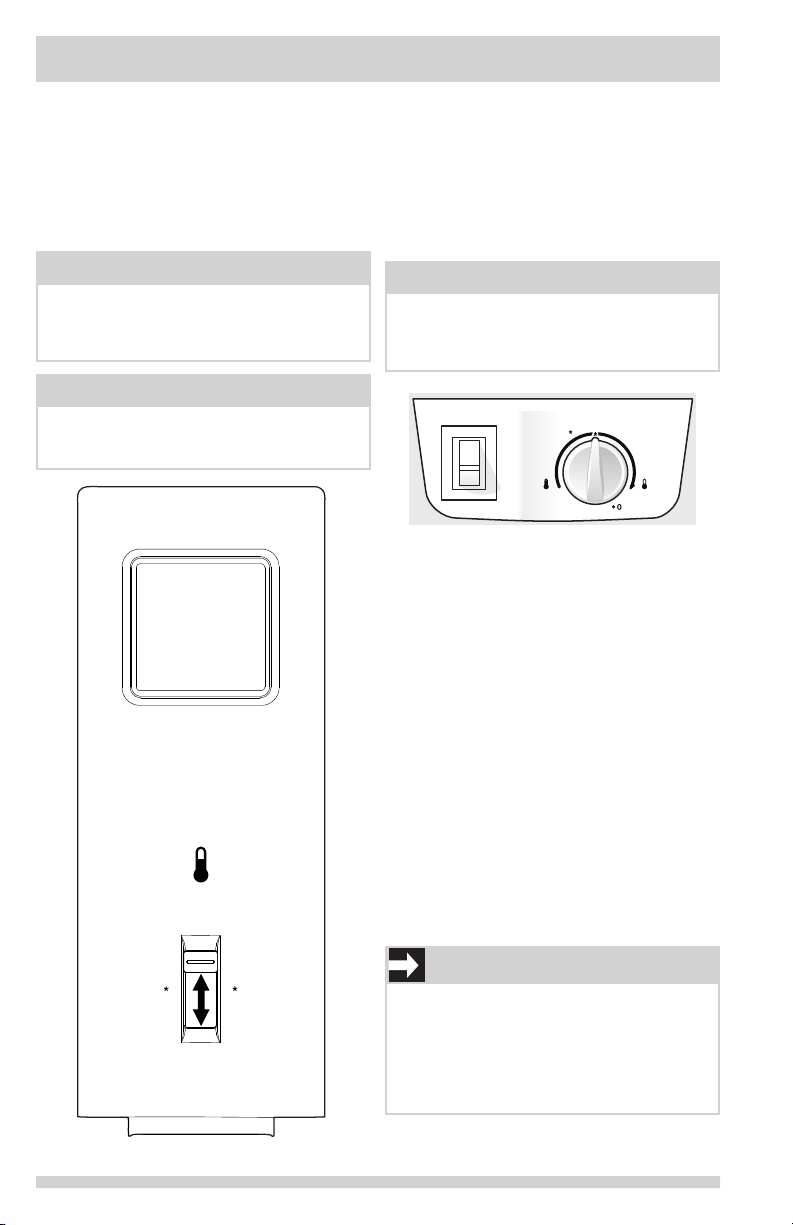
Refrigerator & Freezer Controls
(some models)
NOTE
When rst turning refrigerator on, adjust
the refrigerator control to Normal. This is the
recommended initial setting. After 24 hours,
adjust the controls as needed.
NOTE
If your unit is in a garage or area where the
temperature is below 55°, adjust the freezer
control to the coldest setting.
temperature
Cool Down Period
To ensure safe food storage, allow the
refrigerator to operate with the doors closed
for at least 8 hours before loading it with food.
Refrigerator & Freezer Controls
(some models)
NOTE
When rst turning refrigerator on, adjust
control to Normal. This is the recommended
initial setting. After 24 hours, adjust the
controls as needed.
Allow 24 hrs for adjustments
Normal
Cold Colder
Refrigerator/Freezer Control
Temperature Adjustment
• Adjust temperature gradually: adjust the
knob in small increments, allowing the
temperature to stabilize.
• For colder temperatures, adjust the knob
towards Colder.
• For warmer temperatures, adjust the knob
towards Cold.
Adjusting the refrigerator/freezer control will
change temperatures in both compartments.
The auxiliary freezer control can be left at
the factory pre-set (Normal) or adjusted as
desired; it has no effect on electrical power to
the refrigerator.
To maintain temperatures, a fan circulates air in
the refrigerator and freezer compartments. For
good circulation, do not block cold air vents with
food items.
garage
* recommended
Auxiliary Freezer Control
14
coldest
cold
off
IMPORTANT
Adjusting the refrigerator/freezer temperature
control to “0” turns off the compressor and
prevents the refrigerator from cooling, but
does not disconnect the power to the light
bulb and other electrical components. To turn
off power to your refrigerator, you must unplug
the power cord from the wall outlet.
Page 13
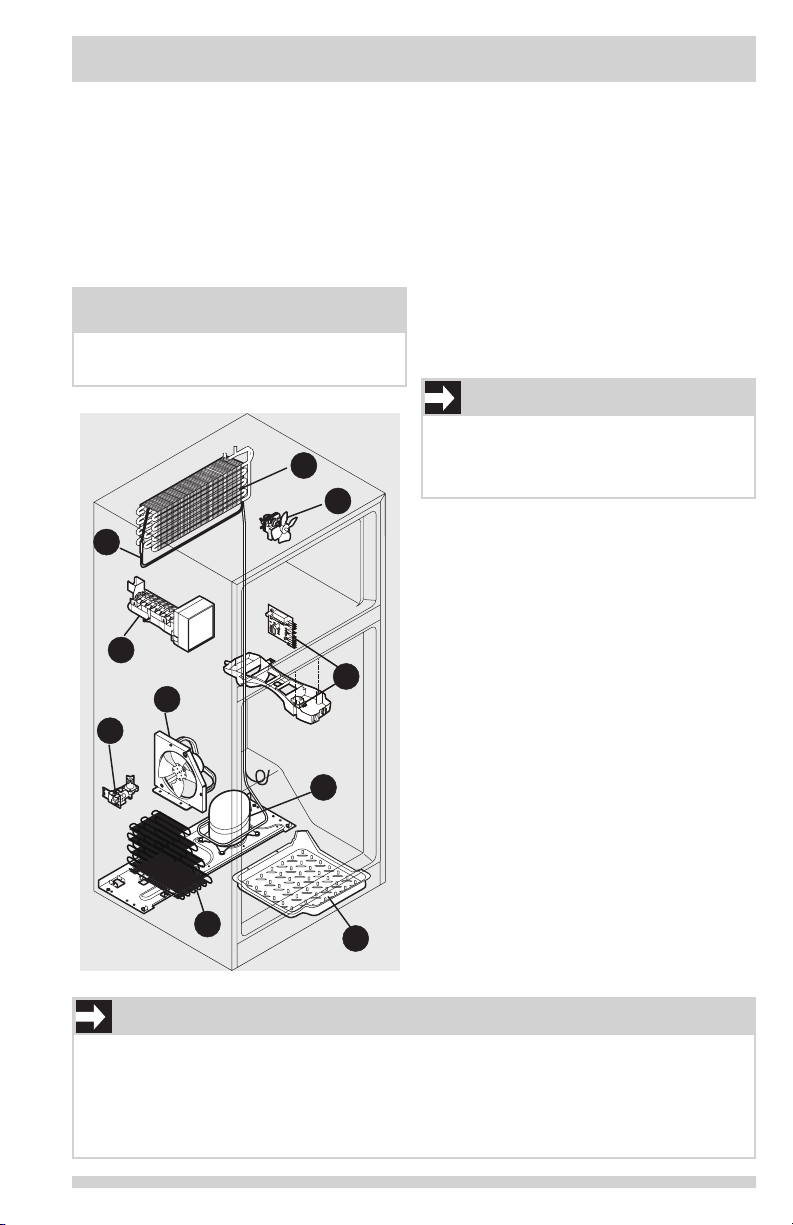
NORMAL OPERATING SOUNDS AND SIGHTS
Understanding the sounds you
may hear
Your new, high-efciency refrigerator may
introduce unfamiliar sounds. These sounds
normally indicate your refrigerator is operating
correctly. Some surfaces on oors, walls, and
kitchen cabinets may make these sounds more
noticeable.
NOTE
Rigid foam insulation is very energy efcient,
but is not a sound insulator.
A
B
C
D
E
F
H
G
J
I
Following is a list of major components in your
refrigerator and the sounds they can cause:
A Evaporator Refrigerant through the
evaporator may create a boiling or
gurgling sound.
B Evaporator fan You may hear air being
forced through the refrigerator by the
evaporator fan.
C Defrost heater During defrost cycles,
water dripping onto the defrost heater
may cause a hissing or sizzling sound.
After defrosting, a popping sound may
occur.
IMPORTANT
During the automatic defrost cycle, you may
notice a red glow in the vents on the back
wall of your freezer compartment. This is
normal during the defrost cycle.
D Automatic ice maker When ice has
been produced, you will hear ice cubes
falling into the ice bin.
E Electronic defrost control These parts
can produce a snapping or clicking sound
when turning the cooling system on and
of f.
F Condenser fan You may hear air being
forced through the condenser.
G Compressor Modern, high-efciency
compressors run much faster than in the
past. The compressor may have a highpitched hum or pulsating sound.
H Water valve If your refrigerator is
equipped with an automatic ice maker,
you will hear a buzzing sound as the water
valve opens to ll the ice maker during
each cycle.
I Drain pan (not removable) You may hear
water dripping into the drain pan during
the defrost cycle.
J Condenser May create minimal sounds
from forced air.
IMPORTANT
If the Fresh Food door is left open form more than 5 minutes, an alarm will sound. The alarm
will sound for 2 minutes and then stop. If the “Door Ajar” condition remains, the alarm will
repeat every 30 minutes for two intervals.
After 15 minutes of a “Door Ajar” Condition, the unit will turn the Fresh Food light off until the
door is closed. The door switch in the Fresh Food can be pressed and released to reset the
alarm and light.
15
Page 14
CARE & CLEANING
Protecting your investment
Keeping your refrigerator clean maintains
appearance and prevents odor build-up. Wipe
up any spills immediately and clean the freezer
and fresh food compartments at least twice
a year. When cleaning, take the following
precautions:
• Never use CHLORIDE or cleaners with
bleach to clean stainless steel.
• Do not wash any removable parts in a
dishwasher.
• Always unplug the electrical power cord
from the wall outlet before cleaning.
• Remove adhesive labels by hand. Do not
use razor blades or other sharp instruments
which can scratch the appliance surface.
• Do not remove the serial plate.
Do not use abrasive cleaners such as
window sprays, scouring cleansers, brushes,
ammable uids, cleaning waxes, concentrated
detergents, bleaches or cleansers containing
petroleum products on plastic parts, interior
doors, gaskets or cabinet liners. Do not use
paper towels, metallic scouring pads, or other
abrasive cleaning materials or strong alkaline
solutions.
NOTE
If you set your temperature controls to
turn off cooling, power to lights and other
electrical components will continue until you
unplug the power cord from the wall outlet.
IMPORTANT
If you store or move your refrigerator in
freezing temperatures, be sure to completely
drain the water supply system. Failure to
do so could result in water leaks when the
refrigerator is put back into service. Contact
a service representative to perform this
operation.
CAUTION
• Pull the refrigerator straight out to move
it. Shifting it from side to side may
damage ooring. Be careful not to move
the refrigerator beyond the plumbing
connections.
• Damp objects stick to cold metal surfaces.
Do not touch refrigerated surfaces with wet
or damp hands.
16
Page 15
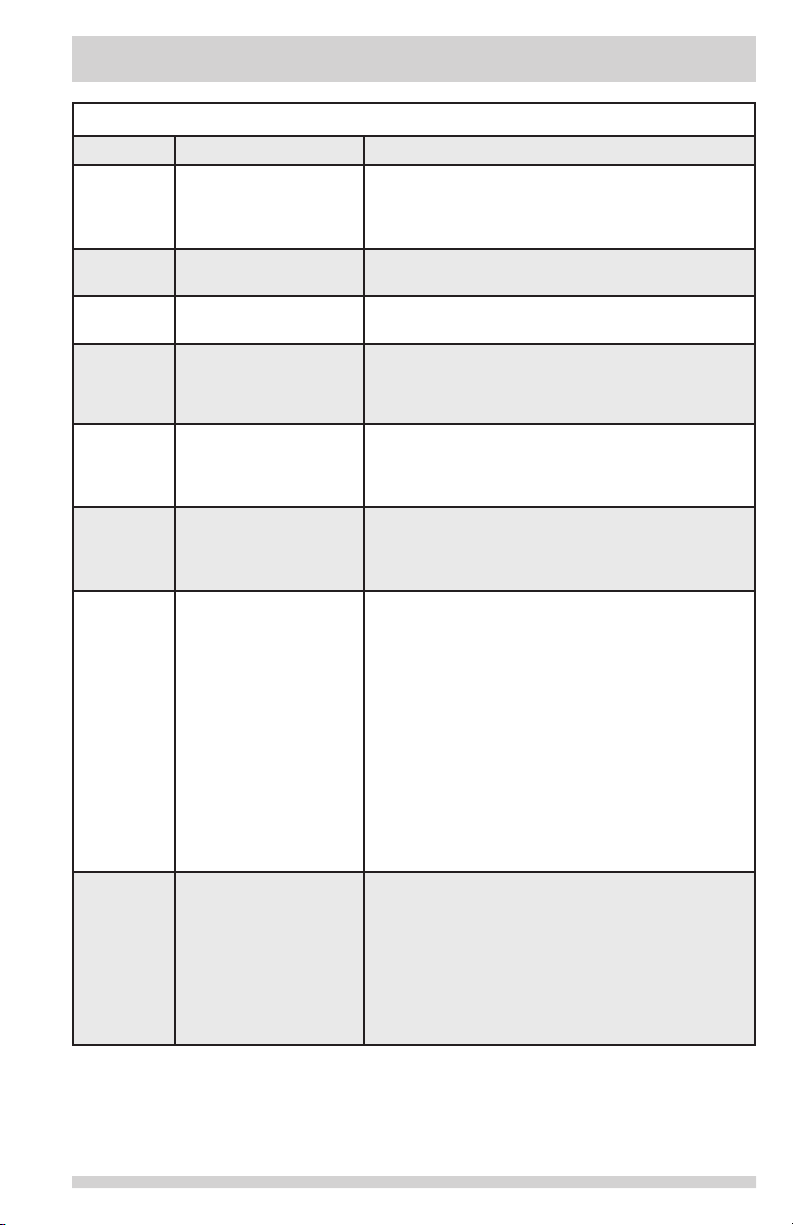
CARE & CLEANING
Care & Cleaning Tips
Part What To Use Tips and Precautions
Interior &
Door Liners
Door
Gaskets
Drawers &
Bins
Glass
Shelves
Toe Grille • Soap and water
Exterior &
Handles
Exterior &
Handles
(Stainless
Steel
Models
Only)
Replacing
Light Bulbs
• Soap and water
• Baking soda and
water
• Soap and water Wipe gaskets with a clean soft cloth.
• Soap and water Use a soft cloth to clean drawer runners and tracks.
• Soap and water
• Glass cleaner
• Mild liquid sprays
• Mild liquid sprays
• Vacuum attachment
• Soap and water
• Non Abrasive Glass
Cleaner
• Soap and water
• Stainless Steel
Cleaners
• Unplug refrigerator
• Wear gloves
• Remove light cover
• Replace old bulb
• Replace light cover
• Plug in the
refrigerator
Use 2 tablespoons of baking soda in 1 quart of warm
water. Be sure to wring excess water out of sponge
or cloth before cleaning around controls, light bulb
or any electrical part.
Allow glass to warm to room temperature before
immersing in warm water.
Vacuum dust from front of toe grille. Remove
toe grille (see Installation Instructions). Vacuum
backside, wipe with sudsy cloth or sponge. Rinse
and dry.
Do not use commercial household cleaners
containing ammonia, bleach or alcohol to clean
handles. Use a soft cloth to clean smooth handles.
DO NOT use a dry cloth to clean smooth doors.
Never use CHLORIDE or cleaners with bleach to
clean stainless steel.
Clean stainless steel front and handles with nonabrasive soapy water and a dishcloth. Rinse with
clean water and a soft cloth. Use a non-abrasive
stainless steel cleaner. These cleaners can be
purchased at most home improvement or major
department stores. Always follow manufacturer’s
instructions. Do not use household cleaners
containing ammonia or bleach.
NOTE: Always clean, wipe and dry with the grain
to prevent scratching. Wash the rest of the cabinet
with warm water and mild liquid detergent. Rinse
well, and wipe dry with a clean soft cloth.
CAUTION: Wear gloves when replacing light bulbs to
avoid getting cut. Use same wattage when replacing
bulb
17
 Loading...