

Page 1

INSTRUCTION MANUAL – RP350-BS FILTER PUMP
DISTRIBUTED BY: POLYGROUP LIMITED (MCO)
Avenida Xian Xing Hai, Centro Golden Dragon, 11 Andar M, Macau
1. SAFETY INSTRUCTIONS: EXTREMELY IMPORTANT!! Read and follow all instructions.
Please retain this information for future reference.
1.1 WARNING! Following the pool manufacturer’s instructions and install your pool properly before
installing this filter pump.
1.2
WARNING! Adult assembly required.
1.3
WARNING! Before starting, check all pipes and accessories for correct installation and reliable
connection.
1.4
WARNING! Do not bury the electric cords. Place the cords where lawn mowers, hedge trimmers and
other equipment will not damage them.
1.5
WARNING! Do not use an extension cord to connect unit to electric supply.
2. PUMP INSTALLATION INSTRUCTIONS
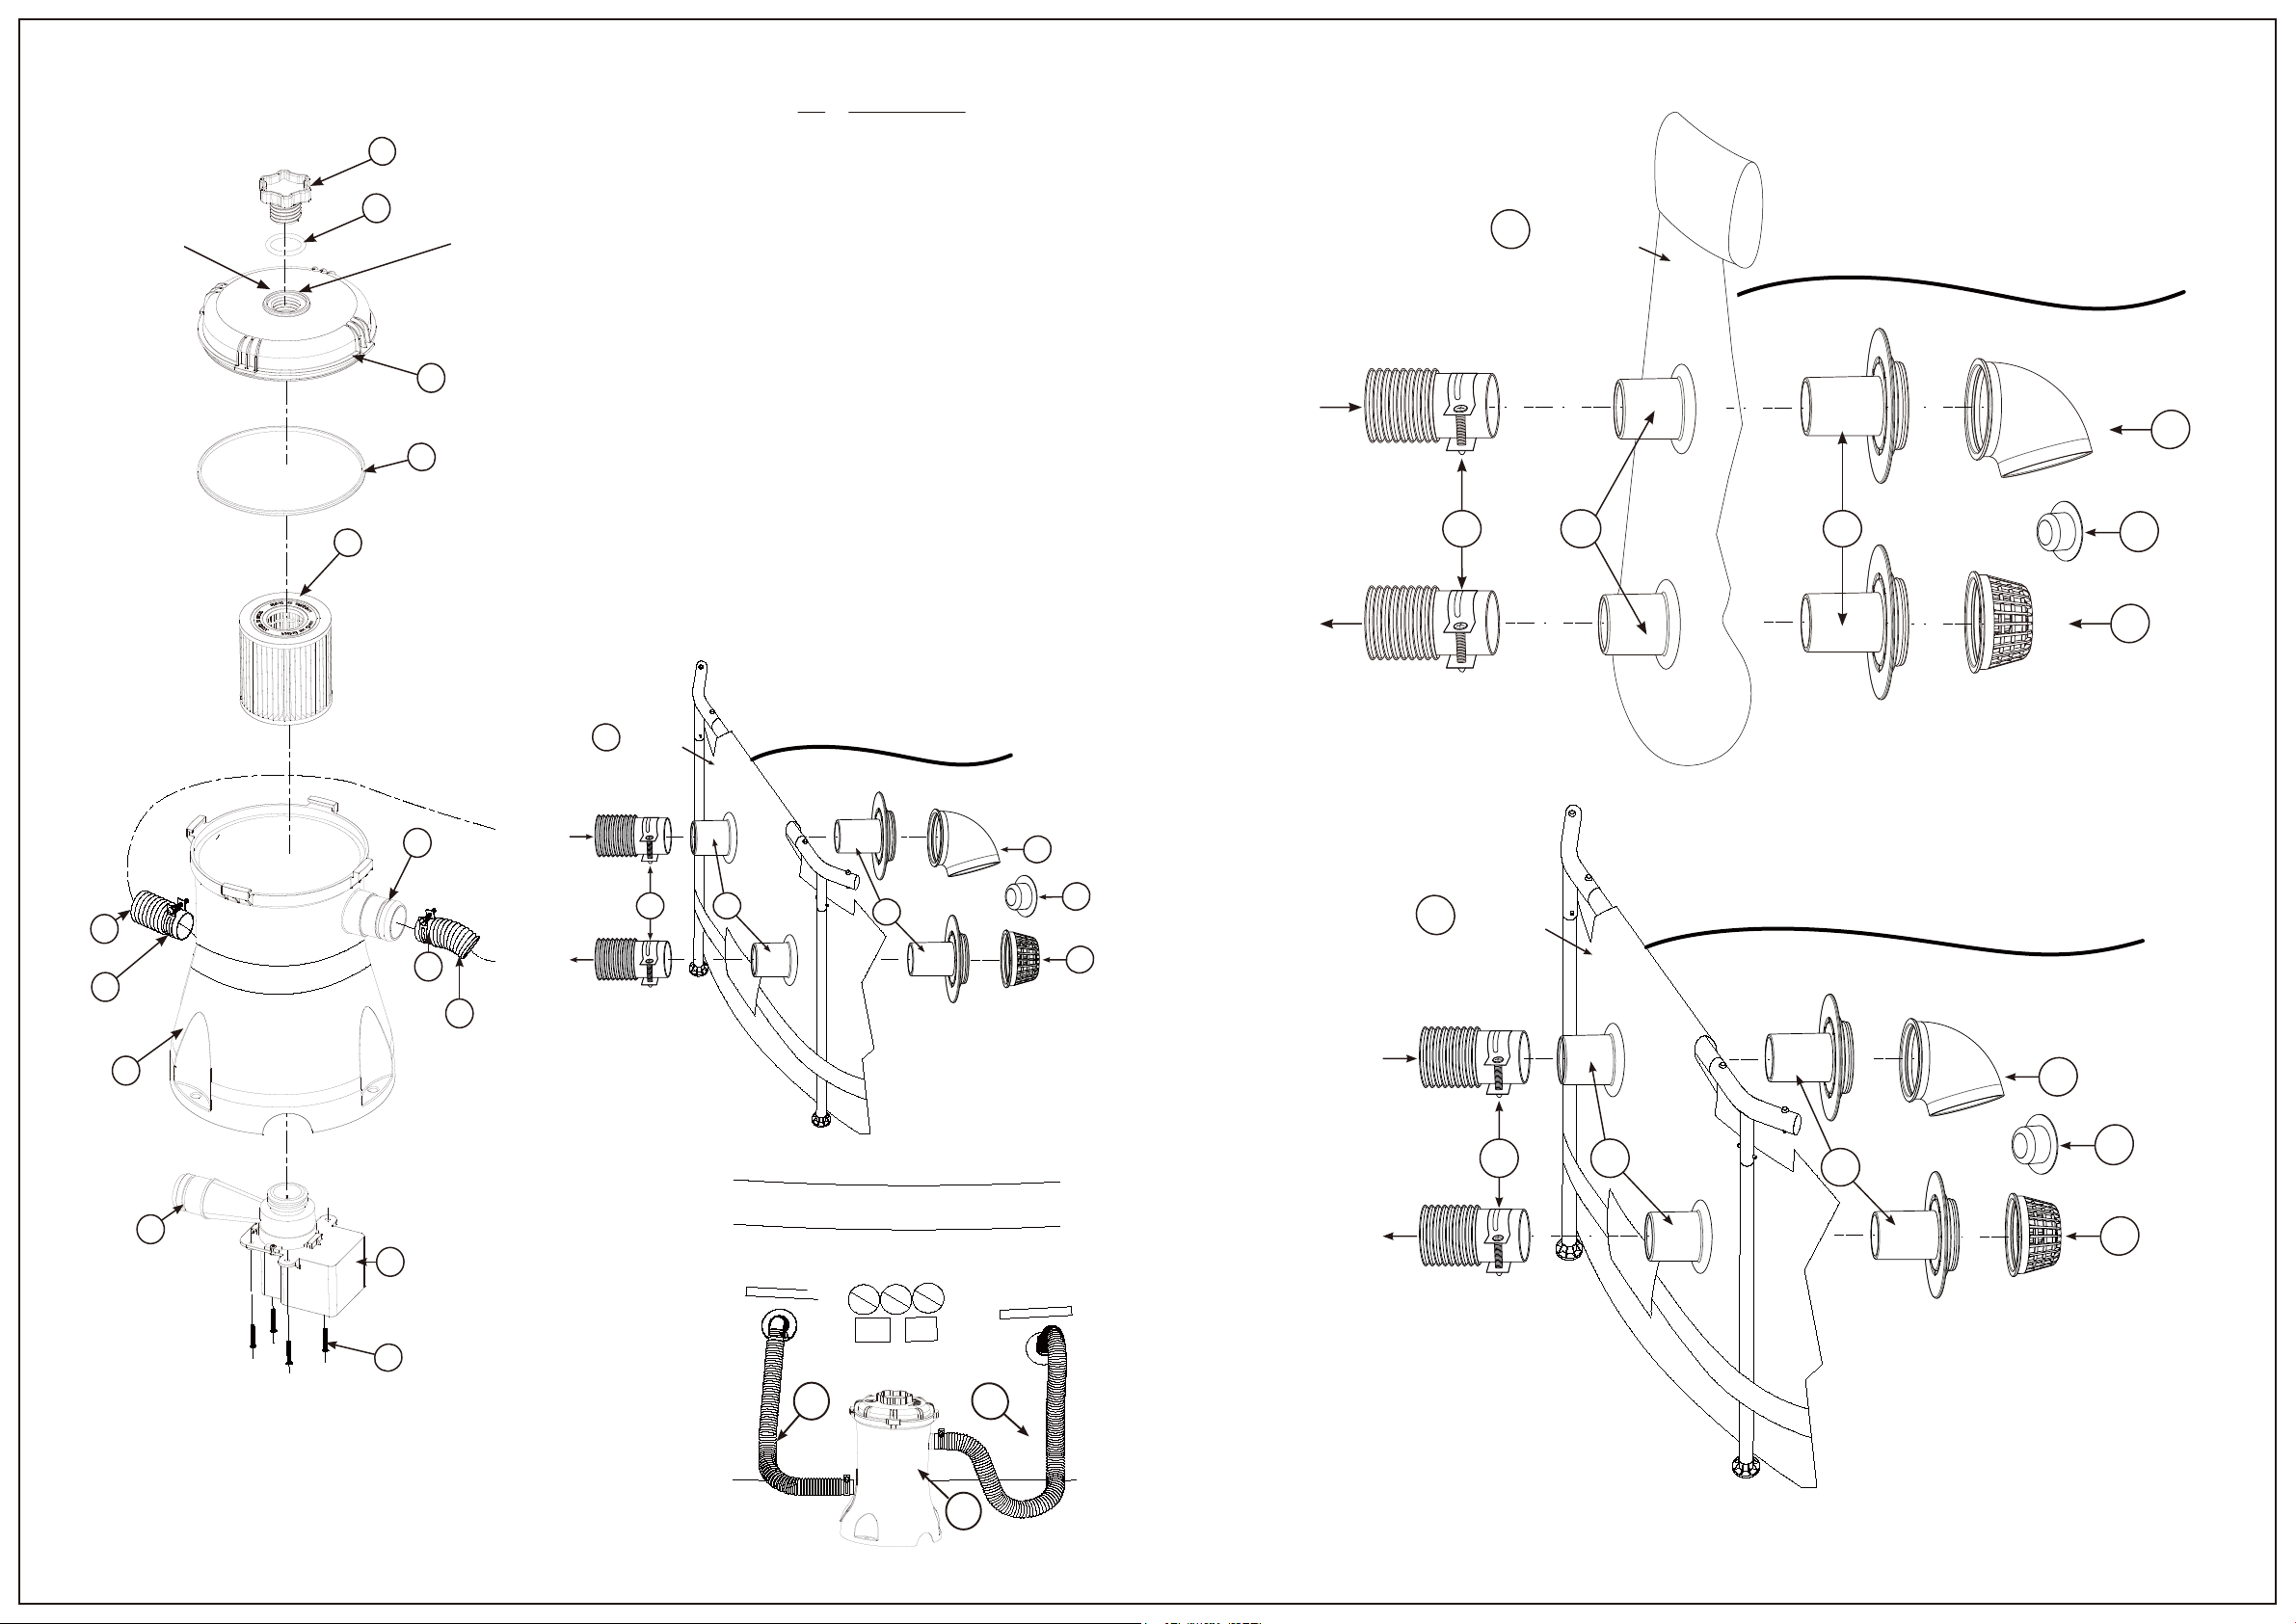
2.1 Take the water Intake and Return Hoses (6, 7) and remove the four Hose Clamps (8) from the hardware
bag. Loosen the hose clamps and slide them over one end of each hose. Insert one hose onto the filter
housing inlet and one hose onto the filter housing outlet. Tighten both Hose Clamps (8) on the filter
housing.
2.2 Insert the Suction Fitting Base (10) and Suction Fitting Screen (11) into the outlet port of the pool wall.
Mount the Intake Hose (6) on the outlet of the pool wall. Tight the Hose Clamp. See FIG 1,3&4.
2.3 Insert the Suction Fitting Base (10) and Flow Diveter (12) to the inlet port of the pool wall. Mount the
Return Hose (7) on the inlet of the pool wall. Tight the Hose Clamp. See FIG 1,3&4.
2.4 Continue to fill the pool.
2.5 Once the pool is filled, position the Filter Assembly between the two fittings on the side of the pool. The
water Intake Hose (6), coming from the top of the filter housing, should be facing towards the right and
the water Return Hose (7), coming from the pump (on the lower part of the housing), should be facing
towards the left. See FIG.3
2.6 Unscrew the Vent Screw (5) on the Seal Top (4) about 1-1/2 turns. NOTE: VENTING THE SYSTEM IS NECESSARY FOR AIR TO ESCAPE AS THE FILTER HOUSING FILLS WITH WATER.
1.6
WARNING! The pool must be at least 2 meters away from the power outlet (receptacle).
1.7
WARNING! Prevent children from using the filter pump without an adult's supervision.
1.8
WARNING! Do not use the filter pump when pool is empty. This pump is designed only for dismount
able storable pools above the ground, not for permanently installed pools. Improper use may lead to
overheating and permanent damage of the product.
1.9
WARNING! To avoid the risk of electric shock, always be aware of damaged cords.
1.10
WARNING! The power cord of the transformer and the filter pump cannot be replaced. If the cord is
damaged, the transformer and the filter pump should be disposed of.
1.11
WARNING! To avoid the risk of electric shock, connect the filter pump only to a receptacle protected
by a Residual-current device (RCD). Contact a qualified electrician if you cannot verify that the receptacle
is RCD protected. Use a qualified electrician to install the RCD.
1.12
WARNING! This appliance is not intended for use by persons (including children) with reduce physi-
cal, sensory or mental capabilities, or lack of experience and knowledge, unless they have been given
supervi sion or instruction concerning use of the appliance by a person responsible for their safety.
1.13
WARNING! Children should be supervised to ensure that they do not play with the appliance.
1.14
WARNING! The pump must not be used when people are in water.
1.15
WARNING! Filter system can be used as many hours as desired, but NEVER when the pool is occupied.
1.16
WARNING! Pollution of the liquid could occur due to leakage of lubricants.
2.7 When the system is full, water should be coming out of the groove of the vent screw. Hand-tighten the
vent screw in the seal top until the O-Ring forms a seal around the screw and water stops coming out.
2.8 At this point, the filter system should be water-tight. Check all of the hoses and fittings, as well as the vent
screw, to make sure that there is no water leak.
2.9 Start the pump by plugging into an electrical outlet.
3. FILTER CARTRIDGE CLEANING INSTRUCTIONS
CAUTION: MAKE SURE THAT THE FILTER PUMP IS UNPLUGGED BEFORE COMMENCING
ANY MAINTENANCE WORK TO AVOID RISK OF SERIOUS INJURY OR EVEN DEATH.
3.1 You will need to clean the Filter Cartridge (9). First, unplug (turn off ) the Electric Filter and loosen the Hose
Clamps on the pool wall side. Then, remove the Suction Fitting (10,11) and the Return Fitting (10,12) from
the Hose Connector (13) on the outlet and inlet ports respectively. Insert the Service Plug (17) and fully
press them into these Hose Connector (13) to ensure a leak-proof fit. To vent the filter, slowly unscrew the
Vent Screw (5). Press down with both hands and turn the Seal Top (4) counter-clockwise to remove it and
the Filter Cartridge (9). After you have finished cleaning the filter cartridge, lubricate the O-Ring (14)
generously with petroleum jelly and reassemble in reverse order.
3.2 The filter cartridge can be cleaned of coarse dirt and debris both inside and out using a garden hose,
making sure that you wash between all of the pleats of the cartridge. If it is still dirty after this cleaning
treatment, replace it. We recommend changing the filter every 2 weeks.
3.3 A spare “stand-by” Filter Cartridge (not included) is an excellent investment. It provides convenient way to
continue filtering your pool while cleaning or replacing a dirty Filter Cartridge. Also, a well-maintained,
clean cartridge ensures that your filter will always be able to operate at its peak efficiency.
1 2
Page 2
LIBERALLY
LUBRICATE
THE PARTS
(14,15,16,19)
WITH SOME
PETROLEUM
JELLY
PATENTED
FILTER
CARTRIDGE
SYSTEM #7,005,062
FIG. 4 (FOR RING POOL)
18
Pool wall
Water Level
15
THE FIL TER CARTRIDGE (9) WILL
5
HOLD 2.54 CM DIAMETER CHLORINE
TABLETS. CHECK YOUR POOL’S CHLORINE
LEVELS TO DETERMINE THE CORRECT
NUMBER OF TABLETS TO ADO.
No. DESCRIPTION
1 PUMP MOTOR
2 PUMP RETAINING NUT
3 FILTER HOUSING
4 SEAL TOP
5 VENT SCREW
6 INTAKE HOSE
7 RETURN HOSE
8 HOSE CLAMPS
9 FILTER CARTRIDGE
14
10 SUCTION FITTING BASE
11 SUCTION FITTING SCREEN
4
12 FLOW DIVERTER
13 HOSE CONNECTOR
(*Non - detachable)
Return Fitting
Water Flow
Direction
14 O-RING (on seal top)
15 O-RING (on vent screw)
Inlet port
12
16 O-RING (on Hose Connections)
17 SERVICE PLUG
9
18 POOL WALL
4 Ea.
10*138
17
19 O-RING (on Volute Housing)
18
Pool wall
20 PUMP MOUNTING SCREWS
Water Level
Suction Fitting
Water Flow
Direction
11
Outlet port
Outside the Pool Inside the Pool
4 Ea.
7
8
3
19
FIG.1
20
Inletport
13
12
17
10
11
Outletport
Inside the Pool
16
8
4 Ea.
6
Return Fitting
Water Flow
Direction
Suction Fitting
Water Flow
Direction
4 Ea.
8
Outside the Pool
FIG.2
INLET PORT
POOL
1
RETURN
FITTING
OUTLET PORT
POOL
SUCTION
FITTING
FIG. 4 (FOR FRAME POOL)
18
Return Fitting
Water Flow
Direction
4 Ea.
Suction Fitting
Water Flow
Direction
Pool wall
8
Inlet port
13
Water Level
12
17
10
11
Outlet port
Outside the Pool Inside the Pool
FIG.3
7
6
3
KANDYTOYS EXETER EX5 1DR
Customer Service Representative: Polygroup The Hollow Ravensthorpe Northampton NN6 8EN
United Kingdom Helpline : 0844 7744888
3 4
Page 3

4. DISASSEMBLY AND STORAGE INSTRUCTIONS
CAUTION: MAKE SURE THAT THE FILTER PUMP IS UNPLUGGED BEFORE COMMENCING
ANY MAINTENANCE WORK TO AVOID RISK OF SERIOUS INJURY OR EVEN DEATH.
4.1 GENERAL INFORMATION: The pool must be stored away if temperature is expected to fall below 4℃.
4.2 All parts should be cleaned using mild soap and lukewarm water only. DO NOT use detergent or hot water.
4.3 Make sure that all parts are dry before storing them to prevent mildew from forming.
4.4 Store all parts in a dry, heated location where temperature does not fall below 4℃ or exceed 51℃.
4.5 Failure to follow the storage instructions could cause damage to your pool and void your warranty.
4.6 YOU MUST FOLLOW THE ASSEMBLY INSTRUCTIONS TO REASSEMBLE YOUR POOL FOR THE NEXT SEASON.
The site for the pool must be cleared and leveled.
IMPO
c
or
r
e
c
tame
RTAN
n
t
e
.
T
:
S'assu
r
er que la
r
ainu
IMPO
IMPO
RTAN
RTANTE
T
:
Ensu
:
A
segú
r
e the g
r
ese de que la
r
o
o
v
e on
4.7 Do not leave an above-ground pool outside when empty.
This marking indicates that this product should not be disposed with other household wastes
throughout the EU. To prevent possible harm to the environment or human health from
uncon trolled waste disposal, recycle it responsibly to promote the sustainable reuse of mate
rial resources. To return your used device, please use the return and collection systems or
contact the retailer where the product was purchased. They can take this product for environ
mental safe recycling.
Electrical product waste should not be discarded with household wasted, use separate collection facilities.
Contact your local government or council for information regarding the collection systems available.
Maximum Water Temperature: 35 degree
Model Voltage/Frequency Wattage Water Proof Level Filter Cartridge
RP350-BS 220~240V/50HZ 20W IPX7 D Type
•
T
he
G
r
oo
ve sur
boîtier filt
r
e O-R
ing (14) doit fai
•
• El
T
he
G
r
G
o
r
o
o
v
o
e en
v
e on
caja del filt
Fil
ter C
ase O-
r
o O-Ring (14) debe quedar hacia a
Ring (14) must fa
r
e sur
boîtier filt
r
e O-
R
ing (14) doit fair
e face à la hausse et le siège dans la f
F
ranu
il
ter
r
C
a de la
ase O-
R
c
aja del filt
ing (14) must fa
r
o O-R
ce up
ing (14) debe quedar hacia a
w
a
r
d and sea
t in the slot of the Seal T
5
6
r
e fa
c
e à la hausse
.
r
r
iba.
ce up
w
a
rd
.
en
t
e du joi
n
t supé
r
ieur (4)
co
r
r
ec
teme
n
t.
r
r
iba y el asie
n
op (4) p
t
o en la
r
ope
r
anu
r
r
l
y
a de la tapa del sello (4)
.
 Loading...