

Page 1
Operator’s Manual
®
8Z1105 - Spray Fill Xpress
8Z1105 - Spray Fill Xpress
SFX1630 & SFX2430
(Spray Fill Xpress)
CAUTION
READ & UNDERST AND OPERATOR’S MANUAL BEFORE
OPERATING MACHINE.
See www.summersmfg.com for latest version of all Summers Operator’s Manuals.
SUMMERS MANUFACTURING CO., INC.
WEB SITE: www.summersmfg.com
DEVILS LAKE, NORTH DAKOTA 58301 (701) 662-5391
8Z1105 © Summers Mfg. Co., Inc. 2019 Printed in USA
Page 2

Publish Date: 11/20/2018
Page 3

TABLE OF CONTENTS
FORWARD .......................................................................................................................................5
Preface.......................................................................................................................................... 5
Disclaimer ..................................................................................................................................... 5
Contact Information....................................................................................................................... 5
Owner Registration Information .................................................................................................... 5
WARRANTY ..................................................................................................................................... 6
SECTION 1 SAFETY .......................................................................................................................7
Safety Information ......................................................................................................................... 7
General Safety Practices .............................................................................................................. 7
Safety During Transport ................................................................................................................ 7
Safety Decals ................................................................................................................................ 8
Spray Fill Xpress Safety Decal Locations ................................................................................... 10
General Maintenance Safety Practices....................................................................................... 12
SECTION 2 - OPERATION SAFETY .............................................................................................13
SECTION 3 - OPERATION ............................................................................................................ 15
Readying for Use ........................................................................................................................ 15
Getting Ready for Transfer.......................................................................................................... 16
SECTION 4 - Maintenance & Specications .................................................................................. 17
Maintenance Safety .................................................................................................................... 17
Daily & Periodic Maintenance ..................................................................................................... 17
Storage ....................................................................................................................................... 17
Specications .............................................................................................................................. 18
SECTION 5 - PARTS LIST .............................................................................................................19
SFX1630 Base Frame ................................................................................................................ 20
SFX1630 Plumbing ..................................................................................................................... 22
SFX1630 Tanks .......................................................................................................................... 24
SFX2430 Base Frame ................................................................................................................ 26
SFX2430 3 Tank Components .................................................................................................... 28
SFX2430 4 Tank Components .................................................................................................... 30
SFX2430 5 Tank Components .................................................................................................... 32
SFX2430 6 Tank Components .................................................................................................... 34
SFX2430 Side Plumbing ............................................................................................................. 36
8Z1105 © Summers Mfg. Co., Inc. 2018 Page 3
Page 4

TABLE OF CONTENTS
Mounting Package ...................................................................................................................... 38
Scale & Mounting Package ......................................................................................................... 40
Transfer Pump Package .............................................................................................................42
Decals ......................................................................................................................................... 44
Part Numbers with Descriptions.................................................................................................. 46
Page 4 © Summers Mfg. Co., Inc. 2018 8Z1105
Page 5

FORWARD
Preface
This manual is intended for use with SFX1630 & SFX2430 Spray Fill Xpress for Summers® Manufacturing Company, Inc.
This book is composed of these basic sections: Safety, Operation & Maintenance, Troubleshooting
and Parts. The Operation & Maintenance section provides information for the proper operation and
maintenance of your Summers Spray Fill Xpress. A complete Parts breakdown is provided in the
Parts section.
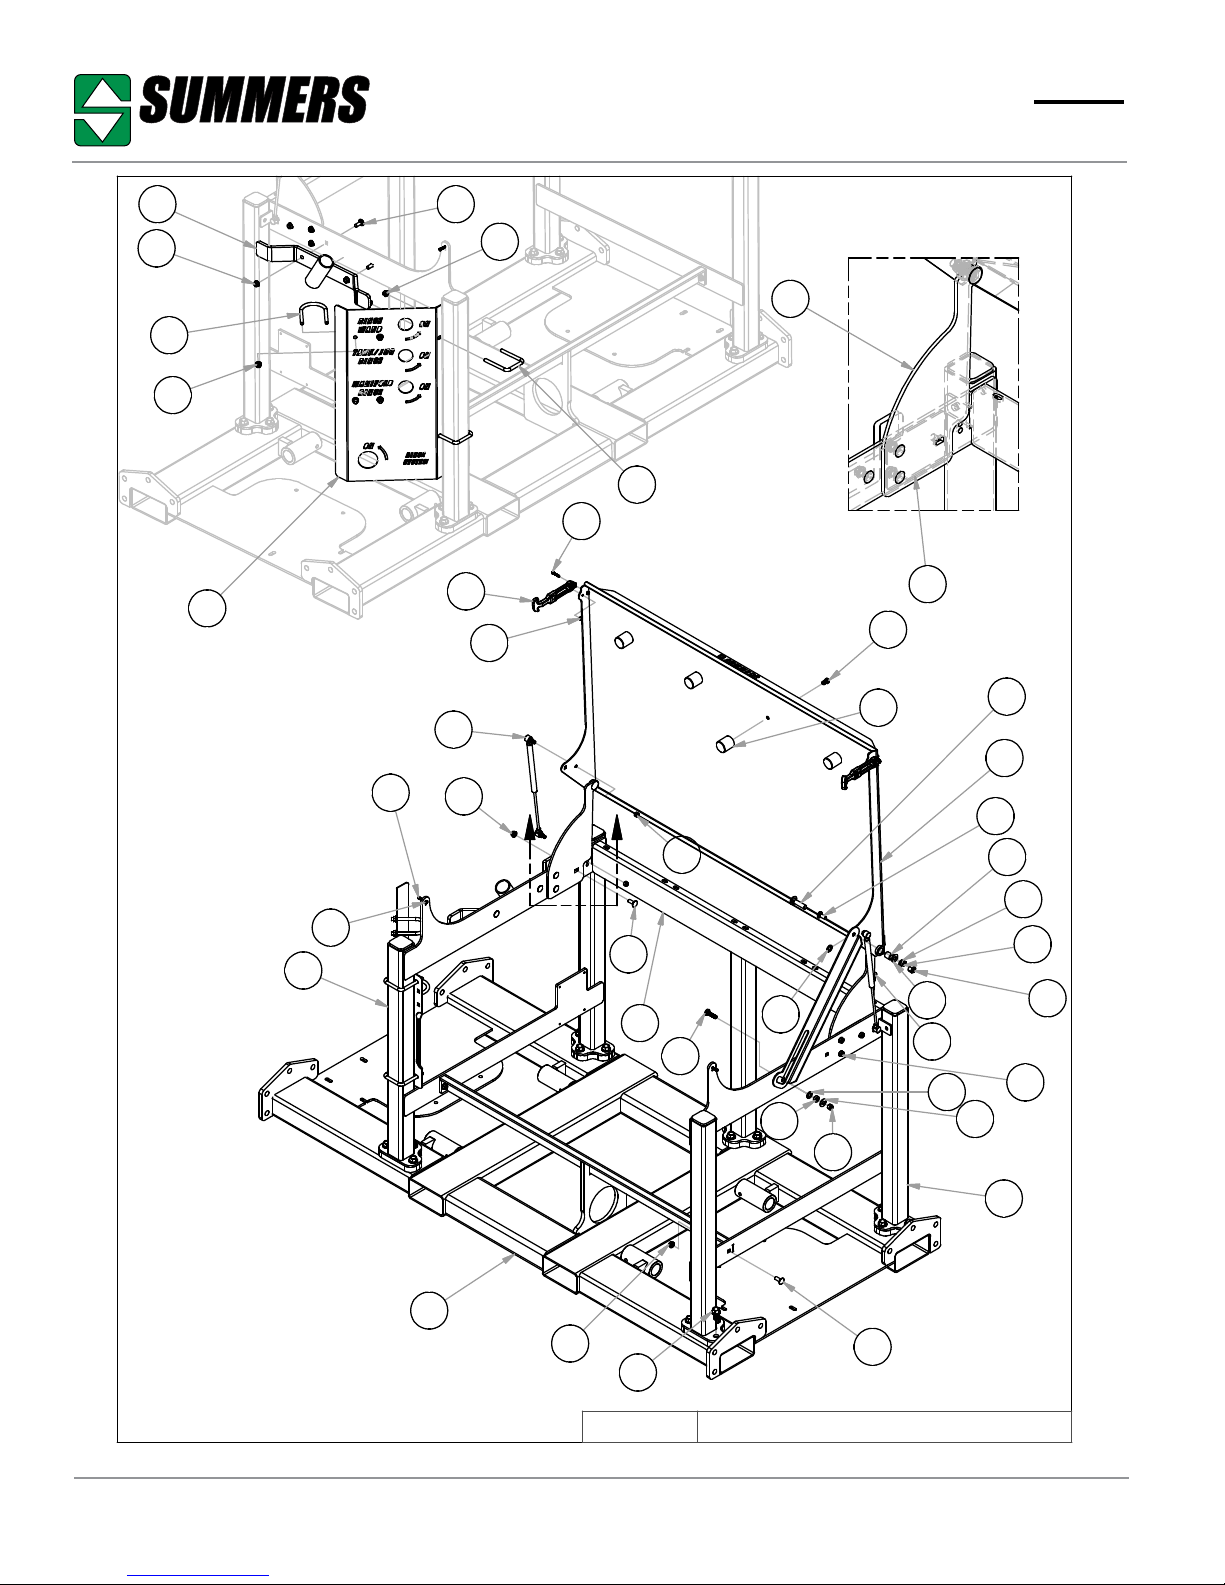
Parts are referenced in each drawing with an item number. On following page the item number is associated with the Summers Manufacturing part number and description. Use this part number when
ordering replacement parts from your Summers dealer.
Disclaimer
It is the policy of this company to improve its products whenever possible and practical to do so. We
reserve the right to make changes or improvements in the design or construction of parts at any time
without incurring the obligation to install such changes on products previously delivered.
Summers Manufacturing Company, Inc. strongly recommends that each Spray Fill Xpress operator
READ and UNDERSTAND the Operator’s Manual before using the machine. In addition, the Operator’s Manual should be REVIEWED at least Annually thereafter.
Contact Information
Summers Manufacturing Company, Inc.
103 Summers St. NW
Devils Lake, ND 58301
Toll Free: 1-800-732-4392
Local: 1-701-662-5391 (Devils Lake, ND)
1-605-226-3644 (Aberdeen, SD)
www.summersmfg.com
Owner Registration Information
Bring this information when ordering parts (Serial Number is located attached to bottom of Spray Fill
Xpress skid).
Name __________________________________ Size ____________________________
Address ________________________________ Serial Number ____________________
City ____________________________________ (located by the hitch)
State/Prov. ______________________________ Date Purchased __________________
Scan code below for
the latest version of all
Summers Operator’s Manuals.
Mail Code _______________________________ Dealer __________________________
8Z1105 © Summers Mfg. Co., Inc. 2018 Page 5
Page 6

WARRANTY
Summers warrants only products of its manufacture against operational failure caused by
defective materials or workmanship which occur during normal use within 36 months from the
date by the end user from Summers’ dealer.
Summers’ obligation is to replace, free of charge, any part of the product that Summers inspection shows to be defective excluding transportation charges to Devils Lake, ND and return
and also excluding all transportation costs from Summers’ dealer to the dealer’s customer and
all other costs, such as removal and installation expense.
Summers shall not be liable for loss of time, manufacturing costs, labor, material, loss of
prots, consequential damages, direct or indirect, because of defective products whether due to
rights arising under the contract of sale or independently thereof, and whether or not such claim
is based on contract, tort or warranty.
Written permission for any warranty claim return must be rst obtained from authorized Summers’ personnel. All returns must be accompanied with a complete written explanation of claimed
defects and the circumstances of operational failure.
Written warranty for all component parts used in the manufacture of Summers products is
available upon request. Warranty of such component parts will be determined by said component
manufacturer upon their inspection of the claimed defective part.
This express warranty is the sole warranty of Summers. There are no warranties, which extend beyond the warranty therein expressly set forth. The sales for products of Summers under
any other warranty or guarantee express or implied is not authorized. This warranty voids all
previous issues.
Summers® Manufacturing Co., Inc.
Devils Lake, ND 58301
01/16
Page 6 © Summers Mfg. Co., Inc. 2018 8Z1105
Page 7

®
Safety
Safety Information
This safety alert symbol is used to denote possible danger and care should be
taken to prevent bodily injury. When you see this symbol it means ATTENTION,
BECOME ALERT! and/or YOUR SAFETY IS INVOLVED!
WARNING: Safe practices must be followed when working on or operating
this equipment. All personnel involved must:
• Read and understand the instructions and manuals for this machine.
• Be instructed in the safe use of tools and all lifting devices involved in the
assembly of this equipment.
• Clear the area of all personnel not involved in the assembly of this machine.
General Safety Practices
1. READ and UNDERSTAND the Operator’s Manual before using any equipment. Review at least
annually thereafter.
2. VERIFY all safety devices and shields are in place before using any equipment.
3. KEEP hands, feet, hair and clothing away from moving parts.
4. STOP engine, place all controls in neutral, set parking brake, remove ignition key and wait for
all moving parts to stop before servicing, adjusting, maintaining or unplugging.
5. BE CAREFUL when working around high pressure hydraulic system.
6. DO NOT ALLOW RIDERS.
Safety During Transportation
1. ONLY TOW at a safe speed. Use caution when making corners and meeting trafc.
2. USE safety chain between tractor drawbar and implement hitch when transporting on public
roads.
3. ALWAYS use transport locks when transporting on public roads.
4. COMPLY with local lighting, marking and oversize regulations when transporting on highways.
5. FREQUENTLY check for trafc from rear, especially during turns.
8Z1105 © Summers Mfg. Co., Inc. 2019 Page 7
Page 8
®
Safety Decals
DANGER
WARNING
CAUTION
Safety
Indicates an immediate hazardous situation that will result in death or serious
injury. The color associated with Danger is RED.
Indicates a potentially hazardous situation that could result in death or serious
injury. The color associated with Warning is ORANGE.
Indicates a potentially hazardous situation that may result in minor or moderate
injury . It may also be used to alert against unsafe practices. The color associated
with Caution is YELLOW.
NOTICE
1. Keep safety signs clean and legible at all
times.
2. Replace safety signs that are missing or
have become illegible.
3. Replaced parts that displayed a safety sign
should also display the current sign.
4. Safety signs are available from your dealer’s
parts department or the factory.
The Notice decals and statements in this manual are to inform the operator
of the correct uids or operational practices for this machine. Failure to follow
these notices will result in damage to the machine. The color associated with
Notice is GREEN.
How to install safety signs?
1. Be sure that the installation area is clean
and dry.
2. Be sure the temperature is above 50° F
(10° C).
3. Decide on the exact position before
removing the backing paper.
4. Remove the smallest portion of the split
backing paper.
5. Align the sign over the specied area and
carefully press the small portion with the
exposed sticky backing in place.
Page 8 © Summers Mfg. Co., Inc. 2019 8Z1105
6. Slowly peel back the remaining paper and
carefully smooth the remaining portion of
the sign in place.
7. Small air pockets can be pierced with a pin
and smoothed out using the piece of sign
backing paper.
Page 9

®
Safety
®
8Z1105 © Summers Mfg. Co., Inc. 2019 Page 9
Page 10
®
Safety
3
5
5
3
4
2
Page 10 © Summers Mfg. Co., Inc. 2019 8Z1105
1
2/18/2016
4
8F8140.iam/
SFX2430 DECALS
Page 11
®
Safety
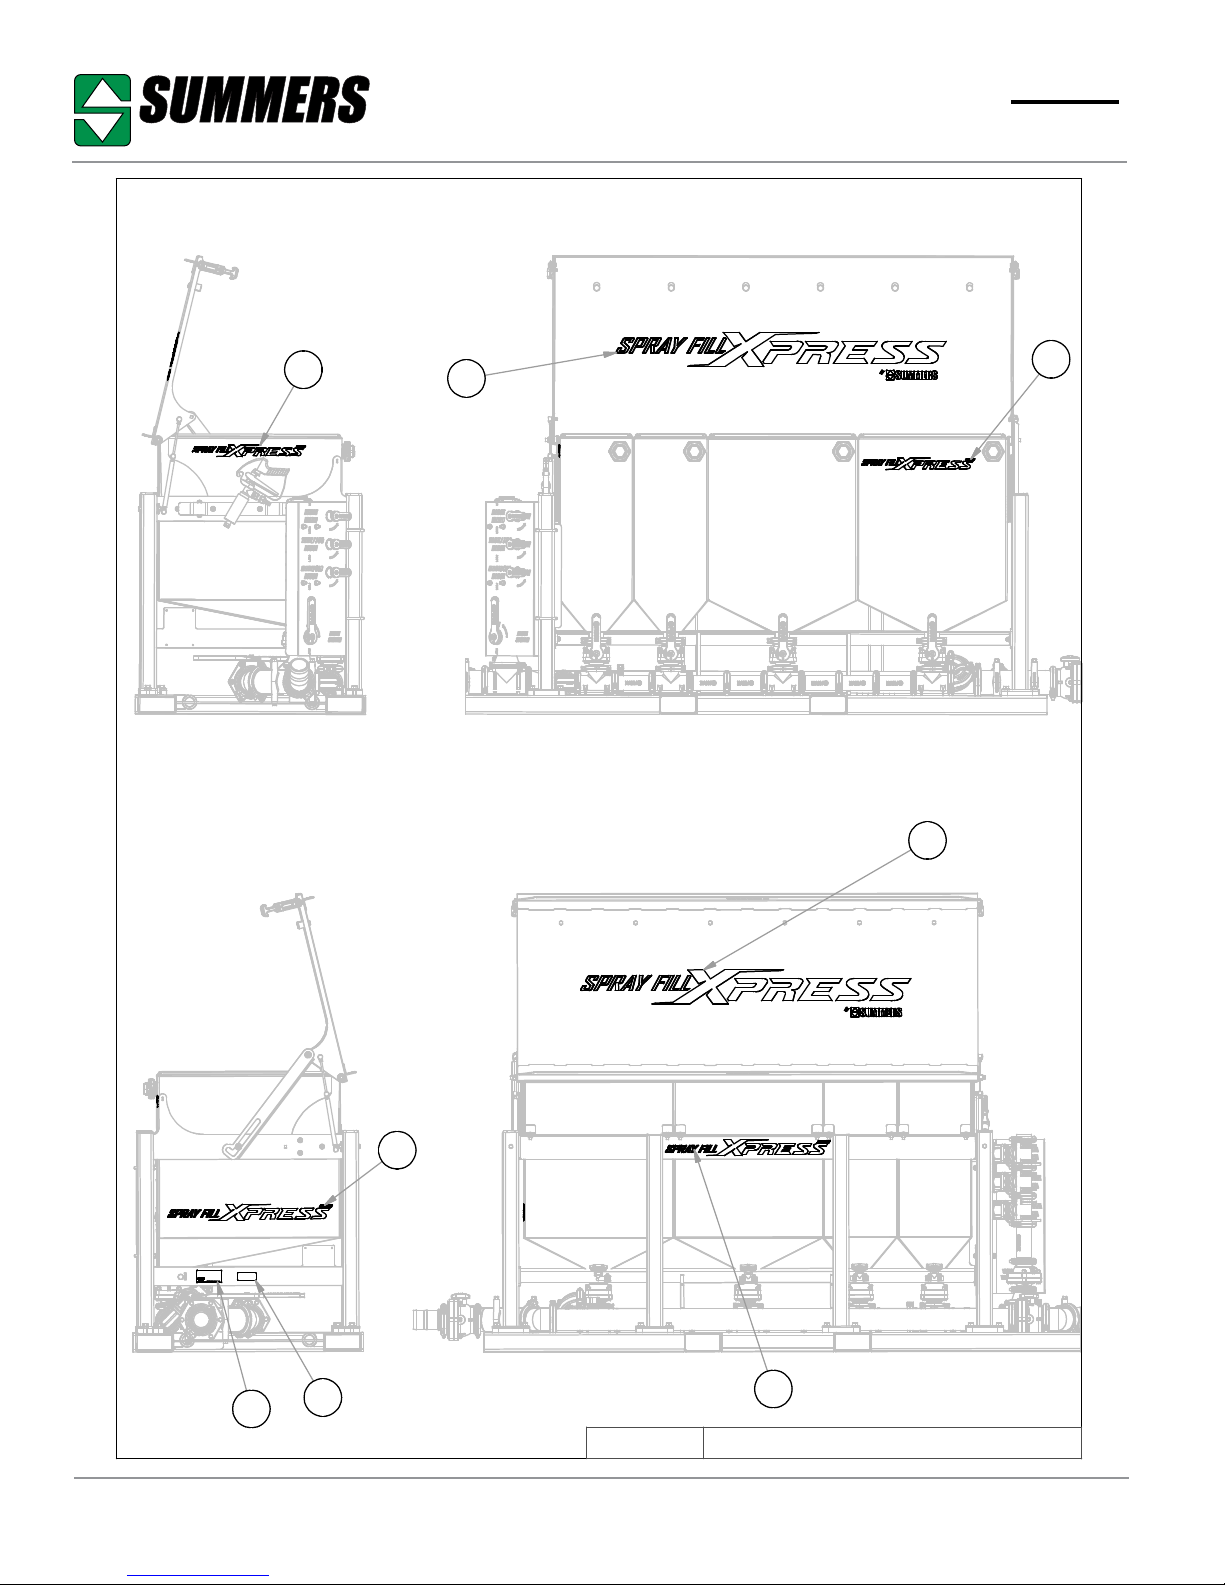
Safety Decal Locations
The types of safety signs and locations on the equipment are shown in the illustrations below. Good
safety requires that you familiarize yourself with the various safety signs, the type of WARNING and
the area or particular function related to that area, that requires your SAFETY AWARENESS.
IMPORTANT:
If Safety Signs have been damaged, removed, become illegible or parts replaced
without safety signs, new signs must be applied. New safety signs are available from
your authorized dealer.
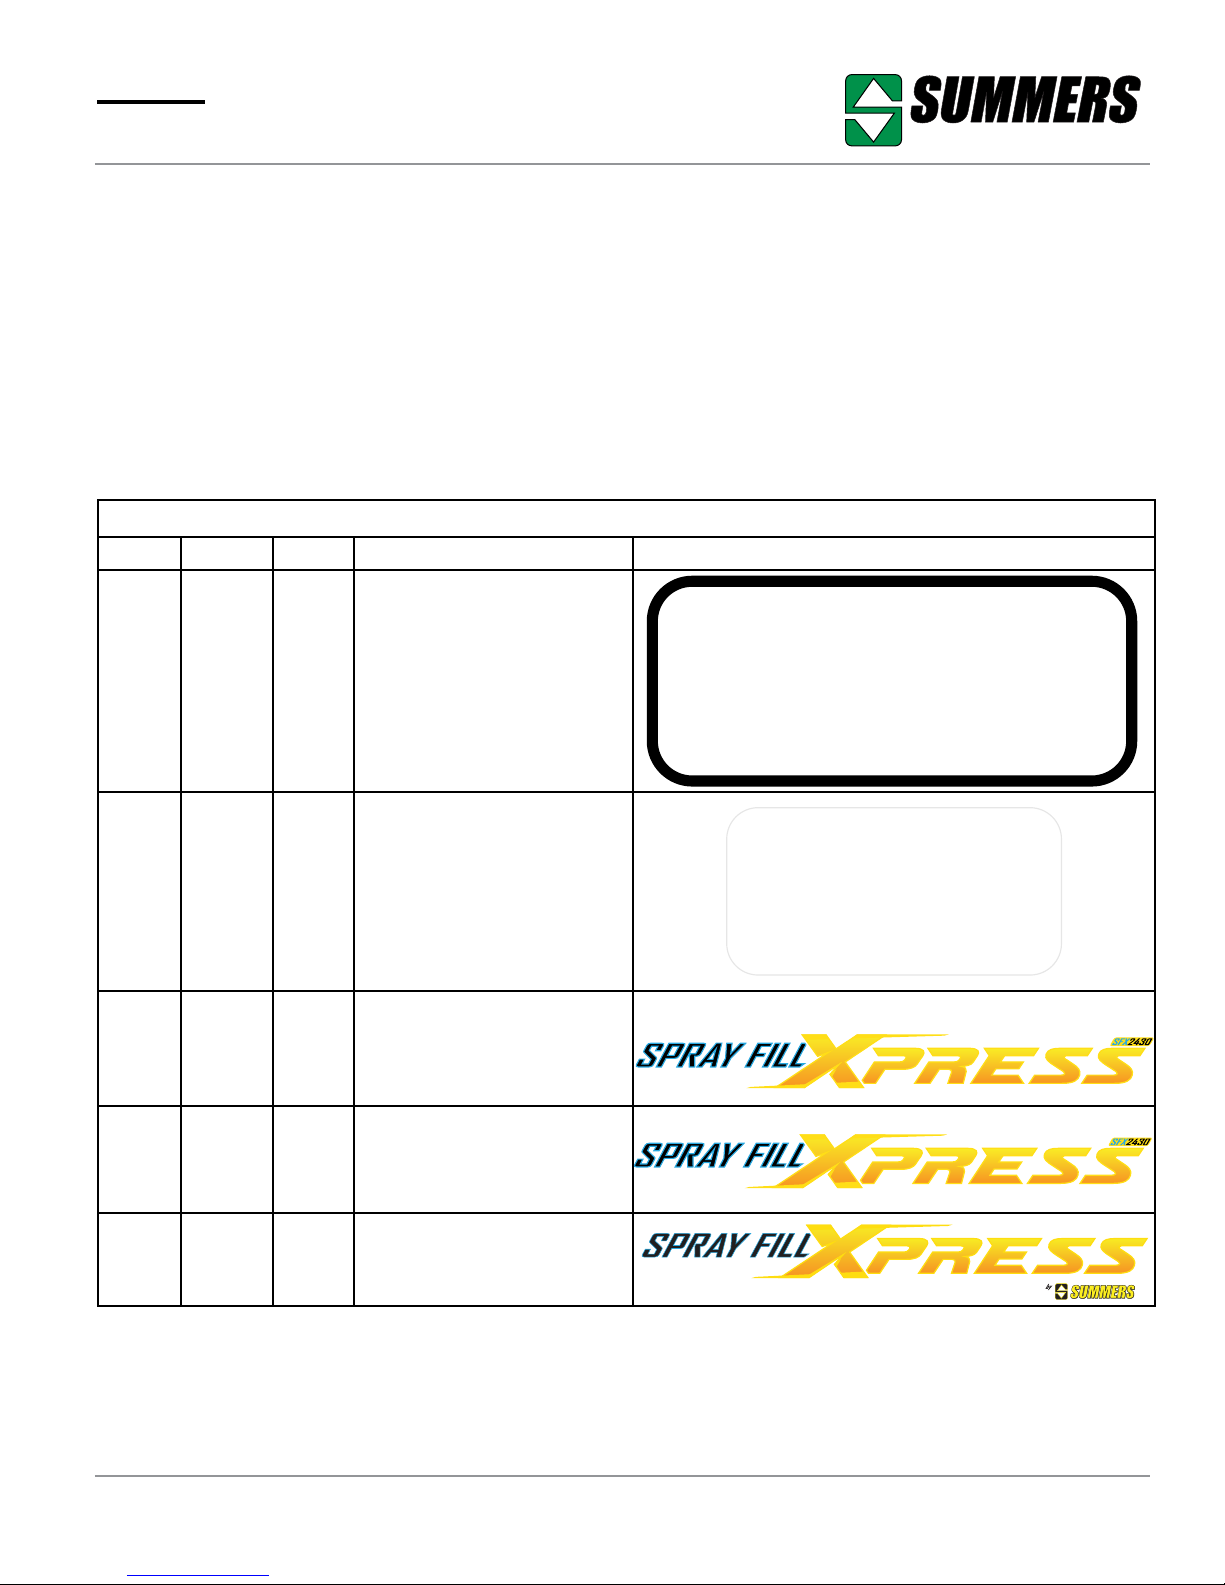
Safety Decals
SFX2430 DECALS
ITEM PN QTY DESCRIPTION
1 8Z0046 1 PATENT PENDING DECAL
2 8Z0100 1 MADE IN THE USA DECAL
PATENT PENDING SUMMERS MFG. CO. INC.
DEVILS LAKE, ND 58301
EMPLOYEE
OWNED
WWW.SUMMERSMFG.COM
PROUDLY MADE IN THE U.S.A.
3
4
5
8Z1105 © Summers Mfg. Co., Inc. 2019 Page 11
8Z2508
8Z2510
8Z2513
8Z2515
8Z2518
8Z2520
18” SFX1630 DECAL
2
18” SFX2430 DECAL
24” SFX1630 DECAL
2
24” SFX2430 DECAL
36” SFX1630 DECAL
2
54” SFX2430 DECAL
®
Page 12
®
Safety
General Maintenance Safety Practices
NOTE: Read the entire section before beginning work.
Before You Begin
• YOU ARE RESPONSIBLE for the safe maintenance of the Spray Fill Xpress.
• DO NOT ALLOW CHILDREN or other unauthorized persons within the Spray Fill Xpress opera-
tional area.
• WEAR PERSONAL PROTECTIVE EQUIPMENT which could include a hard hat, eye protection,
rubber gloves and steel toed boots with slip resistant soles.
• DO NOT MODIFY the equipment or substitute parts in any way. Unauthorized modications may
impair the function and/or safety of the machine.
• USE SUITABLE LIFTING DEVICE for components which could cause personal injury.
• BLOCK UP ANY RAISED PART of the machine. Be sure machine is stable after blocking.
• ALWAYS INSPECT LIFTING CHAINS AND SLINGS for damage or wear.
• BE SURE LIFTING DEVICE IS RATED TO HANDLE THE WEIGHT.
• STOP ENGINE, place all controls in neutral, set parking brake, remove ignition key and wait for
all moving parts to stop before servicing or adjusting. For plumbing repairs make sure valves are
closed to avoid water or chemical spills.
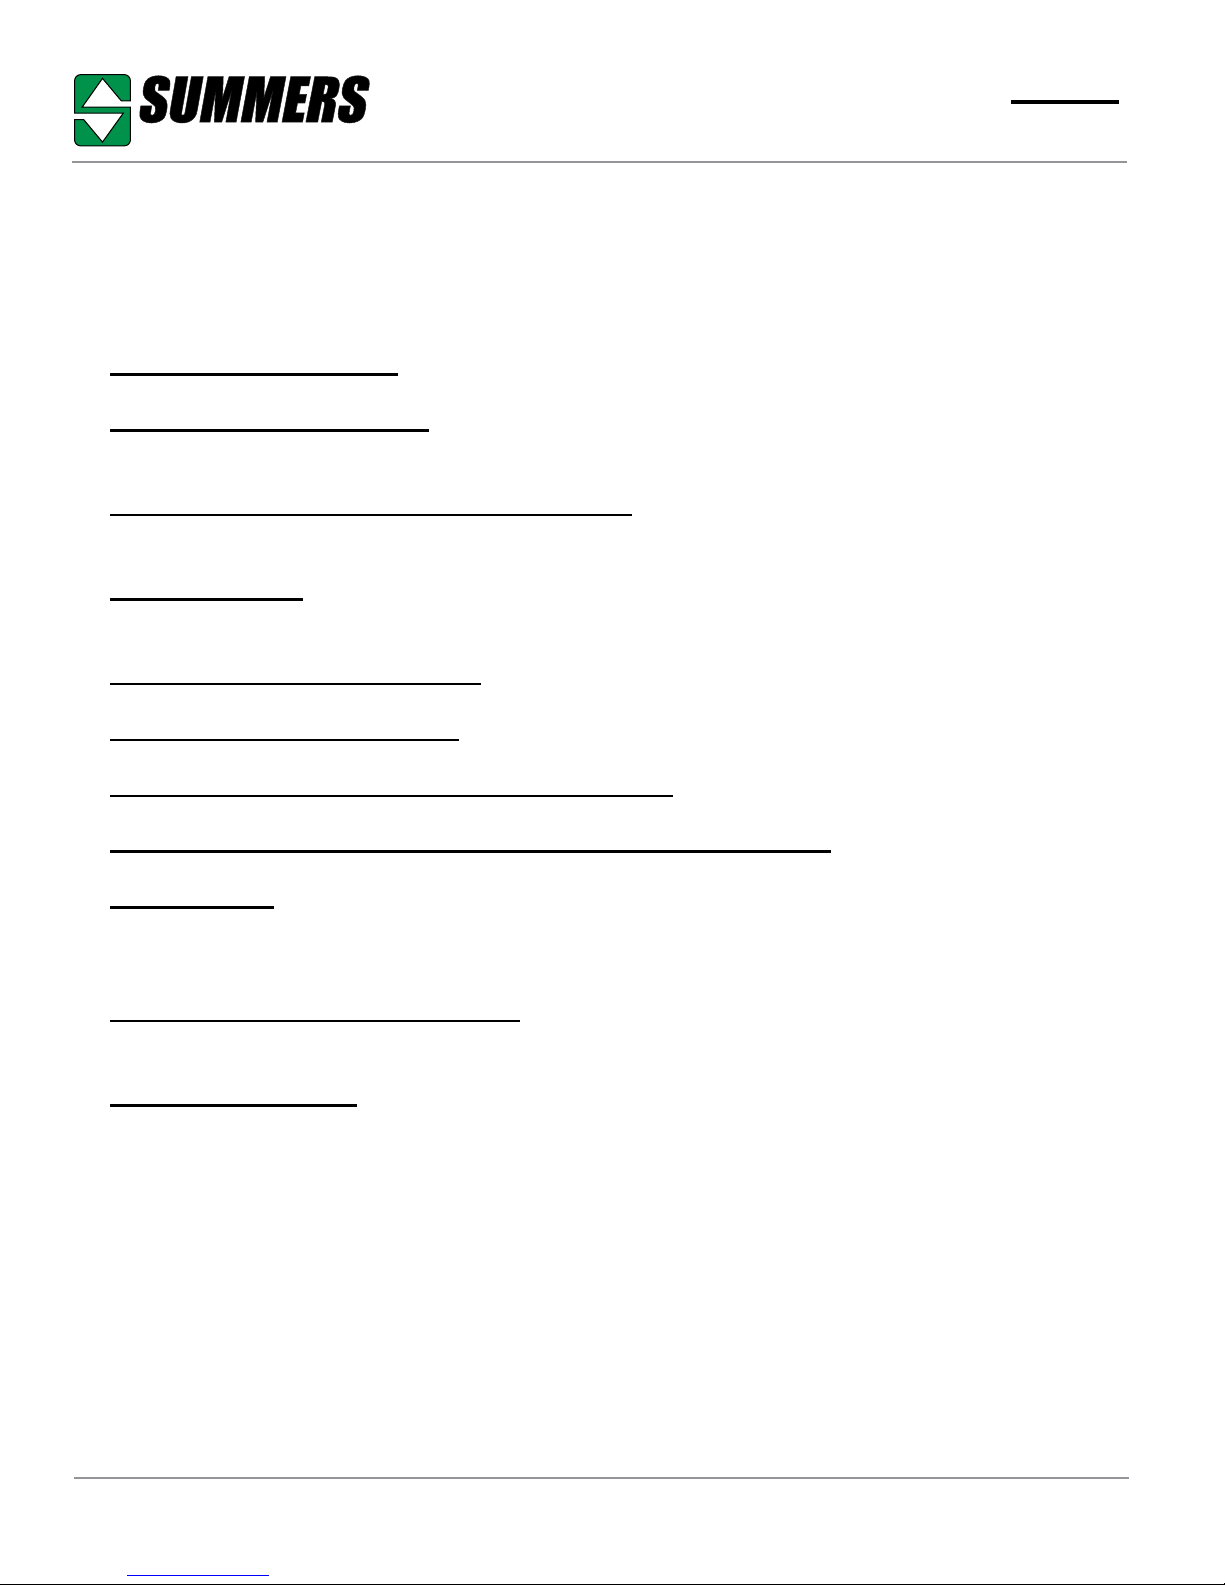
• BE SURE PRESSURE IS RELIEVED from hydraulic circuits before servicing or disconnecting
from tractor.
• USE EXTREME CARE when assembling, servicing or adjusting.
Page 12 © Summers Mfg. Co., Inc. 2019 8Z1105
Page 13

®
Operation Safety
Operation Safety
1. READ AND UNDERSTAND Operator’s Manual before using machine. Review at least
annually thereafter.
2. VERIFY that all safety devices and shields
are in place before using machine.
3. KEEP hands, feet, hair and clothing away
from moving parts.
4. STOP engine, place all controls in neutral, set
parking brake, remove ignition key and wait
for all moving parts to stop before servicing,
adjusting, maintaining or unplugging.
5. BE CAREFUL when working around high
pressure hydraulic system and farm chemicals.
6. ALWAYS make sure that pressure is relieved
from hydraulic circuits before servicing or
disconnecting from tractor.
Steps Prior to Operation
1. COMPLETE WARRANTY REGISTRATION
CARD
A. Complete and return WARRANTY REG-
ISTRATION CARD located at the beginning of this manual. RETURNING CARD
ENTITLES YOU TO A FREE GIFT.
B. Complete the OWNER REGISTER also
located at the beginning of this manual
(Serial Number is located on base piece).
OWNER REGISTER INFORMATION
MAY BE NEEDED WHEN ORDERING
PARTS.
7. DO NOT ALLOW RIDERS.
8. USE EXTREME CARE when making adjustments.
9. KEEP CHILDREN AWAY from machinery at
all times.
10. NEVER ALLOW anyone to walk or work
under a raised piece of equipment without
installing cylinder and transport locks.
8Z1105 © Summers Mfg. Co., Inc. 2019 Page 13
Page 14

®
Operation Safety
®
Page 14 © Summers Mfg. Co., Inc. 2019 8Z1105
Page 15

®
Operation
Description
Spray Fill Xpress chemical ll system is de-
signed with an in-line educator to mix uids and
dry chemicals in a self-contained system quick-
ly, easily, and safely. The Spray Fill Xpress operates by receiving water into a venturi educator
where liquid or dry chemicals are mixed while
they are routed to the sprayer tank. The Spray
Fill Xpress is constructed out of 304 stainless
steel with a venturi type polypropylene educator that routes the spray solution through an as-
sembly of ttings and hose to the spray tank.
The Spray Fill Xpress is designed to be used
by an operator, when installed in an approved
location, during loading and draining of multiple
chemicals from the hoppers while the sprayer
tank is loaded.
Intended Uses
The Spray Fill Xpress is designed and con-
structed to be a part of applications that require
rapid mixing of a recipe of multiple liquid and or
dry chemicals and transport them to the sprayer
tank via some carrier that could be water. The
Spray Fill Xpress can be used in a wide variety
of conditions, but must be used in outdoor or
well ventilated areas.
Unintended Uses
Do not use the Spray Fill Xpress with explosive
materials.
Do not operate the Spray Fill Xpress with missing, damaged, or leaking parts.
Do not use the Spray Fill Xpress in applications
where uid could be used for human consumption.
Do not use the Spray Fill Xpress if it is not properly secured to application.
Initial Check
1. After receiving or assemblying your Spray
Fill Xpress, it is a good practice to double
check the entire machine to be sure all fasteners are securely tightened.
2. Make sure all ttings are in place and clamps
are tight.
Before Operation
1. Park Spray Fill vehicle on a rm level surface
large enough for good access of your eld
sprayer.
2. Ensure all Spray Fill Xpress valves are
closed prior to starting engine and inspect
for leaks.
3. Open Spray Fill Xpress lid and lock lid support brace into place so wind cannot close
lid on you. Inspect hoppers for cleanliness,
remove foreign material as necessary.
4. Turn on scale if equipped and verify scale is
zeroed prior to lling hopper with material to
be measured.
5. Measure required amount of chemical into
each hopper using scale, owmeter or other
accurate measuring vessel.
6. Each hopper is equipped with container
rinse system that can be used to rinse empty
liquid containers just by pushing the plunger
down with the container. Engine and pump
need to be operating for jug rinse nozzles to
function.
7. Each container should be rinsed for 30 seconds or longer so operator is certain the container is visibly clean.
8. Repeat 4 & 5 as required to make recipe.
Do not exceed the maximum pressure of 75 psi
when using the Spray Fill Xpress.
8Z1105 © Summers Mfg. Co., Inc. 2019 Page 15
Page 16

®
Start-Up
1. Start engine and divert pump ow to venturi.
2. Open each hopper outlet valve until hopper
is empty. Hand wand can be used to aid
washing chemical into plumbing. Close hopper valves when hopper is clean and empty.
3. Ensure chemical residue had been ushed
from the hopper and hopper has been rinsed
using the hand wand or by closing lid and
using the hopper rinse system.
4. Open the bypass valve and allow water di-
verted through venturi to ow freely through
plumbing until sprayer tank loading is complete.
Operation
Shutdown
1. Close inlet water source.
2. Close Spray Fill Xpress valve.
3. Close sprayer bottom ll valve.
4. Turn engine off.
5. Disconnect sprayer bottom ll hose.
Transporting Spray Fill Xpress
1. Close and secure lid.
2. Secure any loose chemical containers.
3. FOLLOW ALL local laws governing transporting of farm machinery.
4. Stay clear of overhead lines and other overhead obstructions.
Page 16 © Summers Mfg. Co., Inc. 2019 8Z1105
Page 17
®
Maintenance & Specifcations
Maintenance Safety
1. STOP engine, place all controls in neutral, set
parking brake, remove ignition key and wait
for all moving parts to stop before servicing,
adjusting or maintaining.
2. BE CAREFUL when working around high
pressure hydraulic system.
3. ALWAYS make sure that pressure is relieved
from hydraulic circuits before servicing or
disconnecting from tractor.
4. USE EXTREME CARE when making adjustments.
5. KEEP CHILDREN AWAY from machinery at
all times.
6. NEVER ALLOW anyone to walk or work under
a raised piece of equipment without installing
cylinder and transport locks.
Maintenance after the 1st day and week of
Operation
Daily Maintenance
1. Check all hydraulic components for leaks.
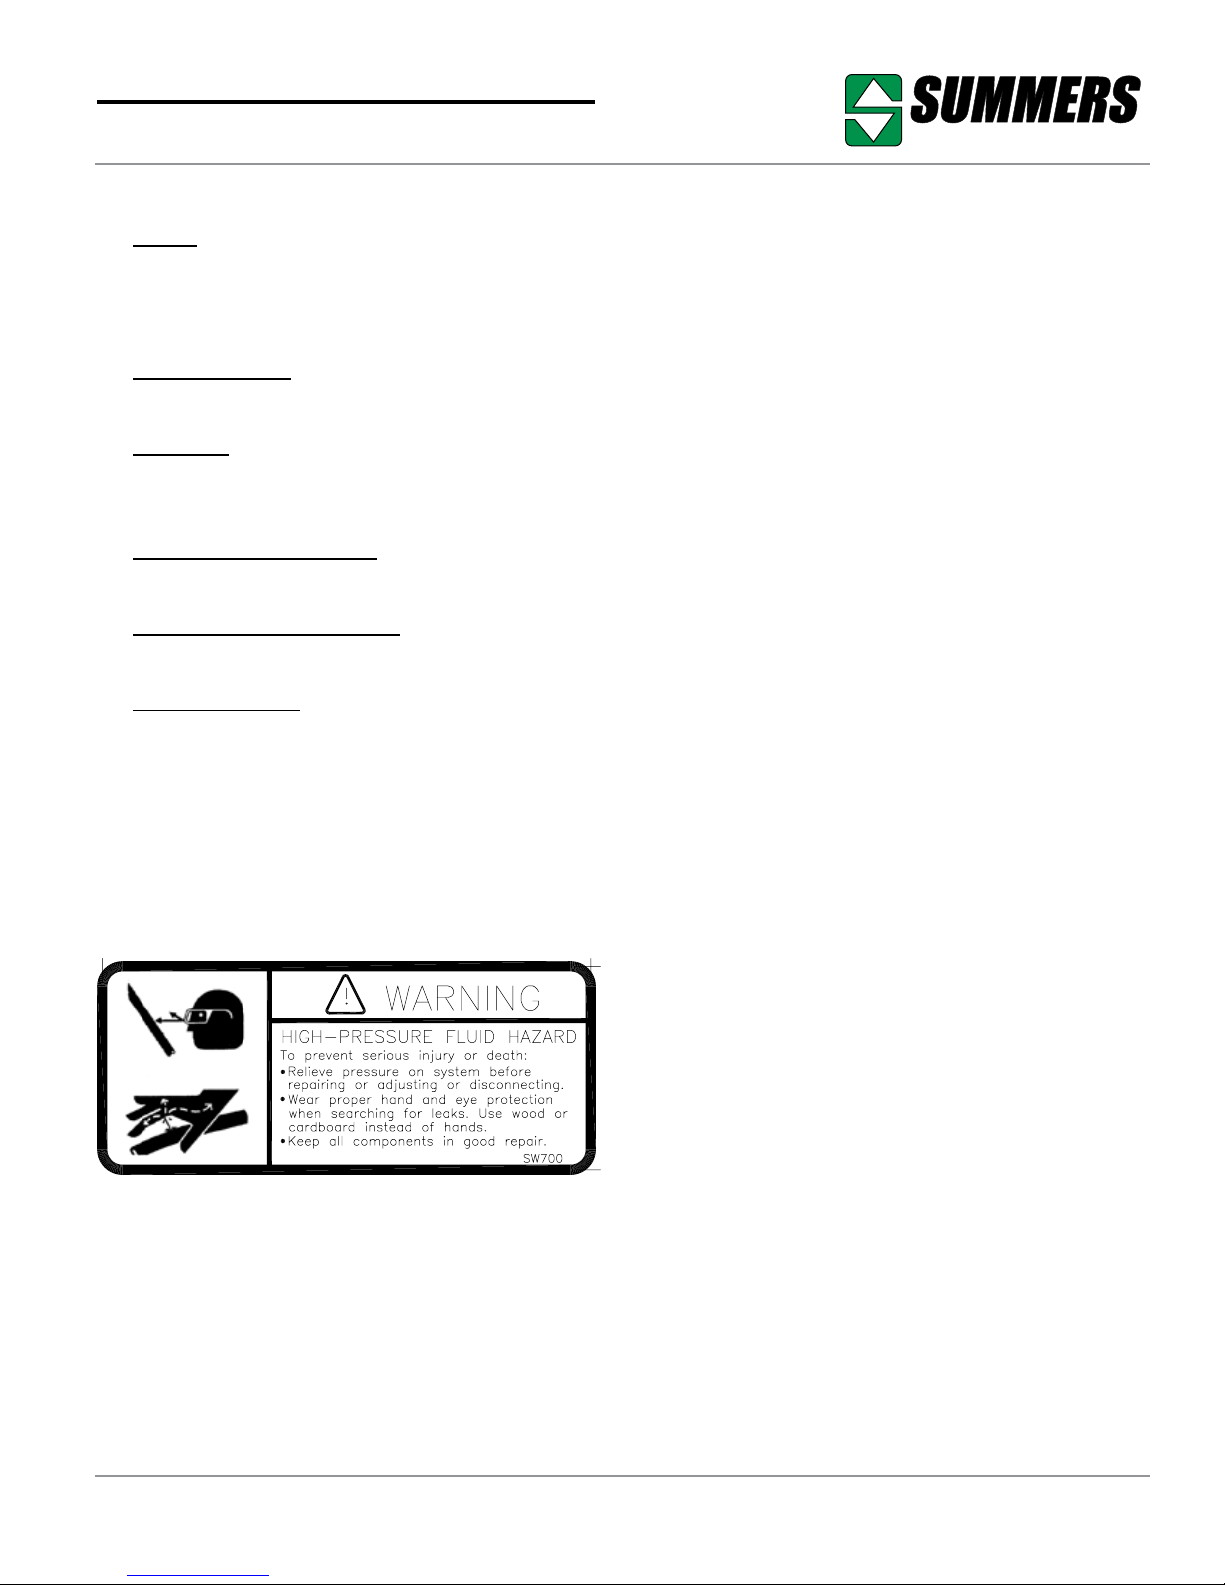
(SEE HIGH-PRESSURE FLUID WARNING.)
Periodic Maintenance
1. Check tightness of all hardware. Pay special
attention to hinges and support bolts.
2. Check Spray Fill Xpress for damaged or worn
parts. Replace as needed.
3. Check Spray Fill Xpress for frayed, chaffed,
or leaking hoses. Verify all clamps are tight.
System must be leak free.
Storage
1. Clean and remove all excessive dirt and grease
from Spray Fill Xpress.
2. T o prevent rusting, repaint any areas that have
been worn, chipped or scratched.
1. Check all plumbing components for leaks.
2. Check for any lose or missing fasteners.
3. Check engine oil and fuel levels.
4. Check valves operation and conditions.
8Z1105 © Summers Mfg. Co., Inc. 2019 Page 17
Page 18
®
Maintenance & Specifcations
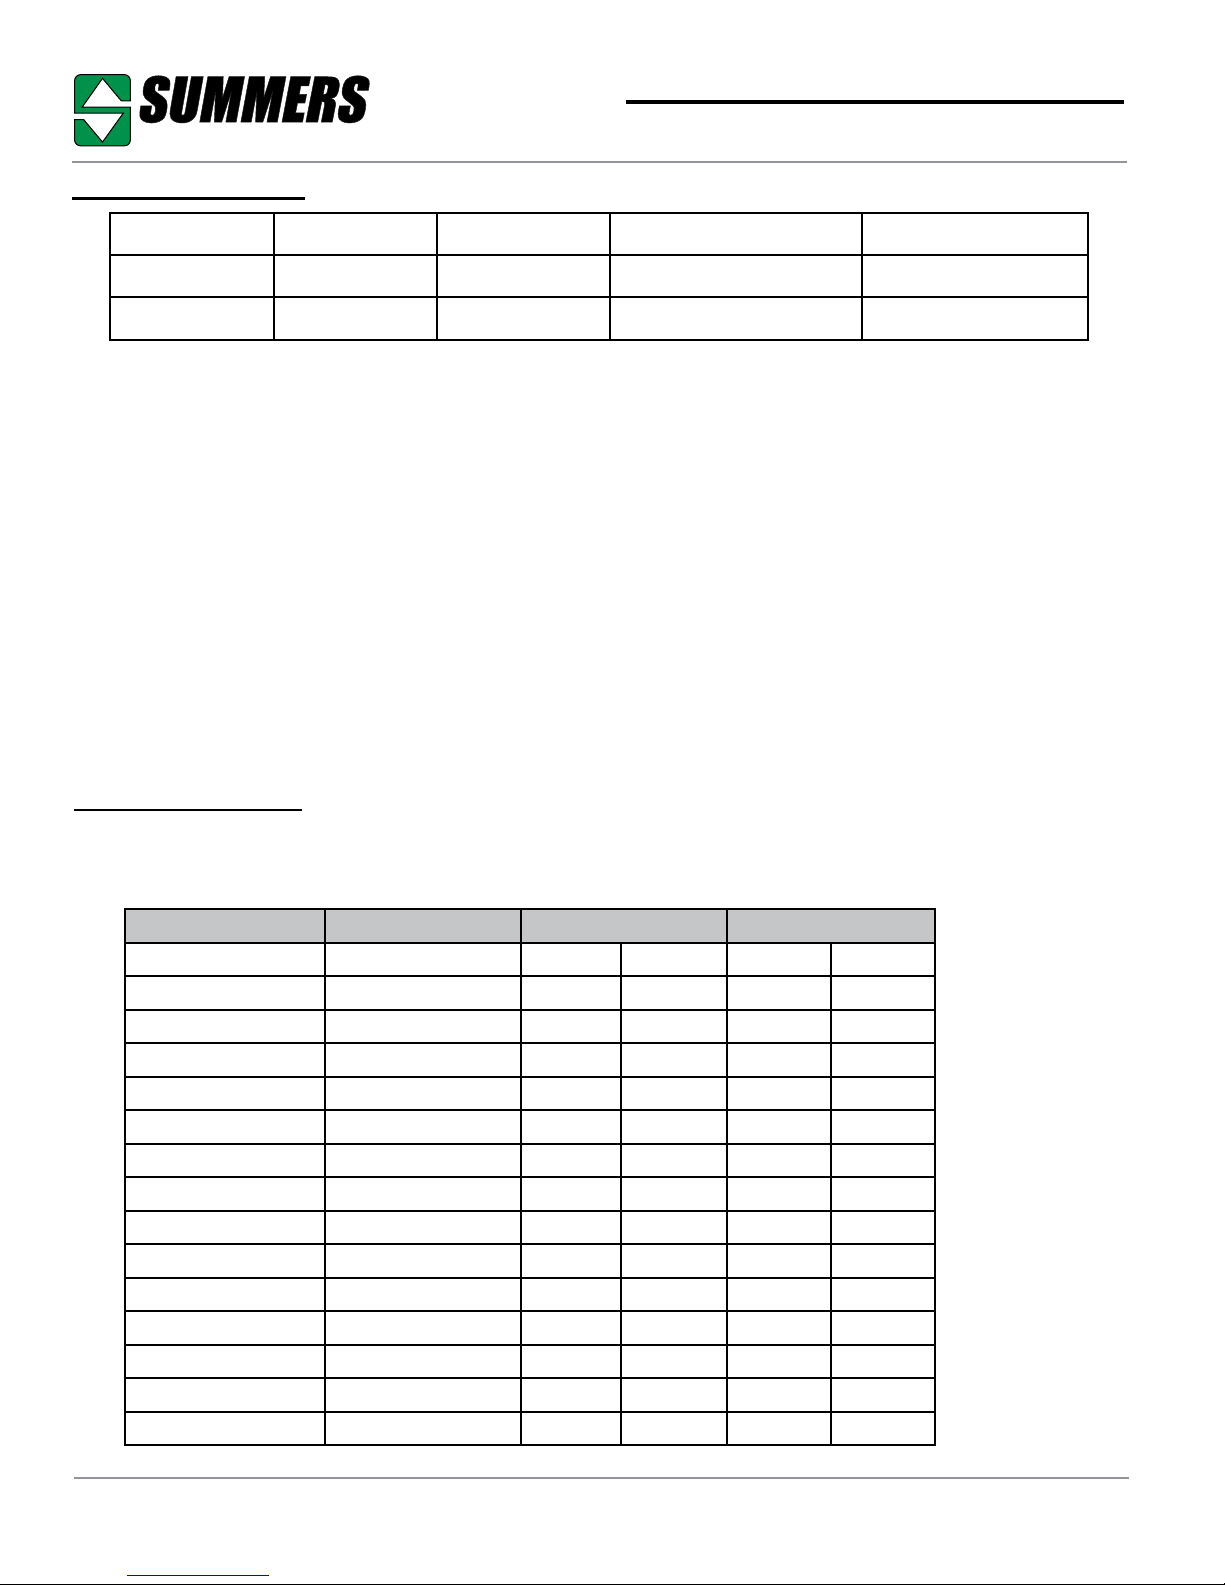
SPECIFICATIONS
Model Width Height Length w/o Engine Length w/Engine
SFX1630 40” 46” 91” 119”
SFX2430 40” 46” 114” 142”
APPROXIMATE WEIGHTS OF COMPONENTS
Maximum Pressure Rating 75 PSI
Scale Capacity 2500 lbs.
13 HP Engine with 3” pump Max GPH - 440
Max PSI - 54
8F8115 - 2 Compartment (SFX1630) Weight - 945 lbs.
8F8125 - 3 Compartment (SFX1630) Weight - 1003 lbs.
8F8135 - 4 Compartment (SFX1630) Weight - 1065 lbs.
8F8130 - 3 Compartment (SFX2430) Weight - 1297 lbs.
8F8140 - 4 Compartment (SFX2430) Weight - 1372 lbs.
8F8150 - 5 Compartment (SFX2430) Weight - 1523 lbs.
8F8160 - 6 Compartment (SFX2430) Weight - 1530 lbs.
PROPER BOLT USE
DO NOT use these values if a different torque value or tightening procedure is given for a specic
application. Torque values listed are for general use only. Check tightness of fasteners periodi-
cally.
BOLT SIZE WRENCH SIZE GRADE 5 GRADE 8
ft-lbs N • m ft-lbs N • m
1/4” 7/16” or 3/8” 7 9.5 12 17
5/16” 1/2” 15 20 25 34
3/8” 9/16” 30 41 45 61
7/16” 5/8” or 11/16” 45 61 70 95
1/2” 3/4” 70 95 105 142
9/16” wheel bolts 7/8” 170 231
5/8” 15/16” 170 231 210 285
5/8” wheel nuts 1-1/16” 240 325
3/4” 1-1/16”* or 1-1/8” 250 339 375 509
7/8” 1-5/16” 350 475 600 814
1” 1-1/2” 450 610 880 1193
1-1/4” 1-7/8” 500 678
1-1/2” 2-1/4” 570 773
2” 3-1/8” 1200 1627
*Nylon Lock Nut 3/8/12 TILLAGE
Page 18 © Summers Mfg. Co., Inc. 2019 8Z1105
Page 19

®
Parts
Parts Ordering Procedure
When ordering parts for your Summers Spray Fill
Xpress, please contact an authorized Summers
dealer in your area. If the parts are associated with
a possible warranty claim, make sure that you contact the original dealer from which you purchased
the Summers implement. Make sure to provide the
Summers implement model, Serial number, Part
number, Part description and quantity.
8Z1105 © Summers Mfg. Co., Inc. 2019 Page 19
Page 20
®
15 28
Parts
21
16
21
21
2
14
20
9
20
6
23
5
21
B
17
8
DETAIL B
3
19
7
28
11
23
12
21
28
13
18
2/20/2017
24
29
26
1
22
8F8125.iam/
4
27
28
26
27
10
28
160GAL SFX 3 HPPR
26
22
25
21
Page 20 © Summers Mfg. Co., Inc. 2019 8Z1105
Page 21
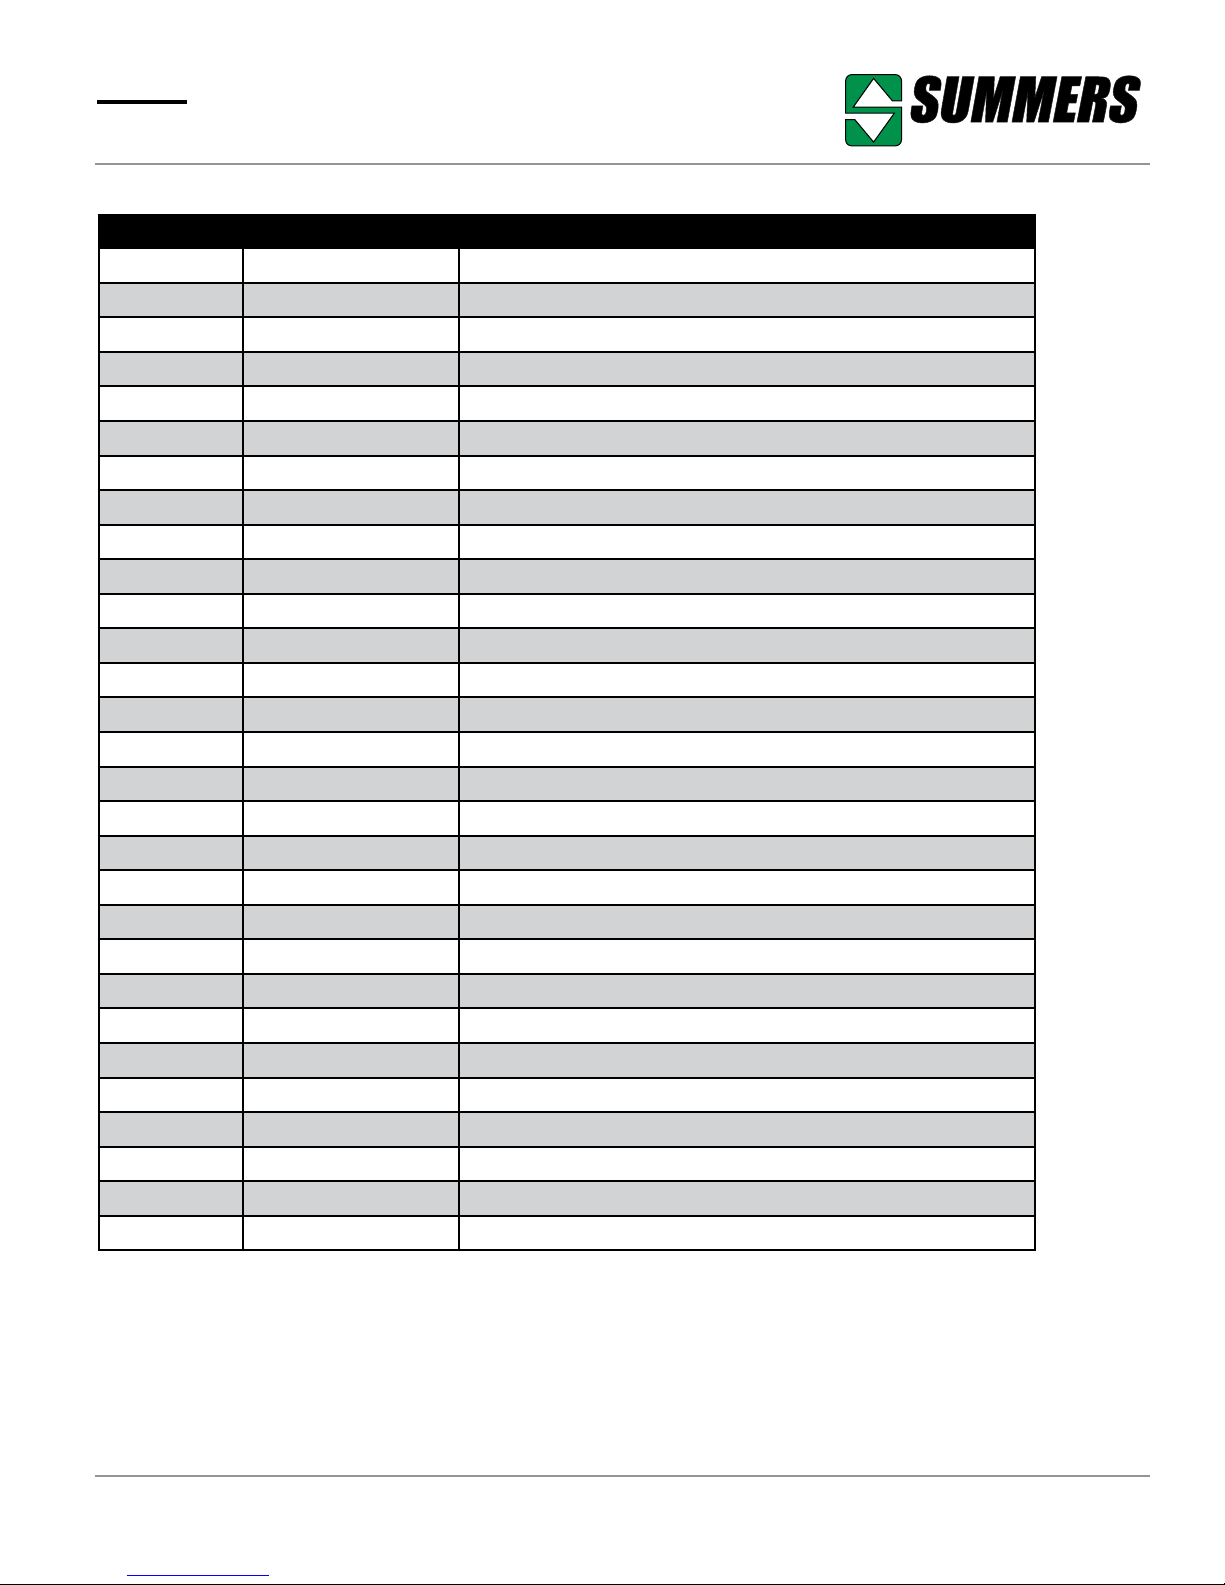
®
Parts
SFX1630 TANK BASE
ITEM PART NUMBER DESCRIPTION
1 8F0004 STAINLESS STEEL BOLT SPACER
2 8F0100 HINGE SUPPORT
3 8F0102 HINGE PLATE
4 8F0400 UHMW HINGE BUSHING
5 8F0414 GAS SPRING
6 8F0424 RUBBER LATCH STRAP
7 8F6004 LID 160 GALLON SPRAY FILL XPRESS
8 8F6100 RINSEBALL DEPRESSER SS304
9 8F6110 VALVE PANEL SPRAY FILL
10 8F8004 SPRAY FILL SIDE RAILING LFT
11 8F8006 SPRAY FILL SIDE RAILING RGT
12 8F8010 SPRAY FILL EXPRESS BASE
13 8F8012 BACK SUPPORT 160 SF PTD 1514 8G8020 U-BOLT 3/8 X 2-9/16 X 3-1/2" SQ
15 8L3376 SPRAY FILL RINSE GUN HOLDER
16 8S0295 U-BOLT 3/8 X 2-5/8 X 4-1/4"RND
17 8X0018 SS 3/8 X 16NC - 1/2" BOLT
18 8X0060 1/2" - 13 FLANGED BOLT
19 8X0065 CRG 1/2-13NC X 2" GR5 ZDI
20 8X0161 SCREW SKT HD 10 X 24 X 1" SS
21 8X0200 NUT 3/8"-16NC SERFLANG GR2 SS
22 8X0202 NUT 3/8"-16NC NY-LOCK GR2 YZ
23 8X0207 NUT THIN 10 X 24 NYLOCK SS
24 8X0212 NUT 5/16"-18NC NY-LOCK GR2 ZDI
25 8X0242 NUT 1/2"-13NC NY-LOCK GR2 YZ
26 8X0319 WASHER 17/32"IDX7/8ODX16GA ZDI
27 8X0320 WASHER 3/8" (7/16" ID)FLAT ZDI
28 8X1112 CRG 3/8-16NC X 1" SS
29 8X1113 CRG 3/8-16NC X 1.5" SS
8Z1105 © Summers Mfg. Co., Inc. 2019 Page 21
Page 22
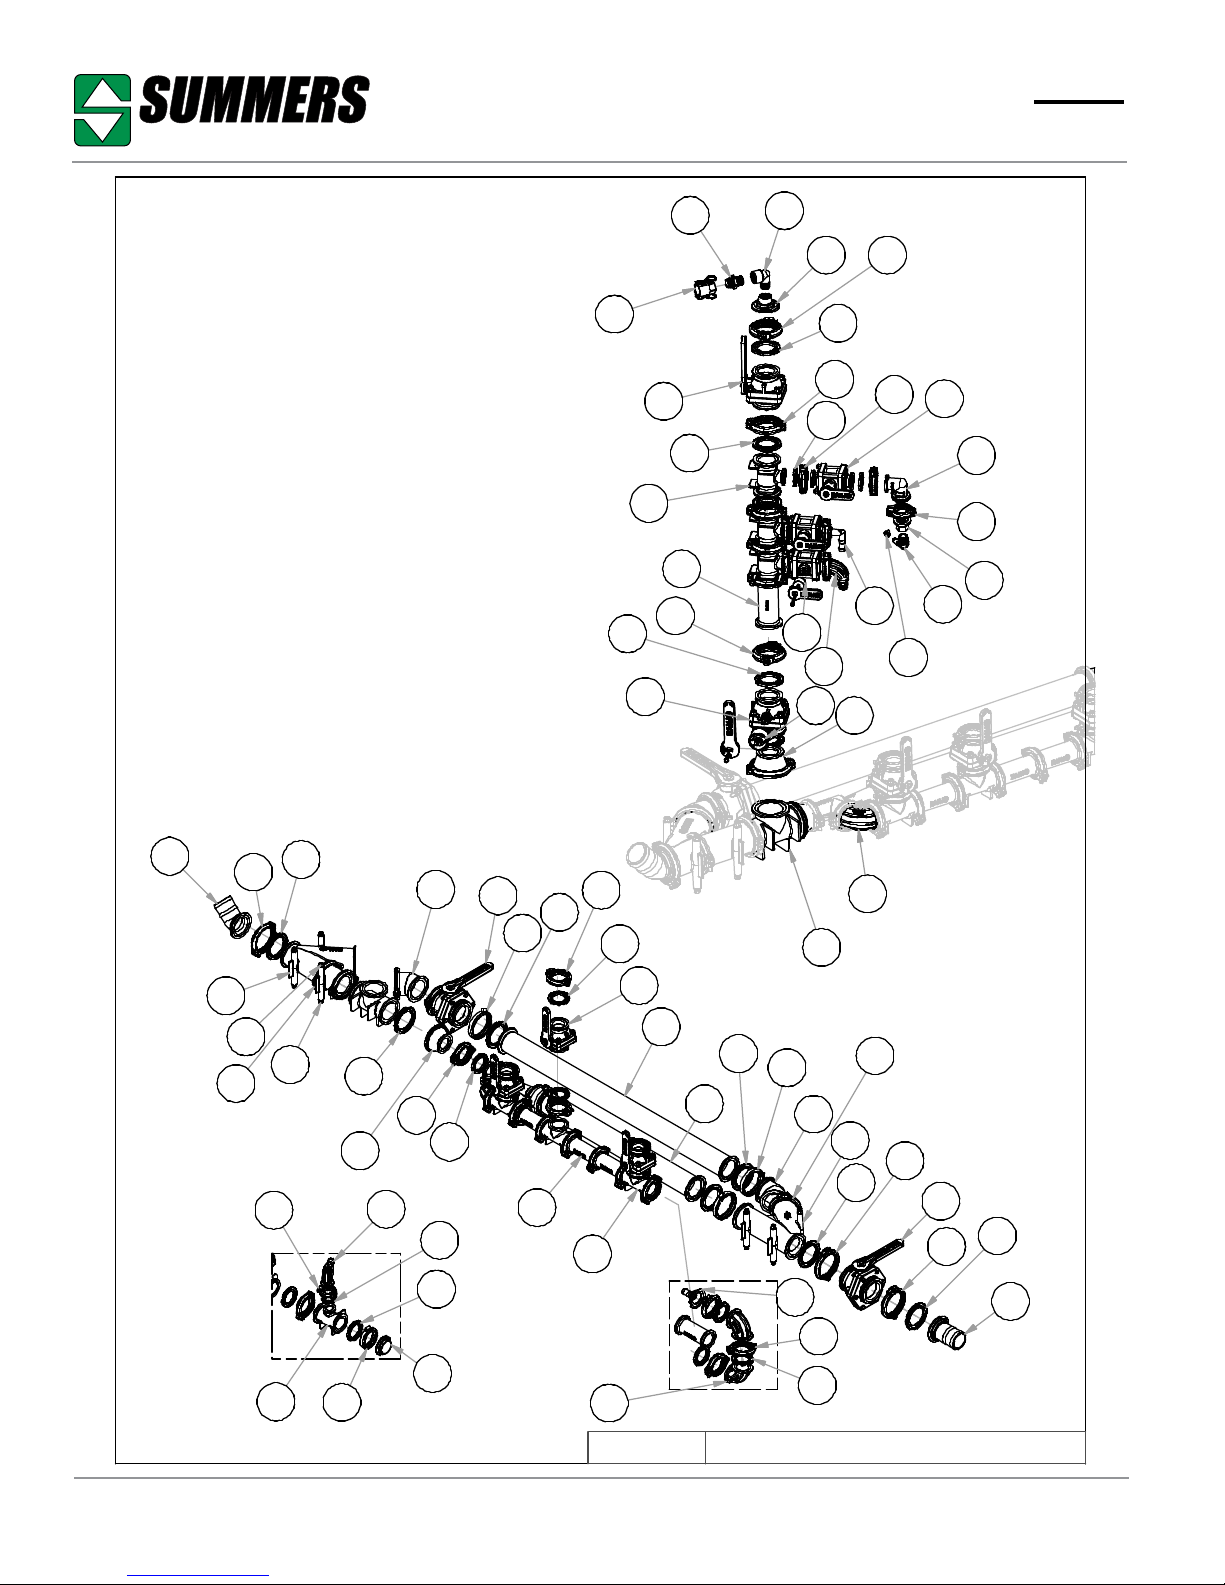
®
Parts
10
34
19
6
11
6
34
27
33
8
5
26 33
34
33
32
14
15
5
24
31
4
22
31
28
9
1
13
29
35
4 HOPPER
ONLY
40
35
27
15
39
36
21
36
33
24
11
26
29
21
8
7
12
34
27
33
36
18
2 & 3
HOPPER
ONLY
23
34
23
20
6
38
37
36
12
21
16
33
34
29
36
35
35
7
35
36
17
Page 22 © Summers Mfg. Co., Inc. 2019 8Z1105
8F8125.iam/
160GAL SFX 3 HPPR11/15/2018
Page 23
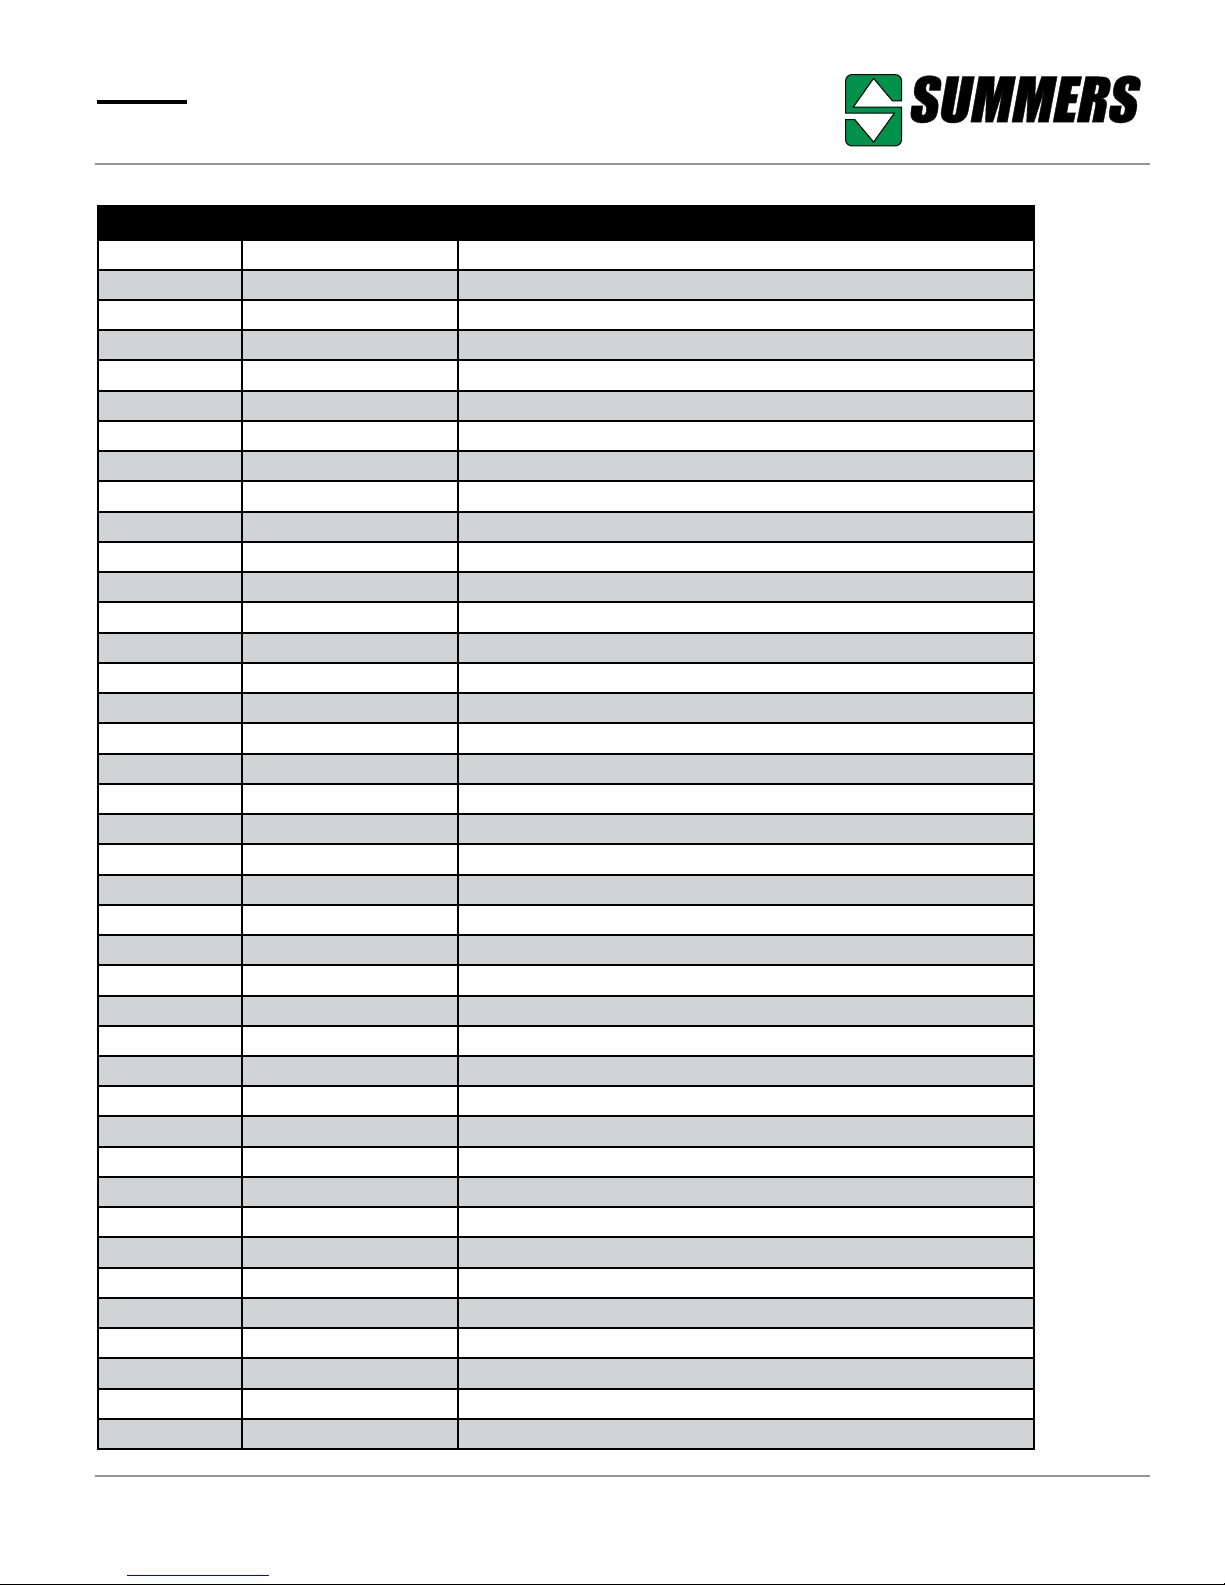
®
Parts
SFX1630 PLUMBING
ITEM PART NUMBER DESCRIPTION
1 8A1003 CLAMP HOSE 1/2" MINI
2 8A1007 CLAMP HOSE 3/4" #12
3 8A1009 CLAMP HOSE 1" #16
4 8A1253 1" FLANGED VALVE
5 8A1254 BV HANDLE RISER 2X1.38" 15-
6 8A1734 2" SHORTY BALL VALVE
7 8A1742 BALL VALVE 3" STUBBY DBLFLNG
8 8A2008 STREET ELBOW 3/4"
9 8A2108 ELBOW 1/2" HB X 3/4 MPT
10 8A2204 3/4"COUPLER X 3/4" GHFTHREAD
11 8A2212 3/4" MPT X 3/4" GHMTHREAD
12 8A2235 FLANGE CLAMP FC300 WORM SCREW
13 8A2249 FLANGE ELBOW 45° M300 X 3" HB
14 8A2250 FLANGE ELBOW 90 M100 X 3/4"HB
15 8A2251A 1" FLANGE SWEEP ELBOW 90 DEGREE
16 8A2287 FLANGE M220 X 1"HB
17 8A2293 FLANGE M300 X 3" HB FULL PORT
18 8A2297 FLANGE TEE M220 FULL PORT
19 8A2298 FLANGE TEE M220 X M220 X M100
20 8A2299 FLANGE TEE M300 FULL PORT
21 8A2317A FLANGE ELBOW 45° M300
22 8A2318 FLANGE ELBOW 90 M100
23 8A2319 2" FULL PORT SWEEP ELBOW
24 8A2328 FLANGE REDUCER M300 X M220
25 8A2332 FLANGE PLUG M220 FULL PORT
26 8A2334 FLANGE PLUG M220 W/3/4" FPT
27 8A2338 2" X 6" FULL PORT COUPLING
28 8A2340 FLANGE M100 X 3/4" FPT
29 8A2342 FLANGE 3" FP 45° Y
30 8A2345 FLANGE 2" FP POLY INDUCTOR
31 8A2380 1" UNIVERSAL FLANGE CLAMP
32 8A2381 FLANGE GASKET 1" HYPRO
33 8A2384 HYPRO 2" UNIVERSAL FLANGE CLAMP
34 8A2385 FLANGE GASKET 2" HYPRO
35 8A2386 HYPRO 3" UNIVERSAL FLANGE CLAMP
36 8A2387 FLANGE GASKET 3" HYPRO
37 8F6134 FLANGEPIPE 3 X 33.75" SS304
38 8F6150 FLANGEPIPE 3 X 50.06" SS304
39 8X0046 BOLT 7/16-14NC X 7-1/4"GR5 ZDI
40 8X0234 NUT 7/16"-14NC NY-LOCK GR2 ZDI
8Z1105 © Summers Mfg. Co., Inc. 2019 Page 23
Page 24
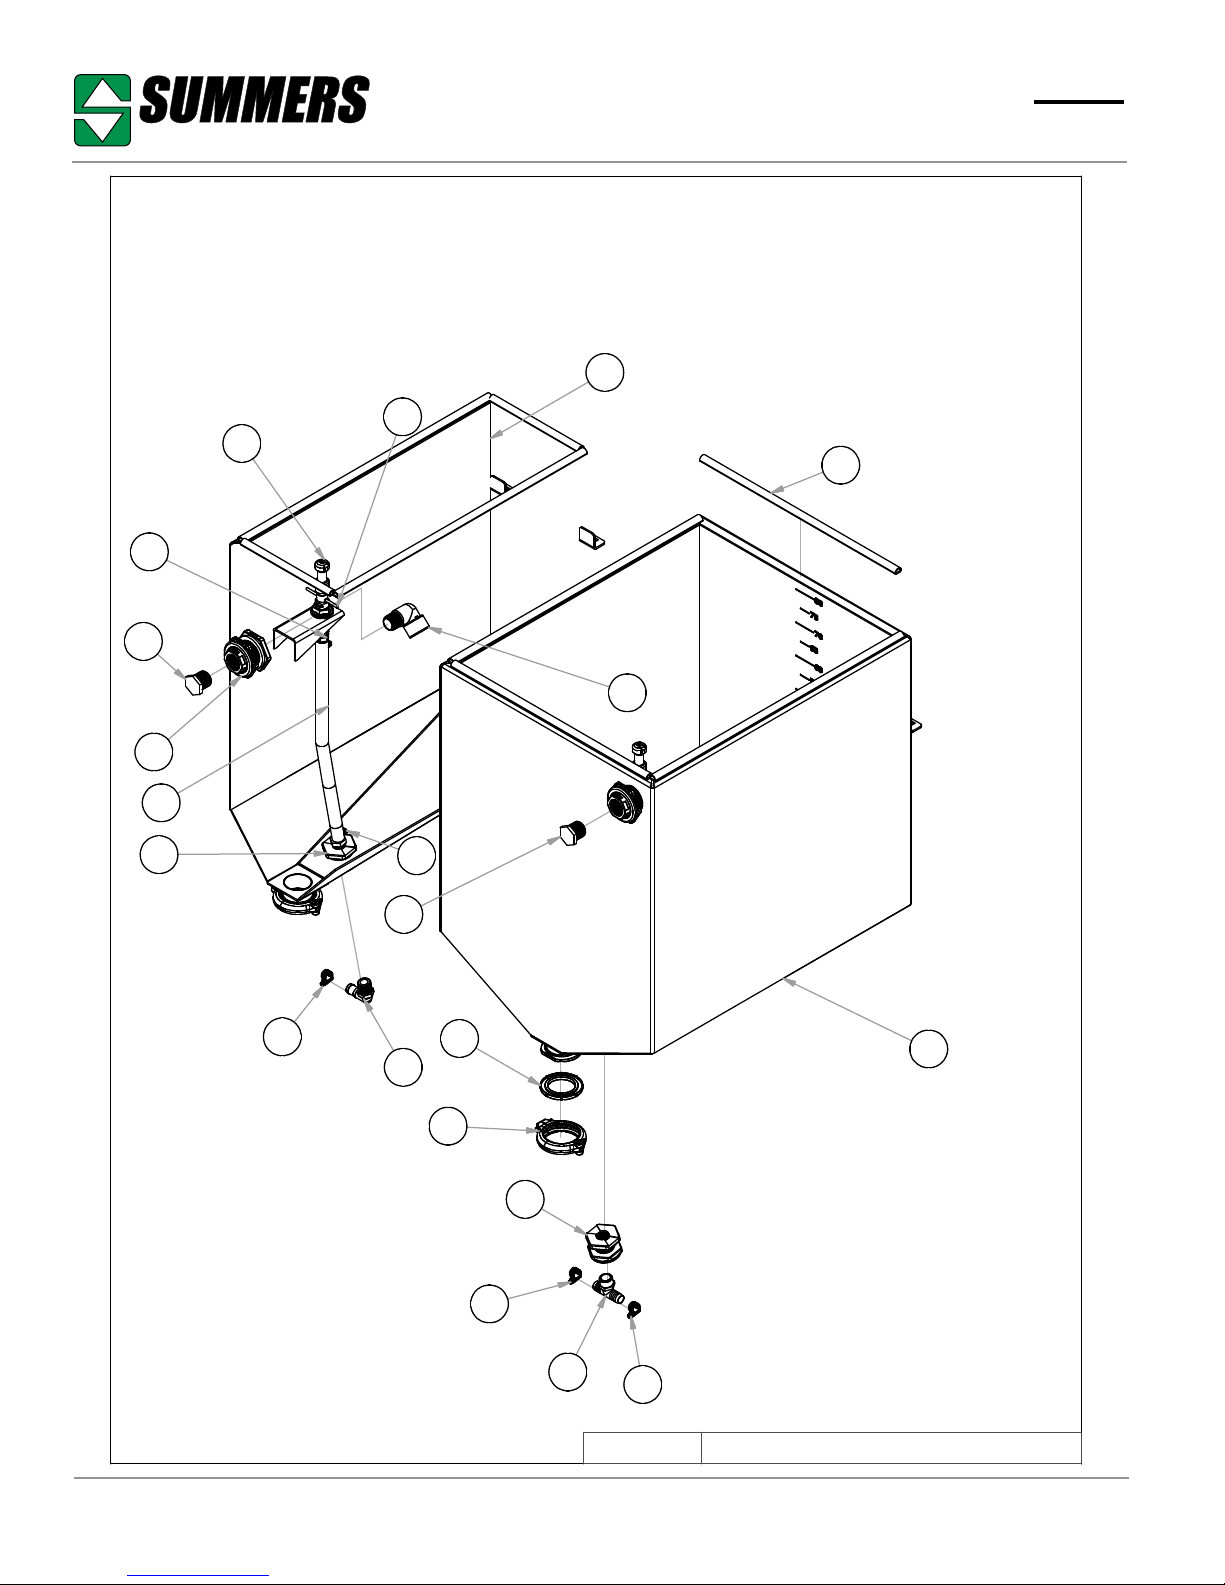
®
Parts
15
11
12
14
7
5
3
13
8
2
1
1
5
10
6
9
2
16
Page 24 © Summers Mfg. Co., Inc. 2019 8Z1105
1
4
1
7/20/2016
NOTE: PARTS REMOVED
FOR CLEAR VIEW.
8F8125.iam/
160GAL SFX 3 HPPR
Page 25
®
Parts
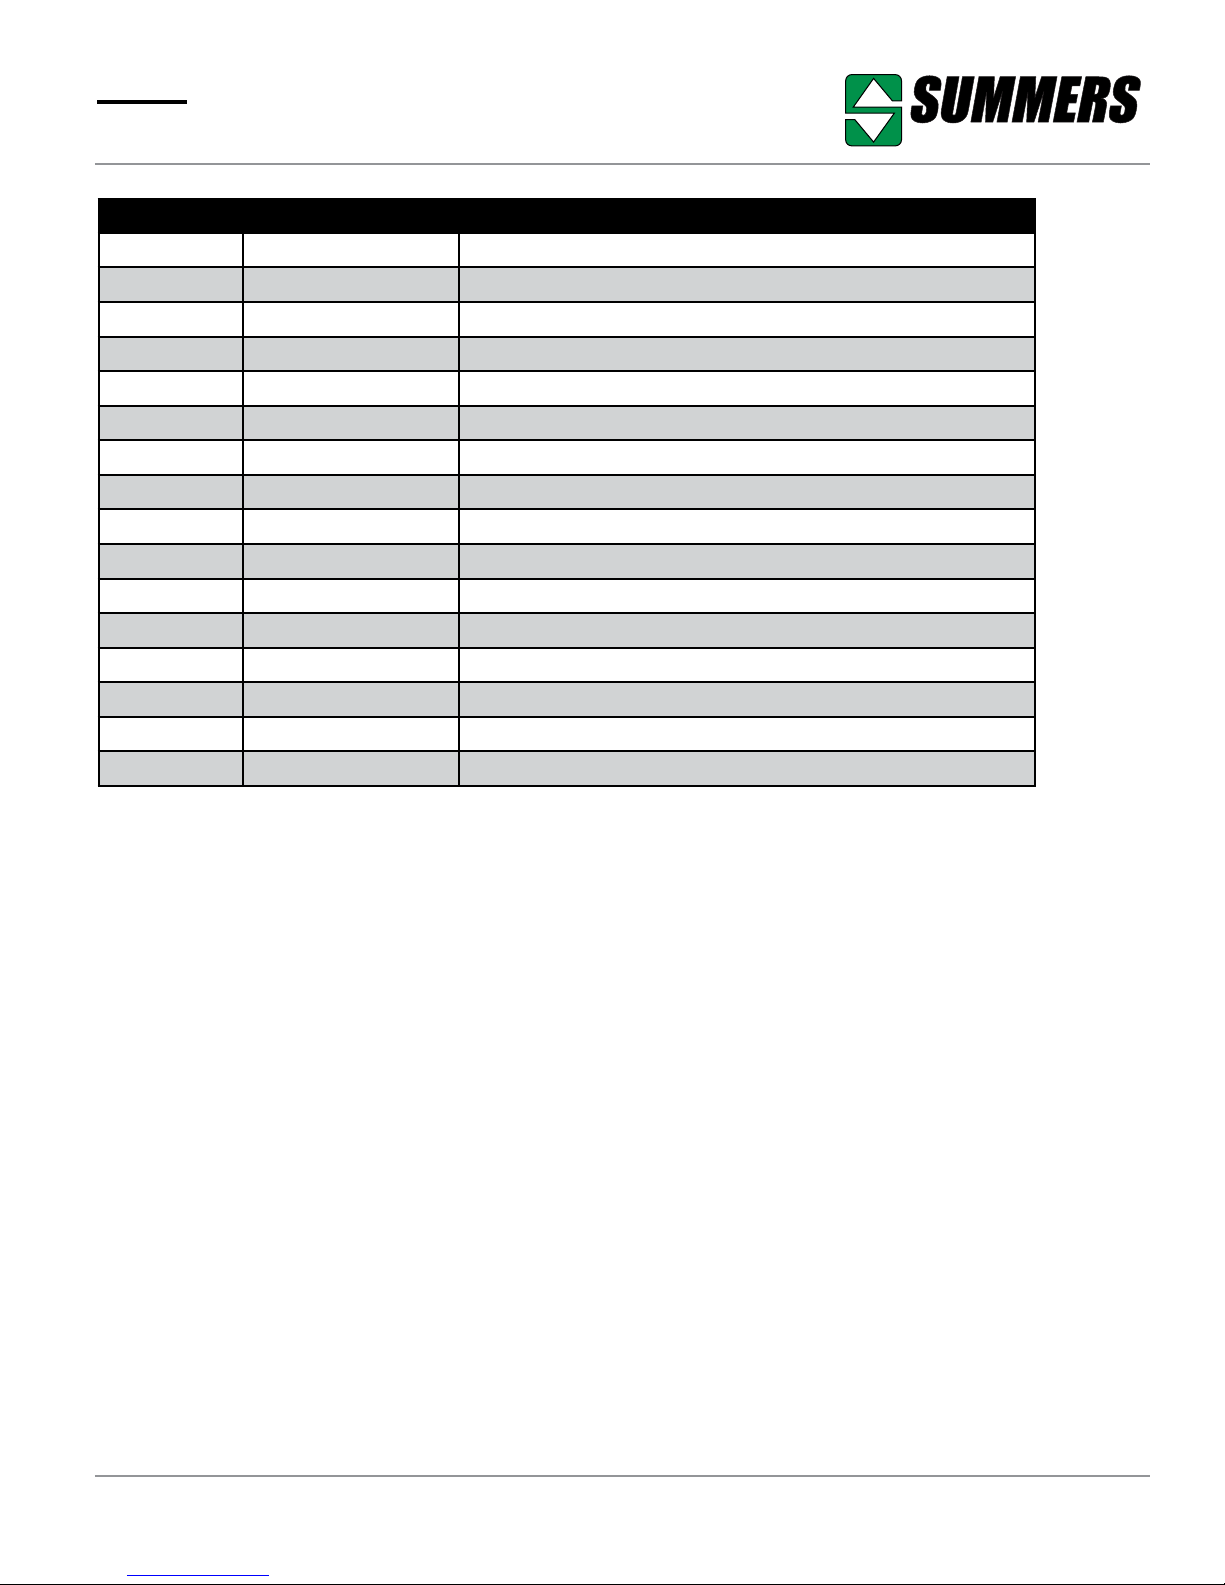
SFX1630 TANKS
ITEM PART NUMBER DESCRIPTION
1 8A1007 CLAMP HOSE 3/4" #12
2 8A1400 BANJO 3/4" FITTING COMPLETE
3 8A1403 BANJO 1" FITTING COMPLETE
4 8A2005G TEE 3/4"MPT X 3/4"HB X 3/4"HB
5 8A2013B PLUG 1"
6 8A2015 ELBOW 3/4" HB X 3/4 MPT
7 8A2021 BARB HOSE 3/4" X 1/2 MPT
8 8A2032 STREET ELBOW 1"
9 8A2384 HYPRO 2" UNIVERSAL FLANGE CLAMP
10 8A2385 FLANGE GASKET 2" HYPRO
11 8A2508A BOTTLE RINSE PLUNGER HYPRO
12 8A2508B BOTTLE RINSE NOZZLE HYPRO
13 8A4008 HOSE 1/2" EPDM AG 200PSI BLACK
14 8F0420 SEAL RUBBER TRIM LOC 1515 8F6040 CHEMTANK SS 40GAL
16 8F6080 CHEMTANK SS 80GAL
8Z1105 © Summers Mfg. Co., Inc. 2019 Page 25
Page 26
®
Parts
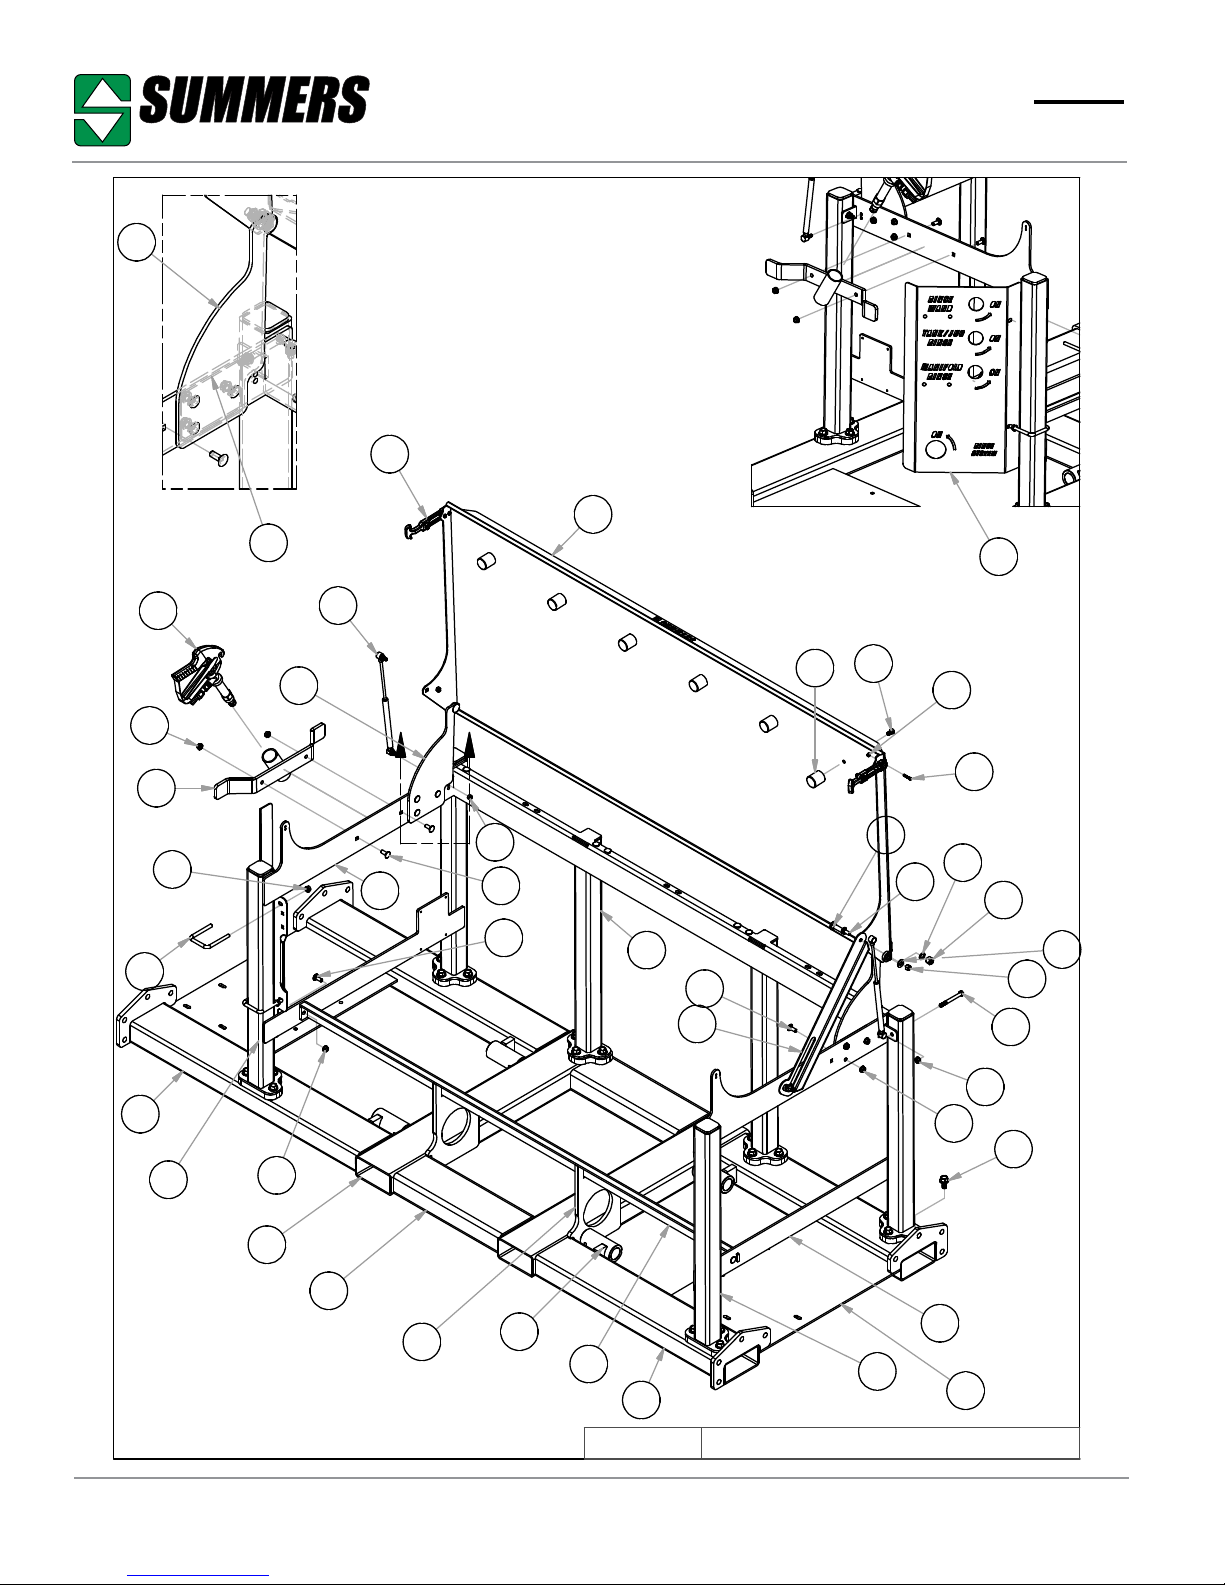
1
4
25
30
24
26
DETAIL A
30
5
2
3
27
1
19
A
33
37
23
17
37
7
6
28
37
8
32
29
35
34
36
31
20
15
19
Page 26 © Summers Mfg. Co., Inc. 2019 8Z1105
22
14
16
11
12
10
2/20/2017
13
8F8130.iam/
22
30
21
18
18
9
BASE UNIT
Page 27
®
Parts
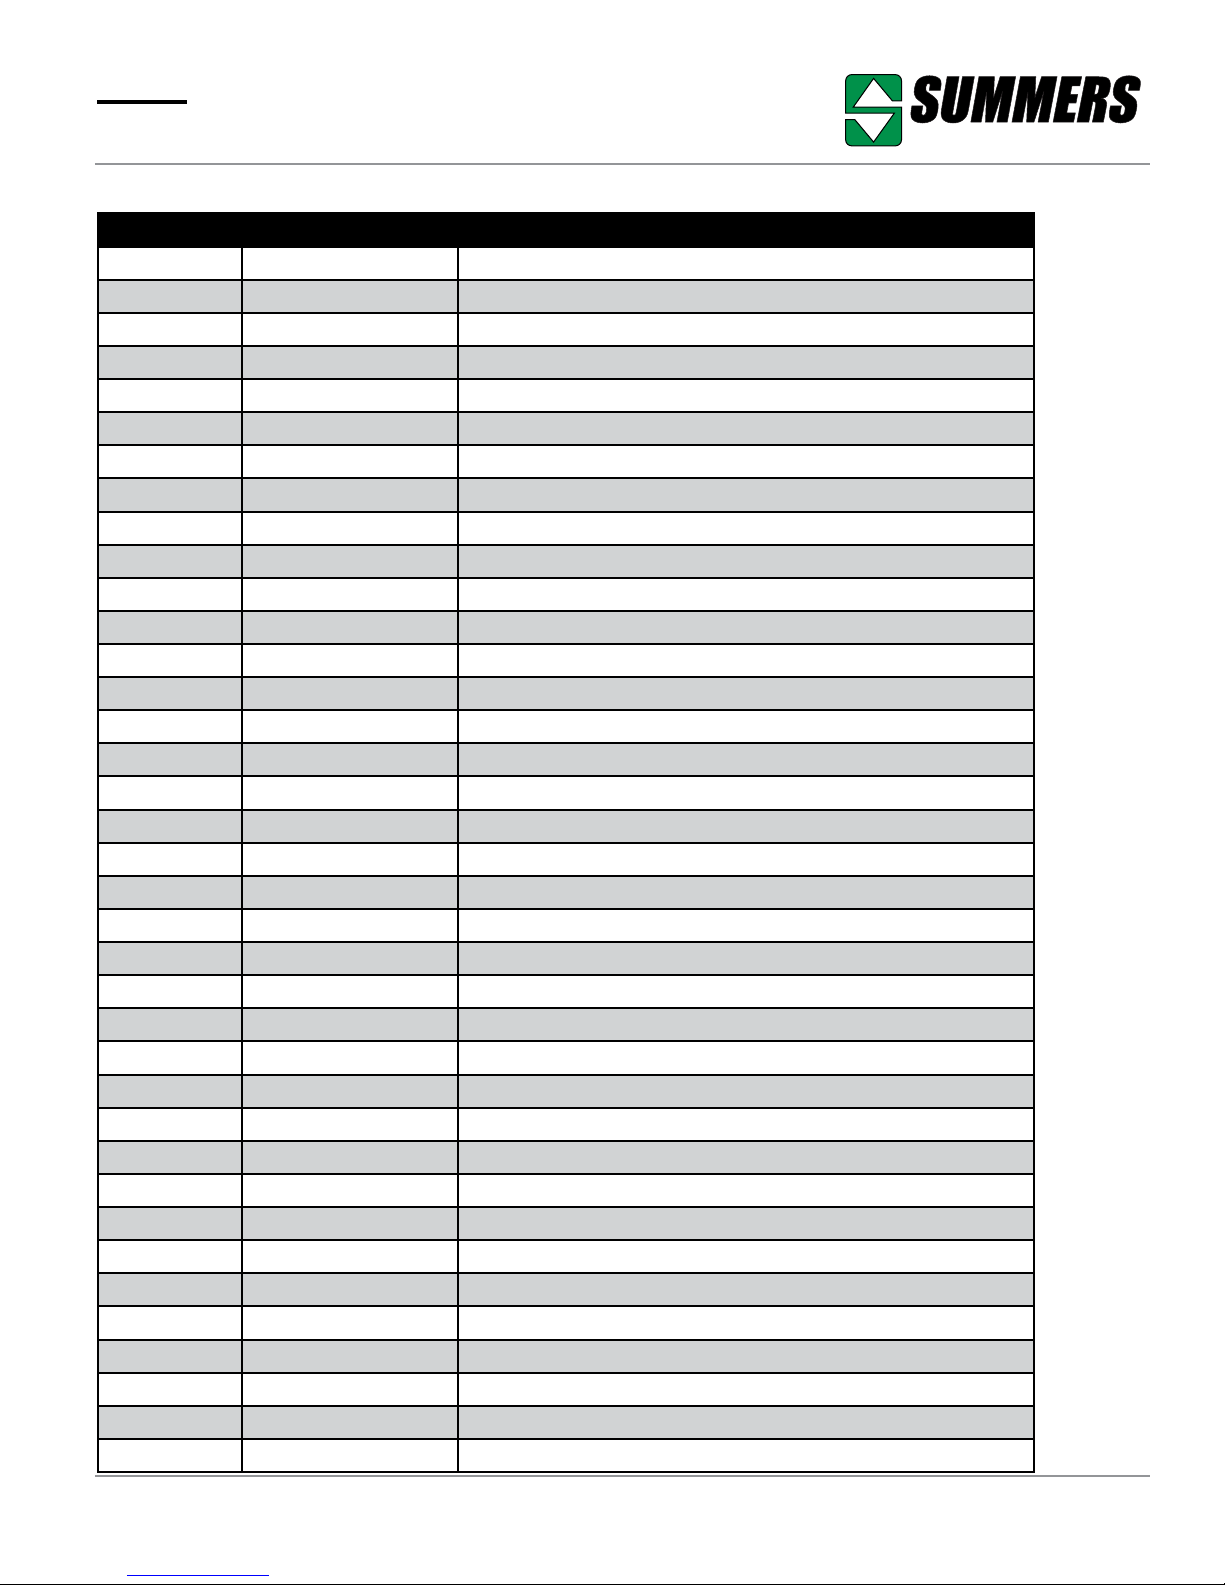
SFX2430 TANK BASE
ITEM PART NUMBER DESCRIPTION
1 8F0100 HINGE SUPPORT
2 8F0102 HINGE PLATE
3 8F0414 GAS SPRING
4 8F0424 RUBBER LATCH STRAP
5 8F6006 LID 6-BANK SPRAY FILL
6 8F6100 RINSEBALL DEPRESSER SS304
7 8F6105 LOCKARM SPRAY FILL LID
8 8F6110 VALVE PANEL SPRAY FILL
9 7F0104 LOWER SHEET METAL BOLTPLATE
10 7F0108 FORMED ANGLE
11 7F0200 STIFFENER PLATE
12 7F0300 MOUNTING SUPPORT
13 7F1818 TUBE REC 6 X 3 X 3T
14 7F1820 REC TUBE 6 X 3 X 3T
15 7F1822 TUBE REC 6 X 3 X 3T
16 7F1920 TUBE REC 6 X 3 X 4T
17 8F8002 SPRAY FILL BACK
18 8F8004 SPRAY FILL SIDE RAILING LFT
19 8F8006 SPRAY FILL SIDE RAILING RGT
20 8X0016B 3/8 - 16 x 3.5" SS bolt
21 8X0060 1/2" - 13 FLANGED BOLT
22 8X0200 NUT 3/8"-16NC SERFLANG GR2 YZ
23 8X1112 CRG 3/8-16NC X 1" SS
24 8F8714 WASH GUN GUNJET SHORT
25 8G8020 U-BOLT 3/8 X 2-9/16 X 3-1/2" SQ
26 8L3376 SPRAY FILL RINSE GUN HOLDER
27 8X0018 SS 3/8 X 16NC - 1/2" BOLT
28 8X0065 CRG 1/2-13NC X 2" GR5 ZDI
29 8X0161 SCREW SKT HD 10 X 24 X 1" SS
30 8X0200 NUT 3/8"-16NC SERFLANG GR2 YZ
31 8X0202 NUT 3/8"-16NC NY-LOCK GR2 YZ
32 8X0207 NUT THIN 10 X 24 NY-LOCK SS
33 8X0212 NUT 5/16"-18NC NY-LOCK GR2 ZDI
34 8X0242 NUT 1/2"-13NC NY-LOCK GR2 YZ
35 8X0319 WASHER 17/32"IDX7/8ODX16GA ZDI
36 8X0320 WASHER 3/8" (7/16" ID)FLAT ZDI
37 8X1112 CRG 3/8-16NC X 1" SS
8Z1105 © Summers Mfg. Co., Inc. 2019 Page 27
Page 28
®
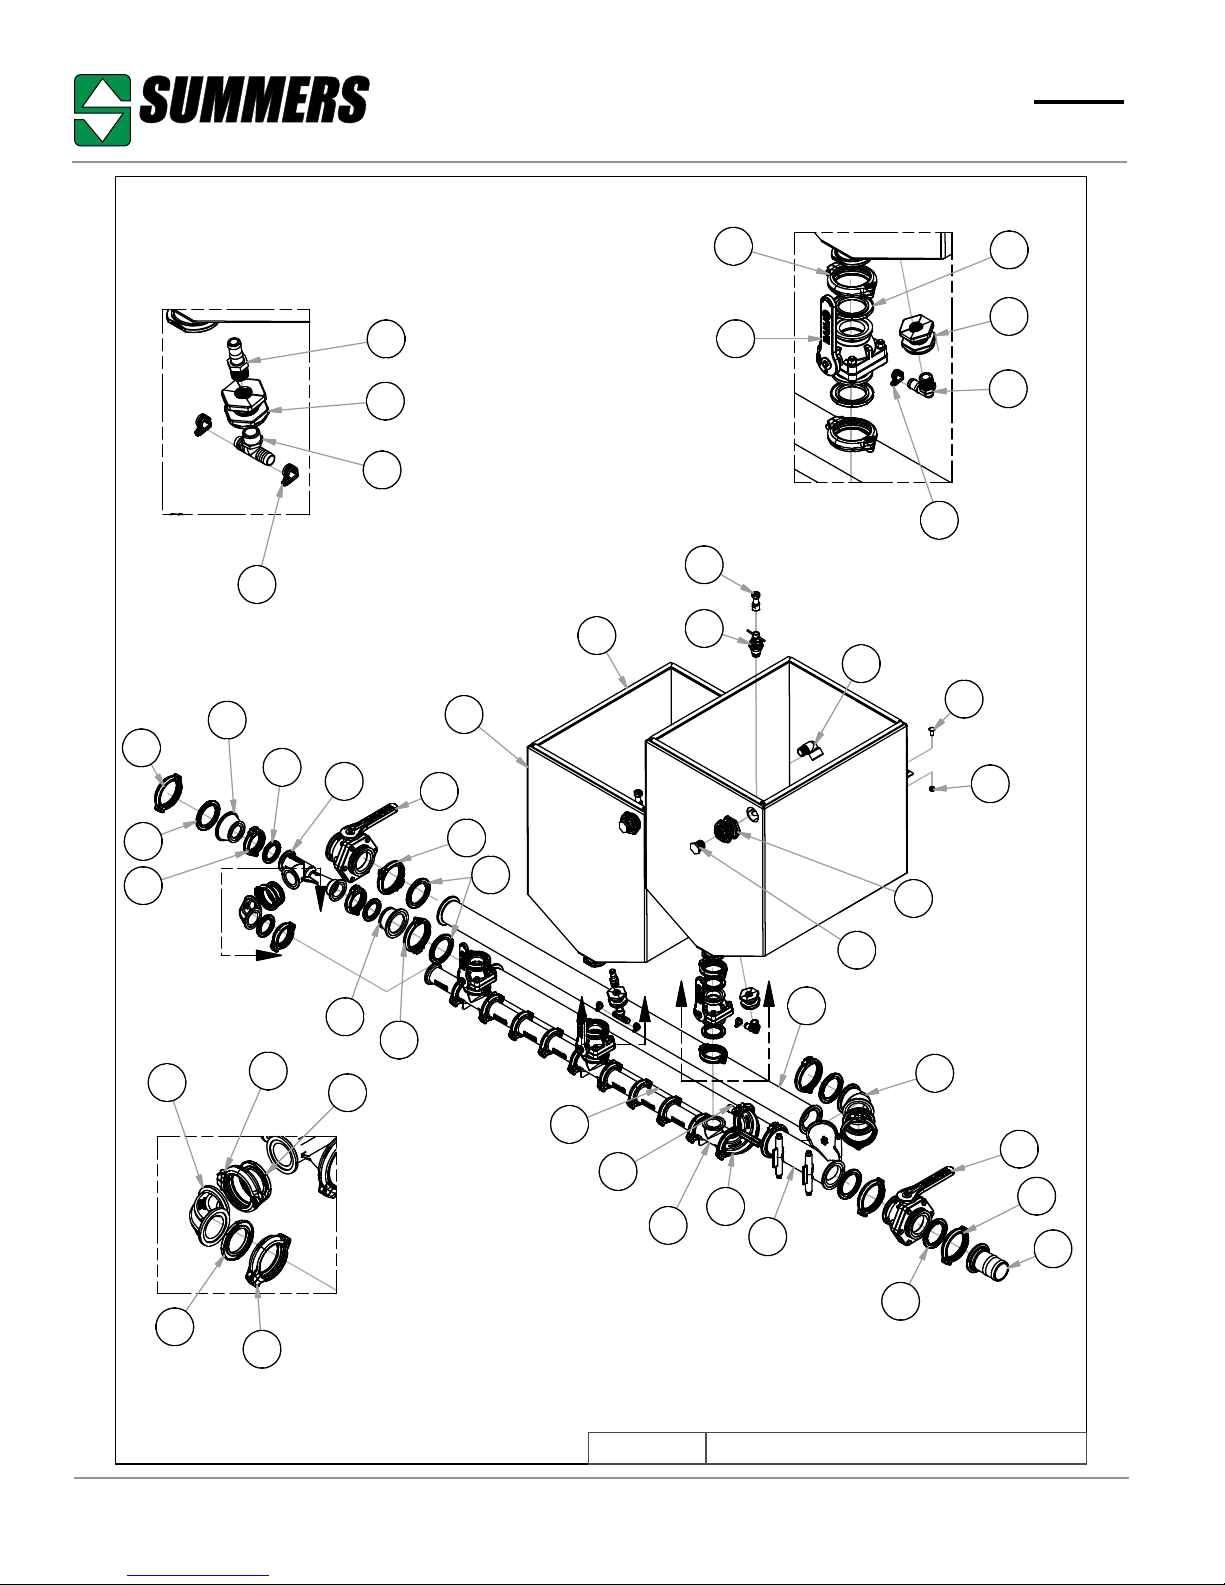
3 TANK PLUMBING
7
20
Parts
21
2
4
22
23
20
DETAIL C
16
2
6
DETAIL A
1
1
26
27
21
B
19
5
22
23
C
25
24
A
10
3
8
9
31
30
16
22
15
21
Page 28 © Summers Mfg. Co., Inc. 2019 8Z1105
20
21
DETAIL B
20
28
11
13
12/15/2015
15
18
8F8130.iam/
29
14
5
22
12
23
3 COMPARTMENT PLUMBING
Page 29
®
Parts
SFX2430 3 TANK PLUMBING
ITEM PART NUMBER DESCRIPTION
1 8A1007 CLAMP HOSE 3/4" #12
2 8A1400 BANJO 3/4" FITTING COMPLETE
3 8A1403 BANJO 1" FITTING COMPLETE
4 8A1734 BALL VALVE 2" STUBBY
5 8A1742 BALL VALVE 3" STUBBY DBLFLNG
6 8A2005G TEE 3/4"MPT X 3/4"HB X 3/4"HB
7 8A2007 BARB HOSE 3/4" X 3/4 MPT
8 8A2013B PLUG 1"
9 8A2015 ELBOW 3/4" HB X 3/4 MPT
10 8A2032 STREET ELBOW 1"
11 8A2287 FLANGE M220 X 1" HB
12 8A2293 FLANGE M300 X 3" HB FULL PORT
13 8A2297 FLANGE TEE M220 FULL PORT
14 8A2317A FLANGE ELBOW 45° M300
15 8A2319 2" FULL PORT SWEEP ELBOW
16 8A2328 FLANGE REDUCER M300 X M220
17 8A2338 2" X 6" FULL PORT COUPLING
18 8A2342 FLANGE 3" FP 45° Y
19 8A2345 FLANGE 2" FP POLY INDUCTOR
20 8A2384 HYPRO 2" UNIVERSAL FLANGE CLAMP
21 8A2385 FLANGE GASKET 2" HYPRO
22 8A2386 HYPRO UNIVERSAL FLANGE CLAMP
23 8A2387 FLANGE GASKET 3" HYPRO
24 8A2508A BOTTLE RINSE PLUNGER HYPRO
25 8A2508B BOTTLE RINSE NOZZLE HYPRO
26 8F0420 SEAL RUBBER TRIM LOC 1527 8F6080 CHEMTANK SS 80GAL
28 8F6156 FLANGEPIPE 3X56" SS304
29 8F6172 FLANGEPIPE 3X72.35" SS304
30 8X0200 NUT 3/8"-16NC SERFLANG GR2 YZ
31 8X1112 CRG 3/8-16NC X 1" GR2 ZN
8Z1105 © Summers Mfg. Co., Inc. 2019 Page 29
Page 30
®
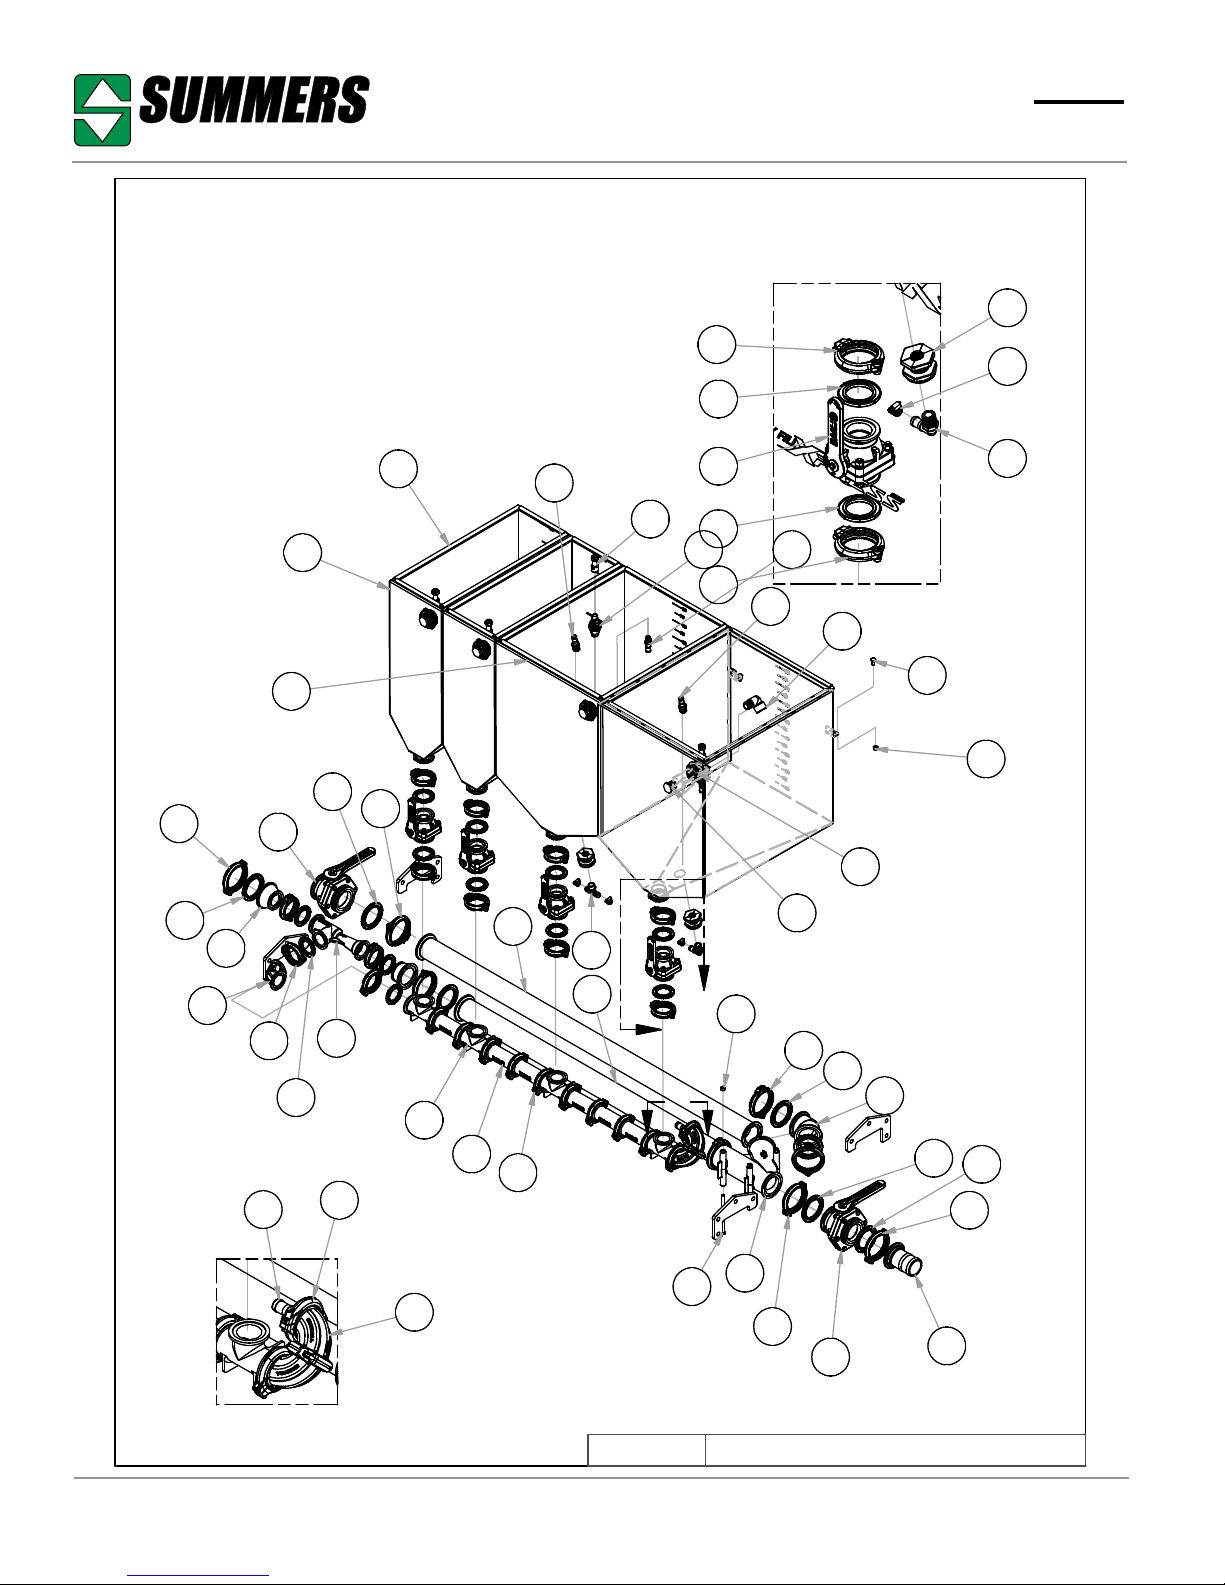
4 TANK PLUMBING
Parts
2
21
1
22
23
24
16
17
12
21
9
33
24
23
B
22
21
4
1025
7
11
8
34
23
24
DETAIL B
35
3
15
24
27
28
29
24
23
5
20
22
14
18
21
31
21
7
26
6
30
A
16
DETAIL A
Page 30 © Summers Mfg. Co., Inc. 2019 8Z1105
1/21/2016
32
19
23
5
8F8140.iam/
13
4 TANK PLUMBING
Page 31
®
Parts
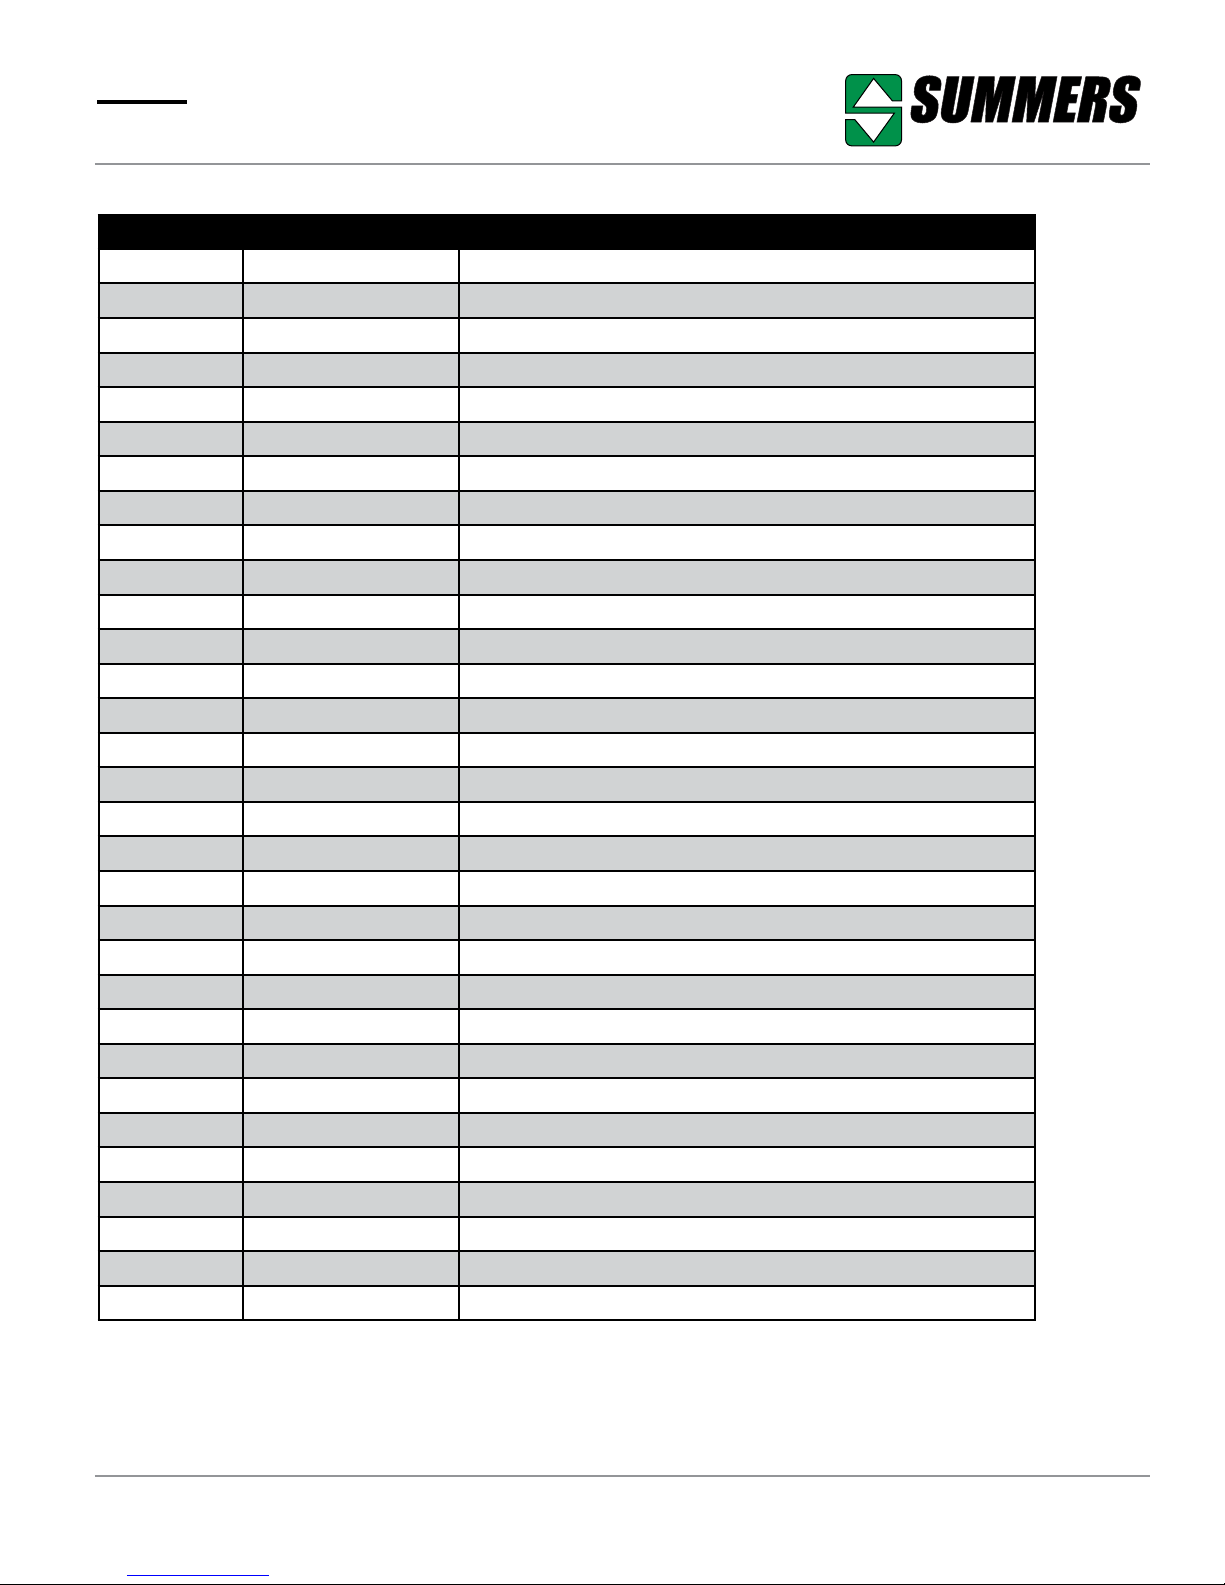
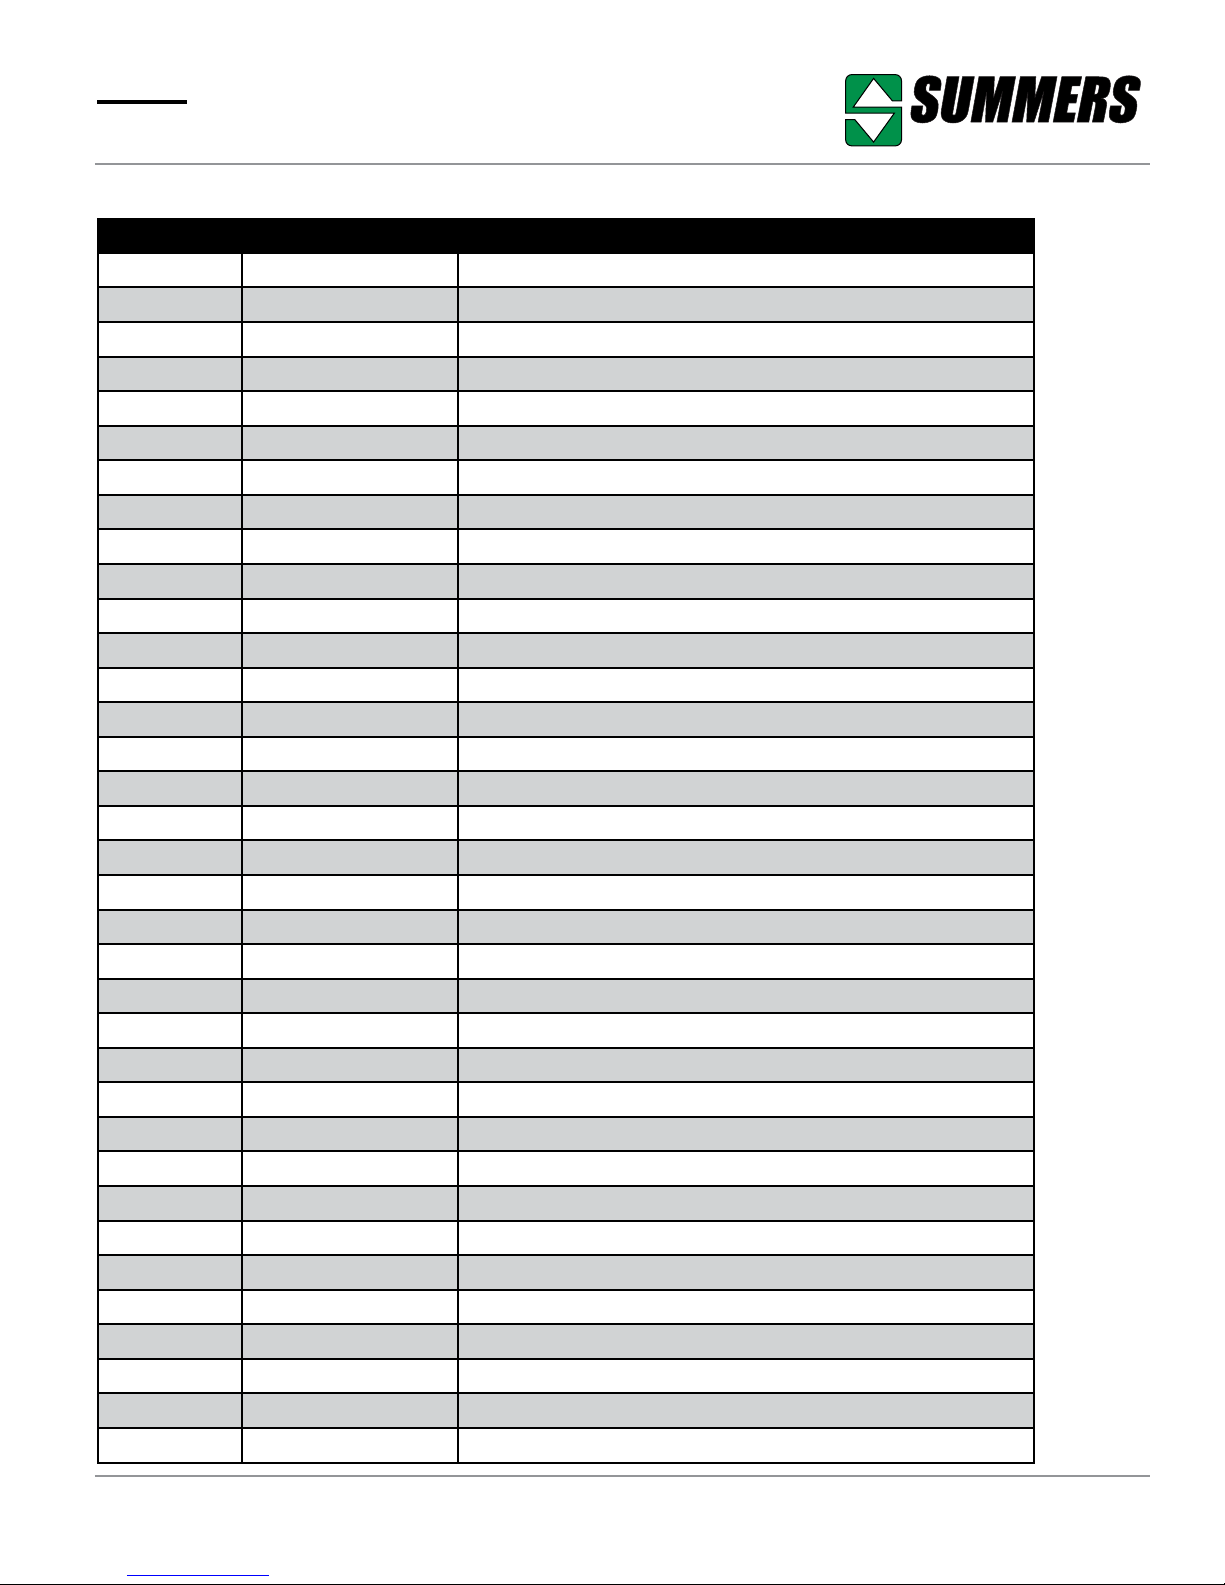
SFX2430 4 TANK PLUMBING
ITEM PART NUMBER DESCRIPTION
1 8A1007 CLAMP HOSE 3/4" #12
2 8A1400 BANJO 3/4" FITTING COMPLETE
3 8A1403 BANJO 1" FITTING COMPLETE
4 8A1734 BALL VALVE 2" STUBBY
5 8A1742 BALL VALVE 3" STUBBY DBLFLNG
6 8A2005G TEE 3/4"MPT X 3/4"HB X 3/4"HB
7 8A2007 BARB HOSE 3/4" X 3/4 MPT
8 8A2013B PLUG 1"
9 8A2015 ELBOW 3/4" HB X 3/4 MPT
10 8A2021 BARB HOSE 3/4" X 1/2 MPT
11 8A2032 STREET ELBOW 1"
12 8A2287 FLANGE M220 X 1" HB
13 8A2293 FLANGE M300 X 3" HB FULL PORT
14 8A2297 FLANGE TEE M220 FULL PORT
15 8A2317A FLANGE ELBOW 45° M300
16 8A2319 2" FULL PORT SWEEP ELBOW
17 8A2328 FLANGE REDUCER M300 X M220
18 8A2338 2" X 6" FULL PORT COUPLING
19 8A2342 FLANGE 3" FP 45° Y
20 8A2345 FLANGE 2" FP POLY INDUCTOR
21 8A2384 HYPRO 2" UNIVERSAL FLANGE CLAMP
22 8A2385 FLANGE GASKET 2" HYPRO
23 8A2386 HYPRO UNIVERSAL FLANGE CLAMP
24 8A2387 FLANGE GASKET 3" HYPRO
25 8A2508A BOTTLE RINSE PLUNGER HYPRO
26 8A2508B BOTTLE RINSE NOZZLE HYPRO
27 8F0420 SEAL RUBBER TRIM LOK 1528 8F6040 CHEMTANK SS 40GAL
29 8F6080 CHEMTANK SS 80GAL
30 8F6156 FLANGEPIPE 3X56" SS304
31 8F6172 FLANGEPIPE 3X72.35" SS304
32 8X0046 BOLT 7/16-14NC X 7-1/4"GR5 ZDI
33 8X0200 NUT 3/8"-16NC SERFLANG GR2 YZ
34 8X0234 NUT 7/16"-14NC NY-LOCK GR2 ZDI
35 8X1112 CRG 3/8-16NC X 1" SS
8Z1105 © Summers Mfg. Co., Inc. 2019 Page 31
Page 32
®
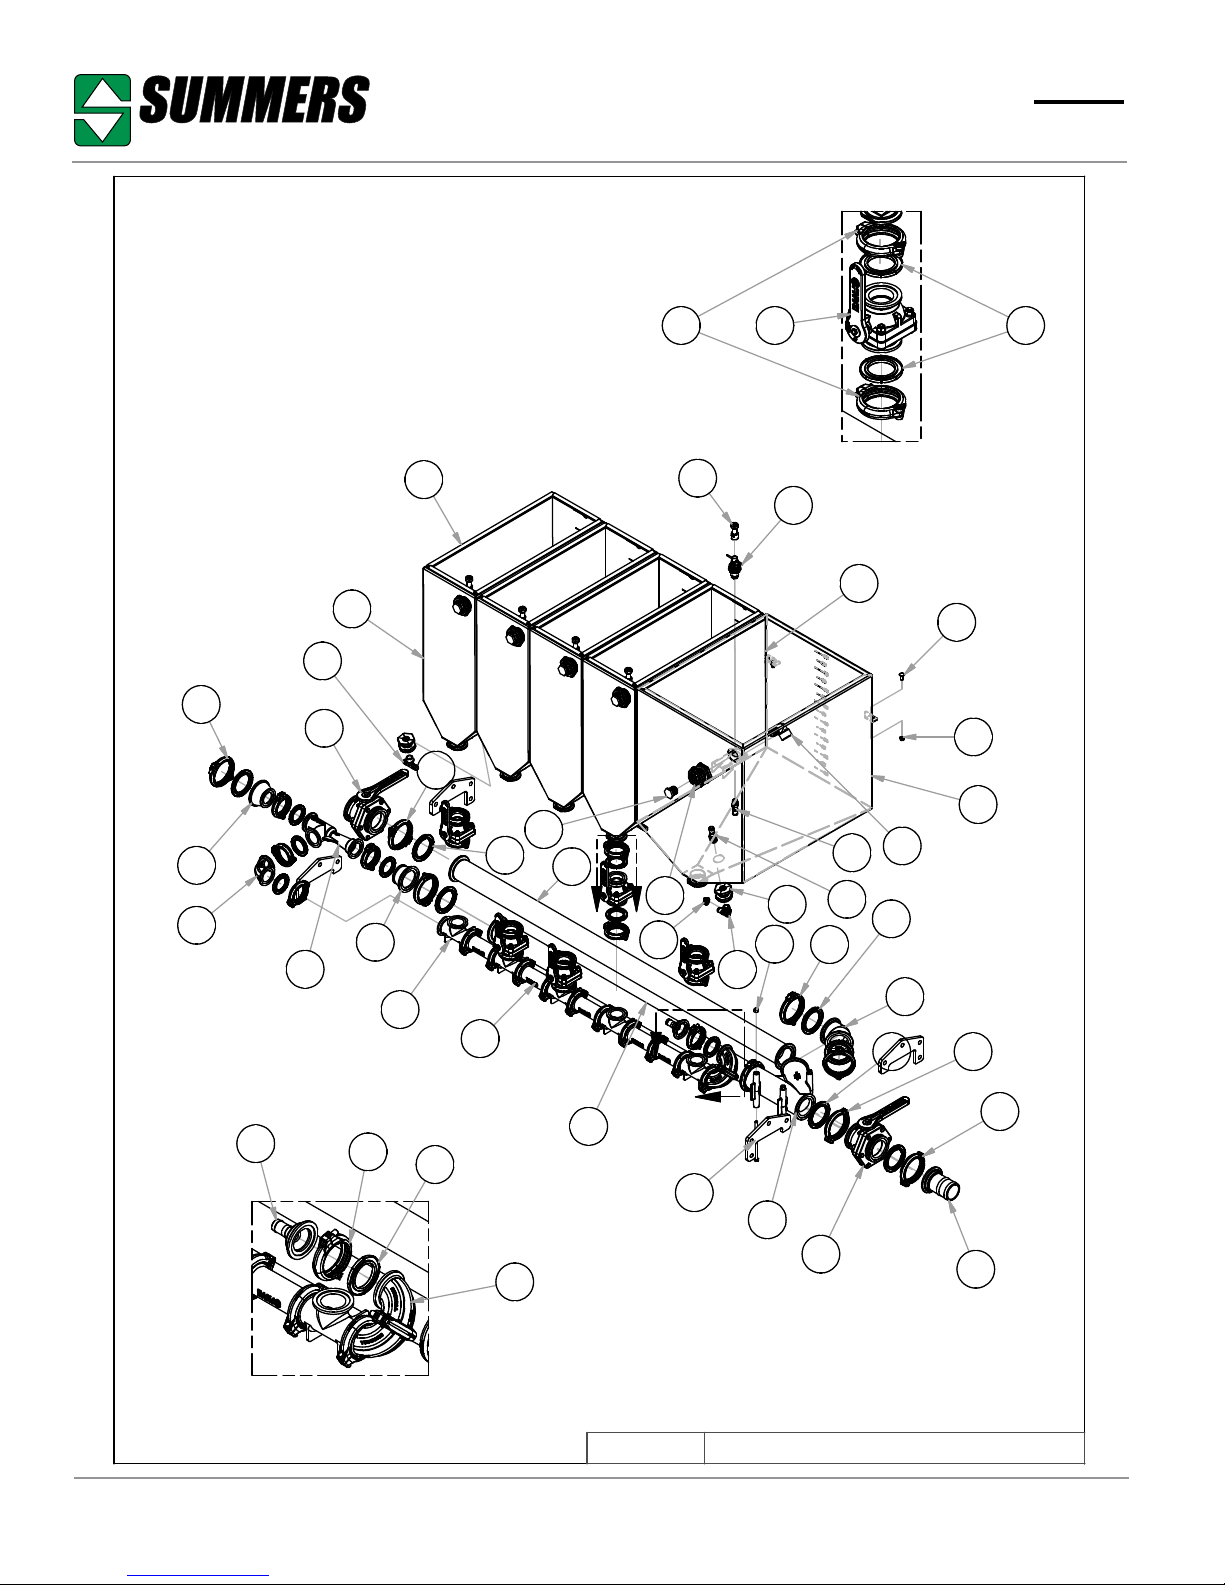
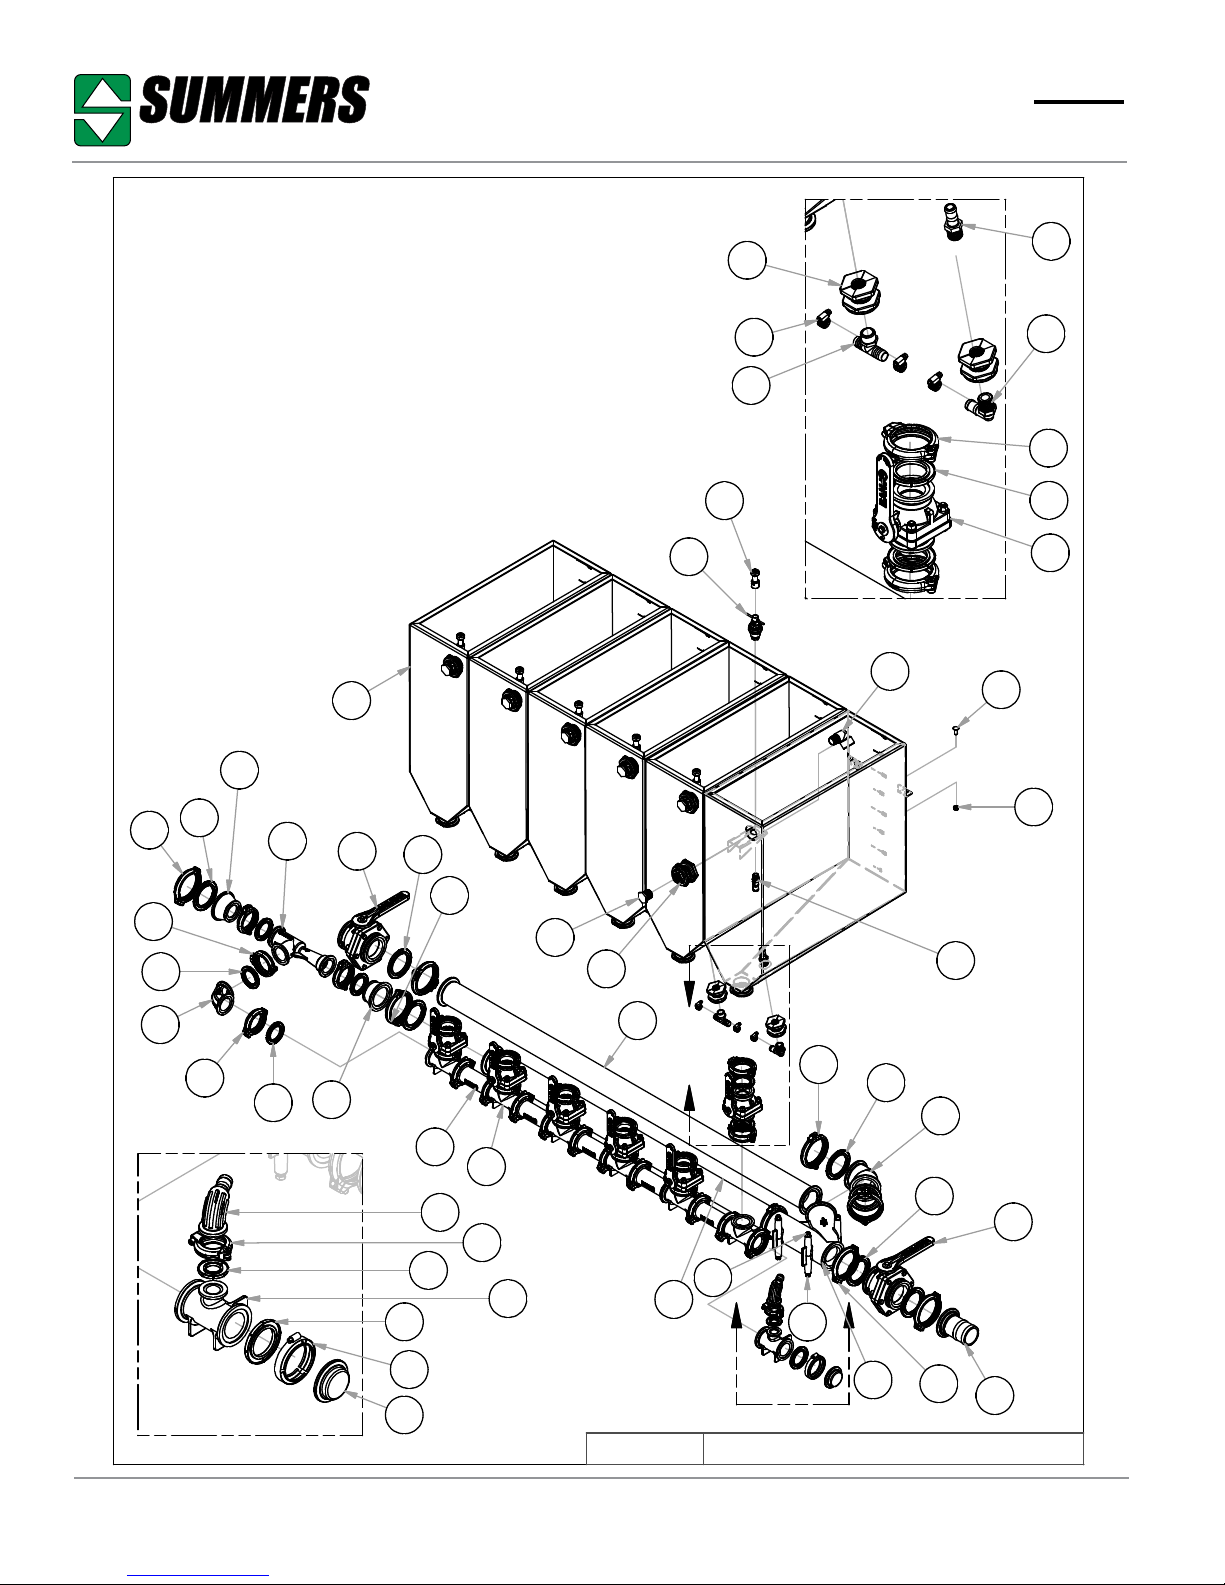
5 TANK PLUMBING
27
28
6
Parts
21 224
DETAIL B
26
25
29
35
17
16
23
12
20
5
23
17
14
18
24
8
31
B
3
1
2
34
23
9
7
10
11
24
15
A
30
21
22
32
19
5
16
33
1
2324
23
13
DETAIL A
Page 32 © Summers Mfg. Co., Inc. 2019 8Z1105
2/1/2016
8F8150.iam/
5 TANK PLUMBING
Page 33
®
Parts
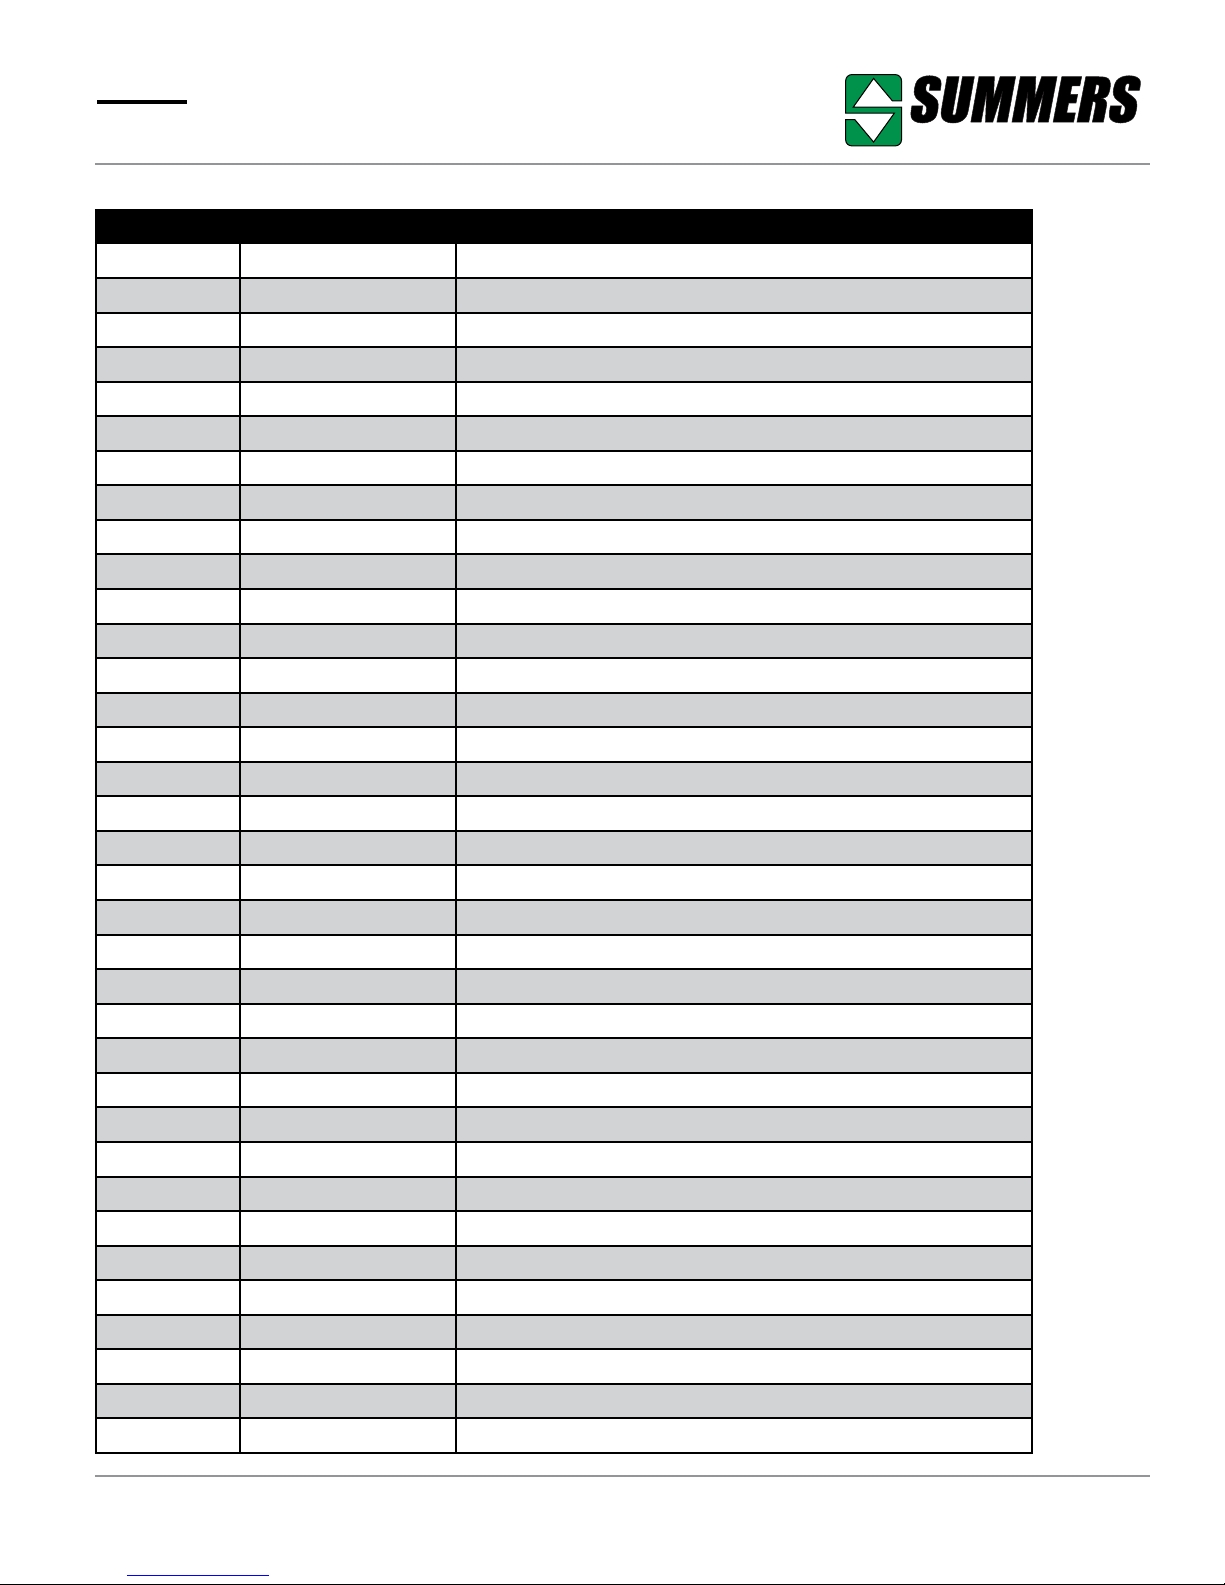
SFX2430 5 TANK PLUMBING
ITEM PART NUMBER DESCRIPTION
1 8A1007 CLAMP HOSE 3/4" #12
2 8A1400 BANJO 3/4" FITTING COMPLETE
3 8A1403 BANJO 1" FITTING COMPLETE
4 8A1734 BALL VALVE 2" STUBBY
5 8A1742 BALL VALVE 3" STUBBY DBLFLNG
6 8A2005G TEE 3/4"MPT X 3/4"HB X 3/4"HB
7 8A2007 BARB HOSE 3/4" X 3/4 MPT
8 8A2013B PLUG 1"
9 8A2015 ELBOW 3/4" HB X 3/4 MPT
10 8A2021 BARB HOSE 3/4" X 1/2 MPT
11 8A2032 STREET ELBOW 1"
12 8A2287 FLANGE M220 X 1" HB
13 8A2293 FLANGE M300 X 3" HB FULL PORT
14 8A2297 FLANGE TEE M220 FULL PORT
15 8A2317A FLANGE ELBOW 45° M300
16 8A2319 2" FULL PORT SWEEP ELBOW
17 8A2328 FLANGE REDUCER M300 X M220
18 8A2338 2" X 6" FULL PORT COUPLING
19 8A2342 FLANGE 3" FP 45° Y
20 8A2345 FLANGE 2" FP POLY INDUCTOR
21 8A2384 HYPRO 2" UNIVERSAL FLANGE CLAMP
22 8A2385 FLANGE GASKET 2" HYPRO
23 8A2386 HYPRO UNIVERSAL FLANGE CLAMP
24 8A2387 FLANGE GASKET 3" HYPRO
25 8A2508A BOTTLE RINSE PLUNGER HYPRO
26 8A2508B BOTTLE RINSE NOZZLE HYPRO
27 8F0420 SEAL RUBBER TRIM LOK 1528 8F6040 CHEMTANK SS 40GAL
29 8F6080 CHEMTANK SS 80GAL
30 8F6156 FLANGEPIPE 3X56" SS304
31 8F6172 FLANGEPIPE 3X72.35" SS304
32 8X0046 BOLT 7/16-14NC X 7-1/4"GR5 ZDI
33 8X0200 NUT 3/8"-16NC SERFLANG GR2 YZ
34 8X0234 NUT 7/16"-14NC NY-LOCK GR2 ZDI
35 8X1112 CRG 3/8-16NC X 1" SS
8Z1105 © Summers Mfg. Co., Inc. 2019 Page 33
Page 34
®
Parts
6 TANK PLUMBING
32
19
29
28
23
5
29
30
31
2
1
6
DETAIL A
11
7
9
26
27
4
38
36
26
27
18
DETAIL B
26
27
19
27
20
12
25
21
13
28
24
15
16
8
3
34
1/18/2017
33
A
37
28
B
35
22
8F8160.iam/
10
29
17
29
5
28
14
6 TANK PLUMBING
Page 34 © Summers Mfg. Co., Inc. 2019 8Z1105
Page 35
®
Parts
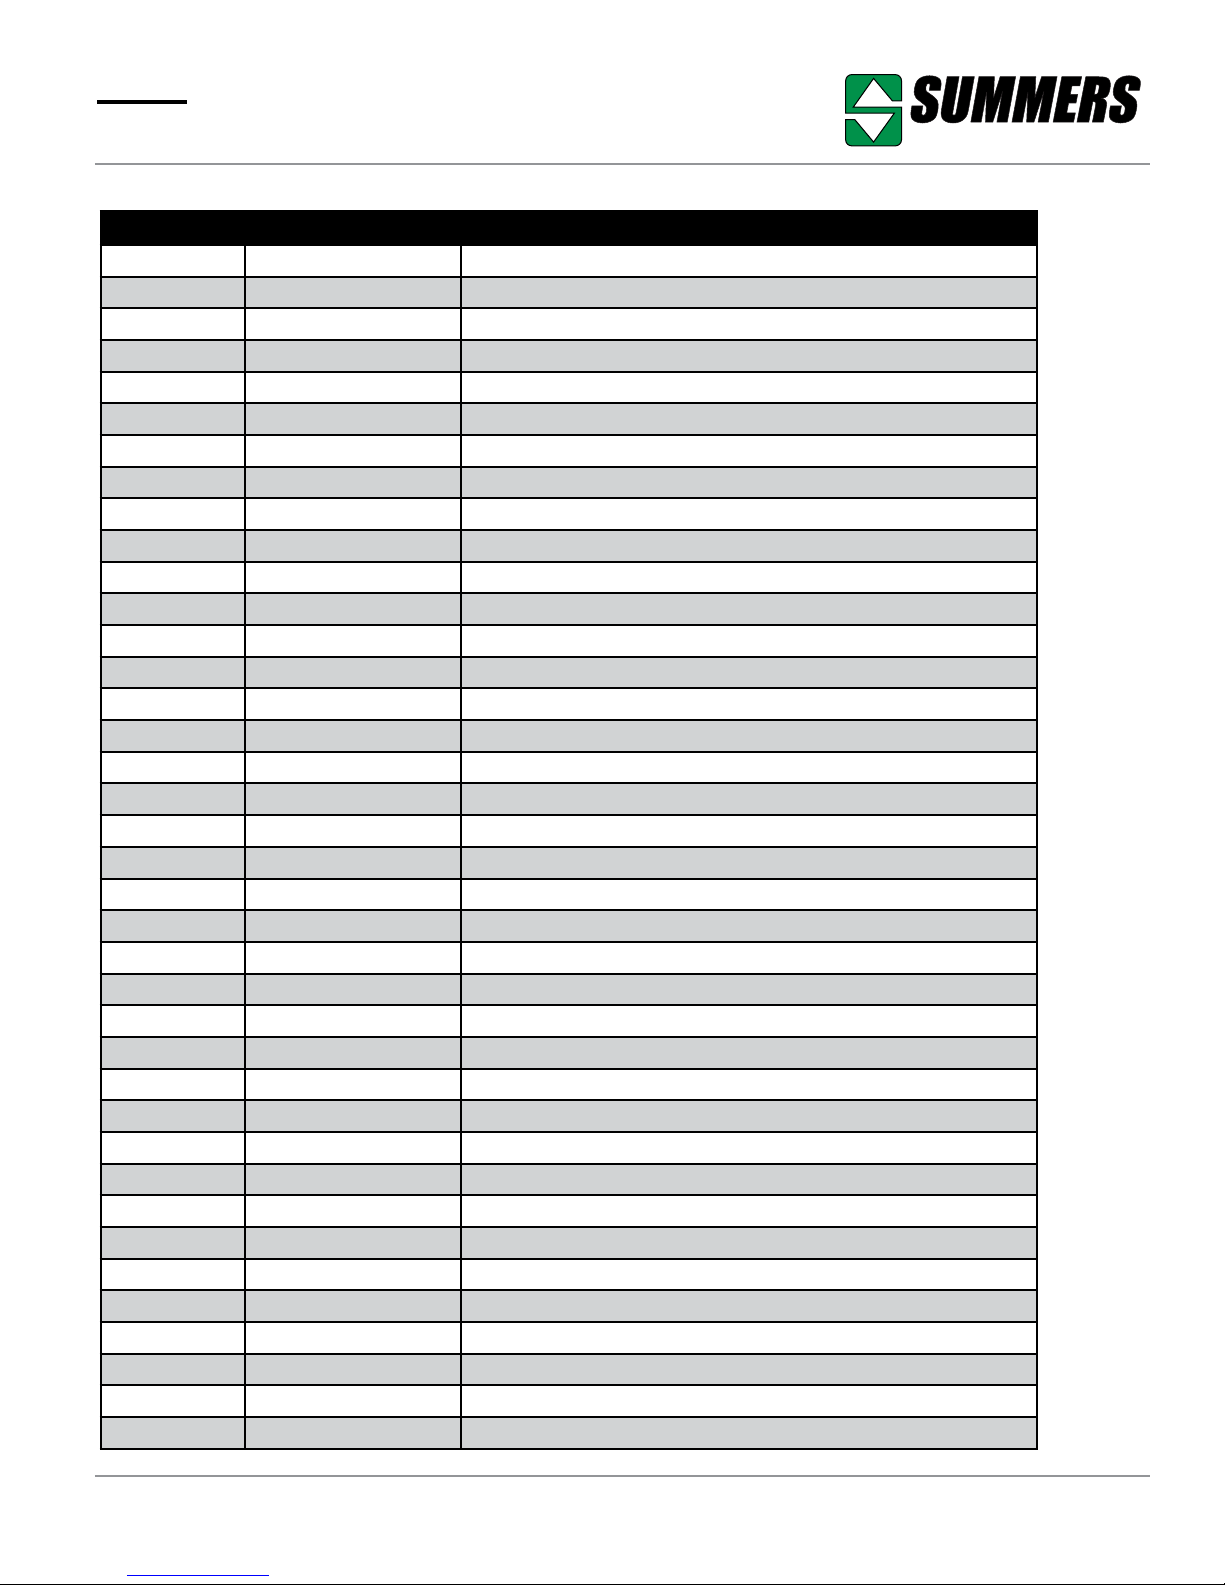
SFX2430 6 TANK PLUMBING
ITEM PART NUMBER DESCRIPTION
1 8A1007 CLAMP HOSE 3/4" #12
2 8A1400 BANJO 3/4" FITTING COMPLETE
3 8A1403 BANJO 1" FITTING COMPLETE
4 8A1734 BALL VALVE 2" STUBBY
5 8A1742 BALL VALVE 3" STUBBY DBLFLNG
6 8A2005G TEE 3/4"MPT X 3/4"HB X 3/4"HB
7 8A2007 BARB HOSE 3/4" X 3/4 MPT
8 8A2013B PLUG 1"
9 8A2015 ELBOW 3/4" HB X 3/4 MPT
10 8A2021 BARB HOSE 3/4" X 1/2 MPT
11 8A2032 STREET ELBOW 1"
12 8A2234 FLANGE CLAMP FC220 WORMSCRW 56
13 8A2251A 1" FLANGE SWEEP ELBOW 90 DEGREE
14 8A2293 FLANGE M300 X 3" HB FULL PORT
15 8A2297 FLANGE TEE M220 FULL PORT
16 8A2298 FLANGE TEE M220 X M220 X M100
17 8A2317A FLANGE ELBOW 45° M300
18 8A2319 2" FULL PORT SWEEP ELBOW
19 8A2328 FLANGE REDUCER M300 X M220
20 8A2332 FLANGE PLUG M220 FULL PORT
21 8A2338 2" X 6" FULL PORT COUPLING
22 8A2342 FLANGE 3" FP 45° Y
23 8A2345 FLANGE 2" FP POLY INDUCTOR
24 8A2380 1" UNIVERSAL FLANGE CLAMP
25 8A2381 FLANGE GASKET 1" HYPRO
26 8A2384 HYPRO 2" UNIVERSAL FLANGE CLAMP
27 8A2385 FLANGE GASKET 2" HYPRO
28 8A2386 HYPRO UNIVERSAL FLANGE CLAMP
29 8A2387 FLANGE GASKET 3" HYPRO
30 8A2508A BOTTLE RINSE PLUNGER HYPRO
31 8A2508B BOTTLE RINSE NOZZLE HYPRO
32 8F6040 CHEMTANK SS 40GAL
33 8F6156 FLANGEPIPE 3X56" SS304
34 8F6172 FLANGEPIPE 3X72.35" SS304
35 8X0046 BOLT 7/16-14NC X 7-1/4"GR5 ZDI
36 8X0200 NUT 3/8"-16NC SERFLANG GR2 YZ
37 8X0234 NUT 7/16"-14NC NY-LOCK GR2 ZDI
38 8X1112 CRG 3/8-16NC X 1" SS
8Z1105 © Summers Mfg. Co., Inc. 2019 Page 35
Page 36
®
11
Parts
10
27
7
26
27
15
8
20
26
7
25
24
4
13
25
2
24
18
25
1
24
22
12
28
29
29
23
28
17
29
28
28
21
28
29
16
7
26
16
29
5
6
19
28
8F8130.iam/
14
19
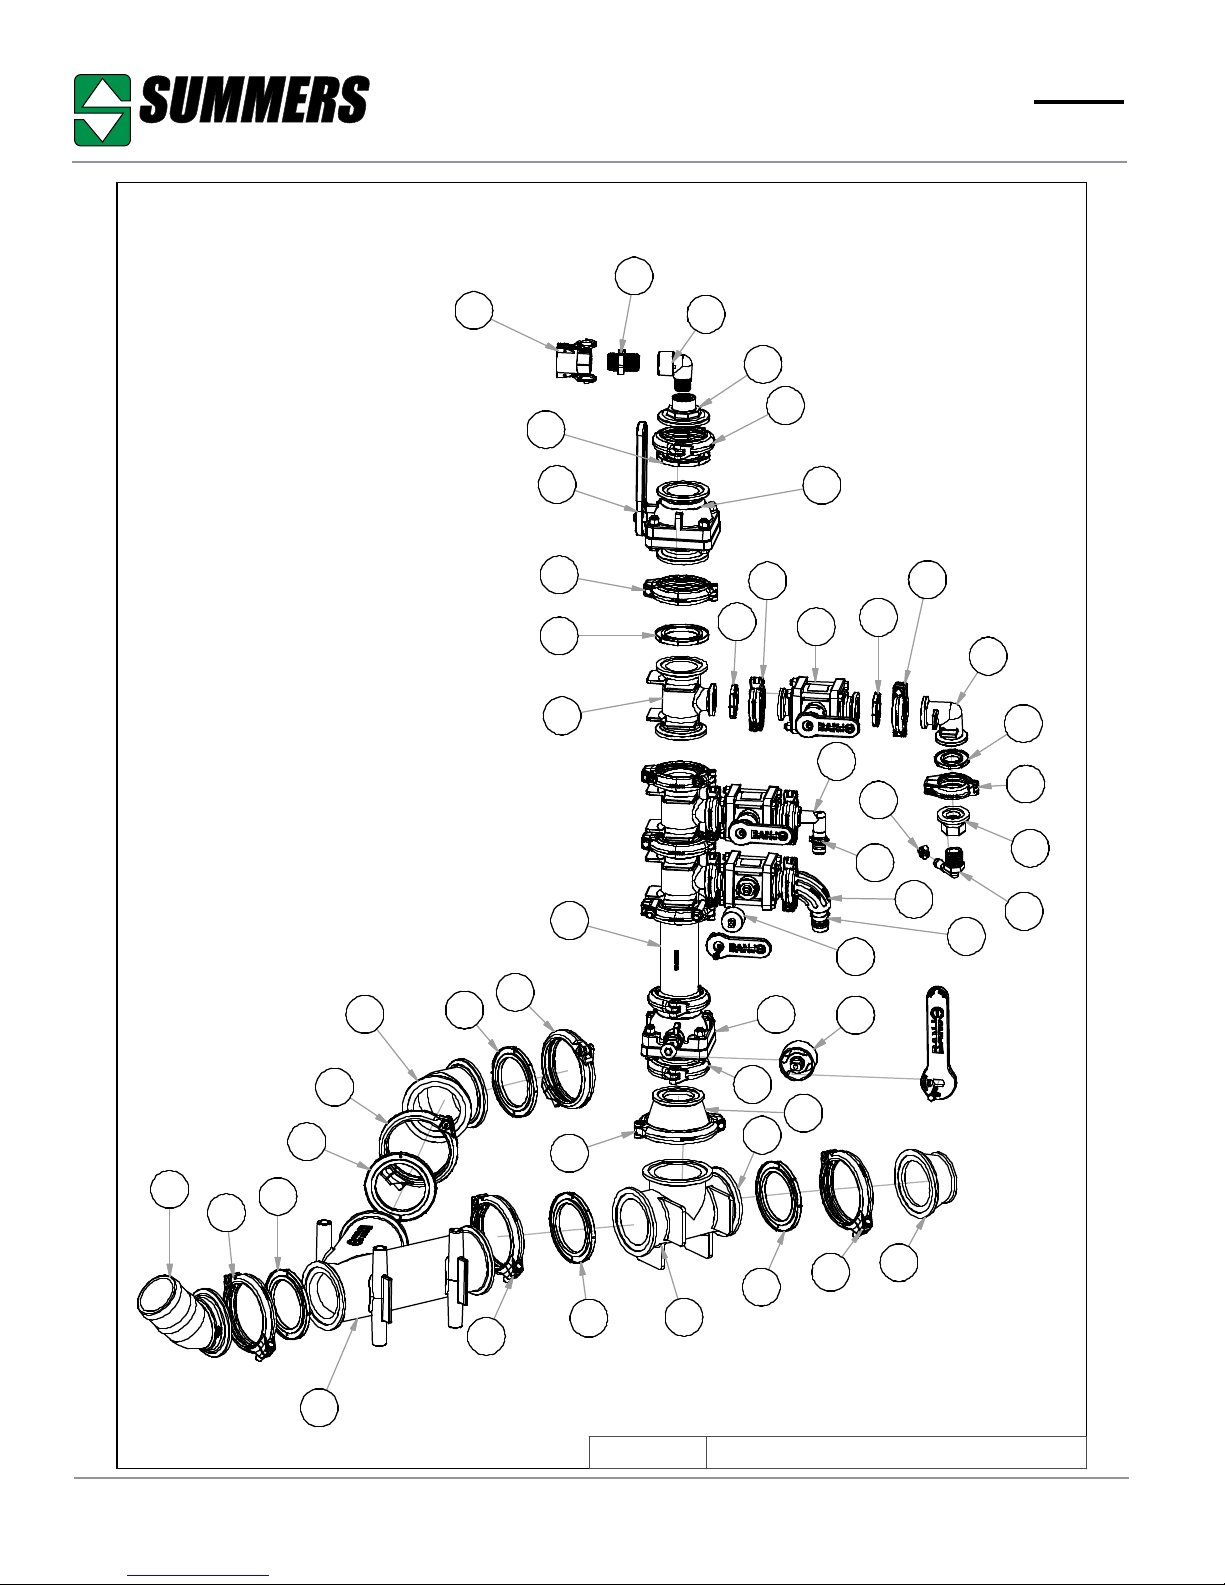
SIDE PLUMBING11/26/2018
9
3
Page 36 © Summers Mfg. Co., Inc. 2019 8Z1105
Page 37
®
Parts
SIDE PLUMBING
ITEM PART NUMBER DESCRIPTION
1 8A1003 CLAMP HOSE 1/2" MINI
2 8A1007 CLAMP HOSE 3/4" #12
3 8A1009 CLAMP HOSE 1" #16
4 8A1253 1" FLANGED VALVE
5 8A1253A HANDLE RISER
6 8A1254 BV HANDLE RISER 2X1.38" 15-
7 8A1734 BALL VALVE 2" STUBBY
8 8A2008 STREET ELBOW 3/4"
9 8A2108 ELBOW 1/2" HB X 3/4 MPT
10 8A2204 3/4"COUPLER X 3/4" GHFTHREAD
11 8A2212 3/4" MPT X 3/4" GHMTHREAD
12 8A2249 FLANGE ELBOW 45° M300 X 3" HB
13 8A2250 FLANGE ELBOW 90 M100 X 3/4"HB
14 8A2251A 1" FLANGE SWEEP ELBOW 90 DEGREE
15 8A2298 FLANGE TEE M220 X M220 X M100
16 8A2299 FLANGE TEE M300 FULL PORT
17 8A2317A FLANGE ELBOW 45° M300
18 8A2318 FLANGE ELBOW 90 M100
19 8A2328 FLANGE REDUCER M300 X M220
20 8A2334 FLANGE PLUG M220 W/3/4" FPT
21 8A2338 2" X 6" FULL PORT COUPLING
22 8A2340 FLANGE M100 X 3/4" FPT
23 8A2342 FLANGE 3" FP 45° Y
24 8A2380 1" UNIVERSAL FANGE CLAMP
25 8A2381 FLANGE GASKET 1" HYPRO
26 8A2384 HYPRO 2" UNIVERSAL FLANGE CLAMP
27 8A2385 FLANGE GASKET 2" HYPRO
28 8A2386 HYPRO UNIVERSAL FLANGE CLAMP
29 8A2387 FLANGE GASKET 3" HYPRO
8Z1105 © Summers Mfg. Co., Inc. 2019 Page 37
Page 38
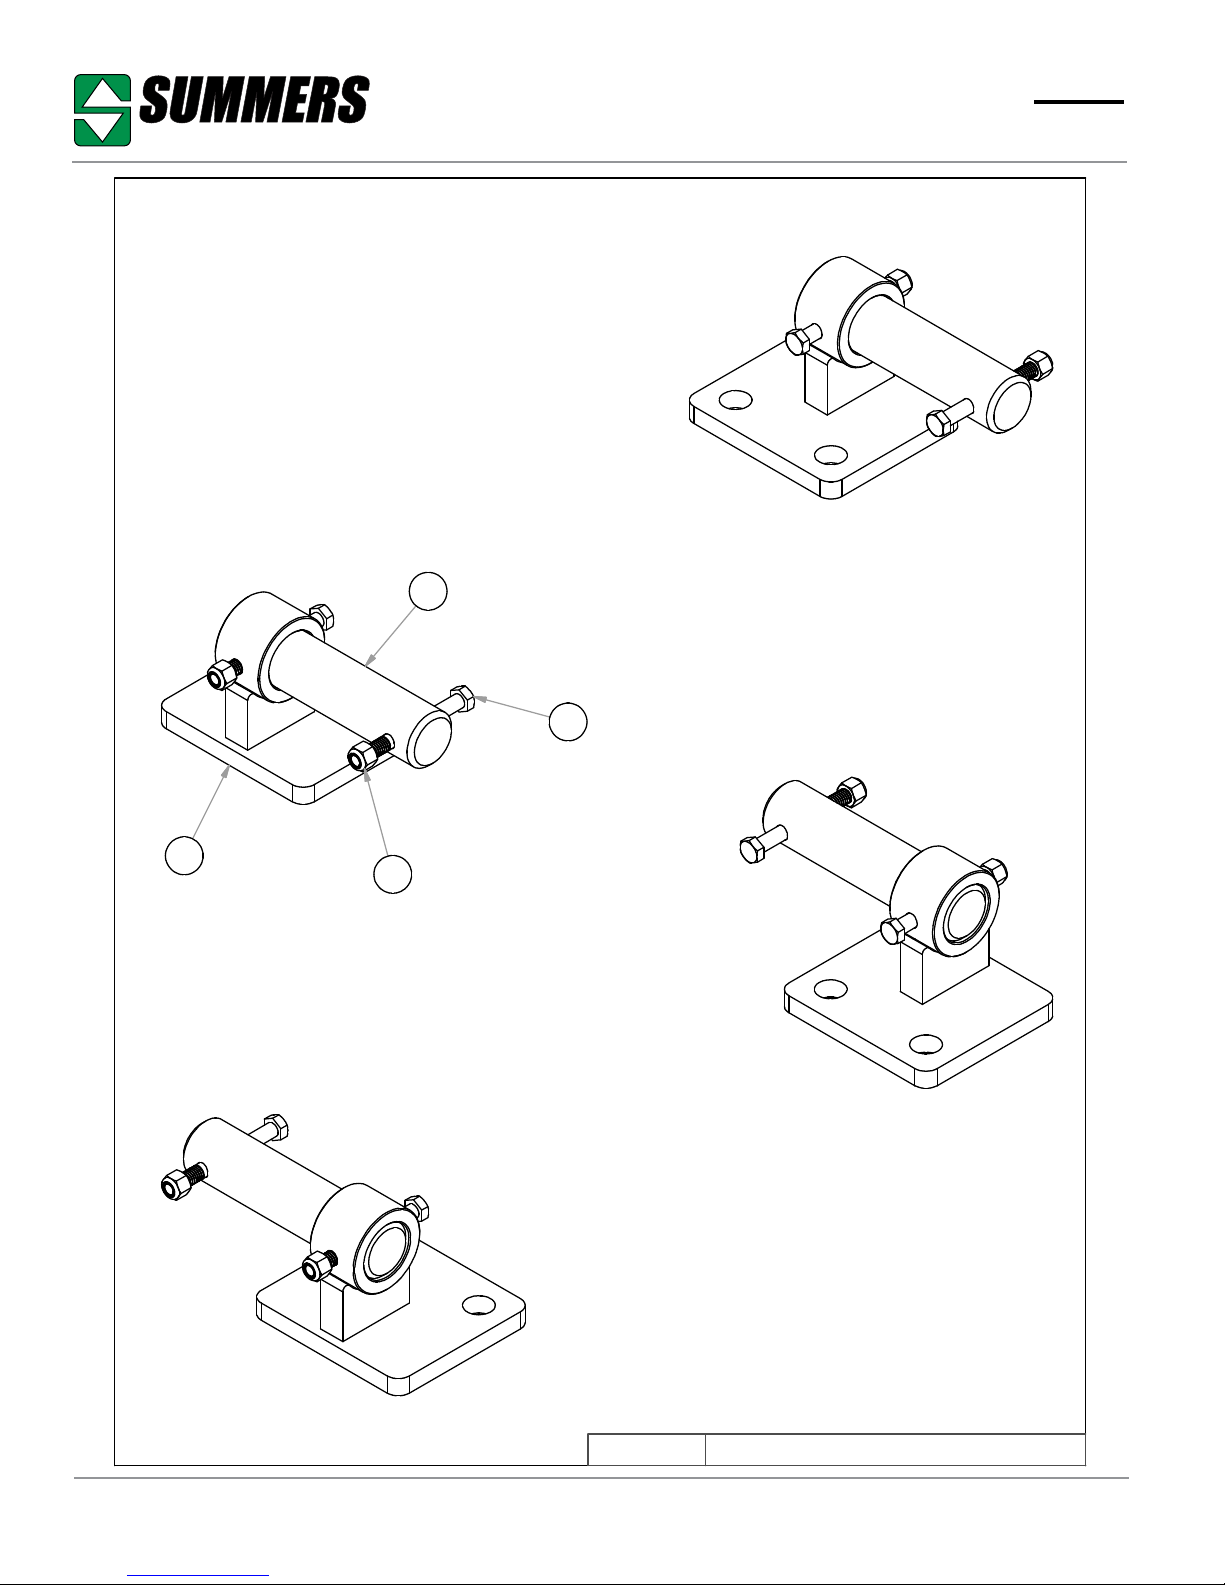
®
MOUNTING PACKAGE
1
Parts
3
2
4
Page 38 © Summers Mfg. Co., Inc. 2019 8Z1105
12/9/2015
8F6190.iam/
MOUNTING PACKAGE
Page 39
®
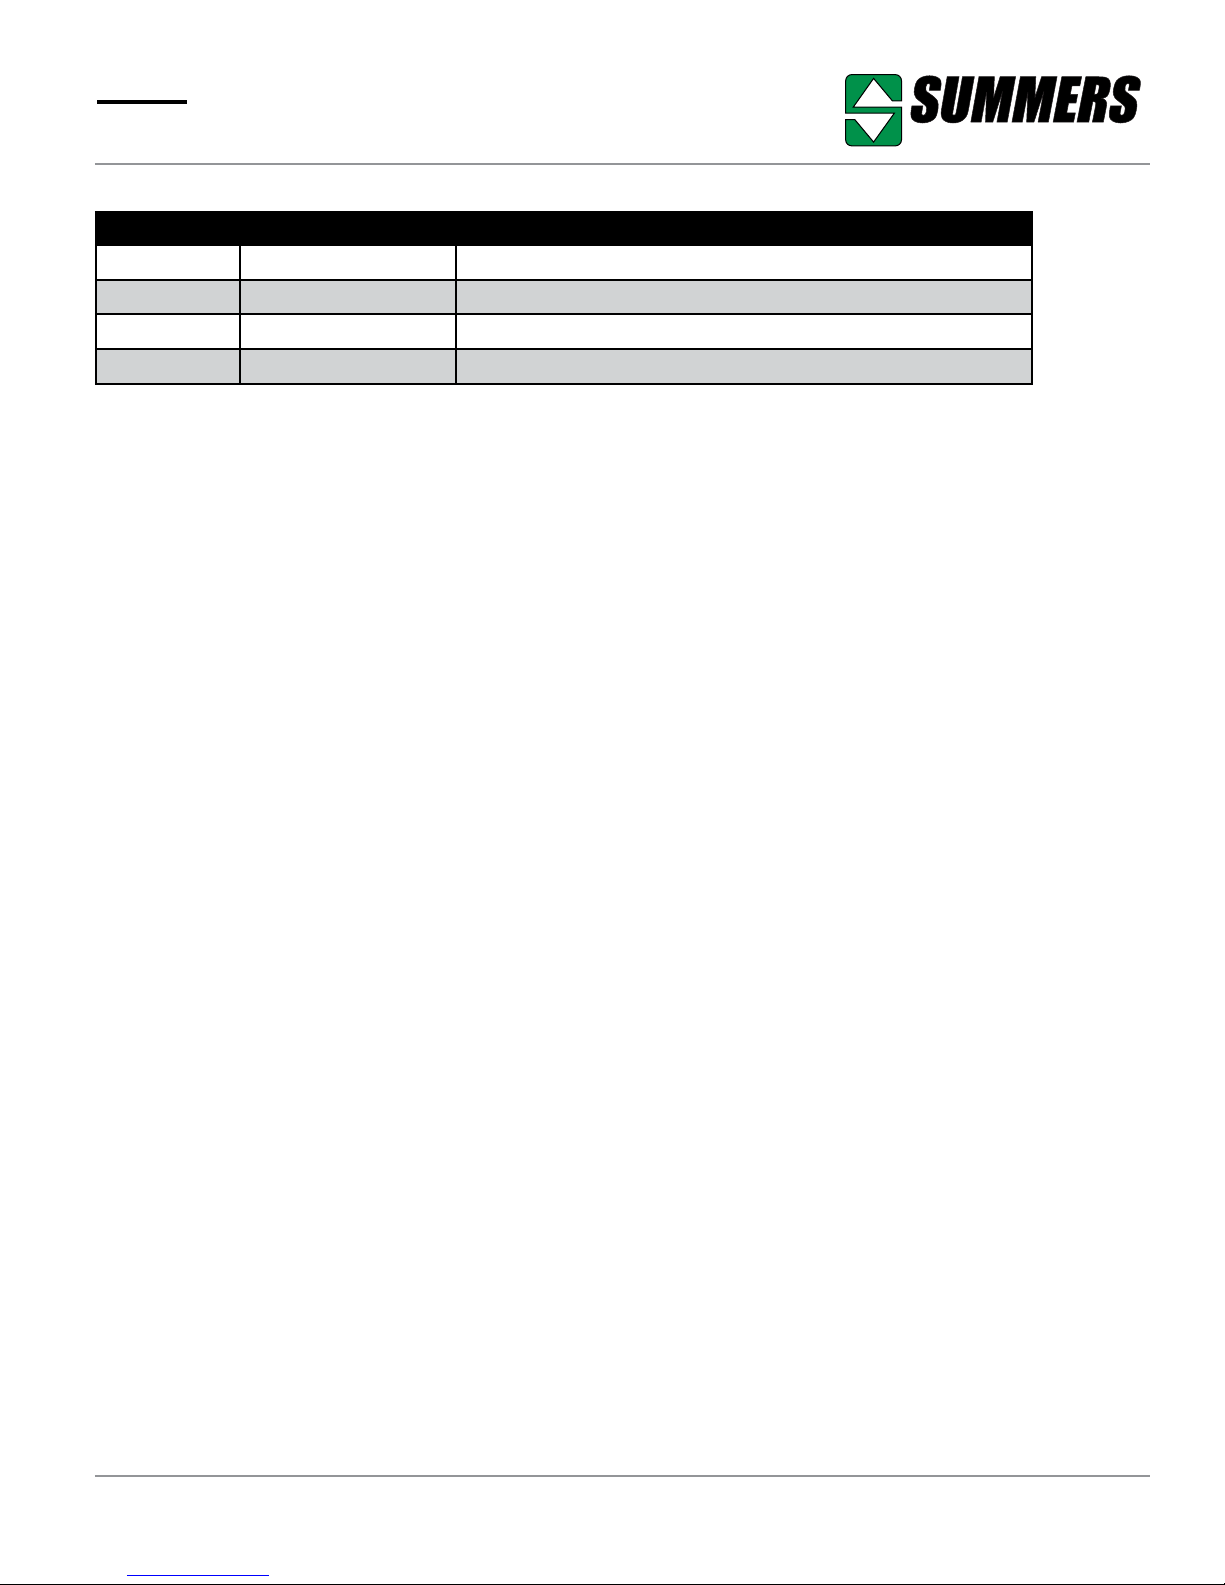
Parts
MOUNTING PACKAGE
ITEM PART NUMBER DESCRIPTION
1 8F0430 SPRAY FILL MOUNTING PIN PLTD
2 8F6180 WEIGHT SUPPORT BRACKET
3 8X0016A 3/8 - 16 x 3.5" SS bolt
4 8X0202 NUT 3/8"-16NC NY-LOCK GR2 YZ
8Z1105 © Summers Mfg. Co., Inc. 2019 Page 39
Page 40
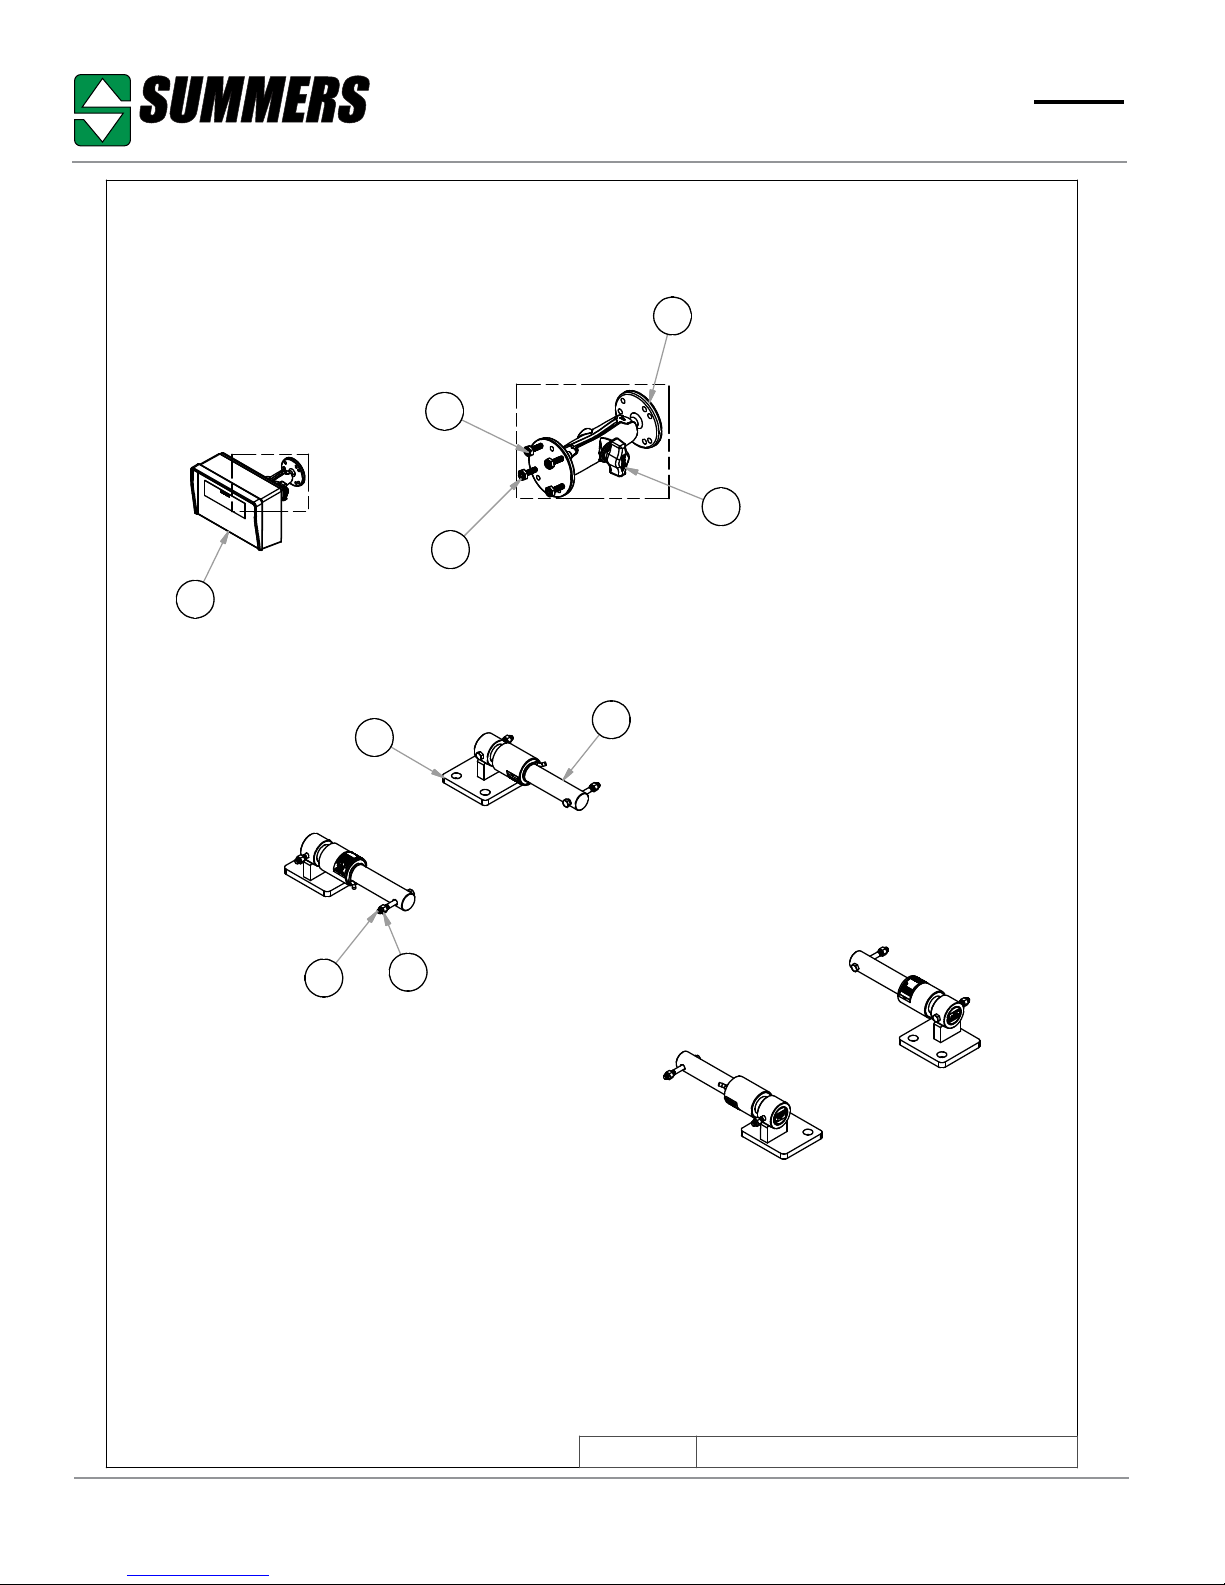
®
B
Parts
1
6
DETAIL B
8
8
2
5
7
3
4
Page 40 © Summers Mfg. Co., Inc. 2019 8Z1105
12/17/2015
8F6210.iam/
FAST FILL SCALE & MOUNTS
Page 41
®
Parts
SCALE & MOUNTING PACKAGE
ITEM PART NUMBER DESCRIPTION
1 8F0002 RAM BASE 2.5" W/1" BALL
2 8F6180 WEIGHT SUPPORT BRACKET
3 8F6200 EZ400 SCALE SYSTEM
4 8N0141 RAM MOUNT
5 8X0016A 3/8 - 16 x 3.5" SS bolt
6 8X0161 SCREW SKT HD 10 X 24 X 1" SS
7 8X0202 NUT 3/8"-16NC NY-LOCK GR2 YZ
8 8X0207 NUT THIN 10 X 24 NYLOCK SS
8A1840 FLOWMETER MINI-BULTK 1”
8Z1105 © Summers Mfg. Co., Inc. 2019 Page 41
Page 42
®
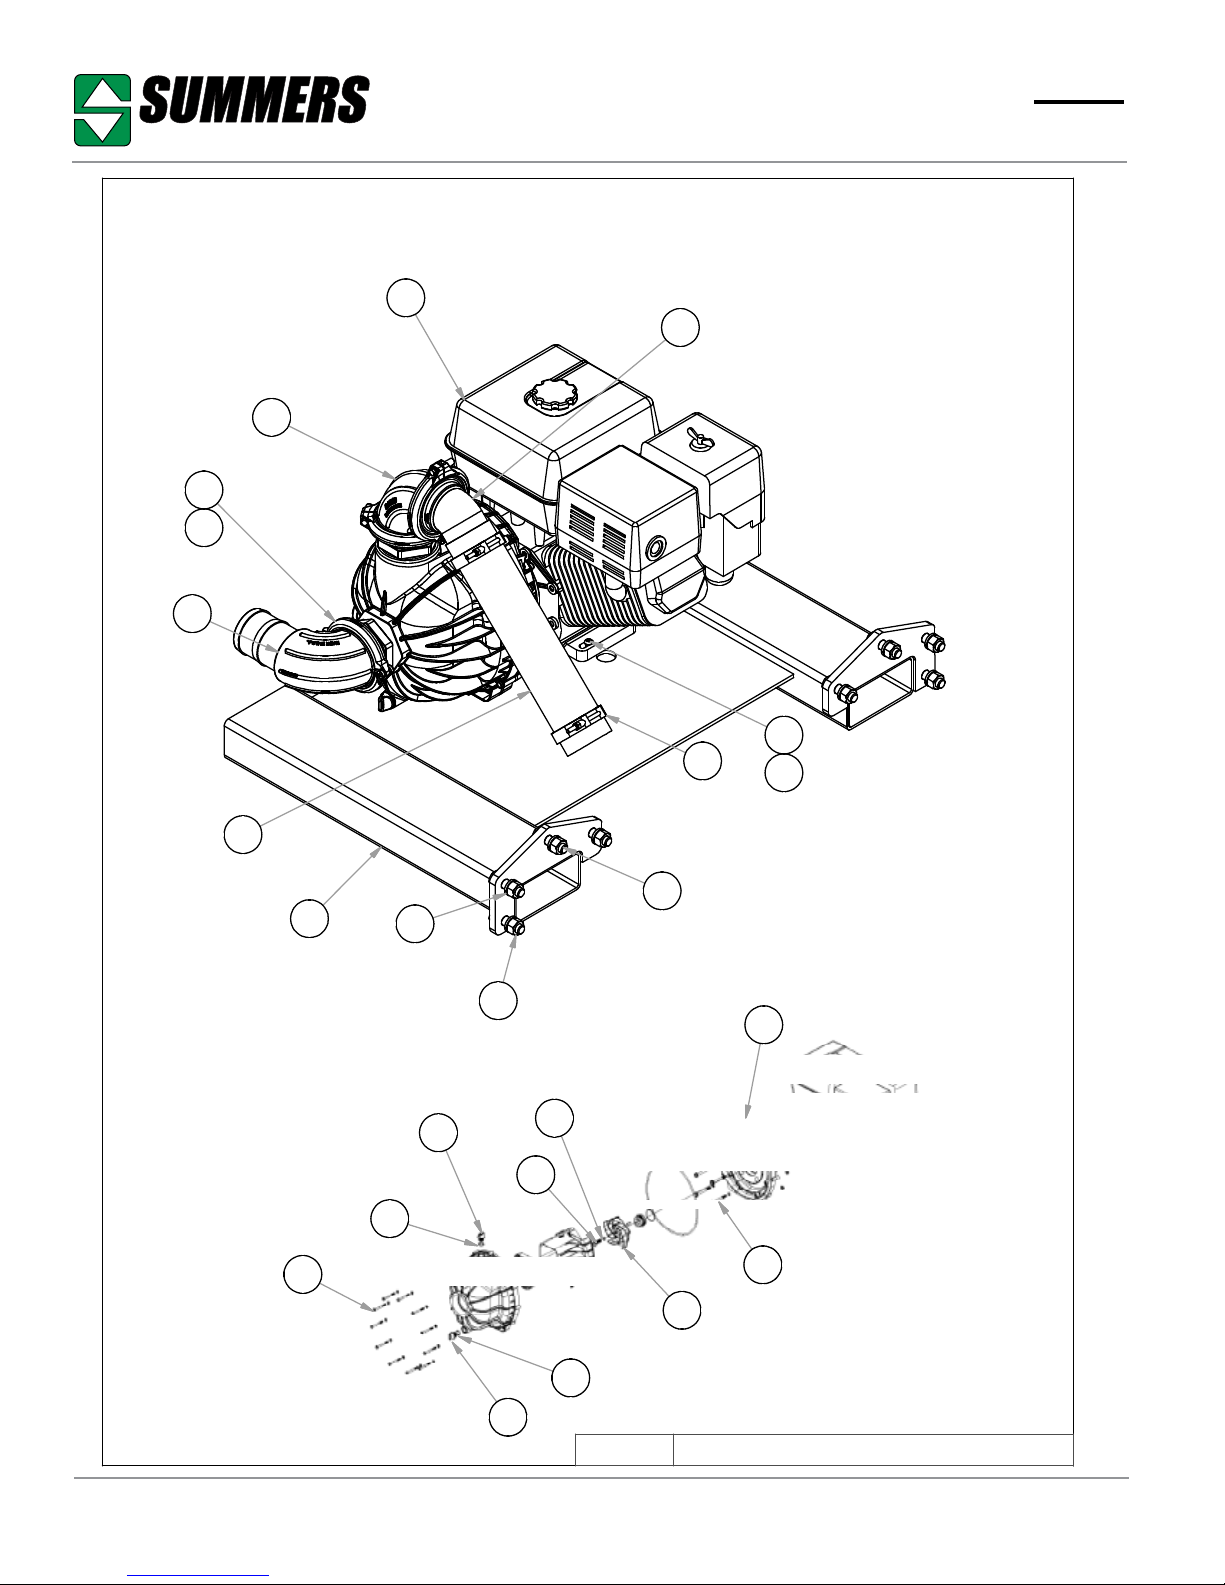
13 HP TRANSFER PUMP PACKAGE
17
11
13
14
15
12
Parts
16
7
18
4
23
3
22
6
5
19
2
10
20
21
8
9
PN 1 - SEAL KIT
Page 42 © Summers Mfg. Co., Inc. 2019 8Z1105
3
4
7/28/2017
8F8020.iam/
13HP TRANSFER ENGINE PKG 15-
Page 43
®
Parts
TRANSFER PUMP PACKAGE
ITEM PART NUMBER DESCRIPTION
1 8A0970 SEAL KIT 3" POLY TRNS PMP
2 8A0971 IMPELLER 3" POLY TRNS PMP
3 8A0972 FILL/DRAIN PLUG 3" POLY TRNS PMP
4 8A0973 O-RING
5 8A0974 O-RING IMPELLER BOLT
6 8A0975 BOLT HEX FLNG IMPELLER
7 8A0976 BOLT PUMP HALF HX HD CP
8 8A0977 NUT HEX FLANGE
9 8A0978 BOLT PUMP TO ENGINE
10 8A1016 HEAVY DUTY 3" HOSE CLAMP
11 8A2249 FLANGE ELBOW 45 M300 X 3"HB
12 8A2261 M300BRBSWP90 FLING ELBOW 300BRB SWP 90 1313 8A2323 FLANGE SWEEP ELBOW 3" 90
14 8A2386 HYPRO 3" UNIVERSAL FLANGE CLAMP
15 8A2387 FLANGE GASKET 3" HYPRO
16 8A4036 HOSE 3" REINFORCED FERT X 1.25' 85PSI
17 8F5400 PUMP W/13HP ENGINE 3" TRANS
18 8F7900A SKID ENGINE MOUNTING
19 8X0093 BOLT 5/8-11NC X 2" GR5 YZ
20 8X0168 SCRW TORXTAMPPRF5/16-18X2"ZDI
21 8X0212 NUT 5/16"-18NC NY-LOCK GR2 ZDI
22 8X0250 NUT 5/8"-11NC HEX GR2 YZ
23 8X0304 LOCKWASHER 5/8" YLW ZNC
8Z1105 © Summers Mfg. Co., Inc. 2019 Page 43
Page 44
®
Parts
3
5
5
3
4
2
Page 44 © Summers Mfg. Co., Inc. 2019 8Z1105
1
2/18/2016
4
8F8140.iam/
SFX2430 DECALS
Page 45
®
Parts
ITEM PART NUMBER DESCRIPTION
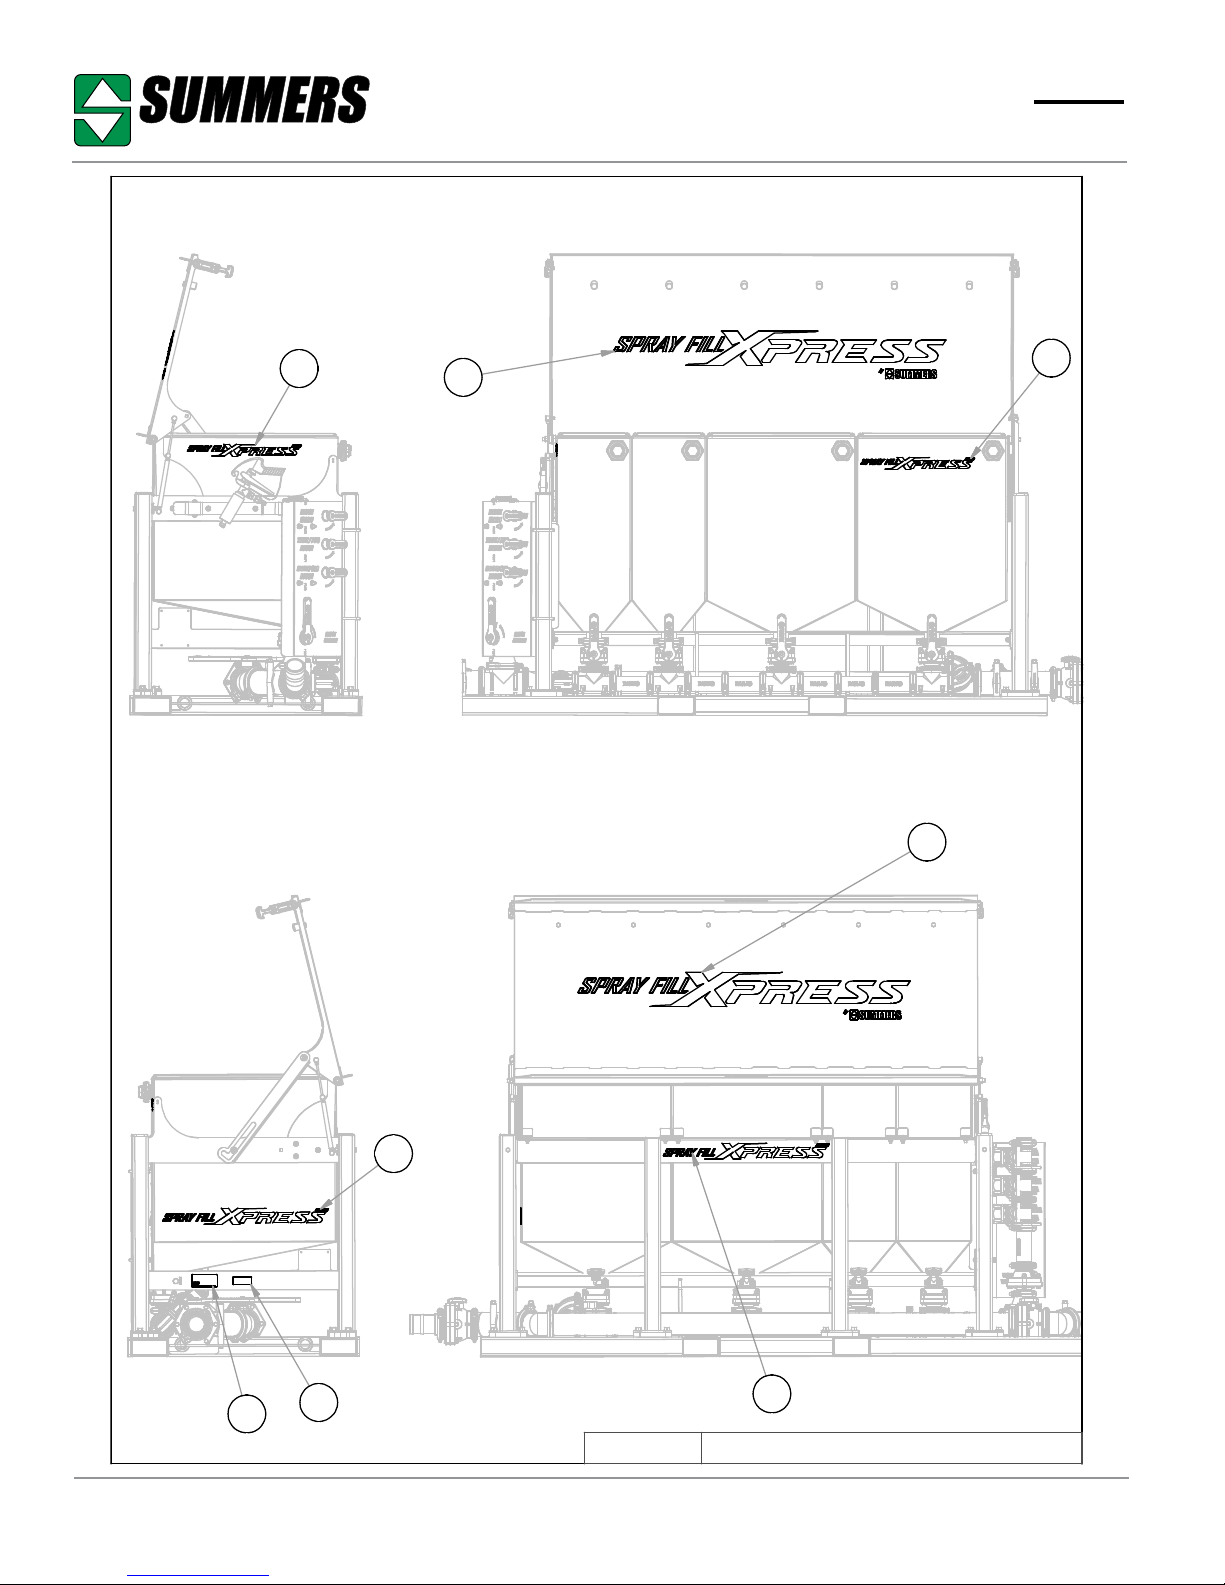
1 8Z0046 DECAL PATENT PENDING 1.25X3”
2 8Z0100 DECAL MADE IN USA
DECALS
3
4
5
8Z2508
8Z2510
8Z2513
8Z2515
8Z2518
8Z2520
DECAL 18” SFX1630
DECAL 18” SFX2430
DECAL 26” SFX1630
DECAL 26” SFX2430
DECAL 36” SFX-SUMMERS
DECAL 54” SFX-SUMMERS
8Z1105 © Summers Mfg. Co., Inc. 2019 Page 45
Page 46

®
Parts
7F0104 LOWER SHEET METAL BOLTPLATE
7F0108 FORMED ANGLE
7F0200 STIFFENER PLATE
7F0300 MOUNTING SUPPORT
7F1818 TUBE REC 6 X 3 X 3T
7F1820 REC TUBE 6 X 3 X 3T
7F1822 TUBE REC 6 X 3 X 3T
7F1920 TUBE REC 6 X 3 X 4T
8A0970 SEAL KIT 3” POLY TRNS PMP
8A0971 IMPELLER 3” POLY TRNS PMP
8A0972 FILL/DRAIN PLUG 3” POLY TRNS PMP
8A0973 O-RING
8A0974 O-RING IMPELLER BOLT
8A0975 BOLT HEX FLNG IMPELLER
8A0976 BOLT PUMP HALF HX HD CP
8A0977 NUT HEX FLANGE
8A0978 BOLT PUMP TO ENGINE
8A1003 CLAMP HOSE 1/2” MINI
8A1003 CLAMP HOSE 1/2” MINI
8A1007 CLAMP HOSE 3/4” #12
8A1009 CLAMP HOSE 1” #16
8A1016 HEAVY DUTY 3” HOSE CLAMP
8A1253 1” FLANGED VALVE
8A1253A HANDLE RISER
8A1254 BV HANDLE RISER 2X1.38” 158A1400 BANJO 3/4” FITTING COMPLETE
8A1403 BANJO 1” FITTING COMPLETE
8A1734 BALL VALVE 2” STUBBY
8A1742 BALL VALVE 3” STUBBY DBLFLNG
8A1840 FLOWMETER MINI-BULTK 1”
8A2005G TEE 3/4”MPT X 3/4”HB X 3/4”HB
8A2007 BARB HOSE 3/4” X 3/4 MPT
8A2008 STREET ELBOW 3/4”
8A2013B PLUG 1”
8A2015 ELBOW 3/4” HB X 3/4 MPT
8A2021 BARB HOSE 3/4” X 1/2 MPT
8A2032 STREET ELBOW 1”
8A2108 ELBOW 1/2” HB X 3/4 MPT
8A2204 3/4”COUPLER X 3/4” GHFTHREAD
8A2212 3/4” MPT X 3/4” GHMTHREAD
8A2234 FLANGE CLAMP FC220 WORMSCRW 56
8A2235 FLANGE CLAMP FC300 WORM SCREW
8A2249 FLANGE ELBOW 45° M300 X 3” HB
8A2250 FLANGE ELBOW 90 M100 X 3/4”HB
8A2251A 1” FLANGE SWEEP ELBOW 90 DEGREE
8A2261 M300BRBSWP90 FLING ELBOW 300BRB SWP 90 138A2287 FLANGE M220 X 1”HB
8A2293 FLANGE M300 X 3” HB FULL PORT
8A2297 FLANGE TEE M220 FULL PORT
8A2298 FLANGE TEE M220 X M220 X M100
8A2299 FLANGE TEE M300 FULL PORT
8A2317A FLANGE ELBOW 45° M300
8A2318 FLANGE ELBOW 90 M100
8A2319 2” FULL PORT SWEEP ELBOW
8A2323 FLANGE SWEEP ELBOW 3” 90
8A2328 FLANGE REDUCER M300 X M220
8A2332 FLANGE PLUG M220 FULL PORT
8A2334 FLANGE PLUG M220 W/3/4” FPT
8A2338 2” X 6” FULL PORT COUPLING
8A2340 FLANGE M100 X 3/4” FPT
8A2342 FLANGE 3” FP 45° Y
8A2345 FLANGE 2” FP POLY INDUCTOR
8A2380 1” UNIVERSAL FLANGE CLAMP
8A2381 FLANGE GASKET 1” HYPRO
8A2384 HYPRO 2” UNIVERSAL FLANGE CLAMP
8A2385 FLANGE GASKET 2” HYPRO
8A2386 HYPRO 3” UNIVERSAL FLANGE CLAMP
8A2387 FLANGE GASKET 3” HYPRO
8A2508A BOTTLE RINSE PLUNGER HYPRO
8A2508B BOTTLE RINSE NOZZLE HYPRO
8A4008 HOSE 1/2” EPDM AG 200PSI BLACK
8A4036 HOSE 3” REINFORCED FERT X 1.25’
8F0002 RAM BASE 2.5” W/1” BALL
8F0004 STAINLESS STEEL BOLT SPACER
8F0100 HINGE SUPPORT
8F0102 HINGE PLATE
8F0400 UHMW HINGE BUSHING
8F0414 GAS SPRING
8F0420 SEAL RUBBER TRIM LOK 158F0424 RUBBER LATCH STRAP
8F0430 SPRAY FILL MOUNTING PIN PLTD
8F5400 PUMP W/13HP ENGINE 3” TRANS
8F6004 LID 160 GALLON SPRAY FILL XPRESS
8F6006 LID 6-BANK SPRAY FILL
8F6040 CHEMTANK SS 40GAL
8F6080 CHEMTANK SS 80GAL
8F6100 RINSEBALL DEPRESSER SS304
8F6105 LOCKARM SPRAY FILL LID
8F6110 VALVE PANEL SPRAY FILL
8F6134 FLANGEPIPE 3 X 33.75” SS304
8F6150 FLANGEPIPE 3 X 50.06” SS304
8F6156 FLANGEPIPE 3X56” SS304
8F6172 FLANGEPIPE 3X72.35” SS304
8F6180 WEIGHT SUPPORT BRACKET
8F6200 EZ400 SCALE SYSTEM
8F7900A SKID ENGINE MOUNTING
8F8002 SPRAY FILL BACK
8F8004 SPRAY FILL SIDE RAILING LFT
8F8006 SPRAY FILL SIDE RAILING RGT
8F8010 SPRAY FILL EXPRESS BASE
8F8012 BACK SUPPORT 160 SF PTD 158F8714 WASH GUN GUNJET SHORT
8G8020 U-BOLT 3/8 X 2-9/16 X 3-1/2” SQ
8L3376 SPRAY FILL RINSE GUN HOLDER
8N0141 RAM MOUNT
8S0295 U-BOLT 3/8 X 2-5/8 X 4-1/4”RND
8X0016A 3/8 - 16 x 3.5” SS bolt
8X0016B 3/8 - 16 x 3.5” SS bolt
8X0018 SS 3/8 X 16NC - 1/2” BOLT
8X0046 BOLT 7/16-14NC X 7-1/4”GR5 ZDI
8X0060 1/2” - 13 FLANGED BOLT
8X0065 CRG 1/2-13NC X 2” GR5 ZDI
8X0065 CRG 1/2-13NC X 2” GR5 ZDI
8X0093 BOLT 5/8-11NC X 2” GR5 YZ
8X0161 SCREW SKT HD 10 X 24 X 1” SS
8X0168 SCRW TORXTAMPPRF5/16-18X2”ZDI
8X0200 NUT 3/8”-16NC SERFLANG GR2 SS
8X0202 NUT 3/8”-16NC NY-LOCK GR2 YZ
8X0207 NUT THIN 10 X 24 NYLOCK SS
8X0212 NUT 5/16”-18NC NY-LOCK GR2 ZDI
8X0234 NUT 7/16”-14NC NY-LOCK GR2 ZDI
8X0242 NUT 1/2”-13NC NY-LOCK GR2 YZ
8X0250 NUT 5/8”-11NC HEX GR2 YZ
8X0304 LOCKWASHER 5/8” YLW ZNC
8X0319 WASHER 17/32”IDX7/8ODX16GA ZDI
8X0320 WASHER 3/8” (7/16” ID)FLAT ZDI
8X1112 CRG 3/8-16NC X 1” SS
8X1113 CRG 3/8-16NC X 1.5” SS
8Z0046 DECAL PATENT PENDING 1.25X3”
8Z0100 DECAL MADE IN USA
8Z2508 DECAL 18” SFX1630
8Z2510 DECAL 18” SFX2430
8Z2513 DECAL 26” SFX1630
8Z2515 DECAL 26” SFX2430
8Z2518 DECAL 36” SFX-SUMMERS
8Z2520 DECAL 54” SFX-SUMMERS
Page 46 © Summers Mfg. Co., Inc. 2019 8Z1105
Page 47

History of Summers Manufacturing Co., Inc.
1965 – Summers Manufacturing is founded by Harley Summers, who purchases patent rights for Goebel truck and pickup hoists from the Goebel
1969 – Firm incorporates and becomes ofcially known as Summers Manufacturing Company, Inc.
1970 – Summers purchases rights to manufacture/market the Herman Harrow.
1973 – Company builds new 20,000 square-foot plant and ofces in Maddock, adding a 20,000 square-foot assembly plant in the fall of 1975 (com-
1977 – Summers introduces the Agri-sprayer, used in conjunction with the Herman culti-harrow to incorporate herbicides and liquid fertilizer.
1980 – Company purchases manufacturing and distributing rights to Crown rockpickers from Crown Manufacturers of Regina, Saskatchewan. This
1981 – Company establishes a branch facility in Regina, Saskatchewan.
1982 – Devils Lake plant begins operations in January, manufacturing supersprayers and rockpickers. The Maddock factory begins producing the
1983 – Summers buys manufacturing and distributing rights to the Fargo Field Sprayer line from Mid America Steel (formerly Fargo Foundry),
1984 – Herman Diamond Disk, a disk harrow made in a diamond shape to reduce blade breakage from rocks, comes off the assembly line.
1985 – Summers signs a contract with Melroe Company of Bismarck to obtain exclusive manufacturing rights to the Melroe harrow line.
1989 – Summers purchases TorMaster Company of Hordean, Manitoba, giving the company a line of rolling packer equipment, comprised of har-
1992 – A new engineering ofce/parts department is added to the Devils Lake factory.
1993 – Company adds two new products: a pickup-mounted sprayer with booms of 80 and 90 feet, and the Summers Superharrow, an extra-heavy-
1994 – a 50 by 125 foot addition to the Maddock factory is completed. Construction begins on a 24,576 square-foot addition to the Devils Lake
1996 – 1500 square foot ofce area added to the Maddock plant. Company introduces Chisel Plow with oating hitch and 700# trip assembly.
1997 – 16,800 square foot warehouse in Maddock purchased from local business.
1999 - Company introduces the Ultimate suspended boom trailer sprayer with hydraulic folding booms. Additional sizes added to the Chisel Plow
2000 - Company introduces the Supercoulter, the innovative solution for excessive eld residue management on no-till, minimum-till, and conven-
2001 - Cold storage building completed at Devils Lake. Company extends boom lengths up to 110 feet on the Ultimate Supersprayer.
2002 - Company adds a warehouse and service man in Aberdeen, SD.
2003 - Company introduces the Ultimate NT Supersprayer featuring a bolt on axle for easier adjustment, and a new family of tanks that feature a
2004 - A 124 ft. x 310 ft. addition is added onto the current Devils Lake plant.
2005 - The Summers Superroller is added to the “Field Tested Tough” product line. Additional sizes of 56’, 58’ and 60’ are added to the Superchisel
2006 - The Summers Coulter-Chisel, Rolling Choppers and 30’ Superroller were included in product line.
2007 - 62’ & 84’ 5 Section Landrollers and a 20’ Coulter-Chisel were introduced.
2008 - Disk-Chisels, ranging from 16’ to 40’ widths, are added to product line.
2009 – M105 and M108 Mounted Harrows added to selection of Mounted Attachments. SuperHarrow 2650, 50’ SuperCoulter, Hydraulic Fold
2010 – Rolling Basket and 47’ Diamond Disk added to product line. A 124 ft. x 310 ft. addition to Devils Lake factory built for a state of the art
2011 – Additional Supercoulter sizes were added along with larger tires for tillage implements. Ultimate and Ultra Supersprayers received an ad-
2012 – 41’, 46’ & 53’ Trail Type Landroller added to product line. Additional Superchisel sizes of 16’ & 20’ were added.
2013 – DT9530 added to product line. Internal Scraper in Rolling Baskets introduced. Finishing Coulter Gang becomes standard on the Diamond
2014 – Introduced the VRT2530 (Variable Rate Tillage).
2015 – Introduced the VT Flex Applicator and Spray Fill Xpress.
2016 – Introduced the 8-Bar Superharrow.
2018 – Introduced the VRT Renegade.
Summers distributes on a wholesale level to dealers and distributors throughout markets in North Dakota, South Dakota, Minnesota, Montana, Iowa,
W ashington, Idaho, Oregon, Utah, Colorado, Kansas, Nebraska, Oklahoma, T exas, Manitoba, Saskatchewan, Alberta, British Columbia, Kazakhstan,
Russia and Australia, making it an international company.
Brothers of Lehr, ND. These hoists, produced in Harley Summers’ blacksmith shop the rst year, were distributed nationwide by a Cincin-
nati, Ohio, dealer. With increasing sales, the company soon outgrows the small shop. Summers wins the Herman harrow contract, beginning
the company’s Herman culti-harrow line. Summers builds a 7,200 square-foot factory in Maddock to meet the demand for truck and pickup
hoists, as well as Herman harrows.
pleted in January 1976), bringing total square footage of Maddock factories to 47,000.
forces another expansion project – a 26,000 square foot factory on a 24 acre site in Devils Lake, ND Industrial Park.
Superweeder, a combination cultivator and harrow.
Fargo. This eld sprayer line is manufactured at the Devils Lake plant. Harley Summers is selected North Dakota’s small-businessman of
the year by the Small Business Administration.
row packers and hydraulic fold coil packers.
duty residue-management tool designed for the minimum and no-till farmer.
factory, which enables the company to increase production of truck-mounted and pull-type supersprayers and rockpickers.
Introduced 2-point sprayer.
line, now ranging from 28’ to 54’.
tional-till farming operations.
drainable sump and a common width dimension.
line. Ultimate-Ultra NT Supersprayer introduced featuring 120’ & 133’ booms.
Rolling Chopper and 36” diameter Landrollers introduced.
paint system.
ditional tank size of 1650 gallons. Front Caster Wheel option was made available for chisel implements.
Disk and 2510 DT. Corporate ofces opened at Devils Lake plant. New building and location for the Aberdeen warehouse.
Page 48

. . . Field Tested TOUGH!
®
Tillage
Rock Picker
Land Rollers/Packers Sprayers
Cultivators/Harrows
Mounted Attachments
1-800-732-4347 • www.summersmfg.com
 Loading...