

Summer Infant 02010T User Manual
PROBLEM SOLVING:
02010
Problem Solution
No picture or sound on TV • Make sure the TV is turned on
• Make sure the AC Adapters are plugged in
• Make sure the outlets are working
• Make sure the Camera and TV are set to the same channel
(try using the other channel if necessary)
• Make sure the antenna on the TV is fully extended
Sound but no picture on TV • Press the Quick View Button ("Video ON/OFF") once to turn on video mode
• Try adjusting the Brightness, Contrast and Vertical Hold dials on the TV
• Test reception by moving the TV and/or Camera to different locations
• Make sure the Camera and TV are set to the same channel
(try using the other channel if necessary)
• Make sure the antenna on the TV is fully extended
Picture but no sound • Turn up the volume on the TV using the Volume Dial
• Make sure the Camera and TV are set on the same channel
(try using the other channel if necessary)
• Make sure the antenna on the TV is fully extended
Picture not clear • Make sure the Camera and TV are set on the same channel
(try using the other channel if necessary)
• Position the TV closer to the camera if necessary
• Move TV away from other monitors, cordless phones, walk-talkies, etc.
• Try adjusting the Brightness, Contrast and Vertical Hold dials on the TV
• Test reception by moving the TV and/or Camera to different locations
• Make sure the antenna on the TV is fully extended
Squealing sound • Move the Camera and the TV further away from each other
If you experience a problem that is not noted in this manual, please do not return the product to the store. Our Customer Relations
Department may have a simple solution to your problem. Please contact us 1-800-268-6237.
Please read the following instructions carefully.
Keep this instruction manual for future reference.
Phillips head screwdriver (not included).
Keep small parts away from children.
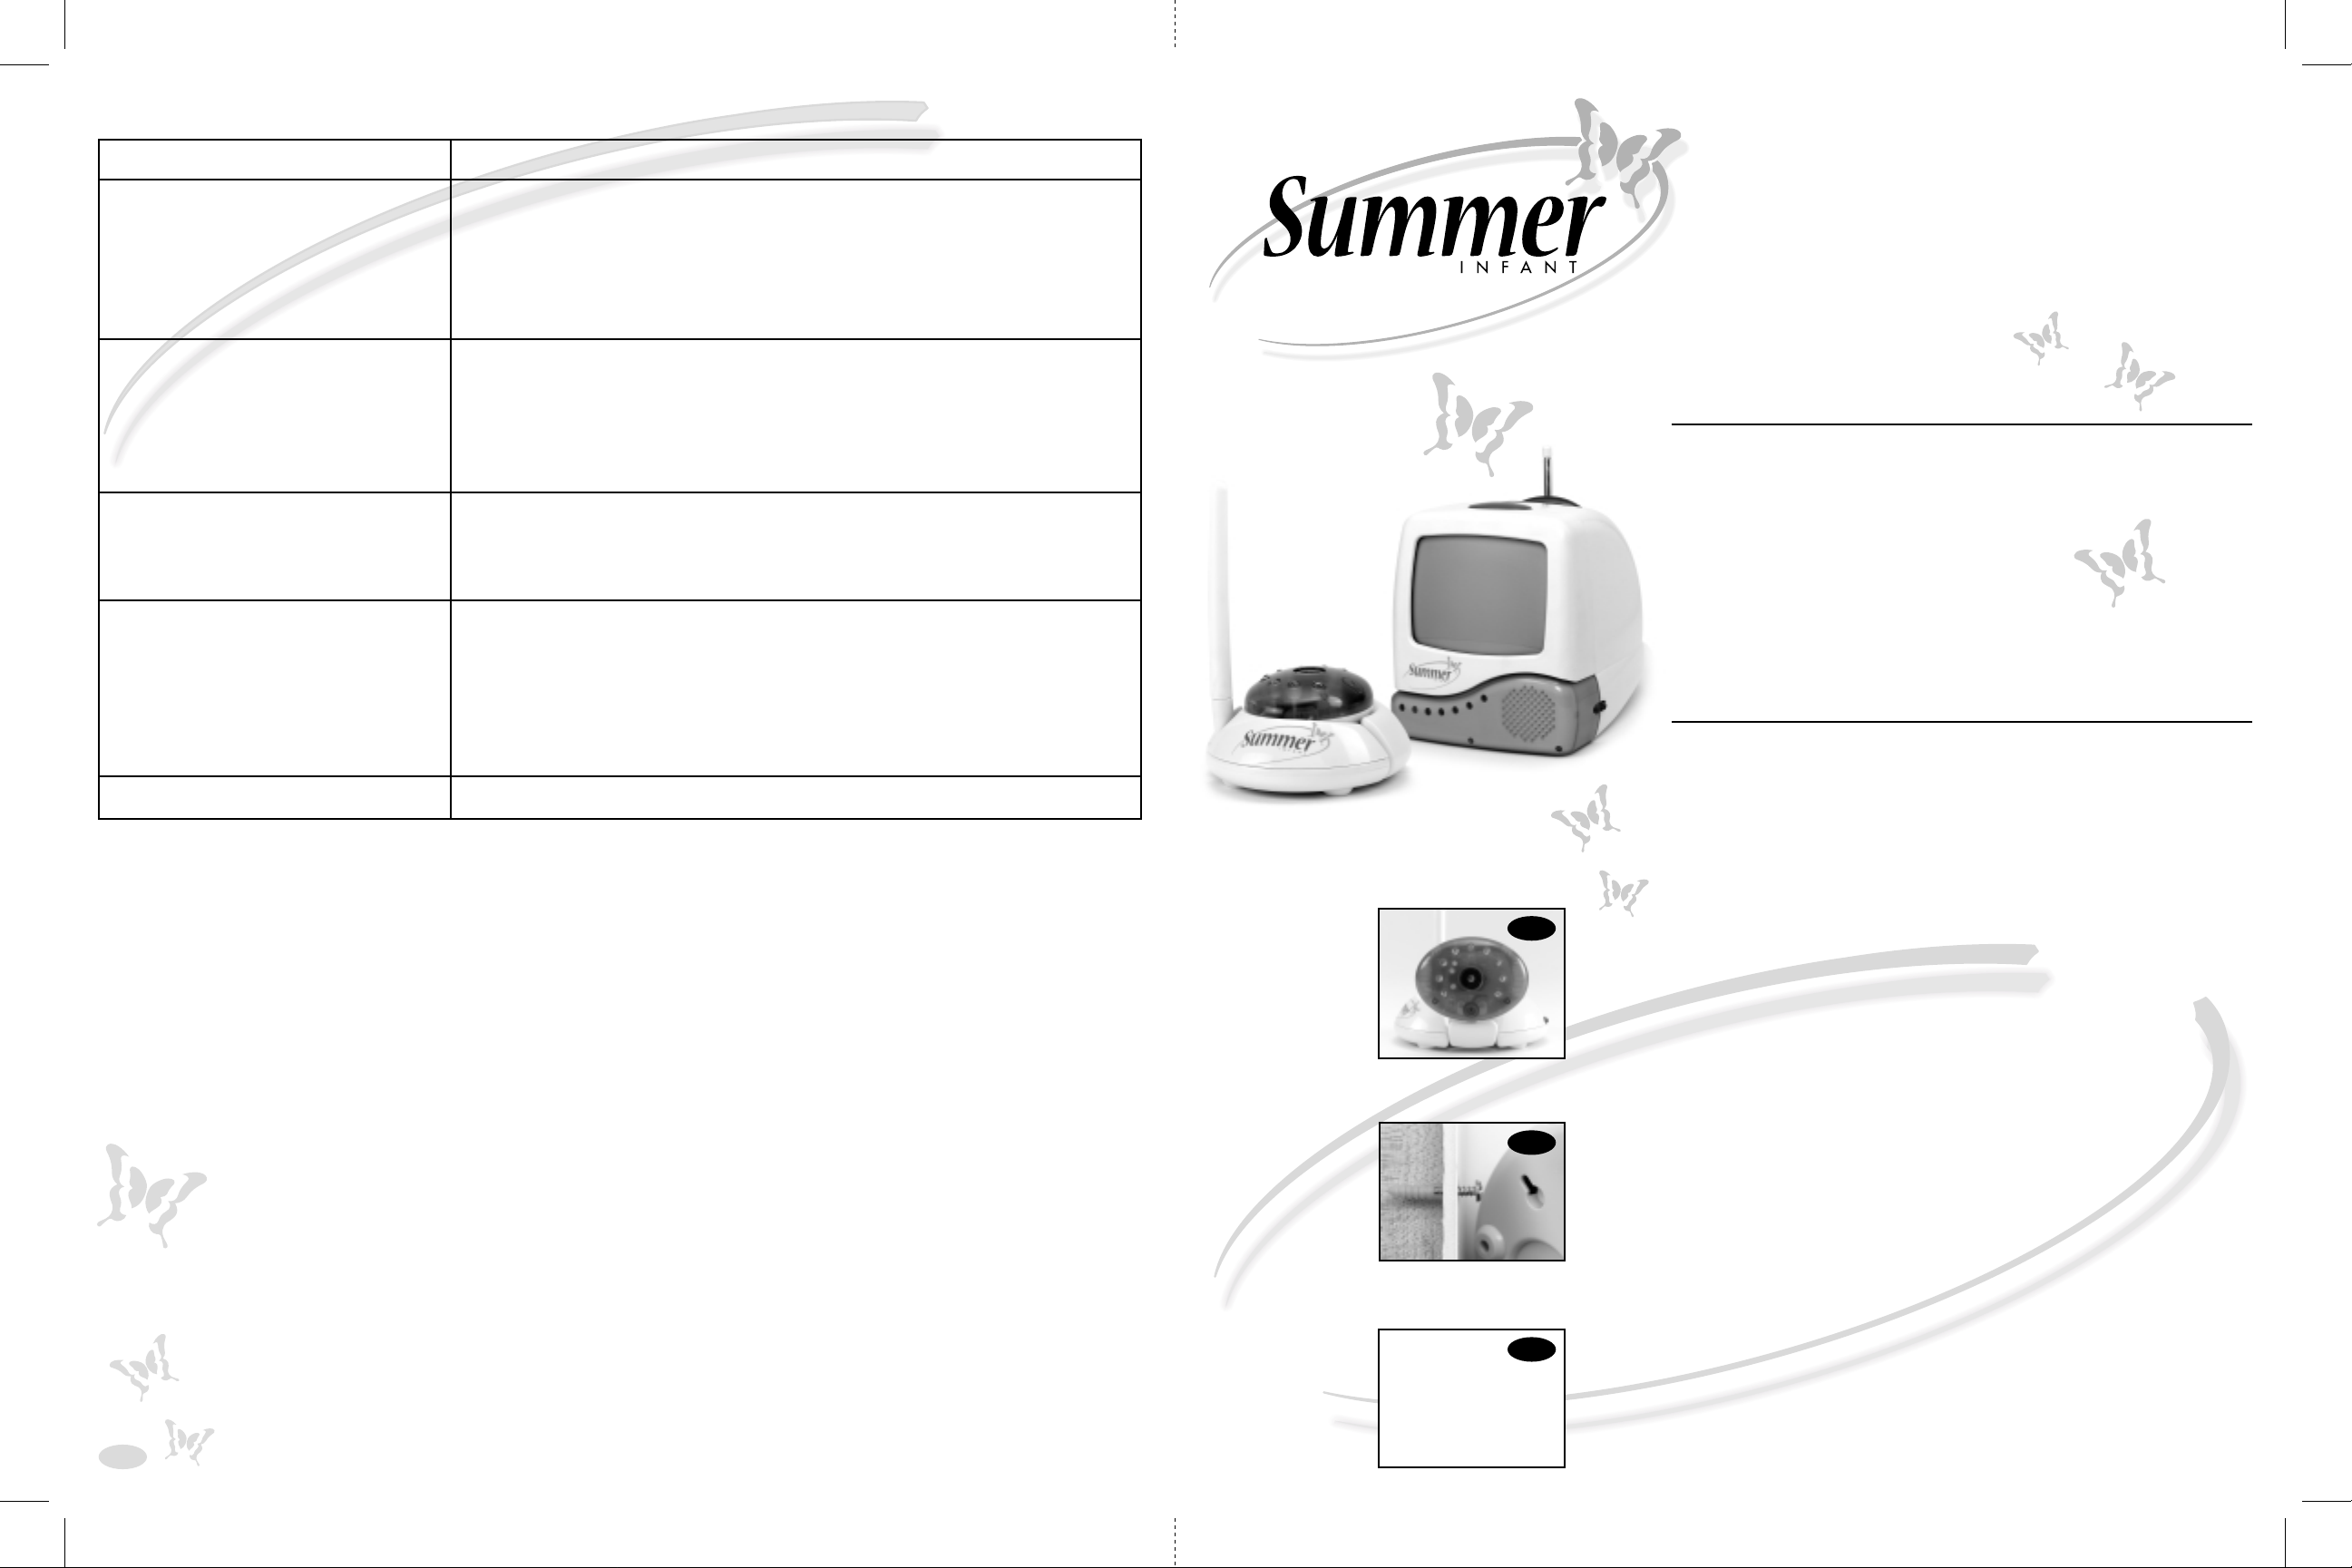
INSTRUCTION MANUAL
BABY SOUNDS
VIDEO MONITOR
Thank you for buying the 900 MHz
Baby Sounds Video Monitor from Summer
Infant. Now you can hear and see your baby!
Ideal for older children too – monitor
playroom activities!
QUICK SET UP:
Read the instruction manual for more detailed instructions
and explanations.
• Place Camera in nursery and position facing crib (do not place
in crib or within child’s reach). Tilt the Multi-Position Camera/
Microphone so it is facing baby as much as possible.
FCC Information
This device complies with part 15 of the FCC Rules. Operation is subject to the following two conditions: (1) This device may not cause
harmful interference, and (2) this device must accept any interference received, including interference that may cause undesired operation.
CAUTION: Changes or modifications not expressly approved by Summer Infant may void the users authority to operate this equipment.
NOTE: This equipment has been tested and found to comply with the limits for a Class B digital device, pursuant to part 15 of the FCC Rules.
These limits are designed to provide reasonable protection against harmful interference in a residential installation. This equipment generates,
uses and can radiate radio frequency energy and, if not installed and used in accordance with the instructions, may cause harmful interference
to radio communications. However, there is no guarantee that interference will not occur in a particular installation. If this equipment does
cause harmful interference to radio or television reception, which can be determined by turning the equipment off and on, the user is
encouraged to try to correct the interference by one or more of the following measures:
• Reorient or relocate the receiving antenna
• Increase the separation between the equipment and the receiver
• Consult the dealer or an experienced radio/TV technician for help
page
4
SATISFACTION GUARANTEED: IF YOU
ARE NOT COMPLETELY SATISFIED WITH
THIS PRODUCT PLEASE RETURN IT TO US
WITH PROOF OF PURCHASE. IF YOU
HAVE ANY QUESTIONS OR COMMENTS,
PLEASE CONTACT OUR CONSUMER
RELATIONS DEPARTMENT.
© 2001 Summer Infant, Inc.
6 Blackstone Valley Place
Suite 206A
Lincoln, RI 02865 USA
1-800-268-6237
www.summerinfant.com
MADE IN CHINA.
Colors and styles may vary.
1
• Plug small AC Adapter into Camera’s AC Adapter Jack and other
end of cord into a standard electrical outlet.
• Turn Camera on and select channel by setting the Channel
Selector (A/Off/B) to channel A.
• Position TV in the room from which you will monitor baby.
Plug large AC Adapter into TV’s AC Adapter Jack and plug the
other end into a standard electrical outlet. Fully extend the
2
TV’s antenna.
• Turn TV on using Power On/Volume Dial. Set Channel Selector
to channel A. You should now be able to see a view of the
nursery and hear any sounds in the nursery. If you don’t get a
picture, press the Quick View Button.
• If the picture is not clear, try switching both the Camera and
3
the TV to channel B. Sometimes a slight adjustment to the
Camera, TV and antenna can make a significant difference
in reception.
• Adjust the volume on the TV as needed.
WARNING:
SET UP & USE(continued):
THIS PRODUCT CANNOT REPLACE RESPONSIBLE
ADULT SUPERVISION.
• Prevent cord entanglement — do not place Camera
in crib or within arm s reach of baby. Use enclosed
Security Clips to help secure cords. Never use
extension cords with AC adapters. Only use the AC
Adapters provided.
• When an AC Adapter is plugged into an electrical
outlet, do not touch the exposed end.
• Test monitor before first use, periodically, and
when changing location of the Camera.
CAUTION:
KEEP SMALL PARTS OUT OF CHILD S REACH.
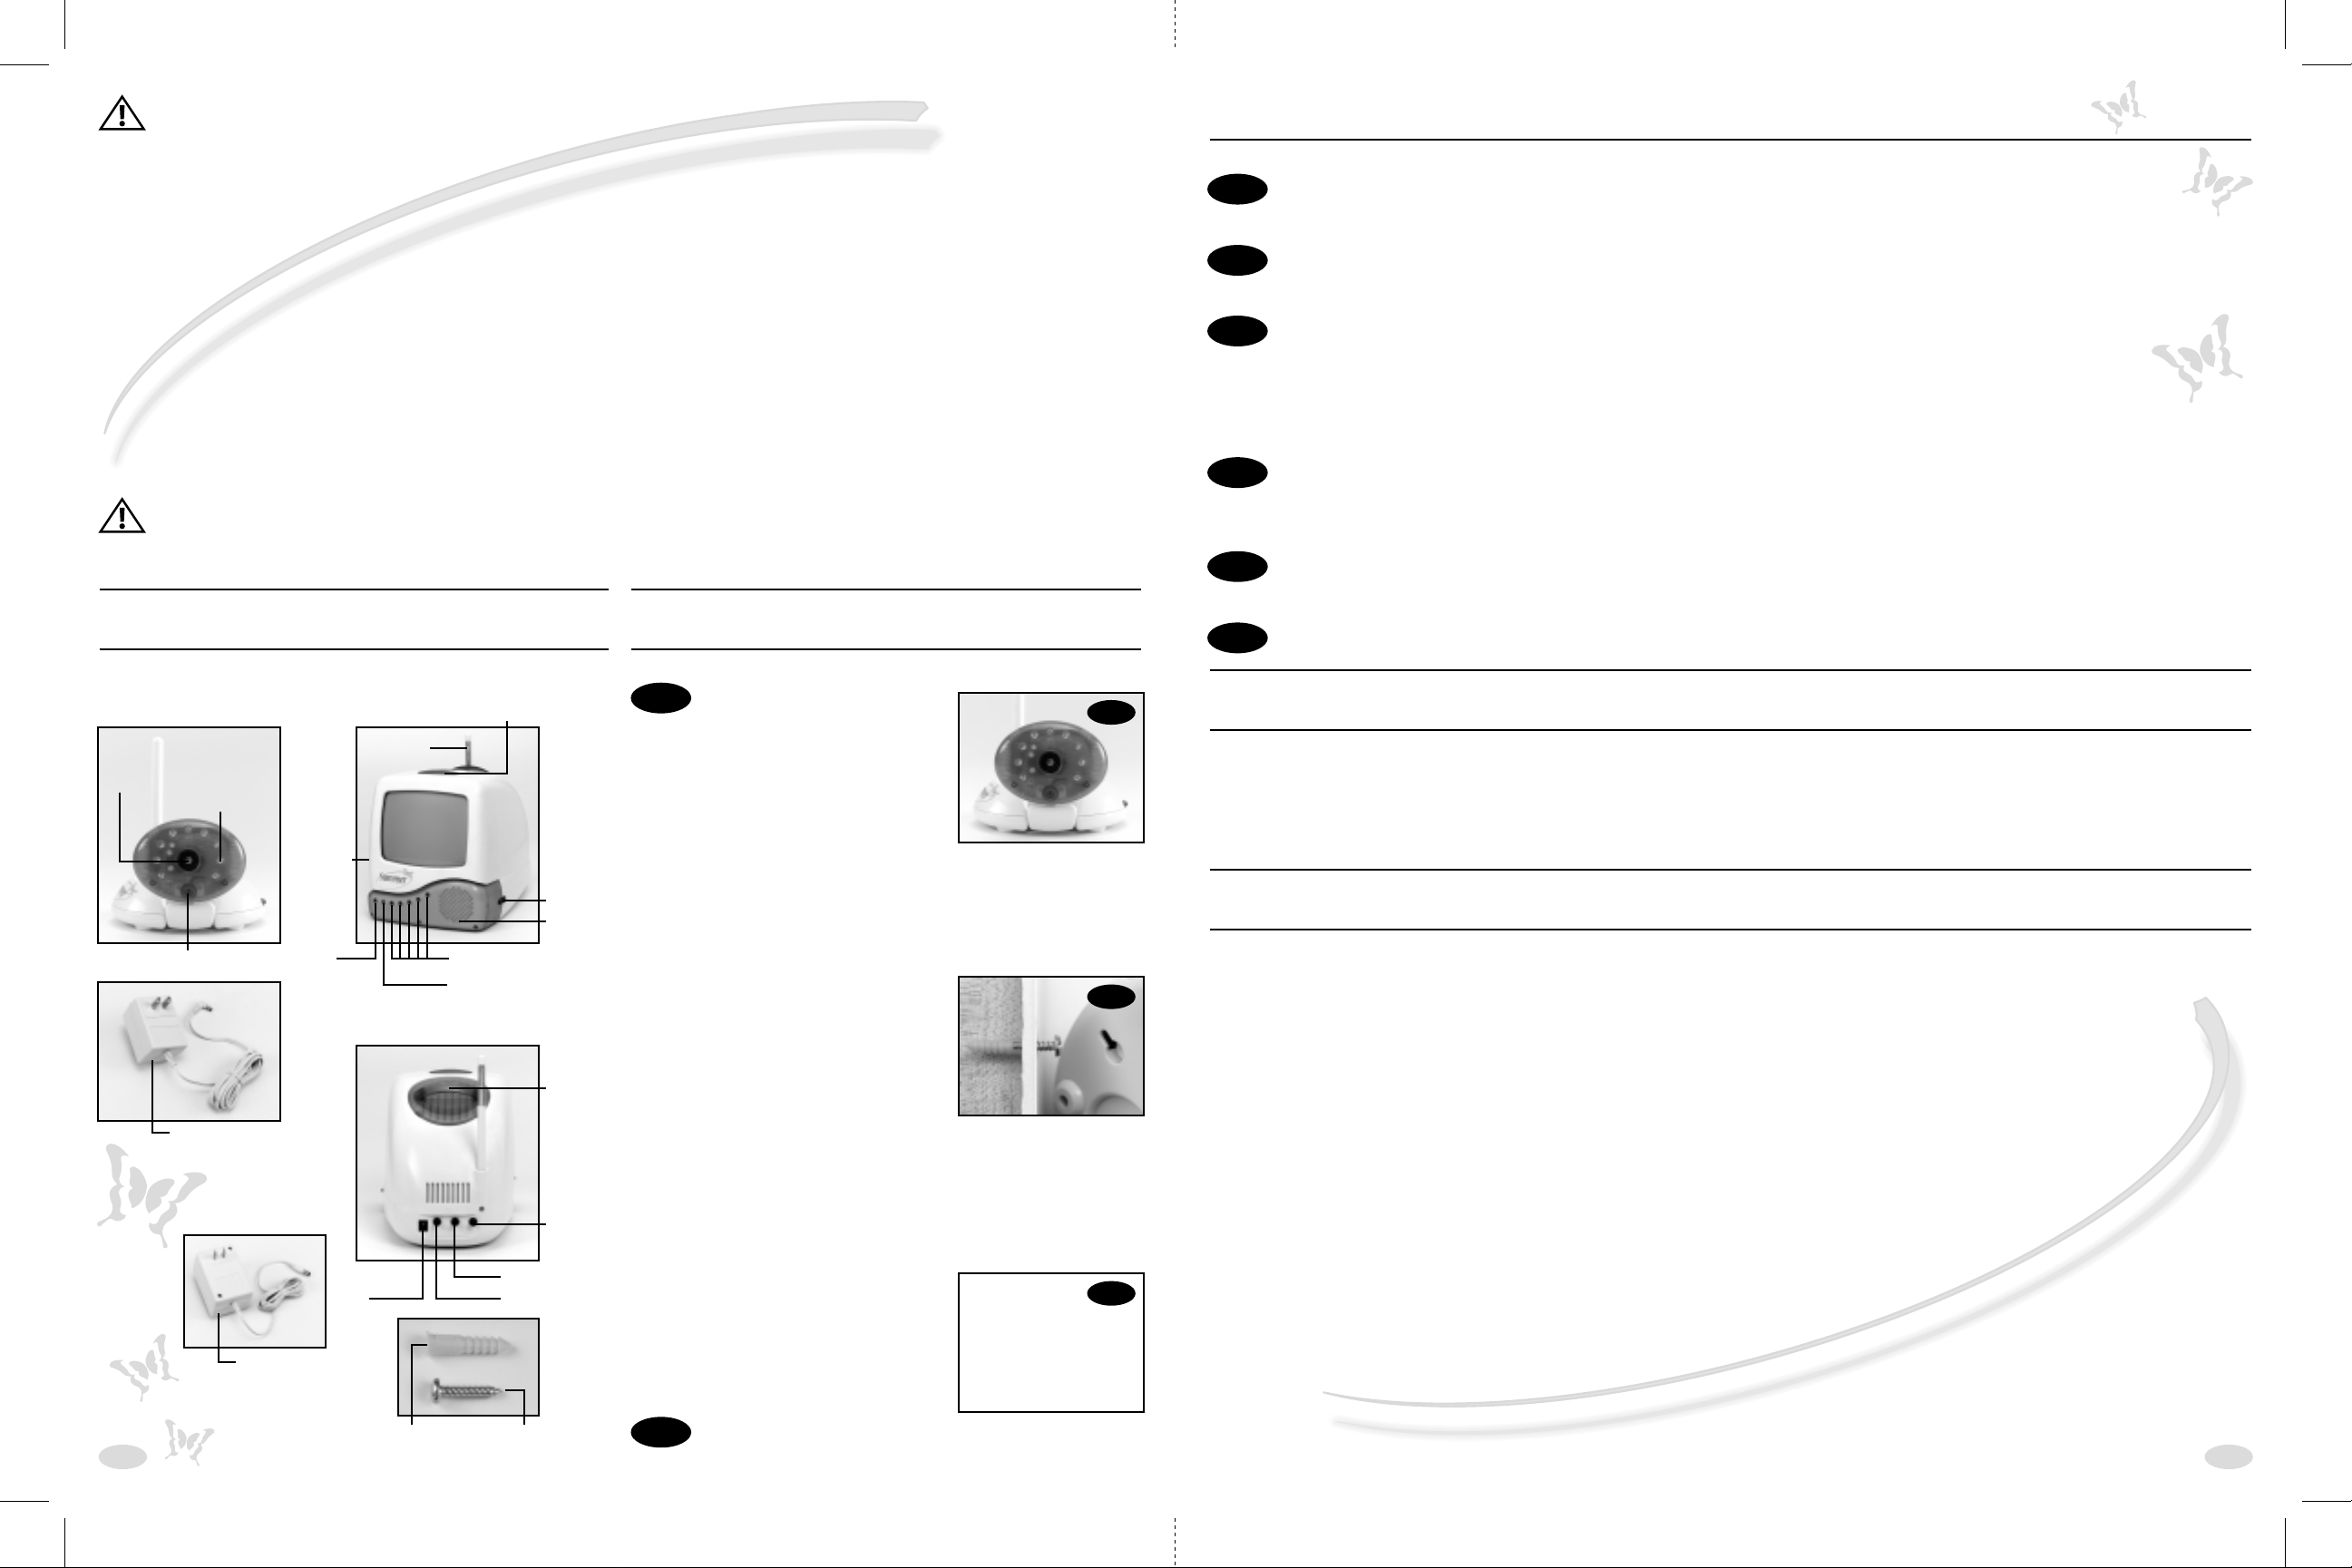
FEATURES & COMPONENTS:
Quick View Button
CAMERA: TV:
Lens
page
Infrared LED’s
(for night vision)
Camera/Microphone
TV AC Adapter
(large)
Camera
AC Adapter
(small)
2
Channel
Selector
(A/Off/B)
Power
On Light
TV (BACK VIEW):
AC Adapter
Jack
Antenna
(Video/On/Off)
Sound Lights
Video On Light
Wall Anchor
(one)
On/
Volume
Dial
Speaker
Carrying
Handle
Vertical
Hold
Brightness
Contrast
Screw
(one)
• Do not use monitor near water (such as bathtub,
sink, etc)
• Keep monitor away from heat sources (such as
stoves, radiators, etc) and make sure there is
proper ventilation (not on sofas, cushions, beds,
etc which may block ventilation)
• Nursery monitors use public airwaves to transmit
signals. This monitor may pick up signals from
other monitors or similar devices and vice versa.
SET UP & USE:
Camera
1
Table Top or Wall Mounting:
Pull the Camera/Microphone up
(see Figure A).
Determine a location for the Camera
that will provide the best view of your
baby in his crib. Place the Camera on a
flat surface, such as a dresser, bureau, or shelf.
Or mount the Camera on a wall. Be sure to test reception
and Camera positioning before mounting to a wall
(see "Testing/Improving Reception" section).
To Wall Mount:
a) Pre-drill a hole in the wall (3/16",
4.8mm, drill bit). See Figure B.
b) Insert the wall anchor (included)
into the hole and with a hammer,
tap gently on the end until the wall
anchor is flush with the wall.
c) Insert the screw (included) into the wall anchor and tighten
screw until only 1/4" (6.2mm) of the screw is exposed.
d)Insert smaller AC Adapter into the Camera’s AC
Adapter Jack.
e) Slide the back of the Camera down onto the screw until the
Camera is secure to the wall.
f) Plug the AC Adapter into a standard
electrical outlet.
g) Secure the cord to the wall using
the 8 Security Clips included
(see Figure C).
2
Set Channel Selector to channel A. The Power On Light
will illuminate solid green.
AFIGURE
BFIGURE
CFIGURE
TV
1
Position TV in the room from which you will monitor
your baby. Pull up the antenna until it is fully extended.
2
Plug the larger AC Adapter into the TV’s AC Adapter
Jack. Plug the other end into a standard electrical outlet.
3
Turn the TV on using the On/Volume Dial. The Power
On light will illuminate green. Set the Channel Selector to
channel A. Press the Quick View Button (labeled "Video
ON/OFF") once for a view of the nursery. When video mode is
on, the Video On Light will illuminate green.
4
Adjust the volume as needed using the Volume Dial.
Adjust picture using the Contrast, Brightness, and Vertical Hold
Dials on the back of the TV.
5
For audio and no video, press the Quick View Button
again to shut off the video mode.
6
To turn the TV off completely, use the ON/Volume Dial.
Testing/Improving Reception:
Be sure to test your monitor’s reception before initial
use. We also recommend testing your monitor’s reception
periodically. Please keep in mind that the Baby Sounds Video
Monitor will not provide the same level of picture quality as
your television with cable, satellite dish, or digital service does.
To test reception you will need two adults. One
adult should view the picture on the TV while the
other is in the nursery to adjust the Camera. Often the
quality of the reception can be improved by slightly
repositioning the Camera, TV, or both. It may help to place
a stuffed animal or doll in the crib to simulate the position
and size of your baby. Adjust the picture quality on the TV
as needed by using the Contrast, Brightness and Vertical
Hold dials.
To test sound quality, have one adult speak in both a normal
tone and a whisper near the crib. Adjust volume on the TV’s
Volume Dial as needed.
TIPS FOR IMPROVING RECEPTION:
• Change the channel on both the TV and the Camera. Always
make sure they are set to the same channel (both on A or
both on B).
• Position the TV closer to the camera if necessary.
• Move TV away from other monitors, cordless phones,
walk-talkies, etc.
• If you hear a squealing noise, move the Camera and the TV
further away from each other.
SPECIAL FEATURES:
• Sound Lights: The 5 Sound Lights will illuminate on the TV
depending on the level of your baby’s sounds. For example,
if your child is just cooing, only one or two lights will
illuminate. If your baby is crying, several will illuminate,
depending on how loud she is crying. This feature is
particularly helpful if you are in a noisy room.
• Quick View Button ("Video ON/OFF"): This button
turns the video mode on. If you only want to hear your baby,
press the Quick View Button again to shut off the video. The
Quick View Button is ideal for easily turning on the video
option in the middle of the night.
• Night Vision: In a darkened room the monitor will
automatically use its infrared LED’s to transmit a clear image
of baby, so you can see your child at night!
• Multi-Position Camera/Microphone: The Camera/
Microphone should be positioned so it is facing baby as
much as possible. This multi-position feature is unique
to Summer Infant nursery monitors. It allows the
microphone to focus on baby’s voice while
filtering out other household noises.
page
3
 Loading...