

Page 1
1
USER
INSTRUCTIONS
SBB100
User Instructions
COMBINATION Wood/Oil warm air FURNACE
Read and understand these instructions
before operating your Summeraire furnace.
Save these instructions for reference
This furnace must be installed and serviced by a qualied installer
and where required by law, a licenced technician.
SUMMERAIRE MFG.
PETERBOROUGH, ONTARIO
FOR SERVICE CALL:
NAME: _____________________________
ADDRESS: _________________________
____________________________________
TELEPHONE: _______________________
Page 2

2
IMPORTANT :THESE INSTRUCTIONS SHALL BE READ AND
UNDERSTOOD BY THE HOME OWNER
Your Sumnmeraire combination wood / oil furnace is controlled automatically.
This furnace is shipped with two thermostats, One thermostat controls the Oil
Burner and the other thermostat controls the Wood re
These entire instructions shall be read to ensure the best possible operation and
safest use of this furnace. Manufacturer’s recommendations and codes set down
by the Regulating Authorities must be followed when installing and operating the
furnace. ALL solid fuel burning furnaces manufactured by Summeraire Mfg. have
been tested for safety by the Canadian Standards Association Laboratories and
carry their Certicate of approval which is recognized by Insurance Underwriters
in Canada.
WARNING!
• DO NOT USE CHEMICALS OR FLUIDS TO START THE FIRE
• NEVER FIRE WITH TREATED WOOD, OR BURN GARBAGE,
GASOLINE, NAPTHA OR ENGINE OIL
• DO NOT FILL THE FIREBOX ABOVE THE BOTTOM OF THE
SMOKE BAFFLE, LOCATED AT THE TOP PORTION OF THE FIREDOOR
OPENING
• DO NOT STORE COMBUSTIBLES WITHIN THE MINIMUM
INSTALLATION CLEARANCES.
• BUILD A SMALL INTENSE FIRE AT LEAST ONCE A DAY TO REDUCE
CREOSOTE BUILD UP.
• CLEAN CHIMNEY AT LEAST ONCE A YEAR, AND INSPECT
REGULARLY FOR CREOSOTE BUILD UP
• FOR SAFETY, KEEP FIRE CHARGING DOOR TIGHTLY CLOSED.
• DO NOT ADJUST ELECTRICAL CONTROL SETTINGS OR BLOWER
PULLEY ARRANGEMENT.
• OPERATE OIL SIDE OF UNIT ONCE A WEEK TO ENSURE THAT IT
WILL OPERATE SATISFACTORILY WHEN NEEDED.
Page 3

3
• KEEP FIREDOOR CLOSED AND MAINTAIN ALL SEALS IN GOOD
CONDITION.
• MAKE SURE ADEQUATE COMBUSTION AIR IS PROVIDED IN
FURNACE AREA.
• DO NOT START WOOD FIRE IF OIL VAPOR IS PRESENT.
• LEAVE A MINUMUM OF 2” OF SAND OR ASH ON THE BOTTOM OF
THE WOOD FIREBOX.
• DO NOT USE FLUIDS, GASOLINE, OILS OR CHEMICALS TO START A
FIRE.
• DO NOT BURN GARBAGE, PAPER ( except to start the re ) TAR
PRODUCTS, GASOLINE, OILS, PLASTIC, DRIFT WOOD OR MATERIALS
CONTAING SALTS OR CHEMICALS . THIS IS EXTREMELY DANGEROUS
AND WILL VOID THE WARRANTY.
• THIS FURNACE IS NOT TO BE CONNECTED TO OR USED WITH AN
AUTOMATIC STOKER OR SAWDUST BURNER.
WOOD SECTION OPERATION
This unit is not to be connected to or used with an automatic stoker or sawdust
burner.
Solid fuel res require sufcient supply of air for combustion. Combustion air is
required above the re bed.
Keep the furnace smoke pipes and chimney clean. This will increase efciency
and reduce the risk of excess soot and creosote res.
This furnace, smoke pipes and chimney should be should be inspected monthly.
FIRING
Start the re in your furnace with paper and kindling only.
Crumple a quantity of paper and place it on the “oor” of the re box.
Randomly stack kindling on top if the paper allowing for good combustion and air
circulation.
Set your “ Wood “ thermostat so that it is 7 – 10 degrees higher than room
temperature. This will open the draft damper allowing combustion air into the
furnace.
Page 4

4
Light the paper and close the re charging door.
When the kindling is burning well, put in some hardwood and allow this to begin
burning.
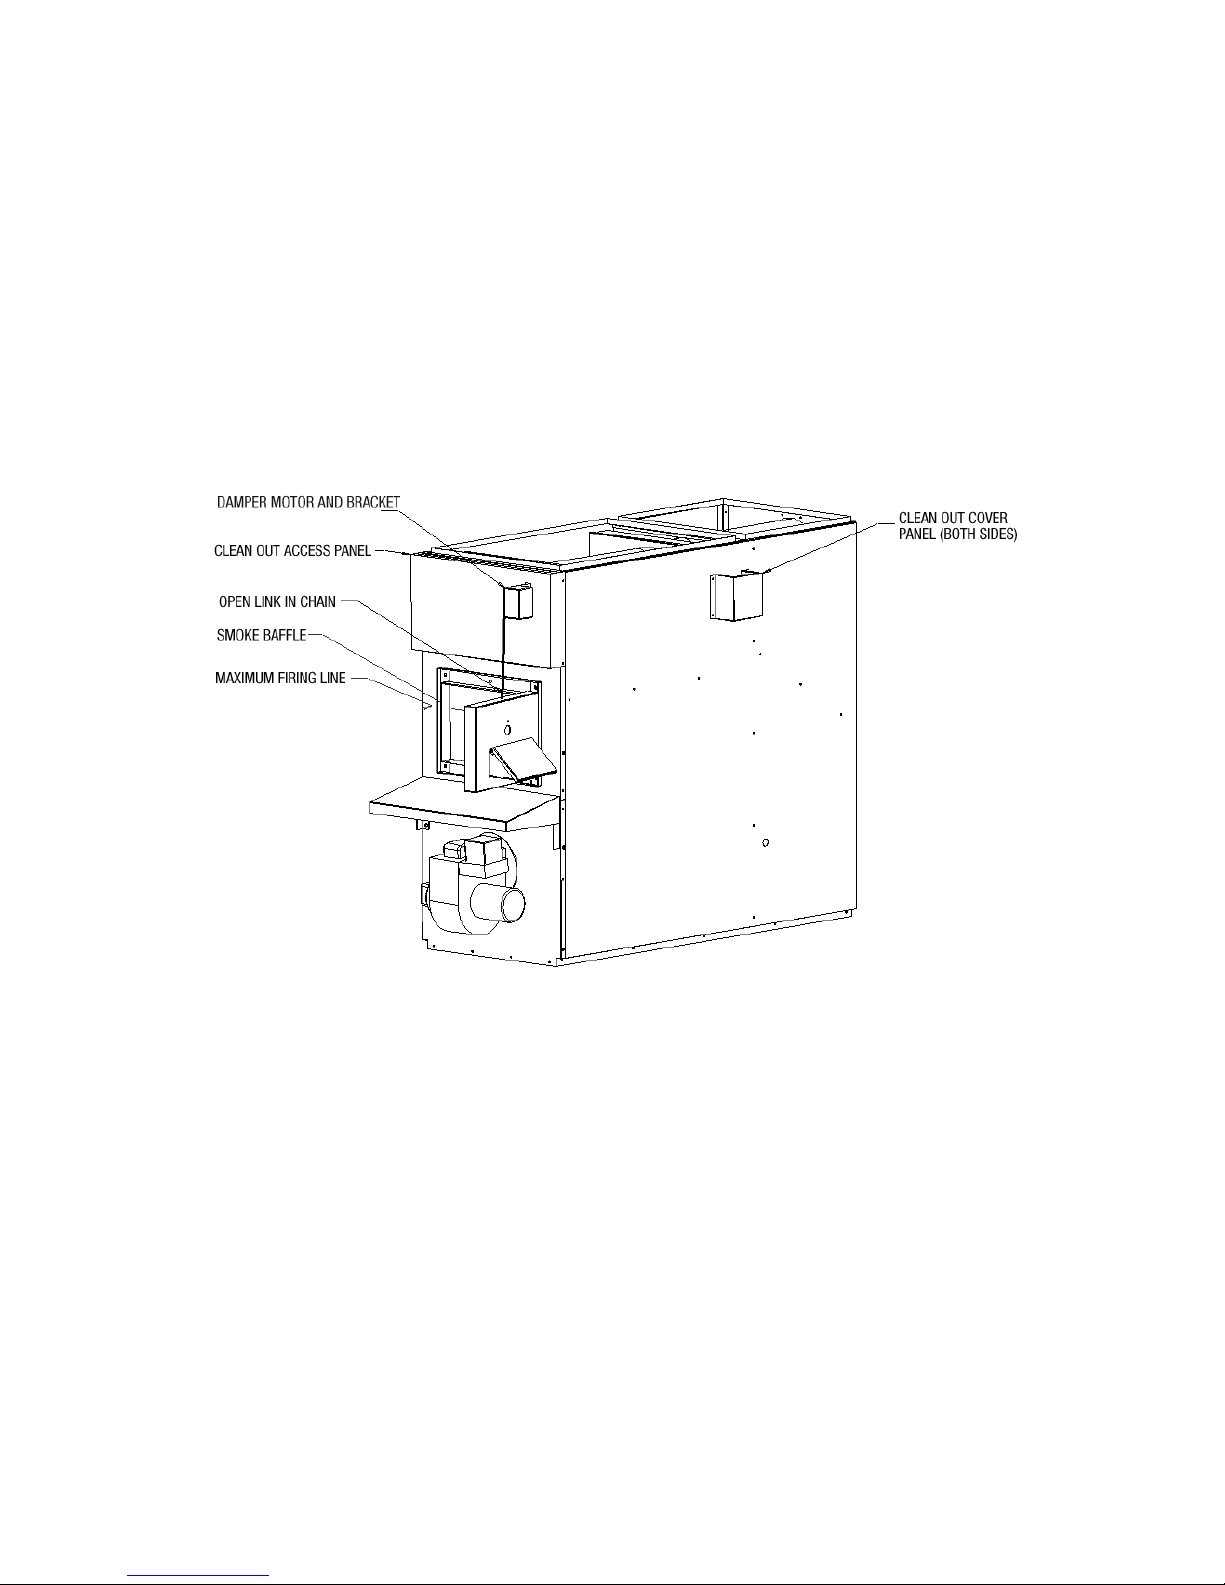
Add Hardwood : do not ll the re box above the bottom of the smoke bafe
located at the top portion of the redoor Fig. #1
Do not put too much wood at one time during initial start – up as you could
smother the re.
When re has been established properly, set “ Wood “ thermostat to your desired
setting. The thermostat controlling the “Wood” section should be set at least 5 º
above the “Oil” section thermostat, i.e. set “Oil” section thermostat at 18 º C
( 65 º F ) and the “Wood” section thermostat at 21 º C ( 70 º F )
LOAD FUEL CAREFULLY OR DAMAGE MAY RESULT
MAINTAINING THE FIRE
You will be required to maintain the re in your furnace manually.
The rate at which you will have to charge your furnace will vary with the size of
house, type of wood, and weather conditions.
When the re in your furnace is not great enough to properly heat your home, the
air circulation blower fan will begin to come on more frequently. In a few days
you will establish the basic recharging period for your specic application.
It is better to build small intense res than building large smoldering res as they
reduce creosote build up.
WHEN BURNING WOOD; DO NOT FILL THE FIREBOX ABOVE THE
BOTTOM OF THE SMOKE BAFFLE, LOCATED AT THE TOP PORTION
OF THE FIREDOOR - FIG. #1
DO NOT OVERFILL
Combustion air is supplied into and over the re through the “damper door and
chute” assembly. This arrangement helps to retard the formation of creosote in the
ue system.
Operate “Oil” burner one day a week to help reduce creosote formation.
Clean lters at least once a month and replace with new lters twice a year, unless
conditions require more frequent replacement.
If air ow is obstructed, the furnace will run longer and waste fuel !
Oil blower motor and burner motor where oil “holes” are provided at least twice
a year with number 20 non detergent oil, 2 drops only for each “oil hole”
Do Not Oil Blower Bearings !
A xed “LIMITER“ device is installed on the damper door of your furnace.
DO NOT TAMPER WITH THIS DEVICE!
Page 5

5
ASH REMOVAL
1) Allow re to burn out
2) Turn “ Wood “ thermostat to its lowest setting.
This de-activates damper motor and allows the damper door to close.
3) Remove ash with clean – out tool provided.
4) Ash is to be disposed of in a steel container with a tightly tting lid, and moved
out of doors immediately. Other waste shall not be placed in this container.
5) After ash removal, return “Wood” thermostat to normal setting and restart re.
OUT OF CONTROL FIRES
These can be caused by excessive fueling – build up of creosote – too much
draft
• Stop the ow of combustion air by lowering the thermostat to its lowest
setting and unhook the damper motor chain ( an open link is provided in the chain
for this purpose ). Fig. #1
• Reduce the draft by fully opening the barometric damper.
• Excess heat can damage the safety controls.
• Your complete furnace, chimney and controls should be checked by a
qualied technician prior to restarting the unit.
WOOD SECTION - OPERATION DURING POWER FAILURE
• Remove blower compartment door and air lter
• If necessary, insert a space under the “damper door” to provide combustion air
to the re.
• Fire at not more than _ normal ring level
• Open all warm air registers and dampers
• Check re at frequent intervals to ensure safe operation.
• DO NOT OVERFIRE YOUR FURNACE DURING POWER FAILURE
– A POTENTIALLY DANGEROUS SITUATION WILL RESULT.
NOTE: When power has been restored, remove space from under the “damper
door” ( if inserted ).
Reinstall blower compartment door.
Page 6

6
FURNACE MAINTENANCE AND CARE
Establish a routine for the storage of fuel, care of the appliance, and ring
techniques. Check daily for creosote build up until experience shows how often
cleaning is necessary. Be aware that the hotter the re, the less creosote will be
deposited, and weekly cleanings may be necessary in mild weather though
monthly cleanings may be enough in the coldest months.
Have a clearly understood plan to handle a chimney re.
To control creosote when burning wood in temperate weather, stoke often with a
small intense re. Heat requirements should determine the size of the Wood re.
To help control creosote build up in the furnace, burn well seasoned hard wood,
sun – dried in an open area for at least 12 months.
Do not allow any wood re to smolder and cool the ue system as this type of
operation condenses the ue gas products creating creosote.
DO NOT OPERATE YOUR SUMMERAIRE COMBINATION FURNACE
WITH THE WOOD CHARGING DOOR OPEN !
CLEANOUTS
It is very important to clean the heat exchanger at least on an annual basis.
One cleanout cover is located on the front of the furnace above the rebox
“charging” door.
To access this cleanout, remove the painted “stand – off” cover.
Remove cleanout cover by removing the nuts and carefully remove the cleanout
cover gasket.
Use a wire brush to clean the secondary heat exchanger tubes to loosen any
accumulation of soot or creosote that may be present.
One clean – out access cover is located on each side of the furnace.
These covers permit access to the cleanouts located in the secondary heat
exchanger
Use a wire brush to loosen soot and creosote present in the area.
Remove residue from the designated cleanout areas with a suitably approved
vacuum cleaner designed for removing this material
All cleanout gaskets should be replaced after each cleanout is carried out.
NOTE : It is recommended that clean out of the secondary heat exchanger and
complete furnace be carried out by a qualied technician and where required by
law, a licensed technician.
Page 7

7
CHIMNEY FIRE
• Call the re department
• Make preparations to leave the house.
• Shut off main power switch to the furnace.
• Close all combustion air openings in the furnace to reduce the re size.
• Do not remove the smoke pipe(s) until the re is completely out.
• Inspect the chimney and repair as necessary after any chimney re. Do not use
the furnace until these steps have been affected.
OIL SECTION NORMAL OPERATION
When operating with the oil burner, the furnace will cycle on call from the oil
thermostat as an oil furnace operates.
When the oil burner starts, the damper which controls the wood re will close
automatically. When using the wood section, the wood thermostat will cause the
damper motor to open the damper door on a call for heat, closing when the wood
thermostat has bee satised.
Should the temperature in the warm air plenum reach its highest allowable limit
( 230º F or 110º C ), the damper motor will close the damper door and the oil
burner will not start, the blower will continue to operate. When the temperature
returns to normal levels, the normal cycle will start.
OIL SECTION OPERATING INSTRUCTIONS
• Use No 2 furnace oil ONLY
• Do not use gasoline, crankcase oil, or any oil containing gasoline.
• Do not attempt to start the burner if excess oil has accumulated, when the
furnace is full of vapor, or if the combustion chamber is hot.
• Do not start the burner unless the blower access door in place.
• Press the burner relay reset button ONLY TWICE; if the burner fails to start,
call an Oil Burner Technician.
• If the oil burner is to be shut off for any period of time, shut the oil valve OFF
at the oil tank.
• Do not adjust or tamper with the furnace or any of the controls
• Do not burn garbage or paper in the oil section of the unit.
• Never leave paper, rags, or other combustibles around the furnace.
• Only qualied, or where required by law, a licensed technician shall set – up
this unit and adjust controls.
Page 8

8
STARTING THE OIL BURNER
• Do not start the burner if the combustion chamber is hot or if oil vapor
is present.
• Make sure all valves installed on the oil line are open.
• Turn the main oil burner switch – ON
• Set the oil thermostat at a point above room temperature.
• If the oil burner fails to start immediately, turn the main oil burner switch
‘OFF’ and call a qualied service technician.
• If the oil burner starts to operate normally, leave the switch in the ‘ON’
position and reset the thermostat to the desired temperature.
TO TURN THE BURNER OFF
• Turn the main oil burner switch to ‘OFF’
• Set the thermostat as far below room temperature as possible.
IF BURNER IS TO BE SHUT OFF FOR AN EXTENDED PERIOD.
• Turn main oil burner switch to ‘OFF’.
• Close all oil supply valves.
• The heating system should be checked and cleaned if necessary.
RESTARTING BURNER AFTER EXTENDED SHUT DOWN.
The complete oil burner should be checked and serviced by a qualied
technician.
• Check oil pump strainer
• Replace oil lter cartridge
• Check electrodes
• Oil burner motor ( see lubrication section )
• Restart burner by following instructions in; “STARTING THE OIL
BURNER“ section.
BURNER FAILS TO OPERATE
Always call a qualied technician
Page 9

9
The trouble may be :
• Raise your “Oil” section thermostat to 5 º C ( 10 º F ) above present room
temperature
• Make sure your “Oil Burner” power switch is in the “ON”position
• If you hear a hum from the oil burner, and the motor has not started, press the
reset button on the burner motor once only.
• Blown fuse in electrical panel
• Thermostat may be set below room temperature.
• Burner relay ( combustion control ) may have to be “reset” ( press reset once
only )
• Oil valve may be closed.
• Oil supply may be too low.
• Manual rest fan and limit control may be “tripped”
• Blocked ue sensor “tripped”
• If the oil burner fails to start or runs for only a few
seconds, call a qualied service technician.
OIL BURNER SERVICE
The oil burner and furnace should be thoroughly serviced annually by a qualied
service technician, and where required by law, a licensed technician.
AIR FILTER
The air lter should be replaced at least every 3 months, more often if unit is
located in a dusty location ).
The replacement air lter shall be C.S.A. certied.
DO NOT USE PLEATED TYPE AIR FILTERS IN THIS APPLIANCE.
OIL FILTER
The oil lter cartridge should be changed annually when annual service is carried
out.
GENERAL MAINTENANCE
• Keep the heat exchanger clean. Soot does not conduct heat. A dirty furnace
requires more oil to heat a home than a clean one.
• The smoke pipe should be removed at least once a year and thoroughly
cleaned.
• Ensure that the furnace, ue pipe and chimney are cleaned at the end of the
heating season.
Page 10

10
CONTROLS
The controls on your Summeraire SBB100 combination furnace are factory set.
DO NOT TAMPER WITH THESE CONTROLS OR THEIR SETTINGS
WARNING!
SAFETY CONTROLS
DO NOT TAMPER WITH OR ADJUST THE FACTORY SETTINGS OF
THESE CONTROLS.
Your Summeraire combination wood / oil furnace is equipped with two ( 2 )
safety controls
These controls are located on either the right or left side of the furnace.
One of these controls is a “Fan & Limit” control.
“FAN” portion of this control senses when the air in the plenum chamber is warm
enough to activate the air circulation fan. As the re / heat cools down, and
reaches the “OFF” setting of this control, it turns the air circulation blower OFF
“LIMIT” portion of this control senses if for some reason, the temperature in the
plenum chamber exceeds the maximum temperature set in the Fan & Limit
control. If this temperature exceeds this temperature, the damper door ( controls
the wood re ) closes, OR, the oil burner shuts OFF. The circulation blower
continues to operate until the air temperature in the plenum returns to a point
below the factory set temperature.
The other safety control, with a RED button and located beside the above control
is a secondary “safety” limit control. This control is a “safety override” control
and acts as a back – up control in the unlikely event that the above noted Fan &
Limit control fails. This factory set Limit Temperature of this control is set
slightly higher than the limit portion of the Fan & Limit control detailed above.
This control will shut down the furnace as noted in the above noted control. The
circulation blower continues to operate until the temperature is reduced to a point
below the factory setting.
This control will not allow the furnace to “restart” under any conditions UNLESS
the RED button is pushed.
HOWEVER, remember, this control activated due to failure of the Fan & Limit
control. Therefore the RED button should not be activated unless you have
thoroughly examined the cause of the failure of the Fan & Limit control, or what
caused the “safety” limit to operate.
We strongly recommend if this situation occurs, that you call a service technician
as soon as possible and have a complete inspection of your furnace completed.
THIS IS A SAFETY CONTROL – A DANGEROUS SITUATION WILL
RESULT IF PROPER PRECAUTIONS ARE NOT OBSERVED.
Page 11

11
CREOSOTE – IMPORTANT WOODBURNING
INFORMATION
Creosote is the black tar – like substance that forms on the heat exchanger, ue
pipe and chimney when burning wood. Wood combustion is never complete, a
visible sign is smoke coming from your chimney.
Wood, when freshly cut, can contain as much as 50% moisture, depending on the
type. Air dried wood, when dried under ideal conditions, will still contain
approximately 20% moisture. The moisture, along with ue gas products, are
vented outside by way of the ue pipe and chimney. Flue gas products, when
chilled, condense into liquid creosote which may become a crystal ( solid form )
as temperatures increase with heat requirements.
The heat control method on furnaces when burning wood, is the size of the fuel
charge along with the control of combustion air, to increase or decrease the rate of
burning which governs the heat output.
To help prevent creosote in both “grate and base burner” types, burn dry seasoned
wood, hard wood is more desirable than soft wood. Govern your wood load with
the heat output required. Spring and fall require frequent small charges. A small
intense re produces less creosote.
Short ue pipe runs help to keep the gases above the dew point.
An interior chimney holds and retains heat longer resulting in less condensation
than an exterior chimney.
A good draft produces a hotter re and exhausts the ue gases outside more
rapidly at higher temperatures preventing condensation of ue products.
A combination furnace in need of cleaning, will have poor draft creating a lazy
re and eventually, if ignored, may smoke around the doors when the oil side is
running with a wood re. (poor draft in a clean system can also produce smoking
around the door). This choked condition with soot and creosote can only be
relieved by cleaning the entire system as frequent as necessary, if neglected, it will
cause a chimney re, which could result in property loss and danger to the lives of
the occupants.
Wood burning equipment must be vented into a factory built Or vitreous clay or
stainless steel lined masonry chimney. Chimneys must be built to Building and
Energy Board Standards. Do not neglect cleaning, or deliberately set your
Page 12
12
chimney on re to burn out the soot and creosote. If no damage is done to the
house, there will be damage to the chimney caused by extreme heat. Not even the
best chimneys are designed to withstand repeated chimney res.
FACTORY BUILT CHIMNEY MUST BE LABELED THAT IT COMPLIES
WITH UNDERWRITERS LABORATORIES CANADA ULC - 629 – M
Figure #1
Page 13

13
LIMITED WARRANTY MODEL SBB100
Summeraire Mfg. warrants , on a limited basis, this furnace to be free from defects
in manufacturing as follows:
1) The Heat Exchanger is warranted for a period of 10 years as detailed below.
2) Electric controls, oil burner and outside casing ( or jacket ) are warranted for a
period of 1 year from date of installation.
(Copy of Bill of Sale must be provided to conrm installation date).
HEAT EXCHANGER LIMITED 10 YEAR WARRANTY
Cost to owner of replacement heat exchanger expressed as a percentage of the
retail price in effect at the time of shipment of the replacement heat exchanger.
First 5 years after date of original installation 0% ( replaced no charge )
From year 5 through year 6 20%
From year 6 through year 7 40%
From year 7 through year 8 50%
From year 8 through year 9 60%
From year 9 through year 10 80%
From year 10 and over 100%
The foregoing warranty applies only where installation has been made in full
accordance with Federal and Local Laws and Codes or ordinances applying to
installation of wood or combination wood / oil warm air furnaces, and failure is
not caused by abuse, or failure to observe proper operating instructions and
cleaning suggestions accompanying the furnace; furnace has been red with the
proper type of fuel and maintained in accordance with our instructions; furnace
has not been red at an output in excess of its rated or designed capacity; furnace
has been installed where standard or normal atmosphere prevails and the unit is
not subject to excessive humidity, dust conditions, or chemical atmosphere of any
type or kind which may cause accelerated metal corrosion.
In Canada this furnace must be installed in accordance with the most current
edition of CSA B140 and CSAB365-M91.
Warranty extends only to the repair or replacement of parts returned, freight
prepaid, to our facilities in Peterborough, Ontario, and which prove defective after
inspection and testing by us. Any labour involved in diagnostics, repair or
replacement is excluded from this warranty and Summeraire Mfg. assumes no
responsibility for consequential damages of any kind to persons or property.
Page 14

14
The following forms part of this warranty and is intended to elaborate on specic
points of our Limited Warranty:
Warranty on above model will be denied as per the following:
• Rusting of secondary heat exchanger where obvious cause is improper
cleaning; particularly at the end of each heating season to prevent damp creosote
from attacking the heat exchanger material; or, a defective or improperly installed
humidier leaking water onto the heat exchanger.
• Warpage and cracking above the indicated solid fuel ring line.
Note: Your furnace requires periodic cleaning throughout the heating season.
Also; at the end of the heating season your furnace must be completely cleaned
including all areas of the secondary heat exchanger where creosote residue may
accumulate and attract moisture from damp basement areas.
Remember, the warranty of this specied it covers the materials and workmanship
of the unit. It does not cover damage resulting from improper ring practices or
maintenance procedures.
Please follow our instructions and keep your unit operating at peak efciency and
keep the warranty on your unit valid.
A heat exchanger replaced under warranty, assumes only the remaining unexpired
portion of the 10 year Limited Warranty period, determined by the date of original
installation.
This is the ONLY warranty applicable to this Summeraire furnace.
Keep your warranty working for you. Please complete and mail your Warranty
Registration Card to Summeraire Mfg., 2040 Fisher Drive, Peterborough,
Ontario, Canada K9J 6X6 to register this warranty.
Page 15

15
F-SBB100-USMAN-EN-REV3
Summeraire Mfg.,
2040 Fisher Drive,
Peterborough, Ontario,
Canada, K9J 6X6.
 Loading...