

Page 1
33020/33028
Please read the following instructions carefully.
Keep this instruction manual for future reference.
For technical support, contact us at 1-401-671-6551
or www.summerinfant.com/contact
For use with children from 6 - 24 months.
Keep small parts away from children.
Adult assembly required.
Fits openings up to 50 inches wide.
We’re here to help! If you have questions or need assistance,
please contact our Consumer Relations Team at 1-401-671-6551 or www.summerinfant.com/contact
Summer Infant (USA), Inc.
1275 Park East Drive
Woonsocket, RI 02895 USA
1-401-671-6551
© 2018 Summer Infant (USA), Inc.
Please retain information
for future reference.
Colors and styles may vary.
MADE IN CHINA.
12/18
Retractable Walk-Thru Gate
INSTRUCTION MANUAL
This helpful gate allows you to create and maintain a secure environment between rooms
and stairways for your child or pet. Installs quickly and removes just as easily!
Page 2
WARNING
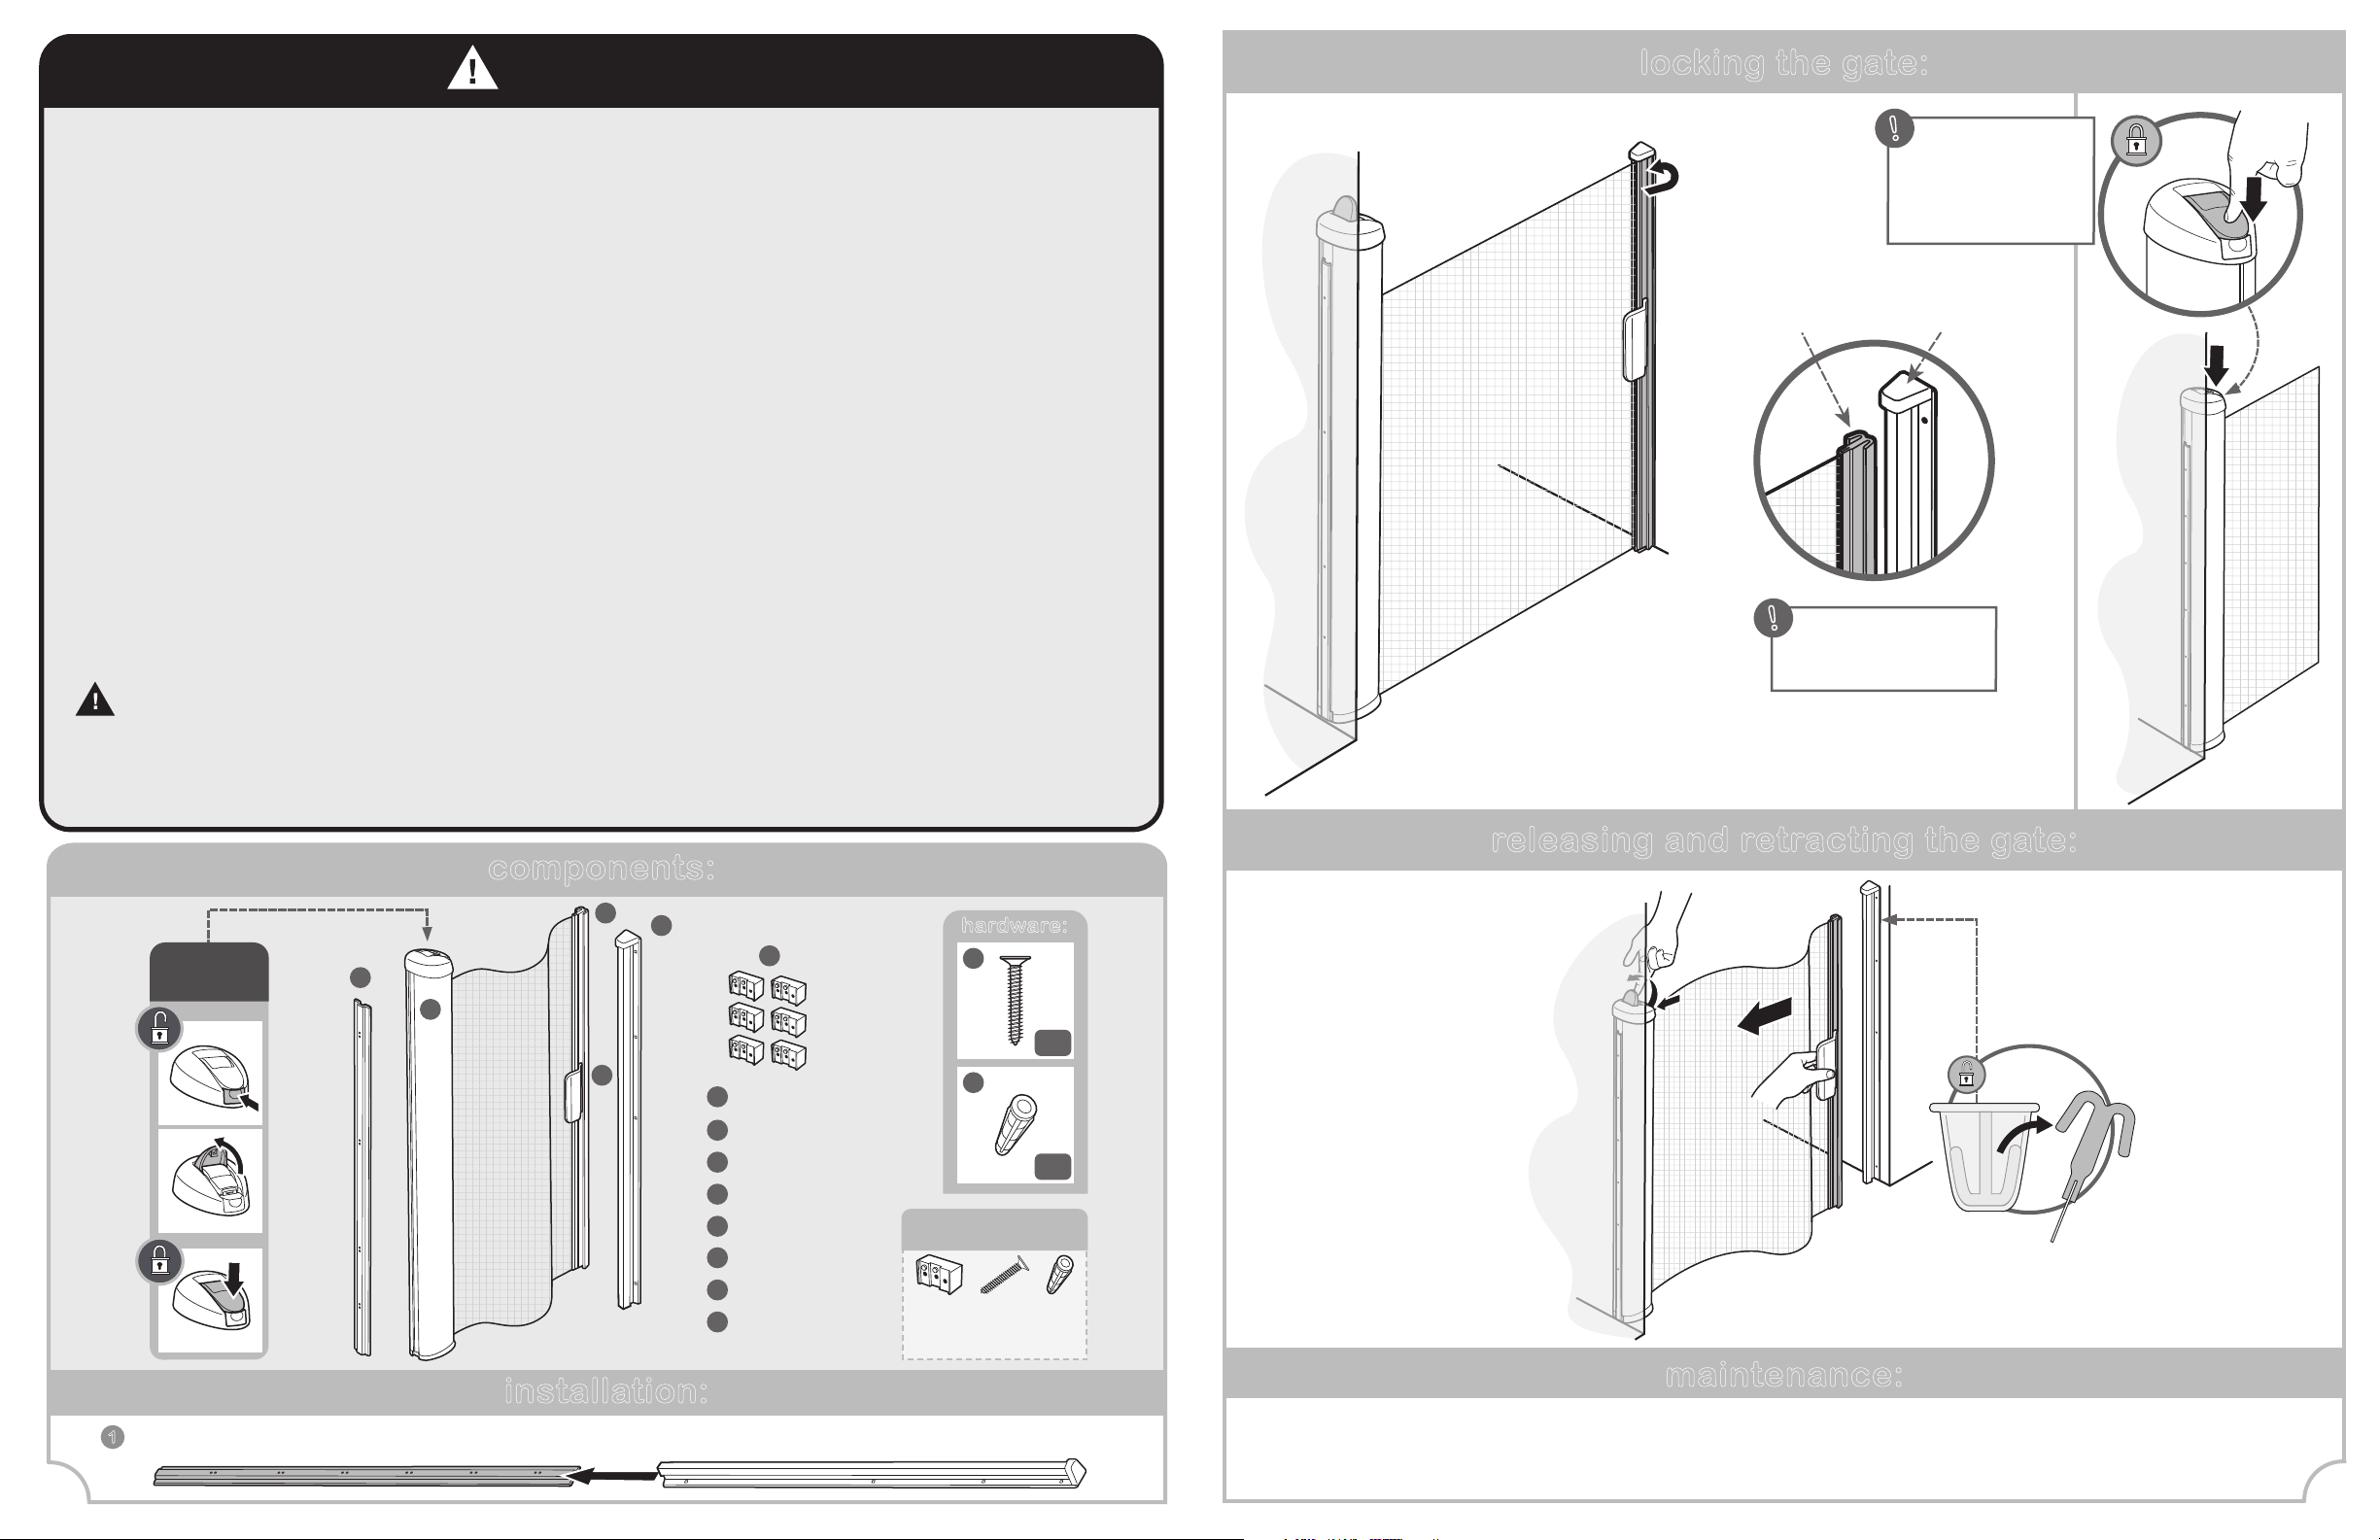
locking the gate:
Children have died or been seriously injured when gates are not securely installed.
• ALWAYS install and use gate as directed, using all required parts. • Install according to manufacturer’s instructions.
• STOP using when a child can climb over or dislodge the gate.
• Use only with the locking/latching mechanism securely engaged.
• To prevent falls, never use at top of stairs with the handle installed on the stair side of the gate.
• Always install handle on the landing side of the gate.
• If the gate is to be used at the bottom of the stairs to prevent the child from climbing up the stairs, it must be placed on the oor
in front of the lowest stair.
• If the gate is to be used at the top of the stairs to prevent the child from falling down the stairs, it must not be placed on any stair
below the level of the top stair.
• At the top of the landing, position the gate 6 inches (15 cm) away from the top step.
• NEVER use a gate to keep child away from pool.
• ALWAYS install wall bracket and gate latch at to the oor.
• NEVER leave child unattended.
• Always close and lock the gate behind you.
• This product will not necessarily prevent all accidents.
• ALWAYS check regularly to ensure gate and locking systems are secure.
• Intended for use with children from 6 months to 24 months.
• Do not use if any components are missing or damaged.
• Adult assembly required. Exercise care when unpacking and assembling product.
slide gate anchor
into gate catch
!
IMPORTANT:
Gate is locked when
lever is pressed down
and clicks into blue
button.
gate
anchor
!
Important: Make sure
gate anchor is fully engaged
in the gate catch.
gate
catch
press
to lock
WARNING FALL HAZARD
- NEVER allow child near gate until it is locked and secure.
- Mesh gate is locked and secure when locking lever is pressed down and gate anchor is fully inserted in gate catch.
components:
F
LOCKING
LEVER
C
D
B
A
E
A
Housing Unit
B
Wall Bracket
C
Gate Catch
D
Baseboard Spacers
E
Gate Handle
F
Gate Anchor
G
Wood Screws
H
Drywall Anchors
hardware:
G
x12
H
x12
Replacement Parts Available
Kit #33010-10
Baseboard Spacers
Drywall Anchors
Wood Screws
releasing and retracting the gate:
Push blue button
and lift lever
to unlock gate.
Use handle to
release and
retract gate
panel.
Guide
gate panel
back into
housing unit.
TOP VIEWTOP VIEW
installation:
maintenance:
1
slide wall bracket out
2
• Check all hardware to ensure gate is securely in place.
• Do not use gate if any of the components are damaged or missing.
• Surface clean with a damp cloth or sponge, using mild detergent and warm water to clean. Towel dry.
7
Page 3
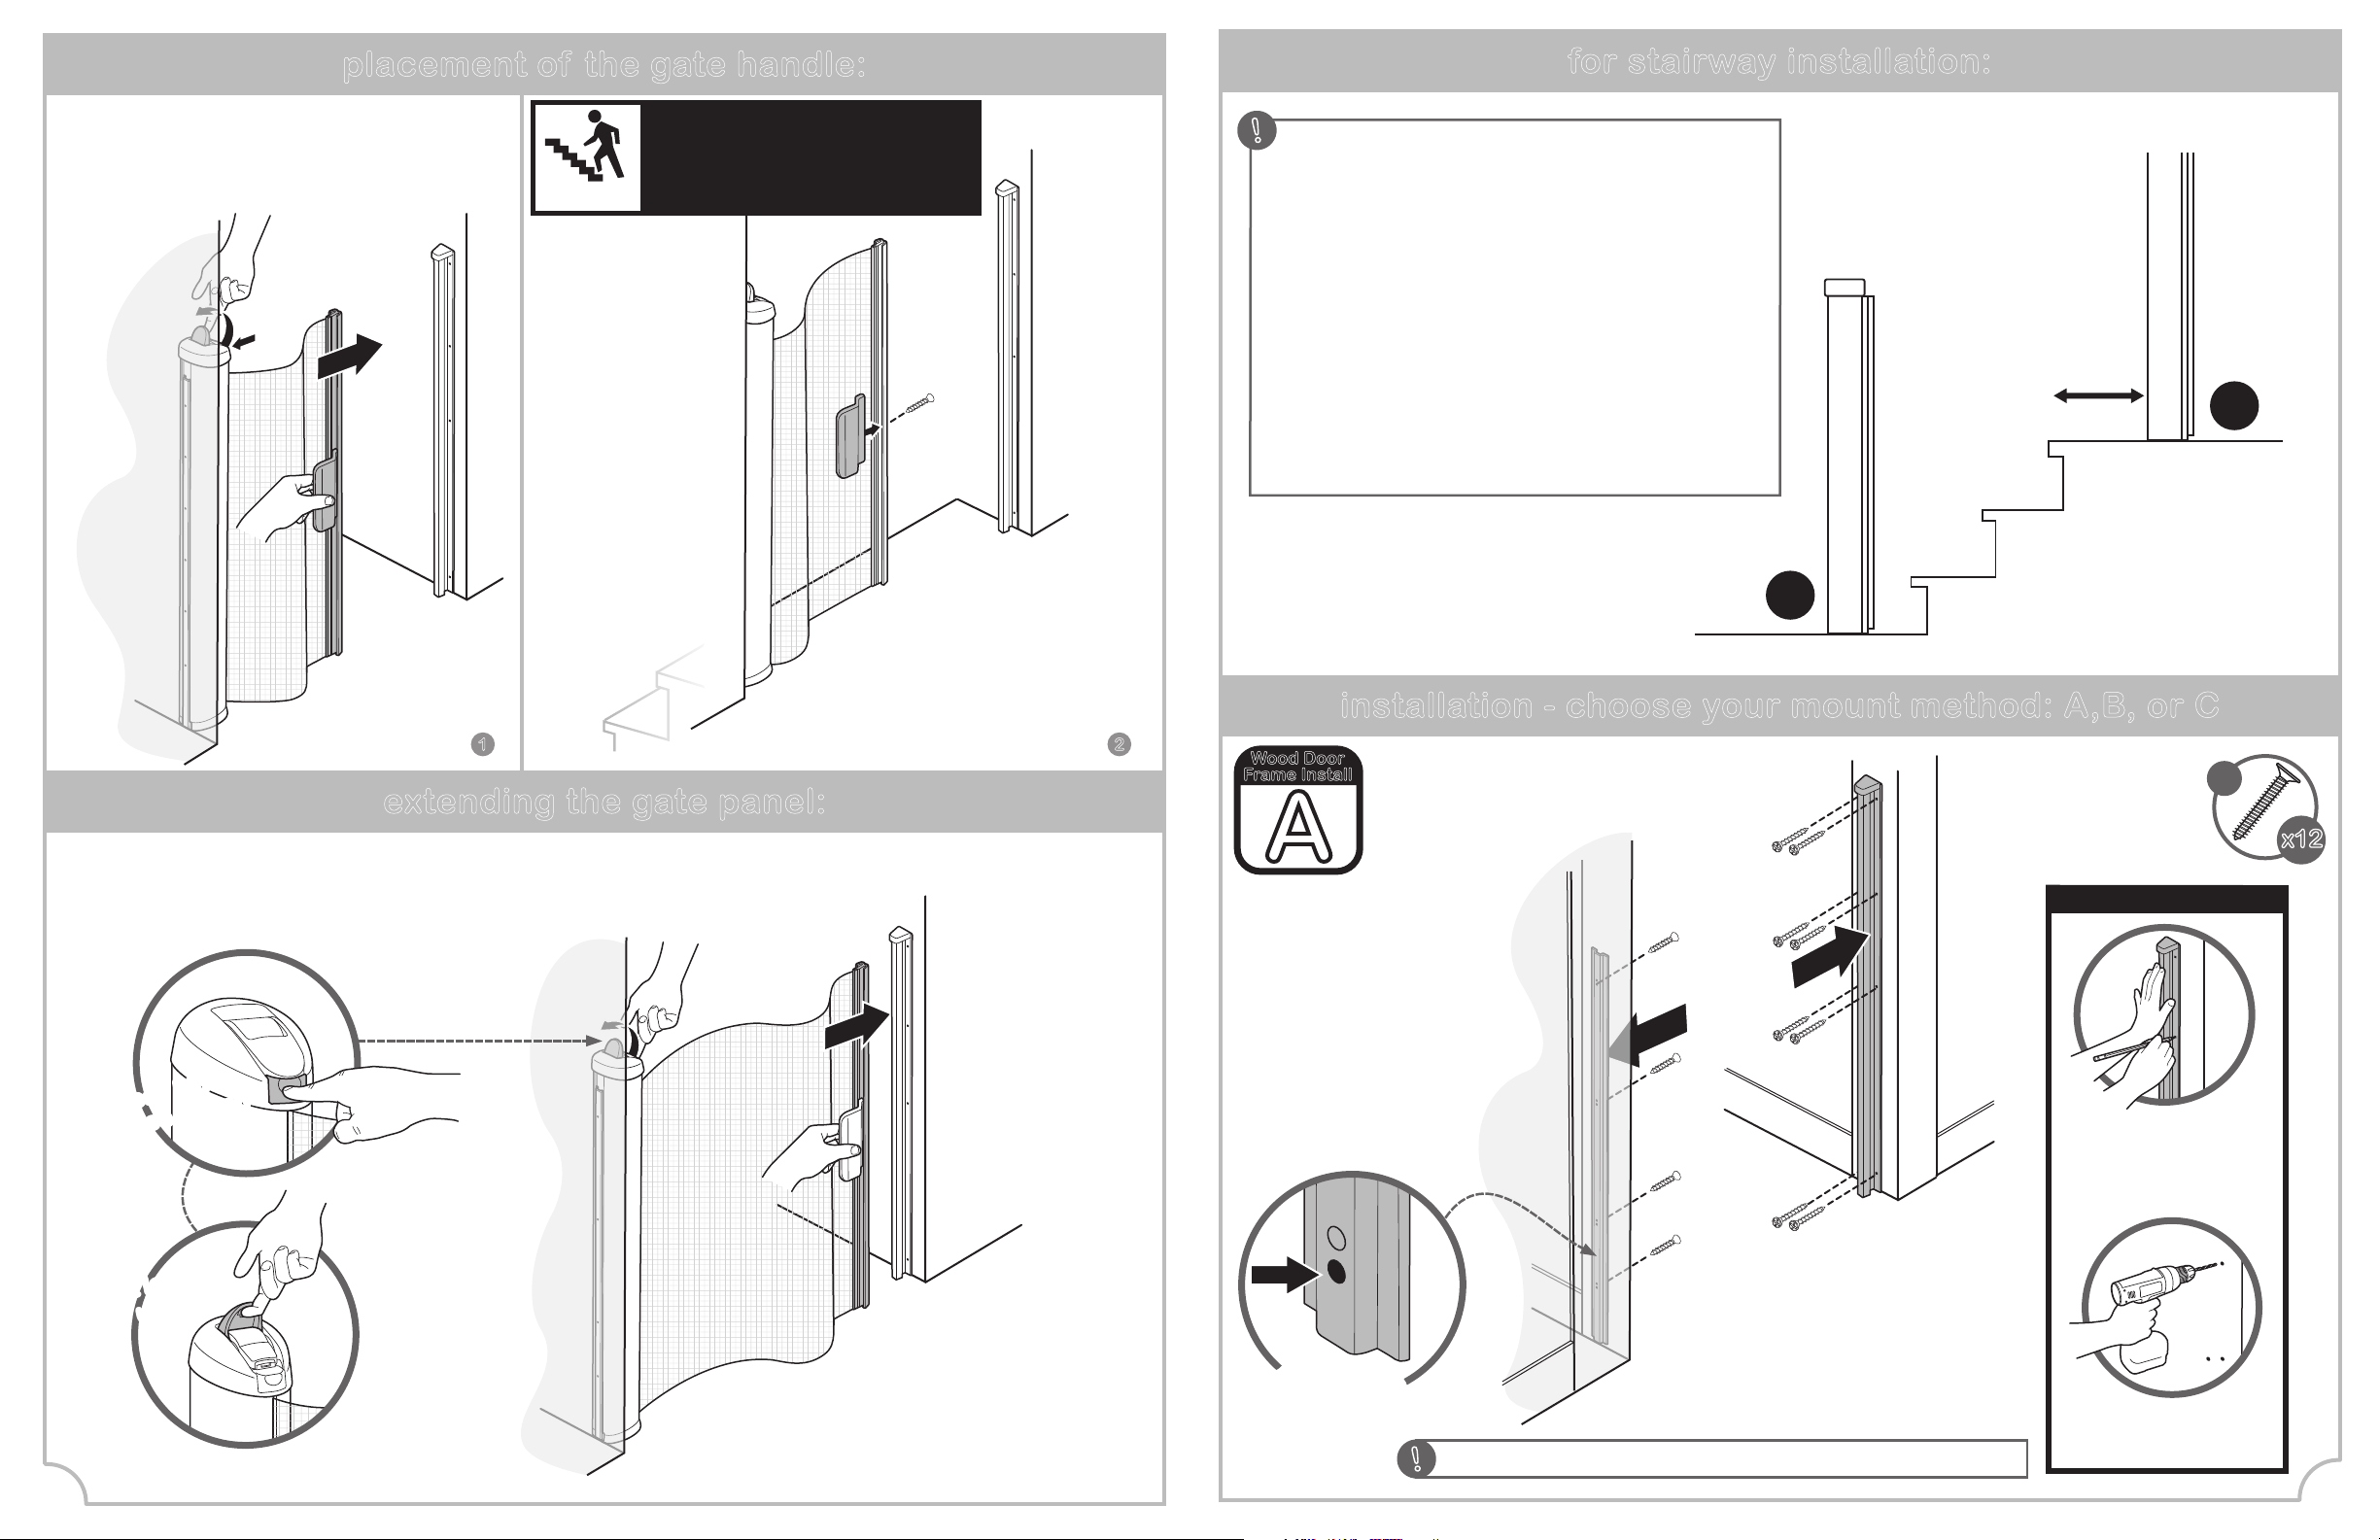
placement of the gate handle:
for stairway installation:
To unlock gate, press blue
release button, then lift lever
and pull gate out.
stair side
IMPORTANT!
FOR STAIRWAY INSTALLATION:
ALWAYS attach handle on landing
side of gate, NEVER on stair side.
First remove screw,
place handle on landing
side of gate. Insert screw.
!
IMPORTANT:
• If the gate is used at the bottom of the stairs to prevent
the child from climbing up the stairs, it must be placed on
the floor in front of the lowest stair. (figure A)
• If the gate is used at the top of the stairs to prevent the
child from accessing the stairs, it must not be placed on any
stair below the level of the top stair.
At the top of the landing, position the gate 6 inches (15cm)
away from the top step. (figure B)
A
installation - choose your mount method: A,B, or C
x12
6 inches
15cm
B
press blue
press blue
release button
release button
lift lever
lift lever
to unlock
to unlock
1 2
extending the gate panel:
press blue release button,
then lift lever to unlock
and extend gate
Wood Door
Frame Install
A
using the
wood screws,
attach the wall bracket
and gate catch to
opposing walls
G
x12
HELPFUL TIP!
First, use the wall bracket and
gate catch to mark mounting
locations on the wall by
aligning the wall bracket and
gate catch flush with the floor.
use
use
lower holes
lower holes
on wall bracket
on wall bracket
for screws
for screws
6
Once complete, continue to housing unit installation on page 5!
!
Then, using a 1/8 inch drill bit,
drill pilot holes and mount
gate hardware.
3
Page 4
installation- choose your mount method (continued): installation- choose your mount method (continued):
Drywall Door
Frame Install
B
nd
2
rd
3
IMPORTANT!
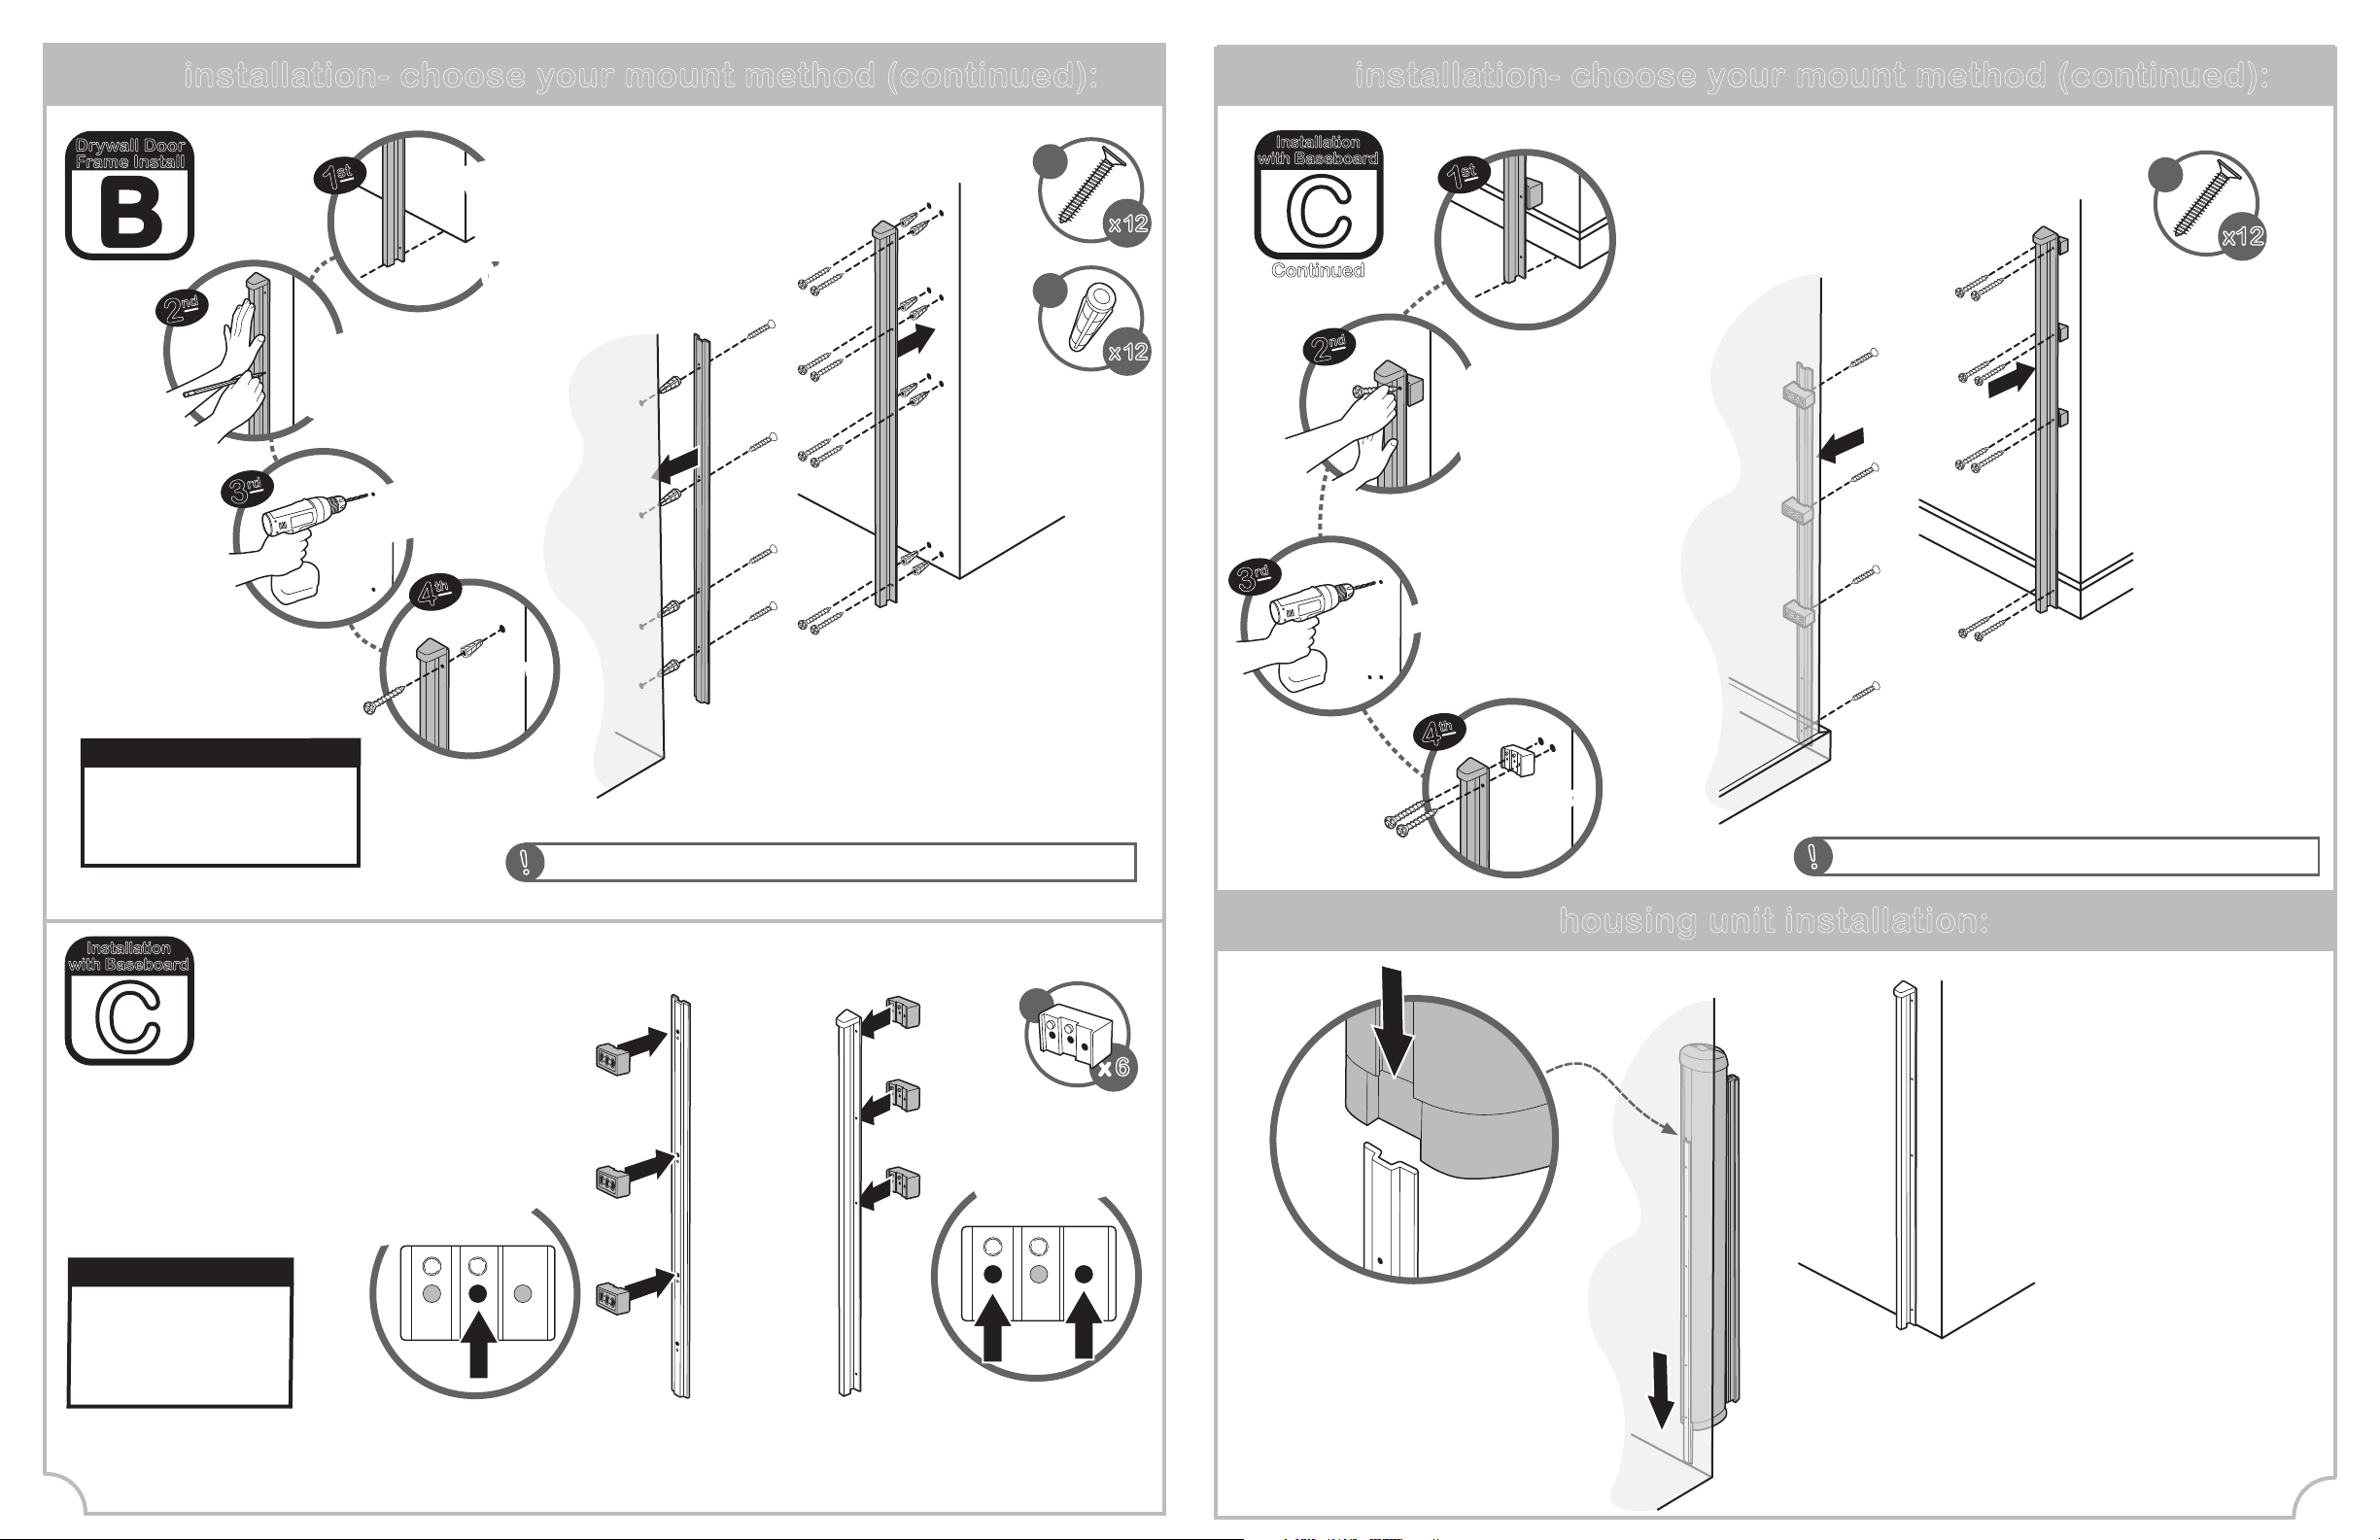
Drywall Mount:
When attaching gate catch and
wall bracket into drywall, wall
anchors are needed.
st
1
mark
mark
pilot hole
pilot hole
locations
locations
7/32 inch
pilot holes
on opposing
on opposing
and gate catch
and gate catch
drill
th
4
attachattach
walls, align
walls, align
wall bracket
wall bracket
flush to floor
flush to floor
Once complete, continue to housing unit installation on page 5!
!
G
H
after drilling 7/32 inch pilot holes,
attach gate hardware using
wall anchors and wood screws
x12
x12
Installation
with Baseboard
C
Continued
2
rd
3
nd
st
1
use
use
one of the
one of the
wood screws
wood screws
to locate
to locate
pilot holes
pilot holes
drill
1/8 inch
pilot holes
th
4
attachattach
on opposing
on opposing
walls, align
walls, align
wall bracket
wall bracket
and gate catch
and gate catch
to floor
flush to floor
G
using the wood screws,
attach the wall gate bracket
and gate catch with the
baseboard spacers to
opposing walls
Once complete, continue to housing unit installation
!
x12
Installation
with Baseboard
C
IMPORTANT!
Be sure to line up all
screw holes when
snapping spacers onto
the gate catch and the
wall bracket.
snap the baseboard
spacers into the backs
of the wall bracket and
the gate catch
align with
align with
screw holes
screw holes
on wall bracket
on wall bracket
D
x 6
align with
align with
screw holes
screw holes
on gate catch
on gate catch
housing unit installation:
slide housing unit
onto wall bracket
flush to floor
4
5
 Loading...