

Page 1
INSTRUCTION MANUAL
BEST VIEW™ DIGITAL COLOR
VIDEO MONITOR
Please read the
following instructions
and warnings carefully.
Keep this instruction manual
for future reference.
Tools required:
screwdriver (not included)
For technical support see back page.
For use with children from birth and up.
WARNING:
Adult assembly required.
Keep small parts away from
children when assembling
.
28030/28035
STRANGULATION HAZARD - Keep cord out of baby’s reach.
NEVER place camera or cords within 3 feet of the crib.
Use enclosed Security Clips to help secure cord away from
baby’s reach. Never use extension cords with AC Adapters.
Only use the AC Adapters provided.
WARNING:
2/11
Meijer.com
Page 2
BATTERY WARNING:
• Use only the original rechargeable batteries
provided. Please contact Summer Infant, Inc. for
replacement batteries. Contact information can be
found on page 12 of these instructions or on the
battery itself.
• Do not mix old and new batteries.
• Do not mix alkaline, standard,
or rechargeable batteries.
• Batteries are to be inserted with correct polarity.
• Clean battery and product contacts prior to
battery installation.
2
WARNING:
THIS PRODUCT CANNOT REPLACE RESPONSIBLE
ADULT SUPERVISION.
• STRANGULATION HAZARD - Keep cord out of baby’s reach.
NEVER place camera or cords within 3 feet of the crib. Use
enclosed Security Clips to help secure cord away from
baby’s reach. Never use extension cords with AC Adapters.
Only use the AC Adapters provided.
• When an AC Adapter is plugged into an electrical outlet,
do not touch the exposed end.
• Test monitor before first use, periodically, and when
changing location of the Camera.
• Do not use monitor near water (such as bathtub, sink, etc.).
• Keep monitor away from heat sources (such as stoves,
radiators, etc.).
• Make sure there is proper ventilation around all monitor
components. Do not place on sofas, cushions, beds, etc.
which may block ventilation.
• Nursery monitors use public airwaves to transmit signals.
This monitor may pick up signals from other monitors or
similar devices and signals broadcast by this monitor may
be picked up by other receivers.
• This product is not a toy. Do not allow children to play with it.
• This product contains small parts. Adult assembly required.
Exercise care when unpacking and assembling the product.
11) Power Lines- An outside antenna system should not be located in the
vicinity of overhead power lines or other electric light or power circuits, or
where it can fall into such power lines or circuits as contact with them
might be fatal.
12) Overloading- Do not overload wall outlets, extension cords, or integral
convenience receptacles as this can result in a risk of fire or electric
shock.
13) Object and Liquid Entry- Never push objects of any kind into this
product through openings as they may touch dangerous voltage points or
short-out parts that could result in a fire or electric shock. Never spill liquid
of any kind on the product.
14) Servicing- Do not attempt to service this product yourself as opening or
removing covers may expose you to dangerous voltage or other hazards.
Refer all servicing to qualified service personnel.
15) Damage Requiring Service- Unplug this product from the wall outlet
and refer servicing to qualified service personnel under the following
conditions:
a) When the power-supply cord or plug is damaged,
b) If liquid has been spilled, or objects have fallen into
the product,
c) If the product has been exposed to rain or water,
d) If the product does not operate normally by following the
operating instructions. Adjusting only those controls that are
covered by the operating instructions as an improper
adjustment of other controls may result in damage and will
often require extensive work by a qualified technician to
restore the product to it’s normal operation,
e) If the product has been dropped or damaged in any way, and
f) When the product exhibits a distinct change in performance-
this indicates a need for service.
16) Replacement Parts- When replacement parts are required, be sure the
service technician has used replacement parts specified by the manufac-
turer or have the same characteristics as the original part. Unauthorized
substitutions may result in fire, electric shock, or other hazards.
17) Safety Check- Upon completion of any service or repairs to the product,
ask the service technician to perform safety checks to determine that the
product is in proper operating condition.
18) Wall or Ceiling Mounting- The product should be mounted to a wall or
ceiling only as recommended by the manufacturer.
19) Heat- The product should be situated away from heat sources such as
radiators, heat registers, stoves, or other products (including amplifiers)
that produce heat.
IMPORTANT SAFETY INSTRUCTIONS
Meijer.com
Page 3
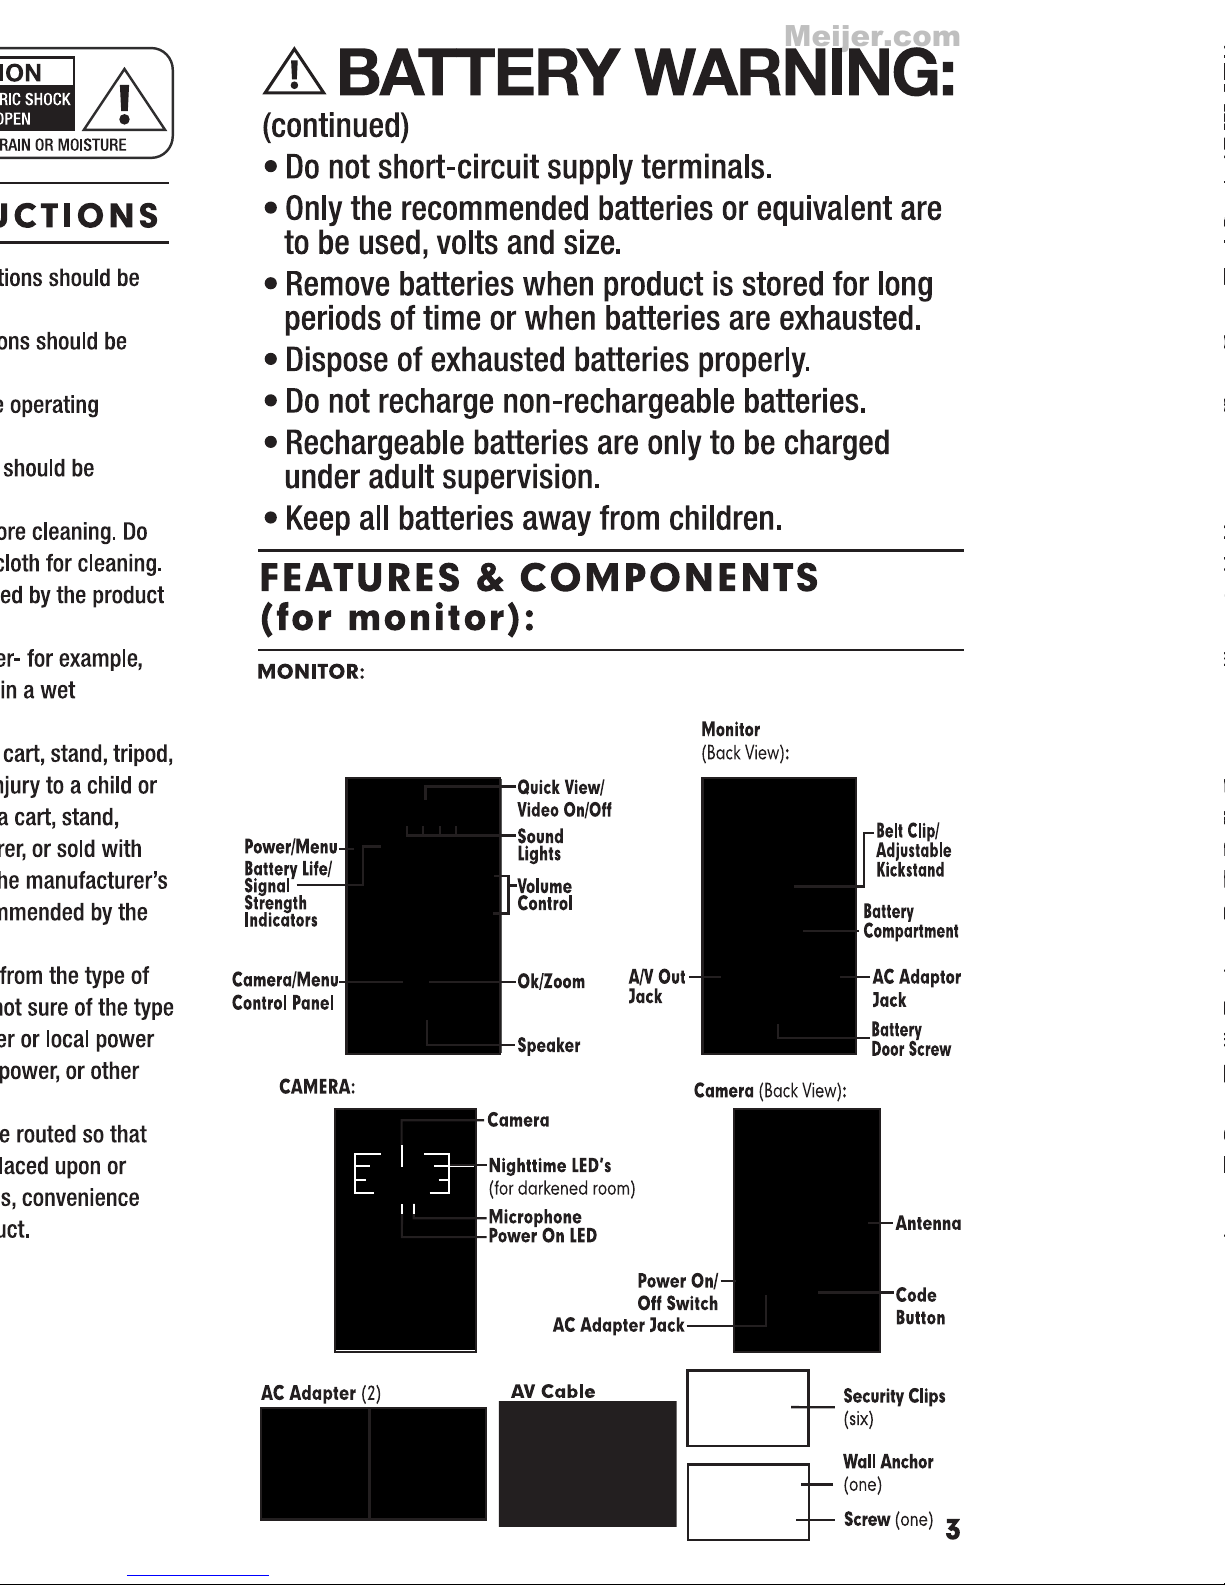
Meijer.com
Page 4
4
SET UP & USE:
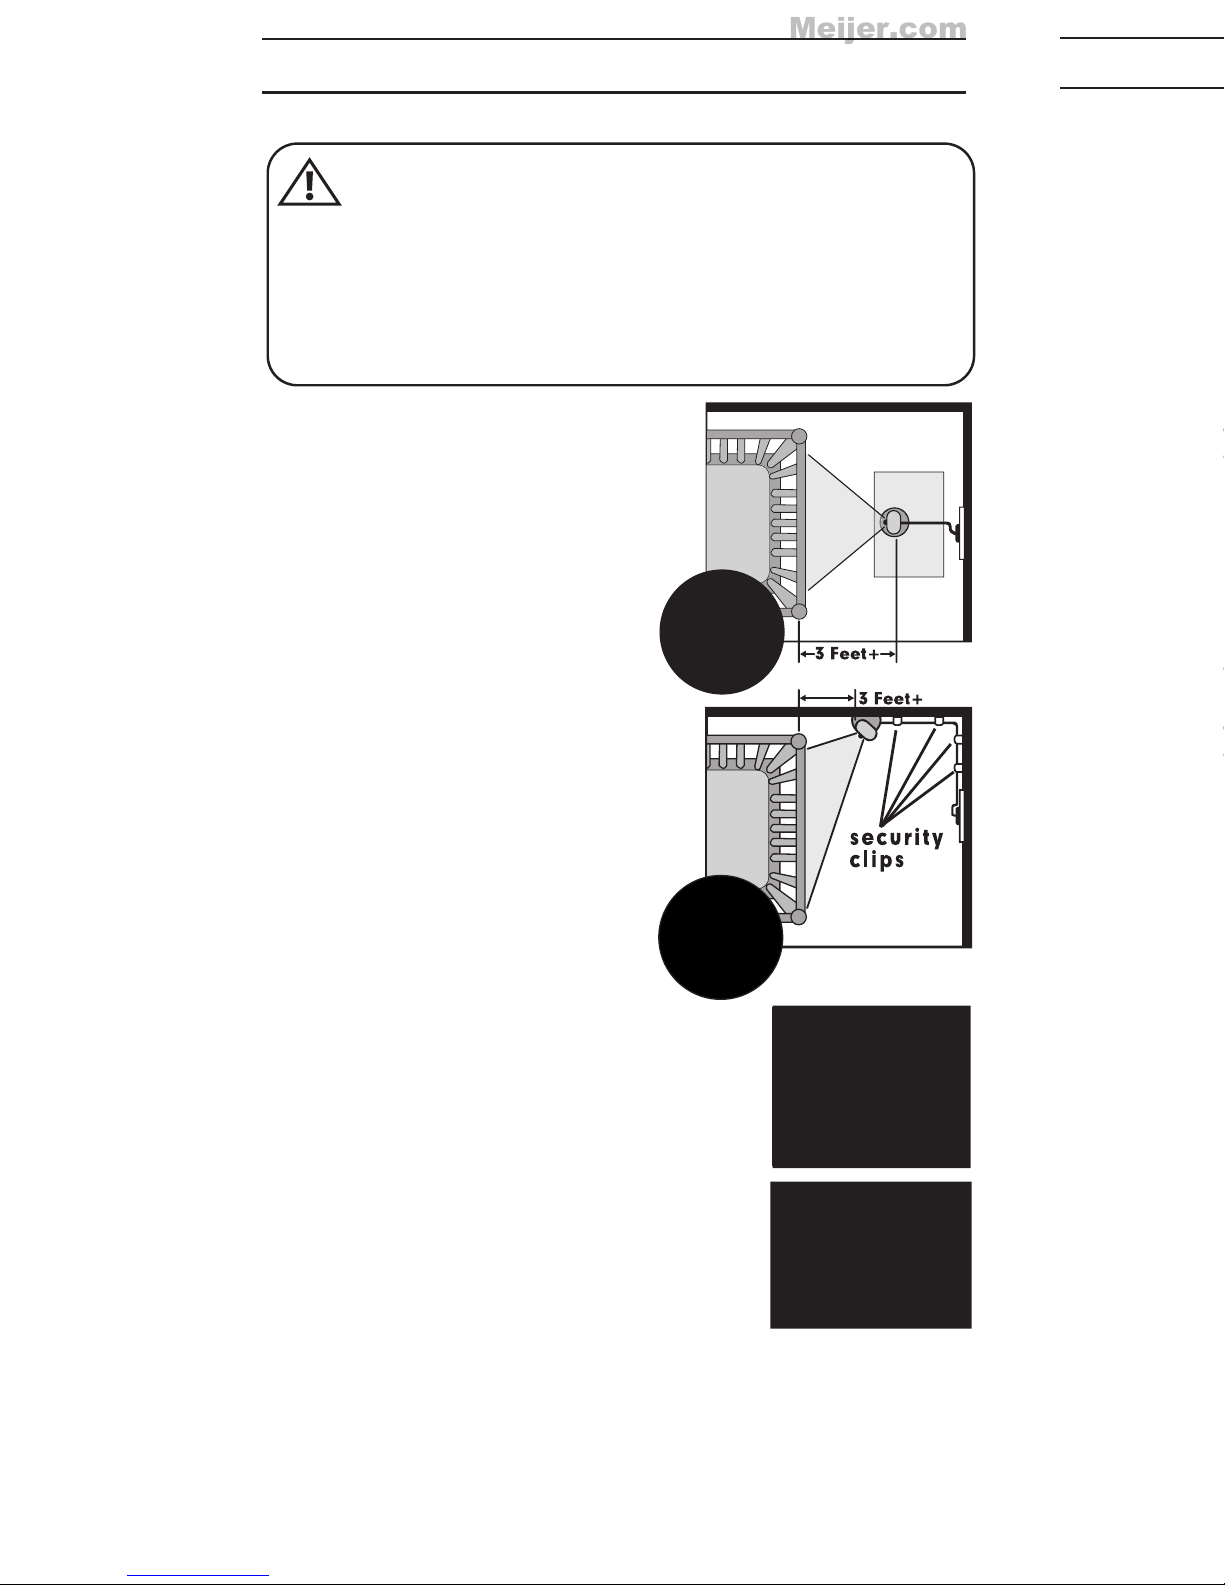
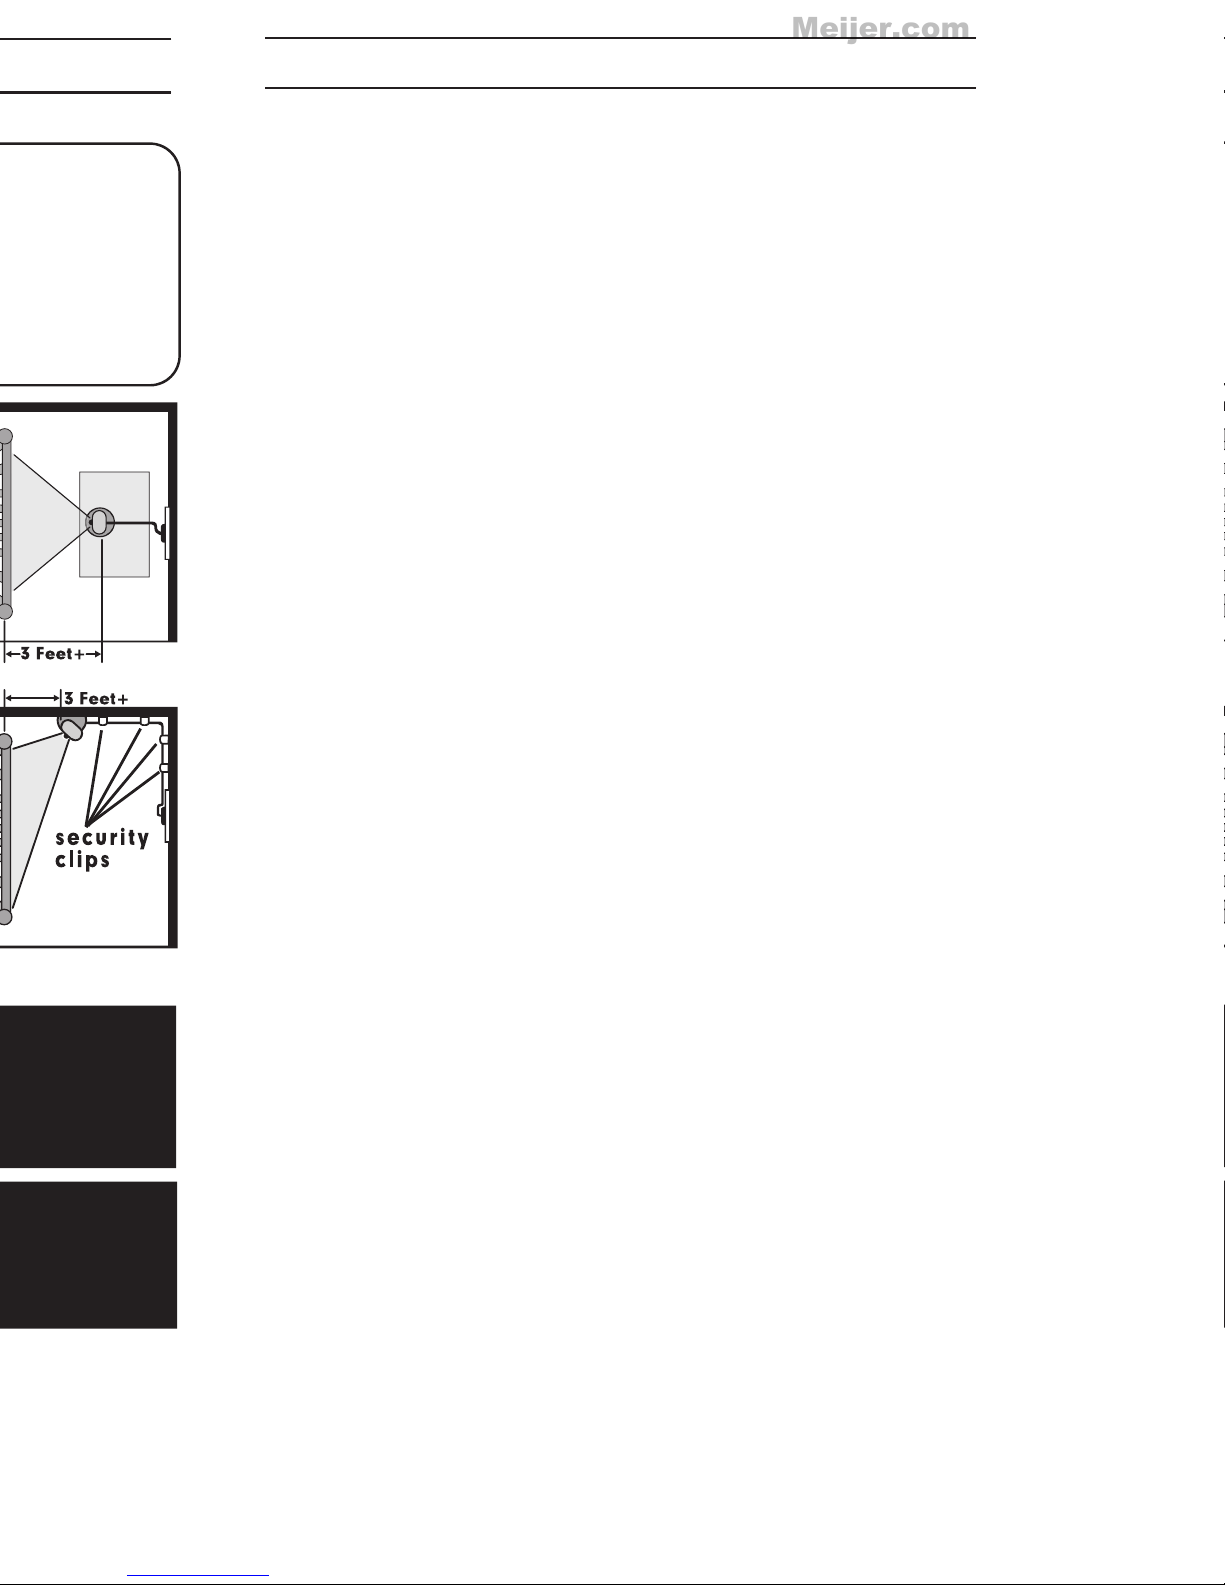
Table Top or Wall Mounting:
Determine a location for the CAMERA
that will provide the best view of your
baby in his crib. Place the CAMERA
on a flat surface, such as a dresser,
bureau, or shelf (Figure A). Or mount
the CAMERA on a wall (Figure B).
NEVER place camera or cords
within 3 feet of the crib. Secure
the cord to the wall using the
6 Security Clips included to keep
cord away from baby’s reach.
Be sure to test reception and
CAMERA positioning before
mounting to a wall (see "Testing
Your Initial Set Up" section).
To Wall Mount:
a) Pre-drill a hole in the wall (3/16",
4.8mm, drill bit) (Figure C).
b) Insert the wall anchor
(included) into the hole and
with a hammer, tap gently on
the end until the wall anchor is
flush with the wall.
c) Insert the screw (included) into the
wall anchor and tighten screw
until only 1/4" (6.2mm) of the
screw is exposed.
d) Insert smaller AC Adapter into
the CAMERA’s AC Adapter Jack.
e) Slide the back of the CAMERA
down onto the screw until the
CAMERA is secure to the wall.
f) Plug the AC Adapter into a
standard electrical outlet.
g) Secure the cord to the wall using the
6 Security Clips included to keep cord
away from baby's reach (Figures B & D).
h) Slide switch on side of
Camera
to ON and the
POWER ON LED will illuminate solid green.
C
D
STRANGULATION HAZARD - Keep cord out of baby’s reach.
NEVER place camera or cords within 3 feet of the crib.
Use enclosed Security Clips to help secure cord away from
baby’s reach. Never use extension cords with AC Adapters.
Only use the AC Adapters provided.
WARNING:
CAMERA
B
A
PROBLEM SOLVING:
No picture or sound on Monitor
• Make sure the Monitor is turned on
• Make sure the AC Adapters are plugged in
• Make sure the outlets are working
• Make sure Monitor and Camera are SYNCHED up.
(refer to “Synching MONITOR and CAMERA” section on
page 7)
Sound but no picture on Monitor
• Press the Quick View/Video On/Off Button once to turn on
video mode
• Try adjusting the Brightness Control on the Monitor
• Test reception by moving the Monitor and/or CAMERA to
different locations
Picture but no sound
• Turn up the volume on the Monitor using the Volume Control
Picture not clear
• Position the Monitor closer to the CAMERA if necessary
•
Move Monitor away from other monitors, cordless phones,
walkie-talkies, etc.
• Try adjusting the Brightness Control on the Monitor
• Test reception by moving the Monitor and/or CAMERA to
different locations
Squealing sound
• Move the CAMERA and the Monitor further away from
each other
Meijer.com
Page 5
MONITOR
To Use in Video and Audio Mode:
Step 1: Place the Monitor in the room from which you want to monitor
your baby (ie. bedroom or living room). Plug an AC Adapter into the
AC Adapter Jack and the other end into a standard electrical outlet.
top of the unit.
Step 2: Press and hold down “POWER ” button to turn on until
video or Summer logo appears on screen.
Step 3: For audio and no video, press the VIDEO ON/OFF button on
top of the unit.
Step 4: To turn the monitor off completely, press and hold the
“POWER ” button for 3 seconds.
MONITOR MENU mode:
Step 1: Press “MENU” button to enter the MENU mode. Press
again to leave the MENU mode.
MAIN MENU item:
BRIGHTNESS – move up and down buttons on Camera/Menu
Control Panel to adjust brightness
Refer to Adding Additional Camera section for other menu
functions.
MONITOR REMOTE CONTROL FUNCTIONS
The Monitor can control the movement of the CAMERA.
The camera head has the ability to rotate up, down, right,
left and zoom.
Step 1: Press the left or right buttons on Camera/Menu
control panel to move the camera left or to the right.
Step 2: Press the up or down buttons on Camera/Menu
control panel to move the camera up or down.
Step 3: Press the OK/Zoom button on Camera/Menu control
panel once for a 2X zoom of image on Monitor and press
again to change back to normal view.
5
SET UP & USE (continued):
Note: This product can accept up to four cameras. To order an
additional camera (#28074), please contact our Customer
Service Department by phone at 1-800-268-6237 or via e-mail at
[email protected] for details. (For Europe Call
+44 (0)208 420 4429 or [email protected])
Please Note: The SCAN, DEL CAM, ADD CAM and VIEW CAM
menu options are only used with additional cameras.
ADDING ADDITIONAL CAMERA:
Meijer.com
Page 6

SET UP & USE (continued):
Testing Your Initial Setup:
Be sure to test your Monitor’s reception before initial use.
We also recommend testing your Monitor’s reception periodically.
Please keep in mind that the Best View™ Digital Color Video Monitor
will not provide the same level of picture quality as your television
with cable, satellite dish, or digital service.
To test reception you will need two adults. One adult should view the
picture on the Monitor while the other is in the nursery to adjust the
Camera. Often the quality of the reception can be improved by
slightly repositioning the Camera, Monitor, or both. It may help to
place a stuffed animal or doll in the crib to simulate the position and
size of your baby. Adjust the picture quality on the Monitor as
needed by using the Brightness Adjustment within monitor menu.
To test sound quality, have one adult speak in both a normal tone
and a whisper near the crib. Adjust volume on the Monitor’s
Volume Adjustment as needed.
To Use the Video Monitor in Portable Mode:
For use in portable mode, the Monitor requires 1 3.7V LITHIUM-ION
rechargeable battery (included).
Tips:
• Before using Monitor in portable mode (battery), be sure to
charge battery 12-16 hours.
• To charge battery, plug the Monitor AC Adapter into the
Monitor’s AC Adapter Jack. Plug the other end into a standard
electrical outlet.
• After initial 12-16 hour charge, to achieve optimal battery life,
charge battery overnight and unplug all day during use.
• Note: Only charge battery when low indicator light comes on.
Constant recharging of your battery before low battery indicator
light comes on will decrease the life of your batteries.
• When battery is low, the Power On LED will illuminate amber,
indicating that the battery needs to be recharged.
SET UP & USE (continued):
• To conserve battery power, use AC Adapter whenever possible.
Remove battery during long periods of non-use.
• If battery is exhausted, remove immediately from the Monitor.
• Properly dispose of exhausted battery.
Battery Installation:
Note: This step is only needed if replacing battery.
1. Locate the battery compartment door on back of monitor.
2. Remove battery door screw with flat head
screwdriver.
3. Remove battery door and battery.
4. Insert new battery and replace battery door
(Figure E).
Belt Clip:
For convenience and portability, you can clip
the Monitor to your belt or waistband after a
battery has been installed (Figure F).
Footrest:
The Monitor has a built-in footrest for tabletop
convenience. Simply flip out footrest and place
the Monitor on a stable, level surface (Figure G).
Synching Monitor and CAMERA:
The Monitor and Camera are synched at the factory
for privacy reasons. If the Monitor and Camera are
not synching with each other for any reason, please
sync them as described below.
Step 1: Move the Monitor to the same area as the
Camera. With both the Camera and Monitor on, press the “POWER”
button once and using Camera/Menu control panel scroll to the Right
and Up to “ADD CAM”. Then press the OK/Zoom button.
Step 2: The Power LED flashes green and within 8 seconds, press the
“CODE” button once at the side of the camera.
Step 3: The Power LED on the camera will flash and you should then
see a picture from the Camera on the Monitor.
Step 4: If this is unsuccessful, you should repeat steps above making
sure the Camera and Monitor are close enough to each other for
synching.
Meijer.com
Page 7
F
G
76
SET UP & USE (continued):
• To conserve battery power, use AC Adapter whenever possible.
Remove battery during long periods of non-use.
• If battery is exhausted, remove immediately from the Monitor.
• Properly dispose of exhausted battery.
Battery Installation:
Note: This step is only needed if replacing battery.
1. Locate the battery compartment door on back of monitor.
2. Remove battery door screw with flat head
screwdriver.
3. Remove battery door and battery.
4. Insert new battery and replace battery door
(Figure E).
Belt Clip:
For convenience and portability, you can clip
the Monitor to your belt or waistband after a
battery has been installed (Figure F).
Footrest:
The Monitor has a built-in footrest for tabletop
convenience. Simply flip out footrest and place
the Monitor on a stable, level surface (Figure G).
Synching Monitor and CAMERA:
The Monitor and Camera are synched at the factory
for privacy reasons. If the Monitor and Camera are
not synching with each other for any reason, please
sync them as described below.
Step 1: Move the Monitor to the same area as the
Camera. With both the Camera and Monitor on, press the “POWER”
button once and using Camera/Menu control panel scroll to the Right
and Up to “ADD CAM”. Then press the OK/Zoom button.
Step 2: The Power LED flashes green and within 8 seconds, press the
“CODE” button once at the side of the camera.
Step 3: The Power LED on the camera will flash and you should then
see a picture from the Camera on the Monitor.
Step 4: If this is unsuccessful, you should repeat steps above making
sure the Camera and Monitor are close enough to each other for
synching.
E
Meijer.com
Page 8
• Video Sleep Mode: While operating on battery power, the
video screen will go to sleep, to conserve battery power. Audio
and sound lights will function normally. Press the Video On/Off
to resume viewing. This option is NOT available when using AC
adapter.
• Sound Lights: The 5 Sound Lights will illuminate on the Monitor
depending on the level of your baby’s sounds. For example, if
your child is just cooing, only one or two lights will illuminate. If
your baby is crying, several will illuminate, depending on how
loud she is crying. This feature is particularly helpful if you are
in a noisy room.
• Quick View/Video On/Off Button: This button turns the video
mode on. If you only want to hear your baby, press the Quick
View/Video On/Off Button again to shut off the video. The
Quick View/Video On/Off Button is ideal for easily turning on
the video option in the middle of the night.
• Night Vision: In a darkened room, the Monitor will
automatically use its infrared LED’s to transmit a clear image of
baby, so you can see your child at night!
• Multi-Position Camera/Microphone: The
Camera/Microphone should be positioned so it is facing baby
as much as possible. This multi-position feature is unique to
Summer Infant nursery monitors. It allows the microphone to
focus on baby’s voice while filtering out other household
noises.
• A/V Cable: To view video through your TV, plug the A/V cable
jack connection into monitor and connect the other ends into
the corresponding color coded parts on your TV. Scroll through
A/V inputs on your television’s menu until monitor picture is
visible.
Note: The Monitor’s power button must be turned ON and CAM
pre-selected before connecting the A/V cable. Once the A/V cable is
connected the Monitor’s controls cannot be activated.
For best results use on a 27” TV or smaller.
MONITOR
To Use in Video and Audio Mode:
Step 1: Place the Monitor in the room from which you want to monitor
your baby (ie. bedroom or living room). Plug an AC Adapter into the
AC Adapter Jack and the other end into a standard electrical outlet.
top of the unit.
Step 2: Press and hold down “POWER ” button to turn on until
video or Summer logo appears on screen.
Step 3: For audio and no video, press the VIDEO ON/OFF button on
top of the unit.
Step 4: To turn the monitor off completely, press and hold the
“POWER ” button for 3 seconds.
MONITOR MENU mode:
Step 1: Press “MENU” button to enter the MENU mode. Press
again to leave the MENU mode.
MAIN MENU item:
BRIGHTNESS – move up and down buttons on Camera/Menu
Control Panel to adjust brightness
Refer to Adding Additional Camera section for other menu
functions.
MONITOR REMOTE CONTROL FUNCTIONS
The Monitor can control the movement of the CAMERA.
The camera head has the ability to rotate up, down, right,
left and zoom.
Step 1: Press the left or right buttons on Camera/Menu
control panel to move the camera left or to the right.
Step 2: Press the up or down buttons on Camera/Menu
control panel to move the camera up or down.
Step 3: Press the OK/Zoom button on Camera/Menu control
panel once for a 2X zoom of image on Monitor and press
again to change back to normal view.
SPECIAL FEATURES:
TIPS FOR IMPROVING RECEPTION:
• Position the Monitor closer to the CAMERA if necessary.
• Move Monitor away from other monitors, cordless phones,
walkie-talkies, etc.; moving even slightly could greatly
improve reception.
• If you hear a feedback or squealing noise, move the
CAMERA and the Monitor further away from each other.
• NOTE: DO NOT MOVE THE CAMERA BY HAND AS IT MAY
DAMAGE INTERNAL MOTOR PARTS.
SET UP & USE (continued):
Note: This product can accept up to four cameras. To order an
additional camera (#28074), please contact our Customer
Service Department by phone at 1-800-268-6237 or via e-mail at
customerservice@summerinfant.com for details. (For Europe Call
+44 (0)208 420 4429 or customerser[email protected])
Please Note: The SCAN, DEL CAM, ADD CAM and VIEW CAM
menu options are only used with additional cameras.
ADDING ADDITIONAL CAMERA:
8
Meijer.com
Page 9
9
C
D
B
A
PROBLEM SOLVING:
No picture or sound on Monitor
• Make sure the Monitor is turned on
• Make sure the AC Adapters are plugged in
• Make sure the outlets are working
• Make sure Monitor and Camera are SYNCHED up.
(refer to “Synching MONITOR and CAMERA” section on
page 7)
Sound but no picture on Monitor
• Press the Quick View/Video On/Off Button once to turn on
video mode
• Try adjusting the Brightness Control on the Monitor
• Test reception by moving the Monitor and/or CAMERA to
different locations
Picture but no sound
• Turn up the volume on the Monitor using the Volume Control
Picture not clear
• Position the Monitor closer to the CAMERA if necessary
•
Move Monitor away from other monitors, cordless phones,
walkie-talkies, etc.
• Try adjusting the Brightness Control on the Monitor
• Test reception by moving the Monitor and/or CAMERA to
different locations
Squealing sound
• Move the CAMERA and the Monitor further away from
each other
Meijer.com
Page 10
Meijer.com
Page 11

11
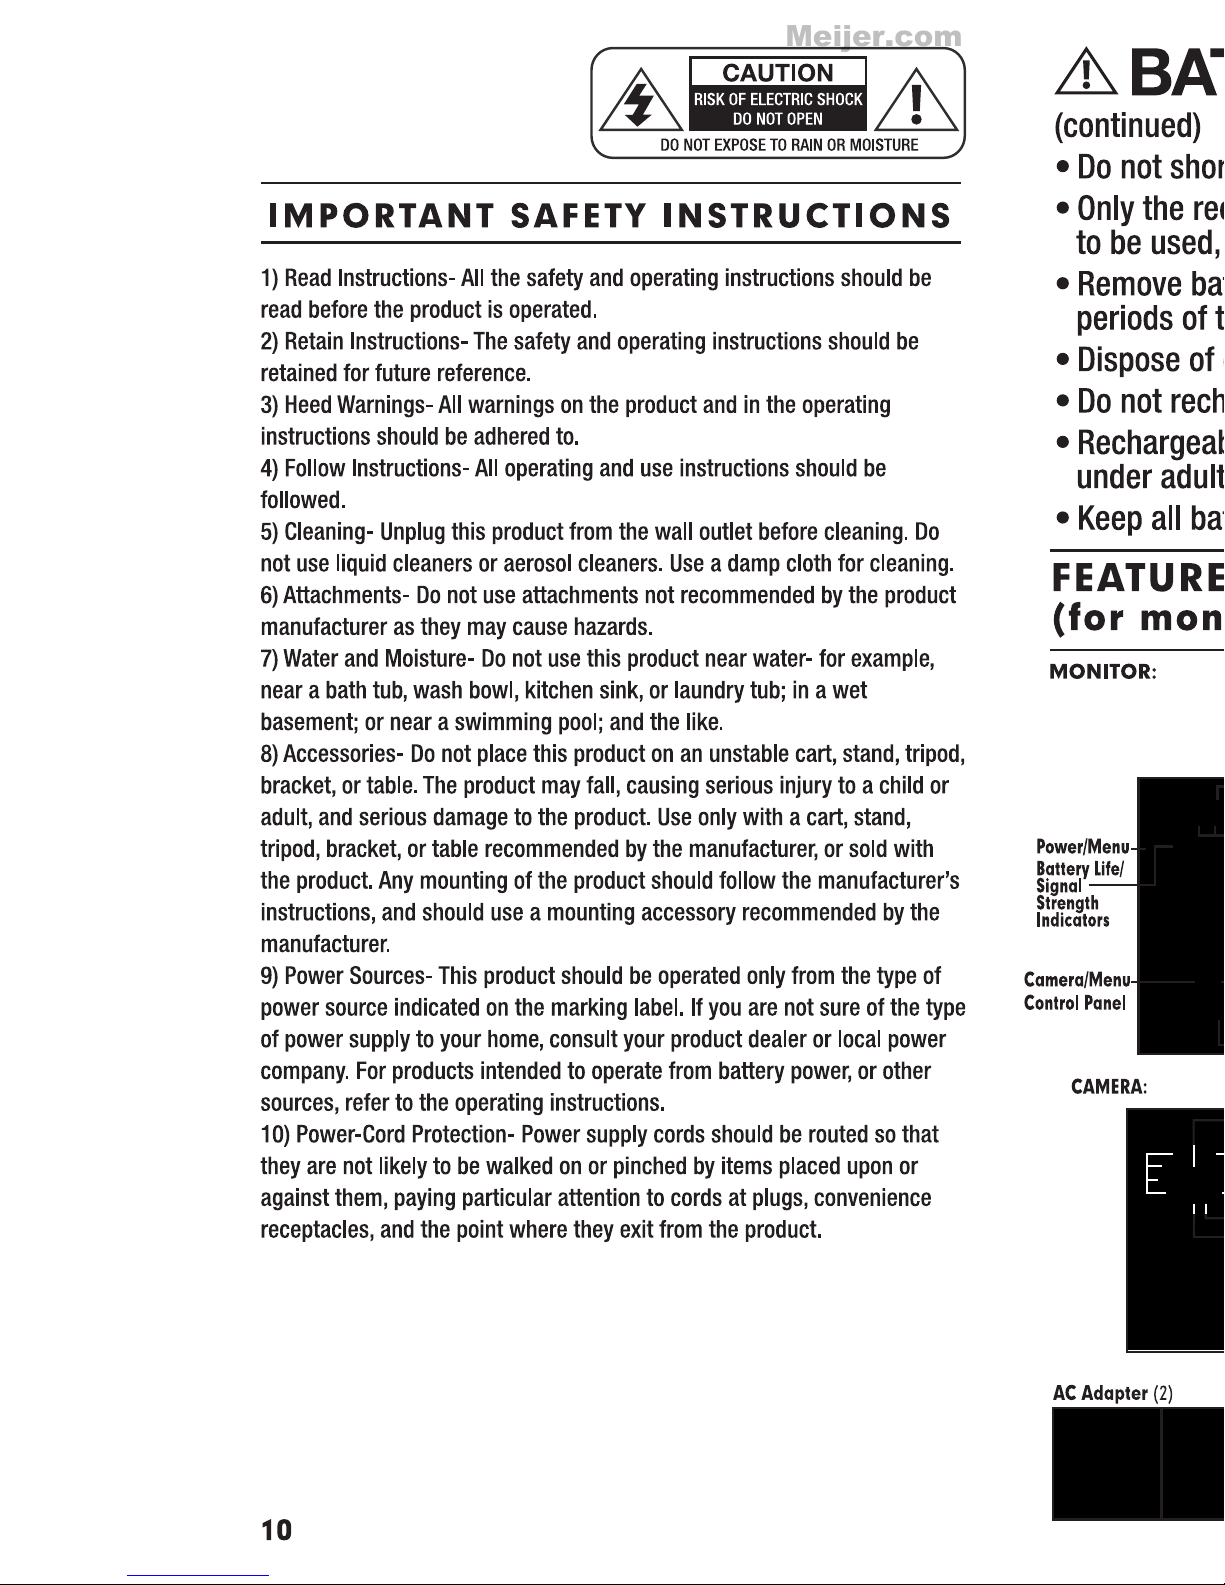
11) Power Lines- An outside antenna system should not be located in the
vicinity of overhead power lines or other electric light or power circuits, or
where it can fall into such power lines or circuits as contact with them
might be fatal.
12) Overloading- Do not overload wall outlets, extension cords, or integral
convenience receptacles as this can result in a risk of fire or electric
shock.
13) Object and Liquid Entry- Never push objects of any kind into this
product through openings as they may touch dangerous voltage points or
short-out parts that could result in a fire or electric shock. Never spill liquid
of any kind on the product.
14) Servicing- Do not attempt to service this product yourself as opening or
removing covers may expose you to dangerous voltage or other hazards.
Refer all servicing to qualified service personnel.
15) Damage Requiring Service- Unplug this product from the wall outlet
and refer servicing to qualified service personnel under the following
conditions:
a) When the power-supply cord or plug is damaged,
b) If liquid has been spilled, or objects have fallen into
the product,
c) If the product has been exposed to rain or water,
d) If the product does not operate normally by following the
operating instructions. Adjusting only those controls that are
covered by the operating instructions as an improper
adjustment of other controls may result in damage and will
often require extensive work by a qualified technician to
restore the product to it’s normal operation,
e) If the product has been dropped or damaged in any way, and
f) When the product exhibits a distinct change in performance-
this indicates a need for service.
16) Replacement Parts- When replacement parts are required, be sure the
service technician has used replacement parts specified by the manufacturer or have the same characteristics as the original part. Unauthorized
substitutions may result in fire, electric shock, or other hazards.
17) Safety Check- Upon completion of any service or repairs to the product,
ask the service technician to perform safety checks to determine that the
product is in proper operating condition.
18) Wall or Ceiling Mounting- The product should be mounted to a wall or
ceiling only as recommended by the manufacturer.
19) Heat- The product should be situated away from heat sources such as
radiators, heat registers, stoves, or other products (including amplifiers)
that produce heat.
IMPORTANT SAFETY INSTRUCTIONS
Meijer.com
Page 12
INSTRUCTION MANUAL
BEST VIEW™ DIGITAL COLOR
VIDEO MONITOR
For technical support see back page.
For use with children from birth and up.
Summer Infant, Inc. Monitor Warranty Policy
Summer Infant, Inc. will repair or replace (at our option) your unit free of
charge for 12 months from the date of purchase if the unit is defective in
workmanship or materials. To claim your repair/replacement, the product
must be returned to Summer Infant along with a copy of the original
purchase receipt. In the absence of the purchase receipt, the warranty will
be 12 months from the date of manufacture. This warranty does not apply to
normal wear or damage from misuse, abuse, improper storage and
handling, installation, accident, unauthorized repair or alteration. Please
contact our Customer Service Department by phone at 1-800-268-6237
or via e-mail at [email protected] for details.
If you experience a problem that is not noted in this manual,
please do not return the product to the store. Our Customer
Service Department may have a simple solution to your problem.
Please contact us at 1-800-268-6237 or email us at
[email protected].
FCC Information
This device complies with part 15 of the FCC Rules. Operation is subject to
the following two conditions: (1) This device may not cause harmful
interference,
and (2) this device must accept any interference received, including
interference that may cause undesired operation.
CAUTION: Changes or modifications not expressly approved by Summer
Infant may void the users authority to operate this equipment.
NOTE: This equipment has been tested and found to comply with the limits
for a Class B digital device, pursuant to part 15 of the FCC Rules. These
limits are designed to provide reasonable protection against harmful
interference in a residential installation. This equipment generates, uses
and can radiate radio frequency energy and, if not installed and used in
accordance with the instructions, may cause harmful interference to radio
communications. However, there is no guarantee that interference will not
occur in a particular installation. If this equipment does cause harmful
interference to radio or television reception, which can be determined by
turning the equipment off and on, the user is encouraged to try to correct
the interference by one or more of the following measures:
• Reorient or relocate the receiver
• Increase the separation between the equipment and the receiver
• Connect the equipment into an outlet on a circuit different from that
to which the receiver is connected.
• Consult the dealer or an experienced radio/TV technician for help
CAUTION: 1. To comply with FCC RF exposure compliance requirements, a
separation distance of at least 20 cm must be maintained between the
antenna of this device and all persons. 2. This transmitter must not be
co-located or operating in conjunction with any other antenna or
transmitter.
12
STRANGULATION HAZARD - Keep cord out of baby’s reach.
NEVER place camera or cords within 3 feet of the crib.
Use enclosed Security Clips to help secure cord away from
baby’s reach. Never use extension cords with AC Adapters.
Only use the AC Adapters provided.
WARNING:
Summer Infant Europe, LTD.
Office Suite 6, Second Floor
Bournehall House, Bournehall Road
Bushey, Hertfordshire WD23 3HP UK
+44 (0) 208 420 4429
Summer Infant
Canadian Office
1055 Middlegate Road
Mississauga, Ontario,
Canada L4Y3Y4
905-848-2424
Summer Infant, Inc.
1275 Park East Drive
Woonsocket, RI 02895 USA
1-800-268-6237
© 2010 Summer Infant, Inc.
Colors and styles may vary.
Please retain information
for future reference.
MADE IN CHINA.
2/11
www.summerinfant.com
We LOV E our customers!
Get to know us at:
We at Summer Infant stand behind all of our products. If
you are not completely satisfied or have any questions,
please contact our customer service department at
1-800-268-6237 or [email protected]
(For Europe call +44 (0)208 420 4429 or
[email protected])
Meijer.com
 Loading...