

Summation Technology SummitBLUPro Operation Manual

SummitBLUPro
BLU-RAY/DVD/CD Multi-Drive
Disc Duplicator
With 500GB Hard Drive
Operation Guide
(Rev 8.4.11)
Summation Technology, LLC
1155 Kelly Johnson Blvd.
Suite 130
Colorado Springs, Colorado 80920
Toll Free: 1-888-340-3738
Phone: 719-590-6063
Fax: 719-590-6057
Email: info@summationtechnology.com
We Are a U.S. Based Company

Summation Technology
2
___
Table of Contents
Chapter 1 Quick Start Guide….…………………..3
Chapter 2 Product Introduction…………………..4
Chapter 3 Safety Information & Set Up………....5
Chapter 4 System Overvi ew...…………………….6
Chapter 5 Menu Overview…………………………7
Chapter 6 Operation Guide………………...…....10
Copy………………….………...…………………………10
Test………………………………………………………..11
Compare………………………………………………….11
Copy + Compare……………………………………… 12
Set Burn Speed………………………………………….12
Select Source…………………………………………....12
Utility……..……………………………………………….13
Audio Track Edit…….…………………………………..15
Set up……………………………………………………..18
HDD Manager……………………………………………21
Chapter 7 Troubleshooting Guide and FAQ….24
Summation Technology
3
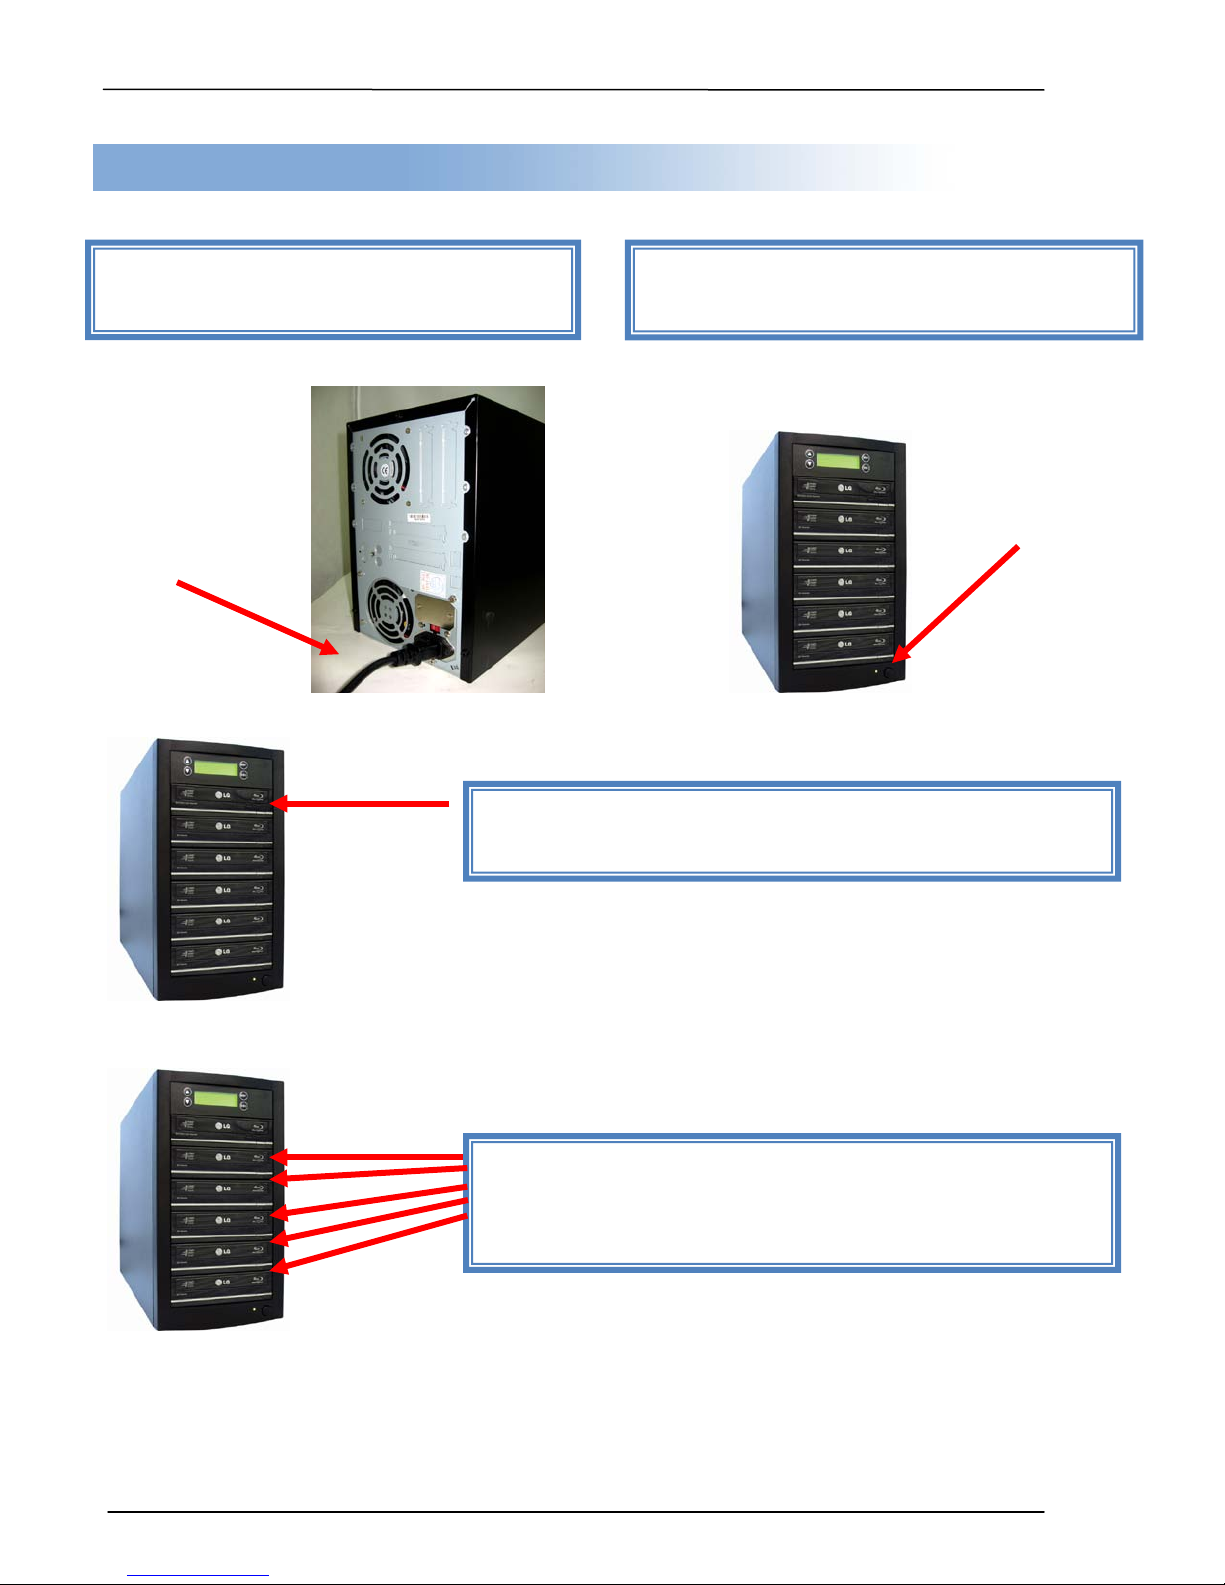
Step 1: Plug in power cord to back of the
Step 2: Turn on power button and wait for
Step 3: Eject reader tray (top drive) and insert source
Step 4: Eject Recorder tray(s) and insert the blank
Chapter 1. Quick Start Guide
unit.
___
LCD to read “1. Copy”.
disc. Close reader tray.
disc(s). Close Recorder tray(s). Duplication will start
automatically in 5 seconds.
(Photos of 5-target duplicator are used in the manual)

Summation Technology
4
T
___
Chapter 2. Product Introduction
Thank you...
...for choosing the SummitBLU Pro Standalone duplication system. SUMMATION duplicators
continue to be second to none in terms of speed and accuracy and we hope it will be a
valuable addition to your organization, business or home for years to come.
he SummitBLU Pro is a stand-alone duplicator that requires no computer connection to
operate. Low cost and high performance, the SummitBLU Pro will fulfill your duplication
requirements.
Specifically designed for home and office applications, the SummitBLU Pro duplicator is
based upon a controller with a large LCD display and simple 4 button navigation, which make
steps easy to follow during the duplication process. Should you encounter any difficulty, please
refer to the "Troubleshooting" section or contact Tech ni cal Supp or t f or assist ance.
We strongly suggest you locate your SummitBLU Pro in a dust free environment. Dirty discs
may cause duplication rejects or even total failure. Do not
For recordable media selection, we recommend you choose high-speed rated and certified
brand name discs (i.e. Sony, Taiyo Yuden, Fuji, Pioneer, Maxell, etc.) and make sure to
reserve some discs for possible troubleshooting issues in the future. Under no circumstance
does SUMMATION encourage users to duplicate copyrighted or copy-protected materials.
Supported Formats: BD-ROM, BD-R, BD-R DL, BD-RE, BD-RE DL, DVD-ROM, DVD-R,
DVD-Video, DVD-RW, DVD-RAM, DVD+R, DVD+RW, CD-ROM, CD-R, CD-Audio Disc, CDRW, Multi-session Photo CDTM, CD-I, Video CD, CD-ROM XA, & CD Extra (CD Plus)
Supported Burning Speed: BD up to 12X, DVD up to 24X, CD up to 48X
place unnecessary items on the uni t.

Summation Technology
5
1. Read these instructions - All the safety and operating
9. Do not defeat the safety purpose of the grounding-type
heat, does not operate normally, or has been dropped.
___
Chapter 3. Safety Information and Set up
Please be aware of the following installation and operation precautions.
instructions should be read before use of this system.
2. Keep these instructions - The safety and operating
instructions should be retained for future reference.
3. Heed all warnings - All warnings on the system and in
the operating instructions should be adhered to.
4. Follow all instructions - All operating and use
instructions should be followed.
5. Do not use this system near water - for example, near
a bathtub, washbowl, kitchen sink, laundry tub, in a wet
basement or near a swimming pool, etc.
6. Clean only with a damp cloth. This system should be
cleaned only as recommended by the manufacturer.
7. Install in accordance with the manufacturers
instructions. Do not block any of the ventilation
openings. For example, the system should not be situated on
a bed, sofa, rug, or similar surface or placed in a built-in
installation, such as a bookcase or cabinet that may impede
the flow of air through the ventilation openings.
8. Do not install near any heat sources such as radiators,
heat registers, stoves, or other products that produce heat.
Unpacking and Inspection
When unpacking your unit, inspect the carton and packaging material for damage. Damages that may have
occurred during shippi ng could cause alignment and operatio n errors. Any damages found upon rece ipt of your
unit should be immediatel y reported to the dea ler you purc has ed it from.
Important!: Keep your packaging! In t he e v ent you need to ship the unit bac k to the factory for repair , t he pr oduct
must be shipped in the m anner in which it was received. Other cont ainers are not satisf actory and
warranty
! If the container is lost or destroyed, another may be purchased from your reseller.
Choosing a Location
Placing your unit in an unsuitable loc ation can cause a number of probl ems. Many problem s can be avoided b y
following these guidelines.
• The unit must be place d on a flat, level surface. A ti lt to the unit’s base can cause er rors in calibration
during use. The surface must also be relatively stable and resistant to bumps and jarring.
• The surface the un it is pl aced on must be able t o ho ld 15+ p ounds and be r es istant to bowing u nder such
weight.
• Place the unit in a location with adequate air circulation. Closets or cabinets are not suitable as heat
build-up can cause the un it to malfunction. Likewise, do not place the unit on or near any heat sourc es
such as heating vents or server racks.
• The unit must not be placed in an area with direct sunlight, excessive dust, mechanical vibration or shock.
plug. A grounding type plug has two blades and a third
grounding prong. The third prong is provided for your safety.
When the provided plug does not fit into your outlet, consult an
electrician for replacement of the obsolete outlet.
10. Protect the power cord from being walked on or pinched
particularly at plugs, convenience receptacles, and the point
where they exit from the system.
11. Only use attachments/accessories specified by the
manufacturer.
12. Use only with a cart, stand,
bracket, or table specified by the
manufacturer, or sold with the system.
When a cart is used, use caution
when moving the cart/system
combination to avoid injury from tipover.
13. Unplug this system during lightning storms or when
unused for long periods of time.
14. Refer all servicing to qualified service personnel.
Servicing is required when the system has been damaged in
any way, such as power-supply cord or plug is damaged, liquid
has been spilled on, been exposed to moisture or extreme
will void your
Summation Technology
6
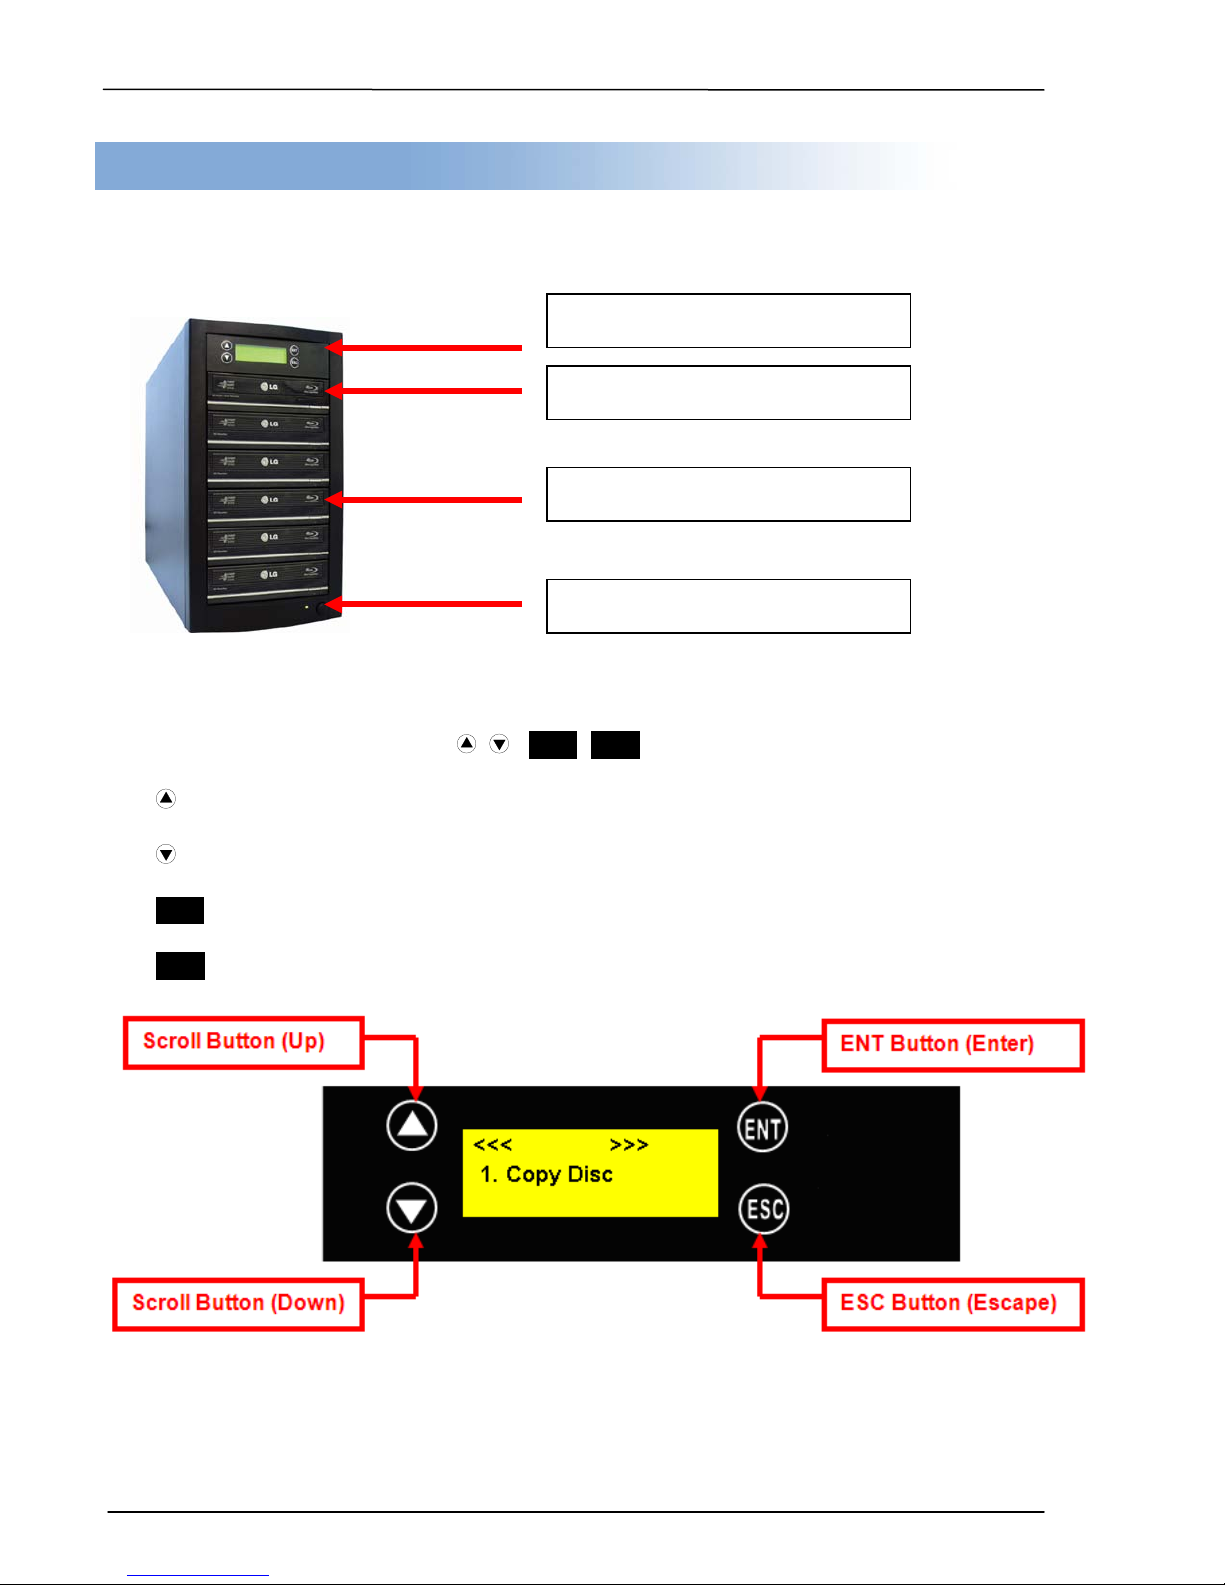
LCD panel & Control Buttons
Reader (Source) Tray
Writer (Target) Trays
Power Button (On and Off)
Chapter 4. System Overview
___
Control Buttons
There are 4 control buttons: , , ENT, ESC
: UP; Backward; Use this button to navigate backward in the menu.
: D own; Forward; Use this button to navigate forward in the men u.
ENT : Enter, Execute or Select the function
ESC : Escape, Go back to previous function

Summation Technology
7
To check the format of disc, burning speed supported and
total capacity or data size.
playable on CD player.
___
Chapter 5. Menu Overview
Function Table
Function Sub-function Description
1. Copy To copy disc to disc
2. Test To simulate copy process
3. Compare To bit by bit compare between source disc and copied disc
4. Copy & Compare To copy first and compare the copied discs later.
5. Set Burn Speed To set burning speed for duplication.
6. Select Source To select source from any optical drive
1. Disc Info.
7. Utility
1.
Information
2. Erase
Disc
3. PreScan Sourc e To check source disc’s readability.
4. Track Edit
5. Eject All Disc To eject all trays.
6. Copy
Counter
7. Update BIOS To update the system’s firmware.
2. Drive Info. To check the version, model No. and brand name
3. System Info. To check the model No. and firmware version
1. Quick Erase To quick erase data from rewriteable disc.
2. Full Erase To full erase data from rewriteable disc.
1. Copy Track
2. Close Disc
3. Disc Info. To check the audio CD’s status of usage.
1. Show Count To check how many discs copy successfully and failed.
2. Enable
Counter
3. Clear
Counter
To select and combine audio tracks from various CDs into
a single customized audio CD.
To close the disc after track copying to make the CD
To enable or disable counter setting.
To delete the record.
8. PRINT LS Label To print Lightscribe image. (Optional)

8
1. Auto Start Time
Allow the system to do the Copy, Test, Compare and Copy
+ Compare functions automatically
1. Eject All
Discs
To eject all trays with disc inside once the
system is booted up.
2. Do Not
Eject
No eject any tray or disc once the system
is booted up.
3. Eject
Target Only
Only eject target trays with disc inside once
the system is booted up.
Source Only
booted up.
5. Eject All
Trays
To eject all trays once the system is booted
up.
To reset all the function back to manufacturer’s default
setting.
1. Power On
Time
To set a warm-up time from 5 seconds to
255 seconds
2. Startup
Menu
To select which function you would like to
show up in the beginning
3. Skip
Reader Error
To set skip the read error and keep
copying.
To make the system eject source disc and
unreadable for system.
5. CD
Overburn
To show HDD image name or capacity on
installed)
7. Keep
Buffer
To set enable or disable load source to the
buffer.
9. Setup
Password
Summation Technology
___
1. Basic
8. Setup
2. Display Mode
3. Button Beep
4. Eject On Start
5. Reader Speed To adjust the reading speed of source drive.
6. Compare Speed To adjust the speed of drives while comparing.
7. Language
8. Clear Setup
2. Show Speed
3. Show Timer
4. Eject
Only eject source disc once the system is
9. Advanced Setup
4. Change
Bad Master
6. Show
HDD Image
Name
8. Boot
Password
ask for another one while the source disc is
Set to copy overburn CD.
Copy, Test, Copy + Compare and
Compare function (with Optional HDD
To enable or disable the user
administrative password.
To set up the login password
 Loading...