

Page 1
User Guide
SMX-10MxX Series USB2.0 Cameras
Page 2

SMX-10Mxx Series USB2.0 Camera User Guide
Revision 2.1
Copyright © 2001-2010 Sumix Corporation
4005 Avenida de la Plata, Suite 201
Oceanside, CA, 92056
Tel.: (877)233-3385; Fax: (508) 300 5526
Email: [email protected]
www.sumix.com
The information in this document is subject to change without notice. The software described in this
document is furnished under a license and be used or copied only in accordance with the terms of such
license.
Page 3

CONTENTS
Chapter 1 Introduction. . . . . . . . . . . . . . . . . . . . . . . . . . . . . . . . . . . . . . . . . . . 5
Chapter 2 Installation . . . . . . . . . . . . . . . . . . . . . . . . . . . . . . . . . . . . . . . . . . . 7
System Requirements. . . . . . . . . . . . . . . . . . . . . . . . . . . . . . . . . . . . . . . . . . . . . . . . . . . . . . . . . . . . . . . . . . . . 7
Installation . . . . . . . . . . . . . . . . . . . . . . . . . . . . . . . . . . . . . . . . . . . . . . . . . . . . . . . . . . . . . . . . . . . . . . . . . . . . . . 7
Update . . . . . . . . . . . . . . . . . . . . . . . . . . . . . . . . . . . . . . . . . . . . . . . . . . . . . . . . . . . . . . . . . . . . . . . . . . . . . . . . . 13
Driver Update . . . . . . . . . . . . . . . . . . . . . . . . . . . . . . . . . . . . . . . . . . . . . . . . . . . . . . . . . . . . . . . . . . . . . . . . .13
Removal. . . . . . . . . . . . . . . . . . . . . . . . . . . . . . . . . . . . . . . . . . . . . . . . . . . . . . . . . . . . . . . . . . . . . . . . . . . . . . . . 15
Troubleshooter . . . . . . . . . . . . . . . . . . . . . . . . . . . . . . . . . . . . . . . . . . . . . . . . . . . . . . . . . . . . . . . . . . . . . . . . . 16
Camera Was Not Detected or Recognized . . . . . . . . . . . . . . . . . . . . . . . . . . . . . . . . . . . . . . . . . . . . . .16
Cannot Install the Hardware . . . . . . . . . . . . . . . . . . . . . . . . . . . . . . . . . . . . . . . . . . . . . . . . . . . . . . . . . . . .19
Chapter 3 Getting Started . . . . . . . . . . . . . . . . . . . . . . . . . . . . . . . . . . . . . . . . 21
3
Installing Lens . . . . . . . . . . . . . . . . . . . . . . . . . . . . . . . . . . . . . . . . . . . . . . . . . . . . . . . . . . . . . . . . . . . . . . . . . . 21
Recommendations on the Camera Connection . . . . . . . . . . . . . . . . . . . . . . . . . . . . . . . . . . . . . . . . . . 21
Plugging in the Camera . . . . . . . . . . . . . . . . . . . . . . . . . . . . . . . . . . . . . . . . . . . . . . . . . . . . . . . . . . . . . . . . . 22
Installing Driver Software . . . . . . . . . . . . . . . . . . . . . . . . . . . . . . . . . . . . . . . . . . . . . . . . . . . . . . . . . . . . . . . 23
Starting the Application. . . . . . . . . . . . . . . . . . . . . . . . . . . . . . . . . . . . . . . . . . . . . . . . . . . . . . . . . . . . . . . . . 23
Switching Between Cameras . . . . . . . . . . . . . . . . . . . . . . . . . . . . . . . . . . . . . . . . . . . . . . . . . . . . . . . . . . . . 26
Viewing Camera ID . . . . . . . . . . . . . . . . . . . . . . . . . . . . . . . . . . . . . . . . . . . . . . . . . . . . . . . . . . . . . . . . . . . . . 27
Reducing CPU Load . . . . . . . . . . . . . . . . . . . . . . . . . . . . . . . . . . . . . . . . . . . . . . . . . . . . . . . . . . . . . . . . . . . . . 27
Chapter 4 Tuning Guidelines . . . . . . . . . . . . . . . . . . . . . . . . . . . . . . . . . . . . . . 29
Initial Settings . . . . . . . . . . . . . . . . . . . . . . . . . . . . . . . . . . . . . . . . . . . . . . . . . . . . . . . . . . . . . . . . . . . . . . . . . . 29
Tuning Light in the Image. . . . . . . . . . . . . . . . . . . . . . . . . . . . . . . . . . . . . . . . . . . . . . . . . . . . . . . . . . . . . . . 30
Color Tuning . . . . . . . . . . . . . . . . . . . . . . . . . . . . . . . . . . . . . . . . . . . . . . . . . . . . . . . . . . . . . . . . . . . . . . . . . . . 31
Contrast Tuning . . . . . . . . . . . . . . . . . . . . . . . . . . . . . . . . . . . . . . . . . . . . . . . . . . . . . . . . . . . . . . . . . . . . . . . . 31
Sensor Controls. . . . . . . . . . . . . . . . . . . . . . . . . . . . . . . . . . . . . . . . . . . . . . . . . . . . . . . . . . . . . . . . . . . . . . . . . 31
Exposure . . . . . . . . . . . . . . . . . . . . . . . . . . . . . . . . . . . . . . . . . . . . . . . . . . . . . . . . . . . . . . . . . . . . . . . . . . . . . .32
Gain . . . . . . . . . . . . . . . . . . . . . . . . . . . . . . . . . . . . . . . . . . . . . . . . . . . . . . . . . . . . . . . . . . . . . . . . . . . . . . . . . . .32
Frequency . . . . . . . . . . . . . . . . . . . . . . . . . . . . . . . . . . . . . . . . . . . . . . . . . . . . . . . . . . . . . . . . . . . . . . . . . . . . .32
Decimation . . . . . . . . . . . . . . . . . . . . . . . . . . . . . . . . . . . . . . . . . . . . . . . . . . . . . . . . . . . . . . . . . . . . . . . . . . . .33
Viewport . . . . . . . . . . . . . . . . . . . . . . . . . . . . . . . . . . . . . . . . . . . . . . . . . . . . . . . . . . . . . . . . . . . . . . . . . . . . . .33
Image Correction . . . . . . . . . . . . . . . . . . . . . . . . . . . . . . . . . . . . . . . . . . . . . . . . . . . . . . . . . . . . . . . . . . . . . . . 34
Contents
Page 4

SMX-10Mxx Series USB2.0 Camera User Guide
4
Color Balance. . . . . . . . . . . . . . . . . . . . . . . . . . . . . . . . . . . . . . . . . . . . . . . . . . . . . . . . . . . . . . . . . . . . . . . . . . . 35
Color Correction . . . . . . . . . . . . . . . . . . . . . . . . . . . . . . . . . . . . . . . . . . . . . . . . . . . . . . . . . . . . . . . . . . . . . . . . 35
Advanced Sensor Controls . . . . . . . . . . . . . . . . . . . . . . . . . . . . . . . . . . . . . . . . . . . . . . . . . . . . . . . . . . . . . . 36
Color Mode . . . . . . . . . . . . . . . . . . . . . . . . . . . . . . . . . . . . . . . . . . . . . . . . . . . . . . . . . . . . . . . . . . . . . . . . . . . .36
Image Flip . . . . . . . . . . . . . . . . . . . . . . . . . . . . . . . . . . . . . . . . . . . . . . . . . . . . . . . . . . . . . . . . . . . . . . . . . . . . .36
Increasing Image Quality . . . . . . . . . . . . . . . . . . . . . . . . . . . . . . . . . . . . . . . . . . . . . . . . . . . . . . . . . . . . . . .37
Frame Rate . . . . . . . . . . . . . . . . . . . . . . . . . . . . . . . . . . . . . . . . . . . . . . . . . . . . . . . . . . . . . . . . . . . . . . . . . . . .37
Auto White Balance . . . . . . . . . . . . . . . . . . . . . . . . . . . . . . . . . . . . . . . . . . . . . . . . . . . . . . . . . . . . . . . . . . . .38
Output Bits per Pixel . . . . . . . . . . . . . . . . . . . . . . . . . . . . . . . . . . . . . . . . . . . . . . . . . . . . . . . . . . . . . . . . . . .38
Filtering . . . . . . . . . . . . . . . . . . . . . . . . . . . . . . . . . . . . . . . . . . . . . . . . . . . . . . . . . . . . . . . . . . . . . . . . . . . . . . .38
Saving and Loading Camera Profiles. . . . . . . . . . . . . . . . . . . . . . . . . . . . . . . . . . . . . . . . . . . . . . . . . . . . . 38
Chapter 5 Capturing . . . . . . . . . . . . . . . . . . . . . . . . . . . . . . . . . . . . . . . . . . . 41
Capturing Images. . . . . . . . . . . . . . . . . . . . . . . . . . . . . . . . . . . . . . . . . . . . . . . . . . . . . . . . . . . . . . . . . . . . . . . 41
Capture Limits . . . . . . . . . . . . . . . . . . . . . . . . . . . . . . . . . . . . . . . . . . . . . . . . . . . . . . . . . . . . . . . . . . . . . . . . .41
Recording Video . . . . . . . . . . . . . . . . . . . . . . . . . . . . . . . . . . . . . . . . . . . . . . . . . . . . . . . . . . . . . . . . . . . . . . . . 42
Saving Video to Memory . . . . . . . . . . . . . . . . . . . . . . . . . . . . . . . . . . . . . . . . . . . . . . . . . . . . . . . . . . . . . . . . 42
Saving Options . . . . . . . . . . . . . . . . . . . . . . . . . . . . . . . . . . . . . . . . . . . . . . . . . . . . . . . . . . . . . . . . . . . . . . . . . 43
Chapter 6 Snapshots . . . . . . . . . . . . . . . . . . . . . . . . . . . . . . . . . . . . . . . . . . . 45
Snapshots Basics . . . . . . . . . . . . . . . . . . . . . . . . . . . . . . . . . . . . . . . . . . . . . . . . . . . . . . . . . . . . . . . . . . . . . . . 45
Taking Snapshots Using Software Trigger. . . . . . . . . . . . . . . . . . . . . . . . . . . . . . . . . . . . . . . . . . . . . . . . 45
Taking Snapshots Using Hardware Trigger. . . . . . . . . . . . . . . . . . . . . . . . . . . . . . . . . . . . . . . . . . . . . . . 46
External Trigger Connector Pinout . . . . . . . . . . . . . . . . . . . . . . . . . . . . . . . . . . . . . . . . . . . . . . . . . . . . . . 47
Setting External Trigger Polarity . . . . . . . . . . . . . . . . . . . . . . . . . . . . . . . . . . . . . . . . . . . . . . . . . . . . . . . .47
Saving Snapshots . . . . . . . . . . . . . . . . . . . . . . . . . . . . . . . . . . . . . . . . . . . . . . . . . . . . . . . . . . . . . . . . . . . . . . . 47
Chapter 7 Use of Accessories . . . . . . . . . . . . . . . . . . . . . . . . . . . . . . . . . . . . . . 49
Using C-mount Adapter with IR-cut Filter . . . . . . . . . . . . . . . . . . . . . . . . . . . . . . . . . . . . . . . . . . . . . . . . 49
IR-cut Filter Characteristics . . . . . . . . . . . . . . . . . . . . . . . . . . . . . . . . . . . . . . . . . . . . . . . . . . . . . . . . . . . . .49
C-mount . . . . . . . . . . . . . . . . . . . . . . . . . . . . . . . . . . . . . . . . . . . . . . . . . . . . . . . . . . . . . . . . . . . . . . . . . . . . . .50
CS-mount . . . . . . . . . . . . . . . . . . . . . . . . . . . . . . . . . . . . . . . . . . . . . . . . . . . . . . . . . . . . . . . . . . . . . . . . . . . . .52
Converting the Camera from CS-mount to C-mount or from C-mount to CS-mount . . . . . .52
Using Tripod Adapter . . . . . . . . . . . . . . . . . . . . . . . . . . . . . . . . . . . . . . . . . . . . . . . . . . . . . . . . . . . . . . . . . . . 54
Appendix 1 Keyboard Shortcuts . . . . . . . . . . . . . . . . . . . . . . . . . . . . . . . . . . . . . 57
Appendix 2 Toolbar Overview . . . . . . . . . . . . . . . . . . . . . . . . . . . . . . . . . . . . . . 59
Appendix 3 Figures . . . . . . . . . . . . . . . . . . . . . . . . . . . . . . . . . . . . . . . . . . . . . 61
Contents
Page 5

Chapter 1
5
INTRODUCTION
SMX-10Mxx Series Cameras are megapixel CMOS cameras with USB2.0 interface
suitable for scientific and industrial application. The cameras are designed for capturing,
streaming and storing high quality digital images.
There are the following models available:
● SMX-10M1M (1.3 megapixel, monochrome)
● SMX-10M2C (2 megapixel, color)
● SMX-10M3C (3 megapixel, color)
All SMX-10Mxx cameras feature:
● USB2.0 communication interface
● Duralumin housing with C/CS - mount
The benefits of SMX-10Mxx cameras are the following:
● High speed
● Low power consumption
● No external power supply required
● Ease of use
● Compact size
● Adjustable frame rate
● External trigger output mode
Programmable functions include viewport window settings, adjustable exposure time
and gain, selectable sensor clock frequency and image decimation, flipping image
horizontally and vertically. The SMX-10Mxx cameras can be used in microscopy, video
conferencing, webcasting, surveillance and security systems, etc.
Introduction:
Page 6

SMX-10Mxx Series USB2.0 Camera User Guide
6
Introduction:
Page 7

Chapter 2
INSTALLATION
Before installing the camera software, install a USB2.0 adapter if needed. Install all
required drivers. Installation of the USB2.0 adapter is beyond the scope of this
document.
System Requirements
7
Operating System
Processor
Performance
Memory
USB 2.0
Video
Installation
XP SP1+/2003/Vista/2008/7, recommended: Windows 7 or XP SP1 and higher
Intel PIII or higher, recommended: Intel Core 2 Duo
Minimum 300 Mflops, recommended: 400 Mflops or higher
256 MP for XP (512 MB for 2008/Vista/7), recommended: 512 MB (1024 MB)
Recommended: Intel integrated Host Controller, not recommended: VIA-based
USB 3.0 Host Controller is also supported
8 MB memory, recommended: GeForce 4xxx/Radeon 9xxx or higher
To install the SMX-10Mxx camera application software:
1 Run the SMX10MX-<version>.exe file downloaded via the URL provided by Sumix
Corporation.
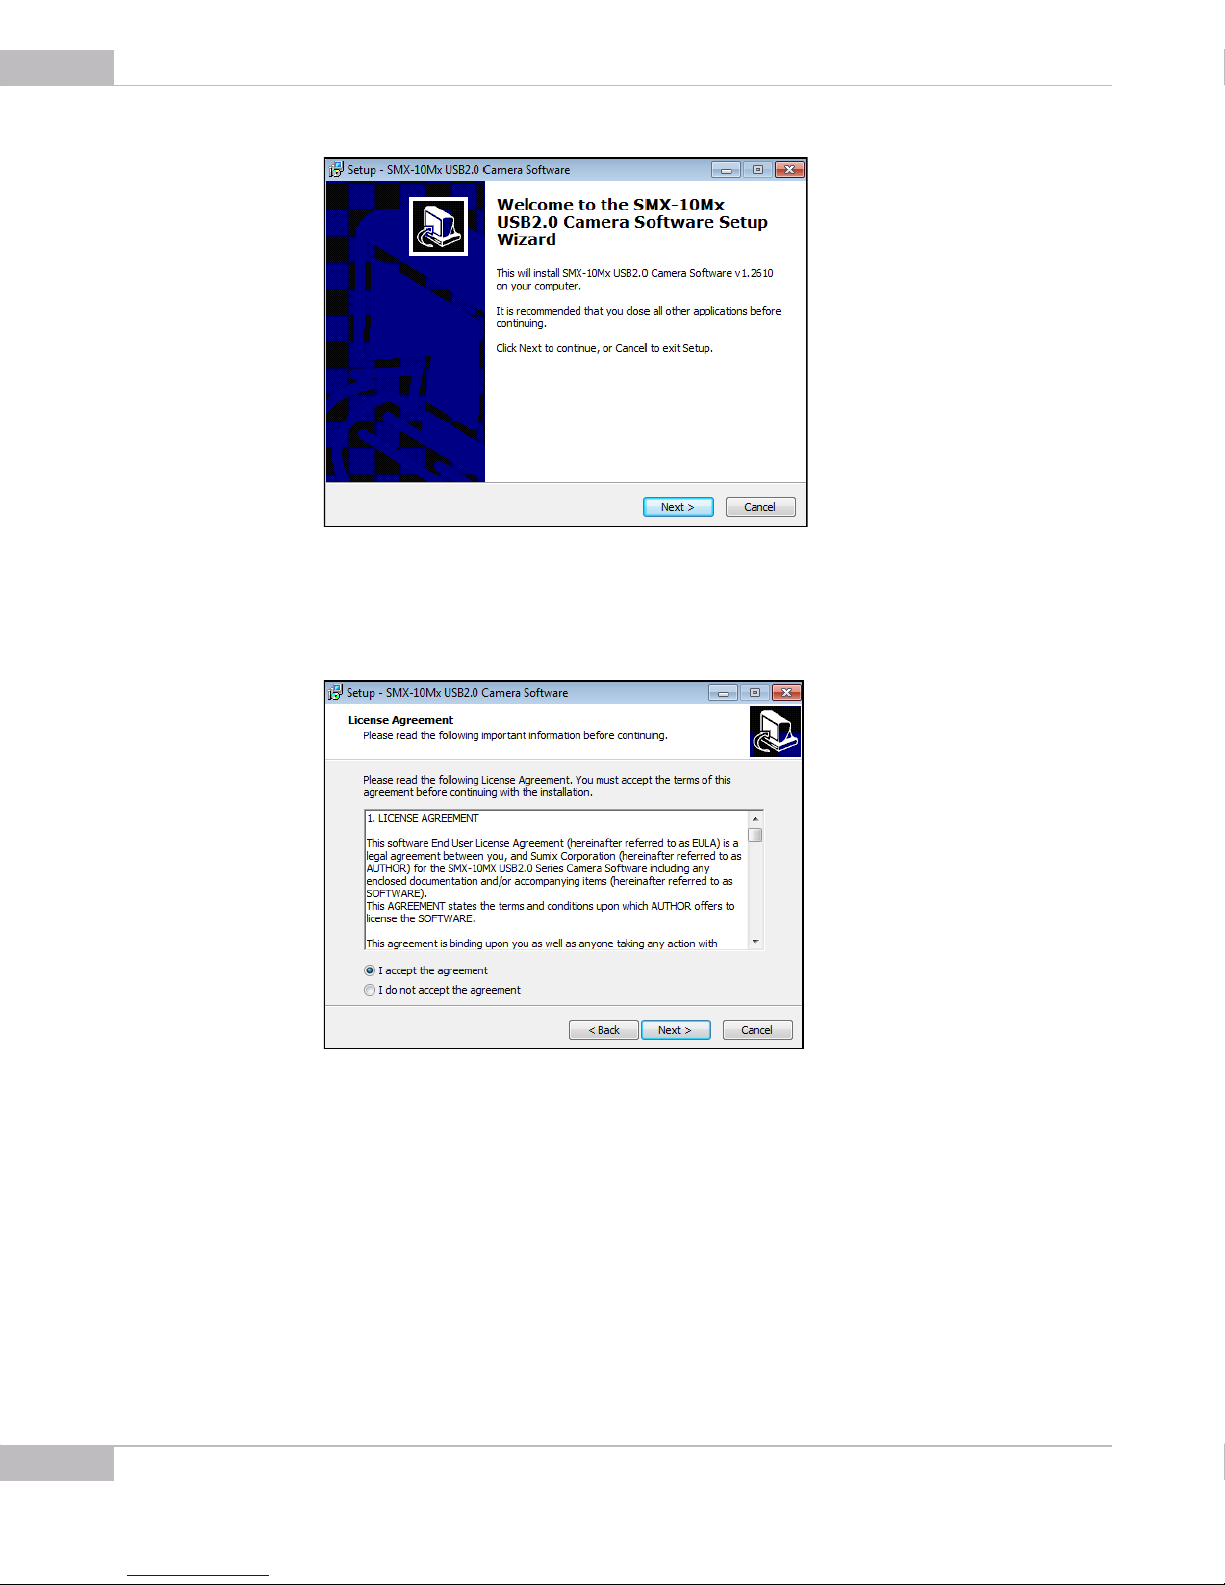
2 Welcome to the SMX-10Mx USB 2.0 Camera Software Setup Wizard starts. The
wizard will guide you through the software and hardware drivers installation. Close
all other applications that are running on your computer and then click the Next but
ton to continue the installation.
-
Installation: System Requirements
Page 8
SMX-10Mxx Series USB2.0 Camera User Guide
8
Figure 2-1 Welcome to the SMX-10Mx Camera Setup Wizard
3 In the License Agreement box, read the license. Then select I accept the agree-
ment and click Next.
Figure 2-2 License Agreement dialog box
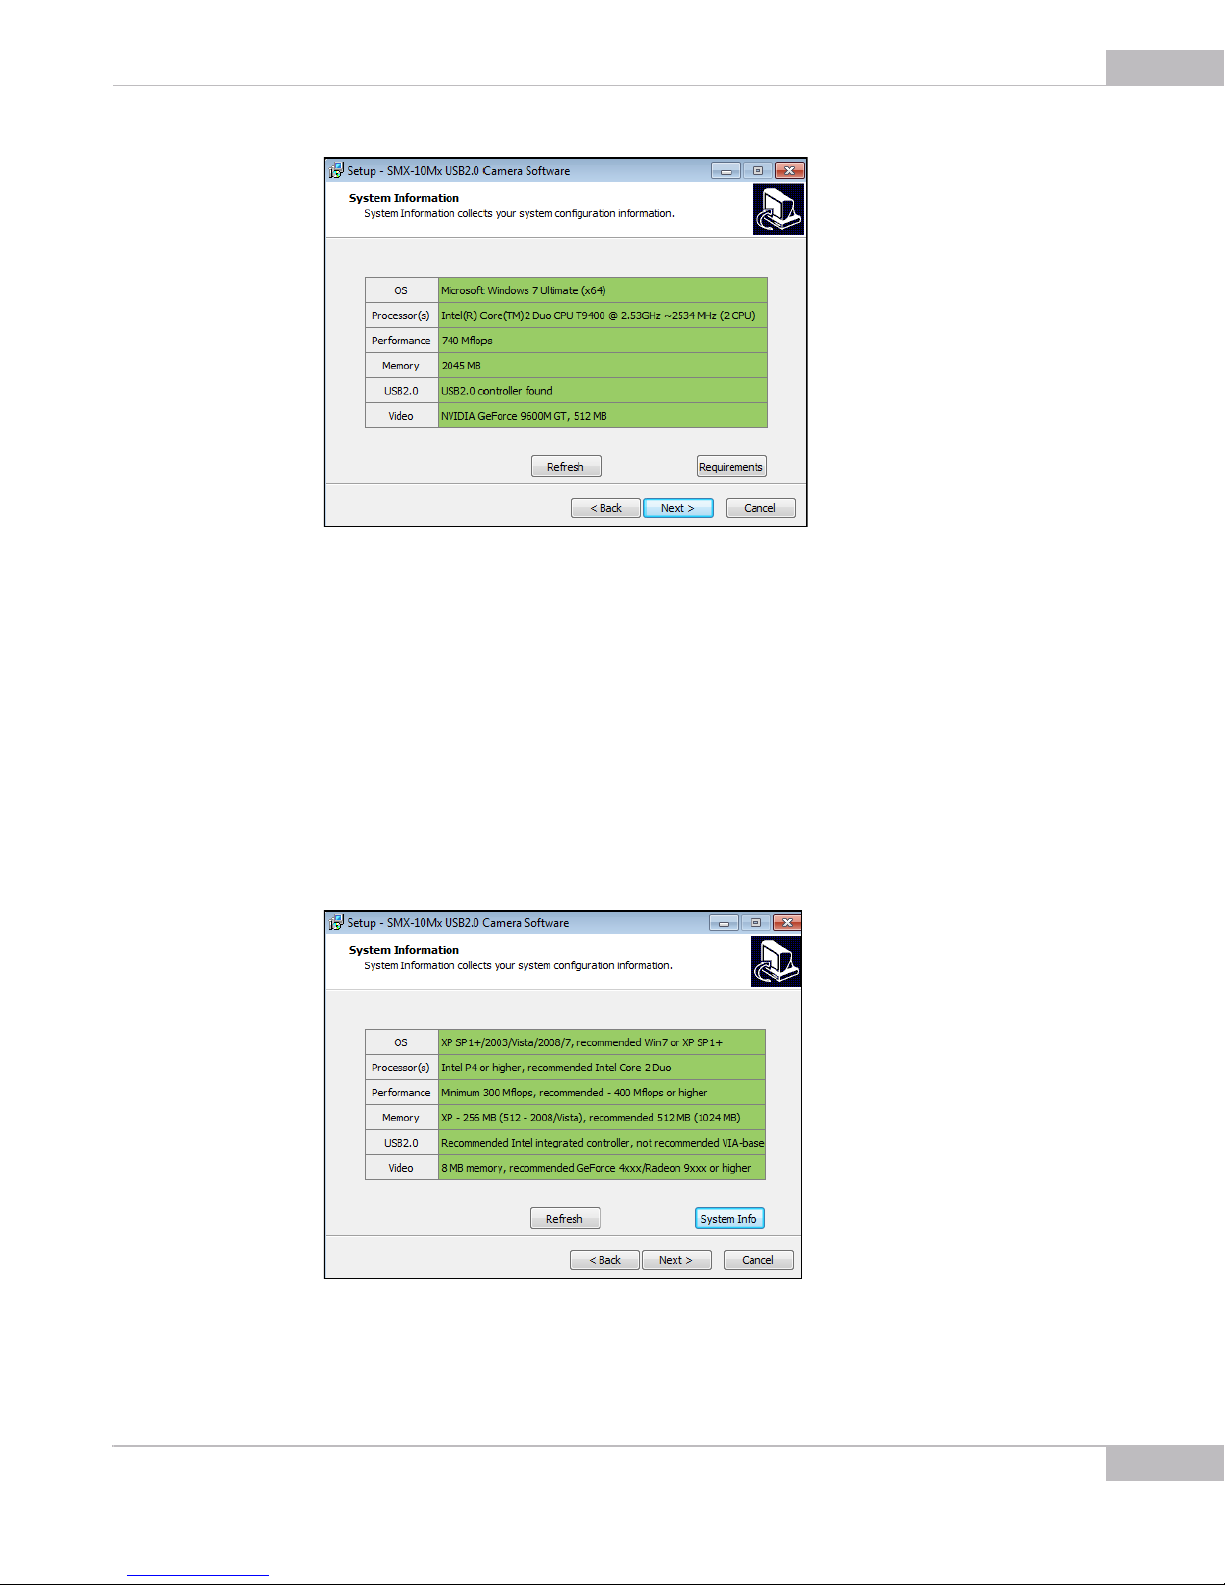
4 The wizard starts to check your system information. Upon completion, a table with
check results is displayed in the System Information box.
Installation: Installation
Page 9
SMX-10Mxx Series USB2.0 Camera User Guide
Figure 2-3 System Information box
5 Do one of the following, depending on the results of the check:
● click the Next button if all table cells with system parameters are green (the
parameters satisfy the software requirements)
9
● update your system if at least one cell is red - such configuration is not recom-
mended
● update your system if at least one cell is yellow, otherwise the technical character-
istics declared for the camera will not be achieved.
To see the recommended system requirements, click the Requirements button in the
System Information dialog box:
Figure 2-4 Recommended system configuration
Installation: Installation
Page 10
10
SMX-10Mxx Series USB2.0 Camera User Guide
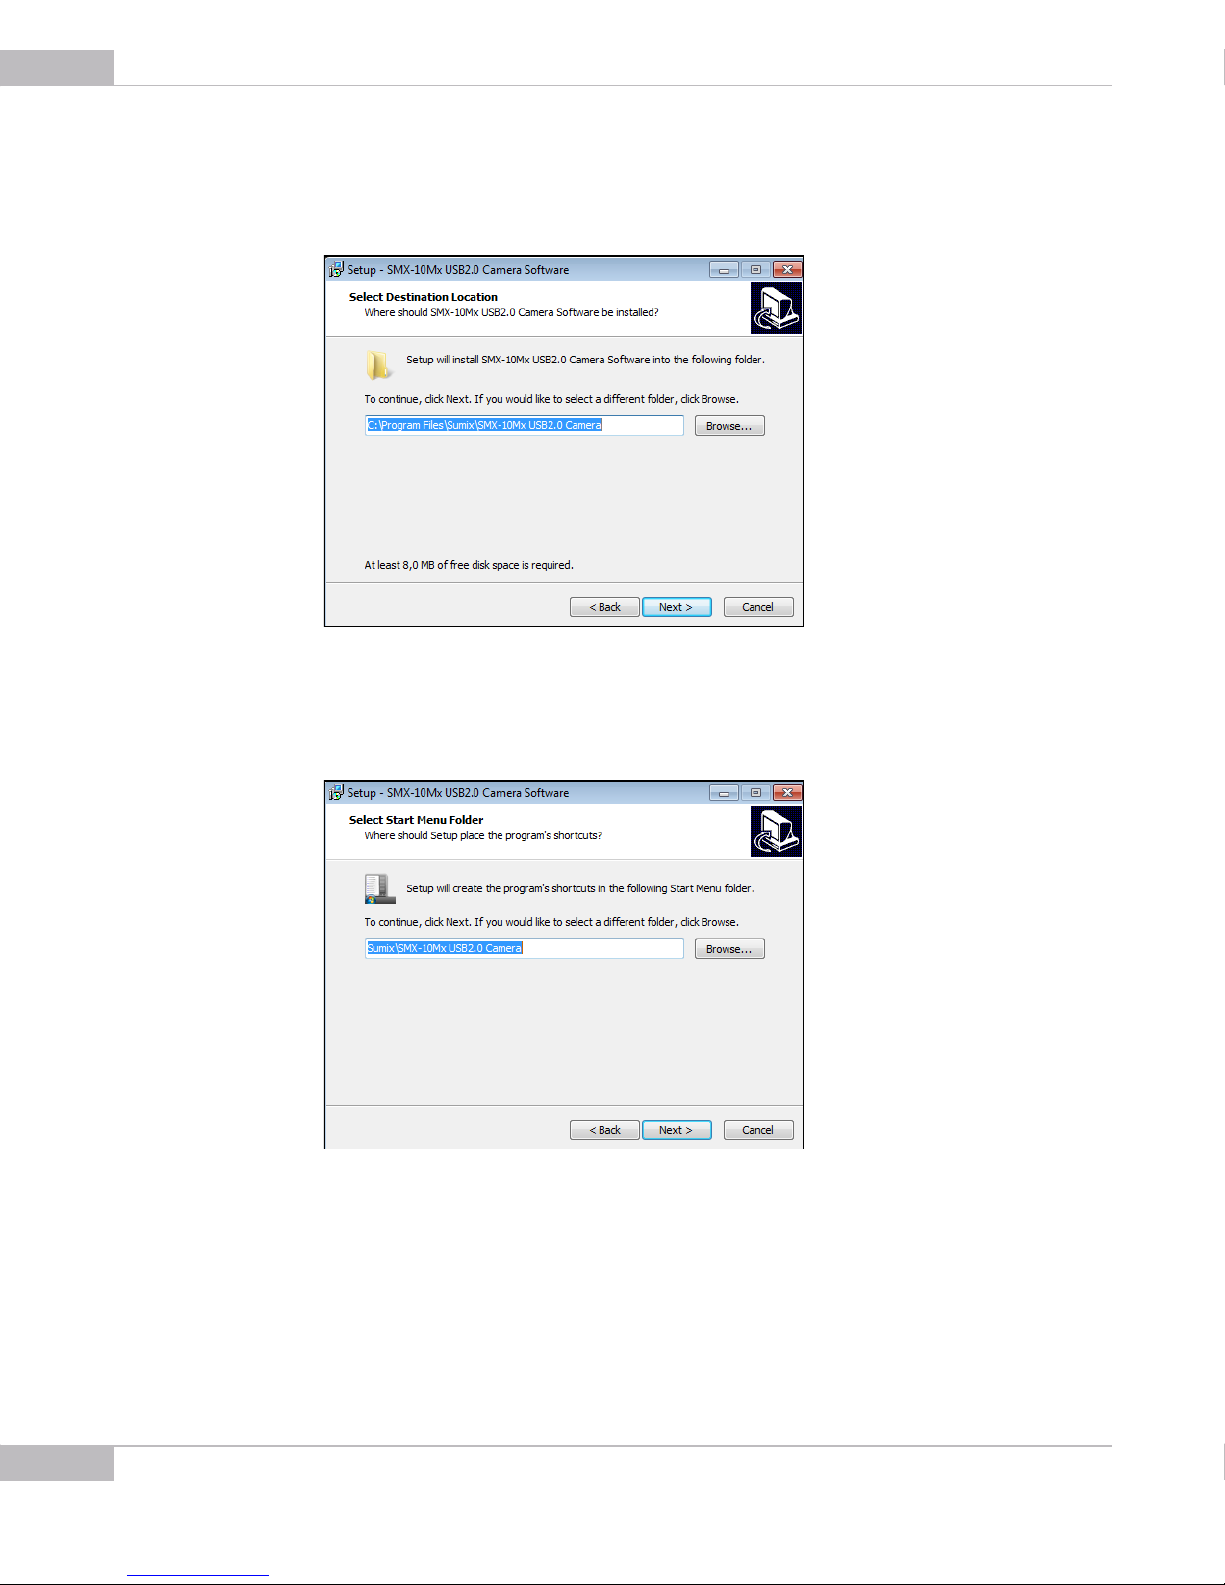
6 In the Select Destination Location box, click Browse to change the folder in which
the SMX-10Mxx camera application software will be installed, or leave the one sug
gested by the wizard. Click Next.
-
Figure 2-5 Select Destination location box
7 In the same way, in the Select Start Menu Folder box, leave the suggested location
or specify the folder you wish. Click Next.
Figure 2-6 Select Start Menu Folder box
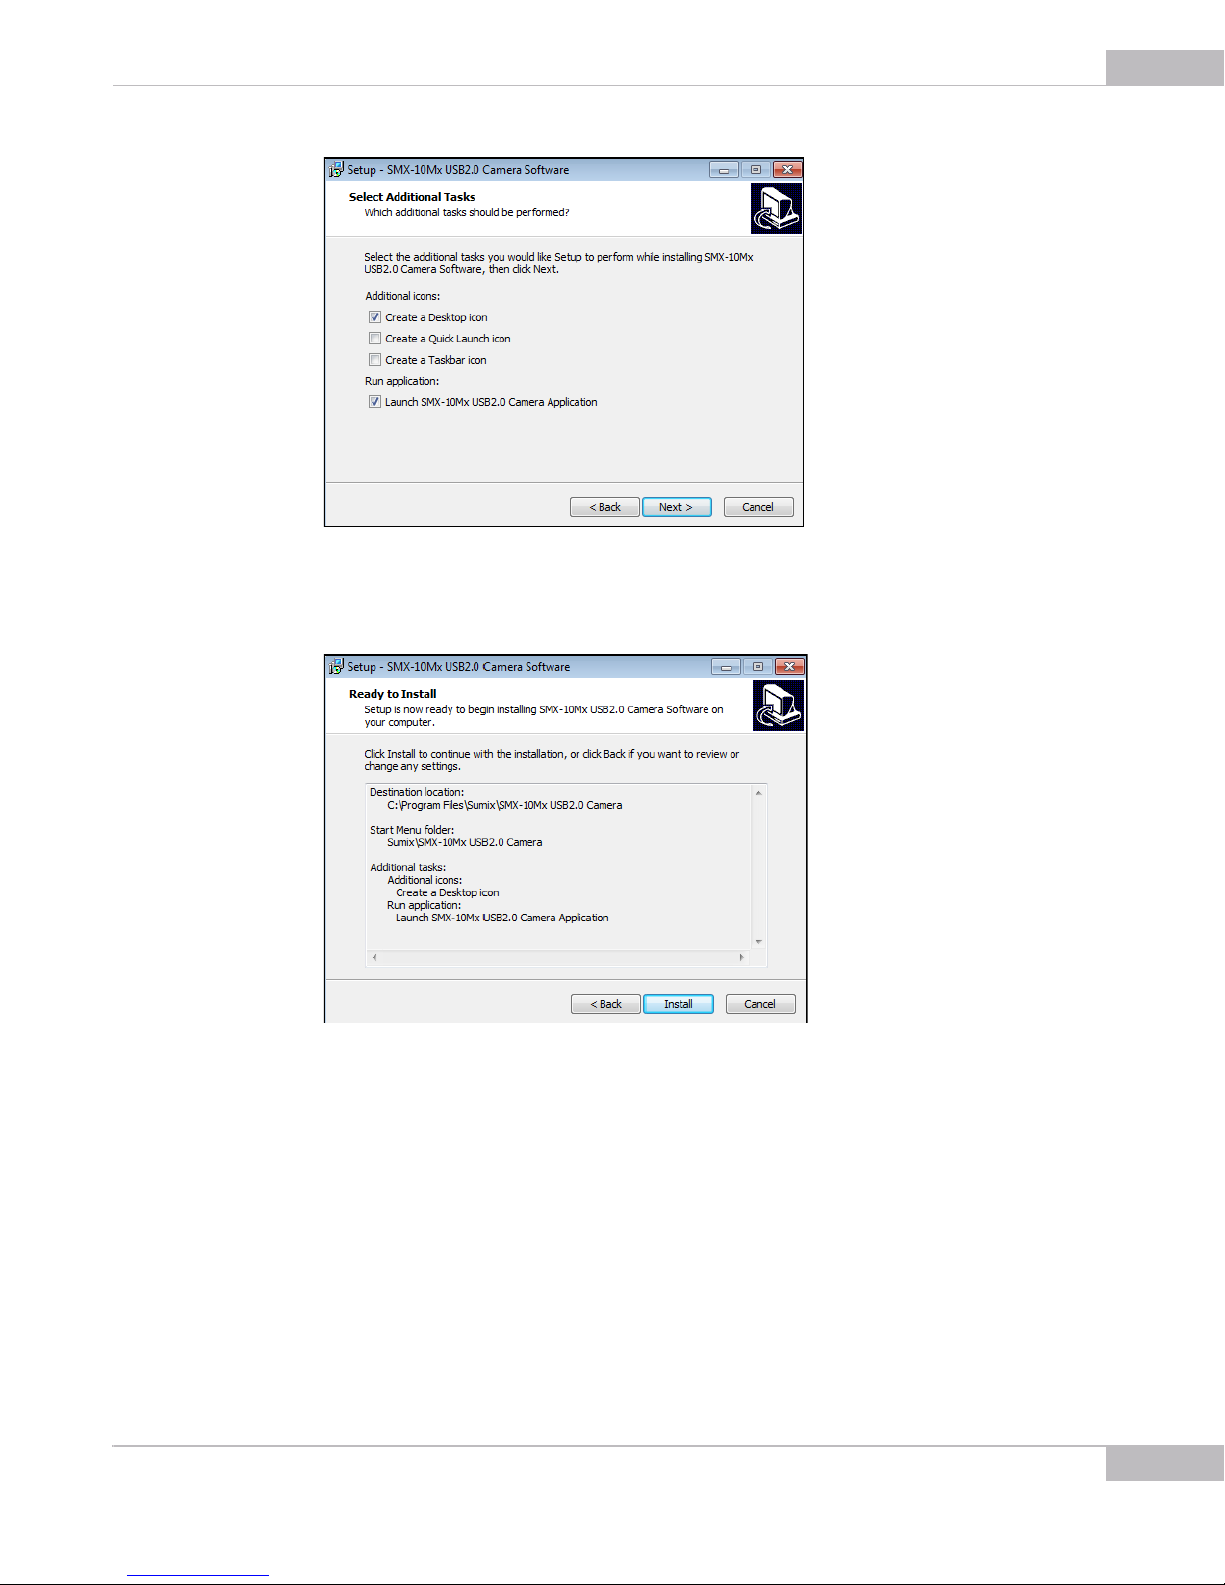
8 In the next wizard box select additional icon that you wish to create and choose
whether you want to launch the application right after the installation, or not.
Installation: Installation
Page 11
SMX-10Mxx Series USB2.0 Camera User Guide
Figure 2-7 Select Additional Tasks box
9 In the Ready to Install step, view the options you selected and click Install.
11
Figure 2-8 Ready to Install box
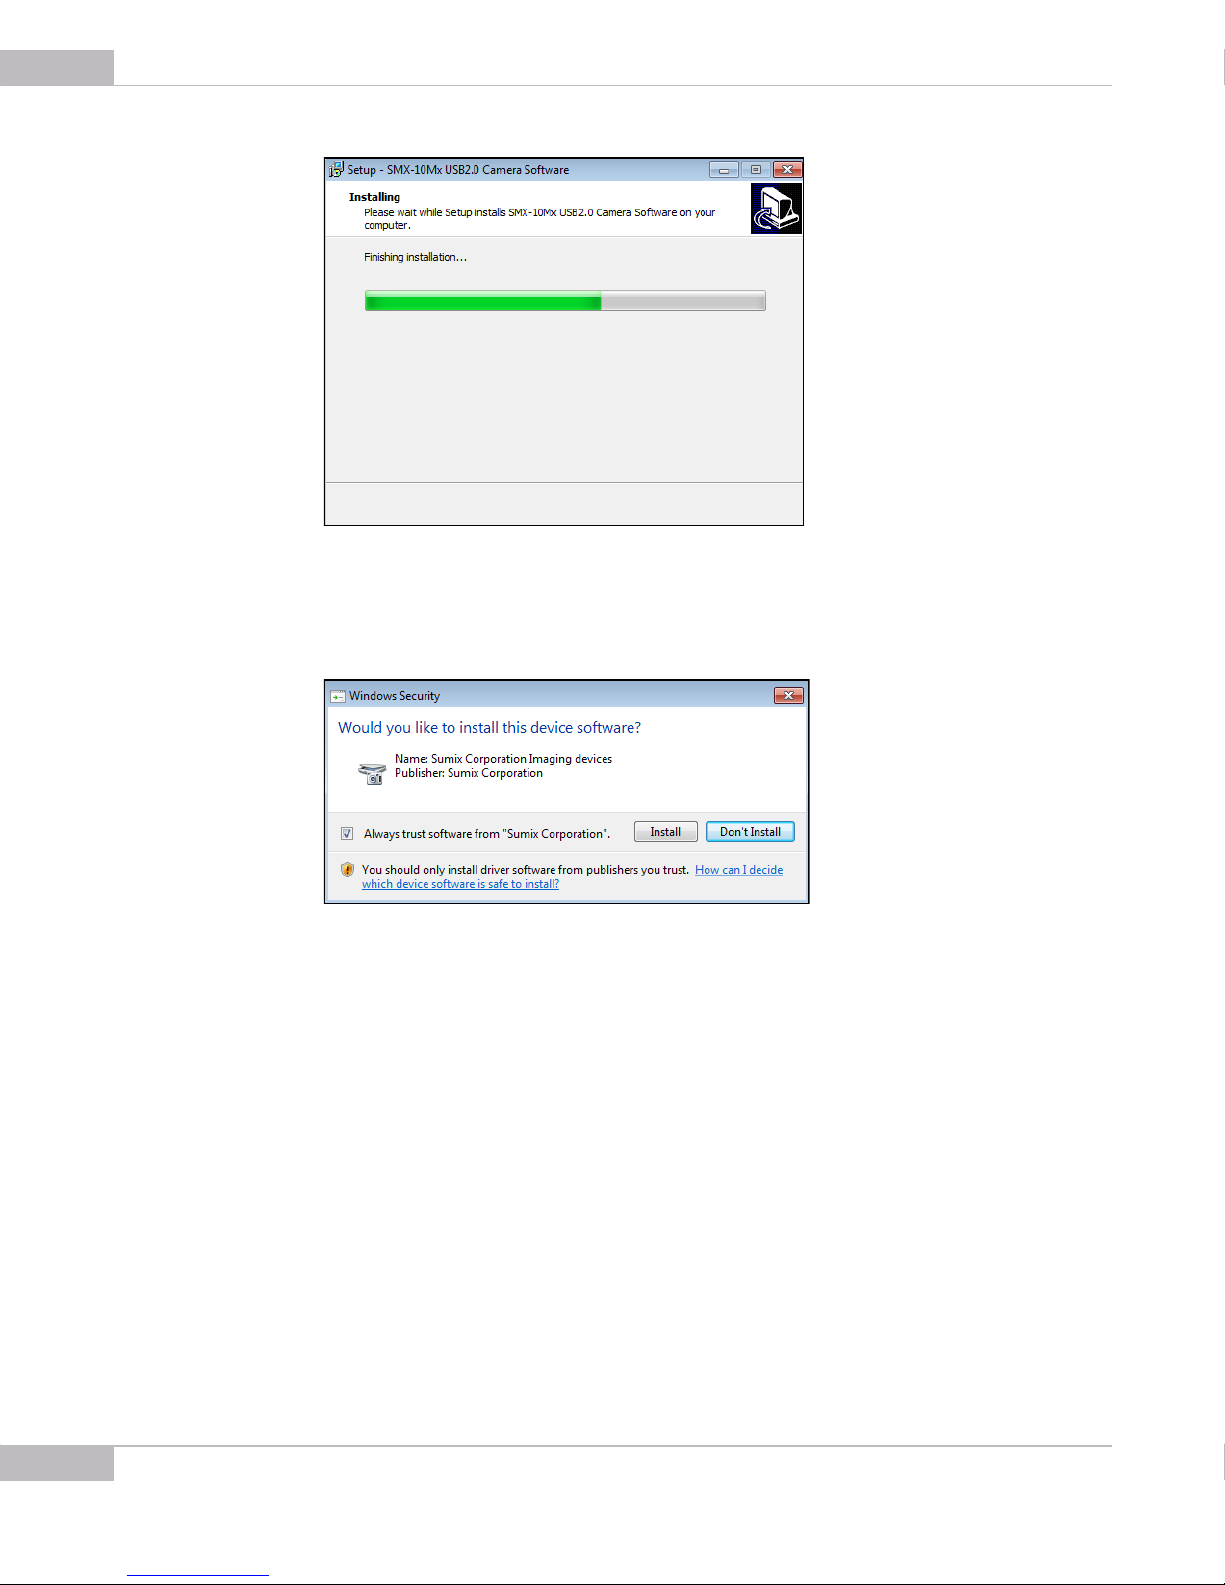
10 The wizard will start to install the application on your computer.
Installation: Installation
Page 12
12
SMX-10Mxx Series USB2.0 Camera User Guide
Figure 2-9 Installing box
During the installation, the system will ask you whether you want to install the device
software. Press Install to proceed.
Figure 2-10 Windows Security box
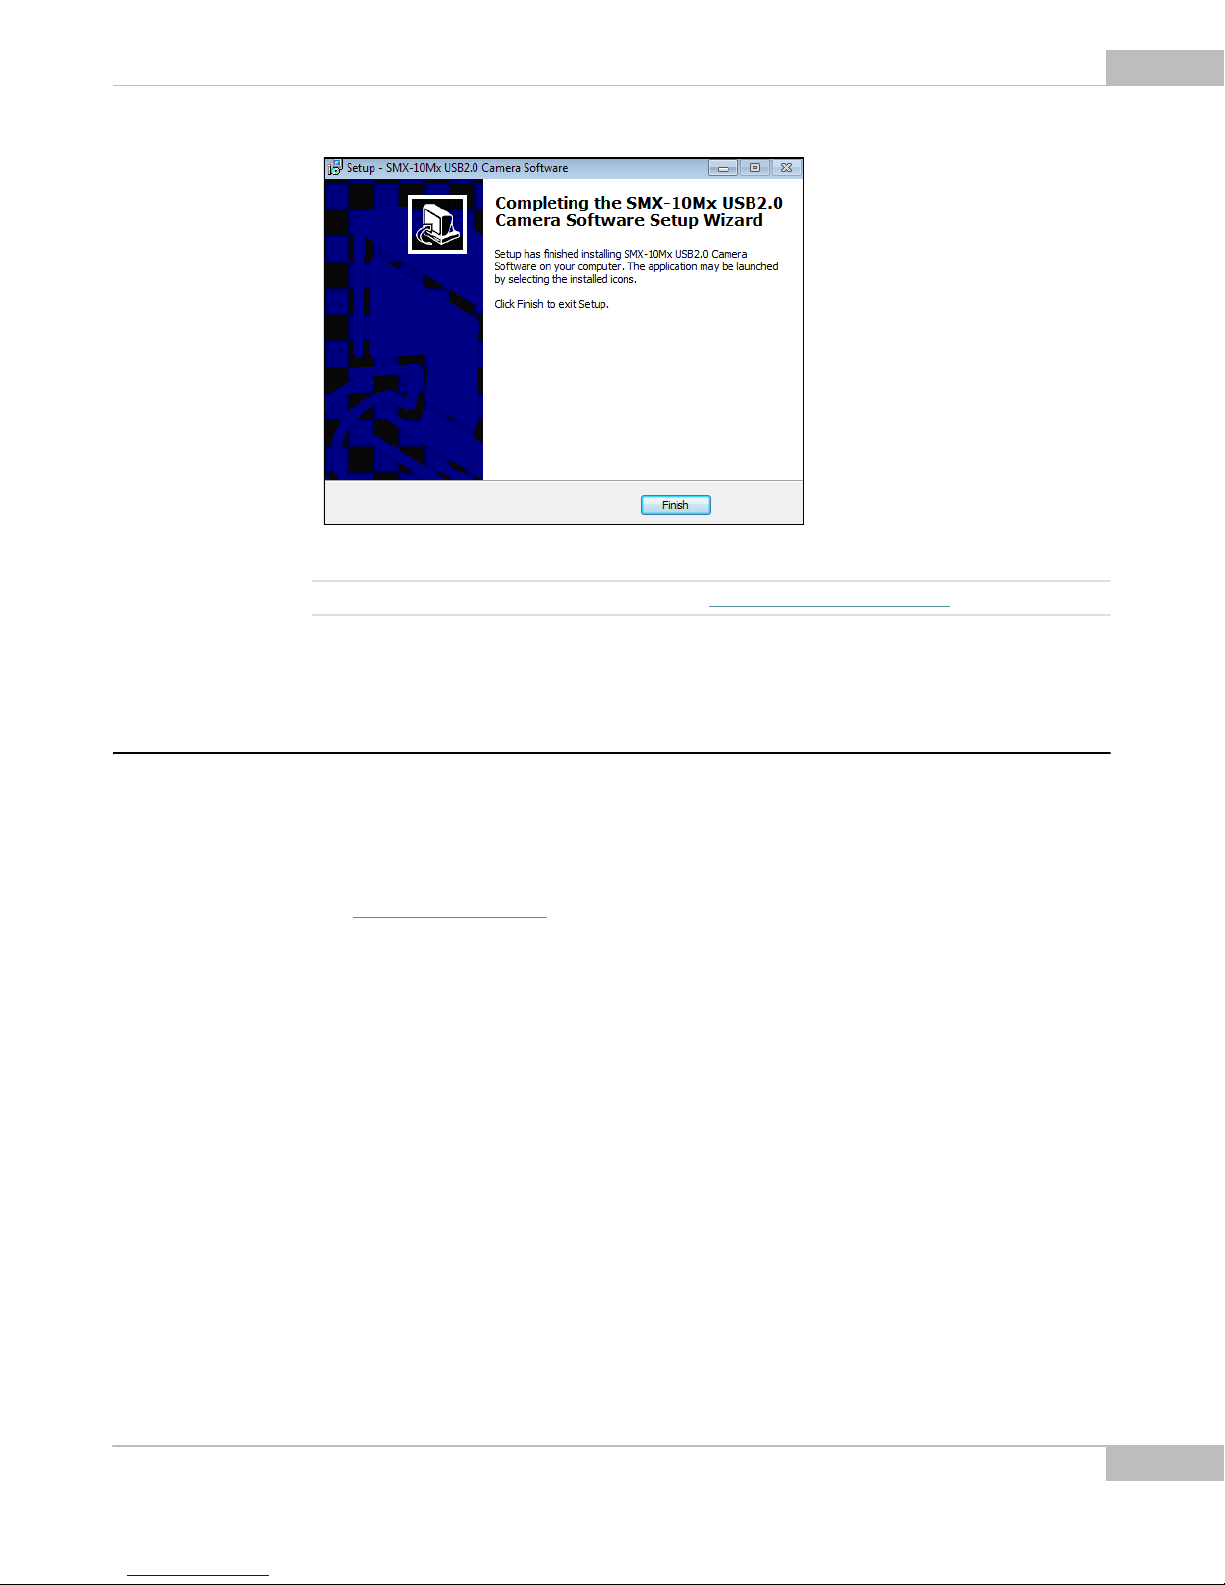
11 Press Finish to exit the wizard.
Installation: Installation
Page 13
SMX-10Mxx Series USB2.0 Camera User Guide
Figure 2-11 The last installation step
Note: If you face problems during the camera installation, see “Troubleshooter” on page 16.
13
Update
Driver Update
The installation of the camera driver will be completed when you first connect the
camera to the computer’s USB port.
The camera application software is constantly developed and improved. When a new
version is available, the customers are notified and a new installer file is sent to them.
The update procedure is exactly the same as the installation described in the previous
section. Simply run the new installer SMX10MX<version>.exe and follow the wizard
“Installation” on page 7).
(see
When a new camera driver version is available, you can update it via the Windows
device manage.
To update the camera driver:
1 Connect the camera to the computer.
2 Open the Device Manager window in the Control panel window.
3 Double-click Imaging devices.
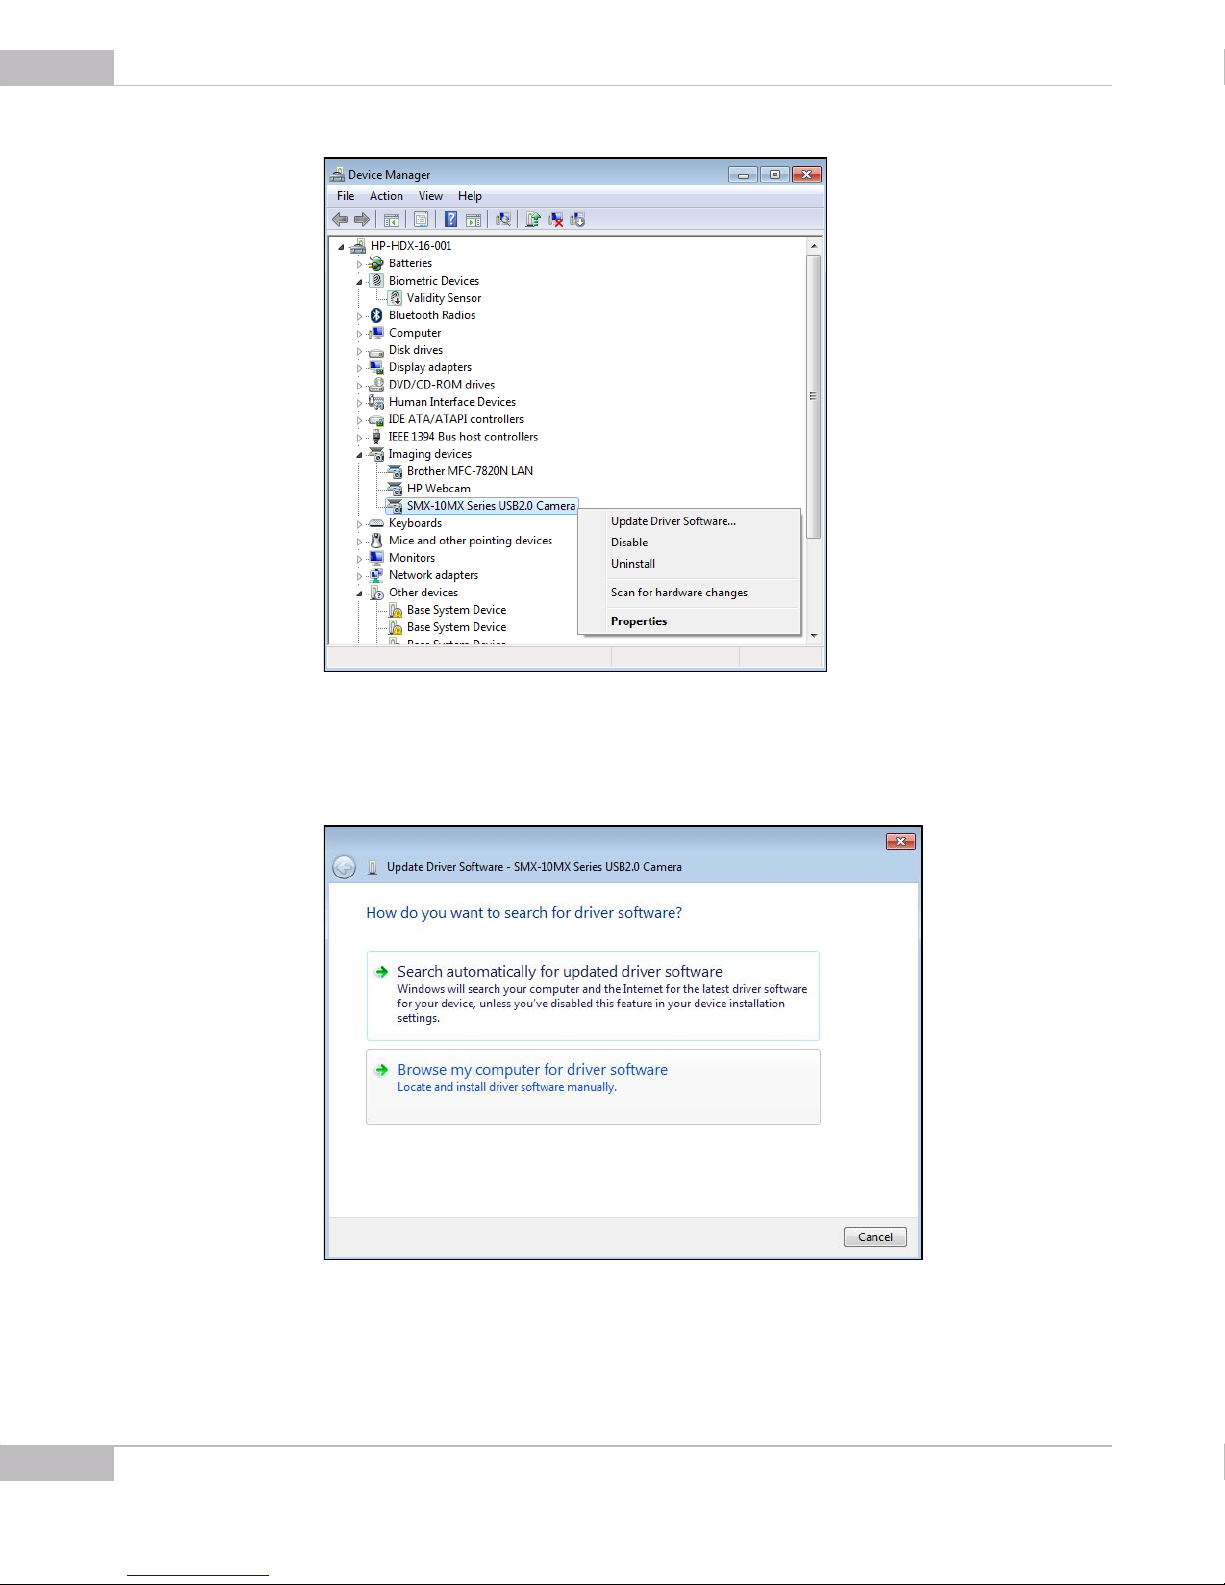
4 Right-click SMX-10MX Series USB2.0 Camera and select Update Driver Soft-
ware...
Installation: Update
Page 14
14
SMX-10Mxx Series USB2.0 Camera User Guide
Figure 2-12 Updating the camera driver
5 Follow the easy-on-screen instructions. On the first step, select Browse my com-
puter for driver software.
Figure 2-13 Updating the camera driver: step1
Installation: Update
Page 15
SMX-10Mxx Series USB2.0 Camera User Guide
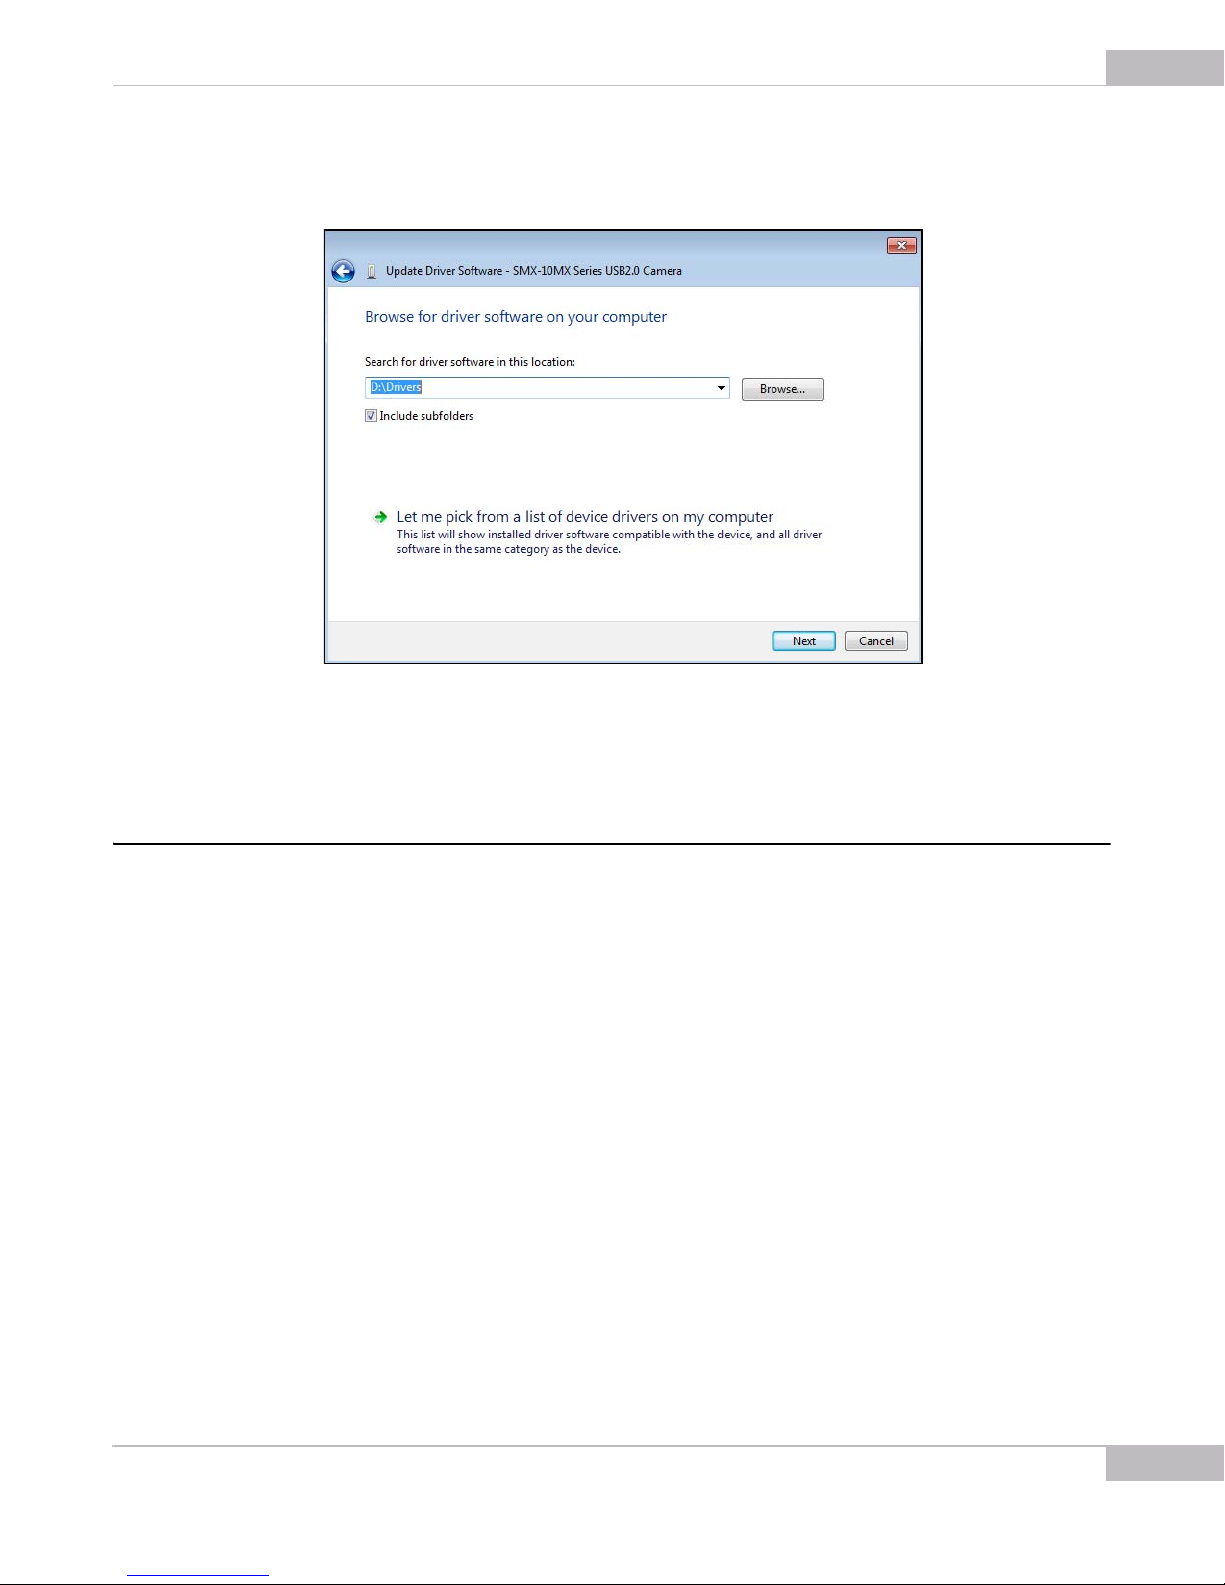
6 On the next step, browse for the location on your computer where the driver is saved
and click Next.
15
Removal
Figure 2-14 Updating the camera driver: step 2
7 The system will start installing the driver. In the end, a message that the installation is
successful will appear. Press Close to finish.
To remove the camera application software, use the Add/Remove Programs section in
the Windows Control Panel. Remove the application according to the general
Windows application uninstallation rules.
Alternatively, you can click the uninstallation shortcut in the application folder (Start >
All Programs > Sumix > SMX-M10x USB2.0 Camera> Uninstall SMX-M10x USB2.0
Camera Software) and follow the uninstallation wizard.
After removing the software, you need also to remove the camera driver.
To remove the camera driver:
1 Connect the camera to the computer.
2 Open the Device Manager window in the Control panel window.
3 Double-click Imaging devices.
4 Right-click SMX-10Mx Series USB2.0 Camera and select Uninstall.
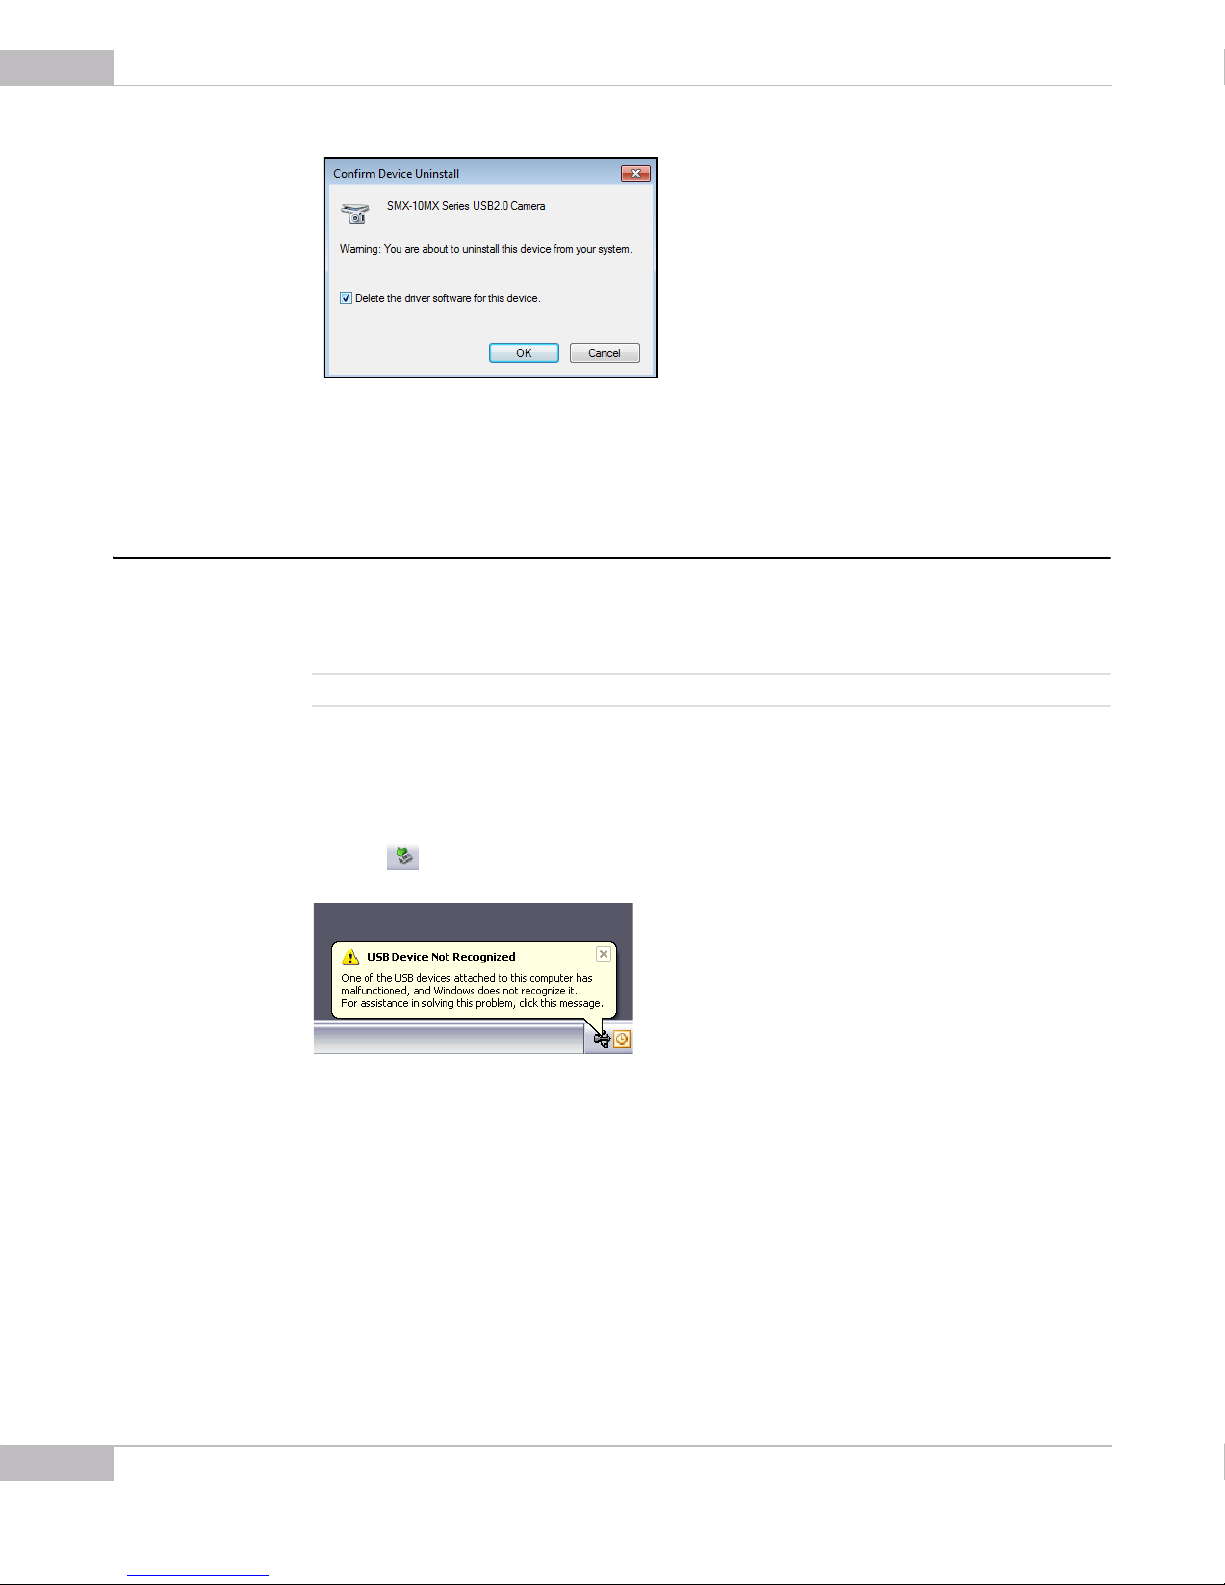
5 Confirm removing the driver: check the Delete the driver software for this device
and click OK.
Installation: Removal
Page 16
16
SMX-10Mxx Series USB2.0 Camera User Guide
Troubleshooter
Figure 2-15 Driver removal confirmation
6 After the driver is uninstalled, the SMX-10Mx Series USB2.0 Camera will disappear
from the Imaging Devices section of the Device Manager.
If you face problems with installation and detection of the camera, use this
Troubleshooter. If you face problems that are not described below, contact Sumix
Technical Department.
Note: Tasks and problems in this section are demonstrated in Windows XP operating system.
Camera Was Not Detected or Recognized
If after connecting the camera to your computer the system does not detect it: there is
no icon on the Taskbar or the camera was not recognized by the system:
Try doing the following:
● Check if the device was installed successfully: open system folder WINDOWS\
system32\drivers and check if there is the SMX10MX.sys file (normally it is located on
the C: hard disk). If not, run the driver installation again. Be sure that no camera is
connected during installation.
● If the problem still persists, manually save the SMX10MX.sys file to the \WIN-
DOWS\system32\drivers folder (the SMX10MX.sys file is located in the \Sumix\SMX10Mx USB2.0 Camera\Drivers folder).
If the problem still persists, try one of the following:
Installation: Troubleshooter
Page 17
SMX-10Mxx Series USB2.0 Camera User Guide
● Reconnect the camera.
● Use other USB2.0 port of your computer - the problem might be due to the USB2.0
port malfunction.
● Use another USB2.0 cable - the problem might be due to the USB2.0 cable malfunc-
tion.
● Connect other SMX-10Mxx camera (if any) to the same USB2.0 port - the problem
might be due to the camera malfunction.
● Disconnect the camera and restart your computer.
If any of the above steps did not help and the device is not recognized yet, try the
following:
1 Connect the problematical camera to the computer.
2 Open the Device Manager window (right-lick My Computer desktop icon, select
Properties, select Hardware tab, and then click Device Manager).
3 In Device Manager, double-click Universal Serial Bus controllers.
4 In Device Manager, select one of the following:
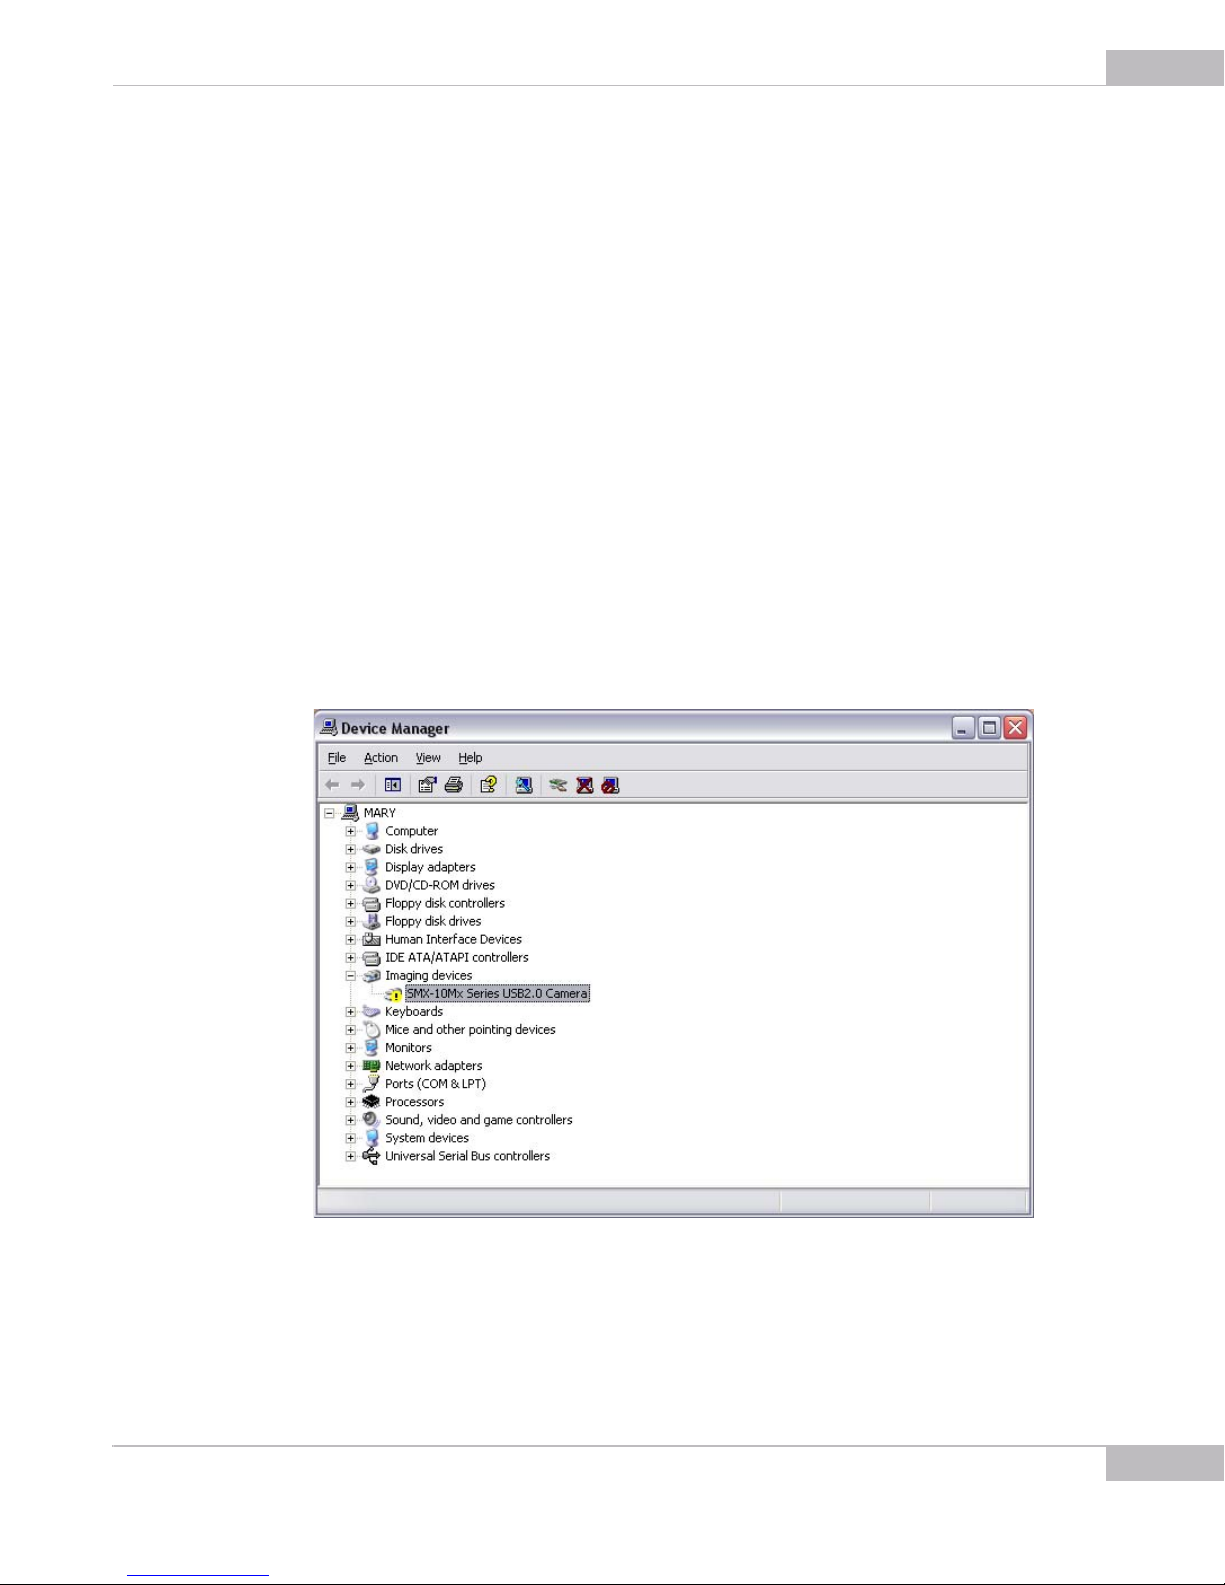
● Imaging devices> SMX-10Mx Series USB2.0 Camera with Warning status, if it is
available there:
17
Figure 2-16 Device Manager: the SMX-10Mx camera with Warning status
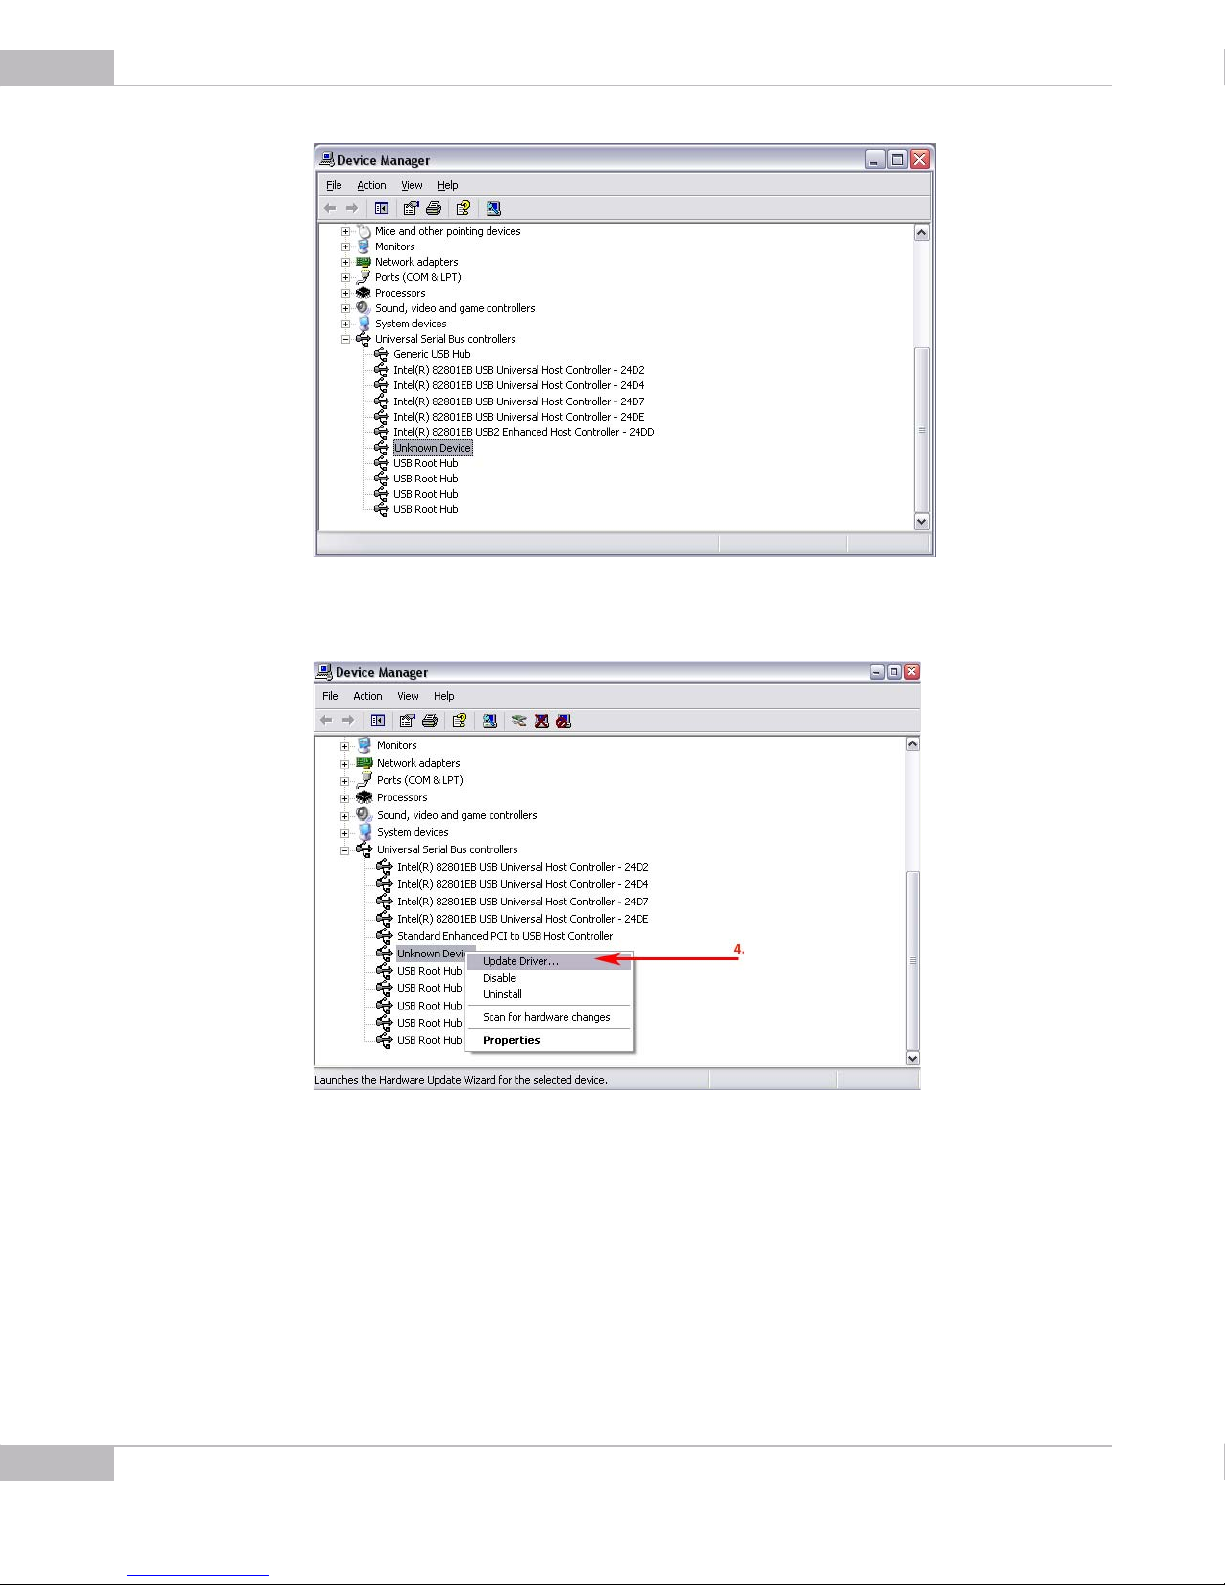
● Universal Serial Bus controllers> Unknown device:
Installation: Troubleshooter
Page 18
18
SMX-10Mxx Series USB2.0 Camera User Guide
Figure 2-17 Device Manager: the SMX-10Mx camera is detected as Unknown device
5 Right-click and select Update Driver…:
Figure 2-18 Device Manager: Updating the SMX-10Mx camera driver
6 Run the Hardware Update Wizard the same way as the Found New Hardware Wiz-
ard by choosing the Install the software automatically (Recommended) option.
7 If some problems occur during the manual hardware installation, read the next sec-
tion of this Troubleshooter.
Installation: Troubleshooter
Page 19
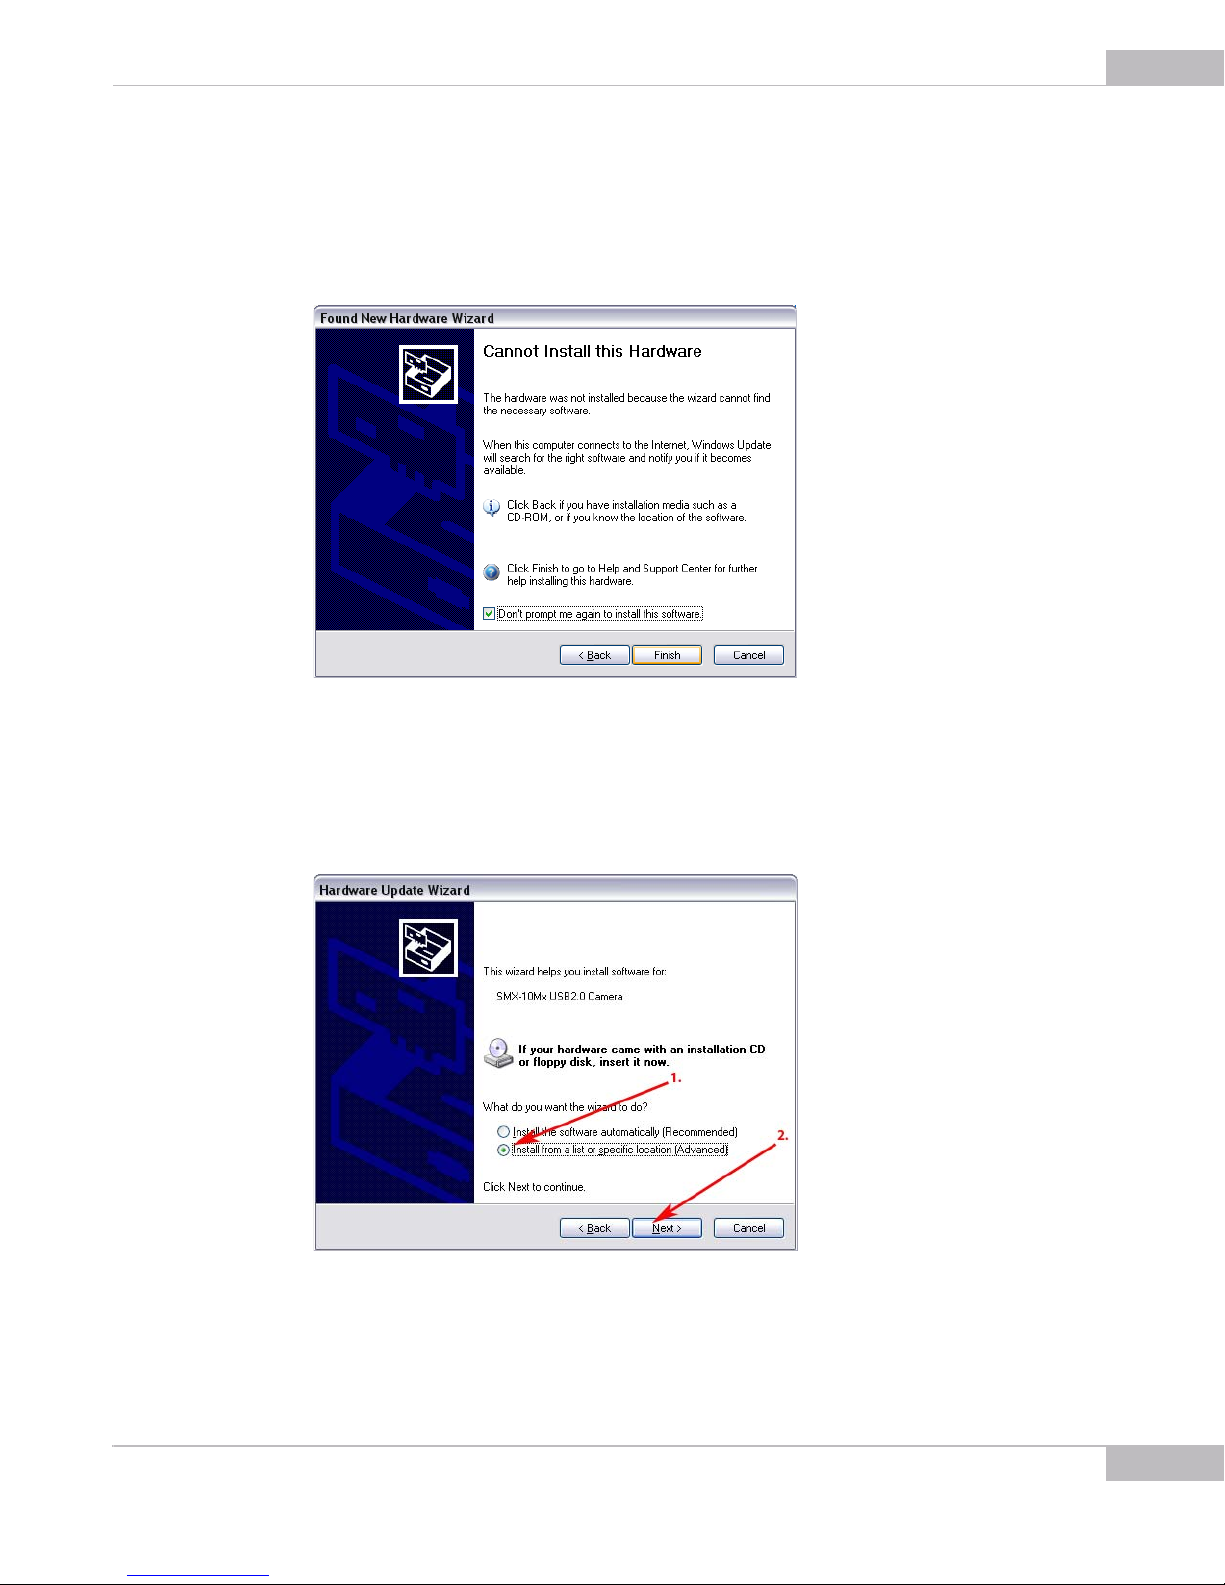
Cannot Install the Hardware
If the Found New Hardware Wizard\Hardware Update Wizard failed to install the
hardware (the wizard that starts after the first connection of the camera or the Wizard
that starts for updating the hardware; failure occurs after you browse to the files needed
for the installing),
SMX-10Mxx Series USB2.0 Camera User Guide
19
Figure 2-19 Found New Hardware Wizard: Cannot install this Hardware
try doing the following:
1 Click Back in the Found New Hardware Wizard and select Install from a list or spe-
cific location (Advanced).
2 Click Next.
Figure 2-20 Found New Hardware Wizard: Installing from a list or specific location (Advanced)
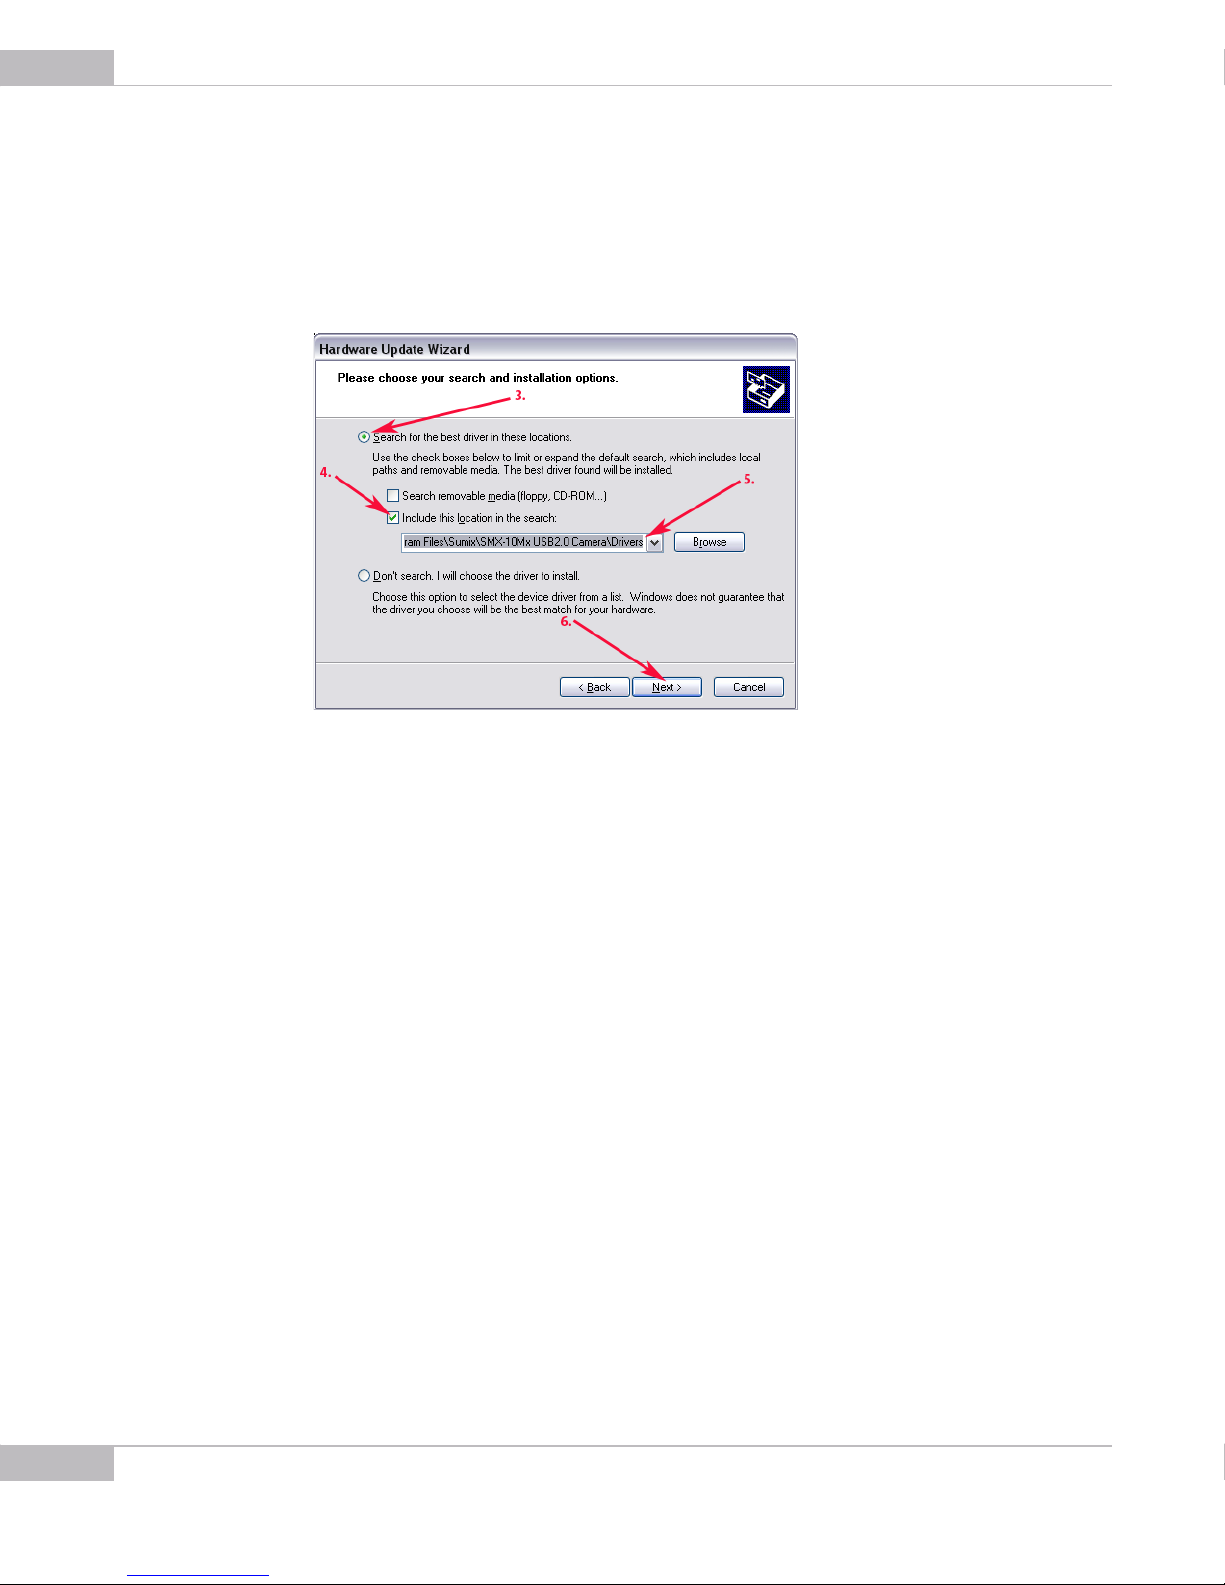
3 Select Search for the best driver in these locations.
Installation: Troubleshooter
Page 20
20
SMX-10Mxx Series USB2.0 Camera User Guide
4 Check the Include this location in the search box.
5 Browse to the Drivers folder - on the SMX-M10x Camera CD or in the Sumix\SMX-
10Mx USB2.0 Camera folder (located on the hard disk where you installed the SMX-
10Mx Camera Software, normally it is the C:\Program Files\Sumix\SMX-10Mx
USB2.0 Camera).
6 Click Next.
Figure 2-21 Installing from a list or specific location: specifying location
7 In the list, select the last item.
8 Click Next.
9 Wait till the wizard installs all files.
10 Click Finish if installation passed successfully.
Installation: Troubleshooter
Page 21

Chapter 3
Installing Lens
21
GETTING STARTED
To use a lens with the camera, remove the cover from the camera and install a lens as
described below.
It is recommended to remove the cover and install a lens (as well as remove a lens and
put on the cover) when the camera is faced down, to prevent the sensor contamination.
To install a lens:
1 Face the camera down.
2 Remove the camera cover.
3 Screw the lens in.
To remove the lens
1 Face the camera down.
2 Screw the lens out.
3 Put on the cover.
Note: Before screwing the lens in or putting on the cover, make sure that the surfaces are free from dust
When you remove the cover, put it facing down to keep dust out
Recommendations on the Camera Connection
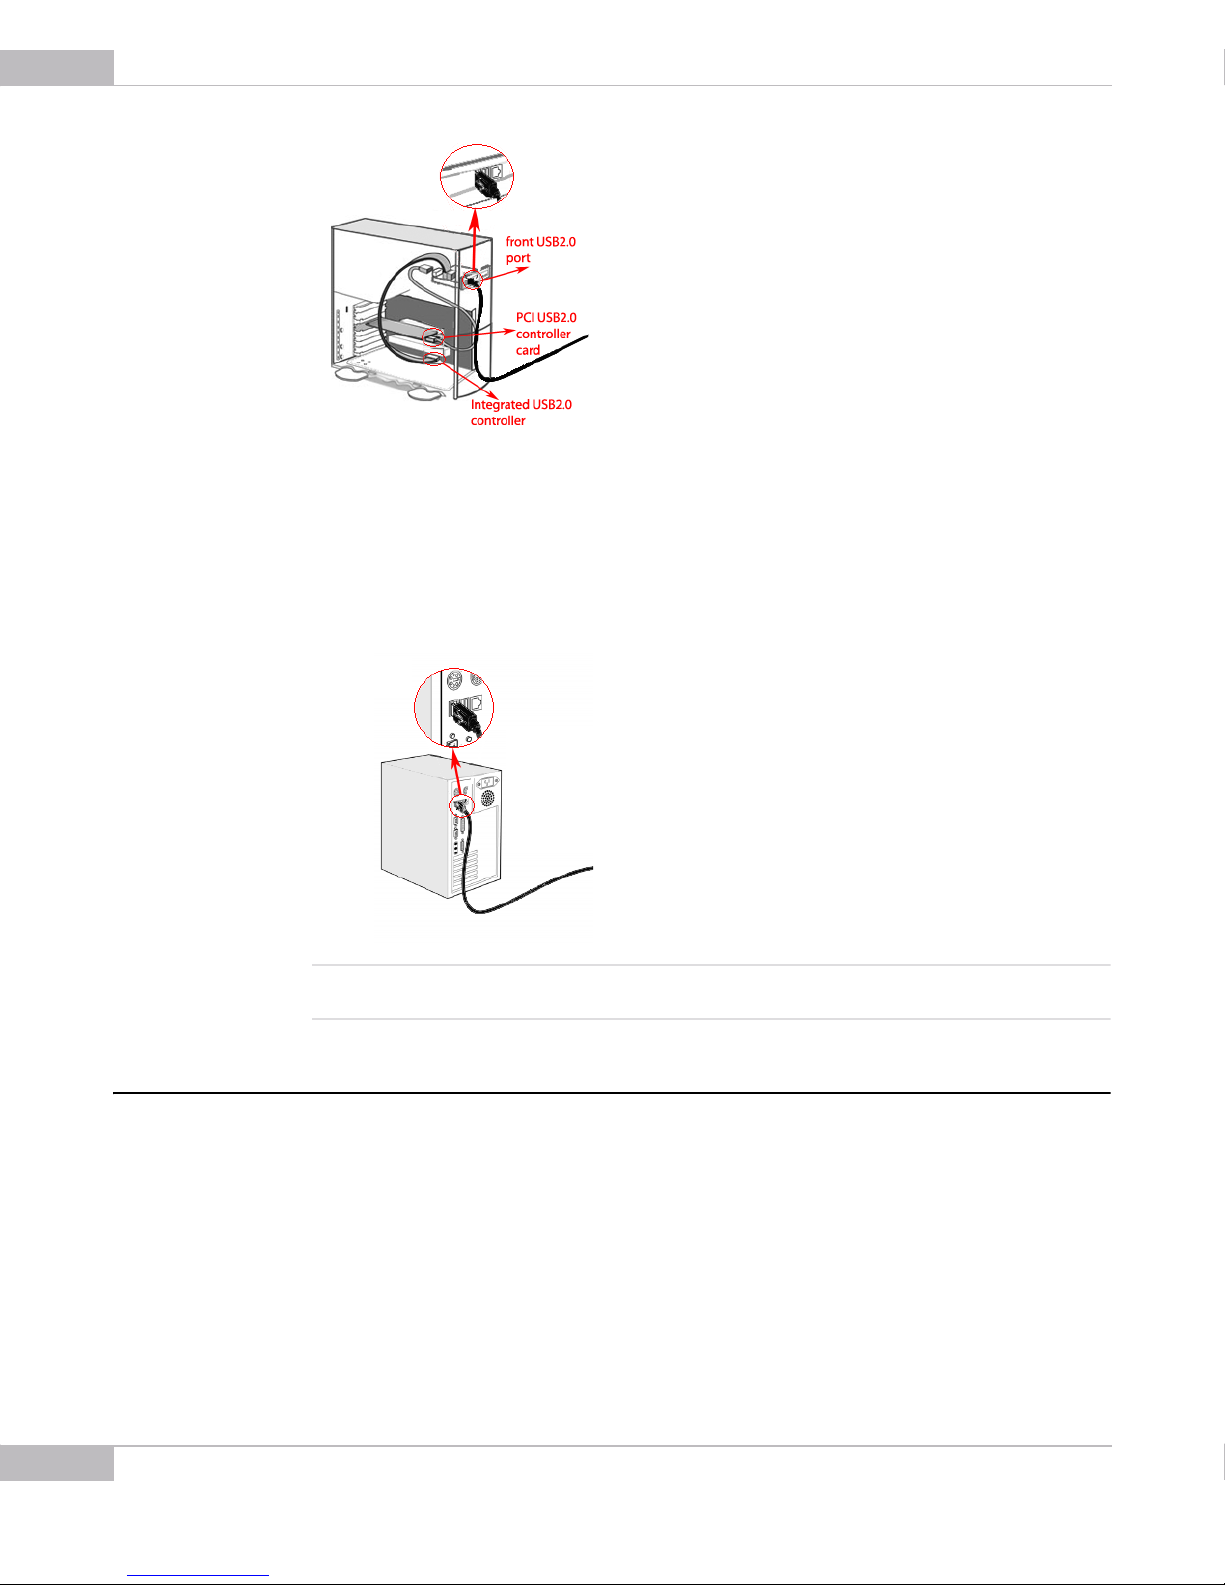
Most computers have both front and back USB2.0 ports location. We do not
recommend using the front USB2.0 port of your computer since it is not directly
connected to the computer's USB Host Controller.
Getting Started
Page 22
22
SMX-10Mxx Series USB2.0 Camera User Guide
+++
As shown on the picture above, the front USB2.0 port is connected to the USB Host
Controller by long cables inside computer, meanwhile back USB2.0 port is connected
directly to its controller at the back panel of computer.
So, when connecting the camera to the front USB2.0 port the device might not work
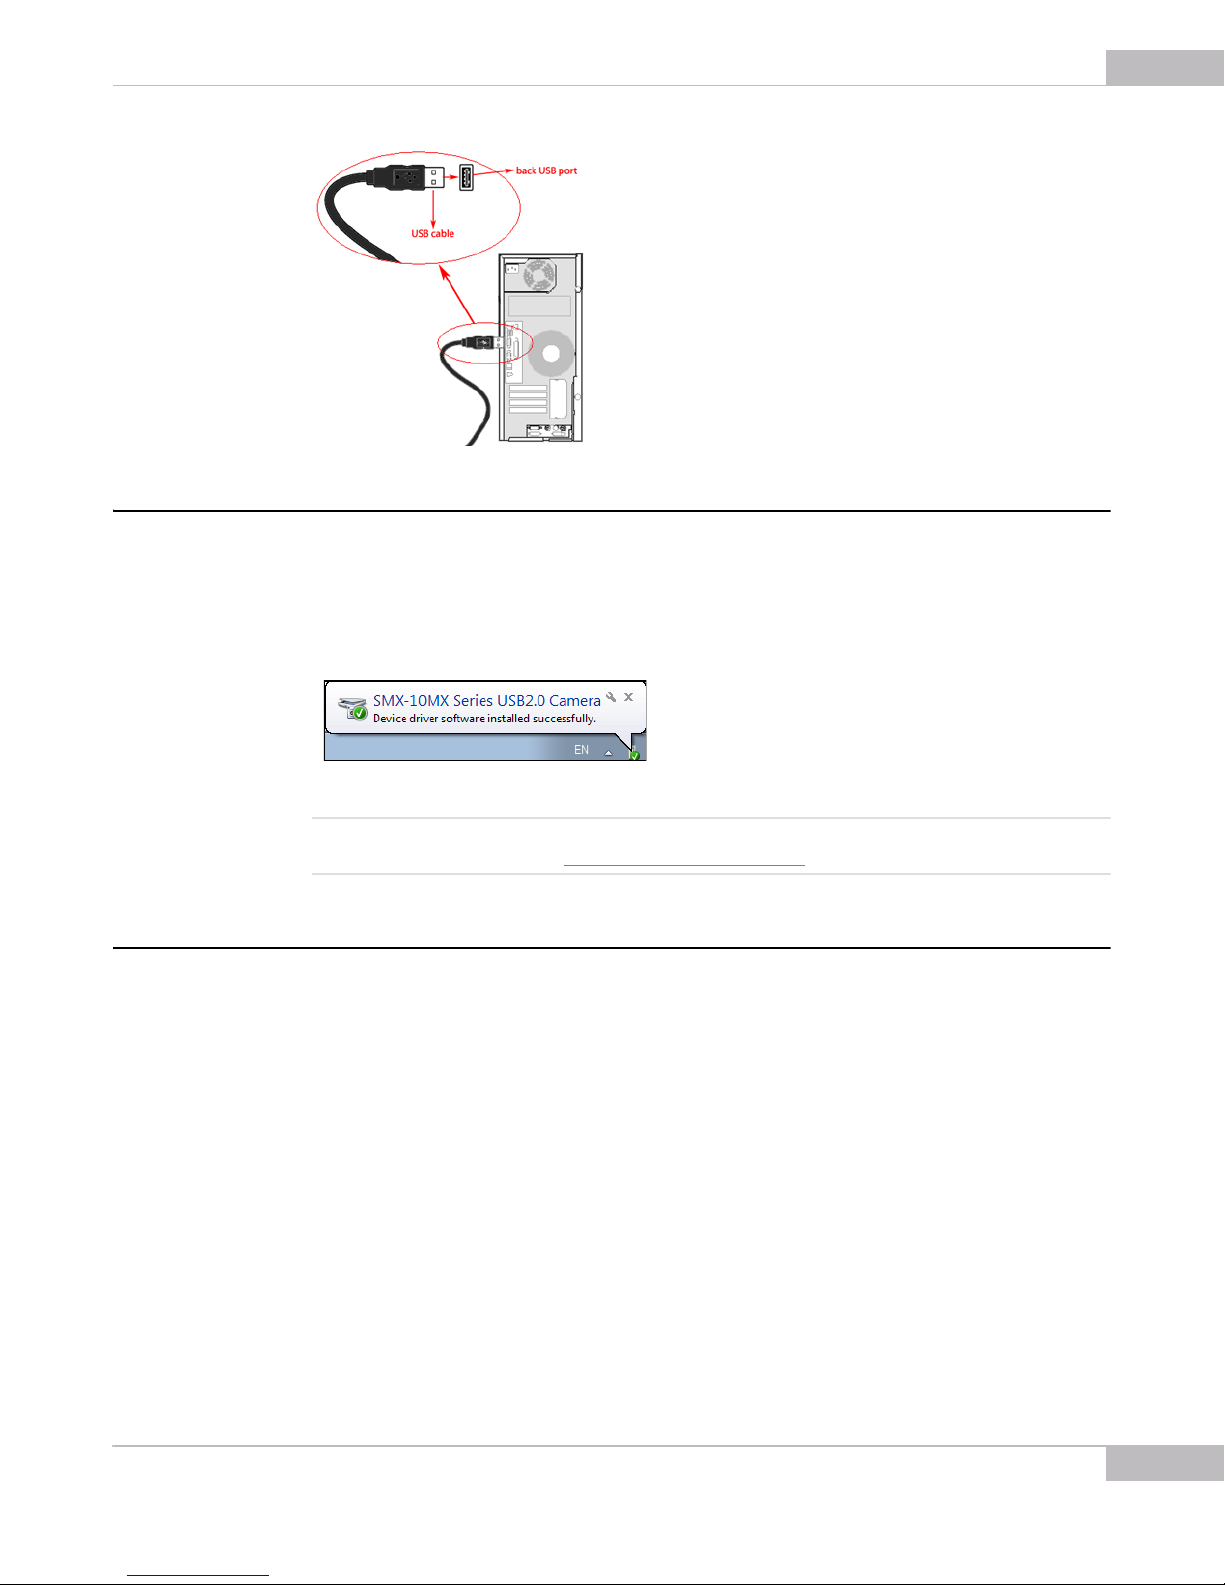
properly. We recommend to use the back USB2.0 port to avoid problems with the
camera work (see the picture below).
Note: Design and configuration of the front USB2.0 port location shown on the pictures above might differ from yours.
The pictures' goal is only to show how the front USB2.0 port is connected to its controller
Plugging in the Camera
Connect SMX-10Mxx camera with USB2.0 cable.
Connect the other end of the USB cable to the back USB2.0 port of your computer.
Getting Started
Page 23
Installing Driver Software
After you connect the camera to the USB port of you computer, a Found New
Hardware message will appear in the notification area of the task bar, and Windows will
install the hardware driver. When the installation is finished, a message will appear in
the notification area:
SMX-10Mxx Series USB2.0 Camera User Guide
23
Figure 3-1 Notification about successful camera installation
Note If you experience problems during the driver software installation, refer to the Installation Troubleshooter and
learn how to fix such problems (see “Troubleshooter” on page 16).
Starting the Application
After the camera hardware has been installed, you can start the application.
To start the camera application:
Click Start > All Programs > Sumix > SMX-10Mx USB2.0 Camera > SMX-10Mx
USB2.0 Camera Application Program. If during the installation you chose to install a
desktop icon and/or a quick launch icon, you can also click the icon to launch the
application. The SMX-10Mxx application will start with its main window.
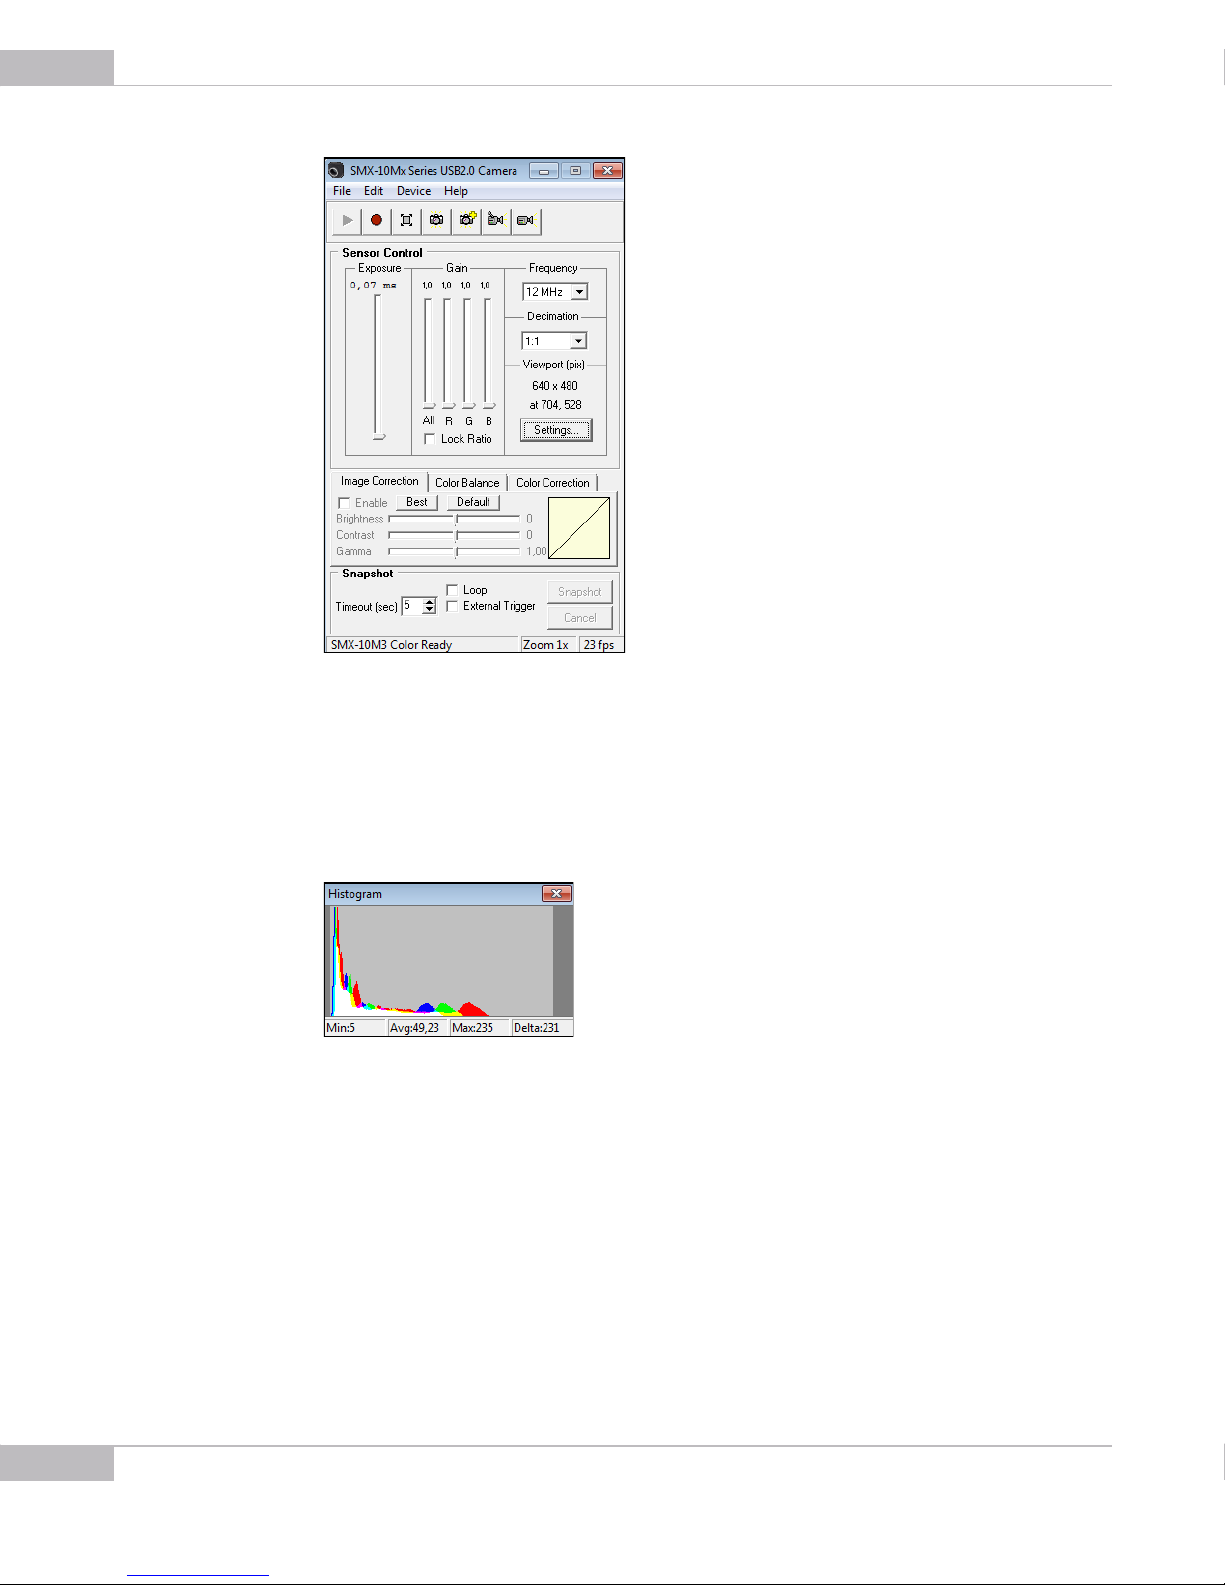
The SMX-10Mxx application consists of the following parts:
● Main window which contains the main functions. On the top of the main window,
there is an application toolbar:
Getting Started
Page 24
24
SMX-10Mxx Series USB2.0 Camera User Guide
Figure 3-2 SMX-10Mxx application main window
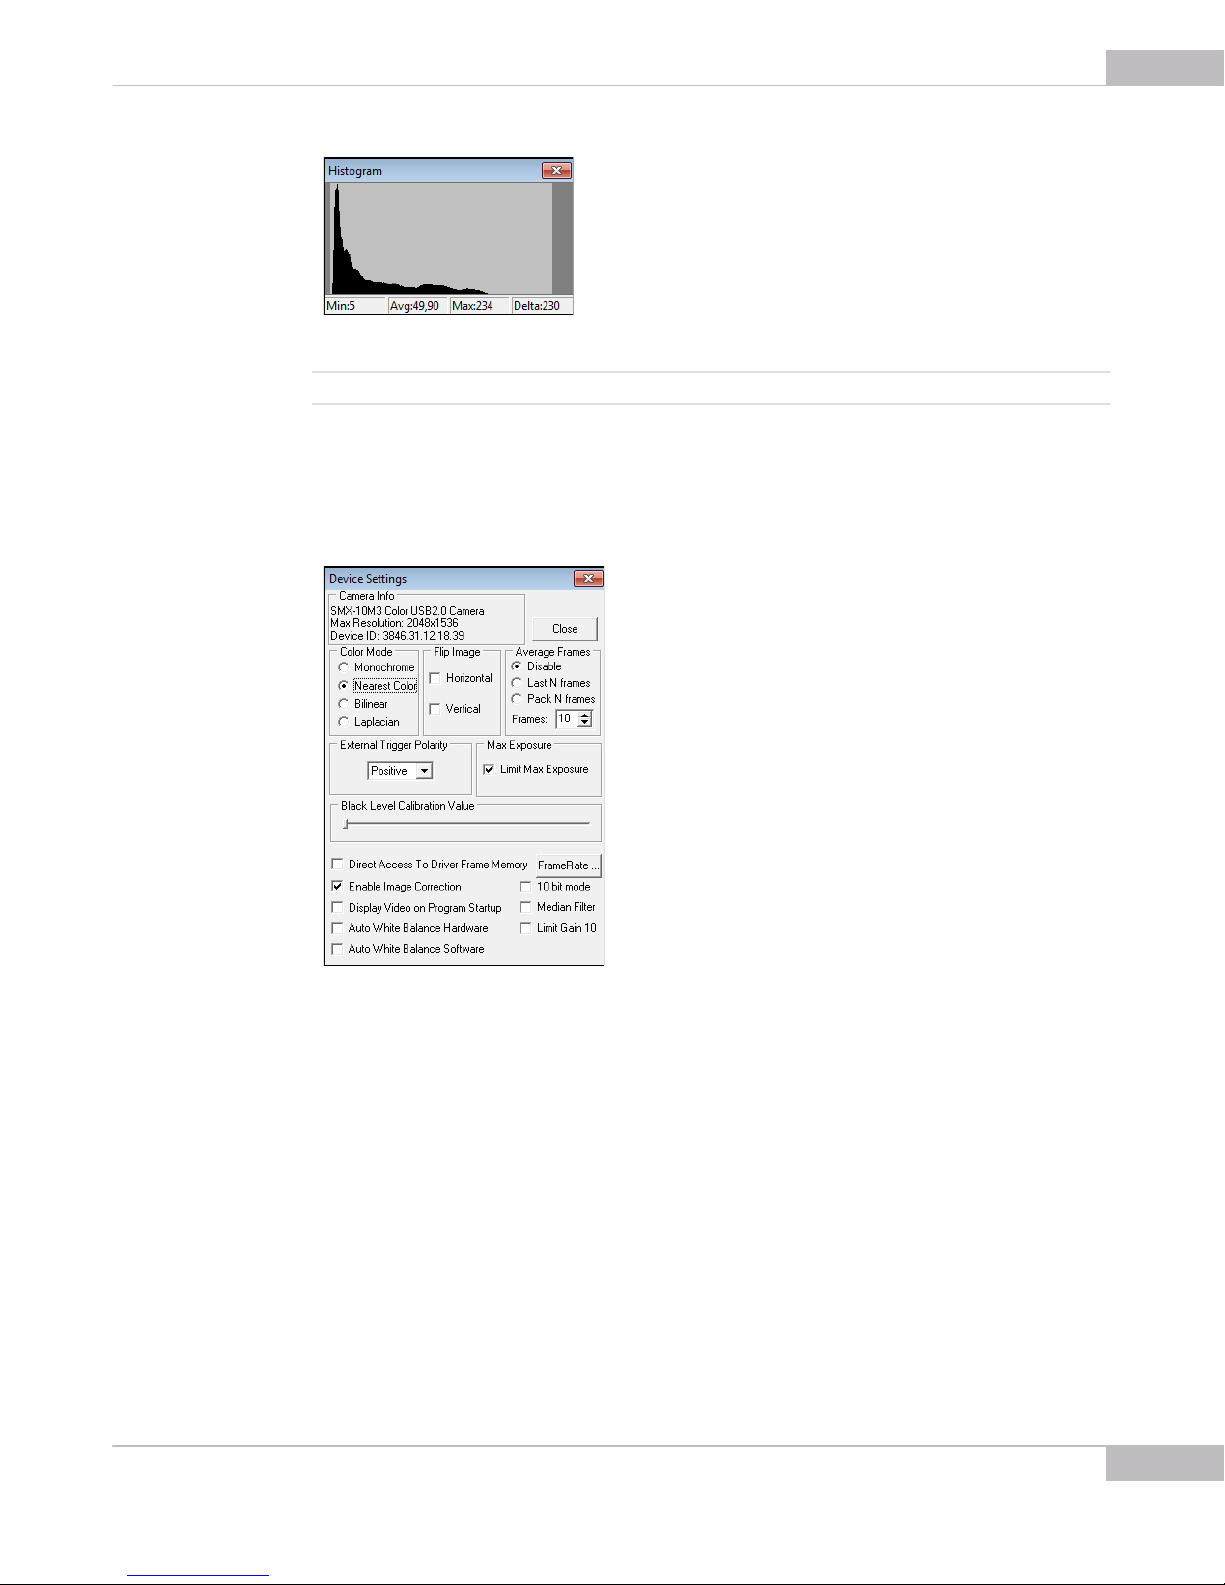
● Histogram which reflects all color settings of the camera.
To open the histogram:
Press the h button on the keyboard or select Histogram from the Device menu. Camera
hardware histogram will appear showing signal for different colors.
Figure 3-3 Camera hardware histogram
Click in the window, and the software histogram will appear instead.
Getting Started
Page 25
SMX-10Mxx Series USB2.0 Camera User Guide
Figure 3-4 Camera software histogram
Note: The histogram window is empty when the video is not started.
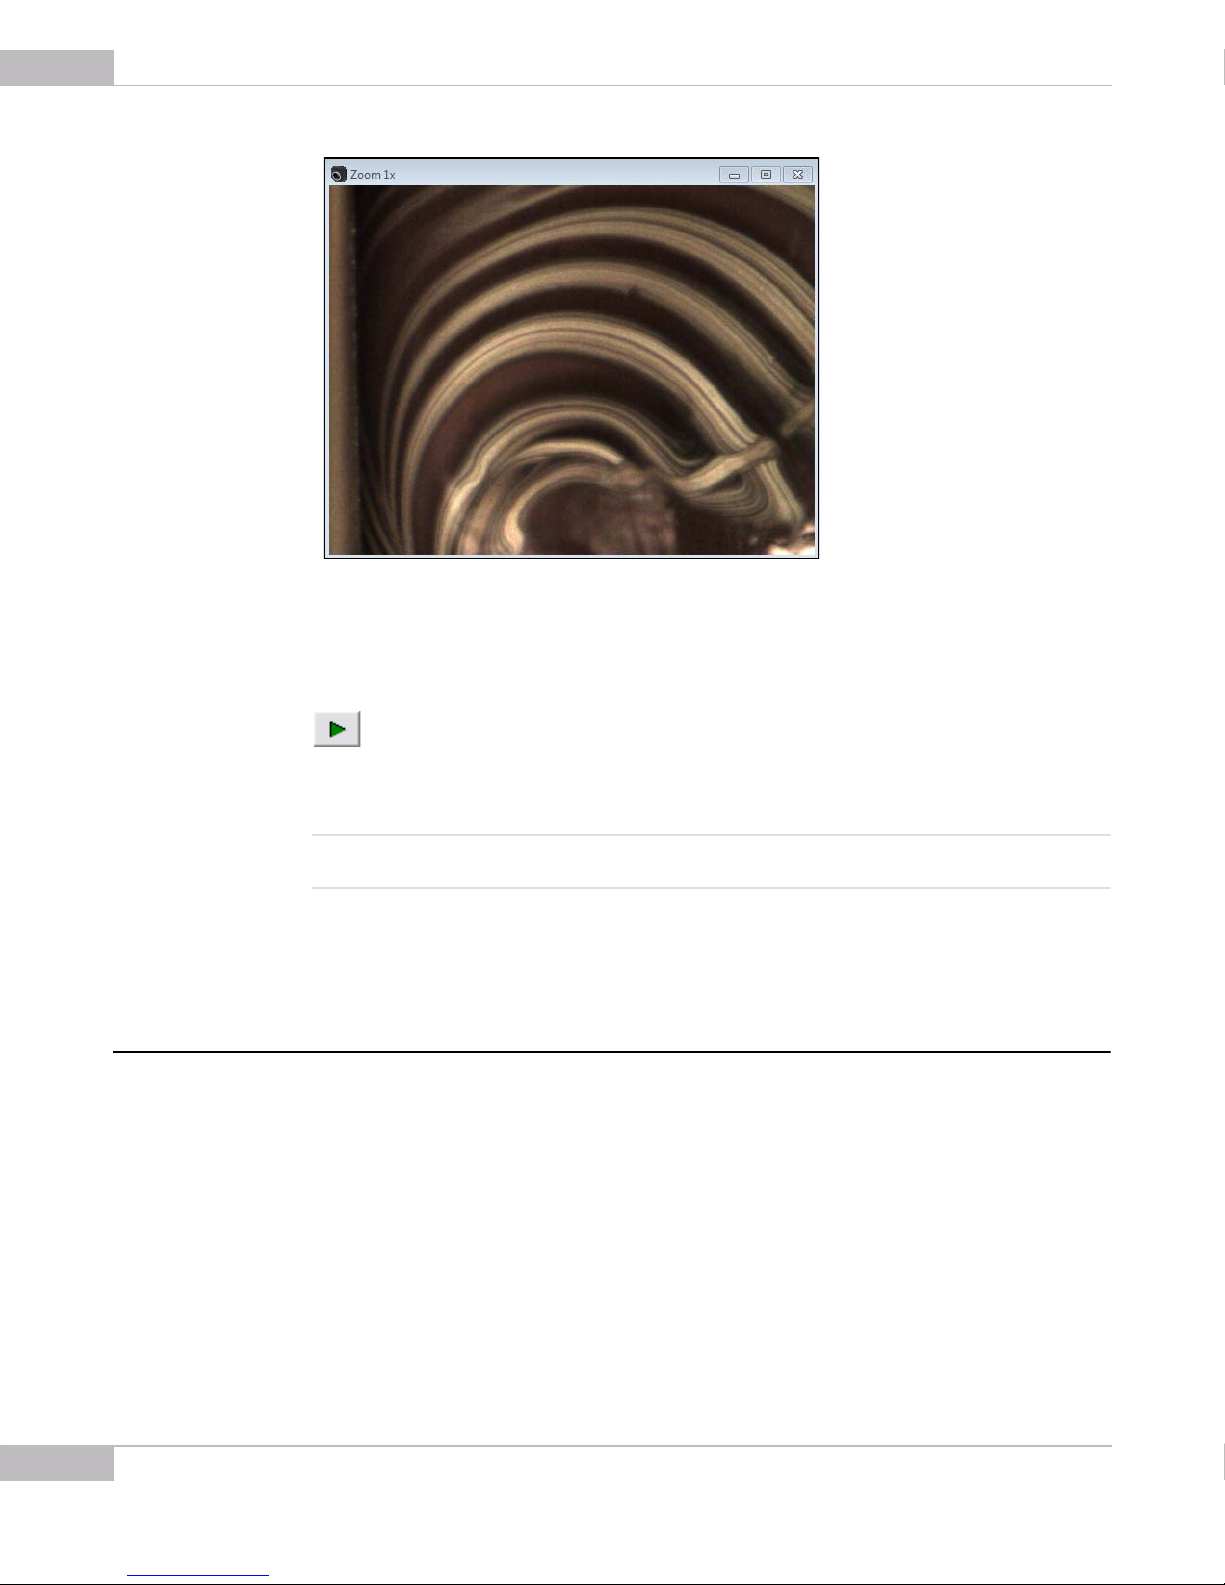
Device Settings window contains the camera settings.
●
To open the Device Settings window:
Select Settings from the Device menu or press Alt+s on the keyboard.
25
Figure 3-5 Device Settings window
● Video mode window which shows a live view from the camera and reflects all set-
tings of the image
Getting Started
Page 26
26
SMX-10Mxx Series USB2.0 Camera User Guide
Figure 3-6 Video mode window
To start video from the camera:
Click the Start Video button in the toolbar:
OR
Select Start Video from the Device menu.
Note: To display video right after you enter the application, select the Display Video on Program Startup check box
in the Device Settings window. Then you will not need to click the Start Video button.
If the Start Video button is not active, in the SMX-10Mx Series USB2.0 Camera
Software main window, click Device menu, select Switch Multiple… and select the
connected camera.
Switching Between Cameras
If you have more than one SMX-10Mxx Series camera connected to your PC, the camera
application allows you to switch between them.
To switch between multiple cameras:
1 In the Device menu of the application’s main window, select the Switch Multiple
command.
2 The Choose a Camera window will appear.
Getting Started
Page 27
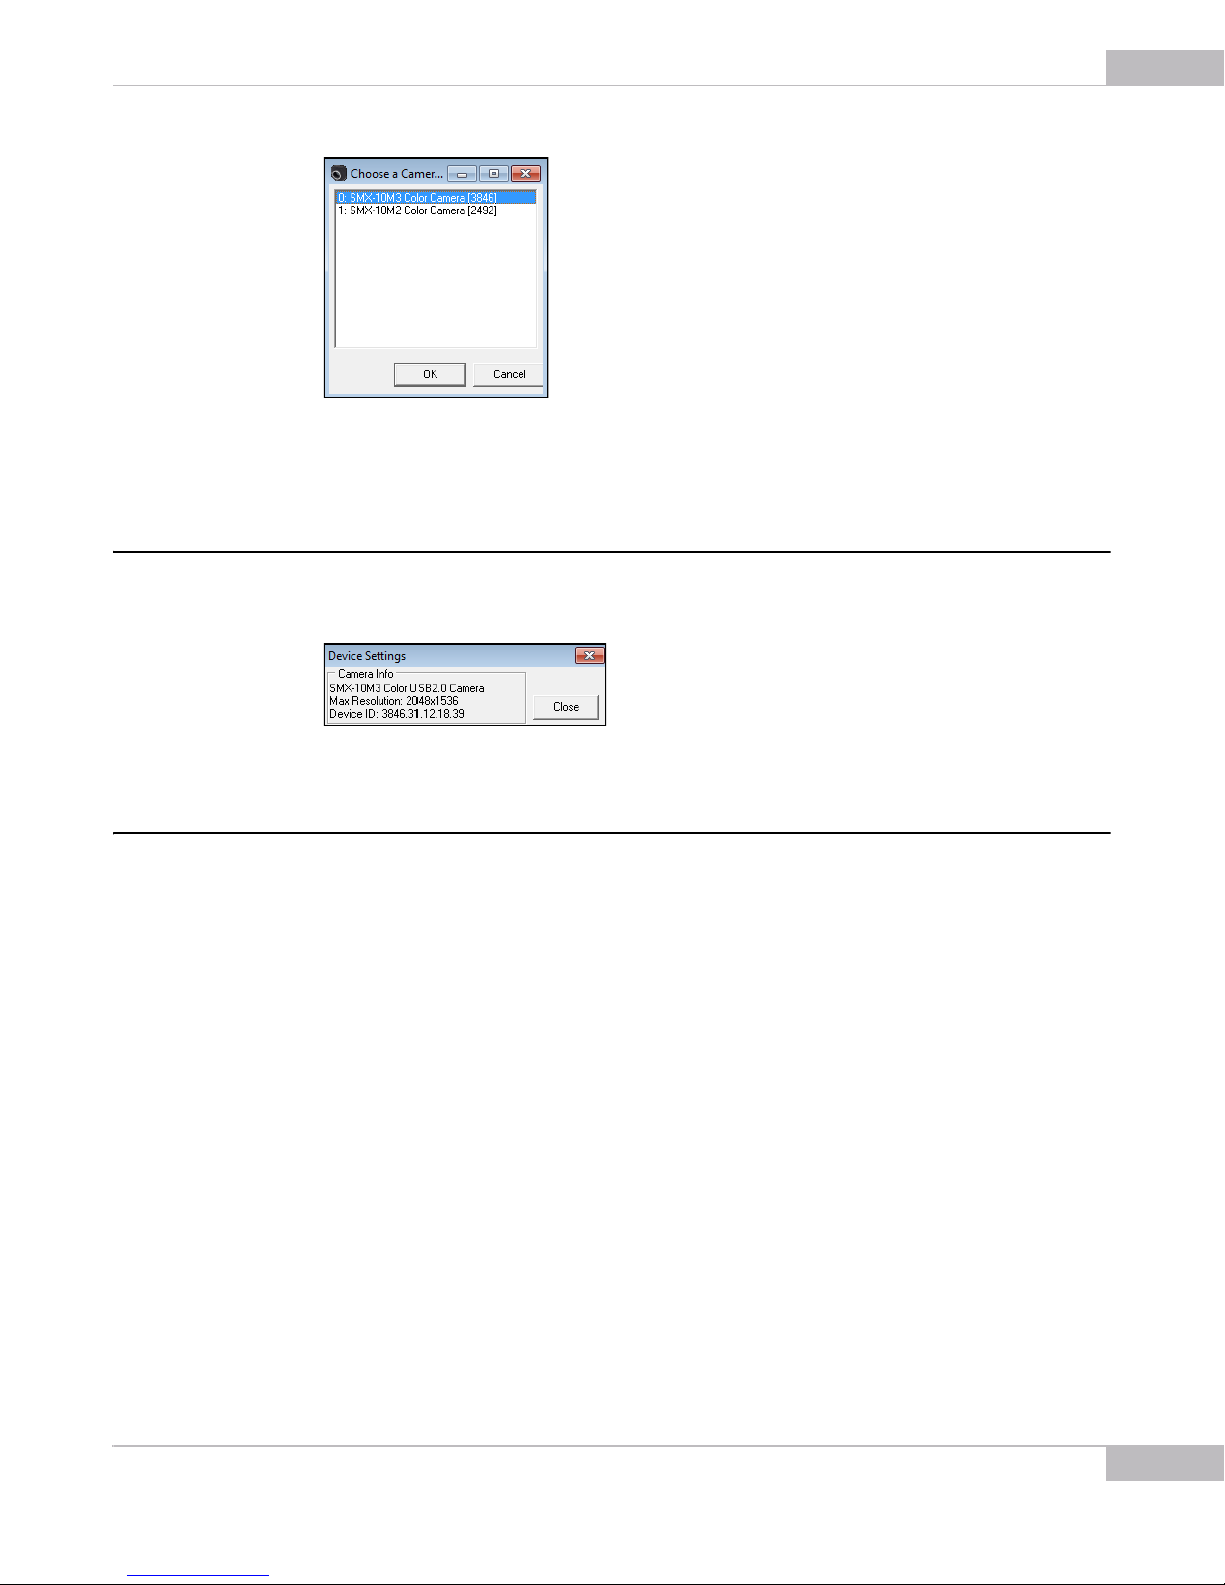
Figure 3-7 Switching between cameras
3 In the list of the present cameras, select the desired one and click OK.
Viewing Camera ID
The camera ID is shown on the top of the Device Settings window.
SMX-10Mxx Series USB2.0 Camera User Guide
27
Figure 3-8 Camera ID
Reducing CPU Load
You can reduce CPU load by enabling the Direct Access to Driver Frame Memory
option at the bottom of Device Settings window. See API documentation for the
details on how to provide direct pointer to the driver frame memory instead of copying
the frame to the user buffer.
Getting Started
Page 28

28
SMX-10Mxx Series USB2.0 Camera User Guide
Getting Started
Page 29
Chapter 4
Initial Settings
29
TUNING GUIDELINES
Check if the Start Video button on the camera application’s toolbar is enabled:
If it is not enabled, check the list of all available cameras in Main menu > Device >
Switch Multiple… If the list is empty, check if the camera is connected and if the driver
is installed correctly.
The illumination of the camera’s image depends on the values of frequency, exposure,
gain, the image dimensions (resolution) and decimation factor.
The recommended initial settings are:
● Gain and Exposure sliders are in the lowest position
● Decimation is 1:1
● Viewport size is 800 x 600 (the Viewport settings dialog box is activated with the
button on the camera application toolbar or Alt + v on the keyboard)
● Color Mode is set to Bilinear (Main Menu > Device > Settings... dialog box, Color
Mode section)
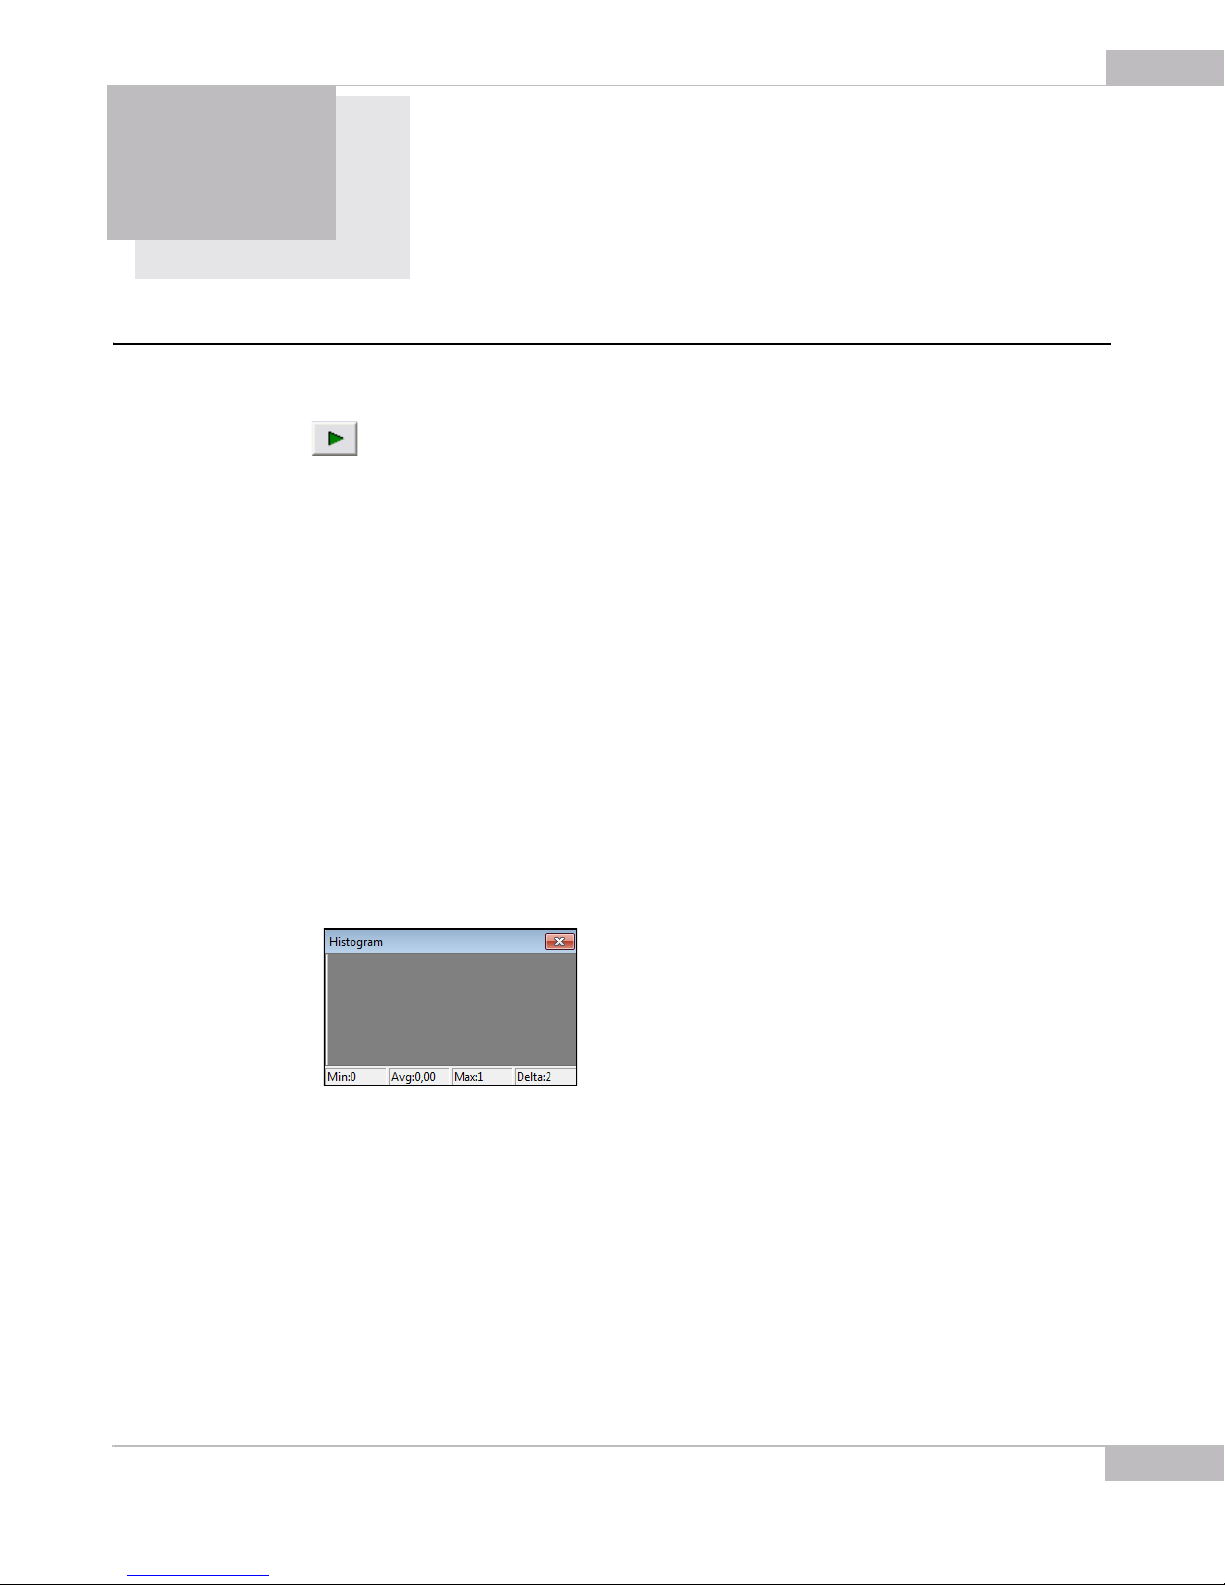
● Histogram is active (Main menu >Device > Histogram is selected or h is pressed)
Figure 4-1 Histogram of initial state
● The Image Correction tab is selected
● The Enable check box is set
● The Brightness, Contrast, Gamma sliders of the Image Correction tab are in the
central position (their values are 0, 1, 1, respectively). To reset the values for all sliders
at one go, click the Default button. To reset one of them, double-click its value at the
right end of the slider bar
Tuning Guidelines: Initial Settings
Page 30
30
SMX-10Mxx Series USB2.0 Camera User Guide
● The R, G, B sliders of the Color Balance tab are in the central position (their values
are 1, 1, 1, respectively). To reset the values for all sliders at one go, click the Default
button. To reset one of them, double-click its value at right end of the slider bar
● The Brightness, Contrast, Saturation sliders of the Color Correction tab are in the
central position (their values are 0, 1, 1 - respectively). To reset the values for all sliders at one go, click the Default button. To reset one of them, double-click its value at
right end of the slider bar
Note: The slider values will affect the image, only if the Enable box is checked.
Tuning Light in the Image
To tune illumination, install a lens ().
To tune light in the image:
1 Use maximum diaphragm aperture of your lens.
2 Try to get enough light using the Exposure slider.
3 If the Exposure slider is at maximum and more light is needed, decrease frequency
(it will enlarge the exposure interval).
4 If illumination is not enough, use the Gain group of sliders (All, R, G, B).
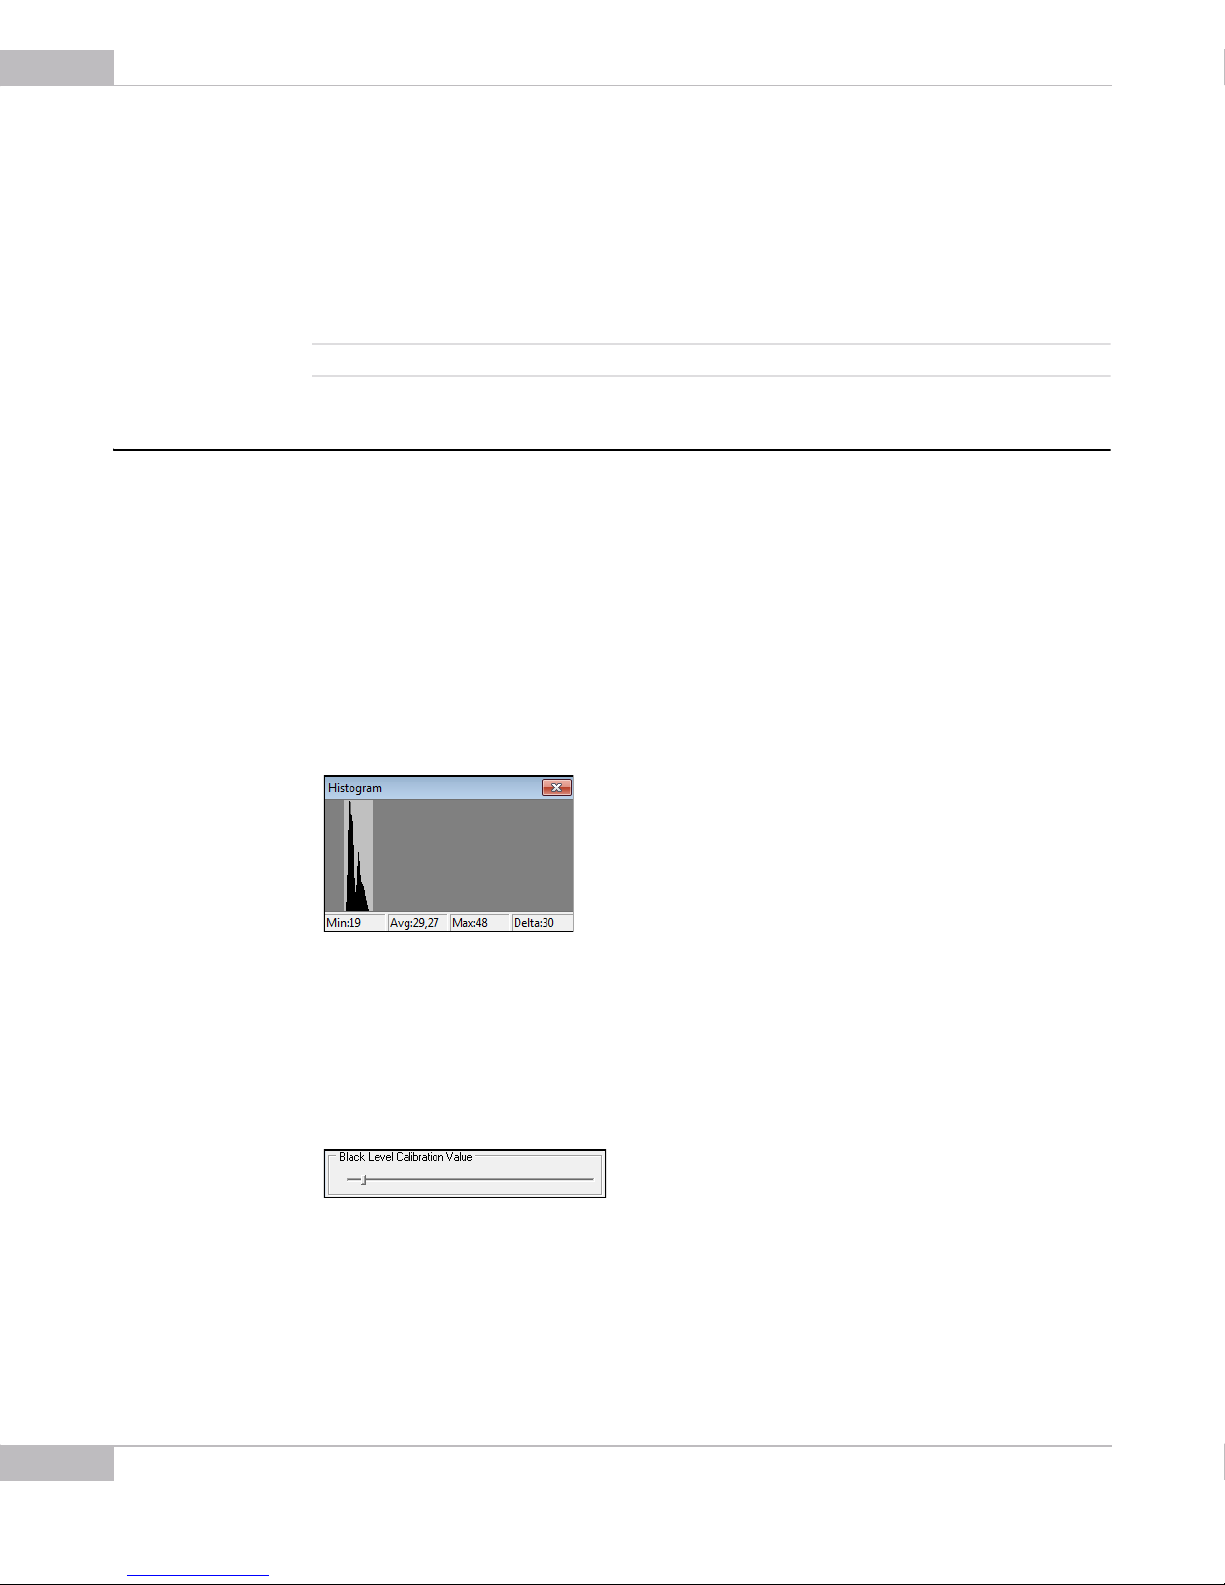
5 Press e on the keyboard to adjust the exposure automatically.
Figure 4-2 Histogram after illumination is tuned
6 If the image is still too dark, you can also change black level:
a. Open the Device Setting window by pressing Alt+s.
b. Go to the Black Level Calibration Value control and move the slider until the
image becomes as bright as you need.
Figure 4-3 Black Level Calibration control
Tuning Guidelines: Tuning Light in the Image
Page 31
Color Tuning
SMX-10Mxx Series USB2.0 Camera User Guide
To tune color of the image:
1 Put a white object (for example, a piece of paper) in front of the camera.
2 Perform White Balance (Hard): select Device > White Balance (Hard) or press
Alt+w. It will balance the RGB components of white at the hardware level.
3 Select Main > Device > White Balance (Soft) item or press w on the keyboard (color
balance at software level).
To control the color components, use the R, G, B sliders of the Color Balance tab and
the Brightness, Contrast and Saturation sliders of the Color Correction tab.
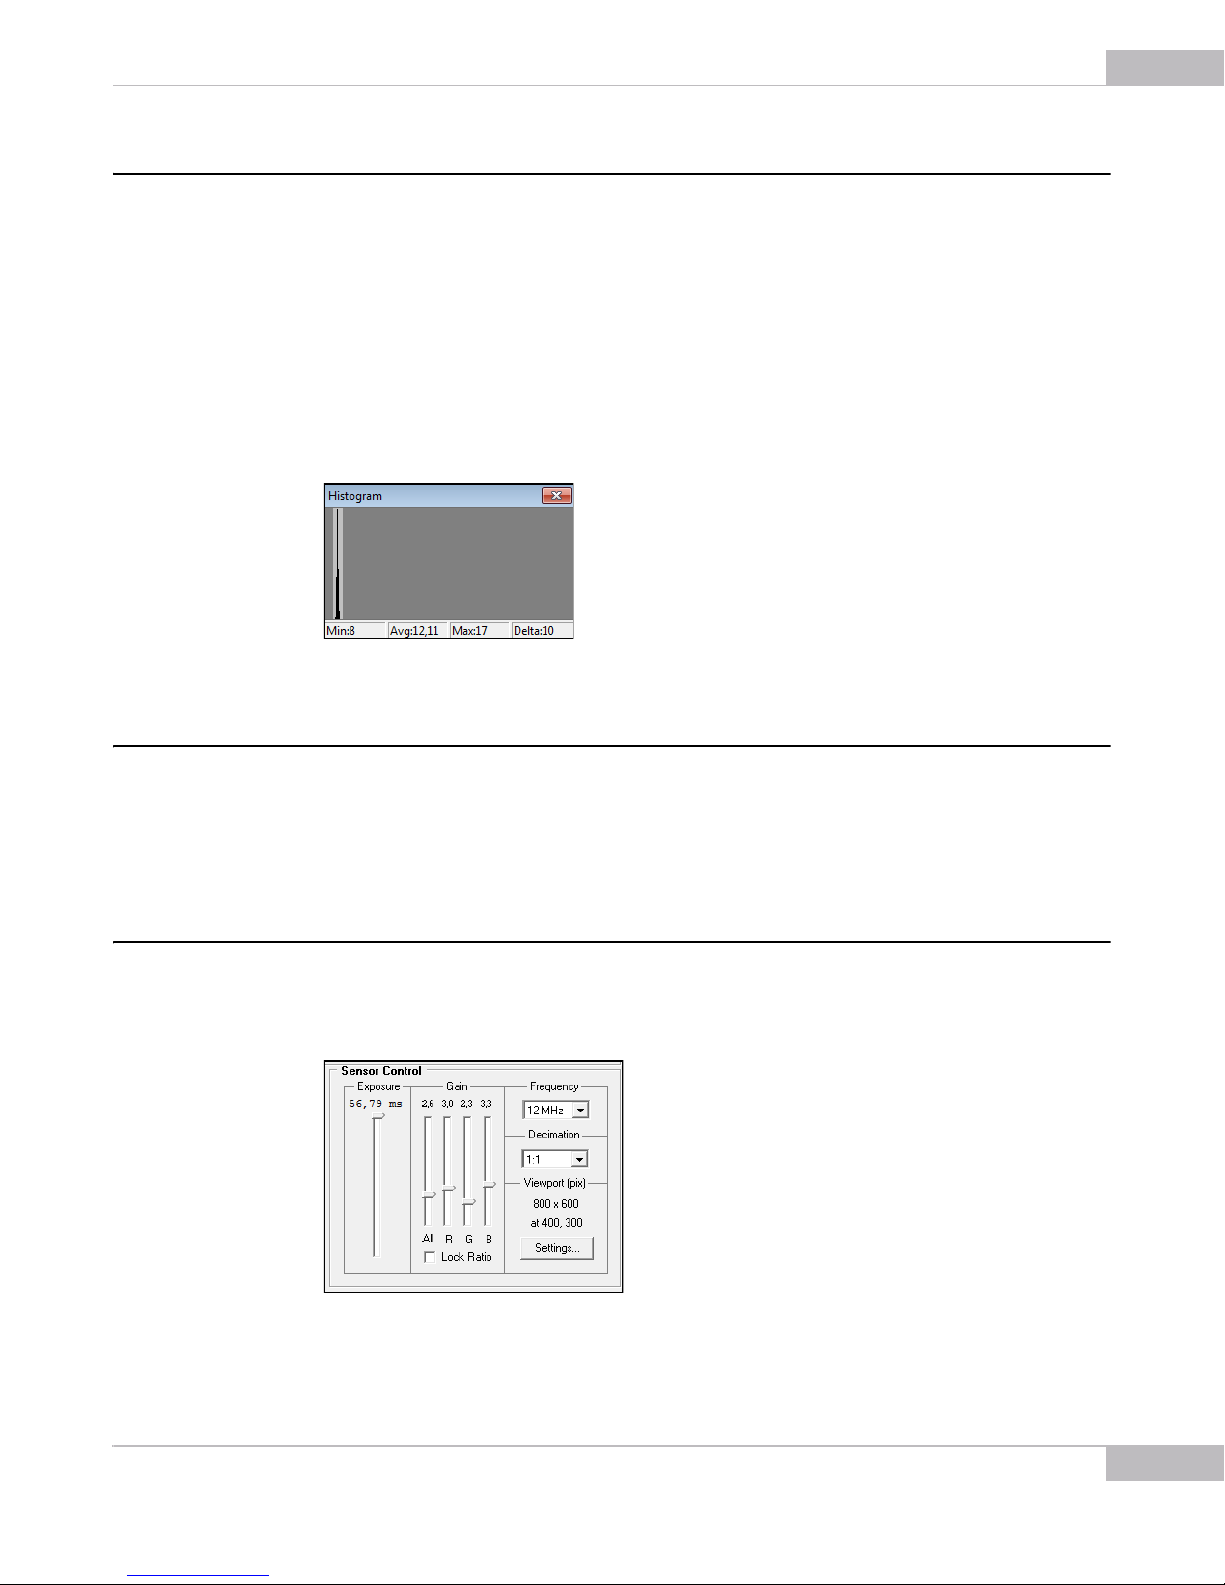
31
Figure 4-4 Histogram after performing White Balance (Soft)
Contrast Tuning
Activate the Histogram (H), activate the Image Correction tab, set the Enable check
box and use the Contrast slider to get the histogram as wide as possible (ideal min = 0,
max = 255 provided there are no red points at the extremities of the histogram
window).
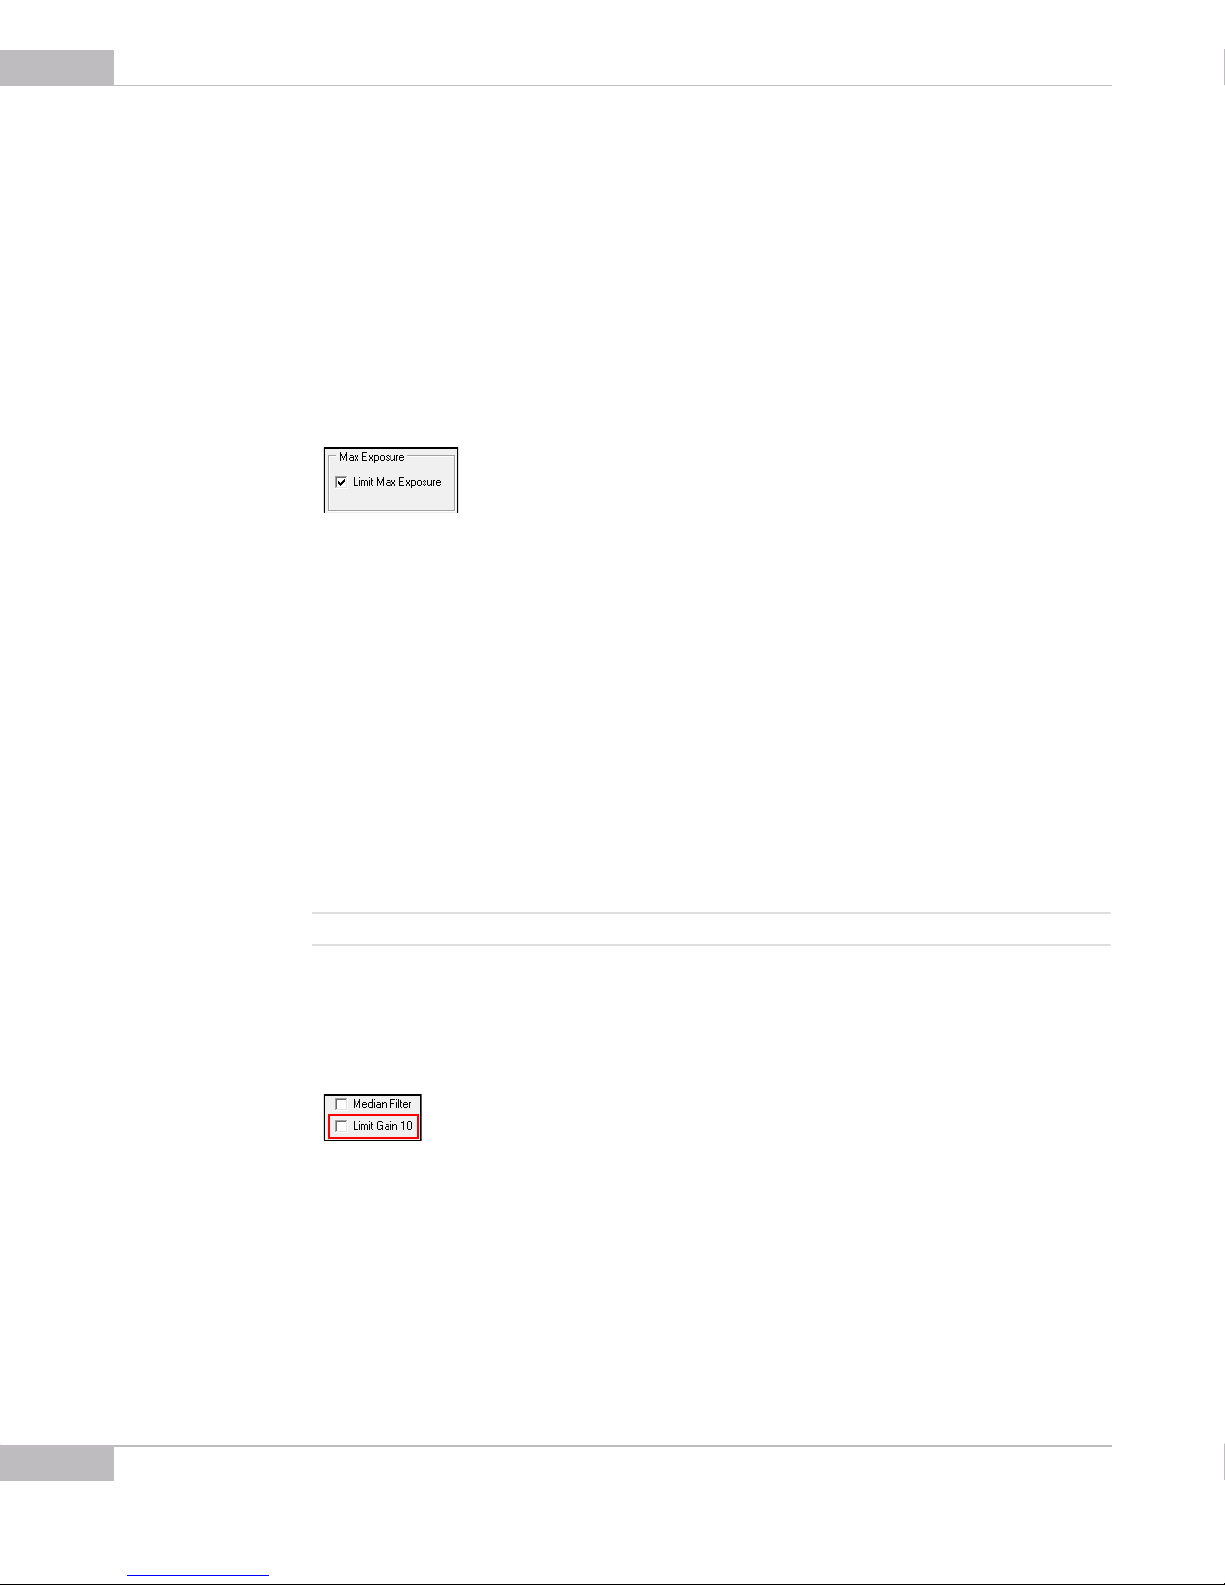
Sensor Controls
The sensor control options are located in the Sensor Control section of the application
main window. They are as follows.
Figure 4-5 Sensor controls
Tuning Guidelines: Color Tuning
Page 32
32
SMX-10Mxx Series USB2.0 Camera User Guide
Exposure
The exposure parameter defines time during which the sensor will consume light
energy before starting to record data.
Use the Exposure slider to adjust the camera exposure time manually. The current
exposure time in milliseconds is displayed above the control. This value depends on
viewport height, decimation and sensor frequency.
If you need to set exposure even higher than the maximum slider value, uncheck the
Limit Max Exposure control in the Device Settings window. The maximum slider value
will become higher.
Figure 4-6 Limit Max Exposure box
To tune exposure automatically:
In the Device menu select the Auto Exposure command, or press E on the keyboard.
Gain
Gain can be controlled independently for Red, Green and Blue channels (R, G, B). All
gain sliders control the camera’s hardware gain amplifier. The R, G and B gain sliders
control the software gain for each color channel.
Checking the Lock Ratio check box allows controlling gain on three channels
simultaneously keeping the fixed R; G; B gain ratio.
Use the 'White balance (Hard)' menu item (Device> White Balance (Hard) or Alt+w to
balance the gain of all three channels so they are equally intense.
Note: Auto Exposure is done automatically every time White Balance (Hard) is performed.
In case of SMX-10M1M monochrome camera, set gain using the All slider.
You can limit the maximal set gain value to 10. Use the Limit Gain 10 checkbox in the
Device Settings window.
Figure 4-7 Limit Gain control
If this box is checked, you will not be able to set gain higher than 10.
Frequency
The Frequency drop-down box provides values for the pixel clock frequency of the
sensor. The lower the frequency, the higher the maximum possible exposure time and
Tuning Guidelines: Sensor Controls
Page 33
Decimation
Viewport
SMX-10Mxx Series USB2.0 Camera User Guide
the less the frame rate is. This control defines the frequency of polling the camera for its
image stream.
Use the Decimation drop-down box to decimate (sub-sample) the picture by 2, 3, 4, 5,
6, 7 or 8. The decimation means excluding pixels and rows from the scan process (for
example, every second pixel and second row for the 1:2 decimation). This mode thus
allows viewing the picture at the higher frame rate.
The higher decimation can be used for preview, when 1600 x 1200 image can be
displayed as 800 x 600 with the frame rate two times higher.
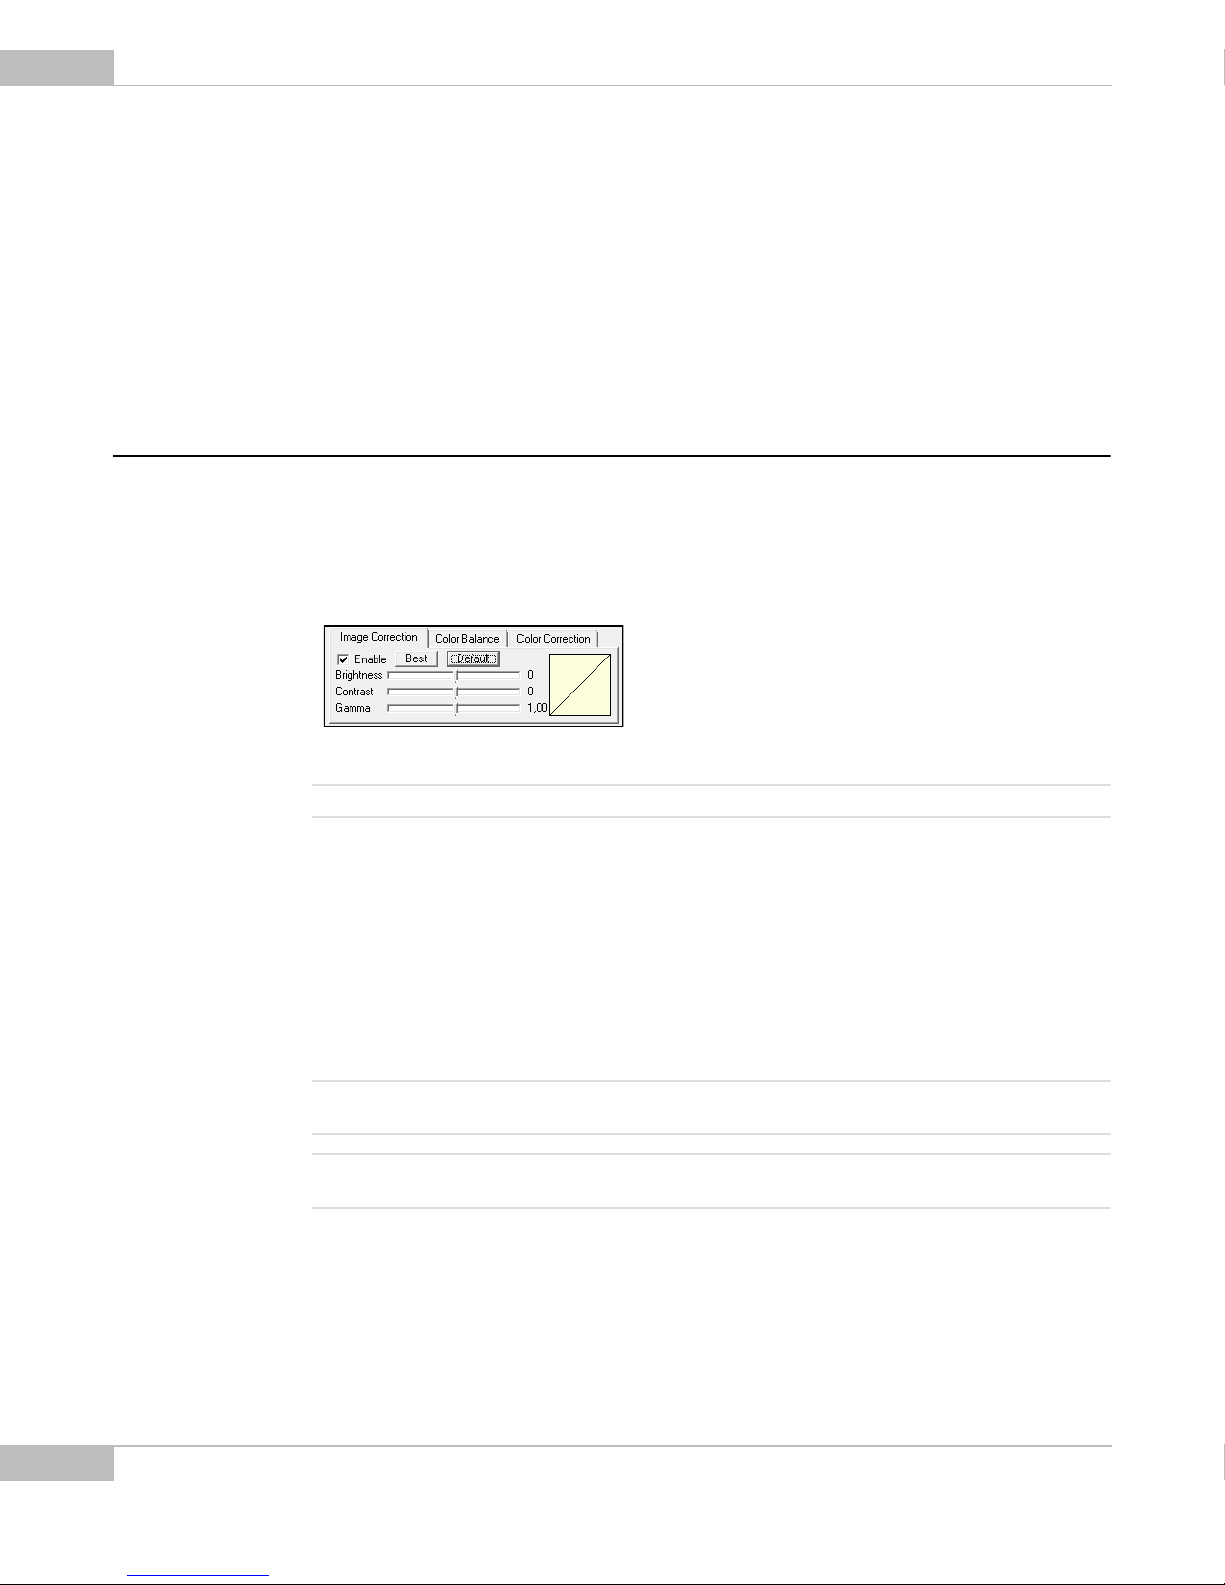
Viewport is a rectangular area of the sensor on which the image is scanned. It can have
variable size: from the full sensor field of view to the small area of 8 x 8 pixels. The
smaller vertical size (in lines) of the viewport, the faster the scan process and the higher
the frame rate is.
To change the viewport:
1 Press Alt+v on the keyboard
33
OR
Click the Settings… button below Viewport (pix)
OR
Click the Viewport Settings button on the toolbar:
2 The Viewport Settings window will open.
Figure 4-8 Viewport Settings window
Tuning Guidelines: Sensor Controls
Page 34
34
SMX-10Mxx Series USB2.0 Camera User Guide
Image Correction
3 You can select one of the predefined viewport options and then drag the rectangle
across the full viewport resolution area for the viewport window. You will notice how
the image in the View Mode window changes with the movement.
4 Alternatively, you can change values in the following fields:
● Offset X, Y fields with coordinates of the top left corner of the rectangle
● Size X, Y fields with coordinates of the bottom right corner of the rectangle
If the viewport size is smaller than maximum viewport size, you can also change it by
dragging the video image in the Video mode window.
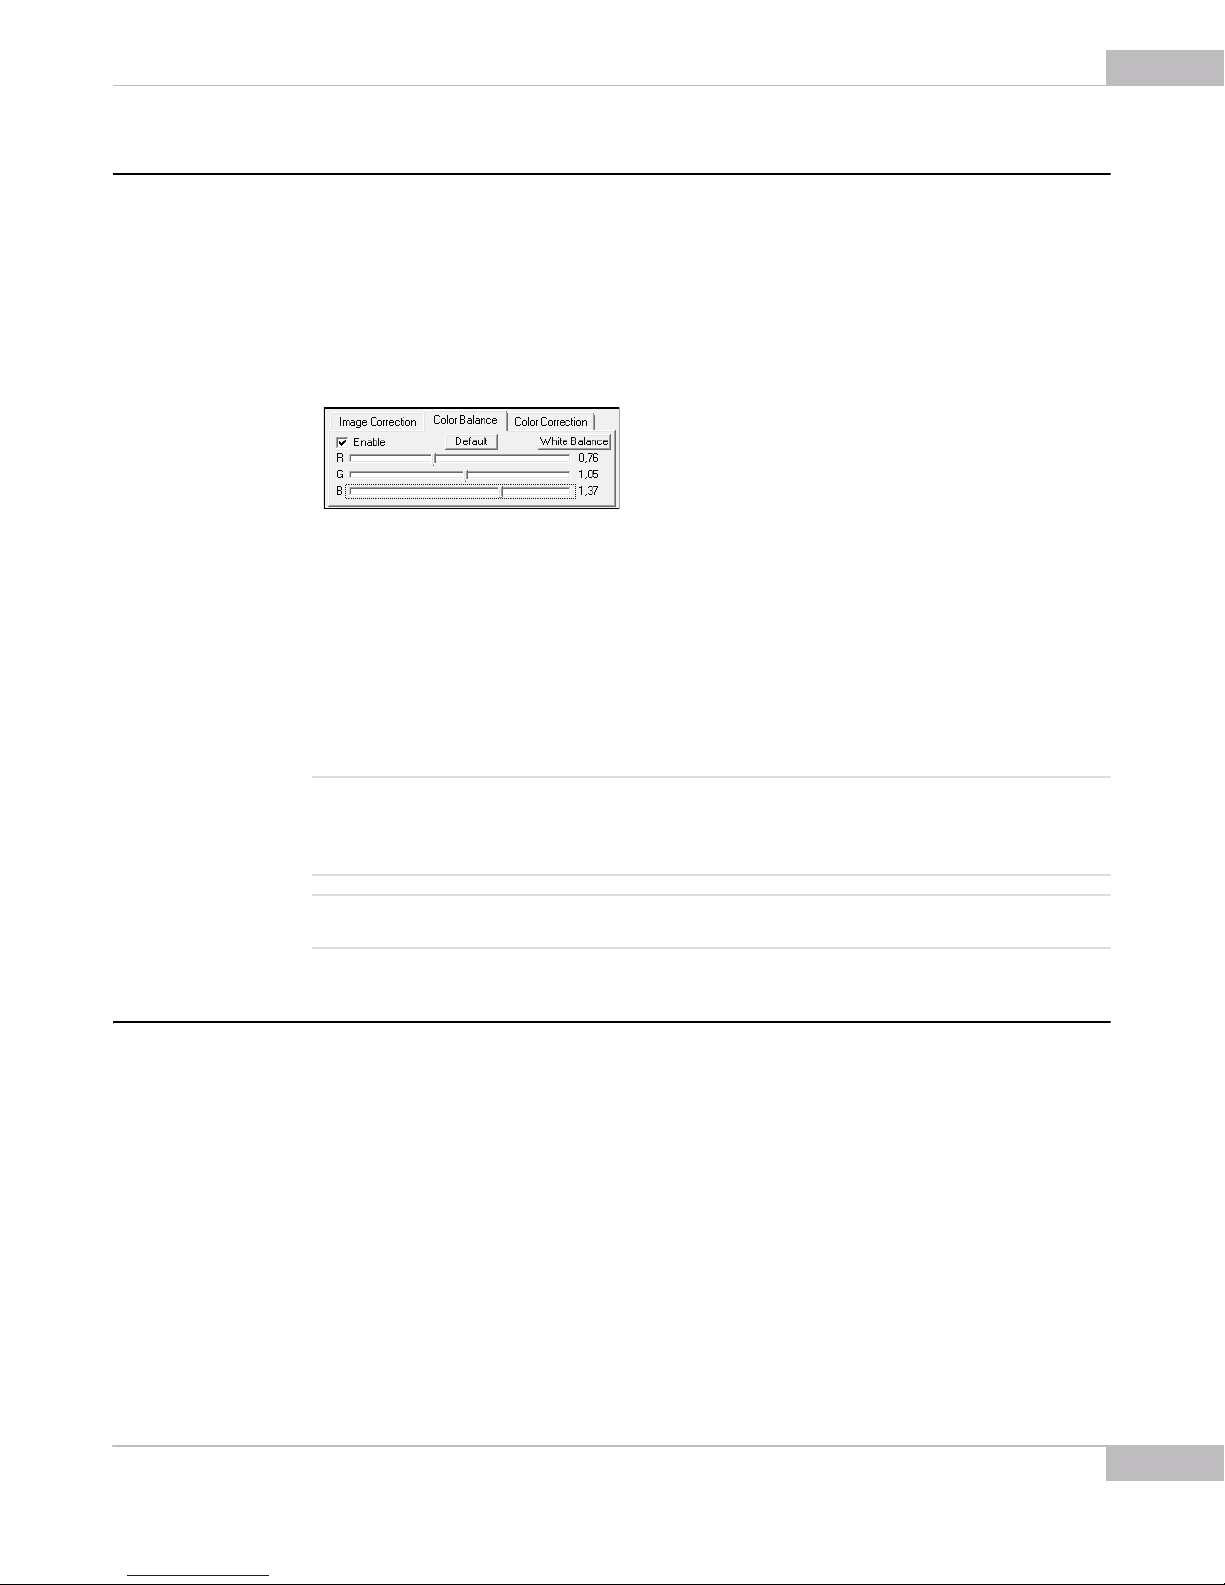
The Image Correction controls are designed for setting up the camera brightness,
contrast and gamma. These corrections are programmable with the conversion (lookup)
table of the values. They do not affect any electrical settings of the camera. The gamma
correction is done by the camera hardware.
Figure 4-9 Image correction controls
Note For 8-bit camera models, the Image Correction tab is disabled.
To use these controls, check the Enable box - the Brightness, Contrast and Gamma
sliders become editable. By default, the values of Brightness, Contrast and Gamma are
set to 0; 0; 1, 00, respectively.
You can restore the default values at any step, just click the Default button on the
Image Correction tab.
Click the Best button to automatically achieve the optimal combination of brightness,
contrast and gamma instead of setting them manually. As the result, the application will
transform the look-up table of 8 and 10 bit to increase the dynamic range.
Note The default values of Image Correction are the most suitable and recommended for performing White Balance
(Hard).
The SMX-10Mxx cameras software do not display changes of the Image Correction look -up table when the Best
button is pressed.
With every change of any Image Correction control, you can view a graphical
interpretation of dependence of the image's changes from the changes of the Image
Correction controls.
Tuning Guidelines: Image Correction
Page 35
Color Balance
SMX-10Mxx Series USB2.0 Camera User Guide
The Color Balance Controls are designed for the SMX-10M2C and SMX-10M3C (color)
models to adjust the ratio of the main induced color components (Red, Green and
Blue) of the image. This correction is performed on the software level and does not
affect any electrical settings of the camera.
To use the Color Balance Controls, set the Enable check box on the Color Balance tab
- R, G and B sliders become editable.
Figure 4-10 Enabling the Color Balance Controls
Use the White Balance button for white color balancing (the same can be done in
Device> White Balance or by pressing w on the keyboard) on the Color Balance tab.
The Default button returns the color balance controls to their default values: 1.00; 1.00;
1.00, respectively.
35
Single step of the Color Balance controls is 10 times smaller than R, G, B (Gain) of the
Sensor Controls, so all changes of Color Balance can be performed with more
accuracy than it can be done using R, G, B (Gain) of Sensor Controls.
Note: The difference between White balance (Soft) and White Balance (Hard) is as follows: the White Balance (Soft)
operation is done only on the software level, so it changes the Color Balance controls. The White Balance
(Hard) operation is done programmatically by the camera firmware, so it changes R, G and B (Gain) of Sensor
Controls.
Note: It is not recommended to perform White Balance (Hard) when White Balance (Soft) is already performed. It
may cause the image colors distortion.
Color Correction
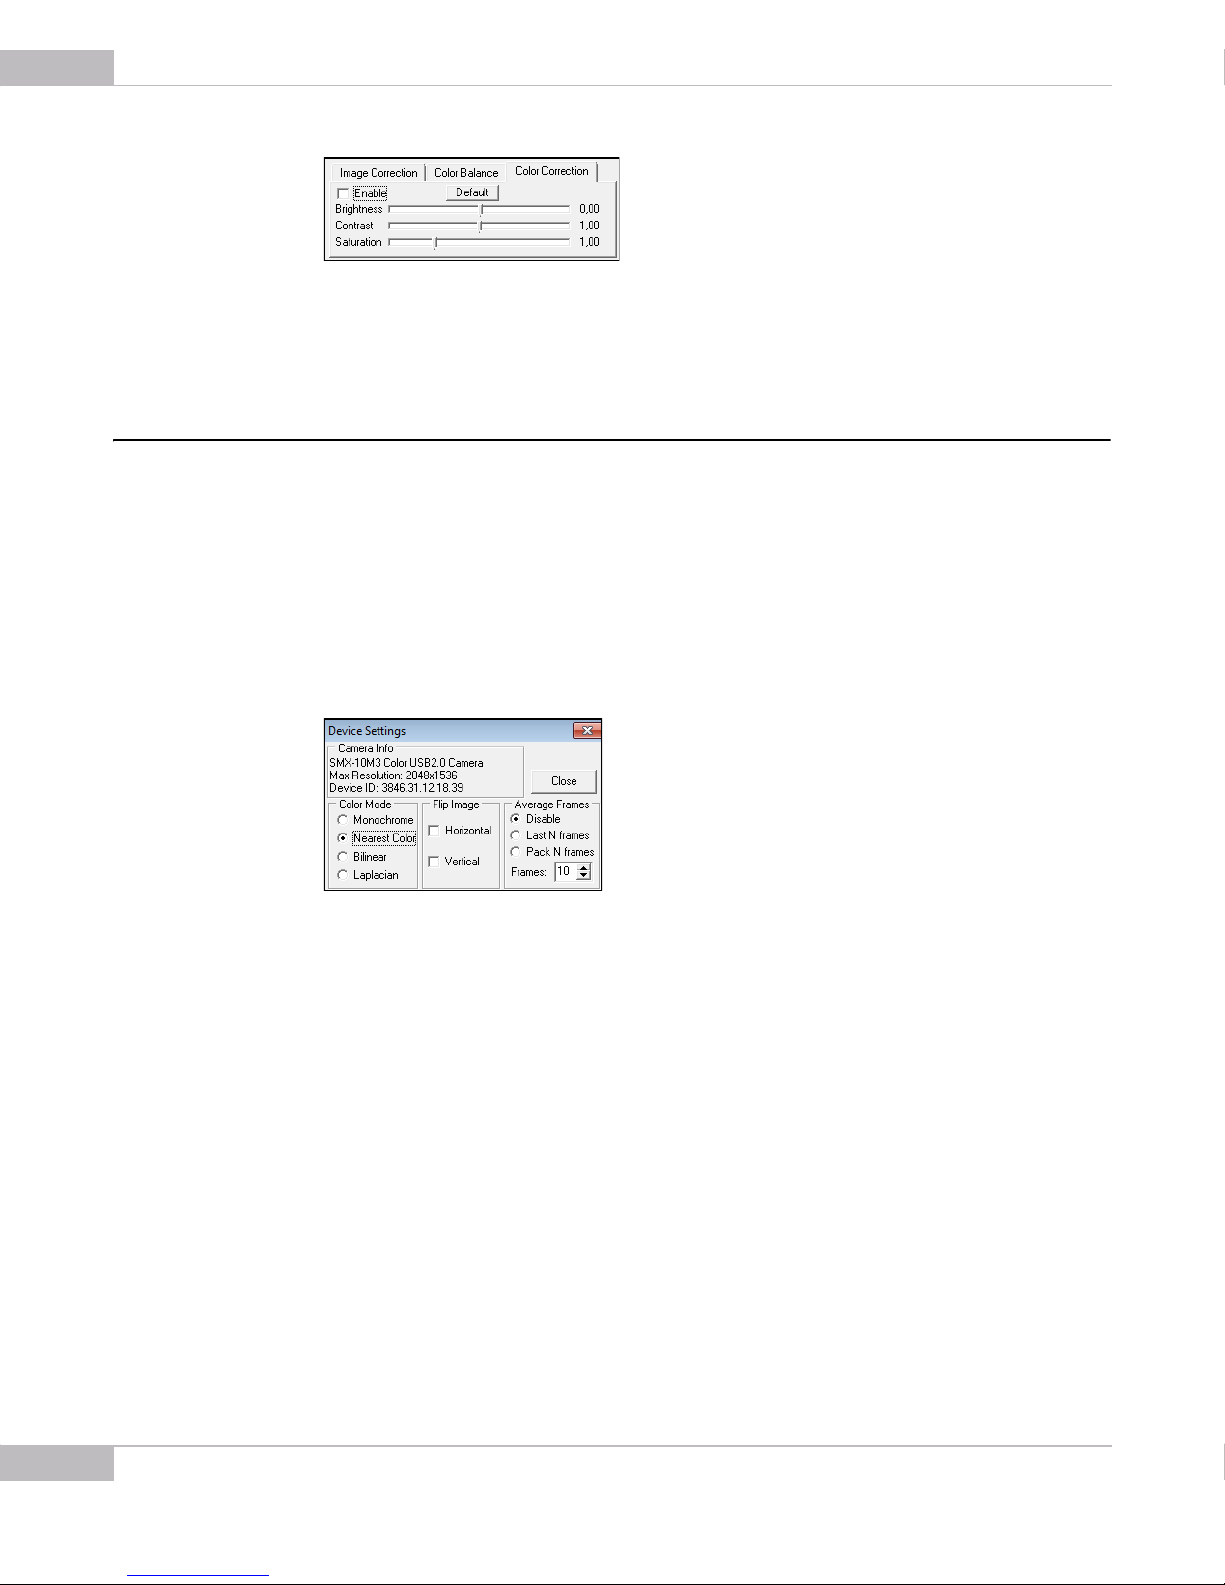
The Color Correction Controls are designed for the SMX-10M2C and SMX-10M3C
(color) models to adjust the intensity of the color properties (brightness, contrast and
saturation) of the image. This correction is performed on the software level and does
not affect any electrical settings of the camera.
Check the Enable check box on the Color Correction tab to make the Color Correction
Controls available.
Tuning Guidelines: Color Balance
Page 36
36
SMX-10Mxx Series USB2.0 Camera User Guide
Figure 4-11 Enabling the Color Correction tab
Use the Default button to restore the default values of brightness, contrast and
saturation - 0.0; 1.00; 1.00, respectively.
Advanced Sensor Controls
Apart of the controls in the main application window, you can also use controls
available in the Device Settings window. To access the Device Settings window, press
Alt+s on the keyboard or select Settings from the Device menu.
Color Mode
The Color Mode section defines the rules for decoding the stream of source pixels from
the sensor and transforming it into the output image. This control is available for the
SMX-10M2C and SMX-10M3C color models.
Figure 4-12 Advanced sensor controls
● The Monochrome mode forces the transformation of the sensor pixels data into
monochrome stream.
● The Nearest Color mode: Bayer matrix from the sensor is transformed into destina-
tion stream using the Nearest Color algorithm (the fastest algorithm that gives the
worst, compared to other algorithms, image quality).
● The Bilinear mode: Bayer matrix from the sensor is transformed into destination
stream using the Bilinear algorithm (a slower algorithm that gives better quality).
● The Laplacian mode: Bayer matrix from the sensor is transformed into destination
stream using the Linear Interpolation with Laplacian second-order correction terms
(the slowest algorithm that gives the best quality).
Image Flip
You can flip the image in the Video mode window horizontally and/or vertically. Check
the corresponding boxes in the Flip Image section of the Device Settings window.
Tuning Guidelines: Advanced Sensor Controls
Page 37
Using the flip controls, you can rotate the image without changing the camera position
itself.
Increasing Image Quality
You can increase the image quality by compensating the random noise of the sensor.
For this purpose, use the Average Frames controls in the Device Settings window.
There are two averaging modes:
● Last N frames: the currently displayed frame is the average of the last N frames set in
the Frames box. The picture is updating every frame
● Pack N Frames: the currently displayed frame is the average of the last N frames set
in the Frames box. The picture is updating every N-th frame.
Note Use the averaging only for static pictures. Displaying moving objects in the average mode will lead to the image
blurring.
Frame Rate
You can change the frame rate for the current sensor parameters (for example,
frequency or viewport) using the FrameRate Control button in the lower part of the
Device Settings window.
SMX-10Mxx Series USB2.0 Camera User Guide
37
To change frame rate:
1 Open the Device Settings window by pressing Alt+s on the keyboard.
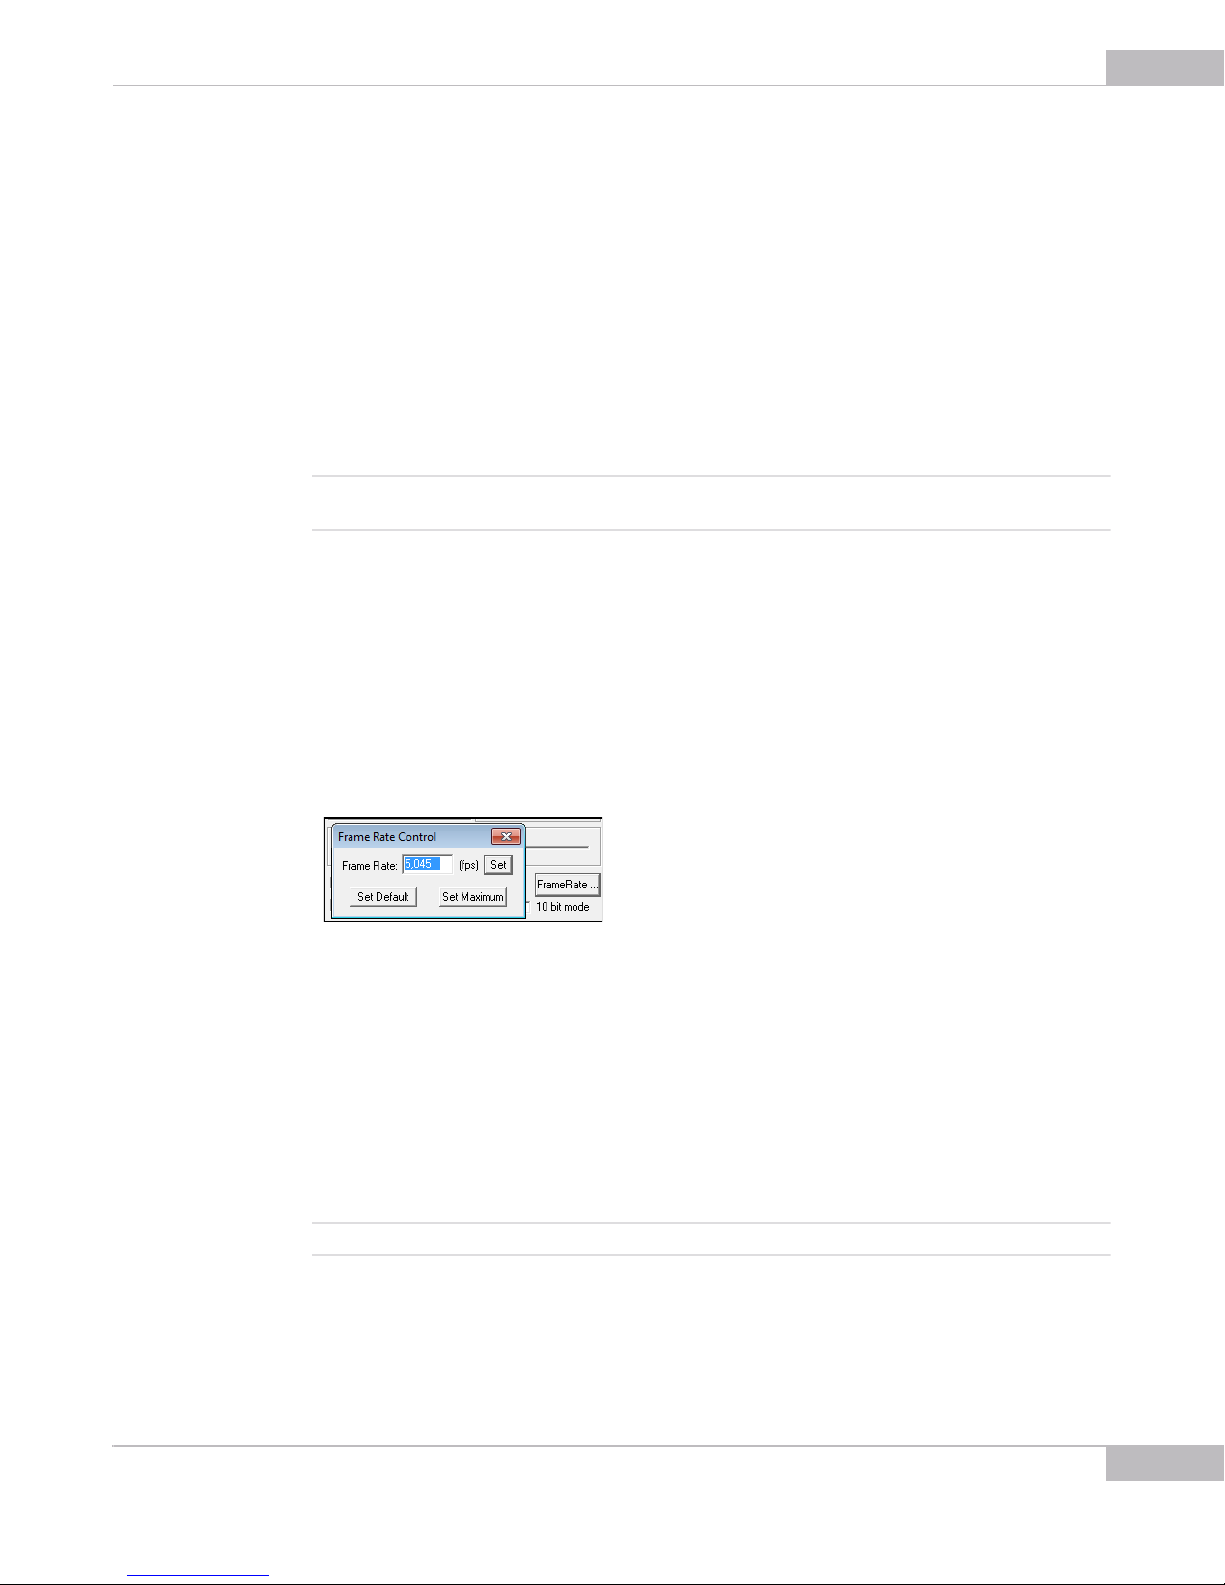
2 Press the FrameRate Control button.
Figure 4-13 The Frame Rate Control window
3 The Frame Rate Control box opens. By default, it shows the maximum value for the
current sensor parameters.
4 Type in the new value in the Frame Rate field, then press Set. You will not be able to
set frame rate lower or greater than limits. To check the maximum limit, press the Set
Maximum button.
The Set Default button - if applied, the default value of frame rate for the camera with
current settings will be performed. The default value is flashed in every camera and is
applied automatically when the camera’s settings are changed.
Note: For the Snapshot Loop mode, it is recommended to use the default value of frame rate.
As a result, the Frame Rate value will not be greater than the one you entered in the
Frame Rate Control window. Check it when running video: frame rate value will be
displayed at the bottom-right corner of the status bar in the application's main window.
Tuning Guidelines: Advanced Sensor Controls
Page 38
38
SMX-10Mxx Series USB2.0 Camera User Guide
Auto White Balance
Output Bits per Pixel
Note: When running the camera on a system that does not meet the minimal requirements (see “System Require-
ments” on page 7), the frame rate value can be less than it is set with the Frame Rate Control option, espe-
cially when running with full viewport and with high frequencies.
Note: These controls are used for the SMX-10M2C and SMX-10M3C color camera models.
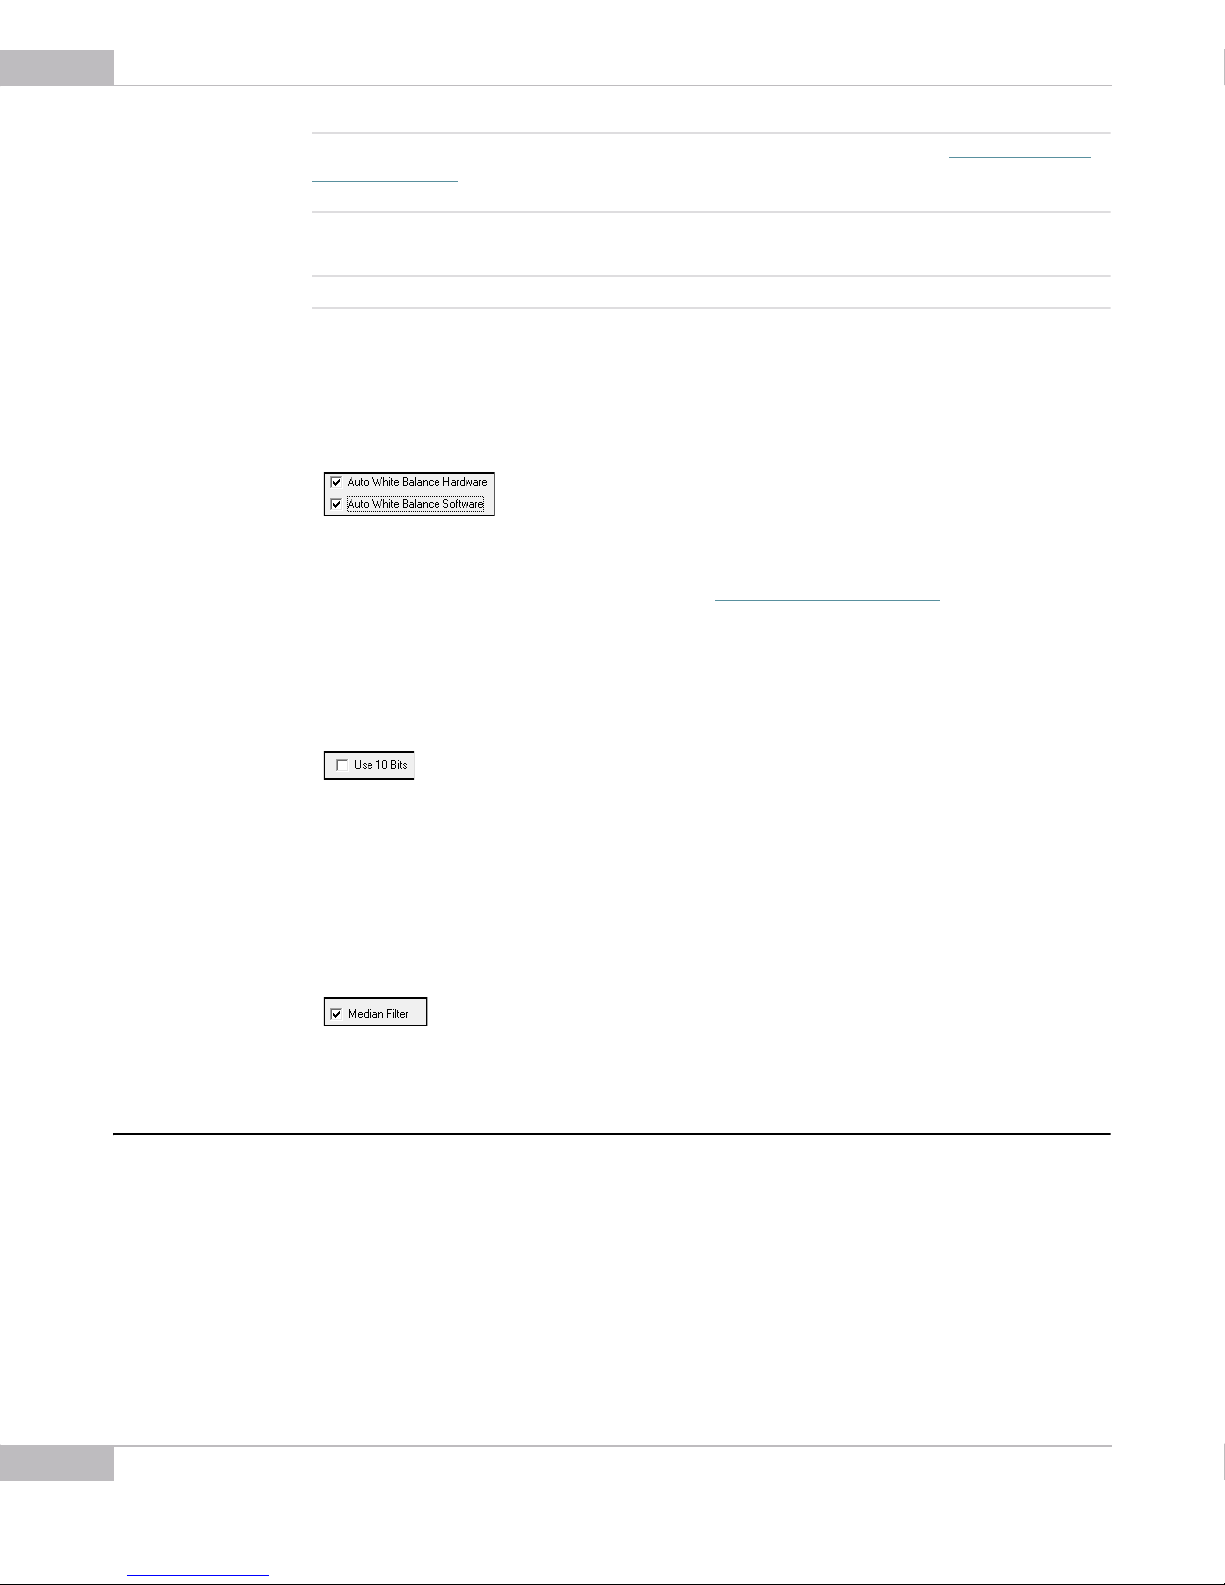
Enable the Auto White Balance Hardware and/or Auto White Balance Software
checkboxes if you want to automatically balance white at the hardware and/or software
levels every time when the picture changes. For Auto White Balance Software
operation, check also the Enable box on the Color Balance tab of the main window.
Figure 4-14 Auto White Balance checkboxes
For more information on white balance, see “Color Balance” on page 35.
If the 10 bit mode box is checked, it enables the software to transmit 10 bit images
from the camera as opposed to regular 8 bit.
Figure 4-15 10 bit mode checkbox
Filtering
The Median Filter option turns on pixel averaging. The brightness of every single pixel
becomes affected by the brightness of its neighbor pixels and the whole image
becomes smoother.
Figure 4-16 Median Filter checkbox
Saving and Loading Camera Profiles
The SMX-10Mxx camera application automatically stores most of the camera settings on
exit and restores them on startup. You can also store current settings in profile files
(*.pro) and load them whenever you need. Profiles store frequency, gain, exposure,
viewport, flip, black level and column balancing, and other settings.
To save current camera settings into a profile:
1 Press Ctrl+s.
Tuning Guidelines: Saving and Loading Camera Profiles
Page 39
SMX-10Mxx Series USB2.0 Camera User Guide
OR
In the File menu select the Save Profile command.
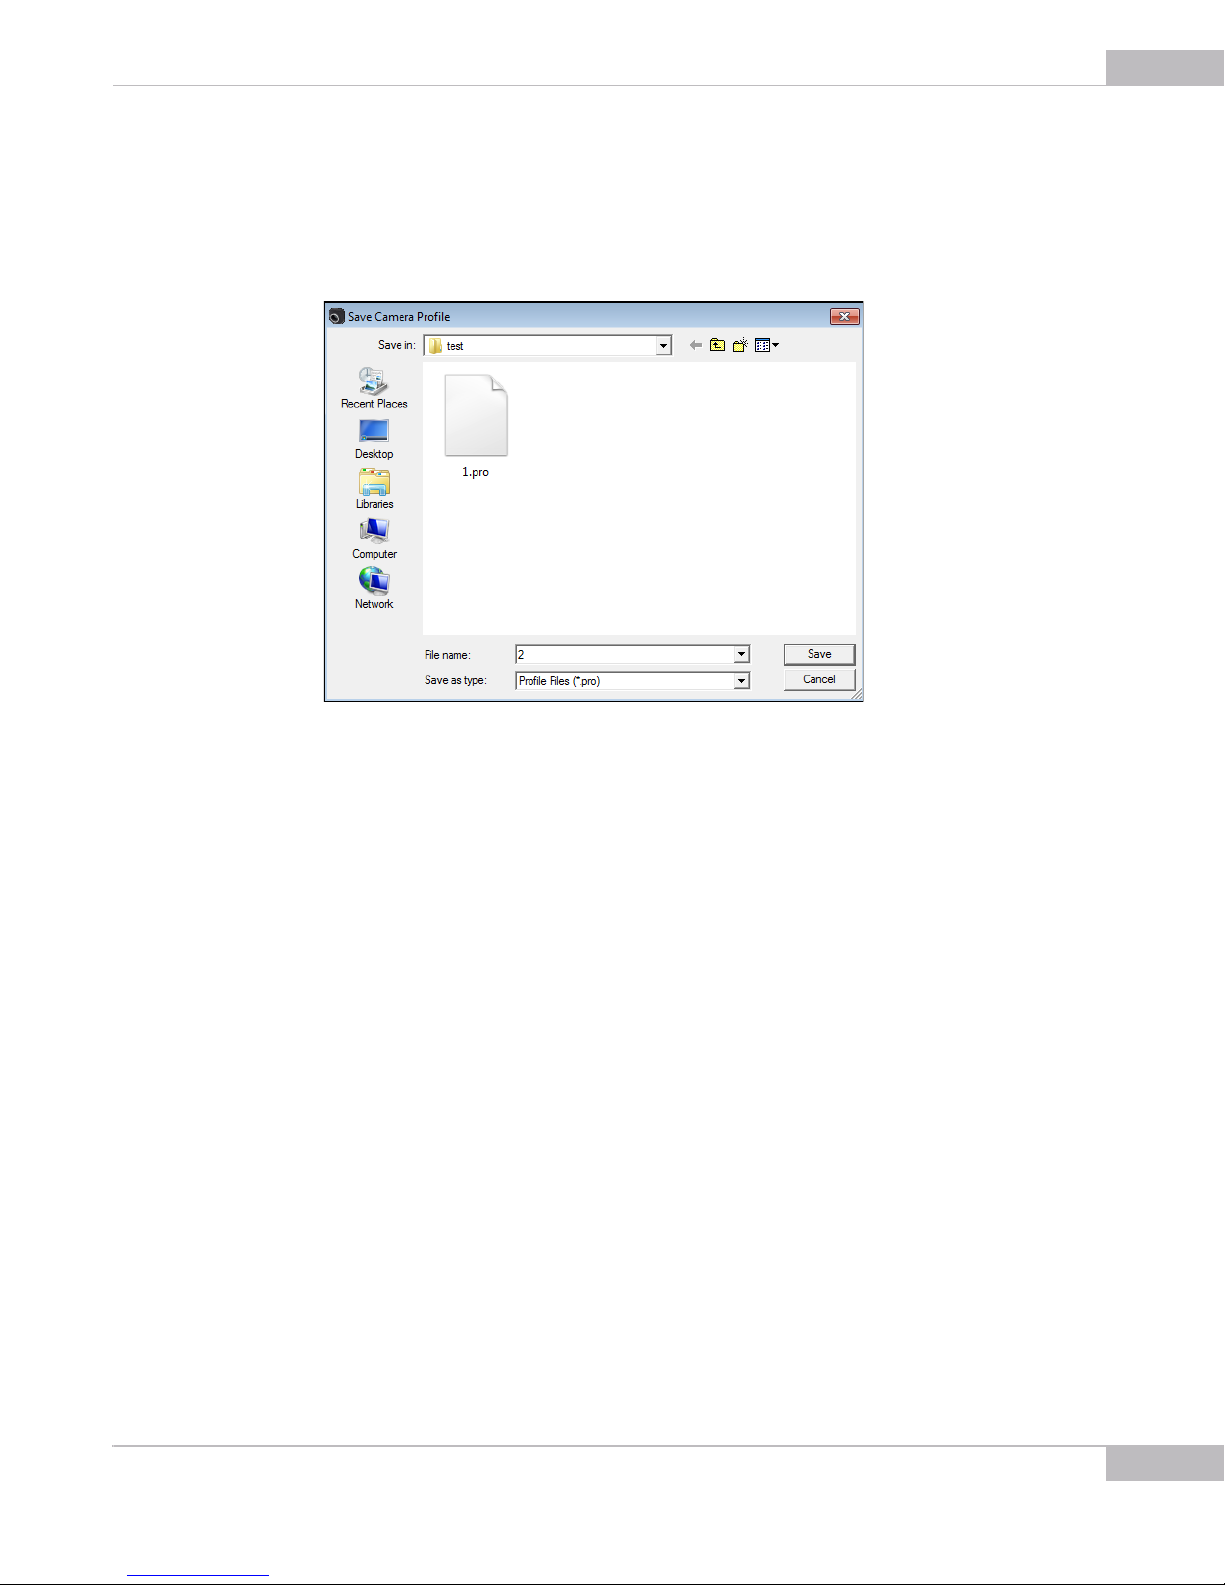
2 Save Camera Profile box appears. Type in profile title and select a folder where you
want to save the file.
39
Figure 4-17 Saving camera profile
3 Press Save.
To load a profile:
1 Press Ctrl+o or in the File menu, select the Open Profile command.
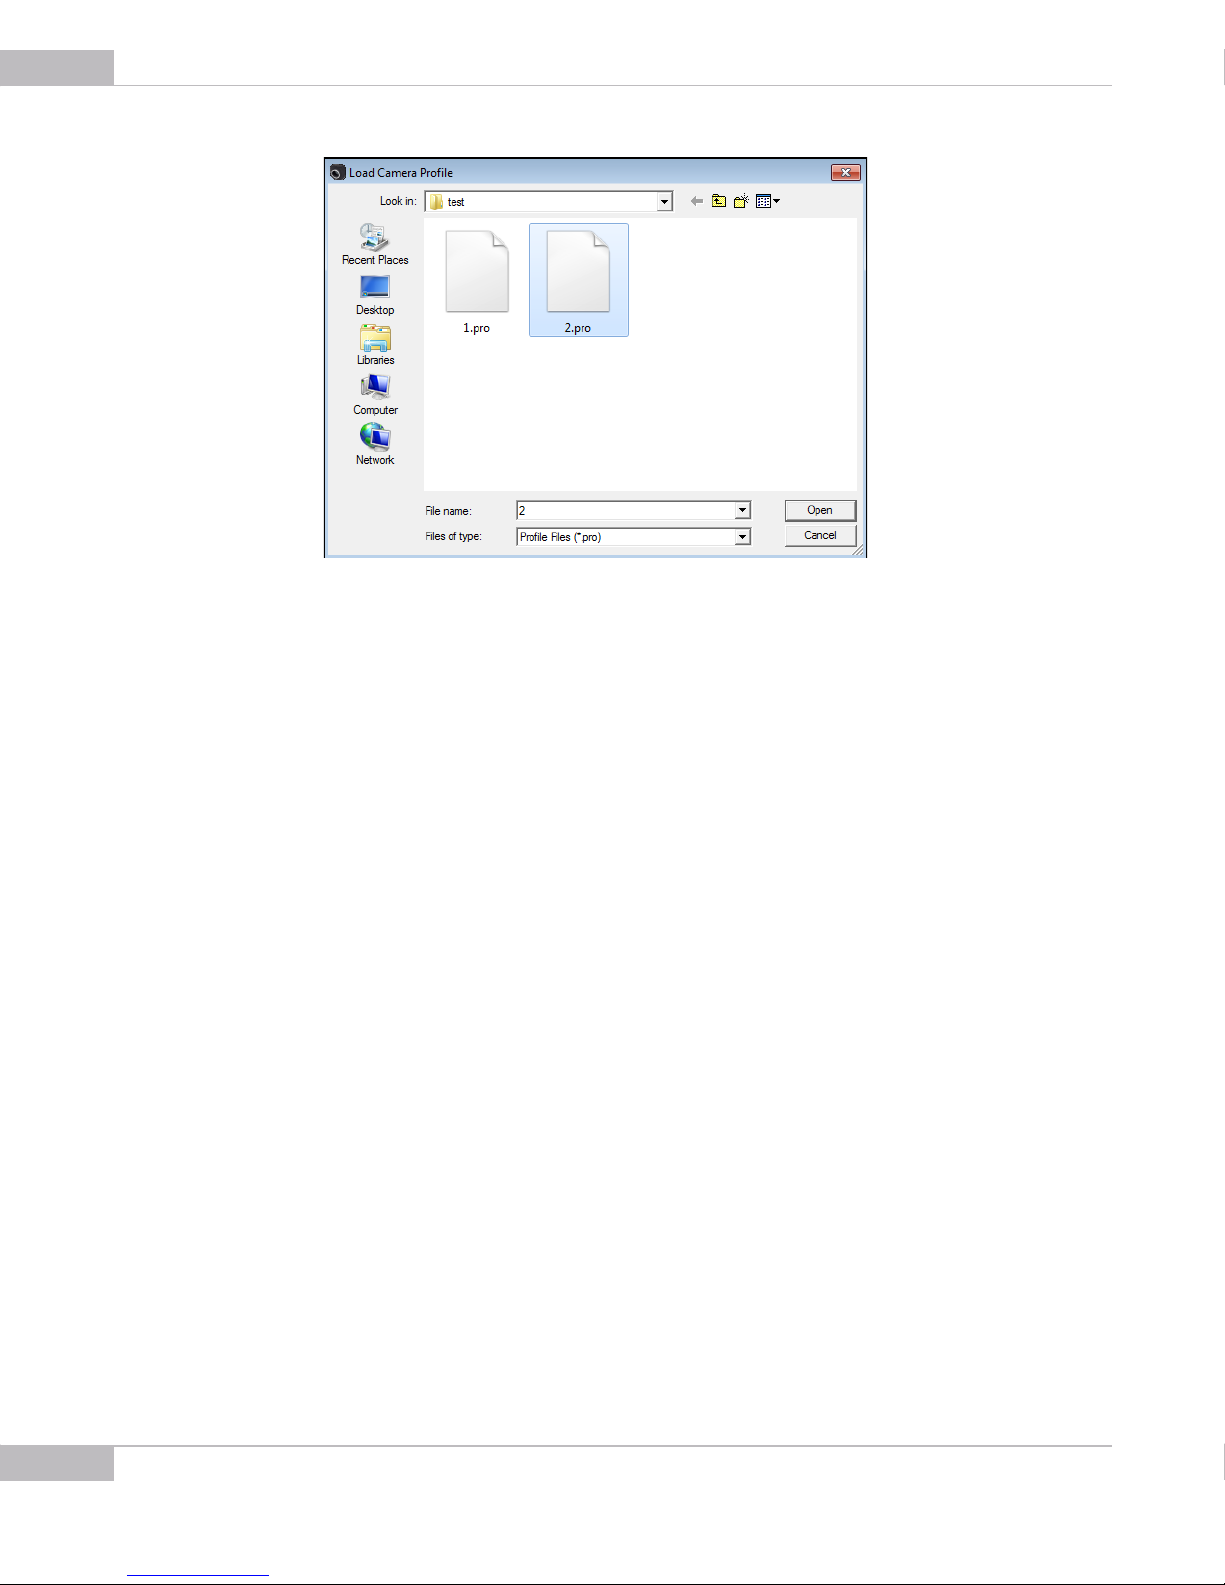
2 Load Camera Profile box appears. Browse to a folder with profile files and select one
you want to load.
Tuning Guidelines: Saving and Loading Camera Profiles
Page 40
40
SMX-10Mxx Series USB2.0 Camera User Guide
Figure 4-18 Loading camera profile
3 Press Open.
Tuning Guidelines: Saving and Loading Camera Profiles
Page 41
Chapter 5
CAPTURING
The SMX-10Mxx camera application enables you to capture images from the camera
and to store them in BMP or TIFF format files. You can also save files with video that you
record.
Capturing Images
To capture frames:
1 Start video (press F5 or the button Start Video in the toolbar).
2 You can capture a single frame or a frame sequence:
41
● For a single frame press F2 or the button in the toolbar
● For a sequence press F3 or the button in the toolbar.
Capture Limits
3 The frame/frame sequence is captured immediately and saved in the folder specified
in Capture Options (see
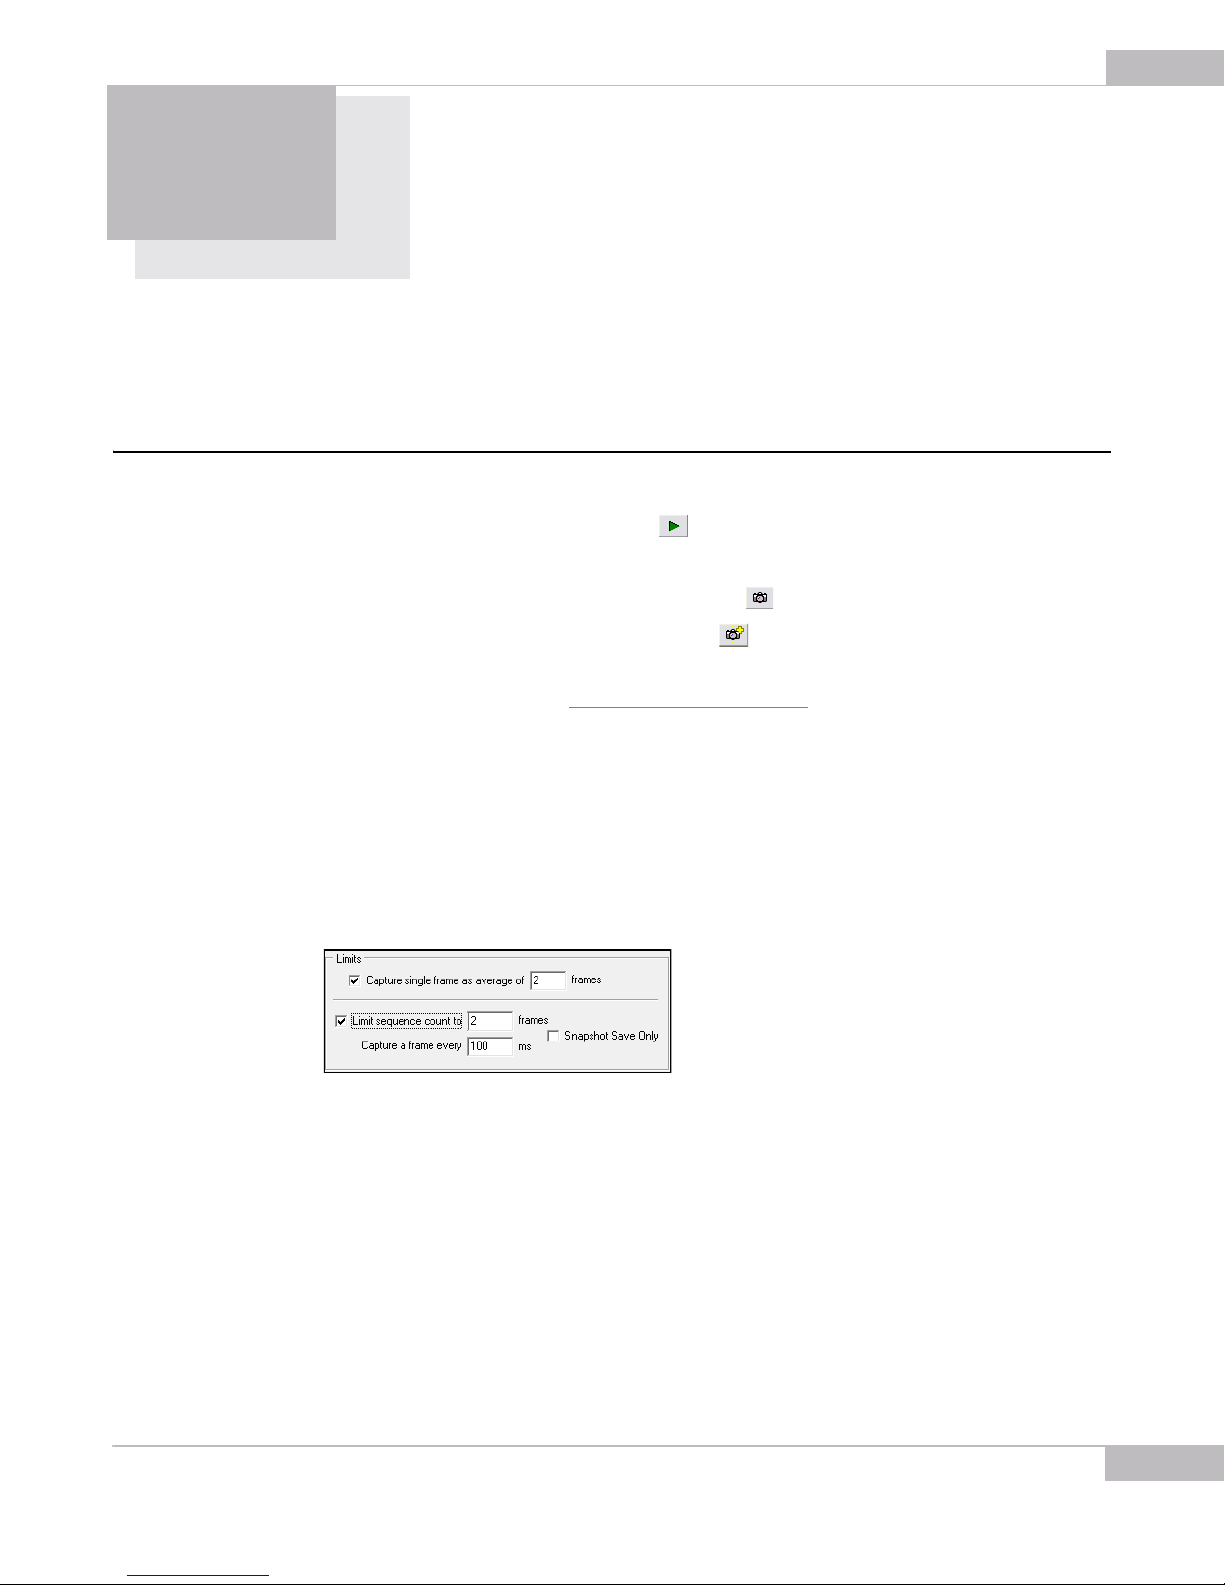
The Limits section in the Capture Options dialog box allows controlling the capture
parameters. To open the dialog box, press Alt+c on the keyboard.
You can lower the noise level in the frame being captured using the Capture single
frame as average of box. Check the box and type in the number of frame you want to
average.
Figure 5-1 Limits section of Capture Options
By default, two frames are captured in a sequence. You can increase this value:
1 Check the Limit sequence count to box.
2 Type in the new value in the field near the checkbox.
3 Change the time period for capturing frames in the Capture a frame every field. The
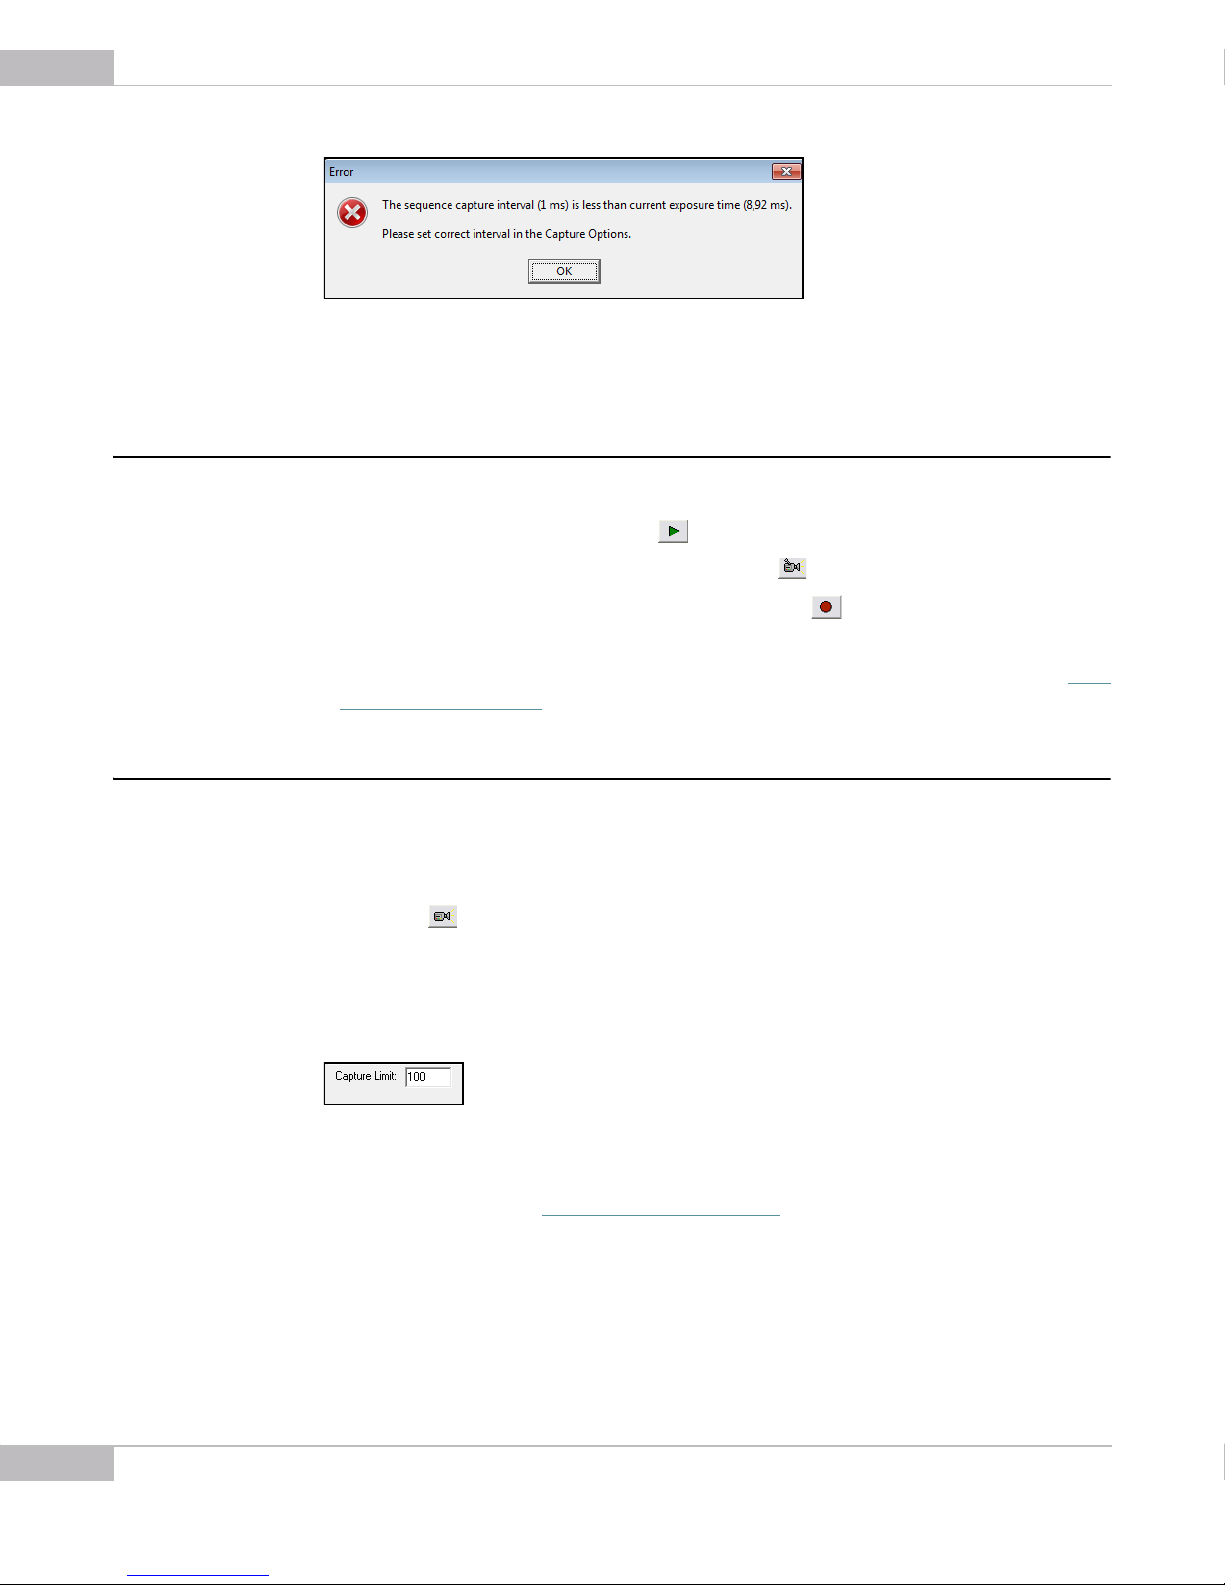
sequence capture interval cannot be less than current frame exposure time. If it is
less, an error message will be displayed when you try to perform a sequence capture:
“Saving Options” on page 43).
Capturing
Page 42
42
SMX-10Mxx Series USB2.0 Camera User Guide
Recording Video
Figure 5-2 Message about incorrect sequence capture interval
4 Press OK.
To record a video:
1 Start video (press F5 or the button Start Video in the toolbar).
2 To start video recording, press F4 or the button in the toolbar.
3 Press Shitf+F5 to stop the video stream or click the Stop Video button in the
toolbar.
4 The video is recorded and saved in the folder specified in Capture Options (see
ing Options” on page 43) as an .avi file.
“Sav-
Saving Video to Memory
You can save video or frames to the core memory. This is done without a delay between
frames. Do the following:
1 Start video.
2 Press the Save Video to Memory button in the toolbar or press Shift+F4 on the
keyboard.
Number of frames in the video is set via the Capture Options box. Type in the required
number in the Capture Limit field:
Figure 5-3 Save Video to Memory section
When you use the Save to Memory option, frames will be saved as image files similarly
to the simple saving (see
which can be replayed and converted to the .avi file with the SMXView utility that goes
with the standard SMX-10Mxx software package.
Saving video directly to memory can slow down the camera’s output visualization, but
this method insures that no frames are missing in the saved file.
“Saving Options” on page 43). Video will be saved as a .smx file
Capturing
Page 43
Saving Options
SMX-10Mxx Series USB2.0 Camera User Guide
When you capture frames or record a video, they are saved in directory and with file
prefix specified in Capture Options.
To change options for saving frames/video:
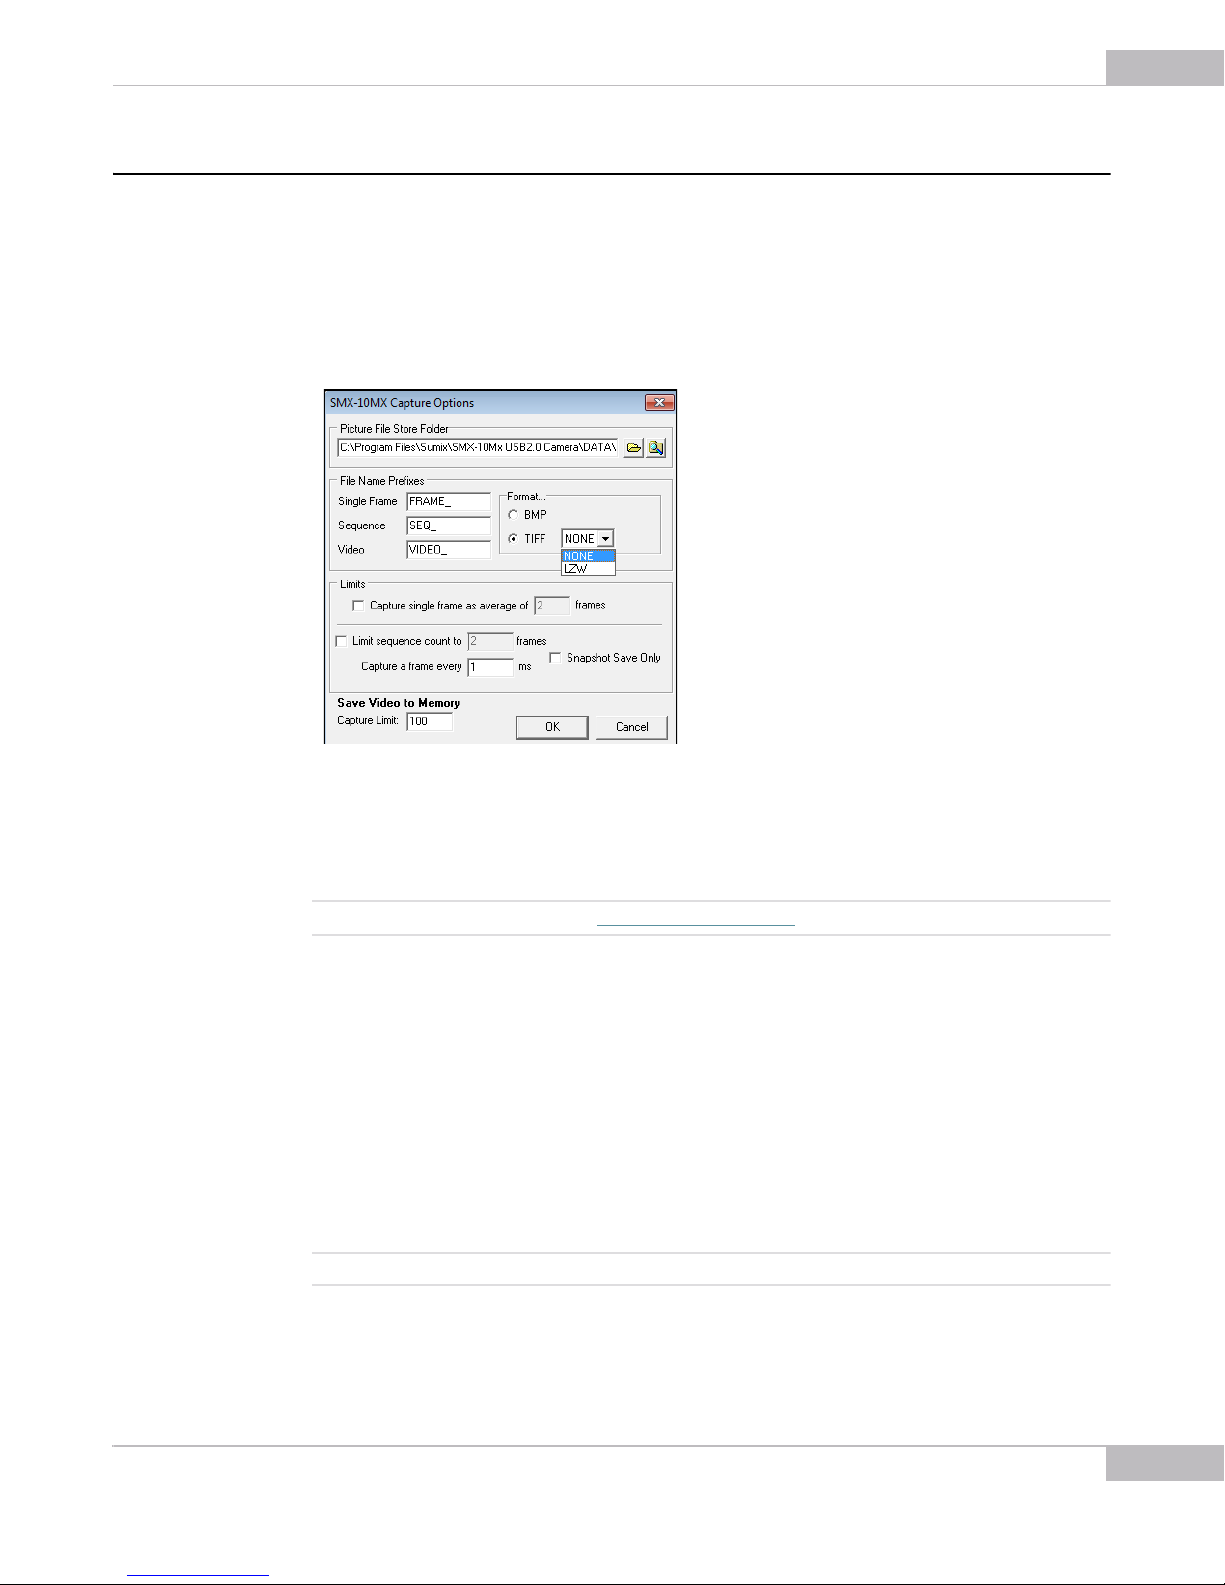
1 Open the Capture Options dialog by pressing Alt+c on the keyboard or go to the
File menu and select Capture Options.
43
Figure 5-4 Capture Options box
2 Set the options:
a. In the Picture File Store Folder box, change the directory in which you want to
save frames/video or leave the default one.
Note: This folder will also store snapshots (see “Snapshots” on page 45).
b. Change the prefix that will be assigned to all frame/frame sequence and video
files or leave the default ones. Use the Single Frame, Sequence and Video fields.
The files are named automatically by combining the corresponding File Name
Prefix and numerical value that is calculated by the number of last captured file +
1.
c. Select image file format for frames:
● BMP - saves any 8 bit or 10 bit image as 8 bit BMP image.
● TIFF - saves 8 bit image as 8 bit TIFF image and 10 bit image as 10 bit TIFF image.
Select also compression type: NONE (without compression) or LZW (Lemple-ZifWelch - lossless type of compression).
Note: The selected image format will also be used for snapshots.
3 Press OK.
Capturing
Page 44

44
SMX-10Mxx Series USB2.0 Camera User Guide
Capturing
Page 45
Chapter 6
SNAPSHOTS
Snapshots Basics
The SMX-10Mxx Series cameras can work only in one of the two modes at the same
time: Video or Snapshot. When the camera is not in the video mode, it is possible to
take a snapshot - to capture a still image. A snapshot can be triggered by the software,
or by external (with respect to the camera) hardware.
The Video mode is the normal mode when the camera is producing the image data. The
Snapshot mode forces the camera to capture a still image (a single frame).
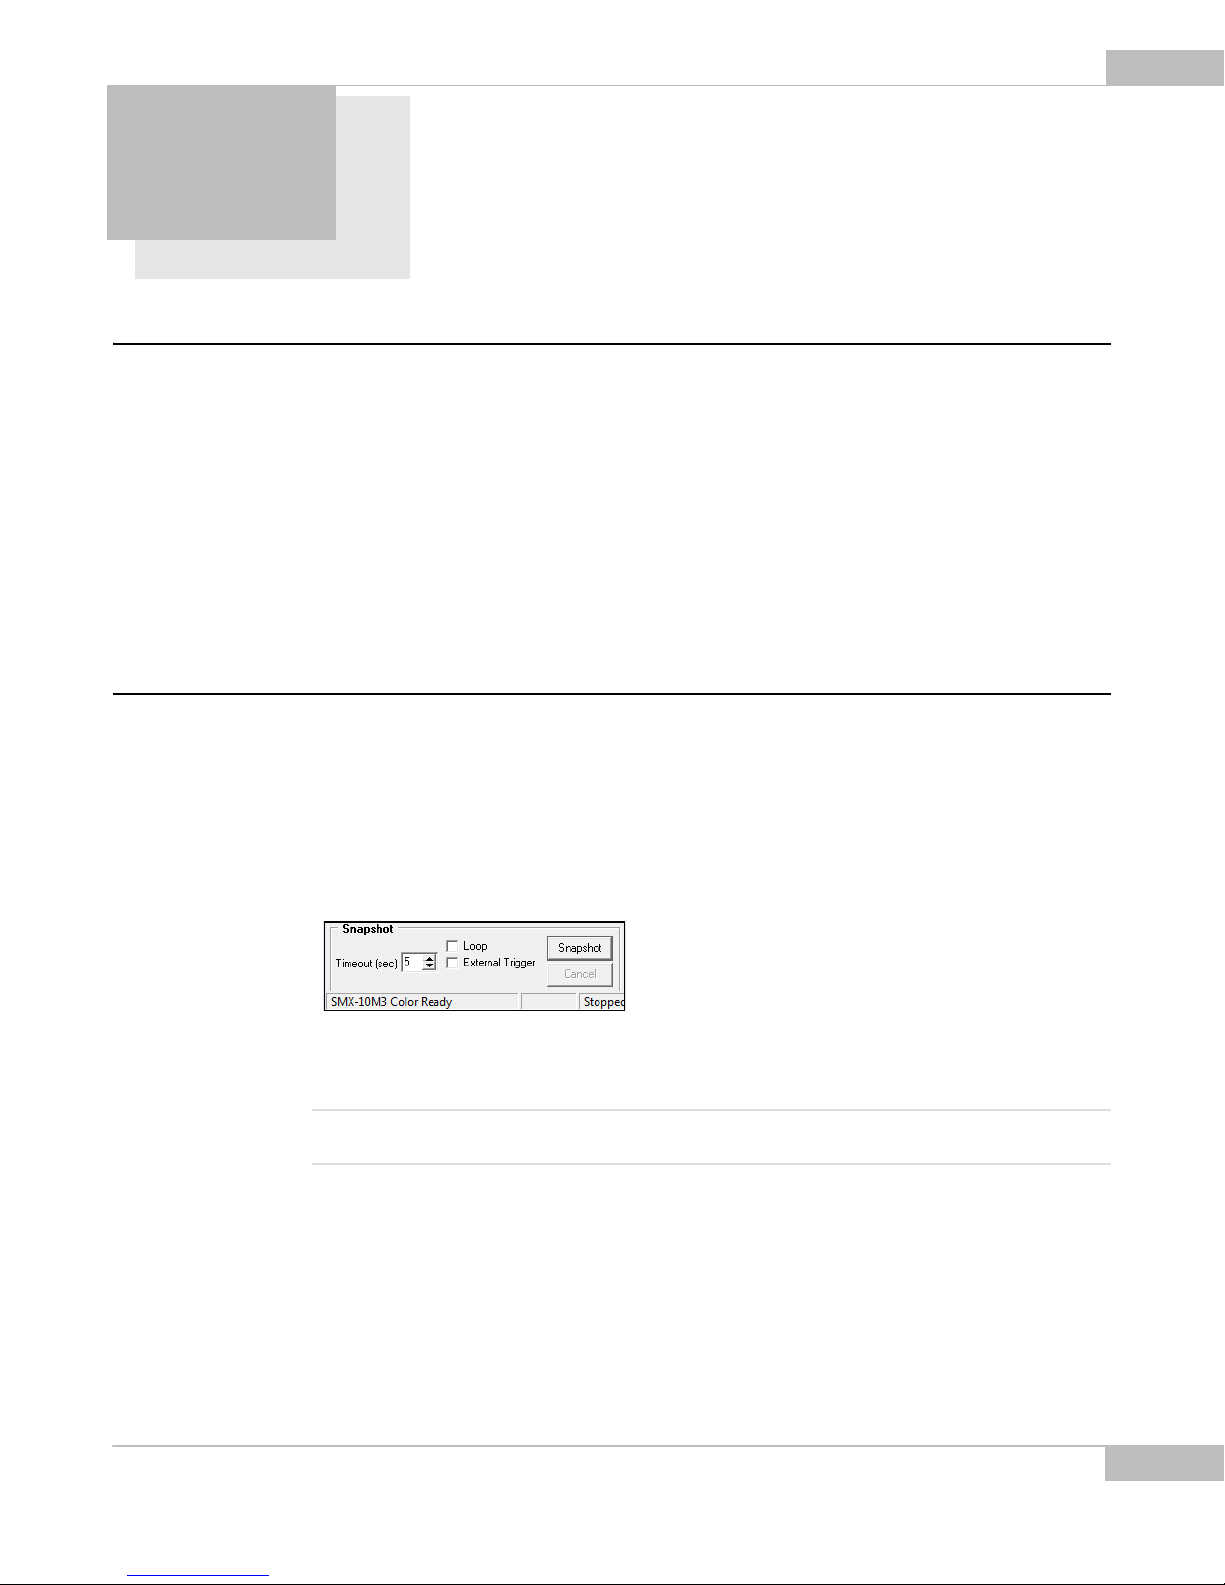
To take a snapshot from the camera, use the Snapshot section of the camera
application main window. Remember that you need to stop video (Shift+F5) before you
turn on the snapshot mode. To start the snapshot process, press the Snapshot button.
45
Taking Snapshots Using Software Trigger
To make a snapshot using the software trigger:
1 Turn the video mode on (press F5 or the Start Video button in the toolbar).
2 Set exposure, gain, viewport, etc.
3 Turn the video mode off (press Shift+F5 or the Stop Video button in the toolbar).
4 Click the Snapshot button in the Snapshot section of the main window.
Figure 6-1 Making a snapshot using software trigger
5 The Snapshot window will open.
Note: In the Video mode, the Exposure slider controls the exposure time for the video. When the video is stopped, the
Exposure slider controls the exposure time of the snapshot.
For continuous sequence of snapshots, use the Loop option. The stream of continuous
snapshots will be displayed in the Snapshot window. This mode can be useful to adjust
the picture parameters for the Snapshot mode.
To make a continuous sequence of snapshots:
1 Turn off the video.
Snapshots: Snapshots Basics
Page 46
46
SMX-10Mxx Series USB2.0 Camera User Guide
2 Check the Loop box in the Snapshot section of the main window.
3 Click the Snapshot button. Snapshots will continuously appear in the Snapshot
window.
4 To stop taking snapshots, press Cancel.
Note: It is strongly recommended not to change any of the camera’s settings when running the Snapshot Loop mode.
This may interrupt the camera operation.
Taking Snapshots Using Hardware Trigger
To take a snapshot using a hardware trigger:
1 Connect an external device (equipment).
2 Turn the video mode off (press Shift+F5 or the Stop Video button in the toolbar).
3 Set exposure, gain, viewport, etc.
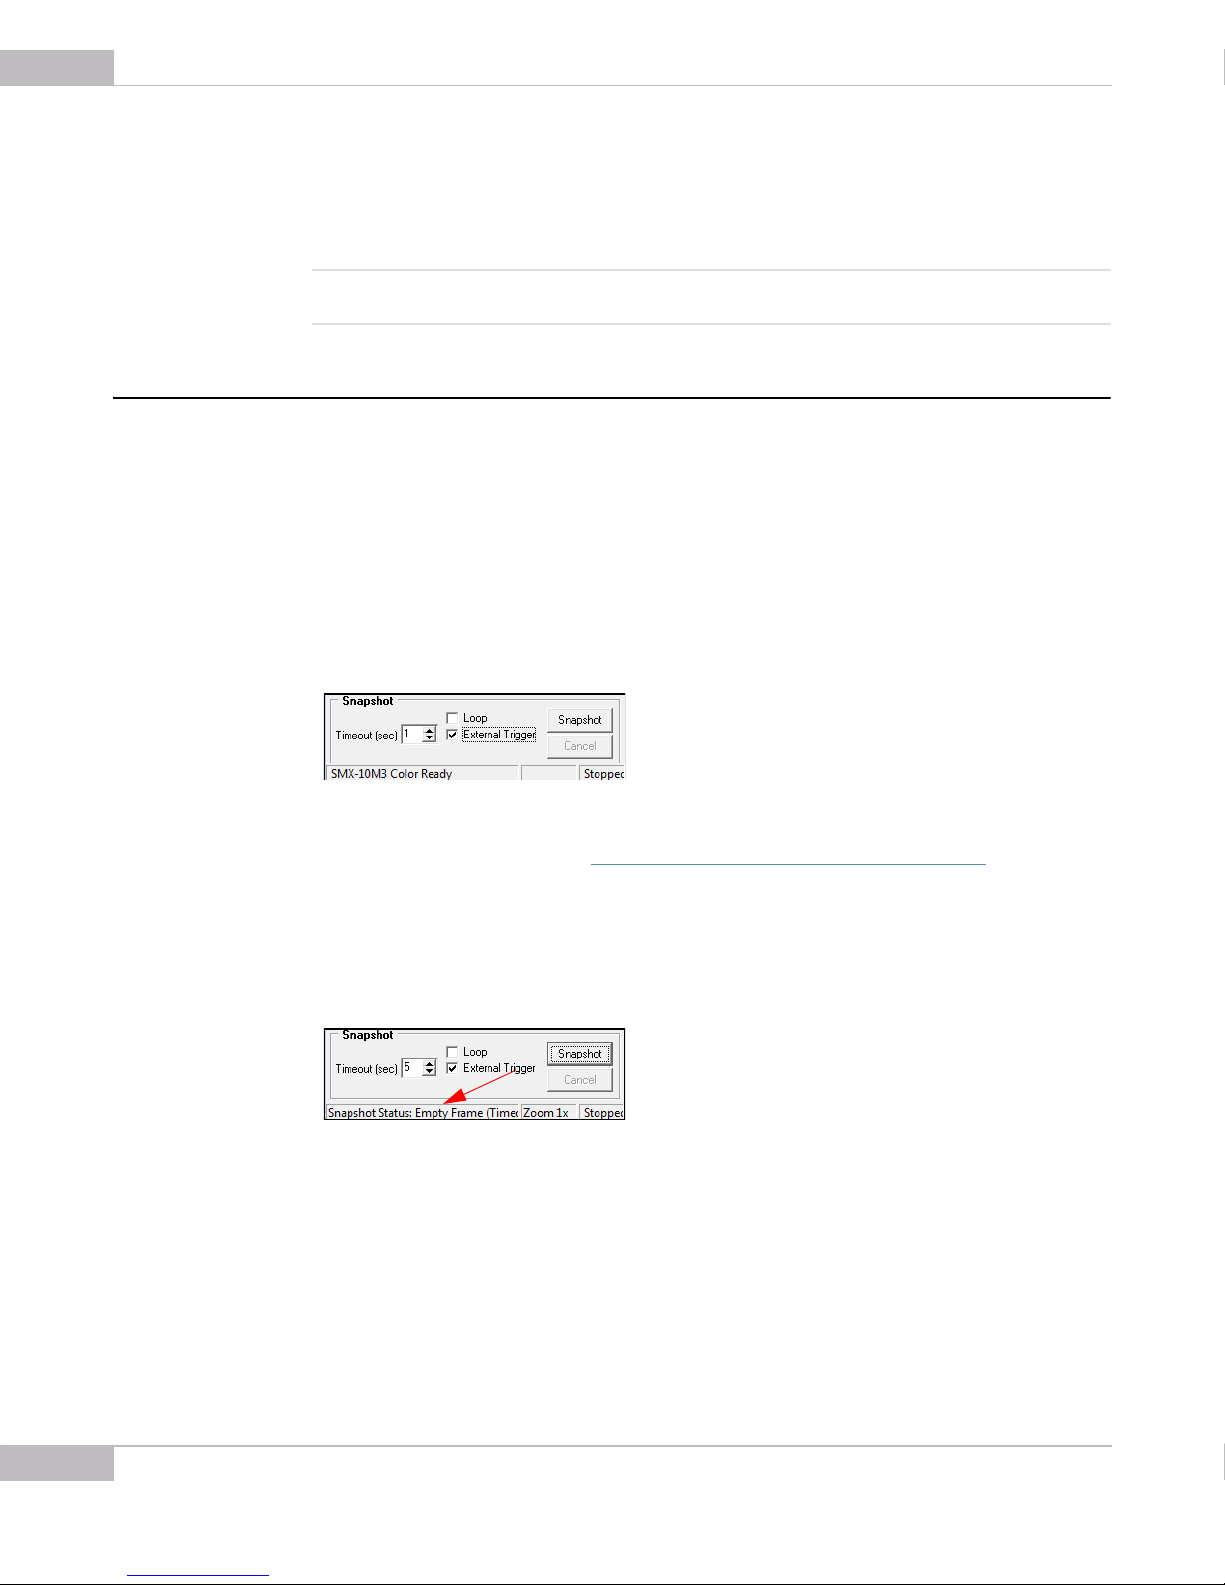
4 Set Timeout (seconds to wait for external triggering pulse).
5 Check the External Trigger box.
6 Click the Snapshot button.
Figure 6-2 Taking a snapshot using the hardware trigger
7 Apply triggering pulse (see “External Trigger Connector Pinout” on page 47).
8 As a result, the Snapshot window will open if the camera has detected the external
triggering pulse.
9 If it failed to detect the external triggering pulse, the Snapshot window will not open
and a timeout message will be displayed in the application status bar.
Figure 6-3 Timeout message in the application status bar
Snapshots: Taking Snapshots Using Hardware Trigger
Page 47
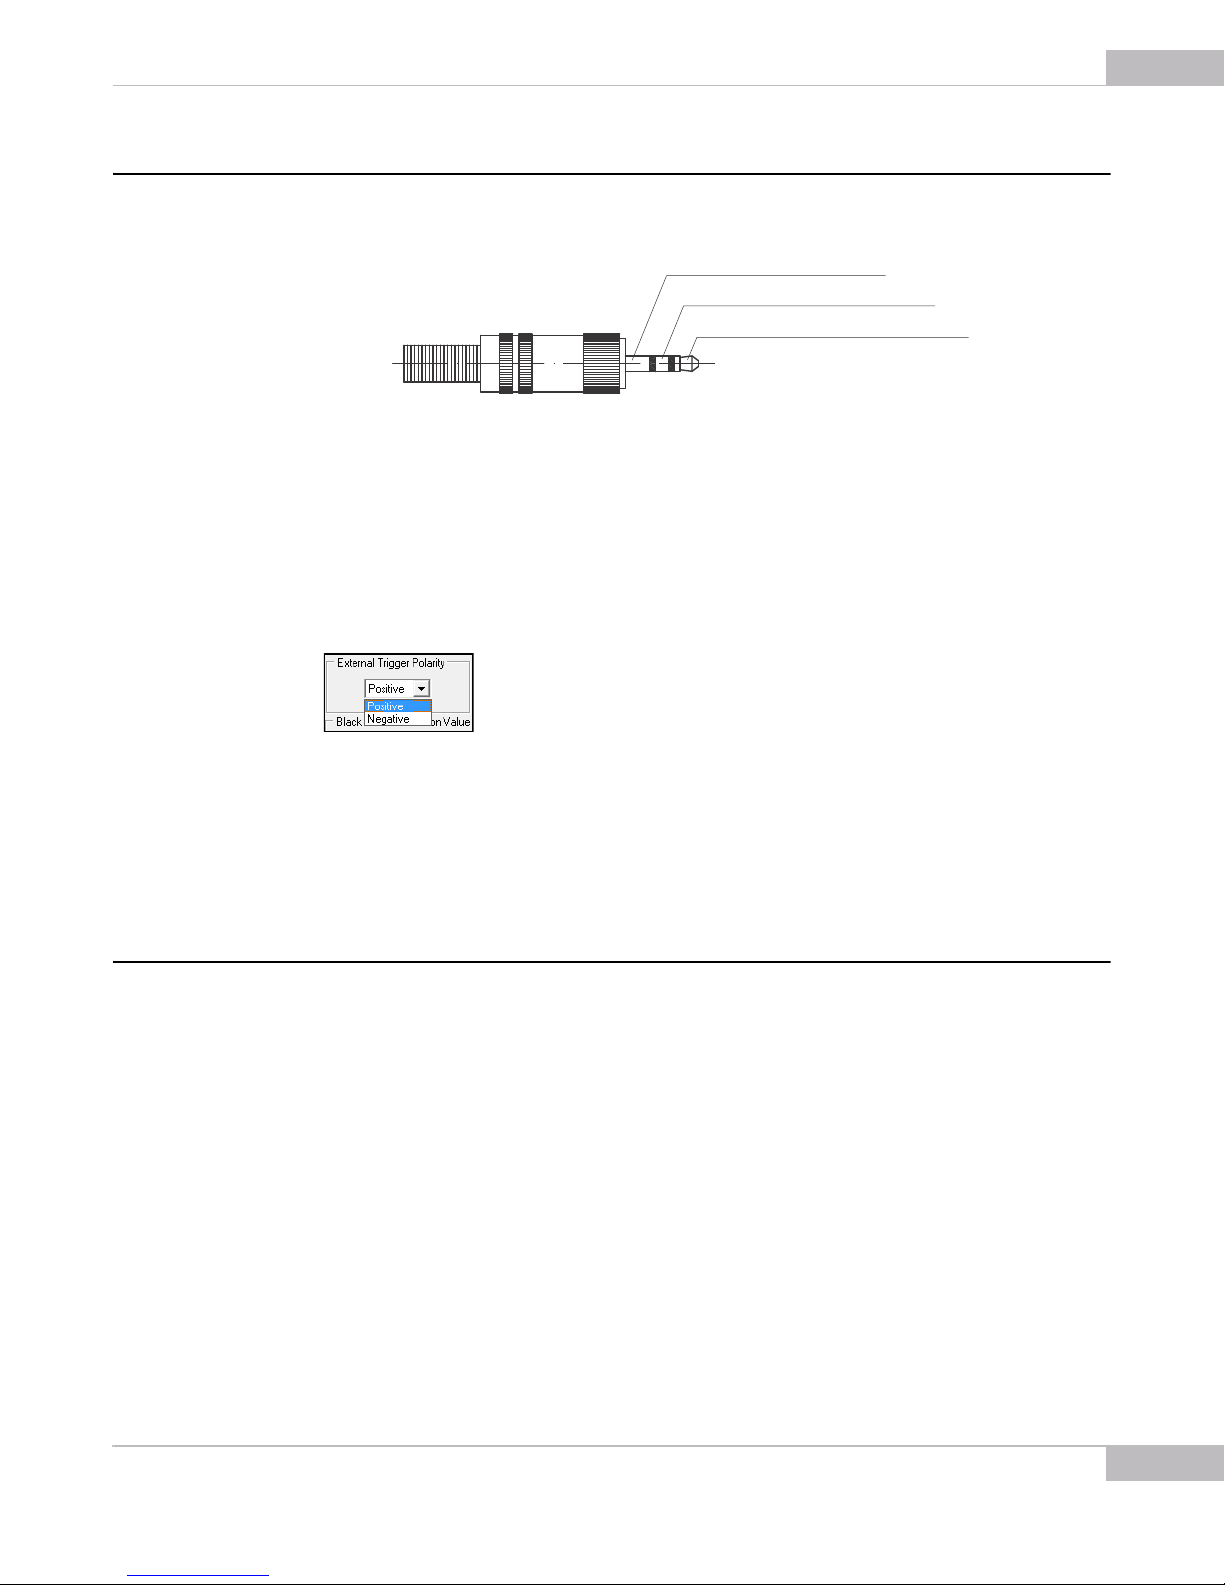
External Trigger Connector Pinout
Common (GND)
External trigger input
External trigger output
External trigger connector pinout
Setting External Trigger Polarity
The polarity of external trigger is set via the Device Setting window (press Alt+s on the
keyboard).
SMX-10Mxx Series USB2.0 Camera User Guide
47
Figure 6-4 Setting the external trigger polarity
The following options are available:
● Positive - the External Trigger Input 1 will be enabled
● Negative - the External Trigger Input 2 will be enabled.
Saving Snapshots
When you take snapshots, they are saved in directory and with file prefix specified in
Capture Options.
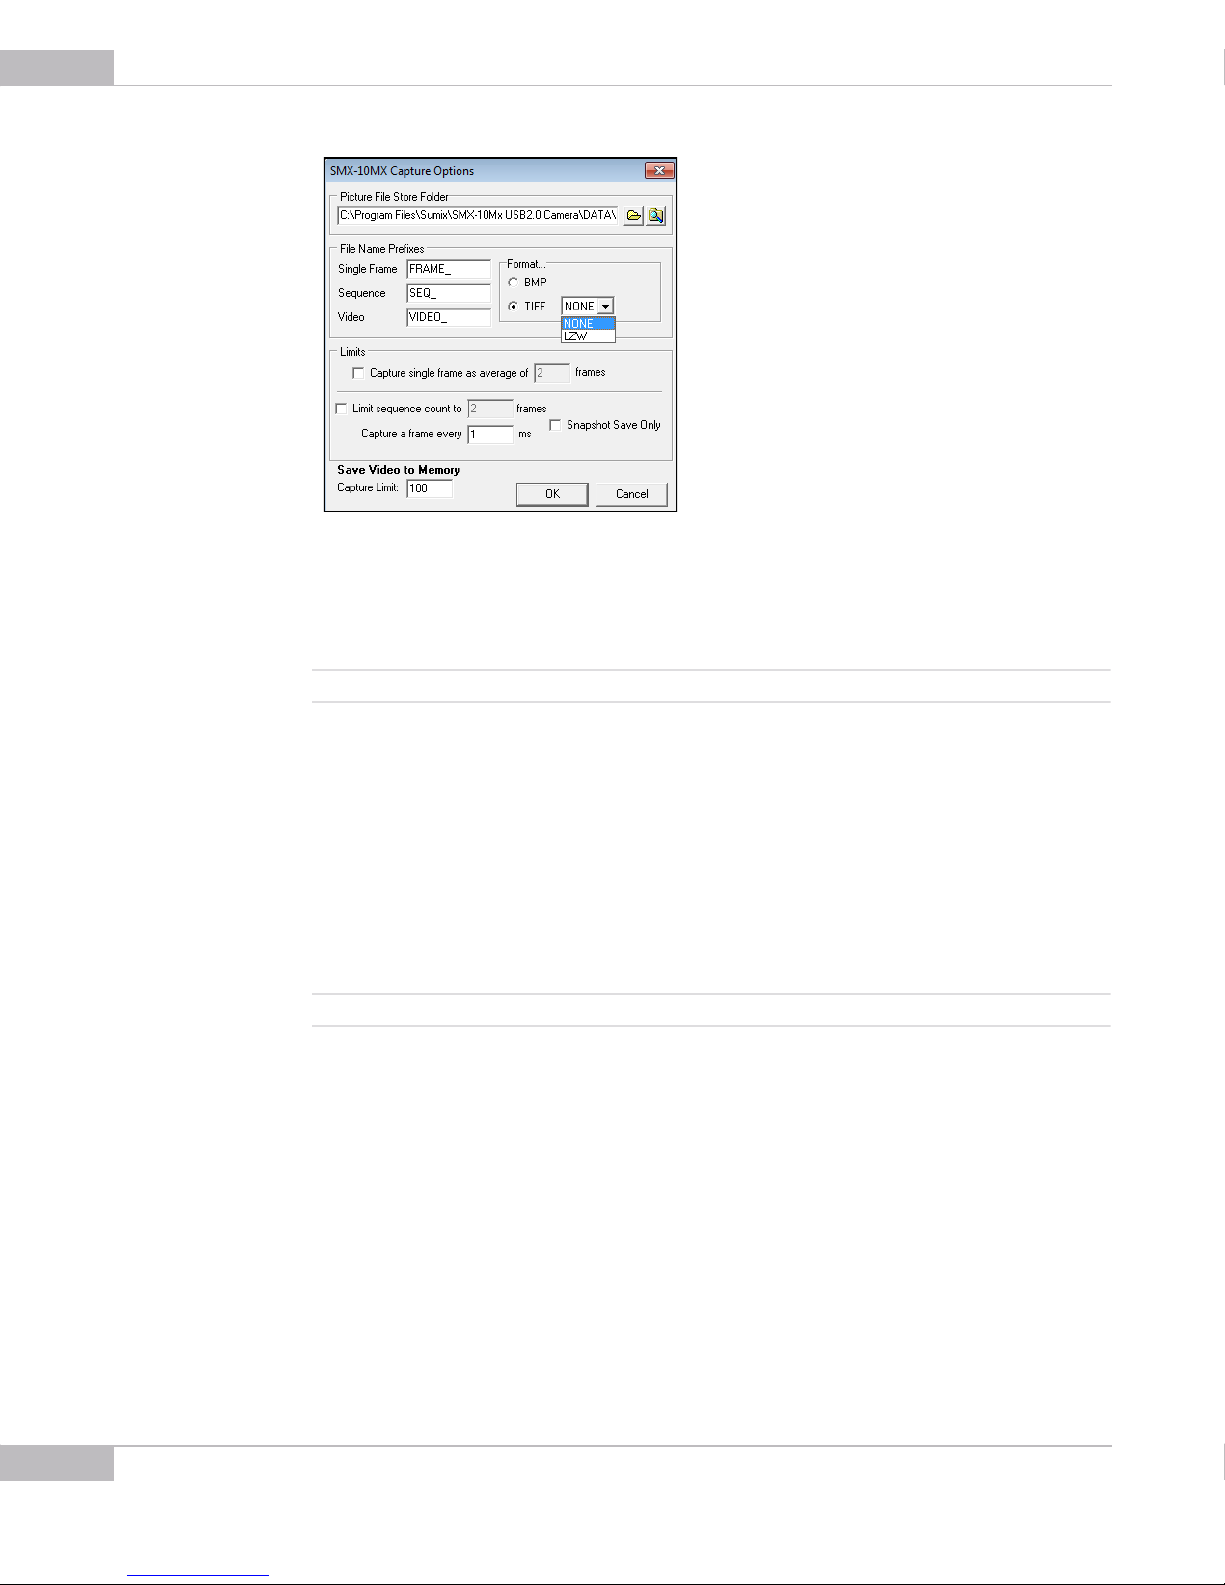
To change options for saving snapshots:
1 Open the Capture Options dialog by pressing Alt+c on the keyboard or go to the
File menu and select Capture Options.
Snapshots: External Trigger Connector Pinout
Page 48
48
SMX-10Mxx Series USB2.0 Camera User Guide
Figure 6-5 Snapshot saving options
2 Set the options:
a. In the Picture File Store Folder box, change the directory in which you want to
save snapshots or leave the default one.
Note: This folder will also store captured videos and frames.
b. Change the prefix that will be assigned to all snapshot files or leave the default
one. Use the Snapshot field. The files are named automatically by combining the
corresponding File Name Prefix and numerical value that is calculated by the
number of last captured file + 1.
c. Select image file format:
● BMP - saves any 8 bit or 10 bit image as 8 bit BMP image.
● TIFF - saves 8 bit image as 8 bit TIFF image and 10 bit image as 10 bit TIFF image.
Select also compression type: NONE (without compression) or LZW (Lemple-ZifWelch - lossless type of compression).
Note: The selected image format will also be used for captured frames.
d. Check the Snapshot Save Only to save snapshots without showing them on the
screen.
Press OK.
Snapshots: Saving Snapshots
Page 49

Chapter 7
USE OF ACCESSORIES
SMX-10Mxx Series cameras can be supplied with the following accessories:
1. C-mount adapter
2. C-mount adapter with IR-cut filter
3. Tripod adapter
4. USB A to Mini B cable
This chapter will show you how to use the cameras with adapters.
Using C-mount Adapter with IR-cut Filter
The SMX-10Mxx Series cameras can be a C-mount (with the adapter/adapter with filter)
or a CS-mount (without the adapter/adapter with filter).
49
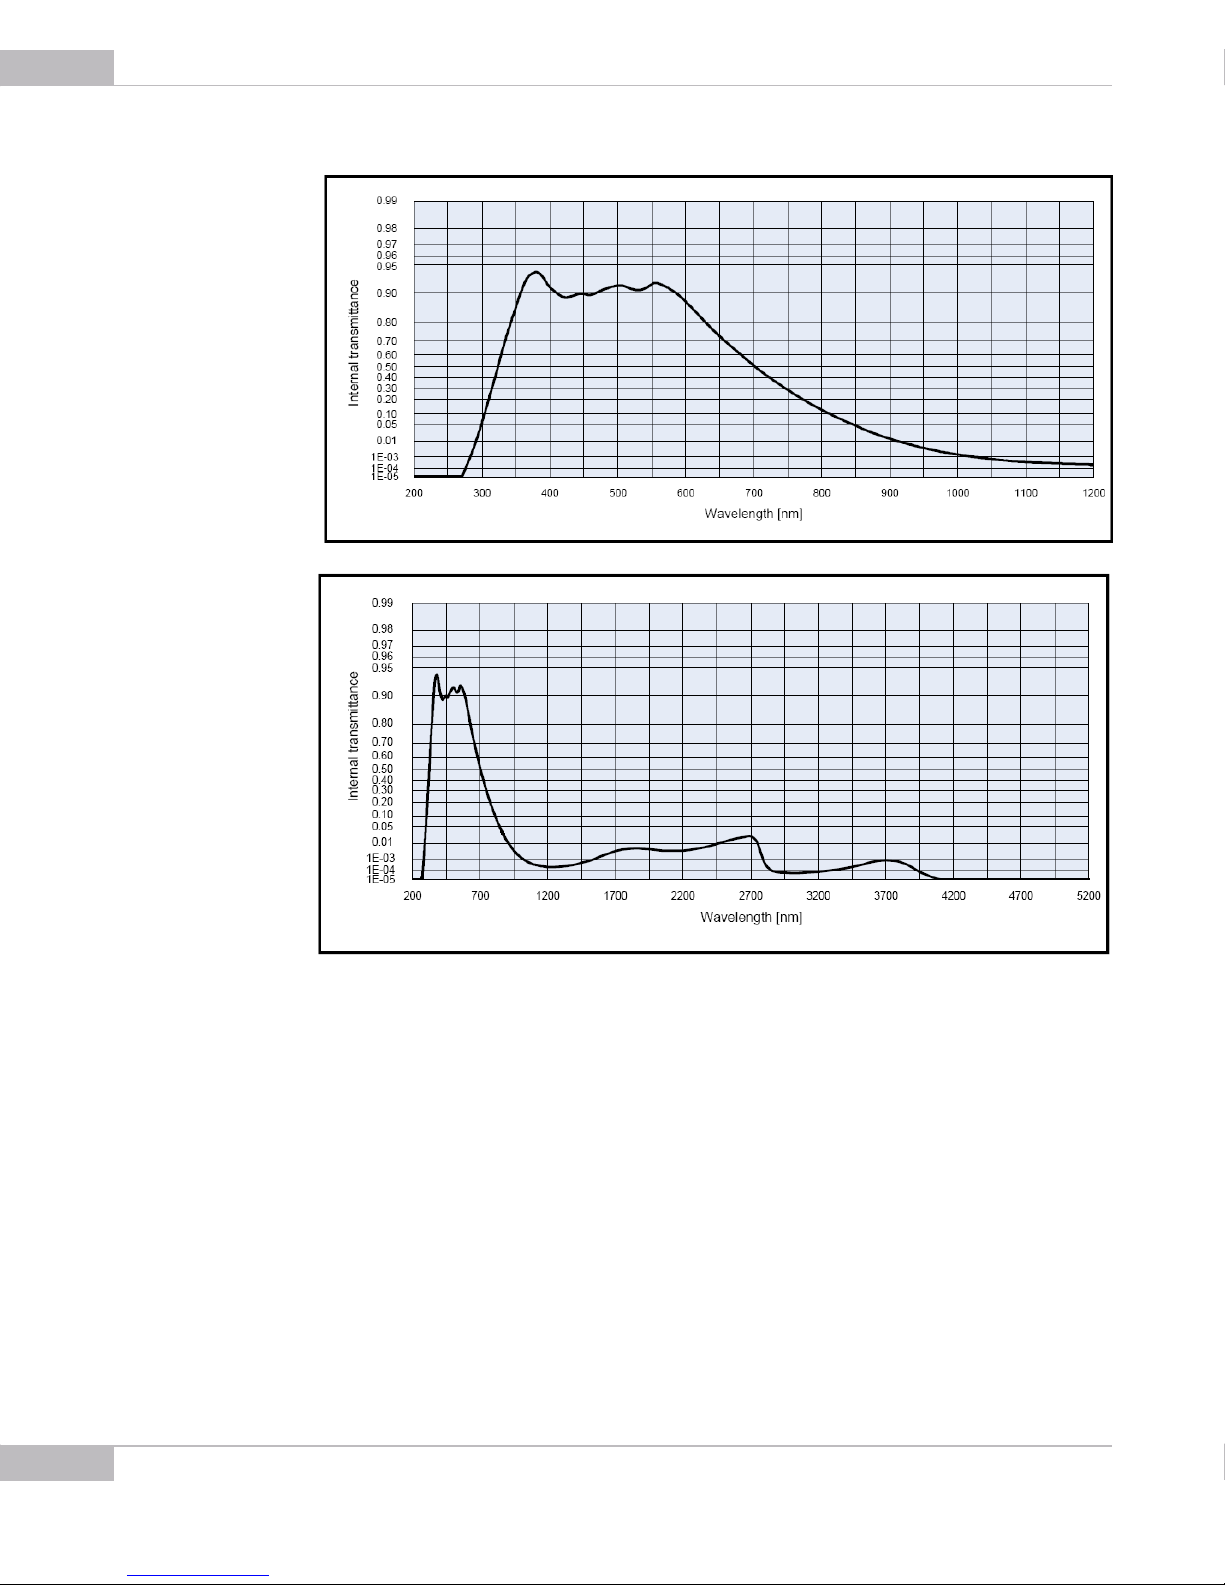
IR-cut Filter Characteristics
The IR-cut filter provided with the camera has the following characteristics:
● Diameter = 20mm
● Thickness = 2 mm
Chart of the IR-cut filter transmission characteristics:
Use of Accessories
Page 50
50
SMX-10Mxx Series USB2.0 Camera User Guide
C-mount
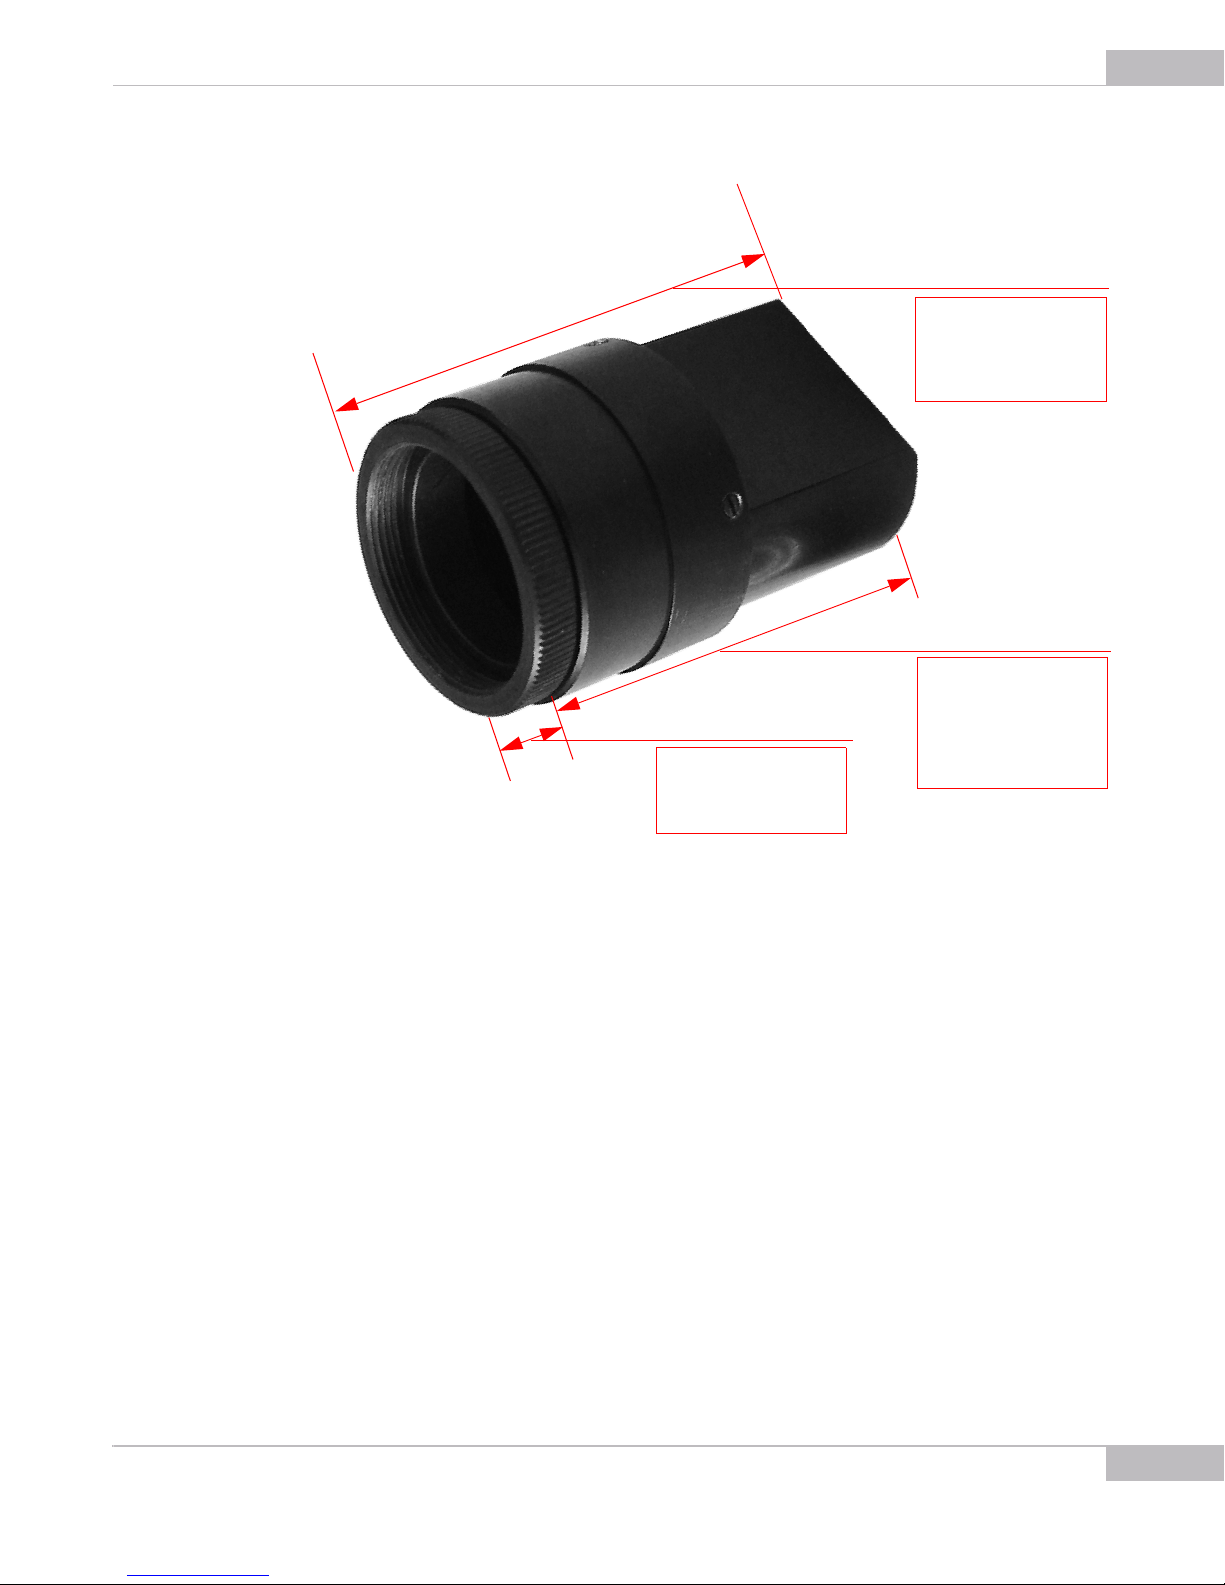
In this case, the camera is used with the C-mount adapter or with the C-mount adapter
with IR-cut filter:
Use of Accessories
Page 51
SMX-10Mxx Series USB2.0 Camera User Guide
C-mount: with
C-mount adapter or
C-mount adapter
with IR-cut filter
CS-mount: without
both C-mount
adapter and C-mount
adapter with IR-cut filter
C-mount adapter with
IR-cut filter or without
IR-cut filter
-
51
Using Adapter with Color Cameras. Since the SMX-10Mxx color cameras are sensitive
to IR-light, use the C-mount adapter with IR-cut filter for the color camera models to
make colors of the image more realistic.
Many light sources, including the sun, emit infrared light, so the color camera in daylight
will see a significant amount of infrared light without the IR-cut filter. As a result,
strange, non-realistic colors appear.
Another reason for using the IR-cut filter is the limited color correction for many lenses.
that have different depth of focus for the visible and infrared spectrum. The IR-cut filter
cuts away a significant amount of the overall collected light and thereby affects the
sensitivity in a negative way. In general, color cameras are one factor less sensitive
compared to monochrome (depending on the sensor). This is primarily due to the IR-cut
filter.
Using Adapter with Monochrome Cameras. SMX-10M1M monochrome camera is
more sensitive to infrared light than color models. Using the cameras in the
environment rich for infrared light may result in highlighted images. To avoid this effect,
use the C-mount adapter with IR-cut filter for monochrome cameras.
Use of Accessories
Page 52
52
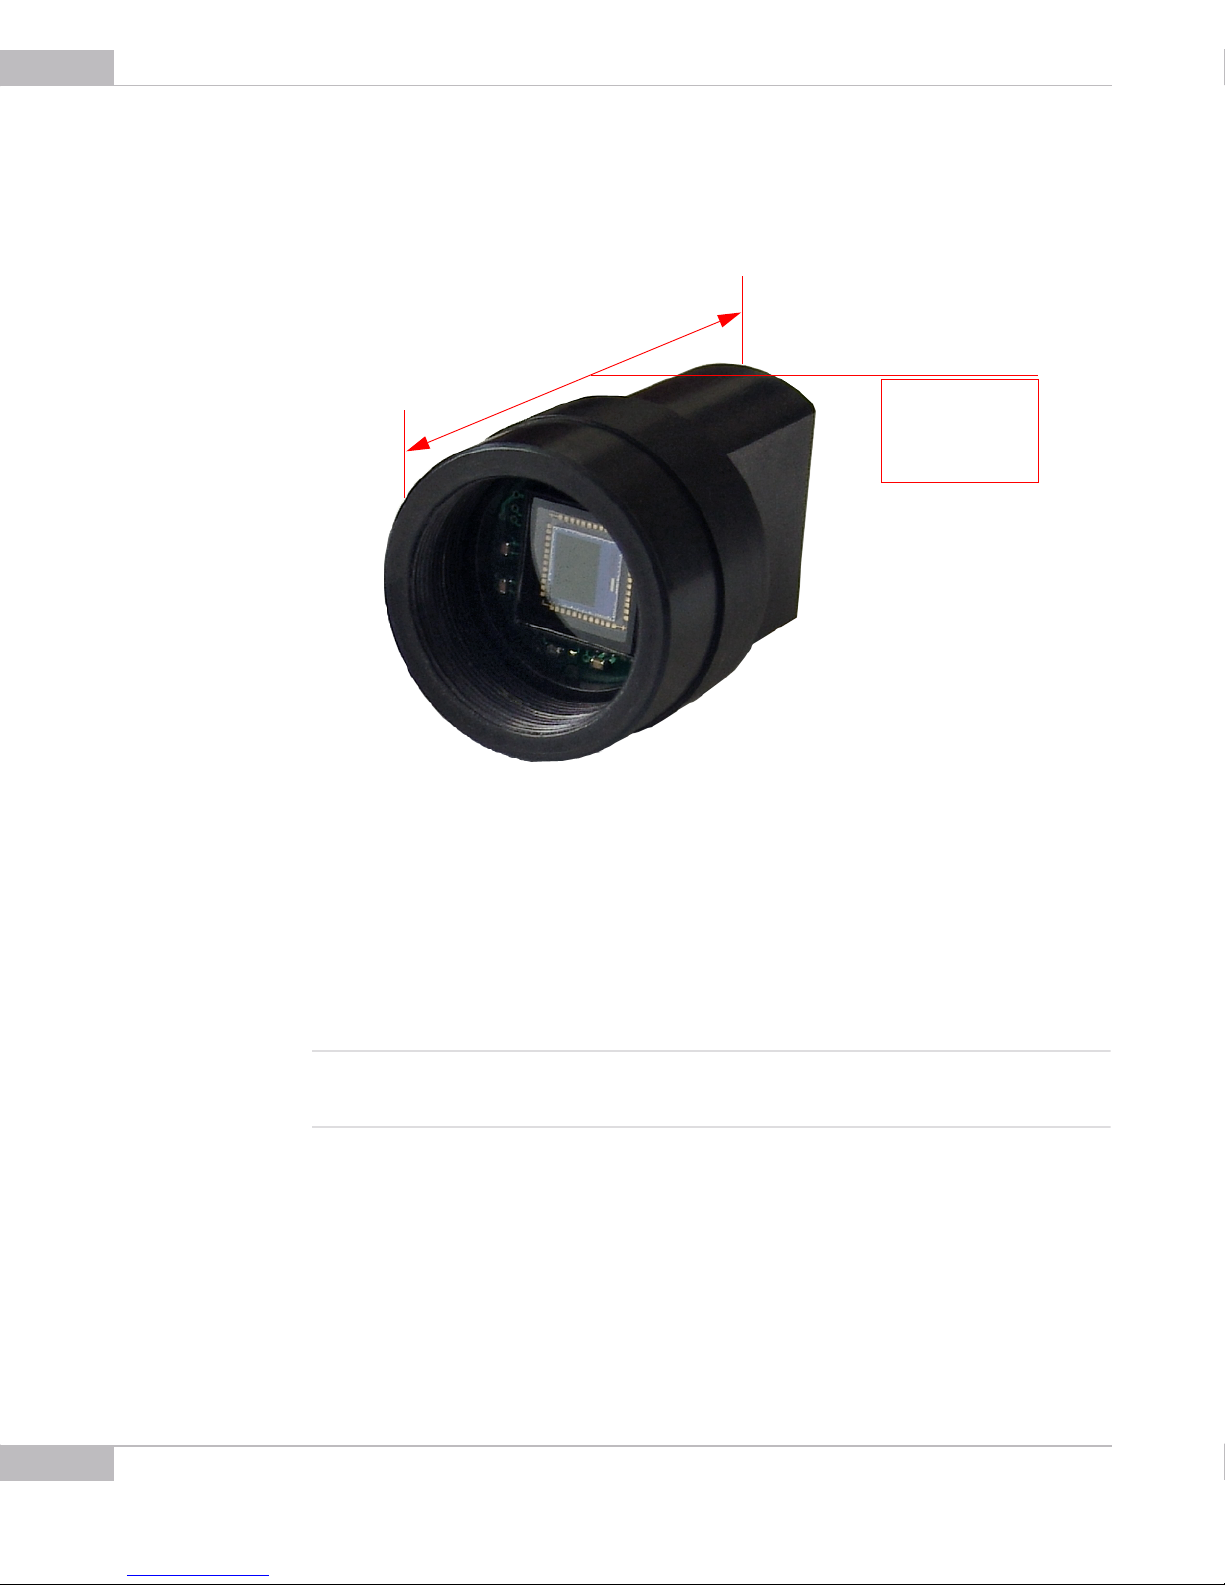
CS-mount:
without C-mount
adapter
SMX-10Mxx Series USB2.0 Camera User Guide
CS-mount
In this case, the camera is used without both C-mount adapter and C-mount adapter
with IR-cut filter:
Converting the Camera from CS-mount to C-mount or from C-mount to CS-mount
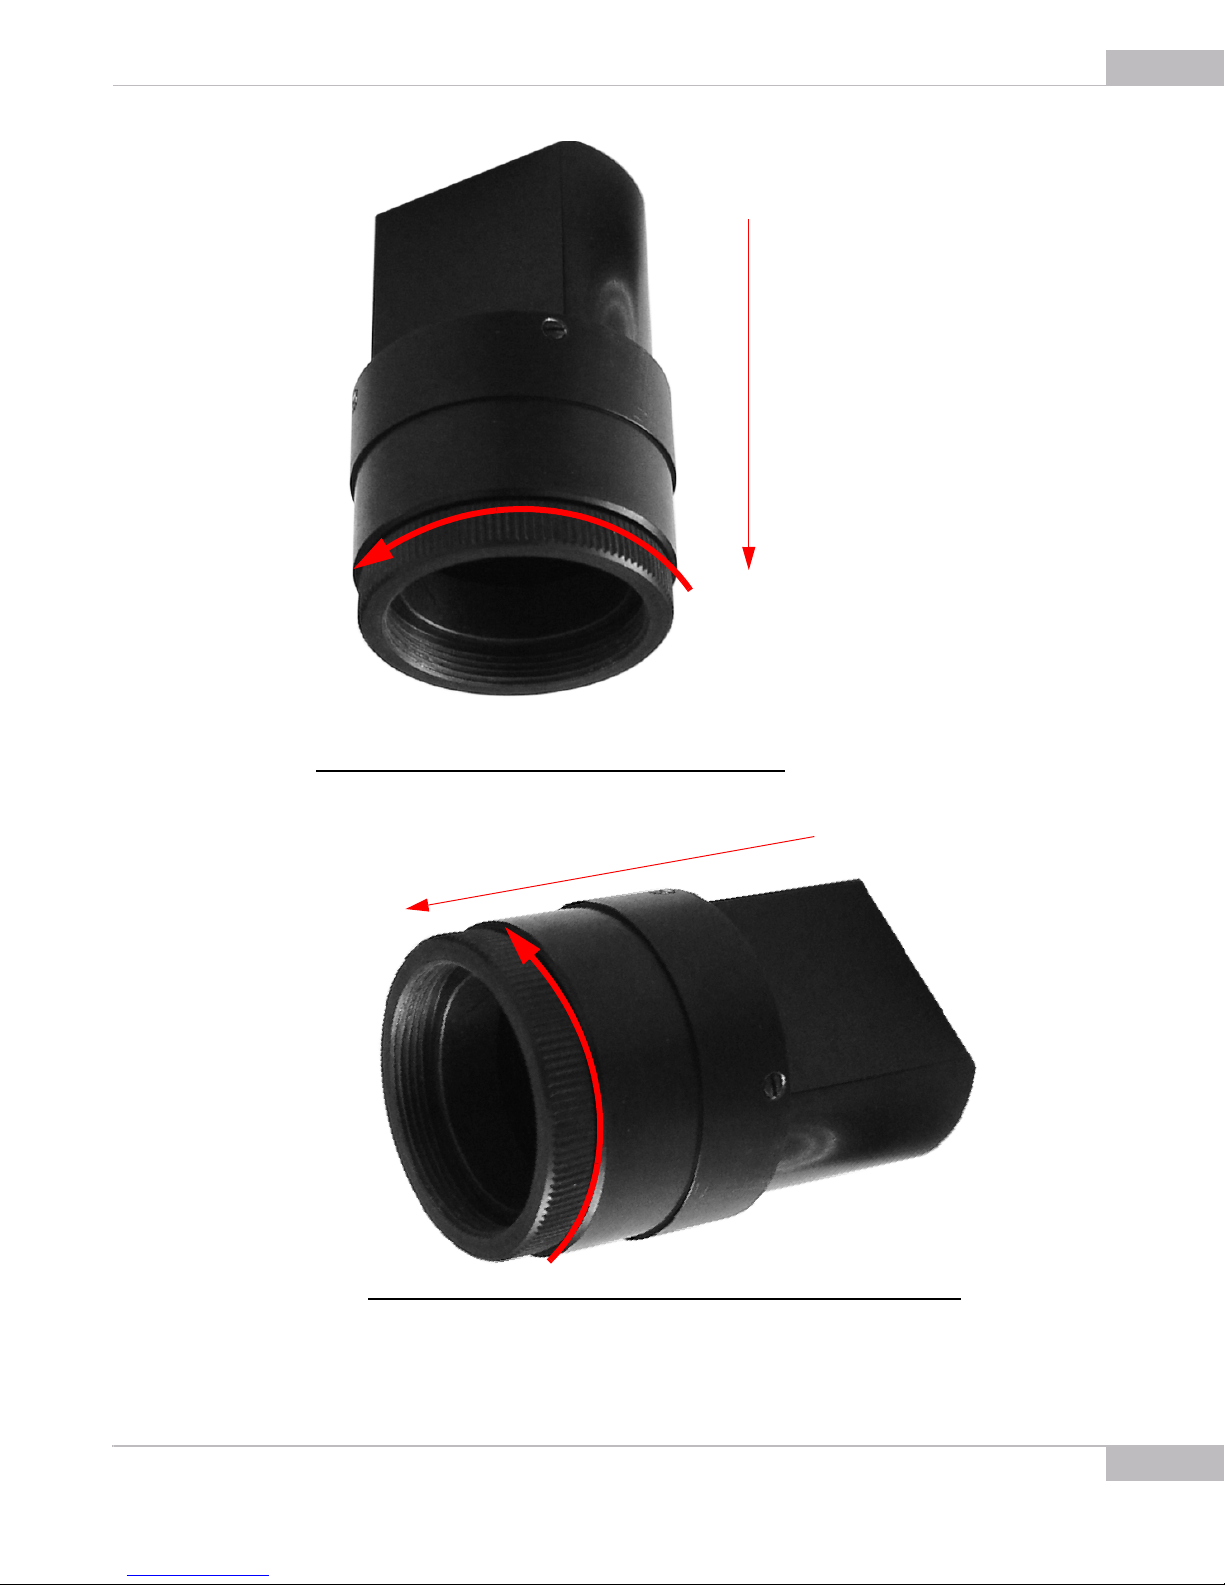
Usually the SMX-10Mxx camera goes with the C-mount adapter or C-mount adapter
with IR-cut filter already screwed in.
● To use the SMX-10Mxx camera as CS-mount, screw the C-mount adapter/C-mount
adapter with IR-cut filter out.
● To use the SMX-10Mxx camera as C-mount, screw the C-mount adapter/C-mount
adapter with IR-cut filter in.
Note It is recommended to screw in (as well as screwing out) the C-mount adapter/C-mount adapter with IR-cut filter,
lens or the camera's cover when the camera is facing down or when the camera is in horizontal position - to prevent the sensor contamination
Use of Accessories
Page 53
SMX-10Mxx Series USB2.0 Camera User Guide
53
Use of Accessories
Page 54
54
SMX-10Mxx Series USB2.0 Camera User Guide
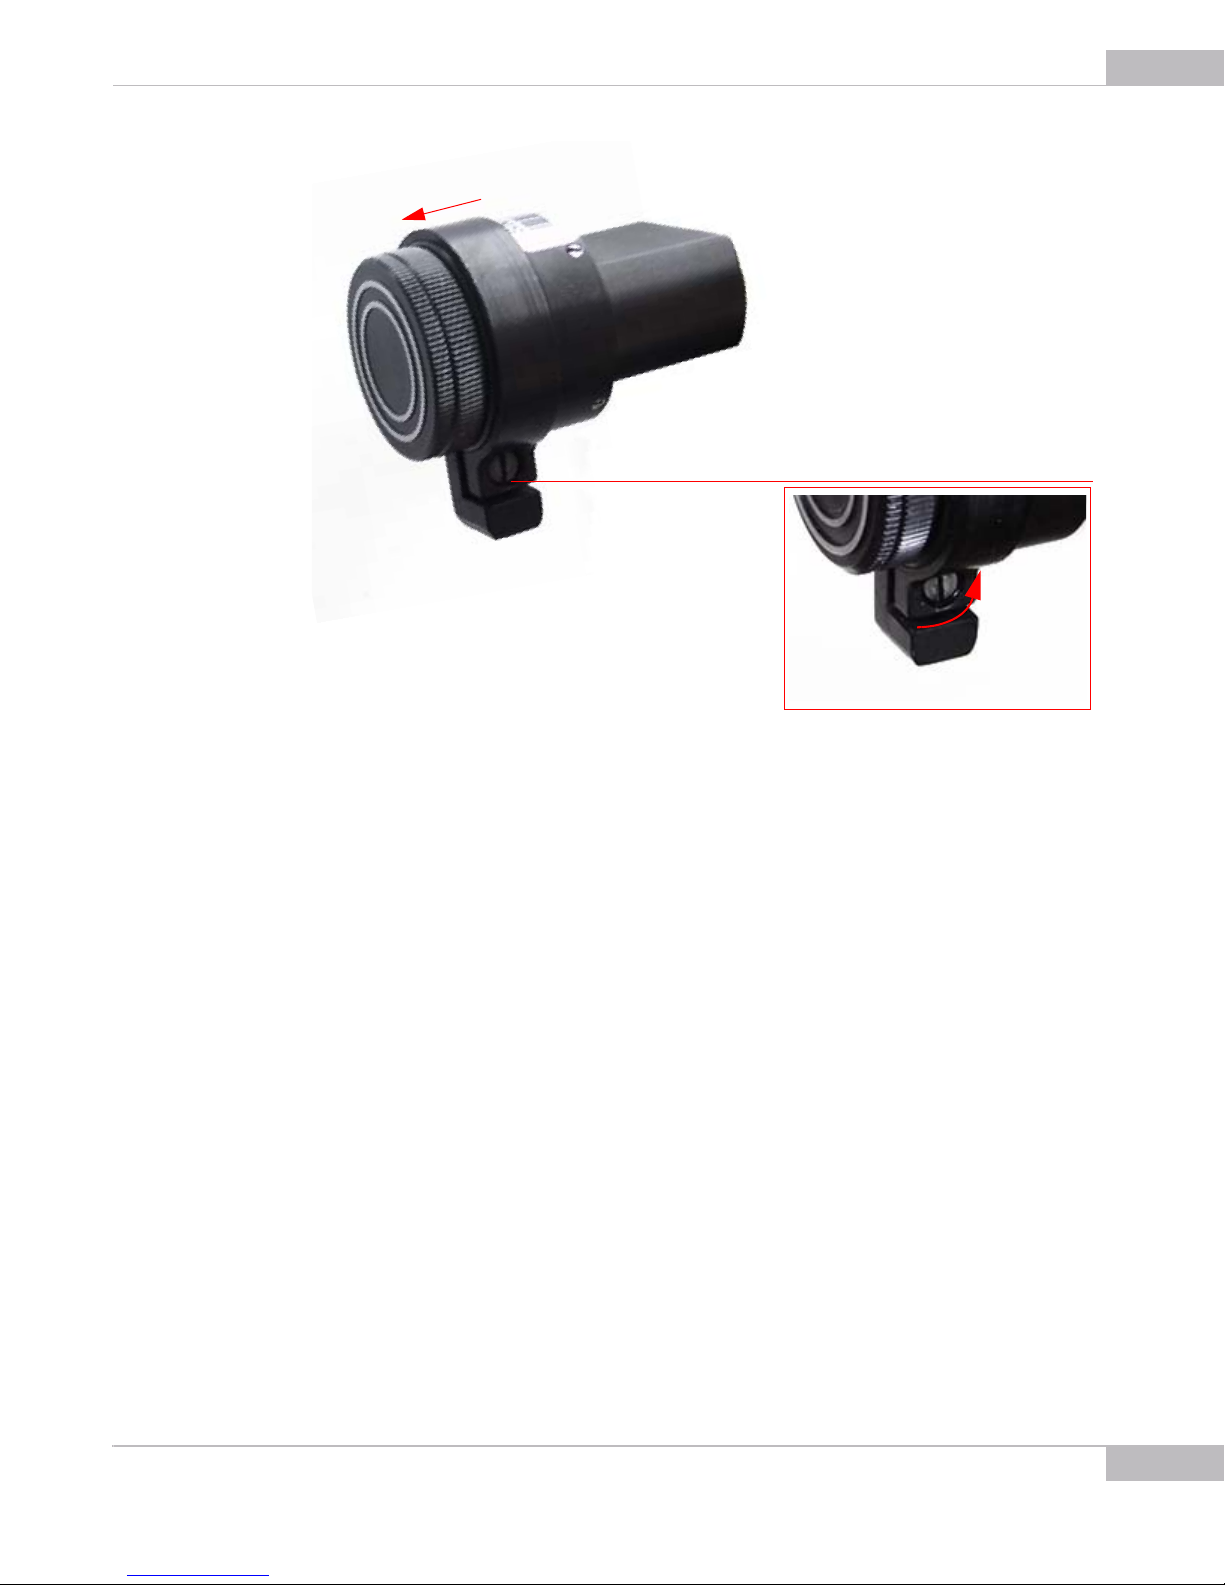
Using Tripod Adapter
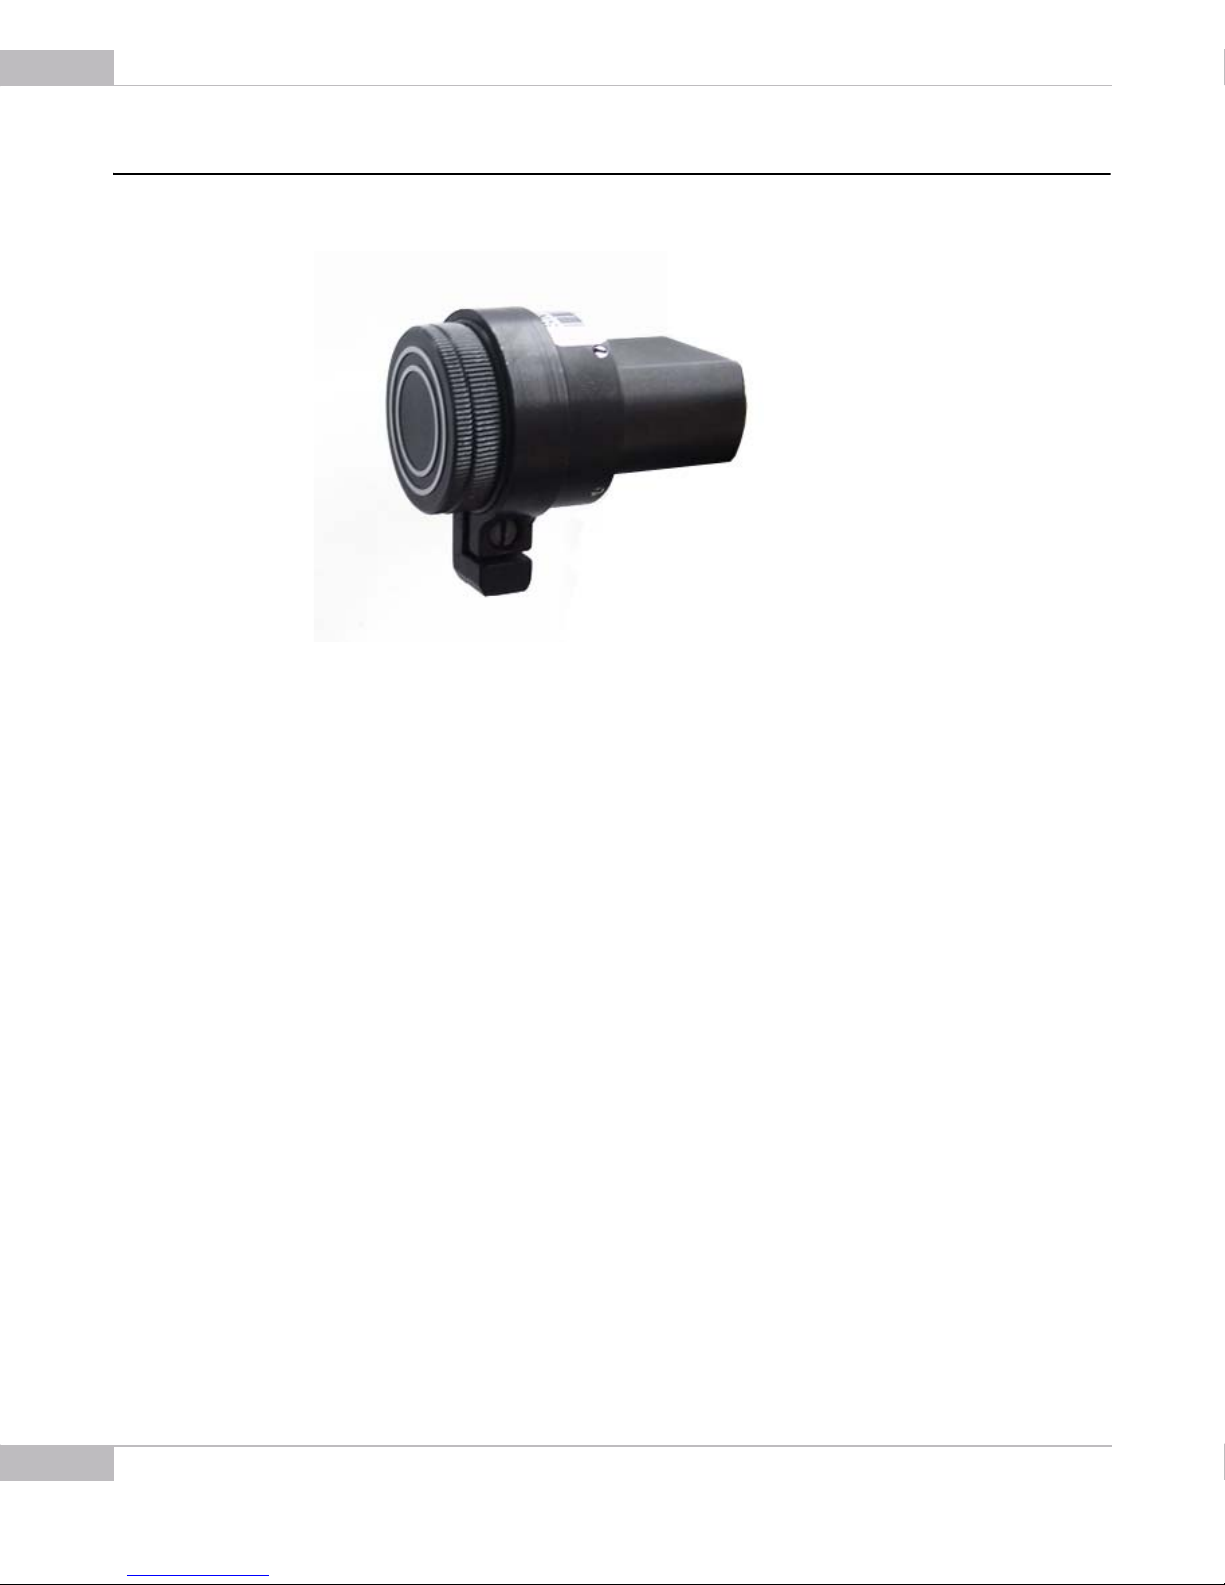
The SMX-10Mxx camera may go with the Tripod adapter already put on:
To remove the tripod adapter from the camera:
1 Loosen the screw of the adapter.
2 Remove it from the camera:
Use of Accessories
Page 55
SMX-10Mxx Series USB2.0 Camera User Guide
1
2
55
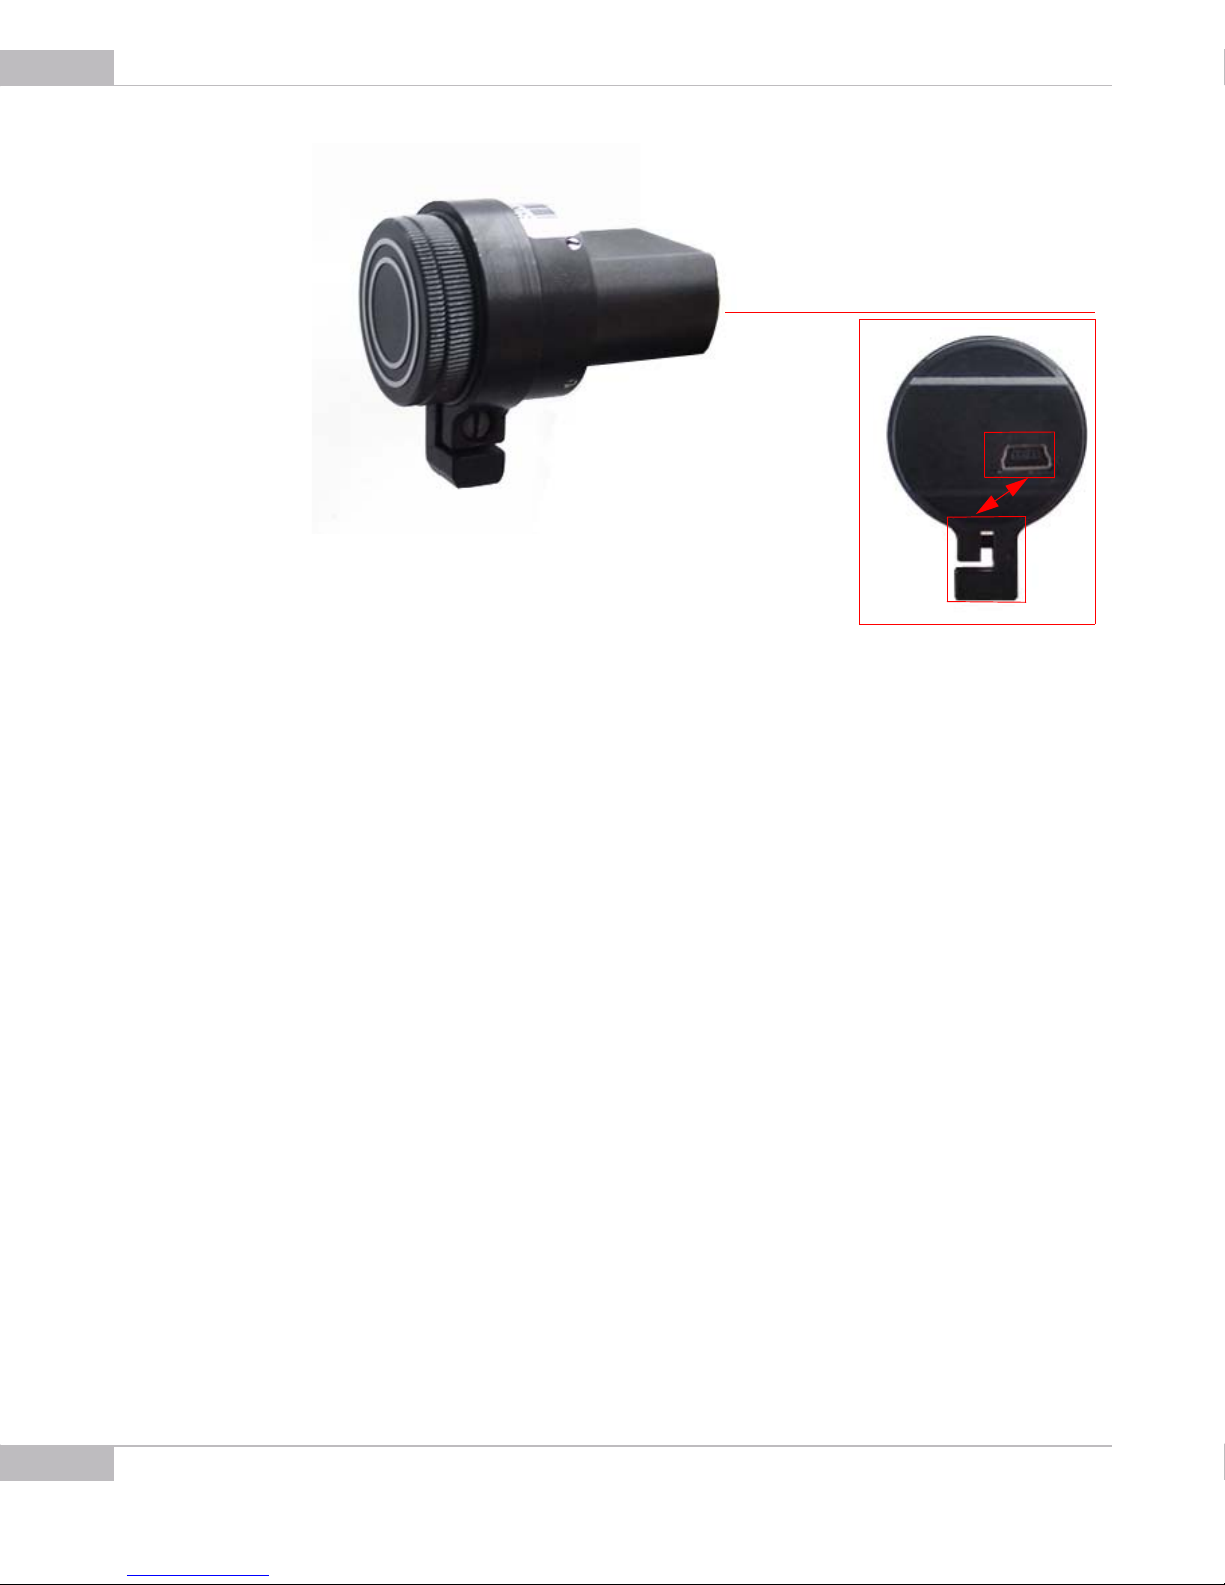
To put the tripod adapter on the camera:
1 Loosen the screw of the adapter.
2 Put the Tripod adapter on the camera. Locate the tripod on the camera as shown in
the image below:
Use of Accessories
Page 56
56
SMX-10Mxx Series USB2.0 Camera User Guide
Use of Accessories
Page 57

Appendix 1
KEYBOARD SHORTCUTS
57
Keyboard shortcut Description
F1 Help
F2 Captures a frame into bitmap file
F3 Captures a sequence of frames into bitmap files
F4 Captures a sequence of frames into AVI file
Shift + F4 Capture a sequence of frames into the memory
F5 Starts live video display in the View window
Shift+F5 Stops live video display and closes the View window
F9 Takes a snapshot
F12 Brings up the Main window when displaying the live video
Esc The same as Shift + F5, stops the video
Ctrl + o Opens Camera Profile
Ctrl + s Stores Camera Profile
Ctrl+c Copies an image from the camera to buffer
Alt + c Brings up the Capture Options dialog box
Alt + s Brings up the Device Settings dialog box
Alt + v Brings up the Viewport Settings dialog box
H Brings up the Histogram
W Performs White Balance (Soft) using Color Balance
Alt + w Performs White Balance (Hard) using Gain Controls
Numpad +/- Zoom In/Zoom Out the picture in the View window
Numpad * Restores the picture in the View window to its original (100%) size
Keyboard Shortcuts
Page 58

58
SMX-10Mxx Series USB2.0 Camera User Guide
Keyboard Shortcuts
Page 59
Appendix 2
TOOLBAR OVERVIEW
59
The most common menu commands are duplicated on the application toolbar:
Starts live video display in the View window
Stops live video display and closes the View window
Brings up the Viewport Setup dialog box
Captures a frame into BMP/TIFF file
Captures a sequence of frames into BMP/TIFF files
Starts saving Video to a file
Starts saving Video to memory
Toolbar Overview:
Page 60

60
SMX-10Mx Series USB2.0 Camera User Guide
Toolbar Overview:
Page 61

Appendix 3
FIGURES
61
Welcome to the SMX-10Mx Camera Setup Wizard . . . . . . . . . . . . . . . . . . . . . . . . . . . . . . . . . . . . . . . . 8
License Agreement dialog box . . . . . . . . . . . . . . . . . . . . . . . . . . . . . . . . . . . . . . . . . . . . . . . . . . . . . . . . . . . 8
System Information box . . . . . . . . . . . . . . . . . . . . . . . . . . . . . . . . . . . . . . . . . . . . . . . . . . . . . . . . . . . . . . . . . 9
Recommended system configuration . . . . . . . . . . . . . . . . . . . . . . . . . . . . . . . . . . . . . . . . . . . . . . . . . . . . 9
Select Destination location box . . . . . . . . . . . . . . . . . . . . . . . . . . . . . . . . . . . . . . . . . . . . . . . . . . . . . . . . . 10
Select Start Menu Folder box . . . . . . . . . . . . . . . . . . . . . . . . . . . . . . . . . . . . . . . . . . . . . . . . . . . . . . . . . . . 10
Select Additional Tasks box . . . . . . . . . . . . . . . . . . . . . . . . . . . . . . . . . . . . . . . . . . . . . . . . . . . . . . . . . . . . . 11
Ready to Install box . . . . . . . . . . . . . . . . . . . . . . . . . . . . . . . . . . . . . . . . . . . . . . . . . . . . . . . . . . . . . . . . . . . . 11
Installing box . . . . . . . . . . . . . . . . . . . . . . . . . . . . . . . . . . . . . . . . . . . . . . . . . . . . . . . . . . . . . . . . . . . . . . . . . . 12
Windows Security box . . . . . . . . . . . . . . . . . . . . . . . . . . . . . . . . . . . . . . . . . . . . . . . . . . . . . . . . . . . . . . . . . . 12
The last installation step . . . . . . . . . . . . . . . . . . . . . . . . . . . . . . . . . . . . . . . . . . . . . . . . . . . . . . . . . . . . . . . . 13
Updating the camera driver . . . . . . . . . . . . . . . . . . . . . . . . . . . . . . . . . . . . . . . . . . . . . . . . . . . . . . . . . . . . 14
Updating the camera driver: step1 . . . . . . . . . . . . . . . . . . . . . . . . . . . . . . . . . . . . . . . . . . . . . . . . . . . . . . 14
Updating the camera driver: step 2 . . . . . . . . . . . . . . . . . . . . . . . . . . . . . . . . . . . . . . . . . . . . . . . . . . . . . 15
Driver removal confirmation . . . . . . . . . . . . . . . . . . . . . . . . . . . . . . . . . . . . . . . . . . . . . . . . . . . . . . . . . . . . 16
Device Manager: the SMX-10Mx camera with Warning status . . . . . . . . . . . . . . . . . . . . . . . . . . . . 17
Device Manager: the SMX-10Mx camera is detected as Unknown device . . . . . . . . . . . . . . . . . 18
Device Manager: Updating the SMX-10Mx camera driver . . . . . . . . . . . . . . . . . . . . . . . . . . . . . . . . 18
Found New Hardware Wizard: Cannot install this Hardware . . . . . . . . . . . . . . . . . . . . . . . . . . . . . . 19
Found New Hardware Wizard: Installing from a list or specific location (Advanced) . . . . . . . 19
Installing from a list or specific location: specifying location . . . . . . . . . . . . . . . . . . . . . . . . . . . . . 20
Notification about successful camera installation . . . . . . . . . . . . . . . . . . . . . . . . . . . . . . . . . . . . . . . . 23
SMX-10Mxx application main window . . . . . . . . . . . . . . . . . . . . . . . . . . . . . . . . . . . . . . . . . . . . . . . . . . 24
Camera hardware histogram . . . . . . . . . . . . . . . . . . . . . . . . . . . . . . . . . . . . . . . . . . . . . . . . . . . . . . . . . . . 24
Camera software histogram . . . . . . . . . . . . . . . . . . . . . . . . . . . . . . . . . . . . . . . . . . . . . . . . . . . . . . . . . . . . 25
Device Settings window . . . . . . . . . . . . . . . . . . . . . . . . . . . . . . . . . . . . . . . . . . . . . . . . . . . . . . . . . . . . . . . . 25
Video mode window . . . . . . . . . . . . . . . . . . . . . . . . . . . . . . . . . . . . . . . . . . . . . . . . . . . . . . . . . . . . . . . . . . . 26
Switching between cameras . . . . . . . . . . . . . . . . . . . . . . . . . . . . . . . . . . . . . . . . . . . . . . . . . . . . . . . . . . . . 27
Figures
Page 62

62
SMX-10Mx Series USB2.0 Camera User Guide
Camera ID . . . . . . . . . . . . . . . . . . . . . . . . . . . . . . . . . . . . . . . . . . . . . . . . . . . . . . . . . . . . . . . . . . . . . . . . . . . . . 27
Histogram of initial state . . . . . . . . . . . . . . . . . . . . . . . . . . . . . . . . . . . . . . . . . . . . . . . . . . . . . . . . . . . . . . . 29
Histogram after illumination is tuned . . . . . . . . . . . . . . . . . . . . . . . . . . . . . . . . . . . . . . . . . . . . . . . . . . . . 30
Black Level Calibration control 30
Histogram after performing White Balance (Soft) . . . . . . . . . . . . . . . . . . . . . . . . . . . . . . . . . . . . . . . . 31
Sensor controls . . . . . . . . . . . . . . . . . . . . . . . . . . . . . . . . . . . . . . . . . . . . . . . . . . . . . . . . . . . . . . . . . . . . . . . . 31
Limit Max Exposure box . . . . . . . . . . . . . . . . . . . . . . . . . . . . . . . . . . . . . . . . . . . . . . . . . . . . . . . . . . . . . . . . 32
Limit Gain control . . . . . . . . . . . . . . . . . . . . . . . . . . . . . . . . . . . . . . . . . . . . . . . . . . . . . . . . . . . . . . . . . . . . . . 32
Viewport Settings window . . . . . . . . . . . . . . . . . . . . . . . . . . . . . . . . . . . . . . . . . . . . . . . . . . . . . . . . . . . . . . 33
Image correction controls . . . . . . . . . . . . . . . . . . . . . . . . . . . . . . . . . . . . . . . . . . . . . . . . . . . . . . . . . . . . . . 34
Enabling the Color Balance Controls . . . . . . . . . . . . . . . . . . . . . . . . . . . . . . . . . . . . . . . . . . . . . . . . . . . . 35
Enabling the Color Correction tab . . . . . . . . . . . . . . . . . . . . . . . . . . . . . . . . . . . . . . . . . . . . . . . . . . . . . . . 36
Advanced sensor controls . . . . . . . . . . . . . . . . . . . . . . . . . . . . . . . . . . . . . . . . . . . . . . . . . . . . . . . . . . . . . . 36
The Frame Rate Control window . . . . . . . . . . . . . . . . . . . . . . . . . . . . . . . . . . . . . . . . . . . . . . . . . . . . . . . . 37
Auto White Balance checkboxes . . . . . . . . . . . . . . . . . . . . . . . . . . . . . . . . . . . . . . . . . . . . . . . . . . . . . . . . 38
10 bit mode checkbox . . . . . . . . . . . . . . . . . . . . . . . . . . . . . . . . . . . . . . . . . . . . . . . . . . . . . . . . . . . . . . . . . . . 8
Median Filter checkbox . . . . . . . . . . . . . . . . . . . . . . . . . . . . . . . . . . . . . . . . . . . . . . . . . . . . . . . . . . . . . . . . . 38
Saving camera profile . . . . . . . . . . . . . . . . . . . . . . . . . . . . . . . . . . . . . . . . . . . . . . . . . . . . . . . . . . . . . . . . . . 39
Loading camera profile . . . . . . . . . . . . . . . . . . . . . . . . . . . . . . . . . . . . . . . . . . . . . . . . . . . . . . . . . . . . . . . . . 40
Limits section of Capture Options . . . . . . . . . . . . . . . . . . . . . . . . . . . . . . . . . . . . . . . . . . . . . . . . . . . . . . . 41
Message about incorrect sequence capture interval . . . . . . . . . . . . . . . . . . . . . . . . . . . . . . . . . . . . . 42
Save Video to Memory section . . . . . . . . . . . . . . . . . . . . . . . . . . . . . . . . . . . . . . . . . . . . . . . . . . . . . . . . . . 42
Capture Options box . . . . . . . . . . . . . . . . . . . . . . . . . . . . . . . . . . . . . . . . . . . . . . . . . . . . . . . . . . . . . . . . . . . 43
Making a snapshot using software trigger . . . . . . . . . . . . . . . . . . . . . . . . . . . . . . . . . . . . . . . . . . . . . . . 45
Taking a snapshot using the hardware trigger . . . . . . . . . . . . . . . . . . . . . . . . . . . . . . . . . . . . . . . . . . . 46
Timeout message in the application status bar . . . . . . . . . . . . . . . . . . . . . . . . . . . . . . . . . . . . . . . . . . 46
Setting the external trigger polarity . . . . . . . . . . . . . . . . . . . . . . . . . . . . . . . . . . . . . . . . . . . . . . . . . . . . . 47
Snapshot saving options . . . . . . . . . . . . . . . . . . . . . . . . . . . . . . . . . . . . . . . . . . . . . . . . . . . . . . . . . . . . . . . 48
Figures
 Loading...